suspension old school: dropped axle & split bones new...
TRANSCRIPT

Modern IFS For'50s Era Cars
SUSPENSION Old School: Dropped Axle & Split Bones
New School: Slippery Springs
At Home Installations • DISPLAY UNTIL 2/3/04
WINTER 2004 $3.99 • $4.99 in Canada
0 UJ
1 Floors Power Windows
• Steering Columns Side Glass
0 I I " 7 4 8 5 1 I I 0 8 8 0 1 I I I I 2 °- VISIT www.streetrodderweb.com • www.customrodder.con


Rutter's Rod Shop & Auto Loc help us learn the ups and downs of power window installation.
Like we said earlier, this particular door panel unscrews completely, giving us great visibility and accessibility to the inner part of the door. While many trucks are set up like this, most cars are not, usually necessitating some cutting of the inner door structure.
B Y J A S O N W A L K E R Photography By Pan Rutlidge
The beauty of building your own car lies within the ability to add or subtract any type of creature comfort. The beauty of building your own car today lies within the availability of really trick aftermarket options. The sky's the limit these
days. Everything that was manual can now be converted to power in some fashion. Most electrical power options like trunk, doors, power windows, and even your ignition can be remotely operated now, as well.
AutoLoc, out of Hillsboro, Oregon, is one of those companies that not only offers a selection of power accessories for custom or universal-type installations, but also a great line of facto-rv replacement parts for certain years and makes of classic cars. For this installation we travel back to Kalamazoo, Michigan, to see Rutter's Rod Shop correctly install one of AutoLoc's Flat Window Super Glide universal power window kits. This kit was ordered for a '37 GMC panel truck, but is designed for any flat-window truck or car. Once you have figured out which kit will work best for your application, the next step will be to decide what combination of switch and switch case will match your interior best. AutoLoc offers 15 choices of switch buttons, with 10 optional switch casings. The buttons are different shapes and sizes, and are offered in black plastic and a brushed aluminum finish. To insure reliability in each of their power window kits, AutoLoc utilizes high-torque, worm gear-driven Bosch motors. Even the guide rails are reinforced to withstand a lifetime of use. This kit can also be easily outfitted with a wireless remote option at any time in the future.
As far as the installation of power windows goes, no marter what kit you have to work with, spend a good amount of time studying the door and kit. Plan the installation before it even happens. If you're working with a panel truck like this one, the inner structure of the door is minimal. The inner door panel can be removed, allowing access to the inside of the entire door. Many applications may require the removal of certain parts of the door structure. This is when
ANNUAL 2003 STREET AND CUSTOM RODDINC ILLUSTRATED 45
nawiamiviiiitiiliiai WER WINDOWS?
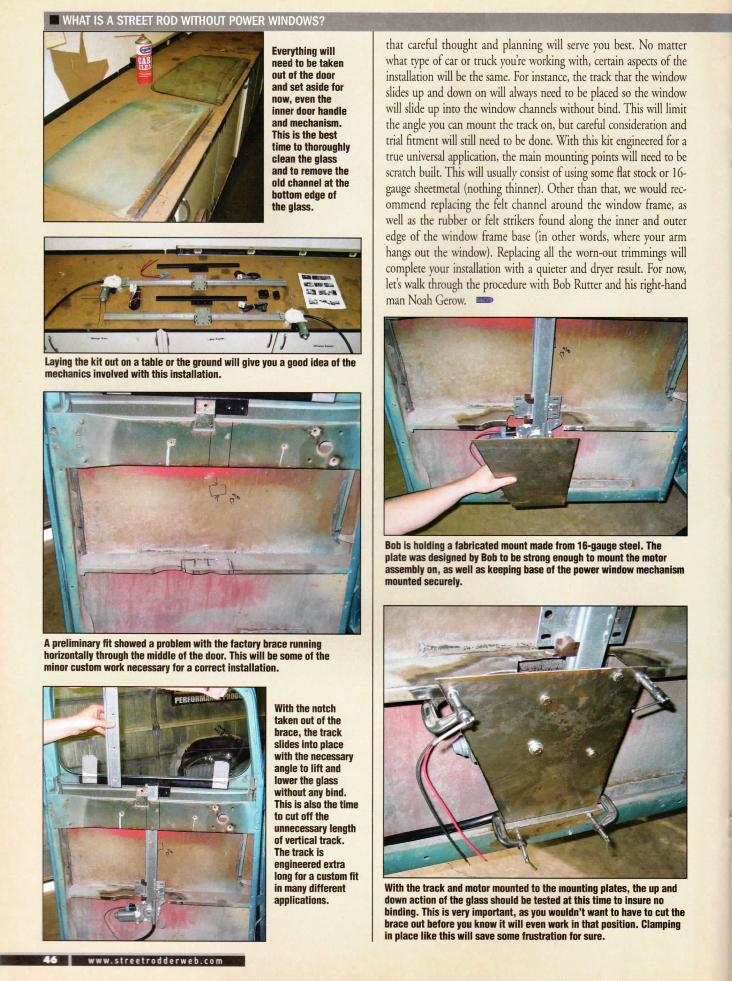
Everything will need to be taken out of the door and set aside for now, even the inner door handle and mechanism. This is the best time to thoroughly clean the glass and to remove the old channel at the bottom edge of the glass.
Laying the kit out on a table or the ground will give you a good idea of the mechanics involved with this installation.
A preliminary fit showed a problem with the factory brace running horizontally through the middle of the door. This will be some of the minor custom work necessary for a correct installation.
With the notch taken out of the brace, the track slides into place with the necessary angle to lift and lower the glass without any bind. This is also the time to cut off the unnecessary length of vertical track. The track is engineered extra long for a custom fit in many different applications.
that careful thought and planning will serve you best. No matter what type of car or truck you're working with, certain aspects of the installation will be the same. For instance, the track that the window slides up and down on will always need to be placed so the window will slide up into the window channels without bind. This will limit the angle you can mount the track on, but careful consideration and trial fitment will still need to be done. With this kit engineered for a true universal application, the main mounting points will need to be scratch built. This will usually consist of using some flat stock or 16-gauge sheetmetal (nothing thinner). Other than that, we would recommend replacing the felt channel around the window frame, as well as the rubber or felt strikers found along the inner and outer edge of the window frame base (in other words, where your arm hangs out the window). Replacing all the worn-out trimmings will complete your installation with a quieter and dryer result. For now, let's walk through the procedure with Bob Rutter and his right-hand man Noah Gerow. ^ m
Bob is holding a fabricated mount made from 16-gauge steel. The plate was designed by Bob to be strong enough to mount the motor assembly on, as well as keeping base of the power window mechanism mounted securely.
With the track and motor mounted to the mounting plates, the up and down action of the glass should be tested at this time to insure no binding. This is very important, as you wouldn't want to have to cut the brace out before you know it will even work in that position. Clamping in place like this will save some frustration for sure.
I
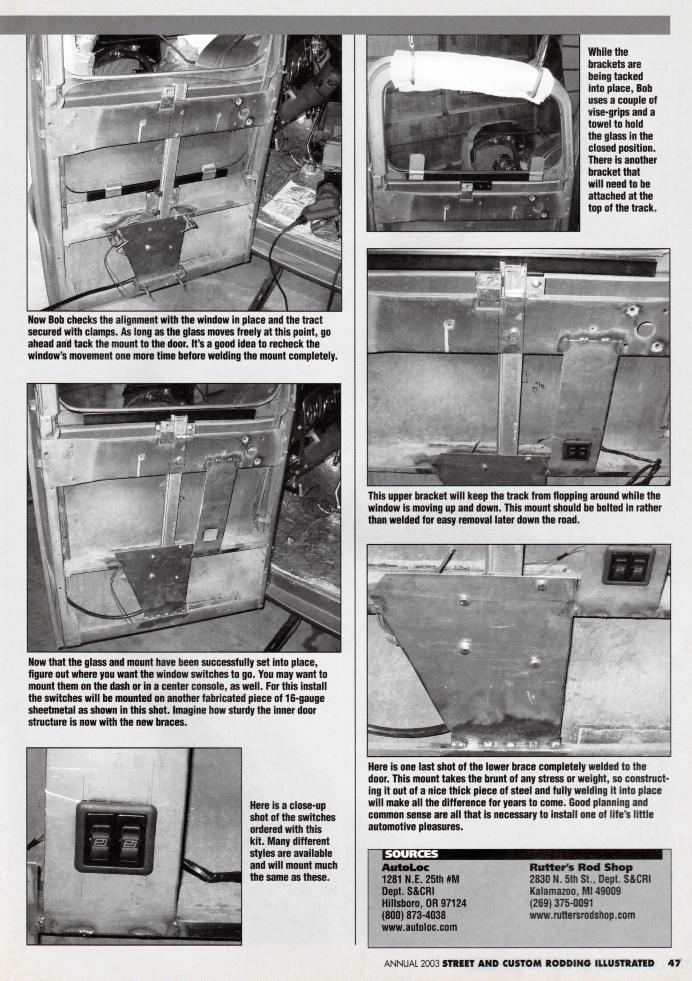
Now Bob checks the alignment with the window in place and the tract secured with clamps. As long as the glass moves freely at this point, go ahead and tack the mount to the door. It's a good idea to recheck the window's movement one more time before welding the mount completely.
Now that the glass and mount have been successfully set into place, figure out where you want the window switches to go. You may want to mount them on the dash or in a center console, as well. For this install the switches will be mounted on another fabricated piece of 16-gauge sheetmetal as shown in this shot. Imagine how sturdy the inner door structure is now with the new braces.
m 1 ED
Here is a close-up shot of the switches ordered with this kit. Many different styles are available and will mount much the same as these.
While the brackets are being tacked into place, Bob uses a couple of vise-grips and a towel to hold the glass in the closed position. There is another bracket that will need to be attached at the top of the track.
This upper bracket will keep the track from flopping around while the window is moving up and down. This mount should be bolted in rather than welded for easy removal later down the road.
Here is one last shot of the lower brace completely welded to the door. This mount takes the brunt of any stress or weight, so constructing it out of a nice thick piece of steel and fully welding it into place will make all the difference for years to come. Good planning and common sense are all that is necessary to install one of life's little automotive pleasures.
A u t o L o c f lutter ' s R o d S h o p 1281 N.E. 25th #M 2830 N. 5th St.. Dept. S&CRI Dept. S&CRI Kalamazoo. Ml 49009 Hillsboro, OR 97124 (269) 375-0091 (800) 873-4038 www.ruttersrodshop.com www.autoloc.com
ANNUAL 2003 STREET AND CUSTOM RODDING ILLUSTRATED 47