surgical revision
TRANSCRIPT

Dermatol Clin
Surgical revision
Ken K. Lee, MD*, Khosrow Mehrany, MD, Neil A. Swanson, MD*
Department of Dermatology, Oregon Health and Science University, 3181 SW Sam Jackson Park Road, Mailcode OP06,
Portland, OR 97201-3098, USA
Revisions are an inherent aspect of surgery just as
complications are an inevitable part of surgery.
Hematomas, infections, necrosis, dehiscence, im-
proper technique, or unknown factors can lead to
less than ideal surgical outcomes. Proper planning
and meticulous technique result in fewer complica-
tions and better surgical outcome—an optimally
appearing scar. The aesthetic appearance of a scar is
often the single most important criterion used by
patients and physicians alike in judging surgical
outcome. The ideal scar is a nearly imperceptible fine
line that is level with the skin and blends with the
natural creases and folds. Sometimes, the final out-
come falls short of these expectations. Scars with
poor cosmetic results include those that are wide,
raised, depressed, red, or pigmented, or those that
transect natural creases and junctions. Depending on
the type of abnormality, different techniques are used
to improve the overall cosmetic appearance. Derma-
tologic surgeons need to understand why unsatisfac-
tory scars result and how to manage them.
Basic surgical techniques
In most cases, proper surgical technique at the
time of the initial surgery eliminates the need for scar
revision. Therefore, whenever the surgical outcome is
less than ideal, the physician must critically analyze
the surgical technique. What could have been done
0733-8635/05/$ – see front matter D 2005 Elsevier Inc. All rights
doi:10.1016/j.det.2004.08.006
* Corresponding authors.
E-mail addresses: [email protected] (K.K. Lee);
[email protected] (N.A. Swanson).
differently that would have resulted in a better scar?
As the physician gains experience, fewer revisions
should be needed; the lessons learned from previous
‘‘mistakes’’ are applied to the present surgeries. The
following sections discuss important components that
maximize the cosmetic outcome of surgical scars.
Suturing technique
Wound eversion, critical in creating a superior
scar, results from meticulous suture technique.
Everted wound edges eventuate in thinner and flatter
scars. Most wound eversion results from proper
placement of buried dermal sutures. The buried
vertical mattress suture can especially promote
wound eversion [1]. In specific regions that have a
tendency to form depressed scars, such as the
forehead creases, additional measures are used to
further evert the upper dermis. Such measures include
vertical mattress sutures placed in the cuticular suture
layer. A technique that ‘‘hypereverts’’ the incisions is
the running horizontal mattress; this technique is
particularly useful for creases. The current authors
recommend using fast-absorbing gut suture when
performing this technique because suture removal
may be difficult otherwise. This technique can be
used to revise depressed scars (Fig. 1).
Scars on the trunk and extremities often spread
with ‘‘track’’ marks when closed with cuticular
sutures. These suture track marks are very noticeable
and should be prevented by using running subcuti-
cular sutures at all sites prone to their development.
The use of this technique with a buried absorbable
suture may also reduce scar spread. Finally, steri-
strips are applied at the time of surgery to further
support the incision line.
23 (2005) 141 – 150
reserved.

Fig. 1. (A) Running horizontal mattress suture technique demonstrates profound eversion of the wound edges. (B) The 6-month
follow-up shows a flat and thin scar.
Fig. 2. Trapdoor or pincushion effect. This effect is more
prominent in rounded flaps.
lee et al142
Relaxed skin tension lines
Relaxed skin tension lines (RSTLs) are a series of
curvilinear lines that form naturally and predictably
on the skin. Scars that run parallel to the RSTLs
reduce the tension across the wound, resulting in a
thinner scar. RSTLs are readily visible when facial
expressions are accentuated and should be identified
with these maneuvers before surgery. This step is
especially important in younger patients in whom the
lines are not as apparent. Whenever possible,
incisions should be placed parallel to the RTSLs.
Even in complex flaps with geometric shapes, the
design should place tension vectors along the RSTLs
to minimize scar spread [2].
Flap refinements
Although there are many different categorizations
of local cutaneous flaps, they may be more simply
divided into two categories based on their principal
motions: sliding and lifting. Sliding flaps include
advancement, island pedicle, and rotation flaps
because local tissue slides into the defect to be
closed. Lifting flaps include transposition, interpola-
tion, and bilobed flaps because the designed flap is
lifted over adjacent tissue into the defect. The primary
defect is the defect that is to be closed, and the
secondary defect is what is created from the creation
of the flap. Typically, in a sliding flap, the primary
defect is closed first; in a lifting flap, the secondary
defect is closed first. The primary motion of a flap is
the movement of the flap into the defect. The
secondary motion is the movement of the surround-
ing skin that results from the flap being placed into
the defect. These motions need to be understood to
avoid complications that arise from errant flap design
near free margins, including the eye, nasal ala, and
oral commissure [3].
Bulkiness or thickening is a commonly seen flap
complication where the flap becomes raised above
the level of the surrounding skin. This complication
usually results from a flap that was cut too thick or
from a trapdoor effect. The trapdoor or pincushion
effect is a ‘‘quiltlike’’ deformity more commonly seen
in lifting flaps and results from contraction of the flap
wound bed during healing, which causes the flap to
buckle upward (Fig. 2) [4,5]. Flaps should generally
lay flat or slightly inset with the surrounding skin at
the time of surgery. To inset the flap, its subcutaneous
tissue may be thinned with care, guarding against
aggressive defatting, which may compromise vascu-
larity. In addition, the defect can be deepened to
receive and accommodate an inset flap. Many flaps
that are set in flat at the conclusion of the surgery can
become bulky as the scar matures. This type of
trapdooring is accentuated in rounded or U-shaped
flaps. The trapdoor effect can be minimized by
widely undermining the defect so that the flap and
the surrounding skin contract together during the

surgical revision 143
wound healing process. Last, flaps may be designed
with squared edges to reduce the trapdoor effect.
Cosmetic units
Respecting cosmetic units is an important aspect
of facial dermatologic surgery. These units divide the
face into distinct regions and are divided by land-
marks, contours, lines, and skin texture differences.
Occasionally, defects are enlarged so that a graft or
flap can be designed to encompass an entire cosmetic
unit, thus leading to a less apparent scar. Scars in the
middle of a cosmetic unit are more noticeable; hence,
placing incision lines at the cosmetic unit junctions
can optimize scar appearance.
Timing of scar revisions
Scars can take 1 year to mature because collagen
continues to remodel during this period. Although
most healing is complete by 1 year, the final ap-
pearance of a scar can improve even beyond this
period. It is therefore imperative to give adequate
time for the natural healing and remodeling process
and not to institute invasive revision procedures
prematurely. Occasional situations may arise where
early scar revision is necessary to avoid a functional
impairment, however [6]. Patients can actively
participate in the healing process of their scars by
gently massaging the scar beginning at approximately
1 month postoperatively. This procedure can hasten
resolution of the firm texture associated with newly
healing wounds.
Revision techniques
Intralesional steroids
Hypertrophic linear scars, and bulky grafts and
flaps, can be treated with intralesional corticosteroids
[7]. Injections can be instituted at approximately
1 month postoperatively. A small amount (as little as
0.1 mL) of low-dose triamcinolone acetonide (Kena-
log) at 5 to 10 mg/mL is injected into the scar; this
dosage can be repeated monthly until the scar has
flattened. This treatment will not affect the width of
the scar, however. The injection is placed into the
bulkiest region of the scar, at the level of the deep
dermis or subcutaneous fat. The physician must be
cautious not to be overly aggressive with the quantity,
frequency, or strength of Kenalog injections, because
significant atrophy may occur, especially if the
injection leaks out into healthy skin.
Nonablative lasers
Ablative techniques, such as dermabrasion and
carbon dioxide laser ablation, have been widely used
for scar improvement, but these techniques carry a
higher risk (see later). Nonablative lasers are used to
treat scars and have the advantage of improving scars
without incision or wounding, thereby minimizing
downtime. Multiple lasers have been used to refine
scars, and practically any nonablative laser that heats
collagen can effectively improve the appearance of a
scar. The flashlamp-pumped pulsed dye laser, how-
ever, has been used most extensively. The pulsed dye
laser works through absorption by oxyhemoglobin,
causing direct destruction of the blood vessels and
an indirect effect on the surrounding collagen. This
vascular laser improves the overall redness caused by
the scar’s vascularity and promotes collagen remod-
eling and scar softening. The collagen remodeling is
most effective at lower subpurpuric fluences where
collagen is believed to be stimulated rather than
injured [8–10]. It is probably best suited for red
hypertrophic scars or for telangiectases surrounding
scars, which typically are not noticed for at least
1 month postoperatively. Recent reports, however,
have shown improvement of the final scar appearance
when the laser treatment is initiated at the time
of suture removal [11]. Newer nonablative lasers
with wavelengths of 532 nm, 1064 nm, 1390 nm, and
1450 nm are also being used to promote collagen
remodeling. Further advancements in technology
should continue to enhance the ability to treat scars
in a minimally invasive fashion.
Fusiform elliptic excision
One of the simplest methods of surgical scar
revision is the re-excision of the scar in a linear or
slightly curvilinear fashion. This technique is best
suited for spread or depressed scars that usually result
from excess tension or poor wound eversion at the
time of the initial surgery. The scar should ideally be
designed to run parallel to RSTLs. Re-excision is best
performed on a mature scar, not a newly placed scar
under tension. This allows for reapproximation with
less resultant scar spreading and better wound ever-
sion. A fusiform ellipse is outlined around the scar
with the ideal 30� at the tips to promote blending. The
scar is excised and the surrounding skin appropriately
undermined to relieve surrounding tension (Fig. 3). In
sebaceous skin, scarring can be minimized by
beveling one edge and counterbeveling the other,
creating a ‘‘tongue-and-groove’’ effect when sutured.
Proper placement of deep and superficial sutures will

Fig. 3. (A) Large split-thickness skin graft used to close an aggressive cancer. The scar has contracted. A fusiform ellipse is
outlined around the scar. (B) Immediate postoperative result. (C) Follow-up at 2 months shows a narrower linear scar.
lee et al144
again allow for wound eversion. In areas such as the
trunk where suture track marks are more likely to
appear, running subcuticular sutures should be used.
A re-excised scar will always be longer than the
original scar. This is an important point to discuss
with patients before the re-excision.
In larger scars, fusiform elliptic excisions are
frequently performed serially in stages to minimize
tension on the wound. For example, split-thickness
skin grafts are sometimes used as a temporary closure
because of large defect size or for tumor surveillance.
If the scar is cosmetically unacceptable to the patient
after it has fully matured, it may be serially excised.
By waiting for the wound tension to subside and
elasticity to return, the final scar length can be made
shorter compared with that of a single-staged
excision. The fusiform ellipse is oriented within the
width of a broad scar (intramarginal excision),
resulting in an increasingly narrowed scar width with
each stage [12]. Serial excisions in tight hair-bearing
areas, such as the scalp vertex, can be performed by
triangulation, which is a modification of a fusiform
ellipse. This procedure allows for the intramarginal
containment of the scar, minimizing the excision of
healthy hair-bearing scalp (Fig. 4).
W-plasty
Both the W-plasty and geometric broken-line
closure (GBLC; mentioned later) techniques rely on
the similar principle that an irregular line is less
visible than a straight line. These techniques are
especially advantageous when the scar is not placed
in the RSTLs, which would cause it to be more
visible and spread. W-plasty is performed by out-
lining a zigzagging line on one side of the scar then a
mirror image line on the opposite side. The ‘‘points’’
of the ‘‘W’’ should run parallel to the RSTL or a skin
fold, whereas the length of the scar runs perpendic-
ular to it. The scar is excised along these lines then
reapproximated so that the mirror images dovetail
and form a single zigzagging line. The width of each
triangular cutout should be approximately 5 mm to
achieve a visibly irregular line. The incision is care-
fully reapproximated using a combination of dermal
3-point tip sutures and cuticular sutures. Not all of a
linear scar needs to be fashioned with a W-plasty;
there is less of an advantage of the W-plasty with
longer scars because the regularity of the zigzags
makes it more noticeable (Fig. 5). In longer scars, the
GBLC is preferable [13,14].

Fig. 4. (A) Staged excision of large kerion scar on vertex of the scalp. A modification of the fusiform ellipse with ‘‘three arms’’ is
outlined to contain the incisions within the circular scar (intramarginal excision). This triangulation allows for maximal removal
of the scar. (B) Immediate postoperative result following the second stage. Notice that after two excisions, the incisions have not
extended into the normal hair-bearing scalp.
surgical revision 145
Geometric broken-line closure
The GBLC is a more elaborate version of the
W-plasty [15]. It is the preferred technique for use
with longer scars to provide a less predictable ir-
regularity to the incision line. An outline is made
along one side of the scar using geometric designs,
such as semicircles, triangles, and squares, and the
mirror image is made on the opposite side. The
pattern should appear random (Fig. 6). The scar is
excised along the drawn outline and adequately
undermined to loosen up the adhesions from the
previous scar. It is then carefully reapproximated
using dermal and cuticular sutures so that the mirror
images coincide. The various random twists and turns
camouflage the scar. Both the W-plasty and GBLC
are better suited for scar revisions than primary
excisions and closures, and the wound may need to
Fig. 5. W-plasty. There is a zigzagging line on the superior
aspect of the incision where the horizontal forehead creases
become visible.
be enlarged to accommodate the various inward and
outward projections.
V -Y and Y -V advancement
V-Y and Y-V advancement repairs are helpful in
lengthening the scar and elevating or depressing a
free margin. When confronted with a contracted scar,
the V-Y repair is used to lengthen a scar. It is par-
ticularly useful near free margins such as around the
eyes and mouth when a scar has caused an ectropion
or eclabion, respectively.
The technique is performed by making a V-shaped
incision along the length of the contracted scar. The
wound is then widely undermined to loosen the scar.
The V-shaped flap is then pushed away from the
incision to relieve the tension and simultaneously
Fig. 6. Geometric broken-line closure. A random geometric
pattern is applied to a linear scar, making it appear less pre-
dictable than a zigzagging line.

lee et al146
lengthen the scar or push a free margin. The tension
should now be released in the ‘‘open’’ part of the
‘‘V.’’ The newly created defect is then closed such
that the two sides of the defect are brought together to
form a straight line along the initial scar line (Fig. 7).
Although this technique may theoretically seem to
move tissue significantly, in practice the V to Y repair
is helpful for relatively smaller contractions. The
immediate postoperative result should be exaggerated
because much of the initial movement is reversed
when the repair heals and contracts.
Just as the V to Y repair can raise an anatomic
point, a Y to V repair can be used to lower it. The
initial incision is made in a Y-shaped fashion and
similarly converted to form a V. Again, the wound
margins should be widely undermined so that the
wound base contracts evenly [16].
Z-plasty
Z-plasty is a versatile technique for revising scars.
First, it is used to create irregular zigzagging lines,
which make the scar less visible. Second, it is used to
change the direction of scar conspicuously perpen-
dicular to the RSTL, converting it parallel to the
RSTL. Third, it has the distinct advantage of length-
ening a contracted scar. This point is particularly
important with visible deformation of free margins,
Fig. 7. (A) V-Y advancement. A V-shaped incision is made
and, after wide undermining, is pulled in the direction of the
open end of the ‘‘V,’’ releasing tension/contracture in this
area. The remaining defect is closed side to side to form the
‘‘Y.’’ (B) Y-V advancement. A Y-shaped incision is made
and, after wide undermining, is pushed and contracted into
a ‘‘V.’’
including the eyelid, nasal alar rim, and lip. Finally,
this technique is used to change a displaced ana-
tomic point, raising or lowering it. It is therefore an
essential technique for scar revision and should be
mastered. Moreover, understanding the Z-plasty
concept helps the surgeon with many other aspects
of designing and implementing cutaneous flaps.
The geometry of the Z-plasty is often considered
to be complex, with flap dynamics that may be
difficult to conceptualize. In essence, a Z-plasty
comprises two zigzagging triangular flaps that are
transposed into the shape of a Z, or more simply, the
two triangles switch places. (For those more familiar
with flap surgery, a rhombic transposition flap is an
asymmetric Z-plasty.)
Two elements are critical in the understanding and
performance of the Z-plasty: the angle size and length
of the common diagonal (also referred to as the
common limb or the common member) [16–18]. In
revising a scar, the common diagonal is the scar
(Fig. 8). Two arms that are of the same length as the
common diagonal are extended from the ends in
opposite directions. The ‘‘angle’’ is determined by the
angle between arm and common limb. The angle of
the designed triangle determines the degree of tissue
lengthening, with larger angles resulting in greater
gains. The length of the central diagonal also de-
termines tissue gain, but this aspect is less variable
because it is usually predetermined by the length
of the scar. The classic 60� Z-plasty angle results in
a 90� change in scar direction and a 75% gain in
tissue length.
The Z-plasty is performed by making an incision
along or around the scar and the outlined arms. The
skin is widely undermined and the scar loosened. The
triangular flaps are then simultaneously lifted, then
transposed to change the direction of the common
diagonal into the new ‘‘transverse diagonal.’’ It is
important that the two triangular flaps are actually
transposed because it can be easy to place them back
in their original orientation. A helpful tip is to mark
one tip with a marking pen and make sure it changes
position during the transposition. Another indication
that the transposition has occurred is that there will
be significant tension along the newly formed trans-
verse diagonal. As the length of the common diagonal
and arms become longer, this tension increases, espe-
cially in inelastic skin, a distinct advantage of a large
Z-plasty. Furthermore, the resultant scar can be quite
noticeable because of the larger Z configuration.
When confronted with a longer scar or inelastic
skin, the multiple Z-plasty helps combat the previ-
ously mentioned problems. This technique has the
advantage of better hiding the Z shape by using

Fig. 8. (A) Webbed and contracted scar in the postauricular sulcus. A single Z-plasty is outlined on the scar. The center line is
the common diagonal, and the two lines that extend in opposite directions are the arms. All three limbs are the same length. The
angle between the common diagonal and the arms is approximately 45� in this case but can vary depending on the desired
lengthening and effect. The black dot shows the actual movement of the triangular flap. The inset diagram outlines the design
as if multiple Z-plasties are performed. (B) The Z-plasty set in place with dermal sutures. The common diagonal has flipped
approximately 90�, the webbing has improved, and the scar has lengthened. The inset diagram outlines the result of multiple
Z-plasty effect.
surgical revision 147
multiple smaller Zs along the scar line and distribut-
ing the tension across multiple smaller transverse
diagonals. Although the final appearance of the mul-
tiple Z-plasty is a zigzagging line, it is not the same
as a W-plasty. There is no gain in tissue length in a
W-plasty [19].
The Z-plasty is a simple method used to correct
contracted or asymmetric anatomic landmarks, such
as an elevated or depressed oral commissure or
eyebrow (Fig. 9). The anatomic point that needs to be
moved is one triangle and the point it moves to is the
other triangle. The two points are switched, thereby
either raising or lowering the anatomic landmark.
Fig. 9. (A) A Z-plasty is used to elevate a contracted and depresse
is a helpful guide that can be used to follow the actual movement
Surgical debulking
Mild trapdoor deformities can usually be managed
with intralesional steroids beginning at approximately
1 month postoperatively. If the flap incision lines
blend well with the surrounding skin, then the
flattening of the bulkiness with intralesional steroids
is all that is required. If the deformity is pronounced,
however, surgical debulking may be required. The
debulking is initiated with an incision made along
the curvature of the flap. It is important to choose the
most appropriate area on the scar line to incise. Most
bulky flaps have both good- and bad-appearing areas.
d eyebrow. (B) The brow has been elevated. The black dot
of the Z-plasty.

lee et al148
Because the entire flap does not need to be lifted, the
portion of the scar that is the most uneven, raised, or
spread is selected for placement of the incision. The
incised flap is lifted and reflected back (Fig. 10). The
anatomy is distorted compared with the initial surgery
because the entire base is a sheet of scar. The
undersurface of the lifted flap is thinned and the
resultant base is deepened. In smaller flaps, the use of
a 69 beaver blade, which is rounded at the tip,
facilitates the removal of a disc of fibrofatty tissue.
The flap can be thinned to a greater degree than at the
time of the initial surgery because there is reduced
tension and better vascularity in that the flap base is
less disrupted. Any excessive flap tissue is trimmed,
and the wound edges are again widely undermined to
extend the scar base to minimize recurrence of the
bulkiness. The flap is then gently draped back and
placed slightly inset compared with the surrounding
skin [20,21]. Techniques, such as W-plasty, GBLC, or
multiple Z-plasties, can be used to further camouflage
the incision line. A subtle change in the shape of a
circular scar to a more square shape also reduces the
pincushion appearance.
Dermabrasion
Dermabrasion is a technique that can improve
textural abnormalities associated with scars. This
technique can be performed on a scar as the sole scar
revision technique or used in combination with a re-
excision. The ideal timing for dermabrasion is 6 to
12 weeks postoperatively.
Fig. 10. Flap debulking. A disc of fibrofatty scar is excised
from a paramedian forehead flap. The wound edges also
should be widely undermined to prevent recurrence of
the trapdoor/pincushion effect.
Dermabrasion superficially abrades the scar and
the surrounding skin to the level of the papillary
dermis in a precise and controlled manner. This
process results in a smoother texture and evens out
any irregularities along the scar surface. Dermabra-
sion can improve the appearance of uneven scar
edges and raised grafts and flaps by leveling the
irregular contours [22,23]. If there is a significant
trapdoor effect, surgical debulking should be per-
formed before dermabrasion. Even in aesthetically
acceptable scars, dermabrasion can help to blend the
scar into the surrounding skin. There are two main
techniques for dermabrasion. For larger areas, a
motorized dermabrader with a diamond fraise tip
allows for a more even and controlled depth of
ablation. A topical spray cryogen serves to anesthe-
tize the skin and harden it, making it more receptive
to dermabrasion. Smaller scars, however, can be
lightly dermabraded to the point of pinpoint bleeding
using sterile 300- to 400-grit sandpaper. The surgeon
must be cautious not to go too deeply into the dermis,
thus causing a depression that would be difficult to
repair. A second dermabrasion can always be
performed if the initial procedure is not enough.
The boundary of the dermabraded area should be
extended beyond the scar and feathered into normal
surrounding skin to include an entire cosmetic unit or
subunit. The pigmentation and texture may differ
between the treated and untreated areas, leading to a
more conspicuous treated area. The blending helps to
prevent this demarcation (Fig. 11).
Ablative laser resurfacing
Pulsed ablative lasers (eg, carbon dioxide and
erbium: YAG) can provide similar results as derm-
abrasion by superficially ablating the scar [24]. Each
laser has its distinct advantages. Erbium:YAG, with
its higher affinity for water, is more precise in
ablating raised scar edges. The carbon dioxide laser
causes more thermal necrosis, which promotes more
wound contraction and collagen remodeling. This
collagen remodeling is an important aspect of the
ablative procedures because it is not just the physical
leveling of the scar that enhances the appearance of
the scar. Surgical scar revision and laser resurfacing
can sometimes be combined into a single-step
procedure in which the cosmetic unit surrounding
the scar undergoes laser treatment first, immediately
followed by scar re-excision. This procedure allows
the entire area to re-epithelialize and remodel at the
same time.
All ablative procedures that include lasers and
dermabrasion may result in pigmentary alteration and
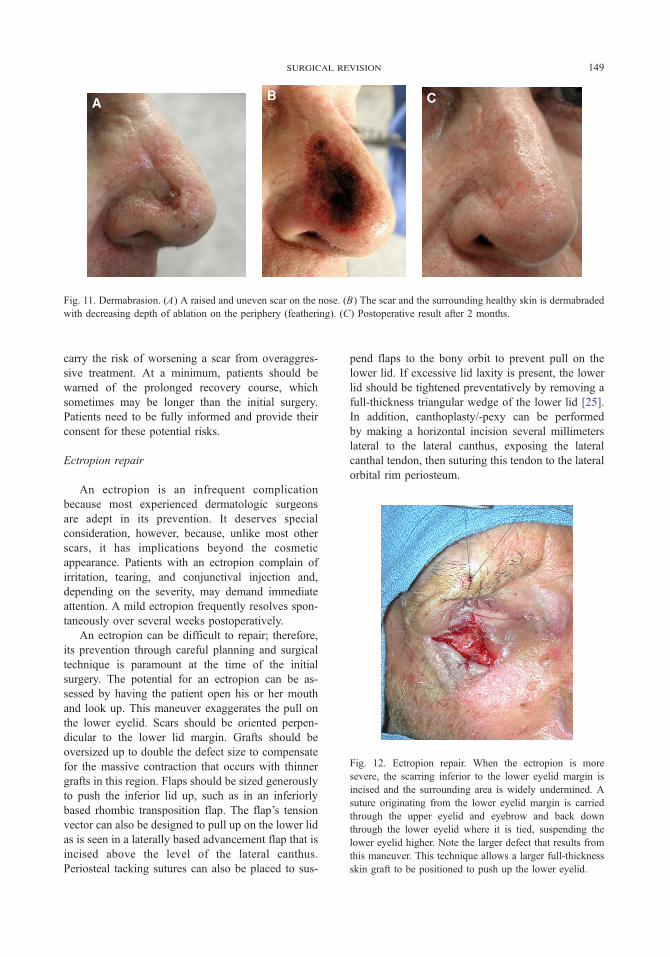
Fig. 11. Dermabrasion. (A) A raised and uneven scar on the nose. (B) The scar and the surrounding healthy skin is dermabraded
with decreasing depth of ablation on the periphery (feathering). (C) Postoperative result after 2 months.
Fig. 12. Ectropion repair. When the ectropion is more
severe, the scarring inferior to the lower eyelid margin is
incised and the surrounding area is widely undermined. A
suture originating from the lower eyelid margin is carried
through the upper eyelid and eyebrow and back down
through the lower eyelid where it is tied, suspending the
lower eyelid higher. Note the larger defect that results from
this maneuver. This technique allows a larger full-thickness
skin graft to be positioned to push up the lower eyelid.
surgical revision 149
carry the risk of worsening a scar from overaggres-
sive treatment. At a minimum, patients should be
warned of the prolonged recovery course, which
sometimes may be longer than the initial surgery.
Patients need to be fully informed and provide their
consent for these potential risks.
Ectropion repair
An ectropion is an infrequent complication
because most experienced dermatologic surgeons
are adept in its prevention. It deserves special
consideration, however, because, unlike most other
scars, it has implications beyond the cosmetic
appearance. Patients with an ectropion complain of
irritation, tearing, and conjunctival injection and,
depending on the severity, may demand immediate
attention. A mild ectropion frequently resolves spon-
taneously over several weeks postoperatively.
An ectropion can be difficult to repair; therefore,
its prevention through careful planning and surgical
technique is paramount at the time of the initial
surgery. The potential for an ectropion can be as-
sessed by having the patient open his or her mouth
and look up. This maneuver exaggerates the pull on
the lower eyelid. Scars should be oriented perpen-
dicular to the lower lid margin. Grafts should be
oversized up to double the defect size to compensate
for the massive contraction that occurs with thinner
grafts in this region. Flaps should be sized generously
to push the inferior lid up, such as in an inferiorly
based rhombic transposition flap. The flap’s tension
vector can also be designed to pull up on the lower lid
as is seen in a laterally based advancement flap that is
incised above the level of the lateral canthus.
Periosteal tacking sutures can also be placed to sus-
pend flaps to the bony orbit to prevent pull on the
lower lid. If excessive lid laxity is present, the lower
lid should be tightened preventatively by removing a
full-thickness triangular wedge of the lower lid [25].
In addition, canthoplasty/-pexy can be performed
by making a horizontal incision several millimeters
lateral to the lateral canthus, exposing the lateral
canthal tendon, then suturing this tendon to the lateral
orbital rim periosteum.

lee et al150
Once a severe ectropion has developed, however,
other techniques need to be performed to release the
contracture causing the ectropion. V-Y repair is
helpful for a mild ectropion only [26]. For more
prominent ectropia, a full-thickness skin graft is a
good option to restore the lower eyelid. The ideal
donor site is the upper lid skin. The graft should be
oversized up to double the defect size [27]. If the
original scar is present near the lower lid margin, then
an incision is made through the scar and undermined
to lift the lower lid into proper position, thus releasing
the ectropion (Fig. 12). The graft is then inserted into
the defect created by the release. If the original scar is
distant from the lid margin, then the incision is made
horizontally at the subciliary line. In severe cases, the
lower lid is tacked to the eyebrow to suspend the
lower lid in an elevated position for approximately
3 weeks. This maneuver can be performed alone
without a skin graft for a mild to moderate ectropion.
Summary
‘‘If you do enough surgeries, you’ll develop
complications’’ is a valid adage. Surgeons therefore
must learn from experience to reduce the chances of
complications. Meticulous planning and technique
will lead to superior results. Even the best surgeons,
however, must confront scars and complications that
are aesthetically unacceptable and need revision.
When to act and how to act is important in surgical
revision. Just waiting often may be the best treatment.
Sometimes, surgical intervention is needed to opti-
mize the appearance of the scar. With careful assess-
ment of the scar, various scar revision techniques can
be applied to create an aesthetically pleasing result.
References
[1] Zitelli JA, Moy RL. Buried vertical mattress suture.
J Dermatol Surg Oncol 1989;15:17–9.
[2] Borges AF. Relaxed skin tension lines (RSTL) versus
other skin lines. Plast Reconstr Surg 1984;73:144–50.
[3] Swanson NA. Classifications, definitions, and concepts
in flap surgery. In: Baker SB, Swanson NA, editors.
Local flaps in facial reconstruction. St. Louis, MO7
Mosby; 1995.
[4] Koranda FC, Webster RC. Trapdoor effect in nasola-
bial flaps. Arch Otolaryngol 1985;111:421.
[5] Webster RC, Benjamin RJ, Smith RC. Treatment of
‘‘trapdoor’’ deformity. Laryngoscope 1978;88:707.
[6] Borges AF. Principles of scar camouflage. Facial Plast
Surg 1984;1:181–90.
[7] Goslen JB. The role of steroids in preventing scar for-
mation. In: Thomas JR, Holt GR, editors. Facial scars:
incision, revision, and camouflage. St. Louis, MO7
Mosby; 1989. p. 88–9.
[8] Alster TS. Improvement of erythematous and hyper-
trophic scars by the 585 nm flashlamp pumped pulsed
dye laser. Ann Plast Surg 1994;32:186–90.
[9] Alster TS, Williams CM. Treatment of keloid stemotoy
scars with 585 nm flashlamp pumped pulsed dye laser.
Lancet 1995;345:1198–200.
[10] Manuskiatti W, Fitzpatrick R, Goldman M. Energy
density and numbers of treatment affect response
of keloidal and hypertrophic sternotomy scars to the
585 nm PDL. J Am Acad Dermatol 2001;45:557–65.
[11] Nouri K, Jimenez GP, Harrison-Balestra C, Elgart GW.
585nm pulsed dye laser in treatment of surgical scars
starting on the suture removal day. Dermatol Surg
2003;29:65–73.
[12] Thomas JR. Scar analysis. In: Thomas JR, Holt GR,
editors. Facial scars: incision, revision, and camou-
flage. St. Louis, MO7 Mosby; 1989. p. 103–22.
[13] Borges AF. Improvement of antitension lines scars by
the ‘‘W’’ plastic operation. Br J Plast Surg 1959;12:
29–43.
[14] Thomas JR, Frost TW. Scar revision and camouflage.
In: Baker SB, Swanson NA, editors. Local flaps in
facial reconstruction. St. Louis, MO7 Mosby; 1995.
p. 587–95.
[15] Webster RD, Davidson TM, Smith RC. Broken line
scar revision. Clin Plast Surg 1977;4(2):263–74.
[16] Swanson NA. Atlas of cutaneous surgery. Boston7
Little Brown; 1987.
[17] Borges AF. Z-plasty. In: Borges AF, editor. Elective
incisions and scar revision. Boston7 Little Brown; 1973.
[18] Frodel JL, Wang TD. Z-plasty. In: Baker SB, Swanson
NA, editors. Local flaps in facial reconstruction. St.
Louis, MO7 Mosby; 1995. p. 131–48.
[19] McGillis ST, Lucas AR. Scar revision. Dermatol Clin
1998;16:173.
[20] Hosokawa K, Susuki T, Kikui T, et al. Sheet of scar
deformity: a hypothesis. Ann Plast Surg 1990;25:134.
[21] Salache SJ. Complications of local flaps. In: Baker SB,
Swanson NA, editors. Local flaps in facial reconstruc-
tion. St. Louis, MO7 Mosby; 1995. p. 581.
[22] Hill TG. Enhancing the survival of full-thickness
grafts. J Dermatol Surg Oncol 1984;10:639.
[23] Robinson J. Improvement of the appearance of full-
thickness skin grafts with dermabrasion. Arch Derma-
tol 1987;123:1340.
[24] Wheeland RG. Revision of full-thickness skin grafts
using the carbon dioxide laser. J Dermatol Surg Oncol
1988;14:130.
[25] Young VL, Bartell TH. Burns of the face. In: Thomas
JR, Holt GR, editors. Facial scars: incision, revision,
and camouflage. St. Louis, MO7Mosby; 1989. p. 238–9.
[26] Tromovich TA, Stegman SJ, Glogau RG. Flaps and
grafts in dermatologic surgery. Chicago7 Year Book
Medical Publishers; 1989. p. 217.
[27] Skouge JW. Skin grafting. New York7 Churchill-
Livingstone; 1991.