supportassist enterprise version 2.0...notes, cautions, and warnings note: a note indicates...
TRANSCRIPT

SupportAssist Enterprise Version 2.0.40User's Guide

Notes, cautions, and warnings
NOTE: A NOTE indicates important information that helps you make better use of your product.
CAUTION: A CAUTION indicates either potential damage to hardware or loss of data and tells you how to avoid the
problem.
WARNING: A WARNING indicates a potential for property damage, personal injury, or death.
© 2019 - 2020 Dell Inc. or its subsidiaries. All rights reserved. Dell, EMC, and other trademarks are trademarks of Dell Inc. or itssubsidiaries. Other trademarks may be trademarks of their respective owners.
2020 - 02
Rev. A02

1 Overview.................................................................................................................................... 10New features in this release............................................................................................................................................... 10Overview of supported device types.................................................................................................................................10How SupportAssist Enterprise works.................................................................................................................................11SupportAssist Enterprise capabilities available with Dell EMC service contracts........................................................12System information collected by SupportAssist Enterprise........................................................................................... 13
2 Getting started with SupportAssist Enterprise ............................................................................. 14Setting up SupportAssist Enterprise for the local system.............................................................................................. 14Setting up SupportAssist Enterprise for remote devices............................................................................................... 15Evaluating SupportAssist Enterprise................................................................................................................................. 15Download the SupportAssist Enterprise installation package........................................................................................ 16Installing or upgrading SupportAssist Enterprise............................................................................................................. 16Minimum requirements for installing and using SupportAssist Enterprise....................................................................16
Hardware requirements................................................................................................................................................. 16Software requirements..................................................................................................................................................18Network requirements...................................................................................................................................................19
Installing SupportAssist Enterprise....................................................................................................................................22Operating system considerations for installing SupportAssist Enterprise .............................................................22Installing SupportAssist Enterprise by using the SupportAssist Enterprise installer package............................. 23Install SupportAssist Enterprise by using the OpenManage Essentials installation package............................... 27
Upgrading SupportAssist Enterprise.................................................................................................................................28Upgrade SupportAssist Enterprise by using the SupportAssist Enterprise installation package........................ 28
Migrating to SupportAssist Enterprise............................................................................................................................. 29Using SupportAssist Enterprise without registration......................................................................................................29Register SupportAssist Enterprise.................................................................................................................................... 30Set up an SELinux enabled system to receive alerts...................................................................................................... 32Open the SupportAssist Enterprise user interface......................................................................................................... 33Log in to SupportAssist Enterprise....................................................................................................................................33Log out of SupportAssist Enterprise.................................................................................................................................34
3 Adding devices...........................................................................................................................35Methods of adding devices................................................................................................................................................35Device types and applicable devices.................................................................................................................................35Add a server or hypervisor................................................................................................................................................. 37Add an iDRAC...................................................................................................................................................................... 39Add a chassis........................................................................................................................................................................ 41Add a Networking device................................................................................................................................................... 42Add a PowerVault storage array........................................................................................................................................44Add an EqualLogic PS Series storage solution ............................................................................................................... 45Add a Compellent SC Series storage solution................................................................................................................. 46Add a Fluid File System NAS device..................................................................................................................................47Add a software.................................................................................................................................................................... 48Add a solution.......................................................................................................................................................................49
Contents
Contents 3
Add a virtual machine..........................................................................................................................................................50SupportAssist Enterprise features available for virtual machines........................................................................... 50
Add a device by duplication................................................................................................................................................ 51
4 Managing device discovery rules..................................................................................................54Create device discovery rule..............................................................................................................................................54View the device discovery rule overview pane............................................................................................................... 56Edit device discovery rule...................................................................................................................................................56Delete device discovery rule.............................................................................................................................................. 57Run the discovery rule........................................................................................................................................................ 58
5 Viewing cases and devices.......................................................................................................... 59Viewing all support cases................................................................................................................................................... 59View support cases for a specific device......................................................................................................................... 60Case management options................................................................................................................................................. 61
Request to suspend case activities for 24 hours....................................................................................................... 61Request to resume support activities......................................................................................................................... 62Request to close a support case................................................................................................................................. 62
View the device inventory..................................................................................................................................................63View the device overview pane.........................................................................................................................................64Sorting the displayed data..................................................................................................................................................65
6 Monitoring site health................................................................................................................ 66View site health....................................................................................................................................................................67Current SupportAssist Enterprise Hostname Details......................................................................................................67Current SupportAssist Overview.......................................................................................................................................67Sitewide Inventory Validation.............................................................................................................................................67Network Connectivity.........................................................................................................................................................68Extensions Tree View......................................................................................................................................................... 68
7 Using Extensions ....................................................................................................................... 69Types of extensions............................................................................................................................................................ 69Support for setting up adapter or Remote Collector .................................................................................................... 69Getting started with adding devices managed by systems management consoles................................................... 70Adapters overview...............................................................................................................................................................70
Set up OpenManage Essentials adapter..................................................................................................................... 71Set up the Microsoft System Center Operations Manager adapter.......................................................................73Management Packs for inventorying devices managed by Operations Manager.................................................75Set up OpenManage Enterprise adapter....................................................................................................................76View the adapter overview pane ................................................................................................................................ 77View devices inventoried by the adapter....................................................................................................................78Synchronize adapter .................................................................................................................................................... 78Edit adapter.................................................................................................................................................................... 78Delete adapter................................................................................................................................................................79Approximate time required to assign Credential Profile............................................................................................79
Remote Collectors overview..............................................................................................................................................80Minimum requirements for setting up a Remote Collector......................................................................................80Set up Remote Collector.............................................................................................................................................. 84View collections for devices associated with a Remote Collector..........................................................................86
4 Contents

View the Remote Collector overview pane................................................................................................................87View devices associated with a Remote Collector....................................................................................................87Edit Remote Collector...................................................................................................................................................88Delete Remote Collector.............................................................................................................................................. 89
8 Device grouping......................................................................................................................... 90Predefined device groups................................................................................................................................................... 91View device groups..............................................................................................................................................................91Creating a device group...................................................................................................................................................... 91Manage devices in a device group.................................................................................................................................... 92Manage the credentials of a device group.......................................................................................................................93View and update device group information..................................................................................................................... 94Delete a device group......................................................................................................................................................... 95
9 Managing device credentials....................................................................................................... 96Account credentials............................................................................................................................................................ 96
Add Account Credentials..............................................................................................................................................96Reassign Account Credentials..................................................................................................................................... 98Edit Account Credentials..............................................................................................................................................99Delete Account Credentials .........................................................................................................................................99
Credential Profiles..............................................................................................................................................................100Create Credential Profile ............................................................................................................................................100Assign Credential Profile............................................................................................................................................. 102View devices associated with a Credential Profile...................................................................................................102Edit Credential Profile..................................................................................................................................................102Delete Credential Profile ............................................................................................................................................ 103
10 Validating device inventory.......................................................................................................104View the Site Inventory Validation page......................................................................................................................... 104Start inventory validation manually..................................................................................................................................105Schedule automatic inventory validation........................................................................................................................ 105
11 Maintaining SupportAssist Enterprise capability......................................................................... 107Enable or disable monitoring of a device.........................................................................................................................107Perform deep discovery....................................................................................................................................................108Install or upgrade OMSA by using SupportAssist Enterprise....................................................................................... 109Configure SNMP settings by using SupportAssist Enterprise......................................................................................110View and update the contact information........................................................................................................................111View and update parts dispatch information.................................................................................................................. 112Integrate SupportAssist Enterprise with your TechDirect account............................................................................. 113Configure proxy server settings........................................................................................................................................114Connectivity test................................................................................................................................................................ 115
View the connectivity status.......................................................................................................................................115Perform the connectivity test.....................................................................................................................................115
Test the case creation capability...................................................................................................................................... 116Clear the System Event Log............................................................................................................................................. 116Automatic update................................................................................................................................................................117
Enable or disable automatic updates.......................................................................................................................... 118Delete a device....................................................................................................................................................................118
Contents 5

12 Configuring email notifications................................................................................................. 120Configure email notification settings............................................................................................................................... 120Configure SMTP server settings...................................................................................................................................... 121Types of email notifications............................................................................................................................................... 121
13 Configuring collection settings................................................................................................. 123Prerequisites for collecting system information.............................................................................................................123Enable or disable the automatic collection of system information on case creation.................................................124Enable or disable the periodic collection of system information from all devices...................................................... 124Enable or disable the collection of identity information................................................................................................ 125Enable or disable the collection of system information.................................................................................................126Enable or disable the automatic upload of collections.................................................................................................. 126
14 Viewing collections.................................................................................................................. 128View a collection from the Devices page........................................................................................................................128View a collection from the Collections page.................................................................................................................. 129Refine collections based on a date range....................................................................................................................... 130Configuration Viewer.........................................................................................................................................................130
Log types....................................................................................................................................................................... 131Items reported in periodic collections from servers.......................................................................................................132Download and view a multiple device collection............................................................................................................ 134
15 Using SupportAssist Enterprise to collect and send system information....................................... 136Set up SupportAssist Enterprise for collecting and sending system information......................................................136Start the collection of system information from a single device................................................................................. 136Start the collection of system information from multiple devices............................................................................... 138Upload a collection.............................................................................................................................................................140Upload a collection from a disconnected site.................................................................................................................140
16 Understanding maintenance mode............................................................................................ 142Enable or disable global-level maintenance mode..........................................................................................................143Enable or disable device-level maintenance mode.........................................................................................................143
17 SupportAssist Enterprise user groups........................................................................................145SupportAssist Enterprise functions and user privileges................................................................................................145Granting elevated or administrative privileges to users................................................................................................ 147Add users to the SupportAssist Enterprise user groups – Windows.......................................................................... 147Add users to the SupportAssist Enterprise user groups – Linux................................................................................. 147
18 Manually configuring SNMP settings.........................................................................................149Manually configuring the alert destination of a server.................................................................................................. 149
Manually configuring the alert destination of a server by using the script file on server running Windows.... 149Manually configuring the alert destination of a server running Windows.............................................................150Manually configuring the alert destination of a server by using the script file on a server running Linux.........151Manually configure alert destination of server running Linux.................................................................................152
Manually configure alert destination of iDRAC using the web interface.................................................................... 152Manually configure alert destination of chassis using the web interface................................................................... 153Manually configure alert destination of networking device.......................................................................................... 153
6 Contents

19 Managing SupportAssist Enterprise alerts in TechDirect............................................................. 154Set up TechDirect to receive SupportAssist Enterprise alerts.................................................................................... 154Configure alert rules in TechDirect..................................................................................................................................155View SupportAssist Enterprise alerts in TechDirect..................................................................................................... 155SupportAssist alerts...........................................................................................................................................................156SupportAssist alert actions...............................................................................................................................................156
20 Other useful information..........................................................................................................158Monitoring servers for hardware issues..........................................................................................................................158Support for automatically installing or upgrading OMSA..............................................................................................159Support for automatically configuring SNMP settings................................................................................................. 160Installing patch for SupportAssist Enterprise................................................................................................................. 160Enable or disable API interface settings...........................................................................................................................161Signing in to TechDirect.....................................................................................................................................................161Deep discovery ...................................................................................................................................................................161Device correlation.............................................................................................................................................................. 162Association view ................................................................................................................................................................162Detection of hardware issues in attached storage devices..........................................................................................163Support for OEM devices................................................................................................................................................. 163Install Net-SNMP on a server running Linux.................................................................................................................. 164Configure sudo access for SupportAssist Enterprise on server running Linux..........................................................164Ensuring successful communication between the SupportAssist Enterprise application and the
SupportAssist server..................................................................................................................................................... 165Accessing the SupportAssist Enterprise application logs............................................................................................. 165Event storm handling........................................................................................................................................................ 166Accessing the context-sensitive help..............................................................................................................................166View SupportAssist Enterprise product information..................................................................................................... 166Uninstalling SupportAssist Enterprise............................................................................................................................. 166
Uninstall SupportAssist Enterprise - Windows.........................................................................................................166Uninstall SupportAssist Enterprise - Linux................................................................................................................ 167Uninstall SupportAssist Enterprise in silent mode - Linux....................................................................................... 167
Identify series of PowerEdge server............................................................................................................................... 168
21 Troubleshooting...................................................................................................................... 169Installing SupportAssist Enterprise ................................................................................................................................. 169SupportAssist Enterprise registration..............................................................................................................................170Opening the SupportAssist Enterprise user interface...................................................................................................170Logging in to SupportAssist Enterprise ..........................................................................................................................170Unable to add device.......................................................................................................................................................... 171Unable to add adapter....................................................................................................................................................... 173Unable to add Remote Collector...................................................................................................................................... 173Disconnected...................................................................................................................................................................... 173OMSA not installed............................................................................................................................................................ 174SNMP not configured........................................................................................................................................................174New version of OMSA available....................................................................................................................................... 174Unable to configure SNMP............................................................................................................................................... 174Unable to verify SNMP configuration............................................................................................................................. 175Unable to install OMSA..................................................................................................................................................... 175
Contents 7

Unable to verify OMSA version........................................................................................................................................175OMSA not supported........................................................................................................................................................ 176Unable to reach device......................................................................................................................................................176Unable to gather system information.............................................................................................................................. 176Insufficient storage space to gather system information............................................................................................. 178Unable to export collection............................................................................................................................................... 178Unable to send system information................................................................................................................................. 178Authentication failed.......................................................................................................................................................... 179Clearing System Event Log failed.................................................................................................................................... 180
Clear the system event log using iDRAC.................................................................................................................. 180Clear the System Event Log by using OMSA........................................................................................................... 181
Maintenance mode............................................................................................................................................................. 181Auto update......................................................................................................................................................................... 181Unable to edit device credentials......................................................................................................................................181Automatic case creation................................................................................................................................................... 183Scheduled tasks................................................................................................................................................................. 183SupportAssist Enterprise services................................................................................................................................... 183
Verify the status of SupportAssist Enterprise services on Windows.................................................................... 184Verify the status of SupportAssist Enterprise services on Linux...........................................................................184Verify the status of SupportAssist Enterprise services on Ubuntu and Debian.................................................. 185
Unable to view tool tips in Mozilla Firefox...................................................................................................................... 185Other services.................................................................................................................................................................... 185Security............................................................................................................................................................................... 186Logs..................................................................................................................................................................................... 186
22 SupportAssist Enterprise user interface.................................................................................... 187SupportAssist Enterprise Registration Wizard............................................................................................................... 189
Welcome........................................................................................................................................................................189Proxy Settings.............................................................................................................................................................. 189Registration...................................................................................................................................................................190Summary........................................................................................................................................................................ 191
Login page........................................................................................................................................................................... 191Site Health .......................................................................................................................................................................... 191Cases page..........................................................................................................................................................................192Devices page...................................................................................................................................................................... 194
Add Single Device........................................................................................................................................................ 196Device overview pane................................................................................................................................................. 198Multiple Device Collection window........................................................................................................................... 202Multiple Device Collection pane.................................................................................................................................202
Site Inventory Validation...................................................................................................................................................202Validation test status.................................................................................................................................................. 203History of inventory validation...................................................................................................................................203
Device Groups page..........................................................................................................................................................203Manage Devices.......................................................................................................................................................... 204Create or Edit Device Group......................................................................................................................................204
Manage Device Discovery Rule.......................................................................................................................................206Create or Edit Device Discovery Rule ......................................................................................................................206Discovery Rule Details................................................................................................................................................ 208Discovery Rule Current Iteration Status...................................................................................................................208Recent Activity............................................................................................................................................................ 208
8 Contents

Current versus Previous Discovery Rule Status..................................................................................................... 209Manage Account Credentials.......................................................................................................................................... 209
Add Account Credentials............................................................................................................................................ 210Edit Account Credentials............................................................................................................................................. 211
Manage Credential Profiles ..............................................................................................................................................212Add Credential Profile..................................................................................................................................................212Edit Credential Profile..................................................................................................................................................213
Collections page................................................................................................................................................................. 213Collection overview pane............................................................................................................................................ 215
Extensions...........................................................................................................................................................................215Adapters........................................................................................................................................................................ 215Remote Collectors....................................................................................................................................................... 219
Settings...............................................................................................................................................................................222Proxy Settings..............................................................................................................................................................222Preferences..................................................................................................................................................................223Contact Information....................................................................................................................................................225TechDirect Login......................................................................................................................................................... 226SMTP Settings.............................................................................................................................................................227
Network Connectivity Test..............................................................................................................................................227SupportAssist Enterprise test..........................................................................................................................................228
23 Error code appendix................................................................................................................ 230
24 Related documents and resources............................................................................................250Contacting Dell EMC......................................................................................................................................................... 251
Contact Dell EMC for sales, technical support, or customer service issues........................................................ 251Find manuals and documents..................................................................................................................................... 251
Contents 9

OverviewSupportAssist Enterprise is an application that automates technical support for your Dell EMC server, storage, and networking devices.SupportAssist Enterprise monitors your devices and proactively detects hardware issues that may occur. When a hardware issue isdetected, SupportAssist Enterprise automatically opens a support case with Technical Support and sends you an email notification.SupportAssist Enterprise automatically collects the system state information required for troubleshooting the issue and sends it securelyto Dell EMC. The collected system information helps Technical Support to provide you an enhanced, personalized, and efficient supportexperience. SupportAssist Enterprise capability also includes a proactive response from Technical Support to help you resolve the issue.
Additionally, SupportAssist Enterprise can monitor hardware issues that may occur on devices that you are managing by usingOpenManage Essentials, Microsoft System Center Operations Manager (SCOM), or OpenManage Enterprise.
This document provides information about installing and setting up SupportAssist Enterprise to:
• Monitor devices for hardware issues• Automatically create a support case when an issue is detected• Collect and send system information from your devices periodically and as needed
NOTE: In this document, the term local system refers to the server where SupportAssist Enterprise is installed; remotedevice refers to any other device in your environment.
Related reference
System information collected by SupportAssist Enterprise
Topics:
• New features in this release• Overview of supported device types• How SupportAssist Enterprise works• SupportAssist Enterprise capabilities available with Dell EMC service contracts• System information collected by SupportAssist Enterprise
New features in this release• Support for newer firmware versions• Support for newer collection attributes from Server, Storage, and Networking devices
Overview of supported device typesSupportAssist Enterprise is compatible with Dell EMC server, storage, and networking devices. The following is an overview of the devicetypes that are compatible with SupportAssist Enterprise.
NOTE: SupportAssist Enterprise can monitor hardware issues on Dell EMC server, Dell EMC networking, Storage MD
series, and Storage PS series devices. For Storage MD Series devices, monitoring of hardware issues is supported when
the device is added either directly or through the OpenManage Essentials adapter. For Storage PS Series devices,
monitoring of hardware issues is supported only if the device is added through the OpenManage Essentials adapter. For
more information on adapters, see Using Extensions. Automatic case creation is supported only for devices that are
monitored by SupportAssist Enterprise.
NOTE: SupportAssist Enterprise capabilities available for a device vary depending on the Dell EMC service contract of
the device. The primary capabilities of SupportAssist Enterprise are available only for devices with an active
ProSupport, ProSupport Plus, ProSupport Flex for Data Center, or ProSupport One for Data Center service contract.
For a summary of the SupportAssist Enterprise capabilities and Dell EMC service contracts, see SupportAssist
Enterprise capabilities available with Dell EMC service contracts.
1
10 Overview

NOTE: SupportAssist Enterprise may not be compatible with all device models of a supported device type. For the
complete list of supported device types and device models, see the SupportAssist Enterprise Version 2.0.40 SupportMatrix at www.dell.com/serviceabilitytools.
NOTE: Remote monitoring, case creation, and periodic collection of system information from Storage SC Series devices
is supported through the SupportAssist solution that is available on the device.
• Servers
• x9xx and later generations of PowerEdge servers• PowerEdge C Series servers• Datacenter Scalable Solutions• Storage NX devices• Storage DL devices• OEM-ready servers
• Storage
• Storage PS Series arrays (previously EqualLogic)• Storage MD Series arrays (previously PowerVault)• Storage ME4 Series arrays• Storage SC Series arrays (previously Compellent)• Fluid File System (FluidFS) Network attached storage (NAS) devices• OEM-ready storage devices
• Networking
• PowerConnect switches• Force10 switches• Dell Networking switches• Networking X-Series switches• Networking Wireless Controllers Mobility Series• Other supported Networking devices (Brocade and Cisco)
• Chassis
• PowerEdge FX2/FX2s• PowerEdge VRTX• PowerEdge M1000e• PowerEdge MX7000
• Software
• HIT Kit / VSM for VMware• SAN HQ• vCenter• SCVMM
• Solution
• XC Series of web-scale hyper-converged appliances
NOTE: You can also add non-Dell branded servers or non-Dell Networking devices in SupportAssist Enterprise. For such
servers and devices, only collection of host information is supported.
Related reference
Identify series of PowerEdge server
How SupportAssist Enterprise worksWhen SupportAssist Enterprise is setup and the devices to be monitored are configured correctly, SupportAssist Enterprise receives analert whenever a hardware event occurs on any monitored device. The received alerts are filtered by using various policies to determine ifthe alerts qualify for creating a new support case or for updating an existing support case. All qualifying alerts are sent securely to theSupportAssist server hosted by Dell EMC, for creating a new support case or for updating an existing support case. After the support caseis created or updated, SupportAssist Enterprise collects system information from the device that generated the alert and sends the
Overview 11

information securely to Dell EMC. The system information is used by Technical Support to troubleshoot the issue and provide anappropriate solution.
You can also use SupportAssist Enterprise to only collect and send system information from your devices to Dell EMC. By default,SupportAssist Enterprise automatically collects and sends system information from your devices at periodic intervals and on case creation.If required, you can also manually start the collection and upload of system information to Dell EMC.
NOTE: To experience the automatic case creation and system information collection capabilities of SupportAssist
Enterprise, you must complete the registration. Without registration, you can only use SupportAssist Enterprise to
manually start the collection and upload of system information from your devices to Dell EMC. For more information
about the restrictions that apply when using SupportAssist Enterprise without registration, see Using SupportAssist
Enterprise without registration.
NOTE: SupportAssist Enterprise does not create a support case for every alert received from a monitored device. A
support case is created only for a device that has an active service contract, and if the alert type and number of alerts
received from the device match with the predefined criteria for support case creation.
NOTE: SupportAssist Enterprise sends you automatic email notifications about support cases, device status, network
connectivity status, and so on. For information about the various email notifications, see Types of email notifications.
SupportAssist Enterprise capabilities availablewith Dell EMC service contractsThe following table provides a comparison of the SupportAssist Enterprise capabilities available with the ProSupport, ProSupport Plus,ProSupport Flex for Data Center, or ProSupport One for Data Center service contracts.
NOTE: Completing the registration is a prerequisite to receive the full benefits of SupportAssist Enterprise for your Dell
EMC devices. For information on registering SupportAssist Enterprise, see Register SupportAssist Enterprise.
Table 1. SupportAssist Enterprise capabilities and Dell EMC service contracts
SupportAssistEnterprise capability
Description Basic Hardware ProSupport ProSupportPlus,ProSupportFlex for DataCenter, orProSupport Onefor Data Center
Proactive detection ofhardware failures
SupportAssist Enterprise receives alerts forhardware events that occur in monitoreddevices and proactively determines if the alertsindicate a hardware failure.
Predictive detection ofhardware failures*
Intelligent analysis of system informationcollected from a monitored device is used topredict hardware failures that may occur infuture.
Automated collection ofsystem information
The system information required fortroubleshooting an issue is automaticallycollected from the monitored device and sentsecurely to Dell EMC.
Automated support casecreation
When a hardware failure is detected eitherproactively or predictively, a Service Request isautomatically created with Technical Support.
Automated emailnotification
An email notification about the support case orissue is automatically sent to your company’sprimary and secondary SupportAssist Enterprisecontacts.
12 Overview
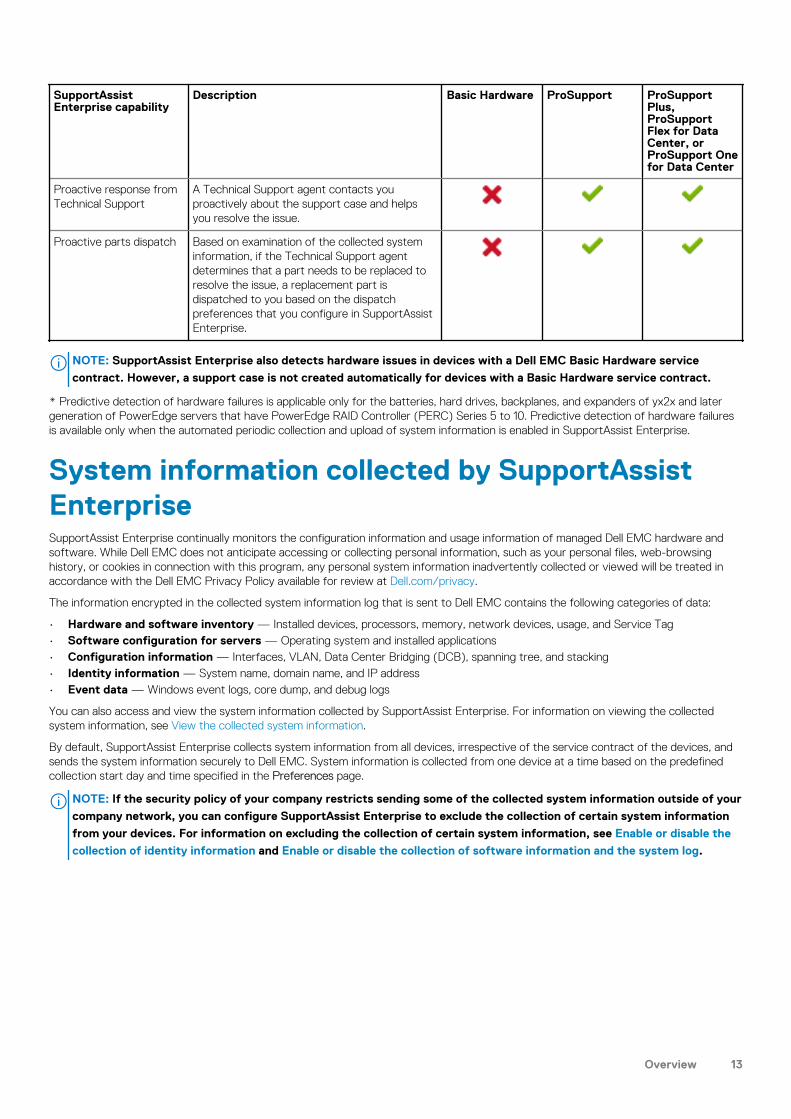
SupportAssistEnterprise capability
Description Basic Hardware ProSupport ProSupportPlus,ProSupportFlex for DataCenter, orProSupport Onefor Data Center
Proactive response fromTechnical Support
A Technical Support agent contacts youproactively about the support case and helpsyou resolve the issue.
Proactive parts dispatch Based on examination of the collected systeminformation, if the Technical Support agentdetermines that a part needs to be replaced toresolve the issue, a replacement part isdispatched to you based on the dispatchpreferences that you configure in SupportAssistEnterprise.
NOTE: SupportAssist Enterprise also detects hardware issues in devices with a Dell EMC Basic Hardware service
contract. However, a support case is not created automatically for devices with a Basic Hardware service contract.
* Predictive detection of hardware failures is applicable only for the batteries, hard drives, backplanes, and expanders of yx2x and latergeneration of PowerEdge servers that have PowerEdge RAID Controller (PERC) Series 5 to 10. Predictive detection of hardware failuresis available only when the automated periodic collection and upload of system information is enabled in SupportAssist Enterprise.
System information collected by SupportAssistEnterpriseSupportAssist Enterprise continually monitors the configuration information and usage information of managed Dell EMC hardware andsoftware. While Dell EMC does not anticipate accessing or collecting personal information, such as your personal files, web-browsinghistory, or cookies in connection with this program, any personal system information inadvertently collected or viewed will be treated inaccordance with the Dell EMC Privacy Policy available for review at Dell.com/privacy.
The information encrypted in the collected system information log that is sent to Dell EMC contains the following categories of data:
• Hardware and software inventory — Installed devices, processors, memory, network devices, usage, and Service Tag• Software configuration for servers — Operating system and installed applications• Configuration information — Interfaces, VLAN, Data Center Bridging (DCB), spanning tree, and stacking• Identity information — System name, domain name, and IP address• Event data — Windows event logs, core dump, and debug logs
You can also access and view the system information collected by SupportAssist Enterprise. For information on viewing the collectedsystem information, see View the collected system information.
By default, SupportAssist Enterprise collects system information from all devices, irrespective of the service contract of the devices, andsends the system information securely to Dell EMC. System information is collected from one device at a time based on the predefinedcollection start day and time specified in the Preferences page.
NOTE: If the security policy of your company restricts sending some of the collected system information outside of your
company network, you can configure SupportAssist Enterprise to exclude the collection of certain system information
from your devices. For information on excluding the collection of certain system information, see Enable or disable the
collection of identity information and Enable or disable the collection of software information and the system log.
Overview 13

Getting started with SupportAssist EnterpriseSupportAssist Enterprise automates technical support from Dell EMC for your devices. Depending on your requirement, you can install andset up SupportAssist Enterprise to automate technical support for one or more of your devices.Topics:
• Setting up SupportAssist Enterprise for the local system• Setting up SupportAssist Enterprise for remote devices• Evaluating SupportAssist Enterprise• Download the SupportAssist Enterprise installation package• Installing or upgrading SupportAssist Enterprise• Minimum requirements for installing and using SupportAssist Enterprise• Installing SupportAssist Enterprise• Upgrading SupportAssist Enterprise• Migrating to SupportAssist Enterprise• Using SupportAssist Enterprise without registration• Register SupportAssist Enterprise• Set up an SELinux enabled system to receive alerts• Open the SupportAssist Enterprise user interface• Log in to SupportAssist Enterprise• Log out of SupportAssist Enterprise
Setting up SupportAssist Enterprise for the localsystemInstalling SupportAssist Enterprise enables you to start the collection and upload of system information from the local system (serverwhere SupportAssist Enterprise is installed). To allow SupportAssist Enterprise to monitor the local system for hardware issues, you mustcomplete the registration and perform additional tasks.
To set up SupportAssist Enterprise for the local system:
1. Download the SupportAssist Enterprise installation package. See Download the SupportAssist Enterprise installation package.2. Review the requirements for installing SupportAssist Enterprise. See Minimum requirements for installing and using SupportAssist
Enterprise.3. Install SupportAssist Enterprise. See Install SupportAssist Enterprise.4. (Optional) Complete the registration of SupportAssist Enterprise. See Register SupportAssist Enterprise.
CAUTION: Completing the registration is a prerequisite to receive the full benefits of SupportAssist Enterprise.
Without registration, you can only use SupportAssist Enterprise to manually start the collection of system
information from your devices. Until registration is completed, SupportAssist Enterprise can neither monitor your
devices for hardware issues nor automatically collect system information.
5. Perform the following if you want SupportAssist Enterprise to monitor the local system for hardware issues:
a. Install or upgrade OpenManage Server Administrator (OMSA) on the local system. See Install or upgrade OMSA by usingSupportAssist Enterprise.
b. Configure the SNMP settings of the local system. See Configure SNMP settings by using SupportAssist Enterprise.c. Enable SupportAssist Enterprise to monitor hardware issues that may occur on the local system. See Enable or disable monitoring
of a device.6. (Optional) Update the contact information to include a secondary SupportAssist Enterprise contact and a parts dispatch address. See
View and update the contact information.
2
14 Getting started with SupportAssist Enterprise

Setting up SupportAssist Enterprise for remotedevicesAdding remote device in SupportAssist Enterprise prepares SupportAssist Enterprise to monitor hardware issues and collect systeminformation from those devices.
To set up SupportAssist Enterprise for remote devices:
1. Ensure that you have completed the steps listed in Setting up SupportAssist Enterprise for the local system.2. (Optional) If you want to manage a set of devices as a group, create one or more device groups based on your preference. See Device
grouping.3. Add remote devices in SupportAssist Enterprise. See Add devices.4. (Optional) Set up an adapter to inventory and add devices from OpenManage Essentials, Microsoft System Center Operations
Manager (SCOM), or OpenManage Enterprise. See Adapters.5. (Optional) If you have more than 4,000 devices, set up Remote Collectors. See Remote Collectors.6. (Optional) If your company utilizes an SMTP server (email server), configure the SMTP server settings in SupportAssist Enterprise.
See Configure the SMTP server settings.7. (Optional) If you want to manage SupportAssist Enterprise alerts in TechDirect, set up TechDirect. See Managing SupportAssist
Enterprise alerts in TechDirect.
Evaluating SupportAssist EnterpriseSupportAssist Enterprise has several configuration settings that you can enable or disable to evaluate the monitoring and systeminformation collection capabilities.
Evaluating the monitoring capabilityYou can disable SupportAssist Enterprise from monitoring some specific devices or all devices.
When you disable monitoring of a specific device, SupportAssist Enterprise does not process alerts that are received from that device.Therefore, even if a hardware issue may occur on the device, SupportAssist Enterprise does not open a support case automatically. Forinstructions to disable monitoring of a specific device, see Enable or disable monitoring of a device.
You can also temporarily disable monitoring of a specific device by placing the device in maintenance mode. Placing a device inmaintenance mode ensures that SupportAssist Enterprise does not process alerts received from the device during a planned maintenanceactivity. For instructions to place a device in maintenance mode, see Enable or disable device-level maintenance mode.
If necessary, you can disable SupportAssist Enterprise from monitoring all your devices by placing all your devices in maintenance mode.For instructions to place all your devices in maintenance mode, see Enable or disable global-level maintenance mode.
Evaluating the system information collection capabilityBy default, SupportAssist Enterprise automatically collects system information from all devices at periodic intervals, and also when asupport case is created. The collected system information is then sent securely to Dell EMC. For information on the system informationcollected by SupportAssist Enterprise from devices, see System information collected by SupportAssist Enterprise.
You can also view the system information that is collected by SupportAssist Enterprise. For information on viewing the collected data, seeView the collected system information.
If the security policy of your company restricts sending some of the collected system information outside of your company network, youcan use the following configuration options available in SupportAssist Enterprise:
• You can disable the collection of identity information from all devices. See Enable or disable the collection of identity information.• You can disable the collection of software information and the system log from certain devices. See Enable or disable the collection of
system information.• You can disable the periodic collection of system information from all devices. See Enable or disable the periodic collection of system
information from all devices.• You can disable the automatic collection of system information when a support case is created. See Enable or disable the automatic
collection of system information.• You can also prevent the upload of collections. See Disable the automatic upload of collections.
Getting started with SupportAssist Enterprise 15

NOTE: In most cases, part or all of the system information collected by SupportAssist Enterprise is required by
Technical Support to properly diagnose issues and provide an appropriate resolution. To receive the full benefits of
SupportAssist Enterprise, you must enable all the system information collection options.
Download the SupportAssist Enterpriseinstallation packagePrerequisites
The system must have Internet connectivity.
About this task
Installation of SupportAssist Enterprise is supported on a virtual machine or a PowerEdge server running either a Windows or Linuxoperating system. You can download the appropriate installation package depending on the operating system running on the server whereyou want to install SupportAssist Enterprise.
Steps
1. Go to www.dell.com/supportassist.
2. In the SUPPORTASSIST FOR ENTERPRISE SYSTEMS section, click Explore.The SupportAssist for Enterprise Systems home page is displayed.
3. In the SupportAssist for enterprise systems 2.0 section, perform one of the following:
• To download the Windows installation package, click the SupportAssist Enterprise Windows management server link.• To download the Linux installation package, click the SupportAssist Enterprise Linux management server link.
The Driver Details page is displayed in a new web browser window.
4. In the Available formats section, click Download File.
Results
The SupportAssist Enterprise installation package is downloaded.
Installing or upgrading SupportAssist EnterpriseInstalling SupportAssist Enterprise enables you to receive the automated support capabilities for your Dell EMC server, storage, andnetworking devices.
• If you are installing SupportAssist Enterprise for the first time, perform one of the following:
• Install SupportAssist Enterprise by using the SupportAssist Enterprise installation package. For more information, see InstallingSupportAssist Enterprise by using the SupportAssist Enterprise installation package.
• Install SupportAssist Enterprise by using the OpenManage Essentials installation package. For more information, see InstallingSupportAssist Enterprise by using the OpenManage Essentials installation package.
• If you have already installed SupportAssist Enterprise version 1.2 or later, upgrade to SupportAssist Enterprise version 2.0.40. For moreinformation, see Upgrading SupportAssist Enterprise.
Minimum requirements for installing and usingSupportAssist EnterpriseThe following sections describe the minimum hardware, software, and networking requirements for installing and using SupportAssistEnterprise.
Hardware requirementsThe hardware requirements for installing and using SupportAssist Enterprise vary depending on:
16 Getting started with SupportAssist Enterprise

• The number of devices you want to monitor• The SupportAssist Enterprise functionality you want to use by either collection of system information only or both monitoring and
collection of system information
You can install SupportAssist Enterprise on a Virtual Machine (VM) or on a x9xx or later generation PowerEdge server.NOTE: For more information on the hardware requirements for installing and using SupportAssist Enterprise, see the
Dell EMC SupportAssist Enterprise Version 2.0.40 User’s Guide at www.dell.com/serviceabilitytools.
The following table provides a summary of the minimum hardware requirements on the server where you want to install SupportAssistEnterprise.
Table 2. Hardware requirements for installing and using SupportAssist Enterprise
Devices Monitoring Collecting SystemInformation
Processor Installedmemory (RAM)
Hard drive(free space)
1 No Yes 1 core 4 GB 1 GB
20 Yes Yes 2 cores 4 GB 4 GB
Up to 100 Yes Yes 4 cores 8 GB 12 GB
Up to 300 Yes Yes 4 cores 8 GB 32 GB
Up to 1000 Yes Yes 8 cores 8 GB 60 GB
Up to 4000 Yes Yes 8 cores 16 GB 90 GB
NOTE: You can extend the monitoring and collection capabilities of SupportAssist Enterprise for up to 18,000 devices by
setting up multiple remote collectors.
NOTE: For monitoring more than 100 devices in your environment, it is recommended that you install SupportAssist
Enterprise on server that meets the specified hardware requirements. Periodic collections from more than 100 devices
may result in a high processor or memory utilization on the monitoring server. This high resource utilization may affect
other applications that are running on the monitoring server, if the resources are shared with other applications.
NOTE: If SupportAssist Enterprise is installed in a virtual environment, hardware resources of the system such as
processor, memory, and I/O are shared among the virtual machines. Therefore, more hardware resources may be
utilized by the virtual machine where SupportAssist Enterprise is installed. For optimal performance, ensure that you
allocate dedicated processor and memory to the VM as specified in the hardware requirements for SupportAssist
Enterprise.
To change the amount of processor resources allocated to a VM by using the shares, reservations, and limits settings,
see the following:
• • For ESX, see the "Allocate CPU Resources" section in the VMware vSphere documentation at docs.vmware.com.
• For Hyper-V, see the "Hyper-V CPU Scheduling" blog post at msdn.microsoft.com.
• For other virtual environments, see the respective documentation.
The following table provides a summary of the minimum hardware requirements on the server running SupportAssist Enterprise forperforming multiple device collections.
Table 3. Hardware requirements for performing multiple device collections
Devices Processor Installed memory (RAM) Hard drive (free space)
Up to 30 devices 2 cores 4 GB 8 GB
Up to 50 devices 4 cores 8 GB 15 GB
Up to 100 devices 8 cores 8 GB 25 GB
Up to 300 devices 8 cores 16 GB 75 GB
NOTE: Performing a multiple device collection for Deployment, System Maintenance, or Consulting purposes may result
in high system resource utilization at irregular intervals.
Getting started with SupportAssist Enterprise 17

Software requirementsYou can install SupportAssist Enterprise on a supported Windows or Linux operating system. After installing SupportAssist Enterprise, youcan view the SupportAssist Enterprise user interface by using a web browser. The following section provides information about theoperating system requirements for installing and using SupportAssist Enterprise.
Operating system requirementsThe following sections provide the list of Windows and Linux operating systems that support the installation of SupportAssist Enterprise.
NOTE: SupportAssist Enterprise can only be installed on operating systems with x86-64 architecture.
Windows operating systems
• Microsoft Windows Server 2008 R2 SP1 Standard, Enterprise, and Datacenter• Windows Server 2012 R2 Standard and Datacenter• Windows Server 2012 Standard, Essentials, and Datacenter• Windows Server 2016 Standard, Essentials, and Datacenter• Windows Server 2019 Standard, Essentials, and Datacenter• Windows 2008 Small Business Server• Windows 2011 Small Business Server• Windows Server Core 2012• Windows Server Core 2012 R2• Windows Server Core 2016• Windows Server Core 2019
NOTE: SupportAssist Enterprise can also be installed on a Microsoft Windows domain controller.
Linux operating systems
• Red Hat Enterprise Linux 8.0• Red Hat Enterprise Linux 7.x• Red Hat Enterprise Linux 6.x• Red Hat Enterprise Linux 5.x• CentOS 7.x• CentOS 6.x• SUSE Linux Enterprise Server 15• SUSE Linux Enterprise Server 12 SP1• SUSE Linux Enterprise Server 12 SP2• SUSE Linux Enterprise Server 12 SP3• SUSE Linux Enterprise Server 12• SUSE Linux Enterprise Server 11 SP4• SUSE Linux Enterprise Server 10 SP4• Oracle Linux 7.x• Oracle Linux 6.x• Debian 7.x• Debian 8.x• Debian 9.x• Ubuntu 14.x• Ubuntu 16.04.x• Ubuntu 18.04.x
NOTE: Installation of SupportAssist Enterprise is not supported on Red Hat Enterprise Linux 6.6 operating system.
Web browser requirementsTo view the SupportAssist Enterprise user interface, one of the following web browsers is required:
• Internet Explorer 11 or later• Mozilla Firefox 31 or later
18 Getting started with SupportAssist Enterprise

• Google Chrome 59 or later• Microsoft Edge 38 or later
NOTE: Transport Layer Security (TLS) version 1.2 must be enabled on the web browser.
NOTE: To open SupportAssist Enterprise by using Internet Explorer:
• In the Security tab, enable Active Scripting.
• In the Advanced tab, enable Play animations in web pages.
Network requirementsThe following are the networking requirements on the local system (the server where SupportAssist Enterprise is installed) and remotedevices.
• Internet connection — Standard 1 GbE network or faster.• The local system must be able to communicate with the SupportAssist server hosted by Dell EMC over HTTPS protocol.• The local system must be able to connect to the following destinations:
• https://apidp.dell.com and https://api.dell.com — End point for the SupportAssist server hosted by Dell EMC.• https://is.us.dell.com/* — The file upload server and related services.• https://downloads.dell.com/ — For downloading OpenManage Server Administrator (OMSA) and receiving new SupportAssist
Enterprise release information, policy files, and product support files.
NOTE: The downloads.dell.com page uses the Akamai third-party vendor for improved download experience.
• https://sa-is.us.dell.com/* — For TechDirect integration.NOTE: During registration, SupportAssist Enterprise verifies connectivity to the Internet by trying to connect to
http://www.dell.com, which then gets redirected to https://www.dell.com.
The following table lists the network bandwidth requirements for monitoring and collecting system information from devices.
Table 4. Network bandwidth requirements
Devices Monitoring Collecting SystemInformation
LAN bandwidth* WANbandwidth**
1 No Yes 10 Mbps 5 Mbps
20 Yes Yes 0.5 Gbps 10 Mbps
Up to 100 Yes Yes 0.5 Gbps 10 Mbps
Up to 300 Yes Yes 0.5 Gbps 10 Mbps
Up to 1000 Yes Yes 1 Gbps 20 Mbps
Up to 4000 Yes Yes 1 Gbps 20 Mbps
* Network bandwidth required for monitoring and collecting system information from devices within a single site.
** Network bandwidth required for monitoring and collecting system information from devices that are distributed across multiple sites.
The following figure illustrates network port connectivity between SupportAssist Enterprise and other monitored devices.
Getting started with SupportAssist Enterprise 19

Figure 1. Managed devices
• 1 — Network ports required for discovering devices and collecting system information• 2 — Network ports required for uploading the collected system information (collection)• 3 — Network ports required for adapters• 4 — Network ports on devices for collecting system information
The following table lists the network ports required for discovering devices and collecting system information.
Table 5. Network ports required for discovering devices and collecting system information
Device Protocol for discovery and collection Port
Server - Windows WMI 135
Server - Linux SSH 22
iDRAC WSMan and REST 443
20 Getting started with SupportAssist Enterprise
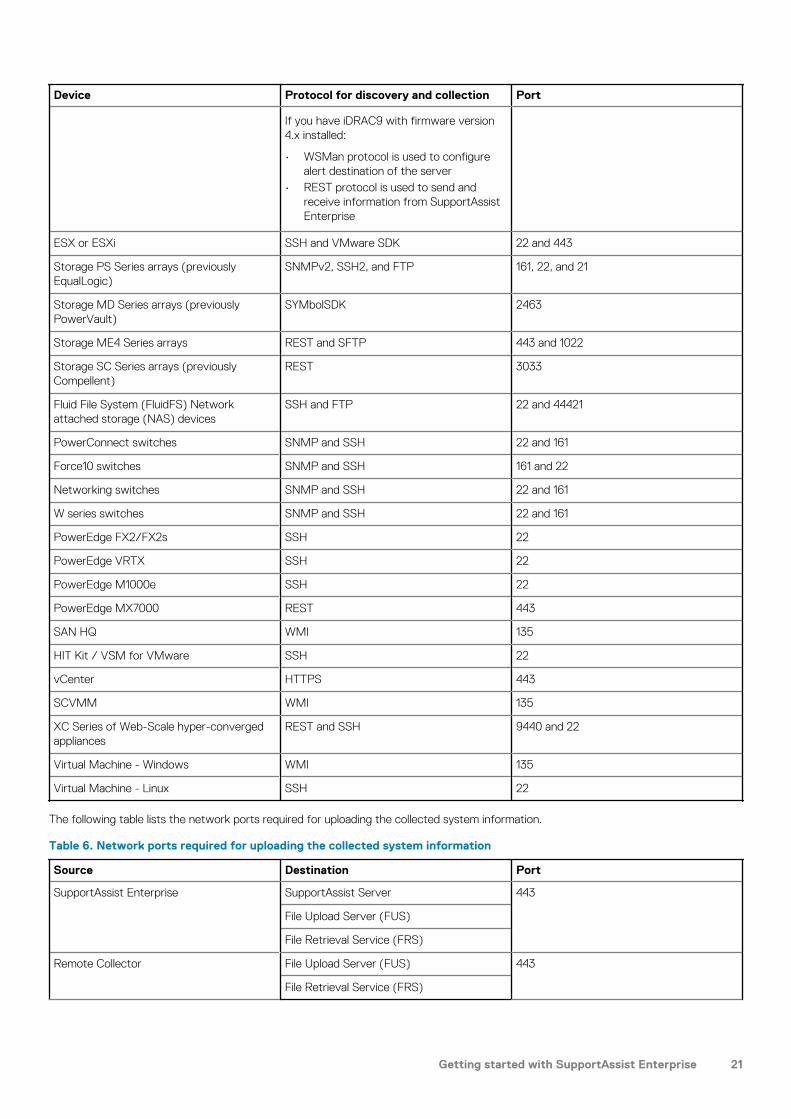
Device Protocol for discovery and collection Port
If you have iDRAC9 with firmware version4.x installed:
• WSMan protocol is used to configurealert destination of the server
• REST protocol is used to send andreceive information from SupportAssistEnterprise
ESX or ESXi SSH and VMware SDK 22 and 443
Storage PS Series arrays (previouslyEqualLogic)
SNMPv2, SSH2, and FTP 161, 22, and 21
Storage MD Series arrays (previouslyPowerVault)
SYMbolSDK 2463
Storage ME4 Series arrays REST and SFTP 443 and 1022
Storage SC Series arrays (previouslyCompellent)
REST 3033
Fluid File System (FluidFS) Networkattached storage (NAS) devices
SSH and FTP 22 and 44421
PowerConnect switches SNMP and SSH 22 and 161
Force10 switches SNMP and SSH 161 and 22
Networking switches SNMP and SSH 22 and 161
W series switches SNMP and SSH 22 and 161
PowerEdge FX2/FX2s SSH 22
PowerEdge VRTX SSH 22
PowerEdge M1000e SSH 22
PowerEdge MX7000 REST 443
SAN HQ WMI 135
HIT Kit / VSM for VMware SSH 22
vCenter HTTPS 443
SCVMM WMI 135
XC Series of Web-Scale hyper-convergedappliances
REST and SSH 9440 and 22
Virtual Machine - Windows WMI 135
Virtual Machine - Linux SSH 22
The following table lists the network ports required for uploading the collected system information.
Table 6. Network ports required for uploading the collected system information
Source Destination Port
SupportAssist Enterprise SupportAssist Server 443
File Upload Server (FUS)
File Retrieval Service (FRS)
Remote Collector File Upload Server (FUS) 443
File Retrieval Service (FRS)
Getting started with SupportAssist Enterprise 21

The following table lists the network ports required for adapters.
Table 7. Network ports required for adapters
Source Destination Port
SupportAssist Enterprise OpenManage Essentials adapter 5700 (web socket)
OpenManage Essentials adapter OpenManage Essentials 443
SupportAssist Enterprise System Center Operations Manageradapter
5700 (web socket)
System Center Operations Manageradapter
System Center Operations Manager Not applicable (SCOM SDK)
SupportAssist Enterprise OpenManage Enterprise 443
The following table lists the network ports required for collecting system information.
Table 8. Network ports on devices for collecting system information
Source Destination Port
Storage SC Series arrays (previouslyCompellent)
SupportAssist Enterprise 5701, 5702, 5703, and 5704
Server SupportAssist agent SupportAssist Enterprise 5701, 5702, 5703, and 5704
Server (In band) SupportAssist Enterprise 5701, 5702, 5703, and 5704
Installing SupportAssist EnterpriseAbout this task
You can install SupportAssist Enterprise by using either the SupportAssist Enterprise installer package or the OpenManage Essentialsinstaller package. The following sections provide the instructions to install SupportAssist Enterprise on Windows or Linux operatingsystems.
NOTE: For SupportAssist Enterprise installation on Linux operating systems only: When installed on a Linux operating
system, servers running a Windows operating system can only be added in SupportAssist Enterprise with the device
type as iDRAC. For instructions to add an iDRAC, see Adding an iDRAC.
Operating system considerations for installingSupportAssist EnterpriseThe features available in SupportAssist Enterprise vary based on the operating system where SupportAssist Enterprise is installed. Thecomplete features of SupportAssist Enterprise are available only when SupportAssist Enterprise is installed on a Windows operatingsystem. The following table provides a comparison of the available features when SupportAssist Enterprise is installed on a Windows orLinux operating system.
Table 9. Features available based on the operating system where SupportAssist Enterprise is installed
Feature Windows Linux
Maximum device support Up to 18,000 devices Up to 18,000 devices
Adding devices Adding all device types is supported Adding all device types is supported, exceptfor:
• Servers running Windows• SCVMM• SAN HQ
Installing or upgrading OMSA on a remoteserver through SupportAssist Enterprise
Supported on Windows and Linux operatingsystems
Supported on Linux operating systems only
22 Getting started with SupportAssist Enterprise

Feature Windows Linux
Set up Remote Collectors to enable aremote device to collect and upload systeminformation to Dell EMC
Supported Supported
Set up adapters to inventory and adddevices that are managed by OpenManageEssentials, Microsoft System CenterOperations Manager, or OpenManageEnterprise
Supported Supported (For OpenManage Enterpriseonly)
NOTE: For more information about setting up adapters and Remote Collectors, see Using Extensions.
Installing SupportAssist Enterprise by using theSupportAssist Enterprise installer package
Install SupportAssist Enterprise on Windows
Prerequisites
• Download the SupportAssist Enterprise installation package for Windows operating systems. See Downloading the SupportAssistEnterprise installation package.
• Log in to the system with Administrator privileges.• The system must meet the requirements for installing SupportAssist Enterprise. See Minimum requirements for installing and using
SupportAssist Enterprise.
Steps
1. Right-click the SupportAssist Enterprise installer package and then click Run as administrator.
NOTE: Microsoft User Access Control (UAC) requires that the installation is performed with elevated privileges that
are obtained only through the Run as administrator option. If you are logged in to the system as an administrator,
double-click the installer package to install SupportAssist Enterprise. However, ensure that you acknowledge the
Open File - Security Warning dialog box to proceed.
The Preparing to Install page is displayed briefly, and then the Welcome to SupportAssist Enterprise Installer page is displayed.
2. Click Next.The License Agreement page is displayed.
NOTE: Installing and using SupportAssist Enterprise requires that you allow Dell EMC to save certain Personally
Identifiable Information (PII) such as your contact information, device credentials, and so on. SupportAssist
Enterprise installation cannot proceed unless you agree to allow Dell EMC to save your PII.
3. Read about the information that SupportAssist Enterprise collects from monitored devices, and select I Agree.
4. Read the Dell End User License Agreement, select I Agree, and then click Next.The Destination Folder page is displayed.
5. The default installation folder for SupportAssist Enterprise is <Drive where SupportAssist Enterprise isinstalled>:\Program Files\Dell\SupportAssist. If you want to install SupportAssist Enterprise on any other location,click Browse and select a folder.
6. Click Install.If the default SupportAssist Enterprise ports (9099 and 2424) are already in use, the Port Settings page is displayed. Else, theInstalling SupportAssist Enterprise page is displayed briefly, and then the Installation Completed page is displayed.
NOTE: In Windows Server 2016, the User Account Control dialog box may be displayed more than once while the
installation is in progress.
7. If the Port Settings page is displayed, perform one of the following:
• Ensure that no other application is configured to use ports 9099 and 2424.• Enter custom port numbers.
NOTE: Ensure that you enter a valid port number which is not in use and within the range 1025 to 65535.
Getting started with SupportAssist Enterprise 23

8. Click Finish to exit the SupportAssist Enterprise installer.The SupportAssist Enterprise login page opens in a web browser window.
Figure 2. Login page
NOTE: If the initialization of the Dell SupportAssist Service takes longer than expected, an error message is
displayed. If this issue occurs, close the web browser and try accessing SupportAssist Enterprise later. For
instructions to access SupportAssist Enterprise, see Opening the SupportAssist Enterprise user interface.
NOTE: If the system is a member of a domain, you must enter the login user name in the [Domain\Username] format.
For example, MyDomain\MyUsername. You can also use a period [ . ] to indicate the local domain. For
example, .\Administrator.
9. Enter the Microsoft Windows operating system user name and password, and then click Login.The SupportAssist Enterprise Registration Wizard is displayed.
NOTE: The server or virtual machine where you have installed SupportAssist Enterprise is automatically added as a
device.
Next steps
(Optional) Follow the instructions in the SupportAssist Enterprise Registration Wizard to complete the registration of SupportAssistEnterprise.
CAUTION: Completing the registration is a prerequisite to receive the full benefits of SupportAssist Enterprise. Without
registration, you can only use SupportAssist Enterprise to manually start the collection of system information from your
devices. Until registration is completed, SupportAssist Enterprise can neither monitor your devices for hardware issues
nor automatically collect system information.
Install SupportAssist Enterprise on Windows Server Core
Prerequisites
• You must be logged in to a system that has PowerShell ISE version 5.1 or later.• You must be logged in to the system with Administrator Privileges.• You must have the SupportAssist Enterprise installation package for Windows.
About this task
You can install SupportAssist Enterprise by remotely accessing the system running Windows Server Core.
Steps
1. Open the PowerShell ISE window.
2. Type get-service winrm and press Enter.
3. Type Enable-PSRemoting –force and press Enter.
4. Type set-item wsman:\localhost\Client\TrustedHosts -value "<Windows Server Core OperatingSystem IP address>" -Force and press Enter.Example: set-item wsman:\localhost\Client\TrustedHosts -value "10.49.18.20" -Force
5. Type $TargetSession = New-PSSession -ComputerName "<Windows Server Core Operating System IPaddress>" -Credential ~\<Username> and press Enter.
24 Getting started with SupportAssist Enterprise

Example: $TargetSession = New-PSSession -ComputerName "10.49.18.20" -Credential ~\Administrator
6. Type Enter-PSSession -ComputerName <HostName/IP address of the Windows Server Core device> -Credential ~\<Username of Windows Server Core machine> and press Enter.Example: Enter-PSSession -ComputerName "10.49.18.20" -Credential ~\Administrator
7. Type the password and press Enter.
8. Create a folder.
9. Type Exit and press Enter to end the remote connection.
10. To copy the installer file to Windows Server Core, type Copy-Item -ToSession $TargetSession -Path "<Locationwhere the SupportAssist Enterprise installer is available>" -Destination "<Destination Path>"-Recurse and press Enter.Example: Copy-Item -ToSession $TargetSession -Path "C:\Installer\SupportAssistEnterprise_2.0.10.exe" -Destination "C:\Users\Administrator\Documents\SupportAssistEnterprise_2.0.10.exe" -Recurse
11. To enable remote login, type set-ItemProperty -Path 'HKLM: \System\CurrentControlSet\Control\TerminalServer\WinStations\RDP-Tcp' -name "UserAuthentication" -Value 1 and press Enter.
12. Open a remote desktop connection to the system running Windows Server Core and run the SupportAssist Enterprise installer.exe file.
Install SupportAssist Enterprise on Linux
Prerequisites
• Download the SupportAssist Enterprise installation package for Linux operating systems. See Downloading the SupportAssistEnterprise installation package.
• Log in to the system with root privileges.• Net-SNMP must be installed on the system. For information on installing Net-SNMP, see Installing Net-SNMP (Linux only).
NOTE: If you choose to install Net-SNMP after installing SupportAssist Enterprise, ensure that you run the script
file, snmptrapdServiceConfiguration.sh, after installing Net-SNMP. The script file will be available at /opt/dell/supportassist/scripts after the installation of SupportAssist Enterprise is completed.
• The system must meet the requirements for installing SupportAssist Enterprise. See Minimum requirements for installing and usingSupportAssist Enterprise.
• If you are using a Linux terminal emulator such as PuTTY to remotely install SupportAssist Enterprise, ensure that you are using PuTTYversion 0.63 or later.
• On Debian operating systems, ensure that en_US.utf.8 locale package is installed.
• If locales are not installed, use the apt-get install locales command to install the locales.
• If any other locale is installed, you can install the en_US.utf.8 locale by using the dpkg-reconfigure locales command.
Steps
1. Open the terminal window on the system running the Linux operating system.
2. Browse to the folder where the SupportAssist Enterprise installation package is available.
3. Perform one of the following:
• Type chmod 744 supportassistenterprise_2.x.x.bin and press Enter.
• Type chmod +x supportassistenterprise_2.x.x.bin and press Enter.
4. Type ./supportassistenterprise_2.x.x.bin and press Enter.The Welcome to the SupportAssist Enterprise Installer message is displayed.
5. To continue, type c.The SupportAssist Enterprise License Agreement is displayed.
6. Read the license agreement and type y to start the installation.If the default SupportAssist Enterprise ports (9099 and 2424) are already in use, you are prompted to ensure that the ports are not inuse or to enter custom port numbers. Else, the SupportAssist Enterprise login page opens in a web browser window.
Getting started with SupportAssist Enterprise 25

Figure 3. Login page
NOTE: Installing and using SupportAssist Enterprise requires that you allow Dell EMC to save certain Personally
Identifiable Information (PII) such as your contact information, device credentials, and so on. SupportAssist
Enterprise installation cannot proceed unless you agree to allow Dell EMC to save your PII.
NOTE: If you are using a Linux terminal emulator such as PuTTY to remotely install SupportAssist Enterprise, the
SupportAssist Enterprise login page is not displayed. In such a scenario, you must access the SupportAssist
Enterprise login page by using one of the following methods:
• Log in to a remote system and access the following web address by using a web browser:
https://<IP address or host name of the server where SupportAssist Enterprise isinstalled>:5700/SupportAssist
You can access SupportAssist Enterprise from a remote system only if port 5700 is open on the network.
• Log in to the local system and access the following web address by using a web browser:
http://localhost:9099/SupportAssist
If you entered a custom port number, you must replace 9099 with the custom port number in the web address.
NOTE: On certain Linux operating systems, the SupportAssist Enterprise services may not start automatically after
the installation is complete. To resolve the issue, edit the /etc/hosts file to include the localhost entries. For
example, 127.0.0.1 localhost.
7. If you are prompted that the default SupportAssist Enterprise ports are in use, perform one of the following and then press y.
• Ensure that no other application is configured to use ports 9099 and 2424.• Enter custom port numbers.
NOTE: Ensure that you enter a valid port number which is not in use and within the range 1025 to 65535.
8. Type the user name and password of a user with root privileges on the system where SupportAssist Enterprise is installed, and thenclick Login.The SupportAssist Enterprise Registration Wizard is displayed.
Next steps
(Optional) Follow the instructions in the SupportAssist Enterprise Registration Wizard to complete the registration of SupportAssistEnterprise.
CAUTION: Completing the registration is a prerequisite to receive the full benefits of SupportAssist Enterprise. Without
registration, you can only use SupportAssist Enterprise to manually start the collection of system information from your
devices. Until registration is completed, SupportAssist Enterprise can neither monitor your devices for hardware issues
nor automatically collect system information.
Install SupportAssist Enterprise on Linux in silent mode
Prerequisites
• Download the SupportAssist Enterprise installation package for Linux operating systems.• Log in to the system with root privileges.
26 Getting started with SupportAssist Enterprise

• Net-SNMP must be installed on the system. For information on installing Net-SNMP, see Install Net-SNMP (Linux only).NOTE: If you choose to install Net-SNMP after installing SupportAssist Enterprise, ensure that you run the script
file, snmptrapdServiceConfiguration.sh, after installing Net-SNMP. The script file will be available at /opt/dell/supportassist/scripts after the installation of SupportAssist Enterprise is completed.
• The system must meet the requirements for installing SupportAssist Enterprise. See Minimum requirements for installing and usingSupportAssist Enterprise.
• On Debian operating systems, ensure that en_US.utf.8 locale package is installed.
• If locales are not installed, use the apt-get install locales command to install the locales.
• If any other locale is installed, you can install the en_US.utf.8 locale by using the dpkg-reconfigure locales command.
Steps
1. Open the terminal window on the system running the Linux operating system.
2. Browse to the folder where the SupportAssist Enterprise installation package is available.
3. Perform one of the following:
• Type chmod 744 supportassistenterprise_2.x.x.bin and press Enter.
• Type chmod +x supportassistenterprise_2.x.x.bin and press Enter.
4. Type ./supportassistenterprise_2.x.x.bin silent and press Enter.
Next steps
(Optional) Follow the instructions in the SupportAssist Enterprise Registration Wizard to complete the registration of SupportAssistEnterprise.
CAUTION: Completing the registration is a prerequisite to receive the full benefits of SupportAssist Enterprise. Without
registration, you can only use SupportAssist Enterprise to manually start the collection of system information from your
devices. Until registration is completed, SupportAssist Enterprise can neither monitor your devices for hardware issues
nor automatically collect system information.
Install SupportAssist Enterprise by using the OpenManageEssentials installation package
Prerequisites
• The system must have internet connectivity.• You must have Administrator rights on the system.• Port 443 must be open on the firewall to access:
• https://apidp.dell.com• https://api.dell.com/• https://is.us.dell.com/*• https://downloads.dell.com/• https://sa-is.us.dell.com/*
NOTE: If the installation of SupportAssist Enterprise is unsuccessful, perform one of the following:
• Retry the installation. To retry the installation, right-click the SupportAssistSetup.exe file available at <System
drive>:\Program Files\Dell\SysMgt\Essentials\SupportAssistSetup on the OpenManage Essentials custom
installation folder, and select Run as administrator.
• Download the SupportAssist Enterprise installation package and install it on the server running OpenManage
Essentials on any other server.
Steps
1. Extract the OpenManage Essentials installation package to a folder on the system.
2. In the folder where you extracted the installation package, double-click the Autorun.exe file.The Dell EMC OpenManage Install window is displayed.
Getting started with SupportAssist Enterprise 27

3. If OpenManage Essentials version 2.5 or later is not installed on the system, make sure that Dell EMC OpenManage Essentials isselected.
4. Select Dell EMC SupportAssist Enterprise, and then click Install.If you selected Dell EMC OpenManage Essentials and Dell EMC SupportAssist Enterprise, installation of OpenManageEssentials is completed and then SupportAssist Enterprise is installed. The system prerequisites for installing SupportAssist Enterpriseare verified. If the system prerequisites are met, the Welcome to Dell EMC SupportAssist Enterprise Installer window isdisplayed.
5. Click Next.The License Agreement window is displayed.
6. Read the terms in the communication requirements and click I Agree.
NOTE: SupportAssist Enterprise installation requires that you allow Dell EMC to save certain Personally Identifiable
Information (PII) such as your contact information, administrator credentials of the devices to be monitored, and so
on. SupportAssist Enterprise installation cannot proceed unless you allow Dell EMC to save your PII.
7. Read the software license agreement, click I Agree, and then click Next.The Installing SupportAssist Enterprise window is displayed briefly, and then the Installation Completed window is displayed.
8. Click Finish.
Next steps
(Optional) Follow the instructions in the SupportAssist Enterprise Registration Wizard to complete the registration of SupportAssistEnterprise.
CAUTION: Completing the registration is a prerequisite to receive the full benefits of SupportAssist Enterprise. Without
registration, you can only use SupportAssist Enterprise to manually start the collection of system information from your
devices. Until registration is completed, SupportAssist Enterprise can neither monitor your devices for hardware issues
nor automatically collect system information.
Upgrading SupportAssist EnterpriseIf you are using SupportAssist Enterprise version 2.0.21 or 2.0.30 and enabled auto-update, the SupportAssist Enterprise version 2.0.40 isautomatically installed and an appropriate message is displayed. But, if you are using SupportAssist Enterprise version greater than or equalto 1.2 but less than 2.0.21, you must upgrade to SupportAssist Enterprise version 2.0.30 and then upgrade to the 2.0.40 version.
You can also upgrade to the 2.0.40 version by using the SupportAssist Enterprise version 2.0.40 installation package available atwww.dell.com/supportassist.
NOTE: Before you upgrade SupportAssist Enterprise, ensure that SupportAssist Enterprise is not open in any web
browser window.
Upgrade SupportAssist Enterprise by using theSupportAssist Enterprise installation package
Prerequisites
The system must have internet connectivity.
Steps
1. Right-click the SupportAssist Enterprise installer package, and select Run as administrator.
NOTE: UAC requires that the installation is performed with elevated privileges that are obtained only through the
Run as administrator option. If you are logged on to the system as an administrator, double-click the installer
package to install SupportAssist Enterprise. However, ensure that you click Run on the Open File - Security Warning
dialog box to proceed.
The Dell SupportAssist Enterprise - InstallShield Wizard window is displayed.
2. At the This setup will perform an upgrade of 'Dell SupportAssist Enterprise'. Do you want to continue? prompt, click Yes.The Preparing to Install window is briefly displayed, and then the Resuming the Install Wizard for SupportAssist Enterprise window isdisplayed.
28 Getting started with SupportAssist Enterprise
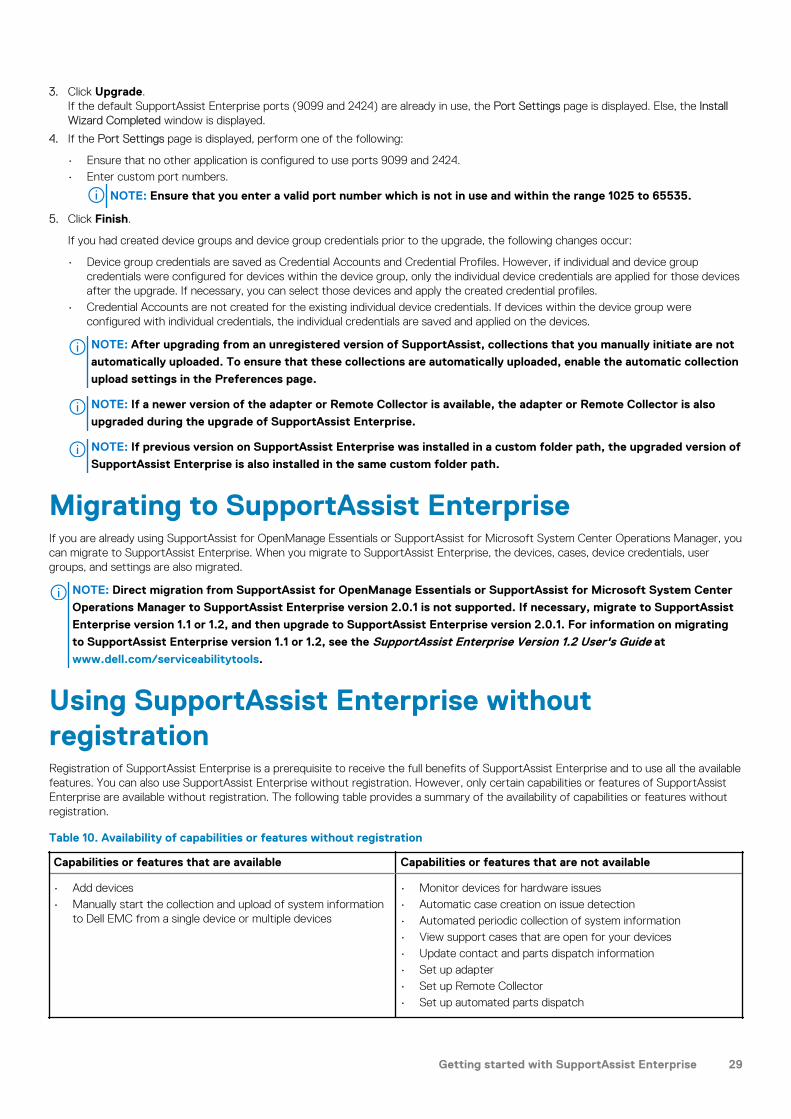
3. Click Upgrade.If the default SupportAssist Enterprise ports (9099 and 2424) are already in use, the Port Settings page is displayed. Else, the InstallWizard Completed window is displayed.
4. If the Port Settings page is displayed, perform one of the following:
• Ensure that no other application is configured to use ports 9099 and 2424.• Enter custom port numbers.
NOTE: Ensure that you enter a valid port number which is not in use and within the range 1025 to 65535.
5. Click Finish.
If you had created device groups and device group credentials prior to the upgrade, the following changes occur:
• Device group credentials are saved as Credential Accounts and Credential Profiles. However, if individual and device groupcredentials were configured for devices within the device group, only the individual device credentials are applied for those devicesafter the upgrade. If necessary, you can select those devices and apply the created credential profiles.
• Credential Accounts are not created for the existing individual device credentials. If devices within the device group wereconfigured with individual credentials, the individual credentials are saved and applied on the devices.
NOTE: After upgrading from an unregistered version of SupportAssist, collections that you manually initiate are not
automatically uploaded. To ensure that these collections are automatically uploaded, enable the automatic collection
upload settings in the Preferences page.
NOTE: If a newer version of the adapter or Remote Collector is available, the adapter or Remote Collector is also
upgraded during the upgrade of SupportAssist Enterprise.
NOTE: If previous version on SupportAssist Enterprise was installed in a custom folder path, the upgraded version of
SupportAssist Enterprise is also installed in the same custom folder path.
Migrating to SupportAssist EnterpriseIf you are already using SupportAssist for OpenManage Essentials or SupportAssist for Microsoft System Center Operations Manager, youcan migrate to SupportAssist Enterprise. When you migrate to SupportAssist Enterprise, the devices, cases, device credentials, usergroups, and settings are also migrated.
NOTE: Direct migration from SupportAssist for OpenManage Essentials or SupportAssist for Microsoft System Center
Operations Manager to SupportAssist Enterprise version 2.0.1 is not supported. If necessary, migrate to SupportAssist
Enterprise version 1.1 or 1.2, and then upgrade to SupportAssist Enterprise version 2.0.1. For information on migrating
to SupportAssist Enterprise version 1.1 or 1.2, see the SupportAssist Enterprise Version 1.2 User's Guide at
www.dell.com/serviceabilitytools.
Using SupportAssist Enterprise withoutregistrationRegistration of SupportAssist Enterprise is a prerequisite to receive the full benefits of SupportAssist Enterprise and to use all the availablefeatures. You can also use SupportAssist Enterprise without registration. However, only certain capabilities or features of SupportAssistEnterprise are available without registration. The following table provides a summary of the availability of capabilities or features withoutregistration.
Table 10. Availability of capabilities or features without registration
Capabilities or features that are available Capabilities or features that are not available
• Add devices• Manually start the collection and upload of system information
to Dell EMC from a single device or multiple devices
• Monitor devices for hardware issues• Automatic case creation on issue detection• Automated periodic collection of system information• View support cases that are open for your devices• Update contact and parts dispatch information• Set up adapter• Set up Remote Collector• Set up automated parts dispatch
Getting started with SupportAssist Enterprise 29

NOTE: Registration of SupportAssist Enterprise is optional. However, it is recommended that you complete the
registration to receive the full benefits of the automated support capabilities of SupportAssist Enterprise.
Register SupportAssist EnterprisePrerequisites
• If the server where you have installed SupportAssist Enterprise connects to the internet through a proxy server, ensure that you havethe details of the proxy server.
• Ensure that you have the details of the contact you want to assign as your company’s primary contact for SupportAssist Enterprise.
About this task
CAUTION: Completing the registration is a prerequisite to receive the full benefits of SupportAssist Enterprise. Without
registration, you can only use SupportAssist Enterprise to manually start the collection of system information from your
devices. Until registration is completed, SupportAssist Enterprise cannot monitor your devices for hardware issues or
automatically collect system information.
The SupportAssist Enterprise Registration Wizard guides you through configuring the proxy server settings (if applicable) andcompleting the registration. The registration wizard is displayed when you log in to SupportAssist Enterprise for the first time. If you do notcomplete the registration or skip the registration, the SupportAssist Enterprise is not registered banner is displayed at the top of thepage. You can click the Register now link to open the registration wizard and complete the registration.
NOTE: You can also click Register in the About page or on the add devices wizard to open the SupportAssist Enterprise
Registration Wizard.
NOTE: In Internet Explorer, if the Internet Explorer Enhanced Security Configuration feature is enabled, the
SupportAssist Enterprise Registration Wizard is not displayed.
Steps
1. On the Welcome page, click Next.SupportAssist Enterprise verifies connectivity to the Internet by trying to connect to http://www.dell.com, which then getsredirected to https://www.dell.com.
• If SupportAssist Enterprise can connect to the Internet, the Registration page is displayed.• If SupportAssist Enterprise is unable to connect to the Internet, a message prompts you to confirm if the system connects to the
Internet through a proxy server. If you click Yes, the Proxy Settings page is displayed.
If the system connects to the Internet directly, but the Internet connectivity issue persists, contact your network administrator forassistance.
2. If the Proxy Settings page is displayed:
a) In the Address field, type the IP address or hostname of the proxy server.b) In the Port field, type the port number of the proxy server.c) If a user name and password is required to connect to the proxy server, select Requires authentication, and type the user name
and password in the appropriate fields.d) Click Next.
SupportAssist Enterprise verifies connectivity to the Internet through the proxy server. If the connection is successful, theRegistration page is displayed. Else, an error message is displayed. If the proxy server connectivity issue persists, contact yournetwork administrator for assistance.
30 Getting started with SupportAssist Enterprise

Figure 4. Registration page
3. On the Registration page, provide the following information:
a) In the Company Information section, type the company name, and select your country or territory, in the appropriate fields.b) In the IT Administrator Contact Information section, type your first name, last name, phone number, alternate phone number,
and email address in the appropriate fields.c) From the Time zone list, select the time zone.
NOTE: Ensure that you use an English keyboard layout to type data in the Phone number, Alternate phone number,
and Email address fields. If a native keyboard layout or non-English language is used to type data in these fields, an
error message is displayed.
NOTE: After registering SupportAssist Enterprise, you can update the primary contact information and also provide
a secondary contact information. If the primary contact is unavailable, Dell EMC contacts your company through the
secondary contact. If both the primary and secondary contacts are configured with valid email addresses, both
receive SupportAssist Enterprise emails. For information about updating the contact information, see View and
update the contact information.
4. Click Next.The Parts Replacement Preferences for Dell Servers page is displayed.
By default, the I want Dell server replacement parts shipped automatically is selected. If you clear the option, the shipment ofthe server replacement parts could be delayed.
5. To copy the already provided contact information, click the appropriate link.The Primary Shipping Contact information is populated.
6. In the Secondary Shipping Contact section, type the first name, last name, phone number, and email address of the secondarycontact.
NOTE: Contact details of the primary and secondary contact must be unique.
7. In the Shipping Address section, perform the following:
a) Select the preferred contact hours during which Dell EMC can contact you, if necessary.b) Select the time zone, country, and type your shipping address in the appropriate fields.c) Type any specific dispatch related information in the Dispatch Notes section.
NOTE: If a device is moved to a different location, ensure that the dispatch preferences and shipping information
are updated.
d) If you want an onsite technician to replace the dispatched hardware component, select I want a technician to replace my partsonsite (if included in my service plan).
8. Click Next.The Integrate With TechDirect (Optional) page is displayed.
Getting started with SupportAssist Enterprise 31

9. Select I agree to integrate SupportAssist Enterprise with TechDirect, and perform the following:
a) Click Sign In to log in to your company's TechDirect Administrator account to get the One-Time Password (OTP).b) Enter the OTP to verify your TechDirect account.
10. Click Submit.SupportAssist Enterprise connects to Dell EMC and completes the registration. If the registration is successful, the Summary page isdisplayed. Else, an error message is displayed. If the registration issue persists, contact your network administrator for assistance.
11. Click Finish.
Results
The SupportAssist Enterprise Site Health page is displayed.
Next steps
• To enable SupportAssist Enterprise to automatically create a support case when a hardware issue occurs on the local system:
1. Install or upgrade OpenManage Server Administrator (OMSA) on the local system. See Install or upgrade OMSA by usingSupportAssist Enterprise.
2. Configure the SNMP settings of the local system. See Configure SNMP settings by using SupportAssist Enterprise.3. Enable SupportAssist Enterprise to monitor hardware issues that may occur on the local system. See Enable or disable monitoring
of a device.• If you have installed SupportAssist Enterprise on a server running a Linux operating system that has Security Enhanced Linux
(SELinux) enabled, set up the server to receive alerts from remote devices. For more information, see Set up an SELinux enabledsystem to receive alerts.
• Add devices in SupportAssist Enterprise. For more information, see Adding devices.• (Optional) If your company uses an SMTP server (email server), configure the SMTP server settings in SupportAssist Enterprise. This
enables SupportAssist Enterprise to use the SMTP server to send you device status and connectivity status email notifications. Formore information, see Configure the SMTP server settings.
• (Optional) Update the contact details of the primary and secondary SupportAssist Enterprise contacts and provide a parts dispatchaddress. See View and update the contact information.
• (Optional) If you want to manage a set of devices as a group, create one or more device groups based on your preference. See Devicegrouping.
Related tasks
View and update parts dispatch information
Open the SupportAssist Enterprise user interface
Set up an SELinux enabled system to receive alertsAbout this task
Security-Enhanced Linux (SELinux) is a security module that authorizes or prevents operations in Linux operating systems. When SELinuxis enabled on the system running SupportAssist Enterprise, alerts (SNMP traps) from remote devices are not received by SupportAssistEnterprise. Without receiving alerts, SupportAssist Enterprise will not be able to identify hardware issues that may occur on remotedevices. Therefore, you must perform the following steps on the system running SupportAssist Enterprise to allow SupportAssistEnterprise to receive alerts from remote devices.
NOTE: SELinux is enabled by default in Red Hat Enterprise Linux 6 and 7, CentOS 6 and 7, SUSE Linux Enterprise Server
12, and Oracle Enterprise Linux 6 and 7.
Steps
1. Open the terminal window and create a policy file named supportassistpolicy.te.
2. Open the policy file (supportassistpolicy.te) and type the following:
module supportassistpolicy 1.0;
require { type websm_port_t; type snmpd_t; type root_t; class tcp_socket name_connect;
32 Getting started with SupportAssist Enterprise

class dir { write add_name }; class file { write getattr open create };}
#============= snmpd_t ============== allow snmpd_t websm_port_t:tcp_socket name_connect;allow snmpd_t root_t:dir write;allow snmpd_t root_t:dir add_name;allow snmpd_t root_t:file { write create open getattr };
3. Save the policy file.
4. Browse to the folder where you saved the policy file.
5. Type checkmodule -M -m -o supportassistpolicy.mod supportassistpolicy.te and press Enter.
6. Type semodule_package -o supportassistpolicy.pp -m supportassistpolicy.mod and press Enter.
7. Type semodule -i supportassistpolicy.pp and press Enter.
Open the SupportAssist Enterprise user interfaceSteps
You can open the SupportAssist Enterprise user interface by using one of the following methods:
• If you are logged in to the server where SupportAssist Enterprise is installed:
• Double-click the SupportAssist Enterprise desktop icon.• Open a web browser and type the address in the following format:
http://localhost:9099/SupportAssistNOTE: If you entered a custom port number during the installation of SupportAssist Enterprise, you must replace
9099 with the custom port number in the web address.
• To access SupportAssist Enterprise from a remote system, open a web browser and type the address in the following format:
https://<IP address or host name of the server where SupportAssist Enterprise isinstalled>:5700/SupportAssistFor example, https://10.25.35.1:5700/SupportAssist
NOTE: When typing the address, ensure that you type SupportAssist with the S and A in uppercase.
• If you are using Internet Explorer, the following message may be displayed: There is a problem with this website’s securitycertificate. To open SupportAssist Enterprise, click Continue to this website (not recommended).
• If you are using Mozilla Firefox, the following message may be displayed: This Connection is Untrusted. To open SupportAssistEnterprise, click I Understand the Risks, and then click Add Exception. In the Add Security Exception window, click ConfirmSecurity Exception.
The SupportAssist Enterprise login page is displayed in the web browser.NOTE: The recommended screen resolution for optimally viewing the SupportAssist Enterprise user interface is 1280 x
1024 or higher.
Log in to SupportAssist EnterprisePrerequisites
You must be logged in to SupportAssist Enterprise with elevated or administrative privileges. See Granting elevated or administrativeprivileges to users.
Steps
1. In the SupportAssist Enterprise login page, type the user name and password in the appropriate fields.
NOTE: If SupportAssist Enterprise is installed on a Linux operating system, you can also provide the user name and
password of a user account that is a member of the root or users user group. For information on the SupportAssist
Enterprise user groups, see SupportAssist Enterprise user groups.
Getting started with SupportAssist Enterprise 33

NOTE: If the server where SupportAssist Enterprise is installed is a member of a Windows domain, you must provide
the user name in the [Domain\Username] format. For example, MyDomain\MyUsername. You can also use a period
[ . ] to indicate the local domain. For example, .\Administrator.
2. Click Login.The SupportAssist Enterprise Site Health page is displayed.
NOTE: By default, after 14 minutes of inactivity, a Session Timeout message is displayed. If you want to continue the
session, click Renew. If no response is received within a minute, you will be logged out automatically.
Log out of SupportAssist EnterpriseSteps
1. Click the user name link that is displayed at the top-right of the SupportAssist Enterprise header area.
2. In the menu that is displayed, click Logout.The SupportAssist Enterprise login page is displayed.
34 Getting started with SupportAssist Enterprise
Adding devicesAdding devices prepares SupportAssist Enterprise to automate support from Dell EMC Technical Support for your devices. To useSupportAssist Enterprise to either monitor hardware issues or collect system information from your devices, you must add your devices inSupportAssist Enterprise.
After the installation of SupportAssist Enterprise, the local system (server or virtual machine where SupportAssist Enterprise is installed) isautomatically added in SupportAssist Enterprise. To receive the benefits of SupportAssist Enterprise for your other Dell EMC devices, youmust add each device in SupportAssist Enterprise.
NOTE: For the complete list of devices types and device models that you can add in SupportAssist Enterprise, see the
SupportAssist Enterprise Version 2.0.40 Support Matrix at www.dell.com/serviceabilitytools.
NOTE: By default, a SupportAssist component is available on yx4x PowerEdge servers. You can register the
SupportAssist component on the server to receive the automated support capabilities of SupportAssist. When an iDRAC
is added in SupportAssist Enterprise, the SupportAssist component is automatically disabled, but the automatic support
capabilities are available through SupportAssist Enterprise.
NOTE: Only IPv4 addresses are supported for adding devices and collecting system information.
NOTE: If the device is part of a domain, you must configure its Domain Name System (DNS) correctly to view the host
name in the Devices page.
Topics:
• Methods of adding devices• Device types and applicable devices• Add a server or hypervisor• Add an iDRAC• Add a chassis• Add a Networking device• Add a PowerVault storage array• Add an EqualLogic PS Series storage solution• Add a Compellent SC Series storage solution• Add a Fluid File System NAS device• Add a software• Add a solution• Add a virtual machine• Add a device by duplication
Methods of adding devicesYou can add devices in SupportAssist Enterprise by using one of the following methods:
• Add a single device — Add each device individually by entering details of the device• Create a device discovery rule — Add devices based on a specific IP address ranges. For more information on discovery rules, see
Managing device discovery rules.• Set up an adapter — Inventory and add devices that are managed by OpenManage Essentials, Microsoft System Operations Manager,
or OpenManage Enterprise Version 3.3.1. For more information on setting up an adapter, see Adapters.
Device types and applicable devicesWhile adding devices in SupportAssist Enterprise, you must select an appropriate device type. The following table lists the devices thatyou can add by selecting a specific device type.
3
Adding devices 35
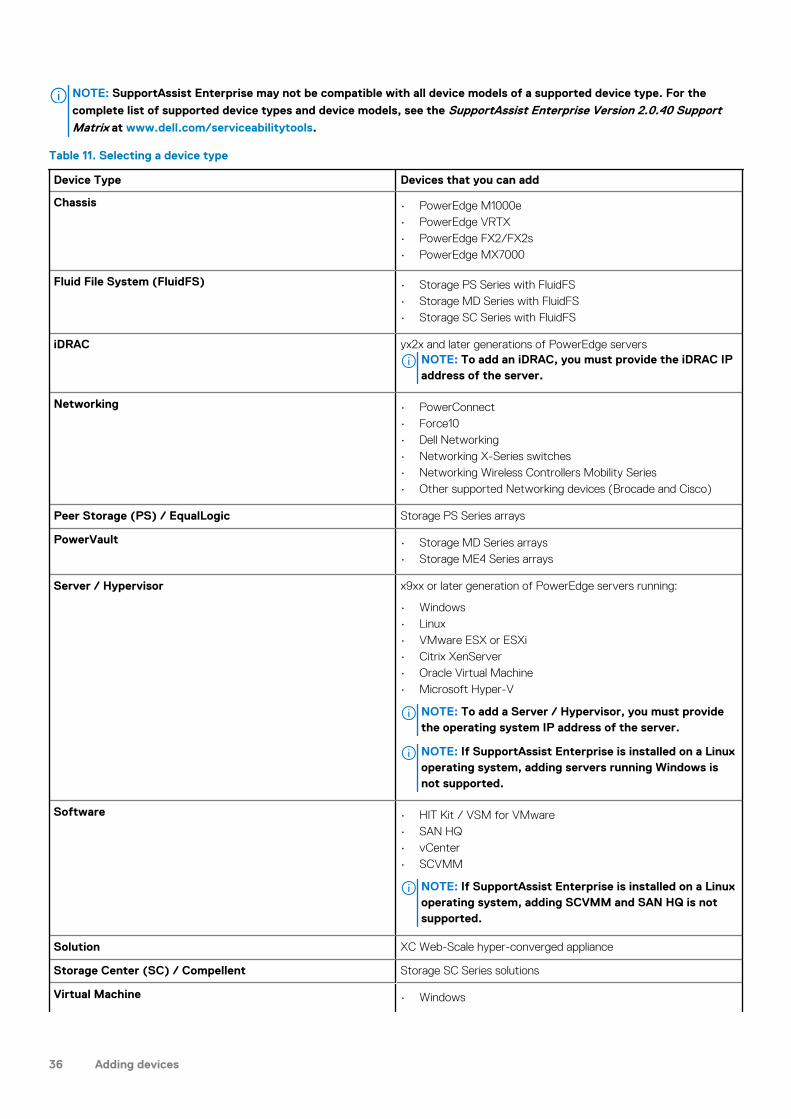
NOTE: SupportAssist Enterprise may not be compatible with all device models of a supported device type. For the
complete list of supported device types and device models, see the SupportAssist Enterprise Version 2.0.40 SupportMatrix at www.dell.com/serviceabilitytools.
Table 11. Selecting a device type
Device Type Devices that you can add
Chassis • PowerEdge M1000e• PowerEdge VRTX• PowerEdge FX2/FX2s• PowerEdge MX7000
Fluid File System (FluidFS) • Storage PS Series with FluidFS• Storage MD Series with FluidFS• Storage SC Series with FluidFS
iDRAC yx2x and later generations of PowerEdge serversNOTE: To add an iDRAC, you must provide the iDRAC IPaddress of the server.
Networking • PowerConnect• Force10• Dell Networking• Networking X-Series switches• Networking Wireless Controllers Mobility Series• Other supported Networking devices (Brocade and Cisco)
Peer Storage (PS) / EqualLogic Storage PS Series arrays
PowerVault • Storage MD Series arrays• Storage ME4 Series arrays
Server / Hypervisor x9xx or later generation of PowerEdge servers running:
• Windows• Linux• VMware ESX or ESXi• Citrix XenServer• Oracle Virtual Machine• Microsoft Hyper-V
NOTE: To add a Server / Hypervisor, you must providethe operating system IP address of the server.
NOTE: If SupportAssist Enterprise is installed on a Linuxoperating system, adding servers running Windows isnot supported.
Software • HIT Kit / VSM for VMware• SAN HQ• vCenter• SCVMM
NOTE: If SupportAssist Enterprise is installed on a Linuxoperating system, adding SCVMM and SAN HQ is notsupported.
Solution XC Web-Scale hyper-converged appliance
Storage Center (SC) / Compellent Storage SC Series solutions
Virtual Machine • Windows
36 Adding devices

Device Type Devices that you can add
• Linux
Add a server or hypervisorPrerequisites
• You must be logged in to SupportAssist Enterprise with elevated or administrative privileges. See Granting elevated or administrativeprivileges to users.
• The device must be reachable from the server where SupportAssist Enterprise is installed.• If the device is running a Microsoft Windows operating system, Windows Management Instrumentation (WMI) service must be
running on the device.• If the device is running a Linux operating system:
• Secure Shell (SSH) service must be running on the device.• SSH password authentication must be enabled (enabled by default).• Unzip package must be installed on the server where SupportAssist Enterprise is installed.
• If the device is running VMware ESXi, ESX, Oracle Virtual Machine, Citrix XenServer, or Microsoft Hyper-V:
• SSH service must be running on the device.• Ports 22 and 443 must be open on the device.• For collecting system information from ESX and ESXi only, ensure that SFCBD and CIMOM are enabled.
• Port 1311 must be open on the device for OMSA communication.• If the device connects to the internet through a proxy server, the following ports must be open on the proxy server firewall: 161, 22
(for adding devices running Linux), 135 (for adding devices running Windows), and 1311.• Review the requirements for installing OMSA on the device. For more information, see the “Installation Requirements” section in the
OpenManage Server Administrator Installation Guide at www.dell.com/openmanagemanuals.
About this task
SupportAssist Enterprise can monitor hardware issues and collect system information from Dell EMC servers. You can perform thefollowing steps to add a server running Windows or Linux, or a hypervisor. While adding the device, you can allow SupportAssist Enterpriseto automatically perform the following tasks that are required for monitoring hardware issues that may occur on the device:
• Install or upgrade OMSA — OMSA is required to generate alerts for hardware events that occur on the device and also to collectsystem information from the device.
• Configure SNMP — Configuration of SNMP settings is required to forward alerts from the device to SupportAssist Enterprise.
Steps
1. Point to Devices and click View Devices.The Devices page is displayed.
2. Click Add Devices.The Add Single Device wizard is displayed.
3. From the Select device type list, select Server / Hypervisor.
Adding devices 37

Figure 5. Add single device window
4. Type the host name or IP address of the device in the appropriate field.
NOTE: It is recommended that you enter the host name of the device. If the host name is not available, you can enter
the IP address of the device.
5. To discover and add other supported device types that may be associated with the server, select Perform deep discovery. SeeDeep discovery.
6. If desired, type a name for the device in the appropriate field.
The name that you enter is used to represent the device in SupportAssist Enterprise. If you do not enter a name, the IP address orhost name that you have entered is used to represent the device.
7. Perform one of the following:
• If you selected the Perform deep discovery option, select the credential profile that you want to assign to the device and itsassociated device types. To create a new credential profile, select Create New Profile and click Create. To enter the profiledetails, follow steps 3 to 7 in Create Credential Profile.
• If you did not select the Perform deep discovery option, select the Account Credentials that you want to assign to the device.To create new account credentials, select Create New Account and click Create. To enter the account details, follow steps 3 to6 in Add Account Credentials.
8. If you want SupportAssist Enterprise to monitor hardware issues that may occur on the device, select the Enable Monitoring,Configure SNMP Settings, and Install / Upgrade OMSA options.
NOTE: If the registration is completed, by default, the Enable Monitoring, Configure SNMP Settings, and Install /
Upgrade OMSA options are selected. If the registration is not completed, when you select the Enable Monitoring
option, you are requested to complete the registration. To continue, you can either clear the Enable Monitoring
option or click Register to open the registration wizard.
For SupportAssist Enterprise to monitor hardware issues that may occur on the device, the following dependencies must be met:
• The SNMP settings of the device must be configured to forward SNMP traps (alerts) to the server where SupportAssistEnterprise is installed.
• The recommended version of OpenManage Server Administrator (OMSA) must be installed on the device.
To help you meet these dependencies, SupportAssist Enterprise can configure SNMP trap (alert) forwarding and also install orupgrade OMSA automatically on the device. To allow SupportAssist Enterprise to automatically:
• Configure the device to forward alerts, ensure that the Configure SNMP Settings option is selected.• Install or upgrade OMSA on the device, ensure that the Install / Upgrade OMSA option is selected.
Tasks to configure alert forwarding and to install OMSA are initiated after the device is added successfully to the device inventory.NOTE: If you prefer to perform both tasks (configure alert forwarding and install or upgrade OMSA) manually, clear
the Configure SNMP Settings and Install / Upgrade OMSA options.
9. Click Next.The Discovering Device page is displayed until SupportAssist Enterprise identifies the device.
38 Adding devices

If the device is discovered successfully, the Assign Device Group (Optional) page is displayed. Otherwise, an appropriate errormessage is displayed.
10. If desired, from the Assign Other Group list, select a device group to which you want to assign the device.
If you do not select a device group, the device is assigned to the Default device group. For information on the Default device group,see Predefined device groups.
11. Click Finish.The device is added to the device inventory and the Summary page is displayed.
12. Click OK to close the Add Single Device wizard.
CAUTION: If the SNMP settings of the device is not configured and OMSA is not installed on the device,
SupportAssist Enterprise cannot monitor hardware issues that may occur on the device.
NOTE: Installation of OMSA is not supported on devices running CentOS, Oracle Virtual Machine, and Oracle
Enterprise Linux. When you add these devices with the Device Type as Server / Hypervisor, SupportAssist
Enterprise can only collect and upload system information. To allow SupportAssist Enterprise to monitor these
devices for hardware issues, add these devices by selecting the Device Type as iDRAC. For more information on
adding an iDRAC, see Add an iDRAC.
The device is added to the device inventory with an appropriate status:
• When SupportAssist Enterprise is configuring the SNMP settings, the device displays a Configuring SNMP status.
• When SupportAssist Enterprise is installing or upgrading OMSA, the device displays an Installing OMSA status.
After the installation of OMSA and configuration of SNMP settings are completed, the device status changes to Success. If anissue occurs during the configuration of SNMP or OMSA installation, the device displays an appropriate status in the Devices page.
NOTE: If the device displays an error status, click the error link to see a description of the issue and the
possible resolution steps. To retry the OMSA installation or SNMP configuration, you can use the Tasks list available
on the device overview pane.
Next steps
(Optional) You can also add the server in SupportAssist Enterprise by using the iDRAC details. In this scenario, SupportAssist Enterpriseautomatically correlates the alerts and collection of system information from both the operating system and the iDRAC. For instructions toadd an iDRAC, see Add an iDRAC. For more information on how SupportAssist Enterprise correlates device information, see Devicecorrelation.
If a message is displayed stating that the device is added to the Staging group:
1. Ensure that all prerequisites for adding the device are met.2. Perform inventory validation on the device. See Start inventory validation manually.
Related reference
Add Single Device
Deep discovery
Add an iDRACPrerequisites
• You must be logged in to SupportAssist Enterprise with elevated or administrative privileges. See Granting elevated or administrativeprivileges to users.
• The device must be a yx2x or later generation Dell PowerEdge server (iDRAC7 or later). For information about identifying thegeneration of a PowerEdge server, see Identifying the generation of a PowerEdge server.
• The device must be reachable from the server where SupportAssist Enterprise is installed.• If the device connects to the Internet through a proxy server, ports 161 and 443 must be open on the proxy server firewall.
Adding devices 39

• To add an iDRAC7 or iDRAC8, Enterprise or Express license must be installed on the iDRAC. To add an iDRAC9, Basic, Enterprise, orExpress license must be installed on the iDRAC. For information about purchasing and installing an Enterprise or Express license, seethe “Managing Licenses" section in the iDRAC User’s Guide at www.dell.com/idracmanuals.
About this task
SupportAssist Enterprise can monitor hardware issues and collect system information from the servers. You can perform the followingsteps to add Dell EMC's yx2x or later generation of PowerEdge servers. While adding the device, you can allow SupportAssist Enterpriseto automatically configure the SNMP settings of the device. Configuration of SNMP settings is required to forward alerts from the deviceto SupportAssist Enterprise.
NOTE: By default, a SupportAssist component is available on yx4x PowerEdge servers. You can register the
SupportAssist component on the server to receive the automated support capabilities of SupportAssist. When an iDRAC
is added in SupportAssist Enterprise, the SupportAssist component is automatically disabled, but the automatic support
capabilities are available through SupportAssist Enterprise.
Steps
1. Point to Devices and click View Devices.The Devices page is displayed.
2. Click Add Devices.The Add Single Device wizard is displayed.
3. From the Select device type list, select iDRAC.
4. Type the host name or IP address of the device in the appropriate field.
NOTE: It is recommended that you enter the host name of the device. If the host name is not available, you can enter
the IP address of the device.
5. If desired, type a name for the device in the appropriate field.
The name that you enter is used to represent the device in SupportAssist Enterprise. If you do not enter a name, the IP address orhost name that you have entered is used to represent the device.
6. From the Account Credentials list, select an account credential that you want to assign to the device. To create an accountcredentials, select Create New Account and click Create. To enter the account details, follow steps 3 to 6 in Add AccountCredentials.
7. If you want SupportAssist Enterprise to monitor hardware issues that may occur on the device, select the Enable Monitoring andConfigure SNMP Settings options.
NOTE: If the registration is completed, by default, the Enable Monitoring and Configure SNMP Settings options are
selected. If the registration is not completed, when you select the Enable Monitoring option, you are requested to
complete the registration. To continue, you can either clear the Enable Monitoring option or click Register to open
the registration wizard.
For SupportAssist Enterprise to monitor hardware issues that may occur on the device, the device must be configured to forwardSNMP traps (alerts) to the server where SupportAssist Enterprise is installed. To help you meet this requirement, SupportAssistEnterprise can configure SNMP trap (alert) forwarding automatically. To allow SupportAssist Enterprise to automatically configure thedevice to forward alerts, ensure that the Configure SNMP Settings option is selected. A task to configure alert forwarding isinitiated after the device is added successfully to the device inventory.
NOTE: If you prefer to configure alert forwarding manually, clear the Configure SNMP Settings option.
NOTE: You can configure the SNMP trap on iDRAC by using the SNMPv2 protocol only.
8. Click Next.The Discovering Device page is displayed until SupportAssist Enterprise identifies the device.
If the device is discovered successfully, the Assign Device Group (Optional) page is displayed. Otherwise, an appropriate errormessage is displayed.
9. If desired, from the Assign Other Group list, select a device group to which you want to assign the device.
If you do not select a device group, the device is assigned to the Default device group. For information on the Default device group,see Predefined device groups.
10. Click Finish.
NOTE: If you have selected the Configure SNMP Settings option, device addition may take some time.
The device is added to the device inventory, and the Summary page is displayed.
40 Adding devices

11. Click OK to close the Add Single Device wizard.
CAUTION: If the SNMP settings of the device are not configured to forward alerts to the server where
SupportAssist Enterprise is installed, SupportAssist Enterprise cannot monitor hardware issues that may occur on
the device.
The device is added to the device inventory with an appropriate status. When SupportAssist Enterprise is configuring the SNMP
settings, the device displays a Configuring SNMP status. After the configuration of SNMP settings is completed, the device
status changes to Success. If an issue occurs during the configuration of SNMP, the device displays an appropriate status in theDevices page.
NOTE: If the device displays an error status, click the error link to view the description of the issue and the
possible resolution steps. To retry the SNMP configuration, you can use the Tasks list available on the device
overview pane.
Next steps
(Optional) You can also add the server in SupportAssist Enterprise by using the operating system details. In this scenario, SupportAssistEnterprise automatically correlates the alerts and collection of system information from both the operating system and the iDRAC. Forinstructions to add the server, see Add a server or hypervisor. For more information about how SupportAssist Enterprise correlates deviceinformation, see Device correlation.
If a message is displayed stating that the device is added to the Staging group:
1. Ensure that all prerequisites for adding the device are met.2. Perform inventory validation on the device. See Start inventory validation manually.
Related reference
Add Single Device
Add a chassisPrerequisites
• You must be logged in to SupportAssist Enterprise with elevated or administrative privileges. See Granting elevated or administrativeprivileges to users.
• The device must be reachable from the server where SupportAssist Enterprise is installed.• Port 22, 161, and 443 must be open on the device.• Secure Shell (SSH) service must be running on the device.
About this task
SupportAssist Enterprise can monitor hardware issues and collect system information from chassis. The chassis that you can add inSupportAssist Enterprise are:
• PowerEdge FX2/FX2s• PowerEdge VRTX• PowerEdge M1000e• PowerEdge MX7000
Steps
1. Point to Devices and click View Devices.The Devices page is displayed.
2. Click Add Devices.The Add Single Device wizard is displayed.
3. From the Select device type list, select Chassis.
4. Type the host name or IP address of the device in the appropriate field.
Adding devices 41

NOTE: It is recommended that you enter the host name of the device. If the host name is not available, you can enter
the IP address of the device.
5. To discover and add other supported device types that may be associated with the chassis, select Perform deep discovery. SeeDeep discovery.
6. If desired, type a name for the device in the appropriate field.
The name that you enter is used to represent the device in SupportAssist Enterprise. If you do not enter a name, the IP address orhost name that you have entered is used to represent the device.
7. Perform one of the following:
• If you selected the Perform deep discovery option, select the credential profile that you want to assign to the device and itsassociated device types. To create a new credential profile, select Create New Profile and click Create. To enter the profiledetails, follow steps 3 to 7 in Create Credential Profile.
• If you did not select the Perform deep discovery option, select the Account Credentials that you want to assign to the device.To create new account credentials, select Create New Account and click Create. To enter the account details, follow steps 3 to6 in Add Account Credentials.
8. If you want SupportAssist Enterprise to monitor hardware issues that may occur on the device, select the Enable Monitoring option.
NOTE: If the registration is completed, by default, the Enable Monitoring option is selected. If the registration is not
completed, when you select the Enable Monitoring option, you are requested to complete the registration. To
continue, you can either clear the Enable Monitoring option or click Register to open the registration wizard.
NOTE: SupportAssist Enterprise can monitor hardware issues that may occur on the device only if the device is
configured to forward SNMP traps (alerts) to the server where SupportAssist Enterprise is installed. For
instructions to configure alert forwarding on a chassis, see Manually configure the alert destination of a chassis by
using the web interface.
9. Click Next.The Discovering Device page is displayed until SupportAssist Enterprise identifies the device.
If the device is discovered successfully, the Assign Device Group (Optional) page is displayed. Otherwise, an appropriate errormessage is displayed.
10. If desired, from the Assign Other Group list, select a device group to which you want to assign the device.
If you do not select a device group, the device is assigned to the Default device group. For information on the Default device group,see Predefined device groups.
11. Click Finish.The device is added to the device inventory and the Summary page is displayed.
12. Click OK to close the Add Single Device wizard.
Next steps
CAUTION: If the device is not configured to forward alerts, SupportAssist Enterprise cannot detect hardware issues
that may occur on the device.
For monitoring hardware issues that may occur on the device only — Ensure that the device is configured to forward SNMP traps (alerts)to the server where SupportAssist Enterprise is installed. For instructions to configure alert forwarding, see Manually configure the alertdestination of a chassis by using the web interface.
If a message is displayed stating that the device is added to the Staging group:
1. Ensure that all prerequisites for adding the device are met.2. Perform inventory validation on the device. See Start inventory validation manually.
Related reference
Add Single Device
Deep discovery
Add a Networking devicePrerequisites
• You must be logged in to SupportAssist Enterprise with elevated or administrative privileges. See Granting elevated or administrativeprivileges to users.
42 Adding devices

• The device must be reachable from the server where SupportAssist Enterprise is installed.• Port 22 and 161 must be open on the device.• Secure Shell (SSH) and SNMP services must be running on the device.
About this task
SupportAssist Enterprise can monitor hardware issues and collect system information from Dell EMC Networking devices. The networkingdevices that you can add in SupportAssist Enterprise are:
• PowerConnect switches• Force10 switches• Dell Networking switches• Networking X-Series switches• Networking Wireless Controllers Mobility Series
Steps
1. Point to Devices and click View Devices.The Devices page is displayed.
2. Click Add Devices.The Add Single Device wizard is displayed.
3. From the Select device type list, select Networking.
4. Type the host name or IP address of the device in the appropriate field.
NOTE: It is recommended that you enter the host name of the device. If the host name is not available, you can enter
the IP address of the device.
5. To discover and add other supported device types that may be associated with the networking device, select Perform deepdiscovery. See Deep discovery.
6. If desired, type a name for the device in the appropriate field.
The name that you enter is used to represent the device in SupportAssist Enterprise. If you do not enter a name, the IP address orhost name that you have entered is used to represent the device.
7. Perform one of the following:
• If you selected the Perform deep discovery option, select the credential profile that you want to assign to the device and itsassociated device types. To create a new credential profile, select Create New Profile and click Create. To enter the profiledetails, follow steps 3 to 7 in Create Credential Profile.
• If you did not select the Perform deep discovery option, select the Account Credentials that you want to assign to the device.To create new account credentials, select Create New Account and click Create. To enter the account details, follow steps 3 to6 in Add Account Credentials.
8. If you want SupportAssist Enterprise to monitor the health status of the device, select the Enable Monitoring option.
NOTE: If the registration is completed, by default, the Enable Monitoring option is selected. If the registration is not
completed, when you select the Enable Monitoring option, you are requested to complete the registration. To
continue, you can either clear the Enable Monitoring option or click Register to open the registration wizard.
NOTE: SupportAssist Enterprise can monitor the health status of the device only if the SNMP settings of the device
is configured to forward SNMP traps (alerts) to the server where SupportAssist Enterprise is installed. For
instructions to configure alert forwarding, see Manually configuring the alert destination of a networking device.
9. Click Next.The Discovering Device page is displayed until SupportAssist Enterprise identifies the device.
If the device is discovered successfully, the Assign Device Group (Optional) page is displayed. Otherwise, an appropriate errormessage is displayed.
10. If desired, from the Assign Other Group list, select a device group to which you want to assign the device.
If you do not select a device group, the device is assigned to the Default device group. For information on the Default device group,see Predefined device groups.
11. Click Finish.The device is added to the device inventory and the Summary page is displayed.
12. Click OK to close the Add Single Device wizard.
Adding devices 43

Next steps
CAUTION: If the device is not configured to forward alerts, SupportAssist Enterprise cannot detect hardware issues
that may occur on the device.
For monitoring hardware issues that may occur on the device only — Ensure that the device is configured to forward SNMP traps (alerts)to the server where SupportAssist Enterprise is installed. For instructions to configure alert forwarding, see Manually configuring the alertdestination of a networking device.
If a message is displayed stating that the device is added to the Staging group:
1. Ensure that all prerequisites for adding the device are met.2. Perform inventory validation on the device. See Start inventory validation manually.
Related reference
Add Single Device
Deep discovery
Add a PowerVault storage arrayPrerequisites
• You must be logged in to SupportAssist Enterprise with elevated or administrative privileges. See Granting elevated or administrativeprivileges to users.
• The device must be reachable from the server where SupportAssist Enterprise is installed.• For adding an Storage MD Series array, port 2463 must be open on the device.• For adding an Storage ME4 Series array, port 443 must be open on the device.
About this task
SupportAssist Enterprise can collect system information from the Storage MD Series arrays and Storage ME4 Series arrays. By adding aStorage MD Series or Storage ME4 Series device, you will be able to collect system information on demand and after deployment.
Steps
1. Point to Devices and click View Devices.The Devices page is displayed.
2. Click Add Devices.The Add Single Device wizard is displayed.
3. From the Select device type list, select PowerVault.
4. Type the host name or IP address of the device in the appropriate field.
NOTE: It is recommended that you enter the host name of the device. If the host name is not available, you can enter
the IP address of the device.
5. To discover and add other supported device types that may be associated with the device, select Perform deep discovery.
6. If desired, type a name for the device in the appropriate field.
The name that you enter is used to represent the device in SupportAssist Enterprise. If you do not enter a name, the IP address orhost name that you have entered is used to represent the device.
7. Perform one of the following:
• If you selected the Perform deep discovery option, select the credential profile that you want to assign to the device and itsassociated device types. To create a new credential profile, select Create New Profile and click Create. To enter the profiledetails, follow steps 3 to 7 in Create Credential Profile.
• If you did not select the Perform deep discovery option, select the Account Credentials that you want to assign to the device.To create new account credentials, select Create New Account and click Create. To enter the account details, follow steps 3 to6 in Add Account Credentials.
NOTE:
• Account Credentials are mandatory for adding a Storage ME4 Series device.
• Account Credentials are not required for adding a Storage MD Series device.
8. Click Next.The Discovering Device page is displayed until SupportAssist Enterprise identifies the device.
44 Adding devices

If the device is discovered successfully, the Assign Device Group (Optional) page is displayed. Otherwise, an appropriate errormessage is displayed.
9. If desired, from the Assign Other Group list, select a device group to which you want to assign the device.
If you do not select a device group, the device is assigned to the Default device group. For information on the Default device group,see Predefined device groups.
10. Click Finish.The device is added to the device inventory and the Summary page is displayed.
11. Click OK to close the Add Single Device wizard.
Next steps
If a message is displayed stating that the device is added to the Staging group:
1. Ensure that all prerequisites for adding the device are met.2. Perform inventory validation on the device. See Start inventory validation manually.
Related reference
Add Single Device
Add an EqualLogic PS Series storage solutionPrerequisites
• You must be logged in to SupportAssist Enterprise with elevated or administrative privileges. See Granting elevated or administrativeprivileges to users.
• The device must be reachable from the server where SupportAssist Enterprise is installed.• Ports 21, 22, and 161 must be open on the device.• Secure Shell (SSH) and SNMP service must be running on the device.
About this task
SupportAssist Enterprise can only collect system information from the Storage PS Series (previously EqualLogic) arrays. By adding aStorage PS Series device, you will be able to collect system information on demand and after deployment.
Steps
1. Point to Devices and click View Devices.The Devices page is displayed.
2. Click Add Devices.The Add Single Device wizard is displayed.
3. From the Select device type list, select Peer Storage (PS) / EqualLogic.
4. Type the host name or IP address of the Storage PS Series group in the appropriate field.
NOTE: It is recommended that you enter the host name of the device. If the host name is not available, you can enter
the IP address of the device.
5. To discover and add other supported device types that may be associated with the Storage PS Series device, select Perform deepdiscovery. See Deep discovery.
6. If desired, type a name for the device in the appropriate field.
The name that you enter is used to represent the device in SupportAssist Enterprise. If you do not enter a name, the IP address orhost name that you have entered is used to represent the device.
7. Perform one of the following:
• If you selected the Perform deep discovery option, select the credential profile that you want to assign to the device and itsassociated device types. To create a new credential profile, select Create New Profile and click Create. To enter the profiledetails, follow steps 3 to 7 in Create Credential Profile.
• If you did not select the Perform deep discovery option, select the Account Credentials that you want to assign to the device.To create new account credentials, select Create New Account and click Create. To enter the account details, follow steps 3 to6 in Add Account Credentials.
8. Click Next.The Discovering Device page is displayed until SupportAssist Enterprise identifies the device.
Adding devices 45

If the device is discovered successfully, the Assign Device Group (Optional) page is displayed. Otherwise, an appropriate errormessage is displayed.
9. If desired, from the Assign Other Group list, select a device group to which you want to assign the device.
If you do not select a device group, the device is assigned to the Default device group. For information on the Default device group,see Predefined device groups.
10. Click Finish.The device is added to the device inventory and the Summary page is displayed.
11. Click OK to close the Add Single Device wizard.
Next steps
If a message is displayed stating that the device is added to the Staging group:
1. Ensure that all prerequisites for adding the device are met.2. Perform inventory validation on the device. See Start inventory validation manually.
Related reference
Add Single Device
Add a Compellent SC Series storage solutionPrerequisites
• You must be logged in to SupportAssist Enterprise with elevated or administrative privileges. See Granting elevated or administrativeprivileges to users.
• The device must be reachable from the server where SupportAssist Enterprise is installed.• Port 443 must be open on the device.• REST service must be running on the device.• For collecting system information, SupportAssist must be enabled in the Dell EMC Compellent Enterprise Manager application for
Compellent devices with SC Series storage solution 7.1 and below.
About this task
SupportAssist Enterprise can only collect system information from the Storage SC Series solutions. By adding a Storage SC Series device,you will be able to collect system information on demand and after deployment.
Steps
1. Point to Devices and click View Devices.The Devices page is displayed.
2. Click Add Devices.The Add Single Device wizard is displayed.
3. From the Select device type list, select Storage Center (SC) / Compellent.
4. Type the host name or IP address of the device in the appropriate field.
NOTE: It is recommended that you enter the host name of the device. If the host name is not available, you can enter
the IP address of the device.
5. If desired, type a name for the device in the appropriate field.
The name that you enter is used to represent the device in SupportAssist Enterprise. If you do not enter a name, the IP address orhost name that you have entered is used to represent the device.
6. From the Account Credentials list, select an account credential that you want to assign to the device. To create an accountcredentials, select Create New Account and click Create. To enter the account details, follow steps 3 to 6 in Add AccountCredentials.
7. Click Next.The Discovering Device page is displayed until SupportAssist Enterprise identifies the device.
If the device is discovered successfully, the Assign Device Group (Optional) page is displayed. Otherwise, an appropriate errormessage is displayed.
8. If desired, from the Assign Other Group list, select a device group to which you want to assign the device.
46 Adding devices

If you do not select a device group, the device is assigned to the Default device group. For information on the Default device group,see Predefined device groups.
9. Click Finish.The device is added to the device inventory and the Summary page is displayed.
10. Click OK to close the Add Single Device wizard.
Next steps
If a message is displayed stating that the device is added to the Staging group:
1. Ensure that all prerequisites for adding the device are met.2. Perform inventory validation on the device. See Start inventory validation manually.
Related reference
Add Single Device
Add a Fluid File System NAS devicePrerequisites
• You must be logged in to SupportAssist Enterprise with elevated or administrative privileges. See Granting elevated or administrativeprivileges to users.
• The device must be reachable from the server where SupportAssist Enterprise is installed.• Ports 22 and 44421 must be open on the device.• Secure Shell (SSH) service must be running on the device.
About this task
SupportAssist Enterprise can only collect system information from a Fluid File System (FluidFS) network attached storage (NAS) device.By adding a FluidFS NAS device, you will be able to collect system information on demand and after deployment. The FluidFS NAS devicesthat you can add are:
• Storage SC Series• Storage PS Series• Storage MD Series
Steps
1. Point to Devices and click View Devices.The Devices page is displayed.
2. Click Add Devices.The Add Single Device wizard is displayed.
3. From the Select device type list, select Fluid File System (FluidFS).
4. Type the host name or IP address of the device in the appropriate field.
NOTE: It is recommended that you enter the host name of the device. If the host name is not available, you can enter
the IP address of the device.
5. If desired, type a name for the device in the appropriate field.
The name that you enter is used to represent the device in SupportAssist Enterprise. If you do not enter a name, the IP address orhost name that you have entered is used to represent the device.
6. From the Account Credentials list, select an account credential that you want to assign to the device. To create an accountcredentials, select Create New Account and click Create. To enter the account details, follow steps 3 to 6 in Add AccountCredentials.
7. Click Next.The Discovering Device page is displayed until SupportAssist Enterprise identifies the device.
If the device is discovered successfully, the Assign Device Group (Optional) page is displayed. Otherwise, an appropriate errormessage is displayed.
8. If desired, from the Assign Other Group list, select a device group to which you want to assign the device.
If you do not select a device group, the device is assigned to the Default device group. For information on the Default device group,see Predefined device groups.
Adding devices 47

9. Click Finish.The device is added to the device inventory and the Summary page is displayed.
10. Click OK to close the Add Single Device wizard.
Next steps
If a message is displayed stating that the device is added to the Staging group:
1. Ensure that all prerequisites for adding the device are met.2. Perform inventory validation on the device. See Start inventory validation manually.
Related reference
Add Single Device
Add a softwarePrerequisites
• You must be logged in to SupportAssist Enterprise with elevated or administrative privileges. See Granting elevated or administrativeprivileges to users.
• The device must be reachable from the server where SupportAssist Enterprise is installed.
About this task
SupportAssist Enterprise can only collect system information from the management and monitoring software such as VMware vCenter,Microsoft System Center Virtual Machine Manager (SCVMM), Dell EMC EqualLogic SAN Headquarters (SAN HQ), and Host IntegrationToolkit for VMware (HIT Kit / Virtual Storage Manager).
Steps
1. Point to Devices and click View Devices.The Devices page is displayed.
2. Click Add Devices.The Add Single Device wizard is displayed.
3. From the Select device type list, select Software.
4. From the Select Software type list, select the software type.
5. Type the host name or IP address of the device in the appropriate field.
NOTE: It is recommended that you enter the host name of the device. If the host name is not available, you can enter
the IP address of the device.
6. If desired, type a name for the device in the appropriate field.
The name that you enter is used to represent the device in SupportAssist Enterprise. If you do not enter a name, the IP address orhost name that you have entered is used to represent the device.
7. From the Account Credentials list, select an account credential that you want to assign to the device. To create an accountcredentials, select Create New Account and click Create. To enter the account details, follow steps 3 to 6 in Add AccountCredentials.
8. If desired, from the Assign Other Group list, select a device group to which you want to assign the device.
If you do not select a device group, the device is assigned to the Default device group. For information on the Default device group,see Predefined device groups.
9. Click Finish.The device is added to the device inventory and the Summary page is displayed.
10. Click OK to close the Add Single Device wizard.
Next steps
If a message is displayed stating that the device is added to the Staging group:
1. Ensure that all prerequisites for adding the device are met.2. Perform inventory validation on the device. See Start inventory validation manually.
48 Adding devices

Related reference
Add Single Device
Add a solutionPrerequisites
• You must be logged in to SupportAssist Enterprise with elevated or administrative privileges. See Granting elevated or administrativeprivileges to users.
• The device must be reachable from the server where SupportAssist Enterprise is installed.• Port 9440 and 22 must be open on the device.• For web-scale solution, firmware version 4.x or later must be installed on the device for the collection of system information.
About this task
SupportAssist Enterprise can monitor hardware issues and collect system information from a web-scale hyper-converged appliance.
Steps
1. Point to Devices and click View Devices.The Devices page is displayed.
2. Click Add Devices.The Add Single Device wizard is displayed.
3. From the Select device type list, select Web-Scale.
4. From the Select solution type list, select the solution.
5. Type the host name or IP address of the device in the appropriate field.
NOTE: It is recommended that you enter the host name of the device. If the host name is not available, you can enter
the IP address of the device.
6. To discover and add other supported device types that may be associated with the solution, select Perform deep discovery. SeeDeep discovery.
7. If desired, type a name for the device in the appropriate field.
The name that you enter is used to represent the device in SupportAssist Enterprise. If you do not enter a name, the IP address orhost name that you have entered is used to represent the device.
8. Perform one of the following:
• If you selected the Perform deep discovery option, select the credential profile that you want to assign to the device and itsassociated device types. To create a new credential profile, select Create New Profile and click Create. To enter the profiledetails, follow steps 3 to 7 in Create Credential Profile.
• If you did not select the Perform deep discovery option, select the Account Credentials that you want to assign to the device.To create new account credentials, select Create New Account and click Create. To enter the account details, follow steps 3 to6 in Add Account Credentials.
9. If desired, from the Assign Other Group list, select a device group to which you want to assign the device.
If you do not select a device group, the device is assigned to the Default device group. For information on the Default device group,see Predefined device groups.
10. Click Finish.The device is added to the device inventory and the Summary page is displayed.
11. Click OK to close the Add Single Device wizard.
Next steps
If a message is displayed stating that the device is added to the Staging group:
1. Ensure that all prerequisites for adding the device are met.2. Perform inventory validation on the device. See Start inventory validation manually.
Related reference
Add Single Device
Deep discovery
Adding devices 49

Add a virtual machinePrerequisites
• You must be logged in to SupportAssist Enterprise with elevated or administrative privileges. See SupportAssist Enterprise user groupsand Granting elevated or administrative privileges to users.
• The system hosting the virtual machine must be reachable from the server where SupportAssist Enterprise is installed.• The virtual machine you want to add must be created on VMware ESX, ESXi, and Microsoft Hyper-V.
About this task
SupportAssist Enterprise can only collect system information from virtual machines. You can perform the following steps to add a virtualmachine.
Steps
1. Point to Devices and click View Devices.The Devices page is displayed.
2. Click Add Devices.The Add Single Device wizard is displayed.
3. From the Select device type list, select Virtual Machine.
4. Type the host name or IP address of the device in the appropriate field.
NOTE: It is recommended that you enter the host name of the device. If the host name is not available, you can enter
the IP address of the device.
5. If desired, type a name for the device in the appropriate field.
The name that you enter is used to represent the device in SupportAssist Enterprise. If you do not enter a name, the IP address orhost name that you have entered is used to represent the device.
6. From the Account Credentials list, select an account credential that you want to assign to the device. To create an accountcredentials, select Create New Account and click Create. To enter the account details, follow steps 3 to 6 in Add AccountCredentials.
7. Click Next.The Discovering Device page is displayed until SupportAssist Enterprise identifies the device.
If the device is discovered successfully, the Assign Device Group (Optional) page is displayed. Otherwise, an appropriate errormessage is displayed.
8. If desired, from the Assign Other Group list, select a device group to which you want to assign the device.
If you do not select a device group, the device is assigned to the Default device group. For information on the Default device group,see Predefined device groups.
9. Click Finish.The device is added to the device inventory and the Summary page is displayed.
10. Click OK to close the Add Single Device wizard.
Related reference
Add Single Device
SupportAssist Enterprise features available for virtualmachinesThe following table lists the SupportAssist Enterprise features that are available for virtual machines.
Table 12. SupportAssist Enterprise features available for virtual machines
SupportAssist Enterprise features Support status
Add devices
Create device discovery rule
50 Adding devices

SupportAssist Enterprise features Support status
Collect software information
Collect system logs
Upload system information to Dell EMC
Collect system information periodically
View device type filters in Devices and Collection page
Perform inventory validation
Revalidate a device
Edit device credentials
Assign Credential profiles to devices
Set up, edit, or delete an adapter or Remote Collector
Perform deep discovery
Install/upgrade OMSA by using SupportAssist Enterprise
Monitor devices
Create cases
Collect hardware information
Collect smart logs
Clear SEL logs
Enable or disable maintenance mode
Configure SNMP by using SupportAssist Enterprise
Graphic of the virtual machine type in the device overview page
Add a device by duplicationPrerequisites
• You must be logged in to SupportAssist Enterprise with elevated or administrative privileges. See Granting elevated or administrativeprivileges to users.
• The device must be reachable from the server where SupportAssist Enterprise is installed.• The required network ports must be open on the device. For the network port requirements on the remote device, see Network
requirements.
Adding devices 51

About this task
You can use the Duplicate feature to quickly add a device that is of the same type as a device that you have already added. For example,if you have already added a remote server, you select that server and click Duplicate to start adding another remote server.
Steps
1. Point to Devices and click View Devices.The Devices page is displayed.
2. Select a device which is of the same type as the device that you want to add.
Figure 6. Duplicate option
The device overview pane is displayed.
3. Click Duplicate.The Duplicate Device wizard is displayed.
4. Type the host name or IP address of the device in the appropriate field.
NOTE: It is recommended that you enter the host name of the device. If the host name is not available, you can enter
the IP address of the device.
5. If desired, type a name for the device in the appropriate field.
The name that you enter is used to represent the device in SupportAssist Enterprise. If you do not enter a name, the IP address orhost name that you have entered is used to represent the device.
6. From the Account Credentials list, select an account credential that you want to assign to the device. To create an accountcredentials, select Create New Account and click Create. To enter the account details, follow steps 3 to 6 in Add AccountCredentials.
7. Click Next.The Discovering Device page is displayed until SupportAssist identifies the device.
If the device is discovered successfully, the Device Options page is displayed. Otherwise, an appropriate error message is displayed.
8. If desired, from the Assign Other Group list, select a device group to which you want to assign the device.
If you do not select a device group, the device is assigned to the Default device group. For information on the Default device group,see Predefined device groups.
52 Adding devices

9. Click Finish.The device is added to the device inventory and the Summary page is displayed.
10. Click OK to close the Duplicate Device wizard.
Next steps
If a message is displayed stating that the device is added to the Staging group:
1. Ensure that all prerequisites for adding the device are met.2. Perform inventory validation on the device. See Start inventory validation manually.
Adding devices 53

Managing device discovery rulesA device discovery rule enables you to discover and add devices that are present within one or more IP address ranges. Creating a devicediscovery rule helps you add multiple devices, and reduces the effort involved in adding each device individually.
Topics:
• Create device discovery rule• View the device discovery rule overview pane• Edit device discovery rule• Delete device discovery rule• Run the discovery rule
Create device discovery rulePrerequisites
You must be logged in to SupportAssist Enterprise with elevated or administrative privileges. See Granting elevated or administrativeprivileges to users.
About this task
By creating a discovery rule, you can discover and add devices based on IP address ranges or hostname. While you create the discoveryrule, you can select a Credential Profile that must be applied to the devices. After creating the device discovery rule, you can run the ruleimmediately or based on a schedule to discover devices.
Steps
1. Point to Devices and click Manage Rules for Device Discovery.The Manage Discovery Rules page is displayed.
2. Click Create Discovery Rule.The Create Device Discovery Rule window is displayed.
Figure 7. Create Device Discovery Rule window
3. Type a name for the discovery rule in the appropriate field.
4
54 Managing device discovery rules

4. From the Credential profile list, select a Credential Profile that contains the Account Credentials for the device types that arepresent within the IP address ranges. To create a new credential profile, select Create New Profile and click Create. To enter theprofile details, follow steps 3 to 7 in Create Credential Profile.
5. To discover devices by using IP address ranges:
a) Select IP address / range.b) Type the IP address or IP address range of the devices that you want to discover. To add another IP address range, click Add
another range, and then type the IP address range of the devices.
NOTE: You can add up to five different IP address ranges in the following formats:
• 10.34.*.*
• 10.34.1-10.*
• 10.34.*.1-10
• 10.34.1-10.1-10
• 10.34.1.1/24
NOTE: Ensure that the IP address ranges that you have entered do not overlap with each other.
NOTE: For an IP address entered in Classless-Inter Domain Routing (CIDR) notation, for example 10.34.1.1/24,
the subnet mask entry is not considered.
c) Type the Subnet Mask of the specified IP address range in the appropriate field.
6. To discover devices by using the hostname or IP addresses:
a) Select Devices.b) Enter the hostname or IP address of devices as comma-separated values in the following formats:
• 10.34.10.2, 10.34.10.3, 10.34.10.22• hostname1, hostname2, hostname3• 10.34.10.22, hostname2, 10.34.10.24
7. Select an option based on your preference:
• Run now — Discover the devices immediately.• Run once — Discover the devices at a specific date and time.• Recur — Schedule the discovery of devices at periodic intervals.
8. Click Next.The Discovering Devices window is displayed. Based on the device types included in the Credential Profile, the device types areselected automatically.
9. If desired, clear the device types that you do not want to discover.
10. In the Configuration Settings section, clear the following options based on your preference:
• Perform deep discovery — Discover a device and its associated device types. See Deep discovery.• Enable Monitoring — Enables SupportAssist Enterprise to detect hardware issues that may occur on the discovered devices.• Configure SNMP to receive alerts from this device — Automatically configure the SNMP settings of the discovered device
to forward alerts (SNMP traps) to SupportAssist Enterprise.• Install latest version of OMSA — Enables SupportAssist Enterprise to install the latest version of OMSA or iDRAC Service
Module (iSM) on the discovered servers. OMSA or iSM is required for collecting system information and to generate alerts fromservers.
11. Click Add Rule.The discovery rule is added and listed on the Manage Discovery Rules page. If you selected Run now, discovery of devices is initiated.
Related reference
Manage Device Discovery Rule
Create or Edit Device Discovery Rule
Managing device discovery rules 55

View the device discovery rule overview paneAbout this task
The Manage Discovery Rules page enables you to view the Discovery Rule Details, Discovery Rule Current Iteration Status, RecentActivity, and Current v/s Previous Discovery Rule Status panes. For more information about the attributes displayed in these panes, seeDiscovery Rule Details, Discovery Rule Current Iteration Status, Recent Activity, and Current v/s Previous Discovery Rule Status.
Steps
1. Point to Devices and click Manage Rules for Device Discovery.The Manage Discovery Rules page is displayed.
2. Select a discovery rule.The Discovery Rule Details, Discovery Rule Current Iteration Status, Recent Activity, and Current v/s Previous Discovery Rule Statuspanes are displayed.
Figure 8. Manage Discovery Rules page
Related reference
Manage Device Discovery Rule
Discovery Rule Details
Discovery Rule Current Iteration Status
Current versus Previous Discovery Rule Status
Recent Activity
Edit device discovery rulePrerequisites
You must be logged in to SupportAssist Enterprise with elevated or administrative privileges. See Granting elevated or administrativeprivileges to users.
About this task
You can edit the discovery rule based on your requirement.
NOTE: You cannot edit a discovery rule when the device discovery is in progress.
56 Managing device discovery rules

Steps
1. Point to Devices and click Manage Rules for Device Discovery.The Manage Discovery Rules page is displayed.
2. Select the discovery rule that you want to edit and click Edit.The Edit Device Discovery Rule window is displayed.
3. To discover devices by using IP address ranges:
a) Select IP address / range.b) Type the IP address or IP address range of the devices that you want to discover. To add another IP address range, click Add
another range, and then type the IP address range of the devices.
NOTE: You can add up to five different IP address ranges in the following formats:
• 10.34.*.*
• 10.34.1-10.*
• 10.34.*.1-10
• 10.34.1-10.1-10
• 10.34.1.1/24
NOTE: Ensure that the IP address ranges that you have entered do not overlap with each other.
NOTE: For an IP address entered in Classless-Inter Domain Routing (CIDR) notation, for example 10.34.1.1/24,
the subnet mask entry is not considered.
c) Type the Subnet Mask of the specified IP address range in the appropriate field.
4. To discover devices by using the hostname or IP addresses:
a) Select Devices.b) Enter the hostname or IP address of devices as comma-separated values in the following formats:
• 10.34.10.2, 10.34.10.3, 10.34.10.22• hostname1, hostname2, hostname3• 10.34.10.22, hostname2, 10.34.10.24
5. Click Next.The Discovering Devices window is displayed.
6. Select or clear the devices types and the configuration settings.
7. Click Edit Rule.The discovery rule is updated.
Related reference
Manage Device Discovery Rule
Create or Edit Device Discovery Rule
Delete device discovery rulePrerequisites
You must be logged in to SupportAssist Enterprise with elevated or administrative privileges. See Granting elevated or administrativeprivileges to users.
About this task
You can delete the discovery rule based on your preference.
Steps
1. Point to Devices and click Manage Rules for Device Discovery.The Manage Discovery Rules page is displayed.
2. Select the discovery rule that you want to delete and click Delete.The Delete Device Discovery Rule window is displayed.
3. Click Yes.
Managing device discovery rules 57

Related reference
Manage Device Discovery Rule
Run the discovery rulePrerequisites
You must be logged in to SupportAssist Enterprise with elevated or administrative privileges. See Granting elevated or administrativeprivileges to users.
About this task
After creating a discovery rule, you can run the rule at any time.
Steps
1. Point to Devices and click Manage Rules for Device Discovery.The Manage Discovery Rules page is displayed.
2. Select the discovery rule that you want to run and click Run now.The devices associated with the discovery rule are discovered immediately.
NOTE: Devices that were discovered by the discovery rule, but are later unreachable are moved to the Inactive
status. If a device is in an Inactive status even after the discovery rule is run for three consecutive times, the device
is deleted automatically from SupportAssist Enterprise.
Related reference
Manage Device Discovery Rule
58 Managing device discovery rules

Viewing cases and devicesThe SupportAssist Enterprise user interface displays the devices that you have added and the support cases that are open for thosedevices. From the Devices page, you can perform various device-specific operations such as view collections, enable or disable monitoring,and so on. From the Cases page, you can manage cases that were opened by SupportAssist Enterprise.
NOTE: SupportAssist Enterprise does not create a support case for every alert that is received from a monitored device.
A support case is created only if the alert type and number of alerts that are received from the device match with the
criteria defined by Dell EMC for support case creation.
Topics:
• Viewing all support cases• View support cases for a specific device• Case management options• View the device inventory• View the device overview pane• Sorting the displayed data
Viewing all support casesAbout this task
NOTE: The list of open cases is displayed only if you have completed the registration of SupportAssist.
To view the support cases that are present for your monitored devices, point to Cases and click View Cases. A Fetching Casesprogress indicator is displayed at the top of the Cases page when SupportAssist Enterprise is checking if cases are present for thedevices that you have added.
Figure 9. Cases page
Support case information is automatically available, for supported devices that have valid Service Tags when SupportAssist Enterpriseconnects to the Dell EMC support case and service contract databases over the internet. Support case information is refreshed only inthe following situations:
5
Viewing cases and devices 59

• When you open the Cases page.• When you click the Refresh link on the Cases page.• When the Cases page is open and you refresh the web browser window.
After SupportAssist Enterprise has completed its open support cases update, the Cases page displays the current support cases. Forinformation on the fields and details displayed on the Cases page, see Case page.
View support cases for a specific devicePrerequisites
You must be logged in to SupportAssist Enterprise with elevated or administrative privileges. See SupportAssist Enterprise user groupsand Granting elevated or administrative privileges to users.
About this task
You can view the open support cases for a specific monitored device by using the Check for cases option.
Steps
1. Point to Devices and click View Devices.The Devices page is displayed.
2. Select the device for which you want to check for support cases.The device overview pane is displayed.
NOTE: The device overview pane is displayed only if a single device is selected in the Devices page.
3. From the Tasks list, select Check for cases.
Figure 10. Check for cases option
• If support cases are present for the device, you are navigated to the Cases page. Support cases that are present for the deviceare displayed at the top of the Cases page.
• If no support cases are present for the device, an appropriate message is displayed.
60 Viewing cases and devices

NOTE: When you check for support cases, the latest support cases information is retrieved from Dell EMC for the
selected device. If support case information cannot be retrieved because of an issue, an appropriate message is
displayed.
Case management optionsThe Cases page provides options that you can use to manage the support cases that were opened automatically by SupportAssistEnterprise. You can request Technical Support to perform the following activities by using the available case management options:
• Suspend activities related to a support case• Resume activities related to a support case• Close a support case
NOTE: The case management options are applicable only for support cases that were opened automatically by
SupportAssist Enterprise.
Figure 11. Case options
Request to suspend case activities for 24 hours
Prerequisites
You must be logged in to SupportAssist Enterprise with elevated or administrative privileges. See SupportAssist Enterprise user groupsand Granting elevated or administrative privileges to users
About this task
You can request Technical Support to stop activities related to a support case for 24 hours, if necessary. For example, you may wantTechnical Support to suspend activities for a support case in the following scenarios:
• If you want to resolve the issue without any assistance from Technical Support• If you do not want to receive any notifications related to the support case from Dell EMC during a planned maintenance activity
NOTE: You can request Technical Support to stop activities related to a support case only if the support case was
opened by SupportAssist.
Steps
1. Point to Cases and click View Cases.The Cases page is displayed.
2. In the Refine by pane, from the Source Type list, select SupportAssist.The list of all cases that were opened by SupportAssist are displayed.
3. Select the support case that you want to suspend.
NOTE: The Case Options list is enabled only if the support case that you have selected was opened by SupportAssist.
NOTE: The Suspend Activity 24 hours option is disabled if you have already requested to suspend notifications for
the selected support case.
Viewing cases and devices 61

4. From the Case Options list, select Suspend Activity 24 hours.The Suspend case activities for 24 hours window is displayed.
5. (Optional) Type your reason for requesting to suspend activities for the support case.
6. Click OK.The Updating Case message is displayed. After the case is updated successfully, the Case Status message is displayed.
7. Click OK.The support case displays a Suspended status.
NOTE: If SupportAssist Enterprise is unable to process your request, an appropriate error message is displayed. In
such a scenario, you can run the case creation test to verify connectivity to Dell EMC, and then retry the operation.
Related tasks
Test the case creation capability
Request to resume support activities
Prerequisites
You must be logged in to SupportAssist Enterprise with elevated or administrative privileges. See SupportAssist Enterprise user groupsand Granting elevated or administrative privileges to users.
About this task
You can request Technical Support to resume activities for a support case, if you had previously requested to suspend activities for thesupport case.
Steps
1. Point to Cases and click View Cases.The Cases page is displayed.
2. In the Refine by pane, from the Source Type list, select SupportAssist.The list of all cases that were opened by SupportAssist are displayed.
3. Select the support case for which you want to Technical Support to resume case activities.
NOTE: The Case Options list is enabled only if the support case that you have selected was opened by SupportAssist.
NOTE: The Resume Activity option is enabled only if you had previously requested to suspend notifications for the
selected support case.
4. From the Case Options list, select Resume Activity.The Resume Activity window is displayed.
5. (Optional) Type your reason for requesting to resume activities for the support case.
6. Click OK.The Updating Case message is displayed. After the case is updated successfully, the Case Status message is displayed.
7. Click OK.The support case displays the appropriate status.
NOTE: If SupportAssist Enterprise is unable to process your request, an appropriate error message is displayed. In
such a scenario, you can run the case creation test to verify connectivity to Dell EMC, and then retry the operation.
Related tasks
Test the case creation capability
Request to close a support case
Prerequisites
You must be logged in to SupportAssist Enterprise with elevated or administrative privileges. See SupportAssist Enterprise user groupsand Granting elevated or administrative privileges to users.
62 Viewing cases and devices

About this task
If you have resolved a problem with a device, you can request Technical Support to close the corresponding support case.NOTE: You can request Technical Support to close a support case only if the support case was opened by
SupportAssist.
NOTE: You can request Technical Support to close a support case that is in any status, except the Closed and Closure
Requested status.
Steps
1. Point to Cases and click View Cases.The Cases page is displayed.
2. In the Refine by pane, from the Source Type list, select SupportAssist.The list of all cases that were opened by SupportAssist are displayed.
3. Select the support case that you want to close.
NOTE: The Case Options list is enabled only if the support case that you have selected was opened by SupportAssist.
4. From the Case Options list, select Request to Close.The Request to close the case window is displayed.
5. (Optional) Type your reason for requesting to close the support case.
6. Click OK.The Updating Case message is displayed. After the case is updated successfully, the Case Status message is displayed.
7. Click OK.The support case displays a Closure requested status.
NOTE: After you request to close a support case, Technical Support may contact you to get more details before
closing the support case.
NOTE: If SupportAssist Enterprise is unable to process your request, an appropriate error message is displayed. In
such a scenario, you can run the case creation test to verify connectivity to Dell EMC, and then retry the operation.
Related tasks
Test the case creation capability
View the device inventoryAbout this task
To view the device inventory, point to Devices and click View Devices.
Viewing cases and devices 63
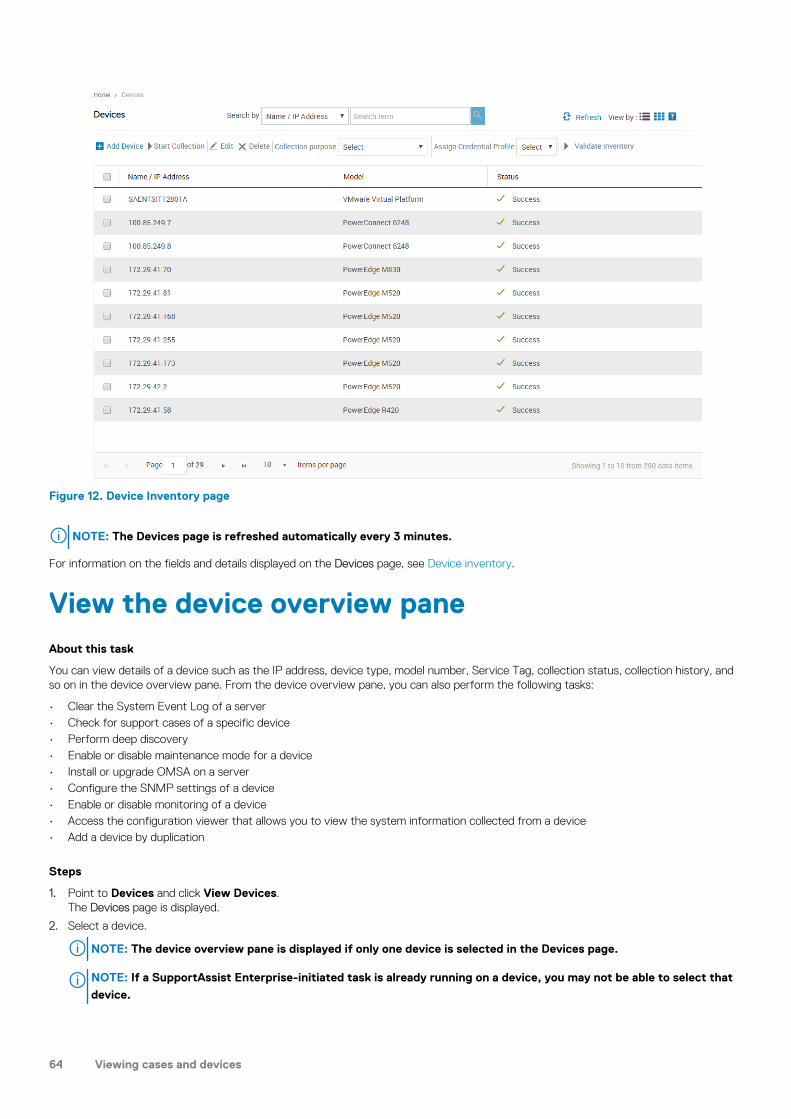
Figure 12. Device Inventory page
NOTE: The Devices page is refreshed automatically every 3 minutes.
For information on the fields and details displayed on the Devices page, see Device inventory.
View the device overview paneAbout this task
You can view details of a device such as the IP address, device type, model number, Service Tag, collection status, collection history, andso on in the device overview pane. From the device overview pane, you can also perform the following tasks:
• Clear the System Event Log of a server• Check for support cases of a specific device• Perform deep discovery• Enable or disable maintenance mode for a device• Install or upgrade OMSA on a server• Configure the SNMP settings of a device• Enable or disable monitoring of a device• Access the configuration viewer that allows you to view the system information collected from a device• Add a device by duplication
Steps
1. Point to Devices and click View Devices.The Devices page is displayed.
2. Select a device.
NOTE: The device overview pane is displayed if only one device is selected in the Devices page.
NOTE: If a SupportAssist Enterprise-initiated task is already running on a device, you may not be able to select that
device.
64 Viewing cases and devices

The device overview pane is displayed.
Figure 13. Device overview pane
Sorting the displayed dataAbout this task
To sort the data displayed on the Devices, Cases or Collections page, click a column header. The displayed data is sorted and an arrowthat indicates the sorting type (ascending or descending) is displayed next to the column title. To reset the sorting, click the columnheader again.
Viewing cases and devices 65

Monitoring site healthSupportAssist Enterprise enables you to view the overall site health connectivity and status of your devices. Site health contains keyconnectivity result information that enables you to identify and prioritize the most important issue on your site.
The Site Health page contains the following panes:
• Current SupportAssist Enterprise (Hostname) Details• Current SupportAssist Overview• Sitewide Inventory Validations• Network Connectivity• Extensions Tree View
If your devices are placed in the Staging group, the count of the devices, details about the error, and the appropriate solution for the erroris displayed in the Site Health page. You can also export this information as a .csv file.
Figure 14. Site Health page
Related concepts
Current SupportAssist Enterprise Hostname Details
Current SupportAssist Overview
Sitewide Inventory Validation
Network Connectivity
Extensions Tree View
Related reference
Site Health
Topics:
• View site health• Current SupportAssist Enterprise Hostname Details
6
66 Monitoring site health

• Current SupportAssist Overview• Sitewide Inventory Validation• Network Connectivity• Extensions Tree View
View site healthSteps
1. Open SupportAssist Enterprise.By default, the Site Health page is displayed.
2. If you are on any another page, then point to Site Health, and then click View Site Health.
Current SupportAssist Enterprise HostnameDetailsThe Current SupportAssist Enterprise (Hostname) Details pane displays information about devices you have discovered or added inSupportAssist Enterprise. This section displays the following information in a chart format:
• Managed — Devices monitored by SupportAssist Enterprise• Staging — Devices in the Staging group• Inactive — Devices that are classified as Inactive• Not managed — Devices not monitored by SupportAssist Enterprise
Related concepts
Monitoring site health
Current SupportAssist OverviewThe Current SupportAssist Overview pane displays the number of devices that are monitored and the number of open support cases.You can click the cases link to go to the Cases page.
Related concepts
Monitoring site health
Sitewide Inventory ValidationThe Sitewide Inventory Validation pane displays the roll-up status of the inventory validation for devices that are discovered or addedin SupportAssist Enterprise. The result is displayed in the following format:
• Success — Number of devices for which tests for connectivity, collection capability, and monitoring capability were successful.• Failed — Number of devices for which tests for connectivity, collection capability, or monitoring capability was not successful.
NOTE: The total count of devices in Site Inventory Validation may not match with the total number of devices that you
have added or discovered in SupportAssist Enterprise. This variance is because inventory validation does not support
validating:
• Devices added in SupportAssist Enterprise through the adapter
• Devices that require manual configuration of SNMP settings, for example, networking devices
Related concepts
Monitoring site health
Monitoring site health 67

Network ConnectivityThe Network Connectivity pane displays the status of SupportAssist Enterprise connectivity to the following network resources:
• Internet Connectivity• SMTP Server• Dell EMC FTP Server• Dell EMC Upload Server• SupportAssist Server
Related concepts
Monitoring site health
Extensions Tree ViewThe Extensions Tree View pane displays the adapters and remote collectors that you have set up in the current SupportAssist Enterpriseinstallation.
This pane also displays the number of devices associated with each remote collector and adapter.
Related concepts
Monitoring site health
68 Monitoring site health

Using ExtensionsThe extensions that are available in SupportAssist Enterprise enable you to extend the SupportAssist Enterprise capability to manydevices. You can use the extensions to inventory and add devices that are managed by a systems management console such as Dell EMCOpenManage Essentials, Microsoft System Center Operations Manager (SCOM), or OpenManage Enterprise. The extensions also enableyou to optimize the performance of SupportAssist Enterprise by distributing the workload of collecting and uploading system informationto remote systems.
Topics:
• Types of extensions• Support for setting up adapter or Remote Collector• Getting started with adding devices managed by systems management consoles• Adapters overview• Remote Collectors overview
Types of extensionsTwo types of extensions are available in SupportAssist Enterprise:
• Adapter — An application that acts as an interface between SupportAssist Enterprise and a systems management console. Theadapter enables SupportAssist Enterprise to inventory and retrieve alerts from supported devices that are managed by a systemsmanagement console, instead of adding each device individually. After inventorying and adding the devices, SupportAssist Enterprisecan monitor the devices for hardware issues and also collect and upload system information to Dell EMC. Two types of adaptersavailable in SupportAssist Enterprise:
• OpenManage Essentials adapter — For inventorying devices managed by OpenManage Essentials• System Center Operations Manager adapter — For inventorying devices managed by System Center Operations Manager• OpenManage Enterprise adapter — For inventorying devices managed by OpenManage Enterprise Version 3.3.1
• Remote Collector — A remote instance of SupportAssist Enterprise that collects and uploads system information from devices thatare present within a specific IP address range. The Remote Collector enables SupportAssist Enterprise to distribute the workload ofcollecting and uploading system information to a remote system. Typically, collection and upload of system information from all yourdevices is performed by the server where SupportAssist Enterprise is installed. When you set up a Remote Collector on a remotesystem, collection and upload of system information from devices within the specified IP address ranges is performed by the remotesystem. To ensure optimal performance of SupportAssist Enterprise, it is recommended that you set up a separate Remote Collectorfor every 3,500 devices.
Support for setting up adapter or RemoteCollectorThe capability to set up an adapter or Remote Collector is available only when SupportAssist Enterprise is installed on a Windows operatingsystem. The following tables provide a summary of the capability to set up an adapter or Remote Collector depending on the operatingsystem.
Table 13. Support for setting up an adapter
Operating system where SupportAssistEnterprise is installed
Support for setting up an adapter on alocal or remote server running Windows
Support for setting up an adapter on alocal or remote server running Linux
Windows Yes Yes (For OpenManage Enterprise only)
Linux No Yes (For OpenManage Enterprise only)
NOTE: For the devices that you can inventory in SupportAssist Enterprise by setting up an adapter, see the list of
devices in the SupportAssist Enterprise Version 2.0.40 Support Matrix at www.dell.com/serviceabilitytools.
7
Using Extensions 69
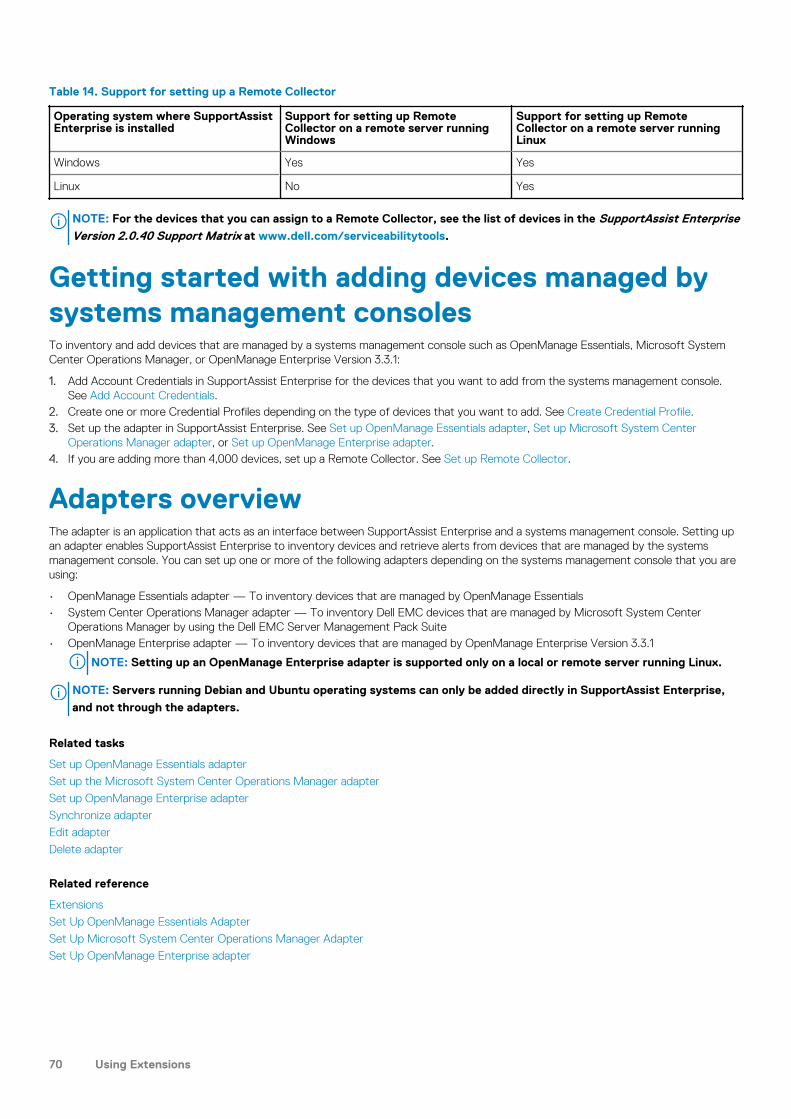
Table 14. Support for setting up a Remote Collector
Operating system where SupportAssistEnterprise is installed
Support for setting up RemoteCollector on a remote server runningWindows
Support for setting up RemoteCollector on a remote server runningLinux
Windows Yes Yes
Linux No Yes
NOTE: For the devices that you can assign to a Remote Collector, see the list of devices in the SupportAssist EnterpriseVersion 2.0.40 Support Matrix at www.dell.com/serviceabilitytools.
Getting started with adding devices managed bysystems management consolesTo inventory and add devices that are managed by a systems management console such as OpenManage Essentials, Microsoft SystemCenter Operations Manager, or OpenManage Enterprise Version 3.3.1:
1. Add Account Credentials in SupportAssist Enterprise for the devices that you want to add from the systems management console.See Add Account Credentials.
2. Create one or more Credential Profiles depending on the type of devices that you want to add. See Create Credential Profile.3. Set up the adapter in SupportAssist Enterprise. See Set up OpenManage Essentials adapter, Set up Microsoft System Center
Operations Manager adapter, or Set up OpenManage Enterprise adapter.4. If you are adding more than 4,000 devices, set up a Remote Collector. See Set up Remote Collector.
Adapters overviewThe adapter is an application that acts as an interface between SupportAssist Enterprise and a systems management console. Setting upan adapter enables SupportAssist Enterprise to inventory devices and retrieve alerts from devices that are managed by the systemsmanagement console. You can set up one or more of the following adapters depending on the systems management console that you areusing:
• OpenManage Essentials adapter — To inventory devices that are managed by OpenManage Essentials• System Center Operations Manager adapter — To inventory Dell EMC devices that are managed by Microsoft System Center
Operations Manager by using the Dell EMC Server Management Pack Suite• OpenManage Enterprise adapter — To inventory devices that are managed by OpenManage Enterprise Version 3.3.1
NOTE: Setting up an OpenManage Enterprise adapter is supported only on a local or remote server running Linux.
NOTE: Servers running Debian and Ubuntu operating systems can only be added directly in SupportAssist Enterprise,
and not through the adapters.
Related tasks
Set up OpenManage Essentials adapter
Set up the Microsoft System Center Operations Manager adapter
Set up OpenManage Enterprise adapter
Synchronize adapter
Edit adapter
Delete adapter
Related reference
Extensions
Set Up OpenManage Essentials Adapter
Set Up Microsoft System Center Operations Manager Adapter
Set Up OpenManage Enterprise adapter
70 Using Extensions

Set up OpenManage Essentials adapter
Prerequisites
• You must be logged in to SupportAssist Enterprise with elevated or administrative privileges. See Granting elevated or administrativeprivileges to users.
• The system where you want to set up the adapter must be running OpenManage Essentials version 2.5 or later.• You must have administrator privileges on the system running OpenManage Essentials.• You must have created Account Credentials and a Credential Profile that contains the credentials of the devices that will be
inventoried by the adapter. See Create Account Credentials and Create Credential Profile.• The server running SupportAssist Enterprise must have internet connectivity.• You must have read-write access to the system drive of the target device.• Ensure that Microsoft .NET Framework 4.5 is installed on the system where you want to set up the adapter.• Ensure that one of the following requirements are met:
• The Secure Socket Layer (SSL) protocol is enabled• The Transport Layer Security (TLS) protocol is enabled and its version is 1.0, 1.1, or 1.2
About this task
Setting up the OME adapter enables you to inventory and add devices that are managed by OpenManage Essentials. During the set up,SupportAssist Enterprise installs the adapter on the system running OpenManage Essentials, and then inventories the devices.
NOTE: If you have installed SupportAssist Enterprise and OpenManage Essentials on the same server, you must also set
up the adapter on the same server to add devices that are managed by OpenManage Essentials.
NOTE: If you have upgraded from SupportAssist for OpenManage Essentials to SupportAssist Enterprise, the
OpenManage Essentials adapter is automatically set up and your devices are inventoried and added in SupportAssist
Enterprise.
NOTE: One OpenManage Essentials adapter can only inventory and add devices from a single OpenManage Essentials
installation.
NOTE: The OpenManage Essentials adapter only inventories devices that are supported by SupportAssist Enterprise.
For the list of supported devices, see the SupportAssist Enterprise version 2.0.40 Support Matrix at www.dell.com/
serviceabilitytools.
Steps
1. Point to Extensions and click Manage Adapters.The Adapters page is displayed.
2. Click Set Up Adapter.The Set Up Adapter window is displayed.
Figure 15. Set Up Adapter window
Using Extensions 71

3. From the Adapter type list, select OpenManage Essentials.
4. Perform the following:
a) Type the hostname or IP address of the server where OpenManage Essentials is installed.b) If desired, type a name for the adapter in the appropriate field.
The name you enter is used to represent the adapter in SupportAssist Enterprise. If you do not enter a name, the host name or IPaddress that you have entered is used to represent the adapter.
c) Type the user name and password in the appropriate fields.
NOTE: The password must not exceed 50 characters.
NOTE: If you change the credentials of the system running OpenManage Essentials because of the security policy
requirements of your company or for other reasons, ensure that you also update the adapter credentials in
SupportAssist Enterprise. It is recommended that you create a service account with credentials that do not expire,
and enter the service account credentials in SupportAssist Enterprise.
NOTE: After SupportAssist Enterprise makes two consecutive failed authentication attempts to connect to
OpenManage Essentials, a lock file is created by SupportAssist Enterprise. The lock file,
SupportAssist_RestError.xml, is created on the system where OpenManage Essentials is installed and is
available at C:\ProgramData. The lock file is automatically deleted after one hour or you can delete the lock file
manually. During the lock out period, there is no communication between SupportAssist Enterprise and OpenManage
Essentials.
5. From the Update device inventory list, select the desired frequency for inventorying devices through the adapter.
6. From the Credential profile list, select a Credential Profile that contains the Account Credentials for the device types that will beinventoried by the adapter.
7. Click OK.The Adapter Details overview pane is displayed and devices that are managed by OpenManage Essentials are inventoried inSupportAssist Enterprise.
Figure 16. Adapters page
NOTE: If the adapter is not added successfully, you may have to delete the adapter and set it up again.
NOTE: While assigning a Credential Profile, SupportAssist Enterprise performs additional classification tasks in the
background for each device. Therefore, assigning Credential Profiles may be prolonged depending on the device
types, number of devices, and your network bandwidth. For more information on the approximate time taken to
assign Credential Profiles, see Approximate time taken to assign Credential Profiles.
Next steps
If the Credential Profile that you selected contains the correct credentials for the inventoried devices, the devices are added to theDefault group. Devices for which the credentials are either not correct or not available are moved to the Staging group.
NOTE: By default, monitoring is enabled for devices that are added successfully through the adapter.
NOTE: The automated support capabilities of SupportAssist Enterprise are not available for devices that are placed in
the Staging group.
To add devices that are placed in the Staging group:
1. In the Refine by pane, expand Groups and select Staging. You can also select the adapter under Devices Added in the Refine bypane to view devices that are inventoried by an adapter. If necessary, use the Search by option to filter the displayed list of devices.
2. Perform one of the following:
72 Using Extensions

• Select the devices and assign a Credential Profile that contains the credentials of the selected devices.• Select a device and click Edit to assign a Credential Account.
3. Repeat step 2 until you have assigned the correct Credential Profile or Account Credentials to all devices.
NOTE: For Storage PS Series devices, only the Storage PS Series management group is added through the adapter. The
Storage PS Series members are not added through the adapter.
Related concepts
Adapters overview
Related reference
Adapters
Set Up OpenManage Essentials Adapter
Set up the Microsoft System Center Operations Manageradapter
Prerequisites
• You must be logged in to SupportAssist Enterprise with elevated or administrative privileges. See Granting elevated or administrativeprivileges to users.
• The system or virtual machine where you want to set up the adapter must be running one of the following:
• Microsoft System Center Operations Manager 2012 R2• Microsoft System Center Operations Manager 2012 SP1• Microsoft System Center Operations Manager 2016
• Dell EMC Server Management Pack Suite Version 6.3 or 7.0 for Microsoft System Center Operations Manager and System CenterEssentials must be installed on the system. For information on the required management packs, see Management packs required byOperations Manager.
• You must have administrator privileges on the system or virtual machine running System Center Operations Manager.• The server running SupportAssist Enterprise must have internet connectivity.• You must have created Account Credentials and a Credential Profile that contains the credentials of the devices that will be
inventoried by the adapter. See Create Account Credentials and Create Credential Profile.• You must have read-write access to the system drive of the target device.
About this task
Setting up the System Center Operations Manager (SCOM) adapter enables you to inventory and add devices that are managed bySystem Center Operations Manager. During the set up, SupportAssist Enterprise installs the adapter on the system running OperationsManager, and then inventories the devices.
NOTE: If you have upgraded from SupportAssist for Microsoft System Center Operations Manager to SupportAssist
Enterprise, the System Center Operations Manager adapter is automatically set up and your devices are inventoried in
SupportAssist Enterprise.
NOTE: One System Center Operations Manager adapter can only inventory and add devices from a single System Center
Operations Manager instance.
NOTE: The System Center Operations Manager adapter only inventories PowerEdge servers, iDRAC, and OEM devices
that are supported by SupportAssist Enterprise. For the list of supported PowerEdge servers, see the SupportAssistEnterprise version 2.0.40 Support Matrix at www.dell.com/serviceabilitytools.
Steps
1. Point to Extensions and click Manage Adapters.The Adapters page is displayed.
2. Click Set Up Adapter.The Set Up Adapter window is displayed.
Using Extensions 73

Figure 17. Set Up Adapter window
3. From the Adapter type list, select System Center Operations Manager.
4. If desired, type a name for the adapter in the appropriate field.
The name you enter is used to represent the adapter in SupportAssist Enterprise. If you do not enter a name, the host name or IPaddress that you have entered is used to represent the adapter.
5. If you are setting up the adapter on the management group:
a) Type the hostname or IP address of the management group.b) Type the user name and password in the appropriate fields.
NOTE: The password must not exceed 50 characters.
6. If you are setting up the adapter on a Remote Console (RC), select Establish a remote connection with the management group,and perform the following:
a) Type the hostname or IP address of the management group.b) Type the user name and password in the appropriate fields.c) Type the hostname or IP address of the Remote Console.d) Type the user name and password in the appropriate fields.
NOTE: If you change the credentials of the system running the Management Group or Remote Console because of
the security policy requirements of your company or for other reasons, ensure that you also update the adapter
credentials in SupportAssist Enterprise. It is recommended that you create a service account with credentials that
do not expire, and enter the service account credentials in SupportAssist Enterprise.
7. From the Credential profile list, select a Credential Profile that contains the credentials of the devices that will be inventoried by theadapter.
8. From the Update device inventory list, select the desired frequency for inventorying devices through the adapter.
9. Click OK.The Adapter Details overview pane is displayed and devices that are managed by System Center Operations Manager are inventoriedin SupportAssist Enterprise.
NOTE: If the adapter is not added successfully, you may have to delete the adapter and set it up again.
NOTE: While assigning a Credential Profile, SupportAssist Enterprise performs additional classification tasks in the
background for each device. Therefore, assigning Credential Profiles may be prolonged depending on the device
types, number of devices, and your network bandwidth. For more information on the approximate time taken to
assign Credential Profiles, see Approximate time taken to assign Credential Profiles.
74 Using Extensions

Next steps
If the Credential Profile that you selected contains the correct credentials for the inventoried devices, the devices are added to theDefault group. Devices for which the credentials are either not correct or not available are moved to the Staging group.
NOTE: By default, monitoring is enabled for devices that are added successfully through the adapter.
NOTE: The automated support capabilities of SupportAssist Enterprise are not available for devices that are placed in
the Staging group.
To add devices that are placed in the Staging group:
1. In the Refine by pane, expand Groups and select Staging. You can also select the adapter under Devices Added in the Refine bypane to view devices that are inventoried by an adapter. If necessary, use the Search by option to filter the displayed list of devices.
2. Perform one of the following:
• Select the devices and assign a Credential Profile that contains the credentials of the selected devices.• Select a device and click Edit to assign a Credential Account.
3. Repeat step 2 until you have assigned the correct Credential Profile or Account Credentials to all devices.
Related concepts
Adapters overview
Related reference
Adapters
Set Up Microsoft System Center Operations Manager Adapter
Management Packs for inventorying devices managed byOperations ManagerThe following table lists the Dell EMC Server Management Pack Suite Version 6.3 or 7.0 required for SupportAssist Enterprise to inventorydevices that are managed by System Center Operations Manager (SCOM).
Table 15. Management Packs for inventorying devices managed by Operations Manager
Devices to bemonitored
Monitoring Feature Required Management Packs
Dell EMC’s x9xx orlater generation ofPowerEdge servers
Servers and Rack Workstations Agent-basedMonitoring
• Dell EMC Base Hardware Library• Dell EMC Server Model• Dell EMC Server Operations Library• Dell EMC Server View Library• Dell EMC Windows Server (Scalable Edition)• Dell EMC Operations Library Common• Dell EMC Server and Rack Workstation Monitoring
(Licensed)
iDRAC DRAC Monitoring • Dell EMC Feature Monitoring (optional)• Dell EMC Base Hardware Library• Dell EMC Operations Library Common• Dell EMC DRAC Model• Dell EMC DRAC View• Dell EMC DRAC Operations Library• Dell EMC DRAC (SC2012 OM)
NOTE: For information about importing the required management packs, see the Dell EMC Server Management PackSuite For Microsoft System Center Operations Manager And System Center Essentials Installation Guide at
www.dell.com/openmanagemanuals, under Server Management Pack Versions for Microsoft System Center Operations
Manager.
Using Extensions 75

Set up OpenManage Enterprise adapter
Prerequisites
• You must be logged in to SupportAssist Enterprise with elevated or administrative privileges. See Granting elevated or administrativeprivileges to users.
• You must have administrator privileges on the system running OpenManage Enterprise Version 3.3.1.• You must have created Account Credentials and a Credential Profile that contains the credentials of the devices that will be
inventoried by the adapter. See Create Account Credentials and Create Credential Profile.
About this task
Setting up the OpenManage Enterprise adapter enables you to inventory devices that are managed by OpenManage Enterprise Version3.3.1. During the set up, SupportAssist Enterprise installs the adapter on the system running SupportAssist Enterprise and then inventoriesthe devices.
You can only inventory and add the following devices through the OpenManage Enterprise adapter:
• iDRAC of yx2x to yx5x PowerEdge servers• Servers running Linux, ESXi, and HyperV• PowerEdge M1000e• PowerEdge VRTX• PowerEdge FX2/ FX2s• PowerEdge MX7000• Storage SC Series devices (previously Compellent)• Dell Networking devices—OS9 and OS10
NOTE: OS10 support is limited only to PowerEdge MX7000 switches.
• OEM devices• IOM devices• Storage MD Series arrays (previously PowerVault)• Storage ME4 Series arrays
NOTE: One OpenManage Enterprise adapter can inventory and add devices from multiple OpenManage Enterprise
instances.
Steps
1. Point to Extensions and click Manage Adapters.The Adapters page is displayed.
2. Click Set Up Adapter.The Set Up Adapter window is displayed.
3. From the Adapter type list, select OpenManage Enterprise.
4. Perform the following:
a) Type the hostname or IP address of the server where OpenManage Enterprise is installed.b) If desired, type a name for the adapter in the appropriate field.
The name you enter is used to represent the adapter in SupportAssist Enterprise. If you do not enter a name, the host name or IPaddress that you have entered is used to represent the adapter.
c) Type the user name and password in the appropriate fields.
NOTE: The password must not exceed 50 characters.
5. From the Credential profile list, select a Credential Profile that contains the Account Credentials for the device types that will beinventoried by the adapter.
6. From the Update device inventory list, select the desired frequency for inventorying devices through the adapter.
7. Click OK.The Adapter Details overview pane is displayed and devices that are managed by OpenManage Enterprise are inventoried inSupportAssist Enterprise.
76 Using Extensions

Next steps
If the Credential Profile that you selected contains the correct credentials for the inventoried devices, the devices are added to theDefault group. Devices for which the credentials are either not correct or not available are moved to the Staging group.
NOTE: By default, monitoring is enabled for devices that are added successfully through the adapter.
NOTE: The automated support capabilities of SupportAssist Enterprise are not available for devices that are placed in
the Staging group.
NOTE: For Storage PS Series devices, only the Storage PS Series management group is added through the adapter. The
Storage PS Series members are not added through the adapter.
To add devices that are placed in the Staging group:
1. In the Refine by pane, expand Groups and select Staging. You can also select the adapter under Devices Added in the Refine bypane to view devices that are inventoried by an adapter. If necessary, use the Search by option to filter the displayed list of devices.
2. Perform one of the following:
• Select the devices and assign a Credential Profile that contains the credentials of the selected devices.• Select a device and click Edit to assign a Credential Account.
3. Repeat step 2 until you have assigned the correct Credential Profile or Account Credentials to all devices.
NOTE: When the OpenManage Enterprise services are suspended and resumed, the OpenManage Enterprise adapter will
only retrieve alerts that have occurred in the last 12 hours for devices that are added in SupportAssist Enterprise
through the OpenManage Enterprise adapter.
NOTE: After synchronization of the OpenManage Enterprise adapter, some of the iDRACs may not be displayed in
SupportAssist Enterprise. This may occur if the iDRAC version cannot be retrieved from OpenManage Enterprise.
Related concepts
Adapters overview
View the adapter overview pane
Prerequisites
You must be logged in to SupportAssist Enterprise with elevated or administrative privileges. See Granting elevated or administrativeprivileges to users.
About this task
You can view details of an adapter such as the adapter type, operating system type, managed devices, staging devices, version, and thelast inventory date and time in the adapter overview pane.
Steps
1. Point to Extensions and click Manage Adapters.The Adapters page is displayed.
2. Select an adapter.The adapter overview pane is displayed.
Related reference
Adapters
Adapter overview pane
Using Extensions 77

View devices inventoried by the adapter
Prerequisites
You must be logged in to SupportAssist Enterprise with elevated or administrative privileges. See Granting elevated or administrativeprivileges to users.
Steps
1. Point to Devices and click View Devices.The Devices page is displayed.
2. In the Refine By pane, under Devices Added, click + to expand the adapter list, and then select the adapter.The devices that are inventoried by the adapter are displayed.
Related reference
Adapters
Synchronize adapter
Prerequisites
You must be logged in to SupportAssist Enterprise with elevated or administrative privileges. See Granting elevated or administrativeprivileges to users.
About this task
By default, the adapter inventories devices from the systems management console at regular intervals, based on your selection.Depending on your requirement, you can also manually initiate the inventory of devices at any time.
Steps
1. Point to Extensions and click Manage Adapters.The Adapters page is displayed.
2. Select an adapter.The adapter overview pane is displayed.
3. Click Sync now.
Related concepts
Adapters overview
Related reference
Adapters
Edit adapter
Prerequisites
You must be logged in to SupportAssist Enterprise with elevated or administrative privileges. See Granting elevated or administrativeprivileges to users.
About this task
You can edit the details of the adapter to update any of the following:
• Credentials of the server where the adapter is set up• Inventory frequency• Credential Profile• Name
78 Using Extensions

Steps
1. Point to Extensions and click Manage Adapters.The Adapters page is displayed.
2. Select the adapter that you want to edit and click Edit.The Edit Adapter window is displayed.
3. Edit the name, user name, and password as required.
4. Change the update inventory frequency and Credential Profile as required.
5. Click Update.The details of the adapter are updated.
Related concepts
Adapters overview
Related reference
Adapters
Delete adapter
Prerequisites
You must be logged in to SupportAssist Enterprise with elevated or administrative privileges. See Granting elevated or administrativeprivileges to users.
About this task
You can delete an adapter from SupportAssist Enterprise based on your preference.
Deleting an adapter results in the following:
• Removes the adapter from SupportAssist Enterprise user interface• Removes the devices associated with the adapter• Uninstalls the adapter application from the server where it was set up
NOTE: Uninstallation of the OpenManage Enterprise adapter occurs only if all the OpenManage Enterprise adapters
are deleted in SupportAssist Enterprise.
Steps
1. Point to Extensions and click Manage Adapters.The Adapters page is displayed.
2. Select the adapter you want to delete and click Delete.The Delete Adapter window is displayed.
3. Click Yes.
Related concepts
Adapters overview
Related reference
Adapters
Approximate time required to assign Credential ProfileAssigning a Credential Profile may be prolonged depending upon the device types, number of devices, and your network bandwidth.
The following table provides the approximate time required to assign a Credential Profile depending upon the number of devices.
Using Extensions 79

Table 16. Device count and Credential Profile assignment duration
Number of devices Time taken to assign a Credential Profile
5 3 minutes
50 15 minutes
100 30 minutes
1000 6 hours
1500 9 hours
2000 12 hours
3000 17 hours
Remote Collectors overviewThe Remote Collector is a remote instance of SupportAssist Enterprise that collects and uploads system information from devices within aspecified IP address range. The Remote Collector enables SupportAssist Enterprise to distribute the workload associated with collectingand uploading system information to a remote server. You can set up the Remote Collector on any remote server. Depending on the totalnumber of devices, you can set up multiple Remote Collectors.
System information collected by a Remote Collector is saved on the remote server and directly uploaded to Dell EMC from the remoteserver.
NOTE: A single Remote Collector can collect and upload system information to Dell EMC from up to 4,000 devices.
NOTE: The Remote Collector (remote instance of SupportAssist Enterprise) can only collect and upload system
information from devices. You cannot add devices to a Remote Collector.
Related tasks
Set Up Remote Collector
Related reference
Extensions
Minimum requirements for setting up a Remote CollectorThe following sections describe the minimum hardware and networking requirements for setting up a Remote Collector in SupportAssistEnterprise.
Hardware requirementsThe following table provides a summary of the minimum hardware requirements on the server where the Remote Collector is set up.
Table 17. Hardware requirements
Devices Monitoring Collecting SystemInformation
Processor Installedmemory (RAM)
Hard drive(free space)
1 No Yes 1 core 4 GB 1 GB
20 Yes Yes 2 cores 4 GB 4 GB
Up to 100 Yes Yes 4 cores 8 GB 12 GB
Up to 300 Yes Yes 4 cores 8 GB 32 GB
Up to 1000 Yes Yes 8 cores 8 GB 60 GB
Up to 4000 Yes Yes 8 cores 16 GB 90 GB
80 Using Extensions

Network requirementsThe following are the network requirements of the server where the Remote Collector is set up.
• Internet connection — standard 1 GbE network or faster.• The server where the Remote Collector is set up must be able to communicate with the SupportAssist server hosted by Dell EMC
over HTTPS protocol.• The Remote Collector must be able to connect to https://is.us.dell.com/*, the file upload server and related services.
The following table lists the network bandwidth requirements for collecting system information from devices.
Table 18. Network bandwidth requirements
Devices Monitoring Collecting SystemInformation
LAN bandwidth* WANbandwidth**
1 No Yes 10 Mbps 5 Mbps
20 Yes Yes 0.5 Gbps 10 Mbps
Up to 100 Yes Yes 0.5 Gbps 10 Mbps
Up to 300 Yes Yes 0.5 Gbps 10 Mbps
Up to 1000 Yes Yes 1 Gbps 20 Mbps
Up to 4000 Yes Yes 1 Gbps 20 Mbps
* Network bandwidth required for collecting system information from devices within a single site.
** Network bandwidth required for collecting system information from devices that are distributed across multiple sites.
The following figure illustrates network port connectivity between SupportAssist Enterprise and other monitored devices.
Using Extensions 81
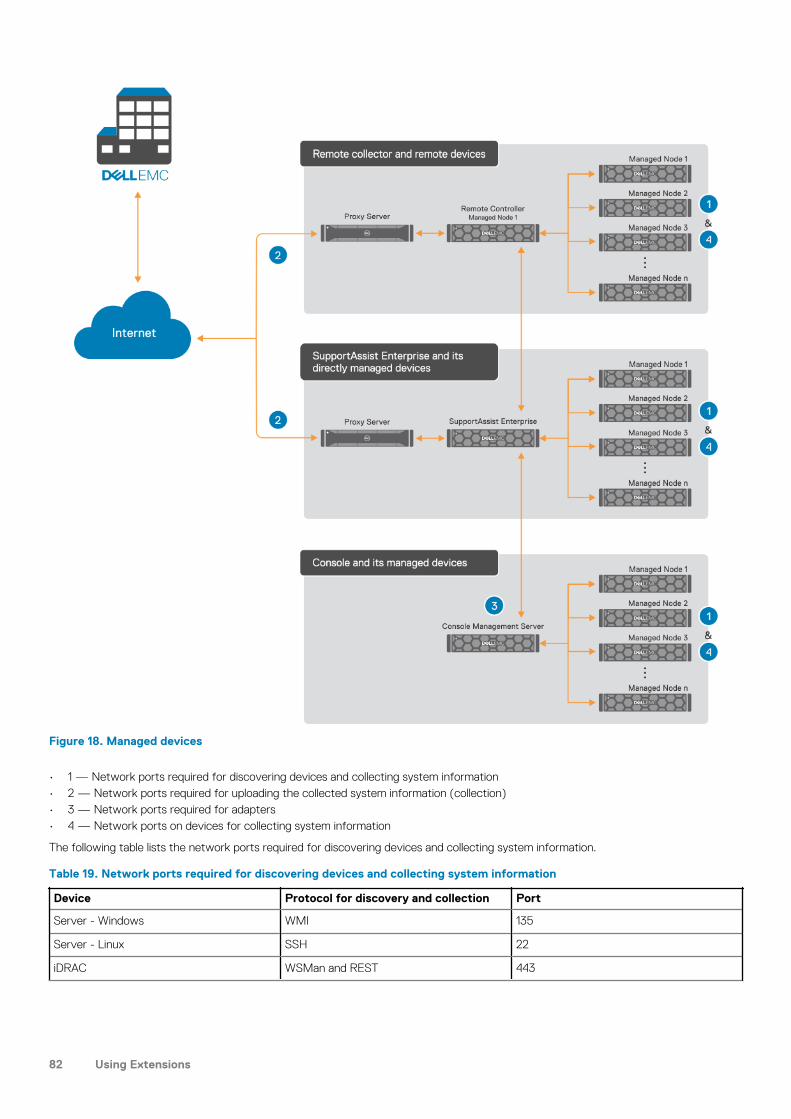
Figure 18. Managed devices
• 1 — Network ports required for discovering devices and collecting system information• 2 — Network ports required for uploading the collected system information (collection)• 3 — Network ports required for adapters• 4 — Network ports on devices for collecting system information
The following table lists the network ports required for discovering devices and collecting system information.
Table 19. Network ports required for discovering devices and collecting system information
Device Protocol for discovery and collection Port
Server - Windows WMI 135
Server - Linux SSH 22
iDRAC WSMan and REST 443
82 Using Extensions

Device Protocol for discovery and collection Port
If you have iDRAC9 with firmware version4.x installed:
• WSMan protocol is used to configurealert destination of the server
• REST protocol is used to send andreceive information from SupportAssistEnterprise
ESX or ESXi SSH and VMware SDK 22 and 443
Storage PS Series arrays (previouslyEqualLogic)
SNMPv2, SSH2, and FTP 161, 22, and 21
Storage MD Series arrays (previouslyPowerVault)
SYMbolSDK 2463
Storage ME4 Series arrays REST and SFTP 443 and 1022
Storage SC Series arrays (previouslyCompellent)
REST 3033
Fluid File System (FluidFS) Networkattached storage (NAS) devices
SSH and FTP 22 and 44421
PowerConnect switches SNMP and SSH 22 and 161
Force10 switches SNMP and SSH 161 and 22
Networking switches SNMP and SSH 22 and 161
W series switches SNMP and SSH 22 and 161
PowerEdge FX2/FX2s SSH 22
PowerEdge VRTX SSH 22
PowerEdge M1000e SSH 22
PowerEdge MX7000 REST 443
SAN HQ WMI 135
HIT Kit / VSM for VMware SSH 22
vCenter HTTPS 443
SCVMM WMI 135
XC Series of Web-Scale hyper-convergedappliances
REST and SSH 9440 and 22
Virtual Machine - Windows WMI 135
Virtual Machine - Linux SSH 22
The following table lists the network ports required for uploading the collected system information.
Table 20. Network ports required for uploading the collected system information
Source Destination Port
SupportAssist Enterprise SupportAssist Server 443
File Upload Server (FUS)
File Retrieval Service (FRS)
Remote Collector File Upload Server (FUS) 443
File Retrieval Service (FRS)
Using Extensions 83

The following table lists the network ports required for collecting system information.
Table 21. Network ports on devices for collecting system information
Source Destination Port
Storage SC Series arrays (previouslyCompellent)
SupportAssist Enterprise 5701, 5702, 5703, and 5704
Server SupportAssist agent SupportAssist Enterprise 5701, 5702, 5703, and 5704
Server (In band) SupportAssist Enterprise 5701, 5702, 5703, and 5704
Set up Remote Collector
Prerequisites
• You must be logged in to SupportAssist Enterprise with elevated or administrative privileges. See Granting elevated or administrativeprivileges to users.
• The server where you want to set up the Remote Collector must be reachable from the server where SupportAssist Enterprise isinstalled.
• Port 5700 must be open on both the server running SupportAssist Enterprise and the server where you want to set up the RemoteCollector.
• The remote system must have internet connectivity for uploading the collected system information to Dell EMC.• The remote system must meet the minimum requirements for setting up the Remote Collector. See Minimum requirements for setting
up a Remote Collector.• The server running SupportAssist Enterprise must have internet connectivity.• You must have read-write access to the system drive of the target device.• Ensure that sudo access is configured for the non-root user account. For information on configuring sudo access, see Configure sudo
access for SupportAssist Enterprise in Linux.
About this task
Setting up a Remote Collector enables SupportAssist Enterprise to distribute the workload associated with collecting and uploadingsystem information to a remote server. During the set up, SupportAssist Enterprise installs the Remote Collector on the remote server.
Steps
1. Point to Extensions and click Manage Remote Collectors.The Remote Collectors page is displayed.
2. Click Set Up Remote Collector.The Set Up Remote Collector window is displayed.
84 Using Extensions

Figure 19. Set Up Remote Collector window
3. Type the hostname or IP address of the server where you want to set up the Remote Collector.
4. If desired, type a name for the Remote Collector in the appropriate field.
5. Type the user name and password in the appropriate fields.
6. To assign devices to the Remote Collector by using hostname expressions:
a) Select Hostname.b) Type the hostname expression or hostname expressions of the devices that you want to assign to the Remote Collector.
NOTE: The hostname expression can only include special characters such as *, ?, or alphanumeric characters.
c) To add multiple hostname expressions, click Add another expression, and then type the hostname expressions of the devices.
7. To assign devices to the Remote Collector by using IP address ranges:
a) Select IP address / range.b) Type the IP address or IP address ranges of the devices that you want to associate with the Remote Collector.c) To add multiple IP address ranges, click Add IP address range, and then type the IP address range of the devices.
You can add up to five different IP address ranges by using one of the following formats:
• 193.109.112.99• 193.109.112.*• 193.104.20-40.*• 192.168.*.*• 192.168.2-51.3-91• 193.109.112.45-99
NOTE: Ensure that the IP address ranges you have entered do not overlap with each other.
8. If the remote server connects to the internet through a proxy server, select the The remote system connects to the internetthrough a proxy server option and then do the following:
a) Type the host name or IP address, and port number of the proxy server in the appropriate fields.b) If a user name and password are required to connect to the proxy server, select Proxy requires authentication and then type
the user name and password in the appropriate fields.
Using Extensions 85

c) In the Proxy Exclusion List box, type the IP address ranges or host name expressions of devices to which the Remote Collectormust communicate directly and not through the proxy server. IP address of devices that communicate through https protocolmust be included in the proxy exclusion list. Examples of devices that communicate through https protocol include iDRAC, StorageSC Series arrays, VMware ESX and ESXi, and XC Series of web-scale hyper-converged appliances.
NOTE: You can enter one or more IP address ranges as semi-colon separated values. For example, 10.49.*.* ;
10.49.18.* ; *.*.100.10.
You can enter a list of IP address ranges in the following formats:
• 10.49.*.*• 10.49.18.*• *.*.100.10• *.*.*.10• *.10.12.100• 10.*.*.*
The following IP address range formats are not supported:
• 10.*.*.49• 10.*.49.*• 10.49.*.10
NOTE: If you have assigned devices to the Remote Collector by using IP address ranges, ensure that you only
enter IP address ranges in the Proxy Exclusion List. If you have assigned devices to the Remote Collector by
using hostname expressions, ensure that you only enter hostname expressions in the Proxy Exclusion List.
9. Click OK.The Set Up Remote Collector overview pane is displayed and the Remote Collector (remote instance of SupportAssist Enterprise) isinstalled and set up on the remote server.
NOTE: If the Remote Collector is not added successfully, you may have to delete the Remote Collector and set it up
again.
Related reference
Remote Collectors
Set Up Remote Collector
View collections for devices associated with a RemoteCollector
About this task
Collections that are performed by Remote Collectors can only be viewed by manually accessing the collection file.
Steps
1. Log in to the server where the Remote Collector is set up.
2. Perform one of the following:
• If you have set up the Remote Collector on a server running Windows — Browse to <Drive where SupportAssistEnterprise is installed>:\Program Files\Dell\SupportAssist\Reports folder.
• If you have set up the Remote Collector on a server running Linux — Browse to \opt\Dell\supportassist\reportsfolder.
3. Extract the appropriate collection .zip file and then double click the index.html file.
NOTE: For collections from devices that are running a non-English operating system, the Configuration Viewer may
not display certain attributes as expected.
The Configuration Viewer opens in a web browser window.
Related reference
Remote Collectors
86 Using Extensions

View the Remote Collector overview pane
Prerequisites
You must be logged in to SupportAssist Enterprise with elevated or administrative privileges. See Granting elevated or administrativeprivileges to users.
About this task
You can view details of a Remote Collector such as the name of the Remote Collector, IP address, connectivity status, collection range,and the details of the connected devices in the Remote Collector overview pane.
Steps
1. Point to Extensions and click Manage Remote Collectors.The Remote Collectors page is displayed.
2. Select a Remote Collector.The Remote Collector overview pane is displayed.
Figure 20. Remote Collector overview pane
Related reference
Remote Collectors
Remote Collector overview pane
View devices associated with a Remote Collector
Prerequisites
You must be logged in to SupportAssist Enterprise with elevated or administrative privileges. See Granting elevated or administrativeprivileges to users.
Steps
1. Point to Extensions and click Manage Remote Collectors.The Remote Collectors page is displayed.
2. Select a Remote Collector.The Remote Collector overview pane is displayed.
Using Extensions 87

Figure 21. Remote Collector overview pane
3. Click View all devices.Devices that are associated with the Remote Collector are displayed on the Devices page.
Related reference
Remote Collectors
Edit Remote Collector
Prerequisites
You must be logged in to SupportAssist Enterprise with elevated or administrative privileges. See Granting elevated or administrativeprivileges to users.
About this task
You can edit the name, IP address range, user name, and password of a Remote Collector based on your preference.
Steps
1. Point to Extensions and click Manage Remote Collectors.The Remote Collectors page is displayed.
2. Select the Remote Collector that you want to update and click Edit.The Edit Remote Collector window is displayed.
3. Edit the name, IP address range, user name, password, proxy details, and the proxy exclusion list as required.
4. Click Update.
If SupportAssist Enterprise is unable to connect to the remote system using the entered credentials:
• The existing credentials are retained• The Remote Collector and the Upload Connectivity on the Remote Collectors page retain the status that was displayed prior to
editing the credentials
If the remote system is unable to connect to the proxy server using the entered proxy server credentials:
• The entered proxy server credentials are saved in SupportAssist Enterprise, but the existing proxy server credentials are retained inthe Remote Collector.
• The Remote Collector displays a proxy validation failed status, but the Upload connectivity retains the status that was displayedprior to editing the proxy server credentials.
Related reference
Remote Collectors
88 Using Extensions

Delete Remote Collector
Prerequisites
You must be logged in to SupportAssist Enterprise with elevated or administrative privileges. See Granting elevated or administrativeprivileges to users.
About this task
You can delete a Remote Collector from SupportAssist Enterprise based on your preference.
CAUTION: Deleting the Remote Collector will also delete all collections that are saved on the remote system.
Steps
1. Point to Extensions and click Manage Remote Collectors.The Remote Collectors page is displayed.
2. Select the Remote Collector you want to delete and click Delete.The Remove Remote Collector window is displayed.
3. Click Remove Remote Collector.The Remote Collector is removed from SupportAssist Enterprise and the Remote Collector application is uninstalled from the remotesystem. If the IP address range or hostname expression of devices that were assigned to the Remote Collector overlap with that ofanother Remote Collector, the applicable devices are assigned to the other Remote Collector. Otherwise, the devices are assigned toserver running SupportAssist Enterprise.
Related reference
Remote Collectors
Using Extensions 89

Device groupingSupportAssist Enterprise has two predefined device groups—Default and Staging—that help you in managing the devices that you add.Depending on your requirement, you can also create custom device groups to manage certain devices as a group. For example, you cancreate device groups that may include devices based on the following:
• Device type (server, storage, or networking)• The individual who manages the devices (Administrator group)• Organization or business unit (Marketing, Operations, Finance, and so on)• Physical location of the devices (shipping address)• Alerting or notification (individuals who must be notified if an issue is detected on certain devices)
After you create a device group, you can:
• Add or remove devices from the device group.• Assign a Credential Profile for each device type included in the device group.• Configure the contact information and parts dispatch information for the device group.• Edit the device group details or delete the device group.
NOTE: Grouping of devices is optional. Device grouping does not have an impact on the monitoring and automatic case
creation capabilities of SupportAssist Enterprise.
NOTE: You can create and manage device groups only if you are logged on as a member of the OpenManage Essentials
Administrators, Power Users, or Site Administrators group.
NOTE: You can create and manage device groups only if you are logged in to SupportAssist Enterprise with elevated or
administrative privileges. For information on the SupportAssist Enterprise user groups, see SupportAssist Enterprise
user groups and Granting elevated or administrative privileges to users.
NOTE: The credentials, contact information, and parts dispatch information configured for a device group override the
default credentials, contact information, and parts dispatch information configured through the Settings pages. For
example, if you have created a device group and configured the primary contact for the device group, all SupportAssist
Enterprise notifications for issues with any device included in the device group are sent to the primary contact assigned
to that device group.
Related tasks
View device groups
Creating a device group
Manage devices in a device group
Manage the credentials of a device group
View and update device group information
Delete a device group
Topics:
• Predefined device groups• View device groups• Creating a device group• Manage devices in a device group• Manage the credentials of a device group• View and update device group information• Delete a device group
8
90 Device grouping

Predefined device groupsThe predefined device groups available in SupportAssist Enterprise are as follows:
• Default group—Contains devices that you have assigned to the Default group. By default, all devices that are discoveredsuccessfully are assigned to this group unless you assign the device to any other group.
• Staging group—Contains devices that were only discovered partially while you tried to add them because certain requirements werenot met. Devices in this group are automatically moved to the Default group when you revalidate them after the requirement is met.SupportAssist Enterprise capabilities are not available for devices that are present in this group. Typically, a device is added to thestaging group in the following cases:
• For servers, iDRAC does not have the required license installed• For Compellent devices, SupportAssist is not enabled in the Dell EMC Compellent Enterprise Manager application• Certain prerequisites for adding the device are not met
View device groupsYou can view the devices groups that you have created in the Device Groups page.
About this task
To view the device groups:
Steps
To view the device groups, point to Devices and click Manage Device Groups.The Device Groups page is displayed.
Figure 22. Device Groups page
Creating a device groupPrerequisites
You must be logged in to SupportAssist Enterprise with elevated or administrative privileges. See SupportAssist Enterprise user groupsand Granting elevated or administrative privileges to users.
Steps
1. Point to Devices and click Manage Device Groups.The Device Groups page is displayed.
2. Click Create Group.The Create Device Group window is displayed.
3. On the Group and Contact Information page, in the Group Details section, type the group name and a description for the group.
4. Select IT Administrator Contact Information, and provide the following information:
a) If you want to use the IT Administrator contact information provided in the Settings > Contact Information page, click theappropriate link.
b) Select one of the following:
Device grouping 91

• Primary• Secondary
c) Type your first name, last name, phone number, alternate phone number, and email address in the appropriate fields.d) Select the preferred contact method, preferred contact hours, and time zone.
5. Click Next.The Parts Replacement Preferences for Dell Servers page is displayed.
By default, the I want Dell server replacement parts shipped automatically is selected. If you clear the option, the shipment ofDell EMC server replacement parts could be delayed.
6. To copy the already provided contact information, click the appropriate link.The Primary Shipping Contact information is populated.
7. In the Secondary Shipping Contact section, type the first name, last name, phone number, and email address of the secondarycontact.
NOTE: Contact details of the primary and secondary contact must be unique.
8. In the Shipping Address section, perform the following:
a) Select the preferred contact hours during which Dell EMC can contact you, if necessary.b) Select the time zone, country, and type your shipping address in the appropriate fields.c) Type any specific dispatch related information in the Dispatch Notes section.
NOTE: If a device is moved to a different location, ensure that the dispatch preferences and shipping information
are updated.
d) If you want an onsite technician to replace the dispatched hardware component, select I want a technician to replace my partsonsite (if included in my service plan).
9. Click Create.The device group that you created is displayed in the Device Groups page.
Manage devices in a device groupAfter creating a device group, you can select the devices you want to add or remove from the device group.
Prerequisites
• Ensure that you have already created a device group. See Creating a device group.• You must be logged in to SupportAssist Enterprise with elevated or administrative privileges. See SupportAssist Enterprise user groups
and Granting elevated or administrative privileges to users.
About this task
You can use the Manage Devices action available in the Device Groups page to add or remove devices from the device group.
Before you begin, makes sure that you have already created a device group. See Creating a device group.
NOTE: You can add or remove devices from a device groups only if you are logged on as a member of the OpenManage
Essentials Administrators, Power Users, or Site Administrators group.
To manage devices in a device group:
NOTE: A device can be included in only one device group.
Steps
1. Point to Devices and click Manage Device Groups.The Device Groups page is displayed.
2. Select a device group.
3. In the Select group actions list, select Manage Devices.The Manage Devices window is displayed.
92 Device grouping

Figure 23. Manage Devices window
4. To add devices to the device group, select the devices in the Ungrouped pane, and click .The selected devices are moved to the Devices in current group pane.
5. To remove devices from the device group, select the devices in the Devices in current group pane, and click .The selected devices are moved to the Ungrouped pane.
6. Click Save.
NOTE: Including or excluding one listing of a correlated device from a device group results in the automatic inclusion
or exclusion of the other associated listing. For more information about device correlation, see Device correlation.
Manage the credentials of a device groupIf the device types within a device group differ from the default credentials, you must provide the credentials of those device types. Ifdevice types within the device group have the same credentials, you can configure common credentials for each device type within thedevice group.
Prerequisites
• You must be logged in to SupportAssist Enterprise with elevated or administrative privileges. See SupportAssist Enterprise user groupsand Granting elevated or administrative privileges to users.
• You must have created a Credential Profile. See Create Credential Profile.
About this task
You can use the Assign Credential Profile option to apply common credentials for the different device types within a device group.NOTE: You can manage credentials of a device group only if you are logged on as a member of the OpenManage
Essentials Administrators, Power Users, or Site Administrators group.
NOTE: The device group credentials override the default credentials configured in the Settings > System Logs page.
When the device group credentials are configured:
• SupportAssist uses the device group credentials (not the default credentials) to collect system information from the
device type.
• If SupportAssist is unable to connect to the device using the device group credentials, SupportAssist uses the
default credentials.
To manage the credentials of a device group:
Device grouping 93

Steps
1. Point to Devices and click View Devices.The Devices page is displayed.
2. From the Refine by pane, expand Groups and select a device group.
3. Select the devices for which you want to apply a Credential Profile.
4. From the Assign Credential Profile list, select a Credential Profile.Credentials are assigned to the device group based on the credentials that are available in the selected Credential Profile.
View and update device group informationPrerequisites
You must be logged in to SupportAssist Enterprise with elevated or administrative privileges. See SupportAssist Enterprise user groupsand Granting elevated or administrative privileges to users.
About this task
You can view or update the contact information, preferred contact method and time, and the parts dispatch information of a devicegroup. You can also integrate automated parts dispatch with specific TechDirect accounts.
Updating the contact information for a device group allows SupportAssist Enterprise to send notifications to the device group contact.
NOTE: The device group parts dispatch information overrides the default parts dispatch information that you
configured through the Settings > Contact Information page. If resolving a problem requires replacing a part, the
replacement part is shipped with your consent to the device group parts dispatch address (not the default parts
dispatch address).
NOTE: If the Technical Support agent determines that a part must be replaced in your system to resolve a support case,
the replacement part is dispatched with your consent to the provided address.
Steps
1. Point to Devices and click Manage Device Groups.The Device Groups page is displayed.
2. Select a device group.
3. From the Select Group Actions list, select Edit Group.The Edit Device Group window is displayed.
4. Select IT Administrator Contact Information, and provide the following information:
a) If you want to use the IT Administrator contact information provided in the Settings > Contact Information page, click theappropriate link.
b) Select one of the following:
• Primary• Secondary
c) Type your first name, last name, phone number, alternate phone number, and email address in the appropriate fields.d) Select the preferred contact method, preferred contact hours, and time zone.
5. Click Next.The Parts Replacement Preferences for Dell Servers page is displayed.
6. Select I want Dell server replacement parts shipped automatically.
NOTE: If you do not wish to set up parts replacement preferences, the shipment of Dell EMC server replacement
parts could be delayed.
7. To copy the already provided contact information, click the appropriate link.The Primary Shipping Contact information is populated.
8. In the Secondary Shipping Contact section, type the first name, last name, phone number, and email address of the secondarycontact.
NOTE: Contact details of the primary and secondary contact must be unique.
9. In the Shipping Address section, perform the following:
a) Select the preferred contact hours during which Dell EMC can contact you, if necessary.
94 Device grouping

b) Select the time zone, country, and type your shipping address in the appropriate fields.c) Type any specific dispatch related information in the Dispatch Notes section.
NOTE: If a device is moved to a different location, ensure that the dispatch preferences and shipping information
are updated.
d) If you want an onsite technician to replace the dispatched hardware component, select I want a technician to replace my partsonsite (if included in my service plan).
10. Click Update.
Delete a device groupPrerequisites
You must be logged in to SupportAssist Enterprise with elevated or administrative privileges. See SupportAssist Enterprise user groupsand Granting elevated or administrative privileges to users.
About this task
You can delete device groups based on your preference.NOTE: You can delete a device group only if you are logged on as a member of the OpenManage Essentials
Administrators, Power Users, or Site Administrators group.
NOTE: Deleting a device group only removes the device group, device group credentials, and contact information. It
does not delete any devices from the Devices page.
Steps
1. Point to Devices and click Manage Device Groups.The Device Groups page is displayed.
2. Select a device group, and then click Delete.
Device grouping 95

Managing device credentialsSupportAssist Enterprise requires the device credentials to add devices and to collect system information.
You can enter or assign credentials to a device by using one of the following methods:
• While adding a device• By using the Edit option• By assigning an account credential or a credential profile
Topics:
• Account credentials• Credential Profiles
Account credentialsAn account credential consists of the credentials of a specific device type. The account credentials are used by SupportAssist Enterpriseto connect to a device and collect system information. Depending on the number of device types in your environment, you may have tocreate one or more account credentials.
Related tasks
Add Account Credentials
Reassign Account Credentials
Edit Account Credentials
Delete Account Credentials
Related reference
Manage Account Credentials
Add Account Credentials
Prerequisites
You must be logged in to SupportAssist Enterprise with elevated or administrative privileges. See Granting elevated or administrativeprivileges to users.
About this task
Account Credentials are required to add a device or to create a Credential Profile that you can apply to devices. Depending on yourrequirement, you can create an Account Credentials for each device type in your environment.
Steps
1. Point to Devices > Manage Credentials and click Account Credentials.The Manage Account Credentials page is displayed.
9
96 Managing device credentials
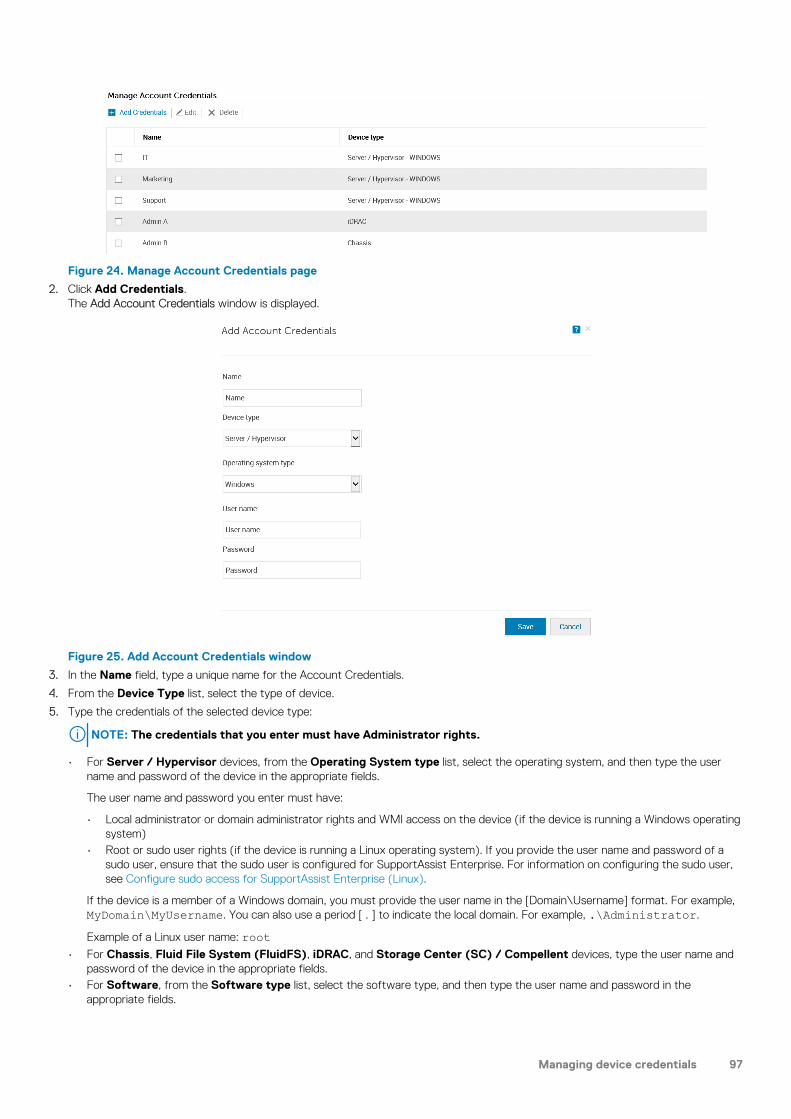
Figure 24. Manage Account Credentials page
2. Click Add Credentials.The Add Account Credentials window is displayed.
Figure 25. Add Account Credentials window
3. In the Name field, type a unique name for the Account Credentials.
4. From the Device Type list, select the type of device.
5. Type the credentials of the selected device type:
NOTE: The credentials that you enter must have Administrator rights.
• For Server / Hypervisor devices, from the Operating System type list, select the operating system, and then type the username and password of the device in the appropriate fields.
The user name and password you enter must have:
• Local administrator or domain administrator rights and WMI access on the device (if the device is running a Windows operatingsystem)
• Root or sudo user rights (if the device is running a Linux operating system). If you provide the user name and password of asudo user, ensure that the sudo user is configured for SupportAssist Enterprise. For information on configuring the sudo user,see Configure sudo access for SupportAssist Enterprise (Linux).
If the device is a member of a Windows domain, you must provide the user name in the [Domain\Username] format. For example,MyDomain\MyUsername. You can also use a period [ . ] to indicate the local domain. For example, .\Administrator.
Example of a Linux user name: root• For Chassis, Fluid File System (FluidFS), iDRAC, and Storage Center (SC) / Compellent devices, type the user name and
password of the device in the appropriate fields.• For Software, from the Software type list, select the software type, and then type the user name and password in the
appropriate fields.
Managing device credentials 97

• For Solution devices, enter the SSH and REST credentials in the appropriate fields.• For Networking devices, type the user name, password, community string, and enable password of the device in the appropriate
fields.NOTE: Community string is required for the following network devices:
• PowerConnect family 28xx and X series
• Cisco
• Wireless controller
NOTE: Enable password is required only when the networking device is configured with an enable password.
• For PeerStorage(PS) / EqualLogic devices, type the user name, password, and community string of the device in theappropriate fields.
NOTE:
• Account Credentials are mandatory for adding a Storage ME4 Series device.
• Account Credentials are not required for adding a Storage MD Series device.
6. Click Save.The Account Credentials is listed on the Manage Accounts Credentials page.
Related concepts
Account credentials
Related reference
Manage Account Credentials
Add Account Credentials
Reassign Account Credentials
Prerequisites
You must be logged in to SupportAssist Enterprise with elevated or administrative privileges. See Granting elevated or administrativeprivileges to users.
Steps
1. Point to Devices and click View Devices.The Devices page is displayed.
2. Select a device and click Edit.The Edit Account window is displayed.
3. From the Account Credentials list, select an account credential.
NOTE: Only Account Credentials that you have already created for the selected device type are present in the
Account Credentials list.
4. Click Save (if the device is in the Default group) or Revalidate (if the device is in the Staging group).
Related concepts
Account credentials
Related reference
Manage Account Credentials
98 Managing device credentials

Edit Account Credentials
Prerequisites
You must be logged in to SupportAssist Enterprise with elevated or administrative privileges. See Granting elevated or administrativeprivileges to users.
About this task
You can edit the Account Credentials based on your requirement. For example, you must edit the Account Credentials whenever there is achange in the credentials of the associated device type.
NOTE: Changing the device type is not supported.
Steps
1. Point to Devices > Manage Credentials and click Account Credentials.The Manage Account Credentials page is displayed.
Figure 26. Manage Account Credentials page
2. Select the Account Credentials that you want to edit and click Edit.The Edit Account Credentials window is displayed.
3. Update the credentials as required.
NOTE: Editing the name of the Account Credentials is possible only if the Account Credentials is not assigned to any
device.
4. Click Update.The Account Credentials is updated. Devices to which the Account Credentials is assigned are re-validated.
Related concepts
Account credentials
Related reference
Manage Account Credentials
Edit Account Credentials
Delete Account Credentials
Prerequisites
• You must be logged in to SupportAssist Enterprise with elevated or administrative privileges. See Granting elevated or administrativeprivileges to users.
• The Account Credentials that you want to delete must not be assigned to any device.
About this task
You can delete the Account Credentials based on your preference.
Managing device credentials 99

Steps
1. Point to Devices > Manage Credentials and click Account Credentials.The Manage Account Credentials page is displayed.
Figure 27. Manage Account Credentials page
2. Select the Account Credentials that you want to delete and click Delete.The Delete Account Credentials window is displayed.
3. Click Yes.
Related concepts
Account credentials
Related reference
Manage Account Credentials
Credential ProfilesA Credential Profile is a collection of Account Credentials of various device types. Credential Profiles enable you to assign a set ofcredentials to your devices, instead of entering the credentials for each device manually.
Related tasks
Create Credential Profile
Assign Credential Profile
Edit Credential Profile
Delete Credential Profile
Related reference
Manage Credential Profiles
Create Credential Profile
Prerequisites
You must be logged in to SupportAssist Enterprise with elevated or administrative privileges. See Granting elevated or administrativeprivileges to users.
About this task
Creating a Credential Profile enables you to assign credentials to your devices.
Steps
1. Point to Devices > Manage Credentials and click Credential Profiles.The Manage Credential Profiles page is displayed.
100 Managing device credentials
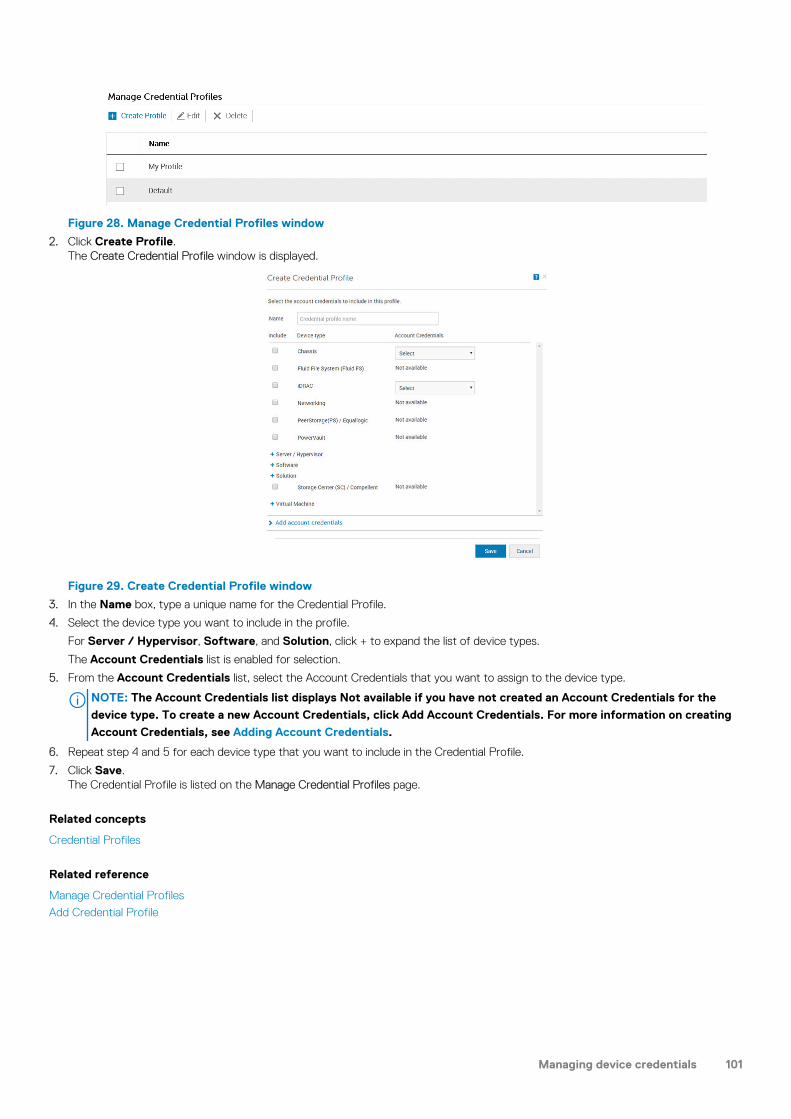
Figure 28. Manage Credential Profiles window
2. Click Create Profile.The Create Credential Profile window is displayed.
Figure 29. Create Credential Profile window
3. In the Name box, type a unique name for the Credential Profile.
4. Select the device type you want to include in the profile.
For Server / Hypervisor, Software, and Solution, click + to expand the list of device types.
The Account Credentials list is enabled for selection.
5. From the Account Credentials list, select the Account Credentials that you want to assign to the device type.
NOTE: The Account Credentials list displays Not available if you have not created an Account Credentials for the
device type. To create a new Account Credentials, click Add Account Credentials. For more information on creating
Account Credentials, see Adding Account Credentials.
6. Repeat step 4 and 5 for each device type that you want to include in the Credential Profile.
7. Click Save.The Credential Profile is listed on the Manage Credential Profiles page.
Related concepts
Credential Profiles
Related reference
Manage Credential Profiles
Add Credential Profile
Managing device credentials 101

Assign Credential Profile
Prerequisites
You must be logged in to SupportAssist Enterprise with elevated or administrative privileges. See Granting elevated or administrativeprivileges to users.
Steps
1. Point to Devices and click View Devices.The Devices page is displayed.
2. Select one or more devices and from the Assign Credential Profile list, select a Credential Profile.The Credential Profile is assigned to the selected devices. Devices to which the Credential Profile is assigned are re-validated.
Related concepts
Credential Profiles
Related reference
Manage Credential Profiles
View devices associated with a Credential Profile
Steps
1. Point to Devices > Manage Credentials and click Credential Profiles.The Manage Credential Profiles page is displayed.
2. Select a credential profile.Devices that are associated with the Credential Profile are displayed on the Credential Profile overview pane.
Edit Credential Profile
Prerequisites
You must be logged in to SupportAssist Enterprise with elevated or administrative privileges. See Granting elevated or administrativeprivileges to users.
About this task
You can update the credentials of a profile based on your requirement. For example, you may edit the Credential Profile to add a newAccount Credentials or change the Account Credentials for a device type.
NOTE: Updating the name of the Credential Profile is not supported.
Steps
1. Point to Devices > Manage Credentials and click Credential Profiles.The Manage Credential Profiles page is displayed.
Figure 30. Manage Credential Profiles window
2. Select the Credential Profile that you want to edit and click Edit.
102 Managing device credentials

The Edit Credential Profile window is displayed.
3. Select the device type for which you want to edit Account Credentials.The Account Credentials list is enabled for selection.
4. From the Account Credentials list, select the Account Credentials that you want to assign to the device type.
5. Click Update.The Credential Profile is updated. Devices to which the Credential Profile is assigned are re-validated.
Related concepts
Credential Profiles
Related reference
Manage Credential Profiles
Edit Credential Profile
Delete Credential Profile
Prerequisites
• You must be logged in to SupportAssist Enterprise with elevated or administrative privileges. See Granting elevated or administrativeprivileges to users.
• The Credential Profile that you want to delete must not be assigned to any device.
About this task
You can delete a Credential Profile based on your preference.
Steps
1. Point to Devices > Manage Credentials and click Credential Profiles.The Manage Credential Profiles page is displayed.
Figure 31. Manage Credential Profiles window
2. Select the Credential Profile that you want to delete and click Delete.The Delete Credential Profile window is displayed.
3. Click Yes.
Related concepts
Credential Profiles
Related reference
Manage Credential Profiles
Managing device credentials 103

Validating device inventorySite inventory validation verifies the availability of the following capabilities of SupportAssist Enterprise for your devices:
• Connectivity Status — Verifies if the device has internet connectivity and if the required ports are open on the device. It alsoverifies if the required credentials of the device are correct and available.
• Collection Capability Status — Verifies if the requirements for collecting system information are met on the device.• Monitoring Status — Verifies if the latest version of OMSA is installed on servers. It also verifies if the SNMP trap destination and
the iDRAC trap destination are configured.
NOTE: Monitoring capability test is supported only on Windows, Linux, and iDRAC.
During inventory validation, the device status is updated.
• If the validation is successful, the device moves to the Default group.• If the validation is unsuccessful, the device moves to the Staging or Inactive group.
NOTE: While inventory validation is in progress, the device is disabled. To view the status of the device operation, move
your mouse pointer on the device.
NOTE: The total count of devices in Site Inventory Validation table may not match with the total number of devices on
the progress indicator. The device count on the progress indicator is assigned when periodic inventory validation begins
or when SupportAssist Enterprise is upgraded to a newer version, whereas the device count in the Site Inventory
Validation table is updated when:
• Some associated devices are discovered as a part of the deep discovery process
• New devices are added in SupportAssist Enterprise
Related tasks
View the Site Inventory Validation page
Start inventory validation manually
Schedule automatic inventory validation
Related reference
Site Inventory Validation
Topics:
• View the Site Inventory Validation page• Start inventory validation manually• Schedule automatic inventory validation
View the Site Inventory Validation pageSteps
Point to Devices and click Site Inventory Validation.The Site Inventory Validation page is displayed.
10
104 Validating device inventory

Figure 32. Site Inventory Validation page
Related concepts
Validating device inventory
Related reference
Site Inventory Validation
Start inventory validation manuallyAbout this task
You can perform inventory validation on your devices to verify the status of the devices.
Steps
1. Point to Devices and click View Devices.The Devices page is displayed.
2. Select one or more devices and click Validate Inventory.SupportAssist Enterprise verifies the connectivity status of the devices.
NOTE: To view the count of devices that were successfully validated and the devices that failed validation, see the
Site Inventory Validation page.
Related concepts
Validating device inventory
Related reference
Site Inventory Validation
Schedule automatic inventory validationAbout this task
By default, Inventory Validation is scheduled on a randomly determined day of every month at 11 PM. If necessary, you can change theschedule based on your requirement.
Steps
1. Point to Settings and click Preferences.The Preferences page is displayed.
2. In Automatically start inventory validation, depending upon your requirement, select the day on which you want to want to startinventory validation.
3. Click Apply.
Related concepts
Validating device inventory
Validating device inventory 105

Related reference
Site Inventory Validation
106 Validating device inventory

Maintaining SupportAssist Enterprisecapability
The changes that occur in your company’s IT setup over a period of time may require configuration or updates in SupportAssist Enterprise.To maintain SupportAssist Enterprise capability over a period of time for all your devices, you may be required to:
• Enable monitoring of devices. See Enable or disable monitoring of a device.• Edit the credentials (user name and password) of a device, if the device credentials were changed because of your company's security
policy or for other reasons. See Edit Account Credentials.• Install or upgrade dependent components such as OpenManage Server Administrator (OMSA). See Install or upgrade OMSA by using
SupportAssist Enterprise.• Configure the SNMP settings of a device. See Configure SNMP settings by using SupportAssist Enterprise.• Update the primary and secondary contact information, if there is a change in the contact details. See View and update the contact
information.• Update the parts dispatch preferences and shipping information to enable the dispatch of a replacement hardware component. View
and update parts dispatch information.• Update the proxy server settings in SupportAssist Enterprise, if applicable. See Configure proxy server settings.• Update the SMTP server (email server) settings in SupportAssist Enterprise, if applicable. See Configure the SMTP server settings.• Perform the connectivity test to ensure that SupportAssist Enterprise is able to connect to all dependent network resources. See
Connectivity test.• Perform the case creation test to verify the automatic case creation capability of SupportAssist Enterprise. See Test the case creation
capability.• Clear the System Event Log of a server. See Clear the System Event Log (SEL).• Upgrade or update SupportAssist Enterprise. See Automatic update.
You may also want to delete a device, if you do not want SupportAssist Enterprise to monitor a device or for other reasons. See Delete adevice.Topics:
• Enable or disable monitoring of a device• Perform deep discovery• Install or upgrade OMSA by using SupportAssist Enterprise• Configure SNMP settings by using SupportAssist Enterprise• View and update the contact information• View and update parts dispatch information• Integrate SupportAssist Enterprise with your TechDirect account• Configure proxy server settings• Connectivity test• Test the case creation capability• Clear the System Event Log• Automatic update• Delete a device
Enable or disable monitoring of a devicePrerequisites
Ensure that you have completed the registration of SupportAssist Enterprise. See Register SupportAssist Enterprise.
11
Maintaining SupportAssist Enterprise capability 107

About this task
For devices that SupportAssist Enterprise can monitor, you can enable monitoring while adding the device. Depending on yourrequirement, you can also enable or disable monitoring of a device at any time from the Devices page. For SupportAssist Enterprise toautomatically create a support case when a hardware issue occurs on a device, monitoring must be enabled for that device.
Steps
1. Point to Devices and click View Devices.The Devices page is displayed.
2. Select the device for which you want to enable or disable monitoring.The device overview pane is displayed at the right side of the Devices page.
3. In Monitoring, select Enable or Disable depending on your requirement.
Figure 33. Enable or disable monitoring option
NOTE: If the registration of SupportAssist Enterprise is not completed, the Enable monitoring option is disabled.
NOTE: To allow SupportAssist Enterprise to monitor a device, in addition to enabling monitoring, the SNMP settings
of the device must also be configured. For instructions to configure the SNMP settings of a device, see Configure
SNMP settings by using SupportAssist Enterprise and Manually configure SNMP settings.
Perform deep discoveryPrerequisites
A Credential Profile must be assigned to the device.
About this task
Deep discovery enables you to discover a device and its associated device types. See Deep discovery.
108 Maintaining SupportAssist Enterprise capability

Steps
1. Point to Devices and click View Devices.The Devices page is displayed.
2. Select the device for which you want to perform deep discovery.The device overview pane is displayed at the right side of the Devices page.
3. From the Tasks list, select Perform deep discovery.The Perform deep discovery window is displayed.
NOTE: If deep discovery is not applicable for a device, the Perform deep discovery option is disabled.
4. Select a Credential Profile and click Next.The device is revalidated and the associated devices are discovered.
Related concepts
Deep discovery
Install or upgrade OMSA by using SupportAssistEnterprisePrerequisites
• You must be logged in to SupportAssist Enterprise with elevated or administrative privileges. See SupportAssist Enterprise user groupsand Granting elevated or administrative privileges to users.
• You must have read-write access to the system drive of the target device.
About this task
For monitoring hardware issues that may occur on a server, the OpenManage Server Administrator (OMSA) agent must be installed andrunning on the server. If OMSA is either not installed or requires an upgrade on a device, the Status column on the Devices page displaysan appropriate message. You can use the Install / Upgrade OMSA option to automatically download and install the recommendedversion of OMSA on a device.
NOTE: The SupportAssist Enterprise recommended version of OMSA may vary depending on the generation of the
PowerEdge server and the operating system running on the server. For information on the recommended versions of
OMSA, see the SupportAssist Enterprise Version 2.0.40 Support Matrix at Dell.com/ServiceabilityTools.
NOTE: Installation or upgrade of OMSA by using SupportAssist Enterprise is not supported on servers running the
following operating systems or hypervisors:
• Oracle Enterprise Linux
• CentOS
• Citrix XenServer
• VMware ESX or ESXi
• Oracle Virtual Machine
• Debian 7.x
• Debian 8.x
• Ubuntu 14.x
• Ubuntu 16.x
• Ubuntu 18.x
Steps
1. Point to Devices and click View Devices.The Devices page is displayed.
2. Select the server where you want to install or upgrade OMSA.The device overview pane is displayed at the right side of the Devices page.
3. From the Tasks list, select Install / Upgrade OMSA.
Maintaining SupportAssist Enterprise capability 109
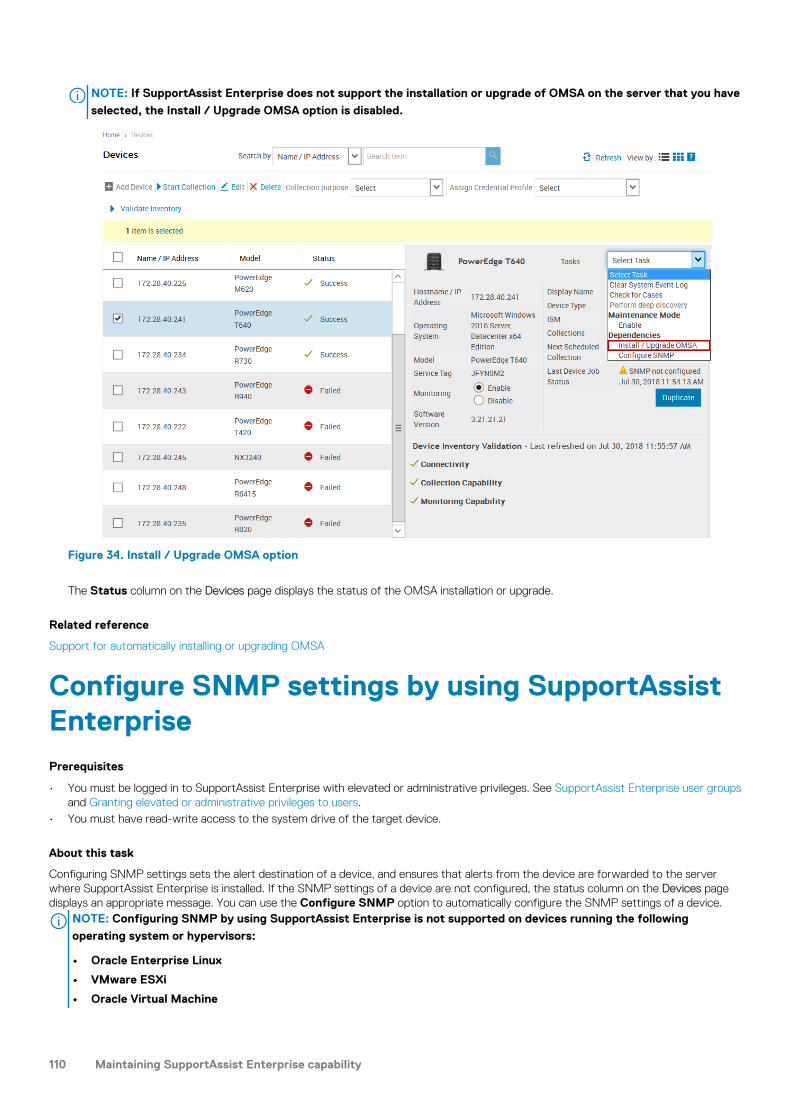
NOTE: If SupportAssist Enterprise does not support the installation or upgrade of OMSA on the server that you have
selected, the Install / Upgrade OMSA option is disabled.
Figure 34. Install / Upgrade OMSA option
The Status column on the Devices page displays the status of the OMSA installation or upgrade.
Related reference
Support for automatically installing or upgrading OMSA
Configure SNMP settings by using SupportAssistEnterprisePrerequisites
• You must be logged in to SupportAssist Enterprise with elevated or administrative privileges. See SupportAssist Enterprise user groupsand Granting elevated or administrative privileges to users.
• You must have read-write access to the system drive of the target device.
About this task
Configuring SNMP settings sets the alert destination of a device, and ensures that alerts from the device are forwarded to the serverwhere SupportAssist Enterprise is installed. If the SNMP settings of a device are not configured, the status column on the Devices pagedisplays an appropriate message. You can use the Configure SNMP option to automatically configure the SNMP settings of a device.
NOTE: Configuring SNMP by using SupportAssist Enterprise is not supported on devices running the following
operating system or hypervisors:
• Oracle Enterprise Linux
• VMware ESXi
• Oracle Virtual Machine
110 Maintaining SupportAssist Enterprise capability

Steps
1. Point to Devices and click View Devices.The Devices page is displayed.
2. Select the device where you want to configure the SNMP settings.
NOTE: If SupportAssist Enterprise does not support the configuration of SNMP on the device that you have
selected, the Configure SNMP option is disabled.
The device overview pane is displayed at the right side of the Devices page.
3. From the Tasks list, select Configure SNMP.
Figure 35. Configure SNMP option
The Status column on the Devices page displays the status of the SNMP configuration.
Related reference
Support for automatically configuring SNMP settings
View and update the contact informationYou can update the primary contact details and also provide secondary contact information. If the primary contact is unavailable, Dell EMCwill contact your company through the secondary contact. If both the primary and secondary contacts are configured with valid emailaddresses, both receive SupportAssist Enterprise emails.
Prerequisites
You must be logged in to SupportAssist Enterprise with elevated or administrative privileges. See SupportAssist Enterprise user groupsand Granting elevated or administrative privileges to users.
Steps
1. Point to Settings and click Contact Information.The Contact Information page is displayed.
Maintaining SupportAssist Enterprise capability 111

2. Select the type of contact:
• Primary• Secondary
3. In the contact details section:
a) Type or edit the first name, last name, phone number, alternate phone number, and email address.b) Select the preferred contact method.c) Select the preferred contact hours.d) Select the time zone.
4. Click Apply.
Related tasks
View and update parts dispatch information
View and update parts dispatch informationPrerequisites
You must be logged in to SupportAssist Enterprise with elevated or administrative privileges. See Granting elevated or administrativeprivileges to users.
About this task
Entering your dispatch preferences and shipping information enables Dell EMC to dispatch of a replacement hardware component to you.You can enter your dispatch preferences and shipping information during registration or later.
NOTE: Parts dispatch is supported only for systems that have an active ProSupport, ProSupport Plus, ProSupport One,
or ProSupport Flex service entitlement.
Steps
1. Point to Settings and click Contact Information.The Contact Information page is displayed.
2. In the Parts Replacement Preferences for Dell Servers section, select I want Dell server replacement parts shippedautomatically.
NOTE: If you do not wish to set up parts replacement preferences, the shipment of Dell EMC server replacement
parts could be delayed.
3. To copy the contact information that you have provided on the Group and Contact Information page, click the appropriate link.
4. In the Primary Shipping Contact section, perform the following:
NOTE: If you choose to use the already entered contact information, the first name, last name, phone number, and
email address fields are populated with the contact information.
a) Select the preferred contact hours during which Dell EMC can contact you, if necessary.b) Select the time zone and type your shipping address in the appropriate fields.c) Type any specific dispatch related information in the Dispatch notes section.
NOTE: If a device is moved to a different location, ensure that the dispatch preferences and shipping information
are updated.
5. If you want an onsite technician to replace the dispatched hardware component, select I want a technician to replace my partsonsite (if included in my service plan).
6. In the Secondary Shipping Contact section, type the first name, last name, phone number, and email address of the secondarycontact, in the appropriate fields.
NOTE: Contact details of the primary and secondary contact must be unique.
7. For Brazil only: Type the CNPJ and IE numbers.
8. Click Apply.
Related tasks
Register SupportAssist Enterprise
112 Maintaining SupportAssist Enterprise capability

View and update the contact information
Related reference
Registration
Contact Information
Integrate SupportAssist Enterprise with yourTechDirect accountAbout this task
You can integrate SupportAssist Enterprise with specific TechDirect accounts, based on your preference.
Steps
1. Point to Settings and click TechDirect Login.The TechDirect Integration page is displayed.
Figure 36. TechDirect Integration page
2. Click Switch Account.The TechDirect Sign In page is displayed in a new web browser window.
3. Type the TechDirect username and password in the appropriate fields, and then click Sign In.The One-Time Password (OTP) is displayed.
4. In the TechDirect Integration page, enter the OTP in the appropriate field, and then click Apply.The user name of the integrated TechDirect account is displayed on the page.
5. In the TechDirect portal, log in to TechDirect by using the TechDirect username and password.The TechDirect Dashboard is displayed.
6. From the Services menu, click SupportAssist, and then in the SupportAssist Services page, click the Assets tab.
7. Click Manage Assets.
Results
SupportAssist Enterprise is integrated with the TechDirect account. Also, after synchronization of the account is complete, the asset andalert information is displayed in the Manage Assets page in TechDirect. This synchronization operation may take up to 4 hours.
Maintaining SupportAssist Enterprise capability 113

Configure proxy server settingsIf the server where SupportAssist Enterprise is installed connects to the Internet through a proxy server, you must ensure that the proxysettings are configured in SupportAssist Enterprise. You must also ensure that the proxy server settings are updated in SupportAssistEnterprise, whenever the settings of the proxy server are changed.
Prerequisites
You must be logged in to SupportAssist Enterprise with elevated or administrative privileges. See SupportAssist Enterprise user groupsand Granting elevated or administrative privileges to users.
Steps
1. Point to Settings and click Proxy Settings.The Proxy Settings page is displayed.
2. Select Use proxy server.
NOTE: SupportAssist Enterprise supports Windows NT LAN Manager (NTLM) and basic proxy authentication
protocols.
3. Type the host name or IP address, and port number of the proxy server in the appropriate fields.
NOTE: If the user name and password required to connect to the proxy server are not provided, SupportAssist
Enterprise connects to the proxy server as an anonymous user.
4. If a user name and password are required to connect to the proxy server, select Requires authentication and then type the username and password in the appropriate fields.
5. In the Proxy exclusion list box, type the IP address ranges or host name expressions of devices to which SupportAssist Enterprisemust communicate directly and not through the proxy server. IP address of devices that communicate through https protocol must beincluded in the proxy exclusion list. Examples of devices that communicate through https protocol include iDRAC, Storage SC Seriesarrays, VMware ESX and ESXi, and XC Series of Web-scale Hyper-converged appliances.
NOTE: You can enter one or more IP address ranges as semi-colon separated values. For example, 10.49.*.* ;
10.49.18.* ; *.*.100.10
You can enter the IP address ranges in the following formats:
• 10.49.*.*• 10.49.18.*• *.*.100.10• *.*.*.10• *.10.12.100• 10.*.*.*
The following IP address range formats are not supported:
• 10.*.*.49• 10.*.49.*• 10.49.*.10
6. Click Apply.SupportAssist Enterprise verifies the connection to the proxy server by using the provided proxy server details, and displays a messageindicating the connectivity status.
NOTE: The proxy settings are saved only if SupportAssist Enterprise is able to connect to the proxy server by using
the provided details.
NOTE: If the proxy server is configured to allow anonymous authentication, the credentials you provide for the proxy
server are saved, but the credentials are not validated.
Related reference
Proxy Settings
114 Maintaining SupportAssist Enterprise capability

Connectivity testThe Network Connectivity Test page enables you to verify and test connectivity status to resources that affect the functionality ofSupportAssist Enterprise. You can use the connectivity tests to verify if SupportAssist Enterprise is able to connect successfully to thefollowing resources:
• Internet (including the proxy server, if the server where SupportAssist Enterprise is installed connects to the internet through a proxyserver)
• The SMTP server (email server) utilized by your company• The FTP server• File upload server hosted by Dell EMC• SupportAssist server hosted by Dell EMC
Figure 37. Network Connectivity Test page
NOTE: The network connectivity test does not verify the following:
• Ports used by SupportAssist Enterprise
• Internet connectivity of the server where the Remote Collector is set up
By default, SupportAssist Enterprise automatically tests connectivity to the dependent resources every day at 11 p.m. (time as on theserver where SupportAssist Enterprise is installed), and displays the result in the Status column. If there is an issue with connectivity to adependent resource, a status email is sent to your primary and secondary SupportAssist Enterprise contacts.
You can also test SupportAssist Enterprise connectivity to the dependent resources at any time. The result of the test is displayed in theStatus column.
View the connectivity status
Steps
In the SupportAssist Enterprise header area, point to the user name link, and then click Network Connectivity Test.
The Status column displays the connectivity status to the dependent resources. If an Error status is displayed, click the Error linkto view a description of the problem and the possible resolution steps.
Perform the connectivity test
Steps
1. In the SupportAssist Enterprise header area, point to the user name link, and then click Network Connectivity Test.The Network Connectivity Test page is displayed.
2. Select the tests that you want to perform.
3. Click Test Connectivity.
Maintaining SupportAssist Enterprise capability 115

The Status column displays the result of the connectivity test. If an Error status is displayed, click the Error link to view adescription of the problem and the possible resolution steps.
Related reference
Network Connectivity Test
Test the case creation capabilityAbout this task
You can use the Case Creation test to ensure that support case creation is working prior to an actual alert that would automaticallycreate a support case.
Steps
1. In the SupportAssist Enterprise header area, point to the user name link, and then click SupportAssist Enterprise Test.The SupportAssist Enterprise Test page is displayed.
2. Select the check box for the Case Creation test.
Figure 38. Testing case creation
3. Click Run Tests.
The Status column displays the result of the test. If the test is successful, the Ready to Create Cases status is displayed.
Related reference
SupportAssist Enterprise test
Clear the System Event LogPrerequisites
You must be logged in to SupportAssist Enterprise with elevated or administrative privileges. See SupportAssist Enterprise user groupsand Granting elevated or administrative privileges to users.
About this task
The System Event Log (SEL) or hardware log, also known as the Embedded System Management (ESM) log, reports potential hardwareproblems in PowerEdge servers. You can use the Clear System Event Log option available in SupportAssist Enterprise to clear the SELin the following scenarios:
• An error message is displayed on a server even after the problem is resolved.• An SEL full error message is displayed.
CAUTION: Clearing the SEL removes the event history of the server.
Steps
1. Point to Devices and click View Devices.The Devices page is displayed.
2. Select the server where you want to clear the System Event Log.
116 Maintaining SupportAssist Enterprise capability

NOTE: If OMSA is not installed on a device that you have added in SupportAssist Enterprise with the Device Type as
Server, the Clear System Event Log option is disabled.
Figure 39. Clear System Event Log option
The device overview pane is displayed at the right side of the Devices page.
3. From the Tasks list, select Clear System Event Log.
While the SEL is cleared from a device, the device displays a Clearing System Event Log status in SupportAssist Enterprise.
After the SEL is cleared successfully, the device displays a System Event Log cleared status.
Automatic updateThe types of SupportAssist Enterprise updates that are available is as follows:
• SupportAssist Enterprise application update — Upgrades the SupportAssist Enterprise application with additional capability,protocol support, usability enhancements, and patches to fix existing issues. The application checks if any updates are available, everyMonday at 11 p.m. (date and time as on the server where SupportAssist Enterprise is installed).
• Policy files update — Defines SupportAssist Enterprise alert handling and case creation. By installing this update, SupportAssistEnterprise will have optimized case management as per the latest Dell EMC definitions. The application checks if any policy filesupdates are available, every Monday at 11:30 p.m. (date and time as on the server where SupportAssist Enterprise is installed).
• Product support files update — Defines the Dell EMC devices and operating systems that are compatible with SupportAssistEnterprise. By installing this update, SupportAssist Enterprise will be able to connect to, and collect system information from moredevice models. The application checks if any product support files updates are available, every Monday at 11:30 p.m. (date and time ason the server where SupportAssist Enterprise is installed).
• Adapter upgrade — Enables support for more and newer versions of the OpenManage Essentials, System Center OperationsManager, or OpenManage Enterprise adapter. By upgrading the adapter, SupportAssist Enterprise can add and inventory more devicetypes and device models from the systems management console. The application checks if any adapter upgrade updates are available,every Monday at 11:30 p.m. (date and time as on the server where SupportAssist Enterprise is installed).
NOTE: The adapter will be updated only if the update option is available.
Maintaining SupportAssist Enterprise capability 117

By default, automatic update is enabled for the SupportAssist Enterprise application, policy files, product support files, and the adapter.This ensures that SupportAssist Enterprise is automatically updated whenever an update is available. You can choose to enable or disablethe automatic update of a specific component based on your preference. For instructions to enable or disable automatic updates, seeEnable or disable automatic updates.
NOTE: It is recommended that you enable automatic update to ensure that SupportAssist Enterprise is up-to-date with
the latest features and enhancements.
The SupportAssist Enterprise application checks:
• If updates are available and automatic updates are enabled, the updates are downloaded and automatically installed in the background.• If updates are available, but automatic update is disabled, the update available banner is displayed at the top of the page. You can
click Update now to allow SupportAssist Enterprise to download and install the latest updates.
NOTE: After the updates are downloaded and installed, an update successful message is displayed. To view and use the
latest updates and enhancements, you must refresh the SupportAssist Enterprise user interface.
Information about the SupportAssist Enterprise update is logged in the log file available at the following location based on the operatingsystem where SupportAssist Enterprise is installed:
• On Windows — <Drive where SupportAssist Enterprise is installed>:\Program Files\Dell\SupportAssist\logs
• On Linux — /opt/dell/supportassist/logs
Enable or disable automatic updatesEnabling automatic updates ensures that SupportAssist Enterprise is automatically updated whenever updates are available.
Prerequisites
You must be logged in to SupportAssist Enterprise with elevated or administrative privileges. See SupportAssist Enterprise user groupsand Granting elevated or administrative privileges to users.
Steps
1. Point to Settings and click Preferences.The Preferences page is displayed.
2. In Automatically update the following features in SupportAssist Enterprise, select or clear the options that you want to enableor disable.
3. Click Apply.
Related reference
Preferences
Delete a devicePrerequisites
You must be logged in to SupportAssist Enterprise with elevated or administrative privileges. See SupportAssist Enterprise user groupsand Granting elevated or administrative privileges to users.
About this task
You can delete one or more devices from SupportAssist Enterprise, if you do not want to monitor a device or for other reasons.NOTE: Deleting a device only removes the device from the SupportAssist Enterprise user interface; it does not affect
the functionality of the device.
NOTE: Devices that are inventoried and added in SupportAssist Enterprise through an adapter cannot be deleted. Those
devices are deleted automatically from SupportAssist Enterprise when either the adapter is deleted or the devices are
removed from the systems management console.
118 Maintaining SupportAssist Enterprise capability

Steps
1. Point to Devices and click View Devices.The Devices page is displayed.
2. Select the devices that you want to delete.
3. Click Delete.The Confirm Device Deletion window is displayed.
Figure 40. Delete option
4. Click Yes.The devices are deleted from the Devices page.
NOTE: When a device is deleted, the system information collected from the device is not deleted until the purge
collections task deletes the collected system information. The purge collection task only deletes system information
collections that are 30 days or older and collections that are older than the last 5 collections over the last 30 days.
Maintaining SupportAssist Enterprise capability 119

Configuring email notificationsBy default, SupportAssist Enterprise is configured to send an email notification when a support case is created automatically.SupportAssist Enterprise can also send email notifications about maintenance mode, device status, and network connectivity status.Depending on your preference, you can perform the following:
• Disable the case creation email notification, or select the preferred language for email notifications, or both. See Configure emailnotification settings.
• Configure SupportAssist Enterprise to send email notifications through your company SMTP server (email server). See ConfigureSMTP server settings.
NOTE: For information about the different types of SupportAssist Enterprise email notifications, see Types of email
notifications.
NOTE: Transport Layer Security (TLS) version 1.0 must be enabled on the SMTP server.
Topics:
• Configure email notification settings• Configure SMTP server settings• Types of email notifications
Configure email notification settingsPrerequisites
You must be logged in to SupportAssist Enterprise with elevated or administrative privileges. See SupportAssist Enterprise user groupsand Granting elevated or administrative privileges to users.
About this task
You can enable or disable automatic email notifications from SupportAssist Enterprise and also select the preferred language for emailnotifications.
Steps
1. Point to Settings and click Preferences.The Preferences page is displayed.
2. To receive email notifications when a new support case is opened, in Email Settings, select Receive email notification when anew support case is opened.
NOTE: Disabling support case email notifications also disables the automatic email notifications that are sent if an
issue occurs while:
• Creating a support case
• Collecting the system information from a device
• Sending the system information from a device to Dell EMC
3. To set the language in which you want to receive email notifications, from the Preferred Email Language list, select a language.
NOTE: The Preferred Email Language is enabled only when the Receive email notification when a new support case is
opened option is selected.
4. Click Apply.
Related reference
Preferences
12
120 Configuring email notifications
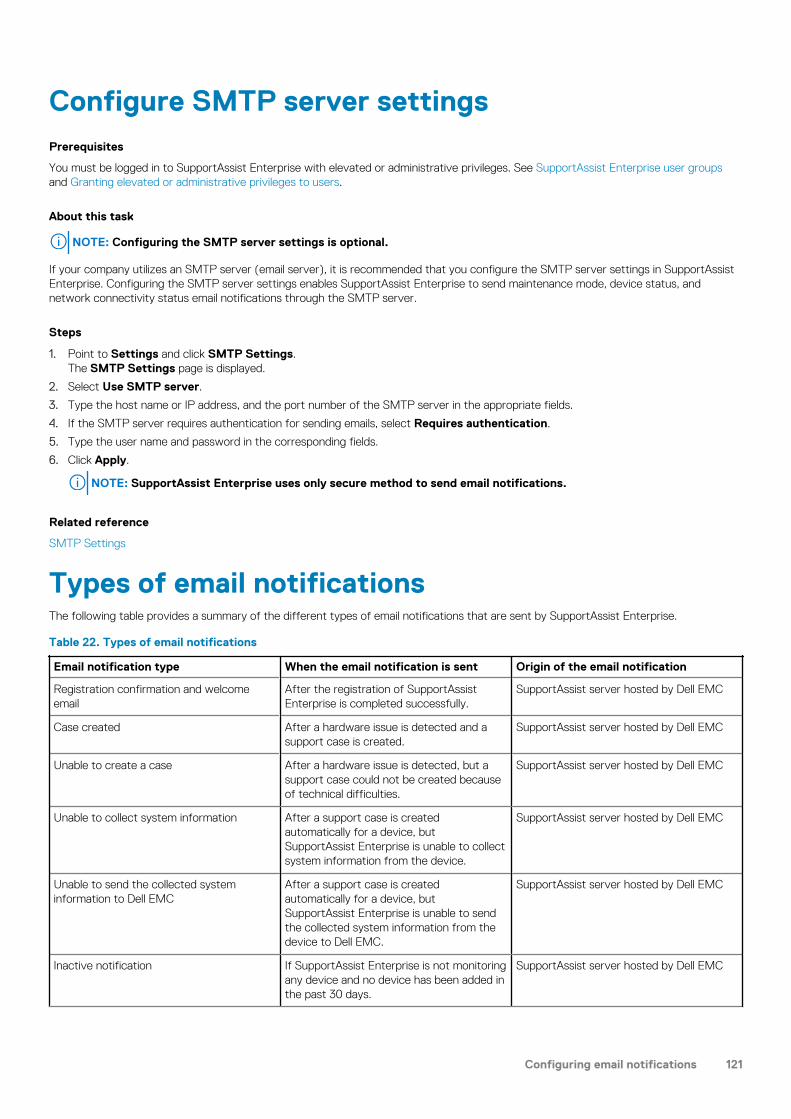
Configure SMTP server settingsPrerequisites
You must be logged in to SupportAssist Enterprise with elevated or administrative privileges. See SupportAssist Enterprise user groupsand Granting elevated or administrative privileges to users.
About this task
NOTE: Configuring the SMTP server settings is optional.
If your company utilizes an SMTP server (email server), it is recommended that you configure the SMTP server settings in SupportAssistEnterprise. Configuring the SMTP server settings enables SupportAssist Enterprise to send maintenance mode, device status, andnetwork connectivity status email notifications through the SMTP server.
Steps
1. Point to Settings and click SMTP Settings.The SMTP Settings page is displayed.
2. Select Use SMTP server.
3. Type the host name or IP address, and the port number of the SMTP server in the appropriate fields.
4. If the SMTP server requires authentication for sending emails, select Requires authentication.
5. Type the user name and password in the corresponding fields.
6. Click Apply.
NOTE: SupportAssist Enterprise uses only secure method to send email notifications.
Related reference
SMTP Settings
Types of email notificationsThe following table provides a summary of the different types of email notifications that are sent by SupportAssist Enterprise.
Table 22. Types of email notifications
Email notification type When the email notification is sent Origin of the email notification
Registration confirmation and welcomeemail
After the registration of SupportAssistEnterprise is completed successfully.
SupportAssist server hosted by Dell EMC
Case created After a hardware issue is detected and asupport case is created.
SupportAssist server hosted by Dell EMC
Unable to create a case After a hardware issue is detected, but asupport case could not be created becauseof technical difficulties.
SupportAssist server hosted by Dell EMC
Unable to collect system information After a support case is createdautomatically for a device, butSupportAssist Enterprise is unable to collectsystem information from the device.
SupportAssist server hosted by Dell EMC
Unable to send the collected systeminformation to Dell EMC
After a support case is createdautomatically for a device, butSupportAssist Enterprise is unable to sendthe collected system information from thedevice to Dell EMC.
SupportAssist server hosted by Dell EMC
Inactive notification If SupportAssist Enterprise is not monitoringany device and no device has been added inthe past 30 days.
SupportAssist server hosted by Dell EMC
Configuring email notifications 121

Email notification type When the email notification is sent Origin of the email notification
Connectivity test alert At 11 p.m. each day (date and time as on theserver where SupportAssist Enterprise isinstalled).
NOTE: The connectivity test alertnotification is sent only if an issueis detected with connectivity todependent resources.
SupportAssist Enterprise application
Automatic maintenance mode If an alert storm received from a device hasresulted in SupportAssist Enterprise placingthe device automatically in maintenancemode.
SupportAssist Enterprise application
Device status alert At 11 p.m. each day (date and time as on theserver where SupportAssist Enterprise isinstalled). If less than 10 devices haveissues, the email includes details about theissues and the possible resolution steps. Ifmore than 10 devices have issues, the emailonly includes a summary of the issues.
NOTE: The device alert notificationis sent only if an issue exists(warning or error status) with thesetup or configuration of thedevices.
SupportAssist Enterprise application
Issue with the adapter or Remote Collector • Within 5 minutes after an adapter orRemote Collector connectivity issue isdetected.
• If the issue is not resolved, anotheremail notification is sent 6 hours afterthe first email was sent.
SupportAssist Enterprise application
Resumed normal operations with theadapter or Remote Collector
If the issue is resolved within 6 hours, afterthe issue was detected.
SupportAssist Enterprise application
Final message regarding unresolved issuewith the adapter or Remote Collector
If the issue is not resolved within 6 hours,after the issue was detected.
SupportAssist Enterprise application
Inventory validation summary After SupportAssist Enterprise hascompleted validating your device inventoryfor its automated support capabilities-support case/incident creation andcollection of system information.
SupportAssist Enterprise application
Alert from devices in Staging and Inactivegroup
If SupportAssist Enterprise has detectedthat the monitoring and automatic supportrequest/incident creation capabilities arelimited for some of your devices.
SupportAssist Enterprise application
Parts dispatch address validation When SupportAssist Enterprise hasdetected a hardware issue on one of youdevices and a part replacement is requiredto resolve the issue.
SupportAssist Enterprise application
Parts dispatch address confirmation After the replacement part is ready to bedispatched.
SupportAssist Enterprise application
NOTE: Email notifications can be received only if the Receive email notification when a new support case is opened
option is selected. See Configuring email notification settings.
122 Configuring email notifications

Configuring collection settingsBy default, when registration is complete, SupportAssist Enterprise automatically collects system information from all devices at periodicintervals. SupportAssist Enterprise also collects system information automatically from a device when a support case is created for anissue with the device. Depending on your preference, you can configure the following collection settings:
• Disable the automatic collection of system information from devices when a support case is created or updated. See Enable or disablethe automatic collection of system information on case creation.
• Disable the periodic collection of system information from all devices. See Enable or disable the periodic collection of systeminformation from all devices.
• Disable the collection of identity information from all devices. See Enable or disable the collection of identity information.• Disable the collection of software information and the system log from all devices. See Enable or disable the collection of software
information and the system log.• Enable or disable the automatic upload of collections. See Disable the automatic upload of collections.
Topics:
• Prerequisites for collecting system information• Enable or disable the automatic collection of system information on case creation• Enable or disable the periodic collection of system information from all devices• Enable or disable the collection of identity information• Enable or disable the collection of system information• Enable or disable the automatic upload of collections
Prerequisites for collecting system informationThe following are the SupportAssist Enterprise prerequisites for collecting system information:
• The local system (server where SupportAssist Enterprise is installed) must have sufficient hard drive space to save the collectedsystem information. For information about the hard drive space requirements, see Hardware requirements.
• For collecting system information from a remote device, the remote device must be reachable from the local system. If the remotedevice is associated with a Remote Collector, the remote device must be reachable from the server where the Remote Collector is setup.
• The local system and remote devices (devices you have added in SupportAssist Enterprise) must meet the network port requirements.For information about the network port requirements, see Network requirements.
• If you have added a server in SupportAssist Enterprise by using the operating system IP address or hostname (agent-basedmonitoring):
• The server must preferably have OpenManage Server Administrator (OMSA) installed.• If the server is running a Windows operating system:
• The device credentials that you have entered in SupportAssist Enterprise must have administrative privileges.• The device credentials must have privileges that are required for Windows Management Instrumentation (WMI)
communication. For information on ensuring WMI communication, see the “Securing a Remote WMI Connection” technicaldocumentation at msdn.microsoft.com.
• If the server is running a Linux operating system:
• The device credentials that you have entered in SupportAssist Enterprise must have administrative privileges.• If you have entered the credentials of a sudo user, the sudo user must be configured for SupportAssist Enterprise. For
information on configuring the sudo user, see Configure sudo access for SupportAssist Enterprise (Linux).• No resource (network share, drive, or ISO image) must be mounted on the /tmp folder.
• If OMSA is installed on the device, the latest version of OpenSSL must be installed on the device. For more information onOpenSSL, see the resolution for OpenSSL CCS injection vulnerability (CVE-2014-0224) available in the support website of theoperating system.
NOTE: If the server you have added for agent-based monitoring does not have OMSA installed, periodic
collections from the device will not include storage and system details.
13
Configuring collection settings 123

• If you have added a server in SupportAssist Enterprise by using the iDRAC IP address (agentless monitoring), the iDRAC credentialsthat you entered must have administrator privileges.
• The local system must have Internet connectivity for uploading the collected system information to Dell EMC.• For collecting system information from ESX and ESXi only, ensure that SFCBD and CIMOM are enabled.• Ensure that the system drive of the remote server running Windows operating system is accessible from the system on which
SupportAssist Enterprise is installed.• If your device is associated with a remote collector, ensure that the system drive of the device is reachable from the remote collector.
Enable or disable the automatic collection ofsystem information on case creationPrerequisites
You must be logged in to SupportAssist Enterprise with elevated or administrative privileges. See SupportAssist Enterprise user groupsand Granting elevated or administrative privileges to users.
About this task
By default, when a support case is created, SupportAssist Enterprise automatically collects system information from the device with theissue and sends the information securely to Dell EMC. If required, you can enable or disable the automatic collection of system informationon case creation based on your preference.
NOTE: To receive the full benefits of the support, reporting, and maintenance offering of the ProSupport Plus,
ProSupport Flex for Data Center, or ProSupport One for Data Center service contract for a device, automatic collection
of system information must be enabled.
Steps
1. Point to Settings and click Preferences.The Preferences page is displayed.
2. In Automatically collect system state information, depending on your requirement, select or clear the When a new supportcase is created option.
NOTE: By default, the When a new support case is created option is selected.
3. Click Apply.
Related reference
Preferences
Enable or disable the periodic collection of systeminformation from all devicesPrerequisites
You must be logged in to SupportAssist Enterprise with elevated or administrative privileges. See SupportAssist Enterprise user groupsand Granting elevated or administrative privileges to users.
About this task
By default, SupportAssist Enterprise starts collecting system information from all monitored devices at periodic intervals and sends itsecurely to Dell EMC. The collection start time is a user-defined day of every month at 11 PM. If required, you can enable or disable theperiodic collection of system information from all monitored devices based on your preference.
Steps
1. Point to Settings and click Preferences.The Preferences page is displayed.
2. In Automatically collect system state information, select or clear the Starting from day N of every month at 11 PM option.
124 Configuring collection settings

3. Click Apply.
Related reference
Preferences
Enable or disable the collection of identityinformationPrerequisites
You must be logged in to SupportAssist Enterprise with elevated or administrative privileges. See SupportAssist Enterprise user groupsand Granting elevated or administrative privileges to users.
About this task
The system information that is collected by SupportAssist Enterprise includes identity information (PII) such as the complete configurationsnapshot of systems, hosts, and network devices that can contain host identification and network configuration data. In most cases, partor all of this data is required to properly diagnose issues. If the security policy of your company restricts sending identity data outside ofthe company network, you can configure SupportAssist Enterprise to filter such data from being collected and sent to Dell EMC.
The following identity information can be filtered when collecting the system information from a device:
• Host name• IP address• Subnet mask• Default gateway• MAC address• DHCP server• DNS server• Processes• Environment variables• Registry• Logs• iSCSI data• Fibre Channel data — host World Wide Name (WWN) and port WWN
NOTE: When the Include identification information in collections option is cleared, some of the data about your company
network (including the system log) is not transmitted to Dell EMC. This may impede Technical Support from resolving
issues that may occur on your devices.
NOTE: If your devices have an active ProSupport Plus, ProSupport Flex for Data Center, or ProSupport One for Data
Center service contract, when the Include identification information in data sent to Dell option is disabled, you will not
receive some reporting information about your devices.
Steps
1. Point to Settings and click Preferences.The Preferences page is displayed.
2. In Identification Information Settings, depending on your requirement, select or clear the Include identification details in theinformation that is sent to Dell option.
NOTE: By default, the Include identification details in the information that is sent to Dell option is selected.
NOTE: If you clear the Include identification details in the information that is to Dell option, the settings for
collection of logs, diagnostic data, and support data are disabled automatically. Therefore, collections that are sent
to Dell EMC from your devices do not include certain categories of data.
NOTE: If you have disabled the collection of identity information from devices, the identity information such as
hostname, IP address, and so on, are replaced by tokenized values in the collected system information. The
tokenized values are represented as TOKENn—for example, TOKEN0, TOKEN1, or TOKEN2.
Configuring collection settings 125

3. Click Apply.
Related reference
Preferences
Enable or disable the collection of systeminformationPrerequisites
You must be logged in to SupportAssist Enterprise with elevated or administrative privileges. See SupportAssist Enterprise user groupsand Granting elevated or administrative privileges to users.
About this task
By default, the system information that is collected and sent to Dell EMC by SupportAssist Enterprise includes software information andsystem logs. If required, you can configure SupportAssist Enterprise to exclude the collection of software information and system logsfrom all devices.
Steps
1. Point to Settings and click Preferences.The Preferences page is displayed.
2. In Collection Data Settings, select or clear the available options for each device type.
NOTE: When you select the collection purpose as Deployment, the following are collected by default:
• Software and SMART logs from Server / Hypervisor
• Logs from Fluid File System
• Inter Array Connectivity Test logs from PeerStorage (PS) / EqualLogic
NOTE: By default, all Collection Data Settings options are selected.
NOTE: For information about the logs that are collected by SupportAssist Enterprise, see the SupportAssistEnterprise Version 2.0.40 Reportable Items document at www.dell.com/serviceabilitytools.
3. Click Apply.
Enable or disable the automatic upload ofcollectionsPrerequisites
You must be logged in to SupportAssist Enterprise with elevated or administrative privileges. See SupportAssist Enterprise user groupsand Granting elevated or administrative privileges to users.
About this task
By default, the system state information is collected from your devices by SupportAssist Enterprise and sent to Dell EMC. If required, youcan disable the automatic upload of collections.
NOTE: Auto upload setting is not applicable for multiple device collections.
Steps
1. Point to Settings and click Preferences.The Preferences page is displayed.
2. In Automatically upload, depending on your requirement, select or clear System state information collected from devices toDell option.
126 Configuring collection settings

3. Click Apply.
Configuring collection settings 127

Viewing collectionsSupportAssist Enterprise collects system information from each device that you have added and sends the information securely to DellEMC. Typically, the system information is collected as follows:
• Periodically — At regular intervals, depending on the predefined collection start date specified in the Preferences page.• On case creation — When a support case is created for an issue that has been identified by SupportAssist Enterprise.• Manual (on demand) — If requested by Technical Support, you can initiate the collection of system information from one or more
devices at any time.
NOTE: By default, SupportAssist Enterprise collects system information periodically and on case creation only after the
registration is completed. For more information on registration, see Registering SupportAssist Enterprise.
You can also use SupportAssist Enterprise to collect and send system information from multiple devices to Dell EMC. For more informationon collecting system information from multiple devices, see Starting a multiple device collection.
The collected system information is saved on the server that hosts the application that runs the collection task. Collections tasks that arerun by SupportAssist Enterprise are saved on the server where SupportAssist Enterprise is installed. Collection tasks that are run by aRemote Collector are saved on the server where the Remote Collector is set up. You can access collections that are run by SupportAssistEnterprise from the Devices or Collections page. The system information available in a collection is displayed in the Configuration Viewerthat is available in SupportAssist Enterprise.
NOTE: Collections that are performed by a Remote Collector cannot be viewed from SupportAssist Enterprise. For
information on viewing such collections, see Viewing collections for devices associated with a Remote Collector.
NOTE: You can only view the last 5 system information collections through the Configuration Viewer. System
information collections that are 30 days or older and collections that are older than the last 5 collections within the last
30 days are automatically purged. The purge collections task runs automatically every day at 10 p.m. (time as on the
server where SupportAssist Enterprise is installed).
NOTE: The Configuration Viewer does not support viewing the system information collected from storage devices with
Fluid File System (FluidFS).
NOTE: For collections from devices that are running a non-English operating system, the Configuration Viewer may not
display certain attributes as expected.
NOTE: Collections tab will only display system information collected during the last 7 days. To view collections that are
older than 7 days, use the date filter to display the list of collections.
NOTE: You cannot view periodic collections that are collected from a server.
Topics:
• View a collection from the Devices page• View a collection from the Collections page• Refine collections based on a date range• Configuration Viewer• Items reported in periodic collections from servers• Download and view a multiple device collection
View a collection from the Devices pageAbout this task
The device overview pane lists the collections that have been performed on a specific device. You can select any collection that you wantto view from the collections list.
14
128 Viewing collections

Steps
1. Point to Devices and click View Devices.The Devices page is displayed.
2. Select the device for which you want to view collections.The device overview pane is displayed at the right side of the Devices page.
The Collections field displays No Collections in the following scenarios:
• No collections have been performed from the device• The device is associated with a Remote Collector
3. From the Collections list, select a collection date and time.
Figure 41. Selecting a collection
If the device is a server, the Configuration Viewer is displayed in a new web browser window. For all other device types and multipledevice collections, you are prompted to save the collection as a .zip file. To view the downloaded collection, extract the .zip fileand click the index.html file.
View a collection from the Collections pageAbout this task
The Collections page lists all the collections that have been performed successfully. You can select any collection that you want to viewfrom the collections list. You can also identify whether the collection is either a single or multiple device collection based on the collectionname.
• Collections from a single device are named in the following format: device name (collection type). If the device name is notavailable, the collection name contains the IP address or hostname of the device.
• Multiple device collections are named in the following format: SA_yyyy_mm_ddThh_ss_collection name
Viewing collections 129

Steps
1. Point to Collections and click View Collections.The Collections page is displayed.
2. Select a collection that you want to view.
Figure 42. View Collection option
The collection overview pane is displayed.NOTE: The View Collection or Download Collection option is disabled if the collection was performed by a Remote
Collector.
3. Click View (for server collections) or Download (for all other device types and multiple device collections).If the collection is from a server, the Configuration Viewer is displayed in a new web browser window. For collections from all otherdevice types and multiple device collections, download and save the collection as a .zip file. To view the downloaded collection,extract the .zip file and click the index.html file.
Refine collections based on a date rangePrerequisites
You must be logged in to SupportAssist Enterprise with elevated or administrative privileges. See Granting elevated or administrativeprivileges to users.
Steps
1. Point to Collections and click View Collections.The Collections page is displayed.
2. From the Date Range filter, select the start and end dates, and then click Apply.Collections in the selected date range are displayed.
Configuration ViewerThe Configuration Viewer enables you to view the system information collected by SupportAssist Enterprise from your devices. TheConfiguration Viewer displays information in a tabbed format. The collected system information is displayed in the ConfigurationViewer under various categories and sub categories.
In addition, the Configuration Viewer displays a Summary category. You can select the Summary category to view the following:
• The system information collection settings in SupportAssist Enterprise at the time of the collection• Summary of errors that were detected in the collected system information• Brief information about the device
The Configuration Viewer comprises of the following:
130 Viewing collections

• Top pane — Displays the various categories and sub categories of collection data in a menu format. You can move the mouse pointerover the menu to see subcategories. You can click Expand All or Collapse All to quickly expand or collapse all categories. In addition,the top pane also displays the Contacts tab and the Section Status tab.
• Contacts — Displays case details, customer information that you have provided while registering SupportAssist Enterprise,collections details, and the application information. The Contacts tab is the default tab.
• Section Status — Displays an overview of the section-level information of a collection. This tab displays the status anddescription of each section of the collection. The number of items that are displayed in Section Status is dependent on theconfiguration of the device. The Section Status section also displays the count and status of the collection. The availablestatuses are:
• Success• Failed• Warning
• Bottom pane — Displays the collection details. The bottom pane also displays the information available for the category orsubcategory that is selected in the top pane. To view more details of the collection, click one of the subcategories. When you click acategory, the category is expanded, enabling you to view its sub categories. The bottom pane also includes a navigation trail, whichyou can click to navigate backwards on the current trail.
Depending on the device types from which the collection was performed, the multiple device configuration viewer may display thefollowing tabs:
• Server — If the collection includes the system information from a server• Storage — If the collection includes the system information from a storage device• Networking — If the collection includes the system information from a network device• Chassis — If the collection includes the system information from a chassis• Software — If the collection includes the system information from a software• Virtual Machine — If the collection includes the system information from a virtual machine
Figure 43. Device configuration viewer
NOTE: If you have disabled the collection of identity information from devices, the identity information such as
hostname, IP address, and so on, are replaced by tokenized values in the collected system information. The tokenized
values are represented as TOKENn—for example, TOKEN0, TOKEN1, or TOKEN2.
NOTE: For a list of items that may be reported in collections from a server, see Items reported in periodic collections
from servers.
NOTE: The Configuration Viewer does not support viewing the system information collected from storage devices with
Fluid File System (FluidFS).
Log typesYou can use the configuration viewer to access two types of logs from the system information that is collected by SupportAssistEnterprise:
Viewing collections 131

Log types Description
Structured logs Contain application logs, Embedded Server Management (ESM) logs, smart logs, and event logs. When you clickthe Structured Logs category, the configuration viewer displays the list of available structured logs. You canclick any of the listed structured logs to view the details of the log in a new web browser window.
Unstructured logs Contain a snapshot of the system files such as the Remote Access Controller (RAC) logs, Windows event logs,and other logs. When you click the Unstructured Logs category, the configuration viewer displays the list ofavailable unstructured logs.
NOTE: Unstructured logs cannot be viewed within the configuration viewer. You can only save the
unstructured logs and view the log details using an appropriate application.
Items reported in periodic collections from serversThe items reported in the system information collected from servers vary depending on the following:
• Device Type used to add the device in SupportAssist Enterprise• Type of collection (manual, periodic, or support case)
The following table provides a summary of the items reported in the collected system information for a periodic collection from servers.NOTE: The system information in a collection that is performed for a support case creation and a manually-initiated
collection is more detailed in comparison with the system information collected in a periodic collection. For the
complete list of items that are collected by SupportAssist Enterprise, see the SupportAssist Enterprise Version 2.0.40Reportable Items document at www.dell.com/serviceabilitytools.
NOTE: The system information from periodic collections enables Dell EMC to provide you an insight into your company’s
as-maintained environment configuration with proactive firmware recommendations and other reports.
Table 23. Items reported in periodic collections from servers
Items reported Device added in SupportAssist Enterprise with Device Typeas Server / Hypervisor
Device added inSupportAssist Enterprisewith the Device Type asiDRACOMSA is installed on the
deviceOMSA is not installed on thedevice
Memory
Memory Array
Memory Operating Mode
Memory Redundancy
Slot
Controller
Connector
PCIe-SSD-Extender
Enclosure
Array Disk
Intrusion Switch
132 Viewing collections

Items reported Device added in SupportAssist Enterprise with Device Typeas Server / Hypervisor
Device added inSupportAssist Enterprisewith the Device Type asiDRACOMSA is installed on the
deviceOMSA is not installed on thedevice
Hardware Log
Main Chassis
Additional Information
Modular Enclosure Information
Firmware
Processor
Fan
Fan Redundancy
Temperature
Voltage
Power Supply
Power Supply Redundancy
Network
IPv4 Address
IPv6 Address
Network Team Interface
Interface Member
Remote Access Device
DRAC Information
Serial Over LAN Configuration
IPv6 Detail
User Setting
User Information
iDRAC User Privilege
Viewing collections 133

Items reported Device added in SupportAssist Enterprise with Device Typeas Server / Hypervisor
Device added inSupportAssist Enterprisewith the Device Type asiDRACOMSA is installed on the
deviceOMSA is not installed on thedevice
DRAC User Privilege
Serial Port Configuration
NIC Configuration
Component Detail
Controller TTY Log
Operating System
NOTE: In a collection from an iDRAC, Controller TTY Log is available only if iDRAC firmware version 2.00.00.00 or later
installed on the server.
Download and view a multiple device collectionAbout this task
You can also view the system information available in the multiple device collections that you have performed. To view a multiple devicecollection, you must download the multiple device collection and open the collection by using a web browser.
Steps
1. Point to Collections and click View Collections.The Collections page is displayed.
2. Select a multiple device collection that you want to view.
Figure 44. Download Collection option
The collection overview pane is displayed.
3. Click Download Collection.You are prompted to open or save the collection file.
134 Viewing collections

4. Save the collection file.
5. Extract the multiple device collection .zip file.
6. Open the folder where you extracted the collection file.
7. Double-click the index.html file.The multiple device configuration viewer opens in a new web browser window. You can view the system information collected fromeach device by accessing the device type menu.
Viewing collections 135

Using SupportAssist Enterprise to collect andsend system information
SupportAssist Enterprise automates the collection of system information from your devices both periodically and on case creation. Ifrequired, you can also manually start the collection and upload of system information to Dell EMC at any time. You can choose to start thecollection of system information from a single device or multiple devices.
NOTE: For information on the devices from which SupportAssist Enterprise can collect and send system information to
the backend, see the SupportAssist Enterprise Version 2.0.40 Support Matrix at www.dell.com/serviceabilitytools.
Topics:
• Set up SupportAssist Enterprise for collecting and sending system information• Start the collection of system information from a single device• Start the collection of system information from multiple devices• Upload a collection• Upload a collection from a disconnected site
Set up SupportAssist Enterprise for collecting andsending system informationAbout this task
Installing SupportAssist Enterprise enables you to use SupportAssist Enterprise to collect and send system information to Dell EMC fromthe local system. To use SupportAssist Enterprise to collect and send system information to Dell EMC from remote devices, you must addeach remote device in SupportAssist Enterprise.
NOTE: The following steps are only required if you have not installed SupportAssist Enterprise. If you have already
installed SupportAssist Enterprise, follow the instructions in Start the collection of system information from a single
device to manually start the collection and upload of system information to Dell EMC.
Steps
1. Install SupportAssist Enterprise. See Install SupportAssist Enterprise.
2. (Optional) Register SupportAssist Enterprise. See Register SupportAssist Enterprise.SupportAssist Enterprise is now ready to collect system information from the local system.
3. Add each remote device in SupportAssist Enterprise. See Adding devices.NOTE: System information collected from servers running OMSA contains additional troubleshooting information
that may not be available in the data collected from servers that are not running OMSA. Therefore, Dell EMC
recommends that you install OMSA on the servers that you have added in SupportAssist Enterprise.
SupportAssist Enterprise is now ready to collect system information from remote devices.
Start the collection of system information from asingle devicePrerequisites
• Ensure that you have completed setting up SupportAssist Enterprise. See Set up SupportAssist Enterprise for collecting and sendingsystem information.
15
136 Using SupportAssist Enterprise to collect and send system information

• You must be logged in to SupportAssist Enterprise with elevated or administrative privileges. See SupportAssist Enterprise user groupsand Granting elevated or administrative privileges to users.
About this task
When a support case is opened or updated for a device, SupportAssist Enterprise automatically collects system information from thatdevice, and uploads the information to Dell EMC. If necessary, you can also manually start the collection of system information from adevice. For example, if an error occurs during the automatic collection and upload of system information, you must resolve the underlyingissue, and then manually start the collection and upload of system information. You may also be required to manually start the collectionand upload of system information, if requested by Technical Support.
Steps
1. Point to Devices and click View Devices.The Devices page is displayed.
2. Select the local system or a remote device from which you want to collect system information.The Start Collection link is enabled.
Figure 45. Starting a collection from a single device
3. Click Start collection.
Using SupportAssist Enterprise to collect and send system information 137

Figure 46. Collection status
The Name/IP Address column on the Devices page displays a progress bar and a message that indicate the status of the collectionand upload of system information to Dell EMC.
NOTE: If you want to cancel the collection of system information, click the icon that is displayed next to the
progress bar.
NOTE: Until the collection is complete, the check box that is used to select the device is disabled. Therefore, you
cannot initiate any other tasks on the device until the collection is complete.
NOTE: If the registration is not complete, the collection is not automatically sent to Dell EMC. However, you can go
to the Collections page, and then manually initiate the upload.
Start the collection of system information frommultiple devicesPrerequisites
You must be logged in to SupportAssist Enterprise with elevated or administrative privileges. See SupportAssist Enterprise user groupsand Granting elevated or administrative privileges to users.
About this task
You can use SupportAssist Enterprise to create and upload a collection bundle that contains the collected system information frommultiple devices.
NOTE: System information is collected only from devices that are not present in the Staging group.
Steps
1. Point to Devices and click View Devices.The Devices page is displayed.
2. Select the devices from which you want to collect system information.The Start Collection link is disabled when you select more than one device.
3. From the Collection Purpose list, select a reason for the collection.The Start Collection link is enabled.
4. Click Start Collection.
138 Using SupportAssist Enterprise to collect and send system information

Figure 47. Starting a multiple device collection
The Multiple Device Collection window is displayed.
5. (Optional) Type a name for the collection bundle, support case number, and the name or email address of the Technical Supportcontact.
6. If you want SupportAssist Enterprise to upload the collection bundle to Dell EMC, ensure that the Upload Collection option isselected.
NOTE: If you clear the Upload Collection option, the collection bundle is saved, but not uploaded to Dell EMC. You
can upload the collection bundle at a later time through the Collections page.
7. Click OK.
Figure 48. Multiple Device Collection pane
The collection progress status is displayed in the Multiple Device Collection pane on the Devices page. If the collection is completedsuccessfully, the Collections page displays the details of the collection. You can also download the multiple device collection from theCollections page. For information on viewing a multiple device collection, see Download and view a multiple device collection.
NOTE: To cancel the multiple device collection, click Cancel on the Multiple Device Collection pane.
NOTE: Until the multiple device collection is complete, the check box that is used to select the devices is disabled.
Therefore, you cannot initiate any other tasks on the devices until the multiple device collection is complete.
NOTE: If the registration is not complete, the collection is not automatically sent to Dell EMC. However, you can go
to the Collections page, and then manually initiate the upload.
NOTE: When you are collecting system information from multiple devices, if the devices you have selected are
associated with multiple Remote Collectors, then each Remote Collector generates a separate collection bundle.
Using SupportAssist Enterprise to collect and send system information 139

Upload a collectionPrerequisites
You must be logged in to SupportAssist Enterprise with elevated or administrative privileges. See SupportAssist Enterprise user groupsand Granting elevated or administrative privileges to users.
About this task
You can use the Upload option available in the Collections page to upload collections to Dell EMC. You may choose to upload a collectionin the following scenarios:
• Collection of system information was successful, but upload of the collection was unsuccessful.• While starting a multiple device collection, you had chosen not to upload the multiple device collection to Dell EMC. Such collections
display a Never Uploaded status in the Collections page.
• You want to upload a collection to Dell EMC once again.
NOTE: Manual upload is not supported for collections that were performed by a Remote Collector.
Steps
1. Point to Collections and click View Collections.The Collections page is displayed.
2. Select one or more collections that you want to upload and click Upload.
NOTE: The total file size of the all collections that you have selected must be lesser than 5 GB.
Figure 49. Upload collection option
The Upload Status column displays the status of the upload.
Upload a collection from a disconnected siteAbout this task
When internet connectivity is available, SupportAssist Enterprise automatically collects and sends system information from your devices toDell EMC. If the server where SupportAssist Enterprise is installed or the server where the Remote Collector is set up does not haveinternet connectivity, you can choose to manually upload collections to Dell EMC.
Steps
1. Perform a collection from the device. See Start the collection of system information from a single device.
2. If the collection was performed by SupportAssist Enterprise:
• For storage, networking, or multiple device collections only — On the Collections page, select the collection, and in the collectionoverview pane, click Download File.
140 Using SupportAssist Enterprise to collect and send system information

• For other device collections, depending on the operating system, you can access the collection .zip file at the following location:
• Windows — <Drive where SupportAssist Enterprise is installed>:\Program Files\Dell\SupportAssist\reports• Linux — /opt/dell/supportassist/scripts/reports
• If the collection was performed by a Remote Collector, log in to the server where the Remote Collector is installed. Depending onthe operating system, you can access the collection .zip file at the following location:
• Windows — <System drive of the remote system>:\Program Files\Dell\SupportAssist\reports• Linux — /opt/dell/supportassist/scripts/reports
3. Copy and paste the collection .zip file to another system that has internet connectivity.
4. Visit https://techdirect.dell.com/fileUpload/The Dell EMC Technical Support File Upload page is displayed.
5. Type the Service Tag of the device.
6. Type your company name, contact name, Service Request #, email address, Dell EMC contact email, and address in the appropriatefields.
NOTE: If you do not have a Service Request number, contact Technical Support to open a service request.
7. Click Choose File and browse to select the collection .zip file.
8. Click Submit.
Using SupportAssist Enterprise to collect and send system information 141

Understanding maintenance modeThe maintenance mode functionality suspends the alert processing and automatic case creation capability of SupportAssist Enterprise,thereby preventing the creation of unnecessary support cases during an alert storm or a planned maintenance activity. If an alert storm isreceived from a monitored device, SupportAssist Enterprise automatically places the device in maintenance mode. You can also manuallyenable the maintenance mode functionality before a planned maintenance activity to temporarily suspend the automatic case creationcapability. The following sections provide more information about the maintenance mode functionality.
Global-level maintenance modeGlobal-level maintenance mode places all monitored devices in maintenance mode, suspending alert processing and automatic casecreation for all devices. While in global-level maintenance mode, SupportAssist Enterprise displays a yellow Maintenance Mode banner atthe top of the page. You can enable global-level maintenance mode to prevent the creation of unnecessary support cases duringdowntime or a routine maintenance activity. For instructions to enable global-level maintenance mode, see Enable or disable global-levelmaintenance mode.
Device-level maintenance modeDevice-level maintenance mode suspends alert processing and automatic case creation for a specific device. For all other monitoreddevices, SupportAssist Enterprise continues to process alerts and create support cases, if the alerts qualify for case creation. Device-levelmaintenance mode is implemented as follows:
• Automated device-level maintenance mode — By default, if SupportAssist Enterprise receives 10 or more valid hardware alertswithin 60 minutes from a specific device, SupportAssist Enterprise automatically places that device in maintenance mode. The deviceremains in maintenance mode for 30 minutes, allowing you to resolve the issue without creating additional support cases for thedevice. An email notification is also sent to the primary and secondary contacts, and the device displays the maintenance mode icon
on the Devices page. After 30 minutes, the device is automatically removed from maintenance mode, enabling SupportAssistEnterprise to resume normal alert processing for the device. If required, you can retain the device in maintenance mode until youresolve the issue, by manually enabling maintenance mode. You can also remove a device from automated maintenance mode beforethe 30-minute period. For instructions to enable or disable the device-level maintenance mode, see Enable or disable device-levelmaintenance mode.
• Manual device-level maintenance mode — If you have a planned maintenance activity for a device, and do not want SupportAssistEnterprise to automatically create support cases, you can place that device in maintenance mode. While in maintenance mode, the
device displays the maintenance mode icon on the Devices page. After the maintenance activity is completed, you can removethe device from maintenance mode, enabling SupportAssist Enterprise to resume processing alerts from the device normally. Forinstructions to enable device-level maintenance mode, see Enable or disable device-level maintenance mode.
The global-level and device-level maintenance mode functionalities work independent of each other. For example:
• If a device is placed in manual maintenance mode, the device continues to remain in manual maintenance mode even if global-levelmaintenance mode is enabled and then disabled.
• If a device is placed in automated maintenance mode, the device continues to remain in automated maintenance mode for 30 minuteseven if the global-level maintenance mode is enabled and then disabled.
Topics:
• Enable or disable global-level maintenance mode• Enable or disable device-level maintenance mode
16
142 Understanding maintenance mode

Enable or disable global-level maintenance modeEnabling global-level maintenance mode suspends the automatic case creation capability for all devices.
Prerequisites
You must be logged in to SupportAssist Enterprise with elevated or administrative privileges. See SupportAssist Enterprise user groupsand Granting elevated or administrative privileges to users.
Steps
1. Point to Settings and click Preferences.The Preferences page is displayed.
2. In Maintenance Mode, depending on your requirement, select or clear the Temporarily suspend case generation activity (forexample, for purposes of downtime, external troubleshooting, etc.) option.
3. Click Apply.The Saving Preferences Data window is displayed. If you enabled maintenance mode, a Maintenance Mode banner is displayed at thetop of the SupportAssist Enterprise user interface. After global-level maintenance mode is enabled, SupportAssist Enterprise remainsin that state unless you clear the option as in step 2.
Related reference
Preferences
Enable or disable device-level maintenance modePrerequisites
You must be logged in to SupportAssist Enterprise with elevated or administrative privileges. See SupportAssist Enterprise user groupsand Granting elevated or administrative privileges to users.
About this task
If you have a planned maintenance activity for a specific device and do not want SupportAssist Enterprise to process alerts from thatdevice, you can place that device in maintenance mode. After the maintenance activity is completed, you can remove the device frommaintenance mode, enabling SupportAssist Enterprise to process alerts from the device normally.
Steps
1. Click Devices.The Devices page is displayed.
2. Select a device on the Devices page.The device overview pane is displayed at the right side of the Devices page.
3. From the Tasks list, under Maintenance Mode, select Enable or Disable depending on your requirement.
Understanding maintenance mode 143

Figure 50. Maintenance mode options
If maintenance mode is enabled for a specific device, the maintenance mode icon is displayed with the name of the device on theDevices page. If you disable maintenance mode for a device, the maintenance mode icon is removed from the device name.
144 Understanding maintenance mode

SupportAssist Enterprise user groupsSupportAssist Enterprise maintains security and privileges through the following user groups that are created during the installation ofSupportAssist Enterprise:
• SupportAssistAdmins — Users who are members of this group have elevated or administrative privileges required for performingboth basic and advanced functions in SupportAssist Enterprise.
• SupportAssistUsers — Users who are members of this group have normal privileges required for performing only basic functions inSupportAssist Enterprise.
After the installation of SupportAssist Enterprise, by default, the operating system user groups specified in the following table areautomatically added to the SupportAssist Enterprise user groups.
Table 24. Operating system user groups that are added to the SupportAssist Enterprise user groups
Operating system where SupportAssistEnterprise is installed
SupportAssistAdmins SupportAssistUsers
Microsoft Windows Local Administrators Users
Windows domain controller Domain Admins Domain Users
Linux root group users group
If you have Administrator privileges (Windows) or root privileges (Linux) on the system, you can add user accounts to the appropriateSupportAssist Enterprise user groups based on your requirement. Users who are members of the operating system user groups on thesystem where SupportAssist Enterprise is installed have the following privileges in SupportAssist Enterprise:
• If SupportAssist Enterprise is installed on Windows:
• Users who are members of the Administrators user group have elevated or administrative privileges in SupportAssist Enterprise.• Users who are members of the Users user group have normal privileges in SupportAssist Enterprise.
• If SupportAssist Enterprise is installed on Linux:
• Users who are members of the root group have elevated or administrative privileges in SupportAssist Enterprise.• Users who are members of the users group have normal privileges in SupportAssist Enterprise.
Topics:
• SupportAssist Enterprise functions and user privileges• Granting elevated or administrative privileges to users• Add users to the SupportAssist Enterprise user groups – Windows• Add users to the SupportAssist Enterprise user groups – Linux
SupportAssist Enterprise functions and userprivilegesThe following table provides a list of functions that can be performed by the SupportAssist Enterprise users depending on their privileges.
Table 25. SupportAssist Enterprise functions and user privileges
SupportAssist Enterprise functions SupportAssistAdmins and users withelevated or administrative privileges
SupportAssistUsers and users withnormal privileges
View cases and check for cases
View the device inventory and device groups
View the collections page
17
SupportAssist Enterprise user groups 145

SupportAssist Enterprise functions SupportAssistAdmins and users withelevated or administrative privileges
SupportAssistUsers and users withnormal privileges
View the collected system information
Perform network connectivity tests
Perform the case creation test
Perform case management actions
Create, manage, edit, or delete device groups
Complete the registration of SupportAssistEnterprise
Add devices
Perform deep discovery
Create device discovery rule
Edit device credentials
Delete devices
Install/upgrade OMSA by using SupportAssistEnterprise
Configure SNMP by using SupportAssistEnterprise
Enable or disable global-level maintenancemode
Enable or disable device-level maintenancemode
Manually start the collection and upload ofsystem information from a single device ormultiple devices
View and configure SupportAssist Enterprisesettings
Perform automatic update
Clear System Event Log
Set up, edit, or delete an adapter
Set up, edit, or delete a Remote Collector
Create, edit, or delete an Account Credentials
Create, edit, or delete a Credential Profile
Uninstall SupportAssist Enterprise
146 SupportAssist Enterprise user groups

Granting elevated or administrative privileges tousersAbout this task
You can grant elevated or administrative privileges to users by adding them to specific user groups on the system where SupportAssistEnterprise is installed. The user groups to which a user must be added to grant elevated or administrative privileges vary depending on theoperating system where SupportAssist Enterprise is installed.
• If SupportAssist Enterprise is installed on Windows, you can grant elevated or administrative privileges through one of the followingmethods:
• Add the user to the SupportAssistAdmins user group. See Add users to the SupportAssist Enterprise user groups (Windows).• Add the user to the Windows Administrators user group.
• If SupportAssist Enterprise is installed on Linux, you can grant elevated or administrative privileges through one of the followingmethods:
• Add the user to the SupportAssistAdmins user group. See Add users to the SupportAssist Enterprise user groups (Linux).• Add the user to the Linux root group.
Add users to the SupportAssist Enterprise usergroups – WindowsPrerequisites
Ensure that you are logged in to the server where SupportAssist Enterprise is installed with administrator privileges.
Steps
1. Open the command prompt window.
2. To add an existing user account to a SupportAssist Enterprise user group, use the following syntax: net localgroupSupportAssist_Enterprise_user_group_name user_name.For example:
• To add an existing user account (for example, User1) to the SupportAssistAdmins user group, type net localgroupSupportAssistAdmins User1 and press Enter.
• To add an existing user account (for example, User2) to the SupportAssistUsers user group, type net localgroupSupportAssistUsers User2 and press Enter.
Add users to the SupportAssist Enterprise usergroups – LinuxPrerequisites
Ensure that you are logged in to the server where SupportAssist Enterprise is installed with root privileges.
Steps
1. Open the terminal window.
2. To create a new user account and add the user account to a SupportAssist Enterprise user group, use the following syntax:useradd –G SupportAssist_Enterprise_user_group_name User_nameFor example:
• To create a new user account (for example, User1) and add it to the SupportAssistAdmins user group, type useradd –GSupportassistadmins User1 and press Enter.
• To create a new user account (for example, User2) and add it to the SupportAssistUsers user group, type useradd –GSupportassistusers User2 and press Enter.
SupportAssist Enterprise user groups 147

3. To add an existing user account to a SupportAssist Enterprise user group, use the following syntax:usermod –G SupportAssist_Enterprise_user_group_name User_nameFor example:
• To add an existing user account (for example, User1) to the SupportAssistAdmins user group, type usermod –GSupportAssistAdmins User1 and press Enter.
• To add an existing user account (for example, User2) to the SupportAssistUsers user group, type usermod –GSupportAssistUsers User2 and press Enter.
148 SupportAssist Enterprise user groups

Manually configuring SNMP settingsConfiguring the SNMP settings (alert destination) of a device ensures that SupportAssist Enterprise receives alerts from the device.SupportAssist Enterprise can automatically configure the SNMP settings of Dell EMC servers. For Dell EMC chassis and networkingdevices, you must manually configure the SNMP settings.
Topics:
• Manually configuring the alert destination of a server• Manually configure alert destination of iDRAC using the web interface• Manually configure alert destination of chassis using the web interface• Manually configure alert destination of networking device
Manually configuring the alert destination of aserverBy default, when you add a server you can allow SupportAssist Enterprise to automatically configure the alert destination of the server. Ifthe automatic SNMP configuration is unsuccessful, you can configure the SNMP settings of a device by using the following methods:
• Running a script file — The SupportAssist Enterprise installation folder includes two script files (one for Microsoft Windows andanother for Linux) that you can use to configure the alert destination of a server.
• Manually configure the SNMP settings — You can configure settings by accessing the SNMP trap service.
NOTE: You can retry the automatic configuration of the alert destination at any time using the Configure SNMP option
available in SupportAssist Enterprise. For information on using the Configure SNMP option, see Configure SNMP
settings by using SupportAssist Enterprise.
Related tasks
Manually configuring the alert destination of a server by using the script file on server running Windows
Manually configuring the alert destination of a server running Windows
Manually configuring the alert destination of a server by using the script file on a server running Linux
Manually configure alert destination of server running Linux
Manually configuring the alert destination of a server byusing the script file on server running Windows
Prerequisites
• Microsoft Windows PowerShell version 1.0 or later must be installed on the device.
NOTE: The script file is supported only on Windows PowerShell. It is not supported on Windows PowerShell (x86),
Windows PowerShell ISE, or Windows PowerShell ISE (x86).
• Ensure that you have administrator rights on the device to run the PowerShell script file.• Ensure that you have write permissions on the C:\ drive of the device.
• If the device is running Windows 2003, ensure that the SNMP service is installed. On all other supported operating systems, the scriptfile installs the SNMP service if it is not installed already.
The script file is supported only on devices running the following operating systems:
• Microsoft Windows Server 2008 R2 SP1 Standard, Enterprise, and Datacenter• Windows Server 2012 R2 Standard and Datacenter• Windows Server 2012 Standard, Essentials, and Datacenter
18
Manually configuring SNMP settings 149

• Windows Server 2016 Standard, Essentials, and Datacenter• Windows Server 2019 Essentials and Datacenter• Windows 2008 Small Business Server• Windows 2011 Small Business Server• Windows Server Core 2012• Windows Server Core 2012 R2• Windows Server Core 2016• Windows Server Core 2019
Steps
1. On the server where SupportAssist Enterprise is installed, browse to the <Drive where SupportAssist Enterprise isinstalled>:\Program Files\Dell\SupportAssist\scripts folder.
2. Copy the script file (WindowsSNMPConfig.ps1) located in the folder and paste the file at a desired location (for example,C:\temp) on the device.
3. Perform one of the following, depending on the operating system running on the device:
• In Windows Server 2012, on the Start screen, right-click the Windows PowerShell tile, and in the app bar, click Run asadministrator.
• In Windows Server 2003, 2008, or Windows Small Business Server 2011, click Start, type PowerShell, right-click WindowsPowerShell, and then click Run as administrator.
4. Set the PowerShell execution policy as appropriate on the device. For example, type the following command: Set–ExecutionPolicy RemoteSigned or Set–ExecutionPolicy AllSigned.
5. Run the script file on the device using the following syntax: <script file path> –hosts <IP address of serverwhere SupportAssist Enterprise is installed>. For example, ./WindowsSNMPConfig.ps1 –hosts10.55.101.20.
6. If Verisign is not included as a trusted publisher on the device, you are prompted to confirm if you want to run the software from anuntrusted publisher. Press <R> to run the script.
Related concepts
Manually configuring the alert destination of a server
Manually configuring the alert destination of a serverrunning WindowsPerform the following steps to manually configure the alert destination of a server running Microsoft Windows:
Steps
1. Open a command prompt, type services.msc, and press Enter.The Services window is displayed.
2. Browse the list of services, and ensure that the status of the SNMP Service is displayed as Started.
3. Right-click SNMP Service and select Properties.The SNMP Service Properties window is displayed.
4. Click the Traps tab, and perform the following:
a) In the Community name box, type the community name, and click Add to list.b) In Trap destinations, click Add.
The SNMP Service Configuration window is displayed.c) In the Host name, IP or IPX address field, type the host name or IP address of the server where SupportAssist Enterprise is
installed, and click Add.
5. Click Apply.
6. In the Services window, right-click SNMP Service and click Restart.
Related concepts
Manually configuring the alert destination of a server
150 Manually configuring SNMP settings

Manually configuring the alert destination of a server byusing the script file on a server running Linux
Prerequisites
• Net-SNMP must be installed on the system. For information on installing Net-SNMP, see Installing Net-SNMP (Linux only)• Ensure that you have root privileges on the device.
The script file is supported only on devices running the following operating systems:
• Red Hat Enterprise Linux 5.5 (32-bit and 64-bit)• Red Hat Enterprise Linux 5.7 (32-bit and 64-bit)• Red Hat Enterprise Linux 5.8 (32-bit and 64-bit)• Red Hat Enterprise Linux 5.9 (32-bit and 64-bit)• Red Hat Enterprise Linux 5.10 (32-bit and 64-bit)• Red Hat Enterprise Linux 5.11 (32-bit and 64-bit)• Red Hat Enterprise Linux 6.1 (64-bit)• Red Hat Enterprise Linux 6.2 (64-bit)• Red Hat Enterprise Linux 6.3 (64-bit)• Red Hat Enterprise Linux 6.4 (64-bit)• Red Hat Enterprise Linux 6.5 (64-bit)• Red Hat Enterprise Linux 6.7 (64-bit)• Red Hat Enterprise Linux 6.8 (64-bit)• Red Hat Enterprise Linux 7.0 (64-bit)• Red Hat Enterprise Linux 7.1 (64-bit)• Red Hat Enterprise Linux 7.2 (64-bit)• SUSE Linux Enterprise Server 10 SP3 (32-bit and 64-bit)• SUSE Linux Enterprise Server 10 SP4 (32-bit and 64-bit)• SUSE Linux Enterprise Server 11 (64-bit)• SUSE Linux Enterprise Server 11 SP1 (32-bit and 64-bit)• SUSE Linux Enterprise Server 11 SP2 (64-bit)• SUSE Linux Enterprise Server 11 SP3 (64-bit)• SUSE Linux Enterprise Server 11 SP4 (64-bit)• SUSE Linux Enterprise Server 12 (64-bit)• SUSE Linux Enterprise Server 12 SP1 (64-bit)• CentOS 7.0• CentOS 6.0• Oracle Linux 7.1• Oracle Linux 6.7
Steps
1. On the server where SupportAssist Enterprise is installed, browse to the <Drive where SupportAssist Enterprise isinstalled>:\Program Files\Dell\SupportAssist\scripts folder.
2. Copy the script file (LinuxSNMPConfig.sh) located in the folder and paste the file at a desired location (for example, \root) onthe device.
3. Open the terminal window and log in as a user with root privileges.
4. Run the script file on the device using the following syntax: sh LinuxSNMPConfig.sh -d <IP address of the serverwhere SupportAssist Enterprise is installed>. For example, sh LinuxSNMPConfig.sh -d 10.10.10.10.
Related concepts
Manually configuring the alert destination of a server
Manually configuring SNMP settings 151
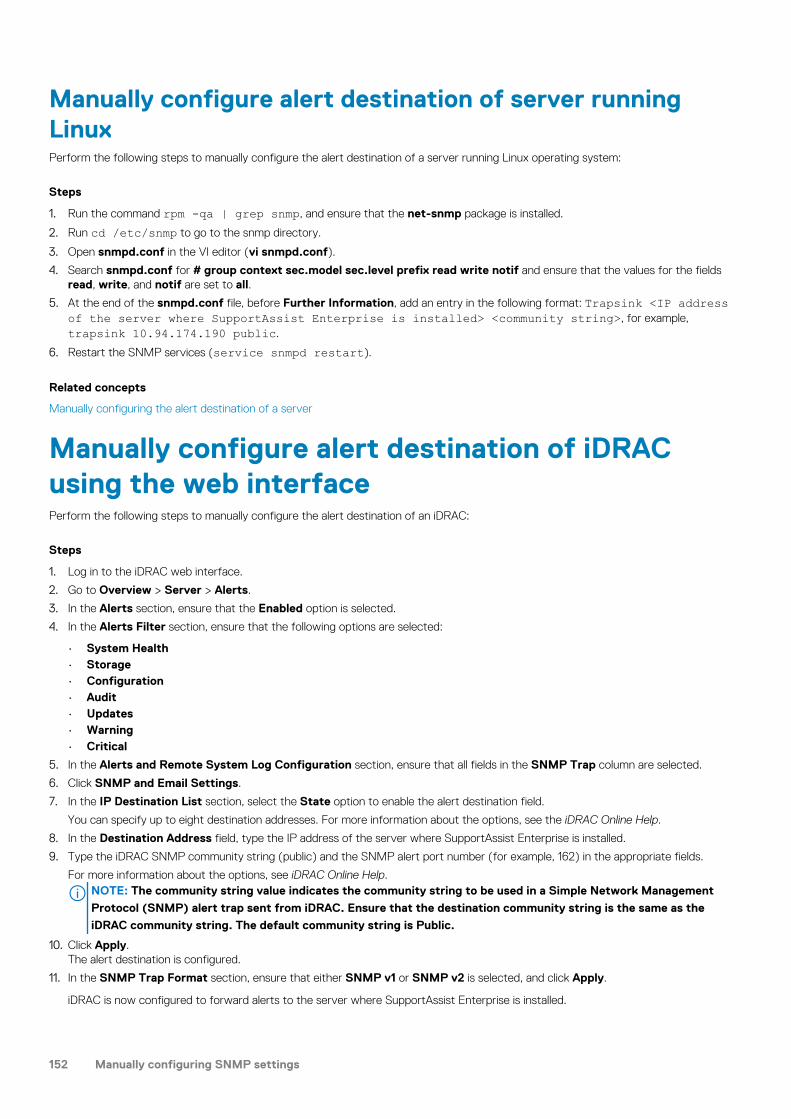
Manually configure alert destination of server runningLinuxPerform the following steps to manually configure the alert destination of a server running Linux operating system:
Steps
1. Run the command rpm -qa | grep snmp, and ensure that the net-snmp package is installed.
2. Run cd /etc/snmp to go to the snmp directory.
3. Open snmpd.conf in the VI editor (vi snmpd.conf).
4. Search snmpd.conf for # group context sec.model sec.level prefix read write notif and ensure that the values for the fieldsread, write, and notif are set to all.
5. At the end of the snmpd.conf file, before Further Information, add an entry in the following format: Trapsink <IP addressof the server where SupportAssist Enterprise is installed> <community string>, for example,trapsink 10.94.174.190 public.
6. Restart the SNMP services (service snmpd restart).
Related concepts
Manually configuring the alert destination of a server
Manually configure alert destination of iDRACusing the web interfacePerform the following steps to manually configure the alert destination of an iDRAC:
Steps
1. Log in to the iDRAC web interface.
2. Go to Overview > Server > Alerts.
3. In the Alerts section, ensure that the Enabled option is selected.
4. In the Alerts Filter section, ensure that the following options are selected:
• System Health• Storage• Configuration• Audit• Updates• Warning• Critical
5. In the Alerts and Remote System Log Configuration section, ensure that all fields in the SNMP Trap column are selected.
6. Click SNMP and Email Settings.
7. In the IP Destination List section, select the State option to enable the alert destination field.
You can specify up to eight destination addresses. For more information about the options, see the iDRAC Online Help.
8. In the Destination Address field, type the IP address of the server where SupportAssist Enterprise is installed.
9. Type the iDRAC SNMP community string (public) and the SNMP alert port number (for example, 162) in the appropriate fields.
For more information about the options, see iDRAC Online Help.NOTE: The community string value indicates the community string to be used in a Simple Network Management
Protocol (SNMP) alert trap sent from iDRAC. Ensure that the destination community string is the same as the
iDRAC community string. The default community string is Public.
10. Click Apply.The alert destination is configured.
11. In the SNMP Trap Format section, ensure that either SNMP v1 or SNMP v2 is selected, and click Apply.
iDRAC is now configured to forward alerts to the server where SupportAssist Enterprise is installed.
152 Manually configuring SNMP settings

NOTE: For information about configuring the alert destination of an iDRAC using other methods, see “Configuring IP
Alert Destinations” in the iDRAC User's Guide available at www.dell.com/idracmanuals .
Manually configure alert destination of chassisusing the web interfacePrerequisites
You must be logged in to the CMC web interface with administrator privileges.
Steps
1. In the system tree, go to Chassis Overview, and then click Alerts > Chassis Events.The Chassis Events page is displayed.
2. Under Chassis Event Filters Configuration section, select Enable Chassis Event Alerts option to enable alert generation.
3. Under the Chassis Event List section, select the Enable Alert option on the column header to generate alerts for all events.
4. In the system tree, go to Chassis Overview, and then click Alerts > Trap Settings.The Chassis Event Alert Destinations page is displayed.
5. Perform the following:
• In the Destination field, enter the IP address of the server where SupportAssist Enterprise is installed.• In the Community String field, enter a valid community string to which the server where SupportAssist Enterprise is installed
belongs.NOTE: CMC uses a default SNMP community string as public. To ensure higher security, it is recommended to
change the default community string and set a value which is not blank.
• Under Enabled, select the check box corresponding to the IP address of the server where SupportAssist Enterprise is installed.
6. Click Apply to save the settings.
7. To test whether the destination IP address is receiving the SNMP traps, click Send in the Test SNMP Trap column.
The IP alert destinations are configured.
Manually configure alert destination of networkingdeviceAbout this task
NOTE: The steps to configure the alert destination of networking devices may vary based on the networking device type
and model. For information about configuring the alert of a specific networking device model, see the networking device
documentation.
Steps
1. Log in to the networking device by using a terminal emulator such as PuTTY.The terminal window is displayed.
2. Enter configure and press Enter.
3. Enter snmp-server host <IP address of the server where SupportAssist Enterprise is installed>traps version 1.
4. To verify if the alert destination is configured successfully, enter show running-config snmp and press Enter.The list of alert destinations that are configured on the device is displayed.
Manually configuring SNMP settings 153

Managing SupportAssist Enterprise alerts inTechDirect
TechDirect is a centralized support portal that enables administrators in your organization to manage alerts that are created bySupportAssist Enterprise. By default, SupportAssist Enterprise automatically forwards alerts that qualify for support case creation or partsdispatch to Dell EMC. TechDirect enables Administrators to set rules that allow them to review and determine if the alerts need to beforwarded to Dell EMC for case creation or parts dispatch.
Topics:
• Set up TechDirect to receive SupportAssist Enterprise alerts• Configure alert rules in TechDirect• View SupportAssist Enterprise alerts in TechDirect• SupportAssist alerts• SupportAssist alert actions
Set up TechDirect to receive SupportAssistEnterprise alertsPrerequisites
The server where SupportAssist Enterprise is installed must have internet connectivity.
About this task
Setting up TechDirect to receive alerts from SupportAssist Enterprise enables you to view and manage alerts.
Steps
1. Go to TechDirect.com.The TechDirect home page is displayed.
2. Click Register and enter the following information on the Registration page:
a) In the Contact Information section, type the first name, last name, email address, and company name, and select the country.b) In the Account Information section, select the preferred language and time zone.c) In the TechDirect Terms of Use section, read about the TechDirect portal access and site terms of use, and then select Yes, I
agree to the TechDirect Terms of Use.d) In the Security Check section, type the displayed text.
3. Click Submit.The Registration Complete page is displayed and an email notification is sent with a link to reset your password. After you have resetthe password, ensure that you login to TechDirect again.
4. From the Services menu, click SupportAssist.The SupportAssist page is displayed.
5. Read about the SupportAssist terms of use and select I have read and understood these terms and conditions, and I amauthorized to accept these terms.
6. If you have multiple accounts, select an account from the Select Account list.
7. In the Manage Devices gadget, click Manage.The Manage Devices page is displayed.
Results
TechDirect is set up to receive alerts from SupportAssist Enterprise.
19
154 Managing SupportAssist Enterprise alerts in TechDirect

Configure alert rules in TechDirectAbout this task
Administrators in your organization can configure rules to determine how alerts created by SupportAssist are handled by the TechDirectportal. For example, you can choose to automatically forward all alerts to technical support or have the alerts placed in your SupportAssistalert queue for your support team to review and determine if the alert should be forwarded to Dell EMC.
Steps
1. Go to TechDirect.com.The TechDirect home page is displayed.
2. Click Sign In, and then type your TechDirect user name and password.The TechDirect Dashboard is displayed.
3. From the Services menu, click SupportAssist.The SupportAssist page is displayed.
4. In the Configure Rules gadget, click Configure.The Configure SupportAssist Alert Rules page is displayed.
5. In the Inactivity notification alert period field, type the desired duration.
6. For the Automated technical support case requests? option, select one of the following:
• Select Yes to directly forward all technical support alerts to Dell EMC.• Select No to send all technical support alerts to your company’s SupportAssist Enterprise alerts queue for review by your support
team to determine if the alert should be forwarded to Dell EMC.
7. For the Auto-forward all Dispatch alerts to Dell? option, select one of the following:
• Select Yes to directly forward all parts dispatch alerts to Dell EMC.• Select No to send all parts dispatch alerts to your company’s SupportAssist Enterprise alerts queue for review by your support
team to determine if the alert should be forwarded to Dell EMC.
The Group Management section is displayed if you have chosen to forward all parts dispatch alerts to Dell EMC.
8. Click Add Group Rule.
The group rules are used to identify the address where dispatched parts should be sent. Whenever a SupportAssist Enterprise alert isforwarded to Dell EMC for parts dispatch, the address in the alert is compared with the addresses defined in the group rules. If there isa match, the address information associated with that group rule is used to identify the address where the dispatched parts should besent.
9. On the Add Group Rule page, select one of the following options:
• By Country — Select this option if you want to route all auto-dispatches from a country to a specific address.• By State/Province — Select this option if you want to route all auto-dispatches from a state or province to a specific address.• By City — Select this option if you want to route all auto-dispatches from a city to a specific address.• By ZIP/Postal Code — Select this option if you want to route all auto-dispatches with a ZIP/Postal Code to a specific address.
10. Enter the required details based on the option that you have selected in Step 8 and click Save Rule.
11. Click Save Alert Rules.
View SupportAssist Enterprise alerts in TechDirectAbout this task
You can view SupportAssist Enterprise alerts in TechDirect after you set up TechDirect to receive alerts.
Steps
1. Go to TechDirect.com.The TechDirect home page is displayed.
2. Click Sign In, and then type your TechDirect user name and password.The TechDirect Dashboard is displayed.
3. From the Services menu, click SupportAssist.The SupportAssist page is displayed.
Managing SupportAssist Enterprise alerts in TechDirect 155

4. In the Manage SupportAssist Alerts tile, click Manage.The SupportAssist Alerts page is displayed.
SupportAssist alertsYou can view details about the alerts generated by SupportAssist Enterprise through the TechDirect portal. The following table describesthe details displayed on the SupportAssist Alerts page.
Table 26. Alert details
Name Description
Service Tag Displays the unique identifier of the system which reported anissue.
Alert Number Displays the unique support request number assigned to the alertthat you can reference while communicating with technicalsupport.
Alert Type Displays the type of alert:
• Technical Support• Dispatch
Notes Displays details about the issue that was detected and errorinformation for investigation.
Create Timestamp Displays the date and time that the alert was created inTechDirect.
Last Activity Time Displays the date and time of the last action taken by the customerAdministrator or Technician User.
Status Displays the status of the alert:
• Unassigned — No customer Technician User has ownership• Assigned — A customer Technician User has ownership• Submit Failed — Attempt to forward to Dell EMC failed
Actions Click to view actions available for the alert.
Technician Users may:
• Take ownership of the alert• Update the alert details• Close the alert• Forward the alert to Dell EMC
Administrators can perform all the actions available for users withthe role Technician. Administrators can assign an alert to one oftheir Technician Users.
Owner Displays the Technician User who is currently the owner of analert.
NOTE: The Owner field is not displayed in the defaultview. You can select the Owner field through the ColumnPreferences link.
SupportAssist alert actionsYou can take action on the alerts created by SupportAssist through the TechDirect portal. The following table describes the actionsavailable for alerts created by SupportAssist.
156 Managing SupportAssist Enterprise alerts in TechDirect

Table 27. Alert actions
TechDirect account type Available actions Description
Administrator andTechnician Users
Take Ownership Individual Technician Users under a TechDirect account can seeall SupportAssist Enterprise alerts as they arrive. A TechnicianUser may take ownership of an alert. Technician Users may notreassign alerts, only the TechDirect Administrator for the accountmay reassign alerts.
Update Displays the Details page that allows you to add a note or anattachment about the alert.
Close Alert Closes the alert. Both you and Dell EMC will not be able to takeany further action on the alert.
Forward To Dell Forwards the support request to technical support. You cancontinue to monitor progress from either your TechnicalSupport or Dispatch Summary pages in TechDirect.
Administrator Assign Ownership Assigns a Technician User as the owner of an alert. May also beused to reassign to another Technician User.
Managing SupportAssist Enterprise alerts in TechDirect 157

Other useful informationThis chapter provides additional information that you may require while using SupportAssist Enterprise.Topics:
• Monitoring servers for hardware issues• Support for automatically installing or upgrading OMSA• Support for automatically configuring SNMP settings• Installing patch for SupportAssist Enterprise• Enable or disable API interface settings• Signing in to TechDirect• Deep discovery• Device correlation• Association view• Detection of hardware issues in attached storage devices• Support for OEM devices• Install Net-SNMP on a server running Linux• Configure sudo access for SupportAssist Enterprise on server running Linux• Ensuring successful communication between the SupportAssist Enterprise application and the SupportAssist server• Accessing the SupportAssist Enterprise application logs• Event storm handling• Accessing the context-sensitive help• View SupportAssist Enterprise product information• Uninstalling SupportAssist Enterprise• Identify series of PowerEdge server
Monitoring servers for hardware issuesSupportAssist Enterprise can monitor Dell EMC servers through the following methods:
• Agent-based monitoring — This method is used to monitor devices that are added with the Device Type as Server / Hypervisor.In this method, an agent acts as an interface between the device and SupportAssist Enterprise. The agent generates an alert (SNMPtrap) whenever a hardware event occurs on the device. For monitoring a device using the agent-based method, SupportAssistEnterprise depends on the OpenManage Server Administrator (OMSA) agent. The OMSA agent is an application that monitors thehealth of various components of the device where it is installed. Whenever a hardware event occurs on the device, the OMSA agentgenerates an alert. SupportAssist Enterprise processes the alert to determine if the alert qualifies for creating a support case. Forinstructions to add a device for agent-based monitoring, see Adding a server or hypervisor.
NOTE: Without OMSA, SupportAssist Enterprise will not be able to monitor a device through the agent-based
monitoring method.
NOTE: Installation of OMSA may not be supported on certain operating systems. SupportAssist Enterprise may be
able to monitor devices running such operating systems only through the agentless monitoring method. For
information on the operating system requirements for agent-based monitoring, see the SupportAssist EnterpriseVersion 2.0.40 Support Matrix at www.dell.com/serviceabilitytools.
• Agentless monitoring — This method is used to monitor devices that are added with the Device Type as iDRAC. In this method,the Integrated Dell EMC Remote Access Controller (iDRAC) available on the device acts as an interface between the device andSupportAssist Enterprise. Whenever a hardware event occurs on the device, the iDRAC generates an alert. SupportAssist Enterpriseprocesses the alert to determine if the alert qualifies for creating a support case. For instructions to add a device for agentlessmonitoring, see Adding an iDRAC.
NOTE: Agentless monitoring is supported only for Dell EMC’s yx2x and later generation of PowerEdge servers
(iDRAC 7 and later).
NOTE: The iDRAC can be configured to send alerts through SNMP and IPMI. However, SupportAssist Enterprise can
only receive alerts sent through SNMP. To ensure that SupportAssist Enterprise receives alerts sent from an iDRAC,
20
158 Other useful information

you must ensure that all SNMP Trap options are selected in the Alerts and Remote System Log Configuration section
of the iDRAC web console.
Benefits of agent-based monitoringEven though Dell EMC's yx2x and later generations of PowerEdge servers can be monitored through the agentless (iDRAC) method,agent-based (OMSA) method has the following benefits:
• Alert generation capabilities of OMSA and iDRAC are not the same. In Dell EMC's yx3x or later generation of PowerEdge servers, thealert generation capabilities of OMSA and iDRAC are almost similar. However, alerts from chipset and software RAID are available onlythrough OMSA.
• For devices with a ProSupport Plus, ProSupport Flex for Data Center, or ProSupport One for Data Center service contract Dell EMC'srecommendations for operating system and software component versions are available only if the device is monitored through OMSA.
• OMSA is the only option available for monitoring x9xx to yx1x generation of PowerEdge servers.
Support for automatically installing or upgradingOMSATo monitor a device through the agent-based method, SupportAssist Enterprise requires the OpenManage Server Administrator (OMSA)agent to be installed and running on the device. The OMSA agent is an application that monitors the health of various components of thedevice where it is installed. When OMSA is installed and running on a device, the OMSA agent generates an alert whenever a hardwareevent occurs on the device. SupportAssist Enterprise receives the alert from the device and processes the alert to identify if the alertindicates a hardware issue. For more information on OMSA, visit Delltechcenter.com/OMSA.
NOTE: The SupportAssist Enterprise recommended version of OMSA may vary depending on the generation of the
PowerEdge server and the operating system running on the server. For information on the recommended versions of
OMSA, see the SupportAssist Enterprise Version 2.0.40 Support Matrix at Dell.com/ServiceabilityTools.
SupportAssist Enterprise has the capability to automatically download and install the recommended version of OMSA on a device. Bydefault, when a server is added for agent-based monitoring, SupportAssist Enterprise verifies if the recommended version of OMSA isinstalled on the device.
• If OMSA is not installed on the device, SupportAssist Enterprise prompts for your confirmation to download and install therecommended version of OMSA on the device. On confirmation, SupportAssist Enterprise downloads and installs OMSA in thebackground. The OMSA installation status is displayed in the Status column on the Devices page. If you choose not to install OMSA,
the status of the device is displayed as OMSA not installed. To install OMSA at a later time, you can use the Tasks > Install /Upgrade OMSA option on the device overview pane.
• If OMSA is already installed on the device, SupportAssist Enterprise verifies if the version of OMSA matches with the recommendedOMSA version for SupportAssist Enterprise. If the existing version of OMSA is not the recommended version, but supports directupgrade to the recommended version of OMSA, SupportAssist Enterprise prompts for your confirmation to download and upgradeOMSA on the device. The OMSA upgrade status is displayed in the Status column on the Devices page. If you choose not to upgrade
OMSA, the status of the device is displayed as New version of OMSA available. To upgrade OMSA at a later time, use theTasks > Install / Upgrade OMSA option on the device overview pane.
NOTE: Direct upgrade to OMSA version n is supported only from the two previous versions (n-2) of OMSA. If direct
upgrade is not supported, you must manually download and upgrade OMSA on the device. For example, if OMSA
version 7.0 is already installed on the device, but the recommended version of OMSA is 7.4, you must manually
upgrade from OMSA version 7.0 to 7.2. After upgrading to OMSA version 7.2, you can upgrade to OMSA version 7.4
using the More Tasks > Install/Upgrade OMSA option on the device overview pane or you can manually download and
upgrade to OMSA version 7.4.
NOTE: When you allow or use SupportAssist Enterprise to install or upgrade OMSA, the downloaded packages of OMSA
are retained in the SupportAssist Enterprise installation folder. If a compatible version of OMSA was already
downloaded during an earlier operation, SupportAssist Enterprise does not download OMSA again. In this scenario,
SupportAssist Enterprise only installs or upgrades OMSA on the device using the already downloaded version of OMSA.
NOTE: The time taken to download OMSA is dependent on the internet download speed and network bandwidth.
Other useful information 159

If the recommended version of OMSA is installed and running on the device, the status of the device is displayed as Success.
NOTE: Automatic installation of OMSA through SupportAssist Enterprise is not supported on devices running Citrix
XenServer, VMware ESXi, or ESX. To allow SupportAssist Enterprise to detect hardware issues on these devices, you
must manually download and install OMSA.
Related tasks
Install or upgrade OMSA by using SupportAssist Enterprise
Support for automatically configuring SNMPsettingsTo enable SupportAssist Enterprise to monitor a device, the device must be configured to forward alerts (SNMP traps) to the serverwhere SupportAssist Enterprise is installed. Configuring the SNMP settings sets the alert destination of a device, and ensures that alertsfrom the device are forwarded to the server where SupportAssist Enterprise is installed. SupportAssist Enterprise has the capability toautomatically configure the SNMP settings of a device, such that the device forwards alerts to the server where SupportAssist Enterpriseis installed. You can allow SupportAssist Enterprise to configure the SNMP settings of the device while adding the device or at a latertime. The status of the SNMP configuration is displayed in the Status column on the Devices page. While SupportAssist Enterprise
configures the SNMP settings of a device, the device displays a Configuring SNMP status. You can also use the Tasks >Configure SNMP option on the device overview pane to automatically configure the SNMP settings of a device at any time.
NOTE: When you allow or use SupportAssist Enterprise to automatically configure the SNMP settings of a device, the
alert destination of the device is set to the IP address of the server where SupportAssist Enterprise is installed.
Related tasks
Configure SNMP settings by using SupportAssist Enterprise
Installing patch for SupportAssist EnterpriseOccasionally, a patch may be available for SupportAssist Enterprise to address certain issues and potential security vulnerabilities.
SupportAssist Enterprise checks if any patch updates are available, every Monday at 10.30 p.m. (date and time as on the server whereSupportAssist Enterprise is installed).
When a patch is available, a Patch for SupportAssist Enterprise (Optional Patch) banner is displayed with the following options:
• Update now — To enable SupportAssist Enterprise to download and install the update.• Skip this version — To skip the update. The update available banner is not displayed again until the next version of the update is
available.• Remind me later — To close the Update Available banner. The Update Available banner is not displayed until you log in to
SupportAssist Enterprise again.• More Info — Provides details about the patch version and the fixes available in the patch update.
NOTE:
• For mandatary patches, the Skip this version and Remind me later options may not be available on the banner.
• Installing the patch may restart the SupportAssist services. Ensure that no operations are in progress while
installing the patch. However, the operations will resume after the patch installation is complete.
• After installing the patch, the SupportAssist Enterprise version number is updated, for example, from version 2.0.0
to 2.0.1.
• Patches are supported for both registered and unregistered installations of SupportAssist Enterprise version 2.0 or
later.
• After installing a patch, you cannot uninstall it separately. If you want to uninstall the patch, you must uninstall and
reinstall SupportAssist Enterprise.
160 Other useful information

Enable or disable API interface settingsPrerequisites
You must be logged in to SupportAssist Enterprise with elevated or administrative privileges. See SupportAssist Enterprise user groupsand Granting elevated or administrative privileges to users.
About this task
Enabling REST API interfaces enables you to programmatically integrate SupportAssist Enterprise with your data center tools andapplications. For more information, see the REST API Guide — SupportAssist Enterprise at www.dell.com/serviceabilitytools.
NOTE: You can perform a maximum of 10 operations such as adding devices and collecting system information, in
parallel. Before you query the operation status and operation ID, ensure that there is a minimum delay of 5 seconds.
Steps
1. Point to Settings and click Preferences.The Preferences page is displayed.
2. In API Interface Collection Data Settings, depending on your requirement, select or clear the Enable API Interfaces forSupportAssist Enterprise option.
3. Click Apply.
Signing in to TechDirectSigning in to your company's TechDirect account from SupportAssist Enterprise enables you to integrate automated parts dispatch withyour company's TechDirect account. For more information, see Integrate parts dispatch with your TechDirect account.
You can sign in to your TechDirect account through one of the following methods:
• During the registration of SupportAssist Enterprise• On the TechDirect Login page
When you try to sign in to your TechDirect account in SupportAssist Enterprise:
1. The TechDirect Sign In page is displayed.2. After you enter the credentials and click Sign In, the OTP is displayed.3. Enter the OTP and click Submit.
NOTE:
• When you sign in to your TechDirect account in SupportAssist Enterprise, you are automatically signed in with the
same TechDirect account to Dell EMC portals that you may open on any other window or tab of the same web
browser.
• If you had already signed in to any Dell EMC portal on the web browser, and then try to sign in to TechDirect in
SupportAssist Enterprise, the OTP related to the signed in account is displayed. To continue signing in to the same
account, enter the OTP and click Submit. If you want to use a different account to sign in, then sign out from the
Dell EMC portal and then try again.
Related reference
TechDirect Login
Deep discoveryThe deep discovery feature enables you to discover and add other devices that are associated with a primary device. To perform deepdiscovery, you must assign a credential profile to the discovery task. You can choose to perform deep discovery while discovering theprimary device or after the primary device is discovered.
NOTE: Deep discovery may result in an increase in the duration of the overall discovery process.
The following table lists the primary device and its associated devices that are discovered by deep discovery.
Other useful information 161
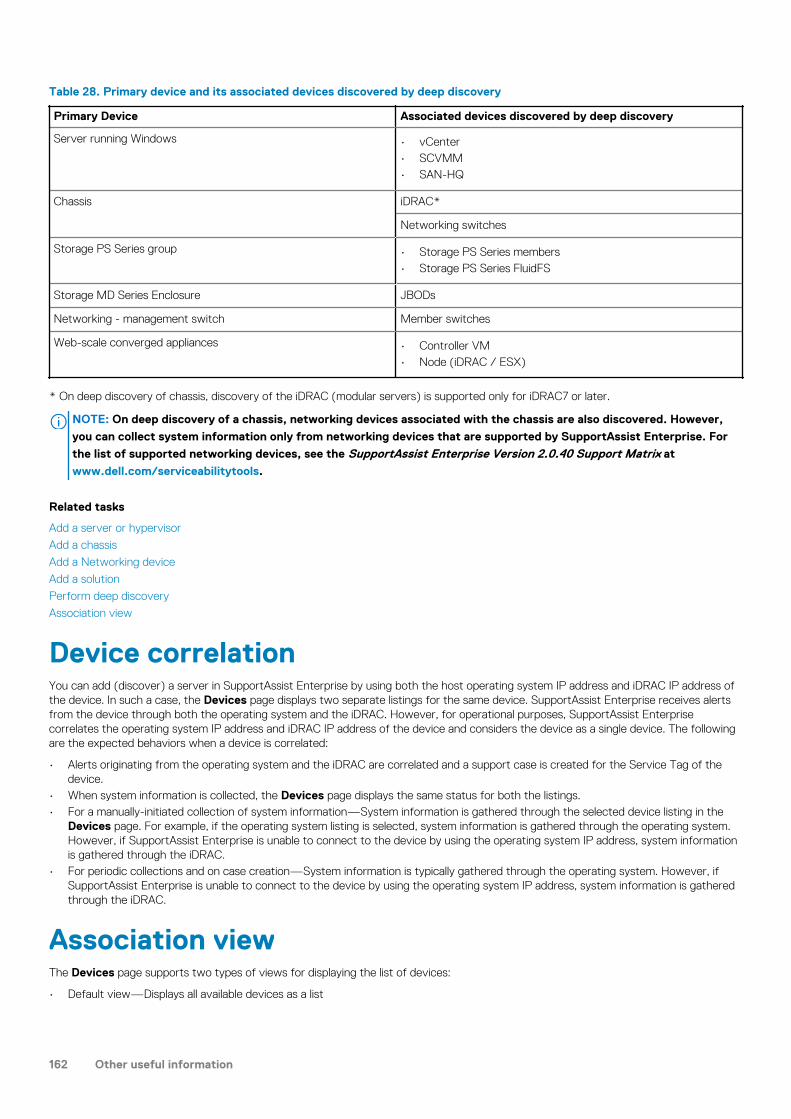
Table 28. Primary device and its associated devices discovered by deep discovery
Primary Device Associated devices discovered by deep discovery
Server running Windows • vCenter• SCVMM• SAN-HQ
Chassis iDRAC*
Networking switches
Storage PS Series group • Storage PS Series members• Storage PS Series FluidFS
Storage MD Series Enclosure JBODs
Networking - management switch Member switches
Web-scale converged appliances • Controller VM• Node (iDRAC / ESX)
* On deep discovery of chassis, discovery of the iDRAC (modular servers) is supported only for iDRAC7 or later.
NOTE: On deep discovery of a chassis, networking devices associated with the chassis are also discovered. However,
you can collect system information only from networking devices that are supported by SupportAssist Enterprise. For
the list of supported networking devices, see the SupportAssist Enterprise Version 2.0.40 Support Matrix at
www.dell.com/serviceabilitytools.
Related tasks
Add a server or hypervisor
Add a chassis
Add a Networking device
Add a solution
Perform deep discovery
Association view
Device correlationYou can add (discover) a server in SupportAssist Enterprise by using both the host operating system IP address and iDRAC IP address ofthe device. In such a case, the Devices page displays two separate listings for the same device. SupportAssist Enterprise receives alertsfrom the device through both the operating system and the iDRAC. However, for operational purposes, SupportAssist Enterprisecorrelates the operating system IP address and iDRAC IP address of the device and considers the device as a single device. The followingare the expected behaviors when a device is correlated:
• Alerts originating from the operating system and the iDRAC are correlated and a support case is created for the Service Tag of thedevice.
• When system information is collected, the Devices page displays the same status for both the listings.• For a manually-initiated collection of system information—System information is gathered through the selected device listing in the
Devices page. For example, if the operating system listing is selected, system information is gathered through the operating system.However, if SupportAssist Enterprise is unable to connect to the device by using the operating system IP address, system informationis gathered through the iDRAC.
• For periodic collections and on case creation—System information is typically gathered through the operating system. However, ifSupportAssist Enterprise is unable to connect to the device by using the operating system IP address, system information is gatheredthrough the iDRAC.
Association viewThe Devices page supports two types of views for displaying the list of devices:
• Default view—Displays all available devices as a list
162 Other useful information

• Association view—Displays all available devices as groups based on their association. This view enables you to view a primary deviceand its associated devices as a group
The following table lists how the devices are grouped in the association view.
Table 29. Device grouping in association view
Primary Device Associated devices
Server • iDRAC• vCenter• SCVMM• SAN-HQ
Chassis • iDRAC*• Networking switches
Storage PS Series group • Storage PS Series members• Storage PS Series FluidFS
Storage MD Series Enclosure JBODs
Networking - management switch Member switches
Web-scale converged appliances • Controller VM• iDRAC
* Only iDRAC7 or later is displayed under the Chassis node.
NOTE: Starting the collection of system information is not supported for the following devices that may be displayed in
the Association view:
• JBODs
• Storage PS Series members
• Stacked switches
• Devices that are listed in SupportAssist Enterprise with an IP address as 0.0.0.0
Related concepts
Deep discovery
Detection of hardware issues in attached storagedevicesIn addition to monitoring PowerEdge servers, SupportAssist Enterprise can also process alerts that are received from Storage MD Seriesarrays that may be attached to a server. Alert generation from an attached storage device occurs through the OpenManage StorageServices (OMSS) application that is installed on the server. When you allow SupportAssist Enterprise to automatically install OMSA on theserver, by default, OMSS is also installed. If you manually download and install OMSA on the server, ensure that you also install OMSS.Otherwise, SupportAssist Enterprise cannot detect hardware issues that may occur on the attached storage device. When a hardwareissue is detected on an attached storage device, SupportAssist Enterprise automatically creates a support case for the associated server.
Support for OEM devicesDell EMC OEM-ready devices (either rebranded or debranded Dell EMC hardware), when added, are classified under the rebranded nameand not the original Dell hardware name. All the functionality available for Dell EMC standard devices, such as alerts handling andautomatic case creation (when the support level has been validated at the time of the support incident as ProSupport Plus, ProSupportFlex for Data Center, or ProSupport One for Data Center service) are available for OEM-ready devices. For some OEM devices, the modelname may be blank in the SupportAssist Enterprise user interface.
Automatic case creation is supported through Dell EMC Enterprise Technical Support and not available for other support case servicerequest management systems.
Other useful information 163

As with any system that is modified for custom solutions, it is recommended that all SupportAssist Enterprise features are validated toensure proper operation with those modifications.
Install Net-SNMP on a server running LinuxPrerequisites
Ensure that you are logged in to the device with a user account that has root privileges.
About this task
SupportAssist Enterprise receives alerts that are forwarded from remote devices through an SNMP agent. Net-SNMP consists of a suiteof SNMP tools, including an SNMP agent. On devices running Linux operating systems, Net-SNMP must be installed to allowSupportAssist Enterprise to receive alerts.
Steps
1. Open the terminal window on the device running the Linux operating system.
2. Type the following commands based on the operating system:
• Red Hat Enterprise Linux, CentOS, and VMware ESX: yum install net-snmp• Oracle Linux: rpm -ivh net-snmp-x.x-xx.x.x.xxx.x86_64.rpm, where x.x-xx.x.x.xxx.x represents the version number
included in the rpm file name.• SUSE Linux Enterprise Server:
a. zypper addrepo http://download.opensuse.org/repositories/net-snmp:factory/SLE_12/net-snmp:factory.repo
b. zypper refreshc. zypper install net-snmp
Configure sudo access for SupportAssistEnterprise on server running LinuxIn Linux operating systems, users with sudo access may be granted administrative privileges to run certain commands. If you have added aremote device in SupportAssist Enterprise using the credentials of a sudo user, you must perform the following steps to allowSupportAssist Enterprise to monitor and collect system information from the device.
Prerequisites
Ensure that you are logged in to the remote device as a user with root privileges.
Steps
1. Open the terminal window.
2. Set the home directory path for the user — Type useradd user_name -d /home and press Enter.
3. Open the /etc/sudoers file.
4. Insert an exclamation mark [!] on the requiretty line. For example, !requiretty5. Add one of the following based on your preference:
• %root ALL=(ALL) NOPASSWD: ALL — To grant permission to all users in the root group.
• user_name ALL=(ALL) NOPASSWD: ALL — To grant permission to only a specific user.
6. Save the /etc/sudoers file.
164 Other useful information

Ensuring successful communication between theSupportAssist Enterprise application and theSupportAssist serverThe server where SupportAssist Enterprise is installed must be able to communicate with the SupportAssist server hosted by Dell EMC to:
• Automatically create a support case if there is a problem with a device in your environment.• Upload the collected system information to Dell EMC.
To ensure that the SupportAssist Enterprise application is able to successfully communicate with the SupportAssist server:
• The server where the SupportAssist Enterprise application is installed must be able to connect to the following destinations:
• https://apidp.dell.com and https://api.dell.com — end point for the SupportAssist server hosted by Dell EMC.• https://is.us.dell.com/* — the file upload server and related services.• https://downloads.dell.com/ — For downloading Dell EMC OpenManage Server Administrator (OMSA) and receiving new
SupportAssist Enterprise release information, policy files, and product support files.• https://sa-is.us.dell.com/* — For TechDirect integration.• On the server where SupportAssist Enterprise is installed, verify if port 443 is open for both incoming and outgoing communication
on is.us.dell.com, downloads.dell.com, apidp.dell.com, and api.dell.com. You can use a telnet client to test the connection.For example, use the following command: is.us.dell.com 443
• On the server where SupportAssist Enterprise is installed, verify if the network settings are correct.• If the server where SupportAssist Enterprise is installed connects the Internet through a proxy server, configure the proxy settings in
SupportAssist Enterprise. See Configure proxy server settings.
If the communication problem persists, contact your network administrator for further assistance.
Accessing the SupportAssist Enterpriseapplication logsAbout this task
SupportAssist Enterprise saves system events and log messages in the following locations:
• On Windows:
• Windows Event Log• The installation logs folder (<Drive where SupportAssist Enterprise is installed>:\Program Files\Dell
\SupportAssist\logs)
• On Linux:
• var logs• The installation logs folder (/opt/dell/supportassist/logs)
A new log file is created daily at 11:59 p.m. based on the time zone configured on the system, and the log is stored in the logs folder. Thelog file contains log information for the current day. At the end of each day, the log file is renamed as application.log <date formatin yyyymmdd>. If the log file is older than two days, the log file is zipped automatically. This enables you to identify the exact log file storedfor a given date when alerts occur. For example, log files similar to the following can be seen:
• application.log• application.log. 20171101
• application.log. 20171102 .zip• application.log. 20171103 .zipThe log files are purged from storage after 30 days.
The log file contains log messages that correspond to the following values (or higher) in the log4j.xml file: FATAL, ERROR, WARN,INFO, and DEBUG, with special values of OFF and ALL. The log4j.xml file is available at <Drive where SupportAssistEnterprise is installed>:\Program Files\Dell\SupportAssist\config (on Windows) and /opt/dell/supportassist/config (on Linux). A value of ERROR in the log4j.xml file results in log messages of FATAL, and ERROR, sinceFATAL is a higher level than ERROR.
Other useful information 165

Event storm handlingSupportAssist Enterprise intelligently handles event storm conditions, allowing up to nine separate alerts from a device within a 60-minutetimespan. However, if 10 or more separate alerts are received from a device, SupportAssist Enterprise automatically places the device inmaintenance mode. Maintenance mode prevents any further processing of alerts from the device, enabling you to make infrastructurechanges without creating unnecessary support cases. After 30 minutes in maintenance mode, SupportAssist Enterprise automaticallyremoves the device from maintenance mode and resumes normal alert processing for the device. For more information about maintenancemode, see Understanding maintenance mode.
Accessing the context-sensitive helpAbout this task
Context-sensitive help provides information about features and tasks that are applicable to the current view on the user interface. Onceyou invoke the context-sensitive help, you can navigate or search through the entire SupportAssist Enterprise help system.
To access context-sensitive help, click the icon that appears in the user interface. Context-sensitive help is displayed in a newbrowser window.
View SupportAssist Enterprise productinformationSteps
Click About in the SupportAssist Enterprise header area or on the log in page.The About page is displayed, where you can view the following:
• SupportAssist Enterprise version• Registration ID• Policy file version• Device configuration file version• Update history
Uninstalling SupportAssist EnterpriseAbout this task
You can uninstall SupportAssist Enterprise based on your preference. During the uninstallation, you can choose to provide a reason for theuninstallation and also provide feedback to Dell EMC. Your feedback will remain confidential and will allow Dell EMC to make productimprovements. The following sections provide information about uninstalling SupportAssist Enterprise on Windows and Linux operatingsystems.
NOTE: During the uninstallation of SupportAssist Enterprise, all adapters and Remote Collectors that you have set up
are also uninstalled, provided the systems hosting the adapters and Remote Collectors are reachable.
Uninstall SupportAssist Enterprise - Windows
Prerequisites
Log in to the server where SupportAssist Enterprise is installed with administrator privileges.
Steps
1. Perform one of the following based on the operating system:
• On Windows Server 2012, 2016, or 2019, point to the bottom-left corner of the screen, and then click the Start icon. On the Startscreen, click the Control Panel tile. On the Control Panel, click Uninstall a program.
166 Other useful information

• On Windows Server 2008 or Windows Small Business Sever 2011, click Start > Control Panel > Programs and Features.• On Windows Server Core 2012, 2016, or 2019, open the terminal emulator and run the following commands:
a. wmic get product nameb. wmic product getc. wmic product get IdentifyingNumber
The unique identification number is displayed.d. MsiExec.exe /<unique identification number>
The Uninstall or change a program window is displayed.
2. Select Dell SupportAssist Enterprise and click Change.The Welcome to Dell SupportAssist Enterprise Installer window is displayed.
3. Click Next.The Dell SupportAssist Enterprise Maintenance window is displayed.
4. Select Remove, and click Next.
NOTE: If you have set up an adapter or a Remote Collector, you are prompted to delete the adapter or Remote
Collector before you uninstall SupportAssist Enterprise.
The Feedback window is displayed.
5. Select an appropriate reason from the Select an option list, provide your comments, and click Remove.The Remove the Program window is displayed.
6. Click Remove.
NOTE: In Windows Server 2016, the User Account Control dialog box may be displayed more than once while the
uninstallation is in progress.
The Uninstallation Completed window is displayed.
7. Click Finish.SupportAssist Enterprise is now uninstalled.
Uninstall SupportAssist Enterprise - Linux
Prerequisites
Ensure that you are logged in to the server where SupportAssist Enterprise is installed with root privileges.
Steps
1. Open the terminal window.
2. Browse to the /opt/dell/supportassist/bin folder.
3. Type ./uninstall and press Enter.
4. To continue the uninstallation, type c.
NOTE: If you have set up an adapter or a Remote Collector, you are prompted to delete the adapter or Remote
Collector before you uninstall SupportAssist Enterprise.
5. When prompted for your feedback, perform one of the following:
• To skip the feedback and start the uninstallation, type n.
• To provide feedback, type y.
6. If you selected to provide feedback, press a number that matches your reason for uninstalling SupportAssist Enterprise.
Results
The Dell SupportAssist Enterprise uninstallation is complete message is displayed.
Uninstall SupportAssist Enterprise in silent mode - Linux
Prerequisites
Ensure that you are logged in to the server where SupportAssist Enterprise is installed with root privileges.
Other useful information 167

Steps
1. Open the terminal window on the system where SupportAssist Enterprise is installed.
2. Browse to the /opt/dell/supportassist/bin folder.
3. Type ./uninstall silent and press Enter.
Identify series of PowerEdge serverPowerEdge servers are represented as xnxx or yxnx series of servers, where:
• x denotes numbers 0 through 9• n denotes the series of the server• y denotes alphabets M, R, and T. The alphabets denote the type of server as follows: M = Modular; R = Rack; T = Tower
The following table provides information about the various series of PowerEdge servers and their model representation:
Table 30. PowerEdge server examples
Series of servers Representation of the servermodel
Examples of server models
9th PowerEdge x9xx PowerEdge 2900
Power Edge 6950
10th PowerEdge yx0x PowerEdge M600
PowerEdge R300
Power Edge T105
11th PowerEdge yx1x PowerEdge M610
PowerEdge R310
PowerEdge T110
12th PowerEdge yx2x PowerEdge M620
PowerEdge R620
PowerEdge T620
13th PowerEdge yx3x PowerEdge M630
PowerEdge R630
PowerEdge R730
PowerEdge FC630
PowerEdge T320
14th PowerEdge yx4x PowerEdge R740
PowerEdge T640
PowerEdge M640
PowerEdge R7415
DSS 9620
15th PowerEdge yx5x
168 Other useful information

TroubleshootingThe following sections provide the information required to troubleshoot issues that may occur while installing and using SupportAssistEnterprise.Topics:
• Installing SupportAssist Enterprise• SupportAssist Enterprise registration• Opening the SupportAssist Enterprise user interface• Logging in to SupportAssist Enterprise• Unable to add device• Unable to add adapter• Unable to add Remote Collector• Disconnected• OMSA not installed• SNMP not configured• New version of OMSA available• Unable to configure SNMP• Unable to verify SNMP configuration• Unable to install OMSA• Unable to verify OMSA version• OMSA not supported• Unable to reach device• Unable to gather system information• Insufficient storage space to gather system information• Unable to export collection• Unable to send system information• Authentication failed• Clearing System Event Log failed• Maintenance mode• Auto update• Unable to edit device credentials• Automatic case creation• Scheduled tasks• SupportAssist Enterprise services• Unable to view tool tips in Mozilla Firefox• Other services• Security• Logs
Installing SupportAssist EnterpriseIf you experience any issues while installing SupportAssist Enterprise:
• Ensure that the server is running a 64-bit operating system.• Ensure that the server where you are installing SupportAssist Enterprise does not have any other SupportAssist application installed
already.• On Windows operating systems, ensure that you right-click the installer package and select Run as administrator to start the
installation.• On Linux operating systems, ensure that the permission of the installer file is updated.• Ensure that you agree to allow Dell EMC to save your Personally Identifiable Information (PII) on the License Agreement page of the
installation wizard.
21
Troubleshooting 169

• Ensure that the server where you are installing SupportAssist Enterprise has internet connectivity. If the server connects to theinternet through a proxy server, enter the proxy server details in the installation wizard.
SupportAssist Enterprise registrationIf you experience any issues with the registration of SupportAssist Enterprise:
• Verify if the server where SupportAssist Enterprise is installed can connect to the internet.• If the server where SupportAssist Enterprise is installed connects to the internet through a proxy server, enter the proxy server details
in the SupportAssist Enterprise Settings > Proxy Settings page.• Verify if the network settings of the server where SupportAssist Enterprise is installed are correct.• Ensure that the registration details, such as first name, last name, email address, and phone number you have provided are valid.• Ensure that you use an English keyboard layout to type data in the Phone Number, Alternate Phone Number, and Email Address
fields.• Verify if port 443 is open for both incoming and outgoing communication on the firewall to access https://apidp.dell.com and
https://api.dell.com.• Perform the Network Connectivity Test and ensure that connectivity to the SupportAssist server is successful. For instructions to
perform the connectivity test, see Perform the connectivity test. If the test is successful, close the web browser, open theSupportAssist Enterprise user interface again, and retry the registration.
• Retry the registration after some time.
Opening the SupportAssist Enterprise userinterfaceAbout this task
If a Problem starting the SupportAssist Service error is displayed when you open the SupportAssist Enterprise userinterface:
• Ensure that you are logged in to the server with a user account that has the required privileges to start system services.• Try to restart the Dell SupportAssist Service. For instructions to restart the SupportAssist Service, see SupportAssist service.• Check the log file, application.log, available at <Drive where SupportAssist Enterprise is
installed>:\Program Files\Dell\SupportAssist\logs (on Windows) or /opt/dell/supportassist/logs (onLinux) to identify the component that failed to load.
Logging in to SupportAssist EnterpriseAbout this task
If you experience any issues while logging in to SupportAssist Enterprise:
• Verify if the user account you are using to log in is a member of the SupportAssistAdmins or SupportAssistUsers user groups:
• Open a command prompt as an administrator and type the following commands: net localgroup SupportAssistAdminsand net localgroup SupportAssistUsers. If the user account is not listed in the SupportAssistAdmins orSupportAssistUsers group, add the user account to one of the SupportAssist Enterprise user groups.
• If you want to add users to the SupportAssist Enterprise users groups, open a command prompt as an administrator, and type thefollowing commands:
• net localgroup SupportAssistAdmins <User1> /add — To add User1 to the SupportAssistAdmins usergroup.
• net localgroup SupportAssistUsers <User2> /add — To add User2 to the SupportAssistUsers user group.
• If you manually deleted the SupportAssistAdmins or SupportAssistUsers user groups, create the SupportAssist Enterprise usergroups, and then add users to the groups:
• To create the SupportAssist Enterprise user groups, open a command prompt as an administrator, and type the followingcommands:
• net localgroup SupportAssistAdmins /add — To create the SupportAssistAdmins user group.
• net localgroup SupportAssistUsers /add — To create the SupportAssistUsers user group.
170 Troubleshooting

• To add users to the SupportAssist Enterprise users groups, open a command prompt as an administrator, and type the followingcommands:
• net localgroup SupportAssistAdmins <User1> /add — To add User1 to the SupportAssistAdmins usergroup.
• net localgroup SupportAssistUsers <User2> /add — To add User2 to the SupportAssistUsers user group.
• Verify if the Dell SupportAssist Service is running. For instructions to verify the status of the SupportAssist Service, seeSupportAssist service.
Unable to add device
If a device displays an Unable to add device status:
• If the device is an iDRAC, ensure that the iDRAC has an Enterprise or Express license installed. For information on purchasing andinstalling an Enterprise or Express license, see “Managing Licenses" section in the iDRAC User’s Guide at www.dell.com/idracmanuals.
• If the device is a Storage SC Series array, ensure that SupportAssist is enabled in Enterprise Manager. For information on enablingSupportAssist in Enterprise Manager, see the Dell EMC Enterprise Manager Administrator's Guide at Dell.com/storagemanuals.
• If the device was inventoried through an adapter, ensure that the credentials of the device are correct. To resolve credential errors,you can edit the device credentials, update the credential account, or assign another Credential Profile.
If an error message is displayed stating that SupportAssist Enterprise is unable to add the device:
• Ensure that the device model is supported. For a complete list of supported device models, see the Dell SupportAssist EnterpriseVersion 2.0.40 Support Matrix at www.dell.com/serviceabilitytools.
• Ensure that the prerequisites for adding the device are met. For information on the prerequisites for adding a device, see Addingdevices.
• Verify if the device is reachable from the server where SupportAssist Enterprise is installed.• Verify if the device credentials (user name and password) you provided are correct.• If the error message states that the device could not be added within the predefined time limit, retry adding the device.• If the device encryption level is greater than 128 bits, perform one of the following:
• Reduce the encryption level to 128 bits.• On the server running SupportAssist Enterprise, the Java Cryptography Extension (JCE) Unlimited Strength Jurisdiction Policy
Files must be installed in the Java Development Kit (JDK) or Java Runtime Environment (JRE). For more information on the JCEUnlimited file, visit Oracle.com.
Servers• If you are adding a server by providing the operating system details (agent-based monitoring) and the device is running a Windows
operating system:
• Verify if the credentials you provided have administrator rights on the device.• Verify if the Windows Management Instrumentation (WMI) service is running on the device.• If the issue persists, review the instructions in “Securing a Remote WMI Connection” technical documentation at
msdn.microsoft.com.• If you are adding a server by providing the operating system details (agent-based monitoring) and the device is running a Linux
operating system:
• Verify if the credentials you provided have root, super user, or sudo user rights on the device. If you provide the user name andpassword of a sudo user, ensure that the sudo user is configured for SupportAssist Enterprise. See Configure sudo access forSupportAssist Enterprise (Linux).
• Verify if the Secure Shell (SSH) service is running on the device.• Verify if SSH password authentication is enabled (enabled by default).
• If you are adding a server by providing the iDRAC details (agentless monitoring), ensure that the iDRAC has an Enterprise or Expresslicense installed. For information on purchasing and installing an Enterprise or Express license, see the “Managing Licenses" section inthe iDRAC User’s Guide at www.dell.com/idracmanuals.
• If the error message states that SupportAssist Enterprise is unable to add the device because the SSL encryption level of the device isset to 256 bit or higher:
1. Download the Zulu Cryptographic Extension Kit available at the Azul Systems website.2. Extract the downloaded file.
Troubleshooting 171

3. Copy the local_policy.jar and US_export_policy.jar files and paste them at the following location on the systemwhere SupportAssist Enterprise is installed:
• On Windows: <Drive where SupportAssist Enterprise is installed>:\Program Files\Dell\SupportAssist\jre\lib\security
• On Linux: /opt/dell/supportassist/jre/lib/security4. Restart the SupportAssist service and retry the operation.
StorageIf the device is a Storage PS Series array:
• Ensure that Secure Shell (SSH) and SNMP service are running on the device.• Ensure that you provide the management group IP address of the device in the add device wizard.
If the device is a Storage SC Series storage array:
• Ensure that the REST service is running on the device.• Ensure that SupportAssist is enabled in Enterprise Manager. For information on enabling SupportAssist in Enterprise Manager, see the
Enterprise Manager Administrator's Guide at Dell.com/storagemanuals.
If the device is a FluidFS NAS device, ensure that SSH service is running on the device.
Networking• Ensure that Secure Shell (SSH) and SNMP service are running on the device.• If the enable password is configured on the device, ensure that you provide the enable password in the add device wizard.
ChassisEnsure that Secure Shell (SSH) service is running on the device.
Software• For troubleshooting HITKIT collection:
• Ensure that Secure Shell (SSH) service is running on the system.• Ensure that you have root credentials for the SSH connection. SupportAssist Enterprise uses the SSH protocol to connect to the
system.• For troubleshooting SAN HQ device:
• Check the server installation details of Dell SAN Headquarters device from the registry entry: HKLM\SOFTWARES\\PerformanceMonitor.
• Ensure that the value of the install type attribute is "Full" and logdir attribute has a value.• Ensure that the WMI and EQLPerfX services are running on the device.
Solution• Ensure that you are logged in to SupportAssist Enterprise with elevated or administrative privileges. See Granting elevated or
administrative privileges to users.• Ensure that the device is reachable from the server where SupportAssist Enterprise is installed.• Ensure that port 443 is open on the device.• Ensure that firmware version 4.x or later is installed on the device for the collection of system information.• Verify if the assigned Account Credentials (user name and password) you provided are correct.
Virtual machine• Ensure that you are logged in to SupportAssist Enterprise with elevated or administrative privileges. See Granting elevated or
administrative privileges to users.• Ensure that the system hosting the virtual machine is reachable from the server where SupportAssist Enterprise is installed.
172 Troubleshooting

• Ensure that the required ports and protocols are enabled on the network. See Network port requirements.
Unable to add adapter
If the Adapters page displays an Unable to add adapter status:
• Verify if the server where you want to add the adapter is reachable from the server where SupportAssist Enterprise is installed.• Ensure that the system where you want to set up the adapter has more than 500 MB of free disk space required for installation of the
adapter.• Verify if port 135 is open on the system where you want to set up the adapter.• For setting up an OpenManage Essentials (OME) adapter, the system where you want to set up the adapter must be running
OpenManage Essentials version 2.5 or later.• For setting up the Microsoft System Center Operations Manager (SCOM) adapter, Dell EMC Server Management Pack Suite Version
7.x For Microsoft System Center Operations Manager and System Center Essentials must be installed on the system.• Ensure that Microsoft .NET Framework 4.5 is installed on the system where you want to set up the adapter.• Ensure that the adapter is not already installed on the server where you are trying to set up the adapter.• Locate the appconfig.properties file in the config folder, and then increase the timeout value for
adapter.websocket.timeout. The default time is 5 seconds and maximum time is 1 minute.• Ensure that SupportAssist_RestError.xml file is not present at C:\ProgramData on the system where OpenManage
Essentials is installed.
Unable to add Remote Collector
If the Remote Collectors page displays Unable to add Remote Collector status:
• Verify if the server where you want to add the Remote Collector is reachable from the server where SupportAssist Enterprise isinstalled.
• Ensure that the system where you want to set up the Remote Collector has more than 500 MB of free disk space required forinstallation of the Remote Collector.
• Verify if port 135 is open on the system where you want to set up the Remote Collector.• Ensure that SupportAssist Enterprise is not previously installed on the server where you want to add the Remote Collector.• Ensure that the Remote Collector is not already installed on the server where you are trying to set up the Remote Collector.
Disconnected
A Disconnected status may be displayed on header area if the server running SupportAssist Enterprise is unable to connect to anadapter or Remote Collector that you have set up. When this issue occurs, a Disconnected status is also displayed on the Adapters orRemote Collectors page depending on the connectivity status of SupportAssist Enterprise with an adapter or Remote Collector. If theDisconnected status is displayed:
• Ensure that server where you have set up the adapter or Remote Collector is reachable from the server where SupportAssistEnterprise is installed.
• For Remote Collectors, ensure that the Dell EMC SupportAssist Enterprise service is running on the server where you have set upthe Remote Collector.
• For adapters, ensure that the Dell EMC SupportAssist Enterprise OME Adapter or Dell EMC SupportAssist Enterprise SCOMAdapter service is running on the server where you have set up the adapter.
• Ensure that port 5700 is open on the server where SupportAssist Enterprise is installed.• For OpenManage Essentials adapter, if you have added the adapter by using your service account, try deleting the
REST_Error.xml file available at <System drive>:\ProgramData, and then manually synchronize the adapter.
Troubleshooting 173

OMSA not installed
If a device displays an OMSA not installed status:
• Install OMSA on the device by using the Install / Upgrade OMSA option. See Install or upgrade OMSA by using SupportAssistEnterprise.
• If the installation of OMSA cannot be completed successfully even after repeated attempts, log in to the device and manuallydownload and install the recommended version of OMSA on the device. For information on the recommended version of OMSA, seethe SupportAssist Enterprise Version 2.0.40 Support Matrix at www.dell.com/serviceabilitytools.
SNMP not configured
If a device displays an SNMP not configured status:
• Configure the SNMP settings on the device by using the Configure SNMP option. See Configure SNMP settings by usingSupportAssist Enterprise.
• If the SNMP configuration cannot be completed successfully even after repeated attempts, log in to the device and manuallyconfigure SNMP settings. For instructions to manually configure the SNMP settings:
• For a server or hypervisor that you have added in SupportAssist Enterprise by using the operating system IP address: Manuallyconfigure the alert destination of a server.
• For a server that you added in SupportAssist Enterprise by using the iDRAC IP address: Manually configure the alert destination ofan iDRAC by using the web interface.
New version of OMSA available
If a device displays a New version of OMSA available status:
• Install OMSA on the device by using the Install / Upgrade OMSA option. See Install or upgrade OMSA by using SupportAssistEnterprise.
• If the installation of OMSA cannot be completed successfully even after repeated attempts, log in to the device and manuallydownload and install the recommended version of OMSA on the device. For information on the recommended version of OMSA, seethe SupportAssist Enterprise Version 2.0.40 Support Matrix at www.dell.com/serviceabilitytools.
Unable to configure SNMP
If a device displays an Unable to configure SNMP status:
• Ensure that the network settings are correct.• Ensure that the SNMP port (162) is open.• Ensure that the firewall settings are correct.• Configure the SNMP settings of the device by using the Configure SNMP option. See Configure SNMP settings by using
SupportAssist Enterprise.
If the SNMP configuration is still unsuccessful, you can manually configure the SNMP. For instructions to manually configure the SNMPsettings:
• For a server or hypervisor that you have added in SupportAssist Enterprise by using the operating system IP address: Manuallyconfigure the alert destination of a server.
• For a server that you added in SupportAssist Enterprise by using the iDRAC IP address: Manually configure the alert destination of aniDRAC by using the web interface.
174 Troubleshooting

Unable to verify SNMP configuration
If the device displays an Unable to verify SNMP configuration status:
• Ensure that the DNS is configured correctly.• Ensure that the SNMP port (162) is open.• Ensure that the firewall settings are correct.• Configure the SNMP settings of the device by using the Configure SNMP option. See Configure SNMP settings by using
SupportAssist Enterprise.• If the server is running a Linux operating system, restart the snmpdtrapd service.
Unable to install OMSA
If a device displays an Unable to install OMSA status:
• Verify if the device is reachable from the server where SupportAssist Enterprise is installed.• Verify if the device credentials (user name and password) you provided are correct.• If the device is running a Windows operating system:
• Verify if the credentials you provided have administrator rights on the device.• Restart the Windows Management Instrumentation (WMI) service on both the server where SupportAssist Enterprise is installed
and the remote device.• Delete any files available in the <System drive>:\Windows\temp folder on the server where SupportAssist Enterprise is
installed.• If the device is running a Linux operating system:
• Verify if the Secure Shell (SSH) service is running on the device.• Verify if SSH password authentication is enabled (enabled by default).• Verify if the credentials you provided have root, super user, or sudo user rights on the device. If you provide the user name and
password of a sudo user, ensure that the sudo user is configured for SupportAssist Enterprise. See Configure sudo access forSupportAssist Enterprise (Linux).
• Ensure that the device has all the required OMSA dependencies installed. For more information about OMSA dependencies, seethe “Remote Enablement Requirements” section in the OpenManage Server Administrator Installation Guide atDellTechCenter.com/OMSA.
• Retry the installation of OMSA. See Install or upgrade OMSA by using SupportAssist Enterprise.• If the installation of OMSA cannot be completed successfully even after repeated attempts, log in to the device and manually
download and install the recommended version of OMSA on the device. For information on the recommended version of OMSA, seethe SupportAssist Enterprise Version 2.0.40 Support Matrix at www.dell.com/serviceabilitytools.
NOTE: Upgrade from a 32-bit version of OMSA to a 64-bit version of OMSA is not supported. In this scenario, you must
uninstall the existing version of OMSA, and install OMSA by using SupportAssist Enterprise. For instructions to install
OMSA by using SupportAssist Enterprise, see Install or upgrade OMSA by using SupportAssist Enterprise.
Unable to verify OMSA versionIf an error message is displayed stating that SupportAssist Enterprise is unable to verify the OMSA version installed on the device:
• Click the error status link in the Status column on the Devices page to view the possible resolution steps.• Perform the connectivity test and ensure that connectivity to the Dell EMC FTP server is successful. See Perform the connectivity
test.• Ensure that the OMSA services are running on the device.• Retry the installation of OMSA. See Install or upgrade OMSA by using SupportAssist Enterprise.• If the installation of OMSA cannot be completed successfully even after repeated attempts, log in to the device and manually
download and install the recommended version of OMSA on the device. For information on the recommended version of OMSA, seethe SupportAssist Enterprise Version 2.0.40 Support Matrix at www.dell.com/serviceabilitytools.
Troubleshooting 175

OMSA not supported
If a device displays the OMSA not supported status:
• Log in to the device and uninstall the existing version of OMSA.• Install OMSA on the device by using the Install / Upgrade OMSA option. See Install or upgrade OMSA by using SupportAssist
Enterprise.
Unable to reach device
If a device displays an Unable to reach device status:
• Click the error status link in the Status column on the Devices page to view the possible resolution steps.• Verify if the device is turned on and connected to the network.• Verify if the required network ports are open on the device.• If you added the device in SupportAssist Enterprise by providing the device IP address, verify if the IP address of the device has
changed. The IP address may change each time the device is restarted, if the device is configured to obtain a dynamic IP address.• If the IP address of the device has changed:
• Delete the device from SupportAssist Enterprise. See Delete a device.• Add the device again. See Adding devices.
NOTE: To avoid deleting and adding a device each time the IP address of the device changes, it is recommended
that you provide the host name of the device (instead of the IP address) while adding the device.
Unable to gather system information
If a device displays an Unable to gather system information status:
• Click the error status link in the Status column to view the possible resolution steps.• Verify if the device is reachable from the server where SupportAssist Enterprise is installed.• Verify if the device credentials (user name and password) you provided are correct.• If the password of the device is lengthy (10 or more characters), try assigning a shorter password (about 5 to 7 characters), that does
not include spaces and quotes, and then update the password in SupportAssist Enterprise.
Servers• If you are adding a device by providing the operating system details (agent-based monitoring) and the device is running a Windows
operating system:
• Verify if the credentials you provided have administrator rights on the device.• Verify if the Windows Management Instrumentation (WMI) service is running on the device.• If the issue persists, review the instructions in “Securing a Remote WMI Connection” technical documentation at
msdn.microsoft.com.• If you are adding a device by providing the operating system details (agent-based monitoring) and the device is running a Linux
operating system:
• Verify if the credentials you provided have root, super user, or sudo user rights on the device. If you provide the user name andpassword of a sudo user, ensure that the sudo user is configured for SupportAssist Enterprise. See Configure sudo access forSupportAssist Enterprise.
• Verify if the Secure Shell (SSH) service is running on the device.• Verify if SSH password authentication is enabled (enabled by default).• Ensure that OpenSSL is updated. For more information, see the resolution for OpenSSL CCS injection vulnerability
(CVE-2014-0224) available in the support website of the operating system.• If you are adding a device by providing the iDRAC details (agentless monitoring), ensure that the iDRAC has an Enterprise or Express
license installed. For information on purchasing and installing an Enterprise or Express license, see the “Managing Licenses" section inthe iDRAC User’s Guide at www.dell.com/idracmanuals.
176 Troubleshooting

• If the error message states that SupportAssist Enterprise is unable to gather system information from the device because the SSLencryption level of the device is set to 256 bit or higher:
1. Download the Zulu Cryptographic Extension Kit available at the Azul Systems website.2. Extract the downloaded file.3. Copy the local_policy.jar and US_export_policy.jar files and paste them at the following location on the system
where SupportAssist Enterprise is installed:
• On Windows: <Drive where SupportAssist Enterprise is installed>:\Program Files\Dell\SupportAssist\jre\lib\security
• On Linux: /opt/dell/supportassist/jre/lib/security4. Restart the SupportAssist service and retry the operation.
After resolving the underlying issue, manually initiate the collection and upload of system information. See Start the collection of systeminformation from a single device.
HypervisorsFor devices running VMware ESX and ESXi:
• Ensure that SFCBD and CIMOM are enabled on your device.
• To enable SFCBD, use the following command: /etc/init.d/sfcbd-watchdog start.
• To enable WBEM, use the following command: esxcli system wbem set --enable true.
Depending on your scenario, you may have to run the following commands.
• To check the status of the agent: /etc/init.d/sfcbd-watchdog status.
• To reset WBEM, perform the following:
1. Disable WBEM on your device: esxcli system wbem set --enable false.
2. Enable WBEM on your device: esxcli system wbem set --enable true.
• To disable SFCBD, use the following command: /etc/init.d/sfcbd-watchdog stop.
StorageIf the device is a Storage PS Series array:
• Ensure that Secure Shell (SSH) and SNMP service are running on the device.• Ensure that you provide the management group IP address of the device in the add device wizard.
If the device is a Storage SC Series array:
• Ensure that the REST service is running on the device.• Ensure that SupportAssist is enabled in Enterprise Manager. For information on enabling SupportAssist in Enterprise Manager, see the
Enterprise Manager Administrator's Guide at Dell.com/storagemanuals.
If the device is a FluidFS NAS device, ensure that SSH service is running on the device.
Networking• Ensure that Secure Shell (SSH) and SNMP service are running on the device.• If the enable password is configured on the device, ensure that you provide the enable password in SupportAssist Enterprise.
ChassisEnsure that Secure Shell (SSH) service is running on the device.
Software• For troubleshooting HITKIT collection:
• Ensure that Secure Shell (SSH) service is running on the system.
Troubleshooting 177

• Ensure that you have root credentials for the SSH connection. SupportAssist Enterprise uses the SSH protocol to connect to thesystem.
• For troubleshooting SAN HQ device:
• Check the server installation details of Dell SAN Headquarters device from the registry entry: HKLM\SOFTWARES\\PerformanceMonitor.
• Ensure that the value of the install type attribute is "Full" and logdir attribute has a value.• Ensure that the WMI and EQLPerfX services are running on the device.
Solution• Ensure that the device is reachable from the server where SupportAssist Enterprise is installed.• Ensure that port 443 is open on the device.• Ensure that firmware version 4.x or later is installed on the device for the collection of system information.
Virtual machine• Ensure that you are logged in to SupportAssist Enterprise with elevated or administrative privileges. See Granting elevated or
administrative privileges to users.• Ensure that the system hosting the virtual machine is reachable from the server where SupportAssist Enterprise is installed.• Ensure that the required ports and protocols are enabled on the network. See Network port requirements.
Insufficient storage space to gather systeminformation
If a device displays an Insufficient storage space to gather system information status, ensure that the server whereSupportAssist Enterprise is installed has sufficient free space on the C:\drive.
Unable to export collection
If a device displays an Unable to export collection status:
• Click the error status link in the Status column to view the possible resolution steps.• Manually initiate the collection and upload of system information. See Start the collection of system information from a single device.
If the problem persists, contact Technical Support for assistance.
Unable to send system information
If a device displays an Unable to send system information status:
• Click the error status link in the Status column to view the possible resolution steps.• Verify if the server where SupportAssist Enterprise is installed is able to connect to the internet.• If the server where SupportAssist Enterprise is installed connects to the internet through a proxy server, ensure that the proxy
settings are configured in SupportAssist Enterprise. See Configure proxy server settings.• Perform the network connectivity test and ensure that connectivity to the Dell EMC upload server is successful. See Perform the
connectivity test.• If the device is associated to a Remote Collector, then verify if the system where Remote Collector is setup has internet connectivity.• Ensure that the collection file does not contain any potential threats such as viruses or malware.
After resolving the underlying issue, manually initiate the collection and upload of system information. See Start the collection of systeminformation from a single device.
178 Troubleshooting

Authentication failed
If a device displays an Authentication failed status:
• Click the error status link in the Status column to view the possible resolution steps.• Verify if the device credentials (user name and password) you provided are correct.
Server• If you added the device by providing the operating system details (agent-based monitoring) and the device is running a Windows
operating system:
• Verify if the credentials you provided have administrator rights on the device.• Verify if the WMI service is running on the device.• If the issue persists, review the instructions in “Securing a Remote WMI Connection” technical documentation at
msdn.microsoft.com.• If you added the device by providing the operating system details (agent-based monitoring) and the device is running a Linux operating
system:
• Verify if the credentials you provided have root, super user, or sudo user rights on the device. If you provide the user name andpassword of a sudo user, ensure that the sudo user is configured for SupportAssist Enterprise. See Configure sudo access forSupportAssist Enterprise (Linux).
• Verify if the SSH service is running on the device.• Verify if SSH password authentication is enabled (enabled by default).
StorageIf the device is a Storage PS Series array:
• Ensure that Secure Shell (SSH) and SNMP service are running on the device.• Ensure that you provide the management group IP address of the device in the add device wizard.
If the device is a Storage SC Series array:
• Ensure that the REST service is running on the device.• Ensure that SupportAssist is enabled in Enterprise Manager. For information on enabling SupportAssist in Enterprise Manager, see the
Dell Enterprise Manager Administrator's Guide at Dell.com/storagemanuals.
If the device is a FluidFS NAS device, ensure that SSH service is running on the device.
Networking• Ensure that Secure Shell (SSH) and SNMP service are running on the device.• If the enable password is configured on the device, ensure that you provide the enable password in the add device wizard.
ChassisEnsure that Secure Shell (SSH) service is running on the device.
Software• For troubleshooting HITKIT collection:
• Ensure that Secure Shell (SSH) service is running on the system.• Ensure that you have root credentials for the SSH connection. SupportAssist Enterprise uses the SSH protocol to connect to the
system.• For troubleshooting SAN HQ device:
• Check the server installation details of Dell SAN Headquarters device from the registry entry: HKLM\SOFTWARES\\PerformanceMonitor.
Troubleshooting 179

• Ensure that the value of the install type attribute is "Full" and logdir attribute has a value.• Ensure that the WMI and EQLPerfX services are running on the device.
Solution• Ensure that the device is reachable from the server where SupportAssist Enterprise is installed.• Ensure that port 443 is open on the device.• Ensure that firmware version 4.x or later is installed on the device for the collection of system information.• Verify if the assigned Account Credentials (user name and password) you provided are correct.
Virtual machine• Ensure that you are logged in to SupportAssist Enterprise with elevated or administrative privileges. See Granting elevated or
administrative privileges to users.• Ensure that the system hosting the virtual machine is reachable from the server where SupportAssist Enterprise is installed.• Ensure that the required ports and protocols are enabled on the network. See Network port requirements.
Clearing System Event Log failed
If the device displays a Clearing System Event Log failed status, ensure that the following requirements are met and then retryclearing the System Event Log:
• The device is reachable from the server where SupportAssist Enterprise is installed.• If the device is a member of a domain, the host name of the device is added in the DNS server.• The credentials you have provided for the device in SupportAssist Enterprise are correct.• The credentials you have provided for the device in SupportAssist Enterprise have administrative privileges.• If you have added the device in SupportAssist Enterprise with the operating system IP address, ensure that the following requirements
are met depending on the operating system running on the device:
• For Windows, the WMI service is running on the device and the firewall allows WMI communication.• For Linux, the SSH service is running on the device and the firewall allows SSH communication.
• If you have added the device in SupportAssist Enterprise with the iDRAC IP address, the WS-MAN service is running on the device.
If the problem persists, try clearing the System Event Log by using one of the following methods:
• Clear the System Event Log by using iDRAC• Clear the System Event Log by using OMSA
Clear the system event log using iDRAC
Prerequisites
Ensure that you are logged in to the iDRAC web console with administrative privileges.
About this task
You can perform the following steps to clear the System Event Log by using the iDRAC web console.NOTE: If you want to clear the System Event Log using the command-line interface, connect to the iDRAC over SSH
protocol using any telnet client and run the following command: racadm clrsel
Steps
1. In the iDRAC web console, click Overview > Server > Logs Page.
2. Click Clear Log.
180 Troubleshooting

Clear the System Event Log by using OMSA
Prerequisites
Ensure that you are logged in to OMSA with administrative privileges.
About this task
If OMSA is installed on the device, you can perform the following steps to clear the System Event Log.NOTE: If you want to clear the System Event Log using the CLI, log in to the device and run the following command
from a command prompt (Windows) or terminal (Linux): omconfig system esmlog action=clear
NOTE: If the device is running VMware ESX, log in to OMSA from another remote device using the Server Administrator
Managed System Login option, and then perform the following steps.
Steps
1. In OMSA, perform one of the following, depending on the type of server:
• If the device is a modular server, click Modular Enclosure > Server Module.• If the device is not a modular server, click System > Main System Chassis.
2. Click the Logs tab.
3. Click Clear Log.
Maintenance mode
If a device displays the Maintenance Mode status:
• Ensure that the issue with the device is resolved.• If more time is required to resolve the issue, you may place the device in manual maintenance mode. See Enable or disable device-level
maintenance mode.• If required, you may place SupportAssist Enterprise in maintenance mode. See Enable or disable global-level maintenance mode.
Auto updateIf the auto update of SupportAssist Enterprise, product support files, or policy files is unsuccessful:
1. Perform the network connectivity test and ensure that connectivity to the FTP server is successful. See Perform the connectivitytest.
2. Click the Update Available banner and try installing the update again.
Unable to edit device credentials
If an error message is displayed stating that SupportAssist Enterprise is Unable to edit the credentials of a device:
• Verify if the device is reachable from the server where SupportAssist Enterprise is installed.• Verify if the device credentials (user name and password) you provided are correct.
Servers• If you are editing the credentials of a device running a Windows operating system:
• Verify if the credentials you provided have administrator rights on the device.• Verify if the Windows Management Instrumentation (WMI) service is running on the device.• If the issue persists, review the instructions in “Securing a Remote WMI Connection” technical documentation at
msdn.microsoft.com.• If you are editing the credentials of a device running a Linux operating system:
Troubleshooting 181

• Verify if the credentials you provided have root, super user, or sudo user rights on the device. If you provide the user name andpassword of a sudo user, ensure that the sudo user is configured for SupportAssist Enterprise. See Configure sudo access forSupportAssist Enterprise (Linux).
• Verify if the Secure Shell (SSH) service is running on the device.• Verify if SSH password authentication is enabled (enabled by default).
• If the error message states that SupportAssist Enterprise is unable to edit the credentials of the device because the SSL encryptionlevel of the device is set to 256 bit or higher:
1. Download the Zulu Cryptographic Extension Kit available at the Azul Systems website.2. Extract the downloaded file.3. Copy the local_policy.jar and US_export_policy.jar files and paste them at the following location on the system
where SupportAssist Enterprise is installed:
• On Windows: <Drive where SupportAssist Enterprise is installed>:\Program Files\Dell\SupportAssist\jre\lib\security
• On Linux: /opt/dell/supportassist/jre/lib/security4. Restart the SupportAssist service and retry the operation.
StorageIf the device is a Storage PS Series array:
• Ensure that Secure Shell (SSH) and SNMP service are running on the device.• Ensure that you provide the management group IP address of the device in the add device wizard.
If the device is a Storage SC Series array:
• Ensure that the REST service is running on the device.• Ensure that SupportAssist is enabled in Enterprise Manager. For information on enabling SupportAssist in Enterprise Manager, see the
Enterprise Manager Administrator's Guide at Dell.com/storagemanuals.
If the device is a FluidFS NAS device, ensure that SSH service is running on the device.
Networking• Ensure that Secure Shell (SSH) and SNMP service are running on the device.• If the enable password is configured on the device, ensure that you provide the enable password in the add device wizard.
ChassisEnsure that Secure Shell (SSH) service is running on the device.
Software• For troubleshooting HITKIT collection:
• Ensure that Secure Shell (SSH) service is running on the system.• Ensure that you have root credentials for the SSH connection. SupportAssist Enterprise uses the SSH protocol to connect to the
system.• For troubleshooting SAN HQ device:
• Check the server installation details of Dell SAN Headquarters device from the registry entry: HKLM\SOFTWARES\\PerformanceMonitor.
• Ensure that the value of the install type attribute is "Full" and logdir attribute has a value.• Ensure that the WMI and EQLPerfX services are running on the device.
Solution• Ensure that the device is reachable from the server where SupportAssist Enterprise is installed.• Verify if the assigned Account Credentials (user name and password) you provided are correct.
182 Troubleshooting

Virtual machine• Ensure that you are logged in to SupportAssist Enterprise with elevated or administrative privileges. See Granting elevated or
administrative privileges to users.• Ensure that the system hosting the virtual machine is reachable from the server where SupportAssist Enterprise is installed.• Ensure that the required ports and protocols are enabled on the network. See Network port requirements.
Automatic case creationIf an issue occurs on a device, but a support case is not created automatically:
NOTE: SupportAssist Enterprise does not create a support case for every alert received from a monitored device. A
support case is created only if the alert type and number of alerts received from a device match with the criteria defined
by Dell EMC for support case creation.
• Ensure that the device is a server, storage, networking switch, or chassis.• Ensure that monitoring is enabled for the device in SupportAssist Enterprise. See Enable or disable monitoring of a device.• Ensure that the device is configured to forward alerts to the server where SupportAssist Enterprise is installed.• Perform the network connectivity test and ensure that the connectivity to the SupportAssist server is successful. See Perform the
connectivity test.• Perform the case creation test and ensure that the Ready to Create Cases status is displayed. See Test the case creation capability.• Check the application.log file available at <Drive where SupportAssist Enterprise is installed>:\Program
Files\Dell\SupportAssist\logs (on Windows) or /opt/dell/supportassist/logs (on Linux) to identify if the alertwas received successfully by SupportAssist Enterprise.
• If the device was inventoried through an OpenManage Essentials adapter, ensure that the device is configured to forward alerts to theserver where OpenManage Essentials is installed.
Scheduled tasksIf the time or time zone of the system on which SupportAssist Enterprise is installed is changed, all built-in and user-defined scheduletasks do not work as expected. Examples of scheduled tasks include the following:
• Periodic collection of system information from monitored devices• Upload of device inventory information to Dell EMC• Connectivity test email notifications• Upload of application logs• Upload of alerts table• Upload of adapter and Remote Collector details• Revalidation of the adapter• Synchronization of the adapter
To resolve this issue, restart the Dell SupportAssist Service.
SupportAssist Enterprise servicesSupportAssist Enterprise has two services that run in the background: Dell EMC SupportAssist Enterprise and Dell EMCSupportAssist Enterprise DB. If the SupportAssist Enterprise application does not respond appropriately, ensure the following:
Steps
1. On the server where SupportAssist Enterprise is installed, verify if the SupportAssist Enterprise services are running. For informationon verifying the status of the SupportAssist Enterprise services, see Verify the status of SupportAssist Enterprise services (Windows)or Verify the status of SupportAssist Enterprise services (Linux).
2. If the services cannot or do not start, open the most recent SupportAssist Enterprise application log file (application.log), andthen search for text with a timestamp of when you tried to start the services. The log file may contain a message indicating any userinterface startup errors and a possible problem diagnosis.
NOTE: You can access the SupportAssist Enterprise application log file (application.log) at the following
location depending on the operating system:
Troubleshooting 183

• On Windows — <Drive where SupportAssist Enterprise is installed>:\Program Files\Dell\SupportAssist\logs
• On Linux — /opt/dell/supportassist/logs3. To verify if the SupportAssist Enterprise application can connect to the SupportAssist Enterprise server hosted by Dell EMC, perform
the connectivity test. See Perform the connectivity test.
• If the server is responding, a success message is displayed in the user interface. If not, the server may be unreachable. If this is thescenario, check the application.log file to find details. If there are no discernible details in the log file, and the server is notreachable, contact Technical Support for assistance.
• If communication is successful, but no data updates occur, the SupportAssist Enterprise application may be identifying itself withan ID that is unknown to the server. If this is the scenario, check the application.log file to find details. The log file maycontain a message stating that the SupportAssist Enterprise application was not recognized. If the SupportAssist Enterpriseapplication is not recognized by the SupportAssist server, uninstall and reinstall the SupportAssist Enterprise application.
Verify the status of SupportAssist Enterprise services onWindowsTo verify the status of the SupportAssist Enterprise services on Windows operating systems:
Steps
1. On the server where SupportAssist Enterprise is installed, click Start > Run.The Run dialog box is displayed.
2. Type services.msc, and then click OK.The Services Microsoft Management Console (MMC) is displayed.
3. Verify if the Dell EMC SupportAssist Enterprise and Dell EMC SupportAssist Enterprise DB services display the status asRunning.
4. If the services are not running, right-click each service and select Start.
NOTE: If you stop one or both of the SupportAssist Enterprise services, ensure that you restart both the services.
NOTE: To verify if the adapter service is running, check for the status of the Dell EMC SupportAssist Enterprise
OME Adapter or Dell EMC SupportAssist Enterprise SCOM Adapter service on the server where you have set up the
adapter.
NOTE: To verify if the Remote Collector service is running, check for the status of the Dell EMC SupportAssist
Enterprise and Dell EMC SupportAssist Enterprise DB service on the server where you have set up the Remote
Collector.
Verify the status of SupportAssist Enterprise services onLinuxTo verify the status of the SupportAssist Enterprise services on Linux operating systems:
Steps
1. Open the terminal window on the system where SupportAssist Enterprise is installed.
2. Type service Dell EMC SupportAssist Enterprise status and press Enter.The status of the Dell EMC SupportAssist Enterprise service is displayed.
3. Type service Dell EMC SupportAssist Enterprise DB status and press Enter.The status of the Dell EMC SupportAssist Enterprise DB service is displayed.
4. If the services are not running, type service <service name> start and press Enter.
NOTE: If you stop one or both of the SupportAssist Enterprise services, ensure that you restart both the services.
184 Troubleshooting

Verify the status of SupportAssist Enterprise services onUbuntu and DebianTo verify the status of the SupportAssist Enterprise services on Ubuntu and Debian operating systems:
Steps
1. Open the terminal window on the system where SupportAssist Enterprise is installed.
2. Type systemctl status supportassist.service and press Enter.The status of the Dell EMC SupportAssist Enterprise service is displayed.
3. Type systemctl status supportassistdatabase.service and press Enter.The status of the Dell EMC SupportAssist Enterprise DB service is displayed.
NOTE: If your system is running the Systemd service, the Dell EMC SupportAssist Enterprise service and the Dell
EMC SupportAssist Enterprise DB service may not display the correct status.
4. If the services are not running, type systemctl start <service name>.service and press Enter.
5. To stop the services, type systemctl stop <service name>.service and press Enter.
6. To restart the services, type systemctl restart <service name>.service and press Enter.
NOTE: If you stop one or both of the SupportAssist Enterprise services, ensure that you restart both the services.
Unable to view tool tips in Mozilla FirefoxAbout this task
If tool tips are not displayed in Mozilla Firefox:
Steps
1. Open Mozilla Firefox, and enter about:config in the address bar.
2. If a warning is displayed, click Accept.
3. Verify that the browser.chrome.toolbar_tips value is set to True.
4. If the browser.chrome.toolbar_tips value is False, double-click the value to set it to True.
Other servicesTo add a device and perform other operations on the device, SupportAssist Enterprise requires the following services to be installed andrunning on the device:
• WMI service (on devices running a Windows operating system)• SSH service (on devices running a Linux operating system)
If the services are either not installed or not running, an error message is displayed in SupportAssist Enterprise. The following sectionsprovide information about verifying the status of the service and restarting the service (if required).
WMI serviceTo verify the status of the WMI service and to start the service (if required):
1. Click Start > Run. The Run dialog box is displayed.2. Type services.msc, and then click OK. The Services Microsoft Management Console (MMC) is displayed.
3. In the list of services, verify the status of the Windows Management Instrumentation service. If the service is running, the statusis displayed as Running.
4. If the service does not display a Running status, right-click Windows Management Instrumentation and click Start.
SSH serviceYou can use the following commands to verify the status of the SSH service and to start the service (if required):
Troubleshooting 185
• service sshd status — Displays the status of the SSH service.
• service sshd start — Starts the SSH service.
SecurityIf the Edit Credentials or Start Collection links remain disabled even after selecting a device in the Devices page, ensure that you arelogged in to SupportAssist Enterprise with elevated or administrative privileges. See SupportAssist Enterprise user groups and Grantingelevated or administrative privileges to users.
LogsIf you notice that the size of the SupportAssist Enterprise application logs file increases intermittently, then:
1. Stop the SupportAssist Enterprise services.2. Back up the application.log file.
3. Delete the application.log file.
4. Restart the SupportAssist Enterprise services.
186 Troubleshooting

SupportAssist Enterprise user interfaceThe SupportAssist Enterprise user interface contains the following tabs:
• Cases — Displays the support cases that are present for the devices that you have added in SupportAssist Enterprise.• Devices — Displays the devices that you have added in SupportAssist Enterprise and their status. You can point to the Devices tab
and click the available options to access following pages:
• Manage Device Groups — Enables you to create and manage devices groups.• Manage Rules for Device Discovery — Enables you to create device discovery rules.• Manage Credentials — Enables you to provide the credentials for the device types.
• Account Credentials — Enables you to connect to your remote devices and collect system information.• Credential Profiles — Enables you to apply a set of credentials to a device or group of devices, instead of entering the
credentials for each device manually.• Collections — Displays the list of collections that have been performed successfully.• Extensions — Enable you to set up adapters and Remote Collectors.• Settings — Enables you to configure the options available in SupportAssist Enterprise. You can point to the Settings tab and click
the available options to access following pages:
• Proxy Settings — Enables you to configure the proxy server settings in SupportAssist Enterprise.• Preferences — Enables you to configure your preferences for tasks, collections, email notification, reports, and maintenance
mode.• Contact Information — Enables you to update the details of your primary and secondary contacts.• SMTP Settings — Enables you to configure the details of the SMTP server utilized by your company.
• Disconnected — Displayed when SupportAssist Enterprise is unable to connect to an adapter or Remote Collector.
At the top-right of the SupportAssist Enterprise header area, you can access links that allow you to navigate to resources or performcertain tasks. The following table describes the use of the available links.
Table 31. Links in the SupportAssist Enterprise header area
Link Description
SupportAssistEnterprise Community
Opens the SupportAssist Enterprise community website in a new browser window.
About Provides information about the SupportAssist Enterprise version, registration ID, policy file version, deviceconfiguration version, patch version, and the update history.
User name The user name of the currently logged in user. Point to the user name link to view a drop-down list thatcontains the following links:
• Network Connectivity Test — Opens the Network Connectivity Test page.• SupportAssist Enterprise Test — Opens the SupportAssist Enterprise Test page.• Logout — Allows you to log out of SupportAssist Enterprise.
NOTE: The Network Connectivity Test and SupportAssist Enterprise Test links are enabledonly if you are logged in to SupportAssist Enterprise with administrative or elevatedprivileges.
Help icon Opens the context-sensitive help.
In some scenarios, a yellow banner may be displayed at the top of the SupportAssist Enterprise user interface. The following tabledescribes the banners that may be displayed.
22
SupportAssist Enterprise user interface 187

Table 32. Banners in the SupportAssist Enterprise header area
Banner Description
Not registered This banner is displayed if you have not completed the registration of SupportAssist Enterprise. The notregistered banner displays the following options:
• Register now — To register SupportAssist Enterprise.• Remind me later — To close the 'not registered' banner. The 'not registered' banner is not displayed
until you log in to SupportAssist Enterprise again.• Why register — To learn about the importance of registering SupportAssist Enterprise.
Update available The types of banners displayed are:
• SupportAssist Enterprise• Patch Update• Product Support• Policy Update• OpenManage Essentials Adapter update• System Center Operations Manager Adapter update• OpenManage Enterprise Adapter update
This banner is displayed in the following scenarios:
• If an update is available, but you have disabled the automatic update of the SupportAssist Enterpriseapplication, policy files, and product support files.
• If an error occurred during the update of SupportAssist Enterprise.
The update available banner displays the following options:
• Update now — To enable SupportAssist Enterprise to download and install the update.• Skip this version — To skip the update. The update available banner is not displayed again until the
next version of the update is available.• Remind me later — To close the 'update available' banner. The 'update available' banner is not
displayed until you log in to SupportAssist Enterprise again.
NOTE: The update available banner is displayed only if you are logged in to SupportAssistEnterprise with administrative or elevated privileges.
Also, one of the following banners may be displayed on the SupportAssist Enterprise user interface:
• Dispatch preference is a new feature in the upgraded application banner — This banner isdisplayed when you have upgraded to SupportAssist Enterprise without providing the dispatch addressin the previous instance.
• Update your secondary shipping contact details for replacement parts dispatch to ensure atimely delivery banner — This banner is displayed when you have already provided the dispatchaddress in the previous instance and then upgraded to SupportAssist Enterprise.
Dispatch preferences This banner is displayed after you upgrade from SupportAssist Enterprise 1.1, 1.2, or later.
Maintenance Mode This banner is displayed when you place SupportAssist Enterprise in maintenance mode. For moreinformation about maintenance mode, see Understanding maintenance mode.
Related reference
SupportAssist Enterprise Registration Wizard
Login page
Site Health
Cases page
Devices page
Site Inventory Validation
Device Groups page
Manage Device Discovery Rule
Manage Account Credentials
Manage Credential Profiles
Collections page
188 SupportAssist Enterprise user interface

Extensions
Settings
Network Connectivity Test
SupportAssist Enterprise test
Topics:
• SupportAssist Enterprise Registration Wizard• Login page• Site Health• Cases page• Devices page• Site Inventory Validation• Device Groups page• Manage Device Discovery Rule• Manage Account Credentials• Manage Credential Profiles• Collections page• Extensions• Settings• Network Connectivity Test• SupportAssist Enterprise test
SupportAssist Enterprise Registration WizardThe SupportAssist Enterprise Registration Wizard guides you through the setup and registration of SupportAssist Enterprise. Thefields displayed in the pages of the SupportAssist Enterprise Registration Wizard are described in the following sections.
Related tasks
Register SupportAssist Enterprise
Related reference
Welcome
Proxy Settings
Registration
Summary
WelcomeThe Welcome page enables you to start the registration of SupportAssist Enterprise. Click Next to start the registration of SupportAssistEnterprise.
Proxy SettingsThe Proxy Settings page allows you to configure the proxy server settings.
NOTE: The Proxy Settings page is displayed only if you confirm that the system connects to the Internet through a
proxy server.
The following table provides information about the fields displayed in the Proxy Settings page.
Table 33. Proxy Settings
Field Description
Use proxy settings Select this option to enable configuring the proxy serversettings.
SupportAssist Enterprise user interface 189

Field Description
Proxy Server Address or Name The proxy server address or name.
Proxy Port Number The proxy server port number.
Proxy requires authentication Select this option if the proxy server requires authentication.
Username The user name required to connect to the proxy server.
Password The password required to connect to the proxy server.
RegistrationThe Registration page enables you to provide your contact information and register SupportAssist Enterprise.
The fields that are displayed in the Registration page are described in the following table.
Table 34. Registration
Field Description
Company Information
Company Name The name of the company.
Country/Territory The location of the company.
IT Administrator Contact Information
First name The first name of the primary contact.
Last name The last name of the primary contact.
Phone number The phone number of the primary contact.
Alternate phone number The alternate phone number of the primary contact.
Email address The email address of the primary contact. SupportAssistEnterprise email notifications are sent to this email address.
Time zone The time zone of the primary contact.
Parts Replacement Preferences for Dell Servers
I want Dell server replacement parts shipped automatically Select this check box if you agree to have Dell EMC contactyour company and send replacement parts.
Primary Shipping Contact
First name The first name of the primary contact who will be responsiblefor receiving the dispatched part.
Last name The last name of the primary contact who will be responsible forreceiving the dispatched part.
Phone number The phone number of the primary contact who will beresponsible for receiving the dispatched part.
Email address The email address of the primary contact who will be responsiblefor receiving the dispatched part.
Secondary Shipping Contact
First name The first name of the secondary contact who will be responsiblefor receiving the dispatched part.
Last name The last name of the secondary contact who will be responsiblefor receiving the dispatched part.
Phone number The phone number of the secondary contact who will beresponsible for receiving the dispatched part.
190 SupportAssist Enterprise user interface

Field Description
Email address The email address of the secondary contact who will beresponsible for receiving the dispatched part.
Shipping Address
Time Zone The time zone of the primary or secondary contact.
Preferred contact hours The preferred hours when Technical Support can contact theperson who is responsible for receiving the dispatched part, ifthere are any issues.
Country / Territory Select the country.
Shipping Address The address where a replacement component must bedispatched.
City / Town
State / Province / Region
Zip / Postal code
Dispatch Notes Type any specific dispatch related information.
CNPJ
IE
For Brazil only: The CNPJ and IE number of your contact.
I want a technician to replace my parts onsite (if included inmy service plan)
Select this option if you want an onsite technician to replace thedispatched hardware component.
TechDirect integration
Sign In Click to sign in to your company's TechDirect Administratoraccount to get the One-Time Password (OTP).
OTP Enter the OTP to verify your TechDirect account.
Related tasks
View and update parts dispatch information
SummaryThe Summary page allows you to complete the setup. Click Finish to open the SupportAssist Enterprise Devices page.
Login pageThe following table describes the fields displayed in the SupportAssist Enterprise login page.
Table 35. Login page
Field Description
Username User name required to log in to SupportAssist Enterprise.
Password Password required to log in to SupportAssist Enterprise.
Login Click to log in to SupportAssist Enterprise.
Related tasks
Log in to SupportAssist Enterprise
Site HealthThe following table describes the information displayed on the Site Health page.
SupportAssist Enterprise user interface 191

Table 36. Site Health
Field Description
Current SupportAssist Enterprise (Hostname) Details Displays information about the devices managed bySupportAssist Enterprise.
Current SupportAssist Overview Displays the number of devices monitored by SupportAssistEnterprise. It also displays the number of support cases that areopen.
Sitewide Inventory Validations Displays the site-wide inventory validation results.
Network Connectivity Displays the status of SupportAssist Enterprise connectivity tothe dependent network resources.
Extensions Tree View Displays the adapter and remote collectors that have been setup in SupportAssist Enterprise.
Related concepts
Monitoring site health
Cases pageThe Cases page displays the support cases that are present for your devices that you have added in SupportAssist Enterprise. For deviceswith a ProSupport, ProSupport Plus, ProSupport Flex for Data Center, or ProSupport One for Data Center service contract, the Casespage displays the case status irrespective of the case creation method. By default, the displayed support cases are grouped under theirrespective device name or device IP address. The last refreshed date and time that is displayed in the group header indicates when thecase information was last retrieved from Dell EMC.
The following options available at the top of the cases page are:
• Search by — To search by a specific category of displayed data. The available options are:
• Service Tag• Name / IP Address• Number• Title• Status
• Search term — To enter the search keyword.
NOTE: You must enter a minimum of 3 characters to perform the search.
• Case Options — Enables you to manage support cases that were opened by SupportAssist Enterprise based on your requirement.The following are the available options:
• Suspend Activity 24 hours — To request Technical Support to suspend activities related to a support case for 24 hours. After24 hours, Technical Support automatically resumes activities related to the support case.
• Resume Activity — To request Technical Support to resume activities related to a support case.NOTE: The Resume Activity option is enabled only if you had previously requested to suspend activities related to
a support case.
• Request to Close — To request Technical Support to close a support case.
NOTE: Only support cases that were opened by SupportAssist Enterprise can be managed by using the Case Options
list.
• Refresh — To refresh the case list view.• Fetching Cases — A progress indicator that is displayed when SupportAssist Enterprise is verifying if cases are present for your
devices.• TechDirect — Opens the Dell EMC TechDirect home page in a new web browser window.
The following table describes the support case information for your Dell EMC devices that are monitored by SupportAssist Enterprise, asdisplayed in the Cases page.
192 SupportAssist Enterprise user interface

Table 37. Cases page
Column name Description
Check box Use to select a support case for performing case management actions.NOTE: The check box is displayed only for cases that were automatically created bySupportAssist Enterprise.
Name/IP Address The name, host name, or IP address depending on the information you have provided for the device. Thedevice name is displayed as a link that you can click to open the Devices page.
Number The numeric identifier assigned to the support case.
Status The current state of the support case. The status of a support case may be:
• Submitted — SupportAssist Enterprise has submitted the support case.• Open — Technical Support has opened the submitted support case.• In Progress — Technical Support is working on the support case.• Customer Deferred — Technical Support has deferred the support case at the customer’s request.• Reopened — The support case was previously closed, and has been reopened.• Suspended — Technical Support has suspended activities related to the support case for 24 hours
based on your request.• Closure Requested — You have requested Technical Support to close the support case.• Closed — The support case is closed.• Not Applicable — An issue was detected by SupportAssist Enterprise, but a support case was not
created because the device has either an expired warranty or Basic Hardware warranty.• Unavailable — The support case status could not be retrieved from Dell EMC.• Unknown — SupportAssist Enterprise is unable to determine the status of the support case.
Title The support case name, which identifies:
• Support case generation method• Device model• Device operating system• Alert ID, if available• Alert description, if available• Warranty status• Resolution description
Date Opened The date and time when the support case was opened.
Service Contract The Dell EMC service contract level under which the device is covered. The Service Contract column maydisplay:
• Unknown — SupportAssist Enterprise cannot determine the service contract.• Invalid Service Tag — The Service Tag of the device is invalid.• No Service Contract — This device is not covered under a Dell EMC service contract.• Expired Service Contract — The service contract of the device has expired.• Basic Support — The device is covered under a Dell EMC Basic Hardware service contract.• ProSupport — The device is covered under a Dell EMC ProSupport service contract.• ProSupport Plus — The device is covered under a Dell EMC ProSupport Plus service contract.• ProSupport Flex for Data Center — The device is covered under a ProSupport Flex for Data Center
service contract.• ProSupport One for Data Center Or ProSupport Flex for Data Center — The device is covered
under a ProSupport One for Data Center Or ProSupport Flex for Data Center service contract.
Service Tag A unique, alphanumeric identifier that allows Dell EMC to individually recognize each Dell EMC device.
NOTE: When you check for support cases of a specific device, the support cases of that device are displayed at the top
of the Cases page with a blue border for the appropriate rows. See Checking for support cases.
You can choose to refine the displayed devices based on the device type, case status, service contract type, case source, or other criteria.The following are the available options for refining the displayed data:
• Device Type
SupportAssist Enterprise user interface 193

• Server• Storage• Networking• Chassis
• Case Status
• Open• Submitted• In Progress• Suspended• Requested for Closure
• Service Contract
• Basic• ProSupport• ProSupport Plus• ProSupport Flex for Data Center• ProSupport One for Data Center Or ProSupport Flex for Data Center
• Source Type
• Email• Phone• Chat• SupportAssist• Help Desk• TechDirect• Others
Related tasks
Case management options
Sorting the displayed data
Devices pageThe Devices page displays the devices that you have added and status of the SupportAssist Enterprise functionality for each device. Inthe default view, the Devices page displays all the devices that you have added.
At the top of the Devices page, the navigation trail is displayed.
The following options available at the top of the device list enables you to perform certain tasks:
• Search by — To search by a specific category of displayed data. The available options are:
• Service Tag• Model• Name / IP Address• Operating System
• Search term — To enter the search keyword.
NOTE: You must enter a minimum of 3 characters to perform the search.
• Add Device — To add a device.• Start Collection — To initiate a single device or multiple device collections.• Edit — To update the name and account credentials of the device.• Delete — To delete a device from SupportAssist Enterprise.• Collection Purpose — To select a reason for performing a multiple device collection.• Assign Credential Profile — To assign credentials for devices.• Validate Inventory — To perform device inventory validation.• Refresh — To refresh the device inventory view.
• View by — Enables you to view the devices in a (list) view or (association) view.
The following table describes the automatically generated inventory information for your supported Dell EMC devices, as displayed in theDevices page.
194 SupportAssist Enterprise user interface

Table 38. Devices page
Column name Description
Check box You can use the check box to:
• Select a device for viewing the devices overview pane.• Select one or more devices for performing certain tasks on the device.
NOTE: The check box is disabled while the following SupportAssist Enterprise initiated tasksare in progress:
• SNMP configuration
• Installation or upgrade of OMSA
• Clear System Event Log
• Collection of system information immediately after an automatic support case creationand also during a manually initiated collection
• Inventory validation
Name/IP Address Displays the following information:
• Device name — Displays the name, host name, or IP address depending on the information you haveprovided for the device.
• Collection status — When a collection occurs, a progress bar and a corresponding message aredisplayed to indicate the status of the collection. The possible collection status messages are as follows:
• For a collection that you manually initiate:
NOTE: When a manually initiated collection is in progress, a icon is displayed next
to the progress bar. Click the icon to cancel the collection, if necessary.
NOTE: You can cancel a collection only when SupportAssist Enterprise is collectingsystem information from the device. You cannot cancel a collection while the collectedsystem information is being sent to Dell EMC.
• Starting collection• Collection in progress• Sending collection• Canceling collection
• For an automated collection that is initiated because a support case was created for a detectedhardware issue:
• Starting collection for support case• Collection for support case in progress• Sending collection for support case
NOTE: If a hardware issue is detected on a device with a Dell EMC Basic Servicecontract, the automated collection is initiated. However, a support case is not createdfor that device.
• For an automated periodic collection based on the default or configured collection schedule:
• Starting periodic collection• Periodic collection in progress• Sending periodic collection
NOTE: In some instances, when a collection is in progress (manual) on a device anothercollection (periodic) may be initiated. In such scenarios, the collection status is displayedin the following order of priority:
• Manual collection
• Support case collection
• Periodic collection
• Maintenance mode — If the device is placed in maintenance mode, the maintenance mode icon isdisplayed.
SupportAssist Enterprise user interface 195

Column name Description
Model Model of the device. For example, PowerEdge M820.
Status The status of inventory validation. The status can be categorized as follows:
• Success — Inventory validation of the device is successfully complete.• Failed — Inventory validation of the device is unsuccessful.• In progress — Inventory validation of the device is in progress.• No status — The inventory validation is yet to be initiated on the device.
You can choose to refine the displayed devices based on the device type, device group, or other criteria. The following are the availableoptions for refining the displayed data:
• Device Type
• Server• Storage• Networking• Chassis• Software• Solution• Virtual Machine
• Need Attention
• Staging — Displays a status icon and a rollup count of number of devices that are present in the Staging group.• Inactive — Displays a status icon and a rollup count of number of devices that are present in the Inactive group.
• Inventory Validation
• Success — Displays a status icon and the rollup count of number of devices that were validated successfully.• Failed — Displays a status icon and the rollup count of number of devices that were not validated successfully.
• Groups
• Default — Displays all devices.• Staging — Displays devices in the staging group.• Inactive — Displays devices that are not reachable.
• Adapter• Remote Collector• Collection Host
• SupportAssist Enterprise• Devices Added
• SupportAssist Enterprise• Adapters
The Devices page also displays the following panes based on your actions:
• Device overview pane — When only a single device is selected. See Device overview pane.• Multiple Device Collection pane — When a multiple device collections is in progress. See Multiple Device Collection pane.
Related tasks
Adding devices
Delete a device
Enable or disable device-level maintenance mode
Install or upgrade OMSA by using SupportAssist Enterprise
View support cases for a specific device
Sorting the displayed data
Add Single DeviceThe Add Single Device page enables you to select the device type and provide details of the device you want to add.
The following table provides information about the items displayed in Add Single Device page
196 SupportAssist Enterprise user interface
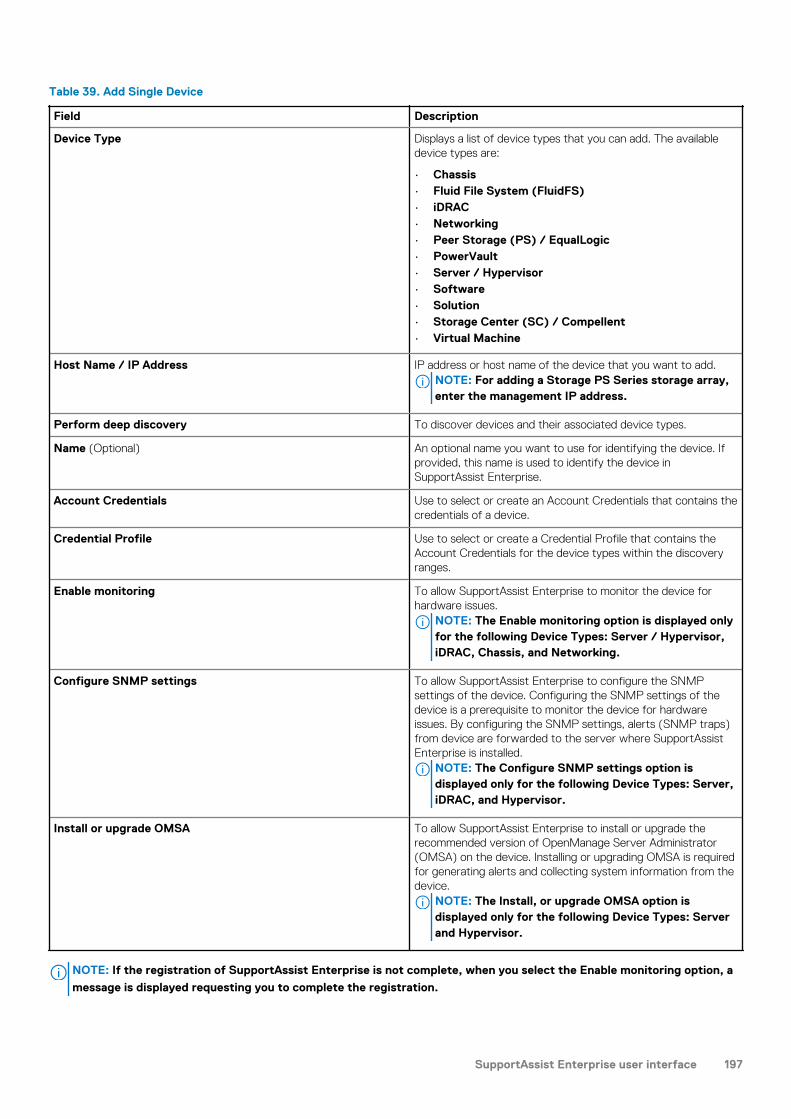
Table 39. Add Single Device
Field Description
Device Type Displays a list of device types that you can add. The availabledevice types are:
• Chassis• Fluid File System (FluidFS)• iDRAC• Networking• Peer Storage (PS) / EqualLogic• PowerVault• Server / Hypervisor• Software• Solution• Storage Center (SC) / Compellent• Virtual Machine
Host Name / IP Address IP address or host name of the device that you want to add.NOTE: For adding a Storage PS Series storage array,enter the management IP address.
Perform deep discovery To discover devices and their associated device types.
Name (Optional) An optional name you want to use for identifying the device. Ifprovided, this name is used to identify the device inSupportAssist Enterprise.
Account Credentials Use to select or create an Account Credentials that contains thecredentials of a device.
Credential Profile Use to select or create a Credential Profile that contains theAccount Credentials for the device types within the discoveryranges.
Enable monitoring To allow SupportAssist Enterprise to monitor the device forhardware issues.
NOTE: The Enable monitoring option is displayed onlyfor the following Device Types: Server / Hypervisor,iDRAC, Chassis, and Networking.
Configure SNMP settings To allow SupportAssist Enterprise to configure the SNMPsettings of the device. Configuring the SNMP settings of thedevice is a prerequisite to monitor the device for hardwareissues. By configuring the SNMP settings, alerts (SNMP traps)from device are forwarded to the server where SupportAssistEnterprise is installed.
NOTE: The Configure SNMP settings option isdisplayed only for the following Device Types: Server,iDRAC, and Hypervisor.
Install or upgrade OMSA To allow SupportAssist Enterprise to install or upgrade therecommended version of OpenManage Server Administrator(OMSA) on the device. Installing or upgrading OMSA is requiredfor generating alerts and collecting system information from thedevice.
NOTE: The Install, or upgrade OMSA option isdisplayed only for the following Device Types: Serverand Hypervisor.
NOTE: If the registration of SupportAssist Enterprise is not complete, when you select the Enable monitoring option, a
message is displayed requesting you to complete the registration.
SupportAssist Enterprise user interface 197

Related tasks
Add a server or hypervisor
Add a chassis
Add a Networking device
Add a solution
Add an iDRAC
Add a PowerVault storage array
Add an EqualLogic PS Series storage solution
Add a Compellent SC Series storage solution
Add a Fluid File System NAS device
Add a software
Add a virtual machine
Assign Device GroupThe Assign Device Group (Optional) page enables you to assign the device to a custom device group.
The following table describes the fields displayed on the Assign Device Group (Optional) page.
Table 40. Assign Device Group (Optional)
Field Description
Name The name you have provided for the device.
Current Group The device group the device is assigned to.
Assign Other Group The available device groups to which you can assign the device.
Summary pageThe Summary page displays the status and details of the device addition.
Table 41. Summary page
Field Description
Name The name that you have provided for the device.
IP Address / Host name The IP address or host name that you have provided for thedevice.
Service Tag A unique, alphanumeric identifier that allows Dell EMC toindividually recognize each device.
Device Type The type of the device.
Model The model of the device.
OS Type The operating system installed on the device.
Group The device group to which the device is assigned.
Device overview paneThe device overview pane displays the details of a device and allows you to perform certain operations on that device. This pane isdisplayed when you select only a single device in the Devices page.
Table 42. Device overview pane
Field Description
Tasks • Clear System Event Log — To clear the System Event Log(SEL) or Embedded System Management (ESM) log.
198 SupportAssist Enterprise user interface

Field Description
• Check for Cases — To check for support cases that arepresent for a device.
• Perform deep discovery — To discover a device and itsassociated device types.
• Maintenance Mode
• Enable — To place the device in maintenance mode.• Disable — To place the device in normal mode.
• Dependencies
• Install / Upgrade OMSA — To install or upgrade OMSAon the device.
• Configure SNMP — To configure the SNMP settings ofthe device.
Hostname / IP address Displays the IP address or host name of the device.
Model Displays the model information of the device. For example,PowerEdge M820.
Service Tag Displays a unique, alphanumeric identifier that allows Dell EMC toindividually recognize the device.
Monitoring • Enable — To enable monitoring hardware issues that mayoccur the device.
• Disable — To disable monitoring hardware issues that mayoccur the device.
Software Version Displays the version of the firmware installed on the device.
Display Name Displays the name that you have provided for the device.
Device Type Displays the type of the device. For example, Server.
Collections Displays a list that contains the collection history. You can select adate and time from the list to view the system information thatwas collected.
NOTE: The Collections field displays No Collections inthe following scenarios:
• No collections have been performed from the device
• The device is associated with a Remote Collector
Next Scheduled Collection Displays the date and time of the next scheduled collection.
Last Device Job Status Displays the status of the SupportAssist Enterprise functionality onthe device, and the date and time the status was generated. Thestatus can be categorized as follows:
Informational status
• OK — The device is configured correctly forSupportAssist Enterprise functionality.
• Installing OMSA — Installation or upgrade of Dell EMCOpenManage Server Administrator (OMSA) is in progress.
• Configuring SNMP — Configuring the SNMP settingsof the device is in progress.
• Clearing System Event Log — Clearing of the SystemEvent Log is in progress.
SupportAssist Enterprise user interface 199

Field Description
• System Event Log cleared — System Event Log hasbeen cleared successfully.
• Revalidating device — SupportAssist Enterprise isvalidating the prerequisites and the credentials of the device.
Warning status
• OMSA not installed — OMSA is not installed on thedevice.
• SNMP not configured; OMSA not latest — SNMPsettings of the device is not configured and the OMSA versioninstalled on the device is prior to the recommended version ofOMSA for SupportAssist Enterprise.
• SNMP not configured — SNMP settings of the deviceis not configured.
• New version of OMSA available — A newer version ofOMSA is available for installation on the device.
• OMSA installed, reboot the added device —Installation of OMSA is complete on the device. Restart thedevice for the changes to take effect.
Error status
• Unable to add device — SupportAssist Enterprise hasplaced the device in the Staging group because the device didnot meet certain prerequisites. For more information on theStaging group, see Predefined device groups.
• Unable to configure SNMP — SupportAssistEnterprise is unable to configure the SNMP trap destination ofthe device.
• Unable to verify SNMP configuration —SupportAssist Enterprise is unable to verify the SNMPconfiguration of the iDRAC.
• Unable to install OMSA — Installation of OMSA couldnot be completed.
• OMSA not supported — Installation of OMSA is notsupported.
• Unable to reach device — SupportAssist Enterprise isunable to communicate with the device.
• Authentication failed — SupportAssist Enterprisecannot log in to the device.
200 SupportAssist Enterprise user interface
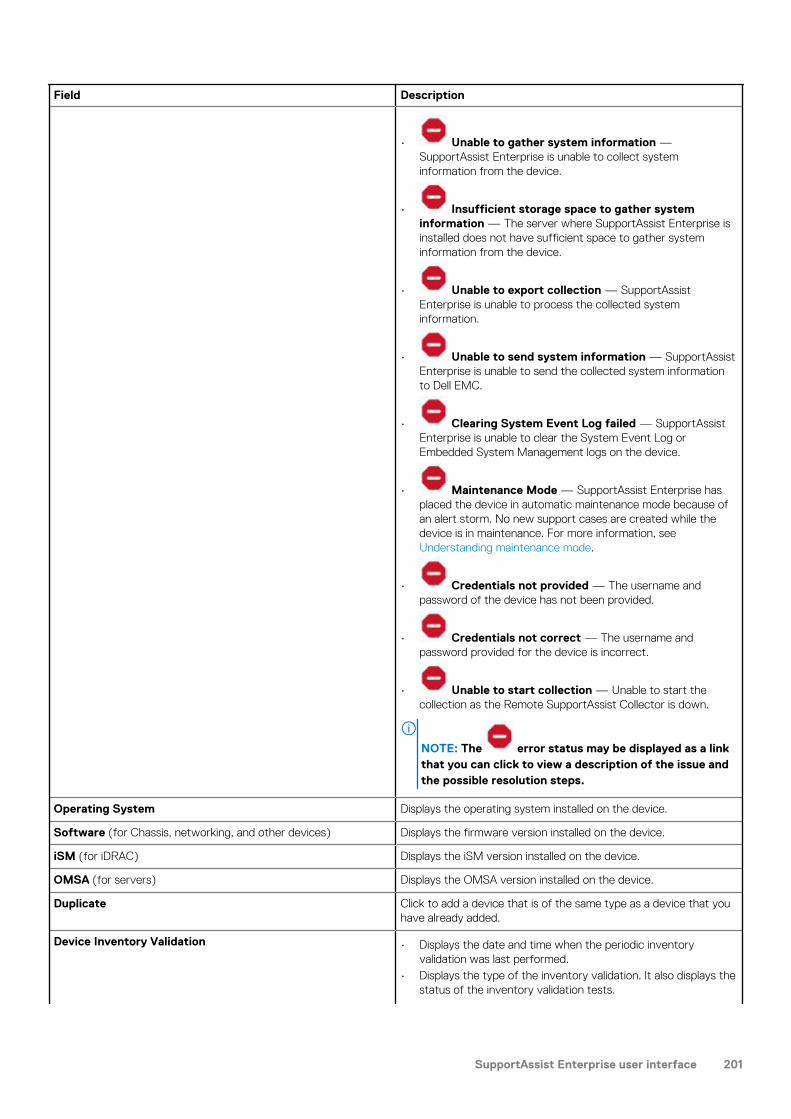
Field Description
• Unable to gather system information —SupportAssist Enterprise is unable to collect systeminformation from the device.
• Insufficient storage space to gather systeminformation — The server where SupportAssist Enterprise isinstalled does not have sufficient space to gather systeminformation from the device.
• Unable to export collection — SupportAssistEnterprise is unable to process the collected systeminformation.
• Unable to send system information — SupportAssistEnterprise is unable to send the collected system informationto Dell EMC.
• Clearing System Event Log failed — SupportAssistEnterprise is unable to clear the System Event Log orEmbedded System Management logs on the device.
• Maintenance Mode — SupportAssist Enterprise hasplaced the device in automatic maintenance mode because ofan alert storm. No new support cases are created while thedevice is in maintenance. For more information, seeUnderstanding maintenance mode.
• Credentials not provided — The username andpassword of the device has not been provided.
• Credentials not correct — The username andpassword provided for the device is incorrect.
• Unable to start collection — Unable to start thecollection as the Remote SupportAssist Collector is down.
NOTE: The error status may be displayed as a linkthat you can click to view a description of the issue andthe possible resolution steps.
Operating System Displays the operating system installed on the device.
Software (for Chassis, networking, and other devices) Displays the firmware version installed on the device.
iSM (for iDRAC) Displays the iSM version installed on the device.
OMSA (for servers) Displays the OMSA version installed on the device.
Duplicate Click to add a device that is of the same type as a device that youhave already added.
Device Inventory Validation • Displays the date and time when the periodic inventoryvalidation was last performed.
• Displays the type of the inventory validation. It also displays thestatus of the inventory validation tests.
SupportAssist Enterprise user interface 201

Field Description
NOTE: If the validation tests fail, then an errormessage is displayed.
Multiple Device Collection windowThe Multiple Device Collection window prompts you to provide details about the multiple device collection that you want to start.
The following table describes the items displayed in the Multiple Device Collection window.
Table 43. Multiple Device Collection window
Field Description
Collection Name (Optional) The name that you want to assign to the collection.
Dell EMC Support Request/case number (Optional) The case identifier that you want to associate with thecollection.
Dell EMC Technician Email (Optional) The email address or name of the Technical Support contact.
Project ID (Optional) The project identification information.
Upload collection • Select this option to upload the collection to Dell EMC afterthe collection is completed.
• Clear this option to only save the collection on the localsystem (server where SupportAssist Enterprise is installed).
Multiple Device Collection paneThe Multiple Device Collection pane is displayed on the Devices page while the collection from multiple devices is in progress.
The Multiple Device Collection pane displays the following:
• Progress bar that indicates the collection status• Collections status message• Number of completed collections and the total number of collections• Name that is assigned to the collection
NOTE: After the collection is completed, the Multiple Device Collection pane closes automatically, and the collection
details are displayed on the Collections page.
Site Inventory ValidationThe Site Inventory Validation page displays the following sections:
• Validation test status — Displays the type of tests performed during inventory validation.• Progress indicator — Indicates the status of the inventory validation.• History — Displays the inventory validation test history.
Related concepts
Validating device inventory
Related tasks
View the Site Inventory Validation page
Start inventory validation manually
Schedule automatic inventory validation
202 SupportAssist Enterprise user interface

Validation test statusThe following table provides information about the items displayed in the Validation test section on the Site Inventory Validation page.
Table 44. Validation test status
Field Description
Validation test Displays a type of tests performed during inventory validation.
Success Displays a status icon and the rollup count of number of devicesthat were validated successfully.
Failed Displays a status icon and the rollup count of number of devicesthat were not validated successfully.
Others Displays a status icon and the rollup count of number of:
• Devices that may not be supported or monitored bySupportAssist Enterprise
• Devices added or discovered in SupportAssist Enterprisethrough the adapter
• Devices for which the connectivity test has failed• Devices for which you have disabled monitoring
History of inventory validationThe following table provides information about the items displayed in the history section on the Site Inventory Validation page.
Table 45. History of inventory validation
Field Description
Started Date and time when the periodic inventory validation wasstarted.
Completed Date and time when the periodic inventory validation wascompleted.
NOTE: If you are running periodic inventory validationfor the first time, the Completed value will be NA.
Last Updated Date and time when the periodic inventory validation was lastperformed.
NOTE: If you are running periodic inventory validationfor the first time, the Last Updated value will beblank.
Device Groups pageThe Device Groups page allows you to create and manage devices groups.
The Create Device Group option available at the top of the Device Groups page enables you to create a new device group.
At the top of the Device Groups page, the navigation trail is displayed.
The Select group actions list enables you to select an action that you want to perform on the group. The following are the availableactions:
• Manage Devices — To add or remove devices from a device group.• Manage Contacts — To provide the contact information and parts dispatch information for each device type included in a device
group.• Edit/Delete Group — To edit the group details or delete a device group.
The following table describes the information displayed in the Device Groups page.
SupportAssist Enterprise user interface 203

Table 46. Device Groups
Column name Description
Check box Use to select a device group for performing an action.
Name The name of the device group and the total number of devices in the device group.
Description The description that you have provided for the device group.
Related reference
Manage Devices
Create or Edit Device Group
Manage DevicesThe Manage Devices window allows you to add or remove devices from a device group.
On the Manage Devices window:
• The Default pane displays all devices that are not included in the Default group.• The Grouped pane displays devices that are included in the current device group.
The following table provides information about the fields displayed in the Manage Devices window.
Table 47. Manage Devices
Field Description
Name The name of the device group.
Type Displays the type of device as discovered by OpenManage Essentials:
• PowerVault Storage Device — The device is a Storage MD Series array.• PowerVault Server — The device is a Storage NX Network Attached Storage (NAS) device.• EqualLogic Storage — The device is a Storage PS Series array.• PowerEdge Server Device — The device is a PowerEdge, PowerEdge VRTX, iDRAC, or CMC device.• PowerEdge Direct Attached Storage — The device is a Storage MD Series or NX Direct Attached
Storage (DAS) device.• Dell Networking — The device is a Dell Networking switch.
Model Model of the device. For example, PowerEdge M820.
Service Tag A unique, alphanumeric identifier that allows Dell EMC to individually recognize each device.
Save Click to save the changes you have made.
Cancel Click to discard the changes you have made.
NOTE: You can use the filter icon displayed in the column titles to filter the displayed data.
Related tasks
Manage devices in a device group
Related reference
Device Groups page
Create or Edit Device GroupThe Create or Edit Device Group window allows you to edit the device group details of a group.
The following table provides information about the fields displayed in the Create or Edit Device Group window.
204 SupportAssist Enterprise user interface

Table 48. Create or Edit Device Group
Field Description
Group and Contact Information
Name The name of the device group.
Description The description of the device group.
IT AdministratorContact Information
Select this check box to enter the contact information of the IT Administrator.
Primary Select this option to view or edit the primary contact information.
Secondary Select this option to view or edit the secondary contact information.
First name The first name of the primary or secondary contact.
Last name The last name of the primary or secondary contact.
Phone number The phone number of the primary or secondary contact.
Alternate phonenumber
The alternate phone number of the primary or secondary contact.
Email address The email address of the primary or secondary contact.
Preferred contactmethod
Select the preferred contact method. The available options are:
• Phone• Email
Preferred contacthours
The preferred hours when Technical Support can contact your primary or secondary contact in case of anyissues with the monitored devices.
Time Zone The time zone of the primary or secondary contact.
Parts Replacement Preferences for Dell Servers
I want Dell serverreplacement partsshipped automatically
Select this check box if you agree to have Dell EMC contact your company and send replacement parts.
Primary Shipping Contact
First name The first name of the primary contact who will be responsible for receiving the dispatched part.
Last name The last name of the primary contact who will be responsible for receiving the dispatched part.
Phone number The phone number of the primary contact who will be responsible for receiving the dispatched part.
Email address The email address of the primary contact who will be responsible for receiving the dispatched part.
Secondary Shipping Contact
First name The first name of the secondary contact who will be responsible for receiving the dispatched part.
Last name The last name of the secondary contact who will be responsible for receiving the dispatched part.
Phone number The phone number of the secondary contact who will be responsible for receiving the dispatched part.
Email address The email address of the secondary contact who will be responsible for receiving the dispatched part.
Shipping Address
Preferred ContactHours
The preferred hours when Technical Support can contact the person who is responsible for receiving thedispatched part, if there are any issues.
Time Zone The time zone of the primary or secondary contact.
Country / Territory Select the country.
Shipping Address The address where a replacement component must be dispatched.
City / Town
SupportAssist Enterprise user interface 205

Field Description
State / Province /Region
Zip / Postal code
Dispatch Notes Type and specific dispatch related information.
CNPJ
IE
For Brazil only: The CNPJ and IE number of your contact.
I want a technician toreplace my parts onsite(if included in myservice plan)
Select this option if you want an onsite technician to replace the dispatched hardware component.
Related tasks
View and update device group information
Related reference
Device Groups page
Manage Device Discovery RuleThe Manage Device Discovery Rule page enables you to discover and add devices based on IP address ranges or comma separatedhostname expressions or IP addresses. The following table provides information about the options in the Manage Device Discovery Rulesection.
Table 49. Manage Device Discovery Rule
Field Description
Create Discovery Rule Click to create a discovery rule.
Edit Click to edit the discovery rule.
Delete Click to delete the discovery rule.
Run now Click to discover devices immediately.
Name The name that you have provided for the discovery rule.
Status The status of a discovery rule.
Related tasks
Create device discovery rule
View the device discovery rule overview pane
Edit device discovery rule
Delete device discovery rule
Run the discovery rule
Create or Edit Device Discovery RuleThe Create or Edit Device Discovery Rule window enables you to create a device discovery rule. The following table provides informationabout the options in the Create or Edit Device Discovery Rule section.
Table 50. Create or Edit Device Discovery Rule
Field Description
Discovery Rule Name Type a name for the discovery rule.
206 SupportAssist Enterprise user interface

Field Description
Credential Profile Use to select or create a Credential Profile that contains theAccount Credentials for the device types within the discoveryranges.
IP address / range Select to enter an IP address range to discover devices by using IPaddress ranges.
IP Address / Range Address The IP address or IP range address of the devices that you want todiscover.
Subnet mask (Optional) A subnet mask that is associated with the IP address. By default,the subnet mask value is 255.255.255.0.
Add another range Click to open an additional IP address or IP address range fields.
Devices Select to discover devices by using the hostname or IP addresses.
Enter hostname or IP address as comma-separated values Enter the hostname or IP address of devices as comma-separatedvalues.
Run now Select to discover the devices immediately.
Run once Select to discover the devices at a specific date and time.
Recur Select to schedule the discovery of devices at periodic intervals.
Device type The device types for which credentials are included in theCredential Profile and PowerVault are selected.
The available device types are:
• Chassis• Fluid File System (FluidFS)• iDRAC• Networking• Peer Storage (PS) / EqualLogic• PowerVault• Server / Hypervisor• Software• Solution• Storage Center (SC) / Compellent• Virtual Machine
Perform deep discovery To discover devices and their associated device types.
Enable Monitoring (may require additional SNMP settings) To allow SupportAssist Enterprise to monitor the device forhardware issues.
Configure SNMP to receive alerts from this device To allow SupportAssist Enterprise to configure the SNMP settingsof the device. Configuring the SNMP settings of the device is aprerequisite to monitor the device for hardware issues. Byconfiguring the SNMP settings, alerts (SNMP traps) from deviceare forwarded to the server where SupportAssist Enterprise isinstalled.
Install latest version of OMSA (This will generate alerts andallow the collection of System State Information)
To allow SupportAssist Enterprise to install or upgrade therecommended version of OpenManage Server Administrator(OMSA) on the device. Installing or upgrading OMSA is requiredfor generating alerts and collecting system information from thedevice.
Related tasks
Create device discovery rule
Edit device discovery rule
SupportAssist Enterprise user interface 207

Discovery Rule DetailsYou can view details of a discovery rule such as the IP range, schedule, status of discovery, and the last run date and time in the DiscoveryRule Details pane. The following table provides information about the attributes displayed in the Discovery Rule Details pane.
Table 51. Discovery Rule Details
Field Description
IP Range The IP address or IP range address of the devices that arediscovered.
Schedule The schedule of a discovery rule.
Status The status of a discovery rule.
Last Run The date and time of when the discovery rule was last run.
Related tasks
View the device discovery rule overview pane
Discovery Rule Current Iteration StatusYou can view details of a discovery rule such as the number of devices added, number of devices moved to staging group, and so on, inthe Discovery Rule Current Iteration Status pane. The following table provides information about the attributes displayed in the DiscoveryRule Current Iteration Status pane.
Table 52. Discovery Rule Current Iteration Status
Field Description
Status The status of the discovery rule. The following are the availablestatuses:
• Success—Number of devices added successfully.• Staging—Number of devices moved to the staging group.• Inactive—Number of inactive devices.• Failed—Number of failed devices.
Devices The device count.
Export CSV Click to export the list of devices that were not discovered as aCSV file.
Related tasks
View the device discovery rule overview pane
Recent ActivityYou can view details of a discovery rule such as the IP Address, date, and the timestamp of devices for which discovery is in progress inthe Recent Activity (Latest 10) pane. The following table provides information about the attributes displayed in the Recent Activity (Latest10) pane.
Table 53. Recent Activity (Latest 10)
Field Description
Name The IP address or IP address range for which discovery is inprogress.
Result The result of a discovery rule.
Time The date and timestamp of a discovery rule that is in progress.
208 SupportAssist Enterprise user interface

Related tasks
View the device discovery rule overview pane
Current versus Previous Discovery Rule StatusYou can view details of a discovery rule such as the number of devices that were added, number of devices moved to the staging group,number of inactive devices, and the number of devices that were deleted from the discovery rule in the Current v/s Previous DiscoveryRule Status pane. The following table provides information about the attributes displayed in the Current v/s Previous Discovery RuleStatus pane.
Table 54. Current versus Previous Discovery Rule Status
Field Description
Added Number of added devices.
Staging Number of devices moved to the staging group.
Inactive Number of inactive devices.
Deleted Number of deleted devices.
Devices The status of the devices.
Number The device count.
Related tasks
View the device discovery rule overview pane
Manage Account CredentialsThe Manage Account Credentials section enables you to configure SupportAssist Enterprise with administrator privileges for eachsupported device type and credential type. The following table provides information about the options displayed in the Manage AccountCredentials section.
Table 55. Manage Account Credentials
Field Description
Add Credentials Click to add Account Credentials.
Edit Click to edit Account Credentials.
Delete Click to delete Account Credentials.
Name The name that you have provided for the Account Credentials.
Device Type The device type to which the Account Credentials is applicable.
Related concepts
Account credentials
Related tasks
Add Account Credentials
Reassign Account Credentials
Edit Account Credentials
Delete Account Credentials
SupportAssist Enterprise user interface 209

Add Account CredentialsThe Add Account Credentials window allows you to add Account Credentials. The following table provides information about the itemsdisplayed in the Add Account Credentials window.
Table 56. Add Account Credentials
Field Description
Name Type a name for the Account Credentials.
Device Type The list of device types that you can add. The available devicetypes are:
• Chassis• Fluid File System (FluidFS)• iDRAC• Networking• Peer Storage (PS) / EqualLogic• Server / Hypervisor• Software• Solution• Storage Center (SC) / Compellent• Virtual Machine
Username* The user name required to connect to the device type.
Password* The password required to connect to the device type.
Community String The community string assigned to the device.NOTE: The Community String option is displayed onlyfor the Networking and Peer Storage (PS) / EqualLogicdevice types.
Enable Password The enable password configured on the device.NOTE: The Enable Password option is displayed only forthe Networking device type.
Operating system type The list of operating system types. The available operating systemtypes are:
• Windows (displayed only if SupportAssist Enterprise isinstalled on a server running Windows)
• Linux• ESX• ESXi
NOTE: The Operating system type option is displayedonly for the Server / Hypervisor device type.
Software Type The list of software types. The available software types are:
• SCVMM• vCenter• SAN HQ• HIT Kit / VSM for VMware
NOTE: The Software Type option is displayed only forthe Software device type.
NOTE: If SupportAssist Enterprise is installed on a Linuxoperating system, adding SCVMM and SAN HQ is notsupported.
Solution Type The type of solution. The available type of solution is Web Scale.
210 SupportAssist Enterprise user interface

Field Description
NOTE: The Solution Type option is displayed only for theSolution device type.
* For Solution device type, you must enter the SSH and REST user name and password.
Related tasks
Add Account Credentials
Edit Account CredentialsThe Edit Account Credentials window allows you to edit the Account Credentials. The following table provides information about the itemsdisplayed in the Edit Account Credentials window.
Table 57. Edit Account Credentials
Field Description
Name Type a name for the Account Credentials.
Device Type The list of device types that you can add. The available devicetypes are:
• Chassis• Fluid File System (FluidFS)• iDRAC• Networking• Peer Storage (PS) / EqualLogic• Server / Hypervisor• Software• Solution• Storage Center (SC) / Compellent• Virtual Machines
Username* The user name required to connect to the device type.
Password* The password required to connect to the device type.
Community String The community string assigned to the device.NOTE: The Community String option is displayed onlyfor the Networking and Peer Storage (PS) / EqualLogicdevice types.
Enable Password The enable password configured on the device.NOTE: The Enable Password option is displayed only forthe Networking device type.
Operating system type The list of operating system types. The available operating systemtypes are:
• Windows• Linux• ESX• ESXi
NOTE: The Operating system type option is displayedonly for the Server / Hypervisor device type.
Software Type The list of software types. The available software types are:
• SCVMM• vCenter
SupportAssist Enterprise user interface 211

Field Description
• SAN HQ• HIT Kit / VSM for VMware
NOTE: The Software Type option is displayed only forthe Software device type.
NOTE: If SupportAssist Enterprise is installed on a Linuxoperating system, adding SCVMM and SAN HQ is notsupported.
Solution Type The type of solution. The available type of solution is Web Scale.NOTE: The Solution Type option is displayed only for theSolution device type.
* For Solution device type, you must enter the SSH and REST user name and password.
Related tasks
Edit Account Credentials
Manage Credential ProfilesThe Manage Credential Profiles section enables you to apply a set of credentials to a device or group of devices. The following tableprovides information about the options displayed in the Manage Credential Profiles section.
Table 58. Manage Credential Profiles
Field Description
Create Profile Click to add a Credential Profile.
Edit Click to edit a Credential Profile.
Delete Click to delete a Credential Profile.
Name The name that you have provided for the Credential Profile.
Related concepts
Credential Profiles
Related tasks
Create Credential Profile
Assign Credential Profile
Edit Credential Profile
Delete Credential Profile
Add Credential ProfileThe Add Credential Profile window allows you to add Credential Profiles. The following table provides information about the itemsdisplayed in the Add Credential Profile window.
Table 59. Add Credential Profile
Field Description
Name Type a name for the Credential Profile.
Check box Use to select a device type.
Device Type The list of device types that you can select. The available devicetypes are:
212 SupportAssist Enterprise user interface

Field Description
• Chassis• Fluid File System (FluidFS)• iDRAC• Networking• Peer Storage (PS) / EqualLogic• PowerVault• Server / Hypervisor• Software• Solution• Storage Center (SC) / Compellent
Account Credentials The Account Credentials that you have created for the specificdevice type.
Add Account Credentials Click to add new account credentials.
Related tasks
Create Credential Profile
Edit Credential ProfileThe Edit Credential Profile window allows you to edit Credential Profiles. The following table provides information about the itemsdisplayed in the Edit Credential Profile window.
Table 60. Edit Credential Profile
Field Description
Name The name of the Credential Profile.
Check box Use to select a device type.
Device Type The list of device types that you can select. The available devicetypes are:
• Chassis• Fluid File System (FluidFS)• iDRAC• Networking• Peer Storage (PS) / EqualLogic• PowerVault• Server / Hypervisor• Software• Solution• Storage Center (SC) / Compellent
Account Credentials The Account Credentials that you have created for the specificdevice type.
Related tasks
Edit Credential Profile
Collections pageThe Collections page displays the collections that have been performed successfully. From the Collections page, you can view thecollected system information, download multi-device collections, and also upload collections to Dell EMC.
At the top of the Collections page, the navigation trail is displayed.
SupportAssist Enterprise user interface 213

The following options available at the top of the collections page are:
• Date Range — To search the collections by a specific date range.• Search by — To search by a specific category of displayed data. The available options are:
• Service Tag• Name / IP Address
• Search term — To enter the search keyword.
NOTE: You must enter a minimum of 3 characters to perform the search.
• Upload — To upload a collection to Dell EMC.
The following table describes the information displayed in the Collections page.
Table 61. Collections page
Column name Description
Check box Use to select a collection for viewing the collection overviewpane and to upload a collection.
Information icon Displayed when some attributes or sections were not collectedfrom the device.
Name The name of the device and collection type. For single devicecollections, the name of the device is followed by the type ofcollection. For example, manual, periodic, and so on.
Collection Date The date when the collection was started.
Collection Purpose The reason selected while performing a multiple devicecollection.
Case Number The numeric support case identifier.
Upload Status The upload status of the collection.
You can choose to refine the displayed collections based on the collection type, device type, or adapter. The following are the availableoptions for refining the displayed data:
• Collection Type
• Manual Collection• Periodic Collection• Case Collection• Multi Collection
• Collection Purpose
• Technical Support• Deployment• System Maintenance• Consulting• Others
• Device Type
• Server• Storage• Networking• Chassis• Software• Solution
• Collection Host
• SupportAssist Enterprise• Remote Collector
• Adapter
214 SupportAssist Enterprise user interface

Collection overview paneThe collection overview pane displays the details of a collection and enables you to view or download the collected system information.This pane is displayed when you select a collection that is listed in the Collections page.
The following table describes the information displayed in the collection overview pane.
Table 62. Collection overview pane
Field Description
Name The name assigned of the collection.
Upload status The status of the collection upload.
Date The date and time when the collection was started.
IP Address / Host name The IP address of host name of the device.
Service Tag A unique, alphanumeric identifier that allows Dell EMC toindividually recognize each device.
Collection status The status of the collection from the device.
View Collection (for server collections only) Click to open a collection from a server in the ConfigurationViewer.
Download Collection (for collections from all other device types andmultiple device collections)
Click to download the collection as a .zip file.
NOTE: The View Collection or Download Collection option is disabled if the collection was performed by a Remote
Collector.
ExtensionsThe extensions available in SupportAssist Enterprise enables you to extend the SupportAssist Enterprise capability to many devices. Youcan use the extensions to inventory and add devices that are managed by a systems management console such as OpenManageEssentials, Microsoft System Center Operations Manager, or OpenManage Enterprise.
Two types of extensions are available in SupportAssist Enterprise:
• Adapter — An application that acts as an interface between SupportAssist Enterprise and a systems management console.• Remote Collector — A remote instance of SupportAssist Enterprise that collects and uploads system information from devices within
a specific IP address range.
Related concepts
Adapters overview
Remote Collectors overview
AdaptersThe adapter is an application that acts as an interface between SupportAssist Enterprise and systems management consoles. Thefollowing table provides information about the options displayed in the Adapters tab.
Table 63. Adapters
Field Description
Set Up Adapter Click to set up an adapter.
Edit Click to edit the details of an adapter.
Delete Click to delete an adapter.
Check box Use to select an adapter that you have set up.
SupportAssist Enterprise user interface 215

Field Description
Name The name that you have provided for the adapter and the hostname or IP address of the server where the adapter is set up.
Type The adapter type.
Managed Devices The total number of devices that are added through the adapter.
Version The version of the adapter application.
Status The status of the adapter.
The status of an adapter may be:
• Connected — SupportAssist Enterprise is able to connectsuccessfully to the adapter.
• Disconnected — SupportAssist Enterprise is unable toconnect to the adapter.
• Initial Synchronization — Initial inventory of devices inprogress.
• Periodic Synchronization — Automatic periodic inventory ofdevices is in progress.
• Manual Synchronization — Manually-initiated inventory ofdevices is in progress.
• Connection lost — The server running SupportAssistEnterprise is unable to connect to the server where theadapter is set up.
• Copy in progress — The adapter installer package is beingcopied to the system.
• Installation in progress — Installation of the adapter is inprogress.
• Validation in progress — SupportAssist Enterprise isverifying if the adapter meets the prerequisites for setting upthe adapter.
• Configuration in progress — SupportAssist Enterprise isconfiguring the settings of the adapter.
• Starting service — SupportAssist Enterprise had installed theadapter and the adapter service is started.
• Awaiting connection — SupportAssist Enterprise is waitingfor the adapter service to start.
• Connection in progress — SupportAssist Enterprise is tryingto connect to the adapter.
• Assigning Profile — The Credential Profile is being applied tothe inventoried devices. The total number of inventorieddevices and the count of devices to which the profile is appliedis also displayed.
Related tasks
Set up OpenManage Essentials adapter
Set up the Microsoft System Center Operations Manager adapter
View the adapter overview pane
View devices inventoried by the adapter
Synchronize adapter
Edit adapter
Delete adapter
Set Up OpenManage Essentials AdapterThe Set Up Adapter window allows you to add an adapter. The following table provides information about the items displayed in the SetUp Adapter window.
216 SupportAssist Enterprise user interface

Table 64. Set Up Adapter (OpenManage Essentials)
Field Description
Adapter type Use to select the type of adapter that you want to set up. Theavailable adapter types are:
• OpenManage Essentials — Select to set up the OpenManage Essentials adapter.
• System Center Operations Manager — Select to set upthe System Center Operations Manager adapter.
• OpenManage Enterprise — Select to set up theOpenManage Enterprise adapter.
Host name / IP address The host name or IP address of the server where OpenManageEssentials is installed.
Name (Optional) An optional name that you want to use for identifying the adapterin SupportAssist Enterprise.
User name The user name required to connect to the server whereOpenManage Essentials is installed.
Password The password required to connect to the server whereOpenManage Essentials is installed.
Credential Profile Use to select a Credential Profile that is required to add thedevices that are inventoried by the adapter.
Update device inventory Use to select the frequency at which the adapter must inventorydevices from the adapter. The available options are:
• Every 12 hours• Daily• Weekly• Every two weeks• Monthly
Related tasks
Set up OpenManage Essentials adapter
Set Up Microsoft System Center Operations Manager AdapterThe Set Up Adapter window allows you to add an adapter. The following table provides information about the items displayed in the SetUp Adapter window.
Table 65. Set Up Adapter (Microsoft System Center Operations Manager)
Field Description
Adapter type Use to select the type of adapter that you want to set up. Theavailable adapter types are:
• OpenManage Essentials — Select to set up theOpenManage Essentials adapter.
• System Center Operations Manager — Select to set upthe System Center Operations Manager adapter.
• OpenManage Enterprise — Select to set up theOpenManage Enterprise adapter.
Name (Optional) An optional name that you want to use for identifying the adapterin SupportAssist Enterprise.
Establish a remote connection with the management group Select this option if you are setting up the adapter on the serverhosting the Remote Console.
SupportAssist Enterprise user interface 217

Field Description
Management group Host name / IP address The host name or IP address of the server that hosts themanagement group.
User Name The user name required to connect to the server that hosts themanagement group.
Password The password required to connect to the server that hosts themanagement group.
Remote Console Host name / IP address The host name or IP address of the server that hosts the RemoteConsole.
User Name The user name required to connect to the server that hosts theRemote Console.
Password The password required to connect to the server that hosts theRemote Console.
Credential Profile Use to select a Credential Profile that is required to add thedevices that are inventoried by the adapter.
Update device inventory Use to select the frequency at which the adapter must inventorydevices from the adapter. The available options are:
• Every 12 hours• Daily• Weekly• Every two weeks• Monthly
Related tasks
Set up the Microsoft System Center Operations Manager adapter
Set Up OpenManage Enterprise adapterThe Set Up Adapter window enables you to add an adapter. The following table provides information about the items that are displayed inthe Set Up Adapter window.
Table 66. Set Up Adapter (OpenManage Enterprise)
Field Description
Adapter type Use to select the type of adapter that you want to set up. Theavailable adapter types are:
• OpenManage Essentials — Select to set up the OpenManage Essentials adapter.
• System Center Operations Manager — Select to set upthe System Center Operations Manager adapter.
• OpenManage Enterprise — Select to set up theOpenManage Enterprise adapter.
Host name / IP address The host name or IP address of the server where OpenManageEnterprise Version 3.3.1 is installed.
Name (Optional) An optional name that you want to use for identifying the adapterin SupportAssist Enterprise.
User name The user name required to connect to the server whereOpenManage Enterprise Version 3.3.1 is installed.
Password The password required to connect to the server whereOpenManage Enterprise Version 3.3.1 is installed.
Credential Profile Use to select a Credential Profile that is required to add thedevices that are inventoried by the adapter.
218 SupportAssist Enterprise user interface

Field Description
Update device inventory Use to select the frequency at which the adapter must inventorydevices from the adapter. The available options are:
• Every 12 hours• Daily• Weekly• Every two weeks• Monthly
Adapter overview paneThe adapter overview pane displays the details of an adapter and allows you to perform certain operations on that adapter. This pane isdisplayed when you select an adapter on the Adapters page.
Table 67. Adapter overview pane
Field Description
Name The name that you have provided for the adapter.
IP address The IP address or host name of the server where the adapter is setup.
Status The status of the adapter.
Sync now Click to inventory devices from the systems management console.
Last sync The date and time when the devices were last inventoried.
Adapter type The type of adapter.
OS Type The operating system running on the server where the adapter isset up.
Assigned devices The total number of devices that are added successfully throughthe adapter.
Staging devices Displays the total number of inventoried devices that are added tothe staging group. Devices may be added to the staging groupbecause they did not meet certain prerequisites.
Version The version of the adapter application.
Related tasks
View the adapter overview pane
Remote CollectorsThe Remote Collector is a remote instance of SupportAssist Enterprise that collects and uploads system information from devices within aspecific IP address range. The following table provides information about the options displayed on the Remote Collectors page.
Table 68. Remote Collectors
Field Description
Set Up Remote Collector Click to set up a Remote Collector.
Edit Click to edit the details of a Remote Collector.
Delete Click to delete a Remote Collector.
Check box Use to select a Remote Collector that you have set up.
Name The name that you have provided for the Remote Collector andthe host name or IP address of the server where the RemoteCollector is set up.
SupportAssist Enterprise user interface 219

Field Description
Managed Devices The total number of devices that are associated with the RemoteCollector.
Version The version of the Remote Collector application.
Status The status of the Remote Collector.
The status of a Remote Collector may be:
• Connected — The server where SupportAssist Enterprise isinstalled is able to connect to the server where the RemoteCollector is set up.
• Disconnected — The server where SupportAssist Enterpriseis installed is not able to connect to the server where theRemote Collector is set up.
• Connection failed — Displayed when a connection fails whileconnecting to the SupportAssist server.
• Registration failed — Displayed when a Remote Collectorfails to connect to SupportAssist Enterprise.
• Registration initiated — Displayed when the RemoteCollector connects to SupportAssist Enterprise.
• Copy in progress — The Remote Collector installer packageis being copied to the remote system.
• Validation in progress — SupportAssist Enterprise isverifying if the remote server meets the prerequisites forsetting up the Remote Collector.
• Configuration in progress — SupportAssist Enterprise isconfiguring the settings of the Remote Collector.
• Registration in progress — The server runningSupportAssist Enterprise is communicating with the RemoteCollector after the configuration is complete.
• Installation in progress — Installation of the RemoteCollector application is in progress.
• Installer not found — The Remote Collector installer file iscorrupted or deleted manually from the server runningSupportAssist Enterprise.
• Copy failed — The Remote Collector could not be copied tothe remote server.
• Installation failed — Installation of the Remote Collectorcould not be completed successfully.
• Configuration failed — SupportAssist Enterprise could notcomplete the configuring the settings of the Remote Collector.
• Validation failed — SupportAssist Enterprise could not verifyif the remote server meets the prerequisites for setting up theRemote Collector.
• Low disk space — The free hard-drive space on the serverwhere the Remote Collector is set up is less than 500 MB.
• Connection initiated — Displayed when a connection isinitiated while connecting to the SupportAssist server.
Upload Connectivity Displays the status of the internet connectivity from the remotesystem to Dell EMC.
Related tasks
Set up Remote Collector
View collections for devices associated with a Remote Collector
View the Remote Collector overview pane
View devices associated with a Remote Collector
Edit Remote Collector
Delete Remote Collector
220 SupportAssist Enterprise user interface

Set Up Remote CollectorThe Set Up Remote Collector window allows you to set up a Remote Collector. The following table provides information about the itemsdisplayed in the Set Up Remote Collector window.
Table 69. Set Up Remote Collector
Field Description
Host name / IP address The host name or IP address of the serve where you want to setup the Remote Collector.
Name (Optional) An optional name that you want to use for identifying the RemoteCollector in SupportAssist Enterprise.
User name The user name required to connect to the server where you wantto set up the Remote Collector.
Password The password required to connect to the server where you wantto set up the Remote Collector.
Hostname Select to enter a hostname expression for assigning devices to theRemote Collector.
Expression The hostname expression for assigning devices to the RemoteCollector.
IP address / range Select to enter an IP address range for assigning devices to theRemote Collector.
Add another hostname Click to open an additional hostname expression field.
IP address / range The IP address or IP address range of the devices that you want toassociate with the Remote Collector.
Add another expression Click to open an additional hostname expression field.
The remote system connects to the internet through a proxyserver
Select to enter details of the proxy server through which theremote server connects to the internet.
Host name / IP address The host name or IP address of the proxy server.
Port The port number used by the proxy server.
Requires authentication Select this option if a user name and password are required toconnect to the proxy server.
Username The user name required to connect to the proxy server.
Password The password required to connect to the proxy server.
Proxy Exclusion List The IP address range or ranges of devices to which the RemoteCollector must communicate directly and not through the proxyserver. IP address of devices that communicate through httpsprotocol must be included in the proxy exclusion list. Examples ofdevices that communicate through https protocol include iDRAC,Storage SC Series arrays, VMware ESX and ESXi, and XC Series ofWeb-scale Hyper-converged appliances.
Related concepts
Remote Collectors overview
Related tasks
Set up Remote Collector
Remote Collector overview paneThe Remote Collector overview pane displays details of a Remote Collector. This pane is displayed when you select a Remote Collector inthe Remote Collectors page.
SupportAssist Enterprise user interface 221

Table 70. Remote Collector overview pane
Field Description
Name The name that you have provided for the Remote Collector.
IP address The IP address or host name of the server where the RemoteCollector.
Status The status of the Remote Collector.
Collector Type The type of the collector.
Version The version of the Remote Collector application.
OS The operating system running on the server where the RemoteCollector is set up.
Managed devices The total number of devices associated with the Remote Collector.
Collection Range The IP address ranges that are assigned to the Remote Collector.
View all devices Click to open the Devices page where all devices that areassociated with the Remote Collector are displayed.
Related tasks
View the Remote Collector overview pane
SettingsThe Settings tab enables you to configure the options available in SupportAssist Enterprise. You can point to the Settings tab and clickthe available options to access the following pages:
• Proxy Settings — To configure the settings of the proxy server available in your environment. This setting is required only if theserver where SupportAssist Enterprise is installed connects to the internet through a proxy server.
• Preferences — To configure your preferences for the following: automatic update, collection of system information, emailnotification, recommendation report, and maintenance mode.
• Contact Information — To view and update your company's primary and secondary SupportAssist Enterprise contacts.• TechDirect Login — To view your asset information from your company's TechDirect account.• SMTP Settings — To configure the details of the SMTP server utilized by your company. This setting is applicable only if your
company utilizes an SMTP server. If you company does not utilize an SMTP server, you may not receive certain email notificationsfrom SupportAssist Enterprise.
Related reference
Proxy Settings
Preferences
Contact Information
TechDirect Login
SMTP Settings
Proxy SettingsThe Proxy Settings page enables you to configure the settings of the proxy server available in your environment.
At the top of the Proxy Settings page, the navigation trail is displayed.
NOTE: Configuring the proxy settings is required only if the server where SupportAssist Enterprise is installed connects
to the internet through a proxy server.
The following table provides information about the items displayed in the Proxy Settings page.
222 SupportAssist Enterprise user interface

Table 71. Proxy Settings
Field Description
Use proxy server Select this option to enable configuring the proxy serversettings.
Host Name / IP Address The host name or IP address of the proxy server.
Port The port number used by the proxy server.
Requires authentication Select this option if a user name and password are required toconnect to the proxy server.
User Name The user name required to connect to the proxy server.
Password The password required to connect to the proxy server.
Proxy exclusion list The IP address range or ranges of devices to whichSupportAssist Enterprise must communicate directly and notthrough the proxy server. IP address of devices thatcommunicate through https protocol must be included in theproxy exclusion list. Examples of devices that communicatethrough https protocol include iDRAC, Compellent storagearrays, VMware ESX and ESXi, and XC Series of Web-scaleHyper-converged appliances.
Related tasks
Configure proxy server settings
PreferencesThe Preferences page enables you to configure collection settings, automatic updates, recommendation report settings, andmaintenance mode.
At the top of the Preferences page, the navigation trail is displayed. You can click Home on the navigation trail to go to the Devices page.
The following table provides information about the options displayed in the Preferences page.
Table 72. Preferences
Field Description
Automated Tasks
Automatically update the following features inSupportAssist Enterprise:
Displays options to automatically download and install the latestupdates, when they are available. The download and installation ofthe updates occur in the background. If a problem occurs duringthe update, an appropriate error message will be displayed.
NOTE: It is recommended that you select automaticupdates to ensure that SupportAssist Enterprise is up-to-date with the latest features and enhancements.
SupportAssist Enterprise application Select this option to automatically download and install theSupportAssist Enterprise application update whenever it isavailable.
Policy files Select this option to automatically download and install the policyfiles update whenever it is available.
Product support files Select this option to automatically download and install the devicesupport update whenever it is available.
Adapter Upgrade Select this option to automatically download and install the adapterupdate whenever it is available.
Automatically collect system state information:
SupportAssist Enterprise user interface 223

Field Description
Starting from day N of every month at 11 PM Select this option to automatically collect system state informationfrom each device type on a randomly determined day of everymonth at 11 PM.
When a new support case is created Select this option to automatically start a system log collectionwhen a new support case is generated.
Automatically upload:
System state information collected from devices to DellEMC
Select to automatically upload collections to Dell EMC.
Automatically start inventory validation:
Starting from day N of every month at 11 PM Select this option to automatically get the validation informationfrom each device type on a randomly determined day of everymonth at 11 PM.
API Interface
Enable API Interfaces for SupportAssist Enterprise Select this option to enable API interfaces for SupportAssistEnterprise.
Email Settings
Receive email notification when a new support case isopened
Select this option to receive an email notification when a newsupport case is opened.
Preferred email Language Select the preferred language for email notifications.
Email Notifications Click to expand the email notifications list:
• Remote Collector Connectivity Status• Adapter Connectivity Status• Remote Collector Upload Connectivity Status• Connectivity Test• Maintenance Mode• Device Validation Status• Periodic Inventory Validation• Staging and Inactive Devices• Auto Dispatch Preferences
Collection Data Settings
Server / Hypervisor • Select Software to collect software-related information fromthe device.
• Select System Logs to collect logs from the device.• Select Smart Logs to collect smart CTL logs from the device.
NOTE: For information about the logs that are collectedby SupportAssist Enterprise, see the SupportAssistEnterprise Version 2.0.40 Reportable Items document atwww.dell.com/serviceabilitytools.
Storage: Fluid File System (FluidFS) Select Logs to collect logs from the device.
Storage: Peer Storage (PS) / EqualLogic • Select Diagnostic Data (Diags collection) to collectdiagnostic information from the device.
• Select Inter Array Connectivity Test (Ping Test) to collectthe ping test result from the device.
Storage: PowerVault Select Support Data to collect support data from the device.
Software: HIT Kit/VSM for VMware Select Advanced Logs to collect logs from the device.
Solution: Nutanix Select Logs to collect logs from the device.
224 SupportAssist Enterprise user interface

Field Description
Virtual Machine Select System Logs to collect logs from the device.
Device Identification Information Settings
Include device identification details in the information thatis sent to Dell
Select this option to allow sending identity information to Dell EMC.NOTE: If you clear this option, settings for the collectionof logs and diagnostic data under Collection DataSettings are automatically disabled.
Maintenance Mode
Temporarily suspend case generation activity (e.g., forpurposes of downtime, external troubleshooting, etc.)
Select this option to set all devices to maintenance mode. While inmaintenance mode, no new support cases are opened.
Related tasks
Enable or disable automatic updates
Configure email notification settings
Enable or disable the automatic collection of system information on case creation
Enable or disable the periodic collection of system information from all devices
Enable or disable the collection of identity information
Enable or disable global-level maintenance mode
Contact InformationThe Contact Information page enables you to view and edit the primary and secondary contact information. The following table providesinformation about the items that are displayed in the Contact Information page.
At the top of the Contact Information page, the navigation trail is displayed.
NOTE: It is mandatory to provide information for all fields, except the alternate phone number.
Table 73. Contact Information
Field Description
Company name The name of your company.
Primary Select this option to view or edit the primary contactinformation.
Secondary Select this option to view or edit the secondary contactinformation.
First name The first name of the primary or secondary contact.
Last name The last name of the primary or secondary contact.
Phone number The phone number of the primary or secondary contact.
Alternate phone number The alternate phone number of the primary or secondarycontact.
Email address The email address of the primary or secondary contact.
Preferred contact method Select the preferred contact method. The available options are:
• Phone• Email
Preferred contact hours The preferred hours when Technical Support can contact yourprimary or secondary contact in case of any issues with themonitored devices.
Time Zone The time zone of the primary or secondary contact.
SupportAssist Enterprise user interface 225

Field Description
Parts Replacement Preferences for Dell Servers
I want Dell server replacement parts shipped automatically Select this check box if you agree to have Dell EMC contactyour company and send replacement parts.
Primary Shipping Contact
First name The first name of the primary contact who will be responsiblefor receiving the dispatched part.
Last name The last name of the primary contact who will be responsible forreceiving the dispatched part.
Phone number The phone number of the primary contact who will beresponsible for receiving the dispatched part.
Email address The email address of the primary contact who will be responsiblefor receiving the dispatched part.
Preferred contact hours The preferred hours when Technical Support can contact yourprimary or secondary contact in case of any issues with themonitored devices.
Country / Territory Select the country.
Shipping address The address where a replacement component must bedispatched.
City / Town
State / Province / Region
Zip / Postal code
Time Zone The time zone of the primary or secondary contact.
Dispatch Notes Type and specific dispatch related information.
I want a technician to replace my parts onsite (if included inmy service plan)
Select this option if you want an onsite technician to replace thedispatched hardware component.
CNPJ
IE
For Brazil only: The CNPJ and IE number of your contact.
Secondary Shipping Contact
First name The first name of the secondary contact who will be responsiblefor receiving the dispatched part.
Last name The last name of the secondary contact who will be responsiblefor receiving the dispatched part.
Phone number The phone number of the secondary contact who will beresponsible for receiving the dispatched part.
Email address The email address of the secondary contact who will beresponsible for receiving the dispatched part.
Related tasks
View and update the contact information
View and update parts dispatch information
TechDirect LoginThe TechDirect Integration page allows you to access reports and manage SupportAssist alerts in TechDirect. The following table providesinformation about the items displayed in the TechDirect Integration page.
At the top of the TechDirect Integration page, the navigation trail is displayed.
226 SupportAssist Enterprise user interface

Table 74. TechDirect Login
Field Description
Learn more about TechDirect Opens the TechDirect website in a new web browser window.
Sign In Click to sign in to TechDirect.
OTP The one-time password required to verify the TechDirectaccount.
Related concepts
Signing in to TechDirect
SMTP SettingsThe SMTP Settings page enables you to configure the SMTP server (email server) settings. If your company utilizes an SMTP server, DellEMC recommends that you configure the SMTP server settings.
At the top of the SMTP Settings page, the navigation trail is displayed.
The following table provides information about the items displayed in the SMTP Settings page.
Table 75. SMTP Settings
Field Description
Use SMTP server Select this option to enable configuring the email serversettings.
Host Name / IP Address The host name or IP address of the email server.
Port The port number used by the email server.
Requires authentication Select this option if a user name and password are required toconnect to the email server.
User Name The user name required to connect to the email server.
Password The password required to connect to the email server.
Related tasks
Configure SMTP server settings
Network Connectivity TestThe Network Connectivity Test page allows you to test SupportAssist Enterprise connectivity to the dependent network resources.
At the top of the Network Connectivity Test page, the navigation trail is displayed.
The following table describes the fields displayed on the Network Connectivity Test page.
Table 76. Connectivity Test
Field Description
Check box Select the appropriate check boxes to test the connectivity status you want to verify.
Test The dependent network resources that you can test. The available options are:
• Internet Connectivity• SMTP Server• Dell EMC FTP Server• Dell EMC Upload Server• SupportAssist Enterprise Server
Description Describes the purpose of each test.
SupportAssist Enterprise user interface 227

Field Description
Connectivity Status Displays an icon and a message that indicates the connectivity status. The possible statusesare:
• Not Configured (applicable only for the SMTP Server test) — The SMTP serversettings are not configured in SupportAssist Enterprise. If your company utilizes an SMTPserver (email server), it is recommended that you configure SMTP Settings inSupportAssist Enterprise.
• In Progress — The connectivity test is in progress.
• Connected — The connectivity test is successful.
• Error — The connectivity test is unsuccessful.
NOTE: The Error status is displayed as a link that you can click to view adescription of the issue and the possible resolution steps.
Last Verified The date and time the connectivity status was last verified.
Test Connectivity Click to perform the selected connectivity tests.
Related tasks
Perform the connectivity test
SupportAssist Enterprise testThe SupportAssist Enterprise test page enables you to verify the ability of SupportAssist Enterprise to run specific tasks.
At the top of the SupportAssist Enterprise test page, the navigation trail is displayed. You can click Home on the navigation trail to go tothe Devices page.
The following table describes the fields that are displayed in the SupportAssist Enterprise test page.
Table 77. SupportAssist Enterprise test
Field Description
Check box Select the appropriate check box to test the task that you want to verify.
Test The feature that you can test. The available option is Case Creation, which enables you toverify the ability of SupportAssist Enterprise to create a support case with Technical Support.
Description Describes the purpose of the test.
Status Displays an icon and a message that indicates the test status. The possible statuses are:
• Not validated — The support case creation task has not been tested.
• In Progress — The support case creation test is in progress.
• Ready to Create Cases — SupportAssist Enterprise can create casessuccessfully.
• Unable to Create Case — SupportAssist Enterprise cannot create support casesbecause of a possible issue with the support case creation workflow.
Last Verified The date and time the status was last verified.
Run Tests Click to perform the selected test.
228 SupportAssist Enterprise user interface

Related tasks
Test the case creation capability
SupportAssist Enterprise user interface 229

Error code appendixThe following table lists the error codes, error messages, and possible resolutions.
Table 78. Error code appendix
Error code Error message Possible resolution
3000_13000_23000_33000_43000_5
An unexpected error occurred during the installation ofOpenManage Server Administrator (OMSA) ondevice_name.
Do one of the following:
• Select the device in the Devices page, and in thedevice overview pane, select Install / UpgradeOMSA from the Tasks list.
• Manually install the recommended version of OMSA.To identify the recommended version of OMSA, seethe SupportAssist Enterprise Version 2.0.40 SupportMatrix at www.dell.com/serviceabilitytools.
If the problem persists, contact Technical Support forassistance.
3000_63000_93000_11
A component required for installing OpenManage ServerAdministrator (OMSA) could not be downloaded.
1. Make sure that the system has internet connectivity.2. Perform the Connectivity Test and ensure that the
system has connectivity to the dependent resources.3. Select the device in the Devices page, and in the
device overview pane, select Install / UpgradeOMSA from the Tasks list.
If the problem persists, contact Technical Support forassistance.
3000_7 Installation of OpenManage Server Administrator (OMSA)is not supported on the operating system running ondevice_name.
Do one of the following:
• Select the device in the Devices page, and in thedevice overview pane, select Install / UpgradeOMSA from the Tasks list.
• Manually install the recommended version of OMSA.To identify the recommended version of OMSA, seethe SupportAssist Enterprise version 2.0.40 SupportMatrix at www.dell.com/serviceabilitytools.
If the problem persists, contact Technical Support forassistance.
3000_8 An unexpected error occurred during the installation ofOpenManage Server Administrator (OMSA) ondevice_name.
Try to repair the SupportAssist Enterprise installation:
1. Open Control Panel.2. In Programs, click Uninstall a Program.3. In the Programs and Features window, select Dell
SupportAssist and click Change.4. In the Welcome to Dell SupportAssist Enterprise
Installer window, click Next.5. Click Repair and then click Install.
If the problem persists, contact Technical Support forfurther assistance.
3000_103000_123000_133000_14
An unexpected error occurred during the installation ofOpenManage Server Administrator (OMSA) ondevice_name.
Do one of the following:
• Select the device in the Devices page, and in thedevice overview pane, select Install / UpgradeOMSA from the Tasks list.
23
230 Error code appendix
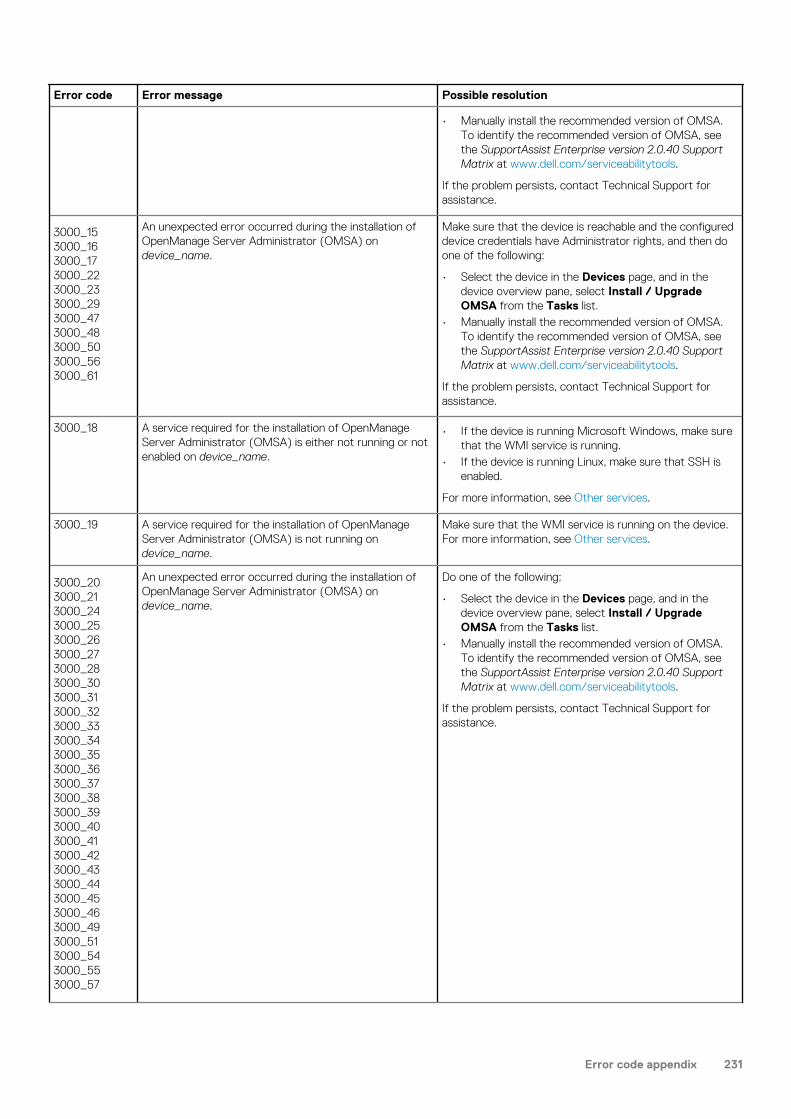
Error code Error message Possible resolution
• Manually install the recommended version of OMSA.To identify the recommended version of OMSA, seethe SupportAssist Enterprise version 2.0.40 SupportMatrix at www.dell.com/serviceabilitytools.
If the problem persists, contact Technical Support forassistance.
3000_153000_163000_173000_223000_233000_293000_473000_483000_503000_563000_61
An unexpected error occurred during the installation ofOpenManage Server Administrator (OMSA) ondevice_name.
Make sure that the device is reachable and the configureddevice credentials have Administrator rights, and then doone of the following:
• Select the device in the Devices page, and in thedevice overview pane, select Install / UpgradeOMSA from the Tasks list.
• Manually install the recommended version of OMSA.To identify the recommended version of OMSA, seethe SupportAssist Enterprise version 2.0.40 SupportMatrix at www.dell.com/serviceabilitytools.
If the problem persists, contact Technical Support forassistance.
3000_18 A service required for the installation of OpenManageServer Administrator (OMSA) is either not running or notenabled on device_name.
• If the device is running Microsoft Windows, make surethat the WMI service is running.
• If the device is running Linux, make sure that SSH isenabled.
For more information, see Other services.
3000_19 A service required for the installation of OpenManageServer Administrator (OMSA) is not running ondevice_name.
Make sure that the WMI service is running on the device.For more information, see Other services.
3000_203000_213000_243000_253000_263000_273000_283000_303000_313000_323000_333000_343000_353000_363000_373000_383000_393000_403000_413000_423000_433000_443000_453000_463000_493000_513000_543000_553000_57
An unexpected error occurred during the installation ofOpenManage Server Administrator (OMSA) ondevice_name.
Do one of the following:
• Select the device in the Devices page, and in thedevice overview pane, select Install / UpgradeOMSA from the Tasks list.
• Manually install the recommended version of OMSA.To identify the recommended version of OMSA, seethe SupportAssist Enterprise version 2.0.40 SupportMatrix at www.dell.com/serviceabilitytools.
If the problem persists, contact Technical Support forassistance.
Error code appendix 231

Error code Error message Possible resolution
3000_583000_59
3000_523000_53
An unexpected error occurred during the installation ofOpenManage Server Administrator (OMSA) ondevice_name.
Make sure that port 22 is open and SSH is enabled on thesystem, and then do one of the following:
• Select the device in the Devices page, and in thedevice overview pane, select Install / UpgradeOMSA from the Tasks list.
• Manually install the recommended version of OMSA.To identify the recommended version of OMSA, seethe SupportAssist Enterprise version 2.0.40 SupportMatrix at www.dell.com/serviceabilitytools.
If the problem persists, contact Technical Support forassistance.
3000_60 An unexpected error occurred during the installation ofOpenManage Server Administrator (OMSA) ondevice_name.
• Verify if the device is reachable.• Verify if the configured device credentials have
Administrator rights.• Select the device in the Devices page, and in the
device overview pane, select Install / UpgradeOMSA from the Tasks list.
• Manually install the recommended version of OMSA.To identify the recommended version of OMSA, seethe SupportAssist Enterprise version 2.0.40 SupportMatrix at www.dell.com/serviceabilitytools.
If the problem persists, contact Technical Support forassistance.
3000_62 The time allowed for OMSA installation has expired. Log on to the device and verify if OMSA is installed. IfOMSA is not installed, select the device, and in the deviceoverview pane, select Install / Upgrade OMSA from theTasks list. If the problem persists, contact TechnicalSupport for assistance.
4000_500 This device has generated an unusual number of alertsexceeding the set threshold limit. SupportAssistEnterprise has temporarily placed it under maintenancemode. During this period, SupportAssist Enterprise willnot process any alerts from this device.
Ensure that the health of this device is restored for optimalSupportAssist Enterprise operations.
5000_1 SNMP settings of the device could not be configuredbecause of an unexpected error.
You must either try to configure the SNMP settingsthrough the Tasks > Configure SNMP option ormanually configure the SNMP settings. For instructions tomanually configure the SNMP settings, Configuring thealert destination of an iDRAC by using the web interface.
5000_2 SNMP settings of the device could not be configuredbecause the Integrated Dell Remote Access Controller(iDRAC) does not have the required license installed.
Make sure that iDRAC has an Enterprise or Express licenseinstalled, and then try to configure the SNMP settingsthrough the Tasks > Configure SNMP option.
5000_3 SNMP settings of the device could not be configuredbecause all configurable fields of the Integrated DellRemote Access Controller (iDRAC) are occupied.
You must manually configure the SNMP settings of thedevice. For instructions to manually configure the SNMPsettings, see Configuring the alert destination of an iDRACby using the web interface.
5000_4 SNMP settings of the device could not be configuredbecause the credentials you have entered do not havethe required privileges.
Make sure that the credentials have either Administratoror Operator privileges on the Integrated Dell RemoteAccess Controller (iDRAC), and then try to configure theSNMP settings through the Tasks > Configure SNMPoption on the device overview pane.
232 Error code appendix

Error code Error message Possible resolution
5000_5 SNMP settings of the device could not be configuredbecause an attempt to connect to the Integrated DellRemote Access Controller (iDRAC) was unsuccessful.
Make sure that iDRAC is reachable from the system onwhich SupportAssist Enterprise is installed, and then try toconfigure the SNMP settings through the Tasks >Configure SNMP option on the device overview pane.
5000_6 SNMP settings of the device could not be configuredbecause the credentials you have entered are invalid.
Make sure that the credentials are valid, and then try toconfigure the SNMP settings through the Tasks >Configure SNMP option on the device overview pane. Ifthe problem persists, contact your system administratorfor assistance.
5000_75000_8
SNMP settings of the device could not be configuredbecause of an unexpected error.
You must manually configure the SNMP settings of thedevice. For instructions to manually configure the SNMPsettings, see Configuring the alert destination of an iDRACusing the web interface.
5000_9 SNMP settings of the device could not be configuredbecause the user account does not have the sufficientprivileges on the device.
You must manually configure the SNMP settings of thedevice. For instructions to manually configure the SNMPsettings, see Manually configuring the alert destination(Windows) or Manually configuring the alert destination(Linux).
5000_10 SNMP settings of the device could not be configuredbecause the hostname/IP address of the system onwhich SupportAssist Enterprise is installed was notprovided.
If you ran the script file to configure the SNMP settings,make sure that you type the IP address of the system onwhich SupportAssist Enterprise is installed as an argument.
5000_11 SNMP settings of the device could not be configuredbecause the SNMP service is not installed on the device.
Manually install the SNMP service on the device, and thentry to configure the SNMP settings through the Tasks >Configure SNMP option on the device overview pane.
5000_12 SNMP settings of the device could not be configuredbecause SupportAssist Enterprise does not support theoperating system running on the device.
For information on the operating systems supported bySupportAssist Enterprise, see the SupportAssist EnterpriseVersion 2.0.40 Support Matrix at www.dell.com/serviceabilitytools.
5000_13 SNMP settings of the device could not be configuredbecause the SNMP service has not started.
Manually start the SNMP service on the device, and thentry to configure the SNMP settings through the Tasks >Configure SNMP option.
5000_14 SNMP settings of the device could not be configuredbecause the WMI service is disabled.
Manually start the WMI service on the device, and then tryto configure the SNMP settings through the Tasks >Configure SNMP option on the device overview pane.
5000_15 SupportAssist Enterprise has configured the SNMPsettings successfully, but the automated test to verifythat the SNMP settings was unsuccessful.
To resolve the issue, verify the network settings and makesure that the SNMP port (162) is open.
6000_016000_116000_126000_136000_146000_24
SupportAssist Enterprise is unable to clear System EventLog from device_name because of a technical error.
To resolve this issue, contact Technical Support forassistance.
6000_02 SupportAssist Enterprise is unable to clear System EventLog from device_name because the device is notreachable.
Make sure that the device is reachable from the serverrunning SupportAssist Enterprise and then retry theoperation.
6000_03 SupportAssist Enterprise is unable to clear System EventLog from device_name because the host name of thedevice could not be resolved to an IP address.
If the device is a member of a domain, make sure that thehost name of the device is added in the DNS server, andthen retry the operation.
6000_46000_5
SupportAssist Enterprise is unable to clear System EventLog from device_name because of an internal error.
To resolve this issue, contact Technical Support forassistance.
Error code appendix 233

Error code Error message Possible resolution
6000_66000_86000_9
SupportAssist Enterprise is unable to clear System EventLog from device_name because an attempt to connectto the device is unsuccessful.
Make sure that WMI service is running on the device andthen retry the operation.
6000_76000_156000_196000_216000_23
SupportAssist Enterprise is unable to clear System EventLog from device_name because the credentials of thedevice are either incorrect or do not have the requiredprivileges.
• Make sure that SupportAssist Enterprise is updatedwith the correct user name and password of thedevice.
• Make sure that the user account has administrator orroot privileges on the device.
6000_10 SupportAssist Enterprise is unable to clear System EventLog from device_name because the credentials of thedevice do not have the required privileges.
Make sure that the user account has administrator or rootprivileges on the device and then retry the operation.
6000_16 SupportAssist Enterprise is unable to clear System EventLog from device_name because of an unknown error.
To resolve this issue, contact Technical Support forassistance.
6000_17 SupportAssist Enterprise is unable to clear System EventLog from device_name because the device does notsupport this operation.
Not applicable.
6000_186000_206000_22
SupportAssist Enterprise is unable to clear System EventLog from device_name because an attempt to connectto the device is unsuccessful.
Make sure that the SSH service is running on the deviceand then retry the operation.
SA-0001 SupportAssist Enterprise is unable to import devicesbecause the device count is more than 300.
Make sure that the device count is below 300 and thenretry the operation.
SA-0008 The device import operation is canceled. Not applicable.
SA-0012 SupportAssist Enterprise is unable to add the devicesbecause the entered host name or IP address, and devicetype are incorrect.
Retry adding the device with the correct host name or IPaddress, and device type.
SA-0005 SupportAssist Enterprise is unable to add thedevice_name because an attempt to connect to thedevice is unsuccessful.
Make sure that both the system running SupportAssistEnterprise and the device you are trying to add areconnected to the network, and then retry adding thedevice.
SA-0010 SupportAssist Enterprise is unable to add thedevice_name because the entered host name or IPaddress is incorrect.
Retry adding the device with the correct host name or IPaddress.
SA-0015 SupportAssist Enterprise is unable to add thedevice_name because an unknown error occurred whilediscovering the device.
Verify the following and then retry adding the device:
• Make sure that the device is supported bySupportAssist Enterprise. For the list of supporteddevice models, see the SupportAssist EnterpriseVersion 2.0.40 Support Matrix at www.dell.com/serviceabilitytools.
• Make sure that the user account has administrator/root privileges.
SA-0020 SupportAssist Enterprise is unable to add thedevice_name because the device is already added.
Not applicable.
SA-0025 SupportAssist Enterprise is unable to add thedevice_name because of an unknown error.
Verify if the device is supported by SupportAssistEnterprise. For the list of supported device models, see theSupportAssist Enterprise Version 2.0.40 Support Matrix atwww.dell.com/serviceabilitytools. If the problem persists,contact Technical Support for assistance.
SA-0030 SupportAssist Enterprise is unable to add thedevice_name because the User Name or Password isincorrect.
Verify the device information, ensure that the useraccount has administrator/root privileges, and then retry
234 Error code appendix

Error code Error message Possible resolution
adding the device. If the problem persists, contact yournetwork administrator for assistance.
SA-0035 SupportAssist Enterprise is unable to add thedevice_name because the enable password is notprovided.
Enter the enable password and then retry adding thedevice.
SA-0040 SupportAssist Enterprise is unable to add thedevice_name because the name is already in use byanother device.
Retry adding the device with any other name.
SA-0045 Identification or cancellation for this device is already inprogress.
Not applicable.
SA-0050 SupportAssist Enterprise is unable to add thedevice_name because of an unknown error.
Verify if the device is supported by SupportAssistEnterprise. For the list of supported device models, see theSupportAssist Enterprise Version 2.0.40 Support Matrix atwww.dell.com/serviceabilitytools.
SA-0055 SupportAssist Enterprise is unable to add thedevice_name because the device is not supported.
For the list of supported device models, see theSupportAssist Enterprise Version 2.0.40 Support Matrix atwww.dell.com/serviceabilitytools.
SA-0060 SupportAssist Enterprise is unable to add thedevice_name because a required file has either beendeleted or moved.
Restart the Dell SupportAssist service on the systemrunning SupportAssist Enterprise, and then retry addingthe device.
SA-0065 SupportAssist Enterprise is unable to add thedevice_name because the entered credentials do nothave superuser privileges.
Enter the credentials that have superuser privileges, andthen retry adding the device.
SA-0070 Installation of OpenManage Server Administrator (OMSA)is not supported on this device.
Not applicable.
SA-0075 SupportAssist Enterprise has detected that OpenManageServer Administrator (OMSA) is not installed on thedevice. Installing OMSA is required to generate alerts forhardware events that occur on the device.
Not applicable.
SA-0080 SupportAssist Enterprise has detected that theOpenManage Server Administrator (OMSA) services arenot running on the device.
For optimal SupportAssist Enterprise capability, you mustrestart the OMSA services.
SA-0085 SupportAssist Enterprise has detected that OpenManageServer Administrator (OMSA) version x.x is installed onthe device.
For optimal SupportAssist Enterprise capability, it isrecommended that you upgrade OMSA to version x.x.
SA-0090 SupportAssist Enterprise has detected that OpenManageServer Administrator (OMSA) version x.x is installed onthe device.
It is recommended that you download and install OMSAversion x.x on the device.
SA-0095 SupportAssist Enterprise is unable to verify the OMSAversion installed on the device.
To resolve the issue, see Unable to verify OMSA version.
SA-0100 The recommended version of OpenManage ServerAdministrator (OMSA) is already installed on the device.
Not applicable.
SA-0105 SupportAssist Enterprise monitors the device through theIntegrated Dell Remote Access Controller (iDRAC).Therefore, installation or upgrade of OpenManage ServerAdministrator (OMSA) is not required.
Not applicable.
SA-0110 SupportAssist Enterprise is unable to add thedevice_name because it does not have a valid license.
Make sure that the iDRAC has a valid Enterprise orExpress license, and then retry the operation.
SA-0115 SupportAssist Enterprise is unable to add thedevice_name because the operating system is notsupported.
Not applicable.
Error code appendix 235

Error code Error message Possible resolution
SA-0120 SupportAssist Enterprise is unable to add the devicebecause a required service is disabled on thedevice_name.
Make sure that the required service is running on thedevice, and then retry adding the device. For informationon the required service, see Other services.
SA-0125 SupportAssist Enterprise is unable to add thedevice_name because a response was not receivedwithin the predefined time limit.
Try adding the device again. For additional troubleshootinginformation, see Unable to add the device.
SA-0130 SupportAssist Enterprise is unable to add thedevice_name because the SSL encryption level of thedevice is set to 256 bit or higher.
For troubleshooting steps, see Unable to add the device.
SA-0135 SupportAssist Enterprise is unable to add thedevice_name because the device type that you selectedis incorrect.
Ensure that you select the correct device type and thentry again.
SA-0140 SupportAssist Enterprise is unable to add thedevice_name because a connection to the device wasunsuccessful.
Perform the following:
• Ensure that the required ports are open on the device.For information on the required ports, see theSupportAssist Enterprise Version 2.0.40 User's Guideat www.dell.com/serviceabilitytools.
• Ensure that you have selected the correct device type.Verify if the device is supported by SupportAssistEnterprise. For the list of supported device models, seethe SupportAssist Enterprise Version 2.0.40 SupportMatrix at www.dell.com/serviceabilitytools.
SA-0145 SupportAssist Enterprise is unable to add thedevice_name because the device credentials were notprovided.
Enter the device credentials and then try again.
SA-0150 SupportAssist Enterprise is unable to add thedevice_name because the device credentials were eithernot provided or incorrectly provided.
1. Enter the device credentials.2. Ensure that the device credentials are correct.
SA-0155 SupportAssist Enterprise is unable to add thedevice_name because it is a Storage PS Series memberIP address.
Try adding the device again with the Peer Storage PSSeries group IP address.
SA-0160 The IP address that you have entered is a Dell EMC PeerStorage/Storage PS Series member IP address.
Ensure that you add the device by using the group IPaddress.
SA-1005 SupportAssist Enterprise is unable to edit the credentialsof the device_name because an attempt to connect tothe device is unsuccessful.
Make sure that both the system running SupportAssistEnterprise and the device are connected to the network,and then retry the operation.
SA-1010 SupportAssist Enterprise is unable to edit the credentialsof the device_name because of an unexpected error.
Verify the following and then retry editing the devicecredentials:
• Make sure that the required services are running onthe device. For information on the required services,see the Online Help.
• Make sure that the entered credentials haveadministrator or root privileges.
SA-1015 SupportAssist Enterprise is unable to edit the credentialsof the device_name because the user name or passwordis incorrect.
Verify the user name and password, ensure that the useraccount has administrator/root privileges, and try again. Ifthe problem persists, contact your network administratorfor assistance.
SA-1025 SupportAssist Enterprise is unable to edit the credentialsof the device_name because the entered it is already inuse by another device.
Enter any other name, and then retry editing the devicecredentials.
236 Error code appendix

Error code Error message Possible resolution
SA-1030 SupportAssist Enterprise is unable to edit the devicecredentials because the entered credentials do not havesuperuser rights.
Enter the credentials that have superuser rights, and thenretry saving the device credentials.
SA-1035 SupportAssist Enterprise is unable to update the devicecredentials because a required service is disabled on thedevice.
Make sure that the required services are running on thedevice, and then retry editing the device credentials. Forinformation on the required services, see Other services.
SA-1040 SupportAssist Enterprise is unable to edit the credentialsof the device_name because the SSL encryption level ofthe device is set to 256 bit or higher.
For troubleshooting steps, see Unable to edit devicecredentials.
SA-0165SA-1045
SupportAssist Enterprise is unable to edit the credentialsof the device because an attempt to connect to thedevice is unsuccessful.
Perform the following:
1. Ensure that the FTP port is open.2. Enter the correct device credentials.3. If the problem persists, contact your network
administrator for assistance.
SA-2000 SupportAssist Enterprise is unable to establishconnections required to auto create cases with TechnicalSupport.
Perform the connectivity test and ensure that the internetconnectivity is successful.
SA-2001SA-2002SA-2003SA-2004
SupportAssist Enterprise is unable to establishconnections required to auto create cases with TechnicalSupport.
Not applicable.
SA-4015SA-4020SA-4025SA-4030SA-4035SA-4040SA-4045SA-4050SA-4055SA-4060SA-4065SA-4070SA-4071SA-4072
SupportAssist Enterprise is unable to collect systeminformation from the device_name because of anunknown error.
SA-4073SA-4074
SupportAssist Enterprise is unable to package the systeminformation collected from the device_name because ofan unknown error.
To retry collecting the system information, select thedevice and click Start Collection. If the problem persists,contact Technical Support for assistance.
SA-4075SA-4080
SupportAssist Enterprise is unable to collect systeminformation from the device_name because an attemptto connect to the device is unsuccessful.
• Make sure that WMI service is running on the device.• To retry collecting the system information, select the
device and click Start Collection.
SA-4085SA-4090
SupportAssist Enterprise is unable to collect systeminformation from the device_name because an attemptto connect to the device is unsuccessful.
• Make sure that WS-Man service is running on thedevice.
• To retry collecting the system information, select thedevice and click Start Collection.
SA-4110SA-4115SA-4120
SupportAssist Enterprise is unable to collect systeminformation from the device_name because an attemptto connect to the device is unsuccessful.
• Make sure that SNMP service is running on the device.• To retry collecting the system information, select the
device and click Start Collection.
SA-4125SA-4130
SupportAssist Enterprise is unable to collect systeminformation from the device_name because an attemptto connect to the device is unsuccessful.
• Make sure that Symbol SDK service is running on thedevice.
Error code appendix 237

Error code Error message Possible resolution
• To retry collecting the system information, select thedevice and click Start Collection.
SA-4135SA-4140
SupportAssist Enterprise is unable to collect systeminformation from the device_name because an attemptto connect to the device is unsuccessful.
• Make sure that vSphere SDK service is running on thedevice.
• To retry collecting the system information, select thedevice and click Start Collection.
SA-4145SA-4150
SupportAssist Enterprise is unable to collect systeminformation from the device_name because an attemptto connect to the device is unsuccessful.
• Make sure that REST API service is running on thedevice.
• To retry collecting the system information, select thedevice and click Start Collection.
SA-4095SA-4100SA-4105
SupportAssist Enterprise is unable to collect systeminformation from the device_name because an attemptto connect to the device is unsuccessful.
• Make sure that the SSH service is running on thedevice.
• To retry collecting the system information, select thedevice and click Start Collection.
SA-4155 SupportAssist Enterprise is unable to collect systeminformation from the device_name because the device isnot reachable.
• Make sure that the device is reachable from the serverrunning SupportAssist Enterprise.
• To retry collecting the system information, select thedevice and click Start Collection.
SA-4160 SupportAssist Enterprise is unable to collect systeminformation from the device_name because the IPaddress of the device is invalid.
• Make sure that SupportAssist Enterprise is updatedwith the correct IP address of the device.
• To retry collecting the system information, select thedevice and click Start Collection.
SA-4165 SupportAssist Enterprise is unable to collect systeminformation from the device_name because the downloadof a certificate file could not be completed successfully.
• Verify the firewall and network settings to make surethat download of the certificate file is not blocked.
• To retry collecting the system information, select thedevice and click Start Collection.
SA-4170SA-4175
SupportAssist Enterprise is unable to collect systeminformation from the device_name because thecredentials of the device are either incorrect or do nothave the required privileges.
• Make sure that SupportAssist Enterprise is updatedwith the correct user name and password of thedevice.
• Make sure that the user account has administrator orroot privileges on the device.
• To retry collecting the system information, select thedevice and click Start Collection.
SA-4180 SupportAssist Enterprise is unable to collect systeminformation from the device_name because the device isnot supported.
For the list of supported device models, see theSupportAssist Enterprise Version 2.0.40 Support Matrix atwww.dell.com/serviceabilitytools.
SA-4185 SupportAssist Enterprise is unable to collect systeminformation from the device_name because of anattempt to connect to the device is unsuccessful.
• Make sure SupportAssist Enterprise is updated withthe credentials of a user account that has rootprivileges. See Configuring sudo access forSupportAssist Enterprise (Linux).
• To retry collecting the system information, select thedevice and click Start Collection.
SA-4190 SupportAssist Enterprise is unable to gather systeminformation from the device_name because the SSLencryption level of the device is set to 256 bit or higher.
For troubleshooting steps, see Unable to gather systeminformation.
SA-4500 SupportAssist Enterprise is unable to send the collectedsystem information from the device_name because thereceiving server hosted by Dell EMC is unreachable.
• To retry collecting the system information, select thedevice and click Start Collection.
238 Error code appendix
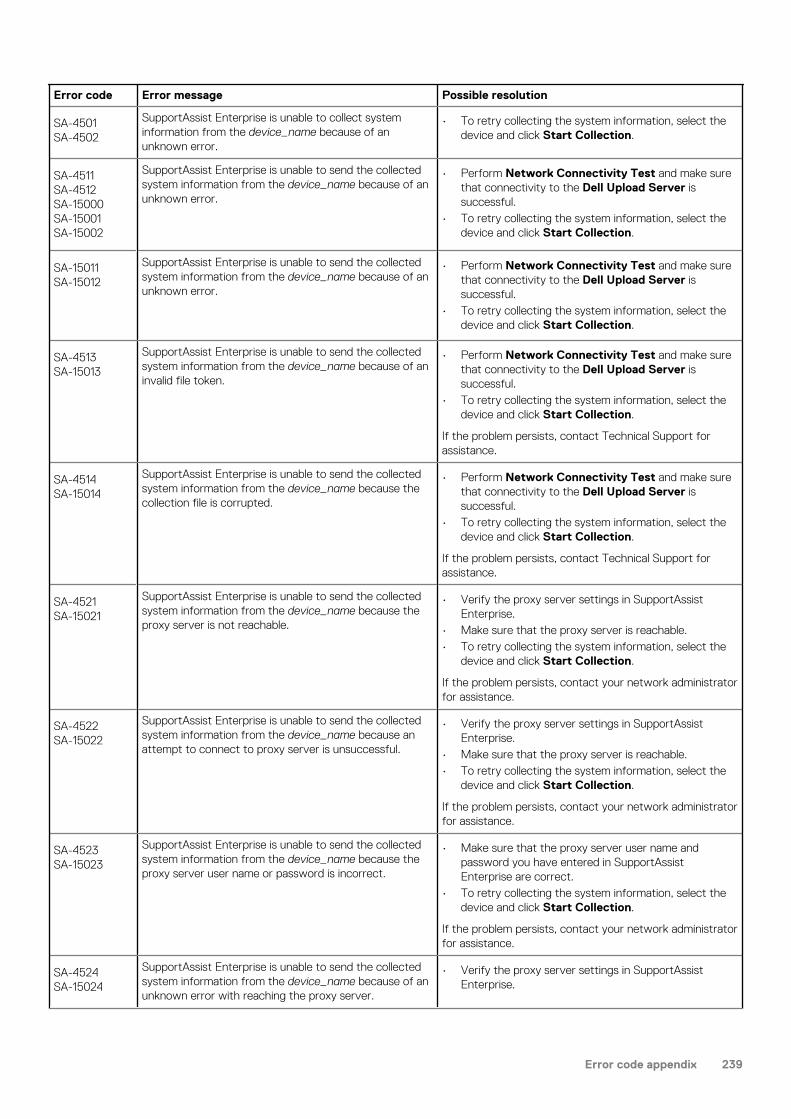
Error code Error message Possible resolution
SA-4501SA-4502
SupportAssist Enterprise is unable to collect systeminformation from the device_name because of anunknown error.
• To retry collecting the system information, select thedevice and click Start Collection.
SA-4511SA-4512SA-15000SA-15001SA-15002
SupportAssist Enterprise is unable to send the collectedsystem information from the device_name because of anunknown error.
• Perform Network Connectivity Test and make surethat connectivity to the Dell Upload Server issuccessful.
• To retry collecting the system information, select thedevice and click Start Collection.
SA-15011SA-15012
SupportAssist Enterprise is unable to send the collectedsystem information from the device_name because of anunknown error.
• Perform Network Connectivity Test and make surethat connectivity to the Dell Upload Server issuccessful.
• To retry collecting the system information, select thedevice and click Start Collection.
SA-4513SA-15013
SupportAssist Enterprise is unable to send the collectedsystem information from the device_name because of aninvalid file token.
• Perform Network Connectivity Test and make surethat connectivity to the Dell Upload Server issuccessful.
• To retry collecting the system information, select thedevice and click Start Collection.
If the problem persists, contact Technical Support forassistance.
SA-4514SA-15014
SupportAssist Enterprise is unable to send the collectedsystem information from the device_name because thecollection file is corrupted.
• Perform Network Connectivity Test and make surethat connectivity to the Dell Upload Server issuccessful.
• To retry collecting the system information, select thedevice and click Start Collection.
If the problem persists, contact Technical Support forassistance.
SA-4521SA-15021
SupportAssist Enterprise is unable to send the collectedsystem information from the device_name because theproxy server is not reachable.
• Verify the proxy server settings in SupportAssistEnterprise.
• Make sure that the proxy server is reachable.• To retry collecting the system information, select the
device and click Start Collection.
If the problem persists, contact your network administratorfor assistance.
SA-4522SA-15022
SupportAssist Enterprise is unable to send the collectedsystem information from the device_name because anattempt to connect to proxy server is unsuccessful.
• Verify the proxy server settings in SupportAssistEnterprise.
• Make sure that the proxy server is reachable.• To retry collecting the system information, select the
device and click Start Collection.
If the problem persists, contact your network administratorfor assistance.
SA-4523SA-15023
SupportAssist Enterprise is unable to send the collectedsystem information from the device_name because theproxy server user name or password is incorrect.
• Make sure that the proxy server user name andpassword you have entered in SupportAssistEnterprise are correct.
• To retry collecting the system information, select thedevice and click Start Collection.
If the problem persists, contact your network administratorfor assistance.
SA-4524SA-15024
SupportAssist Enterprise is unable to send the collectedsystem information from the device_name because of anunknown error with reaching the proxy server.
• Verify the proxy server settings in SupportAssistEnterprise.
Error code appendix 239

Error code Error message Possible resolution
• Make sure that the proxy server is reachable.• To retry collecting the system information, select the
device and click Start Collection.
If the problem persists, contact your network administratorfor assistance.
SA-4550 SupportAssist Enterprise is unable to collect systeminformation from the device device_name because thehard-drive space available on the server whereSupportAssist Enterprise is installed is critically low.
For information about the hard-drive space requirementsfor installing and using SupportAssist Enterprise, seeHardware requirements.
SA-30130 SupportAssist Enterprise has placed the devicedevice_name in the Staging group because a requiredverification could not be completed.
To add the device, revalidate the device later.
SA-30180 SupportAssist Enterprise has placed the devicedevice_name in the Staging group because the devicedoes not have the required license.
To add the device, ensure that iDRAC Enterprise license isinstalled on the device, and then revalidate the device.
SA-30260 SupportAssist Enterprise has placed the devicedevice_name in the Staging group becauseSupportAssist is not enabled in Enterprise Manager.
To add the device, ensure that SupportAssist is enabled inEnterprise Manager, and then revalidate the device.
SA-20005 SupportAssist Enterprise is unable to set up the adapteradapter_name because the adapter is already installed onthe system or the devices associated with the adapterare already added.
Not applicable.
SA-20010 SupportAssist Enterprise is unable to set up the adapteradapter_name because the name is already in use byanother adapter.
Retry adding the adapter with another name.
SA-20015 SupportAssist Enterprise is unable to set up the adapteradapter_name because of an unknown error.
Retry adding the adapter.
SA-20020 SupportAssist is unable to set up the adapteradapter_name because the Management Groupcredentials are incorrect.
Enter the correct Management Group credentials andretry.
SA-20025 SupportAssist Enterprise is unable to reach the systemwhere the adapter is set up or the adapter service is notrunning on the remote system.
Verify the following and then retry:
• The adapter is reachable from the server whereSupportAssist Enterprise is installed.
• Port 5700 is open on the server where SupportAssistEnterprise is installed.
• SupportAssist Enterprise Adapter service is running.
SA-20030 SupportAssist Enterprise is unable to reach the systemwhere the adapter is installed.
Verify the following and then retry:
• Management Group credentials are correct.• Adapter is connected to the Management Group.• SupportAssist Enterprise Adapter service is running.
SA-20035 SupportAssist Enterprise is unable to set up the adapteradapter_name because the adapter has an invalid key.
Retry adding the adapter with a valid key.
SA-20040 SupportAssist Enterprise is unable to reach the adapteradapter_name because the Microsoft System CenterOperations Manager instance is not available or MicrosoftSystem Center Operations Manager service may not berunning.
Verify the following and then retry:
• Microsoft System Center Operations Managerinstance is available.
• Microsoft System Center Operations Manager Serviceis running.
SA-20045 SupportAssist Enterprise is unable to reach the adapteradapter_name because the Management Group
Enter the correct Management Group credentials andretry.
240 Error code appendix

Error code Error message Possible resolution
credentials are incorrect or does not have sufficientprivileges.
SA-20050SA-20065SA-20080SA-20085
SupportAssist Enterprise is unable to reach the adapteradapter_name because of an unknown error.
Not applicable.
SA-20404 SupportAssist Enterprise is unable to set up the adapteradapter_name because the adapter is not available or notreachable.
Ensure that the adapter is available and details of theadapter are correct and retry again.
SA-21005 SupportAssist Enterprise is unable to edit the details ofthe adapter adapter_name because the name is alreadyin use by another adapter.
Enter any other name for the adapter and retry.
SA-21010 SupportAssist Enterprise is unable to edit the details ofthe adapter adapter_name because of an unknown error.
Retry editing the details of the adapter after some time.
SA-21015 SupportAssist Enterprise is unable to edit the details ofthe adapter adapter_name because the details of theadapter are incorrect.
Ensure that the details of the adapter are correct and thenretry.
SA-21404 SupportAssist Enterprise is unable to edit the adapteradapter_name because the adapter is not reachable.
Ensure that the details of the adapter are correct and thenretry.
SA-20095 SupportAssist Enterprise is unable to set up the adapteradapter_name because a connection could not beestablished with the system.
Ensure the following and retry the operation:
• Ensure that the credentials are valid.• Ensure that you have administrator privileges.
SA-20100 SupportAssist Enterprise is unable to set up the adapteradapter_name because of low disk space on the system.
Ensure that the remote system has sufficient free hard-drive space required for installing the adapter and retry theoperation.
SA-20105 SupportAssist Enterprise is unable to copy installer file tothe system.
Ensure that the system is reachable and the installer file ispresent at the required location.
SA-20110 SupportAssist Enterprise is unable to set up the adapteradapter_name because the installation of the adaptercould not be completed successfully.
Retry setting up the adapter.
SA-20115 SupportAssist Enterprise is unable to start the adapterservice on the system.
Ensure that the installation of the adapter is successfuland the configuration file has the correct values.
SA-20120 SupportAssist Enterprise is unable to copy theconfiguration file.
Ensure that the configuration file that is generated is notempty and the system is reachable.
SA-20125 SupportAssist Enterprise is unable to set up the adapteradapter_name because the OpenManage Essentialsadapter is already installed on the system.
Ensure that the OpenManage Essentials adapter is notinstalled on the system and then retry the operation.
SA-20130 SupportAssist Enterprise is unable to set up the adapteradapter_name because the status of the requirednetwork port could not be verified.
Ensure that the system is running a Windows operatingsystem and the WMI port (135) is open on the system.
SA-20135 SupportAssist Enterprise is unable to set up the adapteradapter_name because the OpenManage Essentialsservices are not running on the remote system.
Ensure that OpenManage Essentials services are runningand retry the operation.
SA-20140 SupportAssist Enterprise is unable to set up the adapteradapter_name on the system device_name because ofone of the following:
• OpenManage Essentials is not installed on the system• The adapter is not compatible with the version of
OpenManage Essentials installed on the system
Ensure that OpenManage Essentials version 2.3 or later isinstalled on the system and then retry the operation.
Error code appendix 241

Error code Error message Possible resolution
SA-20145 SupportAssist Enterprise is unable to set up the adapteradapter_name because the installer for OpenManageEssentials adapter is not present at the required location.
Reinstall SupportAssist Enterprise and then retry theoperation.
SA-20150 SupportAssist Enterprise is unable to set up the adapteradapter_name because the operating system installed onthe remote system is not of 64-bit architecture.
Ensure that the remote system is running a 64-bitWindows Operating System and retry the operation.
SA-20155 SupportAssist Enterprise is unable to set up the adapteradapter_name because the version of OpenManageEssentials installed on the system is not compatible withthe OpenManage Essentials adapter.
Ensure that the OpenManage Essentials version 2.3 orlater is installed on the system and then retry theoperation.
SA-20160 SupportAssist Enterprise is unable to set up the adapteradapter_name because the Microsoft .NET package isnot installed on the system.
Ensure that the Microsoft .NET package is installed on theremote system and then retry the operation.
SA-20165 SupportAssist Enterprise is unable to set up the adapteradapter_name because the version of theMicrosoft .NET package installed on the remote system isnot compatible with the OpenManage Essentials adapter.
Ensure that the Microsoft .NET package version 4.0 orlater is installed on the remote system and then retry theoperation.
SA-20170 SupportAssist Enterprise is unable to set up the adapteradapter_name because Microsoft System CenterOperations Manager is not installed on the remotesystem.
Ensure that the Microsoft System Center OperationsManager is installed on the remote system and then retrythe operation.
SA-20175 SupportAssist Enterprise is unable to set up the adapteradapter_name because the version of Microsoft SystemCenter Operations Manager installed on the remotesystem is not compatible with Microsoft System CenterOperations Manager adapter.
Ensure that the Microsoft System Center OperationsManager version 7.0 or later is installed on the remotesystem and then retry the operation.
SA-20180 SupportAssist Enterprise is unable to set up the adapteradapter_name because the Microsoft System CenterOperations Manager service is not running on the remotesystem.
Ensure that the Microsoft System Center OperationsManager service is running and then retry the operation.
SA-20185 SupportAssist Enterprise is unable to set up the adapteradapter_name because the Microsoft System CenterOperations Manager adapter is already installed on theremote system.
Ensure that the Microsoft System Center OperationsManager adapter is not previously installed on the remotesystem and then retry the operation.
SA-20190 SupportAssist Enterprise is unable to edit the adapteradapter_name because a connection could not beestablished with the remote system.
Ensure the following and retry the operation :
• Ensure that the credentials are valid.• Ensure that you have administrator privileges.
SA-20200 SupportAssist Enterprise is unable to edit the adapteradapter_name because the adapter is uninstalled on theremote system.
Not applicable.
SA-20205 SupportAssist Enterprise is unable to set up the adapteradapter_name because of an error during validation.
Delete the adapter and then try setting up the adapteragain
SA-20210 SupportAssist Enterprise is unable to synchronize devicesthrough the adapter adapter_name.
Select the adapter and then perform a manual devicesynchronization
SA-20215 SupportAssist Enterprise is unable to delete the adapteradapter_name because the adapter is not present on thesystem.
Not applicable.
SA-30005 SupportAssist Enterprise is unable to set up the RemoteCollector Remote Collector_name because the RemoteCollector is already added.
You may have already added the Remote Collector byusing another IP address.
242 Error code appendix

Error code Error message Possible resolution
SA-30010 SupportAssist Enterprise is unable to set up the RemoteCollector Remote Collector_name because the providedname is already in use by another Remote Collector.
Provide any other name and retry.
SA-30015 SupportAssist Enterprise is unable to set up the RemoteCollector Remote Collector_name because the providedIP address range IP address_range overlaps with the IPaddress range of another Remote Collector.
Provide a mutually exclusive IP address range and retry.
SA-30020 SupportAssist Enterprise is unable to set up the RemoteCollector Remote Collector_name because anotheroperation is in progress.
Retry the operation after some time.
SA-30025 SupportAssist Enterprise is unable to set up the RemoteCollector Remote Collector_name because thecredentials provided for the remote system are incorrect.
Provide the correct credentials and retry.
SA-30404 SupportAssist Enterprise is unable to set up the RemoteCollector Remote Collector_name because the RemoteCollector is either not valid or not reachable.
Verify the details of the Remote Collector and retry.
SA-30405 SupportAssist Enterprise is unable to set up the RemoteCollector Remote Collector_name because Start IPAddress is greater than the End IP Address.
Provide the correct IP address range and retry.
SA-30406 SupportAssist Enterprise is unable to delete the RemoteCollector Remote Collector_name because anotheroperation is currently in progress.
Retry the operation after some time.
SA-30408 SupportAssist Enterprise is unable to update the details ofthe Remote Collector Remote Collector_name becausethe name is already in use by another Remote Collector.
Provide any other name and retry.
SA-30409 SupportAssist Enterprise is unable to update the details ofthe Remote Collector Remote Collector_name becausethe credentials of the Remote Collector are incorrect.
Verify the credentials of the Remote Collector and retry.
SA-30410 SupportAssist Enterprise is unable to update the details ofthe Remote Collector Remote Collector_name becauseRemote Collector is either not valid or not reachable.
Verify the details of the Remote Collector and retry.
SA-30411 SupportAssist Enterprise is unable to update the details ofthe Remote Collector Remote Collector_name becausethe provided IP address range IP address_range overlapswith the IP address range of another Remote Collector.
Provide a mutually exclusive IP address range and retry.
SA-30412 SupportAssist Enterprise is unable to update the details ofthe Remote Collector Remote Collector_name becausethe Start IP Address is greater than the End IP Address.
Provide the correct IP address range and retry.
SA-30413 SupportAssist Enterprise is unable to update the RemoteCollector Remote Collector_name because anotheroperation is in progress.
Retry the operation after some time.
SA-30414 SupportAssist Enterprise is unable to connect to theRemote Collector Remote Collector_name because of aninternal error.
Ensure that the Remote Collector application is runningand then retry the operation.
SA-30415 SupportAssist Enterprise is unable to connect to theRemote Collector Remote Collector_name because of aninternal error.
Update the credentials of the Remote Collector, ensurethat the Remote Collector application is running, and thenretry.
SA-30416 SupportAssist Enterprise is unable to set up the RemoteCollector Remote Collector_name because the providedIP address range IP address_range overlaps with the IPaddress range of same Remote Collector.
Provide a mutually exclusive IP address range and retry.
Error code appendix 243

Error code Error message Possible resolution
SA-30417 SupportAssist Enterprise is unable to set up the RemoteCollector Remote Collector_name because the installerfor Remote Collector could not be found at the requiredlocation.
Reinstall SupportAssist Enterprise and then retry theoperation.
SA-30418 SupportAssist Enterprise is unable to set up the RemoteCollector Remote Collector_name because a connectioncould not be established with the remote system.
Ensure the following and retry the operation:
• Ensure that the credentials are valid.• Ensure that you have administrator privileges.
SA-30419 SupportAssist Enterprise is unable to set up the RemoteCollector Remote Collector_name because the RemoteCollector installer could not be copied to the remotesystem.
Ensure that the remote system is reachable. Verify thecredentials of the remote system and then retry theoperation.
SA-30420 SupportAssist Enterprise is unable to set up the RemoteCollector Remote Collector_name because the RemoteCollector installation on the remote system wasunsuccessful.
Ensure that the remote system is compatible with thehardware and software requirements for setting up aRemote Collector.
SA-30421 SupportAssist Enterprise is unable to set up the RemoteCollector Remote Collector_name because the RemoteCollector installation was not successful.
Ensure that the remote system is compatible with thehardware and software requirements for setting up aRemote Collector.
SA-30422 SupportAssist Enterprise is unable to set up the RemoteCollector Remote Collector_name because theinstallation of the Remote Collector was unsuccessful.
Reinstall SupportAssist Enterprise and then retry theoperation.
SA-30423 SupportAssist Enterprise is unable to set up the RemoteCollector Remote Collector_name because the RemoteCollector configuration was unsuccessful.
Reinstall SupportAssist Enterprise and then retry theoperation.
SA-30424 SupportAssist Enterprise is unable to set up the RemoteCollector Remote Collector_name because the remotesystem does not have sufficient free hard-drive space.
Ensure that the remote system has at least 500 MB offree hard-drive space.
SA-30425 SupportAssist Enterprise is unable to set up the RemoteCollector Remote Collector_name because SupportAssistEnterprise is already installed on the remote system.
Uninstall SupportAssist Enterprise from the remote systemand then retry the operation.
SA-30426 SupportAssist Enterprise is unable to set up the RemoteCollector Remote Collector_name because the IP addressor hostname that has been provided is of the localsystem.
Provide the correct IP address or hostname of a remotesystem and retry the operation.
SA-30427 SupportAssist Enterprise is unable to set up the RemoteCollector Remote Collector_name because the remotesystem is not reachable.
Ensure that the remote system is reachable and then retrythe operation.
SA-30428 SupportAssist Enterprise is unable to set up the RemoteCollector Remote Collector_name because the RemoteCollector is not supported on a non-Windows operatingsystem.
Ensure you provide the details of a remote system that isrunning a Windows operating system and then retry theoperation.
SA-30429 SupportAssist Enterprise is unable to update the details ofthe Remote Collector Remote Collector_name becausethe provided IP address range IP address_range overlapswith the IP address range of the same Remote CollectorRemote Collector_name.
Provide a mutually exclusive IP address range and retry.
SA-30430 SupportAssist Enterprise is unable to update the details ofthe Remote Collector Remote Collector_name becausethe credentials of the Remote Collector are incorrect.
Verify the credentials of the Remote Collector and retrythe operation.
SA-30431 SupportAssist Enterprise is unable to update the details ofthe Remote Collector Remote Collector_name becausethe Remote Collector configuration on the remote systemwas not successful.
Ensure that the remote system is reachable. Verify thecredentials of the remote system and then retry theoperation.
244 Error code appendix

Error code Error message Possible resolution
SA-30432 SupportAssist Enterprise is unable to update the details ofthe Remote Collector Remote Collector_name becausethe SupportAssist Enterprise service is not running on theremote system.
Start the SupportAssist Enterprise service on the remotesystem and then retry the operation.
SA-30433 SupportAssist Enterprise is unable to update the details ofthe Remote Collector Remote Collector_name becausethe Remote Collector application is not installed on theremote system.
Not applicable.
SA-30434 SupportAssist Enterprise is unable to set up the RemoteCollector Remote Collector_name because the operatingsystem installed on the remote system is not of 64-bitarchitecture.
Ensure that you provide the details of a remote systemthat is running a 64-bit Windows operating system andthen retry the operation.
SA-30435 SupportAssist Enterprise is unable to set up the RemoteCollector Remote Collector_name because the validationof the Remote Collector was unsuccessful.
Ensure that the remote system is compatible with thehardware and software requirements for setting up aRemote Collector.
SA-4525 Uploaded collection file from device_name was deletedbecause a potential security risk was detected.
For information on security risks, see the SupportAssistEnterprise Version 2.0.40 User's Guide at www.dell.com/serviceabilitytools.
SA-4530 Upload of the system information collected fromdevice_name was unsuccessful because the uploadprocess exceeded the defined time limit.
• To retry collecting the system information, select thedevice and click Start Collection.
SA-4531 Upload of the system information collected fromdevice_name was unsuccessful because of an issue withthe upload server hosted by Dell EMC.
• To retry collecting the system information, select thedevice and click Start Collection.
SA-4040SA-4073SA-4074
SupportAssist Enterprise is unable to package the systeminformation collected from the device device_namebecause of an unknown error.
• To retry collecting the system information, select thedevice and click Start Collection.
SA-4075SA-4080
SupportAssist Enterprise is unable to collect systeminformation from the device device_name because anattempt to connect to the device is unsuccessful.
• Make sure that WMI service is running on the device.• To retry collecting the system information, select the
device and click Start Collection.
SA-4085SA-4090SA-4115SA-4120SA-4125SA-4130SA-4135SA-4140SA-4145SA-4150SA-4175
SupportAssist Enterprise is unable to collect systeminformation from the device device_name because anattempt to connect to the device is unsuccessful.
• To retry collecting the system information, select thedevice and click Start Collection.
SA-4095SA-4100SA-4105
SupportAssist Enterprise is unable to collect systeminformation from the device device_name because anattempt to connect to the device is unsuccessful.
• Make sure that the SSH service is running on thedevice.
• To retry collecting the system information, select thedevice and click Start Collection.
SA-4155 SupportAssist Enterprise is unable to collect systeminformation from the device device_name because thedevice is not reachable.
• Make sure the device you are trying to add is reachablefrom the server running SupportAssist Enterprise.
• To retry collecting the system information, select thedevice and click Start Collection.
Error code appendix 245

Error code Error message Possible resolution
SA-4160 SupportAssist Enterprise is unable to collect systeminformation from the device device_name because the IPaddress of the device is invalid.
• Make sure that SupportAssist Enterprise is updatedwith the correct IP address of the device.
• To retry collecting the system information, select thedevice and click Start Collection.
SA-4165 SupportAssist Enterprise is unable to collect systeminformation from the device device_name because thedownload of a certificate file could not be completedsuccessfully.
• Verify the firewall and network settings to make surethat download of the certificate file is not blocked.
• To retry collecting the system information, select thedevice and click Start Collection.
SA-4170 SupportAssist Enterprise is unable to collect systeminformation from the device device_name because thecredentials of the device are either incorrect or do nothave the required privileges.
• Make sure that SupportAssist Enterprise is updatedwith the correct user name and password of thedevice.
• Make sure that the user account has administrator/root privileges on the device.
• To retry collecting the system information, select thedevice and click Start Collection.
SA-4185 SupportAssist Enterprise is unable to collect systeminformation from the device device_name because of anattempt to connect to the device is unsuccessful.
• Make sure SupportAssist Enterprise is updated withthe credentials of a user account that has rootprivileges. For instructions to add a user account to theroot group, see the "Adding a user to the root usergroup" section in the SupportAssist Enterprise Version2.0.40 User's Guide at www.dell.com/serviceabilitytools.
• To retry collecting the system information, select thedevice and click Start Collection.
SA-4500 SupportAssist Enterprise is unable to send the collectedsystem information from the device device_namebecause the receiving server hosted by Dell EMC isunreachable.
• To retry collecting the system information, select thedevice and click Start Collection.
SA-4513 SupportAssist Enterprise is unable to send the collectedsystem information from the device device_namebecause of an invalid file token.
• Perform the Connectivity Test and make sure thatconnectivity to the Dell EMC Upload Server issuccessful.
• To retry collecting the system information, select thedevice and click Start Collection.
If the problem persists, contact Dell EMC TechnicalSupport for assistance.
SA-4514 SupportAssist Enterprise is unable to send the collectedsystem information from the device device_namebecause the collection file is corrupted.
• Perform the Connectivity Test and make sure thatconnectivity to the Dell EMC Upload Server issuccessful.
• To retry collecting the system information, select thedevice and click Start Collection.
If the problem persists, contact Dell EMC TechnicalSupport for assistance.
SA-4521SA-4522
SupportAssist Enterprise is unable to send the collectedsystem information from the device device_namebecause the proxy server is not reachable.
• Verify the proxy server settings in SupportAssistEnterprise.
• Make sure that the proxy server is reachable.• To retry collecting the system information, select the
device and click Start Collection.
If the problem persists, contact Dell EMC TechnicalSupport for assistance.
246 Error code appendix

Error code Error message Possible resolution
SA-4523 SupportAssist Enterprise is unable to send the collectedsystem information from the device device_namebecause the proxy server username or password isincorrect.
• Make sure that the proxy server user name andpassword you have entered in SupportAssistEnterprise are correct.
• To retry collecting the system information, select thedevice and click Start Collection.
If the problem persists, contact Dell EMC TechnicalSupport for assistance.
SA-30265 SupportAssist Enterprise has placed the devicedevice_name in the Staging group because the Softwareservice is not running on the device.
To add the device, ensure that the software service isrunning and then revalidate the device.
SA-0170 SupportAssist Enterprise is unable to add the devicedevice_name because you have entered thehostname/IP address of a Web-Scale Cluster VM.
Try adding the device by entering the hostname/IPaddress of Web-Scale Cluster.
SA-0136 SupportAssist Enterprise is unable to add the devicedevice_name because the device sub type that you haveselected is incorrect.
Ensure that you select the correct device sub type and tryagain.
SA-30428 SupportAssist Enterprise is unable to set up the RemoteCollector Remote Collector_name because setting up aRemote Collector on a Windows system is not supported.
Ensure that the remote system has Linux operating systeminstalled and retry the operation.
SA-30438SA-30442
SupportAssist Enterprise is unable to add the RemoteCollector Remote Collector_name because the providedhostname expression hostname_expression matches withthe hostname expression of another Remote Collector.
Provide a mutually exclusive hostname expression andretry.
SA-30439SA-30441
SupportAssist Enterprise is unable to add the RemoteCollector Remote Collector_name because the providedhostname expression hostname_expression is duplicatedwithin the same Remote Collector.
Provide a mutually exclusive hostname expression andretry.
SA-30440 SupportAssist Enterprise is unable to add the RemoteCollector Remote Collector_name because the pre-checkscript for Remote Collector could not be copied to theremote system.
Ensure that the remote system is reachable. Also verifythe credentials of the Remote Collector and retry theoperation.
SA-30443 SupportAssist Enterprise is unable to edit the RemoteCollector Remote Collector_name because the RemoteCollector configuration is corrupted on the remotesystem.
To resolve the issue, delete the Remote collector, andretry setting up the Remote Collector again.
SA-30444 SupportAssist Enterprise is unable to add the RemoteCollector Remote Collector_name because download ofRemote Collector installer was unsuccessful.
Run the Connectivity Test to ensure that connectivity tothe Dell EMC FTP server is successful and then retry.
SA-20620 Support Assist Enterprise is unable to update the detailsof the host adapter_name, because a connection couldnot be established between the host and managementconsole.
Verify the following and then retry the operation:
• The host running the management console must bereachable.
• The credentials of the host must be valid and must alsohave administrator rights.
• The adapter service must be running on the host.
SA-20550 SupportAssist Enterprise is unable to connect to Adapteradapter_name because the adapter service may not berunning.
Ensure that the adapter service is running on the host.
SA-20666 SupportAssist Enterprise is unable to connect to Adapteradapter_name, because a connection could not beestablished between the host and management console.
Verify the following and then retry the operation:
• The system where the management console is set upmust be reachable from the server runningSupportAssist Enterprise.
Error code appendix 247

Error code Error message Possible resolution
• If the credentials of the management console havechanged, update the credentials of the adapter inSupportAssist Enterprise.
SA-20070 SupportAssist Enterprise is unable to connect to theadapter adapter_name because the adapter credentialsare either incorrect or do not have the required privileges.
Ensure the following and then retry:
• The adapter credentials must be correct.• The adapter credentials must have administrator
privileges.
SA-20075 SupportAssist Enterprise is unable to connect to theadapter adapter_name because of an unknown error.
Ensure the following and then retry:
• If the credentials of the system where the adapter isset up have changed, update the adapter credentials inSupportAssist Enterprise.
• The adapter services must be running on the systemwhere the adapter is set up.
• OpenManage Essentials services must be running onthe system where the adapter is set up.
SA-20090 SupportAssist Enterprise is unable to connect to theadapter adapter_name because the OpenManageEssentials services are not running.
Ensure that OpenManage Essentials services are runningon the system where the adapter is setup and then retry.
SA-30414 SupportAssist Enterprise is unable to reach the RemoteCollector Remote Collector_name.
Ensure the following:
• The server hosting the remote collector must bereachable from the server where SupportAssistEnterprise is installed.
• The Remote Collector services must be running on theserver hosting the Remote Collector.
SA-20605 SupportAssist Enterprise is unable to set up the adapterbecause the hostname/IP address hostname/IP addressis either invalid or unreachable.
Ensure that the hostname/IP address is valid andreachable, and then try setting up the adapter.
SA-20610 SupportAssist Enterprise is unable to set up the adapterfor the host hostname/IP address because thecredentials are incorrect.
Ensure that the credentials of the host are correct andthen try setting up the adapter.
SA-20615SA-20620
SupportAssist Enterprise is unable to inventory devicesthrough the adapter because a connection could not beestablished with the host/management console.
Ensure the following and then retry the operation:
• The host running the management console must bereachable.
• The credentials of the host must be valid and must alsohave administrator rights.
• The systems management console services must berunning on the host.
SA-20625 SupportAssist Enterprise is unable to set up the adapteron the host hostname/IP address because the operatingsystem is not supported.
For information on the operating systems that supportsetting up the adapter_name, see the Online Help.
SA-20634SA-20644SA-20646SA-20648SA-20650SA-20652SA-20656SA-20658SA-20660
SupportAssist Enterprise is unable to set up theadapter_name adapter on the host hostname/IP addressbecause it does not meet certain requirements.
Ensure the following and then try setting up the adapter:
• The host running the management console must bereachable and must also have more than 500 MB freehard-drive space.
• Port x must be open on the host.• The systems management console must be installed
on the host.• The systems management console services must be
running on the host.
248 Error code appendix

Error code Error message Possible resolution
SA-20654 SupportAssist Enterprise is unable to set up theadapter_name adapter on the host hostname/IP addressbecause the services are not running.
Ensure that the systems management console servicesare running on the host and then try setting up theadapter.
SA-20662 SupportAssist Enterprise is unable to set up theadapter_name adapter because the adapter installer fileis not available at the default location.
Reinstall SupportAssist Enterprise and then try setting upthe adapter.
SA-20664 SupportAssist Enterprise is unable to set up theadapter_name adapter because the installation ofanother adapter is in progress.
Try setting up the adapter after the installation of theother adapter is complete.
SA-20666 SupportAssist Enterprise is unable to connect to Adapteradapter_name.
Ensure the following:
• The system where the management console is set upmust be reachable from the server runningSupportAssist Enterprise
• If the credentials of the management console havechanged, update the credentials of the adapter inSupportAssist Enterprise
SA-9000 Inventory Validation capabilities have not been verified forthe device.
None
SA-9015 The monitoring capability is disabled for the device. Ensure that the monitoring capability is enabled for thedevice.
SA-9020 SNMP settings of the device could not be configuredbecause the SNMP service or Net-SNMP service is notinstalled on your system.
Ensure that you install the SNMP service or Net-SNMPservice on your system.
SA-9025 SupportAssist Enterprise is unable to run the script filebecause of one of the following:
1. You may not have superuser privileges on the system.2. You have not entered the Management Server IP
address.3. Network sharing might be disabled.
Perform the following:
1. Ensure that you have superuser privileges on thesystem.
2. Enter the Management Server IP address.
SA-9030 SNMP service is not running on the device. Manually start the SNMP service on the device.
SA-9035 The SNMP trap destination is not configured on thedevice.
You must either try to configure the SNMP settingsthrough the Tasks > Configure SNMP option ormanually configure the SNMP settings. For instructions tomanually configure the SNMP settings, see "Manuallyconfiguring SNMP settings" in the Online Help or User'sGuide.
SA-9040 SupportAssist Enterprise has detected that OpenManageServer Administrator (OMSA) is not installed on thedevice.
Select the device in the Devices page, and in the deviceoverview pane, select Install/Upgrade OMSA from theTasks list.
SA-9045 The system hosting the Remote Collector is notreachable or the Remote Collector service is not runningon the system.
Make sure that the system hosting the Remote Collectoris reachable and the Remote Collector service is runningon the system.
SA-9050 SupportAssist Enterprise has detected that theOpenManage Server Administrator (OMSA) services arenot running on the system.
Make sure that the OpenManage Server Administrator(OMSA) services are running on the system.
SA-9055 Collection of system information is not supported on thedevice because it is assigned to a Remote Collectorhosted on a Linux operating system.
Assign the device to a Remote Collector hosted on aWindows operating system.
Error code appendix 249

Related documents and resourcesIn addition to this guide you can access the following documents that provide more information on SupportAssist Enterprise and the otherrelated products.
Table 79. Related documents
Document title How to access the document
SupportAssist Enterprise Version 2.0.40 Online Help Click the help icon in the SupportAssist Enterprise user interface.
SupportAssist Enterprise Version 2.0 Quick Start Guide 1. Visit www.dell.com/serviceabilitytools.2. Click SupportAssist Enterprise Version 2.0.3. Click DOCUMENTATION.
SupportAssist Enterprise Version 2.0.40 Support Matrix
SupportAssist Enterprise Version 2.0.40 Reportable Items
SupportAssist Enterprise Version 2.0.40 Release Notes
SupportAssist Enterprise REST API Guide
OpenManage Server Administrator Installation Guide Go to www.dell.com/openmanagemanuals and click OpenManageServer Administrator.
OpenManage Server Administrator User’s Guide
iDRAC User’s Guide Go to www.dell.com/idracmanuals.
Video tutorialsYou can access the following video tutorials to learn about the features of SupportAssist Enterprise. To access the video tutorials, go toDell EMC Support.
• SupportAssist Enterprise: Installing and Registering (Windows)• SupportAssist Enterprise: Installing and Registering (Linux)• SupportAssist Enterprise: Checking for Cases• SupportAssist Enterprise: Testing Case Creation• SupportAssist Enterprise: Monitoring the Local System• SupportAssist Enterprise: Adding Devices• SupportAssist Enterprise: Case Management• SupportAssist Enterprise: Managing Device Groups• SupportAssist Enterprise: Testing Network Connectivity• SupportAssist Enterprise: Viewing Collections• SupportAssist Enterprise: Collecting System Information• SupportAssist Enterprise: Uploading Collections from a Disconnected Site• SupportAssist Enterprise: Setting up OpenManage Essentials adapter• SupportAssist Enterprise: Setting up System Center Operations Manager adapter• SupportAssist Enterprise: Setting up Remote Collector• SupportAssist Enterprise: Creating Account Credentials• SupportAssist Enterprise: Creating Credential Profiles• SupportAssist Enterprise: Creating Device Discovery Rule• SupportAssist Enterprise: Managing SupportAssist Enterprise Alerts in TechDirect• SupportAssist Enterprise: Performing Deep Discovery• SupportAssist Enterprise: Setting up Automated Dispatch
SupportAssist communityYou can ask peer-to-peer questions on the Dell SupportAssist Enterprise community forum.
24
250 Related documents and resources

Topics:
• Contacting Dell EMC
Contacting Dell EMCAbout this task
NOTE: If you do not have an active Internet connection, you can find contact information about your purchase invoice,
packing slip, bill, or Dell EMC product catalog.
Dell EMC provides several online and telephone-based support and service options. Availability varies by country or region and product,and some services may not be available in your area.
Contact Dell EMC for sales, technical support, or customerservice issues
Steps
1. Go to www.dell.com/support.
2. Select your country or region in the selection list at the bottom of the page.
3. Click Contact Support and select the appropriate support link.
Find manuals and documents
Steps
1. Go to www.dell.com/support.
2. Click Browse all products.
3. Select the appropriate product category and then select the desired product.
4. To view or download the manuals and documents, click the DOCUMENTATION tab.
NOTE: You can also directly access the manuals and documents for Serviceability Tools from www.dell.com/
serviceabilitytools.
Related documents and resources 251