superpay manual 2008 - computastore ltd · contents page 3 2.12 default settings . . . . . . . . ....
TRANSCRIPT

SUPERPAY MANUAL
2008

Superpay ManualCopyright © 2007 Computastore Ltd.
All rights reserved. No part of this publication may be reproduced, stored in a retrieval system, or transmitted, in any form or by any means, electronic, mechanical, photocopying, recording, or otherwise, without the prior written permission of the publisher.
Although every precaution has been taken in the preparation of this manual, Computastore Ltd. assume no responsibility for errors or omissions. Neither is any liability assumed for damages resulting from the use of the information contained herein.
TrademarksProduct and company names mentioned herein may be the trademarks of their respective owners.
Warning and DisclaimerEvery effort has been made to make this manual as complete and as accurate as possible, but no warranty or fitness is implied. The information provided is on an ‘as is’ basis. Computastore Ltd. shall have neither liability nor responsibility to any person or entity with respect to any loss or damages arising from the information contained in this manual.
Legislation ChangesInland Revenue regulations are under constant review and there are frequent legislation changes. This means that payroll software often moves at a faster pace than the accompanying manual. If there have been any major program changes since this manual was written you will have received Update notes which explain the changes.
Computastore Ltd., 31 Thomas Street, Manchester, M4 1NATel: 0161 832 4761 Fax: 0161 819 3129
Email: [email protected] Website: www.superpay.co.uk

Contents
Section A – Installers Guide
1. Installation1.1 Package contents . . . . . . . . . . . . . . . . . . . . . . . . . . . . . . . . . . . . . . . . A11.2 Licence agreement . . . . . . . . . . . . . . . . . . . . . . . . . . . . . . . . . . . . . . . A11.3 Organisation of this manual . . . . . . . . . . . . . . . . . . . . . . . . . . . . . . . A11.4 System requirements . . . . . . . . . . . . . . . . . . . . . . . . . . . . . . . . . . . . . A21.5 Hotline support . . . . . . . . . . . . . . . . . . . . . . . . . . . . . . . . . . . . . . . . . A31.6 Install Superpay . . . . . . . . . . . . . . . . . . . . . . . . . . . . . . . . . . . . . . . . . A31.7 Window size . . . . . . . . . . . . . . . . . . . . . . . . . . . . . . . . . . . . . . . . . . . . A81.8 Check printing from Superpay . . . . . . . . . . . . . . . . . . . . . . . . . . . A101.9 End session . . . . . . . . . . . . . . . . . . . . . . . . . . . . . . . . . . . . . . . . . . . . A12
2. Networks2.1 Network licence . . . . . . . . . . . . . . . . . . . . . . . . . . . . . . . . . . . . . . . . A132.2 Overview . . . . . . . . . . . . . . . . . . . . . . . . . . . . . . . . . . . . . . . . . . . . . . A132.3 Organisation of Superpay’s data . . . . . . . . . . . . . . . . . . . . . . . . . . A142.4 Prepare the server for installation . . . . . . . . . . . . . . . . . . . . . . . . . A142.5 Prepare the workstation for installation . . . . . . . . . . . . . . . . . . . . A142.6 Install Superpay . . . . . . . . . . . . . . . . . . . . . . . . . . . . . . . . . . . . . . . . A152.7 Other workstations . . . . . . . . . . . . . . . . . . . . . . . . . . . . . . . . . . . . . A152.8 And finally . . . . . . . . . . . . . . . . . . . . . . . . . . . . . . . . . . . . . . . . . . . . A152.9 Single user on a peer to peer network . . . . . . . . . . . . . . . . . . . . . A152.10 Multi‐User set up . . . . . . . . . . . . . . . . . . . . . . . . . . . . . . . . . . . . . . A16
3. Downloads3.1 Overview . . . . . . . . . . . . . . . . . . . . . . . . . . . . . . . . . . . . . . . . . . . . . . A173.2 Confirm Windows version . . . . . . . . . . . . . . . . . . . . . . . . . . . . . . . A173.3 General notes about Print Helper . . . . . . . . . . . . . . . . . . . . . . . . . A183.4 Download Print Helper program . . . . . . . . . . . . . . . . . . . . . . . . . A193.5 Print Helper set up icon . . . . . . . . . . . . . . . . . . . . . . . . . . . . . . . . . A193.6 System Requirements . . . . . . . . . . . . . . . . . . . . . . . . . . . . . . . . . . . A203.7 Start Print Helper . . . . . . . . . . . . . . . . . . . . . . . . . . . . . . . . . . . . . . . A203.8 Select Superpay printer . . . . . . . . . . . . . . . . . . . . . . . . . . . . . . . . . . A213.9 Select ‘file to watch’ . . . . . . . . . . . . . . . . . . . . . . . . . . . . . . . . . . . . . A213.10 ‘Active’ Print Helper icon . . . . . . . . . . . . . . . . . . . . . . . . . . . . . . . A223.11 Prepare Superpay for Print Helper . . . . . . . . . . . . . . . . . . . . . . . A223.12 Confirm Print Helper works . . . . . . . . . . . . . . . . . . . . . . . . . . . . A223.13 What happens next . . . . . . . . . . . . . . . . . . . . . . . . . . . . . . . . . . . . A233.14 Change printer . . . . . . . . . . . . . . . . . . . . . . . . . . . . . . . . . . . . . . . . A233.15 Download Microsoft .NET Framework 2.0 . . . . . . . . . . . . . . . . A23
Page 1

Contents
4. System and printer details4.1 Overview . . . . . . . . . . . . . . . . . . . . . . . . . . . . . . . . . . . . . . . . . . . . . .A294.2 System details screen . . . . . . . . . . . . . . . . . . . . . . . . . . . . . . . . . . . .A294.3 Default payslip style . . . . . . . . . . . . . . . . . . . . . . . . . . . . . . . . . . . .A294.4 Other payslip styles for laser printers . . . . . . . . . . . . . . . . . . . . . .A294.5 Dot matrix payslips . . . . . . . . . . . . . . . . . . . . . . . . . . . . . . . . . . . . .A304.6 Backup/restore disk drive . . . . . . . . . . . . . . . . . . . . . . . . . . . . . . . .A304.7 Close System Details screen . . . . . . . . . . . . . . . . . . . . . . . . . . . . . .A304.8 Printer Control screen 1 . . . . . . . . . . . . . . . . . . . . . . . . . . . . . . . . . .A304.9 Printer Control screen 2 . . . . . . . . . . . . . . . . . . . . . . . . . . . . . . . . . .A314.10 End session . . . . . . . . . . . . . . . . . . . . . . . . . . . . . . . . . . . . . . . . . . .A32
5. Sundry items5.1 Mailing list . . . . . . . . . . . . . . . . . . . . . . . . . . . . . . . . . . . . . . . . . . . . .A335.2 Superpay files ‐ Overview . . . . . . . . . . . . . . . . . . . . . . . . . . . . . . . .A335.3 Data files . . . . . . . . . . . . . . . . . . . . . . . . . . . . . . . . . . . . . . . . . . . . . .A345.4 Program files . . . . . . . . . . . . . . . . . . . . . . . . . . . . . . . . . . . . . . . . . . .A345.5 System files . . . . . . . . . . . . . . . . . . . . . . . . . . . . . . . . . . . . . . . . . . . .A35
Section B – New Users Guide
1. Introduction1.1 Overview . . . . . . . . . . . . . . . . . . . . . . . . . . . . . . . . . . . . . . . . . . . . . . . B11.2 Training . . . . . . . . . . . . . . . . . . . . . . . . . . . . . . . . . . . . . . . . . . . . . . . . B11.3 Forms needed . . . . . . . . . . . . . . . . . . . . . . . . . . . . . . . . . . . . . . . . . . . B21.4 Year end online filing . . . . . . . . . . . . . . . . . . . . . . . . . . . . . . . . . . . . . B21.5 Updates . . . . . . . . . . . . . . . . . . . . . . . . . . . . . . . . . . . . . . . . . . . . . . . . B31.6 Hotline support . . . . . . . . . . . . . . . . . . . . . . . . . . . . . . . . . . . . . . . . . B31.7 Warranty . . . . . . . . . . . . . . . . . . . . . . . . . . . . . . . . . . . . . . . . . . . . . . . B41.8 Copyright . . . . . . . . . . . . . . . . . . . . . . . . . . . . . . . . . . . . . . . . . . . . . . . B41.9 Screen displays . . . . . . . . . . . . . . . . . . . . . . . . . . . . . . . . . . . . . . . . . . B4
2. Getting started2.1 Overview . . . . . . . . . . . . . . . . . . . . . . . . . . . . . . . . . . . . . . . . . . . . . . . B52.2 Data entry . . . . . . . . . . . . . . . . . . . . . . . . . . . . . . . . . . . . . . . . . . . . . . B52.3 Load Superpay . . . . . . . . . . . . . . . . . . . . . . . . . . . . . . . . . . . . . . . . . . B62.4 Enter licence number . . . . . . . . . . . . . . . . . . . . . . . . . . . . . . . . . . . . . B72.5 Logo screen – select company . . . . . . . . . . . . . . . . . . . . . . . . . . . . . B72.6 Company number (multi‐company versions only) . . . . . . . . . . . . B72.7 Date . . . . . . . . . . . . . . . . . . . . . . . . . . . . . . . . . . . . . . . . . . . . . . . . . . . . B82.8 Data path (unlimited version only) . . . . . . . . . . . . . . . . . . . . . . . . . B82.9 Password . . . . . . . . . . . . . . . . . . . . . . . . . . . . . . . . . . . . . . . . . . . . . . . B82.10 Main menu . . . . . . . . . . . . . . . . . . . . . . . . . . . . . . . . . . . . . . . . . . . . B82.11 System overview . . . . . . . . . . . . . . . . . . . . . . . . . . . . . . . . . . . . . . . B9
Page 2

Contents
2.12 Default settings . . . . . . . . . . . . . . . . . . . . . . . . . . . . . . . . . . . . . . . . . B9
3. Company record3.1 Overview . . . . . . . . . . . . . . . . . . . . . . . . . . . . . . . . . . . . . . . . . . . . . . B113.2 Prompt options . . . . . . . . . . . . . . . . . . . . . . . . . . . . . . . . . . . . . . . . . B113.3 Shift‐Help . . . . . . . . . . . . . . . . . . . . . . . . . . . . . . . . . . . . . . . . . . . . . B133.4 Screen 1 – Company data . . . . . . . . . . . . . . . . . . . . . . . . . . . . . . . . B143.5 Screen 1 ‐ Passwords . . . . . . . . . . . . . . . . . . . . . . . . . . . . . . . . . . . . B143.6 Screen 2 – Payroll options . . . . . . . . . . . . . . . . . . . . . . . . . . . . . . . . B163.7 Screen 3 – More payroll details . . . . . . . . . . . . . . . . . . . . . . . . . . . B173.8 Screen 4 – Tax credit funding . . . . . . . . . . . . . . . . . . . . . . . . . . . . . B183.9 End session . . . . . . . . . . . . . . . . . . . . . . . . . . . . . . . . . . . . . . . . . . . . B18
4. Payslip headings4.1 Do you need Payslip Headings? . . . . . . . . . . . . . . . . . . . . . . . . . . B194.2 Display Payslip Headings . . . . . . . . . . . . . . . . . . . . . . . . . . . . . . . B204.3 Description . . . . . . . . . . . . . . . . . . . . . . . . . . . . . . . . . . . . . . . . . . . . B214.4 Flags . . . . . . . . . . . . . . . . . . . . . . . . . . . . . . . . . . . . . . . . . . . . . . . . . . B234.5 NL code . . . . . . . . . . . . . . . . . . . . . . . . . . . . . . . . . . . . . . . . . . . . . . . B244.6 End session . . . . . . . . . . . . . . . . . . . . . . . . . . . . . . . . . . . . . . . . . . . . B24
5. Employee records5.1 Overview . . . . . . . . . . . . . . . . . . . . . . . . . . . . . . . . . . . . . . . . . . . . . . B255.2 Allocate employee codes . . . . . . . . . . . . . . . . . . . . . . . . . . . . . . . . B255.3 Totals to date . . . . . . . . . . . . . . . . . . . . . . . . . . . . . . . . . . . . . . . . . . B265.4 Choose menu option . . . . . . . . . . . . . . . . . . . . . . . . . . . . . . . . . . . . B275.5 Prompt options on new employee record . . . . . . . . . . . . . . . . . . B275.6 Employee record – Screen 1 . . . . . . . . . . . . . . . . . . . . . . . . . . . . . . B315.7 Gross pay items (Fields 2‐12) . . . . . . . . . . . . . . . . . . . . . . . . . . . . . B325.8 Gross pay items – examples . . . . . . . . . . . . . . . . . . . . . . . . . . . . . . B325.9 Pay interval (Field 13) . . . . . . . . . . . . . . . . . . . . . . . . . . . . . . . . . . . B395.10 After‐tax items (Fields 14‐20) . . . . . . . . . . . . . . . . . . . . . . . . . . . . B405.11 After tax items – loans . . . . . . . . . . . . . . . . . . . . . . . . . . . . . . . . . . B405.12 After tax items – attachments . . . . . . . . . . . . . . . . . . . . . . . . . . . . B415.13 After tax items – student loan . . . . . . . . . . . . . . . . . . . . . . . . . . . B455.14 Accrual (Field 21) . . . . . . . . . . . . . . . . . . . . . . . . . . . . . . . . . . . . . . B465.15 Tax code (Field 23) . . . . . . . . . . . . . . . . . . . . . . . . . . . . . . . . . . . . . B465.16 NI code (Field 24) . . . . . . . . . . . . . . . . . . . . . . . . . . . . . . . . . . . . . . B475.17 Other items in constants box . . . . . . . . . . . . . . . . . . . . . . . . . . . . B485.18 Pensions (Fields 35‐62) . . . . . . . . . . . . . . . . . . . . . . . . . . . . . . . . . B505.19 Employee record – Screen 2 . . . . . . . . . . . . . . . . . . . . . . . . . . . . . B555.20 Statutory Sick Pay (SSP) (Field 63) . . . . . . . . . . . . . . . . . . . . . . . B555.21 Parental Pay (Fields 63a‐72) . . . . . . . . . . . . . . . . . . . . . . . . . . . . . B555.22 Last pay . . . . . . . . . . . . . . . . . . . . . . . . . . . . . . . . . . . . . . . . . . . . . . B585.23 Pay Details . . . . . . . . . . . . . . . . . . . . . . . . . . . . . . . . . . . . . . . . . . . B585.24 Main pay details (Fields 75‐80) . . . . . . . . . . . . . . . . . . . . . . . . . . B59
Page 3

Contents
5.25 Second Pay Details (Fields 81‐87) . . . . . . . . . . . . . . . . . . . . . . . . . B605.26 Address (Fields 88‐92) . . . . . . . . . . . . . . . . . . . . . . . . . . . . . . . . . . B615.27 Comment (Field 93) . . . . . . . . . . . . . . . . . . . . . . . . . . . . . . . . . . . . B615.28 Attachment box (Fields 94‐100) . . . . . . . . . . . . . . . . . . . . . . . . . . B625.29 Employee record – Screen 3 . . . . . . . . . . . . . . . . . . . . . . . . . . . . . B625.30 What next? . . . . . . . . . . . . . . . . . . . . . . . . . . . . . . . . . . . . . . . . . . . . B64
6. Run payroll6.1 Overview . . . . . . . . . . . . . . . . . . . . . . . . . . . . . . . . . . . . . . . . . . . . . . B656.2 Run payroll menu screen . . . . . . . . . . . . . . . . . . . . . . . . . . . . . . . . B666.3 Pay day . . . . . . . . . . . . . . . . . . . . . . . . . . . . . . . . . . . . . . . . . . . . . . . . B666.4 Which interval . . . . . . . . . . . . . . . . . . . . . . . . . . . . . . . . . . . . . . . . . . B676.5 Tax week/month . . . . . . . . . . . . . . . . . . . . . . . . . . . . . . . . . . . . . . . . B676.6 All on holiday . . . . . . . . . . . . . . . . . . . . . . . . . . . . . . . . . . . . . . . . . . B686.7 Which payroll type . . . . . . . . . . . . . . . . . . . . . . . . . . . . . . . . . . . . . . B686.8 Employees . . . . . . . . . . . . . . . . . . . . . . . . . . . . . . . . . . . . . . . . . . . . . B696.9 Employee payslip screen . . . . . . . . . . . . . . . . . . . . . . . . . . . . . . . . . B696.10 Pre‐set payslip items . . . . . . . . . . . . . . . . . . . . . . . . . . . . . . . . . . . B706.11 Extra items . . . . . . . . . . . . . . . . . . . . . . . . . . . . . . . . . . . . . . . . . . . . B716.12 Pension, tax and NI . . . . . . . . . . . . . . . . . . . . . . . . . . . . . . . . . . . . B746.13 Student Loans and attachments . . . . . . . . . . . . . . . . . . . . . . . . . . B756.14 Net pay . . . . . . . . . . . . . . . . . . . . . . . . . . . . . . . . . . . . . . . . . . . . . . . B756.15 Negative gross or net pay . . . . . . . . . . . . . . . . . . . . . . . . . . . . . . . B766.16 Prompt . . . . . . . . . . . . . . . . . . . . . . . . . . . . . . . . . . . . . . . . . . . . . . . B766.17 Casual employees . . . . . . . . . . . . . . . . . . . . . . . . . . . . . . . . . . . . . . B796.18 Exit ‘Run payroll’ . . . . . . . . . . . . . . . . . . . . . . . . . . . . . . . . . . . . . . B796.19 End of run . . . . . . . . . . . . . . . . . . . . . . . . . . . . . . . . . . . . . . . . . . . . B796.20 What next? . . . . . . . . . . . . . . . . . . . . . . . . . . . . . . . . . . . . . . . . . . . . B79
7. Print payslips and reports7.1 Overview . . . . . . . . . . . . . . . . . . . . . . . . . . . . . . . . . . . . . . . . . . . . . . B817.2 ‘For’ field . . . . . . . . . . . . . . . . . . . . . . . . . . . . . . . . . . . . . . . . . . . . . . B827.3 Monthly summary . . . . . . . . . . . . . . . . . . . . . . . . . . . . . . . . . . . . . . B837.4 Stakeholder pension summary . . . . . . . . . . . . . . . . . . . . . . . . . . . . B847.5 Nominal analysis . . . . . . . . . . . . . . . . . . . . . . . . . . . . . . . . . . . . . . . B847.6 Subcontractor vouchers (option 9) . . . . . . . . . . . . . . . . . . . . . . . . . B857.7 User reports (option 4 on Main Menu) . . . . . . . . . . . . . . . . . . . . . B857.8 Employee reports print options . . . . . . . . . . . . . . . . . . . . . . . . . . . B887.9 Print P45ʹs . . . . . . . . . . . . . . . . . . . . . . . . . . . . . . . . . . . . . . . . . . . . . B89
8. ‘Undo’ mistakes8.1 Overview . . . . . . . . . . . . . . . . . . . . . . . . . . . . . . . . . . . . . . . . . . . . . . B938.2 Correct a payslip – 3 easy steps . . . . . . . . . . . . . . . . . . . . . . . . . . . B938.3 Correct a payslip which has been printed . . . . . . . . . . . . . . . . . . B958.4 Correct a payslip – net pay adjustment . . . . . . . . . . . . . . . . . . . . . B958.5 Correct a payslip – no net pay adjustment . . . . . . . . . . . . . . . . . . B97
Page 4

Contents
8.6 Correct a payslip – large negative adjustment . . . . . . . . . . . . . . B978.7 Correct a payslip – deleted employee . . . . . . . . . . . . . . . . . . . . . . B998.8 Correct a payslip – more than one employee . . . . . . . . . . . . . . . B998.9 Correct an ‘archive’ payslip . . . . . . . . . . . . . . . . . . . . . . . . . . . . . B1028.10 Correct a payslip from a previous year . . . . . . . . . . . . . . . . . . B106
9. Sundry Items9.1 Overview . . . . . . . . . . . . . . . . . . . . . . . . . . . . . . . . . . . . . . . . . . . . . B1079.2 Company record options . . . . . . . . . . . . . . . . . . . . . . . . . . . . . . . B1079.3 Set up Directors’ NI . . . . . . . . . . . . . . . . . . . . . . . . . . . . . . . . . . . . B1119.4 Enter an employee code . . . . . . . . . . . . . . . . . . . . . . . . . . . . . . . . B1149.5 In‐year online filing . . . . . . . . . . . . . . . . . . . . . . . . . . . . . . . . . . . . B1169.6 Bureaus – monthly summary and IR payments . . . . . . . . . . . . B1169.7 Conclusion . . . . . . . . . . . . . . . . . . . . . . . . . . . . . . . . . . . . . . . . . . . B119
Section C – Reference
1. Attachment of earnings1.1 Overview . . . . . . . . . . . . . . . . . . . . . . . . . . . . . . . . . . . . . . . . . . . . . . . C11.2 Council Tax attachment . . . . . . . . . . . . . . . . . . . . . . . . . . . . . . . . . . C21.3 CSA (Child Support Agency) order . . . . . . . . . . . . . . . . . . . . . . . . C31.4 County Court (non‐priority) order . . . . . . . . . . . . . . . . . . . . . . . . . C51.5 Admin cost . . . . . . . . . . . . . . . . . . . . . . . . . . . . . . . . . . . . . . . . . . . . . C61.6 2 and 4 weekly paid employees . . . . . . . . . . . . . . . . . . . . . . . . . . . . C61.7 Carry forward unpaid maintenance . . . . . . . . . . . . . . . . . . . . . . . . C61.8 Holidays – fixed deductions . . . . . . . . . . . . . . . . . . . . . . . . . . . . . . . C71.9 Holidays – Council Tax percentage deductions . . . . . . . . . . . . . . C71.10 Employee with both student loan and attachment . . . . . . . . . . . C81.11 Employee leaves . . . . . . . . . . . . . . . . . . . . . . . . . . . . . . . . . . . . . . . . C81.12 Attachments and net to gross pay calculations . . . . . . . . . . . . . . C81.13 Second attachment – general . . . . . . . . . . . . . . . . . . . . . . . . . . . . . C81.14 Second attachment – example of a CSA order . . . . . . . . . . . . . . . C91.15 Two Council Tax attachments . . . . . . . . . . . . . . . . . . . . . . . . . . . C111.16 Second attachment – only one Council Tax order . . . . . . . . . . C111.17 Second non‐priority attachment . . . . . . . . . . . . . . . . . . . . . . . . . C131.18 Payment of attachments . . . . . . . . . . . . . . . . . . . . . . . . . . . . . . . . C141.19 Conclusion . . . . . . . . . . . . . . . . . . . . . . . . . . . . . . . . . . . . . . . . . . . C14
2. Bureaus2.1 Overview . . . . . . . . . . . . . . . . . . . . . . . . . . . . . . . . . . . . . . . . . . . . . . C152.2 Company numbers . . . . . . . . . . . . . . . . . . . . . . . . . . . . . . . . . . . . . C152.3 Licence . . . . . . . . . . . . . . . . . . . . . . . . . . . . . . . . . . . . . . . . . . . . . . . . C152.4 Move between companies . . . . . . . . . . . . . . . . . . . . . . . . . . . . . . . C162.5 Client lists . . . . . . . . . . . . . . . . . . . . . . . . . . . . . . . . . . . . . . . . . . . . . C17
Page 5

Contents
2.6 Backup and restore data . . . . . . . . . . . . . . . . . . . . . . . . . . . . . . . . .C202.7 Copy a company . . . . . . . . . . . . . . . . . . . . . . . . . . . . . . . . . . . . . . . .C212.8 System details screen . . . . . . . . . . . . . . . . . . . . . . . . . . . . . . . . . . . .C222.9 Payslip quantities . . . . . . . . . . . . . . . . . . . . . . . . . . . . . . . . . . . . . . .C242.10 Company closes down and opens up again . . . . . . . . . . . . . . . .C242.11 Transfer files to a client . . . . . . . . . . . . . . . . . . . . . . . . . . . . . . . . .C262.12 Transfer files from a client . . . . . . . . . . . . . . . . . . . . . . . . . . . . . .C262.13 Monthly payment to the Inland Revenue . . . . . . . . . . . . . . . . . .C272.14 Set up new clients around year end . . . . . . . . . . . . . . . . . . . . . .C272.15 New clients with SMP and SSP . . . . . . . . . . . . . . . . . . . . . . . . . .C27
3. Change pay interval3.1 Overview . . . . . . . . . . . . . . . . . . . . . . . . . . . . . . . . . . . . . . . . . . . . . .C293.2 Inland Revenue rules . . . . . . . . . . . . . . . . . . . . . . . . . . . . . . . . . . . .C293.3 Mid‐month change from weekly to monthly . . . . . . . . . . . . . . . .C303.4 Mid‐month change from monthly to weekly . . . . . . . . . . . . . . . .C303.5 Warnings . . . . . . . . . . . . . . . . . . . . . . . . . . . . . . . . . . . . . . . . . . . . . .C303.6 Change from weekly to 4 weekly . . . . . . . . . . . . . . . . . . . . . . . . . .C313.7 Extra payments in addition to the main payroll . . . . . . . . . . . . .C32
4. Contact4.1 Overview . . . . . . . . . . . . . . . . . . . . . . . . . . . . . . . . . . . . . . . . . . . . . .C334.2 Hotline support . . . . . . . . . . . . . . . . . . . . . . . . . . . . . . . . . . . . . . . .C334.3 Website . . . . . . . . . . . . . . . . . . . . . . . . . . . . . . . . . . . . . . . . . . . . . . . .C344.4 Updates . . . . . . . . . . . . . . . . . . . . . . . . . . . . . . . . . . . . . . . . . . . . . . .C344.5 Mailing list . . . . . . . . . . . . . . . . . . . . . . . . . . . . . . . . . . . . . . . . . . . . .C344.6 Maintenance pro‐formas . . . . . . . . . . . . . . . . . . . . . . . . . . . . . . . . .C354.7 Orders . . . . . . . . . . . . . . . . . . . . . . . . . . . . . . . . . . . . . . . . . . . . . . . .C354.8 Payment . . . . . . . . . . . . . . . . . . . . . . . . . . . . . . . . . . . . . . . . . . . . . . .C36
5. Directors’ NI5.1 Special rules . . . . . . . . . . . . . . . . . . . . . . . . . . . . . . . . . . . . . . . . . . . .C375.2 Difference between directors’ and standard NI . . . . . . . . . . . . . .C375.3 Employer’s NI on directors earnings . . . . . . . . . . . . . . . . . . . . . . .C385.4 Select basis for each director . . . . . . . . . . . . . . . . . . . . . . . . . . . . . .C385.5 Starters . . . . . . . . . . . . . . . . . . . . . . . . . . . . . . . . . . . . . . . . . . . . . . . .C385.6 Leavers . . . . . . . . . . . . . . . . . . . . . . . . . . . . . . . . . . . . . . . . . . . . . . . .C395.7 Employee ceases to be a director . . . . . . . . . . . . . . . . . . . . . . . . . .C395.8 Director changes NI code mid‐year . . . . . . . . . . . . . . . . . . . . . . . .C395.9 Directors fees paid but not yet voted . . . . . . . . . . . . . . . . . . . . . .C41
6. Holidays6.1 Overview . . . . . . . . . . . . . . . . . . . . . . . . . . . . . . . . . . . . . . . . . . . . . .C436.2 Holiday pay and tax/NI limits . . . . . . . . . . . . . . . . . . . . . . . . . . . .C436.3 Individual holidays . . . . . . . . . . . . . . . . . . . . . . . . . . . . . . . . . . . . .C436.4 All on holiday . . . . . . . . . . . . . . . . . . . . . . . . . . . . . . . . . . . . . . . . . .C44
Page 6

Contents
6.5 Holidays and flat rate pensions . . . . . . . . . . . . . . . . . . . . . . . . . . . C456.6 Holidays and after‐tax items . . . . . . . . . . . . . . . . . . . . . . . . . . . . . C456.7 Construction industry holiday pay . . . . . . . . . . . . . . . . . . . . . . . . C476.8 Holiday pay accruals – the basics . . . . . . . . . . . . . . . . . . . . . . . . . C486.9 Holiday pay accruals – sundry items . . . . . . . . . . . . . . . . . . . . . . C516.10 Holidays and attachments . . . . . . . . . . . . . . . . . . . . . . . . . . . . . . C536.11 Holidays – advance into Week 53 . . . . . . . . . . . . . . . . . . . . . . . . C546.12 Holidays over the tax year end . . . . . . . . . . . . . . . . . . . . . . . . . . C54
7. Leavers7.1 Leavers . . . . . . . . . . . . . . . . . . . . . . . . . . . . . . . . . . . . . . . . . . . . . . . . C557.2 Reprint a P45 . . . . . . . . . . . . . . . . . . . . . . . . . . . . . . . . . . . . . . . . . . . C577.3 Student Loan . . . . . . . . . . . . . . . . . . . . . . . . . . . . . . . . . . . . . . . . . . . C577.4 Undelete – leaver comes back . . . . . . . . . . . . . . . . . . . . . . . . . . . . C587.5 Leavers – directors NI . . . . . . . . . . . . . . . . . . . . . . . . . . . . . . . . . . . C597.6 Leavers – net pay rounding . . . . . . . . . . . . . . . . . . . . . . . . . . . . . . C597.7 Attachment . . . . . . . . . . . . . . . . . . . . . . . . . . . . . . . . . . . . . . . . . . . . C597.8 SMP . . . . . . . . . . . . . . . . . . . . . . . . . . . . . . . . . . . . . . . . . . . . . . . . . . C607.9 SSP . . . . . . . . . . . . . . . . . . . . . . . . . . . . . . . . . . . . . . . . . . . . . . . . . . . C607.10 Leaver’s employee code . . . . . . . . . . . . . . . . . . . . . . . . . . . . . . . . C60
8. Pensions8.1 Overview . . . . . . . . . . . . . . . . . . . . . . . . . . . . . . . . . . . . . . . . . . . . . . C618.2 Set up pension . . . . . . . . . . . . . . . . . . . . . . . . . . . . . . . . . . . . . . . . . C618.3 Some pension examples . . . . . . . . . . . . . . . . . . . . . . . . . . . . . . . . . C648.4 Stakeholder pension providers ID . . . . . . . . . . . . . . . . . . . . . . . . . C668.5 Contracted out NI codes . . . . . . . . . . . . . . . . . . . . . . . . . . . . . . . . . C668.6 Contracted out scheme references . . . . . . . . . . . . . . . . . . . . . . . . . C678.7 Run payroll . . . . . . . . . . . . . . . . . . . . . . . . . . . . . . . . . . . . . . . . . . . . C688.8 Pension totals . . . . . . . . . . . . . . . . . . . . . . . . . . . . . . . . . . . . . . . . . . C708.9 Stakeholder pension payslip layouts . . . . . . . . . . . . . . . . . . . . . . C708.10 Pension reports . . . . . . . . . . . . . . . . . . . . . . . . . . . . . . . . . . . . . . . . C718.11 Stakeholder pension reports . . . . . . . . . . . . . . . . . . . . . . . . . . . . . C72
9. SMP and SPP9.1 Legislation changes . . . . . . . . . . . . . . . . . . . . . . . . . . . . . . . . . . . . . C759.2 Overview . . . . . . . . . . . . . . . . . . . . . . . . . . . . . . . . . . . . . . . . . . . . . . C759.3 Set up employee record, screen 1 . . . . . . . . . . . . . . . . . . . . . . . . . C779.4 Set up employee record, screen 2 . . . . . . . . . . . . . . . . . . . . . . . . . C789.5 Average pay . . . . . . . . . . . . . . . . . . . . . . . . . . . . . . . . . . . . . . . . . . . C799.6 Run payroll – payslip screen . . . . . . . . . . . . . . . . . . . . . . . . . . . . . C839.7 Run payroll – number of weeks paid . . . . . . . . . . . . . . . . . . . . . . C849.8 Run payroll – amount paid . . . . . . . . . . . . . . . . . . . . . . . . . . . . . . C859.9 Run payroll – SMP prompt . . . . . . . . . . . . . . . . . . . . . . . . . . . . . . . C859.10 Run payroll – SMP/SPP not displayed . . . . . . . . . . . . . . . . . . . . C869.11 Run payroll – standard deductions . . . . . . . . . . . . . . . . . . . . . . . C88
Page 7

Contents
9.12 Payroll reports . . . . . . . . . . . . . . . . . . . . . . . . . . . . . . . . . . . . . . . .C889.13 Small Employers’ Relief . . . . . . . . . . . . . . . . . . . . . . . . . . . . . . . .C889.14 Parental Pay totals . . . . . . . . . . . . . . . . . . . . . . . . . . . . . . . . . . . . .C909.15 Two periods of Parental Pay in one year . . . . . . . . . . . . . . . . . .C909.16 Bureau with new client . . . . . . . . . . . . . . . . . . . . . . . . . . . . . . . . .C91
10. SSP10.1 Overview . . . . . . . . . . . . . . . . . . . . . . . . . . . . . . . . . . . . . . . . . . . . .C9310.2 Enter sick days . . . . . . . . . . . . . . . . . . . . . . . . . . . . . . . . . . . . . . . .C9310.3 Display SSP on payslip screen . . . . . . . . . . . . . . . . . . . . . . . . . . .C9510.4 Adjust ordinary pay for SSP paid . . . . . . . . . . . . . . . . . . . . . . . .C9610.5 Reclaim SSP . . . . . . . . . . . . . . . . . . . . . . . . . . . . . . . . . . . . . . . . . . .C9810.6 SSP reports . . . . . . . . . . . . . . . . . . . . . . . . . . . . . . . . . . . . . . . . . . . .C9810.7 Prompt on diary screen . . . . . . . . . . . . . . . . . . . . . . . . . . . . . . . . .C9910.8 Sick note for more than 1 week . . . . . . . . . . . . . . . . . . . . . . . . . .C9910.9 No SSP displayed when you store the diary . . . . . . . . . . . . . . C10010.10 Enter work days – one week only . . . . . . . . . . . . . . . . . . . . . . C10310.11 Enter work days – more than one week . . . . . . . . . . . . . . . . . C10410.12 Enter Sickness before Diary . . . . . . . . . . . . . . . . . . . . . . . . . . . C10710.13 Last SSP1(L) details . . . . . . . . . . . . . . . . . . . . . . . . . . . . . . . . . . C10910.14 New users . . . . . . . . . . . . . . . . . . . . . . . . . . . . . . . . . . . . . . . . . . C10910.15 Starters . . . . . . . . . . . . . . . . . . . . . . . . . . . . . . . . . . . . . . . . . . . . . C11010.16 Leavers . . . . . . . . . . . . . . . . . . . . . . . . . . . . . . . . . . . . . . . . . . . . . C11110.17 Your company is part of a larger group . . . . . . . . . . . . . . . . . C11110.18 SSP forms . . . . . . . . . . . . . . . . . . . . . . . . . . . . . . . . . . . . . . . . . . . C11110.19 Other uses for the calendar . . . . . . . . . . . . . . . . . . . . . . . . . . . . C111
11. Starters11.1 Set up new employee’s details . . . . . . . . . . . . . . . . . . . . . . . . . . C11311.2 Allocate employee code . . . . . . . . . . . . . . . . . . . . . . . . . . . . . . . . C11311.3 Which tax code to use . . . . . . . . . . . . . . . . . . . . . . . . . . . . . . . . . C11311.4 Print a new employee record . . . . . . . . . . . . . . . . . . . . . . . . . . . C11411.5 Enter P45 details . . . . . . . . . . . . . . . . . . . . . . . . . . . . . . . . . . . . . . C11411.6 Use the P45 prompt to enter a P6 . . . . . . . . . . . . . . . . . . . . . . . . C11611.7 Starter with a student loan . . . . . . . . . . . . . . . . . . . . . . . . . . . . . C11611.8 Payment method . . . . . . . . . . . . . . . . . . . . . . . . . . . . . . . . . . . . . C11711.9 Pay interval – Wk/Mn (F2) . . . . . . . . . . . . . . . . . . . . . . . . . . . . . C11711.10 Start date . . . . . . . . . . . . . . . . . . . . . . . . . . . . . . . . . . . . . . . . . . . C11811.11 Directors NI . . . . . . . . . . . . . . . . . . . . . . . . . . . . . . . . . . . . . . . . . C11811.12 Entitlement to Parental Pay . . . . . . . . . . . . . . . . . . . . . . . . . . . C11811.13 SSP . . . . . . . . . . . . . . . . . . . . . . . . . . . . . . . . . . . . . . . . . . . . . . . . C118
Index
Page 8

SUPERPAYInstallers Guide
Section A


1
Installation1.1 Package contentsIn addition to this manual, your SUPERPAY package contains:
A CD containing your SUPERPAY program.A Licence Agreement and post paid envelope.Your Licence number form.A ring binder for update notes.A sample payslip stationery pack.A FAQ (Frequently Asked Questions) manual.
1.2 Licence agreementBefore proceeding, please ensure that you read and agree to our Licence terms. Then return the completed Licence Agreement in the post paid envelope at the back of the binder. Do not proceed if you have not signed our Licence Agreement.
1.3 Organisation of this manual
1. Installers GuideThe Installers Guide (this section) tells you how to install SUPERPAY and PRINT HELPER. There is sufficient detail to guide you through the Installa‐tion process on your own. However, if you have IT support personnel they should install SUPERPAY and PRINT HELPER and check that your printer works with SUPERPAY. It is important to consult your IT support staff if your payroll PC is part of a network, even if you intend to run SUPERPAY as a stand alone installation.
A1

Installers Guide
2. New Users GuideThe New Users Guide explains how to set up your payroll data, run a pay‐roll and produce weekly, monthly and year end reports. This section assumes a basic knowledge of PAYE.
3. ReferenceThe Reference section explains more advanced payroll operations such as Directors’ NI, pensions, SSP, SMP etc.
1.4 System requirementsTo run SUPERPAY and PRINT HELPER and file online at year end you need:
1. A recent version of WindowsWindows Vista (any edition), orWindows XP (Home or Professional) with Service Pack 2, orWindows 2000 with Service Pack 4.
If you do not know which Windows version is on your PC, see 3.2 below.
2. Microsoft .NET Framework 2.0 or 3.0 (unless you have Windows Vista which includes .NET)If needed, you can update your system software with free downloads from Microsoft’s website – see Chapter 3.
3. A suitable printerSUPERPAY is a DOS program and many printers are designed to work only with Windows software. If your printer cannot print directly from SUPER-PAY, you need to install PRINT HELPER to ‘translate’ SUPERPAY’s printouts into a Windows format.
Dot matrix printers and some inkjet and laser printers connected to a par‐allel port on your PC do not need PRINT HELPER. If you have not yet pur‐chased a printer for your payroll, you should consider what type of payslips you require. For example, if you want to print a large number of multi‐part forms you will need a dot matrix printer. If you want security laser payslips you will need a laser printer rather than an inkjet.
4. Network installationsIf you intend to run SUPERPAY on a network, refer to Chapter 2 for more information.
A2

Chapter 1: Installation
1.5 Hotline supportThe SUPERPAY Hotline number is 0161 832 4761.
The Hotline is open Monday to Friday 9:00am to 5:00pm excluding Bank Holidays. Each year it is closed between Christmas Eve and New Year’s Day inclusive.
If you have not yet returned your Licence Agreement, as a brand new user we will record your telephone number and will require your company name and Licence number before dealing with an enquiry. We do not provide installation support to mobile telephone num‐bers.
Email supportIf you work on SUPERPAY out of normal office hours, you can email queries to [email protected]. We normally respond to emails during the next working day. If your email raises a particularly complex issue, it may take a few days before we get back to you.
1.6 Install Superpay
Step 1 – Insert CD in drive
Diagram 1: Setup Wizard
Insert your SUPERPAY CD in your CD drive. After a short pause the above screen is automatically displayed. Click on NEXT.
A3

Installers Guide
Step 2 – Confirm installation directory
Diagram 2: Confirm folder name
The screen prompts the default directory C:\SUPERPAY. If you want to install SUPERPAY in a different directory, either type a directory name or click on BROWSE to find a directory. (If you BROWSE and then click on a directory, that directory name is automatically inserted in the location box.)
It is good practice to accept the default directory if possible. Even if you need to change the drive letter, you should still call the directory SUPER-PAY. This makes it easier to install updates when there are legislation changes. If you install SUPERPAY in a different directory, subsequent users may incorrectly install updates in the default directory rather than the ‘live’ directory.
Click on NEXT to continue. Since the SUPERPAY folder does not yet exist, SETUP asks if you want to create the directory.
Diagram 3: Create SUPERPAY folder
Click on YES to continue.
A4
Chapter 1: Installation
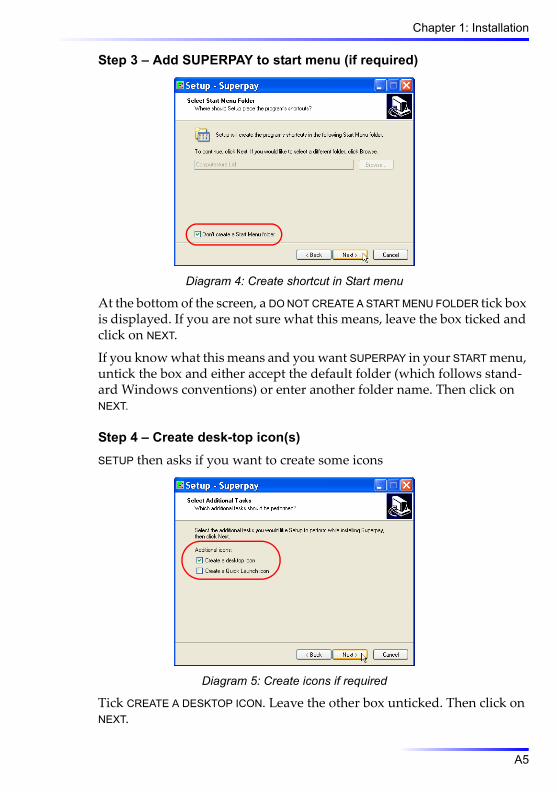
Step 3 – Add SUPERPAY to start menu (if required)
Diagram 4: Create shortcut in Start menu
At the bottom of the screen, a DO NOT CREATE A START MENU FOLDER tick box is displayed. If you are not sure what this means, leave the box ticked and click on NEXT.
If you know what this means and you want SUPERPAY in your START menu, untick the box and either accept the default folder (which follows stand‐ard Windows conventions) or enter another folder name. Then click on NEXT.
Step 4 – Create desk-top icon(s)SETUP then asks if you want to create some icons
Diagram 5: Create icons if required
Tick CREATE A DESKTOP ICON. Leave the other box unticked. Then click on NEXT.
A5

Installers Guide
Step 5 – Confirm installation instructions
Diagram 6: Installation details
Click INSTALL to proceed.
Step 6 – Installation in progress
Diagram 7: Progress bar
A progress bar is displayed while SUPERPAY is being installed.
A6

Chapter 1: Installation
Step 7 – Finish installation
Diagram 8: Installation complete
Click on FINISH to complete the installation.
Step 8 – SUPERPAY icon and Licence numberDouble click the SUPERPAY icon which is now on your desktop.
Diagram 9: SUPERPAY Icon
Diagram 10: Enter licence number
Since this is the first time that you are loading SUPERPAY, you need to enter your Licence Number (in the format of a letter, then 4 or 5 numbers, plus 3 groups of 3 numbers; e.g. X1234‐123‐456‐789). Then enter your Com‐pany Name.
A7

Installers Guide
Step 9 – Select companySUPERPAY then displays the Company selection window. What fields are displayed depends on your version of SUPERPAY.
Diagram 11: Select company (unlimited version)
Number (multi‐company versions only)
Enter the number of the company you want to set up first – usually 1. (Single company users are not asked this question.)
Date
Normally you press ENTER to accept today’s date.
Data path – SP unlimited version only
Press ENTER to store your data in the same directory as your SUPERPAY program. If you want to store your data in a different directory you will need to use Windows or DOS to create the directory before you can enter that directory name here.
Step 10 – Remove SUPERPAY CDSUPERPAY then displays the MAIN MENU. Remove the master CD and file it in a safe place. This CD is not used for actual payroll processing.
1.7 Window sizeAfter installation, SUPERPAY is sometimes displayed in a small window. Although this does not affect the running of SUPERPAY, it can be difficult to read the screen. To temporarily make SUPERPAY run in ‘full screen’ mode press ALT-ENTER. To switch back to a small window at any time press ALT-ENTER again. Alternatively, you can permanently change the size of the SUPERPAY window as described below.
A8

Chapter 1: Installation
Run in full screen modeClose SUPERPAY. Right click on the SUPERPAY icon on your desktop to dis‐play a list of options.
Diagram 12: Select Properties from pop-up list
Left click on PROPERTIES.
Diagram 13: Select Full Screen (Screen tab)
Choose the SCREEN tab, select FULL SCREEN, and click OK to apply the change and close the window. When you next load SUPERPAY, the program will run in full screen.
Run in bigger window (rather than full screen)Load SUPERPAY. Right click on the small icon in the top left of the SUPERPAY window to display a list of options.
Diagram 14: Select Properties from pop-up list
A9

Installers Guide
Left click on PROPERTIES. Click on the FONT tab (if not already selected) and the following screen is displayed.
Diagram 15: Select bigger font (Font tab)
Select ‘Lucida Console’ as the font (instead of Raster Fonts). Then select a suitable font size – usually 16. Now click OK.
Then select SAVE FOR FUTURE WINDOWS and click OK to close this window.
1.8 Check printing from SuperpayNow that you have successfully installed SUPERPAY, you need to deter‐mine if your printer can print directly from SUPERPAY.
Step 1 – Make sure printer connectedMake sure your printer is properly connected and can print from a Win‐dows program such as Word or Notepad.
A10

Chapter 1: Installation
Step 2 – Choose Company Record optionFollowing on from Step 10 in 1.6 above, you should now have the SUPER-PAY MAIN MENU displayed.
Diagram 16: Main Menu – New company selected
Press 7 to highlight the COMPANY RECORD option and press ENTER.
Step 3 – Enter your company’s name
Diagram 17: New company record
A blank Company Record is then displayed.
Diagram 18: Enter company name
Enter your company’s name in the Name field and press ENTER. The high‐light moves to the next line. Now press F10. Then press F9.
If your printer prints something, you do not need to worry at this stage about the actual format of what was printed. The main point is that you do not need PRINT HELPER and should now end the session and proceed to Chapter 4.
A11

Installers Guide
If your printer does not print, you need to install PRINT HELPER and should now end the session and go to Chapter 3.
1.9 End sessionAlways EXIT SUPERPAY by pressing the ESC key on the MAIN MENU and, when asked the following question,
enter Y to confirm. NEVER close down SUPERPAY by clicking the X button in the top right of the window.
A12

2
Networks2.1 Network licenceIf you intend to install SUPERPAY on a network, you need to purchase the Network licence which costs a one‐off fee of £100 + VAT.
2.2 OverviewIf you have a network with a server, you may want to install SUPERPAY on the server and run it from a workstation.
Advantages of this setup are:1. It can be easier to backup data when it is stored on a central server
rather than on usersʹ workstations.
2. If you have multiple SUPERPAY operators they can share the same installation. Updates only have to be installed once and they are avail‐able to all operators.
3. If a workstation fails or is upgraded you donʹt have to reinstall SUPER-PAY on the new one. You need only set up a new shortcut to the server installation.
There are some cautions as well:1. The payroll data may be accessible to other network users. You should
use the security features of Microsoft Windows to prevent unauthor‐ised users reading from or writing to the SUPERPAY folder.
2. If you use a portable computer and work away from your office you would need to synchronise your data when you reconnect. SUPERPAY does not have any built in facilities to do this. (Note: We do not pro‐vide installation help at anywhere other than the telephone land line registered for your SUPERPAY installation.)
Alternative – install locallyIf you do not want to install SUPERPAY on the server, you can install it on one workstation and run it from there. The disadvantage of this set up is
A13

Installers Guide
that your SUPERPAY data is not backed up from the server and the data cannot be shared.
2.3 Organisation of Superpay’s dataSUPERPAY is an MS–DOS program, and by default follows the pre‐Win‐dows convention of storing the program and data in the same folder.
This has the advantage of making the program very portable. Since it is not a Windows program, the only installation required is to copy the pro‐gram and data files to the installation folder and set up desktop short‐cut(s).
If an accident or mistake causes you to lose your SUPERPAY installation, you can get it back by simply copying a backup copy of the folder to the installation location.
2.4 Prepare the server for installation1. Find a place on the server to hold the SUPERPAY program and data.
This can be anywhere on the serverʹs disk(s).
2. Create a folder – you may find future maintenance easier if you name the folder Superpay.
3. Set permissions on the SUPERPAY folder so that all payroll operators have read and write access to it.
4. Share the folder just created. You can either share the SUPERPAY folder itself, or share some point higher in the folder structure. If you have an existing share that provides access to the SUPERPAY folder you can use that one.
5. Set permissions on the share so that the payroll operators have read and write access to it.
2.5 Prepare the workstation for installationMap a drive letter on each operatorʹs workstation to access SUPERPAY on the server. You must use the same drive letter on each workstation, so if you have more than one SUPERPAY operator you need to choose a drive let‐ter that is available to all of them.
Use Windows Explorer to map the drive (Tools/Map Network Drive). Ensure that the ‘Reconnect at logon’ checkbox is ticked.
The following instructions assume that you mapped drive S to a place on the server that contains a folder called SUPERPAY.
A14

Chapter 2: Networks
2.6 Install SuperpayInsert the SUPERPAY CD in the workstation’s CD drive, or run the setup from our website (www.superpay.co.uk) and install SUPERPAY. Change the suggested install location to the path to the server using the mapped drive (S:\Superpay in our example).
If you are only running SUPERPAY from one workstation, that is all you need to do.
2.7 Other workstationsIf you want to access SUPERPAY from other workstations, do the following:
Map a driveMap a drive from each workstation to the server. The mapped path to the SUPERPAY folder on the server must be the same on all workstations (S:\Superpay in our example).
Create a shortcut to SUPERPAY on each workstationInstall the SUPERPAY CD to S:\Superpay on each workstation. This sets up an icon for you and also checks that the write permissions are correct.
Confirm installationIf you double click on this new shortcut, SUPERPAY should start.
2.8 And finallyEnsure that the folder on the server that contains SUPERPAY will get backed up. If it should be lost, all that is needed to restore it is to copy the backup of the folder to the same place on the server that it came from.
When there is an update to SUPERPAY, it should be installed from the work‐station to the drive letter and path in use (S:\Superpay in our example). If you have more than one operator, you need only install the update once from any one of the workstations.
2.9 Single user on a peer to peer networkSometimes users of the single company SUPERPAY want to call up SUPER-PAY from more than one work‐station.
1. In order to run SUPERPAY on a peer to peer network all the worksta‐tions must use the same drive mapping. Decide which PC will be the main SUPERPAY installation. This will be called the host computer.
A15
Installers Guide
2. Use Windows Explorer or My Computer to create a C:\SUPERPAY direc‐tory on the host computer. Then set it as a shared folder.
3. Map the shared Superpay folder as a drive letter on all the computers which will run Superpay – including the host computer. You can use any drive letter you wish – we suggest S for SUPERPAY.
Create a shortcut to SUPERPAY on each workstationInstall the SUPERPAY CD to S:\Superpay on each workstation. This sets up an icon for you and also checks write permissions are correct.
Confirm installationIf you double click on this new shortcut, SUPERPAY should start.
2.10 Multi-User set upMore than one operator can work on different SUPERPAY companies at the same time. SUPERPAY uses a ‘Company locking’ feature so that no two operators can work on the same company at the same time.
A16
3
Downloads3.1 OverviewYou only need to read this chapter if your Windows software is not up to date (see 1.4) or if you need the PRINT HELPER to print from SUPERPAY (see 1.8).
3.2 Confirm Windows versionIf you do not know what version of Windows is on your PC, hold down the Windows key (i.e. the key between CTRL and ALT) and press the PAUSE/BREAK key (top right of your keyboard) to display a System Properties window. (On a laptop you may also need to press the FN (function) key.)
Diagram 19: System properties window
Check your version of Windows. If you have a compatible version of Win‐dows but do not have the correct Service Pack, download the software you
A17

Installers Guide
need from Microsoft’s website before proceeding. Service Pack downloads are free but can take a long time to download.
Unfortunately, this manual cannot guide you through the Service Pack downloads since each Windows update depends on what updates are available from Microsoft at the time of the download, and what system software is already on your PC.
In addition, if you have not updated your PC recently (or not at all) you may have a backlog of High Priority updates which you need to down‐load before you can download a Service pack. There is no way round this. To run PRINT HELPER you need up‐to‐date Windows systems software.
Downloads on a dial up Internet connectionEven if there is no updates backlog, Windows Service Packs are large downloads which take a while even on a high speed Broadband connec‐tion. If you only have a dial up service, it may take hours to download the required software.
3.3 General notes about Print Helper
Do I need Print Helper?If you have already established that your printer cannot print directly from SUPERPAY (see 1.8 above) you will need PRINT HELPER to ‘translate’ SUPERPAY’s output into a format which your printer understands.
How do I install Print Helper on my PC?PRINT HELPER is a free download from SUPERPAY’s website (www.super-pay.co.uk).
How does Print Helper work?Once you have set PRINT HELPER up, when you press F10 in SUPERPAY to print, SUPERPAY sends your printouts to a file on disk. PRINT HELPER then takes over and sends this ‘PRINT’ file to your printer.
All this happens in the background, and once you have downloaded and set up PRINT HELPER you are not aware that the module is running.
Does Print Helper work on a Network?If you run SUPERPAY on a network, you should contact our help desk for advice. How you set up PRINT HELPER on a network depends on your net‐
A18
Chapter 3: Downloads
work configuration – e.g. does each workstation have its own printer or is there one network printer for several SUPERPAY workstations?
3.4 Download Print Helper programStart Internet Explorer and go to our website (www.superpay.co.uk). Click on the DOWNLOADS button at the top of the home page:
Diagram 20: Downloads page
In the DOWNLOAD PRINT HELPER section, click on the link to the PRINT HELPER program. (You may need to scroll down to see this.)
Diagram 21: Select download option
This is a standard Windows download. Choose RUN or OPEN, whichever option is displayed. If you are asked any security questions click on Yes to proceed. On each screen which follows, accept the default answers to install the program until you click on FINISH.
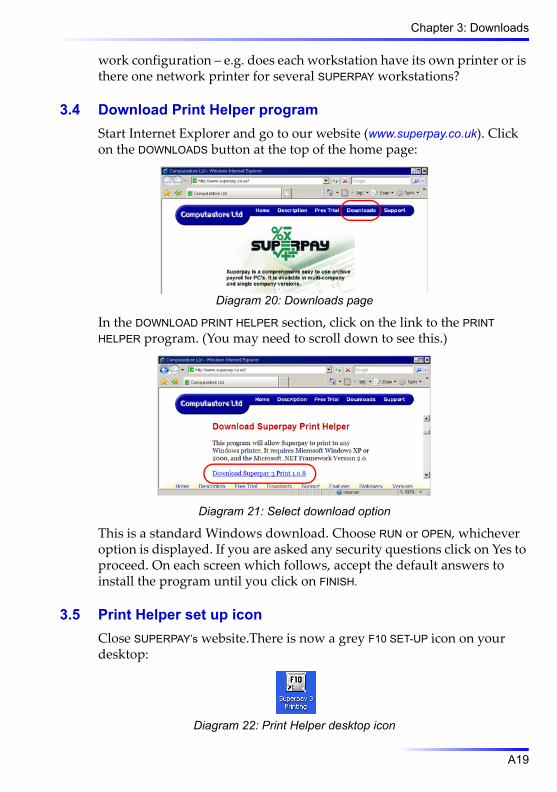
3.5 Print Helper set up iconClose SUPERPAY’s website.There is now a grey F10 SET-UP icon on your desktop:
Diagram 22: Print Helper desktop icon
A19

Installers Guide
Double‐click this icon to start PRINT HELPER.
3.6 System RequirementsTo run PRINT HELPER you need Microsoft’s .NET FRAMEWORK VERSION 2.0 on your PC. If, at this stage, you get a:
‘The application failed to initialise…’
message (or nothing happens), then you do not have the correct version of .NET on your computer and you need to download it now. The .NET FRAME-WORK is a free download from Microsoft’s website. If you do not know how to download this, refer to 3.15 below.
3.7 Start Print HelperWhen you start PRINT HELPER a small red PRINT HELPER icon is displayed in your System Tray to indicate that it is running.
Diagram 23: Inactive Print Helper icon in the system tray
(The System Tray – the bottom right corner of your desktop – holds pro‐grams such as your firewall which automatically load when you turn on your PC. They run in the background and do not normally require opera‐tor intervention. This is exactly how PRINT HELPER works. You set up the module, and then when you ask SUPERPAY to print, PRINT HELPER automat‐ically runs – with no further intervention from you.)
A20

Chapter 3: Downloads
3.8 Select Superpay printerDouble‐click the red (or green) PRINT HELPER icon to display the following SETTINGS screen.
Diagram 24: Settings for PRINT HELPER
Select a printer from the drop down list in the usual way.
3.9 Select ‘file to watch’You now need to tell PRINT HELPER where SUPERPAY will save your print‐outs. If you store SUPERPAY in the default directory of c:\superpay this is already set for you.
You should not need to enter or change any other fields on this screen – the file name rep.txt is already displayed – so now click on SAVE to close the SETTINGS window and activate the module.
A21

Installers Guide
3.10 ‘Active’ Print Helper iconNow that you have activated the PRINT HELPER module, the System Tray icon changes from red to green.
Diagram 25: Green F10 icon
If you later realise you want to change a SETTING, double click this icon to re‐display the SETTINGS screen, and enter the changes.
3.11 Prepare Superpay for Print HelperThe next step is to return to SUPERPAY. On the MAIN MENU, choose option 8, UTILITIES and then choose option 2, PRINTER CONTROL. Press PAGE DOWN to display the next screen. Press F6.
Diagram 26: Printer Control screen 2 - F6 prompt
This sets up rep.txt in the PRINTER 1 LOCATION field and inserts a string of numbers in the PRINTER INITIALISE and CONDENSED ON and OFF fields. Press F9 to STORE this screen.
3.12 Confirm Print Helper worksReturn to the MAIN MENU and choose option 7, COMPANY RECORD. Press F10 to ‘print’ the screen. (Note: It does not matter what report you choose to print here. We suggest COMPANY RECORD because it is easy to print this screen without knowing how SUPERPAY works.)
The first time you use PRINT HELPER, it may take a few seconds to convert the output and start printing. When something prints you have success‐fully set up PRINT HELPER.
A22

Chapter 3: Downloads
3.13 What happens nextFrom now on, whenever you press F10 in SUPERPAY, the printout will be sent to a REP.TXT file which PRINT HELPER automatically sends to your printer.
3.14 Change printerIf you want to change your printer, do this in PRINT HELPER, not SUPERPAY; i.e. double click on the green F10 icon in your System Tray, select the new printer from the drop down printer list and then SAVE the screen.
3.15 Download Microsoft .NET Framework 2.0.NET is a free download from Microsoft’s website. The remainder of this chapter tells you how to download this .NET software.
Step 1 – Go to Microsoft’s website
Diagram 27: Microsoft’s website
Use Internet Explorer to go to the Microsoft website at www.microsoft.com. This web page changes frequently, so your screen may look quite different from the diagram above.
A23

Installers Guide
Step 2 – Click on Downloads & TrialsNow click on DOWNLOADS & TRIALS in the ‘Microsoft Sites’ list (the list is at the top right of the above screen). Your screen will have a list similar to the list below.
Diagram 28: List of Microsoft sites accessible from the Home page
Step 3 – Click on Download CenterOn the Downloads & Trials screen, click on DOWNLOAD CENTER (first on list).
Diagram 29: Microsoft’s Downloads & Trials
Step 4 – Click on .NET option in list of popular downloadsIn the Download Centre, you can see:
.NET Framework Version 2.0 Redistributable Package (x86)
A24

Chapter 3: Downloads
is option 4 in Popular Downloads. (If, when you view this screen, this option is not displayed, you will then need to choose More Popular Down‐loads.)
Diagram 30: Microsoft Download Center
Step 5 – Click on Download
Diagram 31: Microsoft .NET Framework 2.0 download screen
Click on the Download button (in centre of screen). There is no need to read the description.
Step 6 – Click on RUN.The DOWNLOAD follows standard Windows conventions.
A25

Installers Guide
1. Click Run or Open (whichever is displayed).
Diagram 32: Standard file download security warning
2. The DOWNLOAD takes quite a while and a progress window is dis‐played.
Diagram 33: Download in progress
3. You are then asked if you want to run this software. Click on RUN.
Diagram 34: Security warning before Run
A26

Chapter 3: Downloads
4. The Installation program then checks whether this is a new Installa‐tion of .NET, or an update. If it is new, it may ask you to close Internet Explorer before continuing.
Diagram 35: Verifying the downloaded file
If this is a new installation, follow the installation instructions until the program is successfully downloaded. If, on the other hand, .NET is already installed, you are asked if you want to Repair or Uninstall the software.
Diagram 36: .NET Framework Version 2.0 already installed
If you are asked this question, click CANCEL (at the bottom of the screen) to end the download because you already have .NET Framework 2.0 on your computer. You then confirm the CANCEL and click on FINISH.
A27

Installers Guide
A28

4 Sy
stem and printerdetails4.1 OverviewYou now need to set up your SYSTEM DETAILS and PRINTER CONTROL screens.
4.2 System details screenChoose UTILITIES (option 8 on the MAIN MENU) and then SYSTEM DETAILS (option 6).The highlight is automatically in the PAYSLIP STYLE field. Enter an appropriate code for the payslips you will use (see the sample pack for product codes).
Diagram 37: System details
4.3 Default payslip styleSUPERPAY’s default I2 layout is for payslip product code PL which is the standard laser/inkjet payslip.
4.4 Other payslip styles for laser printersEnter:
P2 for Heat Seal laser (Mailer) payslips (product code PLHS)O2 for Pressure Seal laser payslips (product code PLPS).
A29

Installers Guide
4.5 Dot matrix payslipsEnter B2 for a dot‐matrix printer. This works with 1 part, 2 part, 3 part and security continuous payslips; i.e. product codes P1, P2, P3 and PS. If you will use continuous security mailer payslips (product code PM) enter A2 here.
4.6 Backup/restore disk drive
CD driveYou cannot back up SUPERPAY onto a CD.
Floppy driveIf your workstation has a floppy drive, you can backup your SUPERPAY data to floppy disk(s), in which case you do not need to change the drive letter here. However, floppy disks have limited storage and you may end up with lots of disks if you are running SUPERPAY for several companies or you have lots of employees.
USB flash driveYou can backup your data to a flash drive etc. in which case enter the appropriate drive letter here; e.g. H.
4.7 Close System Details screenPress F9 to STORE any changes. This returns you to the UTILITIES menu.
4.8 Printer Control screen 1Choose Option 2, PRINTER CONTROL. Screen 1 displays a list of forms. This screen has two functions:
It allows you to use the DESTINATION function to specify different print‐ers for different reports or forms – e.g. a laser printer for plain paper reports and a dot matrix for 2 part or security payslips. If you want to utilise this function, call our hotline. This manual assumes that you use the same printer for everything.It lists the reports and forms which are sitting in your spool file waiting to be printed. You can then select which ‘pages’ you want to print. Since you have not yet run any payrolls, there is nothing waiting to be printed.
Press PAGEDOWN to move to Screen 2.
A30
Chapter 4: System and printer details
4.9 Printer Control screen 2
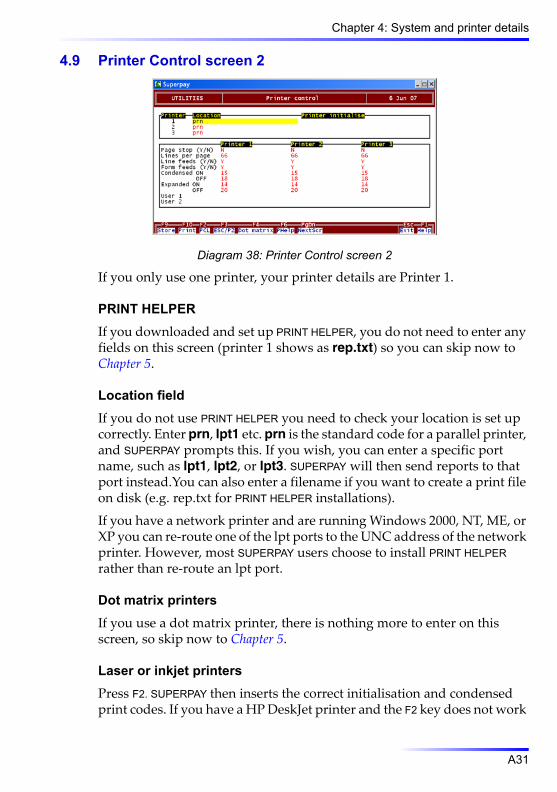
Diagram 38: Printer Control screen 2
If you only use one printer, your printer details are Printer 1.
PRINT HELPERIf you downloaded and set up PRINT HELPER, you do not need to enter any fields on this screen (printer 1 shows as rep.txt) so you can skip now to Chapter 5.
Location fieldIf you do not use PRINT HELPER you need to check your location is set up correctly. Enter prn, lpt1 etc. prn is the standard code for a parallel printer, and SUPERPAY prompts this. If you wish, you can enter a specific port name, such as lpt1, lpt2, or lpt3. SUPERPAY will then send reports to that port instead.You can also enter a filename if you want to create a print file on disk (e.g. rep.txt for PRINT HELPER installations).
If you have a network printer and are running Windows 2000, NT, ME, or XP you can re‐route one of the lpt ports to the UNC address of the network printer. However, most SUPERPAY users choose to install PRINT HELPER rather than re‐route an lpt port.
Dot matrix printersIf you use a dot matrix printer, there is nothing more to enter on this screen, so skip now to Chapter 5.
Laser or inkjet printersPress F2. SUPERPAY then inserts the correct initialisation and condensed print codes. If you have a HP DeskJet printer and the F2 key does not work
A31

Installers Guide
correctly, enter the following initialise code (do not change any of the other fields set up with the F2 key):
27 38 108 50 54 97 54 54 70
4.10 End sessionYou have now completed the SUPERPAY installation on your system, and can proceed to Chapter 5.
A32
5
Sundry items5.1 Mailing listPayroll programs are regularly updated for legislation changes. To ensure that you know when updates for SUPERPAY are available ‘SUBSCRIBE’ to SUPERPAY’s email list. Go to: www.superpay.co.uk and click on DOWNLOADS. Then click on SUBSCRIBE and SEND us a blank email (with the default email ‘subject’ of subscribe). We will then email a confirmation reply to you. On this email, click REPLY to confirm. There is no charge for our mailing serv‐ice.
We cannot add you to SUPERPAY’s email list; this is something that you need to do. If you have a separate IT department, it is good practice for both the IT and payroll departments to ‘subscribe’ independently so that the IT department will know when to update your software, and you will know what changes have been made to the program.
At any time you can remove your email address from our mailing list. To do this, go to SUPERPAY’s website, click on DOWNLOADS and click on SUB-SCRIBE as described above. Change the email subject from SUBSCRIBE to UNSUBSCRIBE and send a blank email to us.
We do not send attachments with our emails; we simply inform you when the program or manual has been updated. It is then up to you to down‐load an update. Please note: We do not email you about every small change to the program.
5.2 Superpay files - Overview
Information about SUPERPAY’s files is included in this Installers Guide since you may find this information useful if you need to RESTORE files after a system crash or from a backup system which is outside the SUPERPAY program. There are three types of files: data, program and system.
Location of filesIf you want to know where your existing SUPERPAY program and data files are stored, load SUPERPAY in the usual way and press ALT-F10 anywhere
A33

Installers Guide
within the program. The screen then displays a window of system infor‐mation which includes the location of your:
Program files:Local files:Shared files:Data files:
If you have the 250+ (i.e. unlimited) version of SUPERPAY, you can choose where to store your data. With all other versions, your SUPERPAY data is always in the same directory as your SUPERPAY program.
5.3 Data filesEach company has one company file and for each tax year one employee file. The names of these files include the company number, so Company 1ʹs files for 2007/2008 are:
SC001CPY.DATSC001Y08.DAT
i.e. the Y08 stands for the Employee Records for the year ending 5/04/08. Company 3ʹs files are:
SC003CPY.DATSC003Y08.DAT
You can see that the three digits after the ‘SCʹ are the company number. The two digits at the end of the second file represent the tax year end. When you have been using SUPERPAY for more than a year you will have an employee file for each tax year. For example, if you started using SUPERPAY on 6th April 2002, in 2007/2008 you have the following files:
SC001CPY.DATSC001Y03.DATSC001Y04.DATSC001Y05.DATSC001Y06.DATSC001Y07.DATSC001Y08.DAT
i.e. you will have six employee files (one for each tax year) and one com‐pany file.
5.4 Program filesIf you need to go back to a backup of your SUPERPAY program (e.g. if your hardware malfunctions and you lose your SUPERPAY programs) you can re‐install your latest update CD which is a complete program. Alterna‐
A34
Chapter 5: Sundry items
tively, you can download the latest version from our website www.super-pay.co.uk.
If your computer has malfunctioned and you want to check whether you still have all your SUPERPAY files on disk, here is a list of SUPERPAY’s pro‐gram files:
SP.EXESPBANKS.DATSPTEXT01.DATSPTEXT02.DATSPREP***.DAT (approximately 155 files, usually increases each year)VXBIOS.DRVVXVRAM.DRV
Report layoutsIf you have copied the sample reports as described in the New Users Guide each of the sample reports is in the format:
SPREP999.DAT
where 999 is a number between 001 and 699, usually in the 300 to 399 range. These sample reports are stored in the same directory as your SUPERPAY program.
Similarly, if we have designed some special reports for you, these reports will also be in this format.
5.5 System filesIn addition to the individual company files, there are also:
Spool file SPSPOOL.DATSystem file SPSYSTEM.DATConfiguration file SPCONFIG.DAT
These three files are common to all companies; i.e. there is only one spool file, one system file, and one configuration file no matter how many com‐panies you run on SUPERPAY.
Spool fileThe Spool File contains any reports you have saved using the SPOOL print prompt option. If there is no Spool File when you choose the SPOOL option, SUPERPAY creates the file for you. The contents of the Spool File are shown on PRINTER CONTROL, Screen 1.
A35

Installers Guide
System fileThe System File is displayed as Option 6 on the UTILITIES menu. It contains ‘system’ information which is common to all your companies – see 4.2.
Configuration fileThe configuration file contains:
the last company number accessed,the last date used within SUPERPAY,directory locations of your SUPERPAY program, shared, local and data files, andprinter details.
It is not displayed within SUPERPAY.
Colour scheme file(s)There are also colour scheme files in the range:
SPCOL001.DAT to SPCOL999.DAT
Most users accept the displayed colours rather than create their own col‐our scheme.
A36

SUPERPAYNew Users Guide
Section B


1
Introduction1.1 OverviewWelcome to SUPERPAY’s New Users Guide. At this stage you should have installed SUPERPAY and set up your system so that your printer works with SUPERPAY. If not, refer back to the Installers Guide and follow through the SUPERPAY set up procedures.
Different VersionsThe same SUPERPAY manual applies whatever size payroll you have. This is because SUPERPAY has the same core functions whether you have the smallest single company version (SP1-10) or the unlimited version (SP) which allows an unlimited number of employees for an unlimited number of companies.
Your licence number determines which functions are available to you. For example, single company versions cannot change company number.
Organisation of this manualThis New Users section guides you through setting up your data and run‐ning your first payroll on SUPERPAY. It is designed to be read in sequence. It specifically does not cover every possible function available within SUPERPAY. If your payroll needs to do something that is not covered by this Guide, refer to the FAQ (Frequently Asked Questions) booklet, email [email protected] or telephone our hotline.
1.2 TrainingSUPERPAY is easy to use and has come top in all the recent ICAEW surveys of payrolls used by accountants. Most new users work through this New Users Guide and run payrolls without any special SUPERPAY training. (You can call our Hotline on 0161 832 4761 if you get stuck.)
If you want a day’s intensive training on SUPERPAY, Computastore can rec‐ommend third party training at your premises. The 2007 daily rate is £300 + expenses + VAT. The price is the same for one, two or 3 people attending
B1

New Users Guide
the training session. The training day is from 10:00 am to 4:00pm with a break for lunch.
If you are new to PAYE, we suggest you attend a free Inland Revenue PAYE course to learn the basics. You can telephone your local tax office for more information on their training provision.
1.3 Forms needed
PayslipsAs part of your SUPERPAY package, you have received a sample pack of payslips.You can order the forms by calling our hotline on 0161 832 4761.
PaypacketsSUPERPAY’s standard laser payslip has been specifically designed to fold over so that the employee’s name and address is visible in a standard DL window envelope which can be purchased from any stationers.
On dot matrix payslips, you can choose a payslip option which prints an employee’s name and address on a separate payslip before the employee’s actual payslip. You can then use the perforation as a fold line so that the name and address is visible in a standard DL window envelope.
If you pay your employees in cash, SUPERPAY’s paypackets are made with strong manila paper for notes and coins. It fits both laser and continuous payslips.
Plain paper reportsReports are printed on either A4 sheets or continuous 9½ʺ x 11ʺ plain list‐ing paper.
Inland Revenue formsYou will need Inland Revenue P45 and P60 forms which you can order free of charge from the Inland Revenue Orderline. (Tel: 08457 646 646.)
1.4 Year end online filingYou can file your year end data using SUPERPAY’s Filing by Internet (FBI) module which is available as a free download from our website www.super-pay.co.uk. The program changes each year in line with Inland Revenue specifications. Each March we supply a separate FBI booklet to guide you through the process. This is supplied as part of your annual Maintenance.
B2

Chapter 1: Introduction
1.5 UpdatesAll PAYE legislation rates and bands are written into SUPERPAY and cannot be changed by you. When there are legislation changes we provide an update to cover the changes. The update may be a CD, an Internet down‐load or whatever media is the current best method of updating payroll software. (Technology is changing all the time so we cannot say how future updates will be supplied.) Please file any update notes in your SUPERPAY ring binder supplied with this manual.
There are usually two updates a year – on 6th April and in May or June. As well as any necessary legislation changes, the updates contain any pro‐gram enhancements made since the previous update. Licenced SUPERPAY users can always download the latest version of SUPERPAY from our Web‐site (www.superpay.co.uk).
Register on our websiteIf you register your email address with us you will be notified when SUPERPAY is updated. You can then download the most recent version of SUPERPAY – see 5.1 in the Installers Guide for registration details.
Maintenance chargeTo be able to use these updates, you need to renew your licence each year. We send Maintenance pro‐forma invoices in December to cover annual licence renewal which runs from February to January.
1.6 Hotline supportEven though new users receive free hotline support for one full year, you need to renew your support contract on 1st February of the current tax year. For example, if you buy SUPERPAY in August, you will be invoiced for 6/12 of the annual Maintenance the following February.
We send out all our Maintenance Invoices at the same time each year. This keeps costs to a minimum which is reflected in our annual Maintenance charges. No part‐year Licences are issued.
Inland Revenue HelplineWe like to be as helpful as possible (which is why we come top in the ICAEW surveys) but we do not have the authority to advise you on certain PAYE queries such as what tax or NI code you should use for particular employees or whether ‘redundancy pay’ is subject to tax or NI.
B3

New Users Guide
You should telephone the Inland Revenue or your accountant for advice on these matters. When the Inland Revenue or your accountant tells you what to do, we can tell you how to do it on SUPERPAY.
1.7 WarrantyUntil you are completely familiar with SUPERPAY, you should take care checking your computer results to ensure that unwanted facilities have not been engaged in error.
Please see your Licence Agreement for details of your warranty.
1.8 CopyrightThe SUPERPAY programs, manuals and payslips are copyright and all rights are reserved by Computastore Ltd. They may not be copied in whole or in part without the prior consent in writing from Computastore Ltd.
1.9 Screen displaysThe screens displayed in this New Users Guide correspond to SUPERPAY Version 3.18 (latest tax change 18th May 2007). If there have been legisla‐tion changes which affect the screen displays you will have received any relevant update notes which document the changes.
Because of the need for frequent legislation changes, payroll software often moves at a faster pace than the accompanying manual. So, do not worry if your screen displays differ from this manual. If there are major changes there will be update notes to explain the changes.
B4

2
Getting started2.1 OverviewAs part of the SUPERPAY installation, you loaded SUPERPAY and selected a company (Section 1.6 in the Installers Guide, steps 8 and 9). In case you are not the person who installed SUPERPAY we repeat that start up information in 2.3 to 2.8 below. If you have already started up SUPERPAY read 2.2 below and then skip to 2.9.
2.2 Data entrySUPERPAY is a DOS program running in a Windows environment. This means that you need a mouse to load the program, but once the SUPERPAY logo screen is displayed, you no longer use a mouse to move around the screen or choose options. This speeds up data entry. If you are unfamiliar with DOS data entry, you need to read this section.
1. When running SUPERPAY, NEVER close the program by clicking the X button in the top right corner of the window.
Diagram 1: Do not use this button to close Superpay
2. Always EXIT SUPERPAY by pressing the ESC key on the MAIN MENU and enter Y to confirm EXIT from SUPERPAY.
Diagram 2: Superpay exit prompt
3. As a general rule, press ENTER when you have finished typing a field.
4. Choose a menu option by entering the menu number; e.g. to choose option number 4 on a menu, type 4 and press ENTER. (You can also use the cursor keys to move up and down the list but it is quicker to type the option number.)
5. Use your cursor keys or ENTER key to move around the screen field by field.
B5

New Users Guide
6. At the bottom of many of the screens there is a list of options called the PROMPT. Press the appropriate function key along the top of your key‐board to choose an option; e.g. to STORE an Employee Record, press the F9 function key.
7. At any time you can press the ESC key to:go back a menu orescape from your current screen without saving any changes you may have made to the screen.
8. When SUPERPAY asks for a range of employees, you can:leave both fields blank to choose all employees.enter an employee’s number in both fields, to choose one employee.enter the codes of the first and last employees in the required range.enter a department letter to choose all employees in a department; e.g. enter A to A for all employees in department A; enter A to C for all employees in departments A, B and C.
9. If you have more than one company, you can go to the MAIN MENU, and press ALT-F2 (i.e. hold down the ALT key and press F2) to change com‐pany; i.e. you do not have to close down and load up SUPERPAY again with a different company.
10.When SUPERPAY asks a y/n type question, type:
Y ENTER or N ENTER
for yes or no. The Y or N can be in capitals or lower case.
2.3 Load SuperpayIf you do not already have SUPERPAY loaded, double click your SUPERPAY icon to display the SUPERPAY logo screen.
Diagram 3: Superpay desktop icon
B6

Chapter 2: Getting started
2.4 Enter licence numberIf this is the first time that SUPERPAY has been loaded, the following mes‐sage is displayed:
Diagram 4: Enter licence number
Enter your Licence number (include the dashes and do not enter any spaces). Then enter the name of your company (i.e. the name of the com‐pany on your Licence Agreement). If your installer has already done this for you (see 1.6 in the Installers Guide) SUPERPAY does not ask you to enter your Licence details again. Instead the screen below is displayed.
2.5 Logo screen – select company
Diagram 5: Select a company (on logo screen)
What you enter next depends on which version of SUPERPAY you have.
2.6 Company number (multi-company versions only)SUPERPAY asks for the company number. Enter Company 1 to start with. (You are not asked for the company number if you have the single com‐pany version of SUPERPAY.)
B7

New Users Guide
2.7 DateSUPERPAY asks for the date. As a new user, SUPERPAY prompts today’s date. Press ENTER to accept the displayed date or enter a new date.
2.8 Data path (unlimited version only)If you have the unlimited version, SUPERPAY asks for the data path. Most bureaux use the same directory for both the SUPERPAY data and program in which case leave this field blank and press ENTER. If you want to use a different directory, enter the folder name here (the folder must exist).
2.9 PasswordWhen (if) you set up password(s) on your COMPANY RECORD, SUPERPAY also asks for a password here on the Logo Screen. However, as a brand new user you have not yet set up any passwords, so you are not asked that question yet.
2.10 Main menuWhen you have completed the Logo screen, SUPERPAY displays the MAIN MENU.
Diagram 6: Main Menu
The MAIN MENU lists SUPERPAY’s main options. When you choose a MAIN MENU option (apart from COMPANY RECORD), you are presented with another list of options. To move from one option in, for example, the Employee Records menu to an option in the Utilities menu you must always come back through this MAIN MENU screen.
B8

Chapter 2: Getting started
Company nameAs part of your Installation instructions, you entered your Company name in the Company Record (see 1.8 in the Installers Guide), so your Company name is displayed in the top left of the screen.
2.11 System overviewTo run your first payroll you need to:
Set up your Company record – Chapter 3.Set up your Payslip headings – Chapter 4.Set up your Employee Records – Chapter 5.Run your payroll – Chapter 6.Print your payslips and reports – Chapter 7.
2.12 Default settingsWhere possible, SUPERPAY prompts default settings to make it as easy as possible for new users to get a payroll up and running.
At this stage you do not need the answer to ‘Why would I need this field?’ for every field on the Company and Employee records. If you do not know what a field is for, it is probable that your company does not need it. Sim‐ply go with the default settings, run a payroll, see if you get unexpected results and if you do, then look again at the default settings.
When you are more familiar with SUPERPAY you can come back and have a look again at all the fields on the Company, Employee and Payslips Headings records to see if SUPERPAY could perhaps do more to help with your payroll processing if you changed some of the default settings.
B9

New Users Guide
B10

3
Company record3.1 OverviewIf you are following through this manual in sequence, the MAIN MENU is currently displayed. Choose option 7, COMPANY RECORD.
Diagram 7: Choose Company Record
There are four screens for each company. Many of the fields will not con‐cern your company in which case leave the default settings unchanged.
(You can ignore Screen 4 which is no longer needed for current pay‐rolls. However, this screen is retained in case existing SUPERPAY users need to go back and look at previous years’ data.)
This chapter describes only the fields that most new users need to enter to get their payroll up and running on SUPERPAY.
3.2 Prompt optionsAt the bottom of the COMPANY RECORD screen, there is a list of options called the PROMPT.
Diagram 8: Company record prompt
B11

New Users Guide
StoreSTORE saves all four screens and returns you to the MAIN MENU. When you are setting up a new company, STORE creates the Company.
PrintPRINT prints the COMPANY RECORD currently displayed. For technical rea‐sons the report does not include Screens 3 and 4. If you want a printout of your Inland Revenue payments which are stored on Screen 3, the MONTHLY SUMMARY report can include these figures (see 7.3).
PasswordsThere is no PASSWORDS prompt on a new record; it is displayed only when you already have some passwords. The passwords themselves are not automatically displayed.
If you want to change or display passwords, press the PASSWORDS prompt. SUPERPAY then asks for a password and checks what you type against your companyʹs existing passwords. If correct, SUPERPAY then dis‐plays passwords up to the level that you enter.
You can then change any of your passwords by overtyping the displayed password with a new password and then storing the revised record.
NextScrNEXT SCREEN displays the next screen (without saving to disk any changes to the current screen). Though the prompt is not displayed, you can also use PREVIOUS SCREEN (i.e. press PageUp) to move back a screen.
When you are on Screen 4, NEXT SCREEN displays Screen 1. When you are on Screen 1, PREVIOUS SCREEN displays Screen 4.If you make a change to the COMPANY RECORD data and then use NEXT SCREEN or PREVIOUS SCREEN to move to another screen, remember to STORE the record when you have finished.You must have something in the COMPANY NAME field before you can use either NEXT SCREEN or PREVIOUS SCREEN.
Std tax year
Diagram 9: Company record prompt on screen 3
B12
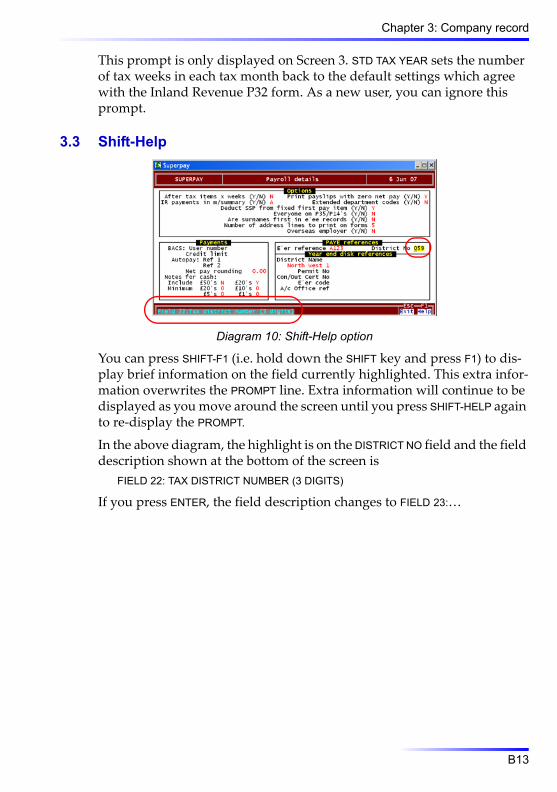
Chapter 3: Company record
This prompt is only displayed on Screen 3. STD TAX YEAR sets the number of tax weeks in each tax month back to the default settings which agree with the Inland Revenue P32 form. As a new user, you can ignore this prompt.
3.3 Shift-Help
Diagram 10: Shift-Help option
You can press SHIFT-F1 (i.e. hold down the SHIFT key and press F1) to dis‐play brief information on the field currently highlighted. This extra infor‐mation overwrites the PROMPT line. Extra information will continue to be displayed as you move around the screen until you press SHIFT-HELP again to re‐display the PROMPT.
In the above diagram, the highlight is on the DISTRICT NO field and the field description shown at the bottom of the screen is
FIELD 22: TAX DISTRICT NUMBER (3 DIGITS)
If you press ENTER, the field description changes to FIELD 23:…
B13

New Users Guide
3.4 Screen 1 – Company data
Diagram 11: Company Record – Screen 1
Name (Field 1)Length: 35 alphanumerics
Enter your Company name. There must be something in this field before you can move the highlight to another field.
Address (Fields 2-6)Length: (5 alphanumeric fields)
1st line: 352nd, 3rd, 4th line: 30 each5th line: 9
Enter your Companyʹs PAYE address.
Sort code/Account number/Account name (Fields 7-9)
Enter these fields if you intend to pay your employees by BACS, AUTOPAY, or ONLINE BANKING. You only need to enter an Account name if it differs from the name stored in field 1 above.
3.5 Screen 1 - PasswordsPasswords (Fields 10-13)
Length: Maximum 8 alphanumerics each
If you do not need passwords, leave these fields blank and press PAGE-DOWN now to move to screen 2.
Set up PasswordsSUPERPAY is supplied without any pre‐set passwords; i.e. all 4 password fields are blank. When you set up passwords here make sure you memo‐rize or write them down so that you wonʹt be locked out of a company just
B14
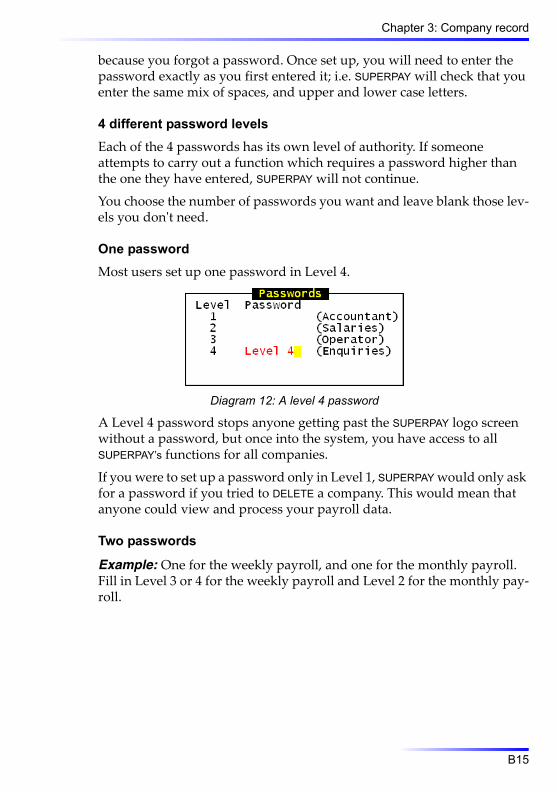
Chapter 3: Company record
because you forgot a password. Once set up, you will need to enter the password exactly as you first entered it; i.e. SUPERPAY will check that you enter the same mix of spaces, and upper and lower case letters.
4 different password levelsEach of the 4 passwords has its own level of authority. If someone attempts to carry out a function which requires a password higher than the one they have entered, SUPERPAY will not continue.
You choose the number of passwords you want and leave blank those lev‐els you donʹt need.
One passwordMost users set up one password in Level 4.
Diagram 12: A level 4 password
A Level 4 password stops anyone getting past the SUPERPAY logo screen without a password, but once into the system, you have access to all SUPERPAY’s functions for all companies.
If you were to set up a password only in Level 1, SUPERPAY would only ask for a password if you tried to DELETE a company. This would mean that anyone could view and process your payroll data.
Two passwords
Example: One for the weekly payroll, and one for the monthly payroll. Fill in Level 3 or 4 for the weekly payroll and Level 2 for the monthly pay‐roll.
B15

New Users Guide
3.6 Screen 2 – Payroll options
Diagram 13: Company Record – Screen 2
At this initial stage, new users should accept all the default settings in the Options box on this screen. Move the highlight down the screen until you reach the Inland Revenue references section.
PAYE references – general
These two fields are printed on Year end forms (P14’s, P60’s), payslips and other reports (P45’s, Deduction cards).
These fields are also used for identifying your submission when you file online at the end of the year. Errors in these two fields are the biggest source of failure of SUPERPAY year end online submissions. Unfortunately, we cannot eliminate these errors by validating these fields for you since SUPERPAY does not have access to the Inland Revenue’s records. So, it is up to you to take care when entering these fields. In particular do not enter spaces, commas, hyphens, full stops or forward slashes in either field.
E'er reference (Field 21)Length: 7 alphanumerics
This is your PAYE reference. (It is on your yellow P30 booklet, e.g. B134 or BZ12345.) Do not enter the district number and forward slash in front of the reference.
PAYE references – District No (Field 22)Length: 3 numeric
This is your PAYE district number; e.g. 490. It is the first three numbers of the Collection reference on your yellow P30 booklet.
B16

Chapter 3: Company record
Year end disk references – general
The screen has been subdivided at this point. The Permit No, E’er Code and A/c Office ref (Fields 24, 26 and 27) are now obsolete. Leave these fields blank.
District Name (Field 23)Length: 40 alphanumerics
This is your PAYE district name; e.g. North West 2.
Con/Out Cert No (Field 25)Length: 9 alphanumerics
Enter this field only if you run a Contracted out pension scheme. (This is the ECON number.)
3.7 Screen 3 – More payroll details
Diagram 14: Company Record – Screen 3
The Tax Credit box is not needed for payrolls run after April 2006.Ignore the INLAND REVENUE PAYMENTS, INCOME TAX YEAR and NOMINAL CODES boxes for now.At this stage, the only box which you need to complete is the TOTAL NI AMOUNTS box. This box determines how much Parental Pay reclaim is shown on the MONTHLY SUMMARY (the report which shows how much you need to pay over to the Inland Revenue at the end of each month). Please note: These fields have nothing to do with SSP.
Total NI amounts (Fields 5 and 6)Length: Enter 1, 2, 3 or 4 (default is 4 in both fields)
Small Employers reclaim the total Parental Pay (SMP/SPP/SAP) paid plus NIC compensation. Large employers reclaim 92% of the amount paid.
B17

New Users Guide
In order to calculate the value of Parental Pay reclaim correctly, SUPERPAY needs to know your NI totals for the previous two tax years. At the end of each tax year, SUPERPAY updates these fields automatically As a new user you need to enter these fields yourself. Enter 1, 2, 3 or 4 as appropri‐ate.The MONTHLY SUMMARY will then automatically calculate any Parental Pay reclaim based on what you enter here.
The default setting is 4; i.e. SUPERPAY assumes that you can claim back only 92% of the amount of Parental Pay paid out.
3.8 Screen 4 – Tax credit fundingThis screen is no longer used.
3.9 End sessionPress F9 to store your COMPANY RECORD and return to the MAIN MENU. You can now move on to PAYSLIP HEADINGS.
B18

4
Payslip headings4.1 Do you need Payslip Headings?The PAYSLIP HEADINGS file has four specific functions:
1. It allows you to store standard HEADINGS for your payslips. This saves entering the same text on each employee’s Record. Instead, you enter HEADING numbers on each employee’s Record, and RUN PAYROLL replaces the numbers with the corresponding text.
2. It allows you to analyse your payroll for management reports. When you print the DEPARTMENT TOTALS report the value for each HEADING is shown in a separate column.
3. It provides a way of grouping your HEADINGS into different nominal cost centres.
4. It enables you to set up Gross Pay items which are not subject to all four calculations of PAYE, NI, Pension and Holiday Pay. (If the item is subject to none of these calculations, enter it as an After‐tax item.)
Small companiesIf you have a small payroll (e.g. SP1-10) you do not need to set up HEAD-INGS. Instead you could enter the text Basic Pay, Salary etc. on each employee’s record and bypass PAYSLIP HEADINGS altogether. If you do not want any HEADINGS, move on to the next chapter now. However, the remainder of this manual assumes that you have set up HEADINGS.
B19

New Users Guide
4.2 Display Payslip HeadingsFollowing on from the previous chapter, the MAIN MENU is now displayed. Choose option 5, EMPLOYEE RECORDS, to show the employee record menu.
Diagram 15: Employee records menu
Choose option 3 on this menu. As a new user, a blank PAYSLIP HEADINGS screen is displayed for you to set up your own HEADINGS.
Diagram 16: Blank payslip headings file
You can have up to 99 HEADINGS for each company split over 3 screens plus 5 fixed HEADINGS on Screen 3. Press PAGEDOWN to move from screen to screen. The following diagram shows a screen which has already been set up.
B20

Chapter 4: Payslip headings
Diagram 17: Sample Payslip Headings
Each HEADING has three fields. Do not worry if you are not sure what HEAD-INGS you will need – you can come back to this screen at any time and add another item if you need extra HEADINGS when you start setting up your employees’ details. If you run a bureau, each company has its own set of HEADINGS.
Note: Most users separate their Gross pay and After tax HEADINGS. How‐ever you do not have to enter all your gross pay items on the left of the screen and the after tax items on the right as in the diagram above. If you wanted, you could have, for example, Mileage (an after tax item) as HEAD-ING 1, and Basic (a gross pay item) could be HEADING 2.
4.3 DescriptionIn the description field enter the text that you want printed on your employees’ payslips; e.g. Basic Pay, Overtime, Bonus, Attendance, BUPA etc. The text is completely flexible within the size constraints of the pays‐lip and only you can decide what is most meaningful to your employees.
‘Global’ valuesIf you wish, you can enter a value or a rate of pay after the text. This is use‐ful if a lot of your employees are on the same amount or rate. You only need to enter the HEADING number on the employees’ Records. SUPERPAY will then pay the standard value unless you enter an alternative value on an employee’s Record.
Example: Your Business Mileage allowance is 40p per mile. All employ‐ees receive the same car rate, so you set up a HEADING of Mileage @0.40 (say HEADING 20 – see Diagram 17 above). For each employee with possible
B21

New Users Guide
business mileage, enter *20 as an After‐tax item on his Record (i.e. you do not enter a value on his Record).
Diagram 18: Mileage rate set up as *20
This shows up in RUN PAYROLL as:
Diagram 19: Payslip screen shows ‘Mileage @ 40p’
One employee has a motorbike and he receives 22p per mile. On his Record, enter *20 @0.22 (i.e. you enter a value on his record). His payslip screen will show ‘Mileage @ 0.22’.
The advantage of using a global rate or value is that when there is a rate change (e.g. a payrise) you only have one field to change, instead of hav‐ing to change each employee’s Record.
B22

Chapter 4: Payslip headings
Fixed HeadingsAt the end of the list of 99 headings there are five fixed HEADINGS; Misc Gross, Misc Net, HP Accrual, SSP, and Parental Pay.
Diagram 20: Fixed headings (on Screen 3)
You cannot alter the text for these items, but you can change the flags and enter NL codes if required.
4.4 FlagsEach time you enter the description for a new HEADING, SUPERPAY auto‐matically inserts the ‘Flags’ NTPH. These letters represent NI, Tax, Pension, and HP Accrual respectively.
RUN PAYROLL checks the ‘Flags’ for each gross pay item on a payslip, and includes or excludes the item as appropriate when calculating NI, Tax, Pension, and HP Accrual amounts. So, by removing one or more letters from the ‘Flags’ field, you can exclude a gross pay HEADING from one or more of the above calculations.
Pension and Holiday Pay flagsIf you do not have Pensions or Holiday Pay accruals, you do not need to delete the P or H flags – just leave them on the HEADINGS file – they will have no effect on your payroll calculations.
After-tax itemsThere is no need to delete the flags for After‐tax items. RUN PAYROLL ignores the Flags for all items in the After‐tax items box on the payslip screen.
B23
New Users Guide
Flags on Negative Gross Pay ItemsIf a deduction is allowable for tax but not NI (e.g. Payslip giving) enter T as the only flag, i.e. delete N, P and H. This deducts the item from the Tax‐able total and Net Pay but does not have any effect on NI, Pension or HP accrual calculations.
Flags on fixed headingsYou can change the Flags for the fixed HEADINGS if you wish. E.g. you might want SSP excluded from Pension or Holiday Pay accrual calcula‐tions.
4.5 NL codeNL codes only need to be entered if you want to use SUPERPAY’s Nominal Analysis report or need to import totals from SUPERPAY’s Nominal Link File option.
If you use these NL codes, to complete your double entry book‐keeping you also need to enter Nominal Codes on Screen 3 of your Company Record (e.g. the code for Cash Book).
NL codes on fixed headingsYou can enter NL codes against the first three fixed HEADINGS (Misc Gross, Misc Net and HP Accrual). You cannot enter NL Codes against SSP and Parental Pay which are automatically posted to the same NL account as employer’s NI (which is set up on Screen 3 of your Company Record).
4.6 End sessionWhen you have finished setting up your HEADINGS, press F9 to STORE. Then choose PAYSLIP HEADINGS again and press F10 to PRINT the screen. It is important to PRINT the screen after you have STORED the record. Our hot‐line experience shows that some operators PRINT the screen and then, instead of STORING the record they press EXIT. This results in a printout which does not agree with the stored HEADINGS which RUN PAYROLL will use.
This printout will be useful when setting up your Employee Records. Now press EXIT (you have already stored the record) to return to the EMPLOYEE RECORDS menu. You can now move on to setting up your employees’ Records (Chapter 5).
B24

5 E
mployee records5.1 OverviewNow that you have set up your COMPANY RECORD and PAYSLIP HEADINGS you can set up your EMPLOYEE RECORDS.
There are three screens for each employee. As with the COMPANY RECORD, SUPERPAY displays ‘default’ settings (often blank) in many of the fields so that you rarely need to enter all the fields on any one record.
This chapter goes through each screen in turn. The field descriptions are in the order that the highlight moves round the screen; i.e. in field number order.
Before you go any further, you need to:Allocate employee codes.Calculate your totals to date (unless you are starting at Week 1).
5.2 Allocate employee codesAllocate a unique code to each employee. (Note: You also need to allocate codes to employees who have already left in this tax year so that you can store their totals for Year end.)
Each employee code must be unique. Sort your employees into depart‐ments or cost centres. Then allocate employee codes in the format X99999 where X is the employeeʹs department letter. You do not have to use all 5 digits for the code – see below.
DepartmentYou can have any letter in the range A to Z as the department. This gives 26 departments. If you do not use departments, give everyone the same department letter; e.g. A.
An employee can belong to one department only during any pay period. To change an employee’s department between pay periods, simply use the F3 prompt to change department letter.
B25

New Users Guide
Format of employee codeThe first character must be the department letter. The remaining char‐acters can be any combination of letters, numbers, forward slashes (/), or hyphens (‐).The employee code can have 2 to 6 characters; e.g. A1, A01, A001, A0001, A00001 are all acceptable. However, you should try to keep the employee code reasonably short to speed up enquiries etc.Once you have decided on the number of characters, keep this num‐bering consistent throughout your payroll. SUPERPAY sorts your employee numbers on each character in sequence from left to right. So, A001 comes before A002 but A002 comes before A01.Even if you are a very small company, it is not a good idea to set up your codes as A1, A2 etc. If you find you later need to upgrade to the 20 record licence and continue the same sequence, A11 to A19 will come before A2 etc. Much better to set up your codes as A01, A02 etc. to allow for future expansion – numbers can be easily changed but its best not to have to.When setting up your employees for the first time, it is a good idea to leave gaps between employee numbers. Then it is easy to slot starters into the gaps when they later join your company; e.g. set up your employees as A01, A03, A06 etc.You cannot incorporate spaces between characters.
Change employee code once it has been set upTo change an employeeʹs department or number, use the E'EE CODE prompt F3.
5.3 Totals to dateWhat totals you enter depends on when you start SUPERPAY. At the begin‐ning of the tax year there are no totals to date. At any other time get together your P11 deduction working sheets or other payroll records. For each employee, total the employerʹs and employeeʹs NI as at last week; i.e. the week before the first week you want to run live. Do not use the P45 prompt to enter totals unless the employee is a starter.
Set up any employee who has already left in this tax year and DELETE his employee Record. This way you will have the leaver’s details stored on file for Year End but he will not be displayed during RUN PAYROLL.
B26

Chapter 5: Employee records
5.4 Choose menu optionFollowing on from the previous chapter, you should now have a printout of your PAYSLIP HEADINGS and the EMPLOYEE RECORDS menu is displayed.
Diagram 21: Employee records menu
Enter 1 to choose EMPLOYEE ENQUIRY/UPDATE.
Diagram 22: Enter an employee code
SUPERPAY displays a blank EMPLOYEE RECORD, and waits for you to enter an employee code. Enter the code of your first employee.
5.5 Prompt options on new employee record
Store (F9)STORE saves all 3 screens; i.e. you can move freely from screen to screen without losing any data you have already entered and press STORE only when you have finished setting up all 3 screens.
When you press STORE, SUPERPAY checks the Record and warns if you have made an invalid entry. If such a warning is displayed, press EXIT to
B27

New Users Guide
clear the message and then make the necessary correction(s) before you press STORE again.
Text (F6)TEXT displays a window showing your current PAYSLIP HEADINGS. How‐ever, if you are following this manual in sequence, you should have a printout of your current PAYSLIP HEADINGS and so you should not need to use this option at this stage.
You cannot change PAYSLIP HEADINGS here on the employee’s Record. If you realise you need to add to or change a HEADING, press STORE to save the data you have already entered, EXIT back to the EMPLOYEE RECORDS menu and choose PAYSLIP HEADINGS again. You can then make any required changes to your HEADINGS before returning to the employee’s Record.
Diary (F4)DIARY displays the employee’s SSP record which you can view or update.
P45 (Shift-F4)Use this P45 prompt only to enter P45, P6 or P9 details for an employee who started earlier in the current tax year. Press P45 and SUPERPAY pops up a P45 box.
Diagram 23: P45 pop-up box
Enter the tax code, total pay to date and total tax to date from the P45 and press STORE. While doing your initial set up, do not enter the date of leav‐ing or Week/Month number even if these details are on the P45.
Zero tax on P45
B28
Chapter 5: Employee records
If the employee has paid no tax to date, enter zero in the P45 tax field. If you leave this field blank, SUPERPAY thinks you have not entered the field and displays a Warning ‘Wrong Combination of fields’ message.
Change P45 fields
If you realise you have made a mistake and want to change the fields in the P45 box on Screen 3 of an employee’s Record, press the P45 prompt again. Change the fields in the Pop‐Up box and then press STORE – you cannot access the P45 details on Screen 3 directly.
P45 and subsequent P6 or P9
Enter only the most recent form – e.g. you received a P45 when an employee joined. Some time later, this was followed by a P6 from the Tax Office. Enter only the most recent details.
P45 from a previous year
If you are setting up records to start from the beginning of the new tax year, do not use the P45 prompt.
Do not use this prompt:
to enter totals to date for employees who are not starters, or
if there are no totals on the P45 etc.; i.e. the employee is on a Week 1 tax code. Instead enter his tax code on Screen 1 of his Record.
Subsequent starters
When you run SUPERPAY live – i.e. you are no longer entering historic information – enter the date of leaving and Week/Month number when completing the P45 box. SUPERPAY will then check the tax, and amend the tax total if necessary before storing it on the employee’s record.
Delete (F5)If an employee has already left, press DELETE instead of STORE when you finish setting up his Record. The Record will then be flagged as DELETED and remain on file until Year end but will not be displayed in RUN PAYROLL Press DELETE and SUPERPAY asks:
Delete requested – are you sure (Y/N)?
and prompts Y. Press ENTER to confirm. The employee’s Record is then cleared from the screen.
B29

New Users Guide
NextScr (Page Down) and Page UpNEXTSCR displays the next screen on the employee’s Record. When you are on the last screen (Screen 3), NEXTSCR displays the first screen.
PAGEUP displays the previous screen of the employee’s Record. When you are on the first screen (Screen 1), PAGEUP displays Screen 3. (Note: This option is not displayed.)
Print a new recordPress the F9 function key when you have entered your employee’s details and want to move on to the next employee.
To PRINT a new Record, you first have to STORE the Record and then re‐enter the employee’s code to bring back his Record. You can then press PRINT. When you are setting up all your employees for the first time, rather than print them one at a time you should LIST ALL EMPLOYEES in one go (EMPLOYEE REPORTS menu, option 5 – see diagram below).
Diagram 24: Print all employee records
ExitIf you have made a real mess of a new Record and want to start again from scratch, press EXIT instead of STORE. SUPERPAY then asks:
Diagram 25: Prompt after changes made
Enter Y to confirm and clear the screen. If you pressed EXIT by mistake, you can enter N (instead of Y) and carry on with what you meant to do (either continue entering fields, or press F9 to STORE the record).
B30

Chapter 5: Employee records
Shift-HelpIn the same way as the COMPANY RECORD, SHIFT-HELP (i.e. hold down the SHIFT key and press F1) displays brief details about the current field, over‐writing the PROMPT. Press SHIFT-HELP again to re‐display the PROMPT.
Other prompt options
Diagram 26: Full employee record prompt
When you have run a payroll you will notice that there are extra prompt options at the bottom of each employee’s Record. These are not required in the initial set up and so are not covered here.
5.6 Employee record – Screen 1
Diagram 27: Sample employee record screen 1
Employee codeLength: 6 alphanumerics, format X99999
Enter the number that you have allocated to this employee – see 5.2 above.
Employee name (Field 1)Length: 25 alphanumerics
Enter the employeeʹs full name. You can enter either first name(s) or sur‐name first but you must use the same format for all your employees. If you enter surnames first, enter Y in the COMPANY RECORD'S ‘ARE SURNAMES FIRST IN E'EE RECORDS' option (Screen 2).
B31

New Users Guide
5.7 Gross pay items (Fields 2-12)Length: 11 fields of 20 alphanumerics
1. You can have up to 11 Gross Pay items for each employee.
2. Only set up items here if you want them on the employeeʹs payslip every pay run. (You enter occasional or non‐recurring Gross pay items as extra items during RUN PAYROLL.)
3. Gross Pay items can be a mixture of rates of pay or flat amounts. For each item you enter a description (the HEADING) and then a value. If needed, you can also set up a standard number of hours; e.g. 35.
4. Values can be positive or negative, and there is no need to enter deci‐mal zeros; e.g. you can enter £15 as 15, or 15.0 or 15.00.
5. Do not enter a pound sign, ‘£’.
6. The maximum value for each line is ±999,999.99. However, even though individual lines may be negative, RUN PAYROLL will not let you store a negative Total Gross pay and the maximum value for the total of all the gross pay items is +9,999,999.99.
7. Do not enter Pension deductions as a Gross Pay deduction. Pensions have special rules and are totalled separately from other items. So, use the designated Pensions box (fields 35 to 62) to set up pensions.
8. All Gross Pay items will be subject to Tax and NI unless you specifi‐cally change the ‘Flags’ for the item on the PAYSLIP HEADINGS file – see 4.4 above.
If you set up percentage pensions and/or HP accruals (field 21 and fields 35 to 62) all Gross Pay items will also be subject to pension and/or HP accrual unless you specifically change the ‘Flags’ in PAYSLIP HEADINGS.
5.8 Gross pay items – examplesSUPERPAY’s format for pay items is very flexible. This section shows exam‐ples of the most popular types of Gross Pay items. The set up on the Employee Record is shown together with the corresponding payslip screen. Using the examples as a guide, you should then be able to see how to set up your own employees’ pay items.
B32

Chapter 5: Employee records
1. Flat amount
Diagram 28: Set up a flat amount
You enter a description and then enter a value; i.e. Salary and £2500.25. Do not enter pound signs. Rather than type the word Salary, most users use heading numbers such as *1 (see below)
Diagram 29: Enter heading number (instead of text)
or *2 etc. The description on the payslip will be identical whether you type in the text or enter a heading number.
Diagram 30: Payslip of Salary paid employee
2. Variable flat amountWhen you RUN PAYROLL you will see that the highlight does not stop on a fixed pay item. So, if an employee’s pay is likely to change from period to
B33

New Users Guide
period, do not enter the value here on the Employee’s Record. Instead, leave the value blank and enter the value during RUN PAYROLL.
Diagram 31: Set up variable flat amount
The above gross pay item is displayed during the RUN as:
Diagram 32: Variable flat amount
and the highlight waits for you to enter a value on the payslip screen.
3. Rate(s) of payMany employees are paid a rate of pay; e.g. an agreed amount per hour for basic hours, weekday overtime, and weekend overtime etc.
Using your printout of the PAYSLIP HEADINGS file, enter headings as *1, *2 etc. rather than type in the text; e.g. enter *1 instead of typing ‘Basic Payʹ and enter the @ symbol and the rate.
Diagram 33: Set up rates of pay
These items will then be displayed on the employee’s payslip screen as:
B34

Chapter 5: Employee records
Diagram 34: Rates of pay
The highlight on the payslip screen pauses and waits for you to enter the number of units for each rate (in this case the number of hours). If, for example, there is no overtime, you simply press enter for zero units. As you can see from this example you can have a mixture of rates and flat amounts on an employee’s payslip.
4. Extra descriptionYou can enter extra description relating to a PAYSLIP HEADING by typing on the next line the text that you want printed on the payslip. Enter a value of zero on this extra description line. You can not enter any additional text on the same line as a heading number.
Example: An employee gets £550 Basic each week which includes a tem‐porary supervisor allowance. Basic is Heading 1. Enter this item over two lines on the employee’s Record as:
Diagram 35: Set up extra description
This is displayed on the payslip screen as:
B35

New Users Guide
Diagram 36: Extra description
The 0.00 on the extra description line is not printed on the payslip.
5. Commission or pieceworkValues can include more than 2 decimal places; e.g. 2.123456. This is useful for piecework rates or for commission percentages.
Example: For a commission of 2¼% enter a rate of .0225 on the employee’s Record.
Diagram 37: Set up commission as a rate
This is displayed on the payslip screen as:
Diagram 38: Commission percentage displayed on payslip
B36

Chapter 5: Employee records
The highlight waits for you to enter the value of goods sold (e.g. £20,000) and then calculates the amount payable.
Diagram 39: Commission calculation
Piecework is entered in the same way; i.e. you set up the rate per piece and then during RUN PAYROLL, you enter the number of ‘pieces’.
6. Net to grossEnter n after the value if an employee receives a fixed Net pay each week and you want RUN PAYROLL to calculate the Gross pay required to achieve that Net pay. You can only have one such item on an employeeʹs payslip.
Example: An employee receives £350 Net Wages each week. Set this up as 350n. There is no space before the n.
Diagram 40: Set up a net to gross pay item
B37
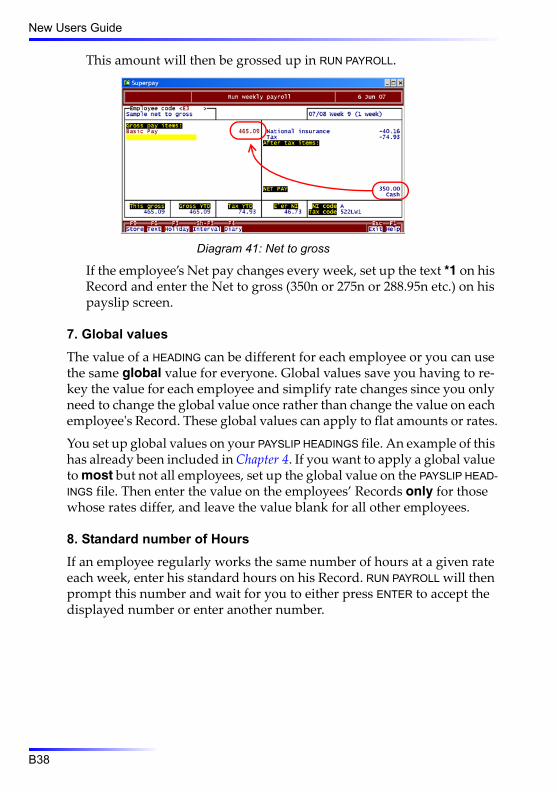
New Users Guide
This amount will then be grossed up in RUN PAYROLL.
Diagram 41: Net to gross
If the employee’s Net pay changes every week, set up the text *1 on his Record and enter the Net to gross (350n or 275n or 288.95n etc.) on his payslip screen.
7. Global valuesThe value of a HEADING can be different for each employee or you can use the same global value for everyone. Global values save you having to re‐key the value for each employee and simplify rate changes since you only need to change the global value once rather than change the value on each employeeʹs Record. These global values can apply to flat amounts or rates.
You set up global values on your PAYSLIP HEADINGS file. An example of this has already been included in Chapter 4. If you want to apply a global value to most but not all employees, set up the global value on the PAYSLIP HEAD-INGS file. Then enter the value on the employees’ Records only for those whose rates differ, and leave the value blank for all other employees.
8. Standard number of HoursIf an employee regularly works the same number of hours at a given rate each week, enter his standard hours on his Record. RUN PAYROLL will then prompt this number and wait for you to either press ENTER to accept the displayed number or enter another number.
B38

Chapter 5: Employee records
Example: An employee earns £8.25 an hour and regularly works 35 hours a week at this rate. On his Record enter *1 @8.25 35.
Diagram 42: Set up standard hours for an hourly pay item
RUN PAYROLL displays:
Diagram 43: Standard hours
The cursor pauses on 35, and waits for you to either press ENTER or alter the hours. (Note: Standard hours can be any heading number and can be entered on any Gross pay line on the employee’s Record. Similarly, you can have standard units in the After tax items.)
5.9 Pay interval (Field 13)Enter W, M, 2 or 4 (for Weekly, Monthly, 2‐Weekly or 4‐Weekly).
Diagram 44: Choose the pay interval
When you have finished setting up Gross Pay items, the highlight moves into the Last Run box. SUPERPAY only gives you this Pay interval? choice when you first set up an employee. If you realise you need to change the pay interval of an employee you have already STORED you will notice that the cursor no longer stops in this field. Instead use the WK/MN (F2) prompt at the bottom of the screen.
B39

New Users Guide
5.10 After-tax items (Fields 14-20)Length: 7 fields of 20 alphanumerics
Enter each field in exactly the same way as Gross Pay items. To deduct an item – e.g. union subs – enter a negative value.
You can have up to 7 after‐tax lines on the payslip. These can be any com‐bination of permanent items set up here in the After‐tax box, Loan repay‐ments, Attachments or Court Orders, Student Loans and items entered during RUN PAYROLL. If you enter something on each of the 7 lines here, you will not get the chance to enter any more items during RUN PAYROLL.
Items entered in these fields have no effect on the Standard Deductions; i.e. Tax, NI, Pension, HP Accrual. They are simply added to or deducted from the employee’s Net Pay.
You can set up a Loan, Attachment or Student Loan in any one of the After‐tax lines – see below.
5.11 After tax items – loansOn any one of the after‐tax lines enter a heading *L with the negative value of the deduction to be made each week. Then enter the balance outstand‐ing in the loan field (field 22). The maximum value for a loan is 9 numeric; i.e. £999,999.99.
Diagram 45: Set up a loan
B40

Chapter 5: Employee records
Each week RUN PAYROLL deducts the amount you set up as an After‐tax item (using the HEADING *L) until the balance in the Loan field is zero.
Diagram 46: Loan deduction
If the balance outstanding (e.g.£5) is less than the weekly repayment (e.g. £10), RUN PAYROLL automatically adjusts the last payment to bring the bal‐ance to zero (i.e. deducts only £5.).
When the balance outstanding reaches zero, RUN PAYROLL no longer deducts a repayment from the employeeʹs payslip but the text ‘Loan’ is still displayed (with a value of zero).
Diagram 47: Loan repaid in full
To make future payslips look neater, once the Loan has been repaid, you should delete the After‐tax item from the employeeʹs Record.
5.12 After tax items – attachmentsFirst enter *A3, *A2, *A1 or *A on one of the After‐tax lines. You decide how much administration charge (if any) you want to make (current max‐imum is £1 per deduction). Then enter the appropriate fields in the Attachments box (bottom right of Screen 2). The following examples show
B41

New Users Guide
a Council Tax attachment, a CSA order (Child Support Agency), and a Court Order (i.e. a non‐priority County Court judgement).
If an employee has more than one Attachment, determine which one has priority and set it up as *A3 etc. Then set up any additional Attachment as a standard After‐tax item; i.e. you will have to calculate how much to deduct.
Council Tax attachment
Diagram 48: Council Tax attachment (Screen 1)
There are three different sets of rates for Council Tax Orders. SUPERPAY selects the applicable rate based on what you enter on the after‐tax line.
*A3 is for orders issued on or after 1st April 2007.*A2 is for orders issued between after 1st October 1998 and 31st March 2007.*A1 is for CT orders issued prior to 1/10/1998. (It can take many years for some attachments to be fully paid, so there may still be some *A1 attachments in force.)
As well as the after‐tax item on Screen 1, you also need to enter the total amount due and any administration charge in the Attachment box on Screen 2.
Diagram 49: Council Tax attachment (Screen 2)
B42
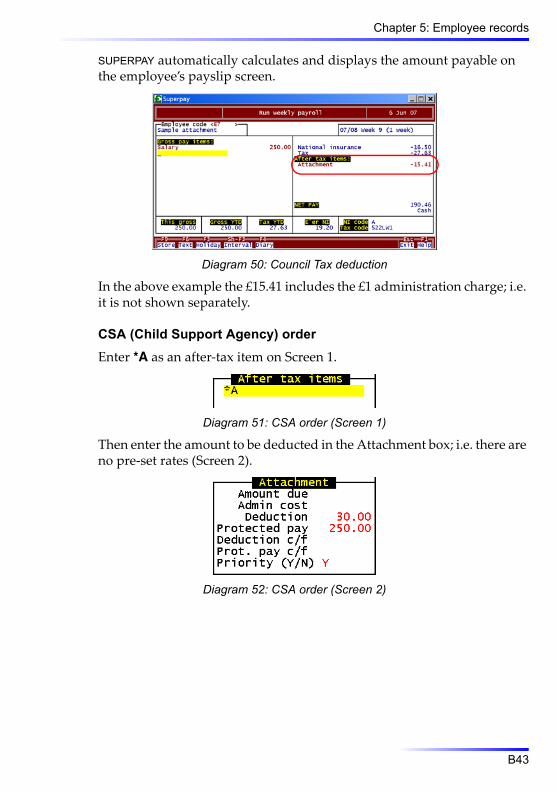
Chapter 5: Employee records
SUPERPAY automatically calculates and displays the amount payable on the employee’s payslip screen.
Diagram 50: Council Tax deduction
In the above example the £15.41 includes the £1 administration charge; i.e. it is not shown separately.
CSA (Child Support Agency) orderEnter *A as an after‐tax item on Screen 1.
Diagram 51: CSA order (Screen 1)
Then enter the amount to be deducted in the Attachment box; i.e. there are no pre‐set rates (Screen 2).
Diagram 52: CSA order (Screen 2)
B43

New Users Guide
In this example there is no administration charge. SUPERPAY will deduct £30 as long as the employee’s ‘Net earnings’ are more than £250.
Diagram 53: CSA deduction
If the employee’s ‘Net earnings’ are less than the Protected Pay (£250 in this example) the payslip still shows the text ‘Attachment’ but no deduc‐tion is made.
Diagram 54: CSA - pay too low for deduction
Since CSA is a priority order, any unpaid CSA is carried forward to the next pay period until the earnings are sufficient to cover current and back‐dated CSA.
County Court (non-priority) orderEnter *A as an after‐tax item.
Diagram 55: County Court order (Screen 1)
B44

Chapter 5: Employee records
Then enter the amount to be deducted in the Attachment box; i.e. there are no pre‐set rates. Enter N for non‐priority
Diagram 56: County Court order (Screen 2)
In this example, there is an administration deduction of £1 in addition to the County Court attachment of £4.25.
Diagram 57: County Court deduction
SUPERPAY deducts £5.25 on the payslip screen. If the employee’s ‘Net earn‐ings’ are not sufficient to pay this amount, SUPERPAY deducts what it can, and does not carry forward any underpayment (since this is a non‐priority order).
5.13 After tax items – student loanIf an employee has a student loan enter *S on any after tax line. Do not enter any amount.
Diagram 58: Student Loan
B45
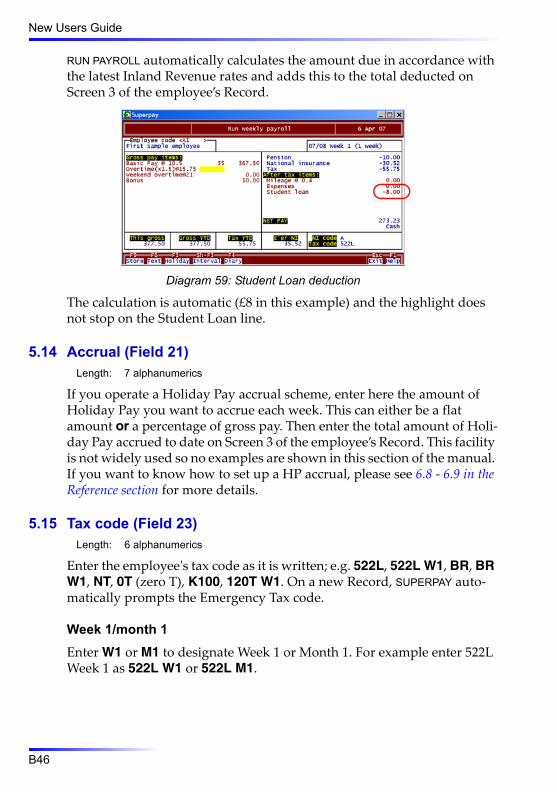
New Users Guide
RUN PAYROLL automatically calculates the amount due in accordance with the latest Inland Revenue rates and adds this to the total deducted on Screen 3 of the employee’s Record.
Diagram 59: Student Loan deduction
The calculation is automatic (£8 in this example) and the highlight does not stop on the Student Loan line.
5.14 Accrual (Field 21)Length: 7 alphanumerics
If you operate a Holiday Pay accrual scheme, enter here the amount of Holiday Pay you want to accrue each week. This can either be a flat amount or a percentage of gross pay. Then enter the total amount of Holi‐day Pay accrued to date on Screen 3 of the employee’s Record. This facility is not widely used so no examples are shown in this section of the manual. If you want to know how to set up a HP accrual, please see 6.8 ‐ 6.9 in the Reference section for more details.
5.15 Tax code (Field 23)Length: 6 alphanumerics
Enter the employeeʹs tax code as it is written; e.g. 522L, 522L W1, BR, BR W1, NT, 0T (zero T), K100, 120T W1. On a new Record, SUPERPAY auto‐matically prompts the Emergency Tax code.
Week 1/month 1Enter W1 or M1 to designate Week 1 or Month 1. For example enter 522L Week 1 as 522L W1 or 522L M1.
B46

Chapter 5: Employee records
Emergency tax codeIf a starter does not have a P45 and you expect him to work for you for more than one week, you must complete a P46. If the employee does not sign the P46, then you must put him on a BR W1 tax code. This means that he will receive no tax allowances and all his pay will be taxed at the Basic Rate of tax (22% for 2007/8; 20% from 6/4/08).
If the employee signs the P46, put him on the Emergency Tax Code (in 2007/2008 522L W1 or 522L for School or College leavers).
No taxEnter NT for no tax. NT is a valid code, but is not often allocated by the Inland Revenue. However, when it is, it is usually on a Week 1 basis – i.e. you do not refund any tax already paid. Exceptionally, it can be on a cumulative basis, so it is up to you to enter NT W1 or NT. If the Inland Revenue Tax Code change simply states NT, you should assume NT W1. If in doubt telephone your tax office.
StudentsIf you know a student working for you during the holidays is not going to exceed the annual taxable pay allowance, get him to sign a P38S and put him on a cumulative NI tax code rather than 522L. SUPERPAY will then con‐vert the student to a 522L code if his pay to date goes over the annual Earn‐ings Threshold.
D prefix codeD prefix codes are always calculated on a Week 1 basis so you do not enter W1 after them.
Year EndIf you are setting up employees’ Records to start from the beginning of the tax year remember to change all Week 1/Month 1 suffix tax codes to cumulative codes (in accordance with Inland Revenue regulations); i.e. 522L W1 becomes 522L. You may also need to apply a global tax code change, e.g. update all L codes by 21 on 6/4/08.
5.16 NI code (Field 24)Enter the employeeʹs current NI code.
A Standard employee.B Reduced NI rate for women who hold an appropriate Certificate of
B47
New Users Guide
election.C Employee with employer NI but no employee NI; e.g. over retirement
age.D Standard employee on COSR pension scheme.E Women with reduced NI rate on COSR pension scheme.F Standard employee on COMP pension scheme.G Woman with reduced NI rate on COMP pension scheme.J Deferred, not contracted out.L Deferred, contracted out, salary related (COSR) pension scheme.S Deferred, contracted out, money purchase (COMP) or Stakeholder pen‐
sion scheme.X Employee with no employee or employer NI. X is used for employees
under 16 years and others who do not come under NI regulations.
Terms used in above listDeferred means that the employee pays 1% employee NI; the employer pays standard rate NI.COSR is Contracted out Salary Related pension scheme.COMP is Contracted out Money Purchase pension scheme.
B codeMarried women who wish to pay reduced NI contributions must produce an appropriate Certificate of Election. Otherwise allocate A or D NI code to them.
C codeEmployees over retirement age must produce an Age Exemption certifi‐cate to go on to C code. Note: C code still has employer NI even though the employee pays no NI.
StudentsStudents are usually A code; only students under 16 are Code X (no NI).
5.17 Other items in constants boxDirector (Field 25)
Length: Enter Y or N
There are special NI regulations for Directors – so make sure you enter Y here for the last payslip of the year for all directors – see 9.3.
B48
Chapter 5: Employee records
NI number (Field 26)Length: 13 alphanumerics
Enter the employeeʹs NI number (e.g. AB 12 34 56 C). If you omit the spaces, SUPERPAY slots them in when you press ENTER. If you leave this field blank, RUN PAYROLL prints ‘(Not known)’ in the NI box on the payslip.
Male/female (Field 27)Length: Enter M or F
Enter M or F for male or female.
Date of birth (Field 28)Length: Date format DD/MM/YY
Enter the employee’s date of birth as Day/Month/Year (e.g.15/09/80).
Start date (Field 29)Length: Date format DD/MM/YY
Enter the date the employee started. This is essential for new directors.
Leave date (Field 30)Length: Date format DD/MM/YY
Enter the date an employee left. You still need to DELETE the employee to ensure that RUN PAYROLL does not display his details. If you DELETE the Record and do not enter this field, SUPERPAY slots in the processing date as the Leave Date.
CIS Expiry date (Field 31)
This field is no longer used.
Emp’ee type (Field 32)Length: Enter C, H, P, T or I
Use this field to specify:
Casual employees.Held employees – e.g. during a Trade Dispute.Employees who need a P11D. P is used by PAS’s P11D Organiser soft‐ware.Employees who have their pay details imported from a Timeclock file using our separate timeclock import module.The correct Irregular payments calculation of Average pay for Direc‐tors’ Parental Pay and SSP.
You can enter multiple combinations if required.
B49

New Users Guide
Clock/Cert. number (Field 33)Length: 15 alphanumerics
Enter this field if an employee has a different number from his Employee Code (field 1); e.g. a clock number. You can use this field when importing data from a timeclock.
Pension c/out no (Field 34)Length: S or A followed by 7 numbers and one letter
If the employee is in a contracted out pension scheme, enter the SCON here without spaces (e.g. S4234008J).
5.18 Pensions (Fields 35-62)Enter pensions in this pension box rather than as Gross pay or After‐tax items. Always enter the contributions as positive amounts; RUN PAYROLL deducts any employee contributions entered here. (You enter any pen‐sion totals to date on Screen 3.)
Diagram 60: Empty pension box (bottom right of Screen 1)
Each employee can have up to four different pension calculations. These can be separate parts of the same pension – e.g. a percentage of gross pay plus a flat rate AVC – or completely different pensions.
Leave blank those fields which do not apply to this employee. The first 3 lines are for non‐stakeholder pensions. Line 4 is only for Stakeholder pen‐sions.
Pensions – Type (lines 1, 2 and 3 only)
Enter a number in the range 1 to 6 so that RUN PAYROLL knows whether to deduct the pension before or after tax and NI.
Type 1 – The e’ee contribution is deducted before tax is calculated.Type 2 – The e’ee contribution is deducted after tax is calculated.Type 3 – The e’ee contribution is deducted after tax has been calcu‐lated. The actual deduction is the amount shown on the screen less Basic Rate tax. E.g. Up to 5/4/08 a Type 3 e’ee pension of £10 gives rise to a £7.80 deduction on the employee’s payslip (i.e. after 22% Basic Rate deduction). After 6/4/08, £8 will be deducted (i.e. after 20% Basic Rate deduction).
B50

Chapter 5: Employee records
Types 1, 2 and 3 are not allowable for NI; i.e. the pension is deducted after NI is calculated.Types 4, 5 and 6 are as 1, 2 and 3 above but before NI has been deducted. Type 4 is used for salary sacrifice pension schemes. Types 5 and 6 are seldom used.
It is important to enter the correct number. If you enter 1 and the Type should be 2, you are in effect giving the employee double tax allowances on this pension – once at source during RUN PAYROLL and the pension com‐pany will also claim tax allowances for that employee since they believe the deductions have been made Net of tax.
There is no type field for Stakeholder pensions. RUN PAYROLL automati‐cally deducts the employee pension after deduction of tax and NI.
Pensions – Emp’eeLength: 7 alphanumerics
Enter the amount deducted from the employee’s pay each week or month.
Flat amount
Enter the amount deducted; e.g. 7.25 and RUN PAYROLL deducts £7.25 each pay day. If the employee goes on holiday for a week and you advance his tax week by one, SUPERPAY deducts £7.25 x 2 = £14.50.
Note: For two and four weekly payrolls enter the equivalent weekly con‐tribution. RUN PAYROLL then deducts the amount you enter here x 4.
Example: A 4 weekly employee pays £50 Pension. Enter 12.50 here on his Record, and RUN PAYROLL deducts £50 every 4 weeks. If you enter 50.00 here, RUN PAYROLL deducts 4 x £50.00 = £200 every 4 weeks.
Percentage deduction
Percentage pension deductions can either be a percentage of all an employee’s pay (including bonuses and overtime) or a percentage of part of his pay.
If you want SUPERPAY to deduct a percentage of all his pay simply enter the percentage.
If you want SUPERPAY to calculate a percentage pension on only part of gross pay, enter the percentage here and update the P (for pension) flags on the PAYSLIP HEADINGS file.
B51

New Users Guide
Pensions – Emp’erLength: 7 alphanumerics
Enter the amount of pension an employer contributes each week or month (if any). A contribution can either be a percentage of gross pay or a flat amount. Enter the percentage sign after the amount for percentage pen‐sions.
If the employer’s contribution is a percentage it must be on the same basis as the employee’s contribution; i.e. if the employee’s percentage pension is a percentage of Hourly Pay only, then the employer’s will also be a per‐centage of Hourly Pay.
Pensions – Pay rangeLength: 2 fields: each 5 alphanumerics for start and end of pay range
These two fields allow you to calculate a percentage pension on that part of an employee’s pay which is within pre‐defined limits. You can enter any amount between 1 and 99,999 (whole pounds only) or L in the first field and/or U in the second field, representing the lower and upper NI limits.
Pensions – IDLength: a number in the range 1 to 299
You must enter this field for Stakeholder pensions (line 4). When Stake‐holder pensions were introduced, it was expected that pension companies would want reports in their own format. This never materialised but you still need to enter something in this field. We suggest you enter 1 as the ID.
Pensions – ReferenceLength: 13 alphanumerics
You can leave this blank. This field is not printed on any of SUPERPAY’s standard reports but is printed on Stakeholder pension reports (see 7.4).
Some pension examples
Example 1: Stakeholder pension.
An employee pays £10 a week to a Stakeholder pension. For a Stakeholder pension you need an ID. See 8.4 in the Reference section for the list of ID’s.
Diagram 61: Stakeholder pension
B52

Chapter 5: Employee records
This is displayed on the payslip screen as:
Diagram 62: Stakeholder pension (payslip screen)
Example 2: Pension Net of tax (non Stakeholder).
An employee pays £10 Net of tax.
Diagram 63: Pension net of tax
Example 3: Percentage pension deducted gross (non Stakeholder).
An employee pays 3% and the employer 5% of his total gross wage each week.
Diagram 64: Pension as a percentage of gross pay
Example 4: Percentage pension on part of gross pay.
An employee pays 3% of his basic Salary each week; there is 5% employer contribution. Set this up on the employee record in the usual way.
Diagram 65: Step 1 - Percentage entered on Employee Record
B53

New Users Guide
On the PAYSLIP HEADINGS file remove the P (for pension) ‘Flag’ on all Gross Pay items that are used for this employee except Salary.
Diagram 66: Step 2 - Amend Payslip Headings
The employee does not receive commission or supervisor’s allowance so the P has been left on these flags. Similarly, you do not need to change the flags on the after‐tax items since flags are ignored for all after‐tax items.
Diagram 67: Payslip screen shows amount deducted
The payslip screen deducts 3% of the Salary as employee pension, but does not deduct any pension from the overtime or bonus.
Pensions - more informationSee Chapter 8 in the Reference section for more information.
B54
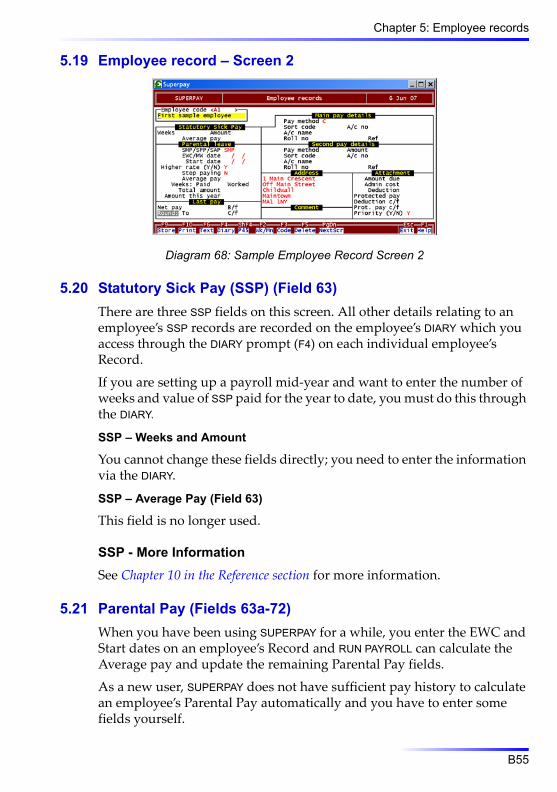
Chapter 5: Employee records
5.19 Employee record – Screen 2
Diagram 68: Sample Employee Record Screen 2
5.20 Statutory Sick Pay (SSP) (Field 63)There are three SSP fields on this screen. All other details relating to an employee’s SSP records are recorded on the employee’s DIARY which you access through the DIARY prompt (F4) on each individual employee’s Record.
If you are setting up a payroll mid‐year and want to enter the number of weeks and value of SSP paid for the year to date, you must do this through the DIARY.
SSP – Weeks and Amount
You cannot change these fields directly; you need to enter the information via the DIARY.
SSP – Average Pay (Field 63)
This field is no longer used.
SSP - More InformationSee Chapter 10 in the Reference section for more information.
5.21 Parental Pay (Fields 63a-72)When you have been using SUPERPAY for a while, you enter the EWC and Start dates on an employee’s Record and RUN PAYROLL can calculate the Average pay and update the remaining Parental Pay fields.
As a new user, SUPERPAY does not have sufficient pay history to calculate an employee’s Parental Pay automatically and you have to enter some fields yourself.
B55

New Users Guide
New Parental PayIf an employee is about to go on Parental Leave, you need to calculate the Average Weekly Pay and enter this figure along with the other fields in this Parental Pay box on the employee’s Record.
Note: SUPERPAY does not check the start date to see if an employee has been working long enough to get Parental Pay. That check is up to you; if you enter the Parental Pay box, SUPERPAY assumes that the employee is entitled even if the start date is recent. SUPERPAY checks only to see if the employee’s average earnings are below the lower earnings limit, in which case SUPERPAY will not pay Parental Pay.
Ongoing Parental PayEnter all the fields in the Parental Pay box – you cannot simply enter the value of Parental Pay already paid. If there are any errors in what you enter, SUPERPAY either does not let you STORE the record, or RUN PAYROLL makes a Parental Pay adjustment on the employee’s first payslip.
Parental Pay fully paid in this tax yearIf an employee has already received Parental Pay in this tax year and is not entitled to any more, you still need to enter all the Parental Pay details in the SMP box; i.e. EWC date, MPP start date etc. in addition to the total paid. If you enter an incorrect combination of fields, SUPERPAY will not let you STORE the Record.
Enter Y in the STOP PAYING SMP field so that RUN PAYROLL will not adjust the value of any SMP already fully paid.
Set up Parental PayChapter 9 in the Reference section explains how to set up Parental Pay. Below is a summary of the information stored in each field in the Parental Pay box.
Diagram 69: Parental Pay box
B56

Chapter 5: Employee records
EWC date (Field 64)Length: Date field
This is the date the baby is due (this is on the MATB1 certificate). If the employee is not entitled to PARENTAL PAY, do not enter this field. Note: You enter this field even if you are paying SPP.
Start date (Field 65)Length: Date field
Enter the calculation start date for Parental Pay.
Higher rate (Field 66)Length: Enter Y or N
Under current legislation, you should not need to change the default Y.
Stop paying (Field 67)Length: Enter Y or N
You should not need to change the default N.
Average pay (Field 68)Length: 10 numeric (maximum value 9,999,999.99)
Enter the value of the employee’s average Weekly Gross Pay in the 8 weeks (or 2 months if monthly paid) prior to the Qualifying Week – see 9.5 in the Reference section.
Weeks paid (Field 69)Length: 2 numeric
Enter the number (if any) of weeks already paid to an employee in the cur‐rent PPP (Parental Pay Period). This field plus the Weeks worked field must not exceed 39 weeks SMP for babies due after 1st April 2007. (The limit was 26 weeks SMP for babies due before that date.) The maximum amount of Paternity Pay is 2 weeks.
Weeks worked (Field 70)Length: 2 numeric
If an employee has worked during the PPP and so lost some Parental Pay entitlement, enter the number of weeks worked.
Total amount (Field 71)Length: 10 numeric
Enter the total value of Parental Pay already paid to the employee in this PPP.
B57

New Users Guide
Amount this year (Field 72)Length: 10 numeric
In many cases you enter the same figure here as the previous field. How‐ever, where an employee’s PPP straddles a tax year end, enter here the value of Parental Pay paid in the current tax year.
5.22 Last payNet pay
Length: SUPERPAY updates this field
You do not enter anything here.
Round to (Field 73)Length: Maximum value ±10.00
Enter the amount that the employeeʹs Net Pay is to be rounded to. E.g. 5 indicates that the employeeʹs pay is to be rounded up to the next £5 pounds. You would normally only use this field if you round the pay for several employees or departments rather than the whole payroll.
Round whole payrollIf you round everybody’s pay there is no need to enter this field on each employeeʹs Record. Simply enter the rounding amount on the COMPANY RECORD. If you want to exempt a few individuals from this global round‐ing, enter 0.01 here on their individual records. This makes SUPERPAY round to 1p which means no rounding.
B/fLength: 5 numeric, maximum ±9.99
You cannot enter this field.
Last pay – C/f (Field 74)Length: 5 numeric, maximum ±9.99
This is the rounding amount to be carried forward to the employee’s next payslip. You enter this field only if you have been using Net Pay Round‐ing on your previous payroll and have an amount to carry forward.
5.23 Pay DetailsThe Main Pay and Second Pay boxes hold an employee’s payment details. Most employees have only one pay method in which case set up the Main Pay box. Sometimes employees want part of their wages paid into a differ‐ent account or savings fund, so SUPERPAY allows you to split Net pay in
B58

Chapter 5: Employee records
two – the Main Pay and Second Pay. PAYMENTS determines the split by what you enter in the Second Pay Amount field. If both pay methods are the same, the employee has two entries on the relevant payment printout.
5.24 Main pay details (Fields 75-80)Pay method (Field 75)
Length: 1 alphanumeric (default is C for cash)
Enter here how the employee is paid – by cash, cheque etc. Enter:
A for AutopaymentsB for BACS (including online banking)C for cashG for Giro (no longer used)Q for chequeO for other
The remaining fields in this section apply only if you use Autopay or, BACS. Note: This includes all the recent online banking systems such as Business Master, Lloydslink, Hexagon, Bank Line etc.
Sort code (Field 76)Length: 6 numeric in format 999999
Enter the employeeʹs bank sort code. E.g. enter 40‐30‐60 as 403060. When you STORE the Record, SUPERPAY searches through its internal list of banks and displays a warning if it cannot find the sort code. If this warning is displayed, you should then call the Record up again and correct the entry. If the entry is correct, you can ignore the message since the Bank List is only used for giros which banks no longer accept.
If you want to set up a new bank, choose option 5 on the Employee Records menu.
Diagram 70: Add or change bank details menu option
B59

New Users Guide
The following screen is displayed for you to enter your new bank’s details.
Diagram 71: Add new bank
A/c no (Field 77)Length: 10 numeric
Enter the employeeʹs bank account number.
A/c name (Field 78)Length: 25 alphanumerics
Leave blank if the employeeʹs bank account is in his own name; i.e. enter the bank account name only if it differs from the employee’s name (field 1). This often applies to joint accounts.
Roll no (Field 79)Length: 15 alphanumerics
Enter this field only if the employee’s wages are paid into a savings account with a Building Society. Note: This field is for a Building Society Roll number – it is not the same as a current account number.
Ref (Field 80)Length: 8 alphanumerics
For employees paid by Autopay, enter the employeeʹs unique Autopay reference number allocated by the bank (usually 5 digits).
5.25 Second Pay Details (Fields 81-87)These fields are identical to the Main Pay Details apart from the ‘Amount’ field, and so the field descriptions are not repeated.
B60

Chapter 5: Employee records
Amount (Field 82)Length: Maximum value 9,999,999.99 or 99.99%
Enter a fixed amount (e.g. 100 for £100) or a percentage of Net Pay to be deducted from the Main Pay each week and paid by a second method.
5.26 Address (Fields 88-92)Length: 5 lines, each 25 alphanumerics
Enter your employeeʹs address.The number of lines you can use for the address is defined by what you have already entered on Screen 2 of your COMPANY RECORD. The default setting is all 5 lines.
Note: If you store addresses or other personal employee information, you must be registered under the Data Protection Act.
5.27 Comment (Field 93)Length: 20 alphanumerics
Use this field to store any useful information about an employee such as Job Description, Pay Review date, Sick Note to 30/08/07 etc. SUPERPAY does not print this comment on any standard reports apart from the EMPLOYEE RECORD print. However, RUN PAYROLL displays any comment next to the employee’s name on his payslip screen. It can therefore be used as a reminder field.
Diagram 72: Sample comment field
This comment is shown at the top of the payslip screen.
Diagram 73: Comment displayed on payslip screen
B61

New Users Guide
5.28 Attachment box (Fields 94-100)This box is covered in 5.12 above and Chapter 1 in the Reference section.
5.29 Employee record – Screen 3
Diagram 74: Sample Employee Record – Screen 3
If you are starting at Week 1, there are no totals to enter on this screen apart from HP Accrual (if used). If you are starting mid‐year, get together your P11 deduction working sheets or other payroll records for each employee – including this tax yearʹs leavers. For each employee, total the employer and employee NI as at last week; i.e. the week before the first week you want to run live.
P45 totals
The cursor does not stop on these fields. To enter P45 details for someone who has already started, press SHIFT-F4 and enter the details (see 5.5 above). To change any of the displayed details, press SHIFT-F4, amend the displayed P45 window, and when you STORE the record, SUPERPAY updates the screen.
Year to date
As with the P45 totals, the cursor does not stop on these fields. The Gross and Tax fields are the sum of the totals from the P45 and This Employment fields. SUPERPAY automatically updates these totals when you enter P45 or This Employment fields.
This employment – Gross Pay totals (Fields 94-97)Length: 4 fields, maximum 9,999,999.99
For many employees you enter the same total in all 4 pay fields. However, each field has a different function.
Pay is the total value of all Gross Pay items.
B62

Chapter 5: Employee records
Gross pay for: Tax is the Taxable Gross.Gross pay for: NI is the total of all Gross pay items which have been subject to NI. This includes all NIʹable pay, even if it is outside the NI limits. This figure is needed to calculate directors’ NI. It is not necessar‐ily the same as the sum of the ‘Gross pay for NI’ fields in the NI totals box if the employee has earned above or below the NI limits.Gross pay for: Pension is the total Gross pay subject to pension.
Tax, Stud. loan, Net pay and HP Accrl (Fields 98-100)Length: 4 fields, maximum 9,999,999.99
Enter these fields if appropriate. (New users do not usually enter Net pay.)
Pension totals (Emp’ee and Emp’er) (Fields 102-109)Length: 8 fields (maximum 9,999,999.99 each)
Enter pension totals (if any) for the year to date. The 4 lines correspond to the 4 pensions on Screen 1 (Stk = Stakeholder pension).
Tax Credit totals (Fields 110-117)
These fields are no longer used.
NI totals (Fields 118-144)Length: 3 lines of 8 fields each
Enter the totals on Line 1. If the employee’s code has changed, enter the most recent code on line 2, etc.
NI Code, Emp'ee and Emp'er
Enter the employee’s NI code, and employee and employer NI contribu‐tions.
Gross pay for NI
Enter the Gross pay (GP) on which NI has been calculated.
To LEL: GP up to and including the Lower Earnings Limit (whole pounds only).To ET: GP from LEL up to and including the Earnings Threshold.To UEL: GP from ET up to and including the Upper Earnings limit.
C/Out rebate (E’ee and E’er) (Fields 117/8, 126/7, 135/6)
These fields show the accumulated employee and employer NI rebates for employees on a contracted out NI code.
B63

New Users Guide
5.30 What next?
List all employeesWhen you have set up your employees, you may wish to LIST ALL EMPLOY-EES or print DEDUCTION CARDS (EMPLOYEE REPORTS menu, options 1 and 5) so that you can confirm that what you have entered is correct. You may instead prefer to print sample reports 901, 902 (and 904 if you pay by Autopay or BACS) to check your set up details. Chapter 7 tells you how to access these sample reports.
Print P35 etc.You should print a P35 (YEAR END menu, option 1) and MONTHLY SUMMARY (PAYSLIPS/REPORTS menu, option 4) to check that the tax and NI on your new SUPERPAY system agree with the totals from your old payroll. There are now so many statutory totals that you need to keep, it is important to make sure everything is correct before you start running SUPERPAY ‘live’.
BackupsWhen you have finished setting up your employees, backup your data (UTILITIES, FILE MAINTENANCE, option 1). It is often useful to have a backup which agrees exactly with your previous payroll. You can then go back and start again if you want to try out various options on your first ‘dummy’ run.
End SessionYou are now ready to run your first payroll – see Chapter 6.
B64

6
Run payroll6.1 OverviewThis chapter describes how to RUN a PAYROLL in SUPERPAY. Before getting down to specifics, there are several points which should be noted before you start your first RUN PAYROLL.
Employee selectionYou select the range of employees you want to process; i.e. you do not have to RUN your whole payroll in one go.
Payslip displayRUN PAYROLL displays each employee’s payslip in turn for you to complete. The display is in the same format as the printed payslip so you can imme‐diately see the effect of any entries you make during the RUN. If you make a mistake, you can press ESC and start again.
Pay itemsYou set up an employee’s pay items either:
permanently on an employee’s personal Record so they are displayed every week, oryou enter them on the employee’s payslip screen during the RUN so that they are included only on this week’s payslip.
The set up is identical. For example you enter permanent and temporary Pay item descriptions as heading numbers (e.g. *1) or text. The set up of pay items was covered in Chapter 5 and the examples illustrating the most popular types of gross and after‐tax pay items are not duplicated here.
Interrupt the RunYou can EXIT the RUN at any time, and come back to the place where you left off. This is useful if you need to change an employee’s Record (e.g. to
B65
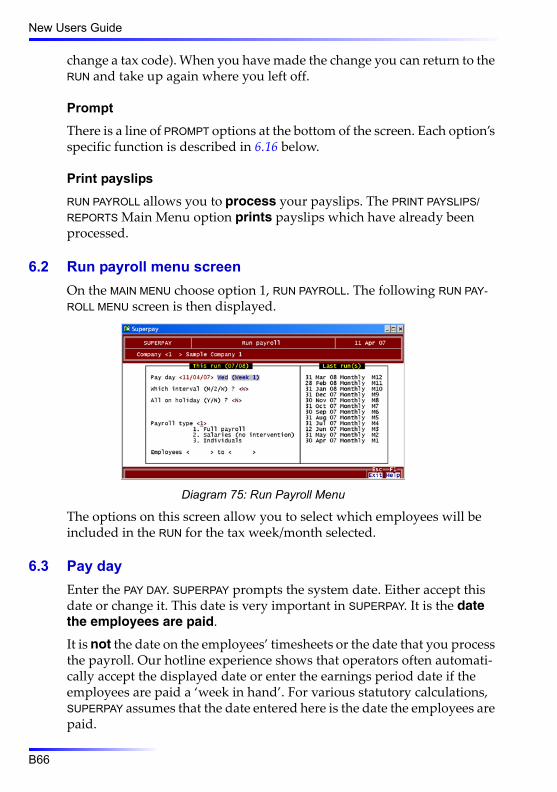
New Users Guide
change a tax code). When you have made the change you can return to the RUN and take up again where you left off.
PromptThere is a line of PROMPT options at the bottom of the screen. Each option’s specific function is described in 6.16 below.
Print payslipsRUN PAYROLL allows you to process your payslips. The PRINT PAYSLIPS/REPORTS Main Menu option prints payslips which have already been processed.
6.2 Run payroll menu screenOn the MAIN MENU choose option 1, RUN PAYROLL. The following RUN PAY-ROLL MENU screen is then displayed.
Diagram 75: Run Payroll Menu
The options on this screen allow you to select which employees will be included in the RUN for the tax week/month selected.
6.3 Pay dayEnter the PAY DAY. SUPERPAY prompts the system date. Either accept this date or change it. This date is very important in SUPERPAY. It is the date the employees are paid.
It is not the date on the employees’ timesheets or the date that you process the payroll. Our hotline experience shows that operators often automati‐cally accept the displayed date or enter the earnings period date if the employees are paid a ‘week in hand’. For various statutory calculations, SUPERPAY assumes that the date entered here is the date the employees are paid.
B66

Chapter 6: Run payroll
Run a payroll for a previous tax yearYou cannot enter a PAY DAY for a previous tax year here. If you want to go back and run or re‐run a payslip in a previous tax year, change the System date on the MAIN MENU first and then return to RUN PAYROLL. (As a new user, this will not apply to you at this stage, but its useful to know for next year.)
6.4 Which intervalEnter W, M, 2 or 4 for weekly, monthly, 2‐weekly, or 4‐weekly.
SUPERPAY displays only the options that apply to your employees; e.g. if you do not have any 2 or 4 weekly employees, SUPERPAY only gives you the choice between M and W (for monthly or weekly).If you can RUN only one type of payroll for the date entered (e.g. all your employees are monthly paid), this question is not displayed.If you have already run all your weekly employees for the tax period, SUPERPAY does not give you the W option. This also applies to the other options; e.g. if you have already run all your monthly employees for the tax month, you do not get the M option here.
6.5 Tax week/monthWhen you enter the interval SUPERPAY displays the tax week/month for the Pay day that you have entered; e.g. for a Pay day of 15/06/07, SUPERPAY displays Week 11, Month 3, or Week 12 (for two and four weekly paid) employees.
or
You cannot change the Tax period directly. If you want to RUN a payroll for a different period, press EXIT to go back and change the PAY DAY.
B67

New Users Guide
6.6 All on holidaySUPERPAY prompts N. Press ENTER to move on to the next question or enter Y. If you enter Y, SUPERPAY asks ‘to week ( )?’. Enter the week/month you want to advance to.
Example: SUPERPAY displays Week 25 next to the Pay day and the whole payroll is about to go on two weeks’ holiday. Enter 27 here.
If only part of your payroll is going on holiday, enter N here and use the HOLIDAY prompt to advance the tax week on each individualʹs payslip screen (see 6.16 below).
6.7 Which payroll type
Diagram 76: Select payroll run type
Enter 1 for Full payrollThis is the most common option. Choose it to process a payslip for all your current employees who have not already been paid for the tax period you have chosen. All your employees will be displayed in turn for you to build up their payslips on screen.
Enter 2 for Salaries (no intervention)Choose this option if all (or nearly all) your employees’ pay is the same each week since it is quicker to have SUPERPAY process all the payslips automatically rather than build up each payslip on the screen. The RUN will then stop only when it comes to an item which needs an entry; e.g. expenses.
B68

Chapter 6: Run payroll
Enter 3 for IndividualsChoose this option if you do not want to process the whole payroll. Instead of automatically displaying the next employee, SUPERPAY displays a blank payslip screen and waits for you to enter an employeeʹs code.
Diagram 77: Enter specific employee code
When running individuals, the payslip screen is exactly the same as the FULL PAYROLL option. The only difference between the options is that in the INDIVIDUALS option, the EMPLOYEE CODE prompt is redisplayed after each payslip. When you have finished the RUN, press EXIT to return to the MAIN MENU.
6.8 EmployeesThis option allows you to choose all employees (i.e. FULL PAYROLL) within a given range. Press ENTER twice to select all employees or enter a range of departments (e.g. A ‐ C) or employees (e.g. A015 ‐ B023). If you want to process one employee only, choose option 3 (INDIVIDUALS) above rather than enter his number in both fields here.
6.9 Employee payslip screenSUPERPAY then displays an employeeʹs payslip screen.
Diagram 78: Sample Employee Payslip Screen before processing
B69

New Users Guide
Week numberThe employeeʹs week number and the number of weeks his pay covers (the pay interval) are shown in the top right of the screen. SUPERPAY high‐lights the pay interval if it differs from the rest of the payroll.
Diagram 79: Pay interval highlighted
6.10 Pre-set payslip itemsYou can have up to 11 gross pay and 7 after‐tax items on a payslip. These can be a mixture of rates, flat amounts, SSP, PARENTAL PAY, STUDENT LOANS, and ATTACHMENTS. They can either be pre‐set on the employeeʹs Record, or you can enter them as extra items during RUN PAYROLL.
Below is a recap of the information about pay items which has already been covered in Chapter 5.
ValuesValues can be positive or negative.Each line can be up to plus or minus 999,999.99.The total pay can be up to 9,999,999.99.Rates of pay and units can include more than 2 decimal places, e.g. Piecework @1.12345 per unit or Commission @.025 (i.e. 2.5%), but the money column is shown to 2 decimals.There is no need to enter decimal zeros; e.g. you can enter £15.00 as 15, 15.0 or 15.00.Do not enter a pound sign, ‘£’.
RatesRates have the ‘@’ symbol in front of the rate payable. Enter the number of units against each item, and SUPERPAY calculates the total amount.
If you want zero units for a displayed rate, press ENTER (i.e. there is no need to enter zero), and SUPERPAY moves on to the next line.If you enter a standard number of units on the employee’s Record (e.g. 35 hours), in RUN PAYROLL the cursor stops on the pre‐set units field. Either press ENTER to accept the displayed number or overtype it with another number.
B70

Chapter 6: Run payroll
Flat amountsPermanent flat amounts are automatically displayed and you cannot change the value on the payslip screen. If you need to change a permanent item, escape the RUN, change the employee’s record and then return to the RUN and pick up where you left off.
If you have a variable flat amount (e.g. bonus or expenses) enter the value.
Zero valuesZero value gross pay or after‐tax items are shown as zero on the screen and blank on the printed payslip.
Example: An employee has not worked any overtime so you press ENTER to move on to the next pay line. The value is zero on the screen, but when you print the payslip, 0.00 is not printed on the Overtime line (i.e. the value is left blank).
‘Net to gross’ payEnter n after a value to show that it is a Net amount. SUPERPAY ‘grosses upʹ the value and shows the Gross Pay, Pension (if it applies), Tax and NI needed to arrive at the Net value that you have entered.
Example: You enter a value of 300n (or 300.00n) in one of the gross pay lines and press ENTER. SUPERPAY then displays the Gross Pay, Tax, NI and any Pension needed to arrive at £300 Net pay.
You can enter n here in RUN PAYROLL, on an employeeʹs Record, or on the PAYSLIP HEADINGS file. (Note: You can only have one net to gross item on a payslip.) A Net bonus is covered in Q11 in the FAQ 2007 booklet.
6.11 Extra itemsIf you have not used all 11 gross pay and 7 after tax items, you can enter extra items. You use the cursor keys to move from pre‐tax to after‐tax items and back again. Enter any extra items in exactly the same way as you set up permanent items on an employeeʹs Record.
Extra flat amountFirst, enter the heading. Normally you enter *n where n is the heading number. The following example shows a Bonus entry which has been set up as heading 4 on the PAYSLIP HEADINGS file.
B71
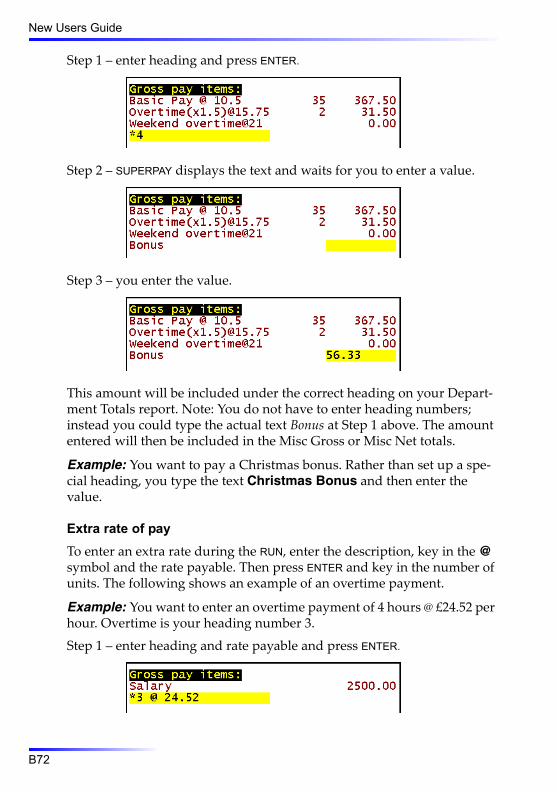
New Users Guide
Step 1 – enter heading and press ENTER.
Step 2 – SUPERPAY displays the text and waits for you to enter a value.
Step 3 – you enter the value.
This amount will be included under the correct heading on your Depart‐ment Totals report. Note: You do not have to enter heading numbers; instead you could type the actual text Bonus at Step 1 above. The amount entered will then be included in the Misc Gross or Misc Net totals.
Example: You want to pay a Christmas bonus. Rather than set up a spe‐cial heading, you type the text Christmas Bonus and then enter the value.
Extra rate of payTo enter an extra rate during the RUN, enter the description, key in the @ symbol and the rate payable. Then press ENTER and key in the number of units. The following shows an example of an overtime payment.
Example: You want to enter an overtime payment of 4 hours @ £24.52 per hour. Overtime is your heading number 3.
Step 1 – enter heading and rate payable and press ENTER.
B72

Chapter 6: Run payroll
Step 2 – SUPERPAY displays the text and waits for you to enter the number of hours.
Step 3 – you enter the number of hours.
SUPERPAY calculates how much to pay. This value will be included under the correct heading on your Department Totals report. Note: As with flat amounts, you do not have to enter heading numbers; instead you could type the actual text Overtime at Step 1 above.
Extra textIf you want to enter some extra description on the payslip, you can enter up to 20 characters on any free lines on the payslip screen. Then enter a value of zero on these lines. (Note: You cannot enter additional text on the same line as a pre‐set heading.)
The value of zero is shown on the payslip screen, but shows as blank on the payslip.
Example: It is an employee’s 60th birthday. You enter Happy 60th Birth‐day as an extra description on the payslip screen.
Zero values are not printed on the actual payslip, so the employee will only see the text that you have typed.
SSPYou must use the DIARY prompt (F4) to enter SSP. SUPERPAY will then auto‐matically display the value to be paid and update your records accord‐ingly. SSP is covered in Chapter 10 in the Reference section.
B73

New Users Guide
Parental PayYou set up PARENTAL PAY on an employee’s Record and SUPERPAY automat‐ically displays the amount payable. SMP is covered in the employee records section. Parental Pay is covered in Chapter 9 in the Reference section.
Add extra Heading number during the RunDuring RUN PAYROLL you may realise that you should have set up an extra Heading (e.g. you want to enter Hotel exps). You cannot change the PAYS-LIP HEADINGS file here on the payslip screen. Instead:
Press EXIT twice to exit the RUN.Go to your PAYSLIP HEADINGS file and set up the Heading – but note you cannot change an existing Heading in the middle of a run – you can add extra Headings but do not change one that already exists. Even if you only change the spelling, SUPERPAY detects that a Heading has been changed mid‐run (which it does not allow) and this can have unforeseen (to you) consequences when you continue your payroll.Return to RUN PAYROLL.
6.12 Pension, tax and NISUPERPAY automatically calculates and displays pension, tax and NI as you enter Gross Pay items.
When (or if) you change the Gross Pay (e.g. enter an extra item), these items change instantly on the screen. Which Gross Pay items are subject to these deductions is determined by the ‘Flagsʹ fields on your PAYSLIP HEAD-INGS file. E.g. you could have Salary subject to a percentage pension, but overtime and bonus excluded from the pension calculation.
PensionPension calculations are based on what is stored in the special pension fields on Screen 1 of the Employee records.Pensions can be deducted from Gross before calculating tax or NET of tax. (NET means that the pension is deducted from the employeeʹs Net pay.) Pensions are always shown in the line above tax and NI calcula‐tions even though they may have been deducted after tax and NI has been calculated.
B74

Chapter 6: Run payroll
No Stakeholder pension is displayed if there is not enough gross pay to pay the pension.An employee can have up to four pensions. The contributions under all four schemes and the total are shown. However, if the values for all four pension elements are too big to fit in the space on the payslip only the total is shown.
National InsuranceSUPERPAY uses the exact percentage method; manual tables use gross pay increments so you can have slight differences between the two systems. Both methods are acceptable to the Inland Revenue.
6.13 Student Loans and attachmentsStudent Loans and Attachments are automatically displayed in the ‘After‐tax’ section of the payslip screen on whatever line you have set up on the employee’s Record.
6.14 Net paySUPERPAY automatically displays the Net Pay. When you have no more items to enter, check that everything is correct, and then press STORE.
Net pay roundingIf the employeeʹs Net Pay is rounded (e.g. to £1), the Net Pay displayed is the rounded amount. (The rounding calculation is shown underneath the Net Pay value.)
Diagram 80: Net pay rounding example
In the above example, the employeeʹs actual net pay is £391.24. SUPERPAY deducts 92p which was rounded up last week, making a total of £390.32, and then rounds this up 68p to make £391.00.
B75
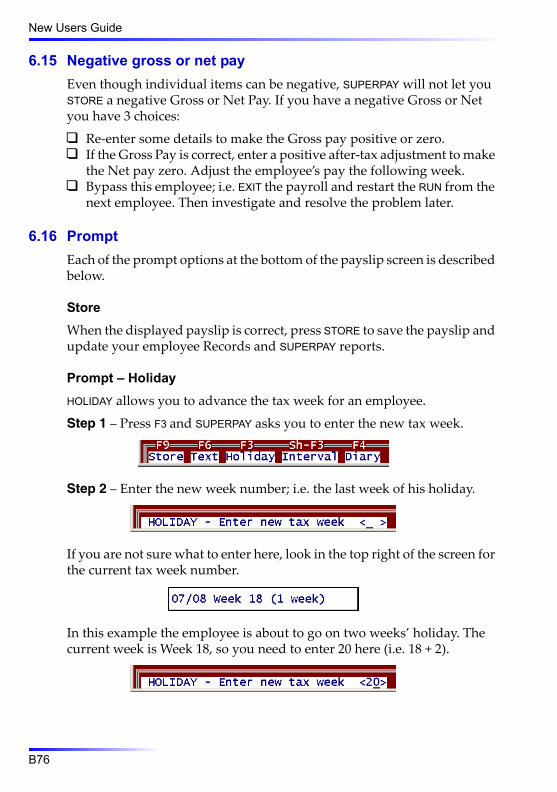
New Users Guide
6.15 Negative gross or net payEven though individual items can be negative, SUPERPAY will not let you STORE a negative Gross or Net Pay. If you have a negative Gross or Net you have 3 choices:
Re‐enter some details to make the Gross pay positive or zero.If the Gross Pay is correct, enter a positive after‐tax adjustment to make the Net pay zero. Adjust the employee’s pay the following week.Bypass this employee; i.e. EXIT the payroll and restart the RUN from the next employee. Then investigate and resolve the problem later.
6.16 PromptEach of the prompt options at the bottom of the payslip screen is described below.
StoreWhen the displayed payslip is correct, press STORE to save the payslip and update your employee Records and SUPERPAY reports.
Prompt – HolidayHOLIDAY allows you to advance the tax week for an employee.
Step 1 – Press F3 and SUPERPAY asks you to enter the new tax week.
Step 2 – Enter the new week number; i.e. the last week of his holiday.
If you are not sure what to enter here, look in the top right of the screen for the current tax week number.
In this example the employee is about to go on two weeks’ holiday. The current week is Week 18, so you need to enter 20 here (i.e. 18 + 2).
B76

Chapter 6: Run payroll
Step 3 – SUPERPAY displays the new week number and pay interval in the top right of screen.
SUPERPAY adjusts the employeeʹs tax and NI limits and any flat rate pen‐sion for the number of weeks paid.
Step 4 – You can now pay the employee his normal pay plus two weeks’ holiday pay (3 weeks’ pay in total). RUN PAYROLL will not display that employee again until Week 21.
Important note
If you press EXIT because you need to re‐enter some payslip items, the tax week is reset back to the standard week. So, if you press EXIT to make some corrections you need to press HOLIDAY again and advance the tax week again.
Prompt – IntervalThe INTERVAL prompt is very similar to the holiday prompt except that it changes the INTERVAL without changing the tax week. You need this if you have not paid an employee for a few weeks and this week’s pay is for one week only.
Step 1 – You notice the employee’s pay interval is highlighted and is not correct. In this example the employee has not been paid for 7 weeks.
Press SHIFT‐F3 (i.e. hold down the Shift key and press F3).
Step 2 – SUPERPAY then asks you to enter the new pay interval (the employee’s current pay interval is displayed).
Step 3 – Overtype the displayed number (in this example 7) with the cor‐rect interval. SUPERPAY displays the new pay interval in the top right of screen.
B77

New Users Guide
SUPERPAY also adjusts the employeeʹs NI limits and any week 1 tax and flat rate pension for the number of weeks paid.
Important note
In the same way as HOLIDAY, if you press EXIT to re‐enter any payslip items, the Interval is reset back to its original value and you would need to press INTERVAL again.
Prompt – DiaryIf an employee has been sick, press the DIARY prompt and enter the sick days. SUPERPAY then calculates:
whether a PIW has been formed.what days to pay (if any).whether this PIW is linked to a previous PIW.
When you STORE the diary, the SSP value is displayed on the payslip screen. If you want to change the number of days paid, press the DIARY prompt again and change the employee’s DIARY. Please see Chapter 10 in the Reference section for further details.
Prompt – TextTEXT displays your PAYSLIP HEADINGS. This is useful if you want to enter an additional item and you do not know what HEADINGS have already been set up. When you have finished viewing your HEADINGS press EXIT to re‐display the payslip screen.
Prompt – SMPThis prompt is only displayed when you have entered an Expected Week of Confinement (EWC) date on Screen 2 of an employee’s Record. If you want to pay SMP/SPP and no prompt is displayed, EXIT the RUN, and com‐plete the PARENTAL LEAVE box on the employee’s Record before returning to the RUN — see Chapter 9 in the Reference section for more information.
Prompt – ExitYou can press EXIT to clear what youʹve entered for this employee and start again. If you want to escape from RUN PAYROLL (for example to update an employee’s Record before doing his payslip) press EXIT twice. When you return to RUN PAYROLL, SUPERPAY will automatically start again where you left off.
B78

Chapter 6: Run payroll
6.17 Casual employeesIf you have casual employees, rather than use the INTERVAL prompt you should enter C in the EMP’EE TYPE field in the CONSTANTS section on Screen 1 of their Records. RUN PAYROLL will then always default to an interval of 1 for these Casual employees.
Prompt – SkipIf you have entered C (for casual) in the EMP’EE TYPE field on an employee’s Record, RUN PAYROLL displays a SKIP prompt for that employee.
If the casual employee is not being paid this week, press F2 to skip the employee this week. SUPERPAY asks for confirmation.
Press ENTER to confirm the skip and move on to the next employee, or press EXIT to cancel the request and pay the employee. This allows you to RUN FULL PAYROLL and bypass casual employees if they are not being paid this week.
6.18 Exit ‘Run payroll’If you want to leave RUN PAYROLL before the end of the RUN, press EXIT once or twice (depending on what is displayed on the screen) to return to the MAIN MENU. If you are running the SALARIES (NO INTERVENTION) option you can EXIT the RUN only when the cursor stops at an item for which a value is needed.
6.19 End of runAt the end of the RUN (or when you press EXIT twice to interrupt the pay‐roll) SUPERPAY returns to the MAIN MENU.
6.20 What next?When you have successfully completed RUN PAYROLL, move on to Chapter 7 for guidance on how to print your payslips and reports.
B79

New Users Guide
B80

7 P
rint payslips andreports7.1 OverviewNow that you have RUN a payroll, you can print payslips and reports. Choose PAYSLIPS/REPORTS (option 2 on the MAIN MENU) to display the fol‐lowing menu.
Diagram 81: Payslips/reports Menu
The PAYSLIPS/REPORTS menu lists options which are calculated from your payslips. The reports are often in the format of one line per employee, one line per department etc.
As a new user, we suggest you select each option in turn and study each printout. You can then decide what reports will be useful for your com‐pany. However, all companies need payslips, a WAGES BOOK and/or DEPARTMENT TOTALS, and a MONTHLY SUMMARY.
There are several points worth noting here:
These print options do not change your Records in any way so you can print them as often as you like.You can print payslips and reports in any order.If you UNDO/RESTORE an employee, SUPERPAY automatically updates the relevant reports which you should then reprint – see Chapter 8.You can print reports/payslips for a range of weeks, even across tax years.
B81

New Users Guide
Choose each option and press ENTER to accept the default settings. Then choose a PRINT prompt. For payslips, press F4 to print a sample as often as you need until you are happy with the alignment. Then press F10 to print your payslips.
The remainder of this chapter describes print options in more detail than you need at this stage. However, this extra information will be useful when you have been using SUPERPAY for a while and have a range of weeks to choose from.
7.2 ‘For’ fieldChoose an option and complete the sub‐menu which is displayed on the right of screen. The following screen is the most common sub‐menu. This section describes the FOR field.
Diagram 82: Report details sub-menu
1. You usually press ENTER to accept the displayed Week or Month number. SUPERPAY always prompts the last payroll RUN; e.g. in the above diagram, the last option run was a Week 14 payroll. You can overtype this with a different period; e.g. M3 for Month 3, T14 for a two weekly payroll, or F16 for a four weekly payroll.
2. You can choose a range of weeks/months in the current year; e.g.
or
Enter the range with a hyphen between the first and last week number.
B82

Chapter 7: Print payslips and reports
3. You can also choose a range of weeks/months for more than one tax year
The above screen is for the weekly payrolls from 1st July 2006 to 30th June 2007.
4. Sometimes you might choose all payments in the current year
This is especially useful if you want all the payslips or a WAGES BOOK for an individual employee for the whole of the year to date.
7.3 Monthly summary
Diagram 83: Monthly Summary screen
When you choose MONTHLY SUMMARY, SUPERPAY asks for the tax year. As a new user you should accept the default 08 which is for the tax year ending 5th April 2008. When you have been using SUPERPAY for more than one year, you can print the MONTHLY SUMMARY for the current or previous years. If you enter 07-08, SUPERPAY will print the MONTHLY SUMMARY for the two tax years ending 5th April 2007 and 5th April 2008.
The MONTHLY SUMMARY shows the totals needed to calculate how much you have to pay to the Inland Revenue each month. These are the totals you would enter on a manual P30 yellow payment booklet.
Which weeks are included in each tax month is determined by the ‘Income tax year’ section on Screen 3 of your COMPANY RECORD.
B83

New Users Guide
SSP reclaim – If you start using SUPERPAY mid year, SUPERPAY can only analyse SSP paid through the calendar section of your employees’ SSP diaries; any entries in the ‘Before diary’ section are not included in this analysis.PARENTAL PAY – The amount you can reclaim depends on whether or not you qualify for Small Employer’s Relief – see COMPANY RECORD, Screen 3.To show the balance outstanding at any time, you need to enter your Revenue payments on Screen 3 of your COMPANY RECORD.You can agree your MONTHLY SUMMARY to your weekly and monthly DEPARTMENT TOTALS and WAGES BOOK reports.
7.4 Stakeholder pension summary
Diagram 84: Stakeholder pension screen
At the end of each calendar month, you can print a Stakeholder Pension report to send to your Pension company. This report only prints the Stake‐holder totals; i.e. those pensions set up on the Stakeholder pension Line 4 of the EMPLOYEES’ RECORDS. Please see 8.11 in the Reference section for fur‐ther details.
7.5 Nominal analysisSUPERPAY can print this report even if you have not set up any Nominal Ledger codes in SUPERPAY. However, to make the report more useful, you can enter Nominal Codes (8 characters maximum) on Screen 3 of your COMPANY RECORD and on your PAYSLIP HEADINGS file (see 4.5 above).
Nominal link file (option 6)This option creates a file on disk which can be linked to third party Nom‐inal Ledgers. You would need to contact your accounts supplier to deter‐mine if SUPERPAY fields can be imported into your Nominal Ledger.
B84

Chapter 7: Print payslips and reports
7.6 Subcontractor vouchers (option 9)This option is no longer available. The Inland Revenue introduced a new CIS system on 6th April 2007, and there is now a separate CIS module to cover the new scheme.
7.7 User reports (option 4 on Main Menu)The USER REPORTS screen lists sample reports which are not included in the standard menus. As a new user, you currently have no samples in your USER REPORTS menu, so nothing happens when you select this option.
First, you need to transfer the samples into your USER REPORTS screen.
Transfer sample reportsChoose REPORT DESIGN (UTILITIES, option 3). A list of reports is then dis‐played. Each report has an ID number.
Diagram 85: Report Design screen
The sample reports are numbered from 900. We suggest you COPY the samples to numbers in the range 301 to 327.
B85

New Users Guide
Step 1 Press F7. SUPERPAY displays:
Diagram 86: Copy a report
Step 2 Enter 901. SUPERPAY displays Employee names and addresses next to the layout number.
Diagram 87: Copy sample reports into User reports screen
Enter 301 in the ‘to’ box and press SPACE.
Step 3 The sample ‘Employee names and addresses’ report has now been stored as report 301.
Step 4 Repeat steps 1 and 2 for any of the following sample reports you think might be useful.
901 Employee names and addresses902 Employee Tax/NI codes etc.903 Employee address labels904 Employee bank details905 Employee pay report – alphabetic906 Employee loans/attachments report907 Amounts paid this period report908 Amounts paid this year report909 Hours worked this period report910 Hours worked this year report911 Blank timesheet for completion
B86

Chapter 7: Print payslips and reports
912 Net pay analysis914 HP accrual to date918 Multi‐period Wages Book919 Employees by start/leave dates920 Number of employees in each company921 Company address labels922 Company address plain paper (C5 env)923 Company address plain paper (DL env)924 Company year end references925 Pensions this pay period926 Internet Filing mandatory fields927 IR pre‐visit data export
When you have finished copying the reports that you want, exit REPORT DESIGN and go back to the MAIN MENU. Choose option 4, USER REPORTS. The screen now looks like this:
Diagram 88: User reports screen
Enter the layout number of any report you wish to print. All the copied samples except 303 and 321 are plain paper reports, and we suggest that you print each report in turn so that you can see what each one looks like with your data. (You could instead press F8 to view the report on screen.) After each print, SUPERPAY returns to the MAIN MENU, so you need to re‐choose USER REPORTS between each printout.
Note: ‘Report’ 327 is not a paper report. It is a file format requested by the Revenue prior to an Inspection – see FAQ 2007, Q3 for more details.
Description of sample reportsMost companies use the following sample reports.
301 – This report lists employees’ names and addresses on plain paper. Print or view this before you do your year end so that you can quickly identify any missing or incomplete addresses.
B87

New Users Guide
302 – This report lists Tax codes, NI numbers etc., one line per employee so that you can quickly check the essential data for new cli‐ents.
304 – This lists Bank details for each employee – one line per employee.
318 – The MULTI-PERIOD WAGES BOOK prints totals for a range of weeks or months which can be agreed to financial accounting periods as well as tax years. E.g. to print a report from Week 20 in the 2006/2007 tax year to Week 19 in 2007/2008 enter: From: 07w20 To: 08w19.
7.8 Employee reports print optionsOn the MAIN MENU, choose EMPLOYEE RECORDS (option 5).
Then choose EMPLOYEE REPORTS (option 2).
B88
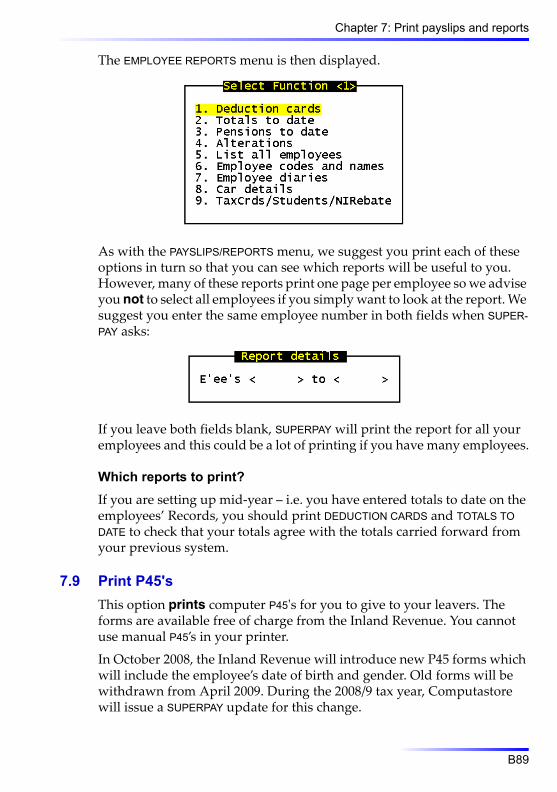
Chapter 7: Print payslips and reports
The EMPLOYEE REPORTS menu is then displayed.
As with the PAYSLIPS/REPORTS menu, we suggest you print each of these options in turn so that you can see which reports will be useful to you. However, many of these reports print one page per employee so we advise you not to select all employees if you simply want to look at the report. We suggest you enter the same employee number in both fields when SUPER-PAY asks:
If you leave both fields blank, SUPERPAY will print the report for all your employees and this could be a lot of printing if you have many employees.
Which reports to print?If you are setting up mid‐year – i.e. you have entered totals to date on the employees’ Records, you should print DEDUCTION CARDS and TOTALS TO DATE to check that your totals agree with the totals carried forward from your previous system.
7.9 Print P45'sThis option prints computer P45ʹs for you to give to your leavers. The forms are available free of charge from the Inland Revenue. You cannot use manual P45’s in your printer.
In October 2008, the Inland Revenue will introduce new P45 forms which will include the employee’s date of birth and gender. Old forms will be withdrawn from April 2009. During the 2008/9 tax year, Computastore will issue a SUPERPAY update for this change.
B89

New Users Guide
Step 1 – When an employee leaves, enter a leave date on his Record
Step 2 – Press F5 to DELETE the record. This sets a PRINT P45 flag for that employee to be included in the next P45 print run. SUPERPAY then asks:
Step 3 – Press ENTER (for Y) and press EXIT back to the EMPLOYEE RECORDS menu. Then choose option 7.
Step 4 – Enter the E’ee type and E’ee’s fields in the usual way.
B90
Chapter 7: Print payslips and reports
Step 5 – Choose laser or continuous and then load your P45 forms and choose SAMPLE. You need to print a SAMPLE to check your alignment with‐out losing the PRINT P45 flag. If you print a ‘real’ P45 and the alignment is out, you would have to reset the flag on the Record (see below). Unlike most of SUPERPAY’s reports, you can print P45’s once only.
Laser P45'sLaser P45ʹs consist of two A4 sheets. So, if you are printing several P45’s, make sure you load sheet 1, sheet 2, sheet 1, sheet 2 etc. (This is the way they are stored in the Inland Revenue stationery box.)
If your laser P45’s do not line up properly you can use the P45 offset fields in the SYSTEM DETAILS file. These offset fields have exactly the same func‐tion as the P14 offset fields which are described in the FAQ 2007 booklet Page 41.
Continuous P45'sContinuous P45ʹs are in exactly the same format as manual P45ʹs with a margin for sprocket holes. Since you have to line up the forms, continuous P45ʹs are really only useful if you have several employees leaving at the same time; i.e. it may be easier to print a P45 on plain paper and then man‐ually transcribe the information onto the Inland Revenue form, rather than load and align the special stationery.
Reprint a P45You cannot simply re‐choose the PRINT P45 option to reprint a P45. Instead you need to:
Go the Employee’s Record.UNDELETE his Record.DELETE his Record again.
This resets the PRINT P45 flag, and you can then reprint the form.
Online Filing of Inland Revenue copyFrom April 2009, all medium and large companies will have to file the Inland Revenue copy of the P45 online. This will require you to transfer over to a new Windows version of SUPERPAY from April 2009. More details of this change will be issued closer to the changeover date.
B91

New Users Guide
B92

8
‘Undo’ mistakes8.1 OverviewIf you realise you have made a mistake after a payslip has been stored and/or printed you need to ‘undo’ the incorrect payslip before SUPERPAY will let you re‐do the employee’s payslip.
Step 1 – Go the employee’s Record and UNDO the payslip.
Step 2 – STORE the undone Record.
Step 3 – Choose RUN PAYROLL again and re‐do the payslip.
These 3 steps are all that you usually need. You do not need to ‘undo’ the whole payroll when you make a mistake on one or two employees.
8.2 Correct a payslip – 3 easy stepsThe following example assumes that you realise that you have made a mistake after you have STORED an employee’s payslip screen and have then pressed EXIT to end the RUN and go back to the MAIN MENU.
Step 1 – Undo the payslip1. Choose option 5, EMPLOYEE RECORDS, and call up the individual’s
Employee Record. Check the week/month number in the bottom left of the screen is this week – i.e. check that you really have STORED the payslip for this week (in this example Week 14).
2. Press F7 to UNDO RUN.
B93

New Users Guide
3. SUPERPAY displays an Action Box.
4. Press ENTER to select UNDO LAST RUN and SUPERPAY cancels the employee’s latest payslip.
i.e. in this example the Week number changes back to Week 13.
Step 2 – Store the recordPress F9 to STORE the changed Record.
Step 3 – Correct the payslipGo back to RUN PAYROLL and choose RUN FULL PAYROLL again (if that is your usual choice). SUPERPAY automatically re‐starts the RUN with the UNDONE payslip.
Diagram 89: Previous pay details displayed
RUN PAYROLL displays the message ‘Using last run’s data’ at the top of the screen. You can then add or amend any items without having to re‐key everything.
B94

Chapter 8: ‘Undo’ mistakes
If you want to start the payslip again from scratch or the pay interval is not correct, press EXIT to clear the entries.
Diagram 90: Clear previous payslip
When you press EXIT you will see that the ‘Using last run’s data’ message is no longer displayed and you can then start afresh.
Whether you add something to an existing payslip or start again from scratch, enter the payslip in the usual way. Then STORE the revised payslip and RUN PAYROLL moves on to the next employee.
Summary This is the most common case; the remainder of this chapter tells you what to do in other cases.
8.3 Correct a payslip which has been printedIf the incorrect payslip has been printed, UNDO and RE-RUN the payslip exactly as described in 8.2 above. The only difference is that when you have corrected the payslip screen, you also need to re-print the individual employee’s payslip.
You also need to reprint any other reports which you have already printed – e.g. WAGES BOOK – which now show the revised figures.
8.4 Correct a payslip – net pay adjustmentIf an employee has already been paid an incorrect amount, UNDO and RE-RUN his payslip exactly as described in 8.2 above.
However, when you re‐RUN the payslip you need to ensure that the revised payslip shows the Net pay that the employee actually received. To do this, enter any difference in Net pay as an After-tax adjustment. You then recover or pay any difference next week by either subtracting or add‐ing the difference as an After‐tax item.
B95

New Users Guide
Example: When an employee receives his Week 14 pay he informs you that his £267.27 Net pay does not include 4 hours weekend overtime.
UNDO his record, and re-RUN his payslip as described above. Using ‘last run’s data’, add 4 hours week end overtime.
Diagram 91: Revised payslip – new net pay
The Net pay is now £316.55 and you owe the employee
£316.55 less £267.27 = £49.28.
Enter -49.28 as an After‐tax adjustment so that his Net pay shows the £267.27 he actually received.
Diagram 92: Revised payslip – original net pay
You will need to add £49.28 to his Net Pay next week as a positive After tax item. Give the employee a copy of the revised payslip with next week’s payslip so that he can see how the £49.28 adjustment has been calculated. The important point about this example is that you cannot change what the employee has already been paid so you need to make the revised pay‐slip agree with his actual Net pay. If you do not, your pay records will not agree with your Cash Book.
B96

Chapter 8: ‘Undo’ mistakes
8.5 Correct a payslip – no net pay adjustmentYou only need to make a Net pay adjustment if the employee has received the wrong amount. If you have not paid the employee yet, no Net pay adjustment is necessary when you re‐run a RESTORED payslip. Similarly, if the employee received the correct amount and it was the payslip that was wrong you do not have to make any adjustment.
Example: A director draws cash throughout the month which is then grossed up. Originally you entered drawings of £1505n. The following month you realise that you should have entered £1620n.
RESTORE and re‐RUN his payslip as described in 8.2. There will be no net pay adjustment since the director has received the correct amount and it was the payslip that was wrong.
8.6 Correct a payslip – large negative adjustmentIf the difference between the original and revised payslip gives rise to a large negative adjustment, you may not want to take off the whole amount in one go. In this case, set up the Adjustment as a Loan on Screen 1 of the employee’s RECORD:
Enter the balance outstanding in the Loan outstanding field (field 22).On one of the After‐tax lines enter *L with the value of the deduction you will make each week.
Each week, SUPERPAY will reduce the balance outstanding by this deduc‐tion until the adjustment has cleared.
Example: same payslip as before (i.e. Week 14 undone).
Diagram 93: Incorrect payslip already paid into bank
B97

New Users Guide
In this example, you realise that the employee was on a week’s unpaid leave and so should not have been paid at all. Unfortunately, the money has already been paid into his bank account.
Diagram 94: Revised payslip with correct net pay
When you re‐run his payslip, you see he should have been paid only £26.93 tax refund; i.e. he has been overpaid by:
£267.27 ‐ £26.93 ‐ £240.34
Enter this as a positive after tax adjustment to reflect his actual Net pay.
Diagram 95: Revised payslip showing overpayment
B98

Chapter 8: ‘Undo’ mistakes
This is a large sum to repay, and you decide the employee can pay it back in 3 instalments of £85, £85 and £70.34. Set up the loan on the employee’s record.
RUN PAYROLL will then take the repayment from his next 3 payslips.
Diagram 96: Overpayment repaid as a loan repayment
8.7 Correct a payslip – deleted employeeThe F7 UNDO prompt is not displayed on a DELETED employee’s record. If you realise that you need to UNDO a payslip for a DELETED employee, you need to first UN-DELETE his record and then follow the relevant instructions in this chapter. (Do not forget to DELETE his record again when you have finished.)
8.8 Correct a payslip – more than one employeeIf you have more than one payslip to correct, you can repeat the UNDO pro‐cedure for each employee as described above, and then re‐RUN all the pay‐slips together. If you have more than a few employees to re‐RUN it may be
B99
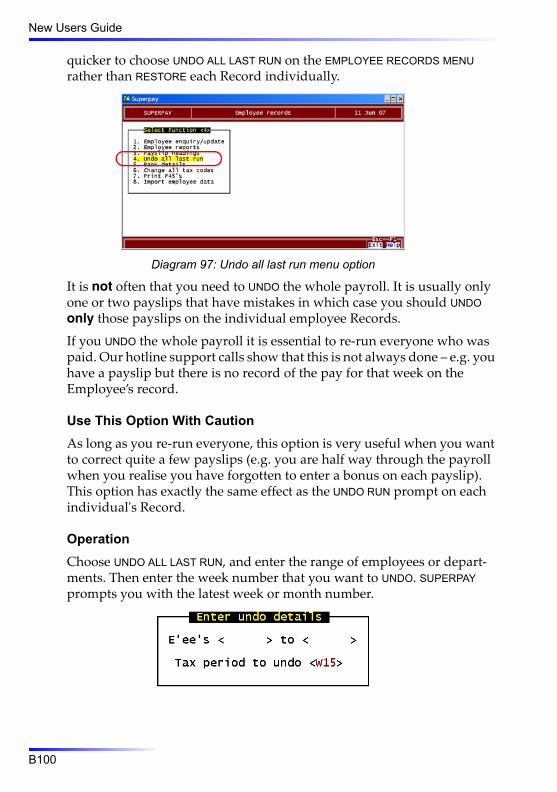
New Users Guide
quicker to choose UNDO ALL LAST RUN on the EMPLOYEE RECORDS MENU rather than RESTORE each Record individually.
Diagram 97: Undo all last run menu option
It is not often that you need to UNDO the whole payroll. It is usually only one or two payslips that have mistakes in which case you should UNDO only those payslips on the individual employee Records.
If you UNDO the whole payroll it is essential to re‐run everyone who was paid. Our hotline support calls show that this is not always done – e.g. you have a payslip but there is no record of the pay for that week on the Employee’s record.
Use This Option With CautionAs long as you re‐run everyone, this option is very useful when you want to correct quite a few payslips (e.g. you are half way through the payroll when you realise you have forgotten to enter a bonus on each payslip). This option has exactly the same effect as the UNDO RUN prompt on each individualʹs Record.
OperationChoose UNDO ALL LAST RUN, and enter the range of employees or depart‐ments. Then enter the week number that you want to UNDO. SUPERPAY prompts you with the latest week or month number.
B100

Chapter 8: ‘Undo’ mistakes
SUPERPAY asks you to confirm your selection.
Press SPACE to start the UNDO or ESC to cancel. UNDO ALL only changes those Records which have been RUN for the period selected. When com‐plete, SUPERPAY tells you how many employees have been UNDONE.
Press ESC to return to the EMPLOYEE RECORDS MENU.
Undo all – one week at a timeThis UNDO ALL option goes back one week or month. If you need to UNDO ALL for more than one week, choose this option as many times as needed, and enter one week number earlier each time until you have UNDONE back to the required period. You can then re‐RUN each pay period in sequence to correct any payslip error(s).
Please note: UNDO ALL does not RESTORE deleted employees. If you want DELETED records included in the UNDO ALL, then you need to UNDELETE them first before proceeding with the UNDO.
No reverse Undo allOn an individual employee’s Record you can RESTORE forwards as well as backwards and so can effectively reverse an UNDO LAST RUN. You cannot reverse this global UNDO ALL LAST RUN in one go. If you need to reverse or cancel the UNDO ALL, you need to go to each individual employee’s Record and RESTORE it forwards.
Correct payslipsTo correct the payslips, go back to RUN PAYROLL. Re‐enter the same PAY DATE again and re‐RUN the payslip(s) as described above for individuals.
B101

New Users Guide
Re-print payslips and reportsRe‐print your payslip(s) and reports which now show the corrected fig‐ures.
8.9 Correct an ‘archive’ payslipIf you want to correct and reprint a payslip several weeks after it was orig‐inally produced, it is most likely that the employee has already been paid the wrong amount. So, you will need to make an After‐tax adjustment on his next ‘live’ payslip. The value of the adjustment will be the difference between what he was originally paid and what he should have been paid.
Net pay adjustments have already been described in 8.4 above if you are only going back one week. If, however, you need to go back more than one week, you will need to work out the total Net pay adjustment for all the weeks that need to be re‐RUN.
Before you start, you need to have to hand the original payslips or WAGES BOOK from the week of the error right through to the present week. If you do not have these to hand you can print the WAGES BOOK now, before you RESTORE the record. This is best illustrated with an example.
Example: In Week 27 you realise you should have entered a new tax code for an employee in Week 22.
Step 1 – Re-print payslips which need to re-done.You probably have copies already of these payslips but they are usually stored with all the other employees’ payslips for the individual weeks. Its much better to simply re‐print the payslips in one go on plain paper.
Go to PAYSLIPS (PAYSLIPS/REPORTS menu, option 1). SUPERPAY prompts W26 in the ‘For’ box. Enter W22-W26 and enter the employee’s number in both fields in the E’ee’s selection fields.
Then press F10 to PRINT the payslips on plain paper. In this example, the net pay for the five weeks is £298.11, £316.33, £316.54, £334.32 and £298.32.
B102

Chapter 8: ‘Undo’ mistakes
Step 2 – Restore the recordNow go to the EMPLOYEE RECORDS menu, option 1. Enter the employee’s number and display his record. Press F7 to UNDO RUN. SUPERPAY displays the same Action Box as described in 8.2 above.
Press Cursor down to move the highlight to the ‘Restore to ..’ line and press ENTER. SUPERPAY then asks you to choose a week number to RESTORE to, prompting the Week/Month number prior to the current one.
General points about RestoreYou have three options:
1. You can enter a Week or Month number, or
2. Press the Up or Down arrow to step through the previous weeks, and then press ENTER on the week you want, or
3. If the employee is fairly new you can go right back right to the begin‐ning by entering W0 or M0 (i.e. week or month zero).
When you press ENTER, SUPERPAY sets the Record back to the displayed week number and flags all subsequent payslips as CANCELLED.
If you enter a week number which has not got any data for that employee, SUPERPAY beeps and informs you that there is no data for the period you entered. Also, if you have made recent changes to the employee’s record, SUPERPAY may display a warning about alterations.
As with UNDO LAST RUN, RESTORE changes the displayed Record. To save the RESTORED Record, you need to press STORE. If you press EXIT, the RESTORED Record is not saved.
B103

New Users Guide
Step 3 – Back to this specific example – enter the required week noEnter 21 to bring the employee’s Record back to Week 21.
Step 4 – enter the changeThe last run box has now changed to show that you are back in the ‘archive’ Week 21 record.
Enter the tax code change (i.e. for this example, overtype 522L with 412L) and STORE the revised record.
Step 5 – Re-run ‘archive’ payslipsGo back to RUN PAYROLL and enter the original PAY DAY so that SUPERPAY selects the correct tax week. Re‐RUN the payslip as described in 8.4 above.
Diagram 98: Week 22 payslip after tax code correction
You can see that the lower tax code means that the Net pay is now only £205.05. Previously it was £298.11. So you need to make a positive after‐tax adjustment to bring the Net pay on the revised payslip back to what the employee actually got paid.
B104
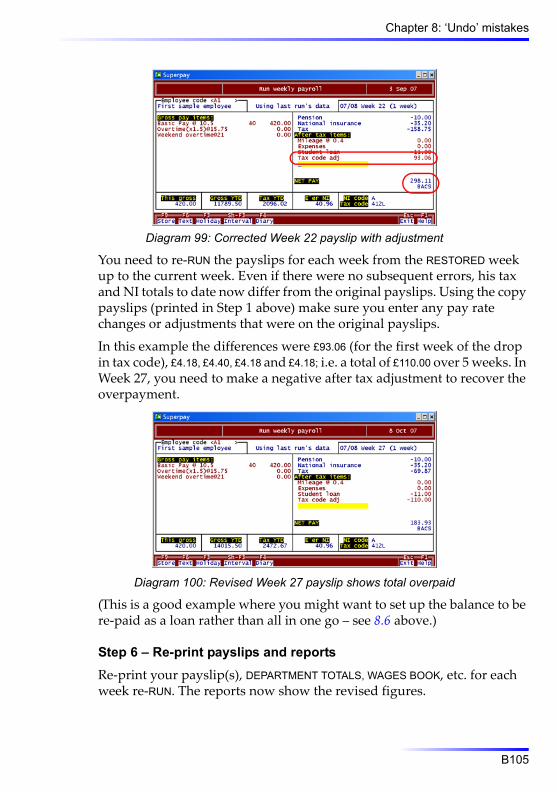
Chapter 8: ‘Undo’ mistakes
Diagram 99: Corrected Week 22 payslip with adjustment
You need to re‐RUN the payslips for each week from the RESTORED week up to the current week. Even if there were no subsequent errors, his tax and NI totals to date now differ from the original payslips. Using the copy payslips (printed in Step 1 above) make sure you enter any pay rate changes or adjustments that were on the original payslips.
In this example the differences were £93.06 (for the first week of the drop in tax code), £4.18, £4.40, £4.18 and £4.18; i.e. a total of £110.00 over 5 weeks. In Week 27, you need to make a negative after tax adjustment to recover the overpayment.
Diagram 100: Revised Week 27 payslip shows total overpaid
(This is a good example where you might want to set up the balance to be re‐paid as a loan rather than all in one go – see 8.6 above.)
Step 6 – Re-print payslips and reportsRe‐print your payslip(s), DEPARTMENT TOTALS, WAGES BOOK, etc. for each week re‐RUN. The reports now show the revised figures.
B105
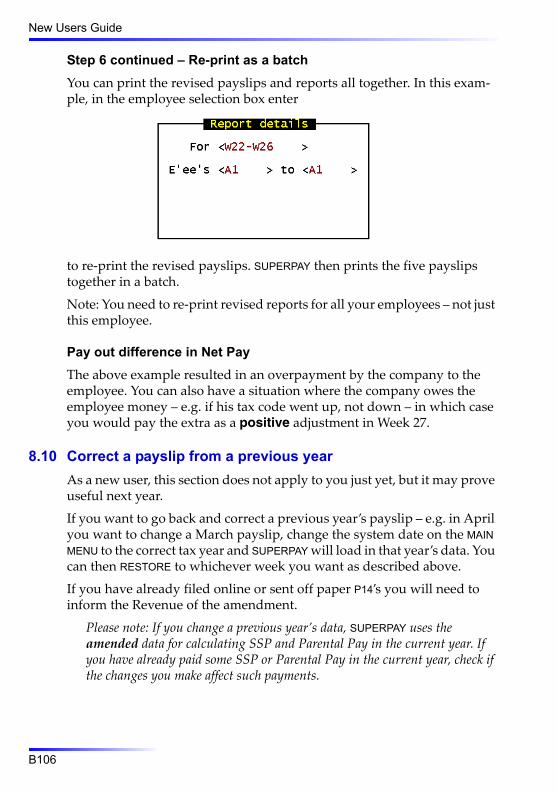
New Users Guide
Step 6 continued – Re-print as a batchYou can print the revised payslips and reports all together. In this exam‐ple, in the employee selection box enter
to re‐print the revised payslips. SUPERPAY then prints the five payslips together in a batch.
Note: You need to re‐print revised reports for all your employees – not just this employee.
Pay out difference in Net PayThe above example resulted in an overpayment by the company to the employee. You can also have a situation where the company owes the employee money – e.g. if his tax code went up, not down – in which case you would pay the extra as a positive adjustment in Week 27.
8.10 Correct a payslip from a previous yearAs a new user, this section does not apply to you just yet, but it may prove useful next year.
If you want to go back and correct a previous year’s payslip – e.g. in April you want to change a March payslip, change the system date on the MAIN MENU to the correct tax year and SUPERPAY will load in that year’s data. You can then RESTORE to whichever week you want as described above.
If you have already filed online or sent off paper P14’s you will need to inform the Revenue of the amendment.
Please note: If you change a previous year’s data, SUPERPAY uses the amended data for calculating SSP and Parental Pay in the current year. If you have already paid some SSP or Parental Pay in the current year, check if the changes you make affect such payments.
B106

9
Sundry Items9.1 OverviewThis chapter gathers together sundry unrelated items which have not been covered elsewhere in this guide.
9.2 Company record options
Diagram 101: Company Record Screen 2 – options box
In order to get you started, Chapter 3 skipped past the Options box on Screen 2 of the Company Record. Now that you have set up some employ‐ees and RUN a PAYROLL, these options will have more meaning and you may now want to change some fields.
After-tax items x weeks (Field 1)Length: Enter Y or N (default is N)
This option is used for weekly paid employees with fixed value after‐tax adjustments.
If you enter Y here and then advance the tax week – e.g. for holidays – RUN PAYROLL multiplies all fixed value After‐tax adjustments by the number of weeks the employee is paid. For example, if the pay interval is 2 weeks, then RUN PAYROLL multiplies all fixed value after‐tax items by 2. If you leave N in this field, RUN PAYROLL does not adjust any After‐tax items when employees go on holiday.
B107

New Users Guide
Example: You have Y in this field. An employee pays a £10 union sub each week. If you use the PAYROLL RUN holiday prompt and give him two weeks’ pay, then 2 x £10 = £20 union sub will be deducted.
2 and 4 weekly paid employeesIf you run 2 or 4 weekly payrolls you need to make sure that you co‐ordi‐nate what you enter here with what you enter on each employee’s Record.
Example: A 4‐weekly paid employee has an After‐tax deduction *8 of £10 per week.
1. You enter *8 -10 as the After‐tax item on his Record:You need to enter Y here so that RUN PAYROLL will deduct £10 x 4 = £40 for the 4 weeks.If you enter N here, RUN PAYROLL will deduct £10 from the employee each time he is paid; i.e. £10 for 4 weeks.
2. You enter *8 -40 as the After‐tax item on his Record.You need to enter N in this field so that RUN PAYROLL will deduct £40 from the employee each time he is paid.If you enter Y here, RUN PAYROLL will deduct £40 x 4 = £160 for the 4 weeks.
Note: This field has no effect on flat rate pensions – see 5.18 above.
Print payslips with zero net pay (Y/N) (Field 2)Length: Enter Y or N
The default is Y. Most companies do not change this. This option has no effect on the calculated amounts – i.e. it does not set any payslips to a zero Net pay. It is simply a print option which is used by some companies who like to process payslips every week for every employee on file but only want to print those payslips which have a value.
IR payments in m/summary (Y/N) (Field 3)Length: Enter A, Y or N (default is A)
Leave the default A here. Then if you enter PAYE payments on Screen 3, the MONTHLY SUMMARY prints a payment line for each month and you can see what is outstanding. If you do not complete Screen 3, no payment line is printed.
Extended department codes (Y/N) (Field 4)Length: Enter Y or N (default is N)
Leave the default N here if all your departments fit in the range A to Z.
B108
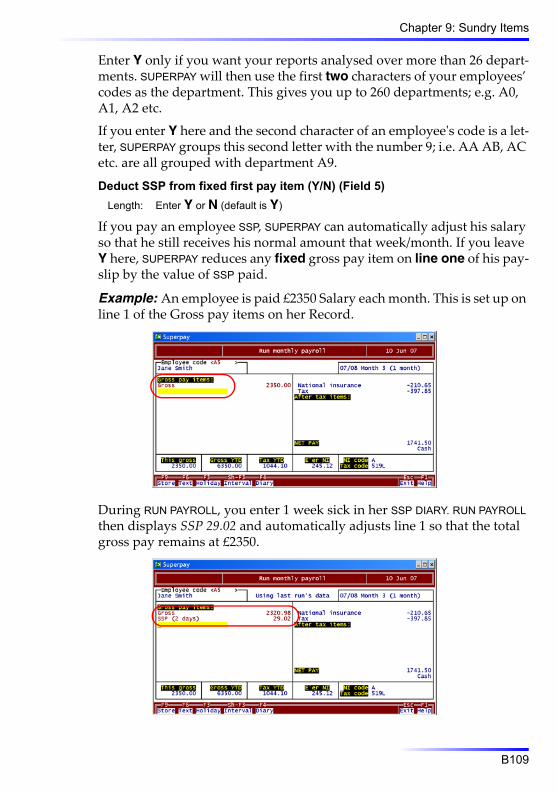
Chapter 9: Sundry Items
Enter Y only if you want your reports analysed over more than 26 depart‐ments. SUPERPAY will then use the first two characters of your employees’ codes as the department. This gives you up to 260 departments; e.g. A0, A1, A2 etc.
If you enter Y here and the second character of an employeeʹs code is a let‐ter, SUPERPAY groups this second letter with the number 9; i.e. AA AB, AC etc. are all grouped with department A9.
Deduct SSP from fixed first pay item (Y/N) (Field 5)Length: Enter Y or N (default is Y)
If you pay an employee SSP, SUPERPAY can automatically adjust his salary so that he still receives his normal amount that week/month. If you leave Y here, SUPERPAY reduces any fixed gross pay item on line one of his pay‐slip by the value of SSP paid.
Example: An employee is paid £2350 Salary each month. This is set up on line 1 of the Gross pay items on her Record.
During RUN PAYROLL, you enter 1 week sick in her SSP DIARY. RUN PAYROLL then displays SSP 29.02 and automatically adjusts line 1 so that the total gross pay remains at £2350.
B109
New Users Guide
If you do not pay the full salary when salaried paid employees are sick, enter N here. You would then need to manually adjust the Gross pay amount on the payslip screen when paying out SSP. (i.e. You would enter a negative adjustment on the payslip screen since you cannot change a fixed amount directly.)
Everyone on P35 /P14's (Y/N) (Field 6)Length: Enter Y or N (default is N)
Employees who are paid less than the lower NI earnings limit and have no SSP reclaim or PARENTAL PAY do not need to be included on a paper P35 at the end of the tax year. (Their details are instead recorded on a P38A.) If you prefer to print a P35/P14 and P60 for all employees whatever their earnings then enter N here.
Note that this option affects only paper P35 and P14/P60 forms. The online year end filing option includes all employees (i.e. the FBI module ignores this question). However, if you have N in this field, no P60’s will be printed for low paid employees even if they have been filed online.
Are surnames first in e’ee records (Field 7)Length: Enter Y or N (default is N)
SUPERPAY has a free format employee name field. However, Inland Reve‐nue forms and returns require the surname to be printed before fore‐names so you need to enter Y or N here to tell SUPERPAY which part of the name field is the surname.
If you set up your employee names with surnames first, e.g. Smith Timo‐thy, enter Y here. If you enter forenames before the surname, e.g. Timothy Smith, enter N.
Number of address lines to print on forms (Field 8)Length: Enter 1, 2, 3, 4 or 5 (default is 5)
If you use one or more lines of the employeeʹs address box for remarks or telephone numbers, enter here the number of lines used solely for the address. Then when you print a payslip with an address (e.g. the standard laser payslip) SUPERPAY will print addresses only and exclude remarks etc. What you enter here is also used for year end forms and returns.
Overseas employer (Field 9)Length: Enter Y or N (default is N)
Leave the default N in this field unless the company is an overseas employer who does not pay Employer NI. Employee NI is unchanged by this field.
B110

Chapter 9: Sundry Items
9.3 Set up Directors’ NIDirectors’ NI is calculated on an annual basis whereas standard NI is based on earnings in the current period only.
Effect of Directors’ basis on NI calculationUsing the Directors’ basis, no NI is deducted until a directorʹs year to date earnings reach the Earnings Threshold – in 2007/2008 this is £5225.00. Then, the whole of a director’s subsequent pay becomes subject to 11% NI until the annual Upper Earnings Limit is reached. Then 1% Employeeʹs NI is payable. (There are equivalent limits for employers.) This can result in very different NI deductions each pay period even when Gross earnings are unchanged.
Director receives irregular payments and low paid directors1. If a director receives irregular payments – e.g. he is paid large sums
once or twice a year and nothing in between – he must stay on the Directors’ basis for the whole year.
2. This also applies to directors who receive a regular salary which is below the Lower Earnings Limit (LEL); i.e. low paid directors have to stay on the Directors’ basis. (The LEL is £87 weekly or £377 monthly in 2007/8.)
In these cases, enter Y in the Director field which is on Screen 1 (Constants box) of the Employee’s Record.
B111

New Users Guide
When you run a payslip on the Directors’ basis, you will see the text Direc‐tor next to the NI code – see the diagram below.
Diagram 102: NI calculated on Directors’ basis
Director receives a regular salaryIf a director’s regular salary is above the Lower Earnings Limit each pay period (£87 weekly or £377 monthly in 2007/8) enter N in the Director field.
Run the director’s payslips in the usual way until you come to the last pay‐slip for the year. Then enter Y in the Director field so that the director’s final payslip will be on the Directors’ basis; i.e. the accumulated earnings for the year will be subject to the correct NI calculation.
Diagram 103: Month 12 payslip on Directors basis
This method matches directors’ NI deductions more evenly to their pay and still complies with Inland Revenue regulations. However, there are three disadvantages to this method.
1. You may forget to change the director over to the Directors’ basis for his final payslip and the wrong NI for the year is deducted.
2. The director may have to pay some extra Employee NI on a large mid‐year bonus separately from receiving the bonus. On his last payslip for
B112

Chapter 9: Sundry Items
the year the director might have a large NI bill which he personally has not made provision for.
So, if you pay big bonuses mid‐year, you should forewarn your direc‐tors that they may have extra NI to pay at year end (or when they leave if they leave mid year).
3. You have to get the director’s agreement.
Note: You do not have to use the same basis for all your directors.
Enter Director in Comment field as a reminderIf you run your own company’s payroll it is not difficult to remember to switch a director back to the correct Director’s NI basis before you run your Week 52 or Month 12 payroll. If you run a bureau you may forget to do this change for all the directors for all your clients since you do not per‐sonally know the names of all your clients’ directors.
To ensure that you do not forget to do this essential change, we suggest you enter the text ‘Y/E:Set Director’ in the Comment field on Screen 2 of the director’s Employee Record.
Diagram 104: ‘Director’ reminder in Comment field
This text will then be displayed on the director’s payslip screen each month. Thus, if you are running a leaver’s payslip or you are running a Week 52 or Month 12 payroll, you will see this comment and can visually
B113

New Users Guide
check that the text Director is next to the NI code. If it is, then the payslip will be correctly calculated on the Directors’ basis.
Diagram 105: Director’s Month 12 payslip screen
If the text Director is not shown next to the NI code, EXIT the RUN, go to the Employee’s Record and enter Y in the Director field (i.e. switch the direc‐tor over to the Director’s basis) before processing his last payslip for the year.
Special note regarding year endWhen you have run CREATE NEXT YEAR’S FILES, leave the Director field as Y in last year’s files. (So your year end documents and online filing will be correct.)
In the new tax year, go to your directors’ Employee Records and change the Director field back to N to start on the standard NI basis again.
9.4 Enter an employee codeWhen SUPERPAY asks for an employee code you have 6 options:
Key in an employee code, and press ENTER.Use ? to display ‘Employee codes and namesʹ until you find the code you want. Then, key in that code and press ENTER.Search for an employee by name (or by part of his name).Press ENTER to display the next employee on file. At the beginning of the file ENTER displays the first employee.Press CURSOR DOWN to step forward one at a time through your employeesʹ names. CURSOR UP steps back through the names. Once you have located the employee, press ENTER to display his details. When you reach the end or beginning of the file, SUPERPAY displays No more at the bottom of the screen.
B114

Chapter 9: Sundry Items
When SUPERPAY asks for a range of employees, you can leave both fields blank to choose all employees.
Display list of employee codes and namesAnywhere SUPERPAY asks for an employee code, you can use ? to display a window of your employees’ names and codes.
Diagram 106: List all employee names and numbers
You can also key in the character(s) you want SUPERPAY to list from, fol‐lowed by a question mark. Then press ENTER.
For example, if you know the employee is department E, enter E?.
A list is displayed, starting with E00000. If you have more than 15 employ‐ees in the list, PAGE DOWN or UP and CURSOR DOWN or UP step forward and backwards through the list. When you see the employee you want, enter his code. SUPERPAY then redisplays your original screen.
Search for an employee’s nameIf you have many employees and do not want to PAGE DOWN through a list of employee names and numbers, you can search for an employee’s name.
When SUPERPAY asks for the employee code, press CTRL-F (‘f’ for find) and SUPERPAY displays a ‘Name to find’ box. Enter part of the employee’s
B115

New Users Guide
name, and SUPERPAY searches for the first employee whose name contains the string entered.
If found, SUPERPAY displays that employee’s details. If there is no match SUPERPAY displays No more at the bottom of the screen. If the employee displayed is not the one you want, press EXIT back to the (now empty) Employee code field and press CTRL-N (‘n’ for next). You can continue doing this until you find the employee you want.
9.5 In-year online filingAll companies with 50 or more employees will need to file and receive in‐year forms online from April 2009. Small companies (less than 50 employ‐ees) will need in year filing from April 2011.
In‐year online filing applies to sending P45’s and P46’s and receiving P6’s, P9’s and Student Loan notifications. From the above dates, your payroll software will need to automatically update your employees’ records for these in‐year forms.
What this means for you is that, if you have 50 or more employees, you will need to upgrade to a Windows version of SUPERPAY by April 2009. Windows SUPERPAY will be launched in Autumn/Winter 2008. The SP1-10, SP1-20 or SP1-50 Windows versions will be released the following year.
9.6 Bureaus – monthly summary and IR paymentsThe MONTHLY SUMMARY shows what you owe the Inland Revenue each month. The report shows the total for the current month and for the year to date. If you enter Inland Revenue payments on Screen 3 of the Com‐pany Record the MONTHLY SUMMARY shows the amount outstanding at any time.
If you run a bureau, you probably do not know when your clients pay the Inland Revenue. However, if you do not enter any payments on the Com‐pany Record, after Month 1 the MONTHLY SUMMARY does not show the actual amount outstanding. We recommend that bureaus use the CO RECORD Screen 3 to record the amounts clients have been instructed to pay. This ensures that the MONTHLY SUMMARY shows the outstanding figure each month. This is best illustrated with an example.
B116
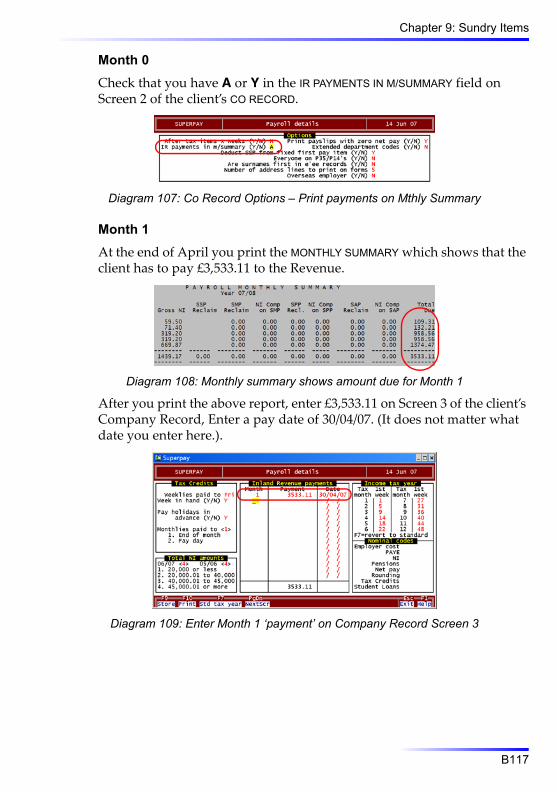
Chapter 9: Sundry Items
Month 0Check that you have A or Y in the IR PAYMENTS IN M/SUMMARY field on Screen 2 of the client’s CO RECORD.
Diagram 107: Co Record Options – Print payments on Mthly Summary
Month 1At the end of April you print the MONTHLY SUMMARY which shows that the client has to pay £3,533.11 to the Revenue.
Diagram 108: Monthly summary shows amount due for Month 1
After you print the above report, enter £3,533.11 on Screen 3 of the client’s Company Record, Enter a pay date of 30/04/07. (It does not matter what date you enter here.).
Diagram 109: Enter Month 1 ‘payment’ on Company Record Screen 3
B117

New Users Guide
Month 2In May you run your client’s payrolls in the usual way. Then, when you print May’s MONTHLY SUMMARY at the end of the month, the report shows the amount the client has to pay this month.
Diagram 110: Monthly Summary shows amount due for Month 2 only
Enter this amount (i.e. £2878.25) on the client’s Co Record with a pay date of 31/05/07.
Month 3In Month 3, you RUN your client’s Month 3 payrolls in the usual way but, for example, this month you also need to go back to Month 2 and re‐run an incorrect payslip (e.g. you need to enter extra hours for an employee).
When you print the MONTHLY SUMMARY for Month 3 the total due is now Month 3’s total plus the extra tax and NI from Month 2; i.e. £2853.61 is due. This is £2632.88 for Month 3 plus an extra £220.73 for Month 2.
B118

Chapter 9: Sundry Items
Your client needs to pay this Outstanding amount – not just the Month 3 figure.
Diagram 111: Monthly Summary shows total due (M3+M2 adj)
Enter this Outstanding total as the amount paid on Screen 3 of that com‐pany’s Record.
Month 4 onwardsContinue doing this each month.
ConclusionBy entering payments each month as you go along, the MONTHLY SUMMARY shows exactly what your client needs to pay over to the Inland Revenue each month. This is particularly useful when you need to go back to a pre‐vious month and re‐run a payslip.
9.7 ConclusionYou have now reached the end of the New Users Guide.
B119

New Users Guide
B120

SUPERPAYReference
Section C


1
Attachment ofearnings1.1 OverviewAttachment of Earnings Orders require employers to deduct money from employees’ pay in order to discharge employees’ debts or to pay child maintenance.
ClassificationThere are 3 types of Attachment:
Council Tax orders for unpaid Council Tax – see 1.2.Child Support Agency (CSA) orders for child support – see 1.3.Court orders to clear outstanding County Court judgements – see 1.4.
Each type of attachment has its own method of calculation.
Administration chargeYou can make a nominal Administration charge each pay period. The cur‐rent maximum is £1 per deduction – see 1.5 below for more information.
Net earningsTo know how much to deduct, you need to know an employee’s ‘Net Earn‐ings’ which are calculated as:
Gross Pay less tax, less NI, less any pension deduction.
This is not necessarily the same as Net Pay. ‘Net Earnings’ includes SSP but excludes SMP, SPP, or SAP. ‘Net Earnings’ also excludes any positive or negative After‐tax items.
Multiple ordersIf an employee has more than one Attachment, Council Tax and CSA orders are always deducted first (in date order) and other (non‐Priority) orders are deducted from the remainder – again in date order.
C1

Reference
1.2 Council Tax attachmentA percentage of ‘Net Earnings’ is deducted each pay period until the total debt has cleared. The percentage used depends on the employee’s ‘Net Earnings’ for the period and also on the date of the Attachment order.
Date of the orderThere are three bands of rates which vary from 3% to 50% depending on the date on the Council Tax order.
*A3 is for orders issued on or after 1st April 2007.*A2 is for orders issued between after 1st October 1998 and 31st March 2007.*A1 is for orders issued prior to 1/10/1998. (It can take many years for some attachments to be fully paid, so there may still be some *A1 attachments in force.)
Set up the correct band of ratesOn an employee’s Record, enter *A3, *A2 or *A1 on any available line in the After tax items box (Screen 1).
Diagram 1: Council Tax attachment (Employee Record, Screen 1)
RUN PAYROLL will then select the applicable percentage to use based on the employee’s ‘Net Earnings’ each period.
Set up amount outstandingEnter the total amount due plus any Admin charge in the Attachment box on Screen 2 of the employee’s Record.
Diagram 2: Council Tax attachment (Employee Record, Screen 2)
C2

Chapter 1: Attachment of earnings
RUN PAYROLL automatically calculates and displays the amount payable on the employee’s payslip screen.
Diagram 3: Council Tax attachment (1/4/07 rate) payslip screen
In this example the £15.41 Attachment includes £1 Admin charge; i.e. the Admin charge is not shown separately.
1.3 CSA (Child Support Agency) orderA fixed Deduction is made each period as long as the employee earns above a certain Protected Pay. On an employee’s Record, enter *A on any available line in the After tax items box (Screen 1).
Diagram 4: CSA order (Employee Record, Screen 1)
Then enter the amount to be deducted each pay period plus any Admin charge in the Attachment box on Screen 2 of the employee’s Record.
Diagram 5: CSA order (Employee Record, Screen 2)
C3

Reference
In this example there is no Admin charge.
Diagram 6: CSA order payslip screen
RUN PAYROLL deducts £30 as long as the employee’s ‘Net earnings’ are more than £250.If the employee’s ‘Net earnings’ are less than the Protected Pay (£250 in this example) the payslip still shows the text ‘Attachment’ but no deduction is made.
Diagram 7: CSA order – pay too low so no deduction
Since CSA is a Priority order, any unpaid CSA is carried forward to the next pay period.If the employee’s ‘Net Earnings’ are more than the Protected Pay but insufficient to pay the full deduction, RUN PAYROLL deducts only that amount which allows the employee to still receive his Protected Pay. Any unpaid CSA is then carried forward.If in a subsequent pay period the employee’s earnings increase, RUN PAYROLL will take off the current CSA deduction plus any balance not deducted in previous period(s).
C4

Chapter 1: Attachment of earnings
1.4 County Court (non-priority) orderA fixed Deduction is made each period as long as the employee earns above a certain Protected Pay. On an employee’s Record, enter *A on any available line in the After tax items box (Screen 1).
Diagram 8: County Court attachment (Employee Record, Screen 1)
Then enter the amount to be deducted each pay period plus any Admin charge in the Attachment box on Screen 2 of the employee’s Record. Enter N for non‐Priority orders
Diagram 9: County Court attachment (Employee Record, Screen 2)
In this example, there is an Admin charge of £1 in addition to the County Court Attachment of £4.25.
Diagram 10: County Court attachment payslip screen
RUN PAYROLL deducts £5.25 on the payslip screen. If the employee’s ‘Net earnings’ are not sufficient to pay this, SUPERPAY deducts what it can, and does not carry forward any underpayment since this is a non‐Priority order.
C5

Reference
1.5 Admin costThe examples in 1.2 and 1.4 above show how you set up an Admin Charge on an employee’s Record. RUN PAYROLL deducts whatever you enter here up to a £99.99 maximum although most employers charge between 50p and £1.
1. Holidays – If an employee goes on holiday and receives several weeks’ pay on one payslip, RUN PAYROLL only deducts the value entered here; i.e. the Admin cost is a charge per payment rather than per pay period.
2. Statutory limit – The Attachment Order shows what the current Statu‐tory limit is. (£1 for 2006/2007.) RUN PAYROLL does not check that your charge is within this Statutory limit. This limit is subject to change without notice and it is up to you to make sure that you do not deduct more than you are allowed to.
3. If any deduction at all has been made you can make the full Admin charge even if this brings the employee’s ‘Net Earnings’ below his Pro‐tected Pay. However, if no deduction has been made because the employee’s Earnings are too low, you cannot make an Admin charge.
1.6 2 and 4 weekly paid employeesAdmin cost: RUN PAYROLL deducts the figure you enter in the Attachment box; i.e. the value entered here is a charge per deduction made – not a charge per week.
Deduction and Protected Pay: Enter a weekly equivalent. RUN PAYROLL multiplies the amount by the number of weeks’ paid.
1.7 Carry forward unpaid maintenanceIf the employee’s Net Earnings are insufficient to make the full deduction on a priority order you must carry forward any unpaid maintenance to the employee’s next payslip.
C6

Chapter 1: Attachment of earnings
SUPERPAY looks after this c/f field.
Diagram 11: Unpaid attachment c/f
If an employee goes on unpaid leave and you produce no payslip at all for him, you need to manually adjust the c/f field on the employee’s Record.
1.8 Holidays – fixed deductionsSUPERPAY multiplies the Deduction and Protected Pay by the number of weeks or months paid. (Still only one admin charge.)
1.9 Holidays – Council Tax percentage deductionsWhen you pay more than one week on a payslip, SUPERPAY averages the total ‘Net Earnings’ over the total number of weeks paid and uses the appropriate percentage for that average pay.
Employee gets paid the same each weekIf the employee gets paid the same each week (including Holiday Weeks) then there is nothing extra for you to do.
Employee’s pay changes from week to weekIf an employee’s Holiday pay differs from his Ordinary pay (e.g. his Ordi‐nary pay includes overtime), you must RUN separate payslips for Ordinary pay and Holiday pay. This is best illustrated by an example from the ‘Council Tax Attachment of Earnings Orders Guide to Employers’.
Example: Employee is paid £800 for 3 weeks’ pay on one payslip. His Net Earnings are £300 for Ordinary Pay, and £500 for 2 weeks’ Holiday Pay. Under the pre April 2007 regulations, the Attachment for the 3 weeks is:
£300 x 17% = £51 on his Ordinary pay, plus£250 x 12% = £30 x 2 = £60 on 2 weeks’ Holiday Payi.e. a Total of £111 deduction.
1. If you put all 3 weeks on one payslip, RUN PAYROLL calculates:
£800/3 = £266.67 x 17% x 3 = £136.
C7

Reference
i.e. RUN PAYROLL deducts too much.
2. If you run 2 separate payslips, RUN PAYROLL calculates:
£300 x 17% = £51 on his Ordinary Pay and£500/2 = £250 x 12% x 2 = £60 on his Holiday Payi.e. £51 + £60 = £111 which is the correct deduction.
1.10 Employee with both student loan and attachmentWhere an employee has both a Student Loan and a CSA or County Court Attachment, you must enter the earliest one first in the after‐tax items.
If the Student Loan is entered before the Attachment then the Student Loan is calculated first, and the Attachment is calculated on what is left.If the Attachment is entered before the Student Loan, the Attachment is calculated first.If the Attachment has a Protected pay, that is also applied to the Stu‐dent Loan.If the Attachment is for unpaid Council Tax, no Student Loan is deducted even if the Student Loan pre‐dates the Council Tax Attach‐ment.
1.11 Employee leavesWhen an employee leaves, you need to inform the Court/Agency which issued the original order if there is an ongoing Attachment. There are rules regarding time limits which you must adhere to – please see your Original Order for more details.
1.12 Attachments and net to gross pay calculationsIf an employee who is paid Net has an Attachment, SUPERPAY calculates the Net to gross, and then deducts the Attachment; i.e. the employee does not end up with the Net pay that you enter – he ends up with Net minus Attachment.
1.13 Second attachment – generalYou set up second and subsequent CSA orders manually. When calculat‐ing the deduction, do not confuse ‘Net Earnings’ with Net Pay. They may or may not be the same figure; e.g. if the employee has after‐tax items.
C8

Chapter 1: Attachment of earnings
First Attachment is a Priority orderIf the first Attachment is a Council Tax or CSA order, leave the existing Attachment unchanged and follow the examples in 1.14 below.
First order is a non-Priority orderIf the existing order is a County Court Judgement, and the second order is a Council Tax or CSA order, then you need to set up the second Attach‐ment as the automatic attachment (i.e. as described in 1.2 and 1.3 above) and manually set up the existing order as the second Attachment. It does not matter that the County Court judgement pre‐dates the Council Tax or CSA order. These Priority orders are always deducted first.
If the existing and subsequent Attachments are all County Court judge‐ments, then deduct them in date order.
1.14 Second attachment – example of a CSA orderIn May 2007, you receive a CSA order for a weekly paid employee who already has a Council Tax Attachment. This second CSA order is for £75 Deduction per week with Protected Pay of £225. You charge £1 Admin charge. Set up the description for this second Attachment as an After‐tax item on Screen 1 of the employee’s Record.
Diagram 12: Second CSA order
The *A3 above is for the first (Council Tax) Attachment. The description for this second Attachment is then displayed on the employee’s payslip screen as:
Diagram 13: Second CSA order payslip screen
C9

Reference
RUN PAYROLL waits for you to enter the amount. In this example. there is sufficient ‘Net Earnings’ to deduct the full amount so enter ‐76; i.e. £75 CSA deduction plus £1 Admin cost.
(The displayed £64.47 Attachment is the original first Priority Attachment (in this case Council Tax) which RUN PAYROLL calculates automatically.)
Set up extra reminder text on employee’s RecordIt is up to you to visually check that the employee’s Net Earnings are suf‐ficient to deduct the standard deduction. To save you having to check the original CSA order each week, we suggest you enter 3 extra text lines in the After tax items section on the employee’s Record.
Diagram 14: Second CSA order (Employee Record, Screen 1)
All three lines have a value of zero – they are description lines only. They are displayed on the employee’s payslip as:
Diagram 15: Second Attachment payslip screen – with extra text lines
RUN PAYROLL waits for you to enter the deduction as described above (usu‐ally ‐76). The zeros on the ‘text only’ lines are shown on the screen but are not printed on the payslip.
Deduction carried forwardIf you have an underdeduction to carry forward, make a manual note of the amount and deduct it as soon as the employee’s earnings are sufficient to cover the balance.
C10

Chapter 1: Attachment of earnings
1.15 Two Council Tax attachmentsCouncil Tax attachments are deducted on a percentage basis – i.e. you deduct a percentage based on the employee’s earnings. The more an employee earns the higher the percentage. If you get two Council Tax orders for the same employee you need to contact the issuing office to check what they want you to do.
Some councils instruct companies to add both orders together and deduct both as one; other councils instruct users to deduct the oldest order first and then deduct the second attachment on the remainder.
Because of this differing advice, you need to contact the issuing office to confirm exactly what you should do with a second Attachment. We are not authorised to advise you.
1.16 Second attachment – only one Council Tax orderIf the first Attachment is a CSA order and the second Attachment is a Council Tax order, each period enter the Council Tax Attachment on the employee’s payslip screen. You can not set up the order permanently on the employee’s Record since you cannot determine what percentage to use until RUN PAYROLL has calculated the employee’s ‘Net Earnings’ for the period.
However, we suggest you set up a text line in the After‐tax items on the employee’s Record as a personal reminder to deduct the Council Tax attachment each pay period.
Diagram 16: Second Council Tax order (Employee Record, Screen 1)
C11

Reference
The 5/07 date reminds you which set of rates to use (in this example the April 2007 rates). This text is shown on the employee’s payslip screen as:
Diagram 17: Second Council Tax order payslip screen – 1
RUN PAYROLL then waits for you to enter an Attachment line. (The £51 is for the first CSA order.) The employee’s ‘Net earnings’ are £322.37 so the April 07 deduction rate is 7%. Enter this as shown below (do not forget to enter the minus sign).
Diagram 18: Second Council Tax order payslip screen – 2
C12
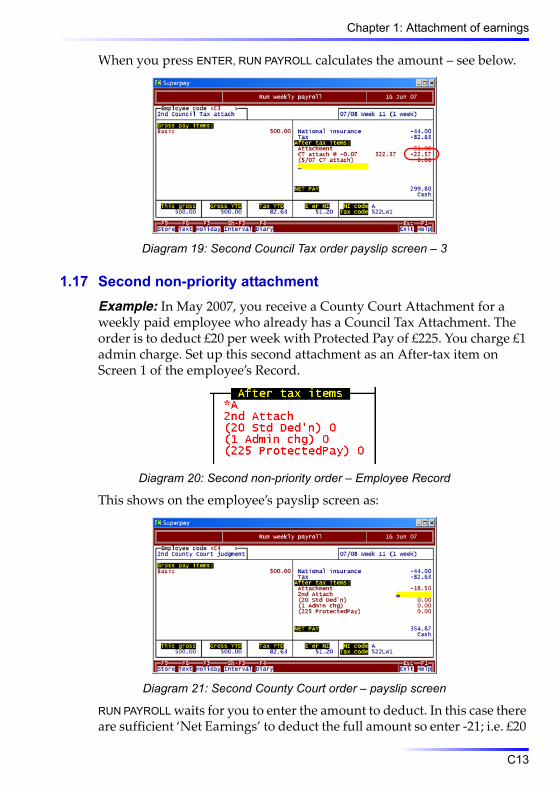
Chapter 1: Attachment of earnings
When you press ENTER, RUN PAYROLL calculates the amount – see below.
Diagram 19: Second Council Tax order payslip screen – 3
1.17 Second non-priority attachmentExample: In May 2007, you receive a County Court Attachment for a weekly paid employee who already has a Council Tax Attachment. The order is to deduct £20 per week with Protected Pay of £225. You charge £1 admin charge. Set up this second attachment as an After‐tax item on Screen 1 of the employee’s Record.
Diagram 20: Second non-priority order – Employee Record
This shows on the employee’s payslip screen as:
Diagram 21: Second County Court order – payslip screen
RUN PAYROLL waits for you to enter the amount to deduct. In this case there are sufficient ‘Net Earnings’ to deduct the full amount so enter ‐21; i.e. £20
C13

Reference
Deduction plus £1 Admin cost. When calculating the deduction, remem‐ber not to confuse ‘Net Earnings’ with Net Pay. They may or may not be the same figure; e.g. if the employee has after‐tax items.
(Note: The displayed £18.50 Attachment is the original Attachment which RUN PAYROLL calculates automatically.)
If there are insufficient ‘Net earnings’ to deduct the standard deduction, deduct what you can while still leaving the employee with his Protected Pay. Do not carry forward any underdeduction.
Consolidate County Court ordersRather than operate multiple orders for the same employee, you can write to the local court and ask them to consider consolidating multiple court orders as a Consolidated Attachment of Earnings Order (CAEO).
1.18 Payment of attachmentsYou pay over Attachments deducted to the Issuing Body as per the Instructions shown on the Original Order. To print a list of Attachments deducted this week, use sample report 906 (which you have probably already copied to User report 306 – see 7.7 in the New Users Guide, Step 4).
1.19 ConclusionThe regulations regarding Attachments are complex. We have summa‐rised the main points in this chapter, and shown how you operate the var‐ious types of Attachment through SUPERPAY.
However, we do not claim that this manual includes everything you need to know to operate all types of Attachment. You should read the appropri‐ate Employer’s Guides for more information – particularly for details of how the various Attachments interact with one another when you have more than one Attachment for the same employee.
C14
2
Bureaus2.1 OverviewThis chapter gathers together those features which are used by multi‐com‐pany bureau installations.
2.2 Company numbersYour company numbers need to be within the range appropriate to your SUPERPAY licence:
SP40 Any number in the range 1 to 40.SP100 Any number in the range 1 to 100.SP250 Any number in the range 1 to 250.SP Any number in the range 1 to 999.
On the SP40, SP100 and SP250 versions, SUPERPAY program and data files are stored in the same directory.
More than 999 companiesOn the SP version, if you have more than 999 companies you can separate your companies into separate folders (directories). Many SP users store ‘live’ clients in one directory and ‘obsolete’ clients in another directory. That way, when a company becomes ‘obsolete’ you do not need to change its company number. This make archive retrieval easier. Other companies separate their client list alphabetically; e.g. A‐L in one folder, M‐Z in another etc.
2.3 LicenceSUPERPAY licences run for 12 months from February to the following Janu‐ary. If you need access to more company numbers, you can trade in your existing program against the cost of a new licence plus any extra Mainte‐nance charge for the year.
If you want to trade down to a smaller version of SUPERPAY in order to reduce your annual Maintenance you need to do this at MAINTENANCE renewal (i.e. before we issue your new licence for the next 12 months). Before entering the revised licence, make sure that all your company num‐
C15

Reference
bers fall within the range of your new version – you can use the RENUMBER function if necessary.
There is a one‐off Network licence (current cost £100 + VAT) to permit SUPERPAY to be run on a network. It does not matter if you only run SUPER-PAY from one PC; if you contact us with a query which is related to the fact that your installation is on a Network, you need the Network Licence.
There are also second and subsequent installation Licences to run SUPER-PAY on more than one PC or in more than one location.
Finally, please note that a multi-company licence is not the same as a multi-location licence; e.g. SP40 is for running 40 companies in one loca‐tion.
2.4 Move between companiesWhen you have finished processing one client and want to move onto another company, go back to the MAIN MENU. Then press ALT-F2 to display the Select Company window.
Diagram 22: Select company window
Enter the number of the company you want to work on and press ENTER. The important point to note is that you do not need to EXIT out of SUPERPAY and re‐enter the logo screen just to change company/directory.
The Data path field is only displayed on the SP (unlimited) version.
C16

Chapter 2: Bureaus
2.5 Client lists
Company directory (Utilities, option 5)This option displays and/or prints a list of your clients. Each company in the current directory is displayed.
Diagram 23: Company directory
F6 alternates the displayed sequence between BY NUMBER (for a numeric list) and BY NAME (for an alphabetic list). The display shows all your com‐panies – including obsolete companies which have not been run this year. The PRINT option prints the displayed sequence. If you want a report which lists only your current clients, print Sample report 920 or 924 – see below.
If you have more than 18 companies, you can press PAGE DOWN to display the next screen. If you have SP(unlimited) you can see what companies are in another directory by typing that directory name in the Directory of box.
Number of employees in each company (report 920)Sample report 920 is useful for billing purposes. For each company, it tells you the total number of employees and the number of DELETED employees each client has on file.
Year end references report (report 924)You can use sample report 924 to view or print a list of your current com‐panies with their PAYE references. Note: The Permit Number field is no longer used – it was a field used for disk returns and has nothing to do with online filing.
Employees by start/leave date (report 919)Sample report 919 is useful for clients who have around 50 employees.
C17

Reference
Online filing requirements and incentives are dependent on the number of employees a company has at a specific date in October chosen by the Rev‐enue each year. In November, when the Inland Revenue sends out online filing letters you should print/view report 920 to see if any of your clients are close to the 50 limit (either above or below). If needed, you can then print/view sample report 919 to ensure that the Inland Revenue has cor‐rectly categorised your clients.
Erase (delete) a company – generalIf you have ‘obsolete’ companies on file which are no longer required, you can DELETE them and reuse the numbers.
However, SUPERPAY data files do not occupy much space and we advise you to keep ‘obsolete’ data for as long as possible. Our hotline experience shows that even if you no longer run a client’s payroll, you may still get Inland Revenue queries about data from several years ago. (This also applies to year end online filing data.)
Use the DELETE option with extreme caution. Once DELETED, a company can only be retrieved from a backup since DELETE removes all record of the company – including previous years’ data. There is no UNDELETE COMPANY option.
If you simply want to free up some company numbers, we suggest you renumber obsolete companies to a particular band of numbers – e.g. if you have the SP100 version, save company numbers 90 to 99 for your obsolete companies.
Erase (delete) a company – instructionsTo DELETE a company, go to the UTILITIES, FILE MAINTENANCE menu. Choose option 5 and enter the number of the company you want to DELETE. If the company has a password, SUPERPAY will ask you to enter it now. The fol‐lowing warning is then displayed – note the company name is displayed to ensure you do not inadvertently DELETE the wrong company.
C18

Chapter 2: Bureaus
Diagram 24: Delete a company option
Press SPACE to remove the company. You can immediately re‐use the com‐pany number if required.
Renumber a company – generalUse the FILE MAINTENANCE, RENUMBER option to change a company’s number. Note: You can only change to a number that is not being used by another company.
If, for example, you wish to renumber Company 57 as number 32 and Company 32 already exists, you must first renumber Company 32 as another (spare) number.
Renumber a company – instructionsTo RENUMBER a company, go to the UTILITIES, FILE MAINTENANCE menu. Choose option 3 and enter the existing and new numbers of the company you want to renumber.
Diagram 25: Renumber a company
The company is immediately renumbered.
C19

Reference
Store your data in more than one DirectoryIf you have the SP (unlimited) option you can separate your data into as many folders/directories as you need. To do this you must:
First create the extra directories in Windows Explorer (or DOS).Enter the new directory name in the data path field on the SUPERPAY logo screen or Alt-F2 window (see 2.4 above).After doing this you can set up new companies in the new directory.You can also COPY existing companies into the new directory (see 2.7).
2.6 Backup and restore dataMulti‐company users do not have to be in a particular company in order to back it up. (SUPERPAY asks for the company number and prompts the current number.) In addition, you can enter ALL to BACKUP/RESTORE all your companies in one go.
Diagram 26: Backup all
BACKUP ALL backs up all your company files plus your System and Config‐uration files and User report layouts (if any). If you BACKUP company by company, SUPERPAY only backs up company files. So, it is a good idea to take a full backup – i.e. enter ALL – at least once a month to ensure that you have a complete backup of all your files.
Backup/restore disk driveWe suggest that bureaus do not backup onto floppy disk(s). Because SUPERPAY is an archive payroll, you would soon need to backup onto mul‐tiple disks. Instead, we recommend that you backup onto a memory stick on your USB port.
You cannot back up SUPERPAY onto a CD.
C20

Chapter 2: Bureaus
Before you backup onto a memory stick, go to UTILITIES, SYSTEM DETAILS and enter the appropriate drive letter – e.g. G or H – in the Backup/restore disk drive field.
Diagram 27: Change backup destination
When you choose the FILE MAINTENANCE, BACKUP and RESTORE options, the wording of the options will not have changed (i.e. the screen still refers to a floppy drive) but SUPERPAY will backup your data to the cor‐rect drive and RESTORE will retrieve it from there.
Restore optionTo prevent you from accidentally overwriting a lot of data files, you can only RESTORE one company at a time if the files already exist on your hard drive. Also, you can only RESTORE to the same directory that the files were BACKED up from.
Backup and restore outside SUPERPAYWe can provide support when you use SUPERPAY’s BACKUP and RESTORE functions. However, if you store your data across a network, we advise you to use Windows to copy the whole folder to a backup location (e.g. a USB flash drive).
2.7 Copy a companyThere are two main reasons why a bureau might want to copy a company.
1. Try out some new ideas
If you want to try out some new ideas without altering the ‘live’ com‐pany use COPY to create a new company. You can then ‘play about’ with the copy, and your ‘live’ company stays unchanged. You can then DELETE the copy company when you have finished.
2. Company closes down
C21

Reference
If a company closes down and immediately opens up again under a different name, some users copy the company as described in 2.10 below.
Copy – instructions1. For SP40, SP100 and SP250 versions, COPY allows you to duplicate a
company with a different company number from the original com‐pany.
2. If you have SP (unlimited) you can COPY a company to a different number and/or directory or drive. Choose this option and enter your details in the COPY box.
Diagram 28: Copy company option on SP (unlimited) version
3. If you attempt to COPY onto a company that already exists, a warning is displayed and you can either overwrite the existing company or EXIT the option and choose another company number/destination.
2.8 System details screenSYSTEM DETAILS (Utilities, option 6) stores global settings for your SUPER-PAY program. These settings apply to all your companies and changes you make to this screen affect all your companies – though you can set up pay‐slip styles for individual companies.
C22

Chapter 2: Bureaus
Example: Payslip style
Set up a default style; e.g. enter M2 for standard laser payslips which most of your clients use.
Diagram 29: ‘Global’ payslip style
On individual COMPANY RECORDs you can then enter – for example – the style for heat seal laser payslip (P2) for those companies who want secu‐rity laser payslips.
Diagram 30: Individual company payslip style
Any entry here on the CO RECORD overrides the SYSTEM DETAILS. (Nor‐mally this field is blank so that SUPERPAY prints the style set up on the SYS-TEM DETAILS file).
C23

Reference
Optional text on payslipsThere is a 50 character field on the SYSTEM DETAILS screen for you to enter an optional payslip message.
Diagram 31: Optional payslip message
This payslip message allows bureaux to personalise their clients’ payslips and does not interfere with any of the pre‐printed boxes on the payslip.
2.9 Payslip quantitiesThere are generous quantity discounts for large payslip orders. However, do not order more than 12 months’ supply at a time. SUPERPAY’s payslips do not often change but we cannot say whether future legislation will impact on our payslip designs.
2.10 Company closes down and opens up againIf a company closes down and immediately opens up again under a differ‐ent PAYE reference, you can COPY the company as described in 2.7 above.
However, having copied the data there is still a lot of setting up on the new company. If you have less than 30 employees it could be quicker just to set up the employees’ details again (as if it were a brand new client). If you have more than 30 employees to transfer to the new company, we offer a data transfer service and you should contact us for an estimate of the cost.
In case you want to use the COPY COMPANY option to set up your new com‐pany, the required steps are detailed below.
1. Copy the company as described in 2.7 above. You now have two iden‐tical companies which for clarity are described below as the old com‐pany and the new company.
2. On the old company:
C24

Chapter 2: Bureaus
Print a list of Employee codes and names. This shows which employees have already left before the close down – you need this for step 6 below.Make sure that you have a copy of the latest payslips. If you run a bureau you may no longer have these, in which case, print another copy (on plain paper) now. You need these for step 9 below.If the employees are paid by Autopay or BACS, print sample report 904 which shows the employees’ current bank details. You need this for step 11 below.DELETE all the current employees and issue P45’s. Leave the com‐pany on file until year end for online filing or paper P14’s.
3. The remainder of these instructions apply to the new company. Change the company’s name to the new name; e.g. Fred Bloggs (2007) Limited.
4. On the COMPANY RECORD, blank out any Inland Revenue payments on Screen 3.
5. On the Employee Records, either RESTORE each individual employee back to Week/Month 0 or UNDO the whole payroll one period at a time. This brings the totals back to zero. E.g. if the employees are monthly paid and it is only Month 3, then use the UNDO ALL option three times; i.e. one month at a time. If the employees are weekly paid and you are at Week 40, it may be easier to RESTORE each employee’s record indi‐vidually.
6. REMOVE all the employees who had already left before the close down. These are listed on the Employee codes and names report printed in step 2 above.
7. Print a MONTHLY SUMMARY to check that all your totals are now at zero – by restoring back to Week/Month 0 you will be back to the records at 6th April.
8. Using the P45 prompt, enter the details of the P45’s printed in step 2 above. As well as setting up the totals to date, this also ensures that the employees’ Tax Codes reflect any changes since 6th April.
9. Check the rates of pay etc. from the employees’ most recent payslips, and apply any changes to their Records and PAYSLIP HEADINGS.
10. You may need to enter SSP in the BEFORE DIARY. Similarly, ongoing Parental Pay, Loans and Attachments may need to be entered.
11. Finally, if the employees are paid by Autopay or BACS, print sample report 904 again and compare the details with the report printed in step 2 above. Apply any changes.
C25
Reference
As you can see, there are a lot of steps.
2.11 Transfer files to a clientIf you sell SUPERPAY to one of your clients, you can transfer their payroll data so that your client does not have to re‐key existing data.
Renumber the company on your recordsIt is most likely that your client will opt for a single company version of SUPERPAY. If this is the case, you need to RENUMBER your client’s data as Company 1 on your system before transferring the data. All single com‐pany versions are for Company number 1 only and do not have access to the RENUMBER option.
Transfer dataIf you use BACKUP to transfer your client’s data onto a memory stick, remember that your client can only RESTORE into the same directory name as the data was backed up from. If both you and your client store SUPER-PAY data in the default directory C:\SUPERPAY, the BACKUP/RESTORE is straightforward.
If either of you uses a different directory you should use Windows or SUPERPAY’s COPY command to transfer the data onto a USB memory stick (if you have the unlimited SUPERPAY). Your client can then use Windows Explorer to transfer the data from the memory stick onto their PC.
2.12 Transfer files from a clientIf one of your clients uses SUPERPAY, you can transfer his data to your PC if he needs you to run his payroll; e.g. if his payroll operator has gone on leave etc.
Renumber the companyAs in 2.11 above, it is most likely that your client’s data is on the single company version of SUPERPAY. If this is the case, RENUMBER your Com‐pany 1 to some other number before transferring your client’s data.
Transfer dataAs in 2.11 above, if your client has used BACKUP to transfer his data, you can only RESTORE into the same directory name as the data was backed up from. If both you and your client store SUPERPAY data in the default direc‐tory C:\SUPERPAY, the BACKUP/RESTORE is straightforward.
C26

Chapter 2: Bureaus
If either of you uses a different directory on your PC, and you have SP (UNLIMITED) you can set up a temporary directory with the same name as your client’s directory. RESTORE the files into that directory and then use DOS or Windows Explorer to COPY the data into your ‘live’ directory.
Alternatively, use Windows to copy data from your client’s PC to a mem‐ory stick and to then copy the data from the memory stick to your PC.
2.13 Monthly payment to the Inland RevenueThe MONTHLY SUMMARY shows the breakdown of what your client owes the Inland Revenue. The report shows the total for the current month and for the year to date. Please see 9.6 in the New Users Guide for more information on displaying amounts outstanding on the MONTHLY SUMMARY.
2.14 Set up new clients around year endAround year end, before setting up a new client, you need to decide what date you want to start running SUPERPAY from. If you are going to run SUPERPAY from a date which is not within the current tax year, on the Logo Screen or on the ALT-F2 window on the MAIN MENU enter a date in the new tax year before you set up the COMPANY’S RECORD.
Example: You are going to run a new client from 6th April 2008. The cli‐ent sends you their data in March for you to start entering their details ready for Week 1/Month 1. Make sure that you have a 6th April 2008 or later date when you set up the new COMPANY RECORD. If you leave the date as March 2008, the company will be set up for the tax year 2007/2008, rather than 2008/2009. You would then have to CREATE NEXT YEAR’s FILES before you could run Week 1.
2.15 New clients with SMP and SSPYou should print a P35 listing (Year end, option 1) before you RUN the first payroll for new clients. This will show whether you have entered the brought forward SSP and SMP correctly.
C27

Reference
C28

3 Ch
ange pay interval3.1 OverviewUse the WK/MN prompt on the bottom of an employee’s Record to change ‘Pay interval’ (e.g. to change from Weekly to Monthly).
Diagram 32: Pay Interval prompt
You have a choice of 4 options – weekly, monthly, two weekly and four weekly.
There are special Inland Revenue rules relating to a change in an employee’s pay interval. If you set up an employee with the wrong pay interval and have not yet paid him, use SUPERPAY’s WK/MN prompt to change the interval; i.e. this does not come under the Inland Revenue’s special rules.
If however, the employee has already been paid, even if only once, you need to be aware of the rules before using the WK/MN prompt.
3.2 Inland Revenue rulesPlease read the Employer’s Further Guide to PAYE and NIC’s (6th April 2007 edition) – Chapter 1, Page 12 for a full explanation of the rules which are complex.
Briefly, if the change is not at the beginning of a tax month the rules require you to treat the employee’s pay in one way for the NI calculation, and in a different way for the PAYE calculation. This is possible on a man‐ual system. SUPERPAY can not do this.
C29

Reference
So, we advise you to change interval only at the beginning of a tax month. If you follow this advice, please ignore 3.3 and 3.4 below.
3.3 Mid-month change from weekly to monthlyIf the employee has already been paid as weekly for part of the month, UNDO the employee’s Record back to the beginning of the tax month. Then RUN his payslip for the whole month making sure you include any weekly wages in his Gross pay. In the After‐tax section enter as a negative item the Net pay that he has already received as weekly wages.
As you can see, by using UNDO and re‐RUN it is possible to change mid‐month from Weekly to Monthly but we do not advise it.
If you do not use UNDO and re‐RUN, the rules are complicated – please see the Inland Revenue guide.
3.4 Mid-month change from monthly to weeklyIf an employee has already been Monthly paid in the same tax month that you want to pay him Weekly, the rules state that you should:
1. Keep him as Monthly for the PAYE calculation until the end of the tax month, and then switch him over to weekly.
2. For the NI calculation, change him to Weekly straight away.
As you can see, if you change mid‐month from Monthly to Weekly, the rules want you to use the Monthly PAYE table and the Weekly NI table for the same pay. This is possible on a manual system, but SUPERPAY does not handle different pay intervals for PAYE and NI on the same payslip. In this case, you would have to make a manual calculation – much better to change over to a shorter tax period only at tax month end.
3.5 WarningsRUN PAYROLL checks for ‘conflicting runs’ and warns if you have changed INTERVAL at the wrong time. For example, if you change an employee from Weekly to Monthly when you have already paid the employee for 2 weeks in that month, RUN PAYROLL displays a warning when you RUN the Monthly payroll. If this happens, you should read and follow the instruc‐tions above.
C30

Chapter 3: Change pay interval
3.6 Change from weekly to 4 weeklyThe same principles apply to this situation with an added complication – there are special rules for the tax week number for 2 and 4 weekly pay‐rolls.
Example: Pay on 6th April is:
Tax week 4 for 4 weekly payrollsTax week 2 for 2 weekly payrollsTax week 1 for weekly payrolls.
Example: Pay on 14/12/07 is:
Tax week 40 for 4 weekly payrollsTax week 38 for 2 weekly payrollsTax week 37 for weekly payrolls.
If an employee changes from weekly or 2 weekly to 4 weekly, you should ensure that his first payslip after the change shows an interval of no more than 4 weeks – if it does, use the Interval prompt to change the interval back to 4.
Example: Pay interval needs changing on first payslip
A weekly paid Employee is paid on 14/12/07. This is Tax Week 37.
On 11/01/08 (4 weeks later), you change his pay interval to 4 weekly and he is paid with the 4 weekly payroll which is Tax Week 44.
Diagram 33: Change from weekly to 4 weekly pay interval
As you can see, the Tax week and pay Interval on his first 4 weekly payslip shows Week 44, 7 weeks. (The highlight shows that the interval is different from the rest of the payroll). Press the INTERVAL prompt (SHIFT-F3):
C31
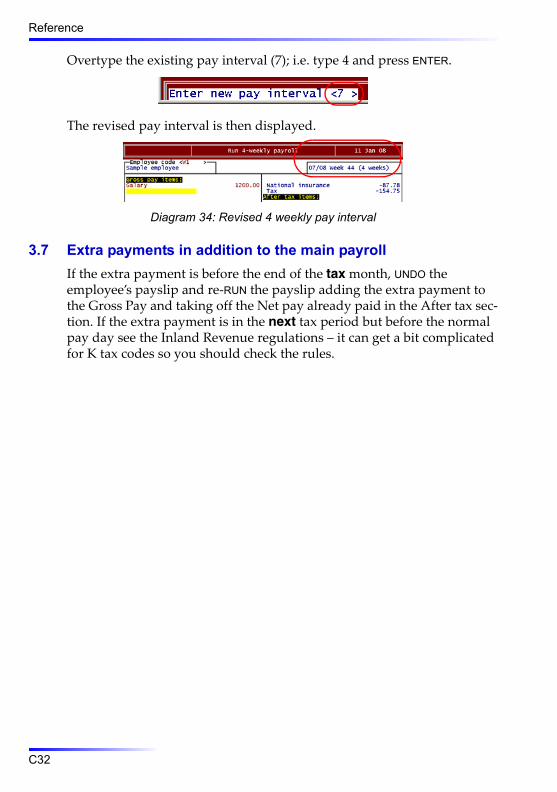
Reference
Overtype the existing pay interval (7); i.e. type 4 and press ENTER.
The revised pay interval is then displayed.
Diagram 34: Revised 4 weekly pay interval
3.7 Extra payments in addition to the main payrollIf the extra payment is before the end of the tax month, UNDO the employee’s payslip and re‐RUN the payslip adding the extra payment to the Gross Pay and taking off the Net pay already paid in the After tax sec‐tion. If the extra payment is in the next tax period but before the normal pay day see the Inland Revenue regulations – it can get a bit complicated for K tax codes so you should check the rules.
C32

4
Contact4.1 OverviewThis chapter tells you how you can contact us and how we keep you informed about changes which affect your payroll.
4.2 Hotline support
TelephoneYou can telephone the SUPERPAY Hotline on 0161 832 4761. When you telephone, please have SUPERPAY (or the FBI module) loaded so that we can provide you with a swift resolution to your query.
The Hotline is open Monday to Friday 9:00am to 5:00pm excluding Bank Holidays. Each year the hotline
closes between Christmas Eve and New Year’s Day inclusive.
If you have not yet returned your Licence Agreement, we will record your telephone number and ask for your company name and Licence number before answering any query.
We do not provide installation support to mobile telephone numbers.
EmailYou can email queries to [email protected]. If you work on SUPERPAY out of normal office hours, we normally respond to overnight emails dur‐ing the next working day. If your email is particularly complex it may take a few days before we get back to you.
Sometimes, we may ask you to email us your file(s) as an attachment so that we can investigate your query more fully. If we do this, we treat your data as strictly confidential. At busy times our hotline staff deal with many queries so it is helpful if you detail in the body of the email what has been discussed so far.
C33

Reference
Post or FaxIf you send us a written query by post or fax we usually telephone or email you to sort out your query.
Sometimes we receive floppy disks with a compliment slip with no details of why the disks have been sent. As with emails, it is helpful if you detail what has been discussed so far; e.g. is the enclosed disk a data conversion or do you have you a complex SSP query etc.?
4.3 WebsiteLicenced SUPERPAY users can always download the latest version of SUPERPAY and SUPERPAY’s PRINT HELPER, FBI and CIS modules from our website (www.superpay.co.uk).
The SUPPORT page lists FAQ’s. These FAQ’s are also documented in the FAQ 2007 paper manual.
4.4 UpdatesWhen there are legislation changes we provide an update to cover the changes. An update may be a CD, an Internet download or whatever media is the current best method of updating payroll software. (Technol‐ogy is changing all the time so we cannot say how future updates will be supplied.) If we send you any written notes, please file them in your SUPERPAY ring binder which was supplied with your original package.
There are usually two legislation changes each year – on 6th April and in May or June.
4.5 Mailing listPayroll programs are regularly updated. To ensure that you know when updates for SUPERPAY are available ‘SUBSCRIBE’ to SUPERPAY’s email list. Go to www.superpay.co.uk and click on DOWNLOADS. Then click on SUB-SCRIBE and SEND us a blank email (with the default email ‘subject’ of sub‐scribe). We will then email a confirmation reply to you. On this email, click REPLY to confirm. There is no charge for our mailing service.
We cannot add you to SUPERPAY’s email list; this is something that you need to do. If you have a separate IT department, it is good practice for both the IT and payroll departments to ‘subscribe’ independently so that the IT department will know when to update your software, and you will know what changes have been made to the program.
C34
Chapter 4: Contact
At any time you can remove your email address from our mailing list. To do this, go to SUPERPAY’s website, click on DOWNLOADS and click on SUB-SCRIBE as described above. Change the email subject from SUBSCRIBE to UNSUBSCRIBE and send a blank email to us.
We do not send attachments with our emails; we simply inform you when the program or manual has been updated. It is then up to you to down‐load an update. Please note: We do not email you about every small change to the program even though we post such changes on our website.
4.6 Maintenance pro-formasYou need to renew your SUPERPAY licence each year. We send Maintenance pro‐forma invoices in December to cover annual licence renewal which runs from February to January. When you pay the pro‐forma we send you a Tax Invoice. An update may be sent with this Tax Invoice or may be sent separately.
The CIS Licence is charged separately from the main SUPERPAY program licence. CIS pro‐formas are sent out in February with the Maintenance running from 6th April each year.
4.7 OrdersMost SUPERPAY users order payslips by telephone on 0161 832 4761 (same number as the hotline), though you can also order goods by fax (on 0161 819 3129) or post.
DeliveriesDeliveries are usually by 48 hour Parcelforce and we quote 3 working days to allow for delays. If you want to speed up your order you can pay £3 + VAT for a 24 hour Parcelforce service.
Neither the 24 or 48 hour Parcelforce service guarantees deliveries. If you urgently need a small supply of payslips, we can arrange for a Special Delivery. The cost of this service depends on the exact weight of the goods. If you need goods urgently, you should contact us by telephone.
PricesOur current software price list is posted on our website www.superpay.co.uk on the Versions tab on the DESCRIPTION page. If you want to upgrade your software, the cost is usually the difference in price between your existing payroll and what you want to upgrade to plus the difference in the annual Maintenance charge.
C35

Reference
4.8 PaymentWe accept cheques made out to Computastore or online bank transfers. If you want to pay us online please telephone us on 0161 832 4761 and we will supply the relevant information. We do not accept credit card pay‐ments.
C36

5
Directors’ NI5.1 Special rulesThere are special rules for Directors’ NI. The Inland Revenue’s CA44 April 2007 Guide (National Insurance for Company Directors) covers all aspects of Directors’ NI and this chapter does not duplicate that information.
This chapter covers only the main points you need so that you can effec‐tively use SUPERPAY to conform to the special rules. However, we do not claim that SUPERPAY automatically calculates directors’ NI in all circum‐stances. Specifically, SUPERPAY does not automatically handle changes of directors’ NI codes during the year – see 5.8 below. Neither does it identify the difference between fees which have been paid in advance and those which have been voted.
5.2 Difference between directors’ and standard NIDirectorsʹ NI is calculated on an annual or pro‐rata basis whereas stand‐ard NI is based on earnings in the current period only. This means that:
Using the Directors’ basis, no NI is deducted until a directorʹs year to date earnings reach the annual Earnings Threshold – in 2007/2008 this is £5225. Then, the whole of the director’s subsequent pay becomes sub‐ject to NI at 11% until the annual Upper Earnings Limit is reached when 1% Employee NI is payable. There are equivalent limits for employers.If an employee (i.e. not a director) is paid above the weekly or monthly Upper Earnings Limit in any one period, only 1% Employee NI is deducted on the top slice of income. Equivalent directors’ earnings could be subject to anything between nil Employee NI and 11% deduc‐tion.To avoid this variability in NI deductions, follow the Inland Revenue approved method of calculation outlined in section 9.3 in the New Users Guide. This explains how to set up Directors’ NI on SUPERPAY and that information is not duplicated here.
C37

Reference
5.3 Employer’s NI on directors earningsEmployer’s NI for Directors is on the same annual or pro‐rata basis as Employee NI. This means that no NI at all is payable until the annual or pro‐rata Earnings Threshold is reached. Using the method outlined in sec‐tion 9.3 in the New Users Guide, Employer’s NI is more evenly spread throughout the year.
5.4 Select basis for each directorYou do not have to use the same basis for all directors. In fact, you must get each individual director’s permission to use the method outlined in section 9.3 in the New Users Guide. However, it is much easier if you use the same basis for all your directors. Note: Whichever method you use to cal‐culate Directors’ NI, the total NI deducted at the end of the year is the same.
5.5 StartersWhen a director starts during the tax year, the NI annual limits are appor‐tioned according to the start date; e.g. if a director starts on 6th October the NI limits are half the annual limits. If you enter the correct Start date on the director’s Record SUPERPAY will apportion the NI limits according to Inland Revenue regulations.
Diagram 35: Start date for director
Former employee becomes a directorYou need to set up a new Record for the director to distinguish his earn‐ings as a director from his earnings as an employee. Ensure that you enter the date of his appointment as the Start Date so that SUPERPAY can appor‐tion the NI limits correctly. On this new Record, enter his taxable totals to date using the P45 prompt. Then DELETE his old Record.
As described in section 9.3 in the New Users Guide, if the new director’s earnings are regularly above the NI Lower Earnings Limit, you can deduct
C38
Chapter 5: Directors’ NI
standard NI until the last payment in the tax year, when you must run him as a director.
5.6 LeaversIf a director leaves during the year and you have deducted standard NI from his pay as described in section 9.3, you must put him on the Direc‐tors’ basis before running his last payslip.
A starter’s NI limits are apportioned according to the period employed in the tax year. This does not happen with leavers. When a director leaves, his NI is still calculated using the full year’s limits. If he started during the year, use the original pro‐rata NI limits (apportioned according to the start date – not the leaving date).
5.7 Employee ceases to be a directorIf an employee ceases to be a director during the year but continues as an employee, you still need to use the Directors’ basis for him.
5.8 Director changes NI code mid-yearSUPERPAY does not automatically calculate NI for a director who has more than one NI code during a tax year. If a director changes NI code, what you do next depends on what basis you have been using to calculate his NI.
Standard basis until year endIf the director is on the standard basis (as described in section 9.3) you can continue with that method.
1. Enter the new code in the NI code field on Screen 1. SUPERPAY will deduct NI on the new code on the standard basis since you have N in the DIRECTOR field.
2. At year end (i.e. after you have run his last payslip for the year) enter Y in the ‘Director’ field on Screen 1 of the employee’s Record. Then use the Inland Revenue Guide to manually calculate what NI should be deducted under each code from the director and his employer for the year to date. If you do not know how to do this, telephone the Inland Revenue Helpline who will help you calculate the correct figures.
C39

Reference
3. Manually enter the correct totals on Lines 1 and 2 of the NI totals on Screen 3 of the director’s Record.
Diagram 36: NI code change
Any changes you enter will be correctly reflected in the MONTHLY SUM-MARY. You may need to deduct some more NI from the director or refund some NI already paid. Make any necessary adjustment as an after-tax item on his next payslip in the new tax year.
4. STORE the record and make sure you do not run any more payslips for the director for this year.
Directors’ basisIf a director has been paid on the Directors’ NI basis (i.e. you have Y in the Director field on Screen 1 of his Record), a change of NI code requires a few more steps.
1. PRINT the director’s record – keep the printout safe until year end. DELETE this record (which is now the old record).
2. Set up a new record with the new NI code. Enter the date of change as the START date, and enter Y in the DIRECTOR field.
3. Enter his taxable gross and tax to date from the old record using the P45 prompt. Do not enter any NI totals.
4. SUPERPAY will deduct NI on the new record on the Directors’ basis since you have Y in the DIRECTOR field.
5. At year end (i.e. after you have run his last payslip for the year) use the Inland Revenue Guide to manually calculate what NI should be deducted under each code from the director and his employer for the year to date. If you do not know how to do this, telephone the Inland Revenue Help‐line who will help you calculate the correct figures.
6. Manually enter the correct totals on Lines 1 and 2 of the NI totals on Screen 3 of the new record. Any changes that you make will be cor‐rectly reflected in your MONTHLY SUMMARY. You may need to deduct some more NI from the director or refund some NI already paid. Make any necessary adjustment as an after‐tax item on his next pays‐lip in the new year.
C40

Chapter 5: Directors’ NI
7. On the new record manually add the P45 taxable gross and tax totals to This employment totals. Now call up the P45 box and blank out the fields. STORE this new record.
8. Make sure you do not run any more payslips for the director.
9. REMOVE the old record – it was already deleted in step 1 above.
5.9 Directors fees paid but not yet votedSUPERPAY does not automatically recalculate a director’s NI when any fees previously paid are subsequently voted. The Inland Revenue Guide, sec‐tions 29 and 30 explain exactly what to do when fees are drawn before they have been voted.
Manually make any necessary adjustments to the director’s Record.
C41

Reference
C42
6
Holidays6.1 OverviewThis chapter brings together all the information relating to the PAYE treat‐ment of holidays in SUPERPAY.
6.2 Holiday pay and tax/NI limitsSUPERPAY combines ‘normal’ pay and ‘holiday pay’ on one payslip and adjusts the tax and NI limits for the number of weeks paid. This is accept‐able to the Inland Revenue unless the employee has:
some items which are subject to tax but not NI – e.g. Construction Industry Holiday pay – see 6.7 below.some items which are subject to NI but not tax and the employee has a Week 1 tax code.the employee has a Council Tax Attachment – see 6.10 below.
If you have such items you need to process the holiday pay separately from the ‘normal’ pay.
6.3 Individual holidaysIf an employee is about to go on holiday, use the HOLIDAY prompt at the bottom of the employee’s payslip screen to advance the tax week.
Step 1 – Press F3 and SUPERPAY asks you to enter the new tax week.
Step 2 – Enter the new week number; i.e. the last week of his holiday.
If you are not sure what to enter here, look in the top right of the screen for the current tax week number.
C43

Reference
In this example the employee is about to go on two weeks’ holiday. The current week is Week 18, so you need to enter 20 here (i.e. 18 + 2).
Step 3 – SUPERPAY displays the new week number and pay interval in the top right of screen.
SUPERPAY adjusts the employeeʹs tax and NI limits and any flat rate pen‐sion for the number of weeks paid.
Step 4 – You can now pay the employee his normal pay plus two weeks’ holiday pay (3 weeks’ pay in total). RUN PAYROLL will not display that employee again until Week 21.
Important note – If you press EXIT because you need to re‐enter some pay‐slip items, the tax week is reset back to the standard week. So, if you press EXIT to make some corrections you need to press HOLIDAY again and advance the tax week again.
6.4 All on holidayInstead of using the HOLIDAY prompt at the bottom of each employee’s pay‐slip screen, you can advance the tax week for the whole payroll on the RUN PAYROLL MENU screen. SUPERPAY asks if the whole payroll is about to go on holiday, prompting N. Normally you press ENTER and move on to the next question.
When your whole payroll is about to go on holiday, enter Y.
Diagram 37: All on holiday
C44

Chapter 6: Holidays
SUPERPAY asks ‘to week ( )?’. Enter the week or month you want to advance to.
Example: In the above Diagram, SUPERPAY displays Week 11 next to the PAY DAY. The whole payroll is about to go on two weeks’ holiday, so enter 13 here.
SUPERPAY then adjusts the NI limits, tax free pay and flat rate pensions for the number of weeks paid for all your employees. If only part of the pay‐roll is going on holiday, enter N here and use the HOLIDAY prompt to advance the tax week on each individualʹs payslip screen (as described in 6.3 above).
HP period differs from rest of payrollIf you have advanced the tax week for the whole payroll on the RUN PAY-ROLL MENU screen, you can use the individual’s HOLIDAY prompt (F3) at the bottom of the payslip screen to enter a different week for an individual.
Example: If a security guard works through your annual summer shut‐down, use the F3 HOLIDAY prompt to set the guard’s pay week back to the current tax week even though everyone else has their pay week advanced.
6.5 Holidays and flat rate pensionsWhen employees go on holiday, RUN PAYROLL multiplies all flat rate pen‐sions by the number of weeks paid.
Example: An employee pays £17.25 pension each week. If the employee goes on holiday for a week and you advance his tax week by one, RUN PAY-ROLL deducts £17.25 x 2 = £34.50 pension.
6.6 Holidays and after-tax itemsWhen employees go on holiday, you have to decide if you want RUN PAY-ROLL to automatically multiply flat rate After tax‐items by the number of weeks paid.
C45

Reference
Example: An employee normally pays £15 union sub each week. If he is paid 1 week’s wages plus 1 week’s holiday pay, do you want SUPERPAY to deduct £15 or £30?
If you want SUPERPAY to deduct £30, enter Y in the AFTER TAX ITEMS x WEEKS field on Screen 2 of your COMPANY RECORD.
Diagram 38: Company Record, Screen 2
If you enter Y in this field, SUPERPAY multiplies all permanent flat after‐tax amounts by the number of weeks paid.
If you leave N (the default) in this field, RUN PAYROLL does not automati‐cally adjust any after‐tax items when employees go on holiday, leaving you to enter any extra items. You would choose this if most flat rate After tax items are only deducted when the employee is actually at work – e.g. a deduction for work clothes.
Note: This field has no effect on flat rate pensions – see above.
C46
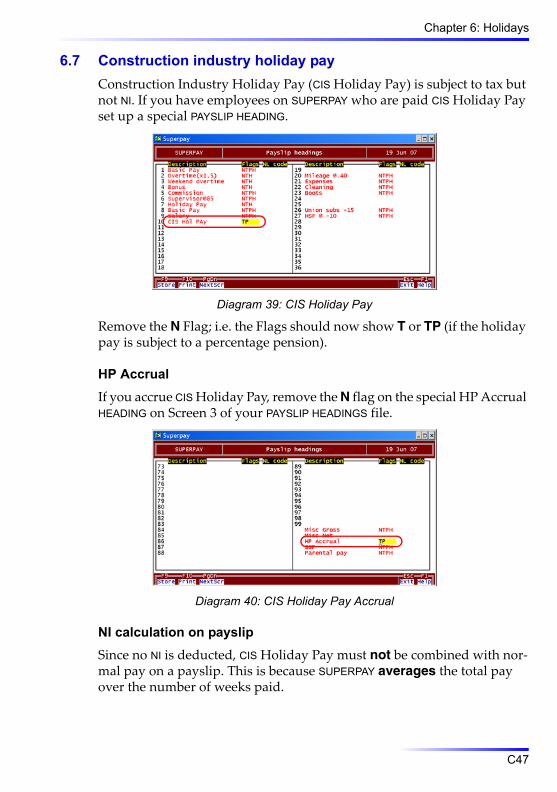
Chapter 6: Holidays
6.7 Construction industry holiday payConstruction Industry Holiday Pay (CIS Holiday Pay) is subject to tax but not NI. If you have employees on SUPERPAY who are paid CIS Holiday Pay set up a special PAYSLIP HEADING.
Diagram 39: CIS Holiday Pay
Remove the N Flag; i.e. the Flags should now show T or TP (if the holiday pay is subject to a percentage pension).
HP AccrualIf you accrue CIS Holiday Pay, remove the N flag on the special HP Accrual HEADING on Screen 3 of your PAYSLIP HEADINGS file.
Diagram 40: CIS Holiday Pay Accrual
NI calculation on payslipSince no NI is deducted, CIS Holiday Pay must not be combined with nor‐mal pay on a payslip. This is because SUPERPAY averages the total pay over the number of weeks paid.
C47

Reference
Example: In Week 10, you pay an employee £290 for 1 week’s normal pay plus £500 for 2 weeks’ CIS Holiday Pay.
If you advance the week to Week 12 and pay £790 on one payslip, SUPERPAY averages the pay which is subject to NI over 3 weeks. Only £290 is subject to NI so no NI would be deducted (since £290/3 = £96.67 is less than the weekly Earnings Threshold).So, in this example you should produce a payslip for Week 10 for the normal pay, and a 2 week payslip for Weeks 11 and 12 for the CIS Hol‐iday pay. When you do this, the employee pays NI on the £290 for Week 10.
6.8 Holiday pay accruals – the basicsSome companies have Holiday Pay (HP) accruals, whereby an amount is set aside each week and paid out when employees go on holiday. HP accruals are subject to PAYE only when paid out, when the payment is included in Gross Pay.
Step 1 – Set up HP accrualHP accruals can be set up to accrue a percentage of pay or a flat amount can be set aside each pay period.
Diagram 41: Holiday Pay accrual
Enter the accrual in the Accrual field on Screen 1 of the employee’s Record (maximum amount £9,999.99 or 99.99%)
C48

Chapter 6: Holidays
Step 2 – Total accruedSUPERPAY stores the total accrued on Screen 3 of the employee’s Record.
Diagram 42: Accrued holiday pay
If you have a total accrual carried forward from a previous payroll system, enter the amount in this field.
Step 3 – Pay out accrued Holiday PayWhen you want to pay out accrued holiday pay, RUN PAYROLL can pay out all or part of the accrued total on an employee’s payslip screen. HP accru‐als can be paid either as a rate (e.g. £80 a day) or a flat amount.
Step 3a – Pay out flat amountIn the Gross pay items, enter *H as the HEADING.
Diagram 43: Pay out accrued holiday pay
C49
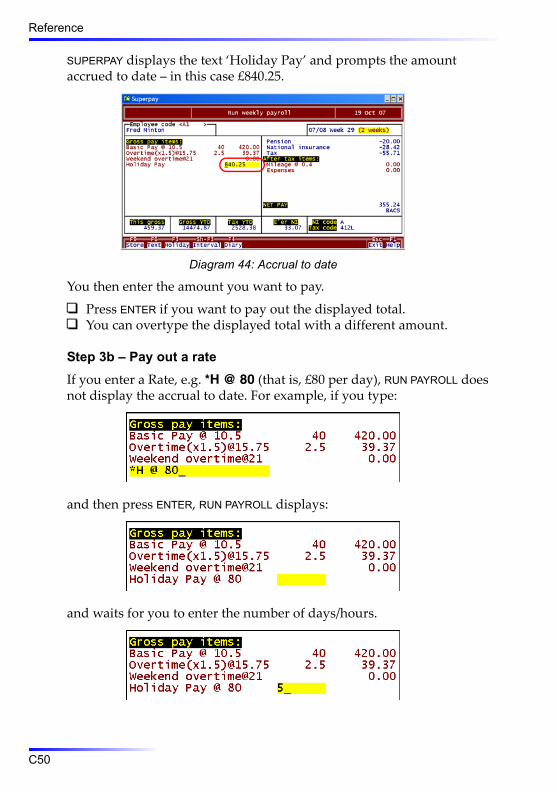
Reference
SUPERPAY displays the text ‘Holiday Pay’ and prompts the amount accrued to date – in this case £840.25.
Diagram 44: Accrual to date
You then enter the amount you want to pay.
Press ENTER if you want to pay out the displayed total.You can overtype the displayed total with a different amount.
Step 3b – Pay out a rateIf you enter a Rate, e.g. *H @ 80 (that is, £80 per day), RUN PAYROLL does not display the accrual to date. For example, if you type:
and then press ENTER, RUN PAYROLL displays:
and waits for you to enter the number of days/hours.
C50

Chapter 6: Holidays
When you press ENTER, RUN PAYROLL displays the amount payable and deducts this from the accrual to date total on Screen 3 of the employee’s Record.
Step 3c – Pay too much Holiday PayIf you enter an amount greater than has been accrued to date, RUN PAYROLL displays the following warning.
You can then either accept or amend the figure already entered; i.e. SUPER-PAY allows you to STORE a negative total in the Accrual to date field on the employee’s Record.
Step 4 – SUPERPAY shows amount accrued on payslipWhether the employee receives accrued HP or not, SUPERPAY prints this weekʹs accrual and new total to date at the bottom of the employee’s pay‐slip. No accrual is calculated on a HP payment.
6.9 Holiday pay accruals – sundry items
1. Tax PeriodSUPERPAY does not automatically adjust the tax interval when you pay out accrued Holiday Pay. If the employee is about to go on holiday, remember to use the HOLIDAY prompt (F3) to advance the individual’s tax week or advance the whole payroll on the RUN PAYROLL menu screen – see 6.3 and 6.4 above.
2. Flags on Payslip HeadingsA payout of accrued HP can be subject to any combination of pension, NI and tax in the same way as any other gross pay item. There is a special HP accrual HEADING already set up on Screen 3 of the PAYSLIP HEADINGS file
C51
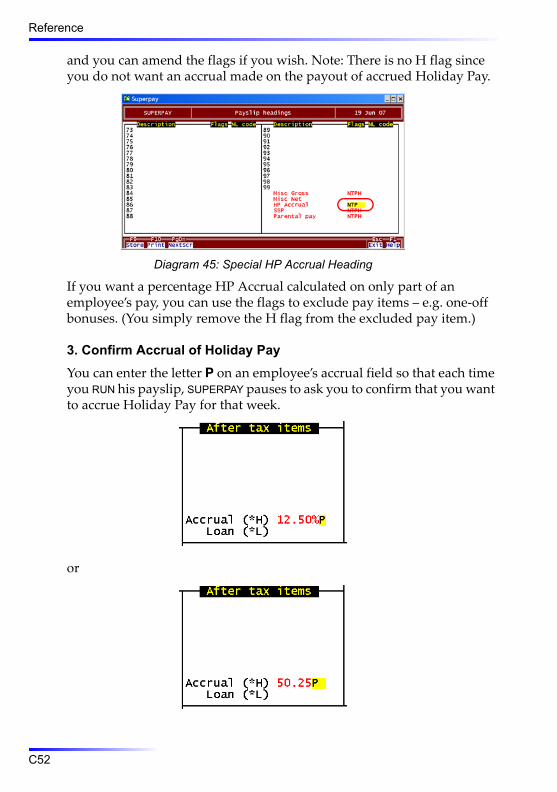
Reference
and you can amend the flags if you wish. Note: There is no H flag since you do not want an accrual made on the payout of accrued Holiday Pay.
Diagram 45: Special HP Accrual Heading
If you want a percentage HP Accrual calculated on only part of an employee’s pay, you can use the flags to exclude pay items – e.g. one‐off bonuses. (You simply remove the H flag from the excluded pay item.)
3. Confirm Accrual of Holiday PayYou can enter the letter P on an employee’s accrual field so that each time you RUN his payslip, SUPERPAY pauses to ask you to confirm that you want to accrue Holiday Pay for that week.
or
C52
Chapter 6: Holidays
If you have set up your employees in this way, when you STORE a payslip, SUPERPAY asks:
Type Y or N and then press ENTER.
Some companies use this P (for pause) feature to ensure that Holiday Pay is only accrued when an employee has met certain pre‐set conditions; e.g. if they work a certain number of hours or earn over a certain amount.
Other companies use this Pause feature to selectively choose which weeks to include for accrual of Holiday Pay.
Example: Your employees receive 1 week’s HP in Week 40 based on their average pay over the 8 weeks up to and including Week 39.
Set up the HP accrual as 1/8 (i.e. enter 12.5%) of the wages for Weeks 32‐39 inclusive (i.e. enter 12.5%P in field 21 on Screen 1 of the employees’ Records.) When you press F9 to store the payslip screen, SUPERPAY asks you to confirm the accrual. Enter Y each week.
In Week 40, pay out the accrued HP. Enter *H as a gross pay item on each employee’s payslip screen. RUN PAYROLL prompts the average pay over the past 8 weeks for you to either accept or overtype.
If the employees are to receive 2 weeks’ HP, then you should accrue 2 x 1/8 = 1/4 = 25% each week so that RUN PAYROLL can prompt you with the cor‐rect figure.
6.10 Holidays and attachments
Fixed deductionsSUPERPAY multiplies fixed Deductions and Protected Pay by the number of weeks/months paid. (There is still only one admin charge.)
Council Tax percentage deductionsWhen you pay more than one week on a payslip, SUPERPAY averages the total ‘Net Earnings’ over the total number of weeks paid and uses the appropriate percentage.
If the employee gets paid the same each week (including Holiday Weeks) then there is nothing extra for you to do. If an employee’s Holiday pay dif‐fers from his normal pay (e.g. his normal pay includes overtime), you
C53

Reference
must RUN a separate payslip for the normal pay and the Holiday pay. Please refer to section 1.9 for more details of this restriction.
6.11 Holidays – advance into Week 53If you want to pay Holiday Pay in Week 52, you cannot use the HOLIDAY prompt to advance the tax week. The special rules for pay in Weeks 53, 54, and 56 mean that any pay for these weeks cannot be combined with pay for Week 52. So you need to pay any Week 52 pay separately from Week 53 pay; i.e. produce two payslips.
To ensure that you conform to these special rules SUPERPAY will not let you advance the week on the RUN PAYROLL MENU screen or press the HOLIDAY prompt (F3) to advance the week on an individual’s payslip.
If you try to get round the rules by using SHIFT-F3 to change the INTERVAL on an individual’s payslip, the employee’s NI will be correct but his tax will be wrong. So, you need to process pay for Week 52 on a separate pay‐slip from Holiday Pay for Week 53.
(In 2007/2008 only those companies with a Friday or Saturday Pay day should have a Week 53, 54 or 56 payroll.)
6.12 Holidays over the tax year endIf you want to pay Holiday Pay for Week 1 (or later) together with some pre‐year end pay, you cannot advance the tax week into the new tax year. Similarly you cannot advance the tax week by using the special rules for Week 53, 54 or 56.
These constraints are set by the Inland Revenue, not SUPERPAY.
C54

7
Leavers7.1 Leavers
Step 1 – RUN the employee’s last payslip
Step 2 – Enter the employee’s leaving date on his record
Diagram 46: Leaving date
If you leave this field blank, the DELETE function (Step 3 below) slots in the system date as the employee’s leaving date.
Step 3 – DELETE the employee’s record
Press F5 to DELETE. SUPERPAY asks:
and prompts Y. Press ENTER to confirm. The Record is flagged as DELETED, cleared from the screen, and a PRINT P45 flag created for this employee.
C55

Reference
Step 4 – Print P45Press ESC to EXIT back to the EMPLOYEE RECORDS menu.
Diagram 47: Print P45 menu option
Choose option 7.Enter the E’ee type and E’ees fields in the usual way.Choose laser or continuous. Both types of form are available free of charge from the Inland Revenue. You cannot use manual P45’s in your printer.Load your P45 forms and choose SAMPLE to check your alignment with‐out losing the PRINT P45 flag. If you print a ‘real’ P45 and the alignment is out, you would have to reset the flag on the Record (see below). Unlike most of SUPERPAY’s reports, you can print P45’s once only.
Laser P45's
Laser P45ʹs consist of four A5 sections printed onto two A4 sheets. If you are printing several P45’s, make sure you load sheet 1, sheet 2, sheet 1, sheet 2 etc. (This is the way they are stored in the Inland Revenue station‐ery box.)
If your laser P45’s do not line up properly you can use the P45 offset fields in the SYSTEM DETAILS file. These offset fields have exactly the same func‐tion as the P14 offset fields which are described in the FAQ 2007 booklet Page 41.
Example 1: Enter 100 in the P45 offset vertical field to move the print down one line (‐100 moves it up).
Example 2: Enter 100 in the P45 offset horizontal field to move the print right one character (‐100 moves it left).
Continuous P45's
Continuous P45ʹs are in exactly the same format as manual P45ʹs with a margin for sprocket holes. Since you have to line up the forms, continuous
C56
Chapter 7: Leavers
P45ʹs are really only useful if you have several employees leaving at the same time; i.e. it may be easier to print a P45 on plain paper and then man‐ually transcribe the information onto the Inland Revenue form, rather than load and align the special stationery.
Step 5 – Give P45 to employee
Step 6 – Send off copy to the RevenueFrom April 2009, companies with more than 50 employees will need to send the P45 details online to the Inland Revenue.
Step 7 – Future Run payrollsDELETED records are not displayed in RUN PAYROLL.
Step 8 – Year endThe DELETED record remains on file until year end when the DELETED employee’s details will be filed online or printed on a P14. SUPERPAY does not print P60’s for DELETED employees.
CREATE NEXT YEAR’S FILES removes DELETED records from next year’s records.
7.2 Reprint a P45If the original P45 does not line up properly or is damaged, you cannot simply choose the PRINT P45 option again to print another P45 for the same employee. Instead you need to:
Go back to the Employee’s Record.UNDELETE his Record.DELETE his Record again.
This resets the PRINT P45 flag, and you can then reprint the form.
7.3 Student LoanIf you have *S as an After‐tax item on an employee’s Record, SUPERPAY prints Y in the Student Loan box of the P45 when he leaves.
C57

Reference
7.4 Undelete – leaver comes backWhen you DELETE a record the DELETE prompt changes to UNDELETE.
Diagram 48: Undelete prompt on Deleted record
The UNDELETE function allows you to correct any mistakes; it should not be used to re‐instate leavers.
If a leaver comes back in the same tax year, you should not UNDELETE him. Instead you should set up another Record (with a new employee number). The Inland Revenue wants a separate record for each period of employ‐ment.
Casual employees and undelete promptIf an employee is Casual you should not use the DELETE and UNDELETE options. Instead, you should set up the Emp’ee type field on Screen 1 of his record as Casual so you can call him up only when he works for you.
You can SKIP his payslip when he has not worked – see 6.17 in the New Users Guide if you want to know more about this feature.
C58

Chapter 7: Leavers
7.5 Leavers – directors NIIf a director leaves during the year and you have deducted standard NI from his pay, you must put him on the directors’ basis before running his final payslip.
A starter’s NI limits are apportioned according to the period employed in the tax year – this does not happen with leavers. When a director leaves, his NI is calculated using the full year’s limits. If he started during the year, use the original pro‐rata NI limits (apportioned according to the start date – not the leaving date).
7.6 Leavers – net pay roundingWhen an employee whose pay has been rounded is leaving, change the rounding amount to 0.01 before running his last payslip.
Example: An employee who has his Net Pay rounded each week to the nearest £1 is leaving. The following diagram shows his Net Pay rounding fields on Screen 2 of his Record.
Change the ‘Round: To’ field to 0.01.
This clears the rounding b/f, and ensures no rounding amount is carried forward. After running his final payslip, the Net Pay rounding fields now show:
7.7 AttachmentWhen an employee leaves, if there is an ongoing Attachment you need to inform the Court or Agency which issued the original order. There are rules regarding time limits which you must adhere to – please see the Original Order for more details.
C59

Reference
7.8 SMPAt the end of an employee’s Maternity Pay Period, SUPERPAY stops paying SMP. If the employee is not returning to work you should then DELETE her record so that her payslip screen is no longer displayed.
7.9 SSPWhen an employee leaves, you must check his SSP DIARY to see whether he has had any SSP in the previous 8 weeks. If he has, complete an SSP1(L). Only enter whole weeks.
Example: If an employee had 5 Qualifying days per week, round down 3 days SSP or less and round up more than 3 days. E.g. if he had 3 days SSP, round this down to zero weeks and you donʹt need to complete a Leavers form SSP1(L). If he had 4 days SSP, enter 1 week on the SSP1(L).
7.10 Leaver’s employee codeYou cannot re‐use a leaverʹs code until after year‐end when DELETED records are erased from the current Employee File. However, we advise you not to re‐use numbers even if the employee left in the previous year.
1. If you are likely to print reports using data from previous years it is best not to re‐use any deleted numbers.
2. Similarly, if a new employee is sick during his first 8 weeks, SUPERPAY may incorrectly look at a leaver with the same number in a previous year.
C60
8
Pensions8.1 OverviewPensions are not the same as other deductions from pay and there is a spe‐cial Pension box on the employee’s Record for you to set up pensions.
All but the very smallest employers must offer a Stakeholder Pension to their employees. So SUPERPAY has a dedicated Stakeholder Pensions line (line 4) in the pension box.
8.2 Set up pensionEnter employee and employer pension contributions in the pensions box on Screen 1 of an employee’s Record. Do not set up employee pensions as negative Gross pay or After‐tax items.
Diagram 49: Empty Pensions box (Employee Record, Screen 1)
Number of pensionsEach employee can have up to four different pension calculations. These can be separate parts of the same pension – e.g. a percentage of gross pay plus a flat rate AVC – or completely different pensions. Leave blank those fields which do not apply to this employee. The first 3 lines are for non‐Stakeholder pensions. Line 4 is only for Stakeholder pensions.
Enter the deduction as a positive amountAlways enter pension contributions as positive amounts; RUN PAYROLL deducts any employee contributions entered in the Pensions box.
C61
Reference
Tax reliefApproved pensions are allowable for tax but not National Insurance. Tax relief can be given at source (i.e. the pension is deducted before tax) or can be claimed by the Pension provider (i.e. the pension is deducted after tax has been deducted).
With Stakeholder Pensions, tax relief is always claimed by the Pension provider, so make sure you set up Stakeholder Pensions in the special Stakeholder line (Line 4).
Type field (lines 1, 2 and 3 only)Enter a number in the range 1 to 6 so that RUN PAYROLL knows whether to deduct the pension before or after tax and NI.
Type 1 – The e’ee contribution is deducted before tax is calculated.Type 2 – The e’ee contribution is deducted after tax is calculated.Type 3 – The e’ee contribution is deducted after tax has been calcu‐lated. The actual deduction is the amount shown on the screen less Basic Rate tax. E.g. Up to 5/4/08 a Type 3 e’ee pension of £10 gives rise to a £7.80 deduction on the employee’s payslip (i.e. after 22% Basic Rate deduction). After 6/4/08, £8 will be deducted (i.e. after 20% Basic Rate deduction).Types 1, 2 and 3 are not allowable for NI; i.e. the pension is deducted after NI is calculated.Types 4, 5 and 6 are as 1, 2 and 3 above but before NI has been deducted. Type 4 is used for salary sacrifice pension schemes. Types 5 and 6 are seldom used.
It is important to enter the correct number in the Type field. If you enter 1 and the Type should be 2, you are in effect giving the employee double tax relief on this pension – once at source during RUN PAYROLL and the Pension provider will also claim tax allowances for that employee since they believe the deductions have been made Net of tax.
There is no type field for Stakeholder pensions. RUN PAYROLL automatically deducts a Stakeholder pension after deduction of tax and NI (in accord‐ance with the regulations).
Emp’ee field (7 alphanumeric)Enter the amount deducted from the employee’s pay each week or month.
1. Flat amount
C62

Chapter 8: Pensions
Enter the amount deducted – e.g. 7.25 – and RUN PAYROLL deducts £7.25 each pay day. If the employee goes on holiday for a week and you advance his tax week by one, SUPERPAY deducts £7.25 x 2 = £14.50.
2. Four weekly payrolls etc.
Enter the equivalent weekly contribution. RUN PAYROLL then deducts the amount you enter here x 4.
Example: A 4 weekly employee pays £50 Pension. Enter 12.50 here on his Record and RUN PAYROLL will deduct £50 every 4 weeks. If you enter 50.00 here, RUN PAYROLL will deduct 4 x £50.00 = £200 every 4 weeks.
3. Percentage deduction
To deduct a percentage pension, enter the ‘%’ sign after the amount. Percentage pension deductions can either be a percentage of all an employee’s pay (e.g. including bonuses and overtime) or a percentage of part of the employee’s Gross pay.
If you want SUPERPAY to deduct a percentage of all the pay simply enter the percentage.If you want SUPERPAY to calculate a percentage pension on only part of the Gross pay, enter the percentage here and update the P (for pension) flags on the PAYSLIP HEADINGS file.
Emp’er field (7 alphanumeric)Enter the amount of pension an employer contributes each week or month in the same way as employee contributions. Enter either a percentage of Gross pay or a flat amount.
If the employer’s contribution is a percentage of Gross pay, it must be on the same basis as the employee’s contribution; i.e. if the employee’s per‐centage pension is a percentage of Basic Pay only, then the employer’s will also be a percentage of Basic Pay.
Pay range (2 fields, each 5 alphanumeric)These two fields allow you to calculate a percentage pension on that part of an employee’s pay which is within pre‐defined limits. You can enter any amount between 1 and 99999 (whole pounds only) or L in the first field and/or U in the second field, representing the lower and upper NI limits.
ID (a number in the range 1 to 299)You must enter this field for Stakeholder pensions (line 4) but can leave it blank on the first three lines. If you want to analyse pensions by pension
C63

Reference
provider, then you need to enter different ID’s for each provider – see the list in 8.4 below. If you do not need any pension analysis, enter 1 as the ID.
Reference (13 alphanumeric)You can leave this blank on lines 1 to 3 but should enter a reference for Stakeholder pensions. This field is not printed on SUPERPAY’s standard pension reports but is printed on the Stakeholders pension reports – see 8.8 below.
8.3 Some pension examplesExample 1: Stakeholder pension.
An employee pays £10 a week to a Stakeholder Pension. Enter an appro‐priate ID number – see 8.4 below for the current list of ID’s.
Diagram 50: Example of a stakeholder pension
This is displayed on the payslip screen as:
Diagram 51: Stakeholder pension (payslip screen)
Example 2: Pension Net of tax (non Stakeholder).
An employee pays £10 Net of tax.
Diagram 52: Pension net of tax
C64
Chapter 8: Pensions
Example 3: Percentage pension deducted gross (non Stakeholder).
An employee pays 3% and the employer 5% of his total gross wage each week.
Diagram 53: Pension as a percentage of gross
Example 4: Percentage pension on part of gross pay.
An employee pays 3% of his basic Salary each week; the employer pays 5%. Set this up on the employee’s Record in the usual way.
Diagram 54: Pension as a percentage of gross (E’ee record)
On the PAYSLIP HEADINGS file remove the P (for pension) Flag on all Gross Pay items that are used for this employee except Salary.
Diagram 55: Payslip Headings (P for pension removed)
C65

Reference
The employee does not receive commission or supervisor’s allowance so the P has been left on these flags. Similarly, the after‐tax items still have all four flags.
Diagram 56: Payslip screen
The payslip screen deducts 3% of the Salary as employee pension, but does not deduct any pension from the overtime or bonus.
8.4 Stakeholder pension providers IDThe following is a list of ID’s for Stakeholder Pension Companies. How‐ever, you can enter in the ID field any number in the range 1 to 299.1. Abbey National 2. Allied Dunbar 3. Axa (Sunlife)
4. B&CE 5.Bank of Scotland 6. Barclays
7. Britannic 8. CIS 9. Clerical Medical
10. Eagle Star 11. Friends Provident 12. HSBC
13. Legal and General 14. Marks & Spencer 15. Merrill Lynch
16. Nationwide 17. Natwest 18. NFU
19. Norwich Union 20. NPI 21. Pearl
22. Police Mutual 23. Prudential 24. Royal & Sun Alliance
25. Royal Liver 26. Royal Scottish Assurance 27. Schroder
28. Scottish Amicable 29. Scottish Equitable 30. Scottish Life
31. Scottish Mutual 32. Scottish Widows 33. Standard Life
34. Teachers 35. TUC 36. Virgin
8.5 Contracted out NI codesIf your employees are in an approved Contracted Out pension scheme, both the employer and employee pay reduced NI contributions. The appropriate NI codes for these reduced rates are as follows:
D Standard employee on COSR pension scheme.
C66

Chapter 8: Pensions
E Women with reduced NI rate on COSR pension scheme.F Standard employee on COMP pension scheme.G Woman with reduced NI rate on COMP pension scheme.L Deferred, contracted out, salary related (COSR) pension scheme.S Deferred, contracted out, money purchase (COMP) or Stakeholder pen‐
sion scheme.
The employer must have a Contracted out certificate to use these codes.
Terms used in above list1. Deferred means that the employee pays 1% employee NI; the
employer pays standard rate NI.
2. COSR is Contracted out Salary Related pension scheme.
3. COMP is Contracted out Money Purchase pension scheme.
8.6 Contracted out scheme referencesIf your employees are in a contracted out pension scheme and hence pay reduced NI contributions, you need to set up the ECON and/or SCON num‐bers to identify the scheme.
Company recordEnter the Employer Contracting Out Number (ECON) on Screen 3 (Field 25) of the COMPANY RECORD.
Diagram 57: ECON number in the Company Record
This Con/Out Cert No field is in the format of 9 alphanumeric characters starting with the letter E and ending with a letter; e.g. E3567891A.
C67

Reference
Employee recordIf the employee is in a contracted out money purchase pension scheme, e.g. NI code F, you enter the Scheme number (SCON) in the Pension c/out no field.
Diagram 58: SCON number
The format of this field is an S or A followed by 7 numbers and one letter without spaces (e.g. S4234008J).
Year end returnsIf you have an employee with a contracted out NI code and the ECON or SCON number is missing, your online filing returns will fail VALIDATION. You would then need to correct the Employee and/or Company Record.
Contracted out pensions helplineIf you are uncertain about your ECON and SCON numbers, telephone the Revenue’s Contracted‐out Pensions Helpline on: 084591 50150.
8.7 Run payrollRUN PAYROLL automatically calculates and displays any employee pension in the Standard Deductions section of the payslip screen.
When or if you change the Gross Pay (e.g. when you enter an extra item), a percentage pension deduction changes instantly on the screen.
C68
Chapter 8: Pensions
Which Gross Pay items are subject to a percentage deduction is deter‐mined by the Flags fields on your PAYSLIP HEADINGS file.Pensions are always shown in the line above tax and NI even if they are a Type 2 or Stakeholder pension (i.e. deducted after tax and NI has been calculated).No pension is displayed if there is no Gross pay.In accordance with Stakeholder regulations, if the pension is a Stake‐holder pension, no flat amount pension is deducted if there is insuffi‐cient Gross Pay to pay the whole deduction.If the pension is not a Stakeholder pension, if there is any gross pay at all, the full flat amount pension is deducted even if this puts the Net pay into negative. Since you cannot STORE a negative net pay, you would then need to make a payslip adjustment to bring the negative net pay back to zero or EXIT the RUN and change the employee’s record.An employee can have up to four pensions. The contributions under each scheme and the total are shown.
If the values for all four pension elements are too big to fit in the space on the payslip only the number of deductions and total is shown.
C69

Reference
8.8 Pension totalsSUPERPAY stores the totals for each pension scheme on 4 lines in the special ‘Pension totals’ box on Screen 3 of the employee’s Record. The maximum value for each pension total is £9,999,999.99. Stakeholder Pension totals are stored on Line 4.
Diagram 59: Employee record, Screen 3 – Pension totals
The Gross Pay for Pension will differ from the Pay in This Employment if you have set up percentage pension deductions which are not calcu‐lated on the whole of an employee’s pay – e.g. the ‘Gross for Pension’ total may exclude bonus and overtime payments.The Gross Pay for Pension will differ from the Gross Pay for Tax if the employee has a Type 1 pension, i.e. the pension is deducted from Gross before tax is calculated.
You do not usually need to amend any of these totals which are automat‐ically updated by SUPERPAY.
8.9 Stakeholder pension payslip layoutsThe standard payslip layouts are B2, I2 etc. and any employee pension is printed above the National Insurance and Tax – i.e. in the same format as the payslip screen.
If you change the 2 to 3 e.g. B3, I3 etc., the payslip prints any employee pension after the National Insurance and Tax. In addition, ‘Stakeholder pension’ is printed instead of ‘Pension’ for those employees who pay into a Stakeholder scheme. If you run a bureau and only some of your clients have Stakeholder pensions, set up B3, I3 etc. on the SYSTEMS DETAILS
C70
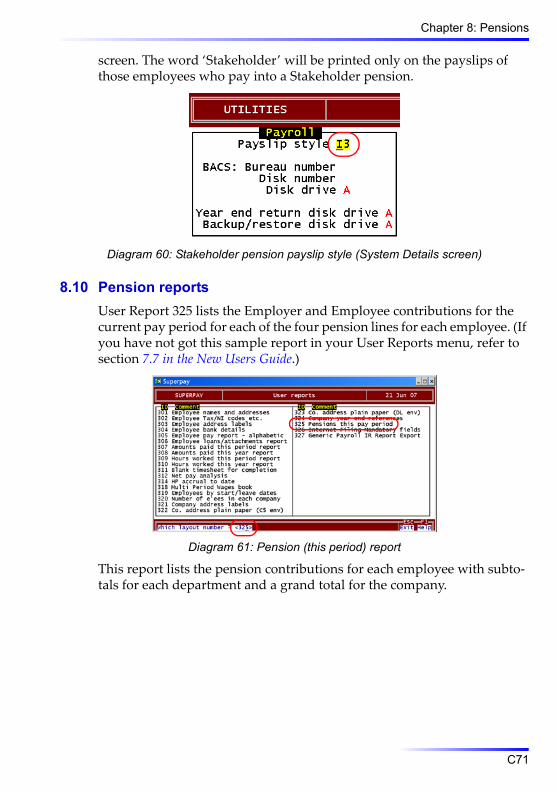
Chapter 8: Pensions
screen. The word ‘Stakeholder’ will be printed only on the payslips of those employees who pay into a Stakeholder pension.
Diagram 60: Stakeholder pension payslip style (System Details screen)
8.10 Pension reportsUser Report 325 lists the Employer and Employee contributions for the current pay period for each of the four pension lines for each employee. (If you have not got this sample report in your User Reports menu, refer to section 7.7 in the New Users Guide.)
Diagram 61: Pension (this period) report
This report lists the pension contributions for each employee with subto‐tals for each department and a grand total for the company.
C71

Reference
You can also print a PENSIONS TO DATE report from the EMPLOYEE REPORTS menu (option 2 on the EMPLOYEE RECORDS menu).
Diagram 62: Pensions (year to date) report
This report is in exactly the same format as User Report 325 and shows the totals for the year to date.
8.11 Stakeholder pension reportsUser Report 325 and the PENSIONS TO DATE report do not provide pension information in the format required by Stakeholder pension regulations.
If any of your employees have a Stakeholder pension, at the end of each calendar month, choose PAYSLIPS/REPORTS option 7. This report is only for Stakeholder pensions which have been set up on Line 4 of the special pen‐sion box on Screen 1 of each employee’s Record.
Diagram 63: Stakeholder pensions report
When you choose this option, SUPERPAY displays a sub‐menu.
C72

Chapter 8: Pensions
1. Which month?Enter the month you want printed as 3 characters, Apr, May, Jun etc. SUPERPAY prompts last month (unless you are in April when SUPERPAY prompts Apr).You can enter a range of months e.g. Apr-Jun for the first quarter.You can do year to date reports by entering the range Apr-XXX where XXX is the current month.
2. Pension Company IDEnter the appropriate ID. This can be any number in the range 1 to 999 but needs to coincide with the ID’s already entered on your employees’ Records – see 8.4 above. Enter ALL if you want SUPERPAY to print a report for all the Stakeholder Pension companies used by your employees.
3. TypeEnter 1 or 2. The Detail report shows the breakdown for each pay period. You should print two copies of the Summary; one for you and one for the Pension company. The Detail report is for your records only.
4. Print reportSUPERPAY prints the details of the pension contributions for all your employees for the Pension company ID selected. Weekly, 2 weekly, 4 weekly, and monthly paid employees are all printed on the same report in Employee code order.
5. Highlight differencesStakeholder Pension companies want you to highlight if an employee has not made the contribution the Pension company expects. Use the Com‐ment column to show if the expected contribution has not been deducted and the reason for the difference.
SUPERPAY’s report shows the current weekly etc. contribution and the number of payslips produced. You must visually check this report to see if the contribution multiplied by the number of payslips equals the amount deducted.
2 or 4 weekly payrolls
You enter the weekly contribution on the employees’ Records and for 2/4 weekly payrolls, the pension report shows 1 payslip and the weekly amount. The amount deducted is usually two or four times this
C73

Reference
amount. In these cases there is no need for a comment since the pen‐sion company will receive the amount they expect.
If you have three 2 weekly or two 4 weekly runs in a calendar month, the deduction will be 6 or 8 times the weekly amount. This may need a comment – its best to check with the Pension company.
Holidays over a month end
If an employee goes on holiday over a month end, he will have a higher contribution than expected this month (e.g. 4 weeks’ usual pension + 2 weeks’ pension for 2 weeks’ holiday) followed by a lower contribution next month. This will probably require a comment; its best to check with the Pension company.
Pension summary – lower deduction because of low pay
In accordance with Stakeholder regulations, SUPERPAY makes no deduction if there is insufficient Net Pay to make the full deduction. If this happens, you can pick this up from your Detail report where you will see zero in the contribution column. This definitely needs a note in the Comment column.
Reports around year endIn accordance with Stakeholder Pension regulations, SUPERPAY prints Stakeholder reports for the calendar month, not the tax month. This means that in April, SUPERPAY prints Stakeholder payments up to and including 31st March. If you have a weekly pay interval, this report will not necessarily include Week 52, 53 etc. Similarly in May, the April report includes all the pension deductions in the period 1st to 5th April from the previous tax year.
C74

9
SMP and SPP9.1 Legislation changesThe rules for Statutory Parental Pay change frequently. If there have been legislation changes since this manual was written in June 2007 you will have received update notes detailing the changes.
SAP (Statutory Adoption Pay) is not specifically covered by this manual. If you would like help setting up SAP, please telephone our helpline.
9.2 OverviewBelow is a brief guide to SMP and SPP. For further general information please refer to the Inland Revenue Employers’ Guide.
EntitlementMothers are entitled to 39 weeks’ SMP and fathers are entitled to one or two weeks’ SPP. To qualify for this pay, an employee must give you ade‐quate notice, provide sufficient evidence, must have been employed long enough, and must have had sufficient average earnings.
It is up to you to decide whether an employee is eligible. SUPERPAY checks for low pay, but performs no other checks to determine an employee’s entitlement. If you are at all unsure whether an employee is entitled to SMP or SPP, telephone the Inland Revenue hotline who can best advise you.
If an employee is not entitled to SMP or SPP, do not complete the Parental Leave box on the employee’s Record.
EvidenceFor SMP, the employee must produce her MATB1 form which shows the baby’s Due Date. For SPP, the employee must complete form SC3 which declares his family commitment.
C75

Reference
Length of serviceSUPERPAY does not check the length of service – even if you enter a start date on Screen 1 of the employee’s Record. It is up to you to determine if the employee has worked long enough. Briefly, the rules are:
The employee must have been employed by you continuously for at least 26 weeks up to and into the 15th week before the week the baby is due.In addition, for SPP only, the employee must continue to work for you right up until the date the baby is born.
EarningsThe employee’s ‘average earnings’ need to be above the Lower Earnings Limit which for 2007/8 is £87.00 per week.
Rate payableSMP
The rate for the first 6 weeks is 90% of the Average Weekly Earnings. For the remaining 33 weeks the rate is the lower of 90% of the Average Weekly Earnings or the standard rate.
SPP
The rate payable is the lower of 90% of Average Weekly Earnings or the standard rate. The Paternity Pay period is one or two weeks taken con‐secutively; i.e. the employee cannot take one week now and another week later.
The standard weekly rate is the same for SMP and SPP and increases slightly each year. For 2007/8, the standard rate is £112.75 per week.
When can you start paying SMP or SPP?The Inland Revenue Employer’s Guide explains the rules for when you can start payment of SMP and SPP.
ReclaimYou claim back a percentage of the SMP and SPP paid by deducting it from your monthly payment to the Inland Revenue. The amount reclaimed depends on your company’s National Insurance payments for the Quali‐fying Year (usually last year). If you are a large employer, you can reclaim 92% of the amount paid. If you are small, you can reclaim 100% of the amount paid plus NIC compensation (4.5% for 2007/2008).
C76

Chapter 9: SMP and SPP
9.3 Set up employee record, screen 1
Reduce normal salaryMost employees do not get SMP or SPP on top of their normal Pay. SUPER-PAY does not automatically adjust the normal pay. It is up to you to adjust the employee’s Gross Pay items either on the EMPLOYEE RECORD or on the Payslip Screen so that the employee receives the correct pay.
Constants box
1. Male/female indicator
SUPERPAY does not pay SMP to a man, so make sure you have F for female if you are paying SMP.
2. Irregular pay
If you enter an amount in the Average Pay field on Screen 2 (see 9.5 below), ignore this section.
If an employee is paid on an irregular basis – e.g. a director who receives irregular bonuses – enter I for irregular in the Emp’ee type field. This tells SUPERPAY to calculate the employee’s ‘Average pay’ in a particular way as specified by the Inland Revenue regulations.
C77

Reference
9.4 Set up employee record, screen 2Complete the PARENTAL LEAVE box on Screen 2 of the Employee’s Record.
Diagram 64: Parental leave box
1. SMP/SPP/SAPSUPERPAY prompts SMP. Overtype this with SPP if you are paying Statutory Paternity Pay.
2. EWC/MW dateEnter the due date which is on the MatB1 form. You still need to enter the due date for SPP – not just the Start date of the Paternity leave.
3. Start dateThis is a calculation Start date; i.e. the date you want SUPERPAY to use as the Start date for payment. This is usually the actual start date unless the employee is paid a ‘week in hand’. If the employee is paid a week in hand enter the ‘actual’ start date plus a week – see example below.
Example: Your employees are paid each Friday, a week in hand. An employee starts Parental Leave on Monday 11th June. The first week’s Parental Pay is due on Friday 22nd June 2007.
If you enter 11/06/07 (Monday) as the START DATE, SUPERPAY pays 2 weeks’ Parental Pay on 22/06/07 (Friday) for the weeks beginning 11th and 18th June.When you enter 18/06/07 (Monday) which is the actual Start date + 7 days, SUPERPAY correctly pays 1 week’s Parental Pay on 22/06/07.
C78

Chapter 9: SMP and SPP
4. Higher rate (Y/N) and Stop payingLeave these fields as Y and N respectively. The Higher rate is now referred to as the Earnings Related rate by the Revenue, but many users still refer to it as the Higher rate.
5. Average payIf you leave this field blank, RUN PAYROLL will calculate the average weekly pay and pay 90% of this amount for Higher rate (Earnings Related) SMP. However, for SMP in particular we strongly recommend you calculate this figure manually and insert whatever figure you consider correct. RUN PAYROLL will not overwrite anything you enter here.
This field is described in 9.5 below.
6. Weeks1. Paid – leave this field blank.
2. Worked – leave blank for SMP. For SPP, if the employee only wants one week’s SPP, enter 1 here.
7. Total amount and amount this yearLeave these fields blank.
9.5 Average payThe Inland Revenue has issued extensive guidance on how to calculate the Average Pay for SMP. It is not enough to know exactly when and how much an employee was paid in the relevant period; you also need to know if an employee is regularly paid and if a payment was mistimed because of holidays etc. This information is not available to SUPERPAY.
Example: Employee paid early for Christmas
You pay regular monthly wages on the last day of each month. On Friday 21st December you pay the 31st December wages. If an employee is regu‐larly paid and her SMP Qualifying Week falls between 22nd and 31st December, the Inland Revenue guidance is to ignore the 21st December payment.
However, if the employee’s wages are on an irregular basis – e.g. casual – the guidance states that you include the 21st December pay.
C79

Reference
Why you should manually calculate the average payAn employee’s Average Pay for SMP and SPP is ‘normally’ the average weekly pay in the 8 weeks or 2 months up to and including the Saturday in the Qualifying Week. In the majority of cases, this calculation is straightforward. However, there are many possible exceptions to the general rule so you should always calculate the figure manually. If you do not know how to do that, telephone the Inland Revenue hotline to confirm what figure you should use. Even the SMP calculator on the Inland Reve‐nue’s website does not follow the Inland Revenue’s own guidance in cases of mistimed holiday payments for ‘regularly’ paid employees.
Whether you calculate the Average Pay yourself or ask the Revenue to do it for you, you need the date of the Saturday in the Qualifying Week and the employee’s earnings in the previous 8 weeks/2 months.
Step 1 – Determine Saturday in Qualifying week1. Press ALT-C to call up SUPERPAY’s calculator.
Diagram 65: SUPERPAY’s calculator
C80
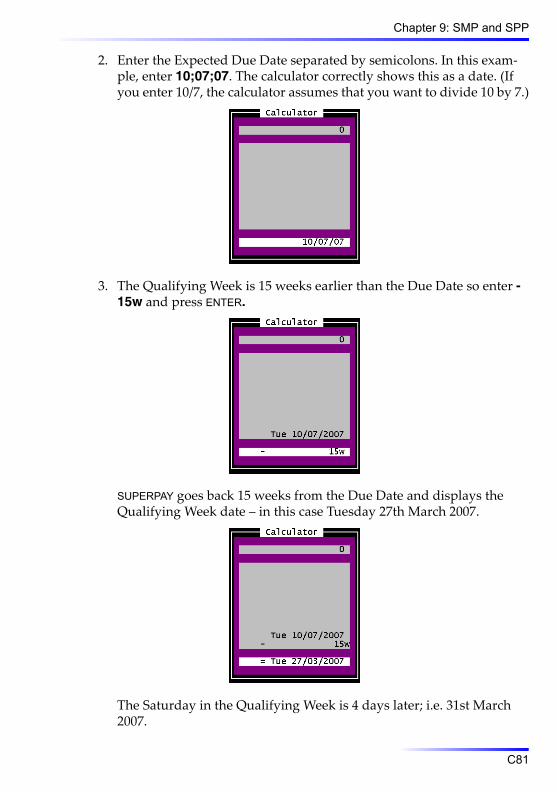
Chapter 9: SMP and SPP
2. Enter the Expected Due Date separated by semicolons. In this exam‐ple, enter 10;07;07. The calculator correctly shows this as a date. (If you enter 10/7, the calculator assumes that you want to divide 10 by 7.)
3. The Qualifying Week is 15 weeks earlier than the Due Date so enter -15w and press ENTER.
SUPERPAY goes back 15 weeks from the Due Date and displays the Qualifying Week date – in this case Tuesday 27th March 2007.
The Saturday in the Qualifying Week is 4 days later; i.e. 31st March 2007.
C81

Reference
Step 2 – Determine ‘set’ period’Now go back 8 weeks. Continuing with the above example, type 31;03;07 and press ENTER. (The actual calculation should be 8 weeks before the last pay day on or before the Saturday of the Qualifying Week but you do not know that date until you print the report). Then type -8w and press ENTER. SUPERPAY goes back 8 weeks and displays the required date.
Step 3 – Print a Wages Book for relevant periodPrint a WAGES BOOK which shows the amounts and dates of each payment for the employee for the appropriate period. In this example, these pay‐ments are all in last year (2006/7), so go back into last year and print a WAGES BOOK for the whole year for that employee.
Diagram 66: Wages Book for whole year for employee
If the ‘set’ period runs over two tax years, print a WAGES BOOK for both tax years for the employee.
Step 4 – Manually calculate Average PayYou now have the amounts and dates of payment from the WAGES BOOK. Either calculate the Average Pay yourself or telephone the Inland Revenue
C82

Chapter 9: SMP and SPP
helpline. When you know how much the Average Pay is, enter that amount in the Parental Leave box.
Average pay – directorsThere are special Inland Revenue rules for the calculation of Average Pay for Directors and SUPERPAY does not distinguish between voted and non voted remuneration etc. If a director’s pay consists of Irregular voted bonuses as well as a contractual salary, you must enter I in the Emp’ee type field on Screen 1 of the Director’s EMPLOYEE RECORD. We suggest that if you have a director on SMP you always check with the Inland Revenue Helpline what figure they want you to use as her SMP Average Pay.
ConclusionThis section may seem complicated when in most cases the Average Pay is easy to calculate. However, there are so many possible variations because of missed or mistimed payments that it is important to be aware of the need to check the figure that SUPERPAY uses in its PARENTAL PAY calcula‐tions.
It is difficult to summarise the reasons why the figure that SUPERPAY cal‐culates may be incorrect. The Inland Revenue’s guidance on this issue is very comprehensive with lots of examples and that information is not duplicated here.
9.6 Run payroll – payslip screen
Diagram 67: SMP paid
SUPERPAY automatically displays the number of weeks SMP or SPP and the amount in the Gross Pay items box.
C83

Reference
9.7 Run payroll – number of weeks paid
First paymentSUPERPAY calculates the number of weeks from the START DATE to the PAY DATE. SUPERPAY always rounds up to the next week.
Example: The START DATE is Friday 21/09/07. You run September’s salaries with a PAY DAY of Friday 28th. SUPERPAY displays 2 weeks SMP for weeks beginning Friday 21st and 28th. If your PAY DAY is Thursday 27th, SUPER-PAY pays 1 week SMP only.
If you want to change the number of weeks paid, you need to change the START DATE on the employee’s Record.
Subsequent paymentsAny PARENTAL PAY due is automatically displayed. SUPERPAY pays the number of weeks PARENTAL PAY from the START DATE to the current PAY DATE less the number of weeks already paid.
Number of Weeks – maximumRUN PAYROLL looks at the combined entries in the Weeks Paid and Weeks Worked fields and stops paying:
SMP when the combined total is 39 weeks.SPP when the combined total is 2.
Adjust number of weeks paidIf you do not agree with the number of weeks paid, you cannot move the highlight onto the PARENTAL PAY line on the payslip screen. If you want to change the number of weeks, either EXIT the RUN and change the PAY DATE on the RUN PAYROLL MENU SCREEN, change the START DATE on the employee’s Record or press the F7 prompt – see 9.9 below.
Split weeksEven though the Revenue allows you to split a weekly payment of SMP or SPP over two pay periods for babies due after 1st April 2007 there is no obligation to do so and SUPERPAY continues to pay full weeks only.
Pay Parental Pay as a lump sumSPP is for two weeks only so there is not usually a problem paying both weeks together.
C84
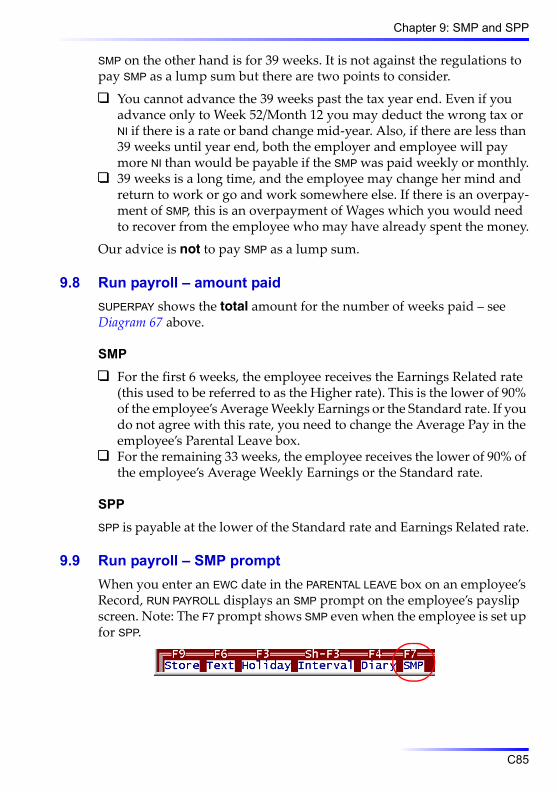
Chapter 9: SMP and SPP
SMP on the other hand is for 39 weeks. It is not against the regulations to pay SMP as a lump sum but there are two points to consider.
You cannot advance the 39 weeks past the tax year end. Even if you advance only to Week 52/Month 12 you may deduct the wrong tax or NI if there is a rate or band change mid‐year. Also, if there are less than 39 weeks until year end, both the employer and employee will pay more NI than would be payable if the SMP was paid weekly or monthly.39 weeks is a long time, and the employee may change her mind and return to work or go and work somewhere else. If there is an overpay‐ment of SMP, this is an overpayment of Wages which you would need to recover from the employee who may have already spent the money.
Our advice is not to pay SMP as a lump sum.
9.8 Run payroll – amount paidSUPERPAY shows the total amount for the number of weeks paid – see Diagram 67 above.
SMPFor the first 6 weeks, the employee receives the Earnings Related rate (this used to be referred to as the Higher rate). This is the lower of 90% of the employee’s Average Weekly Earnings or the Standard rate. If you do not agree with this rate, you need to change the Average Pay in the employee’s Parental Leave box.For the remaining 33 weeks, the employee receives the lower of 90% of the employee’s Average Weekly Earnings or the Standard rate.
SPPSPP is payable at the lower of the Standard rate and Earnings Related rate.
9.9 Run payroll – SMP promptWhen you enter an EWC date in the PARENTAL LEAVE box on an employee’s Record, RUN PAYROLL displays an SMP prompt on the employee’s payslip screen. Note: The F7 prompt shows SMP even when the employee is set up for SPP.
C85

Reference
You do not normally need to use this prompt since SUPERPAY automati‐cally displays the number of weeks and amount. If you press F7 the fol‐lowing box is displayed:
How many weeks at workEnter the number of weeks the employee has worked, if any, during the pay period. You normally enter 0 here. However, if a father is only taking 1 week instead of 2 weeks SPP, you can enter 1 here.
SMP rules state that if an employee works during her MPP, she loses SMP entitlement for that week. You would only enter a value here if the employee returned to work and then went straight back on Maternity Leave. SUPERPAY will then reduce her SMP entitlement by the number of weeks entered here.
Do not enter anything here if the work days are KIT (Keeping in Touch) days.
Pay all due SMP nowThis question allows you to pay all the SMP due to the employee as a lump sum. You normally enter N here. If you enter Y, SUPERPAY alters the SMP payment to the full amount of SMP payable.
We do not recommend paying SMP as a lump sum – see 9.7 above.
Stop paying SMPOnce the employee starts her MPP, SMP normally continues for 39 weeks. However, you can stop paying SMP at any time by entering Y either here during the RUN or on her Record. You can also use this function to cancel a second week of SPP.
9.10 Run payroll – SMP/SPP not displayedEven if you have correctly set up an employee’s PARENTAL LEAVE box, there are 4 main reasons why no SMP or SPP is displayed on the payslip screen.
C86

Chapter 9: SMP and SPP
1. Using last run’s data
If you have already run and then undone the employee’s payslip, RUN PAY-ROLL does not recalculate any PARENTAL PAY changes you have made until you press EXIT to remove the ‘Using last run’s data’ message at the top of the screen.
2. Low payWhen an employee’s Average Pay is less than the Lower Earnings Limit SUPERPAY displays a low pay message.
If you think that the employee should receive SMP or SPP, EXIT the run and on Screen 2 of the employee’s RECORD enter the Average Pay you have cal‐culated.
3. No pay history for new employeeIf you have entered an EWC and START DATE but no AVERAGE PAY on the Record of a newly set up employee, RUN PAYROLL displays:
Press ESC to clear the message and SUPERPAY then asks you to enter the employee’s Average Pay.
C87
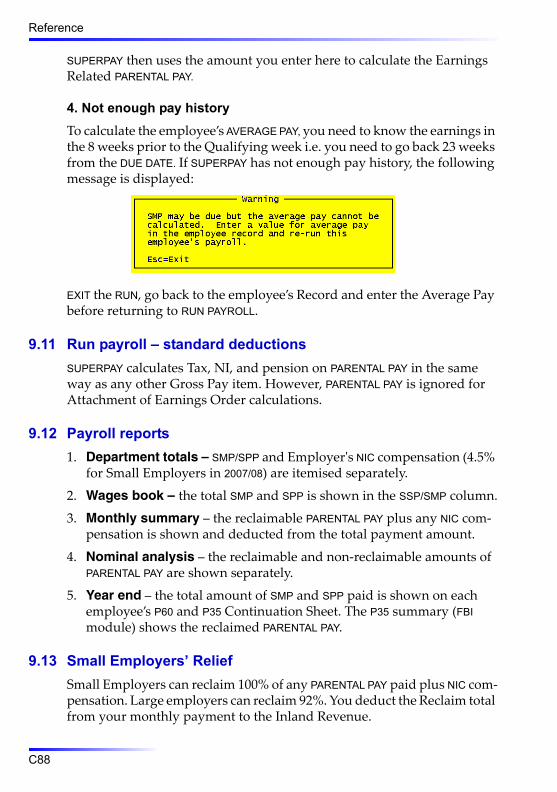
Reference
SUPERPAY then uses the amount you enter here to calculate the Earnings Related PARENTAL PAY.
4. Not enough pay historyTo calculate the employee’s AVERAGE PAY, you need to know the earnings in the 8 weeks prior to the Qualifying week i.e. you need to go back 23 weeks from the DUE DATE. If SUPERPAY has not enough pay history, the following message is displayed:
EXIT the RUN, go back to the employee’s Record and enter the Average Pay before returning to RUN PAYROLL.
9.11 Run payroll – standard deductionsSUPERPAY calculates Tax, NI, and pension on PARENTAL PAY in the same way as any other Gross Pay item. However, PARENTAL PAY is ignored for Attachment of Earnings Order calculations.
9.12 Payroll reports1. Department totals – SMP/SPP and Employerʹs NIC compensation (4.5%
for Small Employers in 2007/08) are itemised separately.
2. Wages book – the total SMP and SPP is shown in the SSP/SMP column.
3. Monthly summary – the reclaimable PARENTAL PAY plus any NIC com‐pensation is shown and deducted from the total payment amount.
4. Nominal analysis – the reclaimable and non‐reclaimable amounts of PARENTAL PAY are shown separately.
5. Year end – the total amount of SMP and SPP paid is shown on each employee’s P60 and P35 Continuation Sheet. The P35 summary (FBI module) shows the reclaimed PARENTAL PAY.
9.13 Small Employers’ ReliefSmall Employers can reclaim 100% of any PARENTAL PAY paid plus NIC com‐pensation. Large employers can reclaim 92%. You deduct the Reclaim total from your monthly payment to the Inland Revenue.
C88

Chapter 9: SMP and SPP
Eligibility for Small Employers’ Relief (SER) is determined by your total NI contributions (excluding Y code NI) in the tax year before the Saturday of the relevant employee’s Qualifying Week. The current SER limit is £45,000 gross NI for the year.
What you need to doWhen you have been using SUPERPAY for two full tax years, you do not do anything; SUPERPAY has enough pay history to know when to apply SER.
If you have been using SUPERPAY for less than two tax years, you need to set up the SER fields on Screen 3 of your COMPANY RECORD.
The default setting for both years is 4 (i.e. until there is enough pay history SUPERPAY assumes that you are not entitled to SER). To change this setting simply enter 1, 2, or 3 in the relevant field and press F9 to STORE the changed COMPANY RECORD.
Your company is part of a larger groupSometimes for administrative reasons, users split their company into sev‐eral SUPERPAY companies even though all the ‘companies’ have the same PAYE reference. If you do this, after Year End, check that the SER setting is correct. CREATE NEXT YEAR’S FILES may have incorrectly set the SER field as a small company when in fact the combined NI for all the companies is greater than £45,000. If this happens, manually change the field to the cor‐rect value.
You change these fields mid-yearIf you change these NI settings mid‐year, SUPERPAY adjusts any reclaimable PARENTAL PAY for the whole year and the MONTHLY SUMMARY for prior months may change. It is up to you to check this, and make any adjust‐ments to your Monthly payment as appropriate.
Employers with NI close to the SER limitIf your annual gross NI contributions are close to £45,000 you could be below the limit one year, and above it the next (or vice versa).
C89

Reference
Because SER depends on the tax year before the Saturday of an employee’s Qualifying Week, the MONTHLY SUMMARY may reclaim 92% for one employee but 104.5% for another. This is best illustrated with an example.
Example: You pay two employees standard rate SMP for the week begin‐ning 19/08/07.
Employee A has a Qualifying Week of 24/2/07. The tax year before the Qualifying Week is 05/06. Your total NI for that year was £43,500 so for employee A you can reclaim 104.5% of the amount paid.
Employee B has a Qualifying Week of 14/04/07. The tax year before the Qualifying Week is 06/07. Your total NI for that year was £45,500. So, for employee B you can reclaim only 92% SMP.
9.14 Parental Pay totalsRUN PAYROLL stores an employee’s PARENTAL PAY totals in the PARENTAL PAY box on the employee’s Record. You can update these totals manually.
Total amount This field shows the total value of PARENTAL PAY paid to an employee. (This pay can cross tax years.)
Amount this year This field often displays the same figure as the TOTAL AMOUNT field. However, if an employee’s PARENTAL PAY straddles a tax year end, this field shows the value of PARENTAL PAY paid in the current tax year.
9.15 Two periods of Parental Pay in one yearIf an employee has two periods of PARENTAL PAY within one year (e.g. the end of one period of SMP at the beginning of the tax year and the start of a second period of SMP at the end of the year) make a note of the figure in
C90

Chapter 9: SMP and SPP
the AMOUNT THIS YEAR field (Screen 2) from the first PARENTAL LEAVE. Now enter this amount in the Additional Parental Leave box on Screen 3.
Then clear the first set of PARENTAL PAY details from Screen 2 and set up the new PARENTAL PAY details in the PARENTAL LEAVE box – i.e. Screen 2 always shows the latest PARENTAL PAY details.
9.16 Bureau with new clientThere are 3 types of PARENTAL PAY you might need to enter on a new client’s records:
New Parental Pay – Set this up exactly as described above. Since the employee has no pay history on SUPERPAY, manually calculate the AVER-AGE PAY – see 9.5 above.
Ongoing Parental Pay – Your client needs to provide the EWC DATE and START DATE. The totals already paid in this tax year are not enough.
Enter all the fields in the PARENTAL LEAVE box. If there are any errors in what you enter, SUPERPAY will either not let you STORE the record, or RUN PAYROLL will make a PARENTAL PAY adjustment on the employee’s first pay‐slip.
Parental Pay which has ended – Enter the correct figure in the AMOUNT THIS YEAR field along with the correct SMP/SPP/SAP identifier. However, if you only enter these two fields, SUPERPAY will not let you STORE the Record. So, even though the employee is not entitled to any more PAREN-TAL PAY you still need to complete the PARENTAL LEAVE box – see example below.
Enter the EWC DATE, START DATE and TOTAL AMOUNT fields (in addition to the AMOUNT THIS YEAR). These fields need to be valid but do not need to be cor‐
C91

Reference
rect. Then enter Y in the STOP PAYING field so that RUN PAYROLL will not adjust the values that you have entered.
ReportsYou should print a P35 and MONTHLY SUMMARY before you run a payroll for this new client. This allows you to check that the b/f figures are correct before you run any more PARENTAL PAY.
C92

10
SSP10.1 OverviewWhen an employee is sick you:
Enter his sick days on his DIARY.STORE the DIARY.RUN PAYROLL calculates the SSP automatically.The MONTHLY SUMMARY calculates any reclaim. (In most cases, there is no reclaim.)
However, you should skim through the whole of this chapter to make sure you have not overlooked something, and stop at anything which is rele‐vant to your company. The Inland Revenue Employers’ Guide covers gen‐eral SSP information and that is not duplicated here.
10.2 Enter sick days
Diagram 68: Diary prompt
C93

Reference
Step 1 – display DiaryYou call up an individual’s DIARY either during RUN PAYROLL or from his EMPLOYEE RECORD before the RUN. In most cases you call up the DIARY dur‐ing RUN PAYROLL. On the employee’s payslip screen, press F4 (for DIARY).
Diagram 69: Employee’s diary
The cursor flashes on the current date in the Calendar section of the diary. On this diary, there are no previous entries.
To move the cursor around the Calendar use CURSOR UP/DOWN/LEFT/RIGHT, the ENTER key, BACKSPACE, and PAGE UP/DOWN. Even though there are only 16 weeks visible at a time, there are in fact 66 weeks in the Calendar – the whole of the current tax year plus 91 days at the beginning to allow for late notification of sickness.
Step 2 – enter sick daysYou can enter individual S’s on the screen or enter a range of dates instead. We advise you to enter a date range instead of individual days – it is easier and will also mean that you do not forget to enter weekends etc. where appropriate.
Press F6 for DATES.
and SUPERPAY displays a date range box.
Enter S as the status and then the start and end dates of his sickness period; e.g. 25/06/07 and 01/07/07. You enter all the days of sickness including weekends and bank holidays. Part days do not count for SSP.
C94
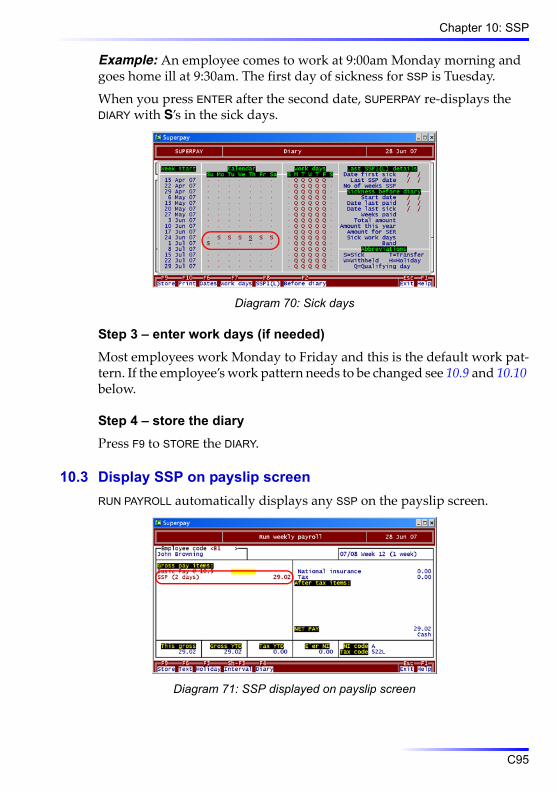
Chapter 10: SSP
Example: An employee comes to work at 9:00am Monday morning and goes home ill at 9:30am. The first day of sickness for SSP is Tuesday.
When you press ENTER after the second date, SUPERPAY re‐displays the DIARY with S’s in the sick days.
Diagram 70: Sick days
Step 3 – enter work days (if needed)Most employees work Monday to Friday and this is the default work pat‐tern. If the employee’s work pattern needs to be changed see 10.9 and 10.10 below.
Step 4 – store the diaryPress F9 to STORE the DIARY.
10.3 Display SSP on payslip screenRUN PAYROLL automatically displays any SSP on the payslip screen.
Diagram 71: SSP displayed on payslip screen
C95

Reference
Number of daysFollowing on from the example in 10.2 above, SUPERPAY pays 2 days SSP since 3 Qualifying Days (Work days) are Waiting days.
AmountSUPERPAY automatically calculates two fifths of the weekly SSP rate; for 2007/2008 this is £72.55 / 5 x 2 = £29.02.
Change SSP lineIf you want to change the SSP, you need call up the DIARY again, and make any changes there. When you press STORE, the employee’s payslip is redisplayed with the revised SSP line.
10.4 Adjust ordinary pay for SSP paidYou do not normally pay SSP on top of an employee’s normal pay.
Example: An employee who normally receives a fixed salary (e.g. £400 a week) does not usually get SSP on top of this salary.
1. Hourly paid employeeIf the employee is paid an hourly rate, simply reduce the number of hours being paid.
2. Salary paid employee (i.e. fixed amount each pay period)If the employee is paid a fixed amount each pay period you cannot move the cursor into that Gross Pay line to change the amount. Instead SUPER-PAY usually changes the figure automatically for you. This is best illus‐trated with an example.
Diagram 72: Fixed Salary = £400
Diagram 73: Fixed Salary + SSP = £400
C96
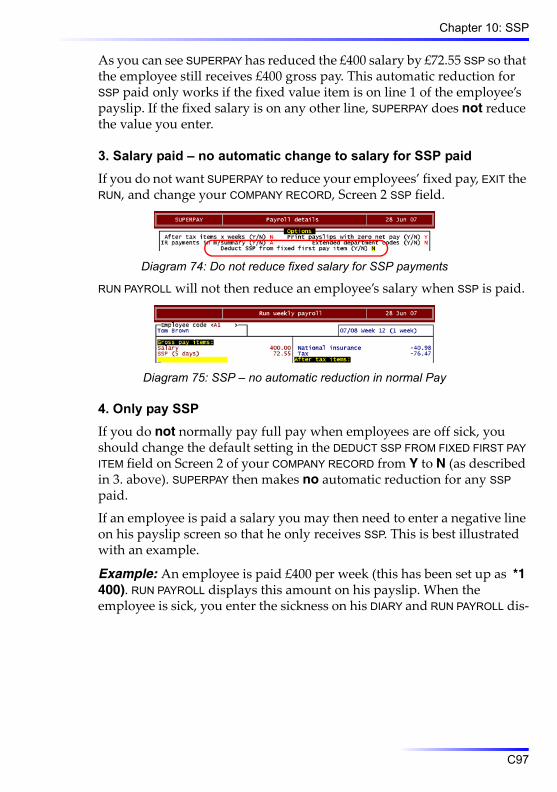
Chapter 10: SSP
As you can see SUPERPAY has reduced the £400 salary by £72.55 SSP so that the employee still receives £400 gross pay. This automatic reduction for SSP paid only works if the fixed value item is on line 1 of the employee’s payslip. If the fixed salary is on any other line, SUPERPAY does not reduce the value you enter.
3. Salary paid – no automatic change to salary for SSP paidIf you do not want SUPERPAY to reduce your employees’ fixed pay, EXIT the RUN, and change your COMPANY RECORD, Screen 2 SSP field.
Diagram 74: Do not reduce fixed salary for SSP payments
RUN PAYROLL will not then reduce an employee’s salary when SSP is paid.
Diagram 75: SSP – no automatic reduction in normal Pay
4. Only pay SSPIf you do not normally pay full pay when employees are off sick, you should change the default setting in the DEDUCT SSP FROM FIXED FIRST PAY ITEM field on Screen 2 of your COMPANY RECORD from Y to N (as described in 3. above). SUPERPAY then makes no automatic reduction for any SSP paid.
If an employee is paid a salary you may then need to enter a negative line on his payslip screen so that he only receives SSP. This is best illustrated with an example.
Example: An employee is paid £400 per week (this has been set up as *1 400). RUN PAYROLL displays this amount on his payslip. When the employee is sick, you enter the sickness on his DIARY and RUN PAYROLL dis‐
C97
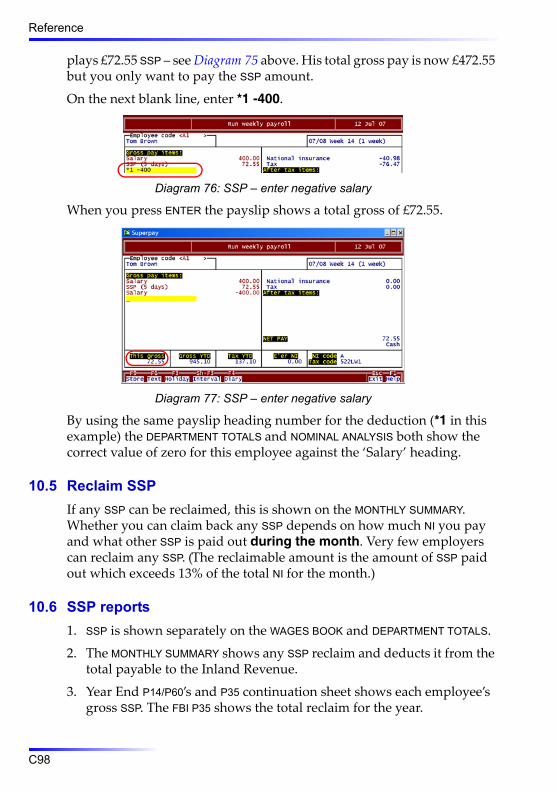
Reference
plays £72.55 SSP – see Diagram 75 above. His total gross pay is now £472.55 but you only want to pay the SSP amount.
On the next blank line, enter *1 -400.
Diagram 76: SSP – enter negative salary
When you press ENTER the payslip shows a total gross of £72.55.
Diagram 77: SSP – enter negative salary
By using the same payslip heading number for the deduction (*1 in this example) the DEPARTMENT TOTALS and NOMINAL ANALYSIS both show the correct value of zero for this employee against the ‘Salary’ heading.
10.5 Reclaim SSPIf any SSP can be reclaimed, this is shown on the MONTHLY SUMMARY. Whether you can claim back any SSP depends on how much NI you pay and what other SSP is paid out during the month. Very few employers can reclaim any SSP. (The reclaimable amount is the amount of SSP paid out which exceeds 13% of the total NI for the month.)
10.6 SSP reports1. SSP is shown separately on the WAGES BOOK and DEPARTMENT TOTALS.
2. The MONTHLY SUMMARY shows any SSP reclaim and deducts it from the total payable to the Inland Revenue.
3. Year End P14/P60’s and P35 continuation sheet shows each employee’s gross SSP. The FBI P35 shows the total reclaim for the year.
C98

Chapter 10: SSP
4. The NOMINAL ANALYSIS shows reclaimable and non‐reclaimable SSP as separate Balance Sheet and Profit and Loss Account items.
At the end of the tax year, you can optionally print employees’ DIARIES. These show sickness for the year.
10.7 Prompt on diary screen
Diagram 78: Default prompt options
In most cases, the only options you need are F6 for DATES and F9 to STORE. However, other options are available which allow you to move from sec‐tion to section on the Diary screen.
F6 promptIn the Calendar section, the F6 prompt is for DATES. In the other sections, the F6 prompt takes the cursor back to the Calendar section.
F7 promptIn the Calendar, SSP1(L) and Sickness Before Diary sections the F7 prompt takes the cursor to the Work Days section. In the Work Days section the F7 prompt displays the PATTERN screen.
10.8 Sick note for more than 1 weekRUN PAYROLL pays all the sick days that you enter on the DIARY. If a sick note goes past the end of the current Pay Period, enter the period end date as the last sick day, rather than enter the last day on the sick note.
Example: An employee who is paid each Friday sends in a sick note for 3 weeks from 3rd to 23rd Sept 07. If you enter the sick dates as 03/09/07 to 23/09/07, RUN PAYROLL pays 3 weeks’s SSP (less any Waiting days) all in one go. This is OK if the employee is monthly paid. If he is weekly paid, this is not usually what you want. Instead, you should enter the sick note as follows:
In Week 1 enter dates as 03/09/07 to 07/09/07 (i.e. Mon – Fri)In Week 2 enter 08/09/07 to 14/09/07 (i.e. Sat – Fri)In Week 3 enter 15/09/07 to 21/09/07 (i.e. Sat – Fri) or 23/09/06 (Sun)In Week 4 enter 22/09/06 to 23/09/06 (i.e. Sat/Sun if not already entered)
Even if the employee does not normally work at the weekend, it is impor‐tant to enter the final Saturday and Sunday so that the last day of sickness
C99

Reference
is correctly recorded. This could be important if the employee is off sick again within the next 8 weeks.
Before running the payslip for the first week of sickness, you may wish to enter the date the sick note ends in the COMMENT field on Screen 2 of the employee’s record.
Diagram 79: End date of Sick note in comment field
For example, enter Sick Note to 30/9. SUPERPAY will then display this comment at the top of the employee’s payslip screen as a reminder.
Diagram 80: Comment displayed on payslip screen
The Comment is merely a reminder to the payroll operator to enter the sickness on the employee’s DIARY; it is not printed on the payslip. When the Sick Note ends, go back to the employee’s Record and delete the Com‐ment.
10.9 No SSP displayed when you store the diaryWhen you enter Sick days and Work days and STORE the DIARY, RUN PAY-ROLL calculates the value of SSP payable. Sometimes SUPERPAY does not pay SSP when you expect it to. If this happens, call up the DIARY from the payslip screen and double check that the Sick days and Work days you have entered are correct. If there are no obvious mistakes for you to cor‐rect, it can be useful to follow through the checks that SUPERPAY makes.
C100

Chapter 10: SSP
Step 1 – is SUPERPAY using last run’s data?
If you have already run and then undone the employee’s payslip and updated the employee’s SSP diary in the EMPLOYEE RECORDS section, RUN PAYROLL does not recalculate any SSP changes you have made until you press EXIT to remove the ‘Using last run’s data’ message at the top of the screen.
When you press EXIT, SUPERPAY displays the SSP.
Step 2 – has a PIW been formed?Are there 4 consecutive sick days? If there are not 4 days of sickness there is no SSP.
Example: Have you entered the weekend if appropriate?
For employees who do not work at the weekend, it is usual to assume that an employee who is sick on Friday and Monday has also been sick on Sat‐urday and Sunday (unless you know otherwise). If you only enter two S’s on his DIARY, SUPERPAY will not join up the Friday and Monday for you. It is up to you to enter Saturday and Sunday as Sick Days. This error can be avoided if you always use the F6(DATES) prompt to enter sickness rather than enter individual S’s.
C101

Reference
Example: (again for Mon–Fri employees). If an employee is sick on Tues‐day and Wednesday, no SSP will be paid since these two days will never form a PIW.
Step 3 – has the employee had all the SSP he is entitled to?Has the employee already had 28 weeks SSP in this PIW or series of linked PIWs? SUPERPAY will pay only up to the 28 week limit. You can print the employee’s DIARY and count how many weeks SSP have already been paid in the current year.
The employee’s Record, Screen 2 also shows the total SSP paid in the cur‐rent PIW or linked PIW’s (which could be over more than one year).
Step 4 – is the sickness linked to a previous PIWHas the employee been sick in the last 8 weeks? If yes, you do not need to recalculate the Average pay to see if the employee is eligible for SSP or not. If the employee was not eligible for SSP at the start of the linked period of SSP then he will not be eligible this time.
Step 5 – has the employee served 3 Waiting Days?
Example: An employee who works Monday to Friday is off sick from Wednesday to Friday and returns to work on Monday. You assume that he
C102

Chapter 10: SSP
was also sick on Saturday and Sunday, so 5 days of sickness. A PIW has been formed but there are only 3 Qualifying Days so no SSP in this PIW.
Example: An employee works on Tuesday and Thursday each week.
Diagram 81: 1 week sick – only 2 waiting days
If he is off for one full week, he will not have been sick for 3 Qualifying Days; i.e. he only has 2 Waiting Days so no SSP is payable.
Step 6 – is the employee excluded because of low pay?Are the employee’s Average earnings less than the NI Lower Earnings Limit? It is easy to check this. Print the employee’s DEDUCTION CARD (EMPLOYEE REPORTS menu, option 1) which shows if the employee’s actual earnings in the previous 8 weeks are above the LEL.
If the employee’s earnings are normally just above the LEL, there may be a week with no earnings at all (e.g. the employee was on unpaid holiday) which then brings the average down below the LEL and so no SSP is pay‐able.
10.10Enter work days – one week onlyIf your employees work Monday to Friday inclusive, ignore this section.
So that SUPERPAY can calculate the number of sick days to pay, you need to enter the days the employee would have worked if he had not been sick (i.e. his Qualifying Days).
C103

Reference
What you doWhen you have entered the sick days, move the cursor to the week con‐taining the sick days (if it is not already on that week). Then press F7 for WORK DAYS.
Diagram 82: Enter 1 week’s Qualifying Days
The cursor then moves into the WORK DAYS section with the cursor flashing in the same week as the sickness. You now enter Q for each Qualifying Day in the week of sickness. (Remember: If he normally works Monday to Friday you do not need to do any of this.) Use the DELETE key or SPACE bar to blank out any Q’s you do not want.
Example: An employee normally works Tuesday to Saturday. You move the cursor to the week of the sickness and press F7. You blank out the Q in the M (for Monday) column, and then use your CURSOR RIGHT key to move the cursor across to the S (for Saturday) column. Enter Q and then press F9 to STORE the DIARY (or press F6 to move back to the Calendar if you have not finished with the Calendar section).
10.11 Enter work days – more than one weekIf the employee is off sick for more than one week, it is easier to get SUPER-PAY to fill in the Q’s for all the weeks rather than enter the Q’s individually. However, if the employee’s work days do not follow a fixed Pattern you still need to enter individual Q’s for each week of sickness as you go along.
This section describes what you do when the employee has a Pattern to his work days. As before, if the employee works Monday to Friday each week, ignore this section.
What you doWhen you have entered the sick days, move the cursor to the first week containing the sick days (it may already be on that week). Then press F7
C104

Chapter 10: SSP
for WORK DAYS. The cursor then moves into the WORK DAYS section with the cursor flashing on the first week of this sickness.
Call up pattern screenNow press F7 for PATTERN and SUPERPAY displays a screen full of Patterns. If this is the first Pattern that you are setting up, the fields are all blank. There are four weeks for each of 15 Patterns. These 15 Patterns can be applied to any employee within the company – this saves having to enter the Q’s for each employee if several employees have the same work pat‐tern.
Enter pattern numberTo set up a new Pattern choose the next blank ID number. To use an exist‐ing Pattern, enter the number of the Pattern you want.
Enter dateEnter the date you want to start the Pattern from – SUPERPAY prompts with the Sunday of the week the cursor was at on the DIARY. The cursor then moves to the first week of the Pattern ID that you have chosen.
Diagram 83: Set new pattern from the start of this period of sickness
New patternIf the employee works the same days each week enter the Qualifying Days in the first week only and then press STORE.
Example: An employee always works Tuesday to Saturday. You move the cursor to T (for Tuesday) and enter Q for each day up to Saturday. (This is Pattern 2 on the diagram below.)
Diagram 84: Example of Tuesday to Saturday pattern
Then press STORE. SUPERPAY re‐displays the employee’s DIARY showing the new work days Pattern for all the weeks from the date that you entered on the Pattern screen.
C105

Reference
Use existing patternIf you want to use an existing Pattern, enter the Pattern ID and the date and then press STORE to redisplay the employee’s DIARY with the new Work Days Pattern.
If you want to change a pattern, blank out any existing Q’s and enter new ones on the appropriate days. When you STORE this new (changed) Pat‐tern, this will have no effect on any other employee’s DIARY which has already been set up with the old Pattern.
Multiple weeks in the patternA work Pattern can consist of up to 4 weeks. You enter each week in the same way as described above for entering a one week only Pattern except that you use your CURSOR keys to move across from one week to the next.
Example: 3 week pattern.
Week 1 – Mon, Weds, ThursWeek 2 – Tues, Fri, SatWeek 3 – Sun, Mon, FriWeek 4 – goes back to Week 1 etc.
This is Pattern 3 on the diagram below.
Diagram 85: 3 week work pattern
This is displayed on the Diary as shown below.
Diagram 86: 3 week work pattern on DIARY
Shift work but no fixed patternIf the employee’s Shift work does not follow any fixed Pattern, enter Q’s for each day in Week 1 and then press STORE. SUPERPAY then displays 7
C106

Chapter 10: SSP
Qualifying Days per week on the employee’s DIARY. This is Pattern 4 on the diagram below.
Diagram 87: No fixed work pattern (7 Qualifying Days per week)
Diagram 88 below shows this pattern on an employee’s Diary.
Diagram 88: No fixed work pattern on DIARY
Multiple patterns for same employeeYou can use the PATTERN key to apply as many Patterns as you wish to an employee’s DIARY for different weeks in the tax year. However, if you go back to an earlier period and change an employee’s work Pattern, this could result in an over/under payment of SSP which will be displayed on the employee’s next payslip. So you should use caution to apply Patterns retrospectively.
10.12Enter Sickness before DiaryOn the right of the DIARY screen is the Sickness before Diary section.
When you first start using SUPERPAY (or you take on a new client), you may have employees who have already received SSP during the current tax year (or who have a linked PIW). There are eight fields to enter. Since SUPERPAY does all the SSP calculations for you (with no manual override), you have to enter the start dates etc. of any current PIW or linked PIW – you
C107

Reference
cannot just enter the value and number of days SSP paid for the year to date.
Diagram 89: Sickness before diary
Start dateEnter the date of the first sick day in the current PIW or linked PIW.
Date last paidEnter the date of the last SSP day that was paid to the employee.
Date last sickEnter the last day of sickness. In most cases, this is the same as the Date last paid, or a later non‐qualifying day (e.g. the last SSP day paid was a Fri‐day and this date is the following Sunday).
For employees who have on‐going SSP when you start using SUPERPAY, the first day you enter into the Calendar should be the first day immedi‐ately after this date so that there is no break.
Weeks paidEnter the number of weeks paid so far in the current PIW (or linked PIW). This is a decimal number based on the number of qualifying days in the week (e.g. for a 5 day week, 6 days would be entered as 1.2 (one week and one day).
Total amountEnter the total value of SSP paid to the employee, including any SSP paid from the previous tax year if the SSP is linked across the tax year.
Amount this yearEnter the total value of SSP paid to the employee in the current tax year.
C108

Chapter 10: SSP
Note: You can only enter this value if you have called up the DIARY from the EMPLOYEE RECORD screen. If you call up the DIARY from the employee’s Payslip screen the cursor does not stop on this field.
Amount for SERCurrently, this field is zero. (SSP was abolished in 1995/96.)
Sick work daysEnter the total number of sick work days (including any Waiting days) in the last set of linked PIW’s. In the above example (Diagram 89), there were 15 sick days, of which 3 were waiting days and so only 12 days; i.e. 2.4 weeks were paid.
BandEnter 1 (for standard rate SSP). Currently there are no other bands.
10.13Last SSP1(L) detailsEnter the details from an employee’s SSP1(L) form (if there is one) when a new employee joins the company. The employee still has to serve 3 Wait‐ing Days before receiving SSP – the SSP1(L) is used only for working out whether the employee has reached his 28 week SSP limit.
10.14New users
New period of sicknessYou enter sickness on an employee’s DIARY in the same way as described below. When you have been using SUPERPAY for 8 weeks, the SSP calcula‐tion is completely automatic. Until 8 weeks have passed, SUPERPAY can only average an employee’s pay over the number of weeks you have been using SUPERPAY. If the employee’s earnings are close to the lower NI earn‐ings limit, in this initial period you should check that SUPERPAY has not incorrectly excluded or included an employee for SSP.
New periods of sickness – linked to previous SSPIf you have SSP during the first 8 weeks of running SUPERPAY, SUPERPAY does not know if the SSP is linked to a previous period of sickness. If there is any linking, you need to enter the SICKNESS BEFORE DIARY section of the employee’s DIARY – see 10.11 above.
C109
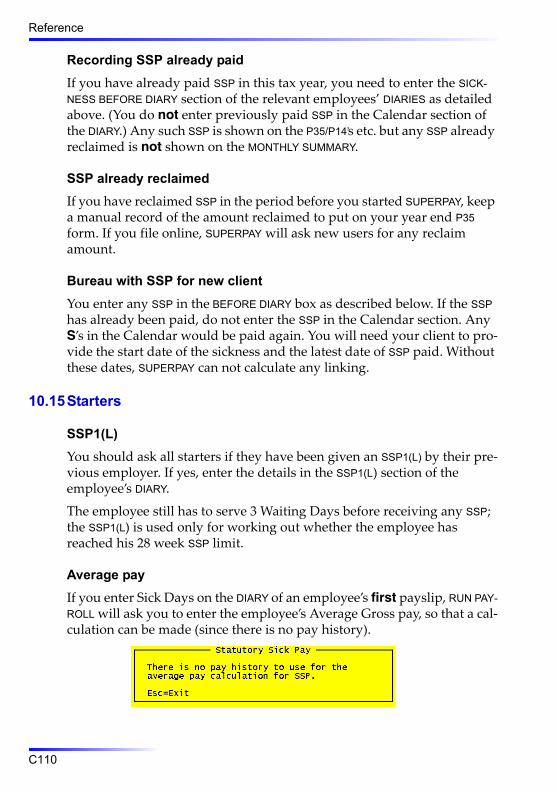
Reference
Recording SSP already paidIf you have already paid SSP in this tax year, you need to enter the SICK-NESS BEFORE DIARY section of the relevant employees’ DIARIES as detailed above. (You do not enter previously paid SSP in the Calendar section of the DIARY.) Any such SSP is shown on the P35/P14’s etc. but any SSP already reclaimed is not shown on the MONTHLY SUMMARY.
SSP already reclaimedIf you have reclaimed SSP in the period before you started SUPERPAY, keep a manual record of the amount reclaimed to put on your year end P35 form. If you file online, SUPERPAY will ask new users for any reclaim amount.
Bureau with SSP for new clientYou enter any SSP in the BEFORE DIARY box as described below. If the SSP has already been paid, do not enter the SSP in the Calendar section. Any S’s in the Calendar would be paid again. You will need your client to pro‐vide the start date of the sickness and the latest date of SSP paid. Without these dates, SUPERPAY can not calculate any linking.
10.15Starters
SSP1(L)You should ask all starters if they have been given an SSP1(L) by their pre‐vious employer. If yes, enter the details in the SSP1(L) section of the employee’s DIARY.
The employee still has to serve 3 Waiting Days before receiving any SSP; the SSP1(L) is used only for working out whether the employee has reached his 28 week SSP limit.
Average payIf you enter Sick Days on the DIARY of an employee’s first payslip, RUN PAY-ROLL will ask you to enter the employee’s Average Gross pay, so that a cal‐culation can be made (since there is no pay history).
C110

Chapter 10: SSP
You can then enter the average pay.
Linking letterYou should ask new employees if they have an Inland Revenue Linking Letter to give you. If they give you this form, you do not pay SSP for either up to 8, 52, or 104 weeks from the date they last received certain benefits. Please read the relevant Revenue documentation for more details.
10.16LeaversWhen an employee leaves, you must check his SSP DIARY to see whether he has had any SSP in the previous 8 weeks. If he has, complete an SSP1(L). Only enter whole weeks.
Example: If he had 5 Qualifying Days per week, round down 3 days SSP or less and round up more than 3 days. For example, if he had 3 days SSP, round this down to zero weeks and you do not need to complete a Leavers form SSP1(L). If he had 4 days SSP, enter 1 week on the SSP1(L).
10.17Your company is part of a larger groupSometimes for administrative reasons, users split their company into sev‐eral SUPERPAY companies even though all the ‘companies’ have the same PAYE reference. If you do this, you need to check any SSP reclaim.
SSP reclaim is the excess of SSP paid over 13% of the total NI for the month. You could find that SUPERPAY shows some SSP reclaim on your MONTHLY SUMMARY which is not reclaimable when you look at the com‐pany as a whole.
It is up to you to check any SSP reclaim if you split your company.
10.18SSP formsYou may need 3 forms – SSP1(L), SSP1(E), SSP1(T), all of which are supplied free of charge by the Inland Revenue.
10.19Other uses for the calendarYou can enter up to two letters on each day of the Calendar. The letters available are shown at the bottom right of the screen. They are:
S Sick Days
C111

Reference
W Withheld. Enter W if the employee was off sick but SSP was withheld. Days that are withheld are not paid.
T Transfer. Enter T if the employee reaches the 28 week SSP limit and has been transferred to the DWP for payment. Stops subsequent pay‐ments in this PIW.
H Holiday. Enter H for Holiday days. This simply records holidays taken.
C112

11
Starters11.1 Set up new employee’s detailsChoose EMPLOYEE ENQUIRY/UPDATE (option 1, EMPLOYEE RECORDS menu). SUPERPAY displays a blank employee Record and the cursor waits for you to enter an employee code.
11.2 Allocate employee codeEnter the code that you have allocated to this new employee (see below). SUPERPAY displays NEW next to the code.
Even if you are a very small company, it is not a good idea to set up your codes as A1, A2 etc. If you find you later need to upgrade to the 20 record version and continue the same sequence, A11 to A19 will come before A2 etc. Much better to set up your codes as A01, A02 etc. to allow for future expansion – numbers can be easily changed but its best not to have to. (See 5.2 in the New Users Guide for more information on employee codes.)
You should not re‐use the codes of employees who have left in the previ‐ous tax year if you are likely to print reports using data from previous years – e.g. multi period Wages Book.
In addition, if a new employee is sick during his first 8 weeks and you re‐use leavers’ codes, SUPERPAY may incorrectly look at the history of a leaver’s pay if they had the same number in a previous year.
11.3 Which tax code to useOn a new Record, SUPERPAY automatically prompts the week 1 Emer‐gency Tax code in the tax code field (522L Week1 for 2007/8).
If a starter does not have a P45 and you expect him to work for you for more than one week, you must complete a P46. If the employee does not sign the P46, then you must put him on a BR Week 1 tax code. This means that he will receive no tax allowances and all his pay will be taxed at Basic Rate (currently 22%).
If the employee signs the P46, put him on the Emergency Tax Code (in 2007/2008 522L W1 or 522L for School/College leavers).
C113

Reference
StudentsIf you employ a student during the holidays and know he is unlikely to exceed his annual taxable pay allowance (e.g. £5220 for 2007/8) when he starts get him to sign a P38S and put him on an NI tax code rather than 522L. This NI code does not apply if you employ a student part‐time during term time, when the student needs to complete a P46 in the normal way.
11.4 Print a new employee recordWhen you create a new employee Record, only 6 options are displayed; STORE, TEXT, DIARY, P45, DELETE and NEXTSCR. To PRINT a new Record, first STORE the Record and then re‐enter the employee’s code to bring the Record back. You can then press F10 to print it.
11.5 Enter P45 detailsWhen a new employee gives you a P45, go to his Record and press SHIFT-F4 to call up the P45 box.
Diagram 90: P45 pop-up box
Enter each field and press F9 to STORE. This STORES the P45 in memory. (To STORE the record permanently, press F9 again.)
Zero tax on P45
If the employee has paid no tax to date, enter zero in the P45 tax field. If you leave this field blank, SUPERPAY thinks you have not entered the field and displays a Warning ‘Wrong Combination of fields’ message.
Change P45 fields
C114

Chapter 11: Starters
If you realise that you have made a mistake and want to change the fields in the P45 box on Screen 3 of an employee’s Record, press the P45 prompt again.
Diagram 91: P45 details on Screen 3 of an Employee’s Record
Change the fields in the pop‐up box and then press STORE – you cannot access the P45 details on Screen 3 directly.
P45 from a previous year
Do not enter any totals from a previous year’s P45. If you are setting up records to start from the beginning of the new tax year, do not use the P45 prompt.
Employee on Week 1/Month 1 tax code
Since there are no totals to enter, do not use the P45 prompt if the employee is on a Week 1 tax code. Instead enter the tax code on Screen 1 of the employee’s Record.
Check tax calculationIn accordance with Inland Revenue specifications, when you press F9 to STORE the P45 pop‐up box, SUPERPAY checks that the tax on the P45 is cor‐rect for the Tax Code, Week or Month number and Total Pay to Date. If the tax is correct, SUPERPAY updates the employee’s totals to date on Screen 3.
If the tax is not correct, SUPERPAY displays a warning to let you know that the correct tax will be stored on the EMPLOYEE’S RECORD instead of the tax figure that you entered. If this happens, check your entries (e.g. did you enter W3 instead of M3?). If your entries agree with the P45, write the cor‐rect tax on Part 3 of the P45 before sending it to the Inland Revenue.
Because of the way K code tax is calculated, there is no check on K code tax.
Omit tax checkThis tax checking of the P45 is in accordance with Inland Revenue regula‐tions. If you do not want SUPERPAY to do this check, leave blank the Date
C115

Reference
of leaving and the Week number fields. If you have already filled in these two fields, use the DELETE key or SPACE BAR key to blank them out.
No P45If a starter has no P45 and is not a school or college leaver, you need to get the employee to complete a P46 – see section 11.3 above.
11.6 Use the P45 prompt to enter a P6You may receive a P6 from the Inland Revenue some time after an employee has started working for you. On the Employee’s Record, press SHIFT-F4 to call up the P45 box. Enter the details from the P6 in the P45 fields. Leave blank the DATE OF LEAVING and the WEEK/MONTH fields. Then press F9 to STORE the P6 in memory. Press F9 again to permanently STORE the P6 details.
P45 details already in P45 boxIf the employee had previously given you a P45, you will already have details in the P45 pop‐up box. Overtype the tax code and then blank out the DATE OF LEAVING and WEEK/MONTH using the space bar or delete key. This is important – you do not want SUPERPAY to check and perhaps change the tax to date figure that the Inland Revenue has sent you.
Zero taxIn the same way as you enter P45’s, if there is no tax to date on the P6 enter zero in the tax field. If you leave this field blank, SUPERPAY thinks you have not entered the field and displays a ‘Wrong Combination of fields’ mes‐sage and will not let you STORE the record.
11.7 Starter with a student loanIf a starter has Y in the Student Loan box of his P45, enter *S in the after‐tax items on the employee’s Record – see 5.13 in the New Users Guide for an example.
C116

Chapter 11: Starters
11.8 Payment methodWhen you set up a new employee Record the default payment method is C for cash.
Diagram 92: Default payment method
Sometimes operators set up new employees, enter the employee’s bank details but forget to change the C for cash. Then when the operator prints (for example) an AUTOPAY report the employee is not on the list.
If this happens to you, go back to the employee’s Record, UNDO the RUN, enter the revised payment details and STORE the Record. Then when you re‐RUN the employee’s payslip, RUN PAYROLL sets a flag to tell PAYMENTS to include the employee in the next (for example) AUTOPAY list.
The point to note is that you must set up the pay details correctly before the RUN, so that RUN PAYROLL can set the flag for PAYMENTS. If you simply change the employee’s Record after the RUN, the flag is not changed until next week and the employee will not be added to the (for example) AUTO-PAY list for this week.
The easiest way to check a new employee’s pay method is to check the pay method shown underneath the Net pay on the payslip screen and printed payslip.
Diagram 93: Payment method on payslip screen
11.9 Pay interval – Wk/Mn (F2)There are special Inland Revenue rules governing a change of pay inter‐val. If you set up an employee with the wrong pay interval and have not
C117

Reference
yet paid him, use this WK/MN prompt to change the interval; i.e. obviously this does not come under the Inland Revenue’s special rules.
11.10 Start dateThis field is essential for new directors, but for most employees SUPERPAY does not use this field. However, it can be useful for your personnel records and can be used by REPORT DESIGN.
11.11 Directors NIWhen a director starts during the tax year, the NI annual limits are appor‐tioned according to the start date; e.g. if a director starts on 6th October the NI limits are half the annual limits.
Ensure you enter the correct Start date on the director’s Record so that SUPERPAY can apportion the NI limits in accordance with the Inland Reve‐nue regulations. The method for calculating pro‐rata limits is documented in the Inland Revenue’s Guide and is not repeated here.
11.12 Entitlement to Parental PayWhen a relatively new employee is about to go on Parental Leave, you need to check how long the employee has worked for you. Use the Inland Revenue Tables or SUPERPAY’s calculator (see 9.5 above) to see the latest start date which gives 26 weeks continuous employment up to the Satur‐day of the Qualifying Week. If the employee started after that date he or she will not be entitled to STATUTORY PARENTAL PAY and you must inform the employee. SUPERPAY does not check this for you.
11.13 SSP
SSP1(L)You should ask all starters if they have been given an SSP1(L) by their pre‐vious employer. If yes, enter the details in the SSP1(L) section of the employee’s DIARY.
The employee still has to serve 3 Waiting Days before receiving any SSP; the SSP1(L) is used only for working out whether the employee has reached his 28 week SSP limit.
Linking letterYou should ask new employees if they have a DWP Linking Letter to give you. If they give you this form, do not pay SSP for either up to 8, 52 or 104
C118

Chapter 11: Starters
weeks from the date they last received certain benefits. Please read the rel‐evant DWP documentation for more details.
Average payIf you enter Sick Days on the DIARY of an employee’s first payslip, RUN PAY-ROLL will ask you to enter the employee’s Average Gross pay, so that a cal‐culation can be made (since there is no pay history).
C119

Reference
C120

SUPERPAYIndex
Index

Index
AAccount name
Employee bank B60Account number
Employee bank B60Accrual, Holiday Pay C48, C51Address
Company B14Employee B61Employee address on forms B110
Advance the tax weekWhole payroll C44
After‐tax items B70Holidays C45Multiply by holiday weeks B107
Attachments C12/4 weekly paid employees C6Admin cost C6Council Tax C2Court orders C5CSA order C3Deduction c/f C6Holidays C7, C53Interact with Student Loans C8Leavers C8, C59Net earnings C1Pay attachments C14Second attachment C9, C13Set up employee record B41
Automated paymentsPayment reference B60
BBank
Employee bank details B59Building society roll number B60Bureaus
List of companies C17Monthly PAYE payment C27Set up new clients at year end C27Transfer files to/from a client C26
CCalendar C111Cancel
Payslip B102Car
Car fuel benefits C33Casual employees B49, B79Change
Company C16Employee code B26Weekly to 4 weekly C31Weekly to monthly C29Window size A8
CIS expiry date B49Comment field, employee record B61Company
Change company C16Company record
Address B14Deduct SSP from Gross Pay B109Extended department codes B108IR payments on Monthly Summary
B108Multiply after‐tax items B107Name B9, B14Passwords B14PAYE references B16Print zero payslips B108Prompt options B11Record PAYE paid C27References for disk return B17Screen 1 B14Screen 2 B16Screen 3 B17, B116, C27Screen 4 B18Small Employers’ Relief B17Tax credits funding B18
Configuration file A36Construction Industry Holiday Pay C47Contracted out NI B63Contracted out NI codes C66Copy a company C21Copyright B4Council Tax C2
Holidays C7, C53
Page 1

Index
Court order C5CSA order C3
DD prefix tax code B47Data files
Location C20Dates
Date of birth B49Default/system date B8Leave date B49
DeleteAn employee B29, C55
DepartmentEnter range of departments B69Set up extended departments B108
Diary B78Directors
SMP C83Directors NI B48, C37
Change of NI code C39Director becomes employee C39Employee becomes director C38Employer contributions C38Fees not yet voted C41Leavers C39, C59Start date B49Starters C38, C118Year end B114
Display employee codes and names B115Download
.NET Framework A23SUPERPAY program A3
EEmail
Join mailing list A33, C34Employee
Change weekly to monthly C30, C117
Display codes and names B115
Enter employee code B114Employee code B25, B31
Change B26Entering and finding B114Leavers C60List codes and names B115Starters C113
Employee name, Find B115Employee record
2/4 weekly payroll B39Address B61After‐tax items B40Allocate employee code C113Code B25, B31Employee type B49Flat payslip amounts B36Global values B38Gross pay items B32Import data B49Leavers employee code C60Name B31Net to gross items B37Pay interval B39Pensions B50, C61Screen 1 B31Screen 2 B55Screen 3 B62SMP B55SSP B55Standard number of hours B38Store record B27Timeclocks B49
EWC date C78Exit key B79Expected week of confinement C78Extra payslip items B71
Extra description B73
FFiles
Colour schemes A36Data files A34List of program files A35Location A33
Page 2

Index
Program files A34Report design layouts A35System files A35
Flags on payslip headings B23Flat payslip amounts B71Fortnightly payroll B39Four weekly payroll B39, B67
GGlobal
Values on payslip headings B21Gross pay items B32, B70
Text B33
HHelp
Shift‐Help B31Holidays C43
Advance all employees B68, C45Advance one employee B76After‐tax items C45All on holiday B68Attachments C53Construction Industry Holiday Pay
C47Council Tax attachment C7, C53Holidays around year end C54HP accrual B46, C48, C51Tax/NI limits C43Week 53 C54Whole payroll C44
Hotline A3, C33HP accrual B46, C48, C51
Total to date B63
IImporting data
Timeclocks B50Inland Revenue
Calculate monthly payment C27Inland Revenue forms B2Installation A1
LLast net pay B58Leavers
Attachments C8, C59Delete an employee B29, C55Directors NI C39, C59Leave date B49Leaver’s statement (SSP) C111Print P45 B89Re‐use code C60SSP C111
Licence A1, C16Enter Licence Number B7
Linking Letter C118Load SUPERPAY B6Loans B40Logo screen A8, B7
MMain Menu B8Male or female indicator B49Monthly Summary
Show PAYE payments C27Monthly summary
Show PAYE payments B108Multi‐company C16, C61
System details C22
NName
Company B9, B14Employee B31Employee bank account B60Find employee B115
National Insurance B75
Page 3

Index
B code B48Contracted out B63Director changes code C39Directors NI B48, C37Employee rebate B63Employer rebate B63NI code B47NI number B49Totals to date B63
.NET Framework A2, A23Net pay B75
Last net pay B58Negative pay B76Rounding B58, B75Total to date B63
Net to gross B37, B71Interaction with Attachments C8
Network installation A13Peer to peer network A15
NewCompany B5, B11, B19, B25,
B65, B81New users
Getting started B5, B11, B19, B25, B65, B81
Set up employee records B27Set up payslip headings B20
Next ScreenCompany record B12Employee record B30
Nominal analysisCreate link file B84Nominal codes B24Print report B84
NumberBuilding society roll number B60NI number B49Payroll week B68
PP14/P60
Surnames first B110P45
Continuous form B91, C56
Enter a P45 B28, C114Laser form B91, C56No P45 received C116Print a P45 B89Remove or change details B29,
C114Stationery B91, C56
P6Enter P6 details C116
Parameters file B3, C34Passwords B12, B14Pay in addition to main run C32Pay interval B39, B77, C44
Change interval B77, C29Wk/Mn prompt C117
Pay method B59PAYE payments to IR B108PAYE reference B16Payroll run B65Payroll type B68Payslip
Correct a payslip B93, B95, B97Date B66Extra description B73Extra payslip items B71Miscellaneous pay items B74Print zero payslip B108Screen display B69Standard deductions B74, C68
Payslip headings B19Description B21Display during run B78Flags B23Global values B21NL codes B24
Pensions B32, B50, B74, C61COMP scheme B48, B52, C64,
C67Contracted out no C64Contracted out number B50, B52,
C63, C66COSR scheme B48, C66Examples B52, C64Stakeholder summary C71Totals to date B63
Permanent pay items B70
Page 4

Index
Previous gross and tax B62Print
Company record B12Nominal analysis B84P45 B89Stakeholder summary C71
Printer requirements A2Prompt
Company record B11Payslip screen B76
RRange of departments B69Rate of pay B70, B72Reclaim SMP C88Renumber a company C19Reports
SMP C88SSP C98
Roll number B60Rounding
Amount B58B/f B58C/f B58Net pay B58
Run payroll B65All on holiday B68Full payroll B68Individuals B69Salaries B68
SSalaries B68Sample reports
Description of reports B87View list of samples B85
SAP, Statutory Adoption Pay C75Second pay details B60, B61SER. See Small Employers’ ReliefShift‐Help B31Sick weeks (SSP) B55
Skip an employee B79Small Employers’ Relief B17, C88SMP C75
Amount this year B58Average pay B57, C79Change number of weeks paid C85Directors C83Employee record B55EWC date B56, B57, C78Low pay C87MPP start date B57No SMP displayed C87Number of higher paid weeks B57Prompt on payslip screen B78Reclaim SMP C88Reduce normal pay C77Set up SMP C77, C78Small Employers’ Relief B17, C88SMP on reports C88Stop paying B57Totals C90Totals to date B57Two SMP’s in one year C90Warning messages C87Weeks paid B57Weeks worked B57Work during MPP C86
Software Download A17Sort code
Employee bank B59Split Net Pay B60, B61Spool file A35SPP, Statutory Paternity Pay. See SMPSSP B73, B78
Adjust fixed gross pay B109Average Pay B55, C119Calculation C100Check reclaim C111Diary C94DWP Linking Letter C118Employee record B55Enter sick days C93, C103Enter work pattern C105Forms C111Leavers C111Linking rule C102
Page 5

Index
Other uses for calendar C111Pay no other pay C97Reclaim C98, C111Reports C98Sick notes C99Sick weeks B55Sickness before Diary C107SSP1(L) form C109, C118Starters C110Work days C103
StartA new company B5, B11, B19,
B25, B65, B81Starters
Directors NI C38, C118Previous pay B62SSP C110Start date B49Student Loan C116
StoreCompany record B12Employee record B27Payslip B76
Student Loans B45Students
Student Loans B45Tax code C114
Subcontractors B49Certificate number B50CIS expiry date B49
SuperpayDownload program A3
System detailsMulti‐company C22
System file A36
TTax
Tax to date B63Tax code B46
D code B47Emergency tax code B47NT tax code B47Starters C113
Students B47, C114Tax credits B63
Funding B18Text for payslip heading B33Text prompt B28, B78Timeclock data B50Totals to date
Gross and Tax B62Training B1
WWarranty B4Website
Microsoft A23Superpay A15
Week number B77, C44Last tax week number B67
Window size A8Windows version A17Wk/Mn prompt
Change weekly to monthly C29
YYear end
Directors’ NI B114Everyone on P35/P14’s B110
Year end return on diskReference numbers B17
Year to date totals B62
Page 6