sun one application server 7 plugin for jbuilder 8 user guide
TRANSCRIPT
Sun ONE Application Server 7, Plugin for JBuilder 8User Guide
Prepared By:
March 14, 2003
Send product feedback (not technical questions) to [email protected]
Fee-based, guaranteed technical support for the Assembly Tool is provided by Developer TechnicalSupport. For community support, visit the Sun Software Forum on AppServer IDE.
Table of Contents
Introduction1.
Installing JBuilderTM 82.
Installing SunTM ONE Application Server 73.
Configuring JBuilderTM 8 with Sun ONE ServerTM 7.04.
Working with JSPsTM and ServletsTM5.
Working with EJBs6.
Deploy the Archive File to Sun ONE Server7.
Troubleshooting8.

Contents | Previous | Next
IntroductionBorland® JBuilder™ Enterprise is a comprehensive set of award-winning visual development tools forcreating enterprise-scale applications written entirely in the Java ™ programming language for the Java 2platform. JBuilder 8 Enterprise provides integration with the market-leading J2EE™ platform applicationservers like Borland® Enterprise Server 5.x, BEA® WebLogic Server™ 5.1, 6.0, 6.1, 7.0, IBM®
WebSphere®3.5, 4.0, iPlanet™ 6.0, 6.5, Sun ONE Application Server 7, Oracle9i™ Application Server,Sybase® and JBoss™. This paper provides an overview of the development, deployment, and debugginglife cycle of Enterprise JavaBeans™ (EJB ™) and JavaServer Pages™ (JSP™) with Borland JBuilder 8Enterprise and Sun ONE Application Server 7.0.
The platforms and software used to create the exercises are Windows 2000, ™ JBuilder 8 EnterpriseEdition, Oracle Database, Sun ONE Application Server 7.0.
This paper is not a reference on developing EJBs, JSPs/servlets, or the Java programming language.Rather, it provides a jump-start while using JBuilder 8 with Sun ONE Application Server 7.0, allowingdevelopers to reach maximum productivity in the minimum amount of time.
Contents | Previous | Next
Contents | Previous | Next
2. Installing JBuilderTM 8
2.1 Platforms
JBuilder 8 can be installed in Windows® 2000(SP2), XP, or NT4.0(SP6a), SolarisTM 7(2.7) or 8(2.8) andRed Hat® Linux 6.2 or 7.2.
2.2 System Requirements
The minimum system requirement for JBuilder 8 Enterprise is 256MB. Also the recommended hard diskspace is 700MB. Refer to http://www.borland.com/jbuilder/pdf/jb8_sysreqs.pdf for the details.
2.3 Installation
JBuilder 8 can be installed with a trial or licensed CD, which can be obtained from Borland Sales Office.JBuilder 8 trial edition can also be downloaded fromhttp://www.borland.com/products/downloads/download_jbuilder.html.
Please see http://www.borland.com/company/borland_worldwide.html for contact information.
2.4 Registration
After JBuilder 8 trial edition installation, obtain the trial license key fromhttp://www.borland.com/products/downloads/download_jbuilder.html.
If you already have the license keys, register JBuilder with the license keys.
2.5 Tuning JBuilder 8
The default heap size for the Java Virtual Machine (JVMTM) can be changed in<JBuilder_Installed_Dir>\bin\jbuilder.config
Change the size of the heap to suit to your machine environment in the following two parameters injbuilder.config.
vmparam –Xms32m●
vmparam -Xmx128m●
Note: For the rest of the white paper, the JBuilder 8 installation directory or JBUILDER_HOME isassumed as C:\Borland\JBuilder8.
Contents | Previous | Next
Contents | Previous | Next
3. Installing SunTM ONE Application Server 7
3.1 Platforms
SunTM ONE Application Server 7 can be installed on Windows 2000 SP2+, Windows XP, Solaris 8 and9 for SPARC platforms.
Solaris 8 users must have the Sun recommended patch cluster installed. The cluster includes the threerequired patches listed below. The patch cluster is available at: http://sunsolve.sun.com/ under"Recommended and Security Patches".
In addition, the following patch must be installed for Solaris:
109326-06 or higher108827-26 or higher110934 for packaged-based installation only.
These patches can be retrieved from the patchfinder page located at the following URL:
http://sunsolve.sun.com/pub-cgi/show.pl?target=patches/patch-access
3.2 System Requirements
Be sure your system meets the following requirements before you install Sun ONE Application Server 7on your machine:
A static IP address on your machine.●
Java Development Kit (JDK) 1.4
If you have not installed JDK 1.4 prior to installing Sun ONE Application Server, the installationprogram will silently install the appropriate files.
●
Remove any Sun ONE Application Server and/or iPlanet Web Server installations using theuninstall program before installing Sun ONE Application Server. Web servers from other productvendors can coexist with Sun ONE Application Server 7.
●
3.3 Installation
You can install Sun ONE Application Server 7 using any of three methods:
GUI-based
Provides a set of graphical dialog boxes to interact with the user.
●
Command Line
Provides text-based interface to interact with the user. Command-line installation follows a pattern
●
similar to GUI-based installation, but lacks some convenience features such as enabling the user tobrowse for directories.
Silent
Enables the user to install Sun ONE Application Server on multiple machines with similarconfigurations without running the interactive installation program on every machine.
Using Silent Installation, the user first installs the server on a machine using GUI-based orcommand-line installation with an option to save input to a state file.
Next, the user invokes the installation program on a target machine, providing it with the state filethat might be modified to suit the environment of the target machine. The installer replicates theinstallation scenario on the target machine using information saved in the state file.
Please see http://docs.sun.com/source/816-7145-10/index.html for detailed information.
●
3.4 Other Details
Detailed Installation Instructions, Release Notes, and other documentation for the Sun ONE ApplicationServer are available at http://docs.sun.com
Contents | Previous | Next

Contents | Previous | Next
4. Configuring JBuilderTM 8 with Sun ONE ServerTM
7.0To configure JBuilder 8 with Sun ONE Application Server 7.0, copy the appsrvSUNJB8.jar to theJBUILDER_HOME\lib\ext directory and appsrvSUNJB8Help.jar to theJBUILDER_HOME\doc directory. Start JBuilder 8 and from the JBuilder menu bar click Tools ->Configure Servers. Select Sun ONE Application Server 7 from the left pane of the Configure Serversdialog box.. Click the Enable Server checkbox in the Server Settings panel on the right hand side of thedialog. Enter the pathname of the Sun ONE Application Server 7 installation directory in the Homedirectory property. This directory can be on a local or mapped drive. No other properties need valuesspecified.
See Figure 1 for details.
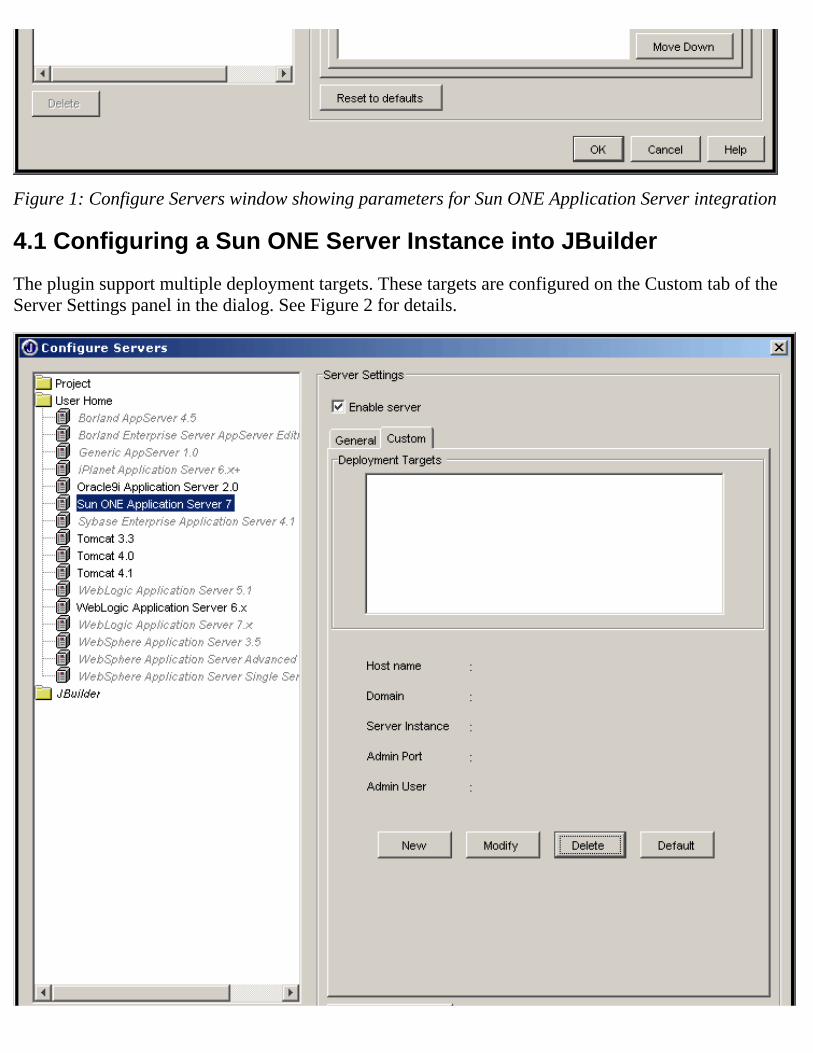
Figure 1: Configure Servers window showing parameters for Sun ONE Application Server integration
4.1 Configuring a Sun ONE Server Instance into JBuilder
The plugin support multiple deployment targets. These targets are configured on the Custom tab of theServer Settings panel in the dialog. See Figure 2 for details.

Figure 2: Configure Servers window showing Custom parameters for Sun ONE Application Server 7integration
Under the Deployment Targets, click New. In this dialog box enter the server host name (which may belocal or remote), domain name, Server Instance name, Admin port, Admin Username and Adminpassword. Please see Figure 3 for details.
Figure 3: New Sun ONE Server Instance being created inside JBuilder
Note: If the server instance being configured is on a remote machine, the hostname or IP address of theremote machine should be entered in the Server Host Name field instead of localhost.
Click OK. You will see the entry of the newly created Sun ONE Server Instance. See Figure 4 for details
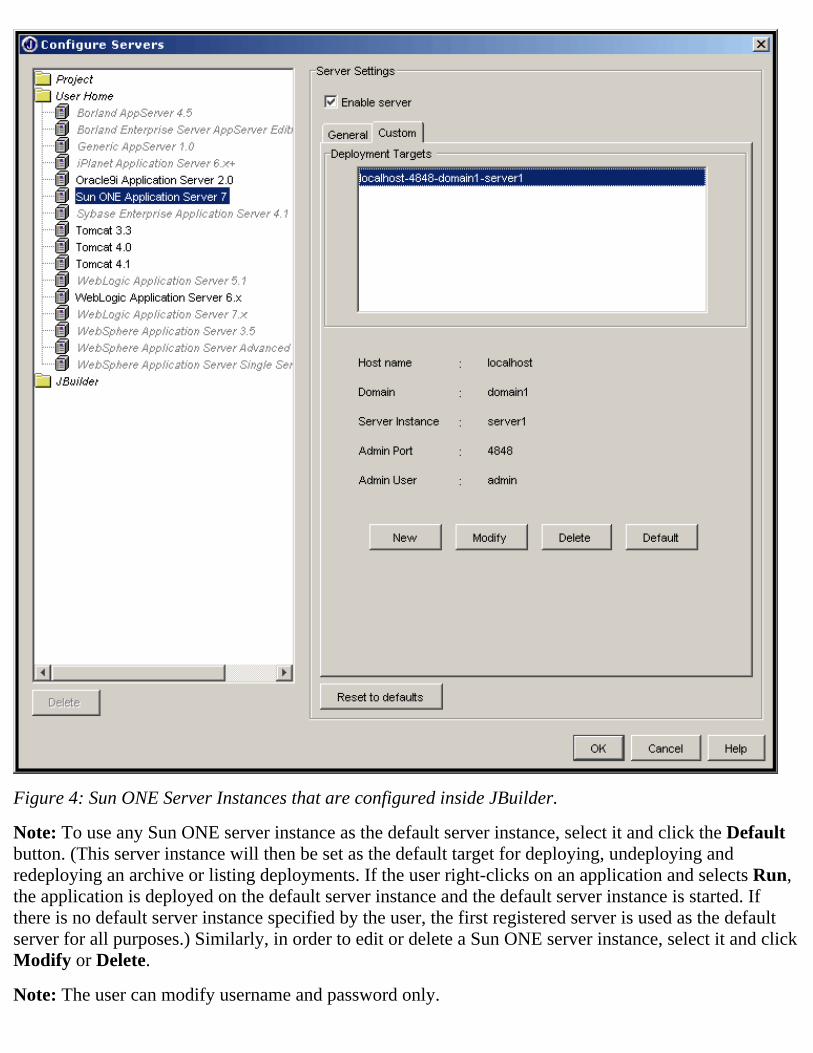
Figure 4: Sun ONE Server Instances that are configured inside JBuilder.
Note: To use any Sun ONE server instance as the default server instance, select it and click the Defaultbutton. (This server instance will then be set as the default target for deploying, undeploying andredeploying an archive or listing deployments. If the user right-clicks on an application and selects Run,the application is deployed on the default server instance and the default server instance is started. Ifthere is no default server instance specified by the user, the first registered server is used as the defaultserver for all purposes.) Similarly, in order to edit or delete a Sun ONE server instance, select it and clickModify or Delete.
Note: The user can modify username and password only.

Contents | Previous | Next
Contents | Previous | Next
5. Working with JSPsTM and ServletsTM
5.1 Create a Project
Start JBuilder. Click File -> New -> Project in the Object Gallery window. Click Project. Click OK. In the ProjectWizard | Step 1 of 3 specify a Directory Name and a Project Name. Leave the Template as (Default Project) and Finish.
Note: For this exercise, the project directory is C:\JBuilderSun ONE and Project Name is WebSample.
5.2 Attach Sun ONE Application Server to the Current Project
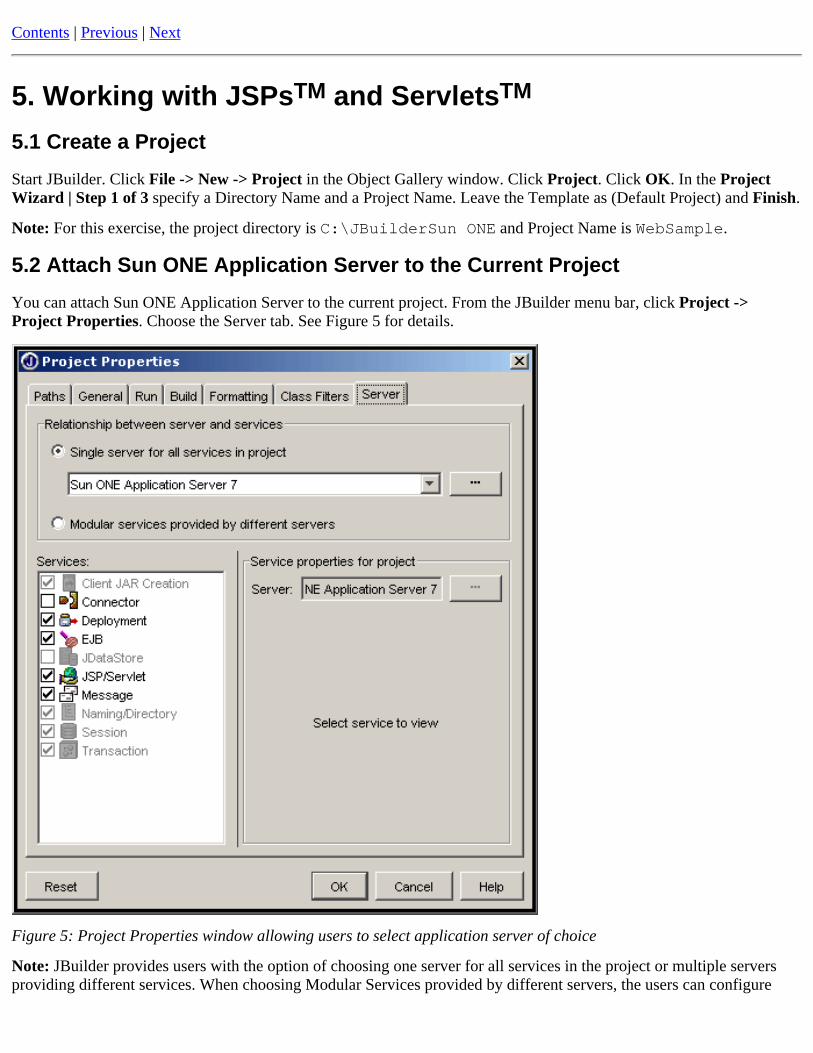
You can attach Sun ONE Application Server to the current project. From the JBuilder menu bar, click Project ->Project Properties. Choose the Server tab. See Figure 5 for details.
Figure 5: Project Properties window allowing users to select application server of choice
Note: JBuilder provides users with the option of choosing one server for all services in the project or multiple serversproviding different services. When choosing Modular Services provided by different servers, the users can configure
different services to be run by different servers.
For example: users can select Tomcat for JSP/servlet, Borland Enterprise Server for EJB and another server forConnector.
For simplicity, select Sun ONE Application Server 7 from the combo box and select Single server for all services inthe project.
Click OK to choose Sun ONE Server for the current project.
Attach the Sun ONE Application Server to All the Projects
If you decide to use Sun ONE Application Server 7 for all of your projects, you can assign Sun ONE to Default ProjectProperties. To assign Sun ONE Application Server as the default server
From JBuilder menu bar click the Project -> Default Project Properties -> Server tab.1.
Select Single server for all services in project and choose Sun ONE Application Server 7 from the combo boxcontaining all the configured servers.
2.
Go to Paths tab under Project -> Default Project Properties, click on Required Libraries tab, click Add andchoose Sun ONE Application Server 7 Client library from the pop up Select One or More Libraries list andpress Enter. This library is required in order to build the web and enterprise applications in the project using SunONE Application Server 7.
3.
From now on, Sun One Application Server 7 will be the default server for all your projects.
5.3 Create a Web Application
JBuilder allows you to create a Web application, which can host applets, Web Start launchers, JSPs and servlets.
From the JBuilder menu bar, click the File -> New -> Web tab in Object Gallery -> Web Application. Enter a nameand directory for the Web application. For this exercise, the Web application name is WebSampleApp and directory isalso WebSampleApp.
Note: JBuilder can recognize that the target server is Sun ONE Application Server 7, so it automatically createsweb.xml and sun-web.xml as the deployment descriptors for this Web application.
5.4 Create a JSP
From the JBuilder menu bar, click on the File -> New -> Web tab in Object Gallery -> JavaServer Page. Enter a JSPname. For this exercise, the JSP name is SampleJSP. Click Next and enter a package name in JSP Wizard | Step 3 of5. For this exercise, the package name is borland.jbuilder.sunone.demo.web. Click Next and then Finish.
This wizard creates a sample JSP and sample JSP bean in the specified package.
Note: The JSP wizard provides many options to users, like creation of a Sample Bean, creation of an Error Page,entering the package name, creation of a runtime configuration etc.
5.5 Make the Project
To make the project, press Ctrl+Shift+F9 or click the Make icon from the JBuilder toolbar. JBuilder may show somewarnings because of the use of deprecated methods. To hide the deprecation, click Project -> Project Properties ->Build. Uncheck Show warnings and Show deprecation.
As a result of make, JBuilder automatically creates the WAR file for the Web archive. The WAR file for this exercise isWebSampleApp.war.
See Figure 6 for details.

Figure 6: JBuilder showing the generated sources, WAR file, and DDs for Sun ONE Application Server
Note: For editing a web.xml the Editor is available where in you can specify the values that go into the web.xml butthere is no such Editor available for sun-web.xml. The user needs to manually edit the sun-web.xml.
5.6 Building the Web Application
To build the web application, right-click on the web application node and do a make or rebuild. A war file is created withthe same name as the web Application containing the Deployment descriptors (web.xml and sun-web.xml) and JSP.
Note: If you find that the .war file contains all the jar files and other class files present in the project, right- click on theweb application and select Properties. Go to the classes tab and check the specified only options for Classes andResources.
If your web application contains a Servlet or a Bean, include it in your web application by clicking on Add Classes. Apane pops up showing all the class files in the current project. Select the servlet you want to include. Make sure that youhave done a make or build on the servlet before including it in the war file. Also go to Dependencies tab and click oneach of the libraries and check the "Never include any class or resources" option for each of the required libraries. Do notremove these libraries from the project settings, as these are required in order to build the web application.

5.7 Deploy and Run the JSP on Sun ONE Application Server
To deploy and run the JSP, simply right-click SampleJsp.jsp from the JBuilder Project Pane and click Web Runusing SampleJsp. This single click, starts the Sun ONE Application Server 7, deploys WebSampleApp.war to SunONE, runs the JSP in Sun ONE, and shows the output content of the JSP in JBuilder AppBrowser.
Figure 7: Sun ONE Server is running, and AppBrowser is displaying the running JSP in Sun ONE Server
Note: This JSP is a simple JSP, created with JBuilder JSP Wizard, which accepts a string in the Text Box and displays it.For more details of the source code see the source code SampleJSP.jsp and SampleJSPBean.java.
5.8 Debug the Application
5.8.1 Local Debugging
If the Sun ONE Application Server 7 is installed on the same machine as JBuilder8, the user can debug the applicationsat runtime. To debug a web application, assign breakpoints in the source code wherever necessary. To assign abreakpoint, simply open source file and click the mouse on that line and press F5 or go to Run and click Add aBreakpoint. Build the web application again and deploy it on the Default Server Instance.
Note: For this exercise, breakpoints are assigned on the 7th line of Sample JSP and at 11th line of
SampleJSPBean.java. For more on debugging see JBuilder Help, type debugging as a keyword in the index ofJBuilder help and click on JSP, which is one of the subheadings displayed under debugging.
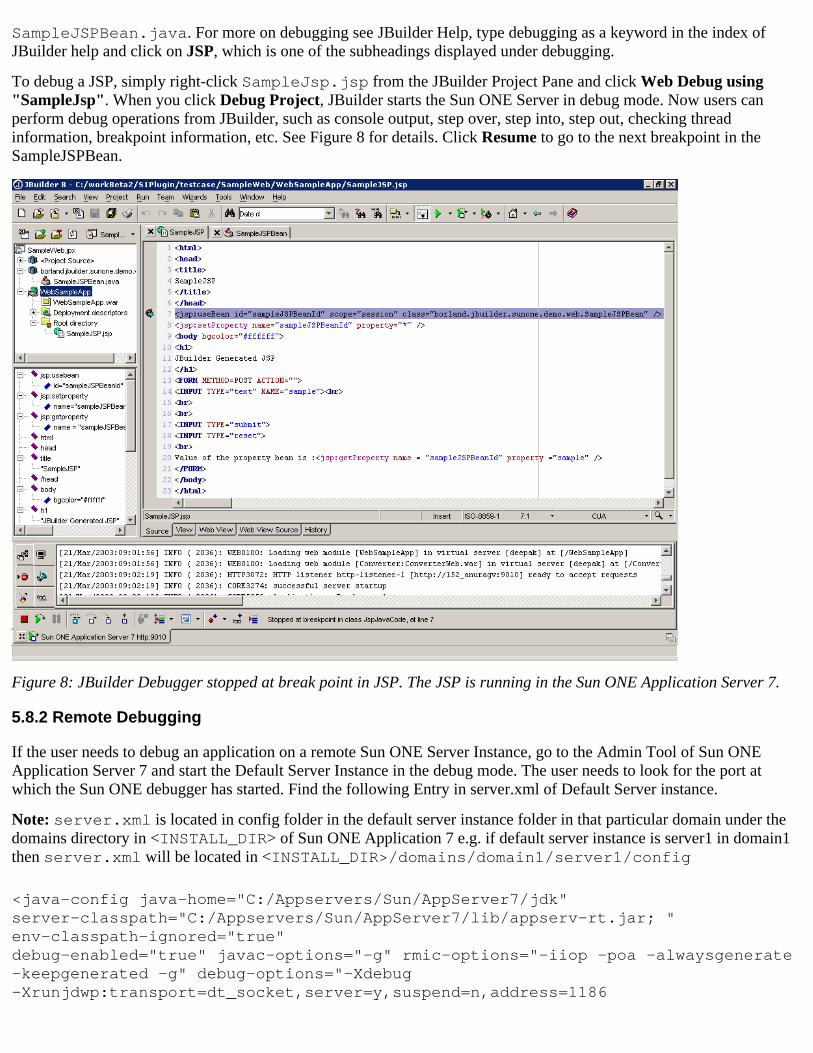
To debug a JSP, simply right-click SampleJsp.jsp from the JBuilder Project Pane and click Web Debug using"SampleJsp". When you click Debug Project, JBuilder starts the Sun ONE Server in debug mode. Now users canperform debug operations from JBuilder, such as console output, step over, step into, step out, checking threadinformation, breakpoint information, etc. See Figure 8 for details. Click Resume to go to the next breakpoint in theSampleJSPBean.
Figure 8: JBuilder Debugger stopped at break point in JSP. The JSP is running in the Sun ONE Application Server 7.
5.8.2 Remote Debugging
If the user needs to debug an application on a remote Sun ONE Server Instance, go to the Admin Tool of Sun ONEApplication Server 7 and start the Default Server Instance in the debug mode. The user needs to look for the port atwhich the Sun ONE debugger has started. Find the following Entry in server.xml of Default Server instance.
Note: server.xml is located in config folder in the default server instance folder in that particular domain under thedomains directory in <INSTALL_DIR> of Sun ONE Application 7 e.g. if default server instance is server1 in domain1then server.xml will be located in <INSTALL_DIR>/domains/domain1/server1/config
<java-config java-home="C:/Appservers/Sun/AppServer7/jdk" server-classpath="C:/Appservers/Sun/AppServer7/lib/appserv-rt.jar; "env-classpath-ignored="true" debug-enabled="true" javac-options="-g" rmic-options="-iiop -poa -alwaysgenerate -keepgenerated -g" debug-options="-Xdebug-Xrunjdwp:transport=dt_socket,server=y,suspend=n,address=1186

-Xnoagent -Djava.compiler=NONE">
Note the value of address Attribute of debug-options. In this example the address is 1186.
Go to Run-> Configurations and edit Run Time Configuration SampleJSP.
Go to the Debug tab. Enable remote debugging and check Attach Option. In the host name text field enter the hostnameof the Default Server Instance. In the transport select dt_socket from the Type List and in the address text field add theaddress specified in the address Attribute in server.xml.
Figure 9: RunTime configurations to attach a debugger to a Sun ONE Server debugee.
Right-click on the web application and select Debug using "SampleJSP". Go to Web Viewer and press Enter in theURL pane.
The debugger is designed to stop at breakpoints in the JavaBean. After the debugger stops at a breakpoint, the user canperform the debug operations like step into, step over, step out, etc.
5.9 Working with Servlets
Create another web application in the same Project SampleWeb. To get help on how to create a web application, refer toCreate a Web Application.
Note: For this exercise the name of the other Web application is SampleServlet.
To create a servlet, from the JBuilder menu bar, click the File -> New -> Web tab in Object Gallery -> Servlet. Enter apackage name and servlet name in Servlet Wizard | Step 1 of 5. Click Next.

Note: For this exercise the package name entered is borland.jbuilder.sunone.demo.web, the servlet name isExampleServlet and the web application name is SampleServlet. In Servlet Wizard | Step 2 of 5, enter themethods that you want to use in the servlet. Click Next.
Note: For this exercise, the implement methods options doget() and doPost() are checked.
In Servlet Wizard | Step 3 of 5, you can enter the servlet name and URL pattern. Leave the defaults and click Next.
In Servlet Wizard | Step 4 of 5, you can enter the Servlet Request Parameters. Click Next.
Servlet Wizard | Step 5 of 5 allows you to create a runtime configuration for the servlet. Click the checkbox Create aRuntime Configuration and leave the default configuration name as ExampleServlet and Finish.
Make the project. To get help on how to make a project, refer to Make the Project.
To deploy and run the servlet, stop the Sun ONE Server. Right-click on the ExampleServlet in the Project pane, thenclick Web Run ->Use ExampleServlet.
See Figure 10 for details.
Note:You can also deploy and run the ExampleServlet by clicking the run icon from the JBuilder toolbar and selectingExampleServlet.
You don't have to stop Sun ONE Server to deploy and run another application. You can right-click onSampleServlet.war. Click Deploy Options for SampleServlet.war and hit Deploy. After deployment, runthe link
http://<hostname:portnumber>/SampleServlet/exampleservlet
from any browser, and the servlet should respond.

Figure 10: A servlet running in Sun ONE Application Server 7 and displaying the results in JBuilder AppBrowser
5.10 Troubleshooting
Error 1: Log File not found. Please check Permissions
Error description: When you run the web application and you get a message in the Message pane saying Could notRead the Server Log File with the log file path.
Reason: Either there is no read permission in order to read the file or the instance created is a new one and log file for itis not created by the Sun ONE Application server or the user is running the application from a remote machine.
Solution: If you are deploying the archive on the local machine and you ge this message, check the permissions of thelog file or try running the server again, as this may happen because of the server instance being a new instance and nothaving created the log file when the user did a Run.
Contents | Previous | Next

Contents | Previous | Next
6. Working with EJBs
6.1 Session Bean
Create a project SampleEJBProject and assign Sun ONE Server as the target server for the project. If you need help on this,refer to Create a Project and Attach Sun ONE Server to the Current Project.
6.1.1 Create an EJB Module
From the JBuilder menu bar, click File -> New -> Enterprise tab of Object Gallery -> EJB Module. Click OK.
In the EJB Module Wizard, enter the module name as HelloUser and select the EJB version. Click OK.
Note: You can select EJB 1.0 or EJB 2.0 specification for your EJB development. For this exercise, the module name isHelloUser and the version is EJB 2.0 compliant.
Create a session bean
Right-click on the Editor pane to create EJBs. Click Create EJB. Click Session Bean.
See Figure 11 for details.
Figure 11: JBuilder creating a session bean visually

Note: A session bean is created and is displayed. You can change the name of the session bean in the Bean Properties window.Click and the session bean with the specified name is created. For this exercise, the name of the session bean is HelloBean.
To add a method in the session bean, right-click on HelloBean. Click Add. Click Method. See Figure 12 for details.
Figure 12: JBuilder adding a business method to an EJB.
The method name is getMessage(java.lang.String name), return type as string and interfaces as remote.
Now double-click on HelloBean.java, which automatically brings source code for HelloBean.java in editor pane.Change getMessage(java.lang.String name) method as follows.
public java.lang.String getMessage(java.lang.String name) { return "Hello "+name;}
6.1.2 Create a Deployable JAR File
To run the session bean, first make project. To get help on how to make the project, refer to Make the Project.
Note: After make, Sun ONE Application Server 7 container specific files and deployment descriptors are created in JBuilder.Expand HelloBean.java to view container-generated files and double-click HelloUser.jar to view deploymentdescriptors in the structure pane. See Figure 13 for details.

Figure 13: JBuilder has created a ready-to-deploy JAR file for Sun One Application Server 7 with required containergenerated files
6.1.3 Using the Deployment Descriptor Editors
JBuilder includes the Deployment Descriptor Editor that the user can use to change deployment information (such astransaction policies and security roles in an EJB deployment Descriptor files).
Viewing deployment descriptor of an enterprise bean
To view information about an enterprise bean in the Deployment Descriptor editor,
Open the EJB module node (by clicking the icon on to the far left of the EJB module node).1.
Double-click the bean in the project pane.2.

Figure 14: The Deployment Descriptor editor with General tab selected.
The Deployment Descriptor editor has many tabs. The user can click on any of these tabs at the bottom of the DeploymentDescriptor editor to view information. Use the editor to make any changes to the deployment information for the bean. Theuser can view additional information about a deployment descriptor by opening a bean node in the project pane. Bydouble-clicking these nodes, the user can see additional panels. For example, double-clicking the Container Transactions nodefor a bean displays a Container Transactions panel in the Deployment Descriptor editor. The JDBC DataSources and SecurityRoles nodes can also be expanded and opened, if they contain data. The subnodes that appear can be used to display moreinformation. To view the source code of each descriptor, double-click the EJB module node in the project pane, and then clickEJB DD Source tab at the bottom of Deployment Descriptor editor. For each deployment descriptor in an EJB module, a tabappears with the name of the file on the tab. Select the tab of the file you want to view. While viewing the source code of adeployment descriptor, you can click on elements in the structure panel to move a highlight bar to the corresponding elementin the source code. You can edit the source code directly.

Figure 15: The Deployment Descriptor source for HelloUser EJB Module.
For adding parameters specific only to Sun ONE Server, the user can see two tabs as Sun ONE Application Server 7 Generaland Sun ONE Application Server 7 Properties. To edit the Pool and Cache properties for the Sun ONE Application Server,click on the Sun ONE Application Server 7 General tab. You will see a screen where you can modify the deploymentdescriptor specific details. See Figure 16 for details.

Figure 16: The screen where values of Sun ONE Application Server 7 General deployment descriptor tags can be modified.
For editing the ior-security-config properties or properties specific for a particular type of bean click on the Sun ONEApplication Server 7 Properties tab. You will see a screen where you can modify the deployment descriptor specific details.See Fig 17 for details.

Figure 17: The screen where values of the Sun ONE Application Server 7 properties for deployment descriptor tags can bemodified.
6.1.4 Create a Web Client to Test the Session Bean
To test the session bean, you can create a web test client using JBuilder.
From the JBuilder menu bar, click File -> New -> Web ->Web Application. Click OK. For more on how create a webapplication refer to Create a Web Application.
Note: For this exercise, enter the name of the web application as HelloClient and the name of JSP as Client.jsp.
Add the logic in the JSP to lookup the bean
<%@ page import="com.hello.*"%><%@ page import="javax.ejb.*"%><%@ page import="java.math.*"%><%@ page import="javax.naming.*"%><%@ page import="javax.rmi.PortableRemoteObject"%><%@ page import="java.rmi.RemoteException"%>
<%! private Hello hello = null; public void jspInit() { try { InitialContext ic = new InitialContext(); Object objRef = ic.lookup("java:comp/env/ejb/HelloBean"); HelloHome home = (HelloHome)PortableRemoteObject.narrow(objRef,HelloHome.class); hello = home.create();

} catch (RemoteException ex) { System.out.println("Couldn't create hello bean."+ ex.getMessage()); } catch (CreateException ex) { System.out.println("Couldn't create hello bean."+ ex.getMessage()); } catch (NamingException ex) { System.out.println("Unable to lookup home: "+ "HelloBean "+ex.getMessage()); } }
public void jspDestroy() { hello = null; }%><html><head>
<title>hello</title> </head> <body bgcolor="white"> <h1><b><center>Hello Client</center></b></h1> <hr> <p>Enter yourName:</p> <form method="get"> <input type="text" name="name" size="25"> <br> <p> <input type="submit"value="Submit"> </form> <% String name = request.getParameter("name"); if(name !=null && name.equals("")) { %> <p><%= hello.getMessage(name) %> <% } %> </body> </html>
Specify EJB References through the web editor. Go to the Deployment Descriptors node in the web application and select theweb.xml. An editor is displayed where in the user can specify various parameters for web application. Select the EJBreferences panel in the lower left pane of JBuilder and do an Add to specify the EJB References used in web application. SeeFigure 18 for details.
Figure 18: Web App DD Editor showing the EJBs referred in the web application.
Go to the sun-web.xml tab. the user can see the default sun-web.xml source. He needs to add the following codemanually in the sun-web.xml.

<sun-web-app><ejb-ref><ejb-ref-name>ejb/HelloBean</ejb-ref-name><jndi-name>HelloBean</jndi-name></ejb-ref></sun-web-app>
Finally the sun-web.xml would look as shown in the Figure 19.
Figure 19: sun-web.xml DD Source showing the EJBs referred in the Web application.
Before doing a make on Web application click on HelloClient, right-click and select Properties.
6.1.5 Make the Web Application
To make the web application, press Ctrl+Shift+F9 or click the Make icon from the JBuilder toolbar. JBuilder may show somewarnings because of the use of deprecated methods. To hide the deprecation, click Project -> Project Properties -> Build.Uncheck Show warnings and Show deprecation.
As a result of make, JBuilder automatically creates the WAR file for the Web archive. The WAR file for this exercise isHelloClient.war.
6.1.6 Make an EAR
From the JBuilder menu bar, click File -> New -> Enterprise tab of Object Gallery -> EAR. Click OK.
It shows all the EJB modules in the current project, check the EJB Module that you want to include in the Ear and click Next.See Figure 20.

Figure 20: Check the EJB Module to be included in the Ear.
The next screen shows all the web application modules in the current project. Check the web application module that you wantto include in the EAR and specify the context Name (the URI with which you want to invoke this web application). You canalso include any external .war file in the EAR, if you wish to do so. See Figure 21.
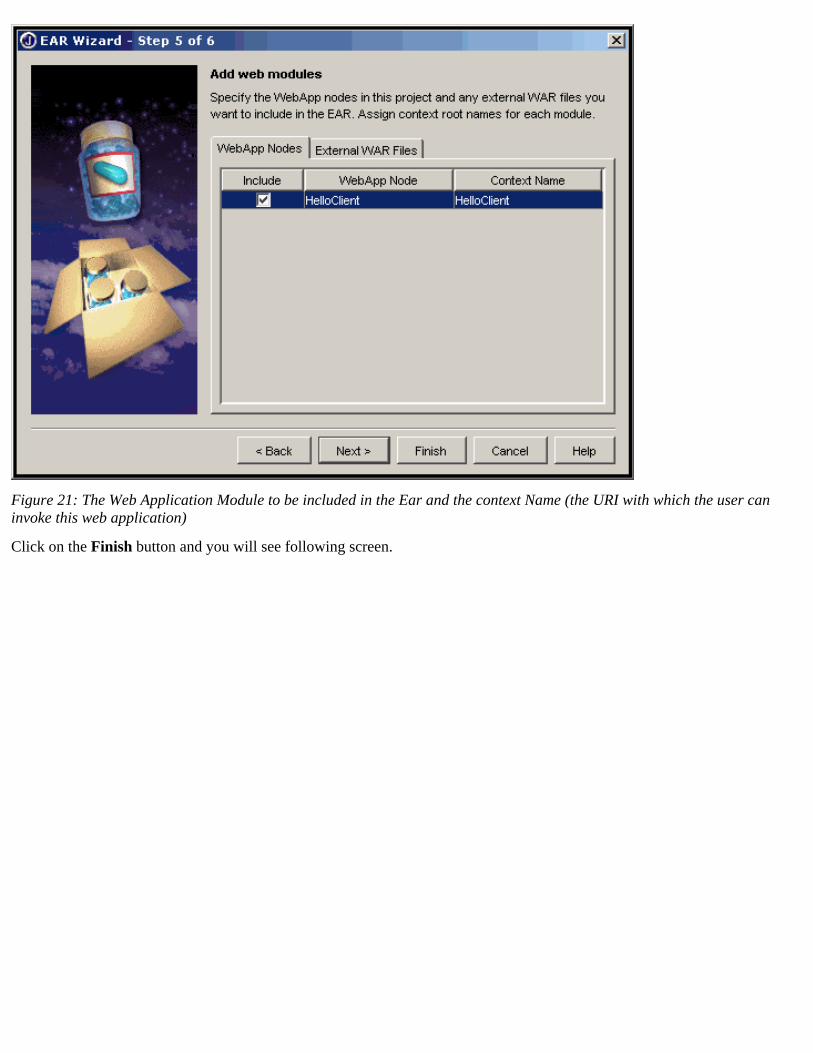
Figure 21: The Web Application Module to be included in the Ear and the context Name (the URI with which the user caninvoke this web application)
Click on the Finish button and you will see following screen.
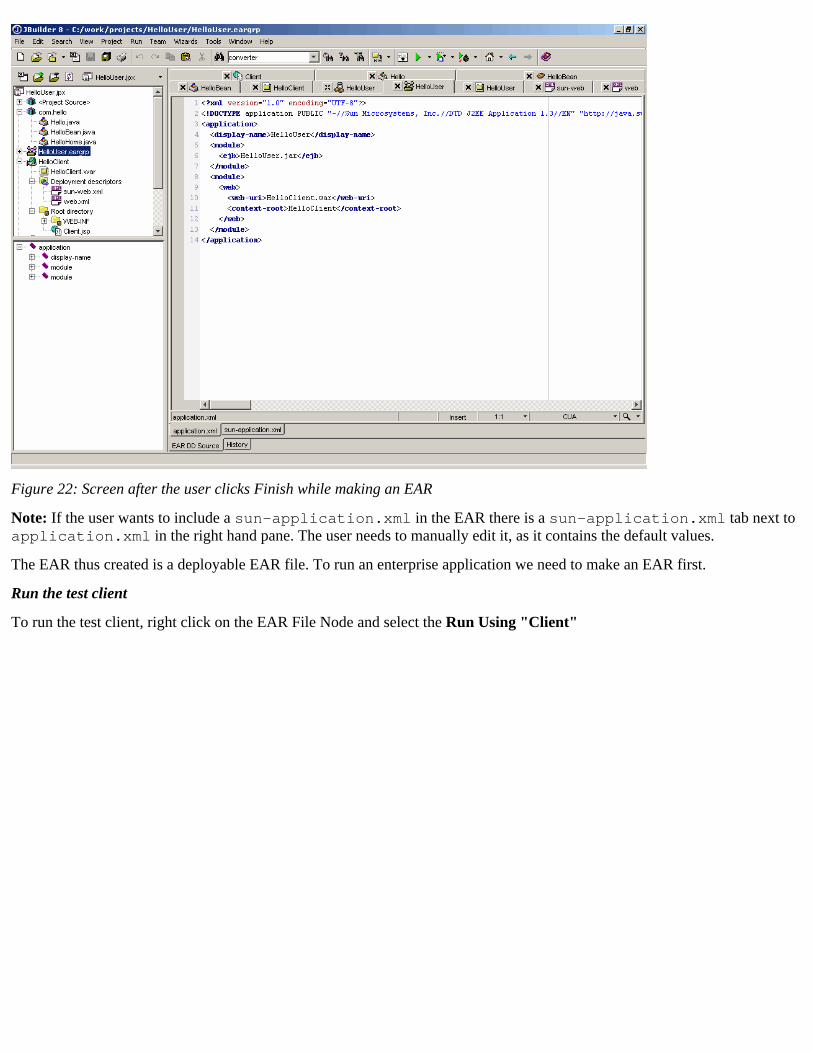
Figure 22: Screen after the user clicks Finish while making an EAR
Note: If the user wants to include a sun-application.xml in the EAR there is a sun-application.xml tab next toapplication.xml in the right hand pane. The user needs to manually edit it, as it contains the default values.
The EAR thus created is a deployable EAR file. To run an enterprise application we need to make an EAR first.
Run the test client
To run the test client, right click on the EAR File Node and select the Run Using "Client"
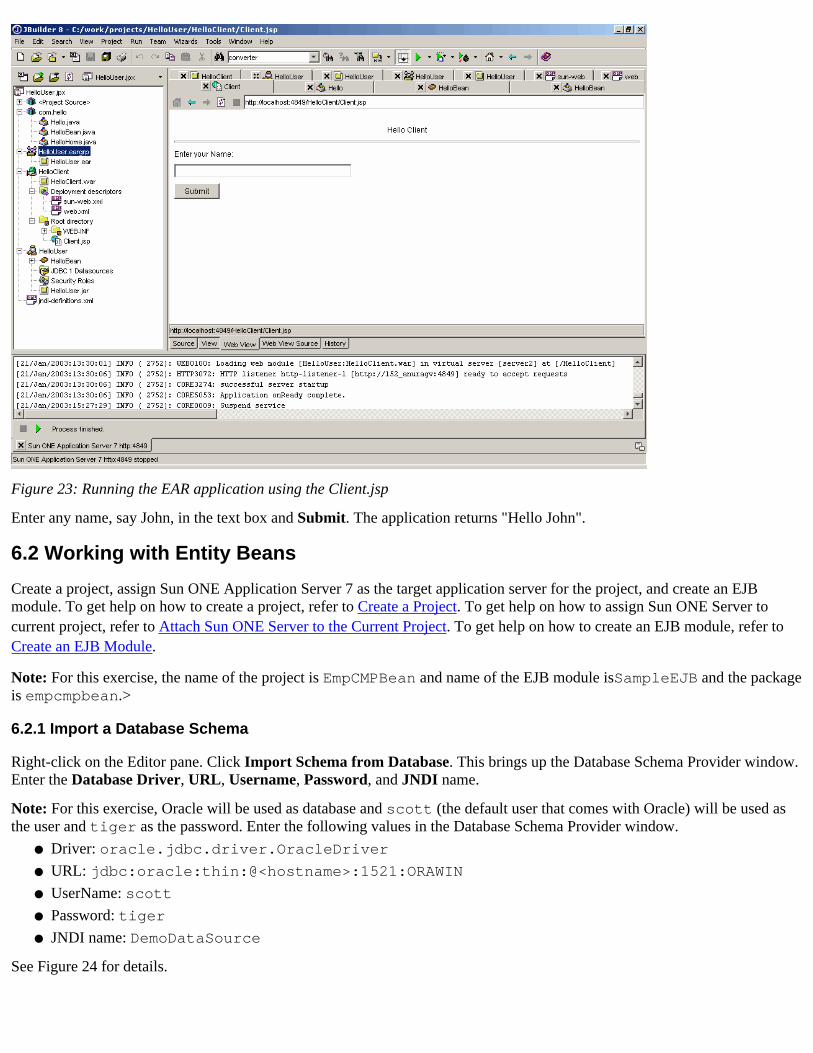
Figure 23: Running the EAR application using the Client.jsp
Enter any name, say John, in the text box and Submit. The application returns "Hello John".
6.2 Working with Entity Beans
Create a project, assign Sun ONE Application Server 7 as the target application server for the project, and create an EJBmodule. To get help on how to create a project, refer to Create a Project. To get help on how to assign Sun ONE Server tocurrent project, refer to Attach Sun ONE Server to the Current Project. To get help on how to create an EJB module, refer toCreate an EJB Module.
Note: For this exercise, the name of the project is EmpCMPBean and name of the EJB module isSampleEJB and the packageis empcmpbean.>
6.2.1 Import a Database Schema
Right-click on the Editor pane. Click Import Schema from Database. This brings up the Database Schema Provider window.Enter the Database Driver, URL, Username, Password, and JNDI name.
Note: For this exercise, Oracle will be used as database and scott (the default user that comes with Oracle) will be used asthe user and tiger as the password. Enter the following values in the Database Schema Provider window.
Driver: oracle.jdbc.driver.OracleDriver●
URL: jdbc:oracle:thin:@<hostname>:1521:ORAWIN●
UserName: scott●
Password: tiger●
JNDI name: DemoDataSource●
See Figure 24 for details.

Figure 24: JBuilder Database Schema Provider
6.2.2 Create an Entity Bean
Expand DemoDataSource from the JBuilder structure pane to see the list of tables available in the database. You can createentity beans by right-clicking a table name and then click Create CMP 2.0 Entity Bean (or Create BMP Entity Bean in caseyou want to create a Bean Managed Persistent bean).
Note: For this exercise, we will create a CMP 2.0 Entity Bean for Emp Table.
Right-click on EMP from the structure pane and click Create CMP 2.0 Entity Bean. This creates a Emp Entity Bean in theeditor pane; you can also check the corresponding source code in the editor pane by expanding the package calledSampleEJB in project pane.

Figure 25: EJBs thus created in JBuilder displaying the fields and methods
The user can change the properties of the fields individually in case he wants to change the type or persistence of the field.JBuilder8 creates the CMP Interfaces internally so to check the source code of the CMP right-click on the Emp EJB and select"View Bean Source" which takes the user to the EmpBean class.
In order to specify the JNDI Name or other properties click the Emp node under the SampleEJB node.
In addition, specify the Sun ONE Application Server 7 specific CMP Properties in the Sun ONE Application Server 7properties tab.
Specify the name of the Schema file that is creates. If nothing is specified, it is created as mySchema.dbschema.
Note: In a situation where there are multiple JAR files within an EAR file (for example, jar1 and jar2), any correspondingdatabase schema files for jar1 and jar2 must have unique fully qualified names. In other words, the database schema filenames must be unique in a given EAR file.

Figure 26: Sun ONE 7CMP-JDBC tab showing the Sun ONE Application Server 7 specific properties for the Emp CMP
Go back to Designer tab by double clicking on the SampleEJB node and do a make or Rebuild. SampleEJB.jar is created.
Just click on the SampleEJB.jar and check its contents. It includes the class files of the CMP and the DeploymentDescriptors for Sun ONE Application Server 7 (i.e., sun-ejb-jar.xml and sun-cmp-mappings.xml) along with theschema file that is mySchema.dbschema (which needs to be included in the jar file while deploying the CMP Bean to theSun ONE Application Server 7).

Figure 27: Figure shows the contents of a jar file created for a CMP Bean created for Sun ONE Application Server 7
6.2.3 Create a Session Bean
Please refer to "Create a session bean" in Create an EJB Module for details on how to create a session bean.
Note: For this exercise, the name of the session bean is EmployeeSesBean, which is created under the same package nameempcmpbean.
Add a method to EmployeeSesBean and provide the following parameters.
Method name: getEmpName●
Return type: String●
Input parameters: Short empNo●
Interfaces: remote●
See Figure 28 for details.

Figure 28: Visual EJBs in JBuilder displaying fields and methods
Double-click EmployeeSesBean.java from the JBuilder project pane and change the getEmpName(int empNo) methodas follows.
public String getEmpName(int empNo) {String empName = "name not found"; try{ javax.naming.Context context = new javax.naming.InitialContext(); Object object = context.lookup("java:comp/env/ejb/Emp"); EmpHome empHome = (EmpHome)javax.rmi.PortableRemoteObject.narrow(object, EmpHome.class); Emp emp = empHome.findByPrimaryKey(new EmpPK(empNo)); empName = emp.getEname() ; }catch (NamingException ex) { ex.printStackTrace(); }catch (ClassCastException ex) { ex.printStackTrace(); }catch (Exception ex){ ex.printStackTrace(); } return empName; }
Also add the entry of the method in the EmployeeSes that is
public String getEmpName(int empNo) throws RemoteException;
6.2.4 Assign Entity Bean Reference to Session Bean

Since the session bean EmployeeSesBean is calling the entity bean Employee, you have to store the Emp entity beanreference in the deployment descriptor. The deployment descriptor tool of JBuilder can be used to create a reference visually.
Double-click EmployeeSesBean under SampleEJB from JBuilder project pane and click EJB Local references tab at thebottom of the editor pane.
Click Add and enter the name as ejb/Emp in EJB Local Reference window. Click OK.
Click the checkbox Islink. The other columns Link, Local Home and Local should be populated automatically. To make sure,check the values of the following columns.
Link: Emp●
Type: Entity●
Local home: empcmpbean.EmpHome●
Local: empcmpbean.Emp●
Figure 29: Creating an EJB reference visually using JBuilder DDEditor Tool.
6.2.5 Create a Web Client for the Session Bean
Create a web application that has a servlet as a Test Client as described in the Create a Web Application.
The source code of the client index.jsp is:
<%@ page import="empcmpbean.*" %><%@ page import="javax.ejb.*" %><%@ page import="javax.naming.*" %><%@ page import="javax.rmi.PortableRemoteObject" %><%@ page import="java.rmi.RemoteException" %><%! private EmployeeSes emp = null;
public void jspInit() { try { javax.naming.Context context = newjavax.naming.InitialContext(); Object object =context.lookup("java:comp/env/ejb/EmployeeSesBean"); EmployeeSesHome empHome = (EmployeeSesHome)javax.rmi.PortableRemoteObject.narrow(object, EmployeeSesHome.class); emp = empHome.create(); } catch (RemoteException ex) { System.out.println("Couldn't create employee session bean."+ex.getMessage()); } catch (CreateException ex) { System.out.println("Couldn't create employee session bean."+ex.getMessage()); } catch (NamingException ex) { System.out.println("Unable to lookup home: "+"EmployeeSesBean "+ ex.getMessage()); } }
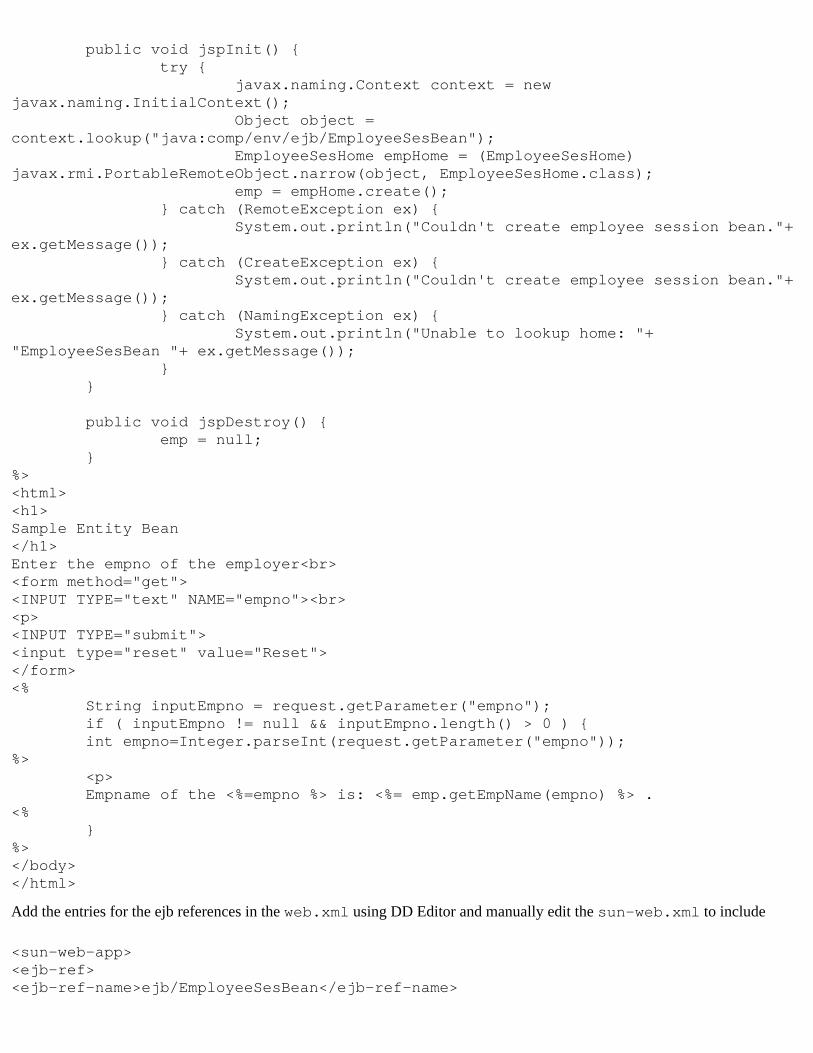
public void jspDestroy() { emp = null; }%><html><h1>Sample Entity Bean</h1>Enter the empno of the employer<br><form method="get"><INPUT TYPE="text" NAME="empno"><br><p><INPUT TYPE="submit"><input type="reset" value="Reset"></form><% String inputEmpno = request.getParameter("empno"); if ( inputEmpno != null && inputEmpno.length() > 0 ) { int empno=Integer.parseInt(request.getParameter("empno"));%> <p> Empname of the <%=empno %> is: <%= emp.getEmpName(empno) %> .<% }%></body></html>
Add the entries for the ejb references in the web.xml using DD Editor and manually edit the sun-web.xml to include
<sun-web-app><ejb-ref><ejb-ref-name>ejb/EmployeeSesBean</ejb-ref-name>

<jndi-name>employee</jndi-name></ejb-ref></sun-web-app>
Note: The JNDI Name specified in the sun-web.xml should be same as the JNDI Name specified in the General tab of theEmployeeSesBean.
Create a .war file by selecting the web application node, right click and selecting make or Rebuild.
Create an EAR file that includes the SampleEJB Module and the Web Application that includes the Test Client Servlet. Makethe ear and right click the ear and Select the "Run using index"
Note: Before running the application the user needs to create the Connection pool, JDBC Resources and Persistence Manageron the server instance on which the user needs to run the application by using the asadmin utility or the Browser based adminUI of the Sun ONE Application Server 7.
Figure 30: The screen takes as an input the empno and displays the name of Employee if the empno specified exists in thedatabase when the user runs the Sample CMP application.
6.3 Working with Message Driven Beans
Create a project, assign Sun ONE Application Server 7 as the target application server for the project, and create an EJBmodule. To get help on how to create a project, refer to Create a Project. To get help on how to assign Sun ONE Server tocurrent project, refer to Attach Sun ONE Server to the Current Project. To get help on how to create an EJB module, refer toCreate an EJB Module.
Note: For this exercise, the name of the project is SampleMDBean and name of the EJB module is SampleMDBand BeanName is SimpleMeassageBean.
6.3.1 Create a Message Driven Bean

Right-click on the Editor pane to create EJBs. Click Create EJB. Click Message-Driven Bean.
A message driven bean is created and is displayed. You can change the name of the session bean in the Bean Propertieswindow. Click and the session bean with the specified name is created.
Figure 31: MDB created in JBuilder displaying the various properties that can be specified for MDB
The user can specify the properties like Destination Name (JNDI Name of the Message Driven Bean), Connection FactoryName in the Bean properties Screen. For the other properties the user can click on the SimpleMeassageBean node and specifyproperties like EJB References, Resource References and Sun ONE specific properties in the various Tabs.
To specify the Business logic click on "View Bean Source" and edit the SimpleMessageBean file and write the code in theonMessage() method.
/** * When the queue receives a message, the EJB container invokes the<code>onMessage</code> * method of the message-driven bean. In the <code>SimpleMessageBean</code> class,the * <code>onMessage</code> method casts the incoming message to a TextMessage anddisplays the text. * @param inMessage incoming message. */ public void onMessage(Message inMessage) { TextMessage msg = null;
try { if (inMessage instanceof TextMessage) { msg = (TextMessage) inMessage; System.out.println("MESSAGE BEAN: Message received: "

+ msg.getText()); } else { System.out.println("Message of wrong type: " + inMessage.getClass().getName()); } } catch (JMSException e) { e.printStackTrace(); } catch (Throwable te) { te.printStackTrace(); } } // onMessage
Click on the SampleMDB node and do a make or Rebuild on the EJB to build the Bean. This creates the SampleMDB.jar.
Figure 32: Figure displays the contents of the SampleMDB.jar
6.3.2 Create a Web Client for the Message Driven Bean
Create a web application that has a servlet as a Test Client in the way as described in Create a Web Application.
The source code of the client servlet for the sample is:
package samples.ejb.mdb.simple.client;import javax.servlet.*;import javax.servlet.http.*;import java.io.*;

import java.util.*;import javax.jms.*;import javax.naming.*;
public class SimpleMessageClient extends HttpServlet { private static final String CONTENT_TYPE = "text/html"; //Initialize global variables public void init() throws ServletException { } //Process the HTTP Get request public void doGet(HttpServletRequest request, HttpServletResponse response)throws ServletException, IOException { response.setContentType(CONTENT_TYPE); PrintWriter out = response.getWriter(); out.println("<html>"); out.println("<head><title>SimpleMessageClient</title></head>"); out.println("<body bgcolor=\"#ffffff\">");
Context jndiContext = null; QueueConnectionFactory queueConnectionFactory = null; QueueConnection queueConnection = null; QueueSession queueSession = null; Queue queue = null; QueueSender queueSender = null; TextMessage message = null; final int NUM_MSGS = 3;
try { jndiContext = new InitialContext(); } catch (NamingException e) { System.out.println("Could not create JNDI " + "context: " +e.toString()); }
try { queueConnectionFactory = (QueueConnectionFactory) jndiContext.lookup ("java:comp/env/jms/MyQcf"); queue = (Queue)jndiContext.lookup("java:comp/env/jms/MyQueue"); } catch (NamingException e) { out.println("JNDI lookup failed: " + e.toString()); }
try { queueConnection =queueConnectionFactory.createQueueConnection(); queueSession = queueConnection.createQueueSession(false,Session.AUTO_ACKNOWLEDGE); queueSender = queueSession.createSender(queue); message = queueSession.createTextMessage();
for (int i = 0; i < NUM_MSGS; i++) { message.setText("This is message " + (i + 1)); out.println("Sending message: " + message.getText());

queueSender.send(message); }
} catch (Throwable e) { out.println("Exception occurred: " + e.toString()); } finally { if (queueConnection != null) { try { queueConnection.close(); } catch (JMSException e) {} } // if } // finally
out.println("<p>The servlet has received GET. This is thereply.</p>"); out.println("</body></html>"); } //Clean up resources public void destroy() { } }
Add the entries for the references in the web.xml using DD Editor and manually edit the sun-web.xml to include thefollowing
Changing web.xml manually and adding the content in the sun-web.xml
Specify the Resource Environment References through the web editor. Go the the Deployment Descriptors node in the webapplication and select the web.xml. Select Resource Environment References in the lower left pane of JBuilder and do anAdd to specify the Resource Environment References used the web application. See Figure 33 for details.

Figure 33: Adding the Resource Environment References in the web.xml
Add the following in the sun-web.xml
<sun-web-app> <resource-ref> <res-ref-name>jms/MyQcf</res-ref-name> <jndi-name>jms/MyQcf</jndi-name> <default-resource-principal> <name>guest</name> <password>guest</password> </default-resource-principal> </resource-ref> <resource-env-ref> <resource-env-ref-name>jms/MyQueue</resource-env-ref-name> <jndi-name>jms/MyQueue</jndi-name> </resource-env-ref></sun-web-app>
Create a .war file by selecting the Web Application node, right click and selecting make or Rebuild.
Create an EAR file that includes the SampleMDB Module and the Web Application that contains the Client Servlet in theEAR refer to Make an Ear for more details. Make the ear and right click the ear to select the "Run using SimpleMessageClient.
Note: Before running the application the user needs to create the Connection Factories and the Destination Resources in theSun ONE Application Server.
The user can see the following output on the servlet screen:
Sending message: This is message 1 Sending message: This is message 2 Sending message: This is message 3
The message bean receives the messages and are printed in the log file (server.log) of the server instance on which theapplication is run is as follows:
MESSAGE BEAN: Message received: This is message 1 MESSAGE BEAN: Message received: This is message 2 MESSAGE BEAN: Message received: This is message 3
Contents | Previous | Next

Contents | Previous | Next
7. Deploy the Archive File to Sun ONE ServerThe Sun ONE plugin can be used to deploy J2EE component archives (jar, war, rar or ear files) on thelocal or the remote instances of the Sun ONE Application Server 7.
There are two ways to deploy an archive file:
Right-click on HelloUser.jar. Click Deploy options of HelloUser.jar. Click Deploy. TheDeployment Tool dialog box pops up. This will have all the details about the Server Instance, DeploymentName and the path of the archive to deploy. See Figure 34 for details.
Figure 34: The Deployment Properties dialog box for the details about deployment
●
Select the server Instance (local or remote), enter a deployment name and then click OK. The selectedserver instance will be used when you choose to deploy with a right-click.
●
Another way to deploy this session bean is by selecting the Enterprise Deployment item from the Tools●

menu. The Enterprise Deployment Tool windows appears with Deploy selected as the Action. Select atarget instance from the Server Instance combobox. Enter a unique deployment name and select thearchive that needs to be deployed. See Figure 36 for details.
Figure 35: HelloUser deployed on Sun ONE Application Server 7 using the right-click.
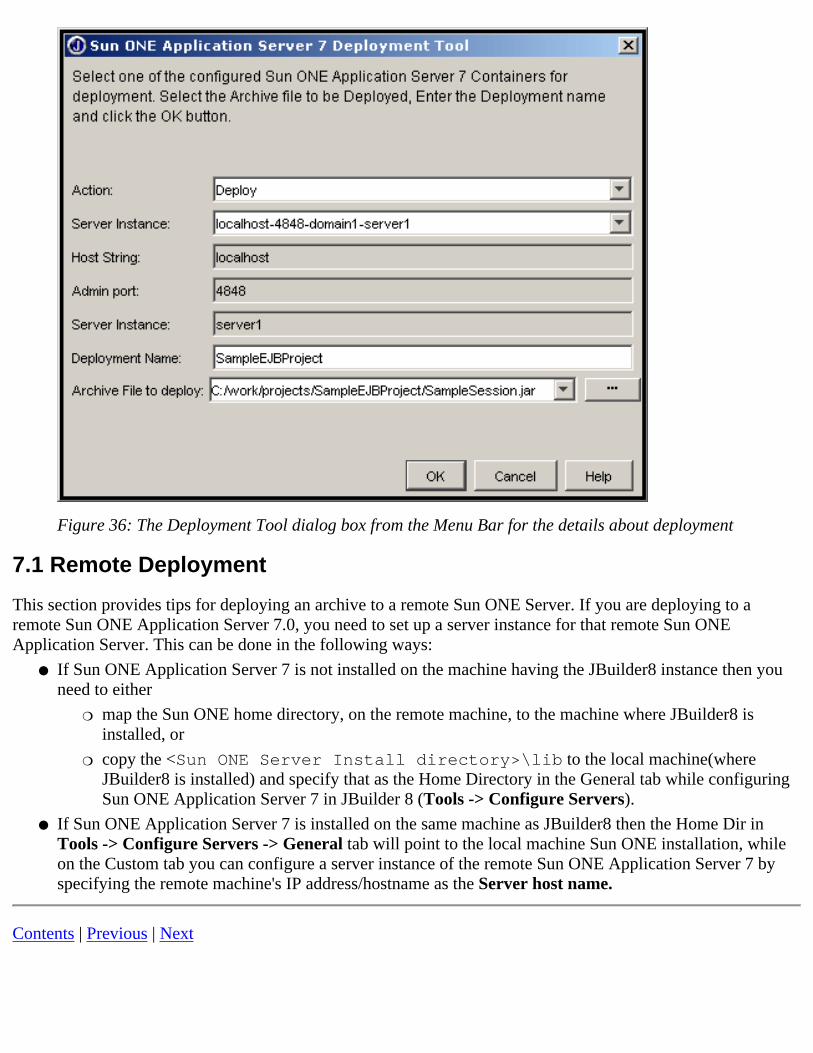
Figure 36: The Deployment Tool dialog box from the Menu Bar for the details about deployment
7.1 Remote Deployment
This section provides tips for deploying an archive to a remote Sun ONE Server. If you are deploying to aremote Sun ONE Application Server 7.0, you need to set up a server instance for that remote Sun ONEApplication Server. This can be done in the following ways:
If Sun ONE Application Server 7 is not installed on the machine having the JBuilder8 instance then youneed to either
map the Sun ONE home directory, on the remote machine, to the machine where JBuilder8 isinstalled, or
❍
copy the <Sun ONE Server Install directory>\lib to the local machine(whereJBuilder8 is installed) and specify that as the Home Directory in the General tab while configuringSun ONE Application Server 7 in JBuilder 8 (Tools -> Configure Servers).
❍
●
If Sun ONE Application Server 7 is installed on the same machine as JBuilder8 then the Home Dir inTools -> Configure Servers -> General tab will point to the local machine Sun ONE installation, whileon the Custom tab you can configure a server instance of the remote Sun ONE Application Server 7 byspecifying the remote machine's IP address/hostname as the Server host name.
●
Contents | Previous | Next

Contents | Previous | Next
8. TroubleshootingError 2: NameNotFoundException from test client
Error Description
javax.naming.NameNotFoundException: Unable to resolve 'TestSes' Resolved:''Unresolved:'TestSes'; remaining name 'TestSes'
When Does This Happen
After deploying the EJB JAR file, the TestClient fails.
Cause
The test client is unable to find the JNDI name of the EJB.
Solution
Check the deployment of EJB JAR file as it may have failed. To check the deployment, start the Sun ONE ApplicationServer console, find the EJB module name from Deployments ->EJB, click on the EJB Module name, then click Deployfrom the right-side window. If the JAR file is deployed properly, you will see the deployment status as true in the Sun ONEconsole. Go to the Monitoring tab, and click the corresponding links to see if your EJB is running.
Error 3: Exception getting the Server Instance: Verify that the Container is registered with IDE
Error Description
Exception getting the Server Instance: Verify that the Container is registered withIDE when user tries to do any deploy action on a right-click.
When Does This Happen
When a user tries to deploy the file on right-click.
Cause
In the Deployment Properties the Server Instance points to a server that has been deleted from Configure Servers
Solution
Configure the server in Configure Server. Alternately, select a server that is currently configured in Deployment Properties.
Error 4: Exception caused while choosing to debug the application
Error DescriptionCannot start Java debug process VM com.sun.jdi.connect.VMStartException.
When Does This Happen
When a user tries to debug the application.
CauseThe admin server of the server instance may not be running.
Solution
During deployment, testing, or debugging the plugin expects the admin server to be running. Ensure that the admin server isrunning using the asadmin or startserv command while doing any of the previously stated tasks.
Additional Information
Borland JBuilderhttp://www.borland.com/jbuilder
Sun ONE Application Server 7 Developer's Guidehttp://docs.sun.com/source/816-7149-10/index.html
Sun Microsystems Java 2 Platform, Enterprise Editionhttp://java.sun.com/j2ee
Sun Microsystems Enterprise JavaBeans http://java.sun.com/products/ejb
Feedback and Suggestions
Please submit your feedback and suggestions at: http://softwareforum.sun.com/NASApp/jive/forum.jsp?forum=53
Contents | Previous | Next