successful wi-fi installation - snap av · investing in wireless tools such as spectrum analyzers...
TRANSCRIPT
Page 1© 2016 Araknis Networks® 160420-1412
Successful Wi-Fi InstallationA Guide for New InstallersAraknis Wireless Access Points
How Do You Get the Best Wi-Fi Performance?Proper Wi-Fi network setup is an important aspect of network installation. Most of our mobile and entertainment devices rely solely on Wi-Fi for Internet and streaming media services, and everyday, more products and ideas rely on the wireless medium for success. Take a look at your kids, your colleagues, and even your parents. Everyone is consuming content wirelessly!
It is imperative that a wireless network be transparent to its end users. In other words, the network just needs to work. With the Araknis™ line of wireless access points, you can be sure that the quality and performance of the products you install is business grade. We spend a lot of time testing our products so you can be confident they will work.
Getting great Wi-Fi performance isn’t always easy. A large part of a successful job is you, the installer. These are the steps we recommend you follow on every install, big or small, to deliver the best wireless network possible.
STEP 1 - LEARN AND USE YOUR TOOLSInvesting in wireless tools such as spectrum analyzers and heat mapping tools will make your life a lot easier. Make sure your techs are well trained on these tools and have well-established processes. Consistency is the key to a fast and professional install. This document does not cover the use of specific tools, but we like MetaGeek a lot.
Metageek offers popular tools like inSSIDer, Wi-Spy + Chanalyzer, and Eye P.A. for gaining insight
into the local Wi-Fi environment and examining your network’s performance.
STEP 2 - DOCUMENT EVERYTHINGEvery network is unique. How you do keep track of everything from job to job? Troubleshooting or expanding an existing network can be a real pain unless you document everything you do. The more details you capture from day one, the less time you spend rediscovering things later.
If you haven’t done so, build a template to document the details of each job. You don’t need an expensive tool; the important thing is using a system and keeping it organized. Some prefer writing everything down, others love electronic solutions for improved access and portability. Do whatever works for you!
Recommended Solutions• Evernote is a cloud-based note taking app that works on most devices with Internet access. The free
version is sufficient for most users but paid plans with great added features are also available.
• Microsoft Office users can try out OneNote (similar to Evernote), Word, or Excel. This makes moving info easier if you already use Office. Excel is great for more structured notes.
• Google Drive is another great free solution. Use the Docs (word processor) or Sheets (spreadsheet) apps from anywhere on the Internet. They can even be used to open Word or Excel files.
<image of someone taking notes or image of a set of notes?>

Page 2© 2016 Araknis Networks® 160420-1412
Successful Wi-Fi InstallationA Guide for New InstallersAraknis Wireless Access Points
STEP 3 - CUSTOMER NEEDS AND SITE SURVEY
Know your CustomerSpend some time with your customer before the install to learn about their needs and set their expectations. Understanding expectations is essential to proper setup. Make sure to capture these pieces of information:
• User types and their security needs
• Coverage area and performance expectations
• Types of wireless client devices in use, like computers, smart phones, media devices...
• Applications that will be used on the network
• Ask the customer to share floor plans if they’re available (preferably in a digital format)
• Note what materials were used in construction
Know the SiteTo provide great Wi-Fi, you need even coverage. Too many or too few WAPs can cause equal amounts of problems, and due to interference, you can’t assume a single WAP will cover a given area. Walk around the site and look for these common trouble areas. Make notes of your findings and map them on the floor plan as you go:
• Kitchen, utility rooms... any area with large electric appliances
• Other wireless devices like cordless phones.
• Obstacles that might block or deteriorate signal quality like metal studs, reflective glass, brick walls, etc.
Next, scan the environment using your spectrum analyzer to see what channels or frequencies have interference. Scan from multiple locations, including possible trouble spots. You want a clear picture of the Wi-Fi environment around and throughout the job. Make note of existing Wi-Fi interference sources and other potential jamming signals on the floor map as you go.
The image above shows MetaGeek Chanalyzer at work scanning a location for a new Wi-Fi install. The only interference we see is above
is above the Wi-Fi spectrum.
Page 3© 2016 Araknis Networks® 160420-1412
Successful Wi-Fi InstallationA Guide for New InstallersAraknis Wireless Access Points
STEP 4 - PLAN ACCESS POINT LOCATIONSNow that you have a good idea of what you are getting into, go back to the floor map and decides where the access points should be installed. It’s recommended to:
• Position the access points on the ceiling facing down toward clients in the most central part of the coverage area possible
• Avoid natural sources of interference and signal disruption. Building materials like concrete, stucco, and metal studs can degrade signal strength.
• Place access points with some overlap, but not a lot. -70dBm to -80dBm in overlap area is recommended.
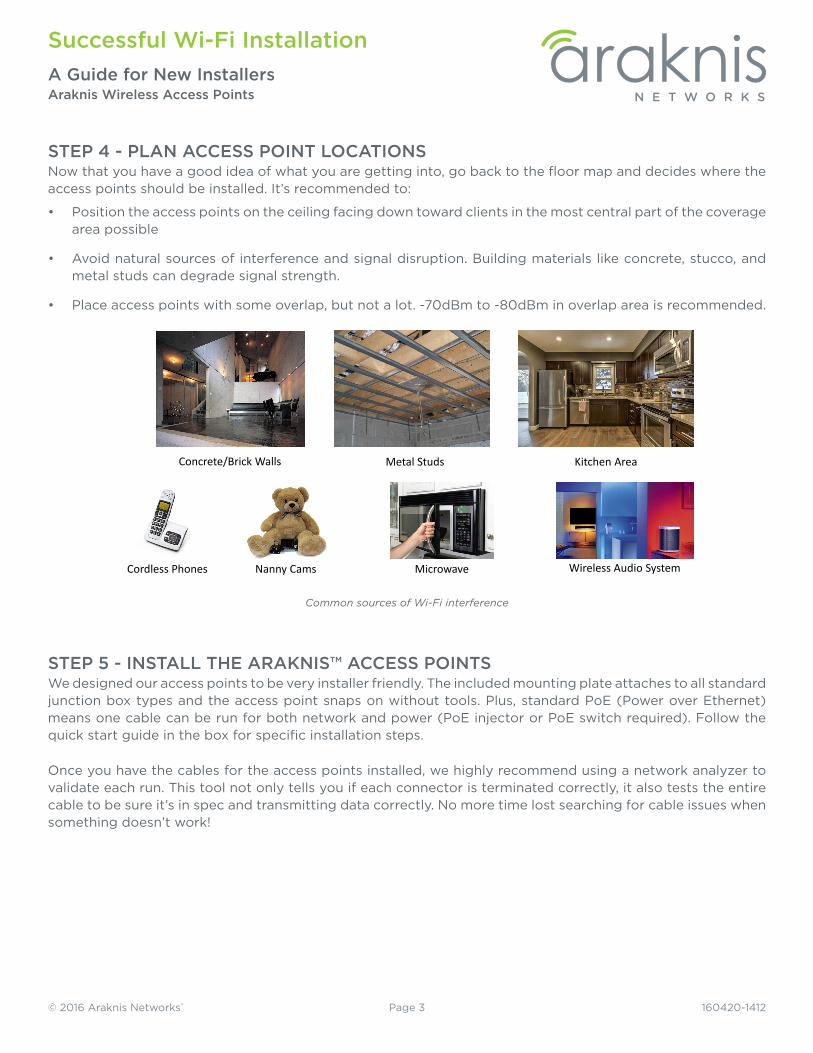
Cordless Phones Nanny Cams
Kitchen AreaMetal StudsConcrete/Brick Walls
Microwave Wireless Audio System
Common sources of Wi-Fi interference
STEP 5 - INSTALL THE ARAKNIS™ ACCESS POINTSWe designed our access points to be very installer friendly. The included mounting plate attaches to all standard junction box types and the access point snaps on without tools. Plus, standard PoE (Power over Ethernet) means one cable can be run for both network and power (PoE injector or PoE switch required). Follow the quick start guide in the box for specific installation steps.
Once you have the cables for the access points installed, we highly recommend using a network analyzer to validate each run. This tool not only tells you if each connector is terminated correctly, it also tests the entire cable to be sure it’s in spec and transmitting data correctly. No more time lost searching for cable issues when something doesn’t work!
Page 4© 2016 Araknis Networks® 160420-1412
Successful Wi-Fi InstallationA Guide for New InstallersAraknis Wireless Access Points
STEP 6 - CLAIM IN OVRC AND CONFIGURE ACCESS POINTS
What is OvrC?OvrC is a cloud management server that allows you to monitor, troubleshoot, and configure your Araknis devices from anywhere on the Internet through your OvrC browser or mobile app. Equipment is organized by location and you get instant notifications when network issues arise. You can change basic device settings right in the app, or use Web Connect to log into the local interface with no port forwarding required.
Learn more at www.OvrC.com.
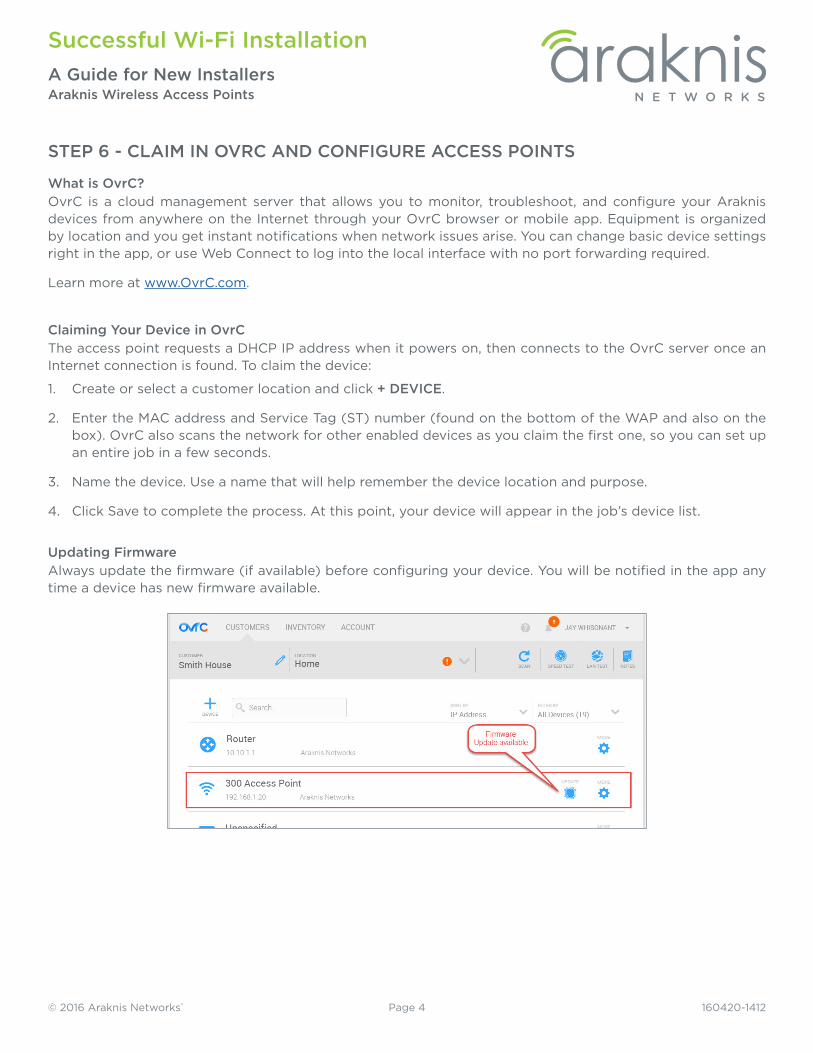
Claiming Your Device in OvrCThe access point requests a DHCP IP address when it powers on, then connects to the OvrC server once an Internet connection is found. To claim the device:
1. Create or select a customer location and click + DEVICE.
2. Enter the MAC address and Service Tag (ST) number (found on the bottom of the WAP and also on the box). OvrC also scans the network for other enabled devices as you claim the first one, so you can set up an entire job in a few seconds.
3. Name the device. Use a name that will help remember the device location and purpose.
4. Click Save to complete the process. At this point, your device will appear in the job’s device list.
Updating FirmwareAlways update the firmware (if available) before configuring your device. You will be notified in the app any time a device has new firmware available.
Page 5© 2016 Araknis Networks® 160420-1412
Successful Wi-Fi InstallationA Guide for New InstallersAraknis Wireless Access Points
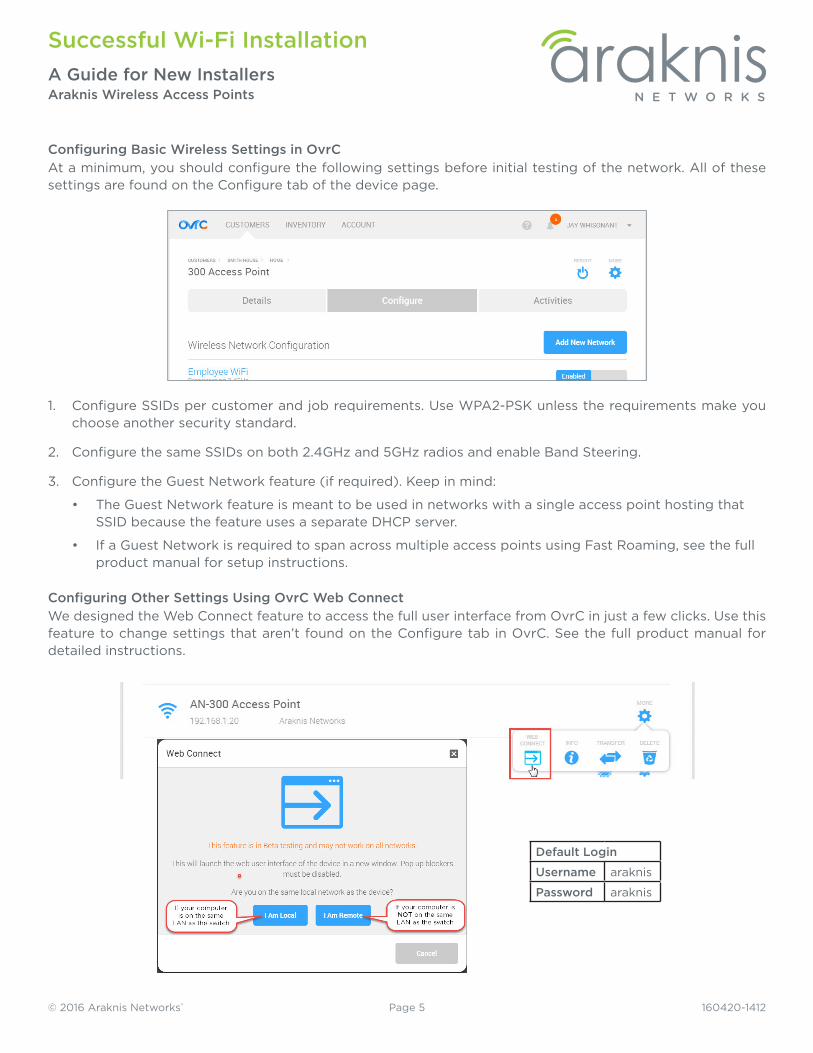
Configuring Basic Wireless Settings in OvrCAt a minimum, you should configure the following settings before initial testing of the network. All of these settings are found on the Configure tab of the device page.
1. Configure SSIDs per customer and job requirements. Use WPA2-PSK unless the requirements make you choose another security standard.
2. Configure the same SSIDs on both 2.4GHz and 5GHz radios and enable Band Steering.
3. Configure the Guest Network feature (if required). Keep in mind:
• The Guest Network feature is meant to be used in networks with a single access point hosting that SSID because the feature uses a separate DHCP server.
• If a Guest Network is required to span across multiple access points using Fast Roaming, see the full product manual for setup instructions.
Configuring Other Settings Using OvrC Web ConnectWe designed the Web Connect feature to access the full user interface from OvrC in just a few clicks. Use this feature to change settings that aren’t found on the Configure tab in OvrC. See the full product manual for detailed instructions.
Default Login
Username araknis
Password araknis
Page 6© 2016 Araknis Networks® 160420-1412
Successful Wi-Fi InstallationA Guide for New InstallersAraknis Wireless Access Points
STEP 7 - HEAT MAP AND FINE TUNE SETTINGSOnce basic setup is complete, you need to fine tune the network. This is where your investment in training and tools will set you apart from others and ensure a great performing wireless network.
Advanced SettingsNow is the time to configure any other Wi-Fi settings like Fast Roaming, VLANs or access limiting rules. See the full product manual for specific feature setup instructions.
Channel SelectionBy default, the wireless channel auto selects-which works well with no other nearby wireless networks. But in densely populated areas or jobs with multiple WAPs, auto settings could lead to nearby devices operating on the same channel and interfering with each other. For this reason, we strongly recommend setting access points in the same location manually to non-overlapping channels (for example, with 2 AN-100-AP-I-N’s, set one to Channel 6 and one to 11).
Log into the WAP’s Wireless Settings menu using OvrC Web Connect, then return to the locations you picked in Step 3 (page 2) and run your spectrum analyzer tool again. You can change the channels in use and rescan until the ideal settings are found. If interference is very high on all channels, double check that Channel Bandwidth settings in the WAP match these values: 2.4 GHz – 20MHz; 5 GHz – 20/40/80MHz Auto.
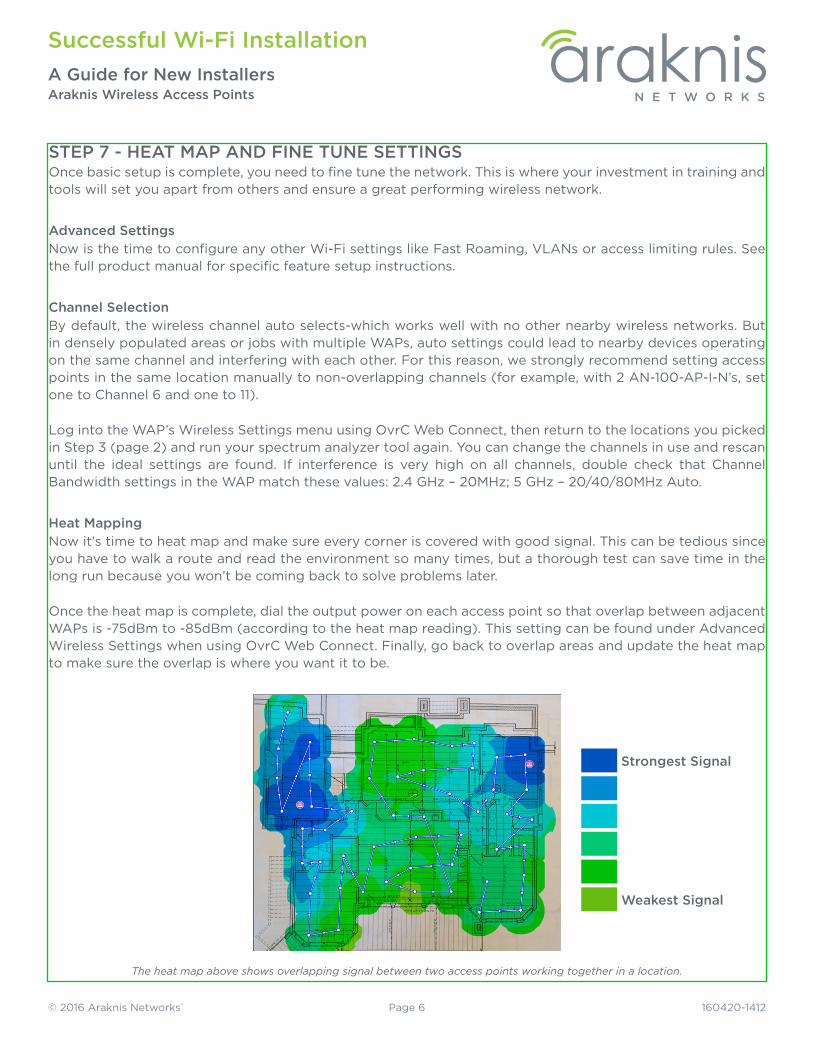
Heat MappingNow it’s time to heat map and make sure every corner is covered with good signal. This can be tedious since you have to walk a route and read the environment so many times, but a thorough test can save time in the long run because you won’t be coming back to solve problems later.
Once the heat map is complete, dial the output power on each access point so that overlap between adjacent WAPs is -75dBm to -85dBm (according to the heat map reading). This setting can be found under Advanced Wireless Settings when using OvrC Web Connect. Finally, go back to overlap areas and update the heat map to make sure the overlap is where you want it to be.
The heat map above shows overlapping signal between two access points working together in a location.
Strongest Signal
Weakest Signal

Page 7© 2016 Araknis Networks® 160420-1412
Successful Wi-Fi InstallationA Guide for New InstallersAraknis Wireless Access Points
STEP 8 - TEST AND VALIDATENow that you feel comfortable about your wireless setup, start testing the performance of the network to make sure everything is working as advertised. Start by running continuous ping tests to the router while roaming around the location. Then test a couple of the applications the customer told you about so the customer is happy when they get your product. Make sure to push the limits when testing to expose any possible issues.
STEP 9 - BACKUP YOUR FILES You have done all the hard work, now make sure you document everything for future reference. Back up the configuration and log files from all of your access points. Make notes about special cases in that particular job site (each job site has one of those!). This will make your life a lot easier in the future in case the customer calls for help. And they always do.
STEP 10 - SHARE WITH CUSTOMER AND CLOSEThis is an optional step, but if you want to set yourself apart, share a standard report document with your customer. Show them all the hard work and science that went into your product. Give them confidence in their choice and your abilities to deliver a phenomenal wireless network.
These are the steps we recommend you get into the habit of performing on each job. No matter the size. Yes, it’s a time investment but this investment will pay off when you have fewer customer calls and a product you can stand behind.
Happy Installing!