submitted to the department of mechanical … · within an environment of friendly, ... frc robots...
TRANSCRIPT

1
Exportable Development of the 2.007 Control System
by
Shane W. Colton
SUBMITTED TO THE DEPARTMENT OF MECHANICAL ENGINEERING INPARTIAL FULFILLMENT OF THE REQUIREMENTS FOR THE DEGREE OF
BACHELOR OF SCIENCE IN MECHANICAL ENGINEERINGAT THE
MASSACHUSETTS INSTITUTE OF TECHNOLOGY
JUNE 2008
©2008 Shane W. Colton. All rights reserved.
The author hereby grants to MIT permission to reproduceand to distribute publicly paper and electronic
copies of this thesis document in whole or in partin any medium now known or hereafter created.
Signature of Author:__________________________________________________________ Department of Mechanical Engineering
5 May, 2008
Certified by:__________________________________________________________ Alexander H. Slocum
Professor of Mechanical EngineeringThesis Supervisor
Accepted by:__________________________________________________________ John H. Lienhard V
Professor of Mechanical Engineering Chairman, Undergraduate Thesis Committee

2
3
Exportable Development of the 2.007 Control System
by
Shane W. Colton
Submitted to the Department of Mechanical Engineeringon May 9, 2008 in partial fulfillment of the
requirements for the Degree of Bachelor of Science inMechanical Engineering
ABSTRACT
2.007: Design and Manufacturing I is a mechanical engineering class at MIT that teaches the fundamentals of engineering design in the context of a robotics competition. The control system for the students’ robots has evolved during the history of the class and now encompasses a full multi-channel wireless control network.
In this project, the control system has been further developed with the primary goal of making the technology more easily replicated and exported to other venues. The development of new USB radio adaptors with reliable and inexpensive ZigBee radio modules allows the control system to be run from any desktop or laptop computer, minimizing the amount of custom hardware required to set up a competition network. Control is accomplished with standard USB input devices such as joysticks or video game controllers. The USB radio modules can also function as powerful standalone development tools.
The control box hardware has been adapted to use the new radio modules and repackaged into a compact single circuit board design. The new circuit board is fully documented for automated assembly and the new enclosure is designed for simple, low-cost manufacturing and assembly. A set of software tools has been developed to accompany the new hardware. The new control architecture has been implemented successfully as of the spring 2008 2.007 class.
Thesis Supervisor: Alexander H. SlocumTitle: Professor of Mechanical Engineering

4

5
1 Background
1.1 2.007: Design and Manufacturing I2.007: Design and Manufacturing I is the first engineering design course taken by
mechanical engineering students at MIT. Typically taken sophomore year, the class provides students with the opportunity to bring analytical tools developed in the core mechanical engineering classes to bear on a significant engineering challenge: the creation of a machine to accomplish a given task. The purpose of the class is to teach the fundamentals of engineering design through a hands-on challenge that develops both rigorous theoretical understanding and practical, experiential knowledge.
The class originated in the 1960s as course number 2.70, and has been taught by Professors Robert Mann, Woodie Flower, Harry West, and presently Alexander Slocum1.In order to motivate design projects, students are given a kit of raw materials from which they are asked to design and build machines to accomplish a specific task. Initially, the kit and machines were purely mechanical, the tasks were simple, and the machines competed individually. For example, in 1970, the challenge was to create a machine to travel as slowly as possible down a ramp. Later, an element of competition was introduced: two machines simultaneously trying to accomplish a task could interact with each other, making for a more exciting display. Soon after this, remote control capability was added, making 2.70 a true robotics competition2.
The remote control system has evolved over time with the class. Beginning as simple switches and remote triggering mechanisms, the system progressively integrated more sophisticated methods for full control of motors and other actuators such as solenoids and pneumatic pistons. The control hardware has been developed primarily in-house by students and as the class has grown, the hardware has become a shared resource: a class of 130 students now utilizes four control stations.
Originally tethered to the control station, called the “podium,” the controllers became wireless in 2002. The operator interface from 2002-2007 consisted of four arcade-style joysticks, each of which commanded one motor, allowing for four channels of forward and reverse control per podium. Pneumatic actuators, previously supplied through the tether, were dropped during the move to wireless control to avoid the complexities of robots carrying air tanks or on-board compressors. The four-motor functionality has been in place since 2002, though the motors, radio transceivers, and control interface have changed significantly3.
The first radio interface for the 2.007 control system utilized radio bands set aside for remote control (RC) devices: 29MHz and 49MHz for ground vehicles and 72MHz for air vehicles. The radio system consisted of a transmitter embedded in the control podium and a receiver built into the control box. Data flow was one-way; no wireless feedback from the control box to the podium was possible. Control data for the motors was carried via
1 2.007: Design and Manufacturing I Course Website. Online, Avaliable: http://pergatory.mit.edu/2.007. Accessed 19 April, 2008.2 2.007 Documentary. Video Produced by Jeff Silva & MIT Video Productions. Online, Available: http://techtv.mit.edu/file/86/. Accessed 20 April, 2008. 3 2.007 History. Archived websites and footage from 1994-2007. Online, Available: http://pergatory.mit.edu/2.007archive/. Accessed 20 April, 2008.

6
frequency modulation (FM), an inherently analog signal. The receiver translated motor commands into pulse duration modulated digital signals, of the type used to control hobby servos. The 1-2ms timed pulse commands were then sent to electronic speed controllers (ESCs), which would convert them into true pulse width modulated (PWM)voltages, amplified to source sufficient current at the motor terminals. Though it is a proven technology, familiar to many hobbyists, the analog nature of the RC radio signal makes it susceptible to noise and interference from other channels. The modularity and scalability of ESCs allow such a system to control a range of different motors, but they can also be prohibitively expensive.
The control system was further enhanced by moving to digital spread-spectrum radios, operating in the 900MHz or 2.4GHz frequency band. This work was done by Dr. Hongshen Ma, as well as Wey-Jiun Lin and Ed Summers. Spread spectrum radio protocols pass information in digital rather than analog form, making them less prone to noise. They employ a method of spreading information across a larger frequency band by deliberately introducing a sequence of pseudo-random noise. If the sequence is known to both the transmitter and receiver, the data can be recovered with high integrity and very low susceptibility to interference from other channels4. Additionally, both radio nodes are capable of transmitting and receiving, allowing for two-way communication and control.
Integrated speed controllers, which are small PWM amplifiers, have also been utilized in the most recent versions of the control system. Though they have power limitations, they are less expensive than ESCs and can be connected directly to the control box circuit board. The change to digital radios and integrated PWM amplifiers necessitated the inclusion of logic in the form of an embedded, programmable microcontroller in the control box. The hardware and software development required for this were also pioneered by Dr. Hongshen Ma, Wey-Jiun Lin, and Ed Summers, and implemented in the control system from 2004 to 2006.
Additional work done by Dr. Ma allowed the control system to accept a wide range of input voltages, appropriately scaling them to drive motors of different, lower voltages without overloading them. This allows for the use of any battery that is readily available to power the system. In 2.007, students use the batteries that come with their cordless drills (14.4V or 18V). Since it is likely that another class implementing the control system would have different available motor and battery stock, the automatic voltage scaling adds a great deal of flexibility to the system5.
A detailed product design of a future control box was carried out by Wey-Jiun Lin. The controller proposed has a custom-molded plastic enclosure, the ability to drive up to six motors (as opposed to four), a robust thermal management system with integrated vents, heat sinks, and fans, and a system of kinematic couplings to allow for reliablemounting6. This design has many advantages in a large-scale distribution, but was put on hold temporarily during experimentation with and implementation of new radio architectures by the author and Dr. Ma.
4 Wireless Data Communication. Technology Overview from Digi-International. Online, Available: http://www.digi.com/technology/rf-articles/wireless-data-communication.jsp. Accessed 20 April, 2008. 5 Ma, Hongshen, and A. H. Slocum. "A flexible-input, desired-output motor controller forengineering design classes." IEEE Transactions on Education. February, 2006: 113-121.6 Lin, Wey-Jiun. Product Realization of the 2.007 Control Box. S.B. Thesis, Massachusetts Institute of Technology, Department of Mechanical Engineering. MIT Libraries / DSpace Archive. June, 2006.

7
1.2 Other Robotics Contests and Control SystemsEducational engineering design and robotics contests have grown in the last two
decades, now covering a very large range of age and experience levels. They embody the kind of problem solving and analytical skills that prepare students for engineeringuniversities and industry. By presenting material in the context of a hand-on experience within an environment of friendly, fun competition, these contests generate interest in engineering and encourage students to apply what they have learned in math and science courses. These contests are serviced by a wide variety of control platforms, some commercial and others open-source.
The largest organizer of robotics competitions at the pre-college level is FIRST (For Inspiration and Recognition of Science and Techology), which was founded in 1989 by inventor Dean Kamen and advised by Professor Woodie Flowers. Much of the structure of the FIRST competition is derived from the 2.007 model: teams are given kits of raw material and a budget to turn into working robots to accomplish a set of tasks. The robots, and therefore the hardware, have been scaled up for FIRST’s highest-level contest, the FIRST Robotics Contest (FRC). FRC robots cost thousands of dollars and are powered by electric motors producing several horsepower in total. For many years, the controllers and power electronics for this contest were developed and manufactured by Innovation First, Inc. The 2006-2008 FRC controller was based on an 8-bit Microchip PICmicro microcontroller, capable of controlling up to 16 high-power ESCs and a wide range of other inputs and outputs. Radio control was achieved with 900MHz spread-spectrum data modems. The complete system for controlling a single robot sells for $1,1477. In April of 2008, FIRST announced a shift to a new control system based on the CompactRIO development module made by National Instruments. This new platform uses a 32-bit real-time processor and on-board field programmable gate array (FPGA). Wireless control is accomplished over an 802.11 Wi-Fi Ethernet connection8. Pricing for this system has not yet been established.
The FRC contest and hardware are often prohibitively expensive, and several less costly alternatives exist. FIRST Lego League (FLL) and Junior Lego League (JFLL) utilize the Lego Mindstorms NXT system to control robots made from Lego. The NXT controller has four inputs for various sensors and three outputs for controlling motors. It utilizes a 32-bit ARM processor and is can be programmed and controlled over a Bluetooth wireless connection. The NXT controller sells for $250.
Another popular low-cost control system is the Vex platform. Originally developed by Radio Shack and used in a middle-range FIRST competition (more advanced than FLL, but less advanced than FRC), the kit is now sold independently by Innovation First, Inc. The current Vex controller sells for $299 and supports RC-band FM wireless control. It is also undergoing a major hardware revision, though, and an IFI announcement indicates that beginning in 2008 it will support 802.11 Wi-Fi control9.
7 “FRC Robot Controller.” IFI Robotics Documentation. Online, Available: http://www.ifirobotics.com/rc.shtml. Accessed 20 April, 2008. 8 “FRC Control System – General Overview.” WPI First Robotics Resource Center. Online, Available: http://first.wpi.edu/FRC/csoverview.html. Accessed 20 April, 2008. 9 “Vex Robotics Design System.” Vex Robotics Home Page. Online, Available: http://www.vexrobotics.com/. Accessed 20 April, 2008.

8
Many other robotics platforms are available with a wide range of capabilities. The general trends are toward more powerful microprocessors, wireless programming and control, and ease of instruction and use. Kits are generally sold as individual modules, with the overall competition system being maintained by the contest organizers. However, with easily-configurable wireless networks, contest management of multiple control channels is becoming more feasible for the end users as well, so that a school could set up and run its own competition without relying on a larger infrastructure. Most controllers do not include power electronics, relying instead on external ESCs to control motors of various sizes. Until the latest round of Wi-Fi enabled controllers, most also relied on external radios for remote control.
1.3 Communication Interfaces: USB and Wireless ProtocolsThe key function of a controller for teleoperated robotic applications is to manage
communications between the human operator and the robot. Doing so wirelessly gives the robot far more freedom. Communication interfaces (both wired and wireless) have progressed greatly and modern USB and wireless protocols offer many advantages for control systems.
Data transmission in most modern control systems is serial. Data is sent digitally and sequentially as a stream of bits on a minimum number of transmission lines (or wireless channels). Most microcontrollers are capable of automatically decoding serial transmissions either synchronously (with a clock signal) or asynchronously (with internal timing). Cabling and transmission between devices can be done with many protocols. In the past, RS-232 was the standard serial protocol, used by computers with 9-pin serial I/O ports. Universal Serial Bus (USB) offers a much faster, more reliable protocol and has replaced RS-232 as the standard interface. However, developing USB hardware and software is somewhat more difficult.
One easy way to get the advantages of USB with the simplicity and familiarity of the RS-232 style (COM port) protocol is with a conversion chip and driver set available from Future Technology Devices International (FTDI) Ltd. This inexpensive chip, recently made even simpler to use, interfaces to most microcontrollers and relays information over USB, but drivers installed on the host computer make it appear as a standard serial port to which control programs can be easily interfaced. This chip and driver set is ubiquitous inserial communication, microcontroller, and radio development tools.
The vast majority of input devices for computers also utilize USB. All modern joysticks and game controllers follow the standard Human Interface Device (HID) protocol and connect to a host computer USB port. Many drivers are available for accessing these devices from programs running on a host computer. Educational robotics controllers have been slow to adopt USB controllers because they require either a host computer or adapting hardware. The upcoming generation of Wi-Fi enabled controllers will use computers for control and radio communication anyway, so inexpensive, readily-available USB controllers will likely become more common.
Wireless communication protocols have also improved greatly in recent years. Wi-Fi(802.11) is the current standard for wireless networking and internet connections. It offers very fast speeds (54Mbps for the common 802.11g), but consumes a relatively large amount of power and has been expensive to implement in embedded hardware. Slower, low-power protocols such as Bluetooth (802.15.1) and ZigBee (802.15.4) fill the gap,

9
providing a protocol useful for small devices that do not require high data rates. These protocols are used extensively in wireless control and sensor networks. All utilize the 2.4GHz band and spread-spectrum digital transmission. They are more reliable and noise resistant than low-frequency FM or infrared transmission protocols, making them ideal for modern wireless control systems.
2 System-Level Design
2.1 MotivationsAs an ongoing project that is driven by students, the 2.007 control system has seen
many iterations and will likely continue to do so in the future as new students take over the project. This is a necessary process as class resources change and new technologies emerge. The motivation of this project was not to create a new system that will work forever, but rather to integrate changes made by the author and others into a robust, well-documented system that can be improved upon further still in the future.
The original scope of the project was a radio upgrade. Working in the Undergraduate Research Opportunities Program (UROP), the author was introduced to the control system by Dr. Hongshen Ma and given the task of testing and integrating new ZigBee-protocol radio modules. The previously-used spread-spectrum radios had shown problems with range and interference. The new radios were close enough in function that they could be made to work in the system with simple adaptations.
It was during the course of testing the new radios that the potential for a system-level change became apparent. To configure the radio modules, a simple circuit board that converted the radio serial data to a USB serial connection was created. Originally intended to allow easy radio setup on a computer, the boards could also communicate directly with the control boxes. Combined with USB input devices, this meant that the control system could be entirely run from a computer, eliminating the need for a set of hardware to interface with analog joysticks. The arcade-style joysticks and associated hardware package would be the biggest barrier to exporting the system to other settings outside of 2.007, as it was custom-built and relatively expensive. Developing a system that could be run entirely from any computer and off-the-shelf USB controllers became the primary motivation for this project.
The computer-controlled system introduced additional flexibility to be explored. The ability to re-map control inputs in software, produce a graphic user interface, and record and save data became a few of many targets for the new system. The new architecture also opened new possibilities for programming, feedback, and autonomous control to be tested. These and other improvements make the system both simpler to use and more powerful.
2.2 System Functional RequirementsThe control system, consisting of the control box, computer, radio modules, input
devices, and all associated software, needs to meet a number of functional requirements in order to be a useful tool for 2.007 and other robotics contests. Many of these requirements have been met through the work of Dr. Ma and others on the previous designs, and a goal in this iteration was to ensure that these favorable design characteristics were carried over in the transition to the new system. New functional

10
requirements were also defined based on the possibilities created by the computer-controlled system. Individual hardware and software components of the system have their own sets of more specific functional requirements, which will be discussed in detail in Sections 3 and 4. This section focuses on the higher-level system requirements. They are presented here in list form for reference in later sections:
1. Provide for wireless control of at least four motors per channel. This has been the core functionality of the control system since 2002, and represents a minimum number of actuators for the design of a 2.007 robot. The current contest uses relatively small motors for which the integrated PWM amplifiers are sufficiently powerful, but provisions for driving high-power external ESCs adds design flexibility. Status in previous system: Met with integrated PWM amplifiers. Not set up for external ESC control.
2. Provide a reliable, noise- and interference-resistant radio link on at least four independent channels. During the 2.007 contest, up to four different robots may need to operate simultaneously. Minimizing the chance for cross-talk or outside interference in therefore important. This is both a hardware and a software challenge: radios must be reliable and noise-resistant, and software must haveprovisions for data validation and failsafe protocols. Status in previous system:Met with digital spread-spectrum radios, software validation techniques, and failsafe timeouts. There were some reliability issues with the previous radios, which motivated the change to ZigBee modules.
3. Exhibit robust mechanical design, capable of surviving common abuses. The 2.007 controller is a shared class resource and one of the drawbacks of this is that students often do not take responsibility for its care and maintenance. It must therefore be design to survive common abuses such as being dropped or poorly constrained. Connectors must survive wear from repeated insertion and removal. Input devices must be strong enough to withstand significant abuse as well. Status in previous system: Met with very strong ABS and polycarbonate control box construction, heavy-duty arcade joysticks bolted to a large aluminum plate, and friction-lock connectors.
4. Exhibit robust electrical design, capable of maintaining signal integrity in high noise environments and surviving common abuses. Combining power and signal electronics into one integrated system requires careful isolation of the control circuitry from the large currents and voltage transients of the power circuitry. Additionally, provisions to protect against reverse polarity, short circuits, and over-current or over-temperature conditions are critical. Status in previous system: Met with extensive use of bypass capacitors, transient voltage suppression diodes, PWM amplifiers with self-protection circuitry, and reverse-polarity protection at the battery input.
5. Provide for rapid, low-cost manufacturing and assembly. As an exportableproduct, the system as a whole must be easy and inexpensive to manufacture. Circuit boards must be integrated as much as possible and capable of being machine-assembled. Enclosures should require a minimum number of machining operations. Electrical and mechanical components should be sourced as inexpensively as possible with a minimum number of “custom” parts. Status in

11
previous system: Not met from an electrical standpoint due to multiple circuit boards and manual modifications. Not met from a mechanical standpoint due to extensive machining required on enclosures. The design by Wey-Jiun Lin seeks to meet this requirement with an integrated circuit board and custom-molded enclosure.
6. Provide for simple, inexpensive control system setup. Other classes or individuals wishing to use the control system should be able to do so with a minimum amount of custom hardware to build. Controllers should be capable of running off of any available computer, preferably with support for multiple operating systems, and should be able to utilize off-the-shelf input devices. Status in previous system: Not met due to custom arcade joystick interface hardware required.
7. Provide for simple, flexible software development. Though it has not been a requirement in 2.007, the ability to easily access and develop the control system software may be important for other users. Being able to simply change radio channels, adjust input device to motor control mapping, implement sensors and feedback control algorithms, or run entirely autonomous competitions adds greatly to the value of the system. The hardware and software tools to accomplish this should be as inexpensive, cross-platform capable, and open-source as possible to encourage development. Status in previous system: Controller programming was done only through proprietary debugging tools, not open to students. External serial interfacing for autonomous control was provided but rarely utilized.
8. Provide detailed and accurate documentation. The useful life of a controller is related to how well its documentation can convey functionality to the next generation of developers. Making the documentation as openly-available as possible increases the chance that the system will be useful and expandable for years to come. Status in previous system: Met with extensive documentation online, as well as in the SB thesis of Wey-Jiun Lin and IEEE paper by Dr. Hongshen Ma and Professor Alexander Slocum.
2.3 ContributionsAs emphasized above, the goal of this design project was to integrate several
changes made by the author and others into a simple and reliable control system that is exportable but may also be further developed by others. With that in mind, the following contributions were made by the author to the 2.007 control system in this thesis project. They are listed in rough chronological order.
1. The testing an implementation of new ZigBee radio modules was carried out during the summer and fall of 2006. These modules showed better range and noise immunity than previous radios. After they were fully tested, an adaptor board was made to fit them to the existing control box. They performed well during the spring 2007 class and have been integrated onto the single circuit board of the new design.
2. The testing and characterization of motors used in the 2.007 class led to the solution of thermal problems previously exhibited. New, more efficient methods for driving the motors and managing current have been implemented into the

12
latest design. A discussion of matching motors to the system is presented in Appendix A.
3. The control box circuitry, modified several times in its latest configuration, wasintegrated onto a single circuit board during the summer and fall of 2007. This circuit board was heavily based on the proven design of Dr. Hongshen Ma and Wey-Jiun Lin. Some changes made include the utilization of the new radio module, a new power supply, a slightly different microcontroller, and a set of accessible connections for external sensors or ESCs. The circuit board and components were fully documented for an automated assembly, which was carried out in January, 2008.
4. The control box enclosure has been redesigned to accommodate the new circuit board. Though it is not custom-molded, it consolidates all machining operations onto a single cover plate which can be manufactured inexpensively by abrasive water jet or laser machining. A single-axis assembly procedure makes control box assembly and disassembly significantly faster.
5. A circuit board adapting the radio modules to USB, originally developed for the purpose of configuring radios during the summer of 2006, has been expanded to allow full wireless control of the control box from any computer. This small radio board, named the “Wootstick” by the author, serves many functions both within the control system and as a separate development tool.
6. A set of software programs, both for the control box and for the host computer, has been developed to allow for reliable wireless control using any USB input device. This software allows for two-way communication of control and sensor data and uses active data validation and failsafe protocols. It is developed entirely with free or open-source tools and fully documented for expandability.
7. A software program and set of hardware modifications has been implemented allowing for wireless programming of the control box over the same radio interface, reducing the development time and making the control software more accessible to an interested user.
8. The new system has been implemented in the 2008 2.007 class. Characterization of reliability as well as the ability of the system to meet functional requirements has been documented.
2.4 System OverviewThe minimum components for a single 2.007 control system channel are: one control
box, one host computer, one Wootstick USB radio module, and one or more USB input devices. A battery or power supply for the control box and a set of appropriate motors to control are also necessary. Figure 1 shows, in block diagram form, the control system using integrated PWM amplifiers to directly control up to four small motors. This is the configuration currently used in the 2.007 class. Most of the control processing happens on the host computer. It reads inputs from standard USB input devices, including mice, joysticks, or hand-held video game controllers. The states of joysticks and buttons are mapped to motor commands based on a reconfigurable mapping algorithm. Motor commands are sent wirelessly using the Wootstick USB radio module. The control box receives and validates the data, using it to drive internal PWM amplifiers that channel power appropriately to up to four motors. The control box can also read internal and

13
external sensors, sending information back to the host computer to be displayed graphically to the user.
To use the controller with higher-power motors, ESCs can be added to the system. Figure 2 shows a configuration with ESCs handling power distribution to high-power motors. The input and motor mapping for this configuration can be the same as in the internal PWM amplifier configuration. However, instead of directly amplifying power to the motors, the control box communicates with external speed controllers. The signal from the control box is amplified by the power electronics in the ESCs to drive the motors. This configuration is scalable to a wide range of motor powers depending on the ESCs and battery used. Depending on the type of ESC, up to 8 high-power motors can be commanded by the control box, allowing for more complex robot designs.
The following sections will discuss the development and functionality of the individual components in more detail, but will frequently reference the system overview presented here.

14
Figure 1: The control system, configured to drive up to four small motors using internal PWM amplifiers. Control input mapping is implemented on the host computer from any USB input device(s).
Figure 2: The system configured to drive high-power motors with external electronic speed controllers (ESCs). The control box sends signals to the speed controllers, which then channel power
to the motors.

15
3 Hardware RealizationThe primary hardware components of the 2.007 control system are the control box
and the Wootstick USB radio module. This section will discuss the development of these core components. Other components that may vary with system implementation include: batteries, motors, other actuators, ESCs, external sensors, host computers, monitors for graphic displays, and USB input devices.
The control box mechanical and electrical development are broken up for clarity, however both design paths were carried out in parallel. Much of the functionality and component selection of the control box was guided by previous designs. The control box hardware description in its most current configuration is presented here and supporting documentation, including schematics and drawings, is located in the Appendices.
The Wootstick USB radio module is presented first in its role as a 2.007 control node, relaying information wirelessly between the host computer and the control box. However, the Wootstick hardware in its most current configuration can also function independently as a powerful development tool. The hardware implementation that gives the Wootstick this flexibility is presented in detail as well.
3.1 The Control BoxThe control box is the most complex individual component of the 2.007 control
system. All of the system functional requirements are present at the level of the control box. It must be mechanically sound and robust to survive drops and impacts. Electrical components must be adequately constrained inside the enclosure and reliable connectors must be easily accessible. Signal and power electronics must function together without interference and must be protected from voltage spikes, reverse polarity, and other fault conditions. Other considerations include space constraints, thermal performance, cost of manufacturing and assembly, and aesthetics.
3.1.1 Mechanical DesignConsolidating the electronics onto a single printed circuit board made several
mechanical modifications possible. For one, more efficiently location of electrical components allowed for a reduction of the physical footprint of the control box. It was also possible to locate all connectors and indicator lights on a single side of the enclosure, making two-dimensional machining and single-axis assembly possible. A custom-molded enclosure such as the one designed in the SB thesis of Wey-Jiun Lin is still the most effective ultimate solution for mass manufacture. However, financial and time constraints make it difficult to create a custom-molded enclosure while simultaneously implementing significant changes to the system design. The enclosure design presented here is a good compromise in that it uses an inexpensive off-the-shelf enclosure and consolidates all custom machining onto a single part, the cover, which can be machined easily by abrasive water jet or laser cutter.
The enclosure used is part number 1591STCL, manufactured by the Hammond Manufacturing Electronics Group, which has several desirable characteristics. The boxes are made from durable, ribbed polycarbonate that will provide impact damage resistance. Covers are attached by four M3 screws and the box has threaded brass inserts which will last much longer than direct threading into plastic. The covers provided were not used,

16
but the box has a lap joint with rectangular corners, allowing for a simple, rectangular custom cover to sit firmly inside the walls. The box is fully transparent, which diminishes the “black box” effect; students can see all of the hardware, so there is less mystery.
While arranging electrical components in the printed circuit board design program, dimensions were simultaneously updated in a SolidWorks 3D model to ensure mechanical clearances. All components that occupied significant “vertical space,” extending above the circuit board by more than 1/8”, were placed on one side to save space. This included the PWM amplifiers, large electrolytic capacitors, cooling fan, radio module, and an inductor for the power supply. This side of the board extends down into the enclosure. All connectors and indicator lights were placed on the opposite side of the board, where they could protrude through the cover for external access or viewing. This minimizes the vertical space occupied by the board, allowing for a smaller enclosure than previously used.
The control box cover is a single piece of 1/8” transparent plastic, either acrylic or polycarbonate, with extruded cutouts for connectors, indicator lights, and screw holes. It is the only custom part of the enclosure. Because the machining is all two-dimensional, it can be accomplished with an abrasive water jet or laser cutter. Services available online10
offer inexpensive cutting of such custom 2D parts with just a .dxf drawing, giving users without shop access a way to make the covers. Alternatively, the covers could be mass-manufactured and sold with a kit, or the control boards may be used without enclosures, mounted directly to robots. The 2.007 controllers have polycarbonate covers, which are less brittle than acrylic. Polycarbonate cannot normally be laser machined, so the covers for the current boxes were prototyped at the MIT Hobby Shop abrasive water jet and manufactured in bulk by an online water jet cutting service.
Figure 3 depicts the assembly steps for the control box enclosure. The printed circuit board subassembly is first attached to the control box cover, with the connector side aligned to fit through the cutouts in the cover. Four hex coupling nuts or standoffs (not shown in the assembly) fasten the circuit board to the cover and maintain a spacing of ¼” between the cover and board. The standoffs are 4-40 threaded male-to-female type such as McMaster-Carr part number 93505A101. The male threaded end of the standoff extends through the PCB and is fastened with a 4-40 nut. A ¼” long 4-40 machine screw fastens the cover to the female threaded end of the standoff. The final step of enclosure assembly is to fasten the cover and board subassembly to the box. This is done with four M3 machine screws passing through holes in the cover into the brass threaded inserts of the box. The M3 screws that come with the enclosure can be used. The corners of the circuit board are routed to allow for clearance of these screws and the posts that support the threaded inserts in the box. This machining operation is done at no extra charge by the circuit board printing company. Loctite 243 removable thread locking adhesive is used on all threaded connections to ensure that screws and nuts do not loosen over time from vibration.
10 For example: Big Blue Saw for abrasive water jet cutting, URL: http://www.bigbluesaw.com. Custom Laser Cutting for laser machining, URL: http://www.customlasercutting.com.

17
(a)
(b)
(c)
Figure 3: The control box is designed for easy single-axis assembly. The three main components (cover, board, and box) are shown expanded (a). The board and cover are attached to each other first
(b), then the cover and board are both secured to the box to complete the assembly (c).

18
The single-axis assembly procedure, in which all alignment is done in the plane of the largest face of the control box, reduces the assembly time. Since no connectors extend through the sides of the control box, vertical alignment (normal to the largest plane of the box) is no longer a critical assembly concern. It is constrained entirely by existing threaded insert posts and the hex standoffs. Assembly time, starting with a completed printed circuit board subassembly, a cover, and a box, is less than five minutes per unit. Disassembly is likewise facilitated, making modifications and quick-fixes during competition easier. For access to the side of the printed circuit board where the radio, microcontroller, and most of the power electronics are located (the opposite side as the connectors), only the four box screws need to be removed.
Connector pairs for the battery and motors are critically important to the design. Most of the power failures in previous competitions were the result of bad connections. The control boxes contain one end of a connector pair and students individually receive mating connectors to attach to their robot. Many considerations went into the selection of connector pairs, including: current carrying capacity, size, guaranteed future availability of mating pairs (well-known brands only), ease of assembly, insertion and removal force, and durability. The Mate-N-Lok connector series manufactured by Tyco/AMP was chosen. A two-conductor Mate-N-Lok pair with detent lock connects battery leads to the control box. An eight-conductor Mini Mate-N-Lok pair connects four pairs of motor terminal leads to the control box. Manufacturer part numbers for the connector pairs and associated crimp terminals are listed in the Control System Need-to-Know Information section, Appendix E.
During the course of the 2008 2.007 class, the two-pin battery connector has exhibited a failure mode in which the conducting pins break off from their base. The breakage is likely a result of repeated stress from insertion and removal, combined with twisting action applied to overcome the tight detent lock of the connector. A rough estimate of the mean time to failure during average class usage is one month or 200 insertions and removals. The time to repair is approximately 30 minutes, but requires disassembly of the control box and access to de-soldering equipment. As a temporary solution, two-pin connector dongles that remain permanently connected to the control box have been added. Students plug into the dongle rather than directly into the box. If the dongle fails, repair is much faster and spares are readily available. The same connector without detent lock may alleviate the problem by no longer encouraging a twisting action during removal. However it is likely that this connector will need to be replaced in a production design with one that can withstand more abuse. This failure mode has not been observed in the 8-pin motor connector, which does not have a detent lock, but it should be monitored carefully as the control boxes are used further.
In an environment where the control box is an individually-maintained resource, such as a class where all teams receive their own, the current design is adequately robust. Within the number of insertions and removals likely to be executed by a single user, even the battery connector could last for a sufficiently long time. If offered as a kit, the partial assembly of the circuit board (soldering of large components and connectors) and the enclosure assembly may be left to the user. Thus if repairs are necessary, they should not be outside the abilities of the user. However, for the target user in a shared classroom setting, the conditions are much harsher and the ability of the user to repair the controller

19
should not be assumed. Though the only mechanical failure mode revealed so far has been that of the battery connector, much more testing would need to be done over a longer period of time to prove that the controller is of adequate mechanical robustness to be useful in such a setting.
Mechanical drawings for the control box enclosure and cover are supplied in Appendix B.
3.1.2 Circuit DesignThe current control box circuit is based heavily on prior designs, particularly the
most recent work of Dr. Hongshen Ma and Wey-Jiun Lin. This design has withstood the tests of the 2.007 classroom environment, proving to be both reliable and effective. The author consolidated many adaptations made over the past three years into a single circuit board and added some new features detailed here, but much of the development that went into this circuit precedes this thesis. A full electrical schematic of the current control box circuit is provided in Appendix C, and the component designators in that schematic will be referenced in this section. Figure 4 is a 3D representation of the control box circuit board, with the location of some components indicated.
Unlike many commercial robotics controllers, this control box design integrates both power and signal electronics into a single circuit. PWM amplifiers for driving up to four motors are included in the same electrical circuit as the signal electronics, including the radio and microcontroller. This has clear advantages in that a user needs only to obtain one component, which can work “out of the box” to control up to four motors. However, it presents a definite electrical design challenge in that the sensitive signal electronics need to be effectively isolated from the transients created by the power electronics.
The effective separation of power and signal electronics is achieved by both the use of protective components such as capacitors and diodes and the physical layout of the electrical circuit on the printed circuit board. Figure 5, which shows the copper patterns on the four layers of the circuit board, illustrates the latter method of isolation. Though the signal and power electronics share a common ground connection and power supply, the planes of copper supplying each are separated on the middle two layers of the circuit board. The battery supply input is connected to a power and ground plane on the right half of the board, as pictured, and these copper areas supply the four PWM amplifiers through large copper traces. All signal electronics are located on the larger ground plane on the left half of the board, as pictured. The two ground planes are connected only with a small trace. It can thus be ensured that as little of the noise induced by high current power electronics as possible is seen on the signal electronics ground and power lines.Four large power supply bypass capacitors (C24, C25, C44, and C45 on the schematic), as well as the capacitance of the ground and power planes themselves, help to smooth out any voltage transients created by the high-speed, high-current switching of the PWM amplifiers across the inductive loads of the four motors. Additional bypass capacitors are utilized at the inputs and outputs of 5V and 3.3V voltage regulators that supply the signal electronics. Small bypass capacitors are also located near the voltage input pin of all critical components to further minimize transients on the supply lines. Zener diodes, which break down at controlled voltages and can thus absorb power from transient voltage spikes before they damage downstream components, are also used (D9 and D10 in the schematic).

20
Protecting the circuit from a reverse polarity condition at the battery supply inputs is essential. Even though the battery connector is polarized, students may inadvertently connect the other end of their battery wires incorrectly to the tabs on the drill batteries used to power robots. Low-power circuitry is often protected with a diode that prevents current from flowing in the reverse direction, however this would be inefficient in a circuit that can draw multiple amps; power would be dissipated as heat from the diode. Instead, a MOSFET protection circuit is used (Q1 and associated circuitry in the schematic). This allows efficient conduction in one direction, but creates an effective open-circuit condition when the voltage is reversed on the input pins of the battery connector.
The microcontroller (U1 in the schematic) coordinates all the operations of the control box circuit. It is a Texas Instruments MSP430F2274 16-bit mixed-signal processor, designed to handle both digital and analog signals. As a 16-bit controller, it is inherently faster than 8-bit PIC and AVR microprocessors commonly used for hobby and educational robotic control, but not as powerful as 32-bit digital signal processors (DSP) such as the ARM line, or single board computers. The chip runs at 16MHz, clocked by an external oscillator (U2 on the schematic). It provides a good balance of functionality and simplicity for this application. The previous design used a very similar chip from the MSP430 line, so it has already been proven to work well in the context of the 2.007controller. As will be discussed in later sections, it also has the advantage of being serially programmable. The program is stored in non-volatile flash memory and begins execution whenever the control box is powered up. Software written for the control box is detailed in Section 4.2. The microcontroller pins can function as inputs or outputs and are routed to different peripherals including the radio, PWM amplifiers, indicator lights, and external control and sensor connections. The chip is available only in a surface-mount package, and is therefore difficult to solder by hand. However, it is easily handled by automated assembly.
The ZigBee radio module (U3 in the schematic) is from the XBee line manufactured by Digi International, formerly Maxstream. This radio was proven to be robust and effective in the adapted 2007 2.007 control system, and was thereafter fully integrated into the new control board circuitry. It communicates with the MSP430F2274 through a Universal Asynchronous Receiver / Transmitter (UART) protocol that is supported by many integrated circuits. The data rate is adjustable, but for the current controller is 9600 bits per second. This data rate partially governs the radio control loop time, discussed in Section 4. The ZigBee protocol allows for many independent channels with minimuminterference, and the channel settings are configurable through a set of simple serial commands sent to the radio. The Wootstick USB radio development board, discussed in Section 3.2, was originally designed to serve the purpose of configuring the radios. The radio range is approximately 300 feet indoors with the use of a higher-power module on the transmitting end at the host computer. With the lower-power module, it would be approximately 100 feet.
The four PWM amplifiers (U4, U5, U6, and U7 in the schematic) are National Semiconductor part number LMD18200T. They are integrated circuits centered around an h-bridge configuration of MOSFETs for reversible control of a DC motor. They contain numerous self-protection features for over-current and over-temperature conditions. They can also measure the current being sourced to a motor, which is useful

21
from a control and diagnostic standpoint. They amplify logic-level PWM signals from the MSP430F2274, generated by its internal timers, into power-level modulation of the motor terminal voltage. Wide traces carry high currents from the battery supply through the PWM amplifiers to the motor connector. The most significant drawback of the LMD18200 PWM amplifiers is a relatively high resistance in the on state, approximately 0.6Ω, which limits the power delivered to motors and causes significant heating. An extensive discussion of this problem and how it effects motor selection is offered in Appendix A. A small fan is located between the PWM amplifiers to increase convective cooling.
Power for the signal electronics is regulated by a 5V switching DC-DC converter and a 3.3V linear regulator. The 5V switching converter (VR1 in the schematic), efficiently converts any voltage from 4.5V up to 30V to a 5V output. Though most of the signal electronics run on 3.3V, this pre-regulation provides a 5V supply for fans and external sensors and is more efficient than the 3.3V regulator (U11 in the schematic).
Several operational amplifiers (U8, U9, and U10 in the schematic) filter and buffer signals from analog sensors before they are read in by the MSP430F2274 analog to digital converter. They handle both internal signals (battery voltage and motor currents) and external signals from additional sensors. Selecting between motor current sensors and external inputs is done through a set of switches (SW2 in the schematic). Both a 5V and a 2.5V reference are available for external sensors and the circuit has been tested with a number of sensors including accelerometers, MEMS gyroscopes, and current sensors. Since the MSP430F2274 cannot directly read 5V analog signals, space for a resistive voltage divider is provided before the operational amplifier stage. The flexible external sensor inputs are a new feature of this design and will add a range of new possible uses for the control system.
External digital lines may also be utilized, configurable by another set of switches (SW1 in the schematic). These lines can be either inputs or outputs. They are normally used to drive the direction and PWM signals of the integrated PWM amplifiers. Four of the digital lines are connected to pins controlled by the MSP430F2274 timer hardware, making them suitable for either driving external PWM signals or reading in signals from encoders and tachometers. For use with external electronic speed controllers, the outputs can be configured to drive 1-2ms servo pulse signals. For use with quadrature encoders or tachometers, they can be configured as timer inputs. The added functionality created by the external digital lines means that the control system can be used for higher-power motor control and for position or velocity feedback mechanisms.
Indicator lights serve the purpose of conveying visual information about controller status to the user. Dual-color light emitting diodes (LEDs) are connected across the motor outputs (D1, D2, D3, and D4 in the schematic) and will glow red or green depending on the direction of the motor. The intensity of the light is related to the voltage being commanded. Ordinary LEDs (D5, D6, and D7 in the schematic) are also used to indicate power on, radio status, and a thermal warning on the PWM amplifiers).
A special connector for use with Texas Instruments chip debugger is also included in the circuit (J17 in the schematic), though the development of serial programming techniques discussed in later sections makes it a less important feature.
The circuit design and component selection was done with mass manufacture in mind. All components are sourced from common distributors and the design is fully

22
documented for automated assembly. This documentation includes a list of all components used, their schematic and circuit board designators, their position and orientation, and information about manufacturer and distributor part numbers. Circuit board printing and automated assembly of all surface mount components for the first 25 boards was completed by Advanced Circuits. Through-hole component assembly was done in-house to reduce cost. In higher quantities, turn-key assembly of all components and enclosures would become cost effective.

23
Figure 4: A 3D representation of the circuit board components that occupy significant "vertical space." The front of the board (top) holds all external connectors, while the majority of the power
and signal electronics are on the back (bottom).

24
(a)
(b)

25
(c)
(d)
Figure 5: The copper patters on the four layers of the PCB. The “top” layer (a) faces out of the enclosure. The next two are inner layers, (b) and (c). The “bottom” layer (d) faces into the enclosure.
All are viewed from the “bottom” of the control box.

26
3.2 The “Wootstick” USB Radio ModuleThe “Wootstick” USB Radio Module (hereafter: Wootstick) is a new component of
the 2.007 control system and, with a host computer and input devices, replaces the arcade joysticks and podium hardware. It is a multifunctional tool that can be used both within the 2.007 system and as a standalone wired or wireless development device. It was named by the author after one of its novel functions: wirless “bootloading,” contracted to: “wootloading” and hence “Wootstick.” Wireless bootloading is the ability to of the device to program either the 2.007 controller or another Wootstick completely wirelessly over the ZigBee radio. Combined with an on-board microcontroller, 3.3V power supply, and USB interface, the features of the Wootstick give it significant advantages over similar existing development tools.
The Wootstick is physically small, approximately 1”x3”, so it can easily be affixed near the host computer or used in an embedded system. It is a very simple circuit board: requiring only two copper layers and with all components on one side. This simplicity and the choice of low-cost components make it inexpensive to manufacture. The full schematic of the Wootstick is presented in Appendix C. The schematic designators will be reference throughout this section. Figure 6 shows the copper patterns of the two-layer Wootstick circuit board.
3.2.1 Radio Transceiver and Control NodeThe Wootstick design originates from a simple board created by the author to allow
for configuration of the ZigBee radio modules from a computer using a simple serial USB connection. Digi International offers a development board for the XBee radio line with USB connectivity and a set of software tools for radio setup, but in this case it was less expensive to create a custom interface.
During testing of these first boards, it became apparent that they could serve a much larger role in the 2.007 control system, acting as a bridge between a computer and the wireless connection of the controller. The first thought was to use the modules, acting as receivers only, to collect and display useful data from the controller. However, with the addition of input devices it was clear that the host computer could actually control the entire system, eliminating the need for custom joystick hardware.
In this capacity, the current Wootstick design is very simple. It utilizes the USB to serial conversion chip made by FTDI, part number FT232R, to translate signals between the computer and the XBee radio module. The module is interfaced through a USB mini-B type connector to the host computer USB port. To the computer, the device appears as a standard RS-232 style serial port, accessible from the many programming languages and software tools that support this protocol. Power for the Wootstick is drawn straight from the USB connection, with an on-board 3.3V linear voltage regulator for the radio.
Software running on the host computer reads signals from the USB input devices, maps them to motor commands, then sends the commands out over the serial USB connection to the Wootstick. The commands are relayed wirelessly to the control box, which in turn responds with data about current status and sensor values. The values come in through the Wootstick serial port, are parsed by the software, and can be displayed for the user or recorded. A second Woostick operating on the same radio channel can also be used to intercept, display, and record data, for example in competition scoring.

27
This functionality of the Woostick is not dependent on on-board logic. Though the Wootstick features an MSP430F2274 microcontroller, the same as is used in the control box, it can be run as a control node or radio transceiver even without the microcontroller in place. Only the USB to serial conversion chip, 3.3V regulator, and ZigBee radio are necessary.
The Wootstick can also be used to program the 2.007 control boxes wirelessly, using the bootloader feature of the MSP430F2274, discussed in Section 4.4. The wireless bootloading ability is also not dependent on on-board logic; the Wootstick does not need to have its MSP430F2274 in place to be able to program the remote controller. All that is needed is a properly-configured ZigBee radio module on the same channel as the controller radio. The ability to wirelessly program the 2.007 controller over the same radio network as it is controlled decreases development time and cost, but also expands the functionality of the system in the following ways:
1. The control box no longer needs to be disassembled to access the programming connection. It is possible to program the box in-system, while it is connected to a robot, for example. No physical connection or interaction is required. (There is no “program” button, as is the case in some similar existing tools.)
2. By virtue of the method used to access the bootloader, discussed in Section 4.4, it is also possible to wirelessly reset the controller, providing an “emergency stop” mode, a fault recovery mode, or a way to shut down all robots simultaneously at the end of a match. This functionality has not yet been implemented for the 2.007class.
3. Since no physical connection is required, it is possible to remotely program multiple control boxes, either in parallel or sequentially. Any control box in range of the Wootstick module could be a potential programming target, and the software used to initiate programming could also change the Wootstick radio channel to select which box is to be programmed. This functionality has also not yet been explored, but could reduce the time required to upgrade control system firmware in a large competition network significantly.
4. With an easy way of accessing the control box software, the potential for autonomous or semi-autonomous control is expanded. The same system can now be used to teach more advanced mechatronics or embedded design. The hardware is easily capable of managing a small real-time feedback control loop.
5. All programming tools associated with the wireless bootloading process are freely available. The wired debugging tools, by contrast, are proprietary. The lack of available serial programming tools for the MSP430 line has kept it out of the hobby and education market, but wireless serial programming with the Wootstick makes it a viable low-cost development platform.
3.2.2 Stand-Alone Development BoardPossibilities exist for use of the Wootstick outside of the 2.007 control system as
well. The latest version includes its own on-board microcontroller, with several options for programming and communication. It can serve as a low-cost wired or wireless embedded development tool with competitive advantage over similar devices. The ability

28
of the same Wootstick hardware to act as both a wireless programmer, attached to a local computer, and a wireless target, in some remote embedded system, is believed by the author to be unique.
There were several influences on the development of the Wootstick as an independent module. The author has used the same configuration of microcontroller, power supply, radio, and USB to serial converter numerous times on different circuit boards. Integrating those core components onto a single module that can be reused in different circuits saves time and effort in the design phase. The competitive advantage such a device would have over similar tools was pointed out by Cameron Tenny after exploring some of the commercial alternatives. The position of the Wootstick in the hobby and educational embedded development market is discussed in Section 5.3.
The key addition to the simple radio transceiver version of the Wootstick discussed in Section 3.2.1 is an on-board microcontroller. The same microcontroller used in the 2.007 control box, the Texas Instruments MSP430F2274, is included on the Wootstick circuit board (U1 in the schematic) with connections to both the radio and the USB to serial conversion chip. All of the microcontroller pins are routed to 0.1” pitch external header pins which can plug directly into a breadboard or another circuit. The MSP430 line has not been heavily utilized in the hobby and educational realm because of the difficulty of soldering small surface mount chips, so the breakout to standard headers is an important design feature. A 16MHz oscillator (U2 in the schematic) is also included on the Wootstick circuit as a clock reference for the microcontroller. A reverse polarity-protected external voltage input is included as well to allow for power in an embedded system without USB connection.
With three communicating components (the microcontroller, the USB to serial conversion chip, and the ZigBee radio), the data transmit and receive lines are no longer clearly defined. At any given time, only two devices can be in two-way communication with each other. Selecting the combination of devices that is in communication is done through a combination of active switches and passive priority-setting resistor networks. A switch (SW1 in the schematic) operated by the user can set the Wootstick to acts as a radio transceiver, bypassing the microcontroller and simply relaying data between the USB to serial conversion chip and the ZigBee radio. In this configuration, it is functionally equivalent to the radio transceiver discussed in Section 3.2.1, provided the on-board microcontroller is either not present or is held in reset mode so as not to interfere with communications. Setting the mode switch the other way allows the microcontroller to communicate with either the ZigBee radio or the USB to serial conversion chip. A network of resistors (R1, R2, R3, R4, R5, R6, R7, and R8 in the schematic) gives preference to voltage signals from the USB to serial conversion chip when both it and the radio try to communicate at the same time.
Two digital lines are used to access the microcontroller bootloader. These are in addition to the normal two data lines (transmit and receive). All four connections are routed appropriately by the switches and resistors so that in various modes the Wootstick can either program its local microcontroller via USB or program a remote microcontroller over the ZigBee radio connection. Thus it is possible for the same piece of hardware to be both a wired and a wireless programming tool for the microcontroller. It is also possible for a local Wootstick to serve as a wireless programming tool while another remote Wootstick, differing only in switch and radio configuration, serves as the programming

29
target. This feature is believed to be unique. A discussion of the bootloading procedure and software is provided in Section 4.4. A comparison of the Wootstick to other commercial development tools is given in Section 5.3.

30
(a) (b)Figure 6: The Wootstick circuit board copper patterns for the top (a) and bottom (b) layers. All
components are located on the top layer for ease of assembly.

31
4 Software RealizationThe 2.007 control system requires a set of software programs running both on the
control box and on the host computer to manage communication and control. Though the control system in its exportable form should give the user full access to the software, a set of default software programs is useful for quickly configuring a control system, and to make the system as broadly accessible as possible, user experience in programming should not be assumed. Additionally, programs developed here could serve as a good starting point for modified custom control schemes. The software development of the wireless bootloader is also discussed here. Source code for all software has been omitted from the appendices, but is available in electronic form.
4.1 Data ProtocolEffective data communication is the core functionality of the control system. The
software programs share a common data protocol, which governs all interaction between the host computer and the control box. The host computer program manages input mapping and generates commands to send to the control box. The control box interprets commands and generates motor control signals. It also reads sensors and sends diagnostic data back to the host computer, which can display or record the information.
All data is transmitted and received using a standard asynchronous serial protocol that is supported by the computer, the USB to serial conversion chip, the ZigBee radio, and the control box microcontroller. Table 1 lists the serial port parameters, which must be configured consistently across all components. Configuration on the host computer may differ depending on the programming language used. In Visual Studio .NET languages, it is easily accomplished by setting serial port object properties. The USB to serial conversion chip is configured using a free software tool from FTDI. Similarly, the ZigBee radio is configured using a free software tool from Digi. The MSP430F2274 microcontroller must be configured in its software at startup.
Table 1: The serial port configuration for the 2.007 control system.Parameter Value
Baud Rate (bits/second) 9600
Data Bits 8
Parity Bit Even
Stop Bits 1
DTR (set on host computer) Low (High to reset)
RTS (set on host computer) Low
The baud rate (9600 bits/second) and parity setting (Even) is chosen to match the factory-configured baud rate and parity of the bootloader. If wireless bootloading is not required, any baud rate up to 115,200 bits/second can be used. The system can also be programmed to change baud rates on the fly, allowing wireless bootloading at 9600 bits/second and data transfer at higher rates, however this is significantly more complex and has not yet been tested.

32
Data is transferred in two fixed-length packets, one from the host computer to the control box, called the “command packet,” and one from the control box to the host computer, called the “return packet.” Packets are sequences of bytes (8 bits each), so each data element of the packet can have 256 resolvable states. Figure 7 shows the structure of the two data packets, the individual elements of which are detailed below. The command packet is 9 bytes long, and the return packet is 17 bytes. All transmission and reception occurs asynchronously while the control system is running its primary control loop, so the control programs are never in a “waiting” state. This change was implemented to increase the efficiency of data transfer and allow the controller to run at the lower data rate of the bootloader. It also allows for high bandwidth control loops to run while transmission and reception of control data occurs in the background. Since transmission and reception occur asynchronously and can be simultaneous, the data can be transferred nearly as fast as the baud rate will allow for the larger packet. Figure 8 illustrates the asynchronous overlapping that makes this possible. The theoretical minimum transfer time for the two packets is therefore given by:
ms
bytes
sbits
bytebits
2.149600
817 .
In most applications, the host computer does not need to wait for a return packet before transmitting the next command packet. It is desirable to continue to transmit control values even if the control box stops responding. One example where this could occur is if the control box, which has a lower-power transmitter, goes out of range of the host computer. The host computer Wootstick module may have a higher-power transmitter that can still maintain one-way control communication with the control box. Another situation where independent transmission for the host computer is desirable is if multiple control boxes are to be controlled by one host computer at the same time. The return packets from the boxes will not provide useful information, as they will interfere with each other, but one-way control with all control boxes can be maintained if control packet transmission is not dependent on the return packet. In the current implementation, the host computer is configured to transmit once every 30 milliseconds, which ordinarily provides adequate time for one return packet to come in before the next transmission.

33
Figure 7: The data structure of the two packets involved in control system communication.
Figure 8: Asynchronous data transmission and reception allows for overlapping program loops and efficient program execution that is never in a “waiting” state.

34
The command packet and the return packet share a similar structure. They each begin with a “start” byte, which always takes the (author-defined) decimal value 255 (hexadecimal: FF). This value, when received by the host computer or control box serial port software, will indicate the start of a new packet no matter what data has been received previously. If a prior transmission was interrupted before completion and a new start byte comes in, it will cause the receive buffer, where data is temporarily stored before processing, to begin refilling from the empty state.
No other byte in the packet can have the value of 255 or it will be misinterpreted as a start byte. So, the transmitting software (the host computer for the command packet, the control box for the return packet) must go through all other bytes and change any that have the value of 255. However, in order to allow the true value of these bytes to be recovered later, a system of “escaped character” flags is used. These flags are individual bits set in another data byte that, when they take the value of 1, indicate that a particular byte in the packet was “escaped,” changed from 255 to another value for the purpose of transmission. The receiving software (the control box for the command packet, the host computer for the return packet), will recognize these escaped character flags and change the indicated bytes back to a value of 255 before final processing. Figure 9 illustrates the character escaping operation as performed on both the command packet and the return packet.
A method of validating data is also implemented to ensure the reliability of control information received. It is possible for individual bytes to be corrupted, which could send spurious signals to motors and cause undesirable machine operation. To reduce the chance of this occurring, the values of all bytes in the packet are encoded into a signature byte by a well-known algorithm called a cyclic redundancy check (CRC). This CRC byte is sent along with the packet and the receiving software checks the signature of the received bytes using the same algorithm. If the calculated CRC matches the transmitted CRC, the data is trusted. If not, it is ignored. The CRC byte is included in the escapedcharacters operation in case it takes the value of 255.
For simpler control systems, the escaped characters and CRC operation can be omitted. The software must still ensure that no bytes other than the start byte take the value of 255, but this can usually be accomplished by limiting any data, such as motor commands, to the range of 0-254. The ZigBee radios perform their own data validation, so incorrect bytes are rare. However, bytes may still be dropped entirely if the radio signal is not strong. A simple way to validate data, therefore, is to not process the packet until the full number of expected bytes is received. If a byte is dropped, it is likely that the start byte will reset the buffer before corrupted data can be processed. However, if a start byte is dropped, it can still be possible to receive what looks to be a full packet, but with corrupted data. Therefore, a data protocol without a CRC operation or another form of data validation should not be used in safety- or resource-critical control operations.

35
(a)
(b)
Figure 9: The escaped characters operation in which bytes having the reserved value of 255 are changed prior to transmission and flagged. The flags are used by the receiving software to recover
the true values by carrying out the process in reverse. The procedure is shown here for the command packet (a) with one escaped character byte and the return packet (b) with two escaped character
bytes.

36
The command packet data, which is the simpler of the two, is generated by the host computer and in the case of the 2.007 controller represents the mapping of inputs to four motor commands. The commands (bytes 1-4) take values of 0-255 representing the voltage to give to the motor, where 127 is neutral, 0 is full reverse voltage, and 255 is full forward voltage. The actual value of full voltage is determined by the control box software and is dependent on the motors being driven. A byte for digital “button” commands (byte 5) allows for up to eight “on or off” control inputs to be utilized as well. An auxiliary byte (byte 6) is also included for future additions.
The return packet is generated by the control box and contains feedback about actual motor values, digital and analog sensors, battery voltage, and signal strength. The motor values (bytes 1-4) are similar to the control packet commands, taking values of 0-255 with 127 being neutral, 0 being full reverse, and 255 being full forward. They represent the actual motor commands driving the PWM amplifiers, and may differ from the commands sent if a direct mapping is not used. For example, the control box may implement a deadband, a range of motor values near neutral that all map to 127 so as not to drive motors when a joystick input is slightly off calibration. Any command between 117 and 137, for example, may be implemented as a motor value of 127, and this will be reflected in the return packet motor value. Another situation where the return value may differ from the command is in a position or velocity control scheme where the command represents the reference input position or velocity and the returned motor value represents a servo-controlled output based on a feedback controller running on the control box.
The return packet also contains information from digital and analog sensors, which can be internal (motor current sensors) or external. Up to eight digital values can be returned in a single byte (byte 5). Four analog values can be returned from analog to digital conversions. The analog to digital conversion of the MSP430F2274 microcontroller gives a 10-bit result (1024 resolvable levels). To return this information efficiently, it is broken up into 5 bytes. The first four (bytes 6-9) contain only the most significant eight bits of the values. If 256 resolvable levels are enough to capture the information adequately, these can be used alone. If the full resolution is required, a fifth byte (byte 10) contains the least significant two bits of all four values. The receiving software must recombine the values into their full 10-bit state. Figure 10 depicts how the analog data is broken up into these five bytes. The battery voltage and radio signal strength are also returned as analog values in single bytes (byte 11 and 12, respectively)with eight bit resolution. An auxiliary byte is included (byte 13) for future additions.

37
Figure 10: The method of breaking up and transmitting 10-bit analog sensor values.

38
4.2 Control Box SoftwareThe control box software is primarily responsible for reading in data from the radio
and using it to control the PWM amplifiers or external ESCs. It also interacts with internal and external sensors, reading in their values and sending them back to the host computer in the return packet. The control box program is written in C and compiled for the MSP430F2274 microcontroller, utilizing many of the hardware peripherals on this chip. Any high-bandwidth feedback control algorithms would be executed in the control box software, asynchronously with data transmission so as not to be bound by the 30ms radio period. No such algorithms are implemented in the 2.007 control software, but they have been tested in other applications. The software is retained in the non-volatile flash memory of the microcontroller and can be programmed wirelessly using the wireless bootloader developed, which is discussed in section 4.4.
Radio communication is handled by a hardware serial port on the MSP430F2274. The port is configured at startup with the parameters listed in Section 4.1, Table 1. All reception of data is handled by interrupts, triggered breaks in the main program that execute short commands such as shifting received data into a buffer. The interrupts are triggered by the serial port hardware only when a byte is received. Only when a full control packet is received and validated is the buffer processed. Transmission is likewise handled by interrupts: when a byte is finished transmitting, it triggers an interrupt routine that processes the next byte in the transmit buffer. Thus, the main program loop always continues to run while data communication occurs in the background; there is never a “waiting” period between bytes.
Motor control is accomplished using the hardware timers on the chip. These timers, clocked off of the 16MHz oscillator, can be used to create precise digital pulse width modulated (PWM) signals. These signals are amplified by the internal PWM amplifiers or external ESCs to generate a voltage on the motor terminals. The MSP430F2274 is capable of automatically generating up to four PWM signals using two timers, and could be configured to generate more using interrupts. The PWM signal duty cycle (the ratio of high time to low time) determines the motor voltage when the internal PWM amplifiers are used. Some external amplifiers will be driven this way, however many ESCs use the 1-2ms pulse duration modulated signal protocol instead. The control box software can be configured to generate either signal.
The frequency of the PWM signal is independent of the duty cycle, but still important to the operation of the system for several reasons. Low frequency PWM signals can be in the audible range, resulting in noisy motor operation. If the frequency is too low, the inductance of the motor may not be sufficient to smooth out the current waveform, which can result in excessive heat dissipation. This problem, present in the control system prior to 2006, is highlighted in the motor selection discussion of Appendix A. Very high PWM frequencies can also dissipate excessive power in the switching transistors. In the present controller, the PWM frequency is approximate 20 kHz, fast enough for inductive smoothing to occur (see Appendix A) and out of the audible range, but still slow enough that switching losses are minimal.
Unlike many PWM controllers, the frequency in the 2.007 system is not fixed. Instead, it is varied to scale the measured battery voltage to the level of the motors used. The method of flexibly and continuously scaling the voltage output so that high voltage

39
drill batteries can be used safely with low voltage motors was pioneered by Dr. Ma and is one of the unique features of this control system. The method of implementation has been modified slightly to constrain the on-time and scale the period of the PWM signal rather than constraining the period and scaling the on-time. This cuts down on the number of floating-point computations required for scaling. Figure 11 illustrates the advantage of the variable-frequency method. In the control box software, PWM signals are implemented on a 16MHz timer and the motor command scale is given 8-bit resolution (256 resolvable time steps). Battery voltage scaling determines the PWM frequency according to:
motor
batt
PWM
V
V
MHzf
256
16.
If the motor is rated for the full battery voltage, no scaling is needed and the frequency can be as fast as the command resolution will allow. For an 8-bit command resolution, this equates to 62.5 kHz. In the 2.007 hardware implementation, motors operate at a maximum of 6.0V and batteries are 18.0V cordless drill batteries. Thus, the average frequency of operation is approximately 20.8 kHz. This is dynamically scaled: as the battery voltage decreases, the frequency will increase. Motor commands maintain the same length (256 time steps), so the resulting duty cycle increases and the voltages seen by the motors stay constant. This produces consistent performance as the battery becomes discharged.
The MSP430F2274 hardware analog to digital converter (ADC) is used to read in analog signals from either the on-board current sensors or external analog inputs. It also measures battery voltage and radio signal strength. These values are read just beforepreparing the return packet for transmission, though in a high-speed sensor network the chip can also be configured to read continuously. The 10-bit ADC values are broken up according to the data protocol discussed in Section 4.1.
The control box software performs several other tasks in support of the main control and communication functions. An initialization routine configures all microcontroller pins and hardware peripherals for proper operation. A status indicator light is driven to provide visual feedback to the user, flashing when radio communication is active. A failsafe timer is included to return all motor commands to zero in the even of loss of communication. This timer kicks in after approximately on second of no communication.
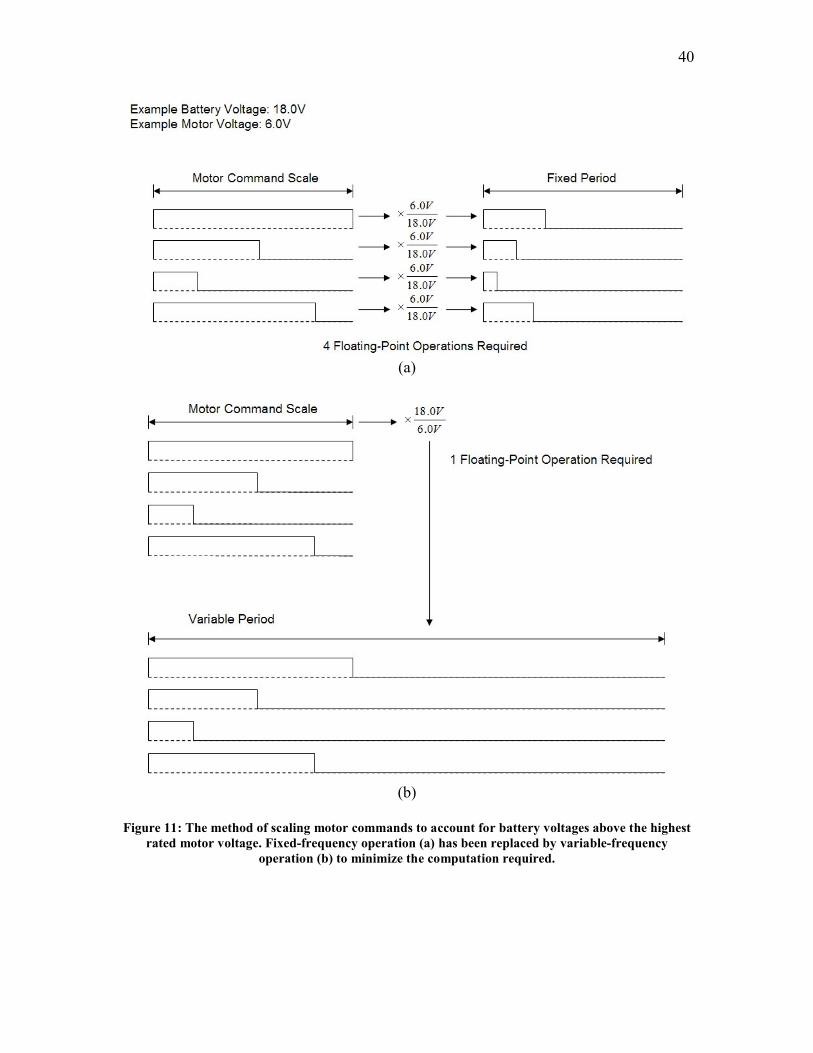
40
(a)
(b)
Figure 11: The method of scaling motor commands to account for battery voltages above the highest rated motor voltage. Fixed-frequency operation (a) has been replaced by variable-frequency
operation (b) to minimize the computation required.

41
4.3 Host Computer SoftwareThe host computer software is primarily responsible for interfacing with USB input
devices, mapping motor commands, and sending the command packet to the control box. It also displays and records sensor information returned from the control box. Host computer software could be written in any computer language that supports serial port communication and interaction with standard USB input devices. The 2.007 control software runs on a Windows PC and is written in Visual Basic 2008. Work done by Cameron Tenny on a host computer program written in the Python programming language has provided a first step toward a cross-platform software solution (Windows, Mac, and Linux compatible). A web-based version should also be possible using Java applets.
The host computer program interacts with the Wootstick radio module via a virtual serial port. Many programming languages, including Visual Basic 2008, have standard objects or libraries for interfacing to serial ports, and the serial port is configured according to the parameters listed in Section 4.1 to be compatible with the rest of the control system components. Visual Basic is an event-driven language, so data transmission and reception is inherently asynchronous. The program is never “waiting” for data. Rather, it buffers data as it comes in and processes it on a first-in-first-out basiswhen the computing time becomes available. This is one level above the interrupt-driven method employed in the control box software; the operating system and serial port hardware handle interrupts and buffering automatically and the Visual Basic program only needs to handle high-level data processing. Thus, software development on the host computer is typically faster and easier than development for the control box microcontroller. The tradeoff is that high-bandwidth asynchronous control loops cannot be implemented. The loop speed is limited by the computational windows allotted by the operating system, and in most situations is less than 100 Hz. It is still possible to execute low-speed or open-loop autonomous control algorithms at the host computer.
Interaction with USB input devices is achieved with a DirectX library, freely available from Microsoft. DirectX is more commonly known for its 3D graphics libraries, but as a tool developed for video game developers, it features a library for interacting with USB joysticks and game controllers. All buttons and analog axes of the game controllers are made available as properties of the game controller object; no direct USB polling of the devices is required.
Visual Basic 2008 provides a very simple means of creating a graphic user interface (GUI). Figure 12 shows the interface displayed on-screen at the host computer. It is refreshed every 30 milliseconds, a period chosen to interfere as little as possible with asynchronous serial transmission events. (Since both are updated at the same rate, there are rarely instances where two GUI updates occur between transmissions or vice-versa.) The graphics update is given a high priority in the Windows operating system, so excessive graphics updates can have a negative effect on communication performance. Careful threading and timing of the two events can minimize this, but for high-speed, low-loss wireless schemes in Visual Basic, the graphics updates should be kept minimal.
On the GUI, the user is given access to serial port settings. The software is capable of automatically searching for a serial port with a 2.007 controller attached for ease of setup. Robot control begins when the serial port is connected. Disconnecting will stop

42
robot operation, but only after the control box failsafe timeout has elapsed. An emergency stop button provides a way to quickly (within one radio cycle, or 30 milliseconds) send a neutral command to all four motors in the event of undesirable or unsafe robot operation. It will disable any further commands until the communication port is reset.
Numeric and bar-graph indicators provide visual feedback to the user about robot performance, including motor voltage, current (or other analog sensor data), battery voltage, and radio signal strength. Raw byte values from the return packet are easily scaled to appropriate physical units on a 32-bit processor. Voltage and current are also multiplied and integrated to indirectly calculate electrical power and energy used. All displayed data can also be recorded to an external, comma-delimited text file for subsequent processing. Excel, MATLAB, and many other analysis tools can parse this file for easy calculation and graphing. Data is recorded at the radio update rate (every 30 milliseconds for 2.007), however it is also time stamped in case packets are dropped.
An example of a low-rate feedback control loop running on the host computer is the current limiter. To help minimize motor and controller heating, a current limit may be set in the host computer software. If the current sensor returns a value higher than this limit, the voltage command is scaled down gradually. The bandwidth required for this operation is sufficiently low that it can be implemented on the host computer rather than on the control box microcontroller. This provides and easy interface for changing or disabling the limit on the fly.
One major advantage of high-level software control on the host computer is the ability to easily map input device axes and buttons to motor commands. A user can rewrite software to achieve any mapping they wish. However, an easy way to remap commands that does not require software development tools is possible. The host computer software reads mapping schemes from text file that has a specific “mapping language.” The user can select between these different schemes in the GUI, and can edit the text file to modify mapping schemes or create new ones. One simple use of this is for reversing the polarity of motors without rewiring them. The “mapping language” used in the 2.007 software is specific to the USB game controllers used, but the protocol could be generalized for more input devices. Figure 13 shows an example of the mapping language.
To avoid confusion, a standard control mapping (the one in Figure 13) is used for 2.007. The diagram shown in the GUI screenshot (Figure 12) depicts how the standard control mapping looks on the game pad layout. The game pad #1 joysticks are used for differential steering, in which one joystick controls two motors operating wheels on opposite sides of the robot. The y-axis controls forward and backwards motion while the x-axis controls turning. It was chosen to allow as many common configuration of drive and manipulator motor control as possible, including: tank steering with two joystick, differential steering with a single joystick, four wheel drive control with four motors, and analog and digital control of manipulator motors. It is implemented on two game pads, but depending on the configuration chosen robots may be driven be either one or two people. It may be possible to allow students to map their own control schemes if a reliable method of changing schemes quickly at the competition could be developed. One possibility is to save the control schemes on individual flash memory sticks, which students attach to the host computer when they are driving.

43
Figure 12: The graphic user interface displayed on-screen at the host PC is designed to give the robot driver feedback on machine performance.
Figure 13: An example of the mapping language used by the host computer to easily configure the mapping of input devices to motor commands. The user can edit a text file with control mappings to
change motor polarities, modify existing mappings, or create new mappings from scratch. The example shown is the default 2.007 control scheme.

44
4.4 The Wireless BootloaderMany robotic control systems and development tools use some form of bootloader. A
bootloader is a special, permanent program that usually runs on startup (boot) of the microcontroller and can rewrite the segment of memory on the microcontroller containing the main, user-written program. It is dependent on the microcontroller’s ability to write its own flash memory without a special tool, a capability most modern microcontrollers have. The advantage of the bootloader is that downloading of the main program can occur over a standard serial interface; no special hardware is required. Any of the serial-interfacing components, including the USB to serial conversion chip and the ZigBee radios, can send a program to the microcontroller.
There are a range of bootloading procedures for different microcontrollers. On 8-bit Microchip PICmicro and Atmel AVR devices, there is no standard, factory-installed serial bootloader. However, users have created many popular and free versions. Theymust first be loaded into a particular segment of the microcontroller memory using a special hardware programming tool, but after this any further program updates can be done using a serial programmer. They generally are active for the first few seconds after power-up and/or require a set of conditions to be present on some of the inputs to indicate that bootloading is to occur. Most robotic control systems using PICmicro or AVR controllers feature a bootloader and serial programming software for programming over RS-232 or USB serial ports. Newer systems are beginning to feature Wi-Fi programming.
The Texas Instruments MSP430 line of microcontrollers has a factory-installed bootloader which is in a special, permanent section of memory on the chip. Thus, there is no need for the user to first program the bootloader into memory using special hardware. To date, the bootloader on the MSP430 is not widely used by developers. Most opt instead for inexpensive but proprietary hardware tools that also support flash emulation. Flash emulation allows the developer to pause program execution and probe particular memory locations to check the state of internal variables, which is useful for debugging.Commercial devices that feature MSP430 microcontrollers will more frequently utilize the bootloader for allowing end users to perform simple firmware upgrades over a RS-232 or USB serial connection. However, the bootloader serial programming software, which runs on a host computer and transmits program data to the microcontroller, is often proprietary. Very little documentation on serial bootloading software for the MSP430 line is available online and much of what is available is out of date.
Working from two Texas Instruments application notes11,12, a software tool for interacting with the MSP430F2274 bootloader was created. The application notes discuss the method of accessing the bootloader and transferring program data into memory. A detailed hardware and software proposal featuring an RS-232 serial interface and a program written for Visual C++ 6.0 is also presented in one of the application notes. The hardware proposal was modified to use the more modern USB to serial conversion chip and ZigBee radios to pass program data to the microcontroller. The software was ported into the newer and simpler Visual Basic 2008 interface. A screen shot of the Wootloader
11 “Application of Bootstrap Loader in MSP430 With Flash Hardware and Software Proposal.” Texas Instruments Application Report SLAA096B, July 2001.12 “Features of the MSP430 Bootstrap loader.” Texas Instruments Application Report SLAA089B, January 2003.
45
(“Wireless bootloader”) interface is shown in Figure 14. Work done by Cameron Tenny on a version of the bootloading software written in the Python programming language makes development and programming on multiple operating systems possible. The wireless bootloader developed (both Windows and multi-OS version) can be used with any of the proprietary or freeware compilers and development environments for the MSP430 line of microcontrollers.
To access the bootloader, a special “entry sequence” of voltage signals is executed on designated pins of the MSP430F2274 microcontroller. This is actually the most difficult part of the bootloading process to set up. The sequence must be generated by the host computer and is sent via two additional digital lines known as the RTS (“Ready To Send”) and DTR (“Data Terminal Ready”) lines. These lines, generally obsolete in modern serial protocols, can still be utilized for special functions and many bootloaders for microcontrollers use them. The USB to serial conversion chip can automatically pass these lines and can also be configured to invert one or both. The particular configuration used for the 2.007 and Wootstick bootloading system is saved as a file that can be used to configure the USB to serial conversion chip with the freely-available software configuration tool from FTDI.
The ZigBee radios must also be configured to pass these signals if wireless bootloading is desired. A capability added to the XBee radio line in the most recent firmware versions allows it to pass a number of extra digital lines between radios automatically. This feature is utilized to pass the DTR and RTS lines on an “on-change” basis. Since the DTR line also controls the reset pin of the microcontroller, it is important that it default to a non-reset state when bootloading is not being used. The radios feature a timeout option that can return both lines to a default state if no state changes are detected. The configurations for both the host computer radio and the remote radio connected to the microcontroller to be programmed are saved in files that can be used to configure the radios with the freely-available Digi software configuration tool.
After accessing the bootloader, the host computer bootloader software finishes the programming procedure as outlined in the Texas Instruments application notes. Commands are sent via the host computer virtual serial port to perform programming operations. The serial port and all serial components (USB to serial conversion chip and ZigBee radios), must First, the flash memory is erased completely. Then, segments of the user program are downloaded into memory. The size of the segments is flexible, and 64-byte segments are used here. After each successful command, the bootloader will send an acknowledgement character. If a command is unsuccessful, a non-acknowledgement character is sent. If the program receives this character or no response at all, it can retry the previous command or indicate to the user that programming has failed. After each command, the program also sends a synchronization character that the bootloader uses to adjust its timing.
Programs for the MSP430F2274 can be compiled into many file formats. Currently, the Windows version of the bootloader can only read in the TI-TXT format. The program file is parsed and split into the 64-byte segments before any bootloading procedure occurs. Extending upon the bootloader interface, cross-platform compatibility, and file format support should be a relatively easy way to make the system more functional and useful to MSP430 developers.

46
Though simple USB bootloading is significantly easier to set up, the benefits of wireless programming are numerous. In the 2.007 control system, no external programming interface is implemented on the control box. Since students have not programmed the control boxes in the past, the only access needed was for thedownloading of new software by class staff, and the boxes were disassembled to access the programming connection. With the ability to be wireless programmed, software upgrades can be done without disassembly and may eventually be done simultaneously on multiple control boxes. Additionally, the ability to access software without disassembling the control box and without expensive hardware tools may make student programming more feasible in 2.007 or a similar class. Finally, the ability to program a control system remotely without interacting physically with the machine it controls is both safer and easier for developers. The original concept for a ZigBee-based “wireless bootloader” was developed by the author for this reason on a different machine control project.

47
Figure 14: The wireless bootloader (“wootloader”) interface. Despite its name, it may be used either with a wired (USB) or wireless (ZigBee) serial connection.

48
5 Present and Future ApplicationsThe 2.007 control system as a whole has been tested in its original context, the 2.007
class competition. The ZigBee radio system has been implemented since the 2007 competition and the full system upgrade was completed for the 2008 class. The system has had many of the desired results, including increased control and radio reliability, ease of use, and development. A number of problem and confusions have also been revealed, which will be useful in the continued development of the system. The individual components of the system, including the Wootstick and the software for bootloading, have also been tested and implemented on other related and unrelated projects.
There are at least two distinct niches for which the system as a whole or its components may be useful. The control system as a whole is most likely to be useful where quick and easy control for a robotics competition is desired. The integrated controller, which includes all provision for wireless communication and control of four small motors, provides a simpler interface than many other control systems. Though it does not have as much I/O capability as other systems, the wireless programming capability and battery/motor voltage flexibility give it advantages in this market.
The Wootstick and bootloader software was created initially for the use of the author to aid development, but these individual components of the control system can also have a place in the development market in general. They provide a simple wireless and USB interface for the MSP430F2274 microcontroller that does not currently exist.
5.1 2.007 Design and ManufacturingThe new control system architecture has been implemented for the 2008 version of
2.007. The arcade joysticks and hardware were removed from the existing control stations and host computers with flat screen monitors were installed in their place. The input devices used are inexpensive Logitech game pads (two per control station).
Radio and communication reliability has been very good. No cross-channel interference, lag, or sudden drop-out of radio connection has been reported or observed. The range has been tested to at least 100 feet indoors, though it has been observed that proximity to wireless access points, which also use the 2.4 GHz frequency band, does have some negative effect on signal quality. Computers running competition software should therefore have their wireless features disabled to minimize the chance of interference.
Mechanical reliability of the control box has been good, with the notable exception of the battery connectors. The failure mode of these connectors is discussed in Section 3.1.1 and will need to be addressed in future revisions of the control box. Otherwise, no mechanical failures have been observed: no enclosures have broken and no components have been jarred loose inside the box by drops or impact.
Adequate thermal performance of the control box has been validated at the current limit of 2.0A with and without the internal fan. No thermal warning lights have been observed or reported. For higher current limits and longer use, additional holes for ventilation may need to be cut into the sides of the control box. However, since the Mabuchi motors currently utilized exhibit their own thermal problems, the lower current limit is desirable.

49
A common confusion among students is on the polarity and wiring instructions of the motor connector. This has been observed in previous years as well and is likely solved through better documentation and training on the system. Web pages detailing the control system and wiring instructions were created and distributed, but having more targeted instructions and lectures would help alleviate confusion. Another good solution would be to provide a method for flexible wiring, such as a distribution rail that can be mounted to the robot. Motors can be attached to one side of the distribution rail with screw terminals while the connector is wired to the other side. If a polarity or channel is incorrect, the screw terminal connections can easily be rearranged.
Confusion about the control mapping was also observed, especially during the early “simple car” stages of the class. Though it is highly flexible, the standard control mapping is somewhat complicated in its use of both game pads and redundant control of motors. Again, more documentation and training on different drive configurations and how they are mapped is the likely solution, though custom mapping of control for each student is also an interesting possibility.
A detailed survey will be distributed during the competition to gather feedback from students and staff on the functionality and the control system and its ease of use. Data and suggestions will be useful in determining how to continue to improve the system for use in future years in 2.007 or other venues.
5.2 Other Robotics CompetitionsThe 2.007 control system occupies a unique corner of the robotic control platform
spectrum. It is a simple and inexpensive integrated system, one of the few available with on-board PWM amplifiers and radio. Its ability to use a range of batteries and appropriately scale the voltage commands for lower-voltage motors is a significant advantage when hardware resources are limited; many other control systems use proprietary hardware. Though it has relatively few inputs for sensors and outputs for motors, the microcontroller used is more powerful than the 8-bit microcontrollers used in some other systems. The ability to wirelessly interact with and program the control system from any computer is also a significant advantage that few current systems can claim. However, as new Wi-Fi compatible control systems emerge, the market position of the 2.007 system may change significantly. Table 2 lists some comparisons between the 2.007 control system and other commercially available systems.
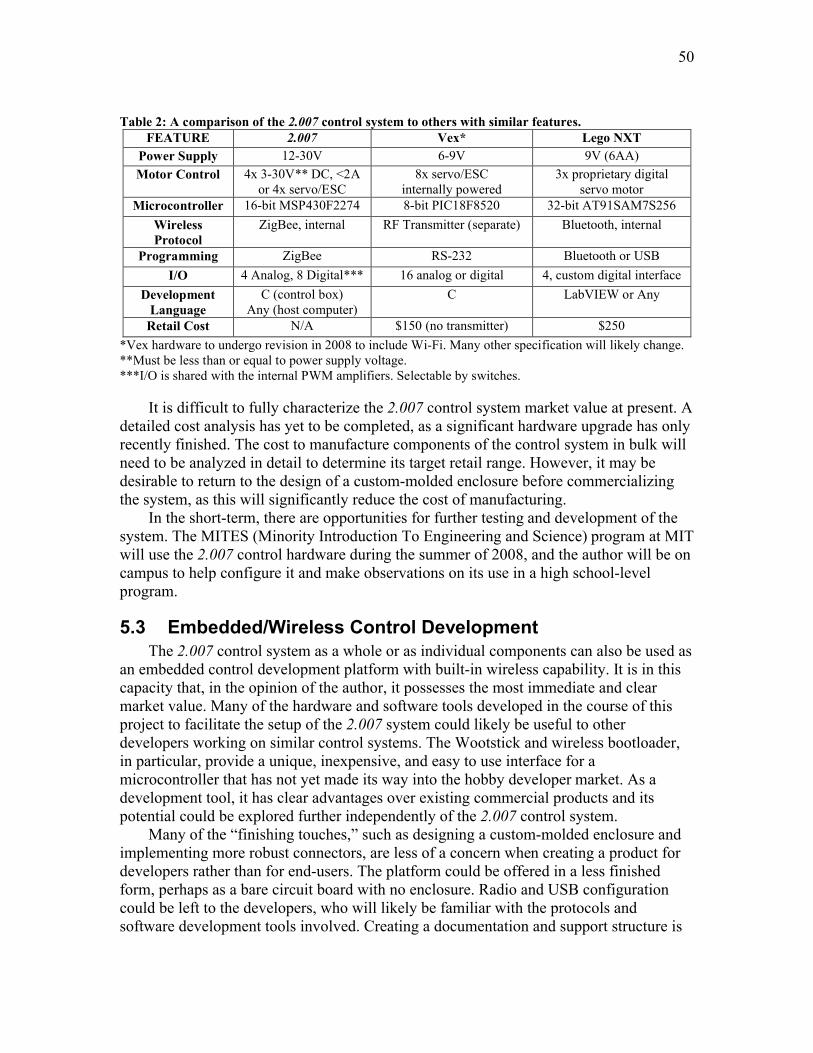
50
Table 2: A comparison of the 2.007 control system to others with similar features.FEATURE 2.007 Vex* Lego NXT
Power Supply 12-30V 6-9V 9V (6AA)
Motor Control 4x 3-30V** DC, <2Aor 4x servo/ESC
8x servo/ESCinternally powered
3x proprietary digital servo motor
Microcontroller 16-bit MSP430F2274 8-bit PIC18F8520 32-bit AT91SAM7S256
Wireless Protocol
ZigBee, internal RF Transmitter (separate) Bluetooth, internal
Programming ZigBee RS-232 Bluetooth or USB
I/O 4 Analog, 8 Digital*** 16 analog or digital 4, custom digital interface
DevelopmentLanguage
C (control box)Any (host computer)
C LabVIEW or Any
Retail Cost N/A $150 (no transmitter) $250
*Vex hardware to undergo revision in 2008 to include Wi-Fi. Many other specification will likely change.**Must be less than or equal to power supply voltage.***I/O is shared with the internal PWM amplifiers. Selectable by switches.
It is difficult to fully characterize the 2.007 control system market value at present. A detailed cost analysis has yet to be completed, as a significant hardware upgrade has only recently finished. The cost to manufacture components of the control system in bulk will need to be analyzed in detail to determine its target retail range. However, it may be desirable to return to the design of a custom-molded enclosure before commercializing the system, as this will significantly reduce the cost of manufacturing.
In the short-term, there are opportunities for further testing and development of the system. The MITES (Minority Introduction To Engineering and Science) program at MIT will use the 2.007 control hardware during the summer of 2008, and the author will be on campus to help configure it and make observations on its use in a high school-level program.
5.3 Embedded/Wireless Control DevelopmentThe 2.007 control system as a whole or as individual components can also be used as
an embedded control development platform with built-in wireless capability. It is in this capacity that, in the opinion of the author, it possesses the most immediate and clear market value. Many of the hardware and software tools developed in the course of this project to facilitate the setup of the 2.007 system could likely be useful to other developers working on similar control systems. The Wootstick and wireless bootloader, in particular, provide a unique, inexpensive, and easy to use interface for a microcontroller that has not yet made its way into the hobby developer market. As a development tool, it has clear advantages over existing commercial products and its potential could be explored further independently of the 2.007 control system.
Many of the “finishing touches,” such as designing a custom-molded enclosure and implementing more robust connectors, are less of a concern when creating a product for developers rather than for end-users. The platform could be offered in a less finished form, perhaps as a bare circuit board with no enclosure. Radio and USB configuration could be left to the developers, who will likely be familiar with the protocols and software development tools involved. Creating a documentation and support structure is

51
also simpler, since developers will be taking on some of that responsibility themselves. In fact, they may produce a lot of the documentation that others wind up using in the future.
The Wootstick as unit has many advantages over other similar development boards, and is the likely target for further work in making an exportable system designed for developers. It makes accessible the MSP430F2274 microcontroller, which has to date not been utilized as much as PIC or AVR microcontrollers due to its surface-mount only package and lack of open-source tools. It also has the unique ability to be both a wireless programming tool and a wireless programming target. Table 3 compares the Wootstickfeatures to those of other similar development boards.
Table 3: A comparison of the Wootstick to other similar development boards.FEATURE Wootstick Arduino Bluetooth TI ez430-RF2500
Power USB or External (4.5V-9V) External (1.2V-5.5V) USB or External (3V)Microcontroller 16-bit MSP430F2274 8-bit ATmega168 16-bit MSP430F2274
Timing on-board 16MHz oscillator on-board 16MHz crystal internal timing onlyProgramming USB or ZigBee AVR ISP or Bluetooth USB (wired only)
Wireless Interface
ZigBee Bluetooth Custom 2.4GHz
Development Language
C C (optional custom environment)
C
Open Source? N/A Yes Partial*Retail Cost N/A** $150 $50
*Schematic is available. Programming environment and radio interface is proprietary.**The cost to manufacture the Woostick PCB in large quantities, based on assembly quotes and Digi-Key catalog prices for components, is estimated at $25, not including the cost of the radio. (XBee radios sell for $19 in single quantities.)
The Wootstick unit has been tested by the author and others in applications independent of 2.007. It was used to control an ESC driving a large motorized gantry as part of the 2.12: Introduction to Robotics final competition in the fall of 2007. It was also used to prototype a Stewart platform controller in a freshman seminar. It was implemented by Cameron Tenny in a custom-designed holonomic robot base. It has thus far proved to be easy to use and reliable. Further testing may be done during the summer as it will be integrated into the power electronics controller of an electric go-kart.
A technology disclosure of the Wootstick module is being prepared, as it is currently in finished form. (No immediate modifications are apparent to make it commercially viable.) A potential distributor could be SparkFun electronics, which sells many similar development boards and tools including the Arduino Bluetooth board. Texas Instruments may also be interested in it as a third-party development tool. Alternatively, the plans and PCB manufacturing files could simply be registered for copyright protection and made open-source under a non-commercial license. The Handy Board, another development tool created at MIT, used this open-source distribution model.
6 Concluding Discussion
6.1 Status of Functional RequirementsMost of the functional requirements of the 2.007 control system have been met with
the present design. To further develop the system into a viable, competitive commercial

52
product would take additional work and a more extensive set of functional requirements related to the robustness, reliability, and cost analysis of the system. The development of the hardware for the new computer-controlled architecture is complete, however, and the vast majority of the development goals associated with the changeover have been achieved. The following lists the status of the functional requirements presented in Section 2.2:
1. Provide for wireless control of at least four motors per channel. This was met by the previous control system design and the inclusion of the same PWM amplifier hardware has met the requirement in the new system. The additional capability of driving up to eight external speed controllers extends upon this functional requirement, allowing it to wirelessly control more powerful motors in a larger system.
2. Provide a reliable, noise- and interference-resistant radio link on at least four independent channels. This functional requirement is met by the ZigBee radio network, which has been extensively tested and proven to be extremely reliable and noise-resistant. The range and power of the new radios is more than adequate for the 2.007 contest and their ease of development contributes heavily to the simplicity of the system.
3. Exhibit robust mechanical design, capable of surviving common abuses. This requirement is not fully met in the present design. Battery connectors have shown an unacceptably low time to failure and modifications or replacements will need to be explored before the system can be exported. This failure mode is detailed in Section 3.1.1. The controllers have shown no other mechanical failures.
4. Exhibit robust electrical design, capable of maintaining signal integrity in high noise environments and surviving common abuses. This requirement is met by protective circuitry as discussed in Section 3.1.2, which was carried over from the previous design. Reverse polarity, over-current, and thermal protection have all been tested. The controllers function as expected in the 2.007 class environment using low-quality motors that draw a lot of current and no electrical failures have been observed.
5. Provide for rapid, low-cost manufacturing and assembly. This functional requirement is met from an electrical standpoint. The control box circuit board was designed with automated assembly in mind. Full assembly documentation was generated and the first batch of circuit boards had all the surface mount components assembled automatically by a company specializing in low-quantityprototypes. However, the manufacturing could be done “turn-key,” fully assembled by a circuit board manufacturing company, with only small additions to the existing documentation. Mechanically, the functional requirement is met by consolidating all machining operations onto a single custom cover that can be cut inexpensively with 2D machining or easily molded. However, it will still be less expensive to generate a custom-molded enclosure for mass production.
6. Provide for simple, inexpensive control system setup. This requirement is met by eliminating the arcade joysticks and associated hardware. Control stations can now be set up on any host computer with the Wootstick USB radio modules. This makes setup of a competition structure much more feasible for venues outside of

53
2.007, as the only hardware required are the control box and radio modules. Input devices can be any USB joystick or game controller. Software to run on the host computer has been made as user-friendly as possible to facilitate setup.
7. Provide for simple, flexible software development. This requirement is met in many ways. Software development for the host computer can be done in any programming language that supports serial port communication. Software development for the control system microcontroller can be done using all open-source tools. Programming the microcontroller using the wireless bootloader interface creates new opportunities for quick and easy wireless development both within the 2.007 system and independently using the Wootstick module.
8. Provide detailed and accurate documentation. This thesis write-up will help satisfy this requirement. Additionally, a set of online documentation for quick setup and troubleshooting was generated for the 2008 2.007 class. Appendix E contains a summary of need-to-know information for future developers and maintainers of the 2.007 control system.
6.2 Project Summary, Personal Impact, and Sign-OffThis project has been a significant and valuable undertaking for the author. The
design of an entire control system presents many challenges, many function requirements (which sometimes compete with each other), and many design decisions to be made. Prior work on the system made development a far more manageable task, as modules and systems created and tested by others, proven over time, could be easily included and/or expanded upon. Because much of the electronics and software design involved in the project was original far out of the field of the author, a mechanical engineering major, the project was also a tremendously valuable learning experience.
The development by the author was carried out over the course of nearly two years. Managing such an extensive project has helped the author, whose previous experience was in much more accelerated time-frame projects, to develop a more patient design methodology with attention to detail. Over time, the project goals changed and expanded greatly. A module which at first was a trivial tool for radio programming became the core of a new system architecture and its own standalone development platform. This lesson in project dynamics, summarized by the idea of continuously probing the usefulness of system elements no matter how small they seem, has had a big impact on the perspective of the author toward system design and the invention process.
Contributing to a system that has been around for so many years and is so integrally tied to the history of 2.007 and robotics competition general has been a very rewardingexperience. It is the hope of the author that the new system can be further developed and improved to continue to serve the needs of the class and that the system, in part or in whole, can find uses elsewhere as a simple and effective development and control tool.
AcknowledgementsThe author would like to acknowledge many individuals and groups who have
contributed to the success of this project. It would not have been possible without the support and design guidance of Professor Alexander Slocum, advisor to this project from 2006 when it was begun a UROP. The electrical engineering component of this project
54
was originally far outside the field of study and experience of the author and the mentorship of Dr. Hongshen Ma, the architect of the 2.007 radio control system, was integral to the development of the necessary knowledge and skills for creating a robust electrical system. The author would also like to thank the many other developers who have worked on the 2.007 control system in the past, bringing it up to the already excellent state it was in before the most recent design and keeping it well-documented. Specifically, the author wishes to thank Wey-Jiun Lin for providing an excellent analysisof the product design of the most recent control system in her S.B. thesis and Ed Summers for his work on the system just before the author became involved. Cameron Tenny has also been integral in the conceptualization, realization, and testing of the Wootstick radio module as a separate development platform, as well as in the creation of multi-OS versions of the controller software. The support and feedback of the 2.007 staff, Undergraduate Assistants, and students over the past two years has helped focus design goals and evaluate the system performance. Finally, the author would like to thank all of the sponsors of the 2.007 class whose continual support allow it to live up to its title as the “mother of all robotics contests.”

55
Appendix A: Matching Motors to the System
The primary function of the 2.007 control box is to control the brushed DC motors that act as actuators for a robot. With external speed controllers, it is important to match the size and power specifications of the speed controller to those of the motors used. The same is true for the internal PWM amplifiers of the 2.007 control box. In the course of this project, alternative PWM amplifiers and motors were tested and the design process yielded a thorough characterization of the motors utilized in 2.007. The results indicate that the motors are poorly matched to the system and it is the recommendation of the author that they be replaced. Several alternatives are proposed here.
Testing alternative PWM amplifiers for the new design revealed that many of the drivers tested, which were rated for 3-5A of continuous current, could not drive the 2.007motors at their rated voltage without excessive heating (of the motor and the amplifier). Some even went into short-circuit protection mode when driving the motors. These results did not agree with the motor specifications listed on the 2.007 web page or with the datasheet of the motor indicated there. After more thorough testing with a power supply and current sensor, it was discovered that the motors were incorrectly specified on the course web page. The actual motors included in the 2.007 kit are the Mabuchi RC-260RA-2670. Figure 15 is an excerpt from the datasheet of this family of motors. The motor formerly specified on the 2.007 website was the RC-260RA-18130, rated for 6.0V with a stall current of 2.0A at 4.5V. The actual motor, however, is only rated to 4.5V and has a stall current of 6.8V at that voltage.
The large discrepancy was traced to the difference between in-system and ideal performance. The datasheet table lists ideal performance where the power supply is a pure voltage source (zero source impedance). The source impedance of the power electronics needs to be accounted for in-system to determine the actual performance. Figure 16 illustrates the voltage division that occurs at stall to change the stall current of the motor when measured in-system. In the case of the RC-260RA-2670 motor, the armature resistance is specified as 0.66Ω, and measurements on the 2.007 motors confirm this. The source impedance of the PWM amplifier is determined by the “on resistance” of its MOSFET transistors. This is specified in the datasheet for the LMD18200 amplifier as 0.3Ω per switch. There are two switches per leg of the h-bridge amplifier, so the total on resistance is at least 0.6Ω. Measurement indicates that the combined source impedance of the amplifiers, battery, connectors, and wiring is closer to 1.0Ω. The combination of relatively high PWM amplifier resistance and relatively low armature resistance (for a motor of this size) leads to a condition at stall where the current is actually limited more by the source impedance than by the motor. The PWM amplifiers being tested as alternatives to the LMD18200 all had lower source impedances, which is generally a good thing since they will dissipate less power. However, the total series resistance became so low that the motor could draw much more current, leading to thermal failures or the triggering of short-circuit protection. Driven at 6.0V as it is in the 2.007 system, the actual stall current of the RC-260RA-2670 motor is 9.1A, far above the specifications of any PWM amplifiers considered.
The problem is further complicated by the high-voltage pulse width modulation technique. Rather than a 6V DC supply, the motor is actually driven by an 18V pulse

56
train, duty-cycle modulated so that the effective average voltage is 6V. This needs to be done fast enough that the mechanical time constant of the motor filters the pulses into a smooth rotation. However, it is not plainly obvious that at a given frequency it also is fast enough for the electrical time constant of the motor inductance and resistance to smooth out the current waveform. The time-average current will still be the stall current of the motor at 6V. Pulsed current, however generates far more heating than its averaged DC value since it is the square of current that contributes to the resistive power dissipation. This is exemplified in Figure 17, which shows the actual current waveform of the motors driven by a low-frequency and a high-frequency PWM. The new control software implements a variable-frequency PWM, but on average it runs at near 20 kHz, fast enough for inductive smoothing to occur. This change has greatly reduced the motor heating problems observed.
Though the implementation of a faster PWM and a software current limit has improved the thermal performance of the system, the motors are still poorly matched to this system. Using motors with significantly higher resistances than the source impedance of the controller would ensure that power is being utilized efficiently by the motor rather than dissipated as heat in the control electronics. Generally, a higher resistance motor can be run at higher voltages to generate power more efficiently than a low resistance motor running at high currents.
Either of two of the Mabuchi motors in the same family as the one used in 2.007 would be more appropriate. The RC-260RA-18130 and RC-260SA-2295 are of identical size and geometry as the RC-260RA-2670, so they would fit the Tamiya gearbox kits. Both have a significantly higher resistance than the RC-260RA-2670. They are capable of producing similar power to the current motors and can likely be run at 6.0V without a current limit. Preliminary testing with both motors has been done and confirms the analysis. These could be used as potential replacements in the Tamiya gearbox kit. Their may also be benefits, though, to moving to an entirely different motor and gearbox set.

57
Figure 15: An except from the Mabuchi datasheet for the RC-260 motor line.
Figure 16: The simplified electrical schematic of a stalled DC motor with a fixed supply voltage. The source impedance of the supply causes a division of the armature voltage and limits the stall current
of the motor.

58
(a)
(b)
Figure 17: Current measurements taken with a hall effect current probe of the 2.007 motors being driven with a 2 kHz (a) and 10 kHz (b) PWM signal. The inductive smoothing is clearly more
pronounced in the 10 kHz PWM. This change greatly reduced motor heating problems.
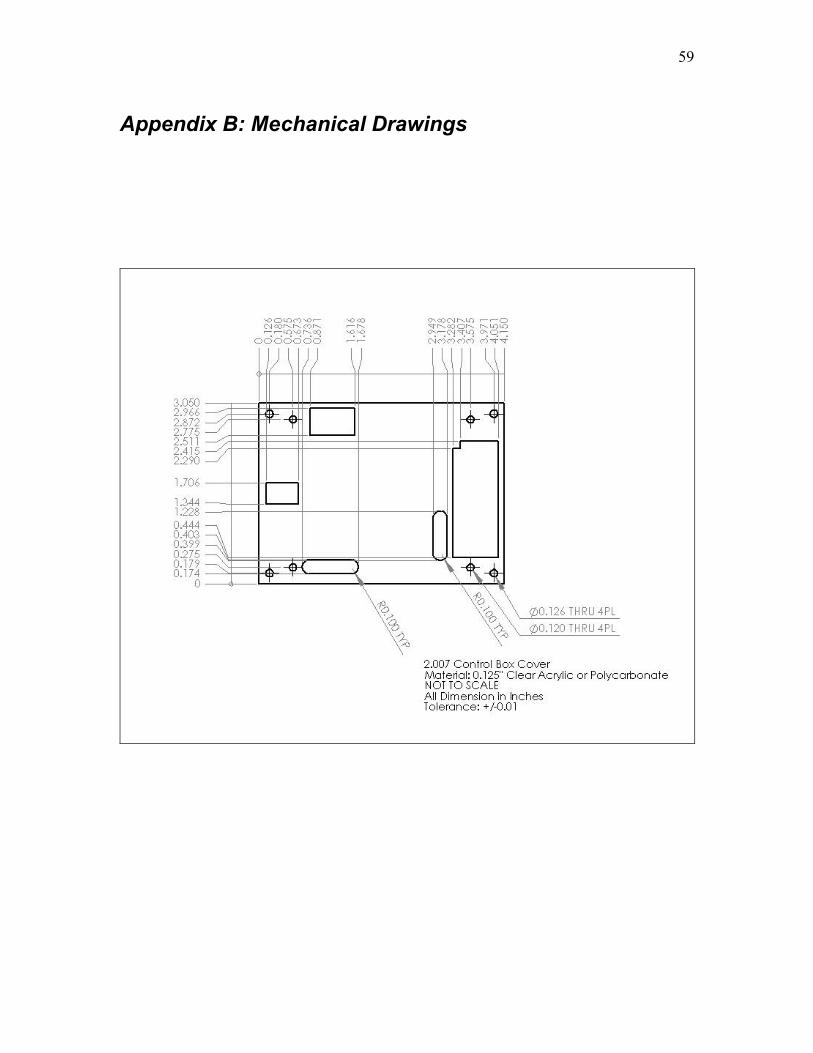
59
Appendix B: Mechanical Drawings

60

61
Appendix C: Electrical Schematics
Schematic Pages2.007 Control Box ….. TK-TKWootstick USB Radio Module ….. TK

62

63

64

65

66
Appendix E: Summary of Need-To-Know Control System Information
Consumable Components:Component Manufacturer Part NumberEnclosure Hammond Mfg. 1591STCLBattery Connector Housing AMP 1-480318-0Battery Connector Crimp Terminals AMP 60619-1Motor Connector Housing AMP 770579-1Motor Connector Crimp Terminals AMP 171639-1
Electrical Ratings:Specification Rating ConditionsPower Supply Voltage 10V - 30V internal PWM amplifiers activePower Supply Voltage 4.5V - 30V signal electronics onlyOutput Current Per Channel max. 3A continuous dutyOutput Current Per Channel max. 6A short duration (thermally limited)Source Impedance Per Channel 0.9Ω PWM amplifier and typical batteryRadio Range 300ft indoors, XBee Pro transceiverRadio Range 100ft indoors, XBee transceiver
Serial Port Settings (for bootloading):Parameter ValueBaud Rate (bits/second) 9600Data Bits 8Parity Bit EvenStop Bits 1DTR (set on host computer) Low (High to reset)RTS (set on host computer) Low