student materials. class # 3: safety scramble no homework!!! bell ringer watch the video
TRANSCRIPT

Student Materials
Class # 3: Safety Scramble• No Homework!!!
Bell Ringer
http://www.youtube.com/watch?v=cr7roogzM8cWatch the Video
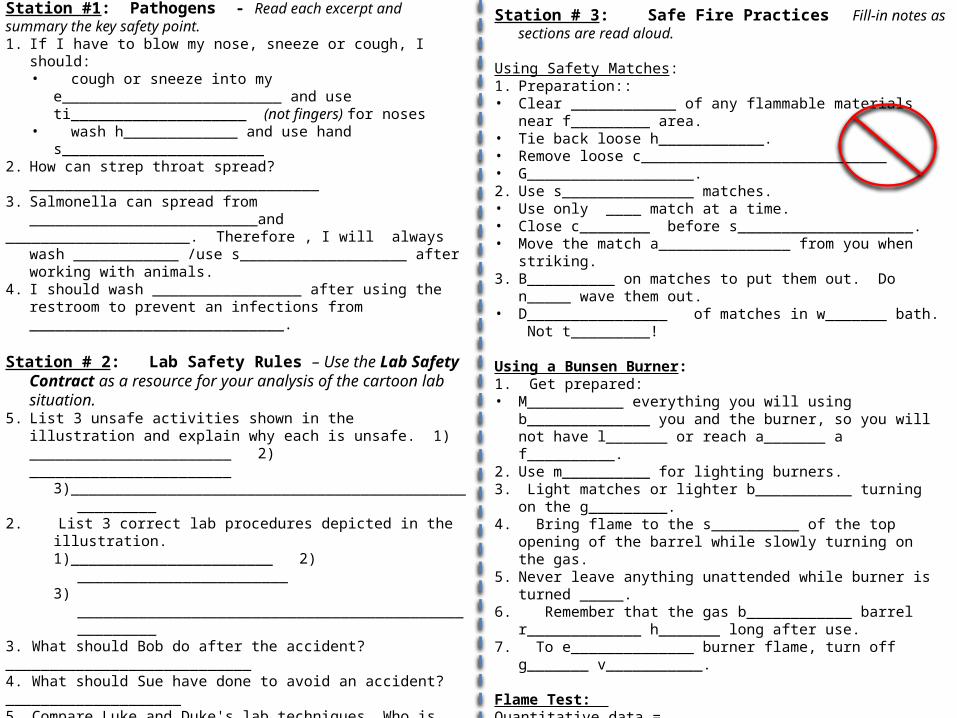
Station #1: Pathogens - Read each excerpt and summary the key safety point.1. If I have to blow my nose, sneeze or cough, I should:
• cough or sneeze into my e_________________________ and use ti____________________ (not fingers) for noses
• wash h_____________ and use hand s_______________________2. How can strep throat spread? _________________________________3. Salmonella can spread from __________________________and _____________________. Therefore , I will always wash ____________
/use s___________________ after working with animals.4. I should wash _________________ after using the restroom to prevent
an infections from _____________________________.
Station # 2: Lab Safety Rules – Use the Lab Safety Contract as a resource for your analysis of the cartoon lab situation.
5. List 3 unsafe activities shown in the illustration and explain why each is unsafe. 1) _______________________ 2) _______________________
3)______________________________________________________2. List 3 correct lab procedures depicted in the illustration.
1)_______________________ 2) ________________________3) _____________________________________________________
3. What should Bob do after the accident? ____________________________4. What should Sue have done to avoid an accident? ____________________5. Compare Luke and Duke's lab techniques. Who is following the rules? ______ What was he doing correctly? _______________________________6. What are three things shown in the lab that should not be there?_______________ _____________________ __________________7. Compare Joe and Carl's lab techniques. Who is doing it the correct way?__________________ Why is his technique correct? __________________8. What will happen to Ray and Tim when the teacher catches them?_____________________________________________________________9. List three items in the illustration that are there for the safety of the students in the lab. ________________ ________________ ______________10. What is Betty doing wrong? _____________________________________
Lab Safety Rules Reflection: Imagine that a new student joined your lab table team and you were assigned to be a Team Leader to help them get oriented to our class – for 5 HIP slips ! How would you explain WHY lab safety rules are really important for everyone?
Station # 3: Safe Fire Practices Fill-in notes as sections are read aloud.
Using Safety Matches:1. Preparation::• Clear ____________ of any flammable materials near f_________ area.• Tie back loose h____________.• Remove loose c____________________________• G___________________.2. Use s_______________ matches. • Use only ____ match at a time.• Close c________ before s____________________.• Move the match a_______________ from you when striking.3. B__________ on matches to put them out. Do n_____ wave them out.• D________________ of matches in w_______ bath. Not t_________!
Using a Bunsen Burner:1. Get prepared:• M___________ everything you will using b______________ you and
the burner, so you will not have l_______ or reach a_______ a f__________.
2. Use m__________ for lighting burners. 3. Light matches or lighter b___________ turning on the g_________. 4. Bring flame to the s__________ of the top opening of the barrel while
slowly turning on the gas. 5. Never leave anything unattended while burner is turned _____.6. Remember that the gas b____________ barrel r_____________
h_______ long after use.7. To e______________ burner flame, turn off g_______ v___________.
Flame Test: Quantitative data = __________________________________________________________________________________________________________Qualitative data = ___________________________________________________________________________________________________________The flame test for metals to identify colors is a ____________________ data test.
1. Test A Result: Magnesium Observation __________________________ Test B Result: Mystery Metal Observation: _______________________2. Analysis Conclusion: The mystery metal is ________________________
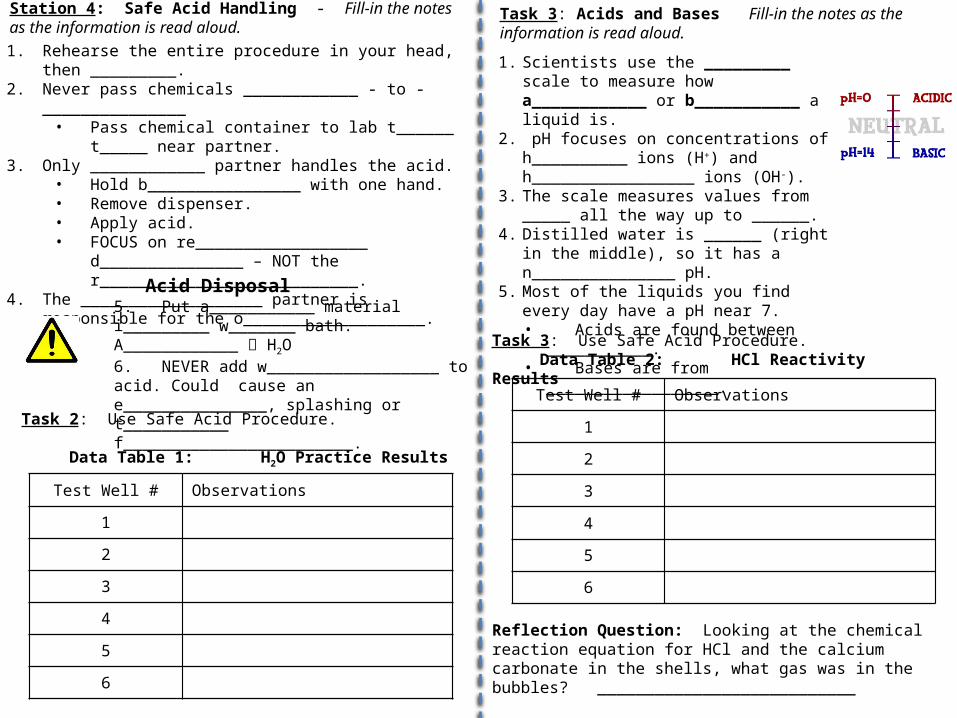
Station 4: Safe Acid Handling - Fill-in the notes as the information is read aloud.1. Rehearse the entire procedure in your head, then _________.2. Never pass chemicals ____________ - to - _______________
• Pass chemical container to lab t______ t_____ near partner.
3. Only ____________ partner handles the acid.• Hold b________________ with one hand.• Remove dispenser.• Apply acid.• FOCUS on re__________________ d_______________ –
NOT the r___________________________.4. The ___________________ partner is responsible for the
o___________________.
Acid Disposal5. Put a___________ material i_________ w_______ bath. A____________ H2O6. NEVER add w__________________ to acid. Could cause an e_______________, splashing or t___________ f________________________.
Task 2: Use Safe Acid Procedure.
Data Table 1: H2O Practice Results
Test Well # Observations
1
2
3
4
5
6
Task 3: Acids and Bases Fill-in the notes as the information is read aloud.
1. Scientists use the _________ scale to measure how a____________ or b___________ a liquid is.
2. pH focuses on concentrations of h__________ ions (H+) and h_________________ ions (OH-).
3. The scale measures values from _____ all the way up to ______.
4. Distilled water is ______ (right in the middle), so it has a n_______________ pH.
5. Most of the liquids you find every day have a pH near 7. • Acids are found between ___________.• Bases are from __________________.
Test Well # Observations
1
2
3
4
5
6
Task 3: Use Safe Acid Procedure. Data Table 2: HCl Reactivity Results
Reflection Question: Looking at the chemical reaction equation for HCl and the calcium carbonate in the shells, what gas was in the bubbles? ___________________________

There are 4 stations: 20 minutes each
• Station 1: Pathogens (microbes that can cause disease)
• Station 2: Lab Safety Procedures• Station 3: Handling Acids• Station 4: Using Fire
Table Team Members Count Off! Partner # 1, 2, 3, 4• Rotate as Reading Out Loud card readers.• Station 4: 2 Different Flame TestsTeam Leaders – 10% EC• All tasks completed• Everyone gets to participate
Lab Team Leaders – Leadership Skills• 10 % Extra Credit for Class 21/20• Responsible for helping your team SUCCEED! – Assigning tasks and roles– Reading directions to everyone– Making sure that EVERYONE participates– Encouraging, helping, refocusing, watching time– Raising hand for Teacher Help– Ensuring EVERYONE has completed lab with quality results
• Rotating Opportunity Students with mastery class %
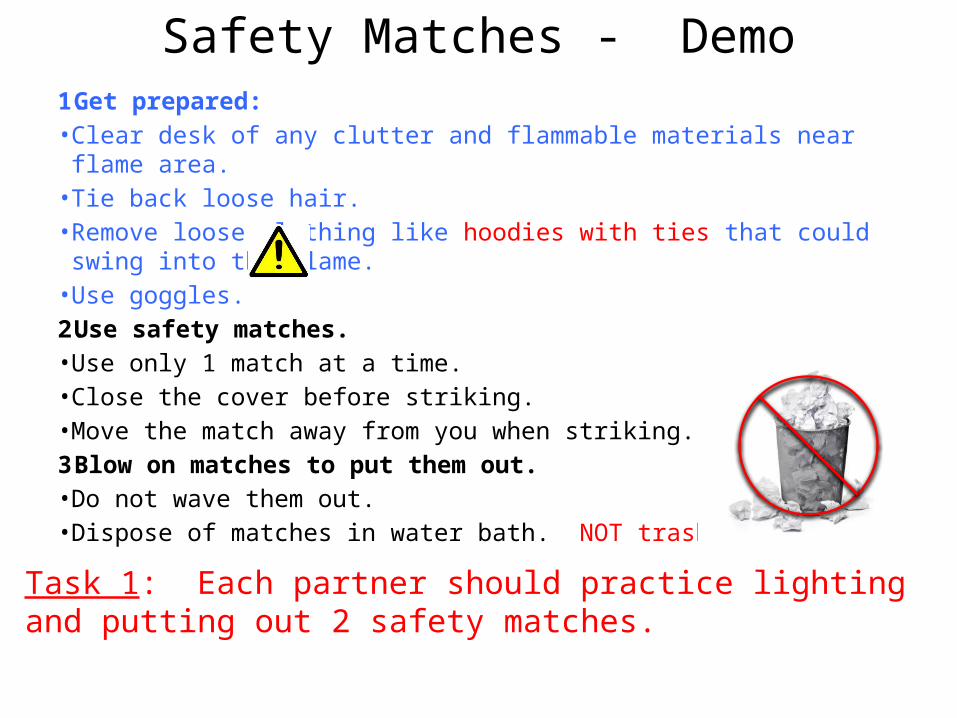
Safety Matches - Demo1.Get prepared:• Clear desk of any clutter and flammable materials near flame area.• Tie back loose hair.• Remove loose clothing like hoodies with ties that could swing into the
flame.• Use goggles.2.Use safety matches. • Use only 1 match at a time.• Close the cover before striking.• Move the match away from you when striking.3.Blow on matches to put them out. • Do not wave them out.• Dispose of matches in water bath. NOT trash.
Task 1: Each partner should practice lighting and putting out 2 safety matches.

Safe Acid Handling Demo1. Use goggles and gloves.2. Rehearse the entire procedure in your head, then do it.3. Never pass chemicals hand-to-hand.
• Pass chemical container to lab table top near partner.
4. Only ONE partner handles the acid.• Hold bottle with one hand.• Remove dispenser.• Apply acid.• FOCUS on replacing dispenser – NOT the reaction.
5. The OTHER partner is responsible for the observations.Acid Disposal
Put acid material into water bath. Acid H2ONEVER add water to acid. Could cause an explosion, splashing or toxic fumes.

Bunsen Burner - Demo1. Get prepared:• Move everything you will using between you and the
burner, so you will not have lean or reach across a flame. • Goggles2.Use matches or lighters instead of strikers for lighting
burners. 3. Light matches or lighter before turning on the gas. 4. Bring flame to the side of the top opening of the barrel
while slowly turning on the gas. 5.Never leave anything unattended while it is being heated
or is reacting rapidly.6. Remember that the gas burner barrel remains hot long
after use.7. To extinguish burner flame, turn off gas valve.
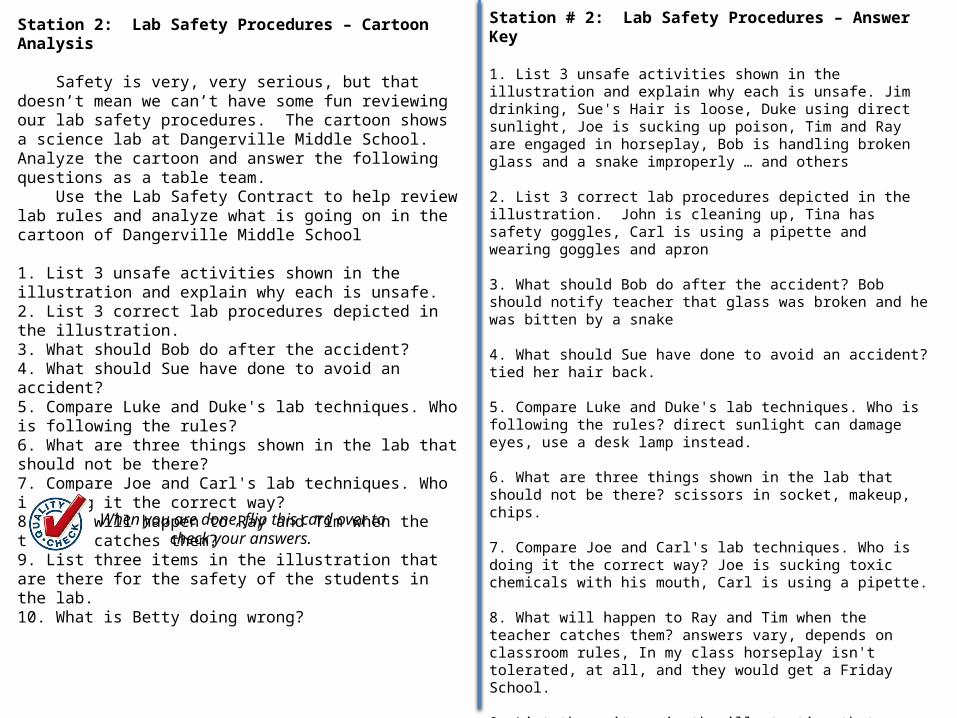
Station 2: Lab Safety Procedures – Cartoon Analysis
Safety is very, very serious, but that doesn’t mean we can’t have some fun reviewing our lab safety procedures. The cartoon shows a science lab at Dangerville Middle School. Analyze the cartoon and answer the following questions as a table team. Use the Lab Safety Contract to help review lab rules and analyze what is going on in the cartoon of Dangerville Middle School
1. List 3 unsafe activities shown in the illustration and explain why each is unsafe.2. List 3 correct lab procedures depicted in the illustration.3. What should Bob do after the accident?4. What should Sue have done to avoid an accident?5. Compare Luke and Duke's lab techniques. Who is following the rules?6. What are three things shown in the lab that should not be there?7. Compare Joe and Carl's lab techniques. Who is doing it the correct way?8. What will happen to Ray and Tim when the teacher catches them?9. List three items in the illustration that are there for the safety of the students in the lab.10. What is Betty doing wrong?
When you are done, flip this card over to check your answers.
Station # 2: Lab Safety Procedures – Answer Key
1. List 3 unsafe activities shown in the illustration and explain why each is unsafe. Jim drinking, Sue's Hair is loose, Duke using direct sunlight, Joe is sucking up poison, Tim and Ray are engaged in horseplay, Bob is handling broken glass and a snake improperly … and others
2. List 3 correct lab procedures depicted in the illustration. John is cleaning up, Tina has safety goggles, Carl is using a pipette and wearing goggles and apron
3. What should Bob do after the accident? Bob should notify teacher that glass was broken and he was bitten by a snake
4. What should Sue have done to avoid an accident? tied her hair back.
5. Compare Luke and Duke's lab techniques. Who is following the rules? direct sunlight can damage eyes, use a desk lamp instead.
6. What are three things shown in the lab that should not be there? scissors in socket, makeup, chips.
7. Compare Joe and Carl's lab techniques. Who is doing it the correct way? Joe is sucking toxic chemicals with his mouth, Carl is using a pipette.
8. What will happen to Ray and Tim when the teacher catches them? answers vary, depends on classroom rules, In my class horseplay isn't tolerated, at all, and they would get a Friday School.
9. List three items in the illustration that are there for the safety of the students in the lab. first aid kit, fire extinguisher, blanket.
10. What is Betty doing wrong? never put makeup on in the lab


Common Colds and FluSalmonella

Excerpt # 2: Salmonella, the name of a group of bacteria, is one of the most common causes of food poisoning in the United States. Usually, symptoms last 4-7 days and most people get better without treatment. But, Salmonella can cause more serious illness in older adults, infants, and persons with chronic diseases. Salmonella is killed by cooking and pasteurization.
Food: Contaminated eggs, poultry, meat, unpasteurized milk or juice, cheese, contaminated raw fruits and vegetables (alfalfa sprouts, melons), spices, and nuts
Animals: and their environment: Particularly reptiles (snakes, turtles, lizards), amphibians (frogs), hedgehogs birds (baby chicks) and pet food and treats.
Excerpt # 2: How Strep Throat Spreads
Anybody can get strep throat, but it's most common in school-age kids and teens. These infections occur most often during the school year when big groups of kids and teens are in close quarters.
The bacteria that cause strep throat (group A streptococcus) tend to hang out in the nose and throat, so normal activities like sneezing, coughing, or shaking hands can easily spread infection from one person to another.
• That's why it's so important to wash hands carefully and use hand sanitizers.
• When coughing or sneezing, put your face in your elbow – not hands.
• After using a tissue, throw it away and use hand sanitizer.
Excerpt # 4: You might wonder why hand washing is so important after going to the bathroom. As one kid put it: I don't wash my hands every time I touch my stomach so why do I have to wash after every time I pee?
The problem isn't necessarily with touching your own body when you go to the bathroom, though there may be more germs in those body areas than, say, your elbow. The bigger problem is that lots of people use the bathroom and they might not be as neat as you.
Poop (feces), especially, contains a lot of germs including E. coli (short for Escherichia coli ) which can make you sick with stomach cramps and diarrhea. Those germs are tiny and not visible without a microscope, so they can be hiding on the faucet, doorknob, and other bathroom surfaces.
In the bathroom, you can easily get some germs on your hands and, if you don't wash up properly, you just might take them with you. Those germs could get into your body and make you sick.
Excerpt #1: Flu vs. Colds: A Guide to Symptoms:Questions Flu
ColdWas the onset of illness ... sudden?
slow?Does your child have a ... high fever?
no (or mild) fever?Is your child's exhaustion level ... severe?
mild?Is your child's head ... achy?
headache-free?Is your child's appetite ... decreased?
normal?Are your child's muscles ... achy?
fine?Does your child have ... chills?
no chills?
If most of the answers fell into the first category, chances are that it could be flu. If most answers were usually in the second category, it's most likely a cold. But, even doctor’s can have a hard time telling the difference between a common cold and the flu and may need to do a test to be certain!
Since both can affect our respiratory systems, they can leave us coughing, sneezing, blowing our noses and feeling awful. Plus, viruses can remain active on surfaces for up to 48 hours, so it is important to:• cough or sneeze into elbows and use tissues (not fingers) for noses• wash hands and use hand sanitizer
Always wash/ use hand sanitizer after working with animals!

Acids can cause burns!
You need goggles and gloves!
Never breathe in fumes.
Call for teacher if there areany spills or accidents of any kind.
Task 3: The pH of Common Acids and Bases
Task 2: Practice Safe Acid Technique
with H2O (water).
Task 4: Acid Reactivity Test
with HCl (hydrochloric acid).
Task 1: Safe Acid Handling Procedure.
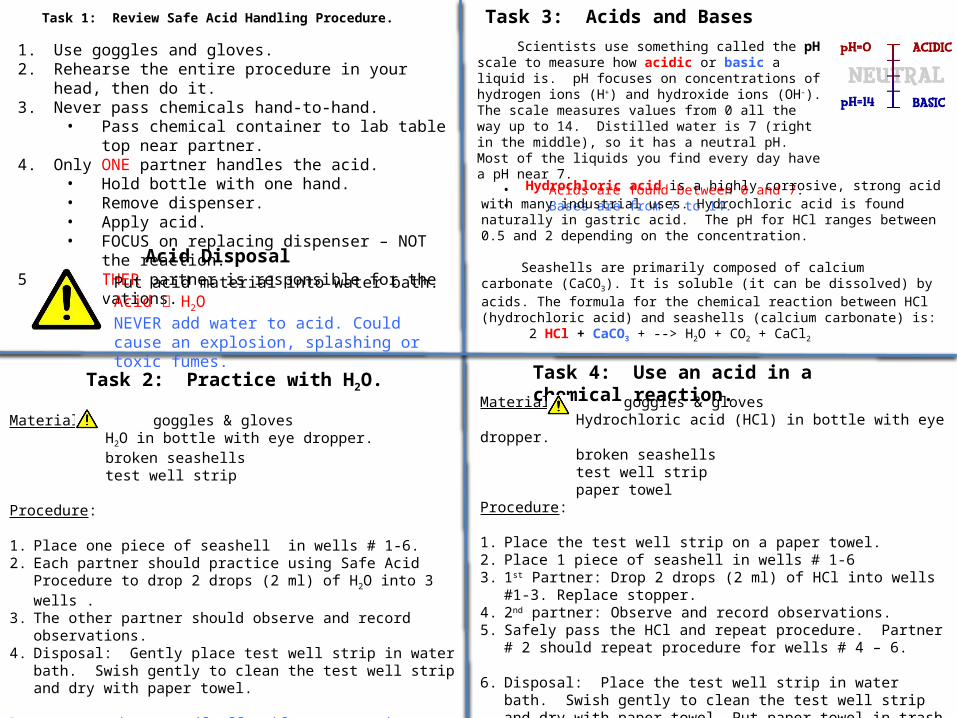
Task 1: Review Safe Acid Handling Procedure.
1. Use goggles and gloves.2. Rehearse the entire procedure in your head, then do it.3. Never pass chemicals hand-to-hand.
• Pass chemical container to lab table top near partner.4. Only ONE partner handles the acid.
• Hold bottle with one hand.• Remove dispenser.• Apply acid.• FOCUS on replacing dispenser – NOT the reaction.
5. The OTHER partner is responsible for the observations.
Acid DisposalPut acid material into water bath. Acid H2ONEVER add water to acid. Could cause an explosion, splashing or toxic fumes.
Task 2: Practice with H2O.
Materials: goggles & glovesH2O in bottle with eye dropper.broken seashellstest well strip
Procedure:
1. Place one piece of seashell in wells # 1-6.2. Each partner should practice using Safe Acid Procedure to drop 2 drops
(2 ml) of H2O into 3 wells . 3. The other partner should observe and record observations.4. Disposal: Gently place test well strip in water bath. Swish gently to
clean the test well strip and dry with paper towel.
Repeat procedure, until all table partners have practiced 3 times.
Materials: goggles & glovesHydrochloric acid (HCl) in bottle with eye
dropper.broken seashellstest well strippaper towel
Procedure:
1. Place the test well strip on a paper towel.2. Place 1 piece of seashell in wells # 1-63. 1st Partner: Drop 2 drops (2 ml) of HCl into wells #1-3. Replace stopper.4. 2nd partner: Observe and record observations.5. Safely pass the HCl and repeat procedure. Partner # 2 should repeat
procedure for wells # 4 – 6.
6. Disposal: Place the test well strip in water bath. Swish gently to clean the test well strip and dry with paper towel. Put paper towel in trash can.
Reset your lab table. It should look exactly like it did when you sat down.
Task 3: Acids and Bases Scientists use something called the pH scale to measure how acidic or basic a liquid is. pH focuses on concentrations of hydrogen ions (H+) and hydroxide ions (OH-). The scale measures values from 0 all the way up to 14. Distilled water is 7 (right in the middle), so it has a neutral pH. Most of the liquids you find every day have a pH near 7.
• Acids are found between 0 and 7.• Bases are from 7 to 14.
Hydrochloric acid is a highly corrosive, strong acid with many industrial uses. Hydrochloric acid is found naturally in gastric acid. The pH for HCl ranges between 0.5 and 2 depending on the concentration.
Seashells are primarily composed of calcium carbonate (CaCO3). It is soluble (it can be dissolved) by acids. The formula for the chemical reaction between HCl (hydrochloric acid) and seashells (calcium carbonate) is:
2 HCl + CaCO3 + --> H2O + CO2 + CaCl2
Task 4: Use an acid in a chemical reaction.

Safety Matches
# 1
Carrying matches in school, outside of our classroom, is a serious violation of school rules.
Make sure the numbered match boxes are put on the Front Desk after your team is done.
Keep matches in the science classroom!
Portable Bunsen Burner
Gas Valve
Metal Salts Flammability Testing:
Test A: Magnesium using forceps
Test B: Mystery Metal Salt using wood strip
Lab Partners # 1 & 2
Lab Partners # 3 & 4
A flame test is a procedure used to test qualitatively for the presence of certain metals in chemical compounds.
When the compound to be studied is excited by heating it in a flame, the metal ions will begin to emit light. Based on the emission spectrum of the element, the compound will turn the flame a characteristic color.
This technique of using certain chemical compounds to color flames is widely used in pyrotechnics to produce the range of colors seen in a firework display!
Flame Test

Safety Matches1. Get prepared:• Clear desk of any clutter and flammable materials near flame
area.• Tie back loose hair.• Remove loose clothing like hoodies with ties that could swing
into the flame.• Use goggles.2. Use safety matches. • Use only 1 match at a time.• Close the cover before striking.• Move the match away from you when striking.3. Blow on matches to put them out. • Do not wave them out.• Dispose of matches in water bath. NOT trash.
Task 1: Each partner should practice lighting and putting out 2 safety matches.
1. Get prepared:• Move everything you will using between you and the
burner, so you will not have lean or reach across a flame.• Goggles 2. Use matches or lighters instead of strikers for lighting
burners. 3. Light matches or lighter before turning on the gas. 4. Bring flame to the side of the top opening of the barrel
while slowly turning on the gas. 5. Never leave anything unattended while it is being heated
or is reacting rapidly.6. Remember that the gas burner barrel remains hot long
after use.7. To extinguish burner flame, turn off gas valve.
Using the Bunsen Burners
A flame test is a procedure used to test qualitatively for the presence of certain metals in chemical compounds.
Qualitative Data = Deals with descriptions. • Data can be observed but not measured. • Colors, textures, smells, tastes, appearance, beauty, etc.
Quantitative Data = Deals with numbers. • Data which can be measured. • Length, height, area, volume, weight, speed, time, temperature,
humidity, sound levels, cost, ages, etc.
Flame Test
The flame test for metals to identify colors is a _______________________________ data test.
Partners 1 & 2: Test A Procedure: Magnesium
1. Light match.2. Turn on burner.3. Use forceps to pick up 1 piece of magnesium and hold over flame.4. DO NOT look DIRECTLY at the flame.5. Place ash and hot tipped forceps on aluminum foil.
Partners 3 & 4: Test B Procedure: Mystery Metal
6. Light match.7. Turn on burner.8. Remove wood strip from solution.9. Hold tip over the flame.10. Observe color.11. Use table to identify the mystery metal.
1. Record data in Lab Journal.2. Use the Metal Table to identify the mystery metal.