strung out - make · a lead guitar has a thinner string ... string a metal wound wire that vibrates...
TRANSCRIPT

Make a one-string electric guitar from plastictubing. By Tom Zimmerman
This project will show you how to build an amazingly inexpensive and rad-looking one-string electric guitar out of pine wood and PVC pipe. A single string purposely keeps the design simple. (For a 3-string cigar box model, see MAKE, Volume 04.) But first, we need to establish the names and functions of the various parts of a guitar. Please refer to the diagram and materials list on thefollowing page before starting.
1. Get your parts together.Do you want a lead or bass guitar? A lead guitar has a thinner string and is used for playing melody. A bass has a thicker string and plays lower notes. Get the cheapest tuning machine and metal low E string you can find. If the tuning machines come in a strip, cut them apart with a hacksaw, preserving a mounting hole for each tuning machine.
2. Make the body.The sound of the vibrating string is picked up by a piezo element, so you can design the body any way you please. Look at pictures of guitars to get ideas, or trace a real guitar. Draw the pattern on the wood and cut it out using a jigsaw, scroll saw, or band saw. It helps to first make release cuts (cuts going from the edge of the wood to the pattern) that fall away, providing turning room for the blade. Next, sand and round the edges to give it a fin-ished look, and then hold it like you are playing it. This is your last chance to modify any curves for comfort. When you’re happy with your design, clean off the dust with a damp rag and paint the body. Several thin layers of paint are better than one thick layer. Refer to the photo at the bottom of the next page to see the process of making the body.
STRUNG OUT
Ph
otog
rap
h b
y S
am M
urp
hy
MUSICDIY
115Make:
M_115-119_DIYM_F1.indd 115M_115-119_DIYM_F1.indd 115 1/31/07 7:51:29 AM1/31/07 7:51:29 AM
Ph
otog
rap
hy b
y To
m Z
imm
erm
an
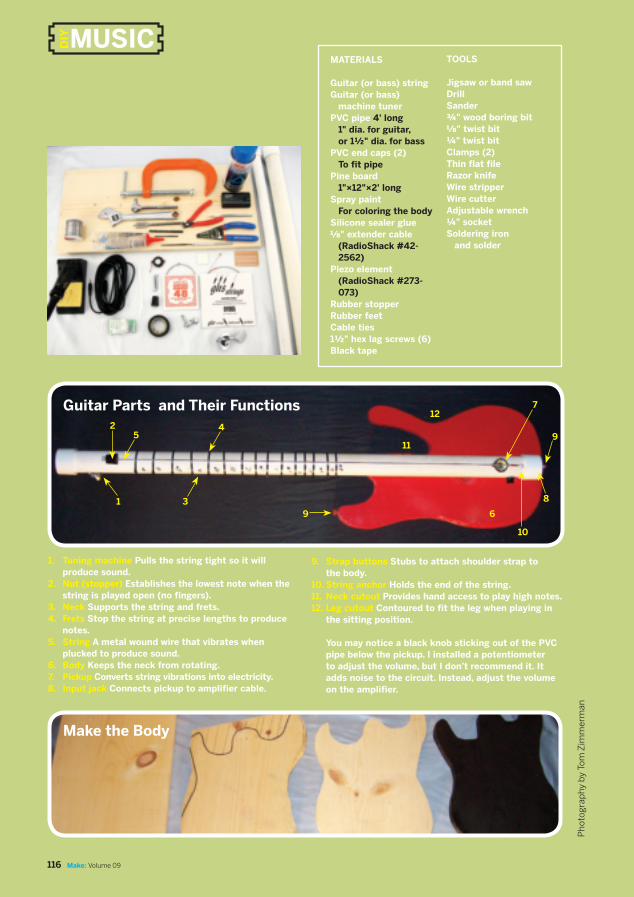
MATERIALS
Guitar (or bass) stringGuitar (or bass)
machine tunerPVC pipe 4' long
1" dia. for guitar, or 1½" dia. for bass
PVC end caps (2) To fit pipe
Pine board 1"×12"×2' long
Spray paint For coloring the body
Silicone sealer glue1" extender cable
(RadioShack #42-2562)
Piezo element (RadioShack #273-073)
Rubber stopperRubber feetCable ties1½" hex lag screws (6)Black tape
TOOLS
Jigsaw or band sawDrillSander¾" wood boring bit1" twist bit¼" twist bitClamps (2)Thin flat fileRazor knifeWire stripperWire cutterAdjustable wrench¼" socketSoldering iron
and solder
Make the Body
1. Tuning machine Pulls the string tight so it willproduce sound.
2. Nut (stopper) Establishes the lowest note when the string is played open (no fingers).
3. Neck Supports the string and frets.4. Frets Stop the string at precise lengths to produce
notes.5. String A metal wound wire that vibrates when
plucked to produce sound.6. Body Keeps the neck from rotating.7. Pickup Converts string vibrations into electricity.8. Input jack Connects pickup to amplifier cable.
9. Strap buttons Stubs to attach shoulder strap tothe body.
10. String anchor Holds the end of the string.11. Neck cutout Provides hand access to play high notes.12. Leg cutout Contoured to fit the leg when playing in
the sitting position.
You may notice a black knob sticking out of the PVC pipe below the pickup. I installed a potentiometerto adjust the volume, but I don’t recommend it. It adds noise to the circuit. Instead, adjust the volume on the amplifier.
3
54
9
11
12
6
10
7
9
8
Guitar Parts and Their Functions
1
2
116 Make: Volume 09
MUSIC
M_115-119_DIYM_F1.indd 116M_115-119_DIYM_F1.indd 116 1/31/07 7:56:00 AM1/31/07 7:56:00 AM

3. Prepare the string anchor.If you’re making a lead guitar, cut the 1" PVC pipe to 39" using a hacksaw. For the bass guitar, cut the 1½" PVC pipe to 44". Clamp the string tightly to the PVC pipe and use it as a guide to draw a straight line down the pipe. Remove the string and drill two ¼" holes 2" and 3½" from the end of the PVC pipe along the line. In the hole closest to the pipe end, use a small flat file to carve a ½"-long notch toward the center of the pipe (Figure A). Test to see that the ball of the string fits in the hole and is grabbed by the notch when the string is pulled tight (Figure B).
4. Install the machine tuner.Drill a ¼" hole 3" from the other end of the PVC pipe, on the line you drew. While the bit is turning, slowly tilt the drill toward the center of the pipe about 45 degrees (Figure C). This will create a slanted ledge for the string to rest on. Drill a ¼" hole 2" from the end of the pipe, 90 degrees around from the first hole. Put the shaft of the machine tuner into the second hole and mark the location of the mounting screw (Figure D). Remove the machine tuner and drill a 5" pilot hole. (Careful: Keep
the bit straight or it will snap). Put the machine tuner back into the hole and screw it in with the wood screw that came with the machine tuner.
5. Attach the neck to the body.Draw a centerline down the back of the body and drill 4 evenly spaced 1" pilot holes. Countersink each hole halfway through the wood from the back with the ¾" wood bore bit. Lay the PVC pipe on a table, string side down. Clamp the body on top of the PVC pipe along the centerline with the ends of the PVC pipe and body flush. Make sure the machine tuner is away from the body. Use the 4 pilot holes as a guide to drill 1" holes through the PVC pipe. From the back of the body, screw the lag bolts through the wood and into the PVC pipe with an adjustable wrench. See Figure E on the following page for reference.
6. Install the strap buttons.Hold the guitar against your body and find2 comfortable anchor points for the strap. Drill1" pilot holes and screw in the lag screws, leaving a ¼" gap between the screw head and the body for the strap to fit into.
Fig. A: File the notch.Fig. B: Insert the string ball (with close-up of the installed string).
Fig. C: Drill holes for the tuner.Fig. D: Mark the tuner mounting screw hole.
A B
3.5"
2"
3"
2"
90˚ around
DC
45˚ angle
117Make:
M_115-119_DIYM_F1.indd 117M_115-119_DIYM_F1.indd 117 1/31/07 8:12:46 AM1/31/07 8:12:46 AM

HGF I
3
3
2
1
E
Fig. E: Attach the neck to the body. (1) Hex lag screws pass through wooden body into PVC pipe. (2) Countersink holes provide clearance for wrench and allow the screw heads to be flush with the body.
(3) Lag screws are used as strap buttons. Fig. F: Prepare the pickup by cutting away the top of the plastic case. Fig. G: Attach a rubber foot in the disk center. Fig. H: Drill the cap. Fig. I: Sand one side flat.
7. Prepare the pickup.Cut away the top of the piezo element’s plastic case, starting at the hole in the center. Don’t in-sert the cutters too far into the hole — you don’t want to damage the piezo element. Cut away the plastic until you get to the side of the case, then start cutting around the side until the whole top comes off (Figure F). Attach a ½" self-adhesive rubber foot onto the center of the piezo element (the brass shiny surface) or slice ¼" off the bottom of a rubber stopper and glue it to the piezo element with a dab of silicone sealer. The diameter of the rubber stopper must be small enough so it does not touch the plastic case (Figure G).
8. Install the pickup.Drill a 1" hole in the center of one PVC end cap (Figure H) and sand one side flat so the pipe will rest against the body (Figure I). Cut the plug off the audio extender cable and feed it through the hole in the PVC cap. Tie a knot in the cable 1' from the end so it won’t pull through the end cap. Feed a cable tie through the non-notched ¼" hole out the bottom of the pipe. Tape the cut end of the extender cable to the cable tie and pull it back
through the non-notched hole (Figure J). Cut and strip the cut end of the extender cable. The piezo has 2 wires: ground (black) and signal (red). The extender cable has 3 wires: ground (bare copper), left and right (both insulated). To confirm which is which, plug the extender cable into multimedia speakers and crank up the vol-ume. When you touch the left channel wire, you’ll hear a buzzing out of the left speaker. When you touch the right channel wire, you’ll hear a buzzing out of the right speaker. When you touch the ground, you won’t hear anything. Solder the piezo ground (black) to the ex-tender cable ground. Solder the right and left channels together to the piezo signal (red). Tape up the connections individually and gently pull them through the ¼" hole (Figure K).
9. Install the string.Slice a wedge off the side of a single-hole rubber stopper. Push the ball end of the string through the notched hole and pull the string so the ball locks securely under the notch. While holding tension on the string, feed the other end through the wedged rubber stopper and into the hole of the tuning machine shaft (Figure L). Rotate the
118 Make: Volume 09
MUSIC
M_115-119_DIYM_F1.indd 118M_115-119_DIYM_F1.indd 118 1/24/07 9:26:15 AM1/24/07 9:26:15 AM

tuning machine until the string is tight enough to stay in place, making sure the string rests on the center of the pickup rubber (Figure M). Notice that we haven’t glued the piezo ele-ment to the PVC pipe. The free-floating pickup guarantees that it is lined up with the string, preventing sideways forces that cause the pickup to distort. You now have a fretless guitar. The gap between the string and PVC pipe should be uniform along the neck. If the string hits the PVC pipe when you pluck it, increase the size of the nut (wedged rubber stopper) and pickup rubber.
10. Add the frets.Frets stop the string at fixed distances to produce discrete notes. If you want to add frets, tighten about 12 cable ties evenly spaced along the length of the neck. If you have a good musical ear, slide each of them to produce a chromatic scale (E, F, F#, G, etc.). If you have no idea what this means, borrow a guitar tuner from a musician friend and turn the machine tuner so it produces an E note when the string is open (no fingers on the string). Press behind the first cable tie (closest to the
machine tuner) and move the cable tie until an F note is produced. Move the next cable tie to produce an F# note, etc. Alternately, you could slide the frets to produce a major scale (“do, re, mi”) or any scale you like, just like a sitar!
11. Learn to play.Now that you have a guitar, it’s time to play. Put on your favorite song and try and play notes that sound like the chords the band is playing. Or get together with a musician friend and have him or her teach you scales and some basic riffs (series of notes). If nothing else, crank up the music, pluck away, and look cool. It works for music videos and it can work for you.
KJ
Fig. J: Feed the cable through the non-notched hole.Fig. K: Wire the pickup and gently pull the connecting wires through.
Fig. L: Install the wedged rubber-stopper nut.Fig. M: Make sure the guitar string rests on the center of the pickup's rubber foot.
Tom Zimmerman is an inventor, educator, and researcher
at the IBM Almaden Research Center who loves gadgets,
LEDs, synthesizers, and hooking people up to computers.
ML
119Make:
M_115-119_DIYM_F1.indd 119M_115-119_DIYM_F1.indd 119 1/31/07 8:20:53 AM1/31/07 8:20:53 AM