storet version 2.0.6 report module user guide · information managed in a storet database....
TRANSCRIPT

STORET Version 2.0.6Report Module
User Guide
STORET Technical Support
United States Environmental Protection AgencyOffice of Water

iiiSTORET Report Module User Guide Version 2.0.6
CONTENTS
INTRODUCTION . . . . . . . . . . . . . . . . . . . . . . . . . . . . . . . . . . . . . . . . . . . . . . . . . . . . . . . . . . . . 1System Requirements . . . . . . . . . . . . . . . . . . . . . . . . . . . . . . . . . . . . . . . . . . . . . . . . . . . . . 1Installation . . . . . . . . . . . . . . . . . . . . . . . . . . . . . . . . . . . . . . . . . . . . . . . . . . . . . . . . . . . . . 1Upgrades . . . . . . . . . . . . . . . . . . . . . . . . . . . . . . . . . . . . . . . . . . . . . . . . . . . . . . . . . . . . . . 2Opening the STORET Report Module . . . . . . . . . . . . . . . . . . . . . . . . . . . . . . . . . . . . . . . 2
MAIN MENU (RPT1) . . . . . . . . . . . . . . . . . . . . . . . . . . . . . . . . . . . . . . . . . . . . . . . . . . . . . . . . . 2Printed Reports . . . . . . . . . . . . . . . . . . . . . . . . . . . . . . . . . . . . . . . . . . . . . . . . . . . . . . . . . . 3File Exports . . . . . . . . . . . . . . . . . . . . . . . . . . . . . . . . . . . . . . . . . . . . . . . . . . . . . . . . . . . . 3Help . . . . . . . . . . . . . . . . . . . . . . . . . . . . . . . . . . . . . . . . . . . . . . . . . . . . . . . . . . . . . . . . . . 3
REPORT SELECTION (RPT2) . . . . . . . . . . . . . . . . . . . . . . . . . . . . . . . . . . . . . . . . . . . . . . . . . 4
REPORT PARAMETERS (RPT3) . . . . . . . . . . . . . . . . . . . . . . . . . . . . . . . . . . . . . . . . . . . . . . 5Filters and Restricters . . . . . . . . . . . . . . . . . . . . . . . . . . . . . . . . . . . . . . . . . . . . . . . . . . . . 8Operators . . . . . . . . . . . . . . . . . . . . . . . . . . . . . . . . . . . . . . . . . . . . . . . . . . . . . . . . . . . . . . 8Built-in Filtering . . . . . . . . . . . . . . . . . . . . . . . . . . . . . . . . . . . . . . . . . . . . . . . . . . . . . . . . 8All versus Selected Indicator Field . . . . . . . . . . . . . . . . . . . . . . . . . . . . . . . . . . . . . . . . . . . 8Save Report Parameters . . . . . . . . . . . . . . . . . . . . . . . . . . . . . . . . . . . . . . . . . . . . . . . . . . . 9Load Report Parameters . . . . . . . . . . . . . . . . . . . . . . . . . . . . . . . . . . . . . . . . . . . . . . . . . . . 9Preview . . . . . . . . . . . . . . . . . . . . . . . . . . . . . . . . . . . . . . . . . . . . . . . . . . . . . . . . . . . . . . 10Print . . . . . . . . . . . . . . . . . . . . . . . . . . . . . . . . . . . . . . . . . . . . . . . . . . . . . . . . . . . . . . . . . 10Export . . . . . . . . . . . . . . . . . . . . . . . . . . . . . . . . . . . . . . . . . . . . . . . . . . . . . . . . . . . . . . . . 10
SELECTION LIST (RPT4) . . . . . . . . . . . . . . . . . . . . . . . . . . . . . . . . . . . . . . . . . . . . . . . . . . . 10Sort by ID . . . . . . . . . . . . . . . . . . . . . . . . . . . . . . . . . . . . . . . . . . . . . . . . . . . . . . . . . . . . . 12Sort by Name . . . . . . . . . . . . . . . . . . . . . . . . . . . . . . . . . . . . . . . . . . . . . . . . . . . . . . . . . . 12Search by ID, Search by Name . . . . . . . . . . . . . . . . . . . . . . . . . . . . . . . . . . . . . . . . . . . . 12Select . . . . . . . . . . . . . . . . . . . . . . . . . . . . . . . . . . . . . . . . . . . . . . . . . . . . . . . . . . . . . . . . 13Select All . . . . . . . . . . . . . . . . . . . . . . . . . . . . . . . . . . . . . . . . . . . . . . . . . . . . . . . . . . . . . 13Deselect . . . . . . . . . . . . . . . . . . . . . . . . . . . . . . . . . . . . . . . . . . . . . . . . . . . . . . . . . . . . . . 13Deselect All . . . . . . . . . . . . . . . . . . . . . . . . . . . . . . . . . . . . . . . . . . . . . . . . . . . . . . . . . . . 13Accept . . . . . . . . . . . . . . . . . . . . . . . . . . . . . . . . . . . . . . . . . . . . . . . . . . . . . . . . . . . . . . . 13
STATIONS BY LOCATION (RPT6) . . . . . . . . . . . . . . . . . . . . . . . . . . . . . . . . . . . . . . . . . . . 14
DATE SELECTION (RPT7) . . . . . . . . . . . . . . . . . . . . . . . . . . . . . . . . . . . . . . . . . . . . . . . . . . 16
FROM DATE/TO DATE (RPT5) . . . . . . . . . . . . . . . . . . . . . . . . . . . . . . . . . . . . . . . . . . . . . . . 17
ABOUT THE STORET REPORT MODULE . . . . . . . . . . . . . . . . . . . . . . . . . . . . . . . . . . . . 18
ivSTORET Report Module User Guide Version 2.0.6
EXHIBITS
Exhibit 1. RPT1 Main Menu . . . . . . . . . . . . . . . . . . . . . . . . . . . . . . . . . . . . . . . . . . . . . . . . . . . . 3Exhibit 2. RPT2 Report Selection . . . . . . . . . . . . . . . . . . . . . . . . . . . . . . . . . . . . . . . . . . . . . . . . 4Exhibit 3. RPT3 Report Parameters . . . . . . . . . . . . . . . . . . . . . . . . . . . . . . . . . . . . . . . . . . . . . . . 5Exhibit 4. Report Parameters . . . . . . . . . . . . . . . . . . . . . . . . . . . . . . . . . . . . . . . . . . . . . . . . . . . . 6Exhibit 5. RPT4 Selection List . . . . . . . . . . . . . . . . . . . . . . . . . . . . . . . . . . . . . . . . . . . . . . . . . 11Exhibit 6. RPT6 Station by Location . . . . . . . . . . . . . . . . . . . . . . . . . . . . . . . . . . . . . . . . . . . . . 14Exhibit 7. Station Location Points . . . . . . . . . . . . . . . . . . . . . . . . . . . . . . . . . . . . . . . . . . . . . . . 15Exhibit 8. RPT7 Date Selection . . . . . . . . . . . . . . . . . . . . . . . . . . . . . . . . . . . . . . . . . . . . . . . . . 17Exhibit 9. RPT5 From Date/To Date . . . . . . . . . . . . . . . . . . . . . . . . . . . . . . . . . . . . . . . . . . . . . 18

1STORET Report Module User Guide Version 2.0.6
INTRODUCTION
The STORET Report Module is intended for use with a STORET database installed on a stand-alone workstation or a dedicated server. The STORET Report Module generates pre-formattedreports for viewing and/or printing, and produces data exports as delimited text files ofinformation managed in a STORET database. Pre-formatted reports may be printed orconverted into a variety of output file types. Exported data in flat file format may be analyzedthrough third-party applications like spreadsheets and Geographic Information Systems (GIS). This user guide provides detailed information on how to use the STORET Report Module.
System Requirements
The following may be required to install and run the STORET Report Module provided on theSTORET v2.0 Compact Disk (CD), Disk 1.
Minimum Hardware Requirements:
C 250 megabytes (MB) of free space on your hard drive.C Pentium II 200 megahertz (MHz) processor.C 128 MB Random Access Memory (RAM).C CD-Read Only Memory (ROM) drive.
Minimum Software Requirements:
C Windows 98 SE, Windows NT v4.0, Windows 2000, or Windows XP.C Connectivity to a STORET v2.0 database.C Oracle 8i database version 8.1.7.0.0 or higher.C At least one installed print driver.C Oracle 8i or higher Client with Oracle Provider for Object Linking and Embedding
(OLE) Database (DB).
It is not necessary to have the STORET Data Entry Module nor a STORET database installedon your computer to install and run the STORET Report Module. The STORET ReportModule can operate in a client-server environment.
Installation
Please see the STORET v2.0 Installation Guide for assistance installing the STORET ReportModule provided on the STORET v2.0 Compact Disk (CD), Disk 1. For STORET ReportModule upgrades, use the installation instructions provided with those software packages.
2STORET Report Module User Guide Version 2.0.6
Upgrades
Upgrades to the STORET Report Module are currently intended for distribution via theEnvironmental Protection Agency (EPA) STORET web site:http://www.epa.gov/storet/updates.html.
Opening the STORET Report Module
1. If running the STORET database locally, make sure the STORET database is started. You may do this from the STORET Data Entry Module v2.0 Program Group.
2. From Windows <Start>, select <Programs>, program group<STORET Report Module v2.0>, then <STORET Report Module v2.0>.
3. Connect to your local or server STORET database by entering the user name, passwordand database name (storuser, storuser, storet respectively by default). Due to variedOracle configurations, entering a database name may not be necessary, or may causeproblems connecting.
MAIN MENU (RPT1)
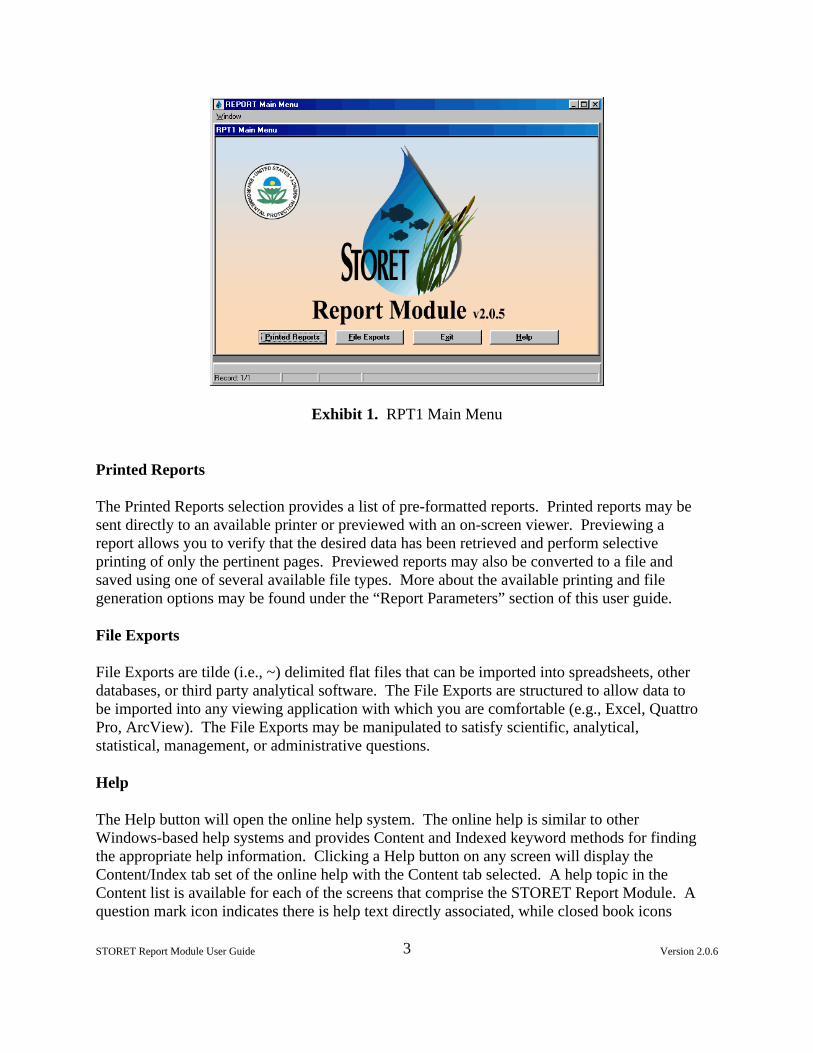
The Main Menu is displayed upon opening the STORET Report Module (Exhibit 1). Theversion number of the STORET Report Module is shown on this screen. From here, the twodifferent report types, Printed Reports or File Exports, can be selected by clicking therespective buttons. The available reports will be different between the Printed Reports and FileExports. The online help system is available by clicking on the <Help> button. To exit theSTORET Report Module, click the <Exit> button or the <X> in the upper right hand corner. Clicking <X> from any window in the STORET Report Module will close the STORETReport Module. Returning back to the Main Menu while using the STORET Report Modulewill allow you to change to a different report type.
3STORET Report Module User Guide Version 2.0.6
Exhibit 1. RPT1 Main Menu
Printed Reports
The Printed Reports selection provides a list of pre-formatted reports. Printed reports may besent directly to an available printer or previewed with an on-screen viewer. Previewing areport allows you to verify that the desired data has been retrieved and perform selectiveprinting of only the pertinent pages. Previewed reports may also be converted to a file andsaved using one of several available file types. More about the available printing and filegeneration options may be found under the “Report Parameters” section of this user guide.
File Exports
File Exports are tilde (i.e., ~) delimited flat files that can be imported into spreadsheets, otherdatabases, or third party analytical software. The File Exports are structured to allow data tobe imported into any viewing application with which you are comfortable (e.g., Excel, QuattroPro, ArcView). The File Exports may be manipulated to satisfy scientific, analytical,statistical, management, or administrative questions.
Help
The Help button will open the online help system. The online help is similar to otherWindows-based help systems and provides Content and Indexed keyword methods for findingthe appropriate help information. Clicking a Help button on any screen will display theContent/Index tab set of the online help with the Content tab selected. A help topic in theContent list is available for each of the screens that comprise the STORET Report Module. Aquestion mark icon indicates there is help text directly associated, while closed book icons
4STORET Report Module User Guide Version 2.0.6
specify topics that have additional choices available. Each help text screen may also provide alink to related topics and/or examples. The Index tab will display a list of related keywords inalphabetical order. Selecting a keyword will open a help text screen or a list of topic matches,depending on how many topics are related to the chosen keyword.
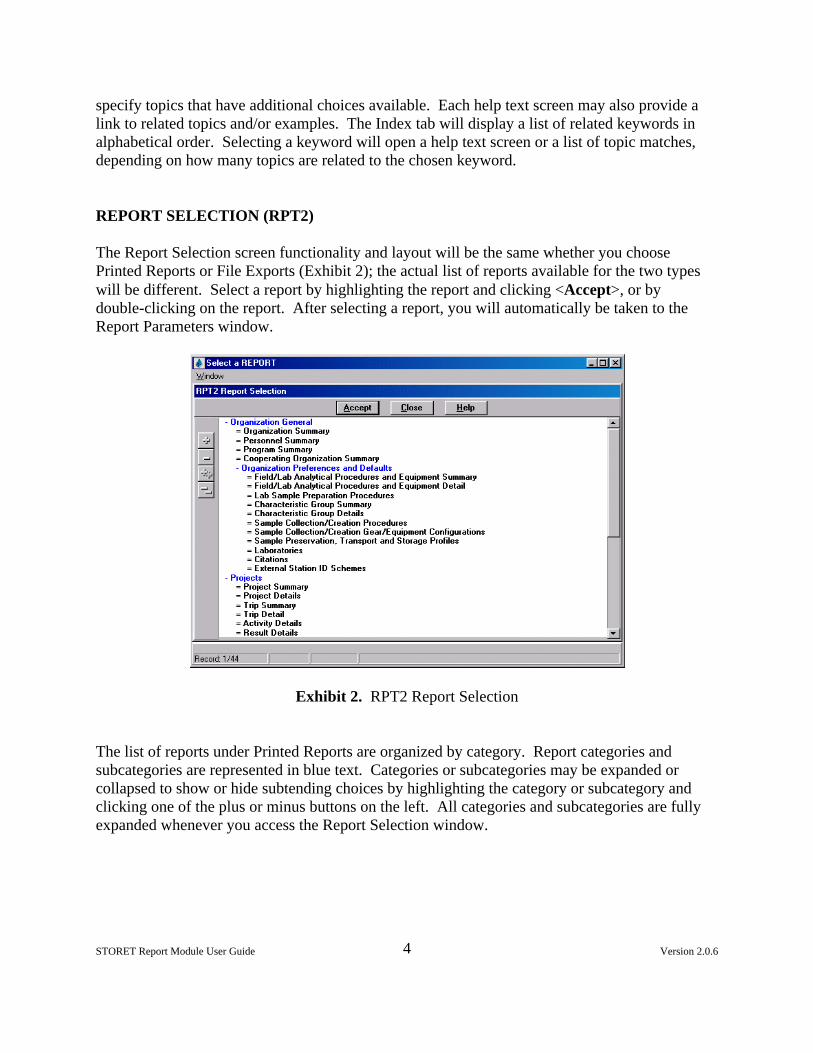
REPORT SELECTION (RPT2)
The Report Selection screen functionality and layout will be the same whether you choosePrinted Reports or File Exports (Exhibit 2); the actual list of reports available for the two typeswill be different. Select a report by highlighting the report and clicking <Accept>, or bydouble-clicking on the report. After selecting a report, you will automatically be taken to theReport Parameters window.
Exhibit 2. RPT2 Report Selection
The list of reports under Printed Reports are organized by category. Report categories andsubcategories are represented in blue text. Categories or subcategories may be expanded orcollapsed to show or hide subtending choices by highlighting the category or subcategory andclicking one of the plus or minus buttons on the left. All categories and subcategories are fullyexpanded whenever you access the Report Selection window.
5STORET Report Module User Guide Version 2.0.6
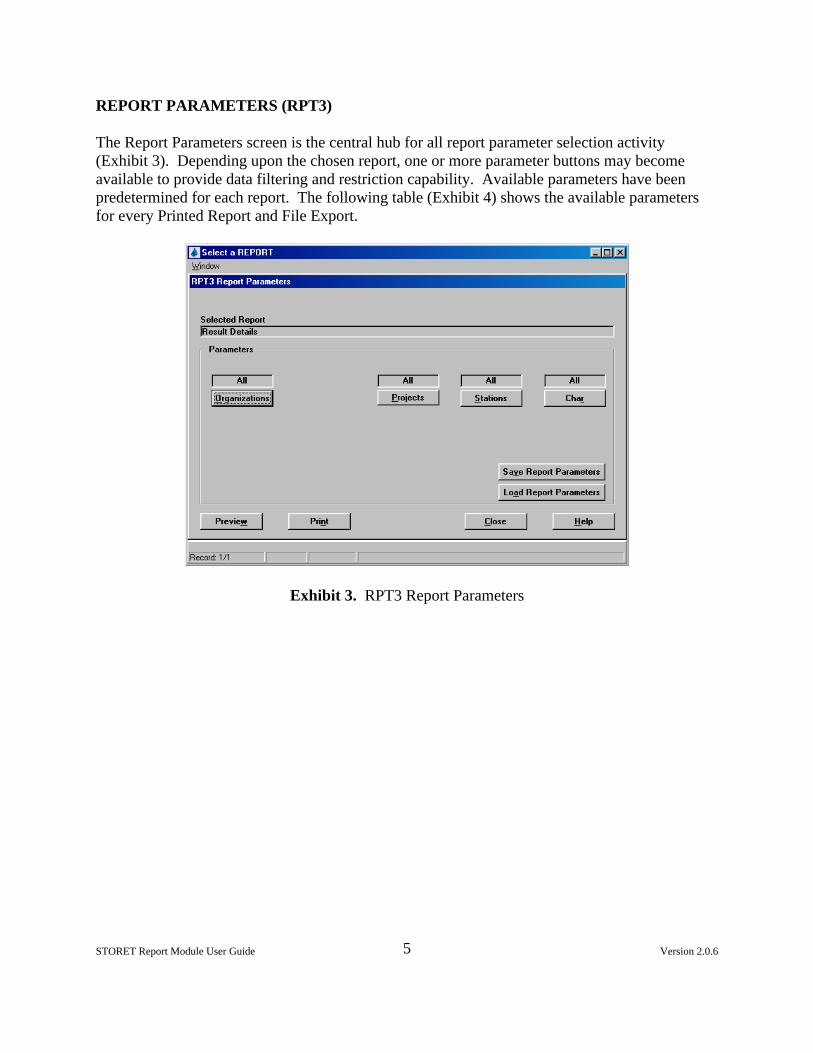
REPORT PARAMETERS (RPT3)
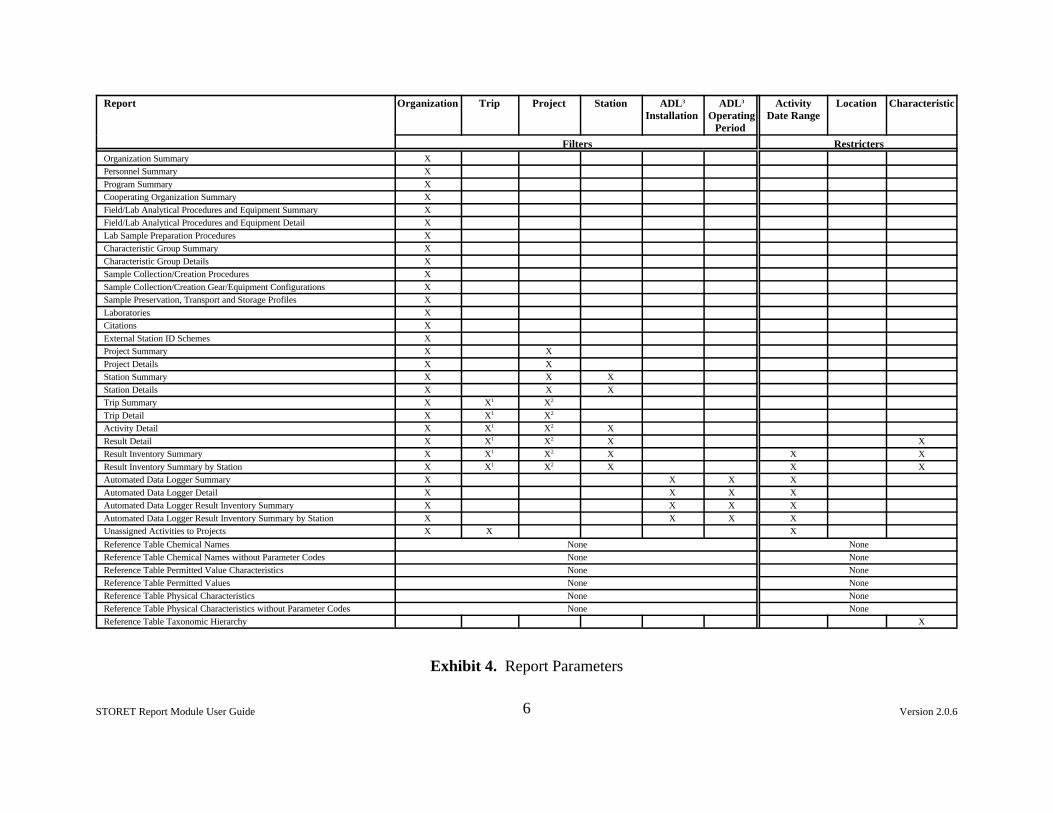
The Report Parameters screen is the central hub for all report parameter selection activity(Exhibit 3). Depending upon the chosen report, one or more parameter buttons may becomeavailable to provide data filtering and restriction capability. Available parameters have beenpredetermined for each report. The following table (Exhibit 4) shows the available parametersfor every Printed Report and File Export.
Exhibit 3. RPT3 Report Parameters
6STORET Report Module User Guide Version 2.0.6
Report Organization Trip Project Station ADL3
Installation ADL3
OperatingPeriod
ActivityDate Range
Location Characteristic
Filters RestrictersOrganization Summary XPersonnel Summary XProgram Summary XCooperating Organization Summary XField/Lab Analytical Procedures and Equipment Summary XField/Lab Analytical Procedures and Equipment Detail XLab Sample Preparation Procedures XCharacteristic Group Summary XCharacteristic Group Details XSample Collection/Creation Procedures XSample Collection/Creation Gear/Equipment Configurations XSample Preservation, Transport and Storage Profiles XLaboratories XCitations XExternal Station ID Schemes XProject Summary X XProject Details X XStation Summary X X XStation Details X X XTrip Summary X X1 X2
Trip Detail X X1 X2
Activity Detail X X1 X2 XResult Detail X X1 X2 X XResult Inventory Summary X X1 X2 X X XResult Inventory Summary by Station X X1 X2 X X XAutomated Data Logger Summary X X X XAutomated Data Logger Detail X X X XAutomated Data Logger Result Inventory Summary X X X XAutomated Data Logger Result Inventory Summary by Station X X X XUnassigned Activities to Projects X X X
Reference Table Chemical Names None NoneReference Table Chemical Names without Parameter Codes None NoneReference Table Permitted Value Characteristics None NoneReference Table Permitted Values None NoneReference Table Physical Characteristics None NoneReference Table Physical Characteristics without Parameter Codes None NoneReference Table Taxonomic Hierarchy X
Exhibit 4. Report Parameters

Report Organization Trip Project Station ADL3
Installation ADL3
OperatingPeriod
ActivityDate Range
Location Characteristic
Filters Restricters
7STORET Report Module User Guide Version 2.0.6
Reference Table Taxonomic Names XExport: Automated Data Logger Detail X X X XExport: Station Summary X X XExport: Station Summary Export (Web Default) X X X XExport: Results Physical/Chemical Small Export X X X X XExport: Results Physical/Chemical Medium Export X X X X XExport: Results Physical/Chemical Large Export X X X X XExport: Results Physical/Chemical Giant Export X X X X X XExport: Results Physical/Chemical Export (Web Default) X X X X X XExport: Results Biological Small Export X X X X XExport: Results Biological Medium Export X X X X XExport: Results Biological Large Export X X X X XExport: Results Biological Giant Export X X X X X XExport: Results Biological Export (Web Default) X X X X X XExport: Results Multi-Taxon Population Census Export X X X X X XExport: Results Habitat Assessment Export X X X X X XExport: Results Habitat Assessment Export (Web Default) X X X X X XExport: Reference Table Chemical Names Export None NoneExport: Reference Table Chemical Names without Parameter Codes Export None NoneExport: Reference Table Taxonomic Hierarchy Export X
1 - Trip parameter not available when generated from the Projects category.2 - Project parameter not available when generated from the Trips category.3 - Automated Data Logger.
Exhibit 4. Report Parameters (continued)
8STORET Report Module User Guide Version 2.0.6
Filters and Restricters
The report parameters fall into two general types: filters and restricters. Parameters that arefilters select directly from the data entered in the STORET database. For example, the<Stations> parameter will allow selection of the Stations in the database. Parameters that arerestricters are not related directly to data entered. For example, the <Date Range> parameteron various reports provides the capability to designate an Activity time period from which youwould like to retrieve data. The database may or may not have Activities performed during thedesignated time period, therefore, designating an Activity time period for which no Activitiesoccurred would produce a null report (i.e., a report with titles and page headers, but no data). View the above table (Exhibit 4) to determine which parameters are filters and which arerestricters.
Operators
The logical operator across all parameters, both filters and restricters, is AND. The logicaloperator within a parameter (i.e., selecting multiple Stations), is OR. For example, you want toget all the result data on water temperature on a given section of stream with 10 stations. Youcould go directly to the <Station> parameter and select the Stations on that particular sectionof stream. Then go to the <Characteristic> parameter, search for temperature, and choose“temperature, water”. When the Result Detail report is run, the only data appearing on thereport would be for the selected Stations that have “temperature, water” readings. If only twoof the ten selected Stations have “temperature, water” data, then only two Stations and theirdata will appear on the report. If none of the ten selected Stations have “temperature, water”data, then a blank report is generated.
Built-in Filtering
Due to the hierarchical nature of STORET data, the STORET Report Module has built-infunctionality to reduce the possibility of generating a null report when using the filterparameters. The available selections for a given parameter are based on the selections ofprevious parameters. For example, if one Organization is selected, only those Projectsassociated with that Organization are available for selection. If one of those Projects isselected, only the Stations associated with that Project are available for selection. With thisutility a user can see a list of Stations associated with a Project before running a report. Thebuilt-in filtering reduces the list of available selections based on known data associations toassist in easier and quicker selection.
All versus Selected Indicator Field
Above each parameter button is a field which indicates whether “All” or “Selected” data isbeing retrieved for that parameter. The default for each parameter is to provide “All” the data. If you have made one or more selections for a given parameter, the indicator field will changeto “Selected”. This indicator acts as a reminder for when selections have been made, or when
9STORET Report Module User Guide Version 2.0.6
re-selection is necessary. Selecting all available choices will change the indicator to “All”. For system performance purposes, it is not recommended to select all the choices when all dataregarding a parameter are desired.
Save Report Parameters
The Report Module allows the user to save parameters selections to a file. After makingselections, press the <Save Report Parameters> button to save the selections for later use. When the Save Parameters button is clicked, a window will appear that will allow you to savethe file to the location of your choice and designate a file name. The default file name is“Par.TXT”. These files may be freely renamed or overwritten and reused. There is nodependency between the parameter file name and system functionality. Note that longer filenames may cause an error on some operating systems.
Load Report Parameters
The Report Module allows the user to populate report parameters with selections previouslysaved. This functionality will save time associated with making individual selections, andreduces the possibility of error. To load a saved parameter file, click the <Load ReportParameters> button. A window will appear that will allow you to navigate to the location ofthe file and select the file for loading. Parameters may also be changed after they are loaded. This flexibility allows users to reuse a base set of parameters, and change those initialselections to fit current needs. For example, after hand-selecting several dozen Stations, ahandful of Characteristics, and choosing to get an export of result data for Activities during themonth of August, the selections may be saved. Next month, you may want to get result datafrom those same Stations and Characteristics. The saved parameter selections can be loadedfrom the file, the Activity date range changed to September, and the result export run withouthaving to re-select a long list of Stations and/or Characteristics.
The usefulness of the saved parameters file does not end with a single report. The files are notreport specific and, therefore, can be reused for any other report. Reports that share the sameparameters will have those parameter selections populated, while reports that do not share thesame parameters will have those parameters ignored without any ill effects. For example, youselect an Organization and some Stations to generate a Station Summary report. Afterexamining the report, you determine that these are indeed the Stations that are needed and savethe parameter file. Now, wanting to get a Result Detail report from those Stations, the ResultDetail report can be selected and the same parameter file loaded. The Organization and Stationselections will be automatically populated for the Result Detail report. You can then either runthe report, or make additional parameter selections and modifications. The same process istrue in reverse. If parameter selections were saved from Organizations, Stations, andCharacteristics for generating a Result Detail report, that saved parameter file could be loadedto run the Station Summary report. The selected Organizations and Stations would be loaded;the Characteristic selections, inapplicable for the Station Summary report, would be ignored.

10STORET Report Module User Guide Version 2.0.6
Preview
For Printed Reports, clicking the <Preview> button will open a new window and display thegenerated report. The Previewer allows a variety of functions such as:
C Viewing each page of the report.C Sending the report to a printer other than the Windows default.C Printing selected pages.C Generating a Portable Document Format (PDF) file.C Generating a Hypertext Markup Language (HTML) or HTML Style Sheet file.C Generating a Rich Text Format (RTF) file.C Generating a Postscript file.C Generating a delimited Text (TXT) file.C Generating an Extensible Markup Language (XML) file.C Zooming in or out for easier viewing.
Documents and graphics stored in the database may be retrieved by pressing the Document/Graphic
button on reports while in the Previewer. A dialog box will appear allowing the document orgraphic to be saved to a file. The default file name is the same as title of the graphic stored in thedatabase. Documents and Graphics may be present for Projects, Stations, Station Visits,Activities, Results, Citations, and Operating Periods.
It should be noted that the Previewer occasionally displays portions of a report imperfectly. The actual data should appear correctly, if generated physically (e.g., sent to printer, or a PDF). Some Oracle provided features such as Mail, Distribute, and the Oracle Help (i.e., ?), may notwork properly in this application, or be active.
For Printed Reports, clicking <Print> will generate the report and send it immediately to thedefault printer set in your Windows printer settings.
Export
For File Exports, clicking <Export> will generate the file and provide a window that willallow you to save the file to the location of your choice and designate a file name. The defaultfile name is an abbreviated name of the report which can be renamed, and has a “.txt”extension. Note that longer file names may cause an error on some operating systems.
SELECTION LIST (RPT4)
The Selection List window is launched after selecting any of the parameters except for<Location> and <Date Range>. This screen provides the functionality to make selections

11STORET Report Module User Guide Version 2.0.6
from the list of all available choices for the given parameter (Exhibit 5). The bottom box listsall the available choices while the top box lists the items selected. When a report is run, onlythe selections in the top box will be considered as criteria for showing data in the report.
Exhibit 5. RPT4 Selection List
The columns displayed in both boxes are ordered from left to right as Organization ID,parameter ID, parameter name or date/time. The parameter ID and name depend upon theparameter (e.g., Station, Project) selected on the Report Parameter screen. The date/timeparameter is displayed instead of parameter name for the Trip and Automated Data Loggerparameters. Other unique display formats are as follows:
C Characteristics - Characteristics are not immediately displayed in the “Available” listand must be searched. Enter at least the first few letters of the desired Characteristicname and press <Search by Name> to retrieve a Characteristic list. All Characteristicsbeginning with the letters entered will be displayed. Enter more letters of theCharacteristic name to narrow the search. Characteristics are not associated with anyIDs, therefore none are displayed.
C Automated Data Logger Installation IDs - The ordered columns display theOrganization ID in the first column, Installation ID in the second column, and theInstallation Date and Start Time in the third column. The column displaying the Dateand Time may be sorted on or searched against to help find and select the appropriaterecords.
12STORET Report Module User Guide Version 2.0.6
C Automated Data Logger Operating Periods - The ordered columns display theOrganization ID in the first column, Log File Name in the second column, and aconcatenation of the Operating Period Start Date, Start Time, Stop Date, and StopTime, in the third column. The column displaying the Date and Time may be sorted onor searched against to help find and select the appropriate records.
C Trips - The ordered columns display the Organization ID in the first column, Trip ID inthe second column, and a concatenation of the Trip Start Date and Start Time in thethird column. The column displaying the Date and Time may be sorted on or searchedagainst to help find and select the appropriate records.
For system performance reasons, it is not recommended to select all available choices when alldata regarding a parameter is desired. In general, actively selecting more than 300 selectionsfor any one parameter may cause system performance problems. For example, if you want allresults in a Result Detail report for a specific Characteristic, select the Characteristic, but leavethe default “all” for other parameter selections. System performance would be compromisedby actively selecting all Organizations, Projects, and Trips along with the Characteristic.
Depending upon the parameter, subsequent filter parameter selections may be reduced if allchoices are actively selected. For example, a database may contain 500 total Stations but only200 Stations have Projects assigned to them. The other 300 are therefore unuseable for Tripsand subsequent Activities. Actively selecting all Projects will make available for selection the200 Stations assigned to Projects, rather than all 500 Stations in the database.
Sort by ID
Click the <Sort by ID> button to sort the list of available selections by the parameter ID.
Sort by Name
Click the <Sort by Name> button to sort the list of available selections by the parameter name.
Search by ID, Search by Name
The search utility allows searching by ID or Name from the list of available selections. Thisutility is most useful when the list of available selections is very large (e.g., thousands ofavailable selections). The specific ID or Name will depend upon which parameter has beenchosen. For example, if you have chosen the Station parameter, then the Search function willoperate against the Station ID or Station Name. If you have chosen the Project parameter, thenthe Search function will operate against the Project ID or Project Name.
To use the Search function, type into the entry field the first few characters, numbers, or lettersfor the ID or Name then click <Search by ID> or <Search by Name>. The search is not casesensitive. When the search function is executed, the available selections will be automatically
13STORET Report Module User Guide Version 2.0.6
sorted by parameter ID or Name, depending on which search you chose. Searches can befurther narrowed by increasing the amount of search criteria. For example, to find all theStations for a single Organization beginning with the Station name “Potomac”, enter the letter“P” into the entry window, and click <Search by Name>. The cursor will highlight the firstStation name in the available selections beginning with the letter “P” and list the Stationsalphabetically by name. There may be numerous Stations that begin with “P”, such as inPatapsco or Patuxent, which will appear alphabetically before the “Potomac” Stations. Tonarrow the search and bring you closer to the Stations beginning with the name “Potomac”,you may type in additional search characters such as “Po” or “Pot” and click<Search by Name> again. Scrolling down the list would also eventually bring you to the“Potomac” Stations.
Select
To make a selection from the available choices for a parameter, highlight a row in the“Available” list and click <Select>. This will remove the selection from the “Available” listand place it in the “Selected” list. A double-click on a row will also move the selection. Inorder to make a group selection, highlight a row then press and hold the <Shift> or <Ctrl> keywhile clicking other rows. Holding the <Ctrl> key will select only the additional rows directlyhighlighted. Holding the <Shift> key will select all rows between the first highlighted row andthe second highlighted row.
Select All
Clicking the <Select All> button moves all rows in the “Available” list to the “Selected” list.
Deselect
To remove a few selections from all the selected choices for a parameter, highlight a row orgroup of rows in the Selected list and click <Deselect>. This will remove the selection fromthe “Selected” list and put it in the “Available” list.
Deselect All
Clicking the <Deselect All> button moves all rows in the “Selected” list to the “Available” list.
Accept
After completing the selection process, clicking <Accept> will return to the Report Parameterswindow for report generation.
14STORET Report Module User Guide Version 2.0.6
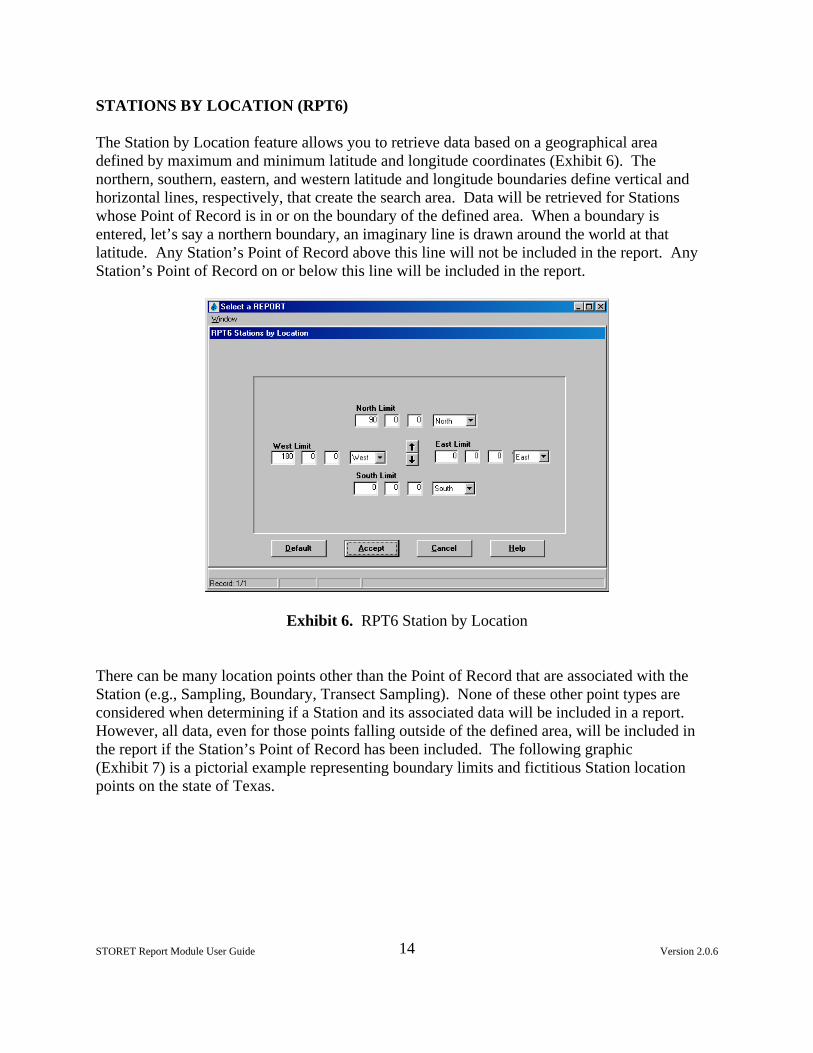
STATIONS BY LOCATION (RPT6)
The Station by Location feature allows you to retrieve data based on a geographical areadefined by maximum and minimum latitude and longitude coordinates (Exhibit 6). Thenorthern, southern, eastern, and western latitude and longitude boundaries define vertical andhorizontal lines, respectively, that create the search area. Data will be retrieved for Stationswhose Point of Record is in or on the boundary of the defined area. When a boundary isentered, let’s say a northern boundary, an imaginary line is drawn around the world at thatlatitude. Any Station’s Point of Record above this line will not be included in the report. AnyStation’s Point of Record on or below this line will be included in the report.
Exhibit 6. RPT6 Station by Location
There can be many location points other than the Point of Record that are associated with theStation (e.g., Sampling, Boundary, Transect Sampling). None of these other point types areconsidered when determining if a Station and its associated data will be included in a report. However, all data, even for those points falling outside of the defined area, will be included inthe report if the Station’s Point of Record has been included. The following graphic(Exhibit 7) is a pictorial example representing boundary limits and fictitious Station locationpoints on the state of Texas.

15STORET Report Module User Guide Version 2.0.6
Exhibit 7. Station Location Points
In the example, the shaded area represents the geographical area defined by the four boundarylimits. There are four data retrieval scenarios depicted as follows:
C The Point of Record for Station A is entirely within the defined geographic area. Allsampling information associated with Station A will be included in the report.
C The Point of Record for Station B is entirely within the defined geographic area. Allsampling information associated with Station B will be included in the report. Thisincludes the Sampling Point for Station B because the Point of Record for Station B iswithin the defined geographic area.
C The Point of Record for Station C is on the boundary of the defined geographic area. All sampling information associated with Station C will be included in the report. Ifthere were Sampling Points for Station C, they would also be included regardless oftheir location.

16STORET Report Module User Guide Version 2.0.6
C The Point of Record for Station D is outside the defined geographic area. All samplinginformation associated with Station D will not be included in the report. If there wereSampling Points for Station D, they would not be included regardless of their location.
Each boundary limit requires a Degree, Minute, and Second entry. Position the cursor into thefield you want to change and enter the desired value. The up and down arrows in the center ofthe screen will increase or decrease the value of the field in which the cursor is placed. Thedefault values represent the entire Northwest hemisphere. After entering new coordinatevalues, click the <Accept> button to return to the Report Parameters screen. Clicking<Default> will reset the coordinates to the Northwest hemisphere and return to the ReportParameters screen.
DATE SELECTION (RPT7)
The Date Selection parameter allows you to specify a single date, multiple dates, a date range,or multiple date ranges, in any combination (Exhibit 8). One method to add dates is to clickthe <From Date> and <To Date> buttons. This will invoke a calendar based selection screen. See section From Date/To Date (RPT5) for information about using the calendar. Optionally,you may directly enter dates into the From Date and To Date data entry fields. Pressing theassociated From Date or To Date button after direct entry will take you to the calendar windowand show the day, month, and year entered in a calendar based format. When a From Date andTo Date have been specified using either method, click the <Add> button to move the datesinto the top list box. The list box lists the selected dates that will be used as criteria for dataselection. If direct entry has been performed, you should verify that the date format in the topbox has been correctly interpreted into the MM/DD/YYYY,MM/DD/YYYY format. Althoughthe system will properly interpret many different date entry formats, this verification step isstill recommended. For example, entering the date “8/5/93” will yield the date “08/05/0093”. The year in this case is probably not what you had in mind, and should be modified. Datesadded to the list box can be manually edited, though doing so will circumvent the data entrychecks, and is therefore not recommended.

17STORET Report Module User Guide Version 2.0.6
Exhibit 8. RPT7 Date Selection
To enter a single date, enter the same date in the From Date and To Date fields, and click<Add>. To enter a date range, enter the beginning date in the From Date and the ending dateinto the To Date field, and click <Add>. Any number of combinations of dates and dateranges may be entered. When all entries have been made, click <Accept> to load all the datesas report selection criteria and return to the Report Parameters screen.
If only a From Date is entered when you click <Add>, the default To Date will be today’s date. If only a To Date is entered when you click <Add>, the default From Date will be January 1,1950. Removing selected dates may be done by putting the cursor in the row of the top boxwith the undesired date and clicking <Remove>.
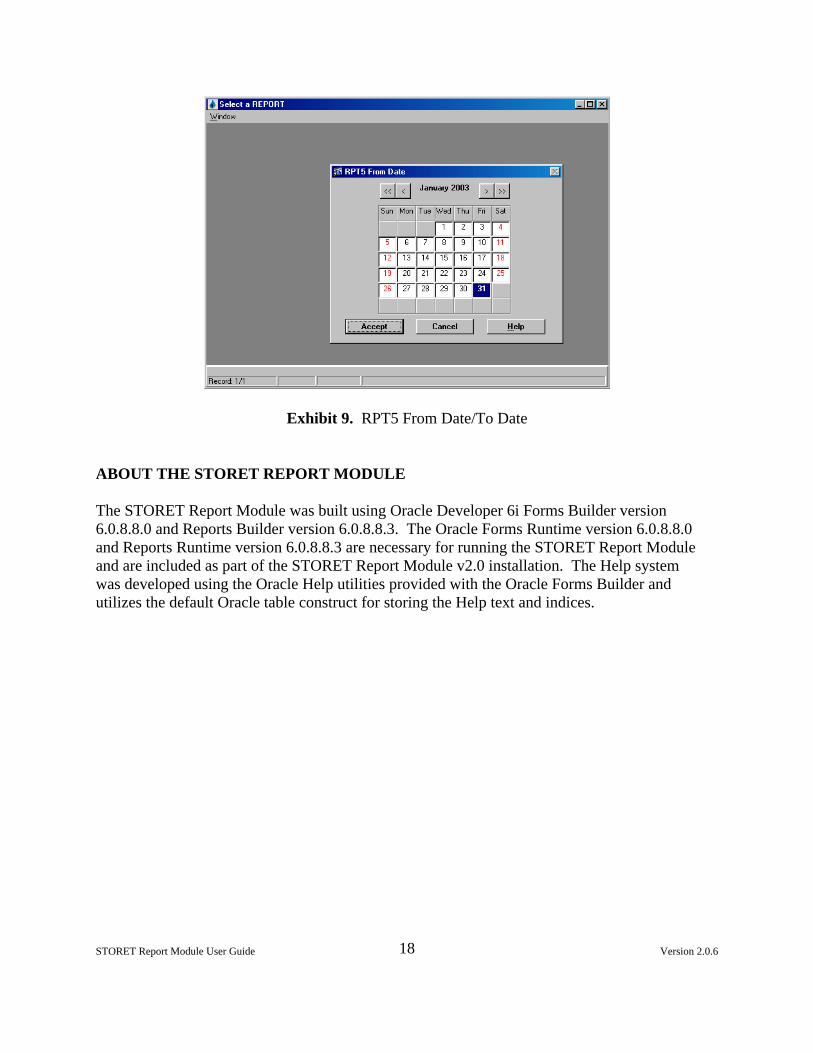
FROM DATE/TO DATE (RPT5)
The calendar-based date selection feature facilitates choosing dates for the date parameters(Exhibit 9). Select a date by highlighting the desired day and clicking <OK>. To movechronologically forward or backward one month at a time, click the > or < buttons,respectively. You may also move chronologically forward or backward one year at a time byclicking the >> or << buttons, respectively. The From Date and To Date calendar defaults totoday’s date.
18STORET Report Module User Guide Version 2.0.6
Exhibit 9. RPT5 From Date/To Date
ABOUT THE STORET REPORT MODULE
The STORET Report Module was built using Oracle Developer 6i Forms Builder version6.0.8.8.0 and Reports Builder version 6.0.8.8.3. The Oracle Forms Runtime version 6.0.8.8.0and Reports Runtime version 6.0.8.8.3 are necessary for running the STORET Report Moduleand are included as part of the STORET Report Module v2.0 installation. The Help systemwas developed using the Oracle Help utilities provided with the Oracle Forms Builder andutilizes the default Oracle table construct for storing the Help text and indices.