stimulsoft reports server manual en
DESCRIPTION
NaTRANSCRIPT
IContents
I© 2015 Stimulsoft
Table of ContentsPart I Introduction 1
................................................................................................................................... 11 System Requirements
................................................................................................................................... 12 Installation
.......................................................................................................................................................... 3NET Framework 4.5 and IIS
................................................................................................................................... 43 Login Dialog
................................................................................................................................... 74 Navigator
................................................................................................................................... 85 Server Controller
Part II Menu Account 10
................................................................................................................................... 101 Settings
................................................................................................................................... 152 About
Part III Tab Home 16
................................................................................................................................... 171 Recycle Bin
Part IV Tab Create 19
................................................................................................................................... 201 Report
.......................................................................................................................................................... 20Blank Report
.......................................................................................................................................................... 21Report from File
................................................................................................................................... 212 Data Source
.......................................................................................................................................................... 22Connection
.......................................................................................................................................................... 24New Table
.......................................................................................................................................................... 27New Query
......................................................................................................................................................... 29Parameters
......................................................................................................................................................... 31Data Columns
................................................................................................................................... 313 Scheduler
.......................................................................................................................................................... 32Type
.......................................................................................................................................................... 33Settings
......................................................................................................................................................... 33Common
......................................................................................................................................................... 34Frequency
......................................................................................................................................................... 37Repeat
......................................................................................................................................................... 38Range
......................................................................................................................................................... 38Exception
......................................................................................................................................................... 39Notify
.......................................................................................................................................................... 39Actions
......................................................................................................................................................... 40Run Report
......................................................................................................................................................... 41Run Scheduler
......................................................................................................................................................... 42Copy
......................................................................................................................................................... 43Send Email
................................................................................................................................... 434 Folder
................................................................................................................................... 445 Cloud Storage
.......................................................................................................................................................... 44Settings
................................................................................................................................... 466 Calendar
................................................................................................................................... 477 File
................................................................................................................................... 488 Contact List
................................................................................................................................... 499 Result Name
Part V Tab Users 50
................................................................................................................................... 501 New Role
.......................................................................................................................................................... 52Permision Table
................................................................................................................................... 552 Add User
II
© 2015 Stimulsoft
Part VI Tab System 56
................................................................................................................................... 561 Update
................................................................................................................................... 592 Licensing
................................................................................................................................... 613 SMTP Server Settings
................................................................................................................................... 624 Email Templates
Part VII Context Menu of Navigator 64
................................................................................................................................... 651 Menu Actions
................................................................................................................................... 662 Menu Versions
................................................................................................................................... 673 Menu Log
................................................................................................................................... 674 Menu Sharing Settings
Part VIII Report Designer 68
................................................................................................................................... 681 Tabs
.......................................................................................................................................................... 68Tab Design
......................................................................................................................................................... 68Report
......................................................................................................................................................... 69Clipboard
......................................................................................................................................................... 70Font
......................................................................................................................................................... 70Borders
......................................................................................................................................................... 70Alignment
......................................................................................................................................................... 71Text Formats
......................................................................................................................................... 71General
......................................................................................................................................... 71Number
......................................................................................................................................... 72Currency
......................................................................................................................................... 73Date
......................................................................................................................................... 74Time
......................................................................................................................................... 75Percentage
......................................................................................................................................... 76Boolean
......................................................................................................................................... 77Custom
......................................................................................................................................................... 78Styles
......................................................................................................................................... 79Color Collection Editor
.......................................................................................................................................................... 79Tab Insert
......................................................................................................................................................... 79Groups
......................................................................................................................................................... 80Components
.......................................................................................................................................................... 80Tab Page
......................................................................................................................................................... 81Page Setup
.......................................................................................................................................................... 84Tab Layout
......................................................................................................................................................... 85Arrange
......................................................................................................................................................... 86View ing Options
.......................................................................................................................................................... 86Tab Preview
......................................................................................................................................................... 87File
......................................................................................................................................................... 87Panels
......................................................................................................................................................... 87Tools
.......................................................................................................................................................... 87Status Bar
................................................................................................................................... 882 Panels
.......................................................................................................................................................... 88Properties Panel
.......................................................................................................................................................... 90Data Dictionary
.......................................................................................................................................................... 92Report Tree
................................................................................................................................... 923 Keyboard Shortcuts
................................................................................................................................... 944 Report Checker
................................................................................................................................... 955 Context Menu
................................................................................................................................... 986 Charts Editor
.......................................................................................................................................................... 99Tab Chart
.......................................................................................................................................................... 100Tab Series
.......................................................................................................................................................... 102Tab Area
.......................................................................................................................................................... 103Tab Labels

IIIContents
III© 2015 Stimulsoft
.......................................................................................................................................................... 104Tab Styles
.......................................................................................................................................................... 104Wizard
................................................................................................................................... 1117 Image
................................................................................................................................... 1138 Sub-Report
Part IX Report Viewer 115
................................................................................................................................... 1151 Toolbar
................................................................................................................................... 1162 Exports
.......................................................................................................................................................... 117Available File Formats
.......................................................................................................................................................... 117Export Formats
.......................................................................................................................................................... 119Common Export Settings
......................................................................................................................................................... 119Image Quality
......................................................................................................................................................... 119Image Resolution
......................................................................................................................................................... 119Image Comparer
......................................................................................................................................................... 119Convert Digits to Arabic
......................................................................................................................................................... 120Arabic Digits Type
......................................................................................................................................................... 120Divide Segment Pages
......................................................................................................................................................... 120Remove Empty Space at Bottom
......................................................................................................................................................... 120Use One Page Header and Footer
.......................................................................................................................................................... 120Formats w ith Fixed Page Layout
......................................................................................................................................................... 120PDF
......................................................................................................................................... 124Embedded Fonts
................................................................................................................................... 124Font Styles
......................................................................................................................................... 124Digital Signature
................................................................................................................................... 124Keys
................................................................................................................................... 124Public Key Certif icate
................................................................................................................................... 125Choosing Certif icate
................................................................................................................................... 125Placing Digital Signature Identif ier
......................................................................................................................................... 125Encryption
................................................................................................................................... 125Passw ords and Access Permission
................................................................................................................................... 126Key Length
......................................................................................................................................... 126Compatibility of Different Versions
......................................................................................................................................................... 126XPS
......................................................................................................................................................... 127Microsoft Pow er Point 2007/2010
.......................................................................................................................................................... 128Wеb Documents
......................................................................................................................................................... 130HTML
......................................................................................................................................... 130Export Modes
......................................................................................................................................... 130Exporting Images in HTML Format
......................................................................................................................................... 130Compatibility of Different Versions
......................................................................................................................................... 130Exporting Text Components
......................................................................................................................................................... 131HTML5
......................................................................................................................................................... 132MHT
.......................................................................................................................................................... 132Text Formats
......................................................................................................................................................... 132TXT
......................................................................................................................................... 134Border Types
......................................................................................................................................... 134Column Width
......................................................................................................................................... 134New Export Mode
......................................................................................................................................................... 134RTF
......................................................................................................................................... 136Export Modes
................................................................................................................................... 136Table Mode
......................................................................................................................................... 137Issues
......................................................................................................................................... 137Compatibility of Different Versions
......................................................................................................................................................... 137Word 2007/2010
......................................................................................................................................... 139Headers and Footers
................................................................................................................................... 139Page Numbering
......................................................................................................................................................... 139ODT
.......................................................................................................................................................... 140Spreadsheets
......................................................................................................................................................... 142Excel
......................................................................................................................................... 142Excel Sheets
......................................................................................................................................... 142Compatibility of Different Versions
......................................................................................................................................................... 143Excel XML
......................................................................................................................................................... 143Excel 2007/2010

IV
© 2015 Stimulsoft
......................................................................................................................................... 143Excel Sheets
......................................................................................................................................................... 143ODS
.......................................................................................................................................................... 144Data
......................................................................................................................................................... 146CSV
......................................................................................................................................... 146Controlling Exports
......................................................................................................................................................... 146DBF
......................................................................................................................................... 146Controlling Exports
......................................................................................................................................................... 147XML
......................................................................................................................................... 148Controlling Exports
......................................................................................................................................................... 148DIF
......................................................................................................................................................... 148SYLK
.......................................................................................................................................................... 149Images
......................................................................................................................................................... 150BMP
......................................................................................................................................................... 150GIF
......................................................................................................................................................... 150PNG
......................................................................................................................................................... 150TIFF
......................................................................................................................................................... 150JPEG
......................................................................................................................................................... 151PCX
......................................................................................................................................................... 151EMF
......................................................................................................................................................... 151SVG
......................................................................................................................................................... 152Compressed SVG
......................................................................................................................................................... 152Dither
.......................................................................................................................................................... 152How to Create Report for Export?
Index 0

Introduction 1
© 2015 Stimulsoft
1 Introduction
Stimulsoft Reports Server is a client-server system for data management. This product provides the ability
to simplify displaying of any data using reports, tables, charts. Data is automatically collected, visualized,
converted to the required form and delivered to end users. Functionality and power of the reporting module
is implemented by the time-tested, modern and fast Stimulsoft report engine.
The main tasks that can be solved using the report server:
Converting data from the database into multi-page reports with graphic elements;
Building and editing reports using the built-in designer;
Storing reports in the workspace of the server;
Processing data using the powerful built-in scheduler;
Notification of users about server events related to data processing, etc.
Getting started:
System requirements
Installation
Registration
Workspace:
Adding new user
Creating new role
Managing the recycle bin
Scheduler:
Type
Settings
Actions
Other actions in Navigator:
Report designer
Report viewer
Exporting reports
Creating items:
Report
Data source
Folder
Additional Navigator menu:
Actions
Versions
History
Other:
File
Calendar
Contact List
System Settings:
Licensing
SMTP Server Settings
Email Templates
1.1 System Requirements
Minimum system requirements are:
2-core processor, frequency at least 2.31 ??GHz;
2 GB of RAM;
At least 500 MB of free space;
Microsoft .NET Framework 4.5.
Internet Information Services.
1.2 Installation
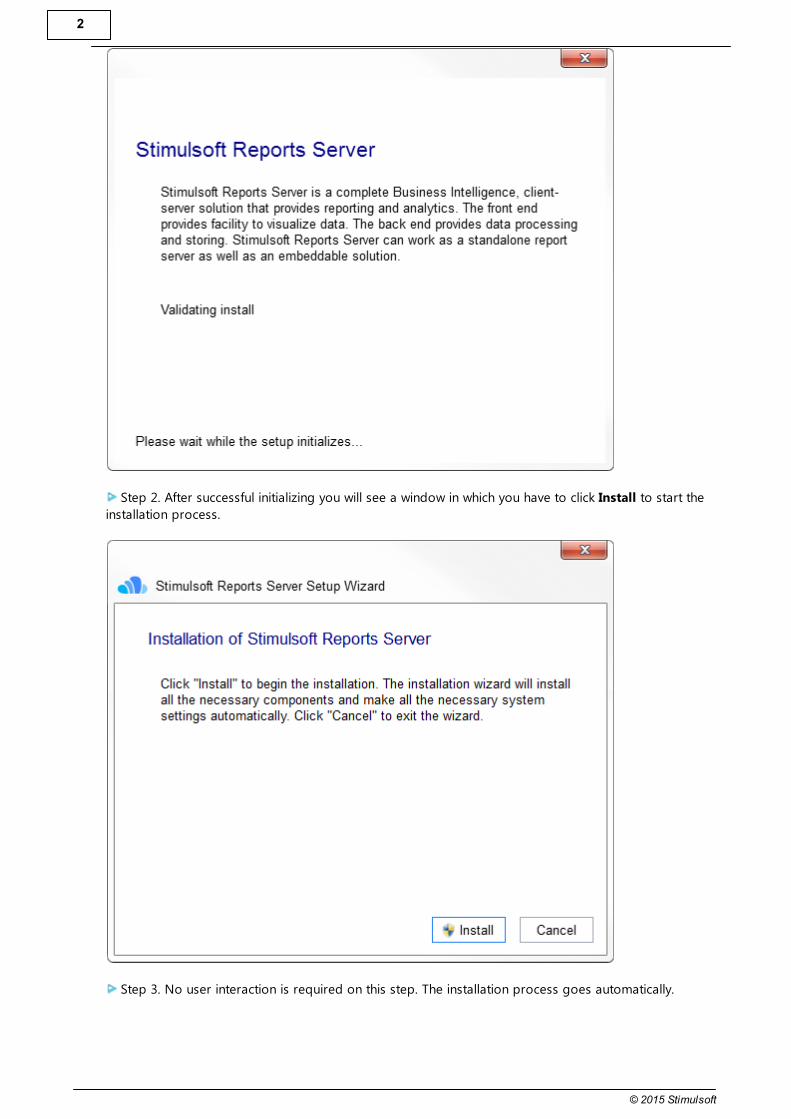
Download the package Stimulsoft Reports Server at http://www.stimulsoft.com/en/downloads . Installation
of the report server goes in several steps:
Step 1. The installer initiates configuration, checks the PC configuration.
2
© 2015 Stimulsoft
Step 2. After successful initializing you will see a window in which you have to click Install to start the
installation process.
Step 3. No user interaction is required on this step. The installation process goes automatically.
Introduction 3
© 2015 Stimulsoft
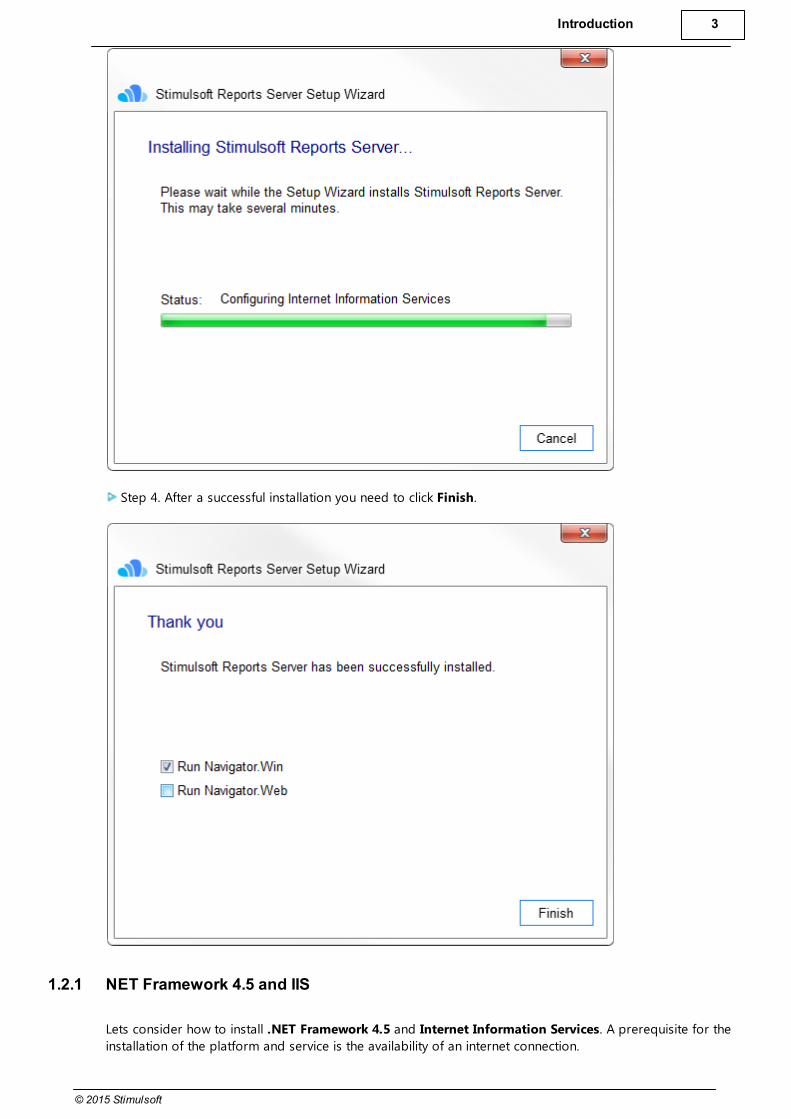
Step 4. After a successful installation you need to click Finish.
1.2.1 NET Framework 4.5 and IIS
Lets consider how to install .NET Framework 4.5 and Internet Information Services. A prerequisite for the
installation of the platform and service is the availability of an internet connection.
4
© 2015 Stimulsoft
Installing .NET Framework 4.5
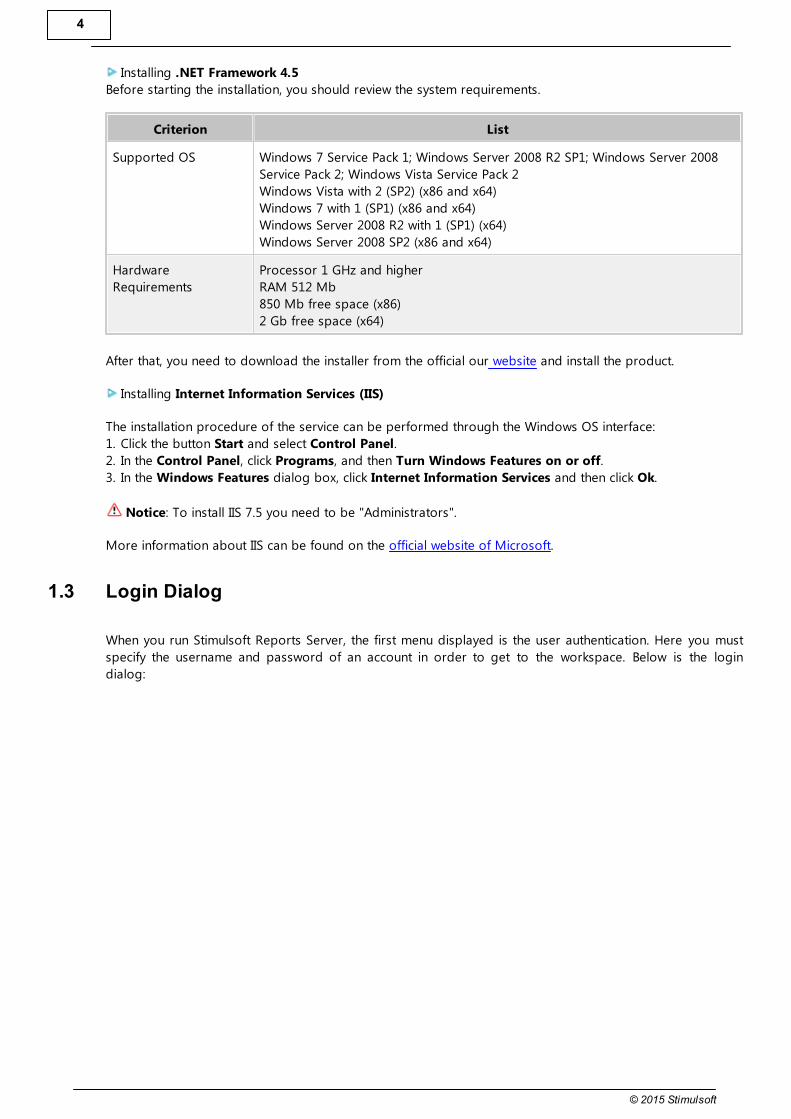
Before starting the installation, you should review the system requirements.
Criterion List
Supported OS Windows 7 Service Pack 1; Windows Server 2008 R2 SP1; Windows Server 2008
Service Pack 2; Windows Vista Service Pack 2
Windows Vista with 2 (SP2) (x86 and x64)
Windows 7 with 1 (SP1) (x86 and x64)
Windows Server 2008 R2 with 1 (SP1) (x64)
Windows Server 2008 SP2 (x86 and x64)
Hardware
Requirements
Processor 1 GHz and higher
RAM 512 Mb
850 Mb free space (x86)
2 Gb free space (x64)
After that, you need to download the installer from the official our website and install the product.
Installing Internet Information Services (IIS)
The installation procedure of the service can be performed through the Windows OS interface:
1. Click the button Start and select Control Panel.
2. In the Control Panel, click Programs, and then Turn Windows Features on or off.
3. In the Windows Features dialog box, click Internet Information Services and then click Ok.
Notice: To install IIS 7.5 you need to be "Administrators".
More information about IIS can be found on the official website of Microsoft.
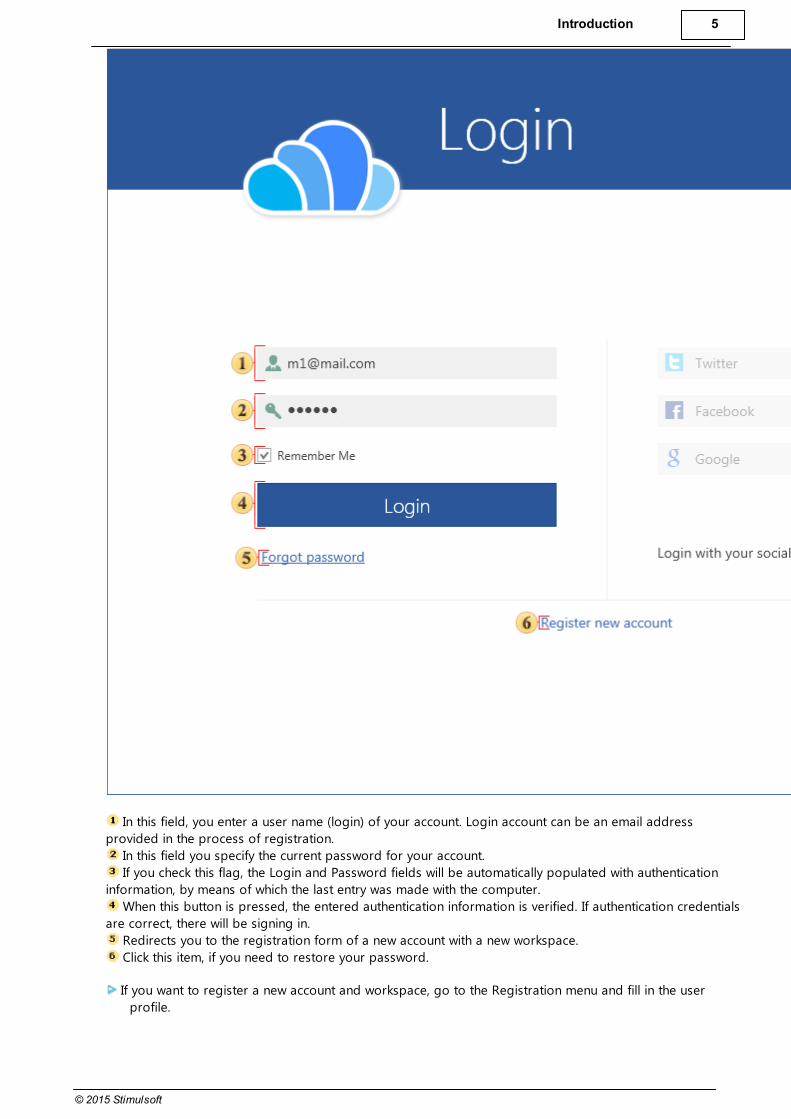
1.3 Login Dialog
When you run Stimulsoft Reports Server, the first menu displayed is the user authentication. Here you must
specify the username and password of an account in order to get to the workspace. Below is the login
dialog:
Introduction 5
© 2015 Stimulsoft
In this field, you enter a user name (login) of your account. Login account can be an email address
provided in the process of registration.
In this field you specify the current password for your account.
If you check this flag, the Login and Password fields will be automatically populated with authentication
information, by means of which the last entry was made with the computer.
When this button is pressed, the entered authentication information is verified. If authentication credentials
are correct, there will be signing in.
Redirects you to the registration form of a new account with a new workspace.
Click this item, if you need to restore your password.
If you want to register a new account and workspace, go to the Registration menu and fill in the user
profile.

6
© 2015 Stimulsoft
Put your first name.
Put your second name.
Type your email address (login) of the future profile. You should remember that the email address
provided here is the login to access the account.
Type the password to your account. Minimum 6 characters are allowed in the password.
Go to the terms of the license agreement. Do not forget to read this!
After clicking this button, a new account with a working space will be created.
Click this menu item if do not need registration or already have the account.
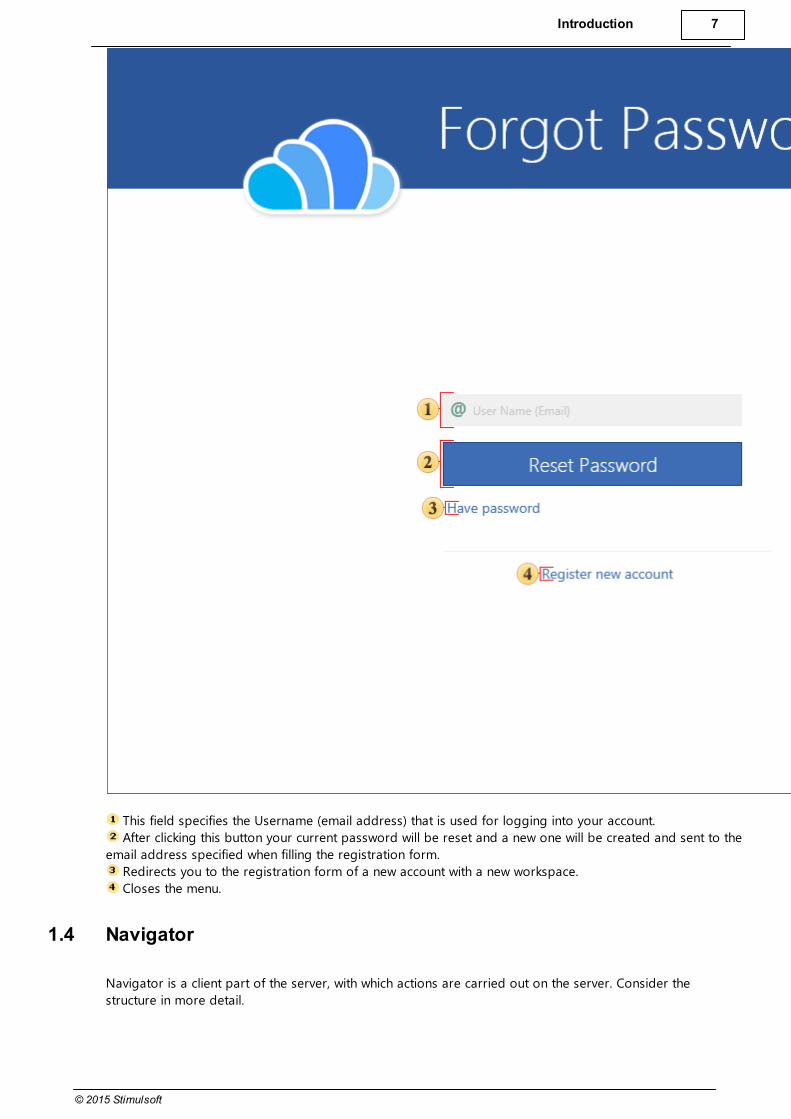
Sometimes you need to log in to your account but forgot your password. To recover your password, use
the following menu.
Introduction 7
© 2015 Stimulsoft
This field specifies the Username (email address) that is used for logging into your account.
After clicking this button your current password will be reset and a new one will be created and sent to the
email address specified when filling the registration form.
Redirects you to the registration form of a new account with a new workspace.
Closes the menu.
1.4 Navigator
Navigator is a client part of the server, with which actions are carried out on the server. Consider the
structure in more detail.

8
© 2015 Stimulsoft
The Navigator tabs which contain commands to control the reports server. By default, 2 main tabs of the
Navigator - Home and Create - are open.
Click this button to open an account profile.
This panel displays the items of the server forming a tree of items. If a user of the account does not have
permission to view the items of a certain type for this account, they will be hidden.
The Action Menu of a selected item.
Preview Panel. This panel is available for report templates and rendered reports if a user of the account has
the right to view these items.
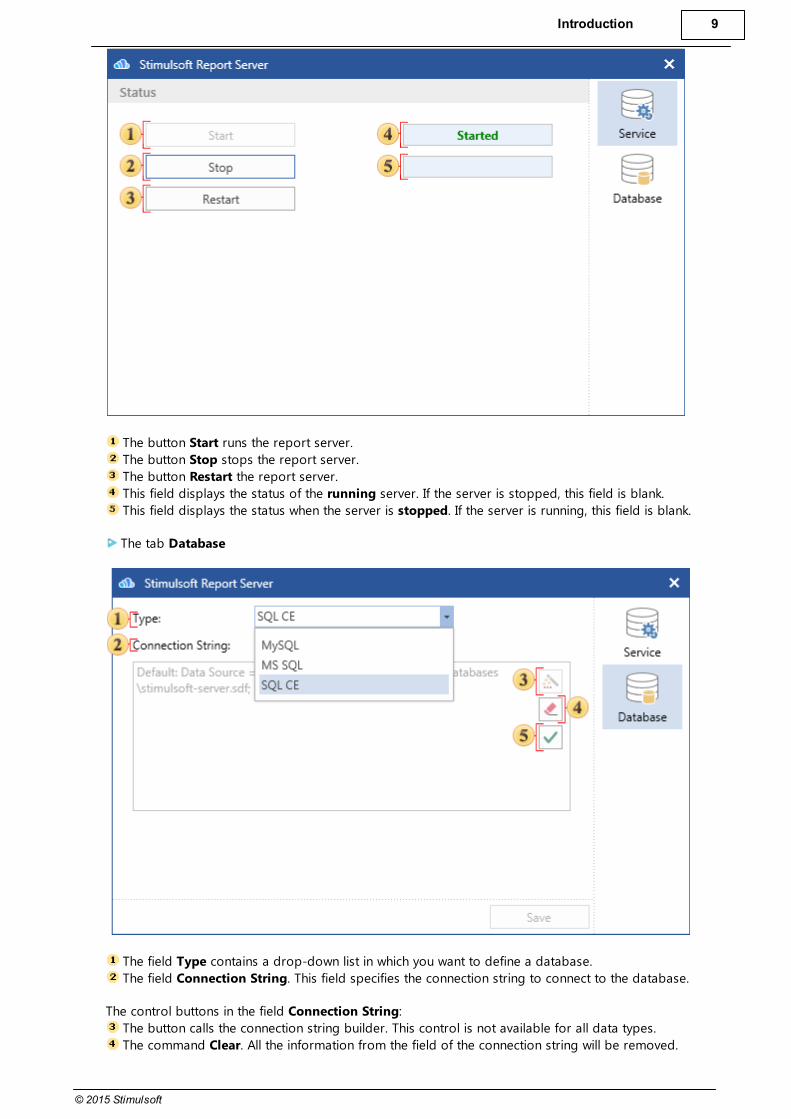
1.5 Server Controller
The server controller has the ability to control Stimulsoft Reports Server. This utility is installed with the server
and folded into a tray on the taskbar. With this utility, you can delete, stop, start, and restart the report
server, and change the database used by the server. Stimulsoft Reports Server can be run only on the
following types of databases - MySQL, MS SQL, SQL CE.
Information: It is important to understand that the server saves its structure in these databases MySQL,
MS SQL, SQL CE. A list of databases from which you can obtain data to create reports, is much broader.
The tab Service
Introduction 9
© 2015 Stimulsoft
The button Start runs the report server.
The button Stop stops the report server.
The button Restart the report server.
This field displays the status of the running server. If the server is stopped, this field is blank.
This field displays the status when the server is stopped. If the server is running, this field is blank.
The tab Database
The field Type contains a drop-down list in which you want to define a database.
The field Connection String. This field specifies the connection string to connect to the database.
The control buttons in the field Connection String:
The button calls the connection string builder. This control is not available for all data types.
The command Clear. All the information from the field of the connection string will be removed.
10
© 2015 Stimulsoft
The command Test. The command is used to test the connection string to the database.
2 Menu Account
From the menu Account you can setup a user profile. The menu is located in the upper right corner of the
Navigator, under the window control buttons.
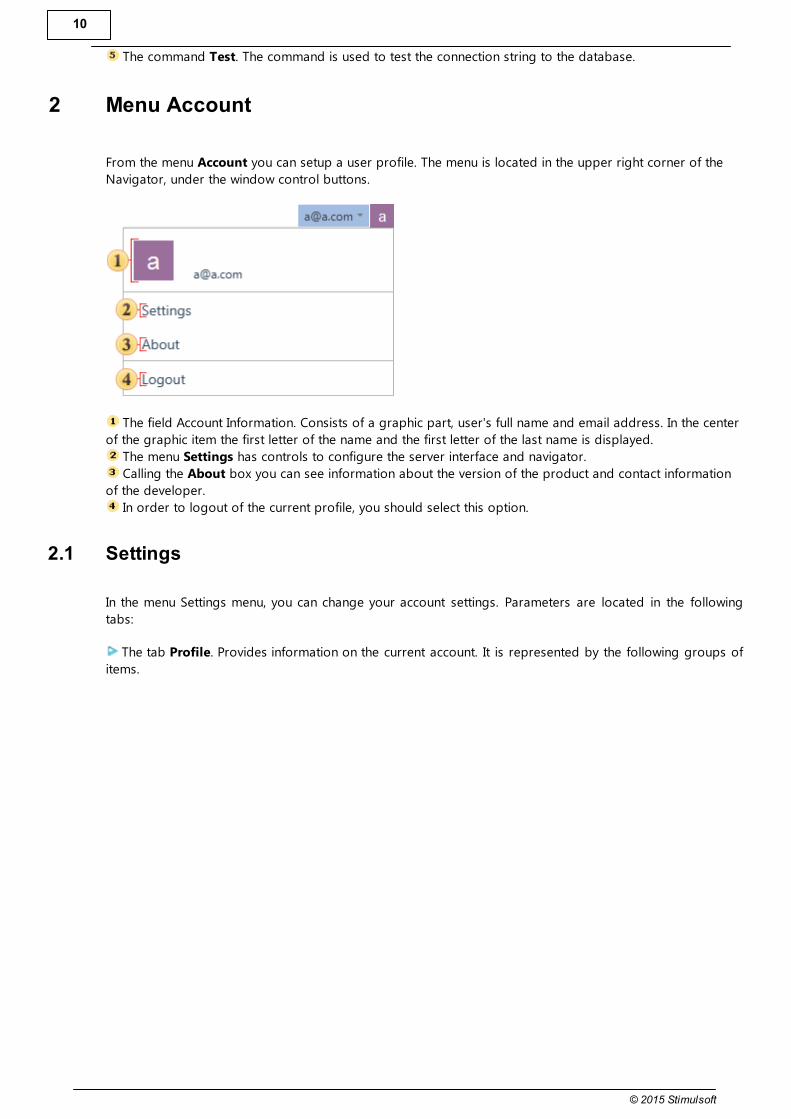
The field Account Information. Consists of a graphic part, user's full name and email address. In the center
of the graphic item the first letter of the name and the first letter of the last name is displayed.
The menu Settings has controls to configure the server interface and navigator.
Calling the About box you can see information about the version of the product and contact information
of the developer.
In order to logout of the current profile, you should select this option.
2.1 Settings
In the menu Settings menu, you can change your account settings. Parameters are located in the following
tabs:
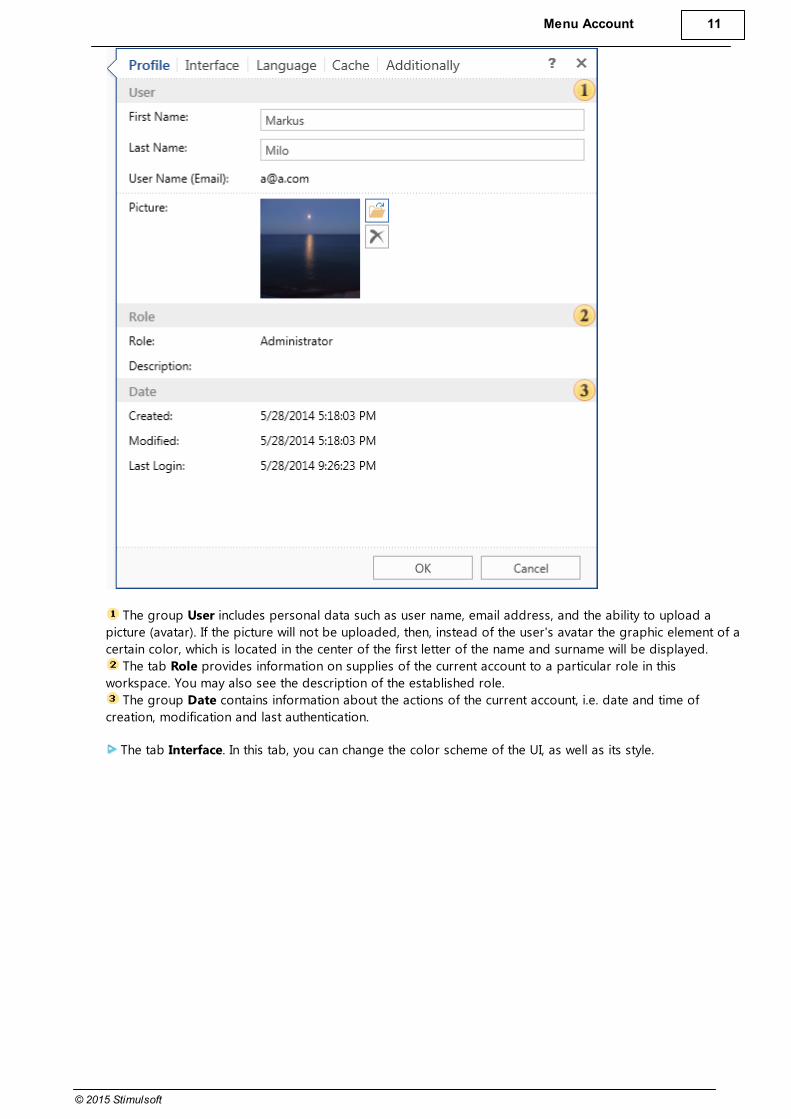
The tab Profile. Provides information on the current account. It is represented by the following groups of
items.
Menu Account 11
© 2015 Stimulsoft
The group User includes personal data such as user name, email address, and the ability to upload a
picture (avatar). If the picture will not be uploaded, then, instead of the user's avatar the graphic element of a
certain color, which is located in the center of the first letter of the name and surname will be displayed.
The tab Role provides information on supplies of the current account to a particular role in this
workspace. You may also see the description of the established role.
The group Date contains information about the actions of the current account, i.e. date and time of
creation, modification and last authentication.
The tab Interface. In this tab, you can change the color scheme of the UI, as well as its style.

12
© 2015 Stimulsoft
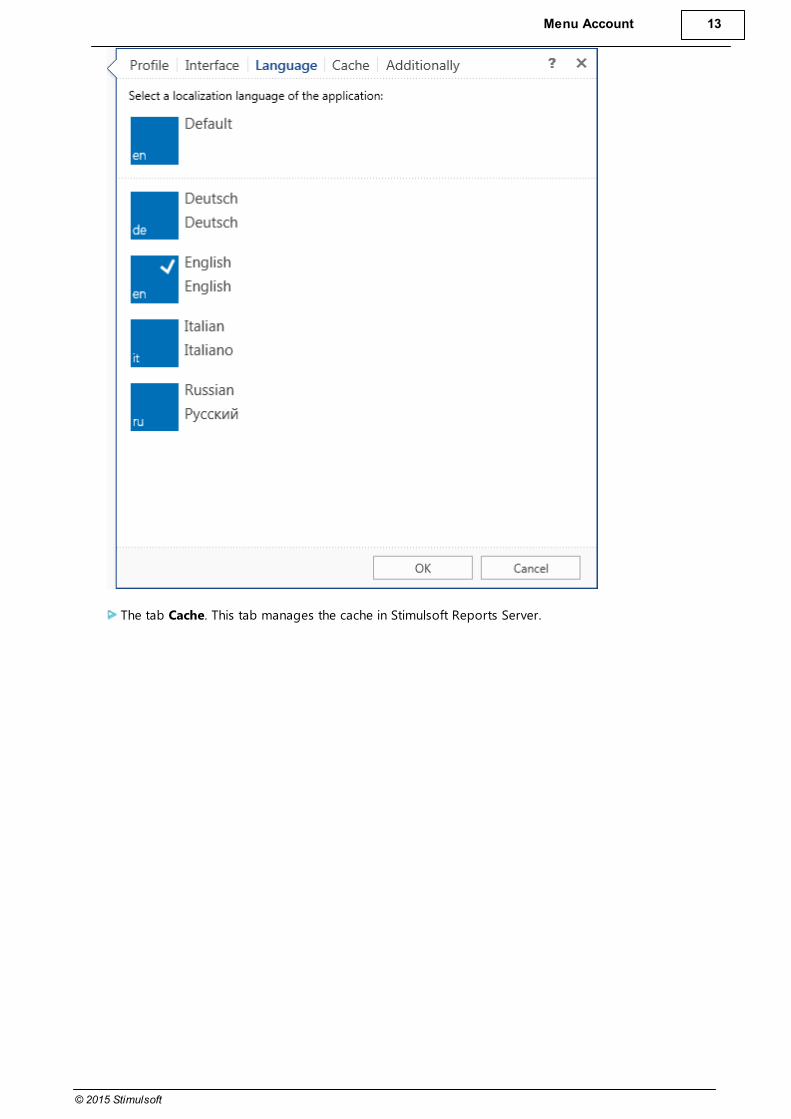
The tab Language. In this tab, you can change the localization of the Stimulsoft Reports Server account. To
do this you need to set the flag for the needed value.
Menu Account 13
© 2015 Stimulsoft
The tab Cache. This tab manages the cache in Stimulsoft Reports Server.

14
© 2015 Stimulsoft
The cache can be viewed, and, if necessary, cleared. To delete one or more items in the cache, you should
check them with flags and click Clear. If you want to clear the entire cache, press the button Clear All.
The tab Additionally. This tab contains settings that are not related to the previous tabs.

Menu Account 15
© 2015 Stimulsoft
The option Open viewer in a new window. If you set this option, the report viewer will be opened in a
new window. If not set, the report viewer will be opened in the Navigator window, in a separate tab.
The option Open designer in a new window. If you set this option, the report designer will be opened in
a new window. If not set, the report designer will be opened in the Navigator window, in a separate tab.
2.2 About
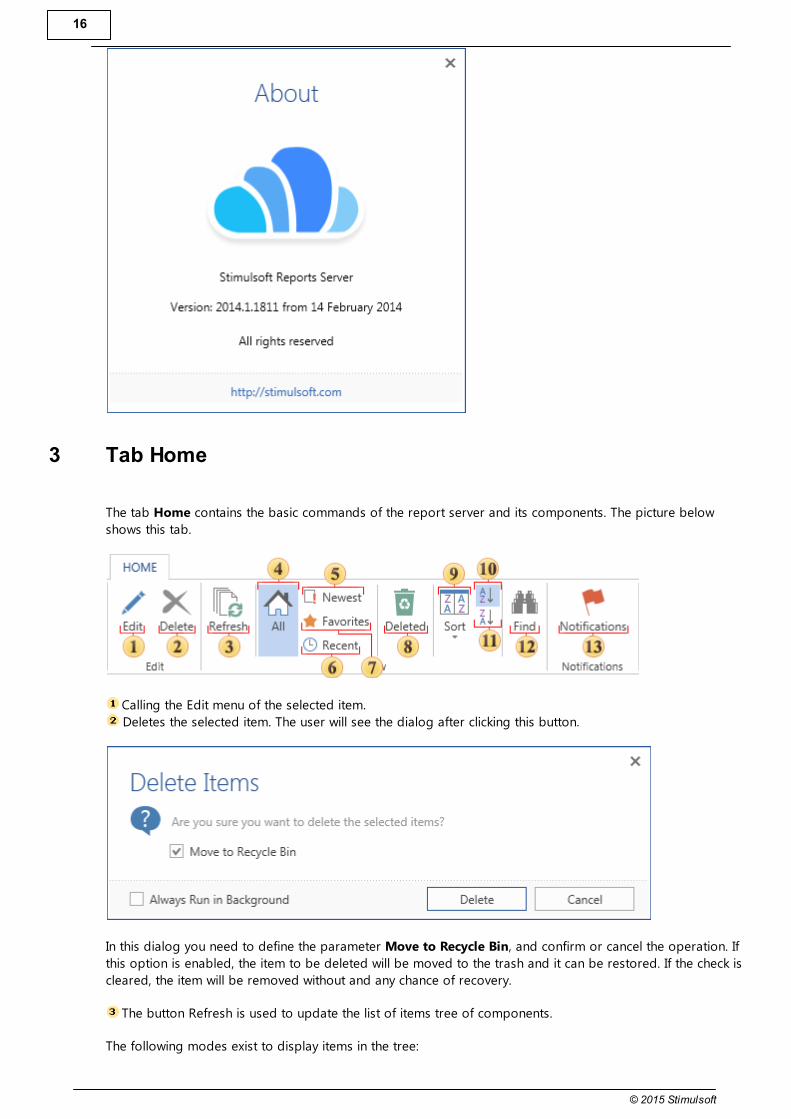
The window About contains information about the product, its version. In addition, this screen has a link to
the official site of the developer.
16
© 2015 Stimulsoft
3 Tab Home
The tab Home contains the basic commands of the report server and its components. The picture below
shows this tab.
Calling the Edit menu of the selected item.
Deletes the selected item. The user will see the dialog after clicking this button.
In this dialog you need to define the parameter Move to Recycle Bin, and confirm or cancel the operation. If
this option is enabled, the item to be deleted will be moved to the trash and it can be restored. If the check is
cleared, the item will be removed without and any chance of recovery.
The button Refresh is used to update the list of items tree of components.
The following modes exist to display items in the tree:

Tab Home 17
© 2015 Stimulsoft
All - to display all items.
Newest - enables displaying only newly created items.
Recent - enables displaying recently opened items.
Favorites - enables displaying only favorite items.
Calling the Recycle Bin mode.
Sort - the following sorting options are available
By name;
By type;
By the date of creation;
By the date of changes.
Ascending direction of sorting.
Descending direction of sorting.
Find items
The notification list displaying progress of executing commands.
3.1 Recycle Bin
When you delete items, you can move them to the trash or completely delete from the server. If the Move to
Recycle Bin is enabled, the item will be moved to the basket. If the Move to Recycle Bin is disabled the item
will be removed from the server. In order to view the contents of the basket, you should click the button
Deleted on the tab Home. After that, the items in the basket will be displayed in the tree (marked as deleted
items):
18
© 2015 Stimulsoft
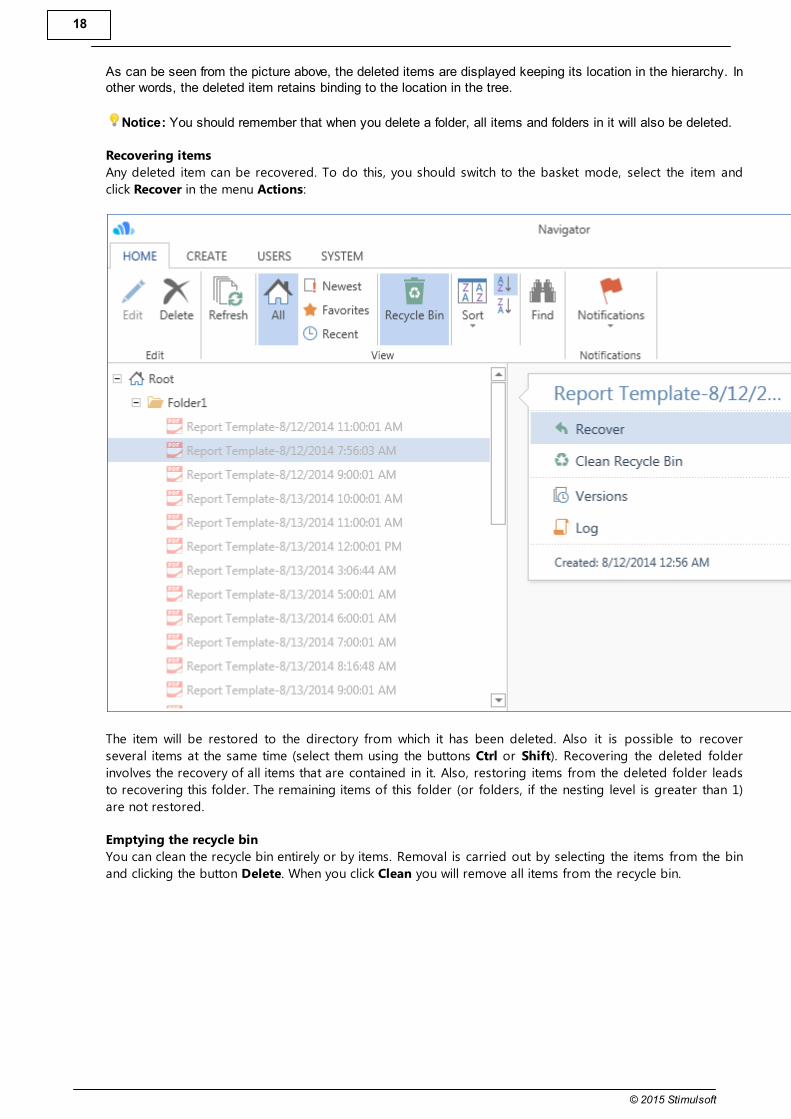
As can be seen from the picture above, the deleted items are displayed keeping its location in the hierarchy. Inother words, the deleted item retains binding to the location in the tree.
Notice: You should remember that when you delete a folder, all items and folders in it will also be deleted.
Recovering items
Any deleted item can be recovered. To do this, you should switch to the basket mode, select the item and
click Recover in the menu Actions:
The item will be restored to the directory from which it has been deleted. Also it is possible to recover
several items at the same time (select them using the buttons Ctrl or Shift). Recovering the deleted folder
involves the recovery of all items that are contained in it. Also, restoring items from the deleted folder leads
to recovering this folder. The remaining items of this folder (or folders, if the nesting level is greater than 1)
are not restored.
Emptying the recycle bin
You can clean the recycle bin entirely or by items. Removal is carried out by selecting the items from the bin
and clicking the button Delete. When you click Clean you will remove all items from the recycle bin.
Tab Home 19
© 2015 Stimulsoft
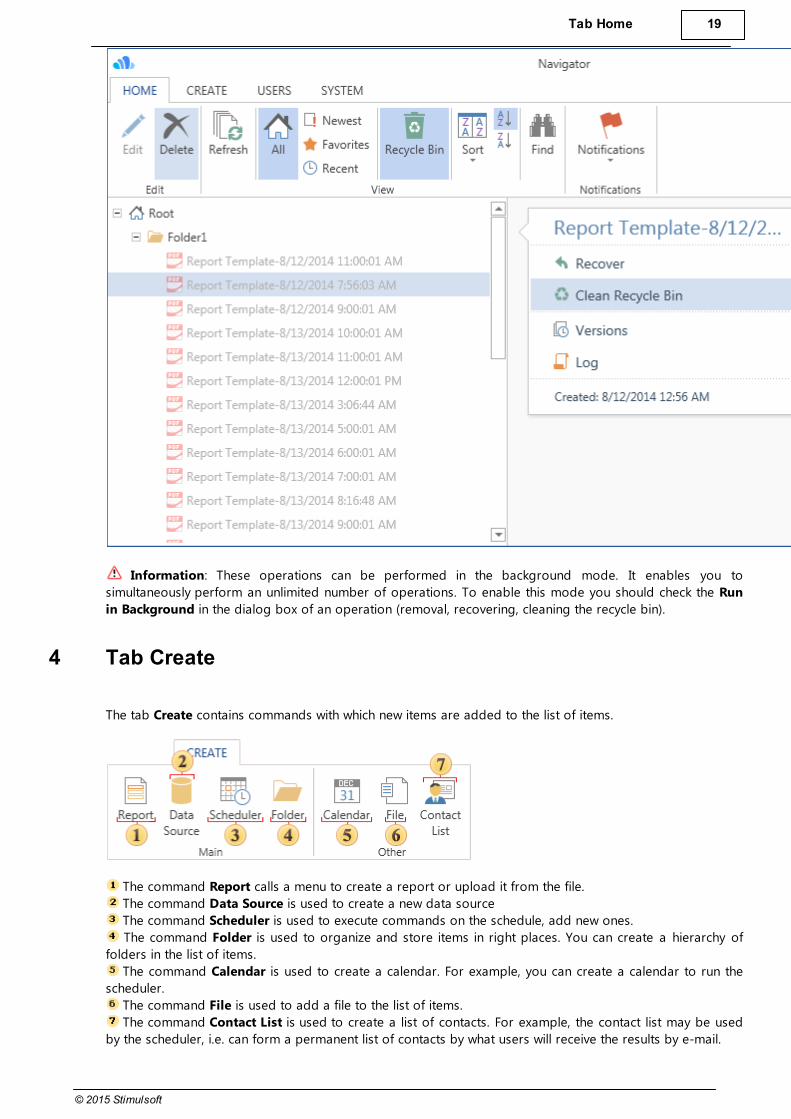
Information: These operations can be performed in the background mode. It enables you to
simultaneously perform an unlimited number of operations. To enable this mode you should check the Run
in Background in the dialog box of an operation (removal, recovering, cleaning the recycle bin).
4 Tab Create
The tab Create contains commands with which new items are added to the list of items.
The command Report calls a menu to create a report or upload it from the file.
The command Data Source is used to create a new data source
The command Scheduler is used to execute commands on the schedule, add new ones.
The command Folder is used to organize and store items in right places. You can create a hierarchy of
folders in the list of items.
The command Calendar is used to create a calendar. For example, you can create a calendar to run the
scheduler.
The command File is used to add a file to the list of items.
The command Contact List is used to create a list of contacts. For example, the contact list may be used
by the scheduler, i.e. can form a permanent list of contacts by what users will receive the results by e-mail.
20
© 2015 Stimulsoft
4.1 Report
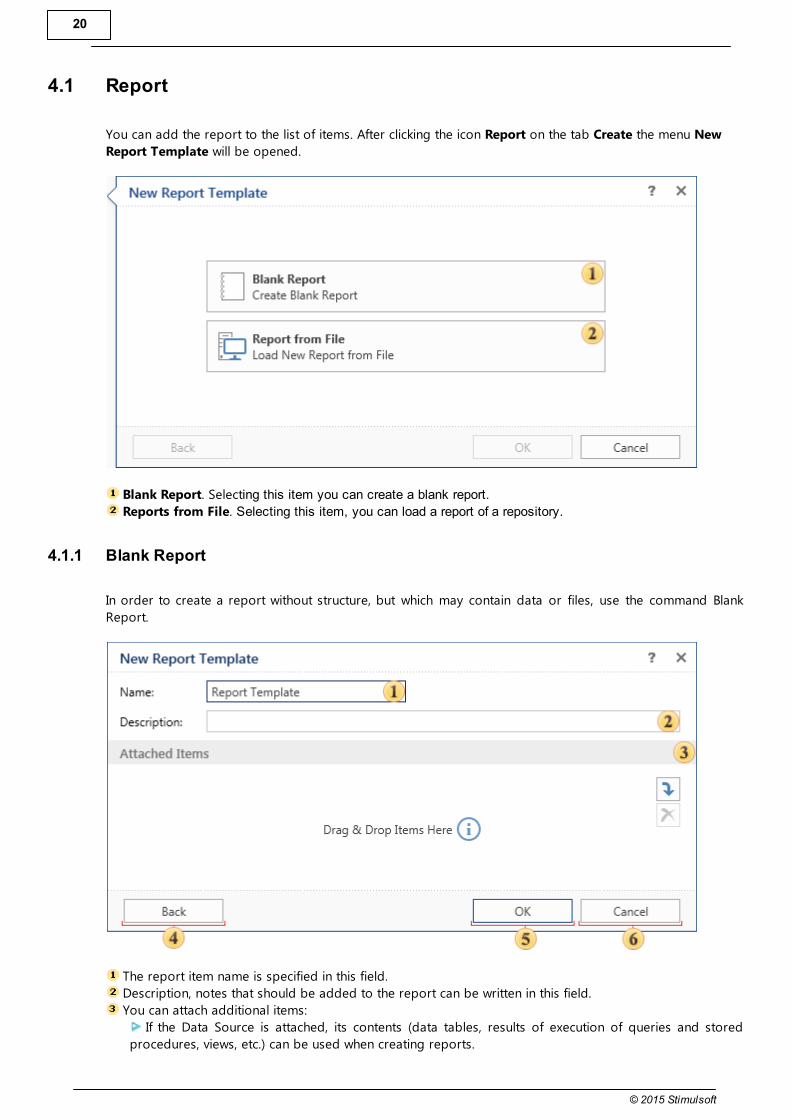
You can add the report to the list of items. After clicking the icon Report on the tab Create the menu New
Report Template will be opened.
Blank Report. Selecting this item you can create a blank report.
Reports from File. Selecting this item, you can load a report of a repository.
4.1.1 Blank Report
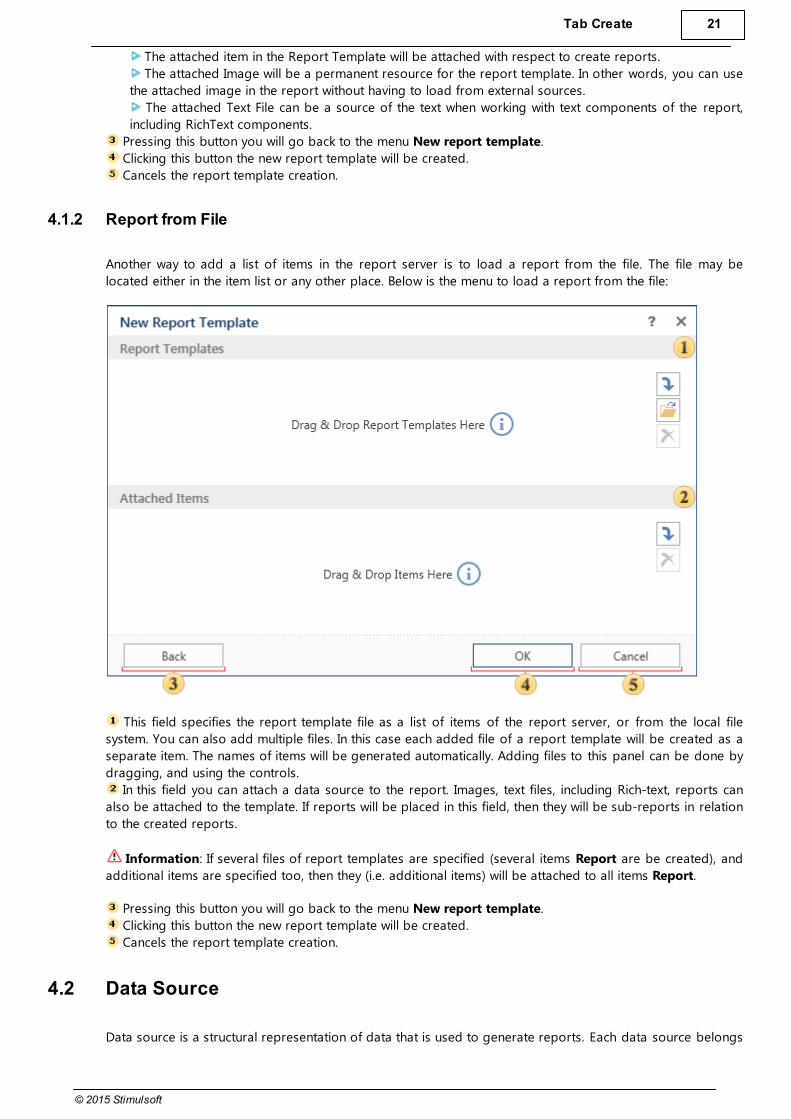
In order to create a report without structure, but which may contain data or files, use the command Blank
Report.
The report item name is specified in this field.
Description, notes that should be added to the report can be written in this field.
You can attach additional items:
If the Data Source is attached, its contents (data tables, results of execution of queries and stored
procedures, views, etc.) can be used when creating reports.
Tab Create 21
© 2015 Stimulsoft
The attached item in the Report Template will be attached with respect to create reports.
The attached Image will be a permanent resource for the report template. In other words, you can use
the attached image in the report without having to load from external sources.
The attached Text File can be a source of the text when working with text components of the report,
including RichText components.
Pressing this button you will go back to the menu New report template.
Clicking this button the new report template will be created.
Cancels the report template creation.
4.1.2 Report from File
Another way to add a list of items in the report server is to load a report from the file. The file may be
located either in the item list or any other place. Below is the menu to load a report from the file:
This field specifies the report template file as a list of items of the report server, or from the local file
system. You can also add multiple files. In this case each added file of a report template will be created as a
separate item. The names of items will be generated automatically. Adding files to this panel can be done by
dragging, and using the controls.
In this field you can attach a data source to the report. Images, text files, including Rich-text, reports can
also be attached to the template. If reports will be placed in this field, then they will be sub-reports in relation
to the created reports.
Information: If several files of report templates are specified (several items Report are be created), and
additional items are specified too, then they (i.e. additional items) will be attached to all items Report.
Pressing this button you will go back to the menu New report template.
Clicking this button the new report template will be created.
Cancels the report template creation.
4.2 Data Source
Data source is a structural representation of data that is used to generate reports. Each data source belongs
22
© 2015 Stimulsoft
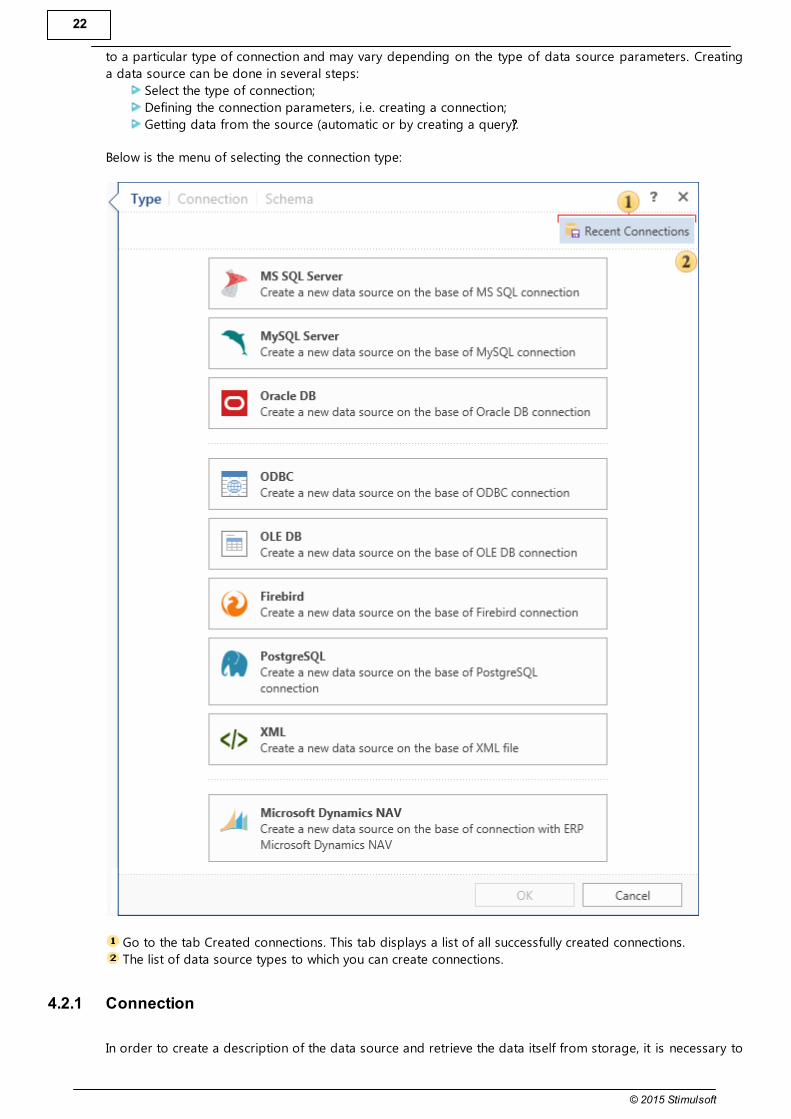
to a particular type of connection and may vary depending on the type of data source parameters. Creating
a data source can be done in several steps:
Select the type of connection;
Defining the connection parameters, i.e. creating a connection;
Getting data from the source (automatic or by creating a query??).
Below is the menu of selecting the connection type:
Go to the tab Created connections. This tab displays a list of all successfully created connections.
The list of data source types to which you can create connections.
4.2.1 Connection
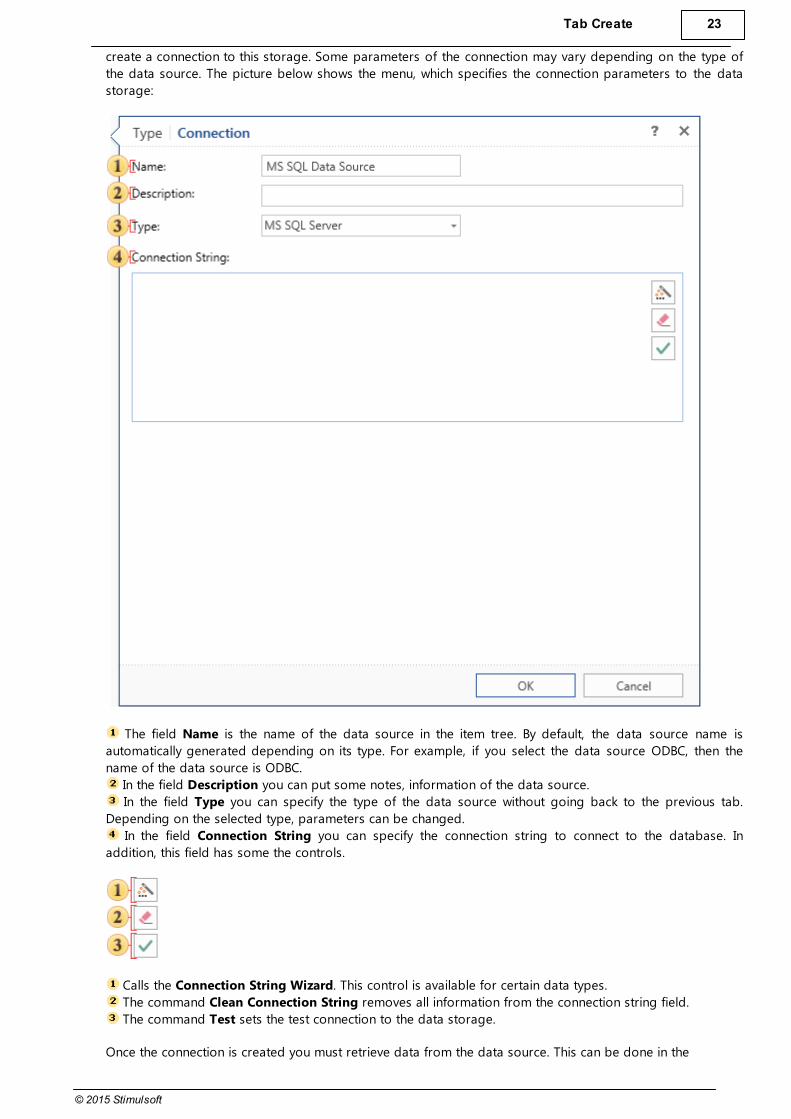
In order to create a description of the data source and retrieve the data itself from storage, it is necessary to
Tab Create 23
© 2015 Stimulsoft
create a connection to this storage. Some parameters of the connection may vary depending on the type of
the data source. The picture below shows the menu, which specifies the connection parameters to the data
storage:
The field Name is the name of the data source in the item tree. By default, the data source name is
automatically generated depending on its type. For example, if you select the data source ODBC, then the
name of the data source is ODBC.
In the field Description you can put some notes, information of the data source.
In the field Type you can specify the type of the data source without going back to the previous tab.
Depending on the selected type, parameters can be changed.
In the field Connection String you can specify the connection string to connect to the database. In
addition, this field has some the controls.
Calls the Connection String Wizard. This control is available for certain data types.
The command Clean Connection String removes all information from the connection string field.
The command Test sets the test connection to the data storage.
Once the connection is created you must retrieve data from the data source. This can be done in the

24
© 2015 Stimulsoft
following ways:
Select the command New Table;
Select the command New Query.
4.2.2 New Table
After you create a connection to the data storage, you need to retrieve data (as tables, views, stored
procedures, etc.). This can be done by choosing New Table from the menu Actions of the created
connection:
As can be seen on the picture, in the item tree of the Navigator the OLE DB data source is selected. In the
menu Action you can find the command New Table. When you select this command, Stimulsoft Reports
Server will check the data storage for presence of tables, views, stored procedures, etc. The result will be
displayed as the New Table:

Tab Create 25
© 2015 Stimulsoft
In this window, the data to be added to the data source should be checked. As can be seen from the picture
above:
Selected data tables Categories, Products, and Suppliers. If there are multiple items, but not all,
selected in the category, this category will be marked with .
Selected Views. Checking this category (in this example, in the category of views) entails the installation
of flags all sub-items.
No stored procedures are checked.
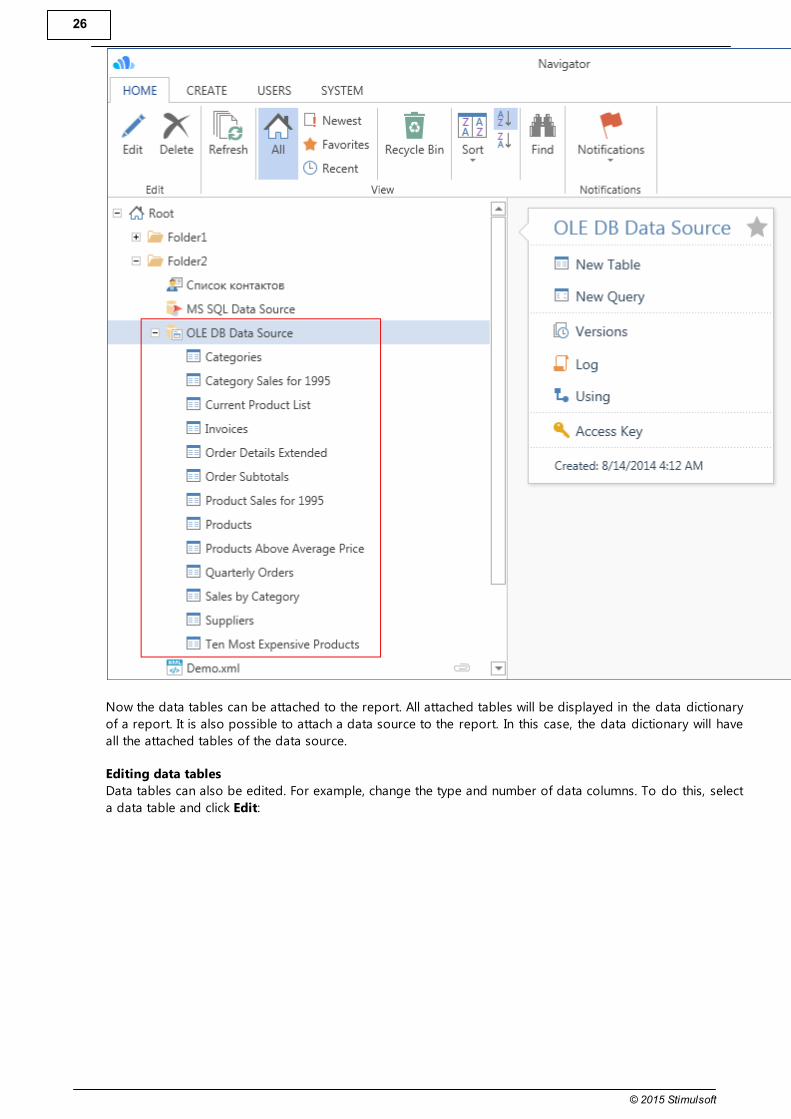
Once the necessary tables, views, stored procedures and other elements of the data storage are selected,
press the button Ok. All data from the storage will be converted into a data table and displayed in the tree of
the navigator:
26
© 2015 Stimulsoft
Now the data tables can be attached to the report. All attached tables will be displayed in the data dictionary
of a report. It is also possible to attach a data source to the report. In this case, the data dictionary will have
all the attached tables of the data source.
Editing data tables
Data tables can also be edited. For example, change the type and number of data columns. To do this, select
a data table and click Edit:
Tab Create 27
© 2015 Stimulsoft
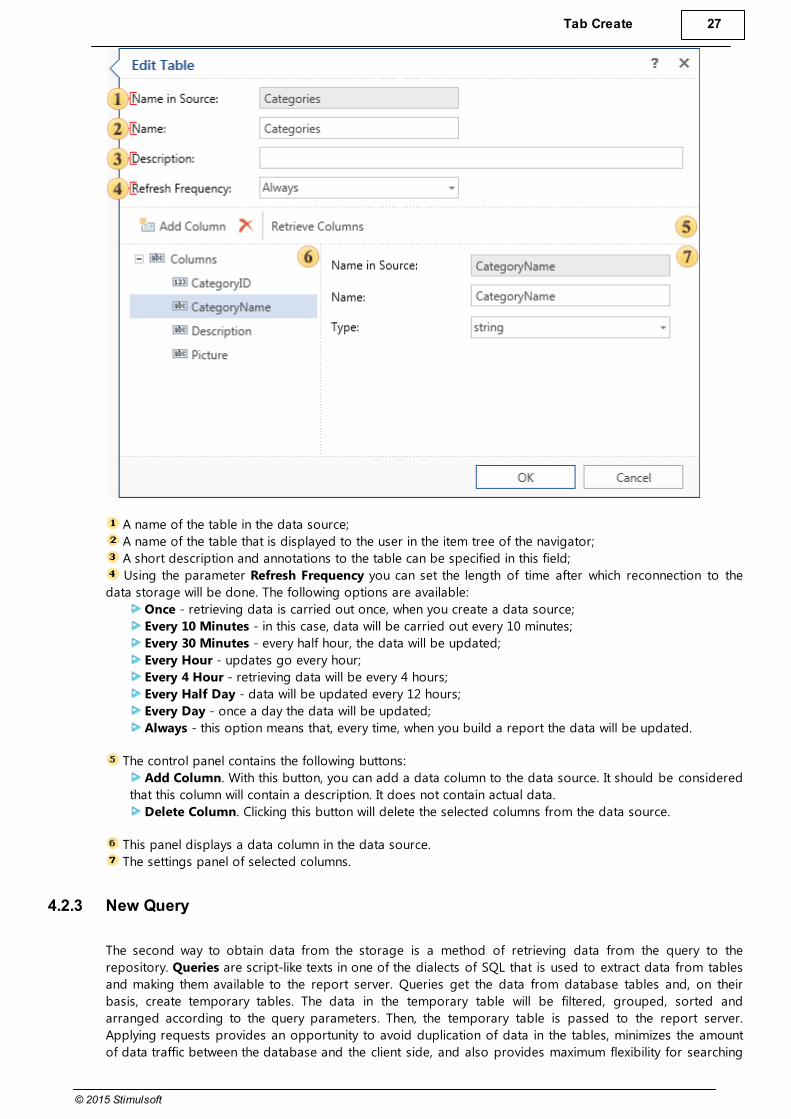
A name of the table in the data source;
A name of the table that is displayed to the user in the item tree of the navigator;
A short description and annotations to the table can be specified in this field;
Using the parameter Refresh Frequency you can set the length of time after which reconnection to the
data storage will be done. The following options are available:
Once - retrieving data is carried out once, when you create a data source;
Every 10 Minutes - in this case, data will be carried out every 10 minutes;
Every 30 Minutes - every half hour, the data will be updated;
Every Hour - updates go every hour;
Every 4 Hour - retrieving data will be every 4 hours;
Every Half Day - data will be updated every 12 hours;
Every Day - once a day the data will be updated;
Always - this option means that, every time, when you build a report the data will be updated.
The control panel contains the following buttons:
Add Column. With this button, you can add a data column to the data source. It should be considered
that this column will contain a description. It does not contain actual data.
Delete Column. Clicking this button will delete the selected columns from the data source.
This panel displays a data column in the data source.
The settings panel of selected columns.
4.2.3 New Query
The second way to obtain data from the storage is a method of retrieving data from the query to the
repository. Queries are script-like texts in one of the dialects of SQL that is used to extract data from tables
and making them available to the report server. Queries get the data from database tables and, on their
basis, create temporary tables. The data in the temporary table will be filtered, grouped, sorted and
arranged according to the query parameters. Then, the temporary table is passed to the report server.
Applying requests provides an opportunity to avoid duplication of data in the tables, minimizes the amount
of data traffic between the database and the client side, and also provides maximum flexibility for searching
28
© 2015 Stimulsoft
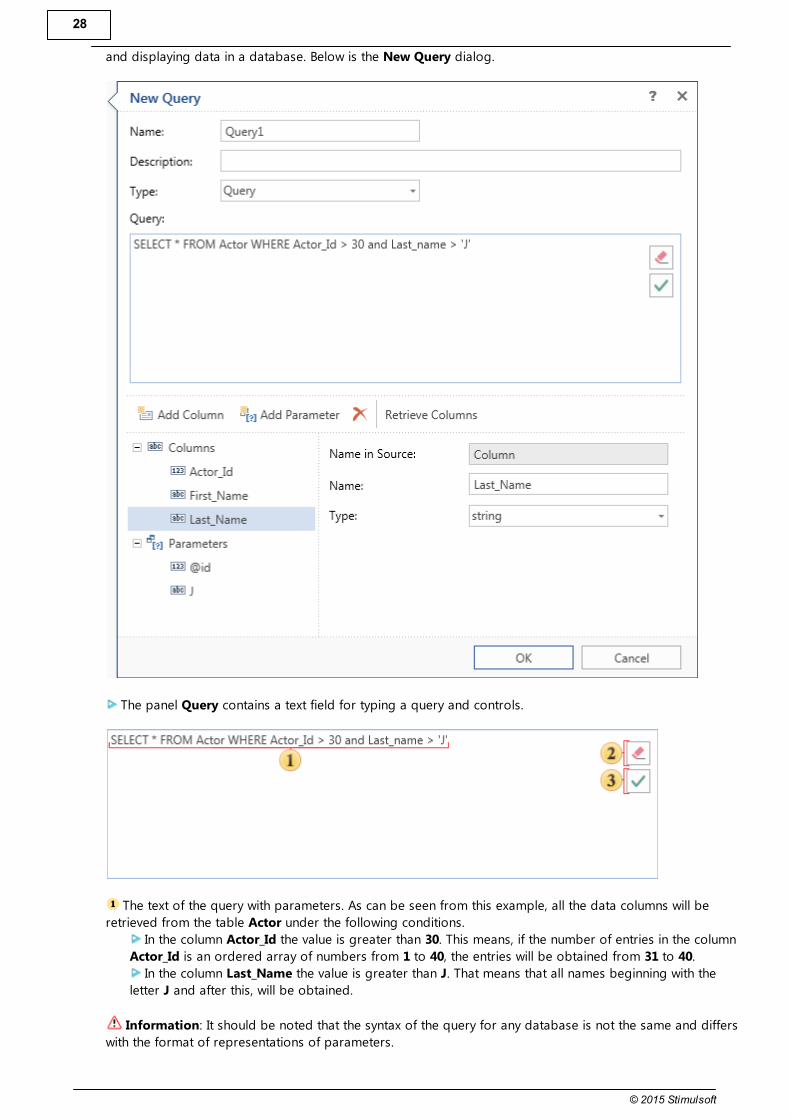
and displaying data in a database. Below is the New Query dialog.
The panel Query contains a text field for typing a query and controls.
The text of the query with parameters. As can be seen from this example, all the data columns will be
retrieved from the table Actor under the following conditions.
In the column Actor_Id the value is greater than 30. This means, if the number of entries in the column
Actor_Id is an ordered array of numbers from 1 to 40, the entries will be obtained from 31 to 40.
In the column Last_Name the value is greater than J. That means that all names beginning with the
letter J and after this, will be obtained.
Information: It should be noted that the syntax of the query for any database is not the same and differs
with the format of representations of parameters.

Tab Create 29
© 2015 Stimulsoft
The command Clear field, ie, the query text will be removed;
The command Check query. When you call this command the report server will generate a test query
execution. The result will be shown to the user as a message.
The panel Column settings consists of controls and two categories.
The command Add Column creates a new columns. Keep in mind that this will be the description of the
data columns and it will not contain real data.
The command Add Parameter. Using this command you can add an option to the category of
Parameters. In this case, this parameter must be specified manually in the query.
The command Delete deletes the selected column or the parameter.
The command Retrieve Columns. Once the query is created and checked, press this button to get a
column with the data from the data storage.
On the panel Columns the following tabs can be found:
The category Columns. In this category data columns obtained after executing the query, as well as
manually created data columns can be found.
The category Parameters. This category contains a list of parameters that will be used in the query.
Creating, editing, and deleting parameters is carried out using the controls.
The panel of parameters of the selected item.
4.2.3.1 Parameters
When creating a query it is possible to use the Parameter object. This object is designed to send additional
conditions for selecting data into a query. For example, if you need a query to use a value entered by the
user each time the query is executed, you can create a query using parameters. The Parameter object can
only be used with SQL data sources. These data sources are typically have the Text Query field. To insert a
parameter in the query, you must click the New Parameter button. The picture below shows the toolbar, on
which the New Parameter button can be found.
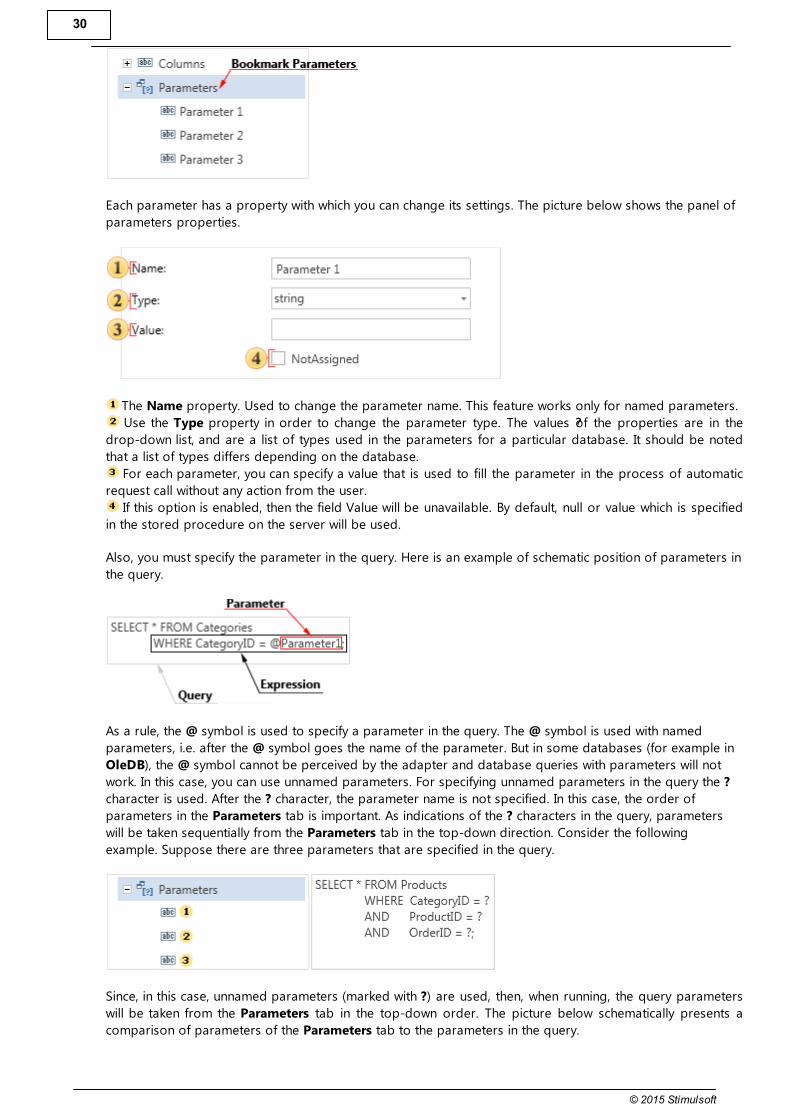
After clicking this button a new parameter will be created. This parameter will be displayed in the Parameters
tab in the Columns panel. The picture below shows an example of the Columns panel with the Parameters
tab.
30
© 2015 Stimulsoft
Each parameter has a property with which you can change its settings. The picture below shows the panel of
parameters properties.
The Name property. Used to change the parameter name. This feature works only for named parameters.
Use the Type property in order to change the parameter type. The values ??of the properties are in the
drop-down list, and are a list of types used in the parameters for a particular database. It should be noted
that a list of types differs depending on the database.
For each parameter, you can specify a value that is used to fill the parameter in the process of automatic
request call without any action from the user.
If this option is enabled, then the field Value will be unavailable. By default, null or value which is specified
in the stored procedure on the server will be used.
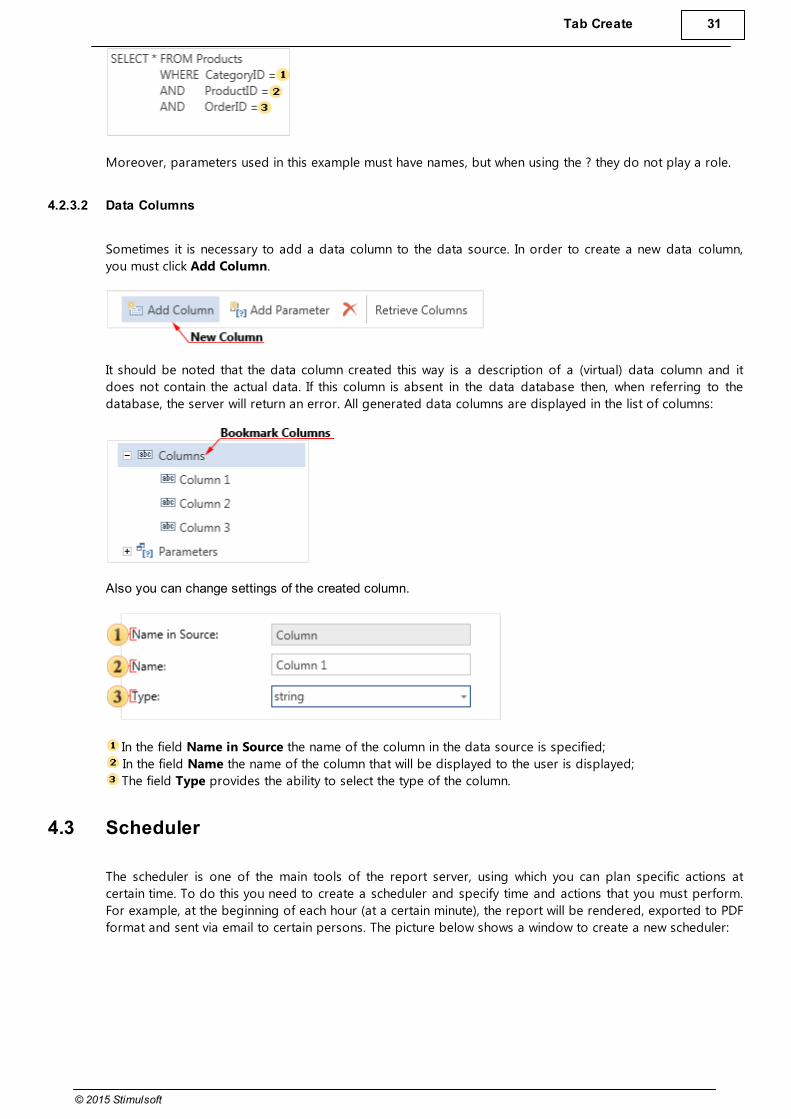
Also, you must specify the parameter in the query. Here is an example of schematic position of parameters in
the query.
As a rule, the @ symbol is used to specify a parameter in the query. The @ symbol is used with named
parameters, i.e. after the @ symbol goes the name of the parameter. But in some databases (for example in
OleDB), the @ symbol cannot be perceived by the adapter and database queries with parameters will not
work. In this case, you can use unnamed parameters. For specifying unnamed parameters in the query the ?
character is used. After the ? character, the parameter name is not specified. In this case, the order of
parameters in the Parameters tab is important. As indications of the ? characters in the query, parameters
will be taken sequentially from the Parameters tab in the top-down direction. Consider the following
example. Suppose there are three parameters that are specified in the query.
Since, in this case, unnamed parameters (marked with ?) are used, then, when running, the query parameters
will be taken from the Parameters tab in the top-down order. The picture below schematically presents a
comparison of parameters of the Parameters tab to the parameters in the query.
Tab Create 31
© 2015 Stimulsoft
Moreover, parameters used in this example must have names, but when using the ? they do not play a role.
4.2.3.2 Data Columns
Sometimes it is necessary to add a data column to the data source. In order to create a new data column,
you must click Add Column.
It should be noted that the data column created this way is a description of a (virtual) data column and it
does not contain the actual data. If this column is absent in the data database then, when referring to the
database, the server will return an error. All generated data columns are displayed in the list of columns:
Also you can change settings of the created column.
In the field Name in Source the name of the column in the data source is specified;
In the field Name the name of the column that will be displayed to the user is displayed;
The field Type provides the ability to select the type of the column.
4.3 Scheduler
The scheduler is one of the main tools of the report server, using which you can plan specific actions at
certain time. To do this you need to create a scheduler and specify time and actions that you must perform.
For example, at the beginning of each hour (at a certain minute), the report will be rendered, exported to PDF
format and sent via email to certain persons. The picture below shows a window to create a new scheduler:

32
© 2015 Stimulsoft
As can be seen from the picture, the scheduler consists of the following tabs:
In the tab Type you can specify time when the scheduler should be run.
In the tab Settings you can setup the scheduler.
In the tab Actions you can specify the list of what should be done with the scheduler.
4.3.1 Type
On the tab Type you can set up when the scheduler should run, i.e. when the scheduler actions will be
executed. Frequency can be set as follows:
Hourly. The scheduler will perform some action every hour, i.e. at a certain minute of every hour (minute
configurable).
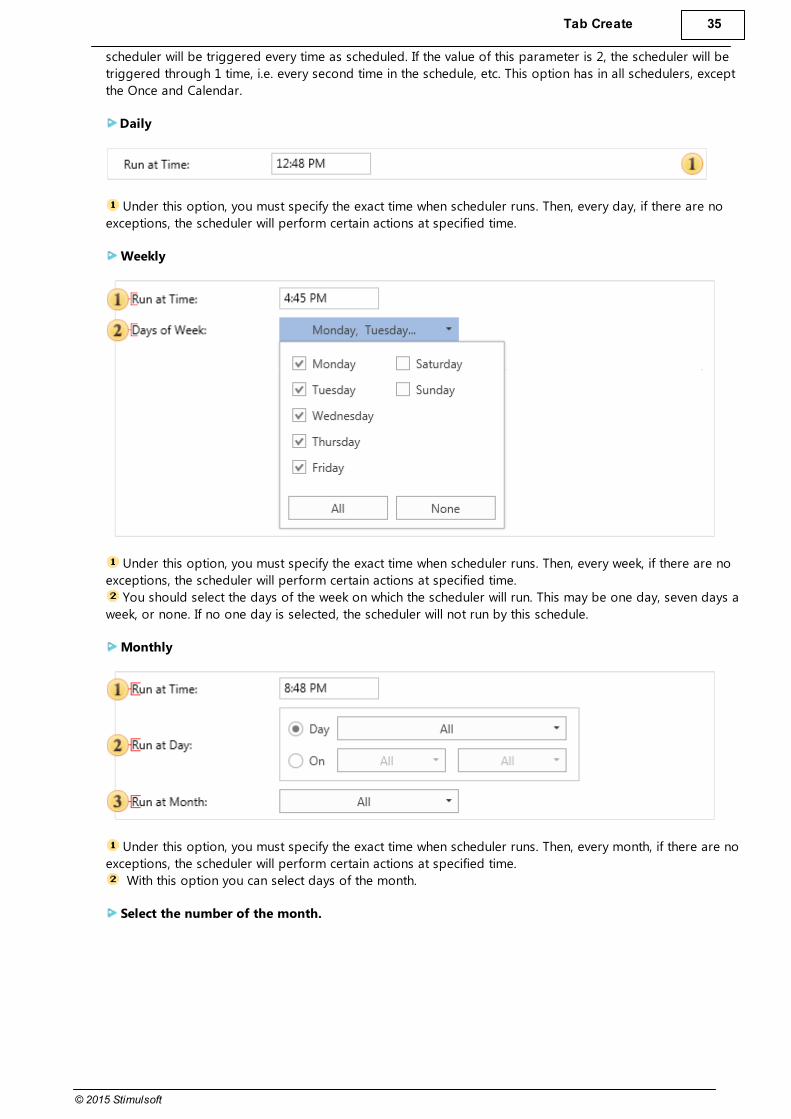
Daily. The scheduler is executed once a day, depending on the specified time (hour and minute).
Weekly. In this case, the scheduler will be executed once a week on the specified day, at time (hour and
minute). Also, you can specify the required days of the week. For example, you can specify all the days of the
week, or only Monday or Monday + Friday + Saturday.
Monthly. This type of scheduler provides the ability to create a schedule at a certain time during the
month. Moreover, it is possible to select the months, i.e. schedule will only work on certain months. Monthly
Scheduler can be configured in the following ways:
Specifies time of a particular day of the selected month, when the scheduler will run. For example,
11:45 AM, on the 13th of February, May, August, November.
Specifies the relative time of the day, selected month. For example, 11:45 AM, the first Monday and
third Friday in February, May, August, November.

Tab Create 33
© 2015 Stimulsoft
Yearly. In this case, you can set the time (hours and minutes), a month and a day when the scheduler runs.
Calendar. In this case, you should specify the calendar, a list of items of which will be a timetable for the
scheduler.
Once. Any action will be executed once, after running the scheduler. Typically, such a scheduler is started
by another scheduler or manually.
4.3.2 Settings
On the tab Settings you can define scheduling parameters. Depending on the selected type, the number and
names of the parameters may vary. Scheduling parameters are presented in groups.
The panel Settings. This panel displays a list of options, depending on the selected group.
This panel contains the list of parameters.
Note: The number of groups may vary depending on the type of the scheduler.
4.3.2.1 Common
This group of parameter contains general settings that do not depend on the type of the selected scheduler.

34
© 2015 Stimulsoft
In the field Name you can set the name of the scheduler.
This field is used to provide a description for the scheduler. The description used for making notes and
explanations for the scheduler.
With this option, you can change the Type of the scheduler, without going back to the previous tab.
This parameter defines the status of the scheduler after it is created. If you select the status Started, the
scheduler will be active after saving and work according to the schedule. If you select the status Stopped, the
scheduler will not be active when you save it, and schedule will not be executed.
Notice: The parameter Status After Creation is not available if you select a single scheduler. The
parameter Run After Creation is available instead of that parameter. If this box is checked, the scheduler will
work after saving and perform defined actions. If the box is not checked, the scheduler does not work, and it
is possible to manually start it or using another scheduler.
4.3.2.2 Frequency
This group contains parameters by which the scheduler is running. Some of the parameters in this group will
vary depending on the type of the scheduler. Here is an example of parameters of the hourly scheduler.
The parameter Run at Minute specifies the minute for each hour, upon the occurrence of which the
scheduler will trigger.
The parameter Time Zone indicates the time zone which will be considered by the scheduler. Suppose
you want to perform an action for the scheduler at 14:00. Depending on the geographical location, i.e. due to
differences in time zones, the response time of the scheduler can vary significantly. For example, the east and
the west coast of the United States, refers to the different time zones. Eastern - (GMT -5:00), West - (GMT -
8:00), so the difference in time will be 3:00 at this moment. In order to calculate time in a different time zone,
you must specify the time and time zone. Therefore, if you set the time of 15:01, specify the time zone GMT -
8:00, then the scheduler will work at 15:01 on the west coast or in 12:01 - the east coast. This parameter will
be present in all types of the scheduler, except the Once.
Information: Always pay attention to the time zone, because wrong time zone definitions will cause the
scheduler running at wrong time.
The checkbox Exclude Weekend Days. With this option, you can exclude the operation of the scheduler
on the weekend (Saturday and Sunday). If this box is checked, then the scheduler will not run on Saturdays
and Sundays. The following actions will be executed to the next weekday - Monday. At the same time, the
number of running will not change. If over the weekend planner should have been executed 5 times, then on
a weekday it works 5 times. This option has in all schedulers, except the Once and Calendar.
The parameter Run Every sets the shift when the scheduler triggers. For example, if the value is 1, the
Tab Create 35
© 2015 Stimulsoft
scheduler will be triggered every time as scheduled. If the value of this parameter is 2, the scheduler will be
triggered through 1 time, i.e. every second time in the schedule, etc. This option has in all schedulers, except
the Once and Calendar.
Daily
Under this option, you must specify the exact time when scheduler runs. Then, every day, if there are no
exceptions, the scheduler will perform certain actions at specified time.
Weekly
Under this option, you must specify the exact time when scheduler runs. Then, every week, if there are no
exceptions, the scheduler will perform certain actions at specified time.
You should select the days of the week on which the scheduler will run. This may be one day, seven days a
week, or none. If no one day is selected, the scheduler will not run by this schedule.
Monthly
Under this option, you must specify the exact time when scheduler runs. Then, every month, if there are no
exceptions, the scheduler will perform certain actions at specified time.
With this option you can select days of the month.
Select the number of the month.

36
© 2015 Stimulsoft
Determination of the relative day of the month. In this case, it is necessary to choose the order of the day
(eg first and second), and then determine the days of the week, such as Monday and Friday. And then, for
this example, the scheduler will be triggered every first and second Monday and Friday of the selected
month:
Month selection is carried out by means of this parameter. One month or several months can be selected.

Tab Create 37
© 2015 Stimulsoft
Yearly
Under this option, you must specify the exact time when scheduler runs. Then, every year, if there are no
exceptions, the scheduler will perform certain actions at specified time.
With this parameter you can set the day of the month on which scheduler will be run.
Months of the year in which you will run the scheduler is defined using this parameter. If the month has
already passed the selected schedule will work next year.
Calendar
When you select this option you must specify a calendar with a schedule (i.e. the calendar contains a list of
specific dates):
This field you should specify the exact time when the scheduler triggers. The calendar indicates only the
dates, so the time of running is defined on the tab Calendar.
The added item Calendar.
The button is used to add the selected item from the tree to the panel of the scheduler.
The is used ti button Delete an item from the panel of the scheduler.
Once
In this case, the scheduler works immediately after creation. It should be known that the scheduler will not
work if to uncheck the parameter Run After Saving. In this case, the running must be implemented manually,
i.e. select this scheduler and select the command Run Once from the menu Actions or the context menu.
Also, the scheduler of this type can be started by another scheduler, through the action Run Scheduler.
4.3.2.3 Repeat
Sometimes you need to repeat the scheduler operations after its actions by the schedule have been
executed. You can enable the repetition and configure it in the group Repeat:
This radio button turns on/off the repeat mode.
Includes the repeat mode and provides the ability to set the repeat options:
The first parameter defines the number of repeats after the scheduler is executed;
The second value defines the range of 0.5; 0.25; 1, etc.
The third parameter specifies the unit: hours or minutes. Depending on the selected unit the repeat
interval will be calculated.
38
© 2015 Stimulsoft
The picture above shows an example of the enabled repeat mode: 3 repeats with an interval of half an hour
after each execution of the schedule. Suppose there is a scheduler which runs daily at 10.00 AM. If the repeat
mode is enabled (see the picture above), the scheduler will run:
at 10.00 AM on a daily schedule;
at 10.30 AM will be the first repeat;
at 11.00 AM will be made to the second repeat;
at 11.30 AM will be made the third repetition.
The next day, the scheduler will run at 10.00 AM, and if the repeat mode is enabled the repetitions will be
performed.
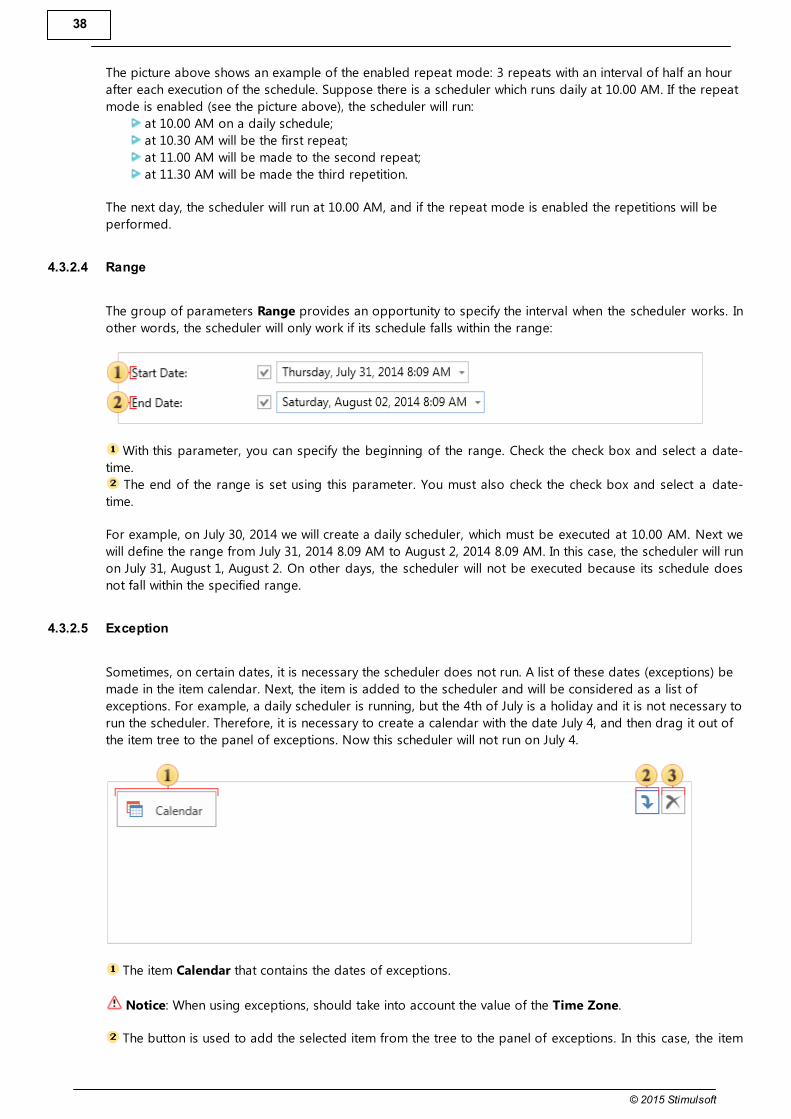
4.3.2.4 Range
The group of parameters Range provides an opportunity to specify the interval when the scheduler works. In
other words, the scheduler will only work if its schedule falls within the range:
With this parameter, you can specify the beginning of the range. Check the check box and select a date-
time.
The end of the range is set using this parameter. You must also check the check box and select a date-
time.
For example, on July 30, 2014 we will create a daily scheduler, which must be executed at 10.00 AM. Next we
will define the range from July 31, 2014 8.09 AM to August 2, 2014 8.09 AM. In this case, the scheduler will run
on July 31, August 1, August 2. On other days, the scheduler will not be executed because its schedule does
not fall within the specified range.
4.3.2.5 Exception
Sometimes, on certain dates, it is necessary the scheduler does not run. A list of these dates (exceptions) be
made in the item calendar. Next, the item is added to the scheduler and will be considered as a list of
exceptions. For example, a daily scheduler is running, but the 4th of July is a holiday and it is not necessary to
run the scheduler. Therefore, it is necessary to create a calendar with the date July 4, and then drag it out of
the item tree to the panel of exceptions. Now this scheduler will not run on July 4.
The item Calendar that contains the dates of exceptions.
Notice: When using exceptions, should take into account the value of the Time Zone.
The button is used to add the selected item from the tree to the panel of exceptions. In this case, the item

Tab Create 39
© 2015 Stimulsoft
Calendar.
The button is used to delete an item from the panel of exceptions.
4.3.2.6 Notify
In this group of parameters it is possible to set up a list of users who will get notifications of the executed
scheduler. You can notify all users of the workspace, or users with a specific role, or users by selection.
In order notifications of the executed scheduler send to all the users in this workspace, you should select
this check box.
If you check the role, all users in this role will be notified of the executed scheduler.
In addition, it is possible to selectively notify users.
4.3.3 Actions
The scheduler in the active (running) state performs a specific list of actions on schedule. The list of actions is
generated when you create or edit the scheduler on the tab Actions.

40
© 2015 Stimulsoft
The drop-down menu that contains a list of actions available for the Scheduler.
Delete the selected action from the list on the panel .
Actions are executed alternately in the scheduler, in the direction from top to bottom. The higher is the
location of a particular action in the generated list of Action , the higher is the order of execution.
Moves the selected action up and down, i.e. increase-decrease execution priority.
The panel list of actions. This panel displays the added action, i.e. those that will be executed each time
you run the Scheduler.
The panel of parameters of the selected action.
Actions performed by the scheduler:
Run Report.
Run Scheduler.
Copy.
Send Email.
4.3.3.1 Run Report
The action Run Report provides an opportunity to start the rendering of a report at a certain time, or to
convert the report to any of the available file formats. After rendering the report can be saved into the item
tree, cloud storage, emailed, etc. Below is a menu of the action run a report.

Tab Create 41
© 2015 Stimulsoft
The field Report. In this field you can specify the report template or a rendered report, i.e. the item that
you want to convert. If the report uses parameters, then click the button to change the default settings.
The field Destination. It specifies the destination of the output file, i.e. location of the report after the
conversion. This may be a folder, a list of contacts, etc. For example, if you specify a folder, the report will be
converted and saved in it. If the destination is a list of contacts, the report will be converted and sent to all
recipients present in the contact list.
Notice: If you specify a contact list item as the destination, it will be necessary to determine the method of
attaching the report to an email. The report can be directly attached to the email as a file or a link to this
report will be attached.
In the field of this parameter you can determine the Result Type the report should be converted to.
If you want to automatically delete the result after a certain date and time, then it can be done using this
parameter. To do this, you must check the box and specify time. When the date and time come the file will be
automatically moved to recycle bin.
Notice: Consider the ways to add items to the fields and :
A method of dragging an item from the item tree into the field of action. To do this, hold down the
left mouse button over the required element and, without releasing the button, move the item to a
particular field.
Another way of adding items is using the control buttons: - this button adds the selected item in
the action field, - removes an item from the field of action.
4.3.3.2 Run Scheduler
The action Run Scheduler provides the ability to run another scheduler. In other words, one scheduler can
run the other, and that one is already carrying out any action. For this action, it is necessary to consider the
following limitations:
The slave scheduler is the one that will run another scheduler must be of the type Once;
One level structure. You cannot run a scheduler that will run another scheduler that will run the third
scheduler. In other words, it is impossible to build a multilevel hierarchy of the action.
Below is a menu of the action Run Scheduler.
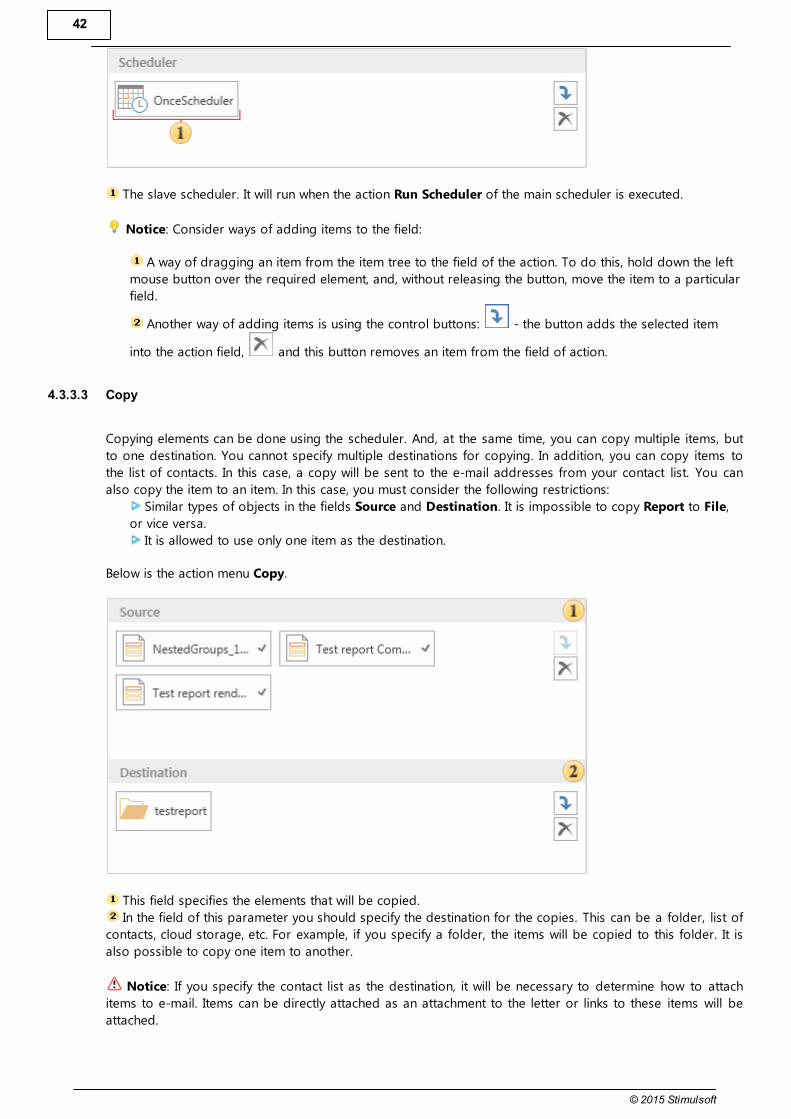
42
© 2015 Stimulsoft
The slave scheduler. It will run when the action Run Scheduler of the main scheduler is executed.
Notice: Consider ways of adding items to the field:
A way of dragging an item from the item tree to the field of the action. To do this, hold down the left
mouse button over the required element, and, without releasing the button, move the item to a particular
field.
Another way of adding items is using the control buttons: - the button adds the selected item
into the action field, and this button removes an item from the field of action.
4.3.3.3 Copy
Copying elements can be done using the scheduler. And, at the same time, you can copy multiple items, but
to one destination. You cannot specify multiple destinations for copying. In addition, you can copy items to
the list of contacts. In this case, a copy will be sent to the e-mail addresses from your contact list. You can
also copy the item to an item. In this case, you must consider the following restrictions:
Similar types of objects in the fields Source and Destination. It is impossible to copy Report to File,
or vice versa.
It is allowed to use only one item as the destination.
Below is the action menu Copy.
This field specifies the elements that will be copied.
In the field of this parameter you should specify the destination for the copies. This can be a folder, list of
contacts, cloud storage, etc. For example, if you specify a folder, the items will be copied to this folder. It is
also possible to copy one item to another.
Notice: If you specify the contact list as the destination, it will be necessary to determine how to attach
items to e-mail. Items can be directly attached as an attachment to the letter or links to these items will be
attached.
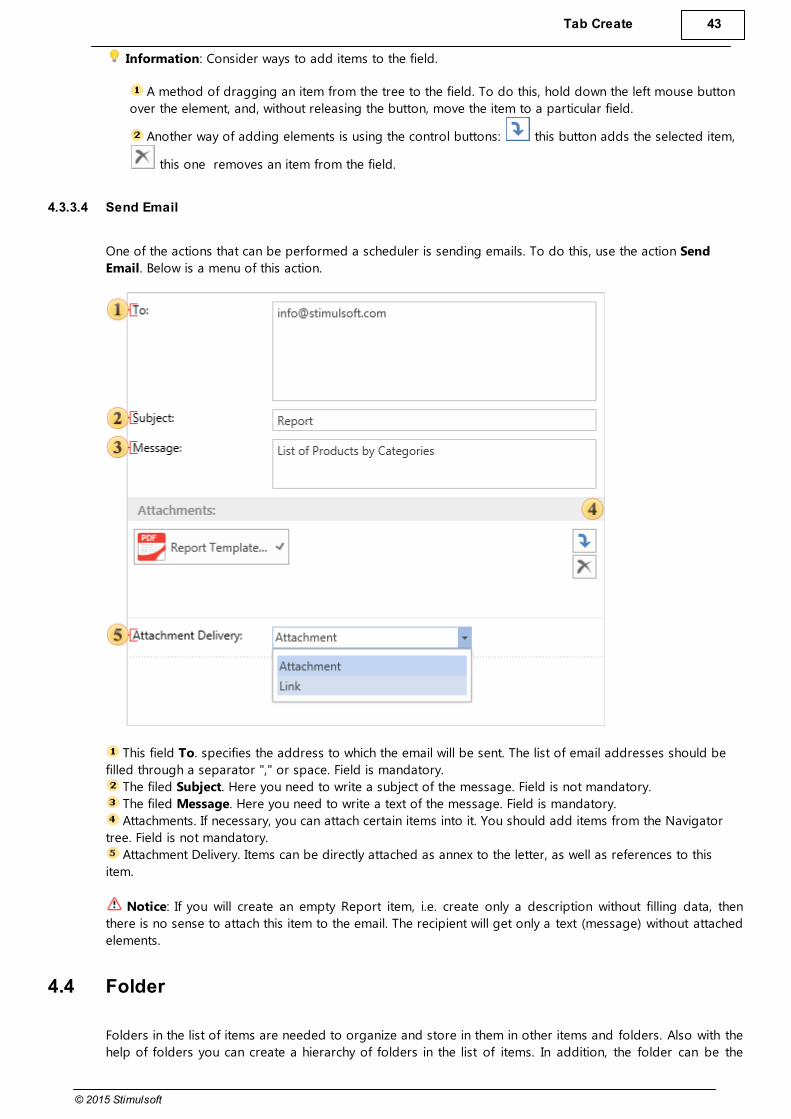
Tab Create 43
© 2015 Stimulsoft
Information: Consider ways to add items to the field.
A method of dragging an item from the tree to the field. To do this, hold down the left mouse button
over the element, and, without releasing the button, move the item to a particular field.
Another way of adding elements is using the control buttons: this button adds the selected item,
this one removes an item from the field.
4.3.3.4 Send Email
One of the actions that can be performed a scheduler is sending emails. To do this, use the action Send
Email. Below is a menu of this action.
This field To. specifies the address to which the email will be sent. The list of email addresses should be
filled through a separator "," or space. Field is mandatory.
The filed Subject. Here you need to write a subject of the message. Field is not mandatory.
The filed Message. Here you need to write a text of the message. Field is mandatory.
Attachments. If necessary, you can attach certain items into it. You should add items from the Navigator
tree. Field is not mandatory.
Attachment Delivery. Items can be directly attached as annex to the letter, as well as references to this
item.
Notice: If you will create an empty Report item, i.e. create only a description without filling data, then
there is no sense to attach this item to the email. The recipient will get only a text (message) without attached
elements.
4.4 Folder
Folders in the list of items are needed to organize and store in them in other items and folders. Also with the
help of folders you can create a hierarchy of folders in the list of items. In addition, the folder can be the

44
© 2015 Stimulsoft
beginning of the item tree for certain users. Below is the menu to create a new folder.
This field specifies the name of the folder.
Add description, explanation or label for the new folder.
4.5 Cloud Storage
The report server has the ability to import files from an online (cloud) storage. In addition, the cloud storage
can be a destination for the result of actions of the scheduler. Access to the online store can be organized
using the item Cloud Storage. Depending on the type of the online storage it is necessary to determine the
item type of the Cloud Storage.
After selecting the type, click the tab Settings to define the settings for the online storage.
4.5.1 Settings
This tab defines the parameters of the Cloud Storage items, and configure access to the online storage of a
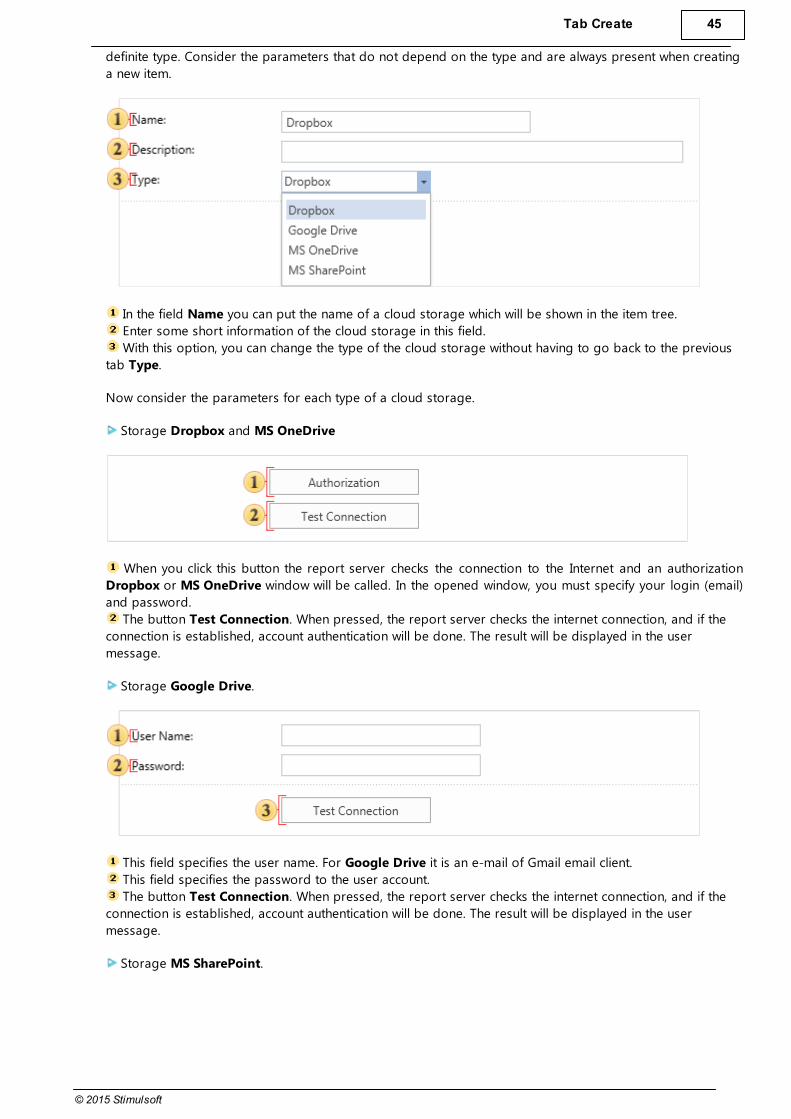
Tab Create 45
© 2015 Stimulsoft
definite type. Consider the parameters that do not depend on the type and are always present when creating
a new item.
In the field Name you can put the name of a cloud storage which will be shown in the item tree.
Enter some short information of the cloud storage in this field.
With this option, you can change the type of the cloud storage without having to go back to the previous
tab Type.
Now consider the parameters for each type of a cloud storage.
Storage Dropbox and MS OneDrive
When you click this button the report server checks the connection to the Internet and an authorization
Dropbox or MS OneDrive window will be called. In the opened window, you must specify your login (email)
and password.
The button Test Connection. When pressed, the report server checks the internet connection, and if the
connection is established, account authentication will be done. The result will be displayed in the user
message.
Storage Google Drive.
This field specifies the user name. For Google Drive it is an e-mail of Gmail email client.
This field specifies the password to the user account.
The button Test Connection. When pressed, the report server checks the internet connection, and if the
connection is established, account authentication will be done. The result will be displayed in the user
message.
Storage MS SharePoint.
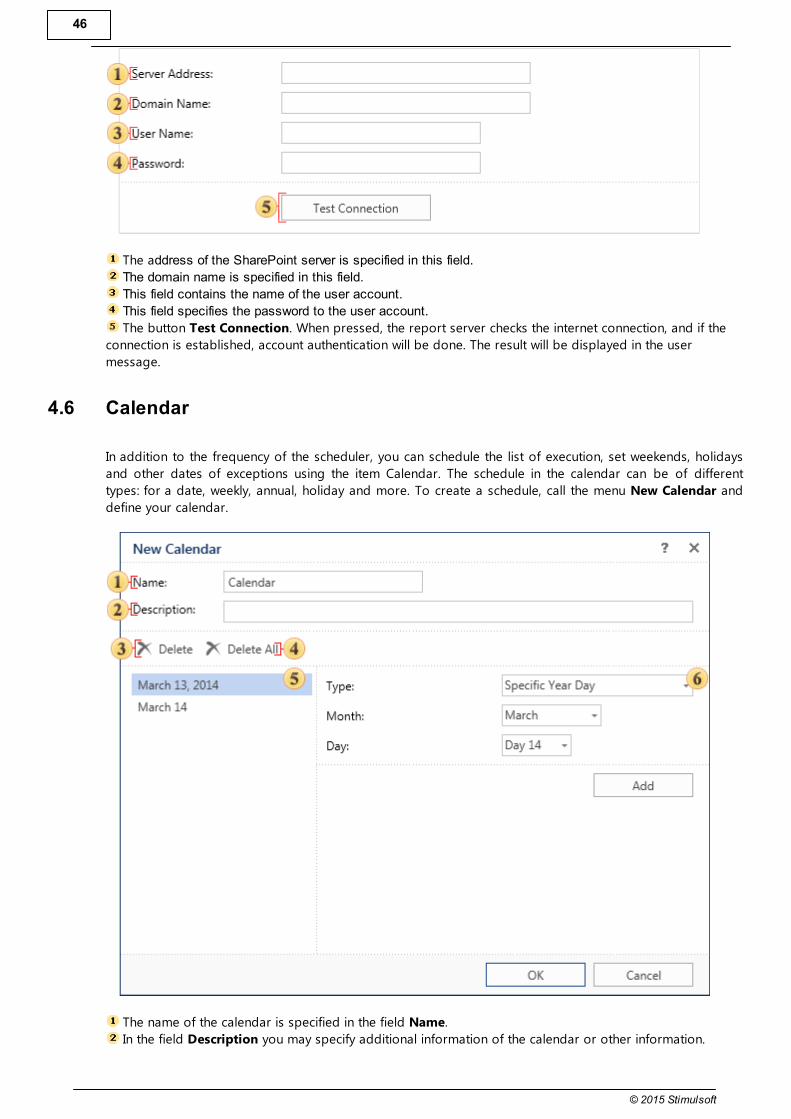
46
© 2015 Stimulsoft
The address of the SharePoint server is specified in this field.
The domain name is specified in this field.
This field contains the name of the user account.
This field specifies the password to the user account.
The button Test Connection. When pressed, the report server checks the internet connection, and if the
connection is established, account authentication will be done. The result will be displayed in the user
message.
4.6 Calendar
In addition to the frequency of the scheduler, you can schedule the list of execution, set weekends, holidays
and other dates of exceptions using the item Calendar. The schedule in the calendar can be of different
types: for a date, weekly, annual, holiday and more. To create a schedule, call the menu New Calendar and
define your calendar.
The name of the calendar is specified in the field Name.
In the field Description you may specify additional information of the calendar or other information.

Tab Create 47
© 2015 Stimulsoft
The button Delete deletes the selected schedule item in the calendar
If you want to remove all scheduler items in the calendar, click Delete All.
The panel Calendar items shows all the elements of the schedule, i.e. the time and date by which the
action of the scheduler will be implemented.
On the panel New Calendar Items you can define settings of an item schedule. Depending on the Item
type, other parameters may vary. Once the parameters are defined element, press the button Add to the
element with the current settings written in the list of calendar items.
Depending on the selected type, different parameters can be shown. Consider the types of calendars:
The type Date. The parameters of the schedule is a specific day, month, year and time. Also a day of the
week corresponding to the selected date is displayed.
The type Weekly. For the calendar of this type it is necessary to determine a day of the week.
The type Annual. For the annual schedule, you should specify the month of the year and a day of the
month.
The type Relative day of the year. In this case, the calendar will not be "tied" to a specific date. The
schedule parameters are:
1. Priority: First, Second, Third, Fourth, Last.
2. Day of the week.
3. Month of the year.
And then, for example, the third Thursday of November is the schedule for this calendar item.
The type Easter. Schedule for this type will be calculated off-day of Easter, which is the start date and it
measured the number of days to offset. You should know that if this year Easter has passed, the reference
point is Easter next year. Consider the examples of indications of some values:
1. The minimum value that can be specified is -365. The calendar date will be a day before Easter - 365
days.
2. The maximum value that can be specified is 365. The calendar date will be the day after the Easter day
+365 days.
3. If the number of days is not specified or is 0, then in this case the date of the calendar will be Easter (if
Easter has passed this year, it will be a day of Easter next year, if the day of Easter had not yet arrived
- in the current year).
Notice: If the next year is a leap year and the date of the schedule falls on a day after February, then you
should always add 1 to the offset.
The type Holidays. This type of the calendar provides an opportunity to create a schedule considering
country holidays. For this type you should choose a country. After this, the list of holidays, which may be
present in the schedule will be displayed on the panel of new items. If necessary, you can add one holiday or
all at once to the items of the calendar.
4.7 File
You should call the File menu to add the required file from the storage to the list of server items or create a
new file based on an existing item. This command creates an object, which can contain any type of files.
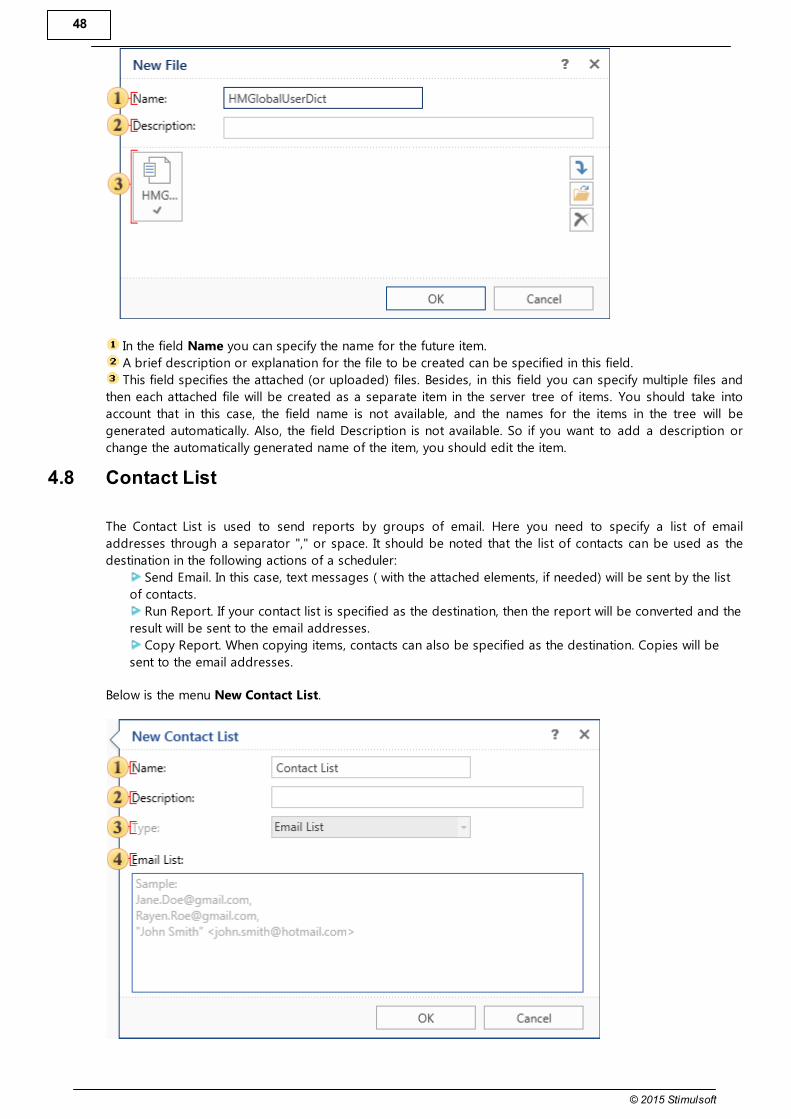
48
© 2015 Stimulsoft
In the field Name you can specify the name for the future item.
A brief description or explanation for the file to be created can be specified in this field.
This field specifies the attached (or uploaded) files. Besides, in this field you can specify multiple files and
then each attached file will be created as a separate item in the server tree of items. You should take into
account that in this case, the field name is not available, and the names for the items in the tree will be
generated automatically. Also, the field Description is not available. So if you want to add a description or
change the automatically generated name of the item, you should edit the item.
4.8 Contact List
The Contact List is used to send reports by groups of email. Here you need to specify a list of email
addresses through a separator "," or space. It should be noted that the list of contacts can be used as the
destination in the following actions of a scheduler:
Send Email. In this case, text messages ( with the attached elements, if needed) will be sent by the list
of contacts.
Run Report. If your contact list is specified as the destination, then the report will be converted and the
result will be sent to the email addresses.
Copy Report. When copying items, contacts can also be specified as the destination. Copies will be
sent to the email addresses.
Below is the menu New Contact List.
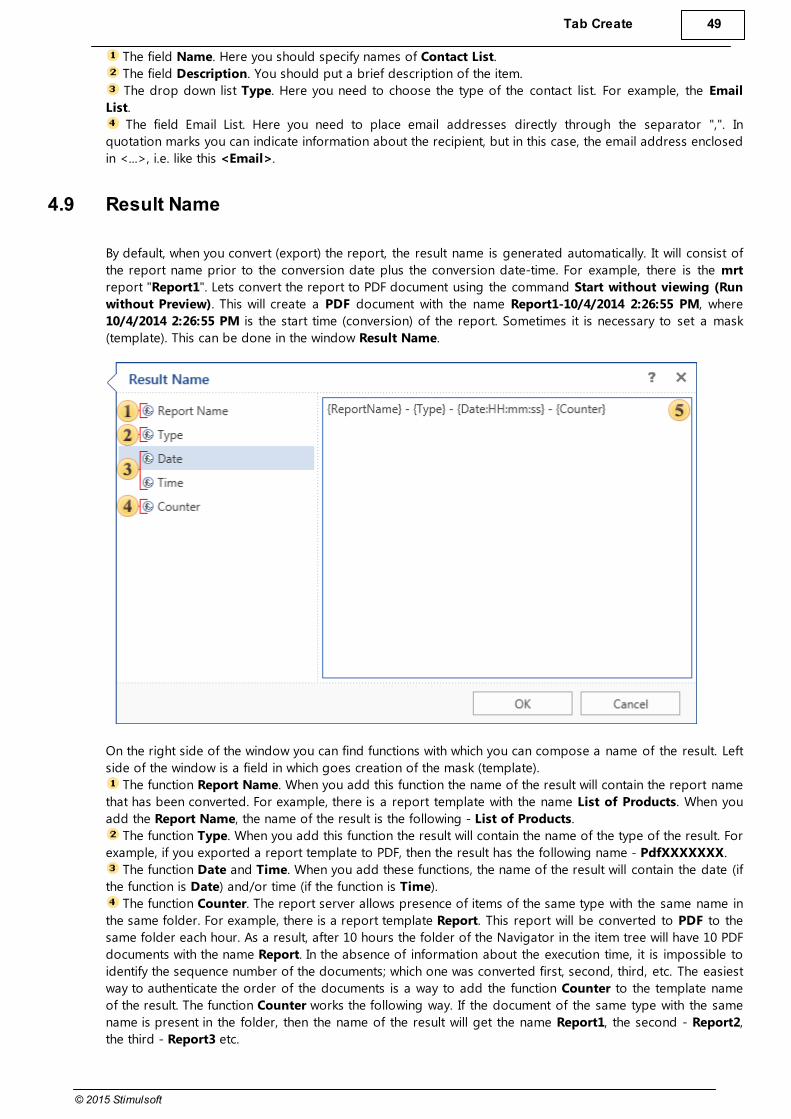
Tab Create 49
© 2015 Stimulsoft
The field Name. Here you should specify names of Contact List.
The field Description. You should put a brief description of the item.
The drop down list Type. Here you need to choose the type of the contact list. For example, the Email
List.
The field Email List. Here you need to place email addresses directly through the separator ",". In
quotation marks you can indicate information about the recipient, but in this case, the email address enclosed
in <...>, i.e. like this <Email>.
4.9 Result Name
By default, when you convert (export) the report, the result name is generated automatically. It will consist of
the report name prior to the conversion date plus the conversion date-time. For example, there is the mrt
report "Report1". Lets convert the report to PDF document using the command Start without viewing (Run
without Preview). This will create a PDF document with the name Report1-10/4/2014 2:26:55 PM, where
10/4/2014 2:26:55 PM is the start time (conversion) of the report. Sometimes it is necessary to set a mask
(template). This can be done in the window Result Name.
On the right side of the window you can find functions with which you can compose a name of the result. Left
side of the window is a field in which goes creation of the mask (template).
The function Report Name. When you add this function the name of the result will contain the report name
that has been converted. For example, there is a report template with the name List of Products. When you
add the Report Name, the name of the result is the following - List of Products.
The function Type. When you add this function the result will contain the name of the type of the result. For
example, if you exported a report template to PDF, then the result has the following name - PdfXXXXXXX.
The function Date and Time. When you add these functions, the name of the result will contain the date (if
the function is Date) and/or time (if the function is Time).
The function Counter. The report server allows presence of items of the same type with the same name in
the same folder. For example, there is a report template Report. This report will be converted to PDF to the
same folder each hour. As a result, after 10 hours the folder of the Navigator in the item tree will have 10 PDF
documents with the name Report. In the absence of information about the execution time, it is impossible to
identify the sequence number of the documents; which one was converted first, second, third, etc. The easiest
way to authenticate the order of the documents is a way to add the function Counter to the template name
of the result. The function Counter works the following way. If the document of the same type with the same
name is present in the folder, then the name of the result will get the name Report1, the second - Report2,
the third - Report3 etc.
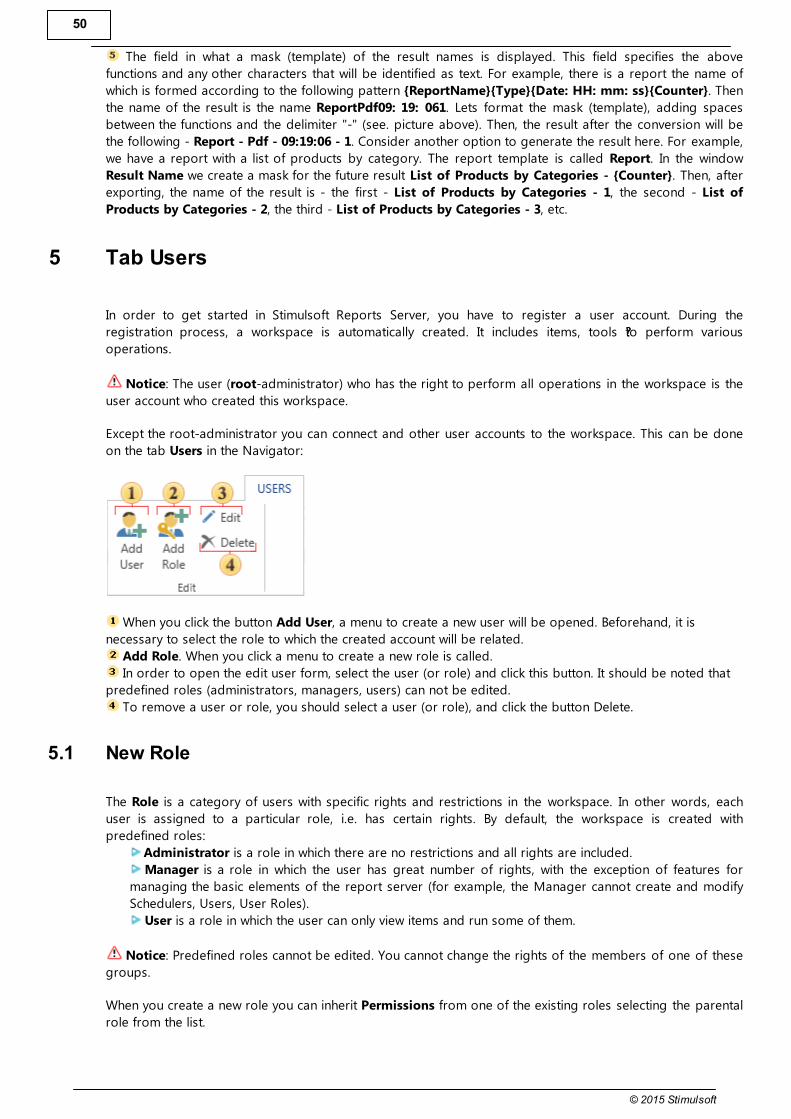
50
© 2015 Stimulsoft
The field in what a mask (template) of the result names is displayed. This field specifies the above
functions and any other characters that will be identified as text. For example, there is a report the name of
which is formed according to the following pattern {ReportName}{Type}{Date: HH: mm: ss}{Counter}. Then
the name of the result is the name ReportPdf09: 19: 061. Lets format the mask (template), adding spaces
between the functions and the delimiter "-" (see. picture above). Then, the result after the conversion will be
the following - Report - Pdf - 09:19:06 - 1. Consider another option to generate the result here. For example,
we have a report with a list of products by category. The report template is called Report. In the window
Result Name we create a mask for the future result List of Products by Categories - {Counter}. Then, after
exporting, the name of the result is - the first - List of Products by Categories - 1, the second - List of
Products by Categories - 2, the third - List of Products by Categories - 3, etc.
5 Tab Users
In order to get started in Stimulsoft Reports Server, you have to register a user account. During the
registration process, a workspace is automatically created. It includes items, tools ??to perform various
operations.
Notice: The user (root-administrator) who has the right to perform all operations in the workspace is the
user account who created this workspace.
Except the root-administrator you can connect and other user accounts to the workspace. This can be done
on the tab Users in the Navigator:
When you click the button Add User, a menu to create a new user will be opened. Beforehand, it is
necessary to select the role to which the created account will be related.
Add Role. When you click a menu to create a new role is called.
In order to open the edit user form, select the user (or role) and click this button. It should be noted that
predefined roles (administrators, managers, users) can not be edited.
To remove a user or role, you should select a user (or role), and click the button Delete.
5.1 New Role
The Role is a category of users with specific rights and restrictions in the workspace. In other words, each
user is assigned to a particular role, i.e. has certain rights. By default, the workspace is created with
predefined roles:
Administrator is a role in which there are no restrictions and all rights are included.
Manager is a role in which the user has great number of rights, with the exception of features for
managing the basic elements of the report server (for example, the Manager cannot create and modify
Schedulers, Users, User Roles).
User is a role in which the user can only view items and run some of them.
Notice: Predefined roles cannot be edited. You cannot change the rights of the members of one of these
groups.
When you create a new role you can inherit Permissions from one of the existing roles selecting the parental
role from the list.
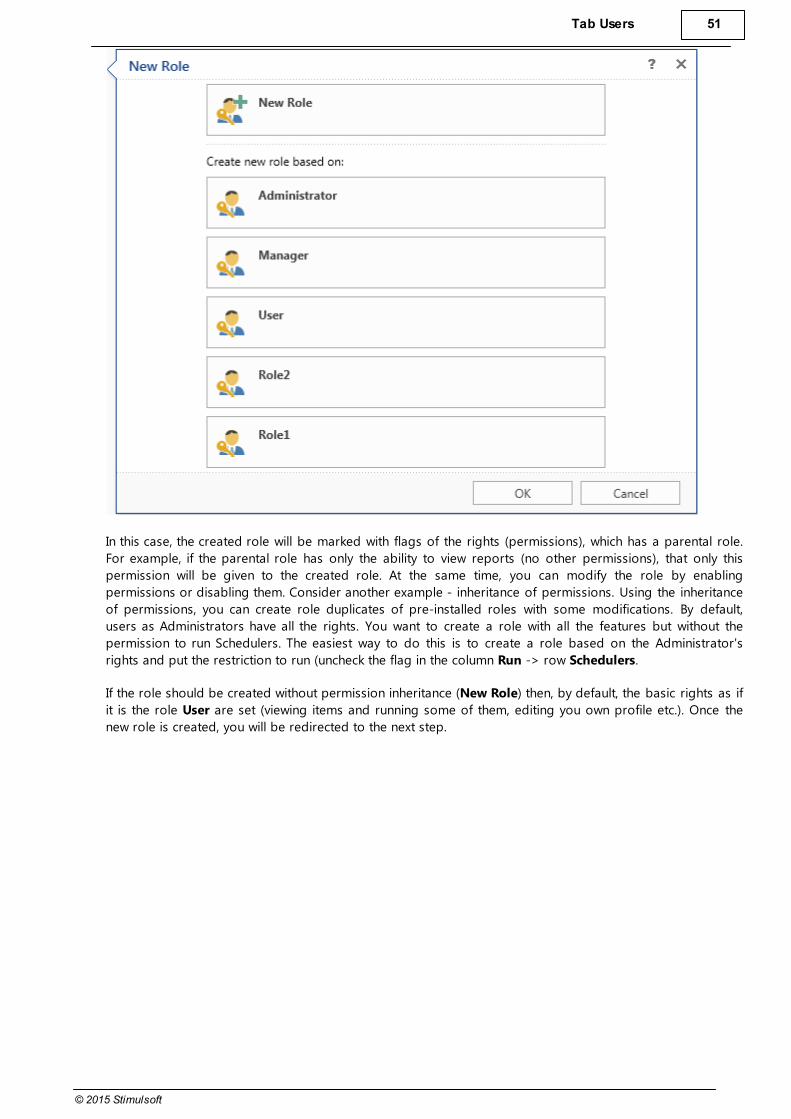
Tab Users 51
© 2015 Stimulsoft
In this case, the created role will be marked with flags of the rights (permissions), which has a parental role.
For example, if the parental role has only the ability to view reports (no other permissions), that only this
permission will be given to the created role. At the same time, you can modify the role by enabling
permissions or disabling them. Consider another example - inheritance of permissions. Using the inheritance
of permissions, you can create role duplicates of pre-installed roles with some modifications. By default,
users as Administrators have all the rights. You want to create a role with all the features but without the
permission to run Schedulers. The easiest way to do this is to create a role based on the Administrator's
rights and put the restriction to run (uncheck the flag in the column Run -> row Schedulers.
If the role should be created without permission inheritance (New Role) then, by default, the basic rights as if
it is the role User are set (viewing items and running some of them, editing you own profile etc.). Once the
new role is created, you will be redirected to the next step.

52
© 2015 Stimulsoft
The field Name. Here you can put the role name.
The field Description. If you need additional description of the role, it can be put in this field.
The field Permission. Consists of columns (rights) and rows (list of items). Also, the rows are split into
categories. Each column defines a certain right.
The right View provides the ability to view items in the current workspace.
The right Create provides the ability to create items in the current workspace.
The right Delete provides the ability to delete items in the current workspace.
The right Modify provides the ability to edit items in the current workspace.
The right Run provides the ability to run the items in the current workspace.
Notice: You should know that if the users of a certain role cannot view any item then the rest of the
actions performed on this item are not allowed too. For example, the role is not authorized to view the
Scheduler, but the role has the right to create and run the Scheduler. In this case members of this role
CANNOT create or run the Scheduler.
5.1.1 Permision Table
The table shows the items (rows) and the rights (columns) and brief descriptions of permissions. The text
inside the cells of the table describes the action allowed.
Items / Rights View Create Delete Modify Run
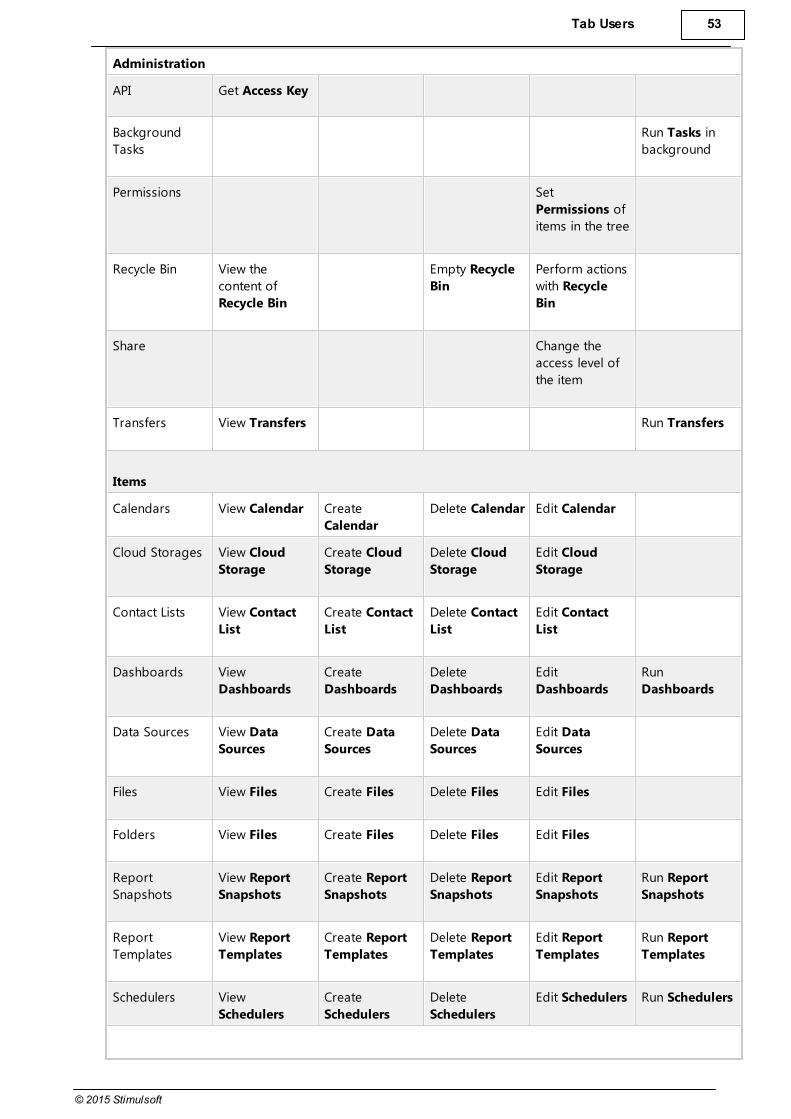
Tab Users 53
© 2015 Stimulsoft
Administration
API Get Access Key
Background
Tasks
Run Tasks in
background
Permissions Set
Permissions of
items in the tree
Recycle Bin View the
content of
Recycle Bin
Empty Recycle
Bin
Perform actions
with Recycle
Bin
Share Change the
access level of
the item
Transfers View Transfers Run Transfers
Items
Calendars View Calendar Create
Calendar
Delete Calendar Edit Calendar
Cloud Storages View Cloud
Storage
Create Cloud
Storage
Delete Cloud
Storage
Edit Cloud
Storage
Contact Lists View Contact
List
Create Contact
List
Delete Contact
List
Edit Contact
List
Dashboards View
Dashboards
Create
Dashboards
Delete
Dashboards
Edit
Dashboards
Run
Dashboards
Data Sources View Data
Sources
Create Data
Sources
Delete Data
Sources
Edit Data
Sources
Files View Files Create Files Delete Files Edit Files
Folders View Files Create Files Delete Files Edit Files
Report
Snapshots
View Report
Snapshots
Create Report
Snapshots
Delete Report
Snapshots
Edit Report
Snapshots
Run Report
Snapshots
Report
Templates
View Report
Templates
Create Report
Templates
Delete Report
Templates
Edit Report
Templates
Run Report
Templates
Schedulers View
Schedulers
Create
Schedulers
Delete
Schedulers
Edit Schedulers Run Schedulers

54
© 2015 Stimulsoft
Report Designer
Business
Objects
View Business
Objects
Create Business
Objects
Delete Business
Objects
Edit Business
Objects
Data
Connections
View Data
Connections
Create Data
Connections
Delete Data
Connections
Edit Data
Connections
Data Columns View Data
Columns
Create Data
Columns
Delete Data
Columns
Edit Data
Columns
Data Relations View Data
Relations
Create Data
Relations
Delete Data
Relations
Edit Data
Relations
Data Sources View Data
Sources
Create Data
Sources
Delete Data
Sources
Edit Data
Sources
Dictionary
Actions
View Dictionary
Actions
Run Dictionary
Actions
Restrictions View
Restrictions
Edit
Restrictions
Variables View Variables Create
Variables
Delete
Variables
Edit Variables
System
Backup &
Restore
View Backup &
Restore
Run Backup &
Restore
Templates
View Email
Templates
Edit Email
Templates
Licensing View Licensing Edit Licensing
Monitoring Run Monitor
SMTP Server View SMTP
Server
Edit SMTP
Server
Workspaces View
Workspace
Create
Workspace
Delete
Workspace
Edit Workspace
Updates View Updates Run Updates
Users
Users View Users Create Users Delete Users Edit Users
Himself View your Own Edit your Own
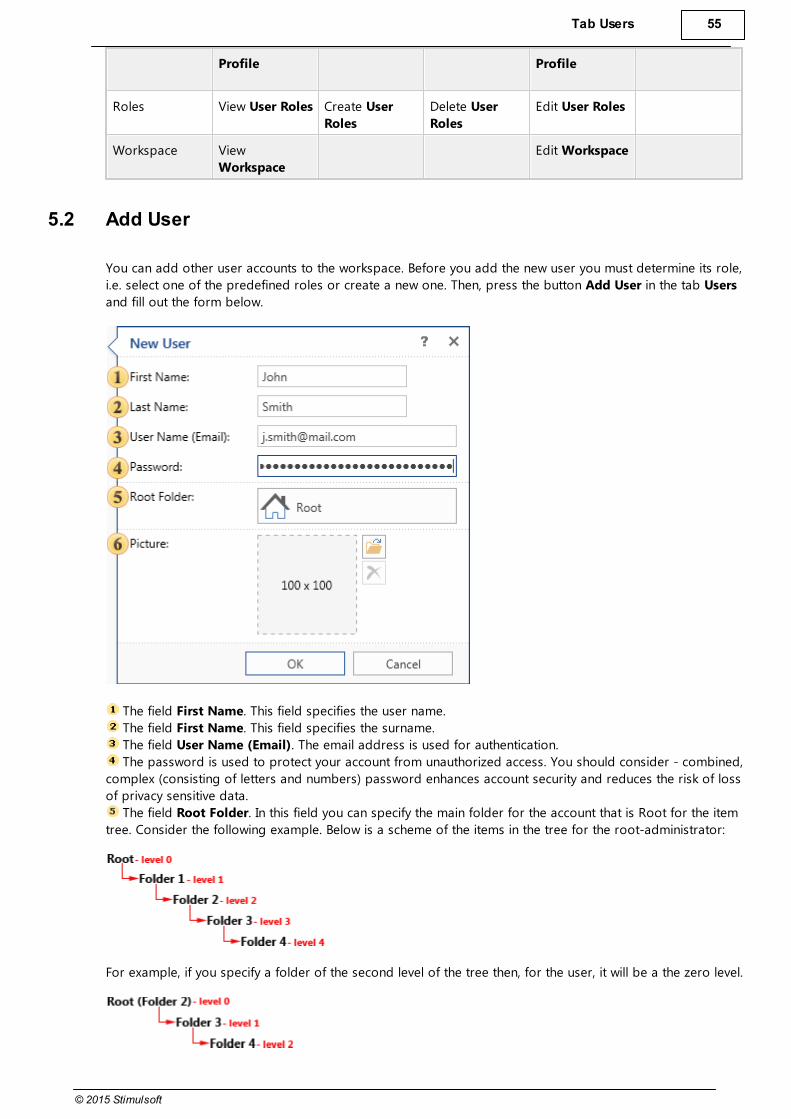
Tab Users 55
© 2015 Stimulsoft
Profile Profile
Roles View User Roles Create User
Roles
Delete User
Roles
Edit User Roles
Workspace View
Workspace
Edit Workspace
5.2 Add User
You can add other user accounts to the workspace. Before you add the new user you must determine its role,
i.e. select one of the predefined roles or create a new one. Then, press the button Add User in the tab Users
and fill out the form below.
The field First Name. This field specifies the user name.
The field First Name. This field specifies the surname.
The field User Name (Email). The email address is used for authentication.
The password is used to protect your account from unauthorized access. You should consider - combined,
complex (consisting of letters and numbers) password enhances account security and reduces the risk of loss
of privacy sensitive data.
The field Root Folder. In this field you can specify the main folder for the account that is Root for the item
tree. Consider the following example. Below is a scheme of the items in the tree for the root-administrator:
For example, if you specify a folder of the second level of the tree then, for the user, it will be a the zero level.

56
© 2015 Stimulsoft
The field Image. You can upload an image that will be the user's avatar.
6 Tab System
This tab of the Navigator contains the basic system settings and commands of the report server.
The command Update. Using this command will run the process of the software update.
The command Backup and Restore. Sometimes you need to go back to the previous version. To do this,
select this option.
The command Licensing. To read the license agreement, select the command.
The command SMTP Server Settings. Here you can setup the SMTP server.
The command Email Templates. It is used to customize the Email templates.
6.1 Update
In order to install the latest version of the software, you must be a registered user, have access to the
Internet and click the button Update on the tab System.
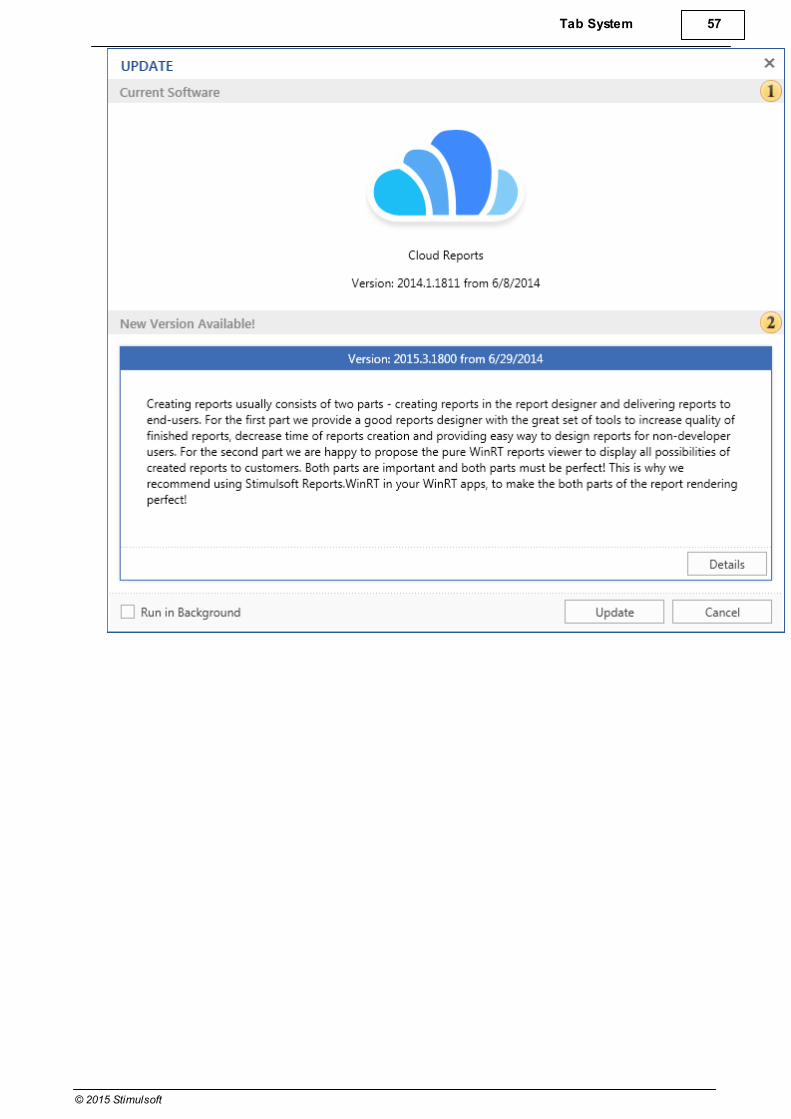
Tab System 57
© 2015 Stimulsoft
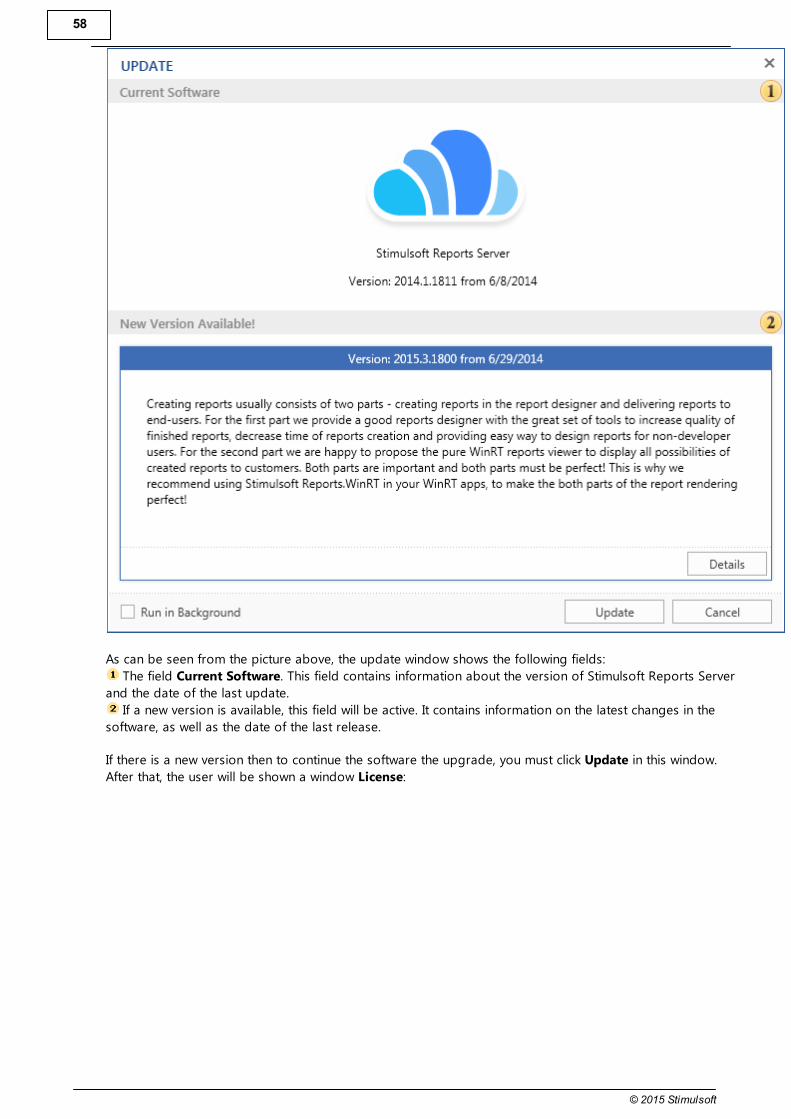
58
© 2015 Stimulsoft
As can be seen from the picture above, the update window shows the following fields:
The field Current Software. This field contains information about the version of Stimulsoft Reports Server
and the date of the last update.
If a new version is available, this field will be active. It contains information on the latest changes in the
software, as well as the date of the last release.
If there is a new version then to continue the software the upgrade, you must click Update in this window.
After that, the user will be shown a window License:
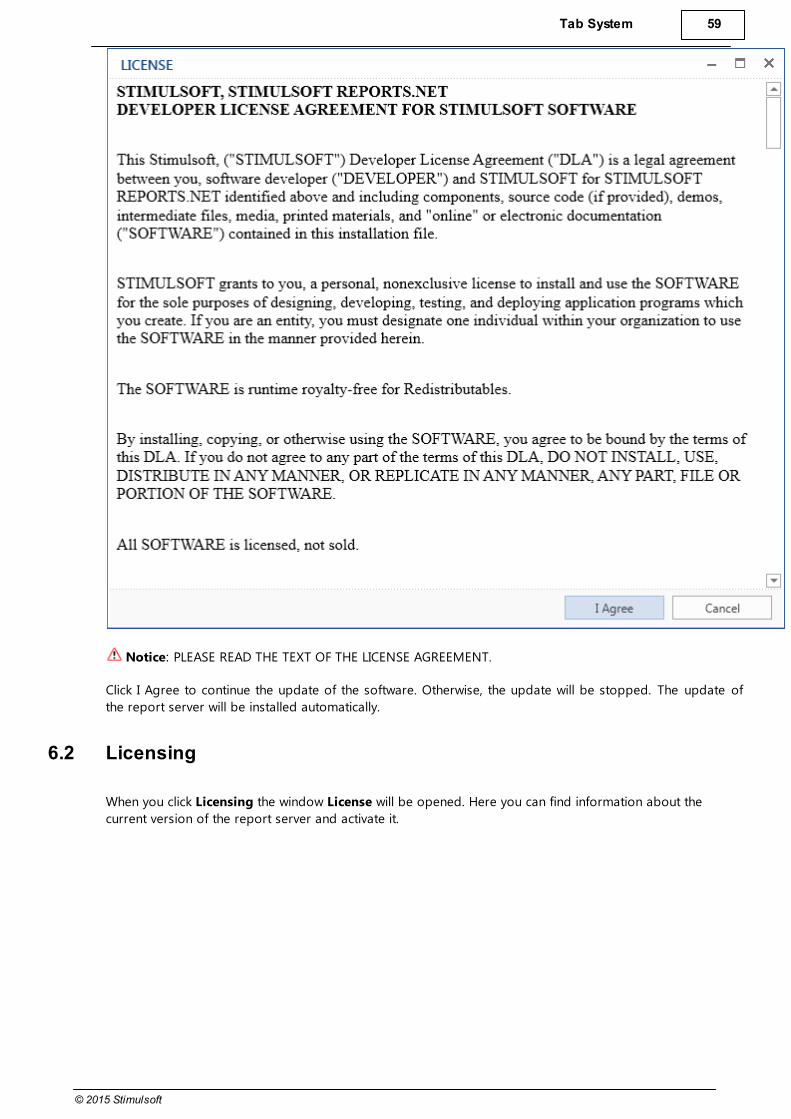
Tab System 59
© 2015 Stimulsoft
Notice: PLEASE READ THE TEXT OF THE LICENSE AGREEMENT.
Click I Agree to continue the update of the software. Otherwise, the update will be stopped. The update of
the report server will be installed automatically.
6.2 Licensing
When you click Licensing the window License will be opened. Here you can find information about the
current version of the report server and activate it.

60
© 2015 Stimulsoft
As can be seen from the picture above, the version is trial. In order to get a licensed version of Stimulsoft
Reports Server click Activate and enter the registration information (username and password).
To obtain registration information, click Buy, choose the type of the license and follow the instructions.
Notice: Clients of Stimulsoft Reports.Ultimate can use their credentials to activate the server.
After successful activation, the field License Information will look like on the picture below.

Tab System 61
© 2015 Stimulsoft
As can be seen from the picture, this field indicates the status of the license (activated) and contains the
following information
Owner. Specifies the user name of the license holder.
License. In the above example, the license up to 5 users.
Order Date. When was the registration.
Expired Date. The date when the subscription expires.
There is also the button Deactivate. When you click it the license will be stopped.
6.3 SMTP Server Settings
For e-mail, you need to use any SMTP server. In order to bring up the SMTP server settings, press the
Settings button of the SMTP server (SMTP Server Settings) tab system (System):

62
© 2015 Stimulsoft
The field SMTP Host. Here you specify the address of the SMTP server.
The field SMTP Port. Here you specify the port of connection to the server.
The field User. The username (login) to connect to the SMTP server is specified in this field.
The field Password. In this field the password is specified to authentication on the SMTP server.
The field Sender Email. Specifies the e-mail address that will appear to the recipient as a sender email.
The field Sender Name. Specifies the name of a sender.
Use SSL. This option provides the ability to apply a cryptographic cipher to e-mails. If this box is checked,
the cipher is applied.
6.4 Email Templates
When performing certain actions the user will receive a notification by email. For example, when you register
a new account, the user will receive the notification to the email specified in registration. You can setup
templates of these notifications by clicking the Email Template on the tab System.
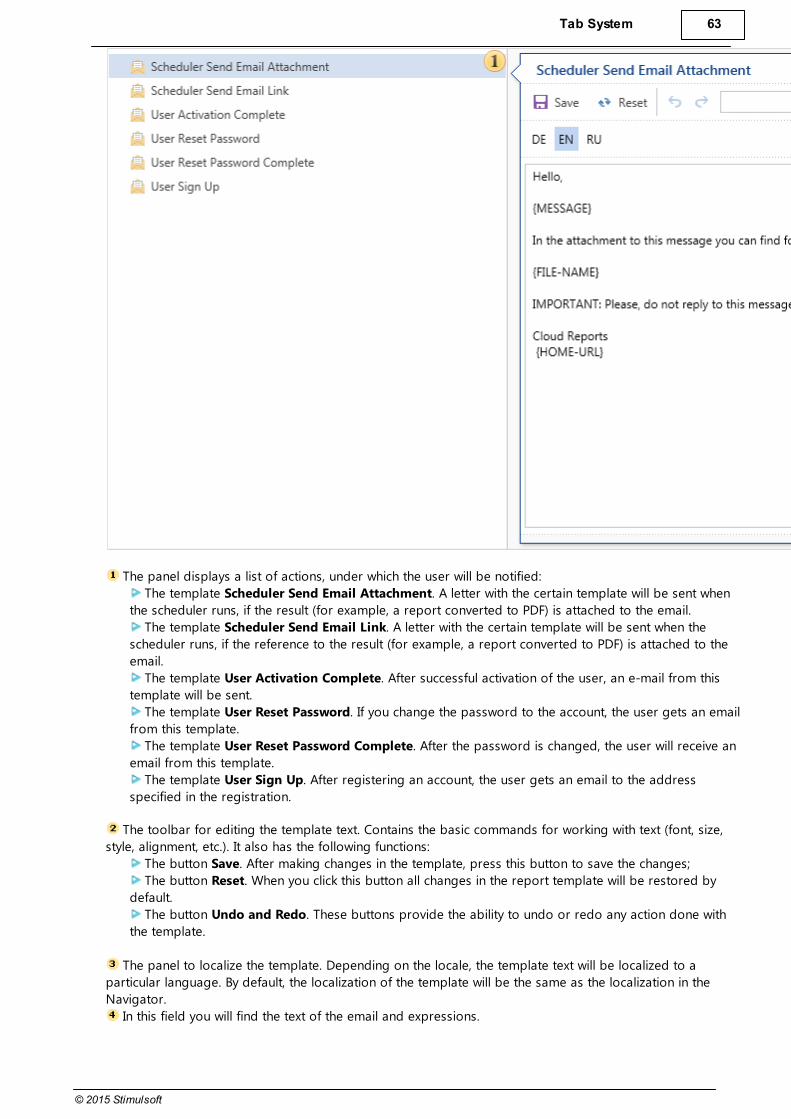
Tab System 63
© 2015 Stimulsoft
The panel displays a list of actions, under which the user will be notified:
The template Scheduler Send Email Attachment. A letter with the certain template will be sent when
the scheduler runs, if the result (for example, a report converted to PDF) is attached to the email.
The template Scheduler Send Email Link. A letter with the certain template will be sent when the
scheduler runs, if the reference to the result (for example, a report converted to PDF) is attached to the
email.
The template User Activation Complete. After successful activation of the user, an e-mail from this
template will be sent.
The template User Reset Password. If you change the password to the account, the user gets an email
from this template.
The template User Reset Password Complete. After the password is changed, the user will receive an
email from this template.
The template User Sign Up. After registering an account, the user gets an email to the address
specified in the registration.
The toolbar for editing the template text. Contains the basic commands for working with text (font, size,
style, alignment, etc.). It also has the following functions:
The button Save. After making changes in the template, press this button to save the changes;
The button Reset. When you click this button all changes in the report template will be restored by
default.
The button Undo and Redo. These buttons provide the ability to undo or redo any action done with
the template.
The panel to localize the template. Depending on the locale, the template text will be localized to a
particular language. By default, the localization of the template will be the same as the localization in the
Navigator.
In this field you will find the text of the email and expressions.
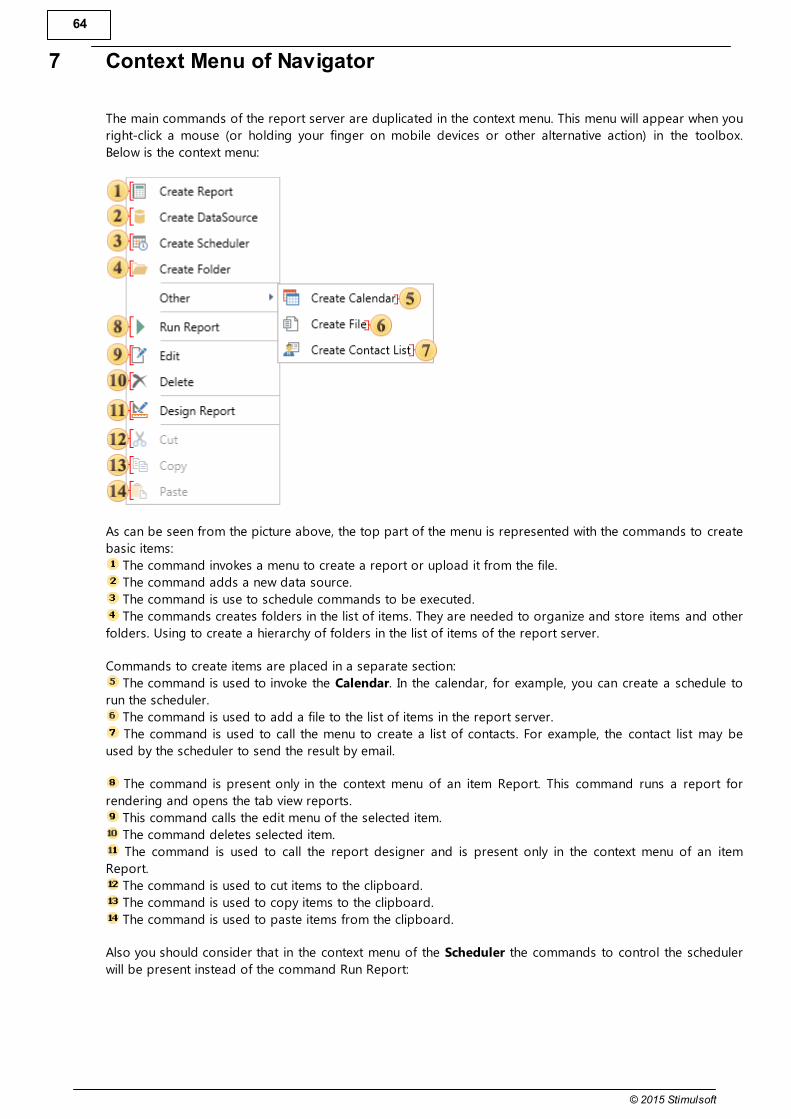
64
© 2015 Stimulsoft
7 Context Menu of Navigator
The main commands of the report server are duplicated in the context menu. This menu will appear when you
right-click a mouse (or holding your finger on mobile devices or other alternative action) in the toolbox.
Below is the context menu:
As can be seen from the picture above, the top part of the menu is represented with the commands to create
basic items:
The command invokes a menu to create a report or upload it from the file.
The command adds a new data source.
The command is use to schedule commands to be executed.
The commands creates folders in the list of items. They are needed to organize and store items and other
folders. Using to create a hierarchy of folders in the list of items of the report server.
Commands to create items are placed in a separate section:
The command is used to invoke the Calendar. In the calendar, for example, you can create a schedule to
run the scheduler.
The command is used to add a file to the list of items in the report server.
The command is used to call the menu to create a list of contacts. For example, the contact list may be
used by the scheduler to send the result by email.
The command is present only in the context menu of an item Report. This command runs a report for
rendering and opens the tab view reports.
This command calls the edit menu of the selected item.
The command deletes selected item.
The command is used to call the report designer and is present only in the context menu of an item
Report.
The command is used to cut items to the clipboard.
The command is used to copy items to the clipboard.
The command is used to paste items from the clipboard.
Also you should consider that in the context menu of the Scheduler the commands to control the scheduler
will be present instead of the command Run Report:

Context Menu of Navigator 65
© 2015 Stimulsoft
This command starts the scheduler at once not by a schedule.
Using this command the scheduler is running and it is executed according to the schedule.
Using this command the scheduler stops.
7.1 Menu Actions
The menu Actions contains commands used for possible actions with the selected item. Depending on the
type of an item, the number of steps may vary. Consider the example of the menu Actions of the item
Report, because you can perform the greatest number of actions with this item. Below is the menu.
The command Run is used to render reports and load it to the viewer.
Using this command the report is loaded to the report designer.
Using this command calls the menu for the selected item of the selected version.
Using this command calls the History menu for the selected item.
Using this command the dialog box for selecting a report and then upload it to the item Report is called.
Using this command the dialog box to save the selected report to a file is called.
Using this command you can make the item available for certain persons
Using this command an automatically generated unique key item is created. The unique key item is
required for future access to this item when using the API of the report server by third party applications.
After selecting this command, the key will be displayed on the panel Access Key.
The menu Actions for all elements of the type Scheduler will contain other commands. The picture below
shows such a menu for the Scheduler.
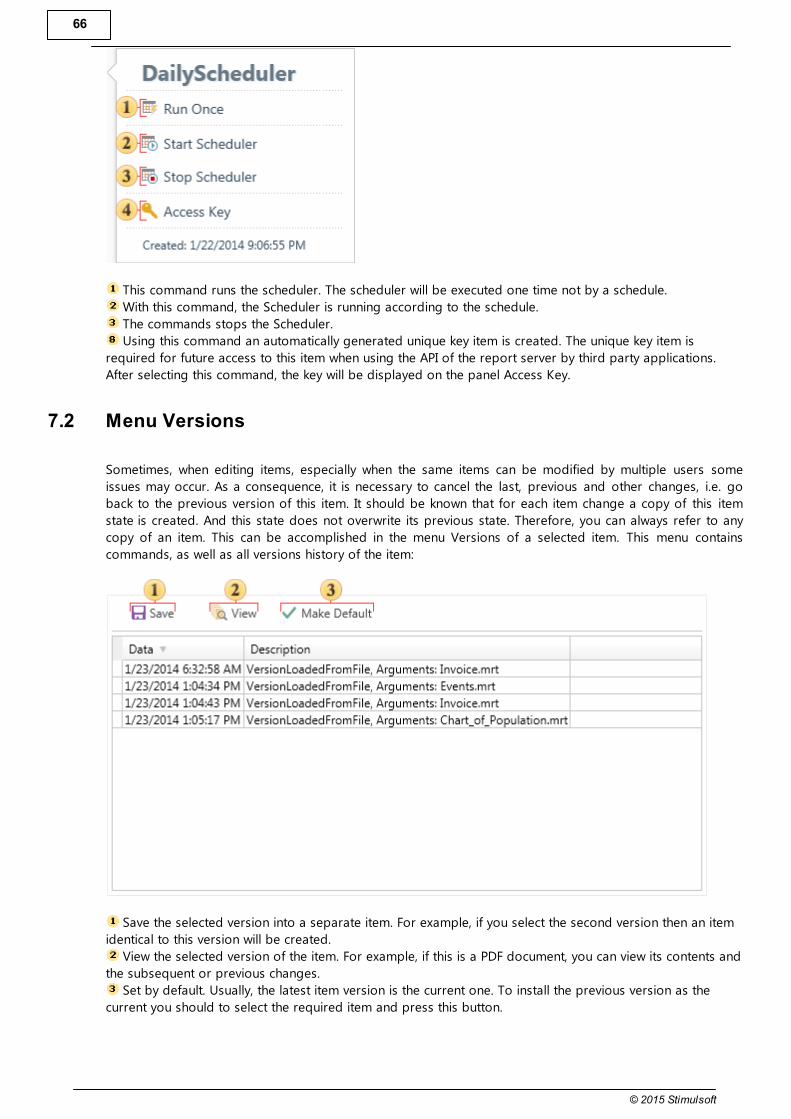
66
© 2015 Stimulsoft
This command runs the scheduler. The scheduler will be executed one time not by a schedule.
With this command, the Scheduler is running according to the schedule.
The commands stops the Scheduler.
Using this command an automatically generated unique key item is created. The unique key item is
required for future access to this item when using the API of the report server by third party applications.
After selecting this command, the key will be displayed on the panel Access Key.
7.2 Menu Versions
Sometimes, when editing items, especially when the same items can be modified by multiple users some
issues may occur. As a consequence, it is necessary to cancel the last, previous and other changes, i.e. go
back to the previous version of this item. It should be known that for each item change a copy of this item
state is created. And this state does not overwrite its previous state. Therefore, you can always refer to any
copy of an item. This can be accomplished in the menu Versions of a selected item. This menu contains
commands, as well as all versions history of the item:
Save the selected version into a separate item. For example, if you select the second version then an item
identical to this version will be created.
View the selected version of the item. For example, if this is a PDF document, you can view its contents and
the subsequent or previous changes.
Set by default. Usually, the latest item version is the current one. To install the previous version as the
current you should to select the required item and press this button.
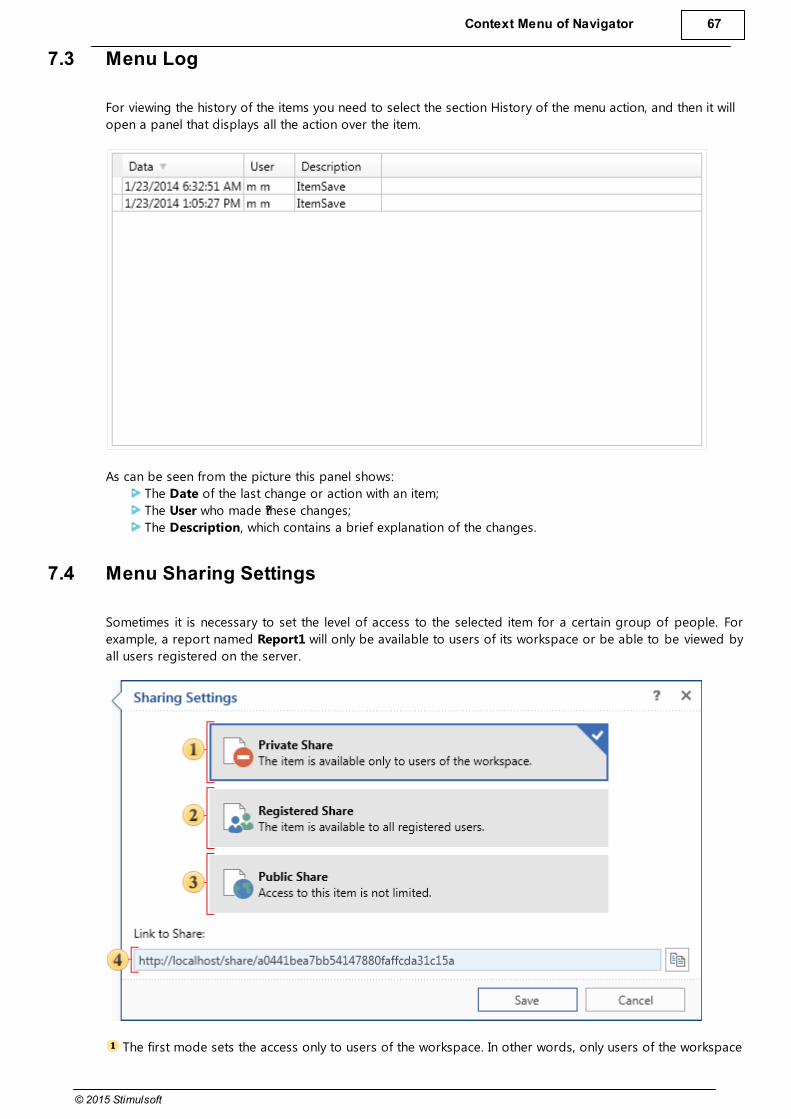
Context Menu of Navigator 67
© 2015 Stimulsoft
7.3 Menu Log
For viewing the history of the items you need to select the section History of the menu action, and then it will
open a panel that displays all the action over the item.
As can be seen from the picture this panel shows:
The Date of the last change or action with an item;
The User who made ??these changes;
The Description, which contains a brief explanation of the changes.
7.4 Menu Sharing Settings
Sometimes it is necessary to set the level of access to the selected item for a certain group of people. For
example, a report named Report1 will only be available to users of its workspace or be able to be viewed by
all users registered on the server.
The first mode sets the access only to users of the workspace. In other words, only users of the workspace
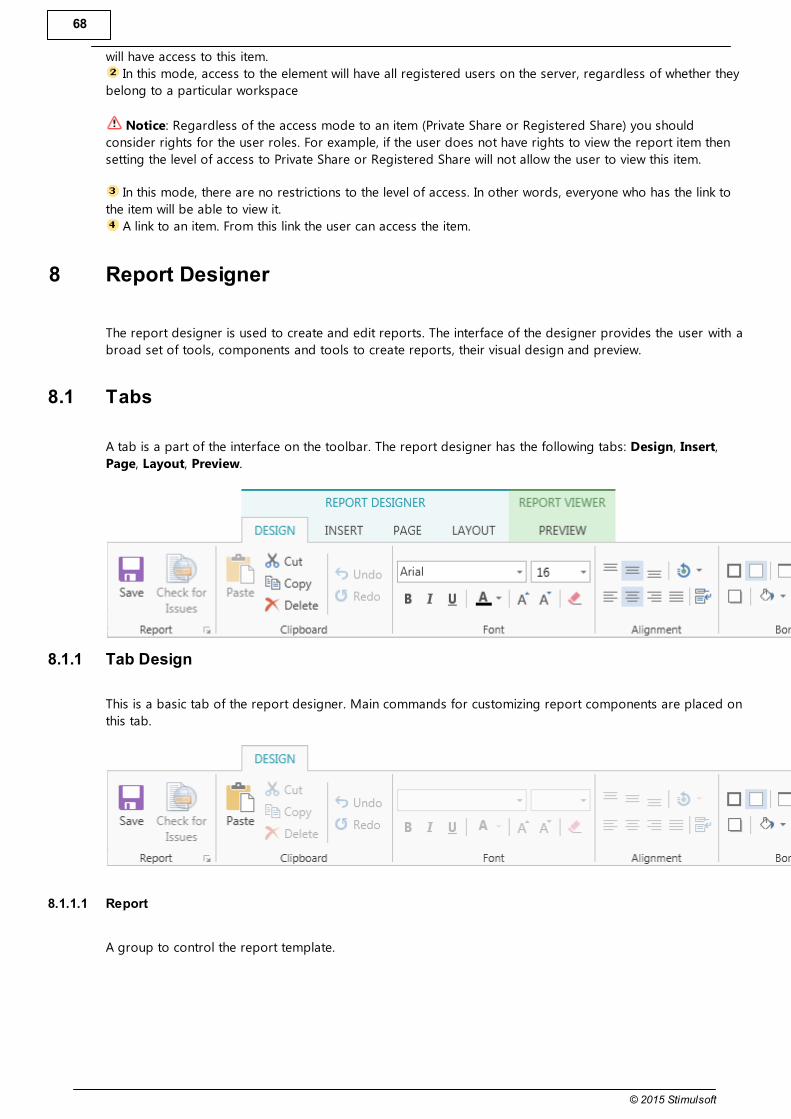
68
© 2015 Stimulsoft
will have access to this item.
In this mode, access to the element will have all registered users on the server, regardless of whether they
belong to a particular workspace
Notice: Regardless of the access mode to an item (Private Share or Registered Share) you should
consider rights for the user roles. For example, if the user does not have rights to view the report item then
setting the level of access to Private Share or Registered Share will not allow the user to view this item.
In this mode, there are no restrictions to the level of access. In other words, everyone who has the link to
the item will be able to view it.
A link to an item. From this link the user can access the item.
8 Report Designer
The report designer is used to create and edit reports. The interface of the designer provides the user with a
broad set of tools, components and tools to create reports, their visual design and preview.
8.1 Tabs
A tab is a part of the interface on the toolbar. The report designer has the following tabs: Design, Insert,
Page, Layout, Preview.
8.1.1 Tab Design
This is a basic tab of the report designer. Main commands for customizing report components are placed on
this tab.
8.1.1.1 Report
A group to control the report template.
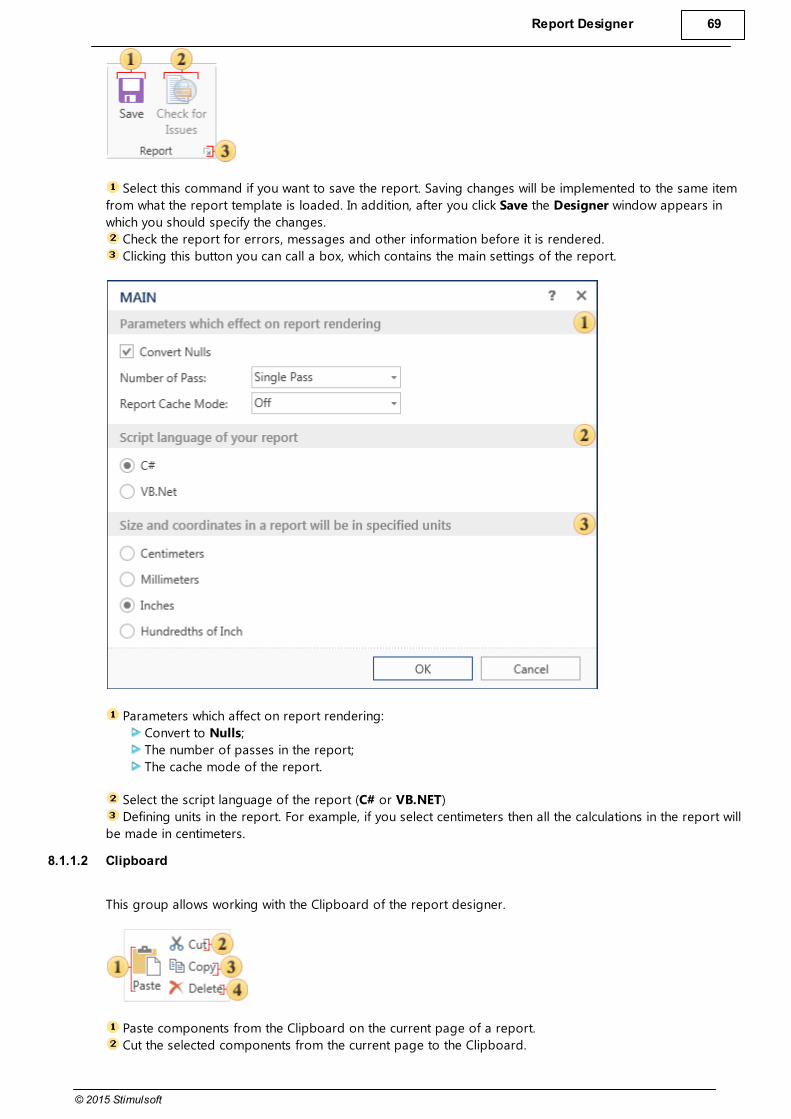
Report Designer 69
© 2015 Stimulsoft
Select this command if you want to save the report. Saving changes will be implemented to the same item
from what the report template is loaded. In addition, after you click Save the Designer window appears in
which you should specify the changes.
Check the report for errors, messages and other information before it is rendered.
Clicking this button you can call a box, which contains the main settings of the report.
Parameters which affect on report rendering:
Convert to Nulls;
The number of passes in the report;
The cache mode of the report.
Select the script language of the report (С# or VB.NET)
Defining units in the report. For example, if you select centimeters then all the calculations in the report will
be made in centimeters.
8.1.1.2 Clipboard
This group allows working with the Clipboard of the report designer.
Paste components from the Clipboard on the current page of a report.
Cut the selected components from the current page to the Clipboard.
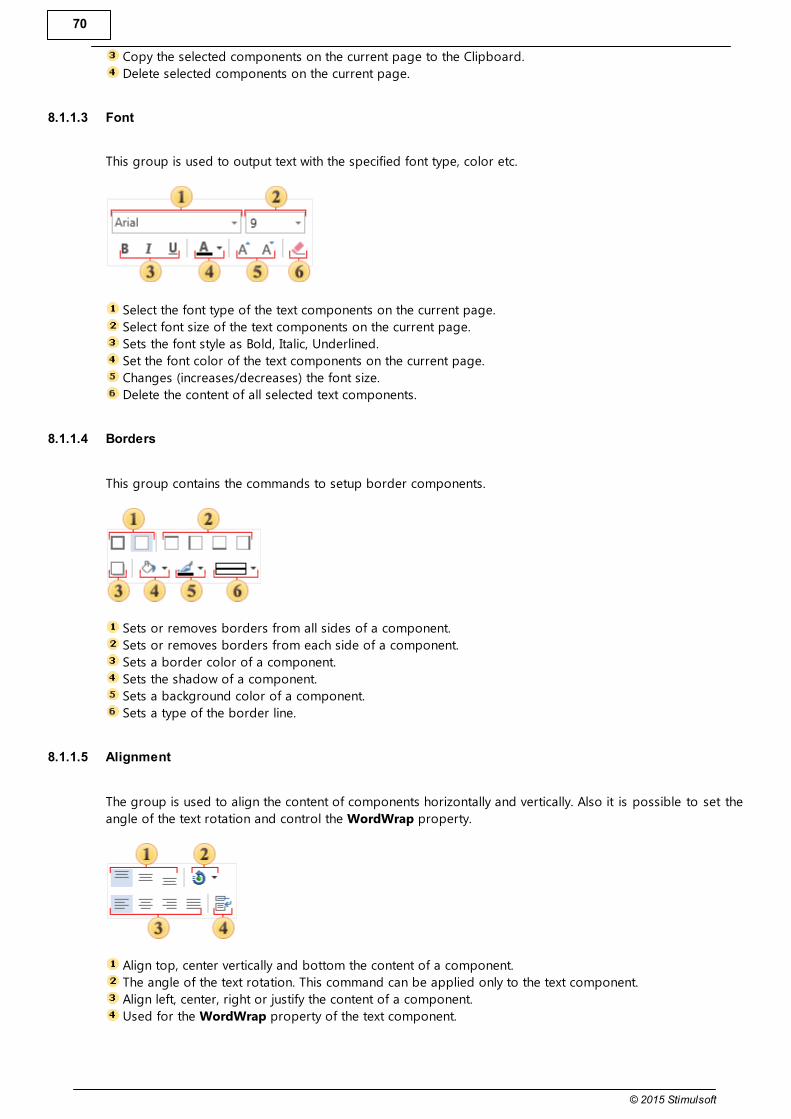
70
© 2015 Stimulsoft
Copy the selected components on the current page to the Clipboard.
Delete selected components on the current page.
8.1.1.3 Font
This group is used to output text with the specified font type, color etc.
Select the font type of the text components on the current page.
Select font size of the text components on the current page.
Sets the font style as Bold, Italic, Underlined.
Set the font color of the text components on the current page.
Changes (increases/decreases) the font size.
Delete the content of all selected text components.
8.1.1.4 Borders
This group contains the commands to setup border components.
Sets or removes borders from all sides of a component.
Sets or removes borders from each side of a component.
Sets a border color of a component.
Sets the shadow of a component.
Sets a background color of a component.
Sets a type of the border line.
8.1.1.5 Alignment
The group is used to align the content of components horizontally and vertically. Also it is possible to set the
angle of the text rotation and control the WordWrap property.
Align top, center vertically and bottom the content of a component.
The angle of the text rotation. This command can be applied only to the text component.
Align left, center, right or justify the content of a component.
Used for the WordWrap property of the text component.
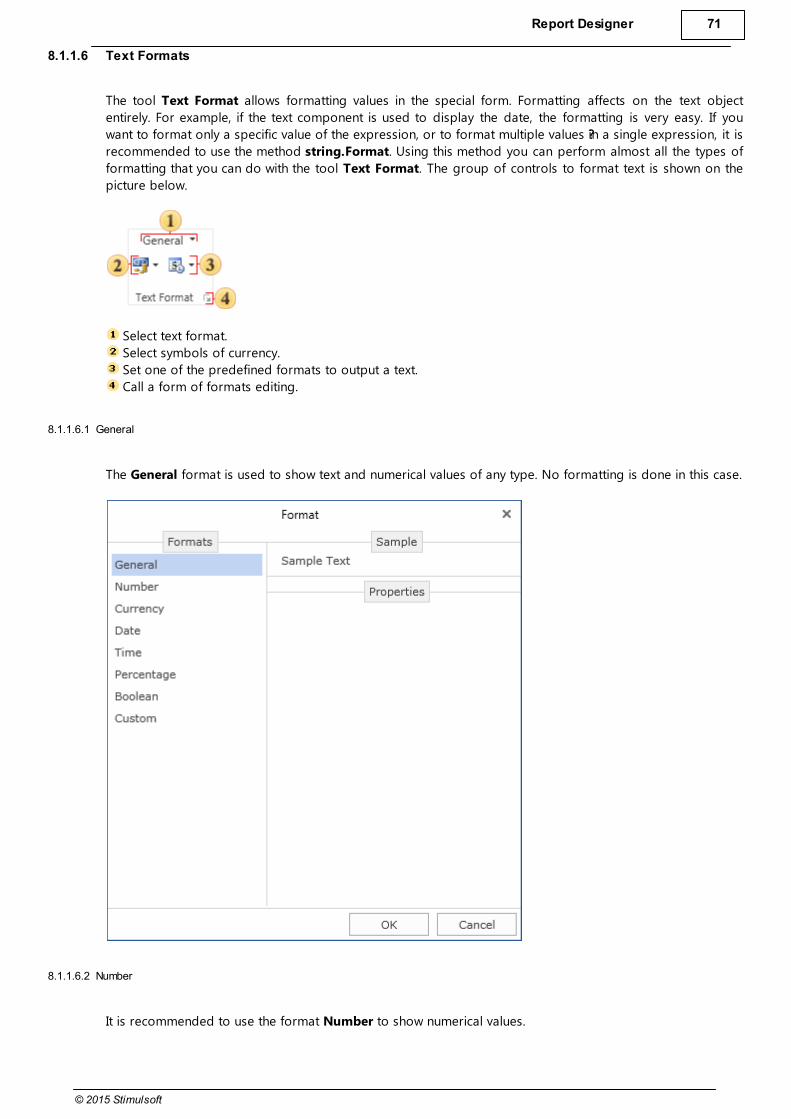
Report Designer 71
© 2015 Stimulsoft
8.1.1.6 Text Formats
The tool Text Format allows formatting values in the special form. Formatting affects on the text object
entirely. For example, if the text component is used to display the date, the formatting is very easy. If you
want to format only a specific value of the expression, or to format multiple values ??in a single expression, it is
recommended to use the method string.Format. Using this method you can perform almost all the types of
formatting that you can do with the tool Text Format. The group of controls to format text is shown on the
picture below.
Select text format.
Select symbols of currency.
Set one of the predefined formats to output a text.
Call a form of formats editing.
8.1.1.6.1 General
The General format is used to show text and numerical values of any type. No formatting is done in this case.
8.1.1.6.2 Number
It is recommended to use the format Number to show numerical values.

72
© 2015 Stimulsoft
Use Group Separator
When the Group Separator is used then number will be separated into number positions.
Use Local Setting
When using the Local settings, numerical values are formatted according to the current OS installations.
Decimal Digits
Number of decimal digits, which are used to format numerical values.
Decimal Separator
Used as a decimal separator to separate numerical values in formatting.
Group Separator
Used as a group separator when numerical values formatting.
Group Size
The number of digits in each group in currency values formatting.
Negative Pattern
This pattern is used to format negative values.
8.1.1.6.3 Currency
It is used to output values as currency. The format Currency can be used to output other numbers.

Report Designer 73
© 2015 Stimulsoft
Use Group separator
When the Group Separator is used then currency values will be separated into number positions.
Use Local setting
When using the Local settings, currency values are formatted according to the current OS installations.
Decimal Digits
Number of decimal digits, which are used to format currency values.
Decimal Separator
Used as a decimal separator to separate currency values in formatting.
Group Separator
Used as a group separator when currency values formatting.
Group Size
The number of digits in each group in currency values formatting.
Positive Pattern
This pattern is used to format positive values.
Negative Pattern
This pattern is used to format negative values.
Currency Symbol
This symbol is used to define the currency name.
8.1.1.6.4 Date
The format Date is used to show a date. The format has different output options - short date format,
extended date format etc. In all formats, except the ones which are marked with the (*) symbol, the order of
elements is not changed.
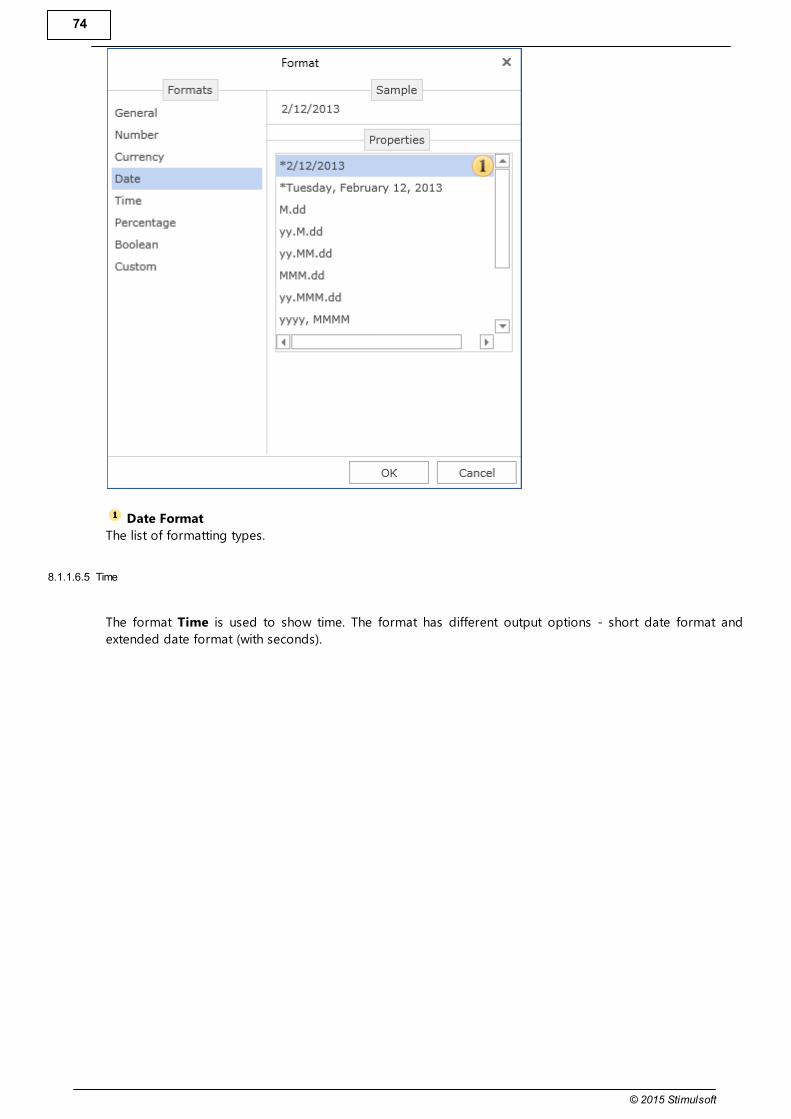
74
© 2015 Stimulsoft
Date Format
The list of formatting types.
8.1.1.6.5 Time
The format Time is used to show time. The format has different output options - short date format and
extended date format (with seconds).

Report Designer 75
© 2015 Stimulsoft
Time Format
The list of formatting types
8.1.1.6.6 Percentage
This format is used to show percent values. When formatting, the value is multiplied by 100 and is output with
the percent symbol.
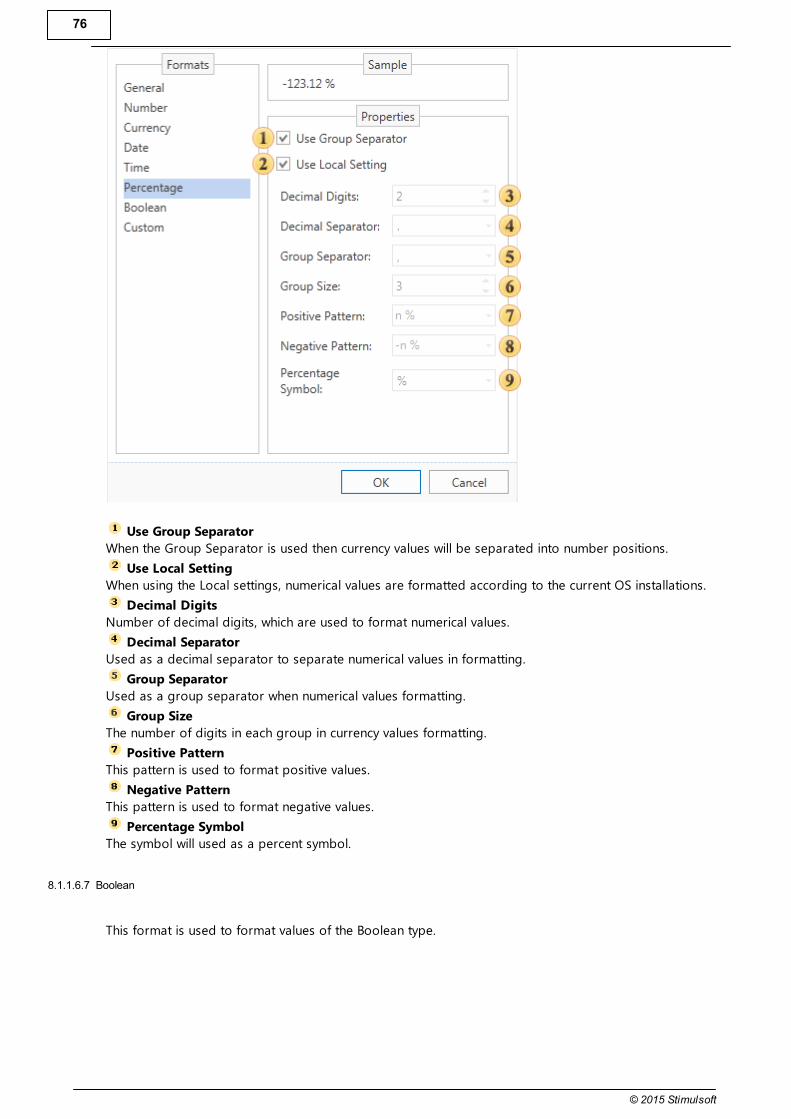
76
© 2015 Stimulsoft
Use Group Separator
When the Group Separator is used then currency values will be separated into number positions.
Use Local Setting
When using the Local settings, numerical values are formatted according to the current OS installations.
Decimal Digits
Number of decimal digits, which are used to format numerical values.
Decimal Separator
Used as a decimal separator to separate numerical values in formatting.
Group Separator
Used as a group separator when numerical values formatting.
Group Size
The number of digits in each group in currency values formatting.
Positive Pattern
This pattern is used to format positive values.
Negative Pattern
This pattern is used to format negative values.
Percentage Symbol
The symbol will used as a percent symbol.
8.1.1.6.7 Boolean
This format is used to format values of the Boolean type.
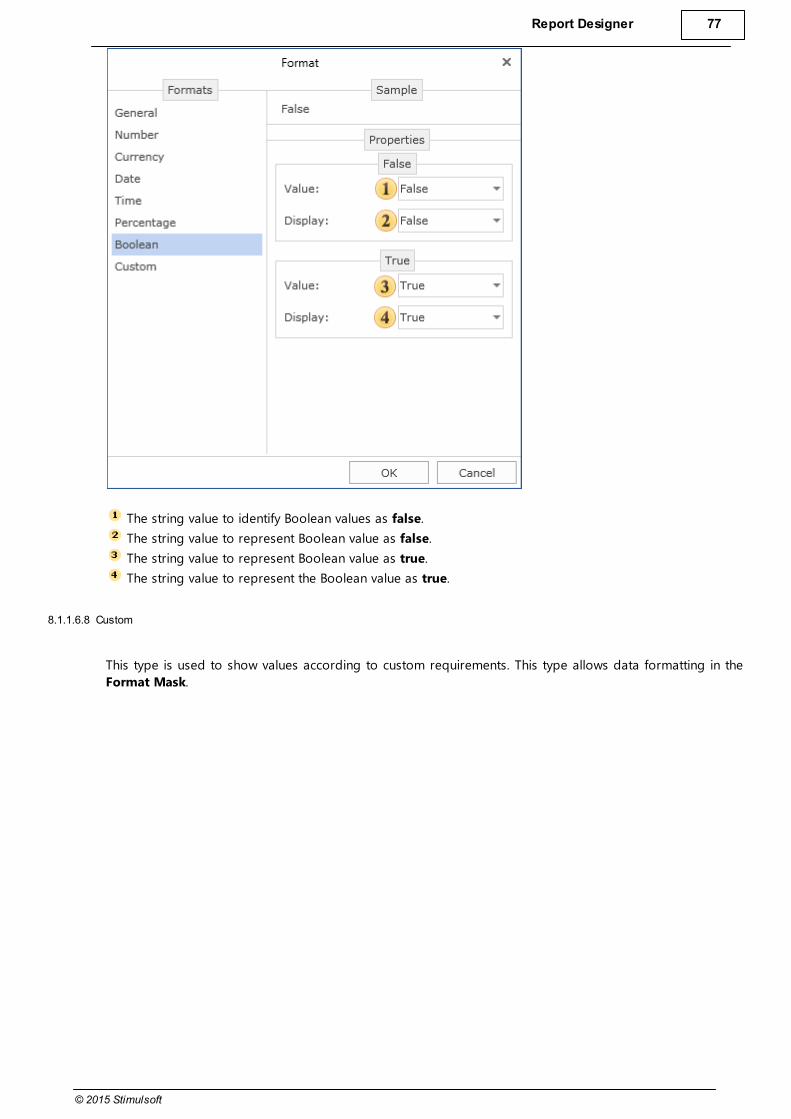
Report Designer 77
© 2015 Stimulsoft
The string value to identify Boolean values as false.
The string value to represent Boolean value as false.
The string value to represent Boolean value as true.
The string value to represent the Boolean value as true.
8.1.1.6.8 Custom
This type is used to show values according to custom requirements. This type allows data formatting in the
Format Mask.
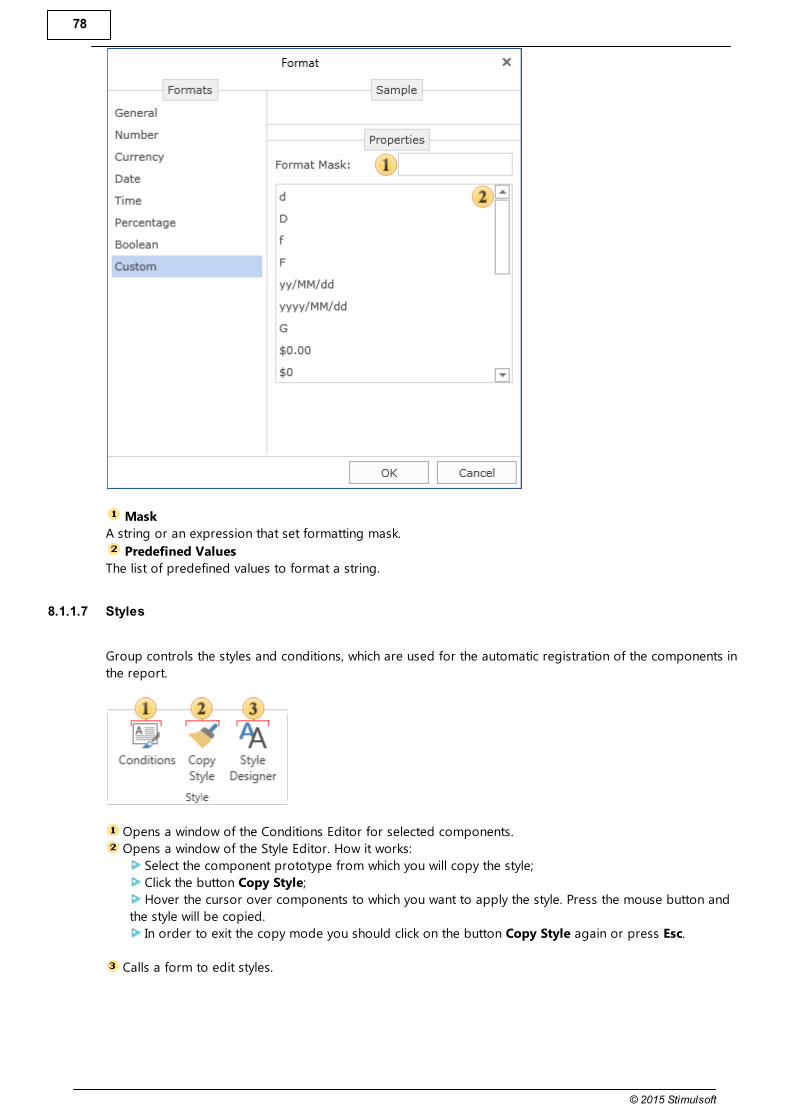
78
© 2015 Stimulsoft
Mask
A string or an expression that set formatting mask.
Predefined Values
The list of predefined values to format a string.
8.1.1.7 Styles
Group controls the styles and conditions, which are used for the automatic registration of the components in
the report.
Opens a window of the Conditions Editor for selected components.
Opens a window of the Style Editor. How it works:
Select the component prototype from which you will copy the style;
Click the button Copy Style;
Hover the cursor over components to which you want to apply the style. Press the mouse button and
the style will be copied.
In order to exit the copy mode you should click on the button Copy Style again or press Esc.
Calls a form to edit styles.

Report Designer 79
© 2015 Stimulsoft
8.1.1.7.1 Color Collection Editor
Color Collection Editor provides an opportunity to create a certain collection of colors for the style:
The button Add. When you click it the collection of colors will be added. By default, the color White is
added. Then, press and select the desired color.
The button Remove. When you click it the selected color is removed from the collection of colors
Up and down arrows are used to move the selected color in the list.
The list of color collections.
8.1.2 Tab Insert
The tab Insert contains the main components for creating reports.
8.1.2.1 Groups
This group contains report components.

80
© 2015 Stimulsoft
Contains bands.
Contains cross-bands and a cross table.
Contains text components - text, rich-text, image, sub-report and others.
Contains shapes including cross-primitives and primitives.
The button is used to display the settings menu of the components, which is a set of components for easy
access. Set the flag in the Setup toolbox window to to add a component to shortcut group.
As can be seen from the picture above, the component cross-table is added to the shortcut group, but the
rest of the cross-bands - no.
8.1.2.2 Components
The toolbox is a group of components for easy access. Accordingly, this group is customizable, i.e. required
components can be added to the group or removed from it. Below is the default state of a Toolbox group.
Adding or removing components in the group can be done in the Setup toolbox window. If the component is
checked, it will be added to the toolbox. You can call the Setup toolbox window by clicking the icon in the
tab Insert -> Groups.
8.1.3 Tab Page
On the tab Page you can find tools to control the parameters of pages in the report template.
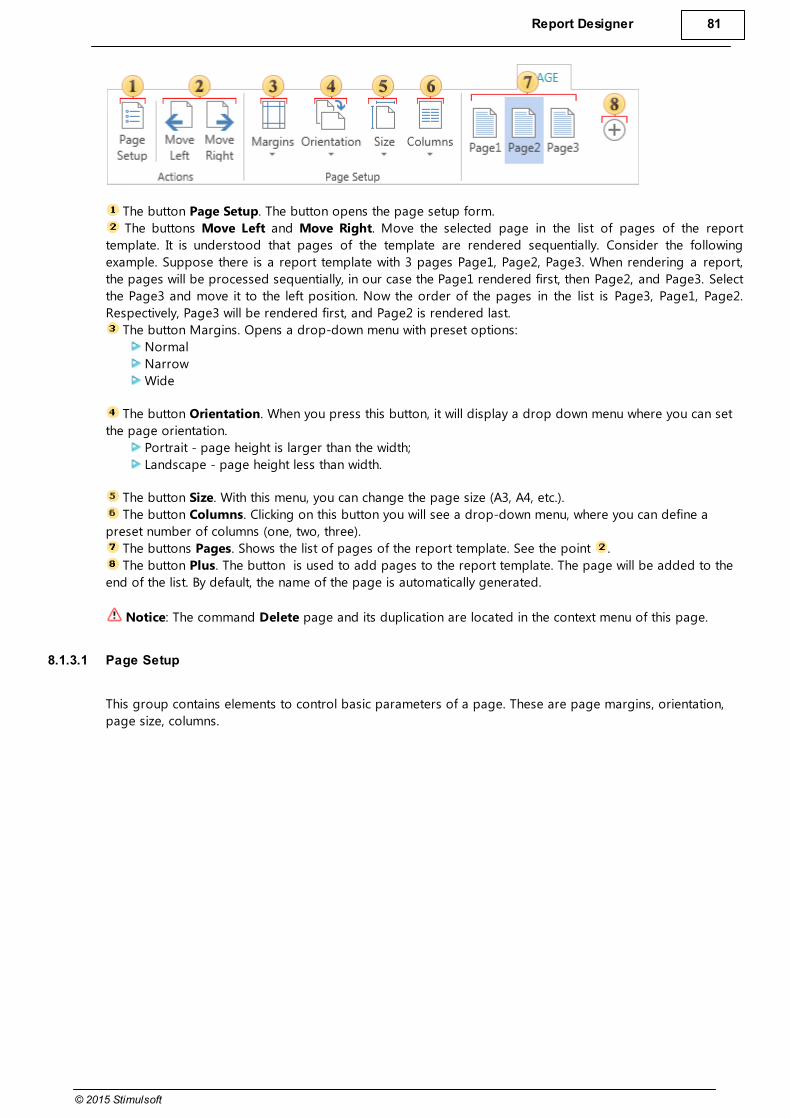
Report Designer 81
© 2015 Stimulsoft
The button Page Setup. The button opens the page setup form.
The buttons Move Left and Move Right. Move the selected page in the list of pages of the report
template. It is understood that pages of the template are rendered sequentially. Consider the following
example. Suppose there is a report template with 3 pages Page1, Page2, Page3. When rendering a report,
the pages will be processed sequentially, in our case the Page1 rendered first, then Page2, and Page3. Select
the Page3 and move it to the left position. Now the order of the pages in the list is Page3, Page1, Page2.
Respectively, Page3 will be rendered first, and Page2 is rendered last.
The button Margins. Opens a drop-down menu with preset options:
Normal
Narrow
Wide
The button Orientation. When you press this button, it will display a drop down menu where you can set
the page orientation.
Portrait - page height is larger than the width;
Landscape - page height less than width.
The button Size. With this menu, you can change the page size (A3, A4, etc.).
The button Columns. Clicking on this button you will see a drop-down menu, where you can define a
preset number of columns (one, two, three).
The buttons Pages. Shows the list of pages of the report template. See the point .
The button Plus. The button is used to add pages to the report template. The page will be added to the
end of the list. By default, the name of the page is automatically generated.
Notice: The command Delete page and its duplication are located in the context menu of this page.
8.1.3.1 Page Setup
This group contains elements to control basic parameters of a page. These are page margins, orientation,
page size, columns.

82
© 2015 Stimulsoft
The tab Paper contains settings such as:
Paper Size. Sets width, height, and supports the ability to select the standard paper size. Width, height
are displayed in units of the report.
Page Orientation. Supports two options - portrait and landscape.
Page Margins. Sets left, right, top, and bottom margins. Values ??are specified in units of the report.
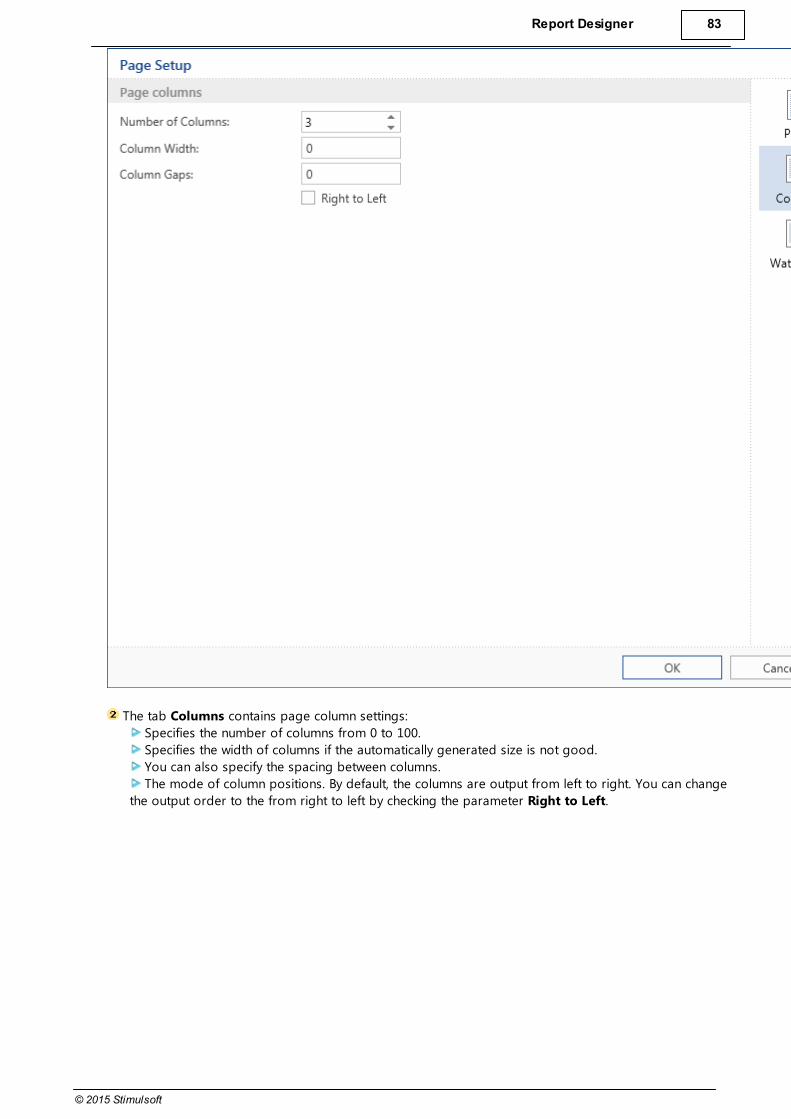
Report Designer 83
© 2015 Stimulsoft
The tab Columns contains page column settings:
Specifies the number of columns from 0 to 100.
Specifies the width of columns if the automatically generated size is not good.
You can also specify the spacing between columns.
The mode of column positions. By default, the columns are output from left to right. You can change
the output order to the from right to left by checking the parameter Right to Left.

84
© 2015 Stimulsoft
The tab Watermark contains settings to output a watermark on the page of the report template:
The first group of parameters provides the ability to set the text and change its properties (color,
angle, font, etc.).
You can set an image as the watermark. You can setup the scale, transparency, image cropping etc.
On the preview panel on the top left side of the dialog form Watermark panel you can see as
thumbnail of the report template page and a watermark added. Changes are immediately shown there.
Notice: When you add an image to the watermark, the value of parameter Image Transparency is set to
0. So you should set the necessary transparency manually.
8.1.4 Tab Layout
This tab is used to control placing different components on a page and also to specify styles of docking
components.
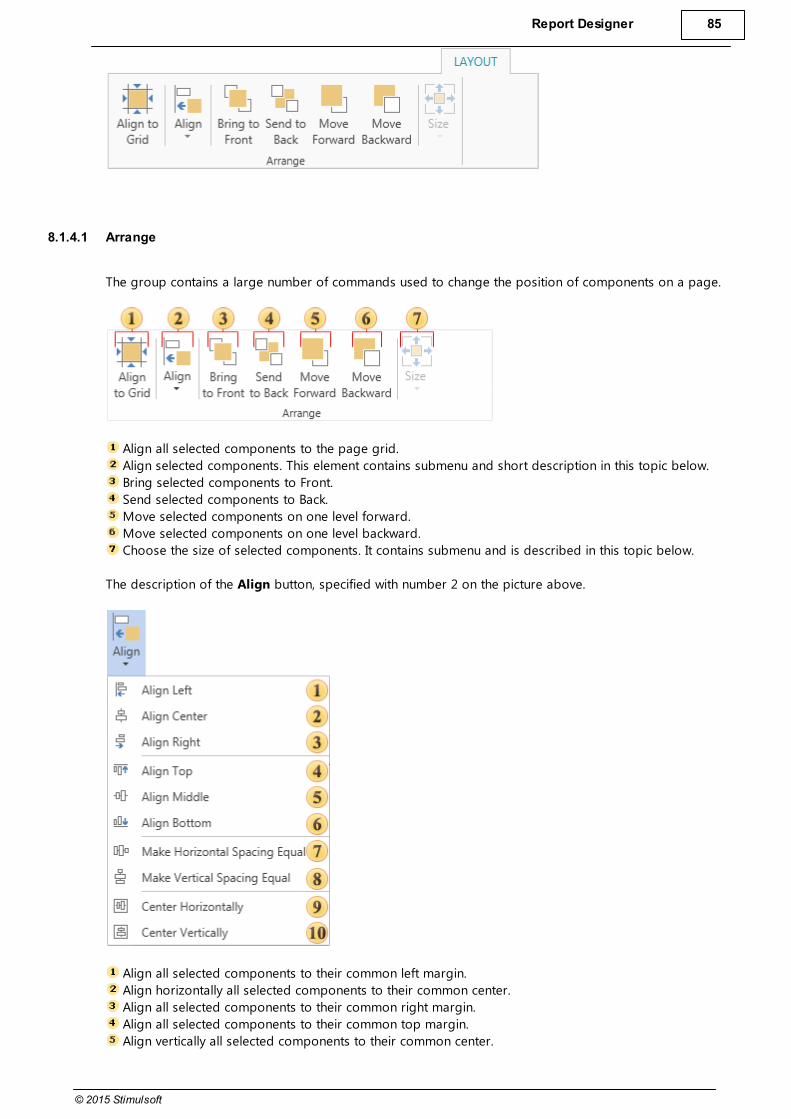
Report Designer 85
© 2015 Stimulsoft
8.1.4.1 Arrange
The group contains a large number of commands used to change the position of components on a page.
Align all selected components to the page grid.
Align selected components. This element contains submenu and short description in this topic below.
Bring selected components to Front.
Send selected components to Back.
Move selected components on one level forward.
Move selected components on one level backward.
Choose the size of selected components. It contains submenu and is described in this topic below.
The description of the Align button, specified with number 2 on the picture above.
Align all selected components to their common left margin.
Align horizontally all selected components to their common center.
Align all selected components to their common right margin.
Align all selected components to their common top margin.
Align vertically all selected components to their common center.
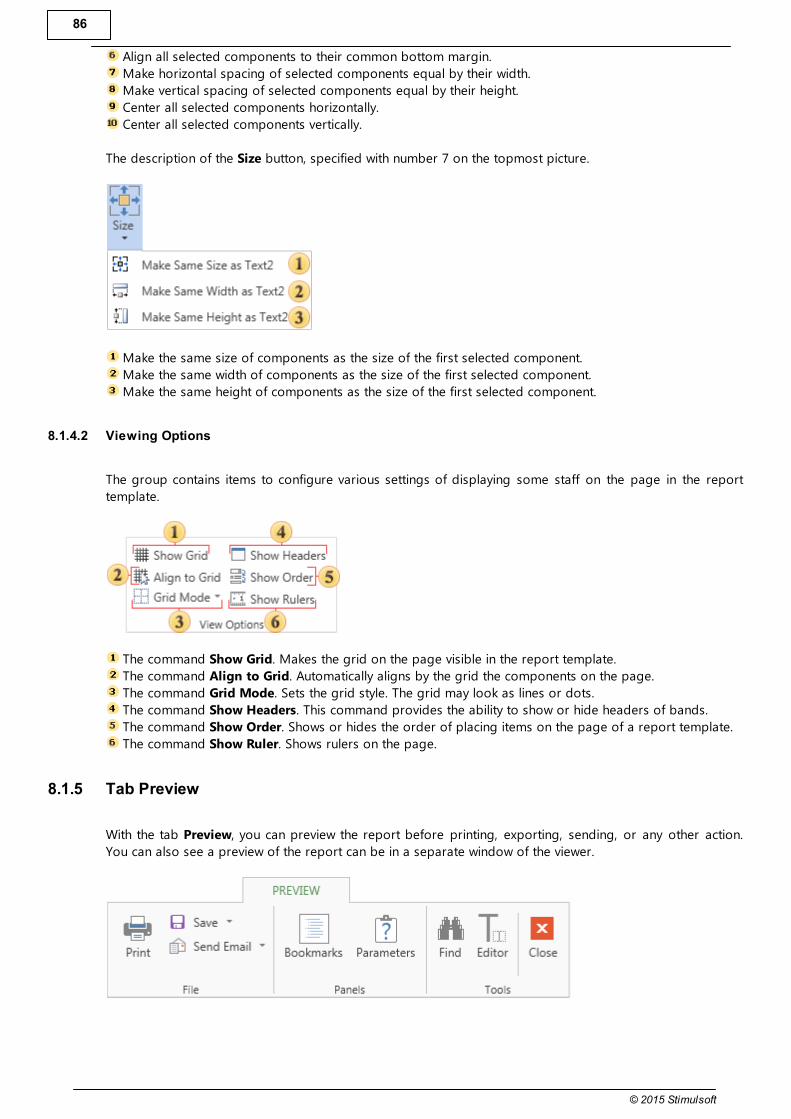
86
© 2015 Stimulsoft
Align all selected components to their common bottom margin.
Make horizontal spacing of selected components equal by their width.
Make vertical spacing of selected components equal by their height.
Center all selected components horizontally.
Center all selected components vertically.
The description of the Size button, specified with number 7 on the topmost picture.
Make the same size of components as the size of the first selected component.
Make the same width of components as the size of the first selected component.
Make the same height of components as the size of the first selected component.
8.1.4.2 Viewing Options
The group contains items to configure various settings of displaying some staff on the page in the report
template.
The command Show Grid. Makes the grid on the page visible in the report template.
The command Align to Grid. Automatically aligns by the grid the components on the page.
The command Grid Mode. Sets the grid style. The grid may look as lines or dots.
The command Show Headers. This command provides the ability to show or hide headers of bands.
The command Show Order. Shows or hides the order of placing items on the page of a report template.
The command Show Ruler. Shows rulers on the page.
8.1.5 Tab Preview
With the tab Preview, you can preview the report before printing, exporting, sending, or any other action.
You can also see a preview of the report can be in a separate window of the viewer.
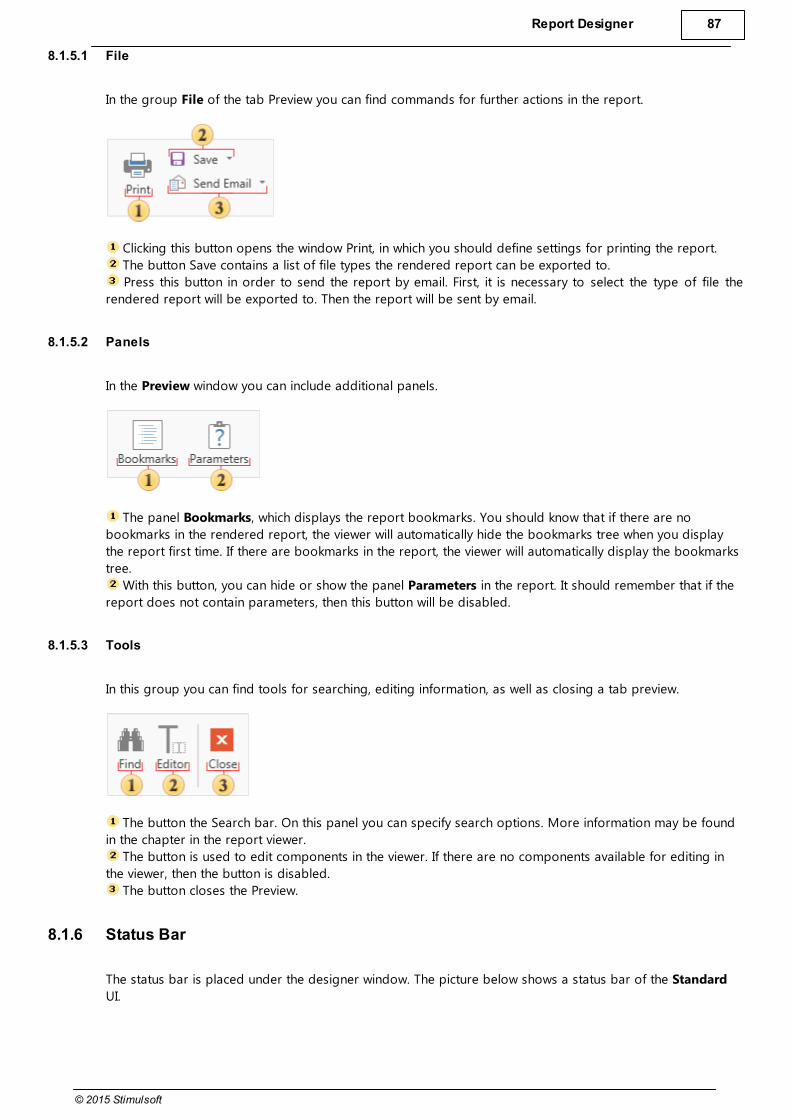
Report Designer 87
© 2015 Stimulsoft
8.1.5.1 File
In the group File of the tab Preview you can find commands for further actions in the report.
Clicking this button opens the window Print, in which you should define settings for printing the report.
The button Save contains a list of file types the rendered report can be exported to.
Press this button in order to send the report by email. First, it is necessary to select the type of file the
rendered report will be exported to. Then the report will be sent by email.
8.1.5.2 Panels
In the Preview window you can include additional panels.
The panel Bookmarks, which displays the report bookmarks. You should know that if there are no
bookmarks in the rendered report, the viewer will automatically hide the bookmarks tree when you display
the report first time. If there are bookmarks in the report, the viewer will automatically display the bookmarks
tree.
With this button, you can hide or show the panel Parameters in the report. It should remember that if the
report does not contain parameters, then this button will be disabled.
8.1.5.3 Tools
In this group you can find tools for searching, editing information, as well as closing a tab preview.
The button the Search bar. On this panel you can specify search options. More information may be found
in the chapter in the report viewer.
The button is used to edit components in the viewer. If there are no components available for editing in
the viewer, then the button is disabled.
The button closes the Preview.
8.1.6 Status Bar
The status bar is placed under the designer window. The picture below shows a status bar of the Standard
UI.
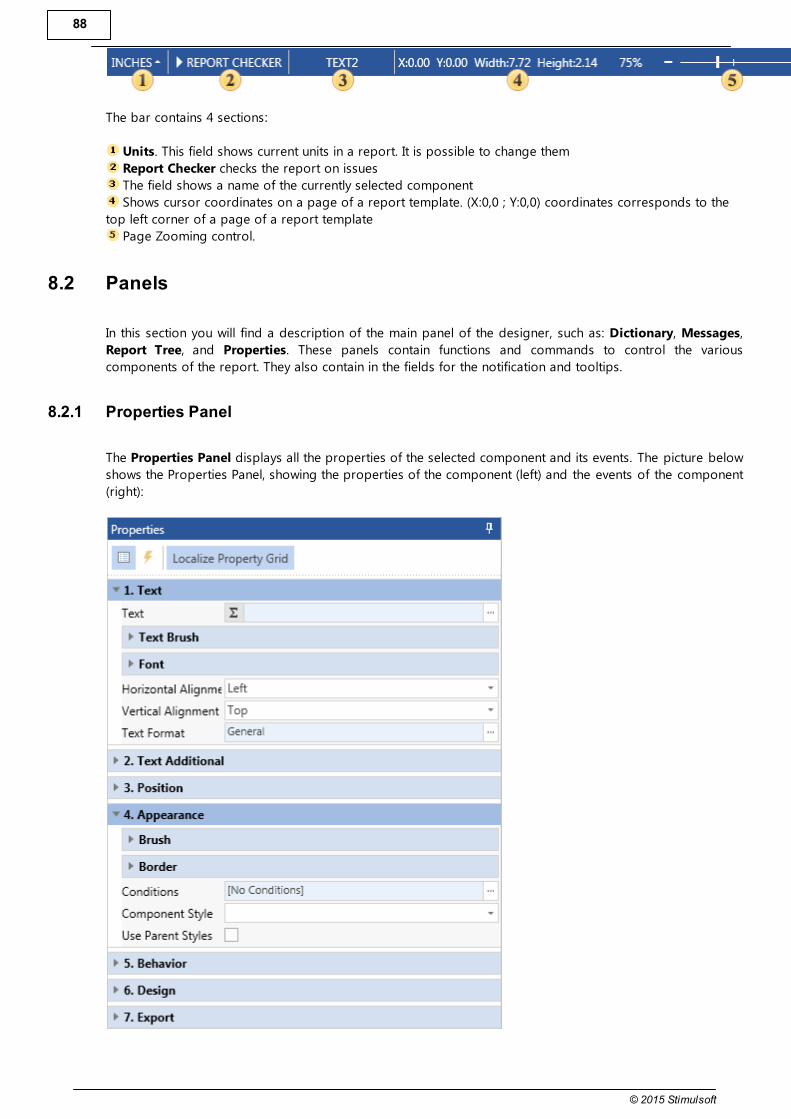
88
© 2015 Stimulsoft
The bar contains 4 sections:
Units. This field shows current units in a report. It is possible to change them
Report Checker checks the report on issues
The field shows a name of the currently selected component
Shows cursor coordinates on a page of a report template. (Х:0,0 ; Y:0,0) coordinates corresponds to the
top left corner of a page of a report template
Page Zooming control.
8.2 Panels
In this section you will find a description of the main panel of the designer, such as: Dictionary, Messages,
Report Tree, and Properties. These panels contain functions and commands to control the various
components of the report. They also contain in the fields for the notification and tooltips.
8.2.1 Properties Panel
The Properties Panel displays all the properties of the selected component and its events. The picture below
shows the Properties Panel, showing the properties of the component (left) and the events of the component
(right):

Report Designer 89
© 2015 Stimulsoft
The Properties Panel includes: the Drop-Down List of Components, Properties Toolbar, Properties Tab or
Events Tab, Description Panel. Consider these components in more detail.
Drop-Down List of Components displays a list of all the components of the report. The picture below
shows an example of Drop-Down List of Components.:
As can be seen from the picture, the list is represented with two columns. The first column shows the Name
of a component, and the second shows its type. For example, the string "Text1: Text", where "Text1" is the
name and "Text" is a type. If to select the component in this list then, in the Properties Panel, the properties
and events of the selected component will be displayed.
Properties Toolbar is used to control the Properties Panel. The picture below shows the Properties

90
© 2015 Stimulsoft
Toolbar:
The button for sorting by category - Categorized. The list of properties or events are sorted by category.
The button of sorting alphabetically - Alphabetical. The list of properties or events are sorted in
alphabetical order from A to Z (from A to Z).
The button is used to enable the Properties Tab.
The button is used to enable the Events Tab.
The button Localize Property Grid. If it is disabled, then the properties panel will be displayed with the
default locale.
The Properties Tab or Events Tab are tables with two columns. The first column shows the name of the
property or event, the second column - entered or selected value of this property or event. The number of
rows depends on the number of properties or events because any property or event takes a single line. In
the context menu of the Properties Panel has a command Localize Property Grid. If this option is enabled, the
Properties Panel will be translated. If this command is disabled, the names of the properties, events, values ??
and descriptions on the Properties Panel will be in English.
8.2.2 Data Dictionary
The panel Dictionary displays attached data, available data sources, system variables and functions. In
addition, the dictionary can create a new connection and connect data sources to set up new connections
between data sources.

Report Designer 91
© 2015 Stimulsoft
The panel Dictionary consists of the Dictionary ToolBar, Data Tree, Description Panel, and Dictionary
Setting Panel.
The basic elements to control data dictionary can be found on the control panel.
The menu Actions. This menu contains the main control commands for the data dictionary - creating,
opening, saving dictionary, adding, export and import as a XML schema, synchronizing registered data in the
dictionary.
The menu New Item. In this menu the basic commands to create new elements in the data dictionary are
placed - new connection, new data source,new variable, business objects.
The button Edit provides an opportunity to change any element, which can be edited.
Using the button Delete one can delete any item in the data dictionary.
Pressing the buttons Up and Down, the selected item in the data dictionary is moved one position up/
down.
The menu Sorting Items. In this menu one can select the sorting direction - ascending, descending. Also
in this menu, you can enable Automatic Sorting.
The Data Tree represents a list of all the data dictionary, which are displayed in a tree.
The Description Panel displays a short description of a selected system variable or function.
The panel Panel Setting Dictionary contains controls that provide an opportunity to change auxiliary
parameters of the data dictionary.
If the option Create Field on Double Click is enabled, then when double clicking the data column data in
the report data dictionary, the report template in the DataBand will create a text component with reference to
this data column.
The parameter Create Label is used to create two text components (one with the signature, the a second
with reference to the data column) when dragging a data column into the report. If this option is disabled,
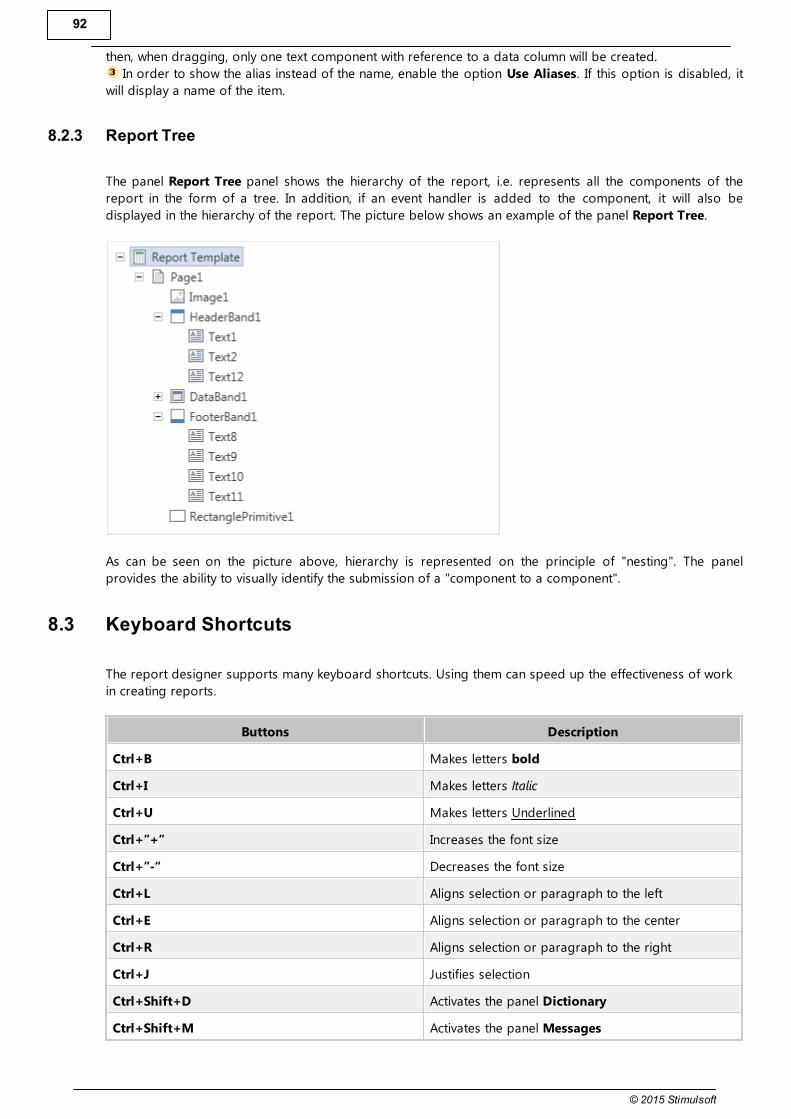
92
© 2015 Stimulsoft
then, when dragging, only one text component with reference to a data column will be created.
In order to show the alias instead of the name, enable the option Use Aliases. If this option is disabled, it
will display a name of the item.
8.2.3 Report Tree
The panel Report Tree panel shows the hierarchy of the report, i.e. represents all the components of the
report in the form of a tree. In addition, if an event handler is added to the component, it will also be
displayed in the hierarchy of the report. The picture below shows an example of the panel Report Tree.
As can be seen on the picture above, hierarchy is represented on the principle of "nesting". The panel
provides the ability to visually identify the submission of a "component to a component".
8.3 Keyboard Shortcuts
The report designer supports many keyboard shortcuts. Using them can speed up the effectiveness of work
in creating reports.
Buttons Description
Ctrl+B Makes letters bold
Ctrl+I Makes letters Italic
Ctrl+U Makes letters Underlined
Ctrl+”+” Increases the font size
Ctrl+”-“ Decreases the font size
Ctrl+L Aligns selection or paragraph to the left
Ctrl+E Aligns selection or paragraph to the center
Ctrl+R Aligns selection or paragraph to the right
Ctrl+J Justifies selection
Ctrl+Shift+D Activates the panel Dictionary
Ctrl+Shift+M Activates the panel Messages

Report Designer 93
© 2015 Stimulsoft
Ctrl+Shift+L Activates the panel Report Tree
F4
Shift+Enter
Activate the panel Properties
Ctrl+C
Ctrl+Insert
Copies the selected text or object to the Clipboard
Delete
Ctrl+Delete
Deletes the selected component
Ctrl+V
Shift+Insert
Pastes the text or object from the Clipboard
Ctrl+X
Shift+Delete
Cuts the selected text or object
Ctrl+A Select All
Ctrl+Z Undo
Ctrl+Y Redo
Ctrl+F2 Shows Data Store
Ctrl+F5 Shows Services Configurator
Ctrl+N Creates a new report
Ctrl+Shift+N Adds a page to the report
Ctrl+Shift+F Adds a form to the report
Ctrl+O Loads a report from the file
Ctrl+Shift+O Loads a page from the file
Ctrl+S Saves a report
Ctrl+F12 Saves a report as...
Ctrl+Tab Switching between pages in the report template
F5 Report preview
Ctrl+Enter Calls the designer by default for the elected
component
Enter Calls the text editor for the selected component
F1 Select the tool Select
F3 Selects the tool Text Editor
F6 Selects the tool Copy Style
F8 Selects the tool Hand
Cursor keys Moves selection
Shift+Cursor keys Resizes the selected component (one step = grid
size)
Shift+Alt+Cursor keys Resizes the selected component (one step = half
grid size)
Ctrl+Cursor keys Moves the selected component (one step = grid
size)
Ctrl+Alt+Cursor keys Moves the selected component (one step = half
grid size)

94
© 2015 Stimulsoft
Ctrl+Drag mouse Copies the selected components
Alt+Drag mouse Ignores Align to Grid when moving and resizing
Ctrl+F4 Calls the page manager
8.4 Report Checker
In order to check the report for errors you should use the Report Checker. The Report Checker will analyze
the report, resulting in an error message, comments, or inaccuracies found in this report. The picture below
shows the Report Checker:
The button Open. Clicking this button, the user will see a dialog box to select a previously saved report
and loading it to the Report Checker.
The button Save saves changes in the report, that was opened in the Report Checker.
The button Check for Issues starts the process of checking the report.
The button Settings opens the window of settings of the Report Checker. The picture below shows the
Settings window:
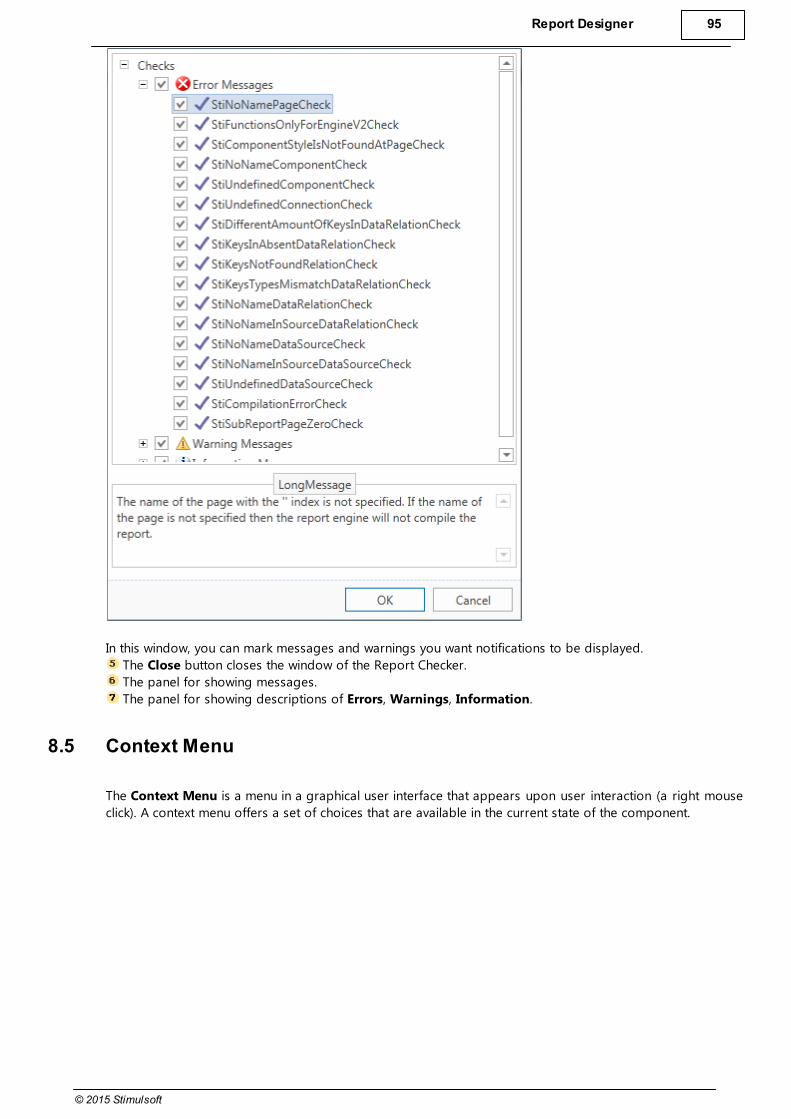
Report Designer 95
© 2015 Stimulsoft
In this window, you can mark messages and warnings you want notifications to be displayed.
The Close button closes the window of the Report Checker.
The panel for showing messages.
The panel for showing descriptions of Errors, Warnings, Information.
8.5 Context Menu
The Context Menu is a menu in a graphical user interface that appears upon user interaction (a right mouse
click). A context menu offers a set of choices that are available in the current state of the component.
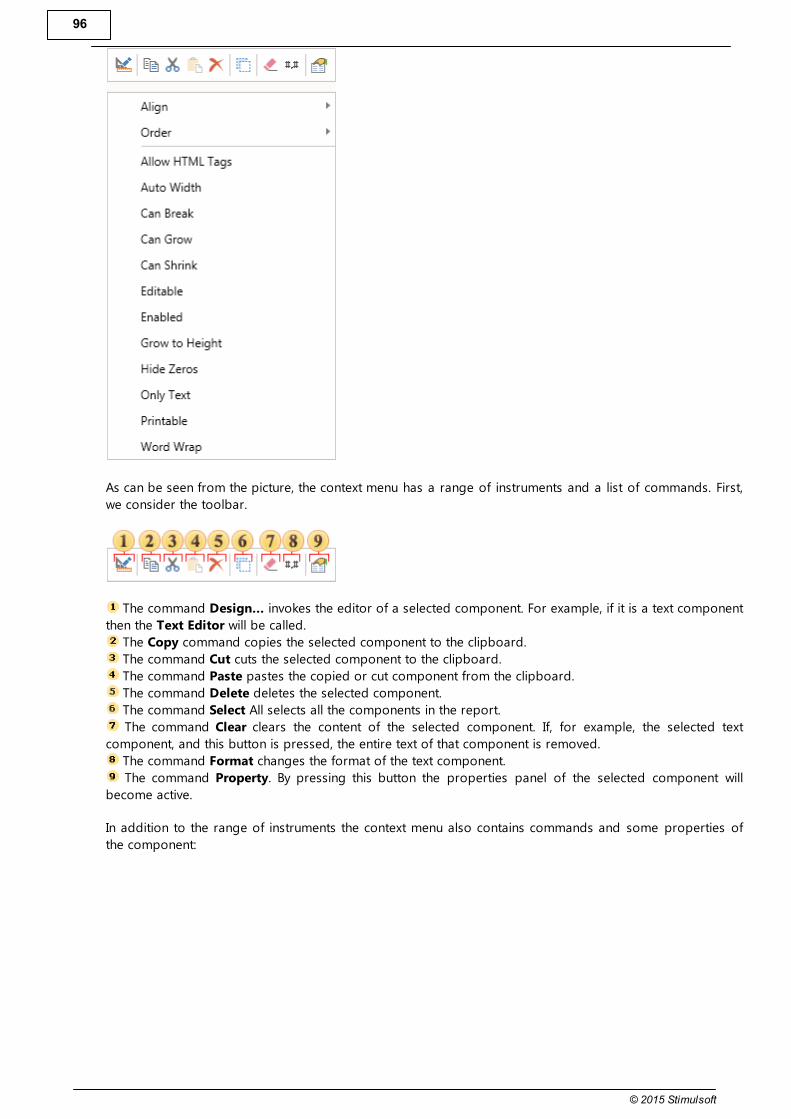
96
© 2015 Stimulsoft
As can be seen from the picture, the context menu has a range of instruments and a list of commands. First,
we consider the toolbar.
The command Design... invokes the editor of a selected component. For example, if it is a text component
then the Text Editor will be called.
The Copy command copies the selected component to the clipboard.
The command Cut cuts the selected component to the clipboard.
The command Paste pastes the copied or cut component from the clipboard.
The command Delete deletes the selected component.
The command Select All selects all the components in the report.
The command Clear clears the content of the selected component. If, for example, the selected text
component, and this button is pressed, the entire text of that component is removed.
The command Format changes the format of the text component.
The command Property. By pressing this button the properties panel of the selected component will
become active.
In addition to the range of instruments the context menu also contains commands and some properties of
the component:
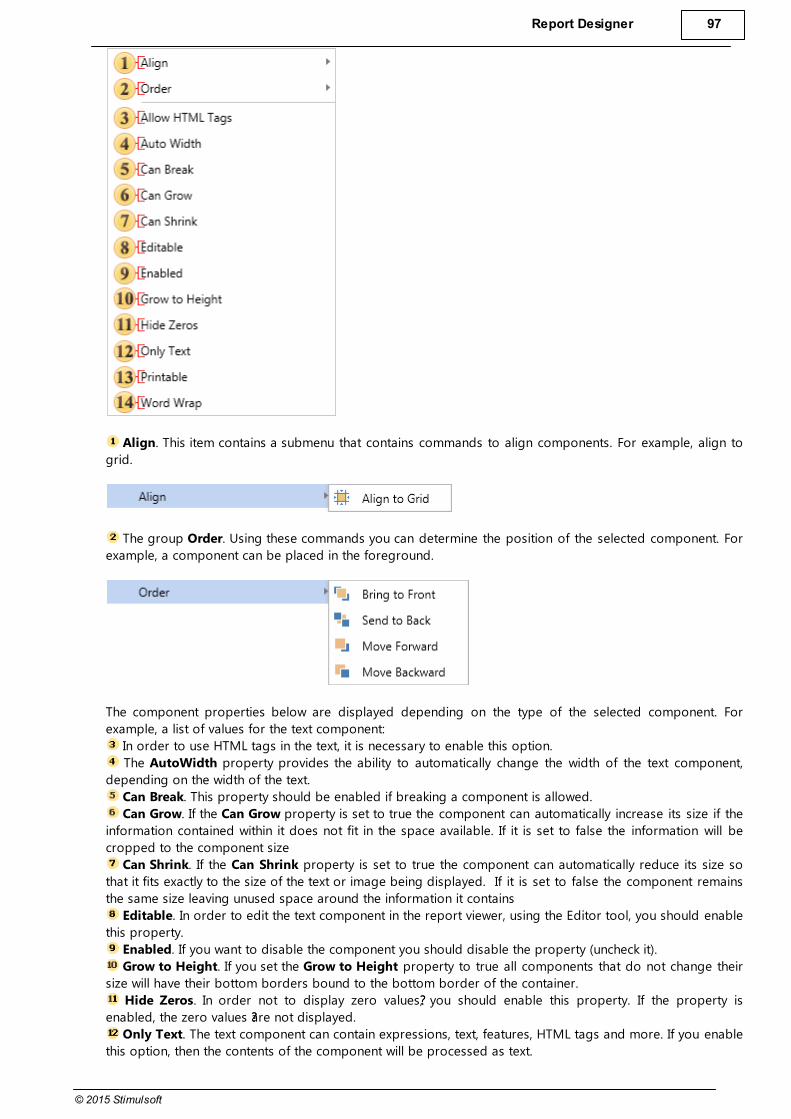
Report Designer 97
© 2015 Stimulsoft
Align. This item contains a submenu that contains commands to align components. For example, align to
grid.
The group Order. Using these commands you can determine the position of the selected component. For
example, a component can be placed in the foreground.
The component properties below are displayed depending on the type of the selected component. For
example, a list of values for the text component:
In order to use HTML tags in the text, it is necessary to enable this option.
The AutoWidth property provides the ability to automatically change the width of the text component,
depending on the width of the text.
Can Break. This property should be enabled if breaking a component is allowed.
Can Grow. If the Can Grow property is set to true the component can automatically increase its size if the
information contained within it does not fit in the space available. If it is set to false the information will be
cropped to the component size
Can Shrink. If the Can Shrink property is set to true the component can automatically reduce its size so
that it fits exactly to the size of the text or image being displayed. If it is set to false the component remains
the same size leaving unused space around the information it contains
Editable. In order to edit the text component in the report viewer, using the Editor tool, you should enable
this property.
Enabled. If you want to disable the component you should disable the property (uncheck it).
Grow to Height. If you set the Grow to Height property to true all components that do not change their
size will have their bottom borders bound to the bottom border of the container.
Hide Zeros. In order not to display zero values??, you should enable this property. If the property is
enabled, the zero values ??are not displayed.
Only Text. The text component can contain expressions, text, features, HTML tags and more. If you enable
this option, then the contents of the component will be processed as text.
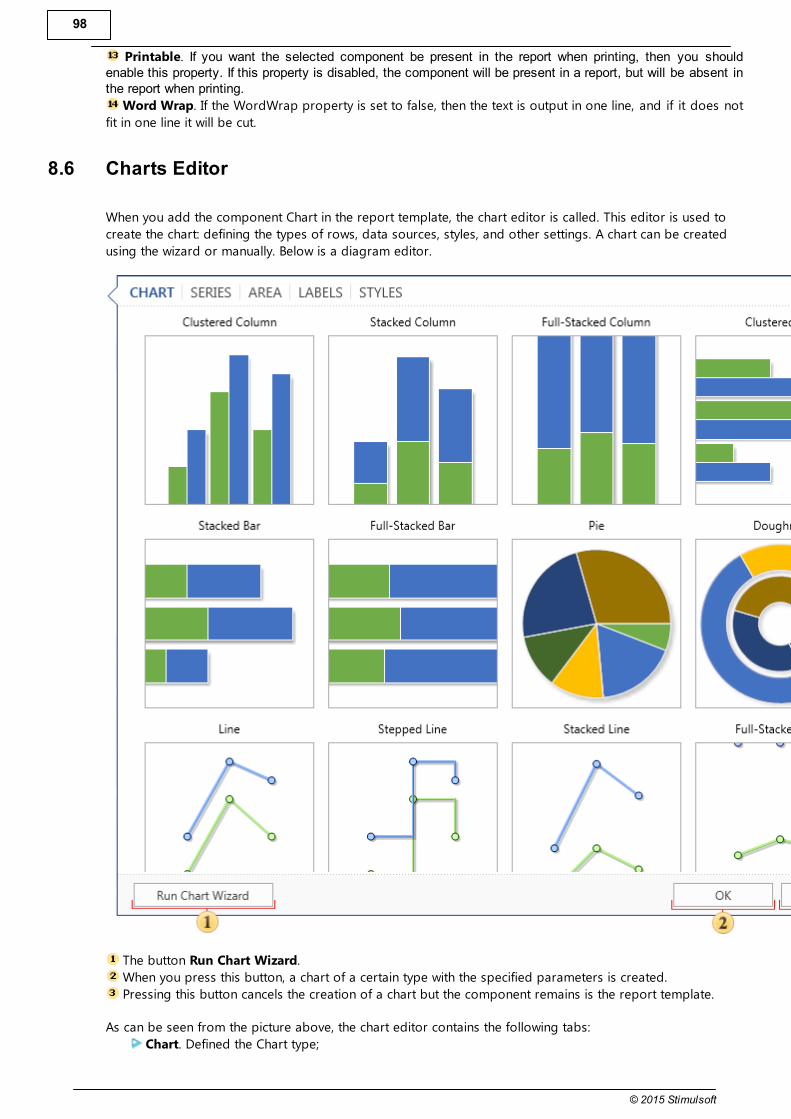
98
© 2015 Stimulsoft
Printable. If you want the selected component be present in the report when printing, then you shouldenable this property. If this property is disabled, the component will be present in a report, but will be absent inthe report when printing.
Word Wrap. If the WordWrap property is set to false, then the text is output in one line, and if it does not
fit in one line it will be cut.
8.6 Charts Editor
When you add the component Chart in the report template, the chart editor is called. This editor is used to
create the chart: defining the types of rows, data sources, styles, and other settings. A chart can be created
using the wizard or manually. Below is a diagram editor.
The button Run Chart Wizard.
When you press this button, a chart of a certain type with the specified parameters is created.
Pressing this button cancels the creation of a chart but the component remains is the report template.
As can be seen from the picture above, the chart editor contains the following tabs:
Chart. Defined the Chart type;
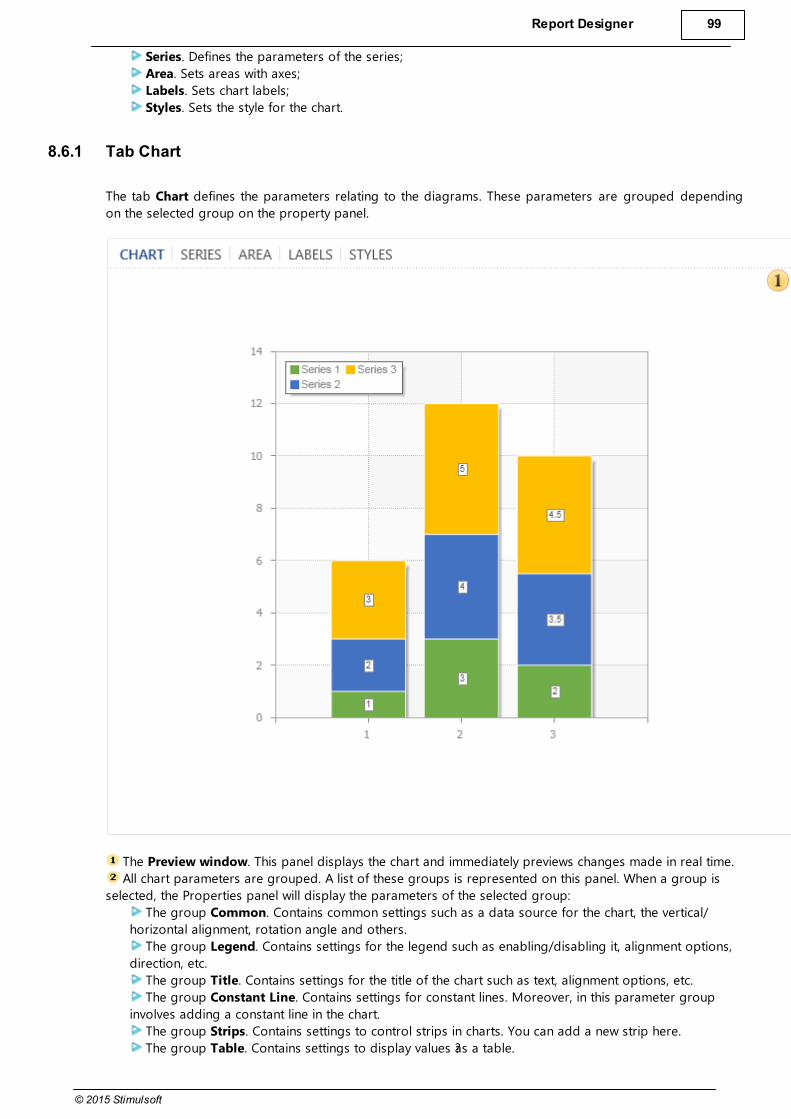
Report Designer 99
© 2015 Stimulsoft
Series. Defines the parameters of the series;
Area. Sets areas with axes;
Labels. Sets chart labels;
Styles. Sets the style for the chart.
8.6.1 Tab Chart
The tab Chart defines the parameters relating to the diagrams. These parameters are grouped depending
on the selected group on the property panel.
The Preview window. This panel displays the chart and immediately previews changes made in real time.
All chart parameters are grouped. A list of these groups is represented on this panel. When a group is
selected, the Properties panel will display the parameters of the selected group:
The group Common. Contains common settings such as a data source for the chart, the vertical/
horizontal alignment, rotation angle and others.
The group Legend. Contains settings for the legend such as enabling/disabling it, alignment options,
direction, etc.
The group Title. Contains settings for the title of the chart such as text, alignment options, etc.
The group Constant Line. Contains settings for constant lines. Moreover, in this parameter group
involves adding a constant line in the chart.
The group Strips. Contains settings to control strips in charts. You can add a new strip here.
The group Table. Contains settings to display values ?as a table.

100
© 2015 Stimulsoft
It should be noted that in some groups you can add elements to the chart. In this tab, this note concerns
groups Constant Lines and Strips.
The button is used to add the constant line.
The button is used to erase the selected line.
The buttons move the selected item in the list on the panel .
The panel with the list of items.
8.6.2 Tab Series
Series of the chart component are the main element of the diagram. Series are important to visualize data. It
should be understood that construction is not possible without series of the diagram.
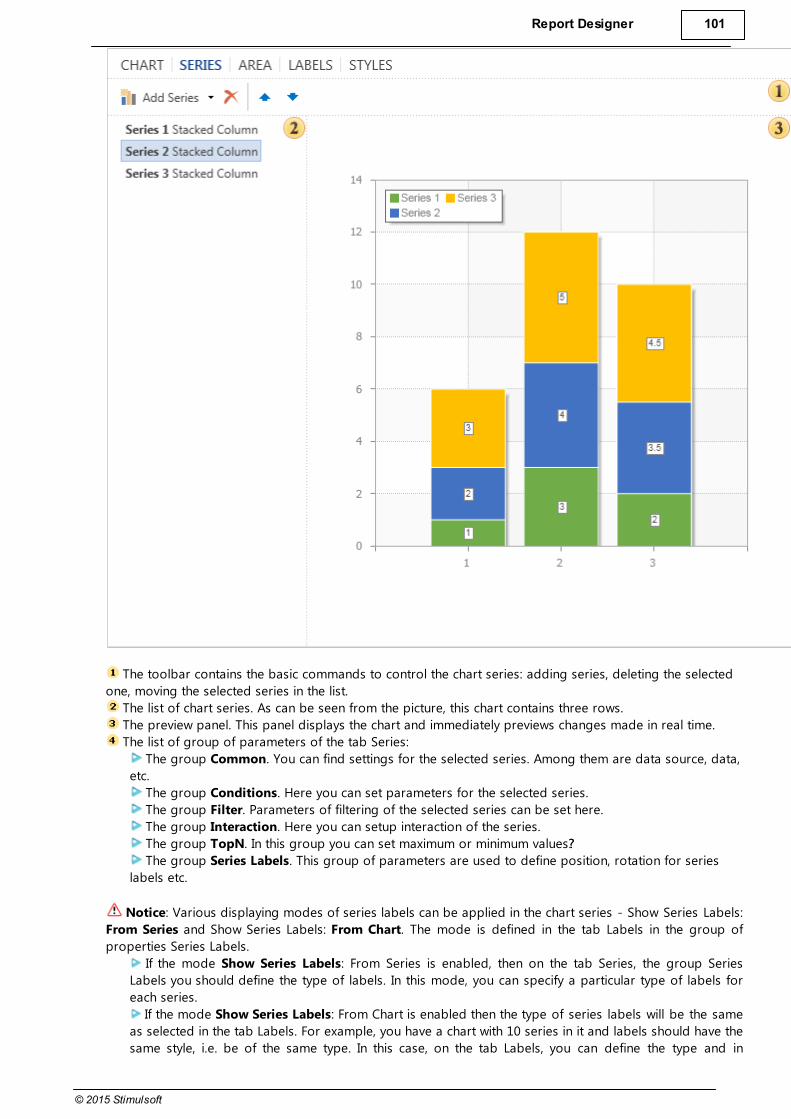
Report Designer 101
© 2015 Stimulsoft
The toolbar contains the basic commands to control the chart series: adding series, deleting the selected
one, moving the selected series in the list.
The list of chart series. As can be seen from the picture, this chart contains three rows.
The preview panel. This panel displays the chart and immediately previews changes made in real time.
The list of group of parameters of the tab Series:
The group Common. You can find settings for the selected series. Among them are data source, data,
etc.
The group Conditions. Here you can set parameters for the selected series.
The group Filter. Parameters of filtering of the selected series can be set here.
The group Interaction. Here you can setup interaction of the series.
The group TopN. In this group you can set maximum or minimum values??.
The group Series Labels. This group of parameters are used to define position, rotation for series
labels etc.
Notice: Various displaying modes of series labels can be applied in the chart series - Show Series Labels:
From Series and Show Series Labels: From Chart. The mode is defined in the tab Labels in the group of
properties Series Labels.
If the mode Show Series Labels: From Series is enabled, then on the tab Series, the group Series
Labels you should define the type of labels. In this mode, you can specify a particular type of labels for
each series.
If the mode Show Series Labels: From Chart is enabled then the type of series labels will be the same
as selected in the tab Labels. For example, you have a chart with 10 series in it and labels should have the
same style, i.e. be of the same type. In this case, on the tab Labels, you can define the type and in

102
© 2015 Stimulsoft
settings of each series you can specify the mode Labels From Chart.
8.6.3 Tab Area
The Area is a space that includes the basic chart items: rendered data series, axes, chart title and legend. The
management of this space is carried out on the tab Area, in the editor Diagram.
The panel Preview. This panel displays the chart and immediately previews changes made in real time.
The list of parameters groups in the tab Area:
The group Common. The group contains settings such as rotation, horizontal, vertical display, border
color etc.
The group X Axis. The group contains settings for the X axis.
The group Y Axis. The group contains settings for the Y axis.
The group X Top Axis. The group contains settings for the X top axis .
The group Right Y-Axis. The group contains settings for the right Y axis.
The group Grid Lines Hor. The group contains settings for horizontal lines.
The group Grid Lines Vert. The group contains settings for vertical lines.
The group Grid Lines Hor Right. The group contains settings for right horizontal lines.
The group Interlacing Hor. The group contains settings of alternation of horizontal cells in the chart
area.
The group Interlacing Vert. The group contains settings of alternation of vertical cells in the chart
area.
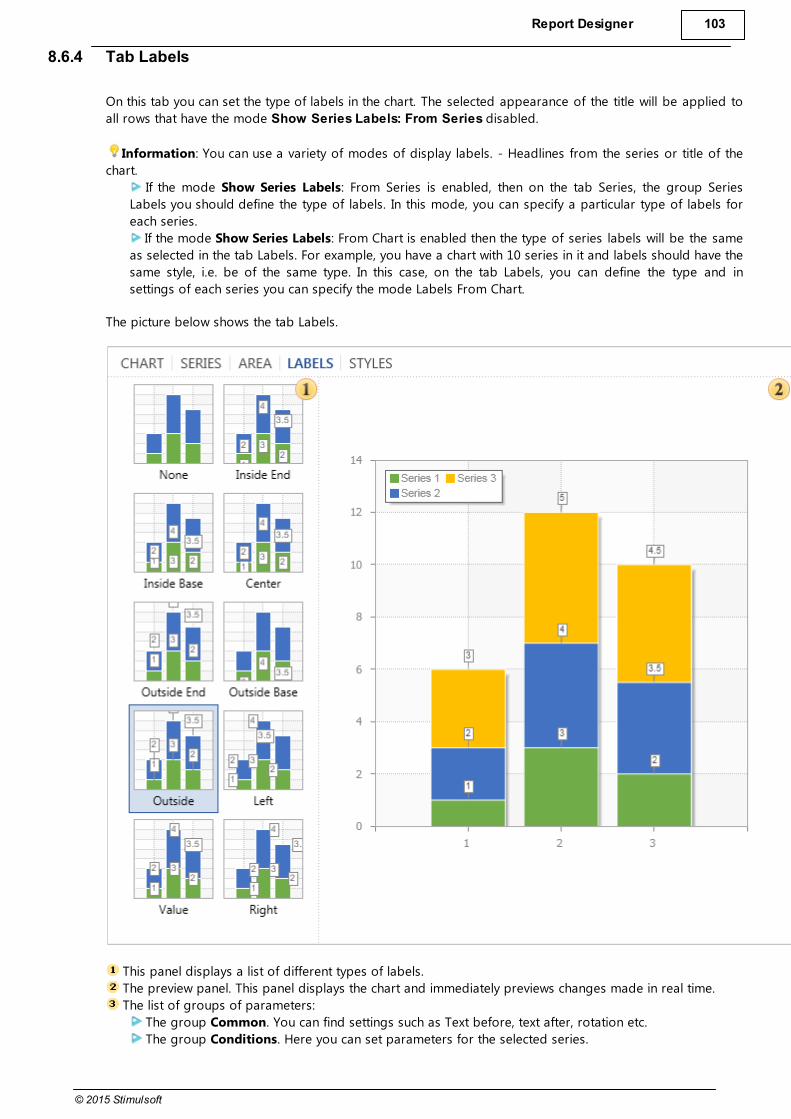
Report Designer 103
© 2015 Stimulsoft
8.6.4 Tab Labels
On this tab you can set the type of labels in the chart. The selected appearance of the title will be applied to
all rows that have the mode Show Series Labels: From Series disabled.
Information: You can use a variety of modes of display labels. - Headlines from the series or title of the
chart.
If the mode Show Series Labels: From Series is enabled, then on the tab Series, the group Series
Labels you should define the type of labels. In this mode, you can specify a particular type of labels for
each series.
If the mode Show Series Labels: From Chart is enabled then the type of series labels will be the same
as selected in the tab Labels. For example, you have a chart with 10 series in it and labels should have the
same style, i.e. be of the same type. In this case, on the tab Labels, you can define the type and in
settings of each series you can specify the mode Labels From Chart.
The picture below shows the tab Labels.
This panel displays a list of different types of labels.
The preview panel. This panel displays the chart and immediately previews changes made in real time.
The list of groups of parameters:
The group Common. You can find settings such as Text before, text after, rotation etc.
The group Conditions. Here you can set parameters for the selected series.

104
© 2015 Stimulsoft
8.6.5 Tab Styles
You can completely change the design of charts, ranging from basic colors and ending with shadows,
borders, and so on. You can do this in the tab Styles.
The button is used to call the style designer. In the designer, you can create a style for the chart and the
collection of styles for other components.
In this panel you can see the list of styles that are available by default.
The panel Preview. This panel displays the chart and immediately previews changes made in real time.
The button More Styles. When you click it you will see the list of styles available by default.
Notice: If the AllowApplyStyle is enabled then the style will be applied. If you disable the
AllowApplyStyle then the parameters of series will be considered.
8.6.6 Wizard
The Chart wizard provides an opportunity to create a chart in a few simple steps. To start the wizard, you
should the button Chart Wizard in the chart editor. The wizard provides a step-by-step procedure to create a
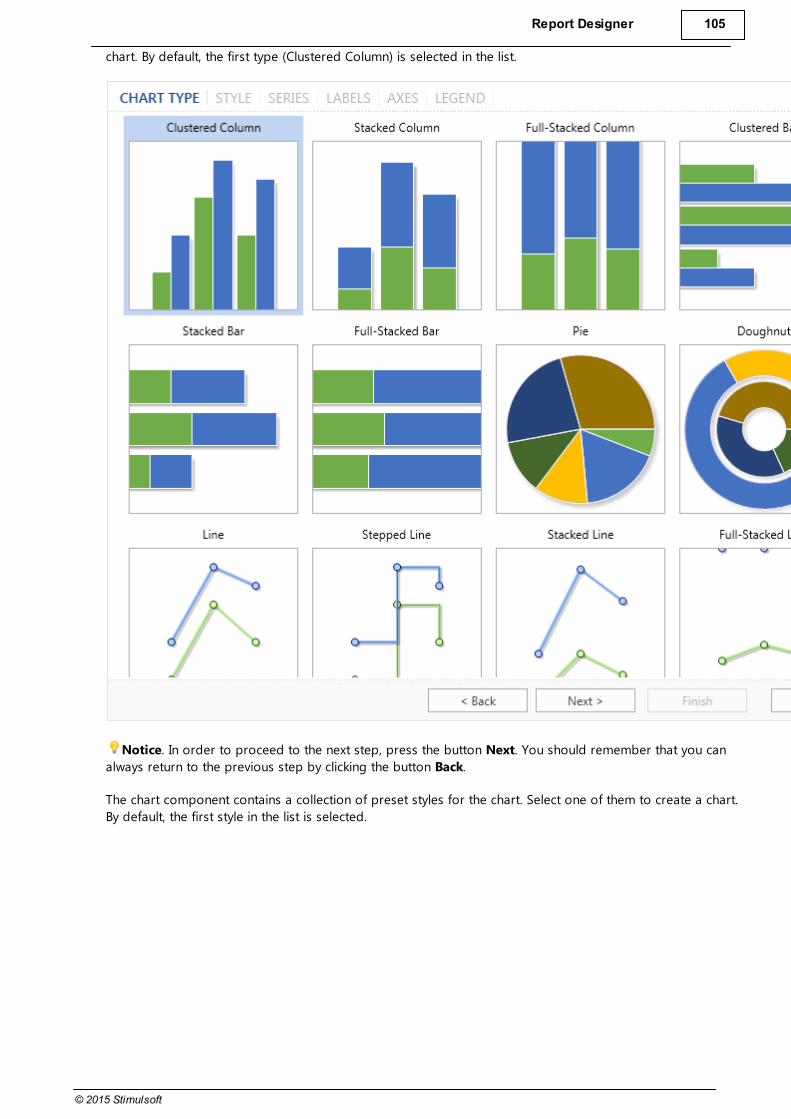
Report Designer 105
© 2015 Stimulsoft
chart. By default, the first type (Clustered Column) is selected in the list.
Notice. In order to proceed to the next step, press the button Next. You should remember that you can
always return to the previous step by clicking the button Back.
The chart component contains a collection of preset styles for the chart. Select one of them to create a chart.
By default, the first style in the list is selected.

106
© 2015 Stimulsoft
In the next step, you need to create a series of charts and specify their values.

Report Designer 107
© 2015 Stimulsoft
Clicking on this button a list of series opens. Depending on the particular type of chart, the list will have
different types of series. To add a series to a chart you should select it in the list.
Deletes the selected series of a chart.
The buttons are used to move the selected number of series in the list of charts.
This panel displays a list of chart series.
In the field of this this option you can change the name of the series. By default, all series have the name
as Series+"number".
In this panel you can set chart arguments and values. This panel has two tabs:
The tab Data Columns ?you must specify the data columns for arguments and values. For example, the
column of arguments contains entries A, B, C. The values column ??will contain entries: 23, 43, 56. In this
case, the argument A will match the value 23, the argument B will match the value 43, and the argument C
- the value 56.
Besides data columns you can manually set the arguments and values. You can do this in the tab List
of Values.

108
© 2015 Stimulsoft
Add new block that consists of fields Argument and Value. You should know that in the added block the
specified value will correspond to the argument in this block.
Remove the last inserted block of fields Value and Argument.
The list of arguments fields, i.e. in these fields arguments of a chart are specified. For example, the
arguments A, B, C, D.
The list of values fields, i.e. in these fields the values ??of the chart are shown. For example, the values ??1, 2, 3,
4.
Notice: It should be noted that for rendering the chart there must be at least one values, i.e. the value is
required to be specified. Arguments, if they are not specified, they will be automatically created.
On the next step, it is necessary to define the look of labels in the chart. By default, labels are disabled.

Report Designer 109
© 2015 Stimulsoft
The list of labels for the chart, with examples of their placing on this type of a chart.
Parameters of labels, their angle, the text before the header text after the header, etc.
Notice: You should know that when you create a chart manually, i.e. without using the wizard, you can
specify label look as the entire chart and its our look for each row of the label. When you create a chart using
the wizard, you can only define the general form of signatures for the whole diagram, i.e. one type for all
series of the chart.
On the next step, it is necessary to define axes settings.
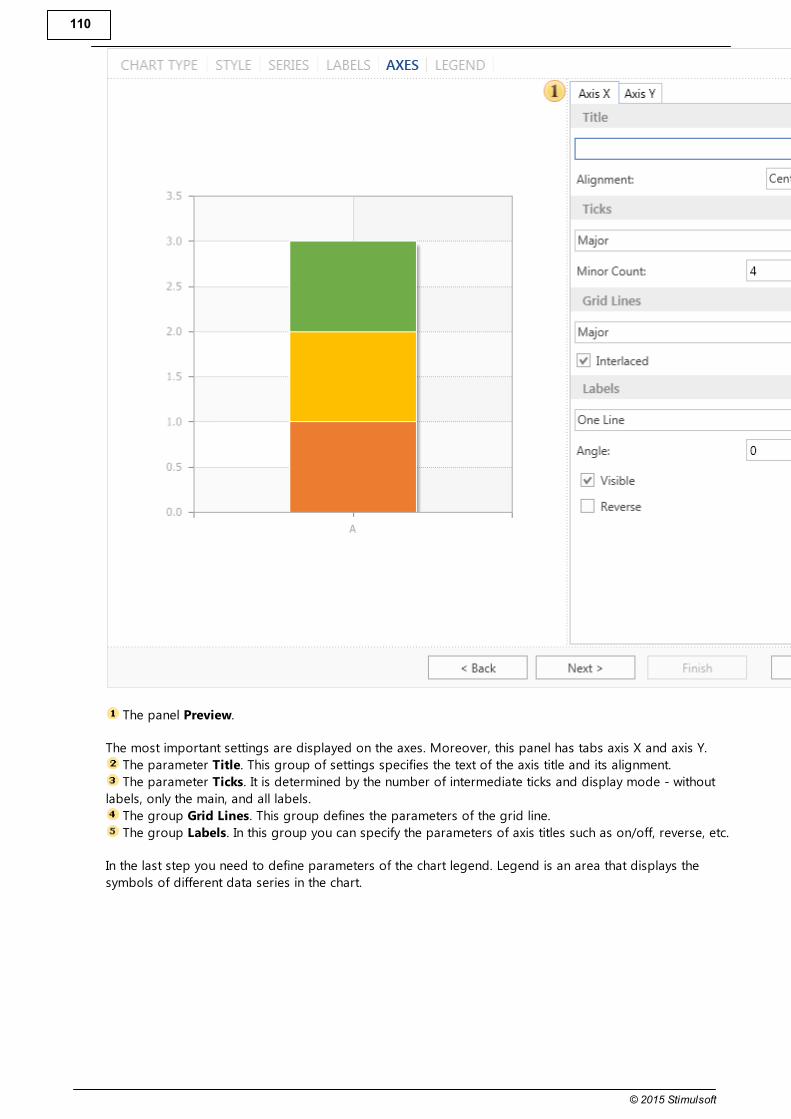
110
© 2015 Stimulsoft
The panel Preview.
The most important settings are displayed on the axes. Moreover, this panel has tabs axis X and axis Y.
The parameter Title. This group of settings specifies the text of the axis title and its alignment.
The parameter Ticks. It is determined by the number of intermediate ticks and display mode - without
labels, only the main, and all labels.
The group Grid Lines. This group defines the parameters of the grid line.
The group Labels. In this group you can specify the parameters of axis titles such as on/off, reverse, etc.
In the last step you need to define parameters of the chart legend. Legend is an area that displays the
symbols of different data series in the chart.
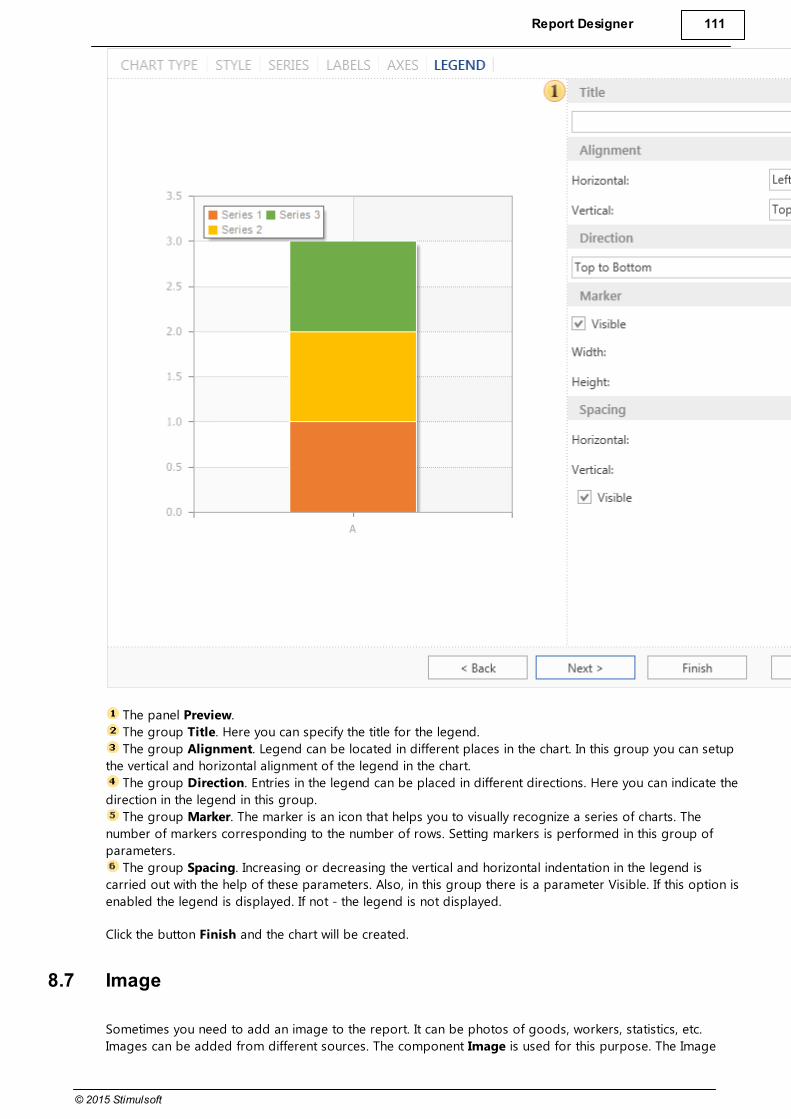
Report Designer 111
© 2015 Stimulsoft
The panel Preview.
The group Title. Here you can specify the title for the legend.
The group Alignment. Legend can be located in different places in the chart. In this group you can setup
the vertical and horizontal alignment of the legend in the chart.
The group Direction. Entries in the legend can be placed in different directions. Here you can indicate the
direction in the legend in this group.
The group Marker. The marker is an icon that helps you to visually recognize a series of charts. The
number of markers corresponding to the number of rows. Setting markers is performed in this group of
parameters.
The group Spacing. Increasing or decreasing the vertical and horizontal indentation in the legend is
carried out with the help of these parameters. Also, in this group there is a parameter Visible. If this option is
enabled the legend is displayed. If not - the legend is not displayed.
Click the button Finish and the chart will be created.
8.7 Image
Sometimes you need to add an image to the report. It can be photos of goods, workers, statistics, etc.
Images can be added from different sources. The component Image is used for this purpose. The Image
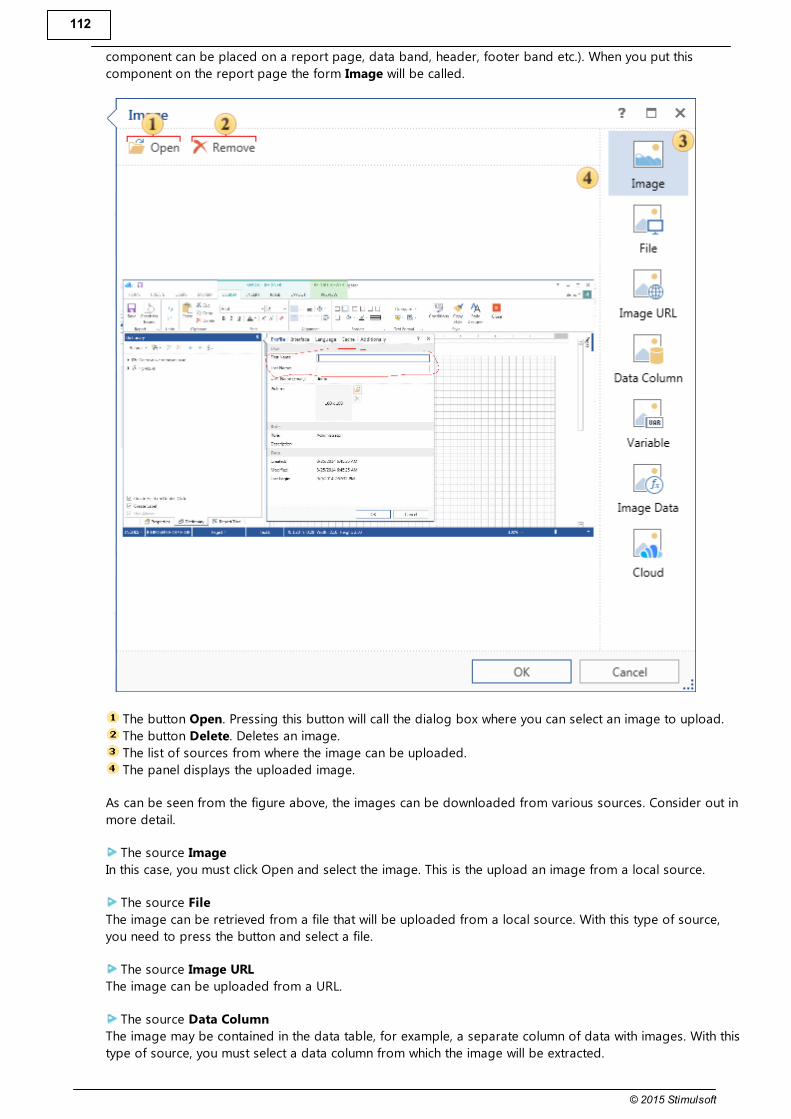
112
© 2015 Stimulsoft
component can be placed on a report page, data band, header, footer band etc.). When you put this
component on the report page the form Image will be called.
The button Open. Pressing this button will call the dialog box where you can select an image to upload.
The button Delete. Deletes an image.
The list of sources from where the image can be uploaded.
The panel displays the uploaded image.
As can be seen from the figure above, the images can be downloaded from various sources. Consider out in
more detail.
The source Image
In this case, you must click Open and select the image. This is the upload an image from a local source.
The source File
The image can be retrieved from a file that will be uploaded from a local source. With this type of source,
you need to press the button and select a file.
The source Image URL
The image can be uploaded from a URL.
The source Data Column
The image may be contained in the data table, for example, a separate column of data with images. With this
type of source, you must select a data column from which the image will be extracted.
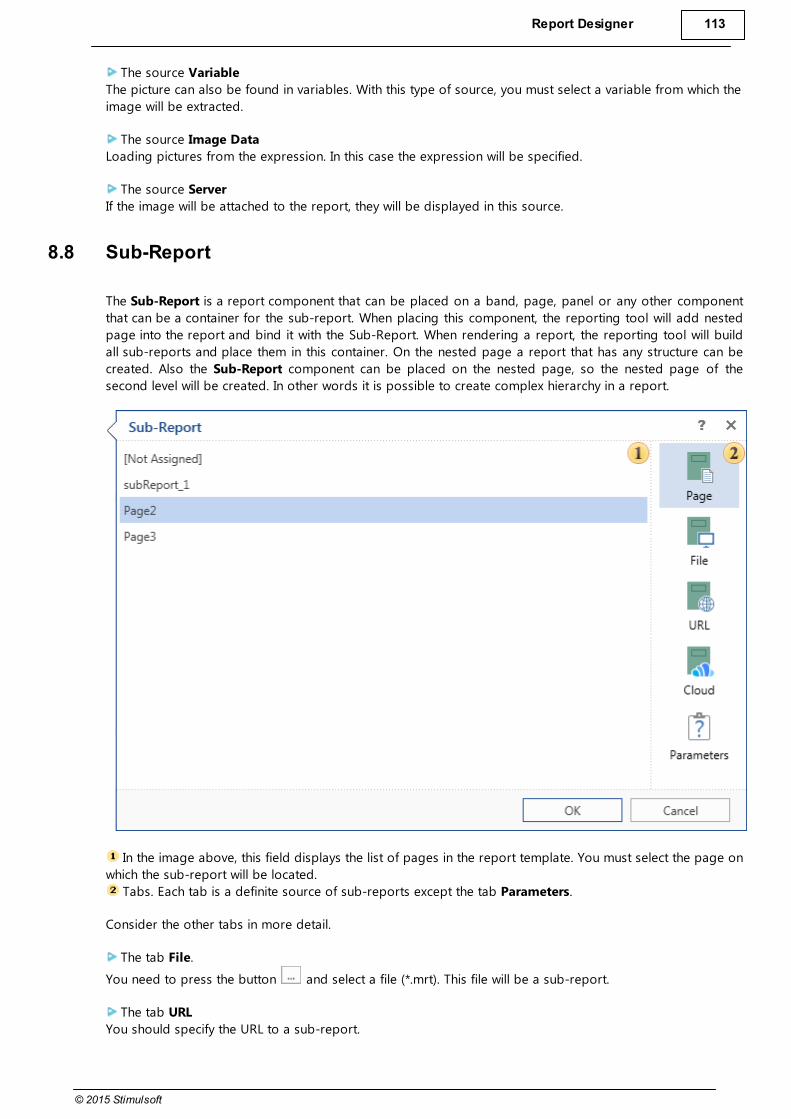
Report Designer 113
© 2015 Stimulsoft
The source Variable
The picture can also be found in variables. With this type of source, you must select a variable from which the
image will be extracted.
The source Image Data
Loading pictures from the expression. In this case the expression will be specified.
The source Server
If the image will be attached to the report, they will be displayed in this source.
8.8 Sub-Report
The Sub-Report is a report component that can be placed on a band, page, panel or any other component
that can be a container for the sub-report. When placing this component, the reporting tool will add nested
page into the report and bind it with the Sub-Report. When rendering a report, the reporting tool will build
all sub-reports and place them in this container. On the nested page a report that has any structure can be
created. Also the Sub-Report component can be placed on the nested page, so the nested page of the
second level will be created. In other words it is possible to create complex hierarchy in a report.
In the image above, this field displays the list of pages in the report template. You must select the page on
which the sub-report will be located.
Tabs. Each tab is a definite source of sub-reports except the tab Parameters.
Consider the other tabs in more detail.
The tab File.
You need to press the button and select a file (*.mrt). This file will be a sub-report.
The tab URL
You should specify the URL to a sub-report.

114
© 2015 Stimulsoft
The tab Server.
On this tab, you should specify the report from the report server, i.e. specify a sub-report from those stored
on the report server. Consider an example. A report list of products is storing on the report server. This
report will be a sub-report. Also the server has a report - list of categories, which will be the master report.
Therefore, you must perform the following steps:
1. Select the report list of categories in the item tree of the Navigator and click the button Edit on the tab
Home or select a similar command from the context menu.
2. In the field Attached Items add a report list of products and click Ok in the edit form.
3. Load the report list of categories to the report designer by selecting the command Design Report. After
the report designer is running all attached items by category will be shown in the Dictionary. If images are
attached then the Dictionary will have the category Images, if reports - the category Reports. In this
example, the report is attached. This means that the category Reports should be created and the report
list of products will be in it. More precisely, a description of the report list of products with reference to
the object of the report server will be present.
4. Add the Sub-Report to a desired location, and, on the tab Server, specify a report by products (dragging
list of products from the data dictionary to the field of the sub-report editor or select it in the data
dictionary and click the button ).
Parameters
The relation between the master and sub-report is done by passing parameters from one to another. For
example, the parameters may be used in filtering data:
If the product should be filtered by category, then it will pass the category ID.
It is necessary to specify in the attached report (in band, cross-table, tables, etc.), a filter expression
by CategoryID.
The picture below shows the editor Sub-Report on the tab Parameters.
The button to add a parameter to the list of parameters.
The button to delete the selected parameter from the list.
Navigation buttons in the parameter list in the direction of "up and down".
The panel with the list of the parameters.
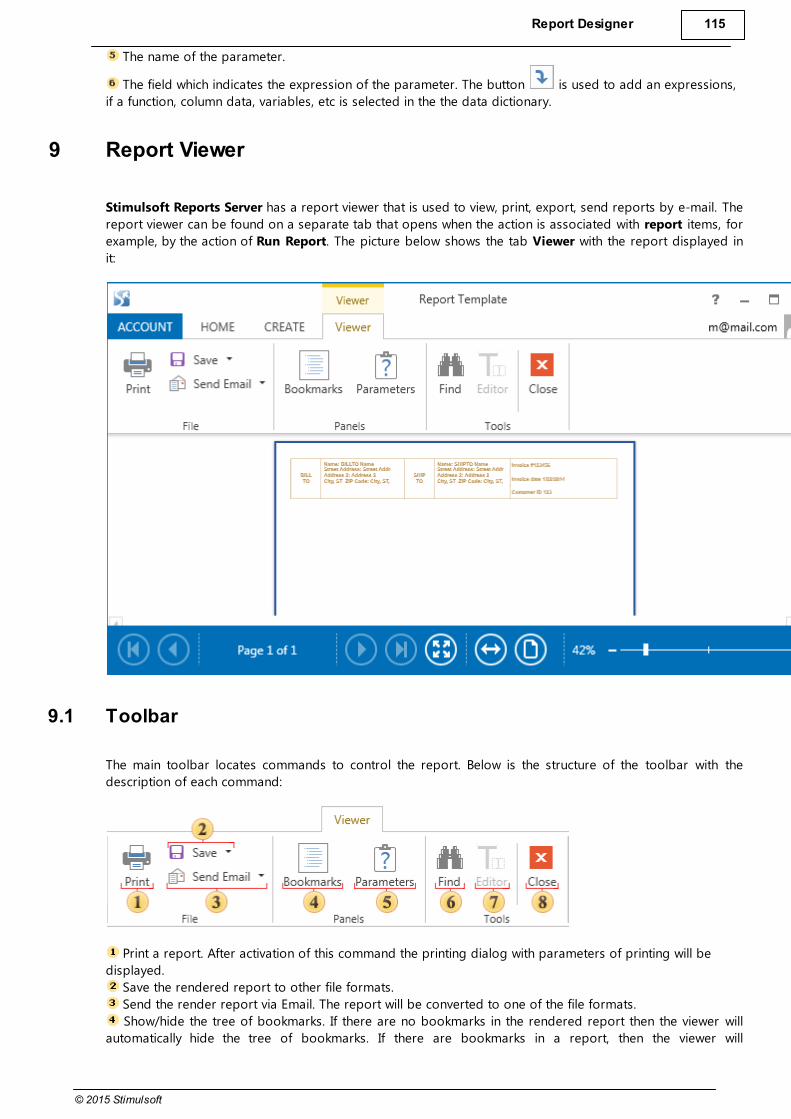
Report Designer 115
© 2015 Stimulsoft
The name of the parameter.
The field which indicates the expression of the parameter. The button is used to add an expressions,
if a function, column data, variables, etc is selected in the the data dictionary.
9 Report Viewer
Stimulsoft Reports Server has a report viewer that is used to view, print, export, send reports by e-mail. The
report viewer can be found on a separate tab that opens when the action is associated with report items, for
example, by the action of Run Report. The picture below shows the tab Viewer with the report displayed in
it:
9.1 Toolbar
The main toolbar locates commands to control the report. Below is the structure of the toolbar with the
description of each command:
Print a report. After activation of this command the printing dialog with parameters of printing will be
displayed.
Save the rendered report to other file formats.
Send the render report via Email. The report will be converted to one of the file formats.
Show/hide the tree of bookmarks. If there are no bookmarks in the rendered report then the viewer will
automatically hide the tree of bookmarks. If there are bookmarks in a report, then the viewer will
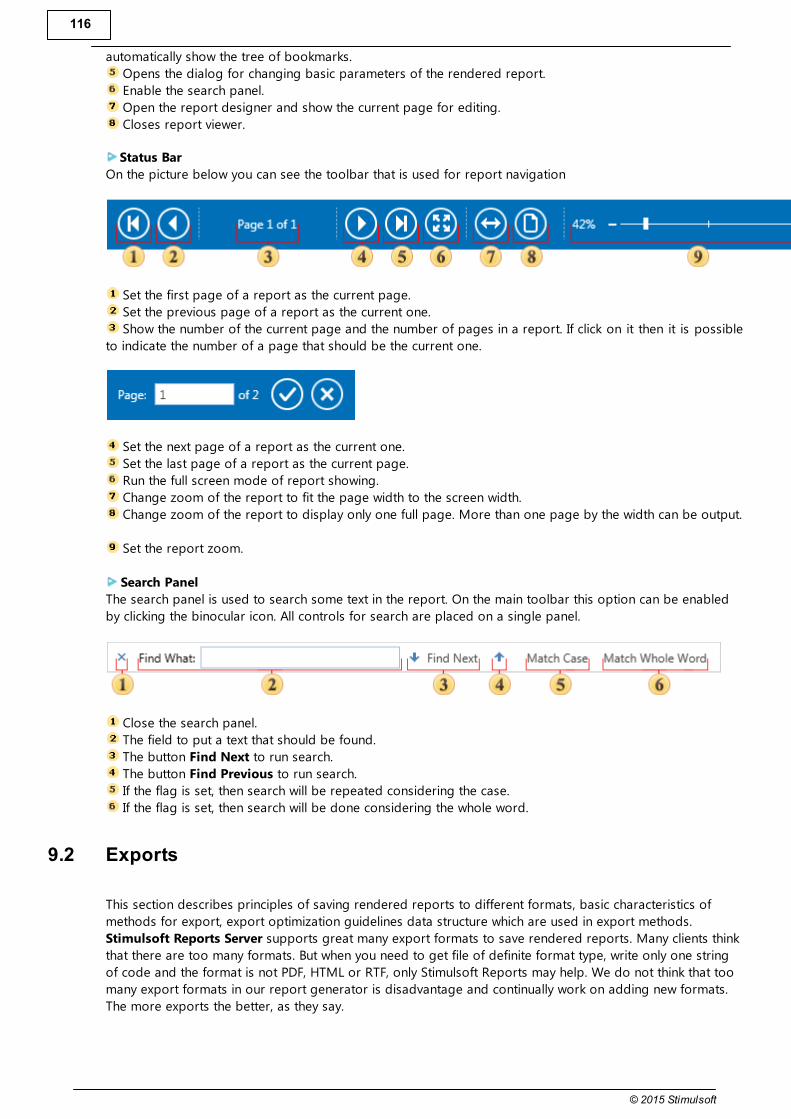
116
© 2015 Stimulsoft
automatically show the tree of bookmarks.
Opens the dialog for changing basic parameters of the rendered report.
Enable the search panel.
Open the report designer and show the current page for editing.
Closes report viewer.
Status Bar
On the picture below you can see the toolbar that is used for report navigation
Set the first page of a report as the current page.
Set the previous page of a report as the current one.
Show the number of the current page and the number of pages in a report. If click on it then it is possible
to indicate the number of a page that should be the current one.
Set the next page of a report as the current one.
Set the last page of a report as the current page.
Run the full screen mode of report showing.
Change zoom of the report to fit the page width to the screen width.
Change zoom of the report to display only one full page. More than one page by the width can be output.
Set the report zoom.
Search Panel
The search panel is used to search some text in the report. On the main toolbar this option can be enabled
by clicking the binocular icon. All controls for search are placed on a single panel.
Close the search panel.
The field to put a text that should be found.
The button Find Next to run search.
The button Find Previous to run search.
If the flag is set, then search will be repeated considering the case.
If the flag is set, then search will be done considering the whole word.
9.2 Exports
This section describes principles of saving rendered reports to different formats, basic characteristics of
methods for export, export optimization guidelines data structure which are used in export methods.
Stimulsoft Reports Server supports great many export formats to save rendered reports. Many clients think
that there are too many formats. But when you need to get file of definite format type, write only one string
of code and the format is not PDF, HTML or RTF, only Stimulsoft Reports may help. We do not think that too
many export formats in our report generator is disadvantage and continually work on adding new formats.
The more exports the better, as they say.
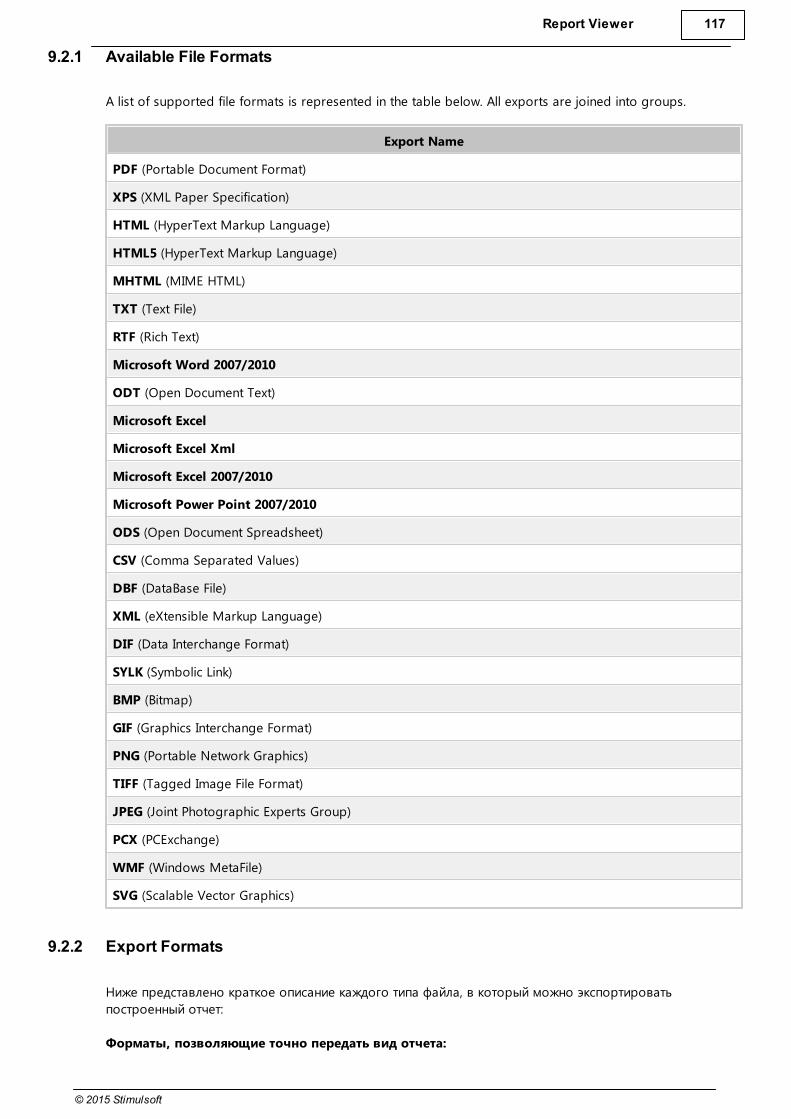
Report Viewer 117
© 2015 Stimulsoft
9.2.1 Available File Formats
A list of supported file formats is represented in the table below. All exports are joined into groups.
Export Name
PDF (Portable Document Format)
XPS (XML Paper Specification)
HTML (HyperText Markup Language)
HTML5 (HyperText Markup Language)
MHTML (MIME HTML)
TXT (Text File)
RTF (Rich Text)
Microsoft Word 2007/2010
ODT (Open Document Text)
Microsoft Excel
Microsoft Excel Xml
Microsoft Excel 2007/2010
Microsoft Power Point 2007/2010
ODS (Open Document Spreadsheet)
CSV (Comma Separated Values)
DBF (DataBase File)
XML (eXtensible Markup Language)
DIF (Data Interchange Format)
SYLK (Symbolic Link)
BMP (Bitmap)
GIF (Graphics Interchange Format)
PNG (Portable Network Graphics)
TIFF (Tagged Image File Format)
JPEG (Joint Photographic Experts Group)
PCX (PCExchange)
WMF (Windows MetaFile)
SVG (Scalable Vector Graphics)
9.2.2 Export Formats
Ниже представлено краткое описание каждого типа файла, в который можно экспортировать
построенный отчет:
Форматы, позволяющие точно передать вид отчета:
118
© 2015 Stimulsoft
PDF - экспорт в формат Adobe PDF.
XPS - экспорт в формат Microsoft XPS.
Форматы интернета:
Html - экспорт в формат Html по умолчанию. Этот элемент дублирует HtmlTable режим.
HtmlTable - экспорт в формат Html с использованием элемента Html Table, для создания структуры
отчета.
HtmlSpan - экспорт в формат Html с использованием элемента Html Span, для создания структуры
отчета.
HtmlDiv - экспорт в формат Html с использованием элемента Html Div, для создания структуры
отчета.
Mht - экспорт в формат WebArchive. Этот формат поддерживается только Microsoft IE.
Текстовые форматы:
Text - экспорт в текстовый формат.
Rtf - экспорт в Rich Text Format по умолчанию. Этот элемент дублирует HtmlTable режим.
RtfTable - экспорт в формат Rich Text Format с использованием элемента Rtf Table, для создания
структуры отчета.
RtfFrame - экспорт в формат Rich Text Format с использованием элемента Rtf Frame, для создания
структуры отчета.
RtfWinWord - экспорт в формат Rich Text Format с использованием элемента Microsoft Word graphic,
для создания структуры отчета.
RtfTabbedText - экспорт в формат Rich Text Format с использованием символов табуляции для
форматирования структуры отчета.
Word2007 - экспорт в формат Microsoft Word 2007. Этот формат поддерживается начиная с Microsoft
Office 2007.
Odt - экспорт в формат OpenDocument Writer файл.
Электронные таблицы:
Excel - экспорт в формат Microsoft Excel. Файл создается с использованием формата BIFF (Binary
Interchange File Format).
ExcelXml - экспорт в формат Microsoft Excel Xml. Файл создается с использованием формата Xml.
Этот формат поддерживается начиная с Microsoft Office 2003.
Excel2007 - экспорт в формат Microsoft Excel 2007. Этот формат поддерживается начиная с Microsoft
Office 2007.
Ods - экспорт в формат OpenDocument Calc.
Экспорт в виде данных:
Csv - экспорт в формат CSV (Comma Separated Value).
Dbf - экспорт в формат dBase/FoxPro.
Xml - экспорт отчета в формате Xml в виде данных. Этот формат представляет из себя сохраненный
DataSet.
Dif - экспорт в формат DIF (Data Interchange Format).
Sylk - экспорт в формат SYLK (Symbolic Link).
Экспорт в виде изображения:
ImageGif - экспорт в формат GIF.
ImageBmp - экспорт в формат BMP.
ImagePcx - экспорт в формат PCX.
ImagePng - экспорт в формат PNG.
ImageTiff - экспорт в формат TIFF.
ImageJpeg - экспорт в формат JPEG.
ImageEmf - экспорт в формат Windows Metafile.

Report Viewer 119
© 2015 Stimulsoft
9.2.3 Common Export Settings
These chapters describe export settings which are not unique and are met in a few exports. Therefore, to
prevent describing them again and again, they are joined in this section.
9.2.3.1 Image Quality
Image quality is the compression degree of JPEG. If the compression is low then an image is of good quality
and has big file size. If the compression is high then an image is of bad quality and has small file size. In
Stimulsoft Reports an image quality can vary from 0.0 (the lowest quality) to 1.0 (highest quality). If an image
quality is 1.0 it does not mean that the image is saved without compression. The JPEG algorithm always
compresses an image. The 1.0 quality means that an image quality will be the same as the quality of an
original document but the file size will be smaller than the original. The 0.0 quality means that the image has
slightest similarity to the original document. In practice, the 0.9 quality has not great distinction from the 1.0
quality but the image with lower than the 0.1 quality looks bad. By default, in Stimulsoft Reports the image
quality is 0.75.
9.2.3.2 Image Resolution
Raster images such as scanned photos consist of small cells called pixels. Image resolution depends on the
pixel size and is measured in pixels per inch, ppi, and sometimes in dots per inch, dpi. The higher resolution
the more pixels the image contains and, accordingly, the more size of the image. In Stimulsoft Reports it is
possible to set any image resolution. But when increasing the resolution in 2 times the image size will
increase in 4 times. Also it is not good to set the image resolution more than maximal resolution of an output
device. For example, devices may have the following resolution:
matrix printer - 72dpi;
monitor screen - 96dpi;
laser printers - 300dpi or 600dpi;
high-end printers - 1200dpi and higher.
By default the resolution is 100dpi.
9.2.3.3 Image Comparer
Sometimes repetitive image can be met in a report, for example, company logos on the header of each
page. If do not process such duplicates then a report after export will have big size. Some formats allows
exporting only one image and then refer to it from different parts of a document. In Stimulsoft Reports, there
is a special class that calculates check sums and searches and processes duplicates. Image processing may
slow down the process of exporting, so it is possible to disable this feature. Each export has its own property
to enable or disable image comparison. By default this property is always enabled.
9.2.3.4 Convert Digits to Arabic
Arabs do not use Arabic digits. They use Hindi digits and Arabic digits are auxiliary (the same as Roman
digits for us). But, in any case, all digits are written from left to right. This property indicates whether it is
necessary to convert Roman digits (ASCII 0030h-0039h) to Arabic digits (Unicode 0660h-0669h or 06F0h-
06F9h, depending on the ArabicDigitsType property). In each types of export the digits conversion can be set
by their own property.

120
© 2015 Stimulsoft
9.2.3.5 Arabic Digits Type
Arabic digits have two variants of drawing: Standard and Eastern. The property allows selecting the type of
Arabic digits that will be used in export: Standard or Eastern; by default the Standard type is used. In each
export the type of Arabic digits is enabled or disabled by its own property.
9.2.3.6 Divide Segment Pages
Stimulsoft Reports Server allows creating segmented pages. These are pages which horizontal and/or
vertical size are increased in some times. Some applications, such as MS Excel, allows working with pages of
any size, because breaking into small segments can is processed with the spreadsheet itself. Other
applications, such as MS Word, cannot break pages into small segments. For such applications segmented
pages are broken into separate pages on the stage of selected export; if property, for example, for
Word2007, StiOptions.Export.Word2007.DivideSegmentPages , is set to false then pages are passed "as
is" without breaking into segments. Each type of export has its own property for breaking segmented pages.
9.2.3.7 Remove Empty Space at Bottom
Many exports uses the table mode of export. In this mode data is converted into one table. If, in the initial
report, there is an empty space on the bottom of a page then the table is broken. The following property
allows removing empty space at the bottom of a page and resulting table is not broken. If it is necessary to
save the initial view of a document then it is necessary to set this property to false. In each type of exports
their own property is used.
9.2.3.8 Use One Page Header and Footer
When exporting to Excel then all report is converted in one table. Headers and footers of a page break this
table. This property leaves only the first header and the last header of a page. All other headers and footers
are removed. If it is necessary to save the initial view of a document then it is necessary to set this property
to false. For each type of exports their own property is used.
9.2.4 Formats with Fixed Page Layout
Stimulsoft Reports Server supports three exports with fixed page layout. This means that all elements of a
page can be placed at any part of a page. In this case, if to change a position of one element then other
components position will not be changed. These are formats to PDF (Portable Document Format), Microsoft
Power Point 2007/2010 and XPS (XML Paper Specification).
9.2.4.1 PDF
PDF (Portable Document Format) – is a file format created by Adobe Systems for document exchange used
to create electronic editions using the Adobe Acrobat package. The PDF format is a file text format that is
used to publish documents on any platform and OS. The PDF document contains one or more pages. Each
page may contain any components: text, graphic and illustrations, information, that provides navigation
across the document.
Notice. Export to PDF is based on the "Adobe Portable Document Format, Version 1.3, second edition",
using some elements of latest format specifications.
Для уменьшения размера файла PDF использует различные методы сжатия. Для сжатия текстового
материала используется алгоритм LZW ("Flate"). Для сжатия графической информации используются
алгоритмы JPEG или LZW. Алгоритм JPEG - это сжатие с потерями, рекомендуется для полноцветных

Report Viewer 121
© 2015 Stimulsoft
иллюстраций и изображений. Алгоритм LZW - это сжатие без потерь, рекомендуется для иллюстраций и
изображений с небольшим количеством цветов, например графики, чарты, схемы. Для обеспечения
независимости от шрифтов PDF файл содержит описание для каждого шрифта, использованного в
документе. Описание включает название, размер, стиль и другие параметры шрифта. В режиме
просмотра документа, если шрифт, описанный в документе, доступен, то он используется. Если не
доступен, то заменяется на подобный с тем же размером и другими характеристиками. Шрифты можно
внедрять в документ. Это значительно увеличивает размер файла, но гарантирует правильное
отображение документа на любом компьютере.
Export options in PDF
Переключатель Все включает обработку всех страниц отчета.
Переключатель Текущая включает обработку только текущей (выделенной) страницы отчета.
Переключатель Номера имеет поле. В данном поле указываются номера страниц, которые
необходимо обработать. Указать можно одну страницу, список страниц (используя запятые как
разделитель), а так же задать диапазон, указав начальную страницу диапазона, разделитель "-" и
конечную страницу диапазона. Например: 1,3,5-12.
Параметр Разрешение изображения - изменение количества пикселей на дюйм (свойство
изображения PPI (Pixels Per Inch)). Чем больше количество пикселей на дюйм, тем выше четкость
изображения и легкость восприятия. Стоит отметить, что значение данного параметра влияет на размер
выходного файла, т.е. чем больше значение, тем больше и размер выходного файла.
Параметр Allow Editable предоставляет возможность включить режим, при котором после экспорта,
можно изменять только компоненты со включенным, предварительно в шаблоне отчета, свойством
122
© 2015 Stimulsoft
Редактируемый. Если выбрано значение No - редактировать можно будет все компоненты, кроме
случаев, когда иное ограничено параметрами группы Безопасность. Если выбрано значение Yes - то
редактировать можно будет только комопненты, у которых включено свойство Редактируемый.
ОБРАТИТЕ ВНИМАНИЕ: Ограничения на редактирование документа не используют стойкие ко
взлому алгоритмы шифрования. Поэтому для безопасности документа рекомендуется использовать
цифровую подпись и группу безопасность.
Примечание: Также стоит отметить, что при редактировании текста в поcтроенном отчете, шрифт
может отличаться от стандартных. Поэтому, если редактирование будет произведено каким-либо другим
шрифтом, то в документ PDF будет встроен файл этого шрифта, что в свою очередь, может привести к
значительному увеличению файла PDF.
Параметр Метод сжатия изображения предоставляет возможность определить способ сжатия
изображений в PDF файле. Доступны следующие варианты:
JPEG - сжатие с потерями,
Flate - сжатие без потерь,
Simple - монохромный режим без дизеринга,
Ordered - монохромное изображение с дизерингом,
FloydSt. - наиболее точный монохромный режим с дизерингом.
Параметр Качество изображения будет доступен только при выборе метода сжатия JPEG. Данный
параметр позволяет изменить качество изображения. Следует учитывать, что при изменении данного
параметра будет изменяться и размер выходного файла, т.е. чем выше качество изображения, тем
больше размер выходного файла.
Флажок Стандартные PDF шрифты предоставляет возможность использовать только 14
стандартных шрифтов Adobe. Если данный параметр включен, то в PDF файле после экспорта будут
использованы только стандартные 14 шрифтов, и все другие шрифты отчета будут преобразованы в эти
шрифты.
ОБРАТИТЕ ВНИМАНИЕ: При использовании параметра Стандартные PDF шрифты, могут
возникнуть проблемы с форматированием текста в файле PDF, т.к. размеры шрифта используемого в
отчете, могут отличаться от размеров ближайшего стандартного шрифта, который будет использован в
файле PDF.
Флажок Встроить шрифты предоставляет возможность встраивать файлы шрифтов в создаваемый
файл PDF. Если данный параметр включен, то при экспорте отчета, файлы всех используемых в отчете
шрифтов будут включены в файл PDF, и шрифты в полученном файле будут корректно отображаться в
любом вьювере PDF файлов. Если свойство выключено, то для корректного отображения файла надо
будет устанавливать на каждом компьютере все шрифты, используемые в отчете.
ОБРАТИТЕ ВНИМАНИЕ: При включении данного параметра, размер файла может значительно
увеличиться. Особенно, при использовании шрифтов с большим количеством различных символов,
например азиатских.
Флажок Использовать Unicode включает/выключает расширенную поддержку кодирования
символов. Влияет на внутреннее кодирование символов внутри PDF файла и улучшает копирование
текста из PDF документа.
Примечание: Из-за технических ограничений платформ программирования, параметр реализован
не во всех продуктах.
Включить/выключить сжатие конечного PDF файла можно при помощи флажка Сжатый.
Рекомендуется всегда включать сжатие файла.
Флажок Экспортировать Rtf текст как изображение включает/выключает конвертацию Rtf текста в
картинку при экспорте. Если параметр выключен, то RichText при экспорте раскладывается на более
простые примитивы, поддерживаемые форматом PDF. RichText со сложным форматированием
(вложенные изображения, таблицы) не всегда может быть преобразован корректно. В этом случае
рекомендуется включить данный параметр.

Report Viewer 123
© 2015 Stimulsoft
ОБРАТИТЕ ВНИМАНИЕ: При включении данного параметра размер файла может значительно
увеличиться.
Флажок PDF/A соглашение включает/выключает поддержку стандарта долгосрочного архивного
хранения электронных документов. Соответствие стандарту гарантирует, что документ по прошествии
времени будет отображаться одинаково и на более поздних версиях Adobe Acrobat. При включении
данного параметра также автоматически включаются параметры Встроить шрифты и Использовать
Unicode.
Группа Безопасноть документа представляет собой набор параметров, при помощи которых можно
защитить документы от несанкционированного доступа к их содержимому и к последующим операциям
с ним:
В поле Пароль пользователя указывается пароль необходимый для открытия документа. Если
указан какой-либо пароль, то доступ к открытию файла считается ограниченным и произойдет
только в случае указания правильного пароля. Если пароль не указан, т.е. поле остается пустым, то
файл может быть открыт без ограничений.
В поле Пароль владельца указывается пароль доступа к операциям с файлом. Если указан
какой-либо пароль, то доступ к операциям с файлом (к примеру, печать, копирование) будет
доступен только после ввода пароля. Если пароль не указан, т.е. поле остается пустым, то операции
с файлом будут доступны без ограничений.
Флажок Разрешить печатать документ включает/выключает ограниченный доступ к операции
печать. Если данный параметр выключен, то необходимо указать пароль владельца для
осуществления данной операции. Если параметр включен, то печать будет доступна всем
открывшим документ.
Флажок Разрешить редактировать текст включает/выключает ограниченный доступ к
редактированию текста. Если данный параметр выключен, то необходимо указать пароль владельца
для осуществления данной операции. Если параметр включен, то редактированеи будет доступно
всем открывшим документ.
Флажок Разрешить копировать текст и графику включает/выключает ограниченный доступ к
копированию информации. Если данный параметр выключен, то необходимо указать пароль
владельца для осуществления данной операции. Если параметр включен, то копирование будет
доступно всем открывшим документ.
Флажок Разрешить добавлять или изменять примечания включает ограниченный доступ к
работе с примечаниями в документе. Если данный параметр выключен, то необходимо указать
пароль владельца для осуществления данной операции. Если параметр включен, то данная
операция будет доступна всем открывшим документ.
Флажок Длина ключа шифрования предоставляет возможность выбрать длину ключа
шифрования к документу. Чем больше длина, тем сложнее расшифровать документ, а
соответственнее безопасность документа выше.
Цифровая подпись представляет собой хороший способ обезопасить документ от подделки.
Исходный документ подвергается криптографическому преобразованию информации с использованием
закрытого ключа электронной цифровой подписи. Это позволяет идентифицировать владельца
сертификата подписи, а также установить отсутствие искажения информации в электронном документе.
Флажок Использовать цифровую подпись включает/выключает применение цифровой подписи
к файлу. Если данный параметр включен, то к файлу будет применена цифровая подпись. Если
выключен - то цифровая подпись не применяется. Цифровая подпись файла требует наличие
сертификата в системном хранилище сертификатов.
Нужный сертификат можно выбрать следующим способом:
Флажок Брать сертификат из Crypto UI влючает/выключает использование интерфейса
системной библиотеки криптографии. В этом случае, при экспорте файла на экране появится меню
выбора сертификата из текущего хранилища сертификатов. Необходимо выбрать один сертификат
из списка доступных.
Примечание. В web-приложении этот способ использовать нельзя, так как меню выбора
сертификата появляется на том компьютере, на котором выполняется экспорт, т.е. на сервере.
Соответственно пользователь его не видит и не может ничего с ним сделать. Экспорт просто ожидает
выбора сертификата до бесконечности, а для поьзователя это кажется зависанием приложения.
124
© 2015 Stimulsoft
В поле Имя субъекта необходимо записать строку - идентификатор сертификата. Идентификатор -
это имя владельца сертификата (полная строка) или часть имени (подстрока).
Флажок Открытие после экспорта включает/выключает автоматическое открытие документа
созданного документа (после завершения экспорта), программой установленной по умолчанию для этих
типов файлов.
9.2.4.1.1 Embedded Fonts
By default all embedded fonts are optimized. Characters which are not used in a report are excluded. It
allows decreasing the size of a file. But, for correct work of the editable field, the font should be complete.
Therefore, for fonts, which are used in editable fields, optimization is not done. This increases the output file
size. If Asian languages are used, the file size can be 15-20mb.
9.2.4.1.1.1 Font Styles
There is one peculiarity of the export: all fonts for embedding to PDF files should be installed in the system.
And for each font style a single font file should be installed.
For example, for the Arial font 4 files should be installed:
"arial.ttf" - the style regular,
"ariali.ttf" - the style italic,
"arialb.ttf" - the style bold,
"arialbi.ttf" - the style bold-italic;
The Lucida Console font is usually represented with one file that contains the regular style (other styles are
generated by the system). Therefore, when embedding such a font to the PDF file, only regular style will be
output, instead of all styles of this font.
9.2.4.1.2 Digital Signature
Digital signature is a requisite of an electronic document used to protect this document from falsification.
This document is a result of cryptographic conversion of information using the closed key of the electronic
signature and allows identifying the owner of the certificate of the key of the signature. Digital signatures are
often used to implement electronic signatures.
9.2.4.1.2.1 Keys
Key is secret information is the secret information that is used by the cryptographic algorithm when creating
and checking the digital signature. Usually for digital signature the pair of keys is used:
Private key this key is known only for the owner;
Public key this key is available for all users of cryptographic system.
In Digital Signature algorithms the signature is signed on the secret key of a user and is checked on the
public key. So anyone may check what user put this signature. Keys are bound with specific certificates..
9.2.4.1.2.2 Public Key Certif icate
Public key certificate EDS is a digital document confirming the correspondence between a public key and
information identifying the owner of the key. It contains information about the owner of the key information
about the public key, its purpose and scope, the name of the certification authority and so on. Each certificate
can be also connected with a private key. Storage of certificates is called a certificate authority. Certificate
Report Viewer 125
© 2015 Stimulsoft
store often contains numerous certificates, possibly derived from different CAs. Certificates in the repository
into folders (categories) that have their own hierarchy. To access any certificate must specify the name of the
repository (category), in which it is located. To create a digital signature private key is required. Certificates
that contain private keys that are usually located in the two repositories - the repository of the current user or
local computer store. To select the storage you want to use the property Use Local Machine Certificates. By
default it is set to false, and the search is made in the certificate store of the current user
(CERT_SYSTEM_STORE_CURRENT_USER). If it is set to true, the search will be made in the local computer
store (CERT_SYSTEM_STORE_LOCAL_MACHINE).
9.2.4.1.2.3 Choosing Certif icate
There are two ways to create the digital signature:
using the interface of the system library of cryptograph;
directly by specifying the string - certificate identifier.
In the first case it is necessary to set the Get Certificate From CryptoUI property to true. When exporting,
the menu for selecting certificate from the current storage of certificates will be displayed. It is necessary to
select one certificate from the list of available ones.
Important: In web applications this way cannot be used, because the menu of selecting a certificate is
displayed on a computer on what the export is in process, in other words on the server. So the user cannot
see and cannot do anything with it. In other words the export endlessly waits when the certificate will be
selected.
In the second way, it is necessary to use the SubjectNameString property and write in it the string -
certificate identifier. Identifier is the name of the certificate owner (full string) or a part of the name
(substring).
9.2.4.1.2.4 Placing Digital Signature Identif ier
By default the digital signature identifier is placed on the top of the first page of a document in the right
corner, on margins. If it is required to set another position of the digital signature identifier, then it is
necessary to place the text box with the description of the digital signature, and to set the Tag property to
"PdfDigitalSignature".
9.2.4.1.3 Encryption
The PDF document can be encrypted to protect the content from illegal access. The user can set the
following encryption patameters:
user password;
owner password;
access permission;
key length.
9.2.4.1.3.1 Passw ords and Access Permission
According to the PDF specification, it is possible to set the access and two passwords: the public password
and the owner's password. If there are no passwords and everything is allowed to do with the document,
then the document is not encrypted. If even one password is set or access is not allowed, then the document
is encrypted.
The public password allows opening and viewing documents, and also some actions are allowed:
edit document;
copy text and graphics from the document;
add and change commentaries;
126
© 2015 Stimulsoft
print document.
The owner password provides access to the document, including password changing and access permission.
If the owner's password is set, and the public password is not set, then, when opening a document, the
password is not requested.
9.2.4.1.3.2 Key Length
The PDF Reference defines both 40-bit and 128-bit encryption. By default 40-bit key is used.
128-bit key is more secure the 40-bit key. But is some countries the key length of encryption is limited.
Quote from PDF Reference
"A PDF document can be encrypted to protect its contents from unauthorized access. The encryption of data
in a PDF file is based on the use of an encryption key computed by the security handler. Different security
handlers can compute the key in a variety of ways, more or less cryptographically secure. In particular, PDF’s
standard encryption handler limits the key to 5 bytes (40 bits) in length, in accordance with U.S. cryptographic
export requirements in effect at the time of initial publication of the PDF 1.3 specification."
9.2.4.1.4 Compatibility of Different Versions
The information below shows the compatibility of Adobe Acrobat versions.
Adobe Acrobat 5:
the PageScaling option from the file is ignored. By default the option in parameters of Adobe Acrobat
is set to "None" but "Fit to printable area" value is used.
Adobe Acrobat 5 & 6:
when editing Adobe Acrobat does not recognize the Unicode - only Latin characters are output (Latin-
1 encoding), other characters are output as dots;
if the "UseUnicode" option in export parameters is enabled, then it is necessary to embed fonts (the
"Embedded Fonts" option), otherwise the will be output incorrectly.
Adobe Acrobat 7:
it is necessary to embed fonts to the PDF file. Otherwise, when editing, any font will be replaced on the
default font (usually on Tahoma).
Adobe Acrobat 7 Reader:
there are some problems with 7.0.5 - 7.0.9 versions. In these versions the field is not included into the
editing mode, if there are non Latin characters present in the text field (different from Latin-1).
9.2.4.2 XPS
XPS (XML Paper Specification) is the open graphic format of fixed page layout on the base XML (more
precisely XAML-based) used to store printed output as electronic documents. This format was developed by
Microsoft as alternative to the PDF format.The XPS document format consists of structured XML markup that
defines the layout of a document and the visual appearance of each page, along with rendering rules for
distributing, archiving, rendering, processing and printing the documents. The markup language for XPS is a
subset of XAML that allows including vector graphic elements, using XAML to mark up the WPF-primitives.
The XPS is a ZIP-archive that contains the files which make up the document. The archive includes page mark
up (one file per each page of a document), text, embedded fonts, raster images, 2D vector graphics and
other information.
Export options in XPS

Report Viewer 127
© 2015 Stimulsoft
The checkbox All enables processing of all report pages.
The checkbox Current Page enables processing only the current (selected) report page.
The checkbox Pages has the field. This field specifies the number of pages to be processed. You can
specify a single page, several pages (using a comma as the separator) and also specify a range by defining
the start page and end page range separated with "-". For example, 1,3,5-12.
The Image Resolution is used to change DPI (image property PPI (Pixels Per Inch)). The greater thenumber of pixels per inch is, the greater is the quality of the image. It should be noted that the value ofthis parameter affects the size of the finished file. The higher the value is, the greater is the size of thefinished file.
The Image Quality allows changing the image quality. Keep in mind that if you change this option thesize of the finished file will increase. The higher the quality is, the larger is the size of the finished file.
The flag Export Rich Text as Image as Image enables/disables the conversion of the RTF text into theimage. If the option is disabled, the Rich Text is decomposed into simpler primitives supported by thePDF format. The Rich Text with complex formatting (embedded images, tables) cannot always beconverted correctly. In this case it is recommended to enable this option.
Notice: When you enable this option, the file size may increase significantly.
The flag Open After Export enables/disables the automatic opening of the created document (aftercompletion of exports), the default program for these file types.
9.2.4.3 Microsoft Power Point 2007/2010
Microsoft PowerPoint is a presentation program developed by Microsoft. It is a part of the Microsoft Office
suite. PowerPoint presentations consist of a number of individual pages or "slides". Slides may contain text,
graphics, movies, and other objects, which may be arranged on the slide. The presentation can be printed,
displayed on a PC, or navigated through at the command of the presenter. In Stimulsoft Reports each report
page corresponds to one slide.
Export options in Microsoft Power Point

128
© 2015 Stimulsoft
The checkbox All enables processing of all report pages.
The checkbox Current Page enables processing only the current (selected) report page.
The checkbox Pages has the field. This field specifies the number of pages to be processed. You can
specify a single page, several pages (using a comma as the separator) and also specify a range by defining
the start page and end page range separated with "-". For example, 1,3,5-12.
The Image Resolution is used to change DPI (image property PPI (Pixels Per Inch)). The greater thenumber of pixels per inch is, the greater is the quality of the image. It should be noted that the value ofthis parameter affects the size of the finished file. The higher the value is, the greater is the size of thefinished file.
The Image Quality allows changing the image quality. Keep in mind that if you change this option thesize of the finished file will increase. The higher the quality is, the larger is the size of the finished file.
The flag Export Rich Text as Image as Image enables/disables the conversion of the RTF text into theimage. If the option is disabled, the Rich Text is decomposed into simpler primitives supported by thePDF format. The Rich Text with complex formatting (embedded images, tables) cannot always beconverted correctly. In this case it is recommended to enable this option.
Notice: When you enable this option, the file size may increase significantly.
The flag Open After Export enables/disables the automatic opening of the created document (aftercompletion of exports), the default program for these file types.
9.2.5 Wеb Documents
There are two formats HTML (HyperText Markup Language), HTML5 and MHTML (MIME HTML) are
described in this chapter. The first and second formats are used for web page layout. The second format is a
web page archive format used to bind resources together with the HTML code into a single file.
Export options in Web

Report Viewer 129
© 2015 Stimulsoft
The checkbox All enables processing of all report pages.
The checkbox Current Page enables processing only the current (selected) report page.
The checkbox Pages has the field. This field specifies the number of pages to be processed. You can
specify a single page, several pages (using a comma as the separator) and also specify a range by defining
the start page and end page range separated with "-". For example, 1,3,5-12.
The option Type provides the ability to determine a type of the file the report will be converted into.
Notice. If Html5 is selected the following additional options are available:
Continuous Page, which provides the ability to set the location of pages in the report as a verticalstrip;
The Image Resolution is used to change DPI (image property PPI (Pixels Per Inch)). The greater thenumber of pixels per inch is, the greater is the quality of the image. It should be noted that thevalue of this parameter affects the size of the finished file. The higher the value is, the greater isthe size of the finished file;
The Image Quality allows changing the image quality. Keep in mind that if you change this optionthe size of the finished file will increase. The higher the quality is, the larger is the size of thefinished file.
With the Image Format it is possible to specify the format of images, which will be transformed intothe image of the report.
The option Scale provides the ability to determine the size (scale) of report pages and items of thereport after the export.
The option Export Mode provides the ability to determine the markup for the HTML page. The pagelayout is possible using tags div, span or table.
The flag Compress to Archive provides the ability, when exporting to HTML, to get the zip file afterconversion. If this flag is on, the report processing occurs first, and then all the files and folders will bepacked in a zip archive.
The flag Embedded Image Data provides the ability to embed images directly into the HTML file. In

130
© 2015 Stimulsoft
this case, it is necessary to consider that the correct displaying of this file depends on the browserbeing used. Not all browsers support the option to view the HTML file with embedded pictures.
The flag Add Page Breaks enables/disables the visual separator of report pages. If, for example, afew pages of the report are exported to a HTML page, it is not always possible to identify the beginningof the report page. To do this, you should select this option, then it will be, the beginning of the reportpage will be indicated by the appropriate delimiter.
The flag Open After Export enables/disables the automatic opening of the created document (aftercompletion of exports), the default program for these file types.
9.2.5.1 HTML
HTML (HyperText Markup Language) is the predominant markup language for Web pages. The majority of
web pages are created using the HTML language. The HTML language is interpreted by browser and shown
as a document. HTML is a tag language of the document layout. It provides a means to describe the
structure of text-based information in a document by denoting certain text as links, headings, paragraphs,
lists, etc. Elements are the basic structure for HTML markup. Elements have two basic properties: attributes
and content. Each attribute and each element's content has certain restrictions that must be followed for a
HTML document to be considered valid. An element usually has a start tag (e.g. <element-name>) and an
end tag (e.g. </element-name>).
9.2.5.1.1 Export Modes
There are three mode of export to HTML:
Div - in this mode all objects of a report are converted to the div block element; the report is
converted precisely, except for vertical text alignment;
Span is the same as the Div mode but the span element is used;
Table - in this mode all objects of a report are converted to the table block element; in this mode the
vertical text alignment is correct but, if the WordWrap is disabled then the problem may occur with long
lines of text.
9.2.5.1.2 Exporting Images in HTML Format
Also it is possible to specify how to export images of a document. Images with transparency can be saved to
the PNG format. It is important to remember that some browsers (for example Internet Explorer 6) do not
support images with transparency.
9.2.5.1.3 Compatibility of Different Versions
The following minimal web-browsers versions are required for correct HTML export:
Internet Explorer 6.0 and higher;
FireFox 1.5 and higher;
Opera 7.5 and higher.
9.2.5.1.4 Exporting Text Components
When exporting reports to the HTML format, it is necessary to take the following features of this format into
consideration:
if a text does not fit a table cell horizontally, then a browser automatically carries a text to the next
page;
if a text does not fit a table cell vertically, then a browser automatically increases height of a table cell.
Such a behavior of a text can be obtained in the Net and WPF viewers (Win-viewers) by setting WordWrap
and CanGrow properties of a text component to true. In the HTML format (and in the Web viewer

Report Viewer 131
© 2015 Stimulsoft
correspondingly), no matter what is the value of these two properties, the text component will be shown the
same way. For example, put 2 text components on a report template. Insert long text to the first component
and a short one to the second. Set WordWrap and CanGrow properties to false. The picture below shows a
report template:
After rendering a report in the Win-viewer, a report will look like on a picture below:
As seen on the picture, a text in the first text component did not fit and was cut, in the second text
component the text fits a text component and shown without changes. Now set the WordWrap property to
true for both components. After rendering, a report will look in the Win viewer like on the picture below:
As seen on the picture, a text in the first text component is wrapped to the second row. But the component is
not grown by height, so the text does not fit this component and was cut. In the second component the text
fit this component and shown without changes. In both ways the text in the HTML format in the Web will look
the following way:
If to set the Can Grow properties of these texts components to true, then the report will look the same in
the Win viewer and Web viewer:
9.2.5.2 HTML5
HTML5 is a language for structuring and presenting content for the World Wide Web, and is a core
technology of the Internet originally proposed by Opera Software.[1] It is the fifth revision of the HTML
standard (created in 1990 and standardized as HTML4 as of 1997)[2] and as of December 2011 is still under
development. Its core aims have been to improve the language with support for the latest multimedia while
132
© 2015 Stimulsoft
keeping it easily readable by humans and consistently understood by computers and devices (web browsers,
parsers, etc.). HTML5 is intended to subsume not only HTML 4, but XHTML 1 and DOM Level 2 HTML as well.
9.2.5.3 MHT
MHTML (MIME HTML) is a web page archive format used to bind resources which are typically represented
by external links (such as images, Flash animations, Java applets, audio files) together with HTML code into a
single file. This file is a web archive and has the «.mht» extension. The content of a file is written as an Email
message using the MIME standard: in the beginning of a file the HTML file is written. Then all resources in the
base64 encoding with headers are written. Internet Explorer, Opera, Microsoft Word can work with the
MHTML format.
9.2.6 Text Formats
This chapter describes exports formats of text files. In other words the files which are used to create text
documents.
9.2.6.1 TXT
Text file (TXT) is a kind of computer file that is structured as a sequence of lines. A text file exists within a
computer file system. The end of a text file is often denoted by placing one or more special characters,
known as an end-of-file marker, after the last line in a text file.
Text files are commonly used for storage of information.
Export options in TXT:
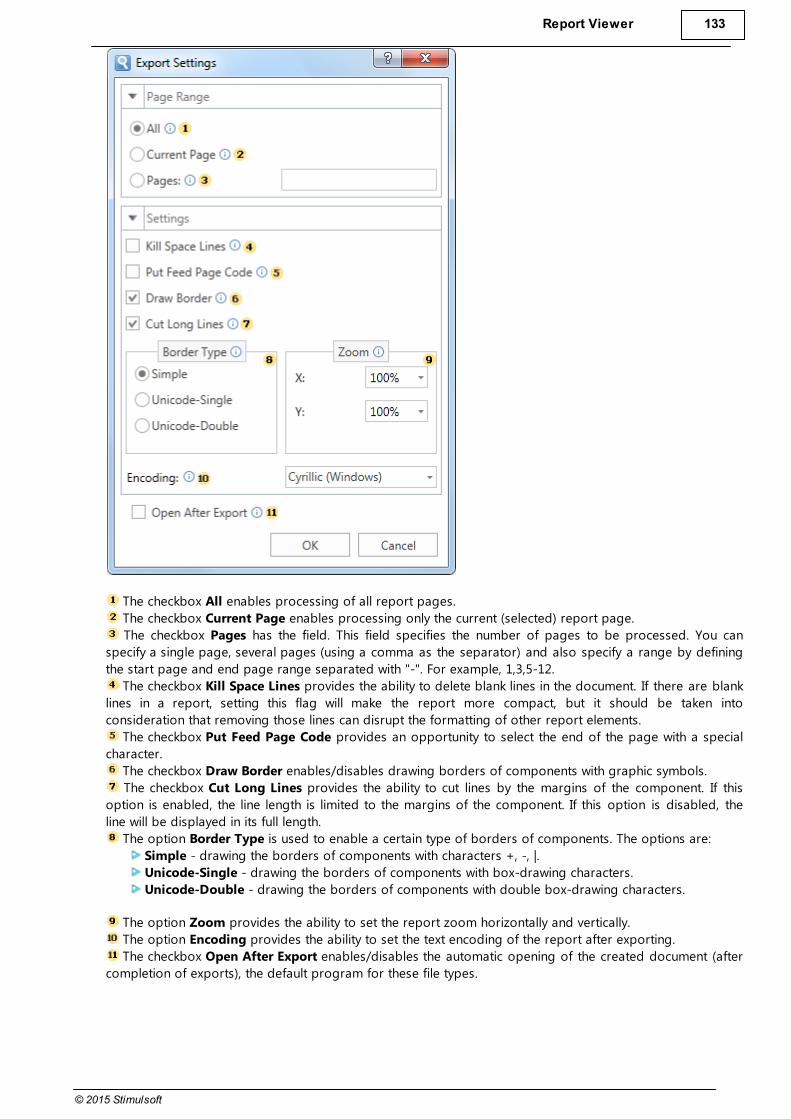
Report Viewer 133
© 2015 Stimulsoft
The checkbox All enables processing of all report pages.
The checkbox Current Page enables processing only the current (selected) report page.
The checkbox Pages has the field. This field specifies the number of pages to be processed. You can
specify a single page, several pages (using a comma as the separator) and also specify a range by defining
the start page and end page range separated with "-". For example, 1,3,5-12.
The checkbox Kill Space Lines provides the ability to delete blank lines in the document. If there are blank
lines in a report, setting this flag will make the report more compact, but it should be taken into
consideration that removing those lines can disrupt the formatting of other report elements.
The checkbox Put Feed Page Code provides an opportunity to select the end of the page with a special
character.
The checkbox Draw Border enables/disables drawing borders of components with graphic symbols.
The checkbox Cut Long Lines provides the ability to cut lines by the margins of the component. If this
option is enabled, the line length is limited to the margins of the component. If this option is disabled, the
line will be displayed in its full length.
The option Border Type is used to enable a certain type of borders of components. The options are:
Simple - drawing the borders of components with characters +, -, |.
Unicode-Single - drawing the borders of components with box-drawing characters.
Unicode-Double - drawing the borders of components with double box-drawing characters.
The option Zoom provides the ability to set the report zoom horizontally and vertically.
The option Encoding provides the ability to set the text encoding of the report after exporting.
The checkbox Open After Export enables/disables the automatic opening of the created document (after
completion of exports), the default program for these file types.
134
© 2015 Stimulsoft
9.2.6.1.1 Border Types
The border in the text mode can be drawn using simple symbols or using pseudographics. Using the
BorderType property it is possible to choose the mode of border drawing. It may have the following modes:
Simple - drawing a border using simple symbols such as "+", "-", and "|";
UnicodeSingle - drawing a border using the symbols of pseudographics; symbols of solid border are
used;
UnicodeDouble - drawing a border using the symbols of pseudographics; symbols of double border
are used.
9.2.6.1.2 Column Width
When exporting to the text format, all coordinates and sizes of objects are recalculated to get the text
appearance the same as it is in a report. You can control the conversion, by changing the zoom coefficients
of ZoomX and ZoomY. The width of the columns of the output text is proportional to the width of the initial
report. If you want to change the column width, it is possible to use the following methods:
change the width of a column: it is necessary to specify the column width in characters in the Tag text
box, the width will be set only for those lines which contain this text box;
column width can be set globally via the ColumnWidths static property; in this case, the width of the
columns is indicated starting from the left column, through the separator (a semicolon), for example, "10,
12, 45, 10, 10, 5, 20, 50 "; zero width of columns is ignored.
9.2.6.1.3 New Export Mode
The old/new export mode is set using the UseOldExportMode property. The new mode is created on the
base of the StiMatrix: if the Word Wrap is enabled and a text cannot be placed in a cell then the cell height is
increased automatically. By default the new mode is enabled.
9.2.6.2 RTF
Rich Text Format (RTF) is a free document file format developed by Microsoft for cross-platform document
interchange. The first version of the RTF standard appeared in 1987. Since that time format specification was
changed and added. RTF-documents are supported by many text editors.
Export options in RTF:
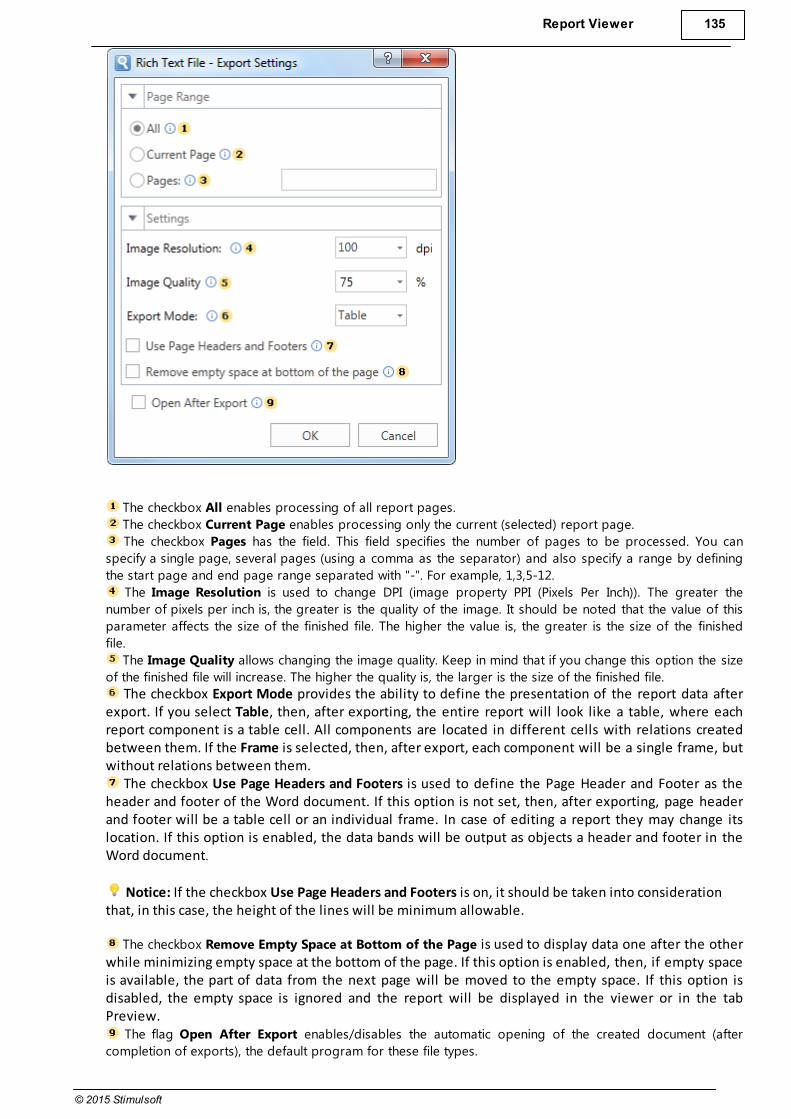
Report Viewer 135
© 2015 Stimulsoft
The checkbox All enables processing of all report pages.
The checkbox Current Page enables processing only the current (selected) report page.
The checkbox Pages has the field. This field specifies the number of pages to be processed. You can
specify a single page, several pages (using a comma as the separator) and also specify a range by defining
the start page and end page range separated with "-". For example, 1,3,5-12.
The Image Resolution is used to change DPI (image property PPI (Pixels Per Inch)). The greater the
number of pixels per inch is, the greater is the quality of the image. It should be noted that the value of this
parameter affects the size of the finished file. The higher the value is, the greater is the size of the finished
file.
The Image Quality allows changing the image quality. Keep in mind that if you change this option the size
of the finished file will increase. The higher the quality is, the larger is the size of the finished file.
The checkbox Export Mode provides the ability to define the presentation of the report data afterexport. If you select Table, then, after exporting, the entire report will look like a table, where eachreport component is a table cell. All components are located in different cells with relations createdbetween them. If the Frame is selected, then, after export, each component will be a single frame, butwithout relations between them.
The checkbox Use Page Headers and Footers is used to define the Page Header and Footer as theheader and footer of the Word document. If this option is not set, then, after exporting, page headerand footer will be a table cell or an individual frame. In case of editing a report they may change itslocation. If this option is enabled, the data bands will be output as objects a header and footer in theWord document.
Notice: If the checkbox Use Page Headers and Footers is on, it should be taken into considerationthat, in this case, the height of the lines will be minimum allowable.
The checkbox Remove Empty Space at Bottom of the Page is used to display data one after the otherwhile minimizing empty space at the bottom of the page. If this option is enabled, then, if empty spaceis available, the part of data from the next page will be moved to the empty space. If this option isdisabled, the empty space is ignored and the report will be displayed in the viewer or in the tabPreview.
The flag Open After Export enables/disables the automatic opening of the created document (after
completion of exports), the default program for these file types.
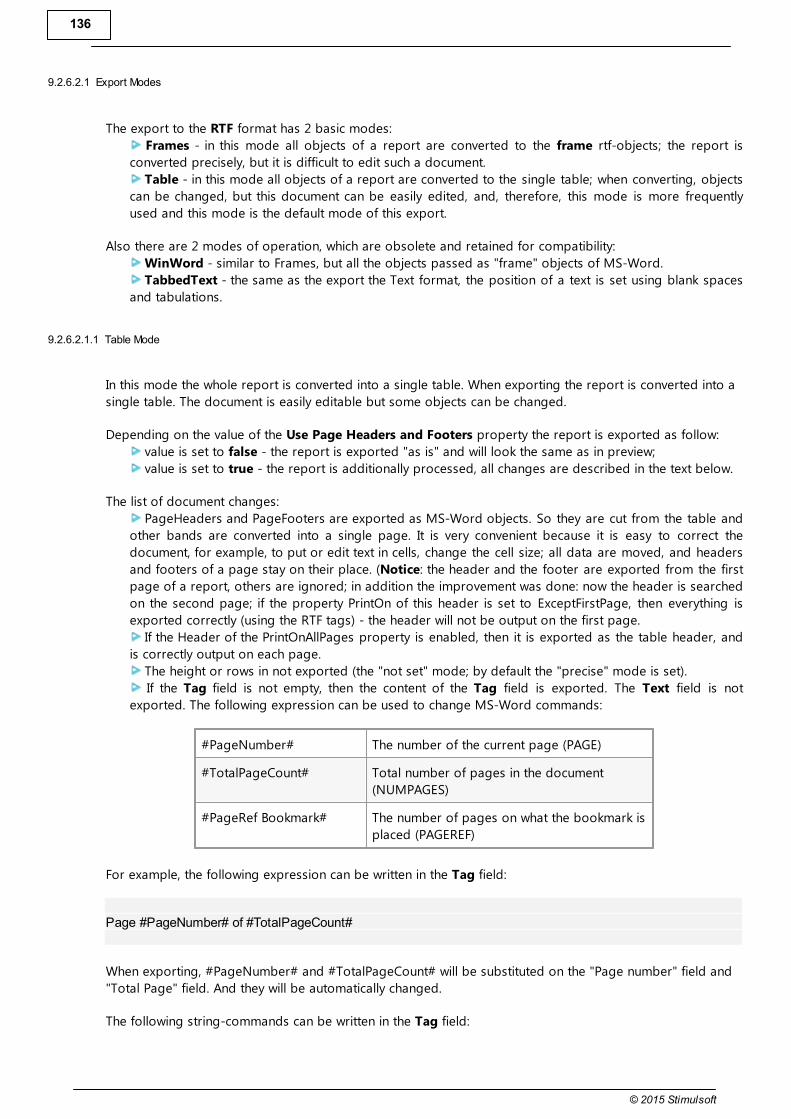
136
© 2015 Stimulsoft
9.2.6.2.1 Export Modes
The export to the RTF format has 2 basic modes:
Frames - in this mode all objects of a report are converted to the frame rtf-objects; the report is
converted precisely, but it is difficult to edit such a document.
Table - in this mode all objects of a report are converted to the single table; when converting, objects
can be changed, but this document can be easily edited, and, therefore, this mode is more frequently
used and this mode is the default mode of this export.
Also there are 2 modes of operation, which are obsolete and retained for compatibility:
WinWord - similar to Frames, but all the objects passed as "frame" objects of MS-Word.
TabbedText - the same as the export the Text format, the position of a text is set using blank spaces
and tabulations.
9.2.6.2.1.1 Table Mode
In this mode the whole report is converted into a single table. When exporting the report is converted into a
single table. The document is easily editable but some objects can be changed.
Depending on the value of the Use Page Headers and Footers property the report is exported as follow:
value is set to false - the report is exported "as is" and will look the same as in preview;
value is set to true - the report is additionally processed, all changes are described in the text below.
The list of document changes:
PageHeaders and PageFooters are exported as MS-Word objects. So they are cut from the table and
other bands are converted into a single page. It is very convenient because it is easy to correct the
document, for example, to put or edit text in cells, change the cell size; all data are moved, and headers
and footers of a page stay on their place. (Notice: the header and the footer are exported from the first
page of a report, others are ignored; in addition the improvement was done: now the header is searched
on the second page; if the property PrintOn of this header is set to ExceptFirstPage, then everything is
exported correctly (using the RTF tags) - the header will not be output on the first page.
If the Header of the PrintOnAllPages property is enabled, then it is exported as the table header, and
is correctly output on each page.
The height or rows in not exported (the "not set" mode; by default the "precise" mode is set).
If the Tag field is not empty, then the content of the Tag field is exported. The Text field is not
exported. The following expression can be used to change MS-Word commands:
#PageNumber# The number of the current page (PAGE)
#TotalPageCount# Total number of pages in the document
(NUMPAGES)
#PageRef Bookmark# The number of pages on what the bookmark is
placed (PAGEREF)
For example, the following expression can be written in the Tag field:
Page #PageNumber# of #TotalPageCount#
When exporting, #PageNumber# and #TotalPageCount# will be substituted on the "Page number" field and
"Total Page" field. And they will be automatically changed.
The following string-commands can be written in the Tag field:
Report Viewer 137
© 2015 Stimulsoft
rtfparagraphThe TextBox, RichTextBox and Image content is
output as simple text, in the table break;
rtfnewpage The page break is put before the text box
Also it is possible to export a separate sheets of a template to separate sections of the document with the
headers/footers. To do this, use the ExcelSheet property. in this case all pages of a report with the same
value of the ExcelSheet property are combined in groups, then each group is exported as a separate section
of the document with its headers/footers. By default, this property is not filled, and the report is exported as
a single partition.
9.2.6.2.2 Issues
MS-Word: if to set top and bottom margin of one of cells in the table row, the same margin will be set in all
cells of the row. Therefore, if to set the top and bottom margins of the text box, then, after exporting, the
same margin will be set for the row of the table and the text will be moved. In OpenOffice this works without
problems.
9.2.6.2.3 Compatibility of Different Versions
The RTF format is based on the RTF specification version 1.4 from 9/1995. The RTF files can be opened in
Microsoft Word starting with the 97 (Office 97) version. In Microsoft Word 95 the RTF will have the following
limitation:
does not support vertical alignment in cells;
does not some parameters of a page;
some colors and not shown correctly.
9.2.6.3 Word 2007/2010
Microsoft Word is a text processing software produces by Microsoft. It is a component of the Microsoft
Office system. The first version was released for IBM PC's running DOS in 1983. Later there was a release for
Apple Macintosh (1984), SCO UNIX, and Microsoft Windows (1989). Microsoft Word is the most popular text
processors. Starting with first versions MS Word could write files in binary code with the «.doc» extension.
The Word specification was secret and only in 2008 was published. The latest version of Word 2007/2010
"uses by default" the XML based format: Microsoft Office Open XML. For a new format the «.docx» file
extension is used. This format is a zip-archive that contains a text as XML, graphics, and other data. When
exporting, a report is converted into one table. Such a document is easy to edit.
Export options in Word
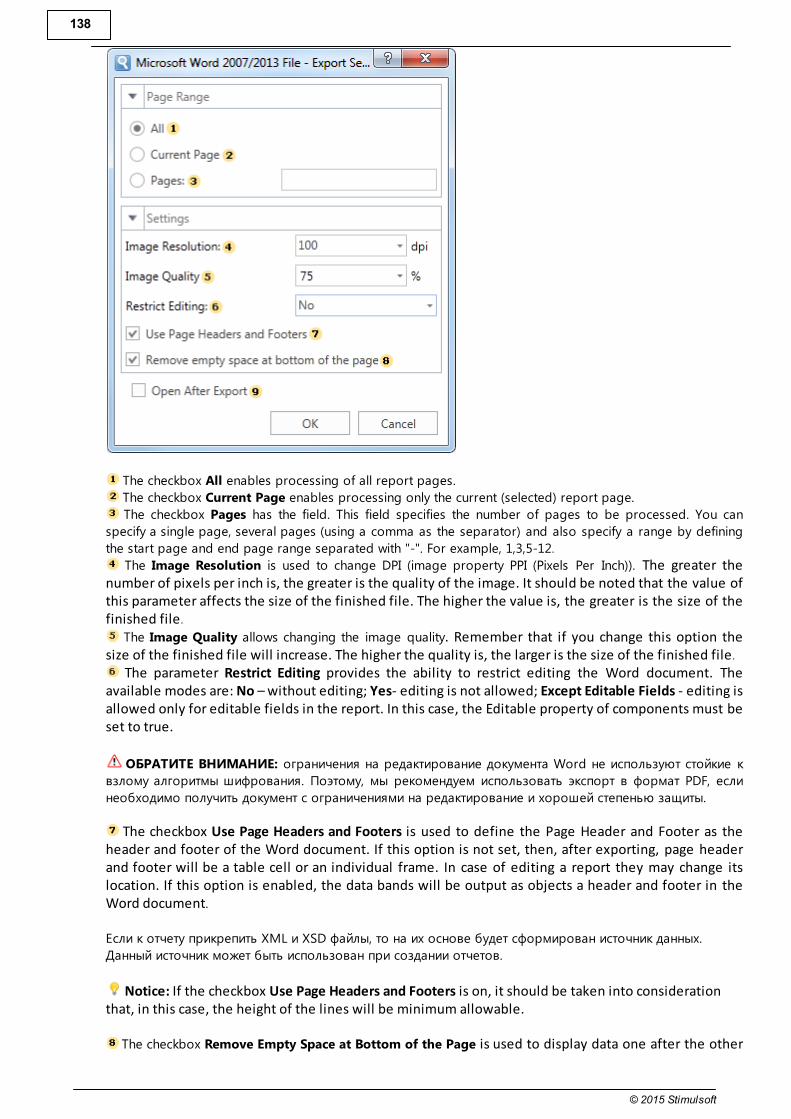
138
© 2015 Stimulsoft
The checkbox All enables processing of all report pages.
The checkbox Current Page enables processing only the current (selected) report page.
The checkbox Pages has the field. This field specifies the number of pages to be processed. You can
specify a single page, several pages (using a comma as the separator) and also specify a range by defining
the start page and end page range separated with "-". For example, 1,3,5-12.
The Image Resolution is used to change DPI (image property PPI (Pixels Per Inch)). The greater thenumber of pixels per inch is, the greater is the quality of the image. It should be noted that the value ofthis parameter affects the size of the finished file. The higher the value is, the greater is the size of thefinished file.
The Image Quality allows changing the image quality. Remember that if you change this option thesize of the finished file will increase. The higher the quality is, the larger is the size of the finished file.
The parameter Restrict Editing provides the ability to restrict editing the Word document. Theavailable modes are: No – without editing; Yes- editing is not allowed; Except Editable Fields - editing isallowed only for editable fields in the report. In this case, the Editable property of components must beset to true.
ОБРАТИТЕ ВНИМАНИЕ: ограничения на редактирование документа Word не используют стойкие к
взлому алгоритмы шифрования. Поэтому, мы рекомендуем использовать экспорт в формат PDF, если
необходимо получить документ с ограничениями на редактирование и хорошей степенью защиты.
The checkbox Use Page Headers and Footers is used to define the Page Header and Footer as theheader and footer of the Word document. If this option is not set, then, after exporting, page headerand footer will be a table cell or an individual frame. In case of editing a report they may change itslocation. If this option is enabled, the data bands will be output as objects a header and footer in theWord document.
Если к отчету прикрепить XML и XSD файлы, то на их основе будет сформирован источник данных.
Данный источник может быть использован при создании отчетов.
Notice: If the checkbox Use Page Headers and Footers is on, it should be taken into considerationthat, in this case, the height of the lines will be minimum allowable.
The checkbox Remove Empty Space at Bottom of the Page is used to display data one after the other
Report Viewer 139
© 2015 Stimulsoft
while minimizing empty space at the bottom of the page. If this option is enabled, then, if empty spaceis available, the part of data from the next page will be moved to the empty space. If this option isdisabled, the empty space is ignored and the report will be displayed in the viewer or in the tabPreview.
The flag Open After Export enables/disables the automatic opening of the created document (aftercompletion of exports), the default program for these file types.
9.2.6.3.1 Headers and Footers
Depending on the value of the Use Page Headers and Footers property a report is exported in the following
way:
the value is false - a report is exported "as is" and looks as in preview;
the value is true - a report is additionally processed. All changes are described below.
The list of changes of the document:
PageHeaders and PageFooters are exported as MS-Word objects. So they are cut from a table and all
other bands are exported as one table. It is very convenient, if it is necessary to elaborate the document
(add rows or edit a text in cells, change cell size); in this case all data are moved but headers and footers
stay on their place. (Notice: a header and a footer of the first page are taken, others are ignored).
Row height is not exported (the "not set" mode; by default - the "precise" mode).
9.2.6.3.1.1 Page Numbering
If the Tag is not empty then the content of the Tag property is exported. The Text field is not exported. Also
the string may contain the following expressions, which are changed on MS-Word commands:
#PageNumber# The number of the current page (PAGE)
#TotalPageCount# Total number of pages in a document (NUMPAGES)
For example, in the Tag property the following expression can be written:
Page #PageNumber# of #TotalPageCount#
When exporting #PageNumber# and #TotalPageCount# will be replaced on "PageNumber" field and
"TotalPageCount" field and will be automatically changed together with text.
9.2.6.4 ODT
Open Document Text (ODT) is the open document for storing documents of the OpenOffice Writer, which is
included into the OpenOffice.org package. OpenOffice.org is the open package of office applications created
as alternative to Microsoft Office. OpenOffice.org was one of the first what supported the new open
OpenDocument. Works on Microsoft Windows and UNIX systems: GNU/Linux, Mac OS X, FreeBSD, Solaris,
Irix. OpenDocument Format (ODF) is the open file format for storing office documents, including text
documents, spreadsheets, images, data bases, presentations. This format is based on the XML format.
OpenOffice Writer is the text processor and visual HTML editor, included into the OpenOffice. It is open
software (LGPL license). Writer is similar to Microsoft Word and has approximately the same functionality.
Writer allows saving documents in different formats including Microsoft Word, RTF, XHTML, and OASIS Open
Document Format. Starting with the OpenOffice version 2.0, the OpenDocument Format is the default format
for saving documents. File have the «.odt» extension. When exporting the report is converted into a single
table. The document is easily editable but some objects can be changed.
Export options in ODT
140
© 2015 Stimulsoft
The checkbox All enables processing of all report pages.
The checkbox Current Page enables processing only the current (selected) report page.
The checkbox Pages has the field. This field specifies the number of pages to be processed. You can
specify a single page, several pages (using a comma as the separator) and also specify a range by defining
the start page and end page range separated with "-". For example, 1,3,5-12.
The Image Resolution is used to change DPI (image property PPI (Pixels Per Inch)). The greater thenumber of pixels per inch is, the greater is the quality of the image. It should be noted that the value ofthis parameter affects the size of the finished file. The higher the value is, the greater is the size of thefinished file.
The Image Quality allows changing the image quality. Keep in mind that if you change this option thesize of the finished file will increase. The higher the quality is, the larger is the size of the finished file.
The checkbox Use Page Headers and Footers is used to define the Page Header and Footer as theheader and footer of the Word document. If this option is not set, then, after exporting, page headerand footer will be a table cell or an individual frame. In case of editing a report they may change itslocation. If this option is enabled, the data bands will be output as objects a header and footer in theWord document.
Notice: If the checkbox Use Page Headers and Footers is on, it should be taken into considerationthat, in this case, the height of the lines will be minimum allowable.
The checkbox Remove Empty Space at Bottom of the Page is used to display data one after the otherwhile minimizing empty space at the bottom of the page. If this option is enabled, then, if empty spaceis available, the part of data from the next page will be moved to the empty space. If this option isdisabled, the empty space is ignored and the report will be displayed in the viewer or in the tabPreview.
The flag Open After Export enables/disables the automatic opening of the created document (aftercompletion of exports), the default program for these file types.
9.2.7 Spreadsheets
This group of exports create spreadsheets. They are exports to both different formats of Microsoft Excel and
to OpenOffice Calc.
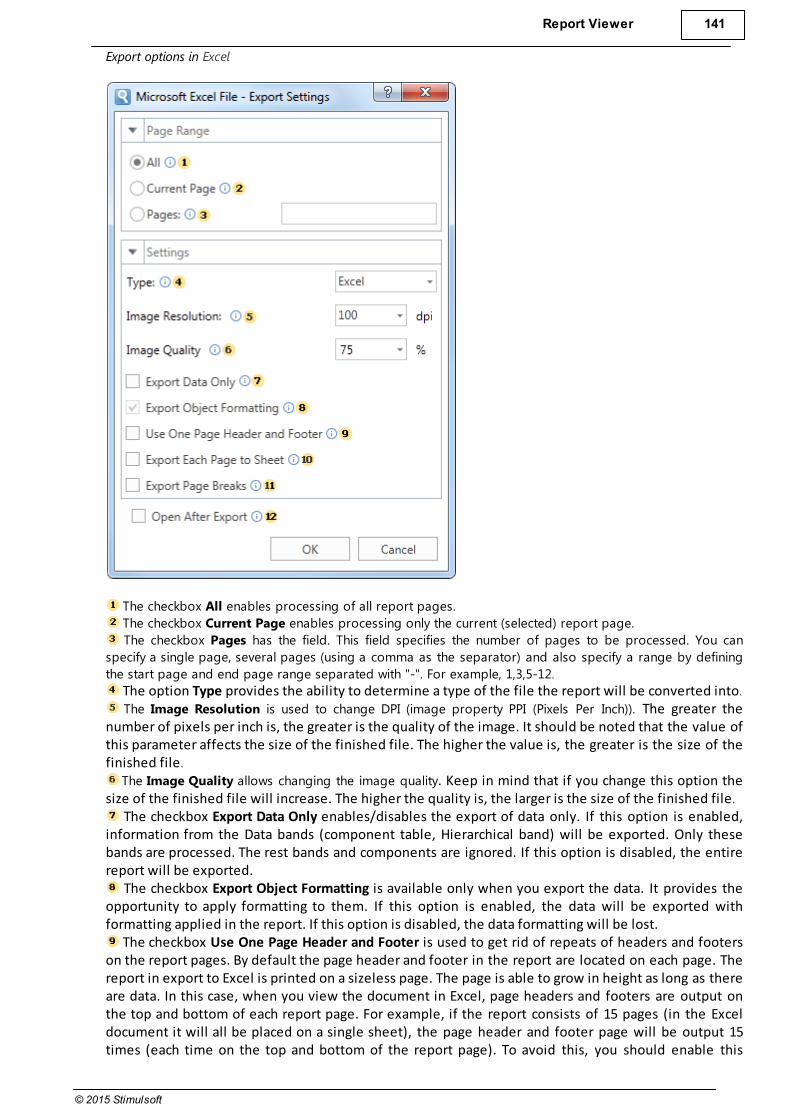
Report Viewer 141
© 2015 Stimulsoft
Export options in Excel
The checkbox All enables processing of all report pages.
The checkbox Current Page enables processing only the current (selected) report page.
The checkbox Pages has the field. This field specifies the number of pages to be processed. You can
specify a single page, several pages (using a comma as the separator) and also specify a range by defining
the start page and end page range separated with "-". For example, 1,3,5-12.
The option Type provides the ability to determine a type of the file the report will be converted into.
The Image Resolution is used to change DPI (image property PPI (Pixels Per Inch)). The greater thenumber of pixels per inch is, the greater is the quality of the image. It should be noted that the value ofthis parameter affects the size of the finished file. The higher the value is, the greater is the size of thefinished file.
The Image Quality allows changing the image quality. Keep in mind that if you change this option thesize of the finished file will increase. The higher the quality is, the larger is the size of the finished file.
The checkbox Export Data Only enables/disables the export of data only. If this option is enabled,information from the Data bands (component table, Hierarchical band) will be exported. Only thesebands are processed. The rest bands and components are ignored. If this option is disabled, the entirereport will be exported.
The checkbox Export Object Formatting is available only when you export the data. It provides theopportunity to apply formatting to them. If this option is enabled, the data will be exported withformatting applied in the report. If this option is disabled, the data formatting will be lost.
The checkbox Use One Page Header and Footer is used to get rid of repeats of headers and footerson the report pages. By default the page header and footer in the report are located on each page. Thereport in export to Excel is printed on a sizeless page. The page is able to grow in height as long as thereare data. In this case, when you view the document in Excel, page headers and footers are output onthe top and bottom of each report page. For example, if the report consists of 15 pages (in the Exceldocument it will all be placed on a single sheet), the page header and footer page will be output 15times (each time on the top and bottom of the report page). To avoid this, you should enable this
142
© 2015 Stimulsoft
option, and then the page header will be displayed only on the top of the Excel sheet, and the pagefooter - in the end.
Notice: Enabling this option may have residual effects. For example, if the page header or footer hasborders, then, when this option is enabled, these borders may be shown. It is recommended, beforerendering the report, to enable the parameter of the report page, Unlimited Height. In this case, thereport will be rendered on a sizeless single page. The page header and footer will be printed only onceon the Excel sheet.
The checkbox Export Each Page to Sheet is used to export each report page on a separate Excel sheet.If this option is enabled, then each report page will be located on a separate sheet in Excel. If thisoption is disabled, the entire report will be printed on a single sheet of Excel.
The checkbox Export Page Breaks is used to display the borders of the report pages on the Excelsheet. In other words, if the report contains 10 pages, all of them are placed on one sheet after export.Enable this option to define the borders of pages. If this option is disabled, all report pages will beprinted, and, if no other delimiters present, will be output in one sizeless page.
The flag Open After Export enables/disables the automatic opening of the created document (aftercompletion of exports), the default program for these file types.
9.2.7.1 Excel
Microsoft Excel is a spreadsheet application written and distributed by Microsoft for Microsoft Windows. It
allows using calculation, graphing tools, pivot tables and a macro programming language called VBA. So, it is
the most popular table processor available for these platforms since version 5 in 1993.
Microsoft Excel up until Excel 2007 version used a proprietary binary file format called Binary Interchange File
Format (BIFF) and .xls file extension. Specification was closed but since 2008 it was published. Besides, most
of Microsoft Excel can read CSV, DBF, SYLK, DIF, and other formats.
9.2.7.1.1 Excel Sheets
By default a report is exported as one table to one sheet of Excel. Maximal number of rows on a sheet is
unlimited. It depends on the Excel version and is set using the MaximumSheetHeight static property (by
default 65534, for Excel XP and Excel 2003). If the number of rows is more than default then odd rows will be
carried on the next sheet.
Also it is possible to export each page of a report on a single sheet of Excel. To do this it is possible to set
the ExportEachPageToSheet property to true.
Besides the forced Excel sheets creation they can be created using the ExcelSheet page property to what any
value can be assigned. If some sheets has the same ExcelSheet value then they are joined and exported as
one sheet. In this case the name of a sheet is a name of a value.
9.2.7.1.2 Compatibility of Different Versions
The XLS format is based on the BIFF8 specification. Full support of this format is realized starting with the
Excel 9.0 (Excel 2000).
Excel 8.0 (Excel 97):
does not support correct color;
does not fully support the Right to Left mode.
Excel 7.0 (Excel 95) and earlier versions:
does not support vertical alignment in a cell;
does not support integrated cells;
does not support some other parameters.
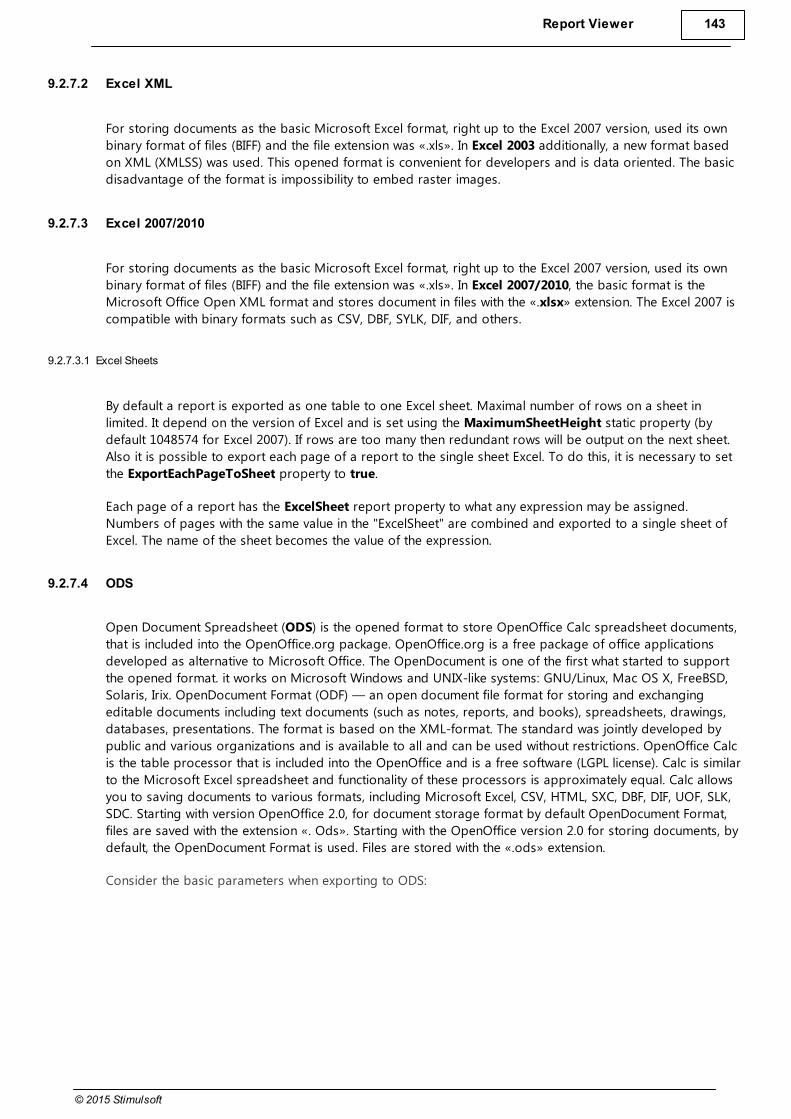
Report Viewer 143
© 2015 Stimulsoft
9.2.7.2 Excel XML
For storing documents as the basic Microsoft Excel format, right up to the Excel 2007 version, used its own
binary format of files (BIFF) and the file extension was «.xls». In Excel 2003 additionally, a new format based
on XML (XMLSS) was used. This opened format is convenient for developers and is data oriented. The basic
disadvantage of the format is impossibility to embed raster images.
9.2.7.3 Excel 2007/2010
For storing documents as the basic Microsoft Excel format, right up to the Excel 2007 version, used its own
binary format of files (BIFF) and the file extension was «.xls». In Excel 2007/2010, the basic format is the
Microsoft Office Open XML format and stores document in files with the «.xlsx» extension. The Excel 2007 is
compatible with binary formats such as CSV, DBF, SYLK, DIF, and others.
9.2.7.3.1 Excel Sheets
By default a report is exported as one table to one Excel sheet. Maximal number of rows on a sheet in
limited. It depend on the version of Excel and is set using the MaximumSheetHeight static property (by
default 1048574 for Excel 2007). If rows are too many then redundant rows will be output on the next sheet.
Also it is possible to export each page of a report to the single sheet Excel. To do this, it is necessary to set
the ExportEachPageToSheet property to true.
Each page of a report has the ExcelSheet report property to what any expression may be assigned.
Numbers of pages with the same value in the "ExcelSheet" are combined and exported to a single sheet of
Excel. The name of the sheet becomes the value of the expression.
9.2.7.4 ODS
Open Document Spreadsheet (ODS) is the opened format to store OpenOffice Calc spreadsheet documents,
that is included into the OpenOffice.org package. OpenOffice.org is a free package of office applications
developed as alternative to Microsoft Office. The OpenDocument is one of the first what started to support
the opened format. it works on Microsoft Windows and UNIX-like systems: GNU/Linux, Mac OS X, FreeBSD,
Solaris, Irix. OpenDocument Format (ODF) — an open document file format for storing and exchanging
editable documents including text documents (such as notes, reports, and books), spreadsheets, drawings,
databases, presentations. The format is based on the XML-format. The standard was jointly developed by
public and various organizations and is available to all and can be used without restrictions. OpenOffice Calc
is the table processor that is included into the OpenOffice and is a free software (LGPL license). Calc is similar
to the Microsoft Excel spreadsheet and functionality of these processors is approximately equal. Calc allows
you to saving documents to various formats, including Microsoft Excel, CSV, HTML, SXC, DBF, DIF, UOF, SLK,
SDC. Starting with version OpenOffice 2.0, for document storage format by default OpenDocument Format,
files are saved with the extension «. Ods». Starting with the OpenOffice version 2.0 for storing documents, by
default, the OpenDocument Format is used. Files are stored with the «.ods» extension.
Consider the basic parameters when exporting to ODS:
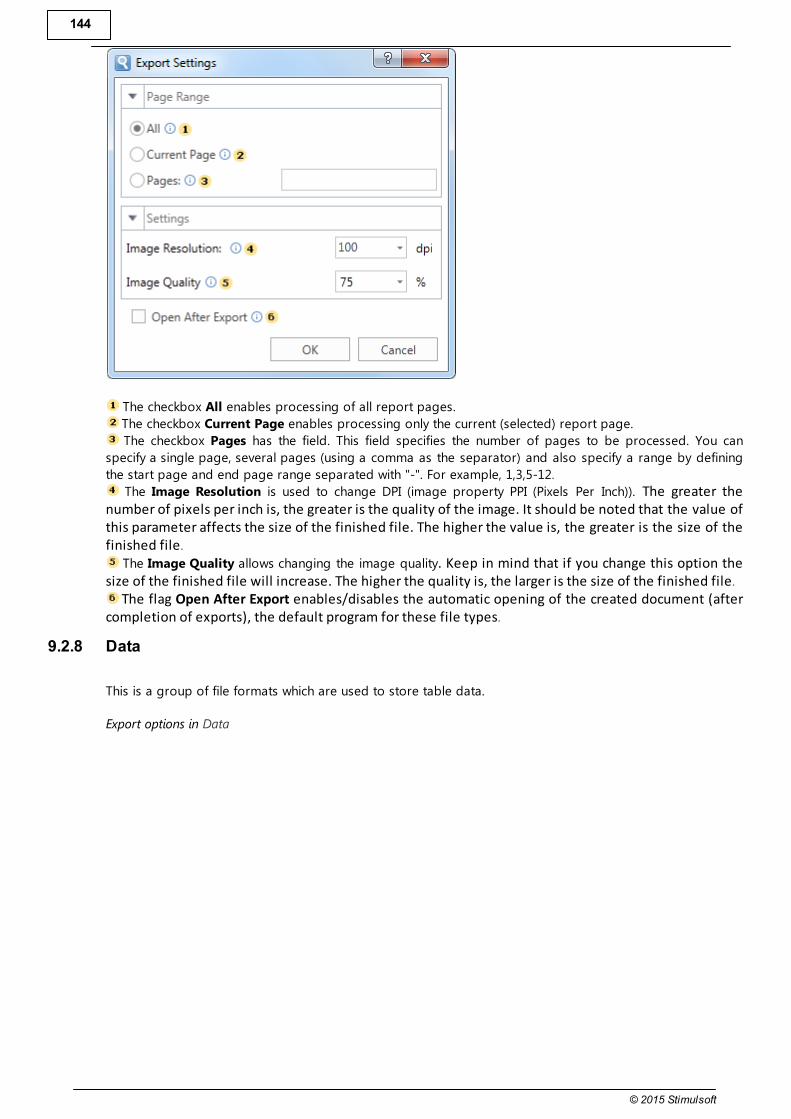
144
© 2015 Stimulsoft
The checkbox All enables processing of all report pages.
The checkbox Current Page enables processing only the current (selected) report page.
The checkbox Pages has the field. This field specifies the number of pages to be processed. You can
specify a single page, several pages (using a comma as the separator) and also specify a range by defining
the start page and end page range separated with "-". For example, 1,3,5-12.
The Image Resolution is used to change DPI (image property PPI (Pixels Per Inch)). The greater thenumber of pixels per inch is, the greater is the quality of the image. It should be noted that the value ofthis parameter affects the size of the finished file. The higher the value is, the greater is the size of thefinished file.
The Image Quality allows changing the image quality. Keep in mind that if you change this option thesize of the finished file will increase. The higher the quality is, the larger is the size of the finished file.
The flag Open After Export enables/disables the automatic opening of the created document (aftercompletion of exports), the default program for these file types.
9.2.8 Data
This is a group of file formats which are used to store table data.
Export options in Data

Report Viewer 145
© 2015 Stimulsoft
The checkbox All enables processing of all report pages.
The checkbox Current Page enables processing only the current (selected) report page.
The checkbox Pages has the field. This field specifies the number of pages to be processed. You can
specify a single page, several pages (using a comma as the separator) and also specify a range by defining
the start page and end page range separated with "-". For example, 1,3,5-12.
The parameter Type provides the ability to determine a type of the file the report will be convertedinto.
Notice: Depending on the file type, parameters, and their number may vary. For example, when youselect a format DIF or Sylk, the following options will be available:
The option Only Data Only enables/disables the mode of exporting data only. If this option isenabled, information will be exported from the Data bands (the component table, Hierarchicalband). Only these bands are processed, the rest are ignored. If this option is disabled, the entirereport will be exported;
The option Use Default System Encoding allows you to use the system encoding by default.Different encoding can be applied depending on the installed system. If this option is disabled, youmust set the encoding by the standard.
The parameter Encoding is used to define file encoding.
The parameter Separator specifies delimiter between the data in the CSV file.
The parameter Bands Filter is used to apply a filtering condition in the export. The following options are
available:
Data Only - in this case only Data bands will be processed (the Table component, Hierarchicalband);
Data and Headers/Footers - Data bands will be processed (the Table component, Hierarchicalband), and their headers/footers, if any;
All Bands - all bands of the report will be processed.
The checkbox Skip Column Headers enables/disables the column headers. If the option is enabled,then column headers will not be displayed. If this option is disabled, then column headers (if present inthe report) will be displayed.
The flag Open After Export enables/disables the automatic opening of the created document (after

146
© 2015 Stimulsoft
completion of exports), the default program for these file types.
9.2.8.1 CSV
CSV (Comma Separated Values) is a text format that is used to represent table data. Each string of the file is
one row of the table. The values of each column are separated by the delimiter that depends on regional
settings. The values that contain reserved characters (such as a comma or a new string) are framed with the
double quotes ( ") symbol; if double quotes are found in the value they are represented as two double
quotes in the file.
Notice: Only those data (components) can be exported to the CSV format which are placed on data
bands. If the SkipColumnHeaders property is set to false then, additionally, column headers are exported as
the first row.
9.2.8.1.1 Controlling Exports
The Tag property of each textbox in a Data band can be specified with the following elements that control
the export:
Export Type : "FieldName"
Column: "FieldName" "DataRow"
Several elements should be separated with the semicolon.
The "Export Type" element indicates for which export the field name is set. The values can be used: “dbf”,
“csv”, “xml”, “default”. The "FieldName" element indicates the field name in the file. The own name can be
specified to each type of export. If the name for each export is not specified then the name for the “default”
type is taken. For example:
DBF : "Describe" ; CSV : "Description" ; default: "Default name"
The "Column" element indicates that additional field is added to exported data. The "FieldName" element
indicated the name of a new field. The "DataRow" element indicates the content of a new field and can be an
expression. For example:
Column: "SortField" "{Products.Categories.CategoryName}"
9.2.8.2 DBF
DBF (DataBase File) is the format to store data and it is used as the standard way to store and pass
information. The DBF file consist of a header section for describing the structure of the data in the file. There
are several variations on the .dbf file structure.
Notice: Only data can be exported to the DBF format, in other words only the components, which are
placed on data bands.
9.2.8.2.1 Controlling Exports
The following elements can be specified in the Tag property to control export:
DataType [ : FieldLength [ : DecimalPartLength ] ]
ExportType : "FieldName"
Column: "FieldName" "DataString"
Several elements should be separated with the semicolon. The “DataType" element should be only one and
should be placed first, other elements – if necessary.

Report Viewer 147
© 2015 Stimulsoft
Values of the "DataType" element are shown in the table below. If the data type is not set, then the string
data type is taken by default. The "FieldLength" element sets fixed width of a data field. If the field width is not
set, then the width is taken from the table. For the string type the default width is the longest string. The
"DecimalPartLength" element sets the number of characters after comma. If it is not set, then the default
number is taken.
Data typeDBF data type
(default size)Description
int Numeric (15 : 0) Numeric
long Numeric (25 : 0) Numeric
float Numeric (15 : 5) Decimal
double Numeric (20 : 10) Decimal
string Character (auto) Text
date Date (8) Date
Sample of using elements are shown in the table below.
Type Description
string : 25 set the column width (25 characters) and cuts all long strings
float converts decimal digit with the length 15 characters, 5 characters
after comma
float :10 converts decimal digit with the length 10 characters, 5 characters
after comma
float :10 : 2 converts decimal digit with the length 10 characters, 2 characters
after comma
int :10 : 2 converts integer digit with the length 10 characters; the second
parameter is ignored
Notice: If the integer part of a digit is long and cannot be placed into the specified field, then it is cut, so
data are lost. For example, if the write «-12345,678» in the «float:8:3» field, then the «2345,678» will be
output.
The "ExportType" element indicates for which export the field name is set. The values can be used: “dbf”,
“csv”, “xml”, “default”. The "FieldName" element indicates the field name in the file (for the DBF the is
automatically cut up to 10 characters). The own name can be specified to each type of export. If the name for
each export is not specified then the name for the “default” type is taken. For example: DBF : "Describe" ; XML : "Description" ; default: "Default name"
The "Column" element indicates that the additional field is added to the exported data. The "FieldName"
element indicates the name of a new field. The "DataRow" element indicates the content of a new field and
can be expression. For example Column: "SortField" "{Products.Categories.CategoryName}"
9.2.8.3 XML
XML (eXtensible Markup Language) is a text format that is used to store structured data (in exchange for
existed files of data bases), for exchange of information between programs and also to create on its base
the special markup languages (for example, XHTML), sometimes called dictionaries. XML is the hierarchical
structure that is used to store any data. Visually this structure can be represented as the tree. XML supports
Unicode and other encoding.
Notice: Only those data (components) are exported to the XML format which are placed on data bands.
148
© 2015 Stimulsoft
9.2.8.3.1 Controlling Exports
The following elements can be specified in the Tag property to control export to XML:
DataType
ExportType : "FieldName"
Column: "FieldName" "DataRow"
Several elements should be separated with the semicolon. The “DataType" element should be only one and
should be placed first, other elements – if necessary.
Values of the "DataType" element are shown in the table below. If the data type is not set, then the string
data type is taken by default.
Data type Description
int Numeric
long Numeric
float Decimal
double Decimal
string Text
date Date
The "ExportType" element indicates for which export the field name is set. The values can be used: “dbf”,
“csv”, “xml”, “default”. The "FieldName" element indicates the field name in the file. The own name can be
specified to each type of export. If the name for each export is not specified then the name for the “default”
type is taken. For example: DBF : "Describe" ; XML : "Description" ; default: "Default name"
The "Column" element indicates that additional field is added to the exported data. The "FieldName" element
indicates the name of a new field. The "DataRow" element indicates the content of a new field and can be
expression. For example: Column: "SortField" "{Products.Categories.CategoryName}"
9.2.8.4 DIF
DIF (Data Interchange Format) is a text format that is used to exchange sheets between spreadsheets
processors (Microsoft Excel, OpenOffice.org Calc, Gnumeric, StarCalc, Lotus 1-2-3, FileMaker, dBase,
Framework, Multiplan, etc). The only limitation of this format is that the DIF format may contain only one sheet
in one book.
9.2.8.5 SYLK
SYLK (Symbolic Link) format- this text format is used to exchange data between applications, specifically
spreadsheets. Files of SYLK have «.slk» extension. Microsoft does not publish a SYLK specification, therefore
work with this format in different applications can be different.
Notice: A SYLK file can be written in Unicode and read by some applications but anyway many
applications which do support Unicode writes SYLK files into ANSI but not Unicode. Therefore, symbols which
do not have representation in the system code page will be written as ('?') symbols.
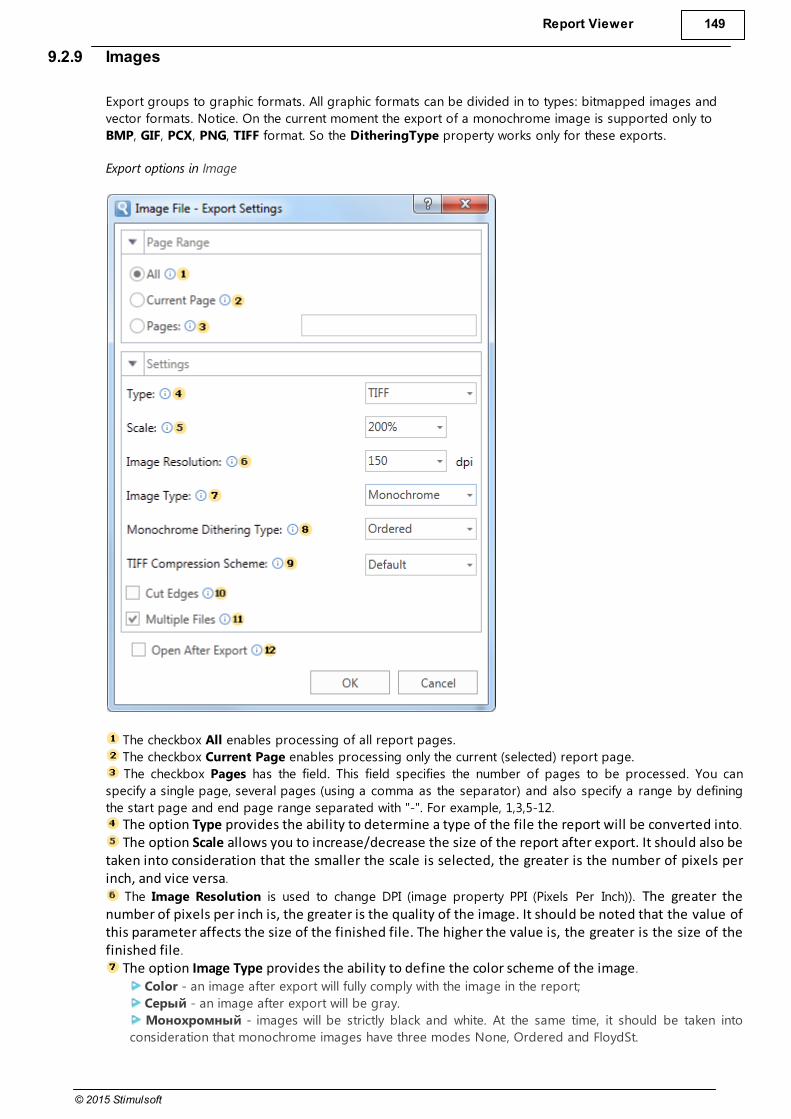
Report Viewer 149
© 2015 Stimulsoft
9.2.9 Images
Export groups to graphic formats. All graphic formats can be divided in to types: bitmapped images and
vector formats. Notice. On the current moment the export of a monochrome image is supported only to
BMP, GIF, PCX, PNG, TIFF format. So the DitheringType property works only for these exports.
Export options in Image
The checkbox All enables processing of all report pages.
The checkbox Current Page enables processing only the current (selected) report page.
The checkbox Pages has the field. This field specifies the number of pages to be processed. You can
specify a single page, several pages (using a comma as the separator) and also specify a range by defining
the start page and end page range separated with "-". For example, 1,3,5-12.
The option Type provides the ability to determine a type of the file the report will be converted into.
The option Scale allows you to increase/decrease the size of the report after export. It should also betaken into consideration that the smaller the scale is selected, the greater is the number of pixels perinch, and vice versa.
The Image Resolution is used to change DPI (image property PPI (Pixels Per Inch)). The greater thenumber of pixels per inch is, the greater is the quality of the image. It should be noted that the value ofthis parameter affects the size of the finished file. The higher the value is, the greater is the size of thefinished file.
The option Image Type provides the ability to define the color scheme of the image.
Color - an image after export will fully comply with the image in the report;
Серый - an image after export will be gray.
Монохромный - images will be strictly black and white. At the same time, it should be taken into
consideration that monochrome images have three modes None, Ordered and FloydSt.
150
© 2015 Stimulsoft
The option Monochrome Dithering Type allows you to determine the type monochrome colormixing: None - no dithering, Ordered, FloydSt. - with dithering.
The option TIFF Compression Scheme provides the ability to define a compression scheme for TIFFfiles.
The checkbox Cut Edges provides the ability to display a report without page edges. If this is enabled,then when you export the report the page edges will be cut off. If this option is disabled, the reportpage will be displayed with the specified edges.
The checkbox Multiple Files is available when exporting to TIFF. By default, each report page is aseparate image. When exporting to TIFF you can put multiple images in a single file by disabling theoption. You need a special viewer to view the TIFF file that contains multiple images.
The flag Open After Export enables/disables the automatic opening of the created document (aftercompletion of exports), the default program for these file types.
9.2.9.1 BMP
BMP (Bitmap) is an image file format used to store bitmap digital images. Initially the format could store only
DDB (Device Dependent Bitmap) but today the BMP format stores device-independent rasters (DIB - Device
Independent Bitmap). Color depth in this format varies from 1 to 48 bits per pixel. The maximal image size is
65535×65535 pixels. An image can be compressed but often is stored in uncompressed and has big size of
the file. Many programs work with the BMP format because its support is integrated into Windows and OS/2.
9.2.9.2 GIF
GIF (Graphics Interchange Format) is a format to store graphic images. The GIF format can store compressed
images, supports up to 8 bits per pixel, allowing a single image to reference a palette of up to 256 distinct
colors. The GIF format was introduced by CompuServe in 1987 and has since come into widespread usage on
the World Wide Web. In 1989 the format was modified (GIF89a), and transparency and animation was added.
GIF uses LZW-compression. It allows reducing the file size without degrading the visual quality (logos,
schemes). GIF is widely used in World Wide Web.
9.2.9.3 PNG
PNG (Portable Network Graphics) - is a bitmapped image format that employs lossless data compression.
PNG was created to improve and replace more simple GIF format, and to replace more complicated TIFF
format. In compare with the GIF format, the PNG format supports RGB images without color losses, supports
alpha channels, and uses DEFLATE (open algorithm of compression), that provides higher compression of
multicolored files. The PNG format is usually used in World Wide Web and for graphic editing.
9.2.9.4 TIFF
TIFF (Tagged Image File Format) is a file format for storing images. Originally, the TIFF format was created by
the Aldus company in cooperation with Microsoft for using with PostScript. TIFF became popular for storing
high-color-depth images, and is used for scanning, fax, to identify text, polygraphy and widely used in
graphic applications. This format is flexible. It allows saving photos in different color spaces, and to use
different algorithms of file compression, and to store a few images in one file.
9.2.9.5 JPEG
JPEG (Joint Photographic Experts Group) is a format to store images. This format was created by C-Cube
Microsystems as effective method to store high-color-depth images. For example, scanned photos with
smooth variations of tone and color. Algorithm of compression with losing information is used in the JPEG
format. This means that some visual quality is lost in the process and cannot be restored. It is necessary to

Report Viewer 151
© 2015 Stimulsoft
get the highest coefficient of compression. Unpacked JPEG images are rarely have the same quality as
original image but differences are insignificant. Compression ratio is usually set in conventional units, for
example from 1 to 100. 100 is the best quality and 1 is the worst quality. The better quality the bigger file
size.
9.2.9.6 PCX
PCX is a format to store images. This format was used in the ZSoft PC Paintbrush graphic editor (one of the
most popular programs) for MS-DOS, text processors and Microsoft Word and Ventura Publisher. This is not
so popular format analogue of BMP but is supported with such graphics editors as Adobe Photoshop, Corel
Draw and others. The algorithm of compression is very quick but is not effective for compression of photos
and other detailed computer graphics. Today this format is not displaced with formats which supports better
compression. These formats are GIF, JPEG, and PNG.
9.2.9.7 EMF
WMF (Windows MetaFile) is a universal graphics file format on Microsoft Windows systems. This format was
created by Microsoft and is an integral part of Windows because this file stores a list of function calls that
have to be issued to the Windows graphics layer GDI in order to display an image on screen.
WMF is a 16-bit format. This format was introduced in Windows 3.0. A 32-bit version is called Enhanced
Metafile EMF (Enhanced Metafile). The EMF format supports many new commands, supports work with the
GDI+ library, and also is used as a graphic language for drivers of printers.
9.2.9.8 SVG
SVG (Scalable Vector Graphics) is an XML-based file format for describing two-dimensional vector graphics,
both static and dynamic. The SVG specification is an open standard. SVG supports scripting and animation.
The vector image is composed of a fixed set of shapes.
SVG allows three types of graphic objects:
Vector graphics;
Raster graphics;
Text.
The Images below shows the difference between exporting Bitmap format and SVG (vector) format.
Bitmap Formats
SVG Format

152
© 2015 Stimulsoft
9.2.9.9 Compressed SVG
In addition to the SVG file format, there is a compressed SVG (with file extension SVGZ), which applies
industry-standard, nonproprietary "gzip" compression (an open-source variant of Zip compression) to SVG
files. Compressed SVG files are typically 50 to 80 percent smaller than SVG files. SVG files are compact and
can be used to provide high-quality graphics on the Web.
9.2.9.10 Dither
Dither is an intentionally applied form of noise, when processing digit signals. It is used in most often
surfaces in the fields of digital audio and video. The following image shows (from left to right) original image
and the result of export to monochrome image. There are three modes of DitheringType: Ordered,
FloydSteinberg, None.
Notice: On the current moment the export of monochrome image is supported only to the PCX format.
So the DitheringType property works only for this export. Different images may look differently in these
modes. The FloydSteinberg is the best mode to output an image but the file size is too big.
9.2.10 How to Create Report for Export?
Many exports have the table mode. In this mode the whole report is converted into one table. Creating
correct templates from the source code allows making the table look much better, decrease the size of the
file, increase the speed of working with export. Therefore, when using the table mode of export it is
important to follow some recommendations:
use the "Align to Grid" button of the designer. This will decrease the number of rows and columns in
the output file; also this allows avoiding very small gaps between components (some formats "do not
like" table with very small columns);
put components on the data band at the same level (see the picture below); this will decrease the
number of rows and columns in the output file;
For example: put three components in the designer. They should be placed without gaps. See the picture
below:
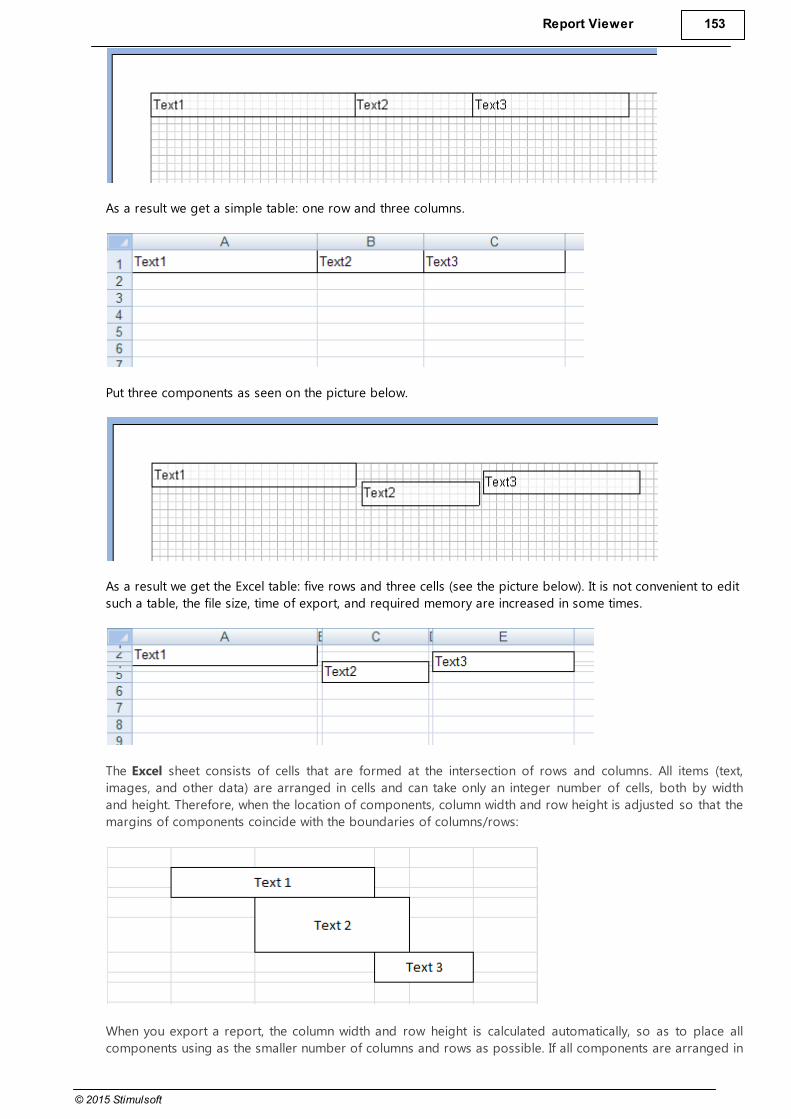
Report Viewer 153
© 2015 Stimulsoft
As a result we get a simple table: one row and three columns.
Put three components as seen on the picture below.
As a result we get the Excel table: five rows and three cells (see the picture below). It is not convenient to edit
such a table, the file size, time of export, and required memory are increased in some times.
The Excel sheet consists of cells that are formed at the intersection of rows and columns. All items (text,
images, and other data) are arranged in cells and can take only an integer number of cells, both by width
and height. Therefore, when the location of components, column width and row height is adjusted so that the
margins of components coincide with the boundaries of columns/rows:
When you export a report, the column width and row height is calculated automatically, so as to place all
components using as the smaller number of columns and rows as possible. If all components are arranged in

154
© 2015 Stimulsoft
columns/rows, the number of result columns/rows in the Excel file will match the number of columns/rows in
the report components. If the template structure is more complex, for example components as headers are
not placed in the columns, then additional columns/rows will be added the Excel file. Consider the following
example:
As can be seen from the picture above the text components in the report template are located on different
levels (rows) and not in the same columns. In this case, when you export a report to Excel, the result will be as
follows:
As can be seen from the picture above you add more columns/rows.
do not use the Autowidth property. This property increases the number of columns in the exported file
which is proportionally to number of records.
On the left picture the number of columns is 14, and this case is equal in number of data rows. If to disable
the AutoWidth property then only one column will be output (see the right picture). Accordingly, the file size
of a report, shown of the right picture, is some times smaller then the file of the report shown on the left
picture and the export works faster.
Notice: Number of columns is very important for the text editors. For example, MS Word allows no more
than 64 columns; if the table has more than 64 columns then the document is output incorrectly.