still technique...still technique saao march 2015 dennis j. dowling, d.o., f.a.a.o. private practice...
TRANSCRIPT

STILL TECHNIQUESAAO
March 2015
Dennis J. Dowling, D.O., F.A.A.O.Private Practice
Osteopathic Manipulative Medicine Associates, PC
Syosset, New York
Past President
American Academy of Osteopathy
Director of Manipulation
Physical Medicine and Rehabilitation Department
Nassau University Medical Center
East Meadow, New York
Director of OMM Assessment
National Board of Osteopathic Medical Examiners
Consulting Medical Director
Continuous Professional Development & Innovations Department
National Board of Osteopathic Medical Examiners


Truth or Factoid?Dr. Still never wrote his techniques in book
or journal form.• He never wrote a technique book. He attempted, by way of his writings, to
guide his students to an understanding of structure and function and then to the application of the treatment that was most appropriate.
• His continued success became the magnet that drew patients and students to him. It is no wonder that the latter attempted to emulate him.
• Once the school was established, he met disappointment with some of his early students. He called them "engine wipers"
• It was more important to Dr. Still that those who practiced osteopathic medicine develop treatments for the individual.
• Some maneuvers are embedded in Osteopathy: Research and Practice and The Philosophy and Mechanical Principles of Osteopathy.
• He called himself a "lightning bonesetter" and frequently referred to the "pop's” and "cracks" that the joints sometimes made in response to the manipulations. Whether these were due to articulatory or positioning maneuvers, he felt that the goal was to restore function. He also admonished his followers to diagnose and find the health of the human patient.
• There is even a very brief movie clip of a few seconds with Dr. Still demonstrating a treatment for either a shoulder or rib on the porch of a house in Kirksville.

• The first book, Osteopathy Complete by Elmer Barber, D.O. caused consternation
• Some of Dr. Still’s students wrote down their own observations in books and articles. One of these was Charles Hazzard, D.O., a graduate from the American School of Osteopathy in the late nineteenth century.
• Dr. Hazzard produced his own work, The Practice and Applied Therapeutics of Osteopathy, and credited all to Dr. Still. His observations were a continuation of Dr. Still’s own descriptions.
• There is a consistency of approach that sets it apart as a unique modality.
• Some of the applications have survived down through the decades outside of the Hazzard book after having been passed along from parent to child osteopathic physician or mentor to apprentice.
• However, they existed as localized specific treatments, not an organized systemic approach.
• Richard Van Buskirk, D.O., Ph.D. published an article in 1996 that we have a true recognition of a technique that was uniquely developed and applied by Dr. Still.
• He first became intrigued of the possibility while as a faculty member and then a student at the West Virginia School of Osteopathic Medicine.
• This led him to investigate further the writings of Dr. Still and his students. Sometimes he was able to even correlate these with demonstrations by other practitioners.
• His FAAO thesis in the book, The Still Technique Manual was published in 2000.

OCTOBER
1996

MARCH
2000

JULY
2001

• Still Technique most resembles Facilitated PositionalRelease developed by Stanley Schiowitz, DO, FAAO.
• If you know FPR, you generally have little or no difficultyin learning the eponymous “Still” Technique and viceversa.
• Dr. Van Buskirk has stated that FPR is most like theindirect portion of the Still technique but does not includethe final articulatory portion of the Still technique.– True if one were to only learn FPR from the writings of Dr.
Schiowitz and others.
– However, the actual practice of FPR frequently includes achallenge toward the barrier at its completion.
• Sometimes the only difference is the position of thepatient and/or physician– STILL – patient sitting & physician standing anterior with arms
over the patient’s shoulders for typical thoracic
– FPR - patient sitting & physician standing to the patient’s sidewith one arm over the patient’s shoulder for typical thoracic
• Some similarities to Functional, BLT, and CounterstrainTechniques

OSTEOPATHYOMTFUNCTIONAL
BLT/LASCOUNTERSTRAINFPR
HVLAMUSCLE
ENERGYSTILL

ELEMENTS of TECHNIQUE
• Mixed type of technique.
• Passive method
• Initially - indirect
• Then - direct
• Addresses the arthroidal and soft tissue components of the somatic dysfunction.
• True application is in the ability to examine, adapt, and individually apply the method.

PROCEDURE1. The patient is passive throughout all procedures
2. The diagnosis of the joint and the position at which the surrounding tissue is at its least taut state are determined
3. The joint and tissue are moved into the directions of ease in all planes
4. The position is slightly exaggerated so as to increase the relaxation of the affected myofascial elements
5. A force that is vectored parallel to the part of the body that is being used as a lever (i.e. head & neck, arm, leg, trunk) is applied to the point of further relaxing the involved tissues. Traction or compression are the most common forces applied for a few seconds.
6. While maintaining the vector force, the region and dysfunction are brought towards the barrier directions and then through the restrictions.
7. The force and motion will commonly mobilize the joint and release the tissue to the point that there may be a sudden release as reflected by a “pop”, “click”, or other such noise.
8. The forces are released
9. The region is brought back to neutral
10. Reassessment of the dysfunction is made.

First Rib Somatic Dysfunction - Typically elevated
(Rib 1 on Right) – Patient Seated
(Physician Posterior to Patient)
1. Patient position: seated.
2. Physician position: standing behind the patient on the dysfunctional side (right side in this example).
3. Technique:
a. The physician places the pad of the thumb of his monitoring hand on the angle of the rib somatic dysfunction (The left finger contacts the patient's R2 right rib in this example). The palm of that hand can contour to the back and the fingers extend towards and over the shoulder on the side of the dysfunction.
b. With the other hand, the physician grasps the patient’s elbow on the side of the dysfunction (right hand holds right elbow).
c. The physician uses the arm as a lever and extends the shoulder by bringing the elbow posteriorly and up to the level of the monitoring finger. Some amount of slight abduction may occur as the shoulder extends.
d. Compression is introduced from the elbow along the humerus towards the rib.
e. The physician introduces abduction of the shoulder by moving the elbow laterally and then into adduction-flexion by bringing the elbow anteriorly through an arc.
f. The upper arm will come to rest against the patient’s chest.
g. Compression is released.
h. The arm is brought back to the patient’s side
i. The rib somatic dysfunction is reassessed.


PROCEDURE1. Patient is passive
2. Diagnosis of the joint
3. Moved into the directions of ease
4. Position is slightly exaggerated
5. Force that is vectored parallel to the part of the body further relaxing the involved tissues.
6. Brought towards the barrier directionsand then through the restrictions.
7. Released
8. Brought back to neutral
9. Reassessment of the dysfunction

WHAT POSITION DO YOU USE?
STANDING
SEATED
SUPINE
PRONE
SIDELYING

CERVICAL

Typical Cervical Somatic Dysfunction (C5 SR RR)
Supine/Compression
1. Patient position: supine.
2. Physician position: seated at the head of the table.
3. Technique:
a. The physician places the pad of his index or middle finger of his monitoring hand on posterior articular pillar at the level of the somatic dysfunction (The right finger contacts the patient's posterior C5 articular pillar in this example). The palm of that hand contours to and supports the side of the patient's head and the remaining fingers support the patient's head and neck.
b. The physician places the palm of his other hand on top of the patient's head with the fingers contouring to the patient's head.
c. The physician sidebends and rotates the patient's head towards and to the level of the monitoring finger. Flexion or extension is added, depending on the diagnosis of the dysfunction, finishing the position into the relative freedoms of the somatic dysfunction.
d. The physician puts approximately five pounds of downward pressure towards the patient's feet with the hand on the top of the patient's head towards the monitoring finger.
e. While maintaining the compression, the head is gently carried through the sagittal plane neutral and towards the flexion or extension barrier, then through neutral position and into the barrier directions (sidebending left and rotating left in this case)
f. The patient's head and neck are brought back to the neutral position and the cervical somatic dysfunction level is reassessed.

APPLY
THE
PRINCIPLES!

Cervical Somatic Dysfunction
(C5 SR RR) - Seated1. Patient position: seated.
2. Physician position: standing facing the patient
3. Technique:
a. pad of his index or middle finger of his monitoring (left) hand on the side of the posterior articular pillar of the somatic dysfunction (The left finger contacts the patient's right C5 posterior articular pillar in this example). The palm of that hand contours to the patient’s (right) shoulder.
b. palm of his other hand on top of the patient's head with the fingers contouring to the patient's head.
c. sidebends the patient's head towards the monitoring finger at the posterior transverse process.
d. Simultaneously, slight rotation towards the posterior transverse process is introduced. e.
e. Slight flexion or extension is added, depending on the diagnosis of the dysfunction, finishing the position into the relative freedoms of the somatic dysfunction.
f. approximately five pounds of downward pressure towards the floor with the hand on the top of the patient's head towards the monitoring finger.
g. There should be relaxation of the palpated soft tissue noted.
h. While maintaining the compression, the head is gently carried through barrier directions
i. The patient's head and neck are brought back to the neutral position
j. T1 joint is reassessed.

Typical Cervical Somatic Dysfunction (C5 SR RR) - Seated

OA Somatic Dysfunction (OA SR RL) - Seated
• OA Somatic Dysfunction (OA SR RL) - Seated
• 1. Patient position: seated.
• 2. Physician position: standing facing the patient.
• 3. Technique:
• a. The physician places the pad of his index or middle finger of his monitoring hand on the side of the sidebending component in the basiocciput at the level of the shallow occipital sulcus (The left finger contacts the patient's right shallow occipital sulcus in this example). The palm of that hand contours to and supports the side of the patient's head.
• b. The physician places the palm of his other hand on top of the patient's head with the fingers contouring to the patient's head.
• The physician sidebends the patient's head towards the monitoring finger at the basiocciput. Since the motion is coupled at the OA joint, slight rotation away from the shallow sulcus will occur. The physician can further exaggerate this if necessary. Slight flexion or extension is added, depending on the diagnosis of the dysfunction, finishing the position into the relative freedoms of the somatic dysfunction. (Figure 30-1)
• The physician puts approximately five pounds of downward pressure towards the floor with the hand on the top of the patient's head towards the monitoring finger.
• While maintaining the compression, the head is gently carried through sagittalplane neutral and towards the flexion or extension barrier, then through neutral position and into the barrier directions (sidebending left and rotating right in this case)
• The patient's head and neck are brought back to the neutral position and the OA joint is reassessed.

•OA Somatic Dysfunction (OA SR RL) - Seated

•OA Somatic Dysfunction (OA SR RL) - Seated

OA Somatic Dysfunction (OA SR RL)
- Supine/Compression• OA Somatic Dysfunction (OA SR RL) - Supine/Compression
• 1. Patient position: supine.
• 2. Physician position: seated at the head of the table.
• 3. Technique:
• a. The physician places the pad of his index or middle finger of his monitoring hand on the side of the sidebending component in the basiocciput at the level of the shallow occipital sulcus (The right finger contacts the patient's right shallow occipital sulcus in this example). The palm of that hand contours to and supports the side of the patient's head and the remaining fingers support the patient's head beneath the occiput.
• b. The physician places the palm of his other hand on top of the patient's head with the fingers contouring to the patient's head.
• The physician sidebends the patient's head towards the monitoring finger at the basiocciput. Since the motion is coupled at the OA joint, slight rotation away from the shallow sulcus will occur. The physician can further exaggerate this if necessary. Slight flexion or extension is added, depending on the diagnosis of the dysfunction, finishing the position into the relative freedoms of the somatic dysfunction. (Figure 30-2)
• The physician puts approximately five pounds of downward pressure towards the patient's feet with the hand on the top of the patient's head towards the monitoring finger.
• While maintaining the compression, the head is gently carried through the sagittal plane neutral and towards the flexion or extension barrier, then through neutral position and into the barrier directions (sidebending left and rotating right in this case)
• The patient's head and neck are brought back to the neutral position and the OA joint is reassessed.

•OA Somatic Dysfunction (OA SR RL) - Supine/Compression

OA Somatic Dysfunction (OA SR RL) -
Supine/Traction• OA Somatic Dysfunction (OA SR RL) - Supine/Traction
• 1. Patient position: seated.
• 2. Physician position: seated at the head of the table.
• 3. Technique:
• a. The physician places the pad of his index or middle finger of his monitoring hand on the side of the sidebending component in the basiocciput at the level of the shallow occipital sulcus (The right finger contacts the patient's right shallow occipital sulcus in this example). The palm of that hand contours to and supports the side of the patient's head.
• b. The physician places the palm of his other hand against the opposite side of the patient's head and one or two fingers are placed beneath the patient's chin.
• The physician sidebends the patient's head towards the monitoring finger at the basiocciput. Since the motion is coupled at the OA joint, slight rotation away from the shallow sulcus will occur. The physician can further exaggerate this if necessary. Slight flexion or extension is added, depending on the diagnosis of the dysfunction, finishing the position into the relative freedoms of the somatic dysfunction. (Figure 30-3)
• The physician puts approximately five pounds of traction with the contacts of the palms of his hands that are against the patient's head and pulls parallel to the table and towards the physician.
• While maintaining the traction, the head is gently carried through sagittal plane neutral and towards the flexion or extension barrier, then through neutral position and into the barrier directions (sidebending left and rotating right in this case)
• The patient's head and neck are brought back to the neutral position and the OA joint is reassessed.

•OA Somatic Dysfunction (OA SR RL) - Supine/Traction

AA Somatic Dysfunction (AA RR) - Seated• AA Somatic Dysfunction (AA RR) - Seated
• 1. Patient position: seated.
• 2. Physician position: standing facing the patient.
• 3. Technique:
• a. The physician places the pad of his index or middle finger of his monitoring hand at the transverse process of the atlas located between the mastoid process and the mandibular ramus (The left finger contacts the patient's right atlas transverse process in this example). The palm of that hand contours to and supports the side of the patient's head and the remaining fingers wrap around the rest of the patient's neck.
• b. The physician places the palm of his other hand on top of the patient's head with the fingers contouring to the patient's head.
• The physician rotates the patient's head towards the monitoring finger until tissue relaxation is noted.
• The physician puts approximately five pounds of downward pressure towards the floor with the hand on the top of the patient's head towards the monitoring finger. (Figure 30-4)
• While maintaining the compression, the head is gently carried through neutral position and into the barrier directions (sidebending left and rotating left in this case)
• The patient's head and neck are brought back to the neutral position and the AA joint is reassessed.

•AA Somatic Dysfunction (AA RR) - Seated

AA Somatic Dysfunction (AA RR) - Supine
• AA Somatic Dysfunction (AA RR) - Supine
• 1. Patient position: supine.
• 2. Physician position: seated at the head of the table.
• 3. Technique:
• a. The physician places the pad of his index or middle finger of his monitoring hand at the transverse process of the atlas located between the mastoid process and the mandibular ramus (The right finger contacts contacts the patient's right atlas transverse process in this example). The palm of that hand contours to and supports the side of the patient's head and the remaining fingers support the patient's head beneath the occiput.
• b. The physician places the palm of his other hand on top of the patient's head with the fingers contouring to the patient's head.
• The physician puts approximately five pounds of downward pressure towards the patient's feet with the hand on the top of the patient's head towards the monitoring finger.
• While maintaining the compression, the head is gently carried through neutral position and into the barrier directions (rotation left in this case) (Figure 30-5)
• The patient's head and neck are brought back to the neutral position and the AA joint is reassessed.

•AA Somatic Dysfunction (AA RR) - Supine

Typical Cervical Somatic Dysfunction (C5 SR
RR) - Supine/Traction• Typical Cervical Somatic Dysfunction (C5 SR RR) -
Supine/Traction
• 1. Patient position: supine
• 2. Physician position: seated at the head of the table.
• 3. Technique:» The physician places the pad of his index or middle finger of his
monitoring hand on posterior articular pillar at the level of the somatic dysfunction (The right finger contacts the patient's right shallow occipital sulcus in this example). The palm of that hand contours to and supports the side of the patient's head.
» The physician places the pad of his index or middle finger of his other hand on the opposite articular pillar at the same level as the somatic dysfunction (The left finger contacts the patient's left articular pillar of C5 in this case). The palm of that hand contours to and supports the side of the patient's head.
» The physician sidebends and rotates the patient's head towards the monitoring finger at the posterior articular pillar. Flexion or extension is added, depending on the diagnosis of the dysfunction, finishing the position into the relative freedoms of the somatic dysfunction.
» The physician puts approximately five pounds of traction with the contacts of the palms of his hands that are against the patient's head and pulls parallel to the table and towards the physician. (Figure 30-8)
» While maintaining the traction, the head is gently carried through sagittalplane neutral and towards the flexion or extension barrier, then through neutral position and into the barrier directions (sidebending left and rotating left in this case)
» The patient's head and neck are brought back to the neutral position and the OA joint is reassessed.
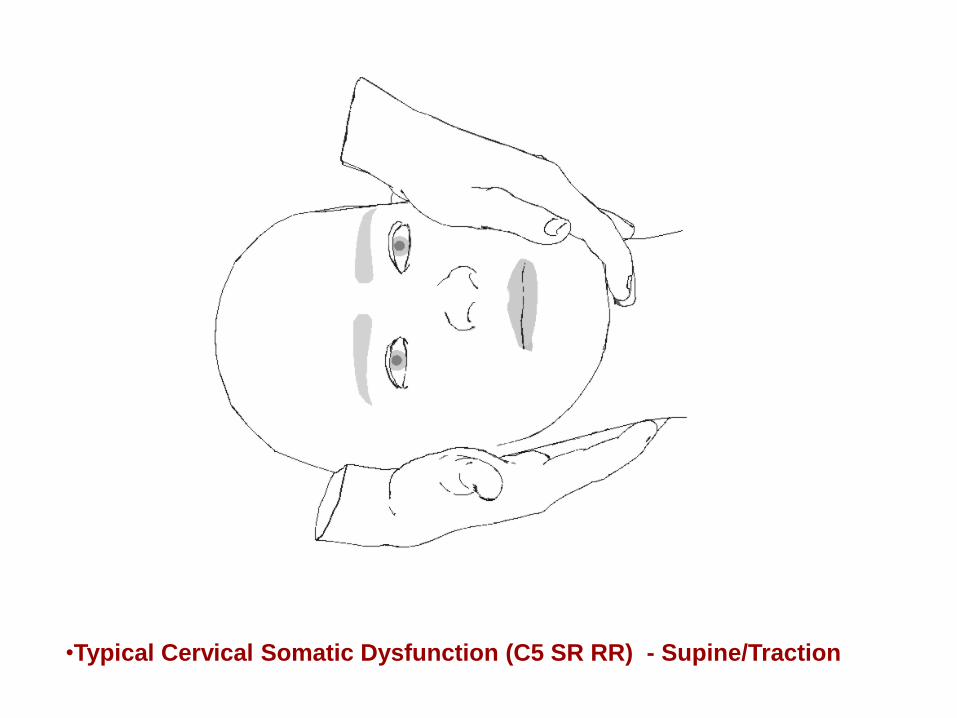
•Typical Cervical Somatic Dysfunction (C5 SR RR) - Supine/Traction

Typical Cervical Somatic Dysfunction (C5 SR
RR) - Supine/Compression
• Typical Cervical Somatic Dysfunction (C5 SR RR) - Supine/Compression
• 1. Patient position: supine.
• 2. Physician position: seated at the head of the table.
• 3. Technique:
• a. The physician places the pad of his index or middle finger of his monitoring hand on posterior articular pillar at the level of the somatic dysfunction (The right finger contacts the patient's posterior C5 articular pillar in this example). The palm of that hand contours to and supports the side of the patient's head and the remaining fingers support the patient's head and neck.
• The physician places the palm of his other hand on top of the patient's head with the fingers contouring to the patient's head.
• The physician sidebends and rotates the patient's head towards and to the level of the monitoring finger. Flexion or extension is added, depending on the diagnosis of the dysfunction, finishing the position into the relative freedoms of the somatic dysfunction.
• The physician puts approximately five pounds of downward pressure towards the patient's feet with the hand on the top of the patient's head towards the monitoring finger. (Figure 30-7)
• While maintaining the compression, the head is gently carried through the sagittal plane neutral and towards the flexion or extension barrier, then through neutral position and into the barrier directions (sidebending left and rotating left in this case)
• The patient's head and neck are brought back to the neutral position and the cervical somatic dysfunction level is reassessed.

•Typical Cervical Somatic Dysfunction (C5 SR RR) -Supine/Compression

Typical Cervical Somatic Dysfunction (C5 SR RR) - Supine/Compression
LOOKS ALMOST EXACTLY LIKE THE FPR POSITION & TREATMENT

THORACIC

T1 Somatic Dysfunction
(T1 SL RL) - Seated1. Patient position: seated.
2. Physician position: standing facing the patient
3. Technique:
a. pad of his index or middle finger of his monitoring (right) hand on the side of the posterior transverse process of the somatic dysfunction (The right finger contacts the patient's left T1 transverse process in this example). The palm of that hand contours to the patient’s (left) shoulder.
b. palm of his other hand on top of the patient's head with the fingers contouring to the patient's head.
c. sidebends the patient's head towards the monitoring finger at the posterior transverse process.
d. Simultaneously, slight rotation towards the posterior transverse process is introduced. e.
e. Slight flexion or extension is added, depending on the diagnosis of the dysfunction, finishing the position into the relative freedoms of the somatic dysfunction.
f. approximately five pounds of downward pressure towards the floor with the hand on the top of the patient's head towards the monitoring finger.
g. There should be relaxation of the palpated soft tissue noted.
h. While maintaining the compression, the head is gently carried through barrier directions
i. The patient's head and neck are brought back to the neutral position
j. T1 joint is reassessed.

T1 Somatic Dysfunction (T1 SL RL) - Seated

Upper Thoracic Type II Somatic Dysfunction
(T3 SR RR) – Patient Seated
(Physician Anterior to Patient)
1. Patient position: seated.
2. Physician position: standing facing the patient.
3. Technique:
a. The physician’s forearms are placed on the patient’s shoulders as close to the patient’s neck as is possible.
b. The physician places the pad of his index or middle finger of his monitoring hand on the transverse process on the side of the sidebending/rotation component of the somatic dysfunction
c. The physician introduces a downward pressure through the patient’s shoulders with slightly more pressure exerted on the side of the dysfunction.
d. introduce sidebending and rotation into the direction of the relative freedoms.
e. Slight flexion or extension is added, depending on the diagnosis of the dysfunction, finishing the position into the relative freedoms of the somatic dysfunction. (Figure 41-2)
f. The physician puts approximately five pounds of downward pressuretowards the patient's feet with both forearms on the patient’s shoulders towards the monitoring finger.
g. While maintaining the compression, the patient’s upper body is gently carried through the sagittal plane neutral and towards the flexion or extension barrier, then through neutral position and into the other barrier directions(sidebending left and rotating left in this case)
h. The patient's body is brought back to the neutral position
i. The thoracic somatic dysfunction is reassessed.

Upper Thoracic Type II Somatic Dysfunction (T3 SR RR) – Patient Seated
(Physician Anterior to Patient)

Lower Thoracic Type II Somatic Dysfunction (T9 SR
RR) – Patient Seated (Physician Anterior to Patient)1. Patient position: seated.
2. Physician position: standing facing the patient.
3. Technique:
a. The physician places the pad of his index or middle finger of his monitoring hand at the posterior transverse process of the somatic dysfunction by passing the monitoring hand beneath the patient’s axilla and then posteriorly to the patient’s back (The left finger contacts the patient's right T9 transverse process in this example). The palm of that hand contours to and supports the patient’s back in this region.
b. The physician places the forearm of his opposite arm on the patient’s shoulder that is on the side opposite to the somatic dysfunction as close to the patient’s neck as is possible (The physician’s right forearm is on the patient’s left shoulder in this example).
c. The physician rotates and sidebends the patient's body towards the monitoring finger until tissue relaxation is noted.
d. Slight flexion or extension is added, depending on the diagnosis of the dysfunction, finishing the position into the relative freedoms of the somatic dysfunction.
e. The physician puts approximately five pounds of downward pressuretowards the floor with the arm on top of the patient’s shoulder towards the monitoring finger creating compression.
f. While maintaining the compression, the body is gently carried through neutral position and into the barrier directions (sidebending left and rotating left in this case).
g. The patient's body is brought back to the neutral position
h. The Thoracic somatic dysfunction is reassessed.

Lower Thoracic Type II Somatic Dysfunction (T9 SR RR) – Patient Seated
(Physician Anterior to Patient)

Thoracic Type II Somatic Dysfunction (T6
SR RR) – Patient Seated (Physician
Posterior to Patient)• Thoracic Type II Somatic Dysfunction (T6 SR RR) – Patient Seated (Physician Posterior
to Patient)
• 1. Patient position: seated.
• 2. Physician position: standing behind the patient.
• 3. Technique:
• a. The physician places the pad of his index or middle finger of his monitoring hand on the transverse process on the side of the sidebending/rotation component of the somatic dysfunction (The right finger contacts the patient's T6 right transverse process in this example).The palm of that hand contours to and supports the patient's back.
• The patient is instructed to take his or her hand on the side of the somatic dysfunction and reach anteriorly and across to hold the opposite side shoulder.
• The physician places his axilla on the side opposite to the somatic dysfunction on the opposite shoulder and reaches the non monitoring hand anterior and across to hold the shoulder on the side of the dysfunction (the physician’s left axilla is on the patient’s left shoulder and the physician’s left hand is upon the patient’s right shoulder).
• The physician sidebends and rotates the patient down to and towards the posterior transverse process. The physician can further exaggerate this if necessary until softening of the underlying tissue is noted. Slight flexion or extension is added, depending on the diagnosis of the dysfunction, finishing the position into the relative freedoms of the somatic dysfunction. (Figure 41-3)
• The physician puts downward compression with the contacts of the palm of his (left) hand and (left) axilla that are on the patient's shoulders until further soft tissue is noted at the monitoring finger.
• While maintaining the compression, the patient’s body is gently carried through sagittal plane neutral and towards the flexion or extension barrier, then through neutral position and into the barrier directions (sidebending left and rotating left in this case).
• The patient's body brought back to the neutral position and the Thoracic somatic dysfunction is reassessed.
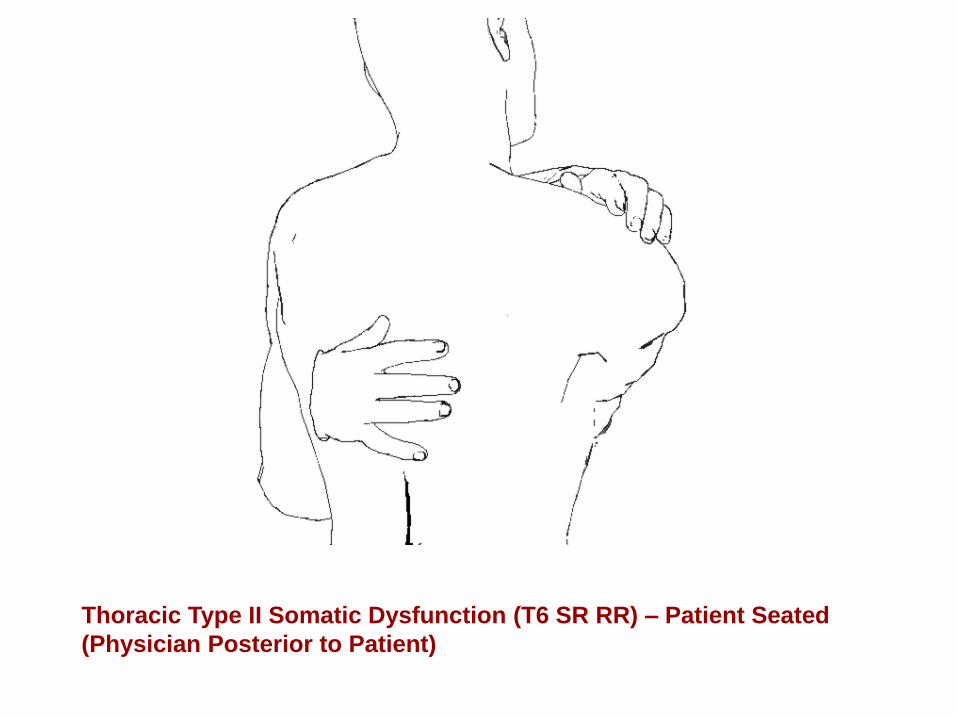
Thoracic Type II Somatic Dysfunction (T6 SR RR) – Patient Seated
(Physician Posterior to Patient)

Lower Thoracic Type II Somatic Dysfunction
(T9 SR RR) – Patient Seated (Physician
Anterior to Patient) - Alternative• Lower Thoracic Type II Somatic Dysfunction (T9 SR RR) – Patient Seated
(Physician Anterior to Patient) - Alternative
• 1. Patient position: seated.
• 2. Physician position: seated at the head of the table.
• 3. Technique:– The patient places the palms of both hands on his lap and leans slightly forward.
– The physician reaches his hands beneath both of the patient’s axillae laterally and then passes them behind the patients and then places the pads of his index or middle fingers of both hands at the transverse processes either at or one segment below the level of the somatic dysfunction (The fingers contact the same level if it is a flexion and one level below if it is an extension somatic dysfunction). The palms of the hands and the remaining fingers contour to and support the patient's back.
– The patient’s head and shoulders rest on the physician’s chest. The physician’s upper arm & shoulder on the side of the somatic dysfunction make contact with the patient’s shoulder on that side.
– The patient’s body is rotated backwards on the side of the posterior transverse process by drawing the transverse process on the opposite side forward. Sidending is created by the physician’s arm on the opposite side lifting the opposite axilla upwards.
– The physician draws the fingers and hand toward himself creating flexion or extension (The fingers on the same level as the somatic dysfunction will create relative flexion. When the fingers are below the level of the somatic dysfunction, this creates relative extension at the.
– The physician puts approximately five pounds of downward pressure towards the patient's feet with the upper arm/shoulder that is in contact with the patient’s shoulder on the somatic dysfunction side.
– While maintaining the compression, the body is gently carried through neutral position, anterior pressure on the transverse processes is released and the region is brought into the barrier directions (rotation and sidebending left in this case) (Figure 41-5)
– The patient's body is brought back to the neutral position and the thoracic somatic dysfunction is reassessed.

Lower Thoracic Type II Somatic Dysfunction (T9 SR RR) – Patient Seated
(Physician Anterior to Patient) - Alternative

Lower Thoracic Type II Somatic Dysfunction (T8 SR
RR) – Patient Sidelying (Physician Anterior to Patient)• Lower Thoracic Type II Somatic Dysfunction (T8 SR RR) – Patient Sidelying (Physician
Anterior to Patient)
• 1. Patient position: lying on side with somatic dysfunction side up.
• 2. Physician position: standing facing the patient.
• 3. Technique:
• The patient's arm on the side of the somatic dysfunction is flexed and abducted and the hand is placed on his or her own neck.
• The physician places his cephalad arm (the one closer to the patient's head) through the opening created by the patient's bent arm and places the palm and fingers of that hand over the scapula on that side.
• The physician places the pad of his index or middle finger of the other (caudad) monitoring hand on posterior transverse process at the level of the somatic dysfunction (The left finger contacts the patient's right posterior T8 transverse process in this example). The palm and fingers of this hand contour to the patient's body and maintain position of the trunk throughout much of the treatment. The physician may rest his elbow or forearm on the patient's iliac crest on that side as well (left elbow on right hip).
• Flexion or extension is added, depending on the diagnosis of the dysfunction: If the somatic dysfunction is a flexion dysfunction, the physician uses the hand on the patient's shoulder and scapular to first introduce flexion of the spine to that level. If the direction of the somatic dysfunction is extension, then the physician initially pushes the patient’s shoulder posterior.
• By pushing the patient’s shoulder posterior, the physician rotates the patient’s upper body towards the direction of the freedom of motion of the somatic dysfunction. Compression (approximately five pounds of pressure) and sidebending are introduced by the physician using his cephalad arm to push the patient’s shoulder (right in this example) towards the posterior transverse process by finishing the positioning into the relative freedoms of the somatic dysfunction. (Figure 41-6)
• While maintaining the compression, the physician uses his caudad arm on the patient’s hip and rolls the pelvis posterior. The cephalad hand and arm pull the patient’s shoulder anteriorly and pulls the scapula up towards the patient’s head and reverses the flexion or extension (sidebending left and rotating left in this case into the barrier directions)
• The patient's body is brought back to the neutral position and the thoracic somatic dysfunction level is reassessed.

•Lower Thoracic Type II Somatic Dysfunction (T8 SR RR) – Patient Sidelying (Physician Anterior to Patient)

Thoracic Type I Group Curve Somatic Dysfunction (T1-9 N SR RL)
– Patient Seated (Physician Anterior to Patient)
• Thoracic Type I Group Curve Somatic Dysfunction (T1-9 N SR RL) –Patient Seated (Physician Anterior to Patient)
• 1. Patient position: seated.
• 2. Physician position: standing facing the patient.
• Technique:– Both of the physician’s forearms are placed on the patient’s shoulders as
close to the patient’s neck as is possible.
– The physician places the pad of his index or middle finger of his monitoring hand on the transverse process on the side of the apex of the group curve on the convex side (The right finger contacts the patient's T5 left transverse process in this example).
– The physician introduces a downward pressure through the patient’s shoulders with slightly more pressure exerted on the side of the group curve sidebending (physician’s left arm pushes the patient’s right shoulder downwards in this example). Simultaneously, the physician’s other arm pushes the patient’s other shoulder posteriorly creating rotation opposite to sidebending (physician’s right arm pushes the patient’s left shoulder posteriorly in this example)
– The patient is kept in neutral while the physician puts bilateral compression through the patient’s shoulders towards the group curve apex. (Figure 41-7)
– While maintaining the compression, the patient’s upper body is gently carried into the sidebending and rotation barrier directions (sidebending left and rotating right in this case)
– The patient's body is brought back to the neutral position and the group curve is reassessed.

•Thoracic Type I Group Curve Somatic Dysfunction (T1-9 N SR RL) –Patient Seated (Physician Anterior to Patient)

RIBS

Upper Exhalation/Posterior Rib (Posterior 2nd Rib on Right)- Seated

Upper Inhalation/Anterior Rib (Anterior 2nd Rib on Right)- Seated
Patient position: seated.
• Physician position: standing behind the patient on the dysfunctional side (right side in this
example).
•Technique:
- The physician places the pad of his thumb of his monitoring hand on the angle of the rib
somatic dysfunction (The left finger contacts the patient's R2 right rib in this example). The
palm of that hand can contour to the back and the fingers extend towards and over the
shoulder on the side of the dysfunction.
- With the other hand, the physician grasps the patient’s elbow on the side of the dysfunction
(right hand holds right elbow).
- The physician uses the arm as a level and abducts the shoulder by bringing the elbow
laterally and up to the level of the monitoring finger. Some small amount of extension is also
introduced until localization is noted at the monitoring finger. (A variation can be utilized
whereby the patient is directed to shrug the shoulder towards the ipsilateral ear, the physician
maintains the position by holding and lifting the elbow, and the patient is then told to relax.)
- Compression is introduced from the elbow along the humerus towards the rib.
- The physician introduces further abduction of the shoulder by moving the elbow laterally in
the coronal plane. As the elbow is raised higher, a combined shoulder abduction-flexion-
internal rotation occurs.
- The elbow is brought anteriorly through an arc by bringing the shoulder into further flexion.
- Compression is released.
- The arm is brought back to the patient’s side and the rib somatic dysfunction is reassessed.

Upper Inhalation/Anterior Rib (Posterior 2nd Rib on Right)- Seated

*NOTE: This technique can easily be adapted to the patient in the supine position
and the physician seated or standing at the head of the table. The major difference
is that a monitoring finger, thumb or index, is more comfortably placed beneath the
patient.

Anterior/Inhalation Rib (Anterior 3rd Rib on the Right) – Patient Seated (Physician
Anterior to Patient)
• Patient position: seated.
• Physician position: standing facing the patient.
• Technique:
- Both of the physician’s forearms are placed on the patient’s shoulders as close to
the patient’s neck as is possible.
- The physician places the pad of his index or middle finger of his monitoring hand
on the angle of the involved rib on the side of the somatic dysfunction (The left
finger contacts the patient's R3 right rib in this example).
- The proximal part of the physician’s forearm on the side opposite to the involved
side, which is anterior to the patient’s shoulder, pushes the shoulder on that side
posteriorly (right forearm pushes the left shoulder posteriorly which causes the
right side and especially the rib somatic dysfunction to be rotated anteriorly).
- The physician’s forearm on the side of the dysfunction pushes downwards on that
shoulder to introduce sidebending to the level of the rib dysfunction.
- The physician introduces a downward pressure through the patient’s shoulders
with slightly more pressure exerted on the side of the dysfunction towards the
monitoring finger.
- While maintaining the compression, the patient’s upper body is gently carried
through the sidebending and rotation into the opposite directions (sidebending left
and rotating right in this case)
- The patient's body is brought back to the neutral position and the thoracic
somatic dysfunction is reassessed.

Anterior/Inhalation Rib (Anterior 3rd Rib on the Right) – Patient Seated
(Physician Anterior to Patient)

Posterior/Exhalation Rib (Posterior 3rd Rib on the Right) – Patient Seated
(Physician Anterior to Patient)
• Patient position: seated.
• Physician position: standing facing the patient.
• Technique:
- Both of the physician’s forearms are placed on the patient’s shoulders as close to
the patient’s neck as is possible.
- The physician places the pad of his index or middle finger of his monitoring hand
on the angle of the involved rib on the side of the somatic dysfunction (The left
finger contacts the patient's R3 right rib in this example).
- The proximal part of the physician’s forearm on the same side as the involved
side, which is anterior to the patient’s shoulder, pushes the shoulder on that side
posteriorly (left forearm pushes the right shoulder posteriorly which causes the
right side and especially the rib somatic dysfunction to be rotated posteriorly).
- The physician’s forearm on the side of the dysfunction pushes downwards on that
shoulder to introduce sidebending to the level of the rib dysfunction.
- The physician introduces a downward pressure through the patient’s shoulders
with slightly more pressure exerted on the side of the dysfunction towards the
monitoring finger.
- While maintaining the compression, the patient’s upper body is gently carried
through the sidebending and rotation into the opposite directions (sidebending left
and rotating left in this case)
- The patient's body is brought back to the neutral position and the thoracic
somatic dysfunction is reassessed.

Posterior/Exhalation Rib (Posterior 3rd Rib on the Right) – Patient Seated
(Physician Anterior to Patient)

Posterior/Exhalation Rib (Posterior 6th Rib on the Right) or Anterior/Inhalation Rib (6th Rib on the Right) –
Patient Seated (Physician Anterior to Patient)
• Patient position: seated.
• Physician position: standing behind the patient.
• Technique:
-The physician places the pad of his thumb of his monitoring hand on the angle of the rib somatic dysfunction
(The right thumb contacts the patient's R6 right rib angle). The palm of that hand contours to and supports
the patient's back.
-The patient is instructed to take his or her hand on the side of the somatic dysfunction and reach anteriorly
and across to hold the opposite side shoulder (right hand on left shoulder).
-The physician places his axilla on the side opposite to the rib somatic dysfunction on the opposite shoulder
and reaches the non-monitoring hand anterior and across to hold the shoulder on the side of the dysfunction
(the physician’s left axilla is on the patient’s left shoulder and the physician’s left hand is upon the patient’s
right shoulder).
-The physician sidebends the patient towards the side of the rib dysfunction
-If the rib dysfunction is posterior, the physician rotates the patient posterior on that side (rotates right side
backwards) down to and towards the posterior rib angle. If the rib dysfunction is anterior, the physician
rotates the patient anterior on that side (rotates right side forwards) down to the posterior rib angle (Figure
74-5B). The physician can further exaggerate this if necessary until softening of the underlying tissue is
noted. Slight flexion or extension is added, depending on the reaction to the positioning.
-The physician puts downward compression with the contacts of the palm of his (left) hand on the patient’s
right shoulder and through his (left) axilla on the patient’s left shoulder until further soft tissue is noted at the
monitoring finger.
-While maintaining the compression, the patient’s body is gently carried through neutral position and into the
barrier directions (sidebending left and rotating left for a posterior right rib; sidebending left and rotating right
for an anterior right rib in this case).
-The patient's body brought back to the neutral position and the rib somatic dysfunction is reassessed.

Posterior/Exhalation Rib (Posterior 6th Rib on the Right) or Anterior/Inhalation
Rib (6th Rib on the Right) – Patient Seated (Physician Anterior to Patient)

Posterior/Exhalation Rib (Posterior 6th Rib on the Right) or Anterior/Inhalation Rib (6th Rib on the Right) anterior – Patient
Side lying)
• Patient position: lying on side with somatic dysfunction side up.
• Physician position: standing facing the patient.
• Technique:
-The patient's arm on the side of the rib somatic dysfunction is flexed and abducted and the hand is placed on his or her own
neck.
-The physician places his cephalad arm through the opening created by the patient's bent arm and places the palm and
fingers of that hand over the scapula on that side (physician’s right hand on patient’s right scapula).
-The physician places the pad of his index or middle finger of the other (caudad) monitoring hand on the rib angle at the level
of the somatic dysfunction (The left finger contacts the patient's right sixth rib angle in this example). The palm and fingers of
this hand contour to the patient's body and maintain position of the trunk throughout much of the treatment. The physician
may rest his elbow or forearm on the patient's iliac crest on that side as well (left elbow on right hip).
-If the diagnosis is a posterior rib, the patient’s (right) shoulder is pushed posterior by the physician’s cephalad (left) hand,
rotating the patient’s upper body towards the direction of the freedom of motion of the somatic dysfunction (Figure 74-6A). If
the diagnosis is an anterior rib, the patient’s (right) shoulder is pulled anterior by the physician’s cephalad (left) hand, rotating
the patient’s upper body forwards and towards the direction of the freedom of motion of the somatic dysfunction (Figure 74-
6B).
-Compression (approximately five pounds of pressure) and sidebending are introduced by the physician using his cephalad
arm to push the patient’s shoulder (right in this example) towards the hip on the same side until relaxation is noted in the soft
tissue being monitored over the rib.
-Compression is maintained.
-If the diagnosis is of a posterior rib the physician uses his caudad arm on the patient’s hip and rolls the pelvis posterior. The
cephalad hand and arm pull the patient’s shoulder anteriorly and pulls the scapula up towards the patient’s head
(sidebending left and rotating left in this case into the barrier directions). If the diagnosis is of an anterior rib the physician
uses his caudad arm on the patient’s hip and rolls the pelvis anterior. The cephalad hand and arm pull the patient’s shoulder
posteriorly and pulls the scapula up towards the patient’s head (sidebending left and rotating right in this case into the barrier
directions).
-The patient's body is brought back to the neutral position and the rib somatic dysfunction level is reassessed.
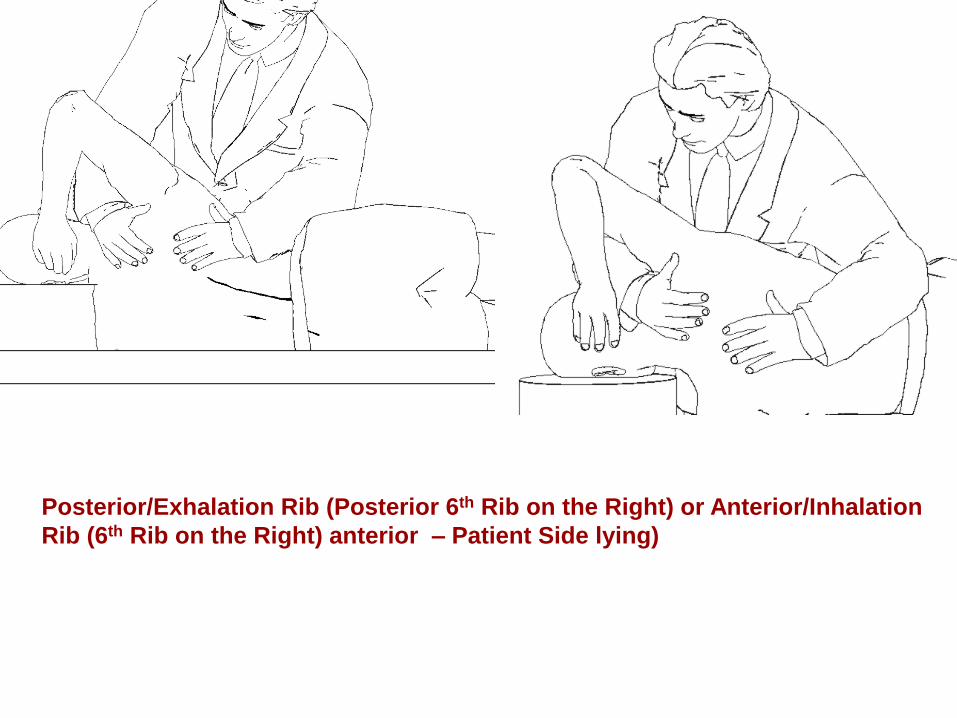
Posterior/Exhalation Rib (Posterior 6th Rib on the Right) or Anterior/Inhalation
Rib (6th Rib on the Right) anterior – Patient Side lying)

Posterior/Exhalation Rib (Posterior 6th Rib on the Right) – Patient supine
• Patient position: supine with the shoulder on the involved side slightly off the edge of
the table
• Physician position: standing facing the patient.
• Technique:
-The physician places the pad of his index or middle finger of his caudad
monitoring hand on the costal cartilage on the side and at the level of the rib
somatic dysfunction (The right finger contacts the patient's 6th rib somatic
dysfunction in this example).
-The physician takes hold of the patient’s wrist of the arm on the side of the rib
somatic dysfunction (The physician’s left hand holds the patient’s right wrist in this
example)
-The physician introduces a long axis traction by pulling the patient’s (right) arm
towards the patient’s feet until relaxation is noted at the monitoring finger)
-The physician introduces shoulder extension, abduction and external rotation
while maintaining traction.
-While maintaining the traction, the patient’s arm is flexed and adducted across the
patient’s body
-Eventually the patient’s arm is brought across to the opposite shoulder or higher.
-The patient's arm is brought back to the neutral position and the rib dysfunction is
reassessed.

Posterior/Exhalation Rib (Posterior 6th Rib on the Right) – Patient supine

Anterior/Inhalation Rib (Anterior 6th Rib on the Right) – Patient supine
• Patient position: supine with the shoulder on the involved side slightly off the edge of
the table
• Physician position: standing facing the patient.
• Technique:
The physician places the pad of his index or middle finger of his caudad monitoring
hand on the costal cartilage on the side and at the level of the rib somatic
dysfunction (The right finger contacts the patient's 6th rib somatic dysfunction in
this example).
The physician takes hold of the patient’s wrist of the arm on the side of the rib
somatic dysfunction (The physician’s left hand holds the patient’s right wrist in this
example)
The physician introduces a long axis traction by pulling the patient’s (right) arm
towards the patient’s feet until relaxation is noted at the monitoring finger)
The physician introduces shoulder flexion, adduction across the anterior side of the
patient’s body and internal rotation while maintaining traction.
While maintaining the traction, the patient’s arm is further flexed and abducted
anteriorly and laterally from the patient’s body
The patient's arm is brought back to the neutral position and the rib dysfunction is
reassessed.

Anterior/Inhalation Rib (Anterior 6th Rib on the Right) – Patient supine

LUMBAR

Lumbar Type II Extended
(L3 E SR RR) – Patient supine
B
Lumbar Type II Flexed
(L3 F SR RR) – Patient supine
1. monitoring cephalad hand on the posterior transverse process on the side of the sidebending/rotation
2. other hand to grasp the patient’s leg on the dysfunctional side and flex the patient’s hip and knee until
motion is felt at the monitoring finger
3. abducts the patient’s knee of the affected side
4. externally rotates the leg
3. adducts the patient’s knee of the affected side
4. internally rotates the leg
5. puts downward compression with arm or shoulder towards the lumbar somatic dysfunction
6. adduction across the midline and 7. slightly increased hip flexion by engaging the
extension barrier, 8. then through neutral position and into the
barrier directions
6. Then add abduction and
7. external rotation across and
8. slightly decreased hip flexion

Lumbar Type II Extended
(L3 E SR RR) – Patient supine
B
Lumbar Type II Flexed
(L3 F SR RR) – Patient supine
1. monitoring cephalad hand on the posterior transverse process on the side of the sidebending/rotation
2. other hand to grasp the patient’s leg on the dysfunctional side and flex the patient’s hip and knee until
motion is felt at the monitoring finger
3. abducts the patient’s knee of the affected side
4. externally rotates the leg
3. adducts the patient’s knee of the affected side
4. internally rotates the leg
5. puts downward compression with arm or shoulder towards the lumbar somatic dysfunction
6. adduction across the midline and 7. slightly increased hip flexion by engaging the
extension barrier, 8. then through neutral position and into the
barrier directions
6. Abduction
7. external rotation across and
8. slightly decreased hip flexion

Lumbar Type II Extended Somatic Dysfunction
(L3 E SR RR) – Patient supine
• Lumbar Type II Extended Somatic Dysfunction (L3 E SR RR) – Patient supine
• 1. Patient position: supine.
• 2. Physician position: standing at the side of the patient, typically on the same side, facing the patient.
• 3. Technique:
• The physician places the pad of his index or middle finger of his monitoring cephalad hand (the hand that is closer to the patient’s head) on the posterior transverse process on the side of the sidebending/rotation component of the somatic dysfunction (The left finger contacts the patient's L3 right transverse process in this example).
• The physician uses his other hand to grasp the patient’s leg on the dysfunctional side and flex the patient’s hip and knee until motion is felt at the monitoring finger (The physician’s right hand grasps and flexes the patient’s right leg in this example).
• The physician abducts the patient’s knee of the affected side and externally rotates the leg until motion and soft tissue relaxation is felt at the monitoring finger. This creates relative extension, rotation, and sidebending to the somatic dysfunction. (Figure 52-1A) A modification is for the physician to insert the forearm of his caudad arm from lateral to medial beneath the patient’s knee and places his hand on the patient’s anterior thigh. This can add torsion to the modifying and localizing forces (Figure 52-1B)
• The physician puts downward compression with his caudad (right) arm or shoulder from the patient’s knee through his femur, towards the pelvis and hip, and directed towards the lumbar somatic dysfunction until further soft tissue is noted at the monitoring finger.
• While maintaining the compression, the patient’s leg is gently carried through adduction across the midline and slightly increased hip flexion by engaging the extension barrier, then through neutral position and into the barrier directions (sidebending left and rotating left in this case).
• The patient's hip and knee are brought back to the neutral position by extending both and then the Lumbar somatic dysfunction is reassessed.

•Lumbar Type II Extended Somatic Dysfunction (L3 E SR RR) – Patient supine

•Lumbar Type II Extended Somatic Dysfunction (L3 E SR RR) – Patient supine (Modification)

Lumbar Type II Flexed Somatic Dysfunction (L3
F SR RR) – Patient supine
• Lumbar Type II Flexed Somatic Dysfunction (L3 F SR RR) – Patient supine
• 1. Patient position: supine.
• 2. Physician position: standing at the side of the patient, typically on the same side, facing the patient.
• 3. Technique:
• The physician places the pad of his index or middle finger of his monitoring cephalad hand (the hand that is closer to the patient’s head) on the posterior transverse process on the side of the sidebending/rotation component of the somatic dysfunction (The left finger contacts the patient's L3 right transverse process in this example).
• The physician uses his other hand to grasp the patient’s leg on the dysfunctional side and flex the patient’s hip and knee until motion and soft tissue relaxation is felt at the monitoring finger (The physician’s right hand grasps and flexes the patient’s right leg in this example).
• The physician adducts the patient’s knee of the affected side and internally rotates the leg until motion and soft tissue relaxation is felt at the monitoring finger. This creates relative flexion, rotation, and sidebending to the somatic dysfunction. (Figure 52-2A) A modification is for the physician to insert the forearm of his caudad arm beneath the patient’s knee from medial to lateral and place his hand on the patient’s lateral thigh. This can add torsion to the modifying and localizing forces (Figure 52-2B)
• The physician puts downward compression with his caudad (right) arm or shoulder from the patient’s knee through his femur, towards the pelvis and hip, and directed towards the lumbar somatic dysfunction until further soft tissue is noted at the monitoring finger.
• While maintaining the compression, the patient’s leg is gently carried through abduction and external rotation across and slightly decreased hip flexion by engaging the extension barrier, then through neutral position and into the barrier directions (sidebending left and rotating left in this case).
• The patient's hip and knee are brought back to the neutral position by extending both and then the Lumbar somatic dysfunction is reassessed.

•Lumbar Type II Flexed Somatic Dysfunction (L3 F SR RR) – Patient supine

•Lumbar Type II Flexed Somatic Dysfunction (L3 F SR RR) – Patient supine (Modification)

SACRUM
&
PELVIS

Anterior Ilium/Anterior Innominate (Right)
– Patient supine1. Anterior Ilium/Anterior Innominate (Right) – Patient supine
2. 1. Patient position: supine.
3. 2. Physician position: standing at the side of the patient, typically on the same side, facing the patient.
4. 3. Technique:
5. The physician places the pad of his index or middle finger of his monitoring cephalad hand (the hand that is closer to the patient’s head) medial to the posterior superior iliac spine (PSIS) as a means of following the iliosacral motion (The left finger contacts the patient's medial to PSIS on the right).
6. The physician uses his other hand to grasp the patient’s leg on the dysfunctional side and flexes the patient’s hip and knee until motion is felt at the monitoring finger (The physician’s right hand grasps and flexes the patient’s right leg in this example). (Figure 64-1A)
7. The physician abducts the patient’s knee of the affected side and externally rotates the leg until motion and soft tissue relaxation is felt at the monitoring finger. (Figure 64-1B) A modification is for the physician to insert the forearm of his caudad arm from lateral to medial beneath the patient’s knee and places his hand on the patient’s anterior thigh. This can add torsion to the modifying and localizing forces.
8. The physician puts downward compression with his caudad (right) arm or shoulder from the patient’s knee through his femur, towards the pelvis and hip, and directed towards sacroiliac joint until further soft tissue is noted at the monitoring finger.
9. While maintaining the compression, the patient’s leg is gently carried through adduction in an arc across the midline and with increased hip flexion by engaging the sacroiliac barrier (rotating the innominate/ilum posteriorly).
10. The patient's hip and knee are brought back to the neutral position by extending both and then the iliosacral somatic dysfunction is reassessed.

•Anterior Ilium/Anterior Innominate (Right) – Patient supine
A
B

Posterior Innominate /Posterior
Ilium (Right) – Patient supine• Posterior Innominate /Posterior Ilium (Right) – Patient supine
• 1. Patient position: supine.
• 2. Physician position: standing at the side of the patient, typically on the same side, facing the patient.
• 3. Technique:
• The physician places the pad of his index or middle finger of his monitoring cephalad hand (the hand that is closer to the patient’s head) medial to the posterior superior iliac spine (PSIS) as a means of following the iliosacral motion (The left finger contacts the patient's medial to PSIS on the right).
• The physician uses his other hand to grasp the patient’s leg on the dysfunctional side and fully flexes the patient’s hip (greater than 90 degrees) and knee until motion is felt at the monitoring finger. The knee is adducted (The physician’s right hand grasps and flexes the patient’s right leg in this example).
• The physician puts downward compression with his caudad (right) arm or shoulder from the patient’s knee through his femur, towards the pelvis and hip, and directed towards sacroiliac joint until further soft tissue is noted at the monitoring finger. (Figure 64-2A).
• The physician abducts the patient’s knee of the affected side and externally rotates the leg until motion and soft tissue relaxation is felt at the monitoring finger.
• The physician then uses his abdomen or hip to maintain compression through the femur. (Figure 64-2B).
• While maintaining the compression and external rotation, the patient’s leg is gently carried through extension and to the neutral position.
• The iliosacral somatic dysfunction is reassessed.

•Posterior Innominate /Posterior Ilium (Right) – Patient supine
A
B

Upslipped Innominate (Right) –
Patient supine• Upslipped Innominate (Right) – Patient supine
• Patient position: supine.
• Physician position: initially standing at the foot of the table.
• Technique:
• The physician grasps the ankle on the dysfunctional side with both hands and externally rotates and compresses the leg towards the hip and iliosacral joint. (Figure 64-3)
• The physician then internally rotates the patient’s leg on the involved side until just prior to the ASIS lifting upwards.
• The physician then progressively reduces the compression and transitions to traction until localized to the involved joint (Occasionally, a slighter sharper long axis tug can be placed to encourage downslip of the somatic dysfunction).
• The Still technique for a posteriorly rotated innominate/ilium is applied; followed by:
• The Still technique applied for an anteriorly rotated innominate/ilium.
• This series is designed to “ratchet” the upslipped innominate/ilium into place.
• The dysfunction is reassessed

•Upslipped Innominate (Right) – Patient supine

Downslipped Innominate (Right)
– Patient supine• Downslipped Innominate (Right) – Patient supine
• Patient position: supine.
• Physician position: initially standing at the foot of the table.
• Technique:– The physician grasps the ankle on the dysfunctional side with both
hands and externally rotates and tractions the leg towards the physician by pulling parallel to the table.
– The physician then internally rotates the patient’s leg on the involved side until just prior to the ASIS lifting upwards.
– The physician then progressively reduces the traction and transitions to compression until localized to the involved joint
– The Still technique for an anteriorly rotated innominate/ilium is applied; followed by:
– The Still technique applied for a posteriorly rotated innominate/ilium.
– This series is designed to “ratchet” the downslipped innominate/ilium into place.
– The dysfunction is reassessed

•Downslipped Innominate (Right) – Patient supine

PUBIC DYSFUNCTIONS
Pubic Ramus Dysfunction• PUBIC DYSFUNCTIONS
• Pubic Ramus Dysfunction
• Patient position: supine.
• Physician position: standing at the foot of the table.
• Technique:– The physician grasps the patient’s ankles and flexes the patient’s hips and knees and the
places the patient’s feet upon the table. The knees will be bent approximately 90 degrees and the feet will be placed together.
– The physician places both of his palms of his hands on the anterior inferior knees and introduces a long axis compression through the femurs towards the pubic bones.
– While maintaining the compression, the physician symmetrically separates the patient’s knees laterally creating leg external rotation to the approximate soft tissue barrier. (Figure 64-4)
– The physician then releases the patient’s knees and then grasps the patient’s ankles. The position of the patient’s knees is maintained by gravity and the patient’s passive compliance.
– The physician then pulls the patient’s ankle towards the physician by straightening the patient’s legs until the hips and knees are in a netraul position
– The pubic dysfunctions are reassessed.

PUBIC DYSFUNCTIONS Pubic Ramus Dysfunction

SACRAL DYSFUNCTIONS
Unilateral Sacral Shear/Flexion Dysfunction (Right)• SACRAL DYSFUNCTIONS
• Unilateral Sacral Shear/Flexion Dysfunction (Right)– Patient position: supine.
– Physician position: standing at the side of the table facing the patient on the side of the dysfunction.
– Technique:
– The physician places the pad of his index or middle finger of his monitoring caudad hand (the hand that is closer to the patient’s legs) under the patient and monitors just medial to the posterior superior iliac spine (PSIS) on the involved side (left).
– The physician’s cephalad hand (left) reaches across and down from the patient’s body and grasps the patient’s opposite (left) knee and flexes that hip and knee to approximately 90 degrees or to the point where motion is noted at the monitoring finger. (64-5A)
– The opposite (left) knee is abducted and adducted in an alternating sequence until relaxation is noted at the monitoring finger. The position is temporarily maintained and compression is introduced from that knee downwards through the femur towards the sacroiliac joint. (64-5B)
– The physician move’s the monitoring hand from beneath the patient to the ankle of the opposite (left) leg.
– While maintaining the compression with the cephalad (left) hand, the physician then pushes the patient’s (right) leg laterally.
– The patient’s (left) knee is then adducted past the midline. The left side of the pelvis may lift slightly from the table. (64-5C)
– The patient’s (left) ankle is then brought towards and past the midline (towards the physician). (64-5D)
– The compression is maintained and the patient’s (left) leg is gradually straightened.
– The sacroiliac dysfunction is reexamined.

SACRAL DYSFUNCTIONS Unilateral Sacral Shear/Flexion Dysfunction
(Right)

Sacral Rotations and Torsions (Left on Left)• Sacral Rotations and Torsions (Left on Left)
• Patient position: supine.
• Physician position: standing at the side of the table facing the patient on the side of the dysfunction.
• Technique:– The physician places the pad of his index or middle finger of his monitoring
cephalad hand (the hand that is closer to the patient’s head) under the patient and monitors just medial to the posterior superior iliac spine (PSIS) on deep sacral sulcus side (right)
– The physician’s other (caudad) hand scoops both of the patient’s legs from under the knees and lifts both and bends the knees 90 degrees or more until motion is felt at the monitoring finger. (64-6A)
– The physician then shifts the monitoring (cephalad) hand from beneath the patient and transfers it to the patient’s knees. The other (caudad) hand is transferred to the patient’s ankles. (64-6B)
– The patient’s knees are deviated to the side opposite to the deep sulcus (left) (towards the physician).
– The patient’s feet are deviated towards the same side as the knees (left). (64-6C)
– The physician then simultaneously shifts the patient’ knees and ankles towards the opposite direction (right) across the midline (away from the physician). (64-6D)
– At approximately 45 degrees from the vertical, the physician gradually begins to extend the patient’s legs.
– Once the legs are back upon the table the somatic dysfunction can be reassessed.

•Sacral Rotations and Torsions (Left on Left)

Upper Exhalation/Posterior Rib (Posterior 2nd Rib on Right)- Seated
• Patient position: seated.
• Physician position: standing behind the patient on the dysfunctional side (right
side in this example).
• Technique:
- The physician places the pad of his thumb of his monitoring hand on the angle
of the rib somatic dysfunction (The left finger contacts the patient's R2 right rib in
this example). The palm of that hand can contour to the back and the fingers
extend towards and over the shoulder on the side of the dysfunction.
- With the other hand, the physician grasps the patient’s elbow on the side of the
dysfunction (right hand holds right elbow).
- The physician uses the arm as a level and extends the shoulder by bringing the
elbow posteriorly and up to the level of the monitoring finger. Some amount of
slight abduction may occur as the shoulder extends.
- Compression is introduced from the elbow along the humerus towards the rib.
- The physician introduces abduction of the shoulder by moving the elbow
laterally and then into adduction-flexion by bringing the elbow anteriorly through
an arc.
- The upper arm will come to rest against the patient’s chest.
•Compression is released.
- The arm is brought back to the patient’s side and the rib somatic dysfunction is
reassessed.


References
• Hazzard, C. The Practice and Applied Therapeutics of Osteopathy, Third revised edition, Journal Printing, Co. Kirksville, MO, 1905
• Schiowitz, S. Facilitated positional release, JAOA 90 (1990), 145-155
• Still, A.T. Osteopathy: Research and Practice Kirksville, MO, 1910 (eastland Press reprint, Seattle, WA, 1992)
• Still, A.T. The Philosophy and Mechanical Principles of OsteopathyHudson Kimberly Publishing Co., Kansas City, MO, 1902 (Reprinted by Osteopathic Enterprise, Kirksville, MO)
• Van Buskirk, R.L. A manipulative technique of Andrew Taylor Still, JAOA, 96 (1996), 597-602
• Van Buskirk, R.L. The Still Technique Manual, American Academy of Osteopathy, Indianapolis, IN, 1999

THANKS