stickley done lightly - fine woodworking · buying lumber by the log allows book-matching finding...
TRANSCRIPT
80 F I N E W O O D W O R K I N G Photo above: Jeffrey A. Rycus
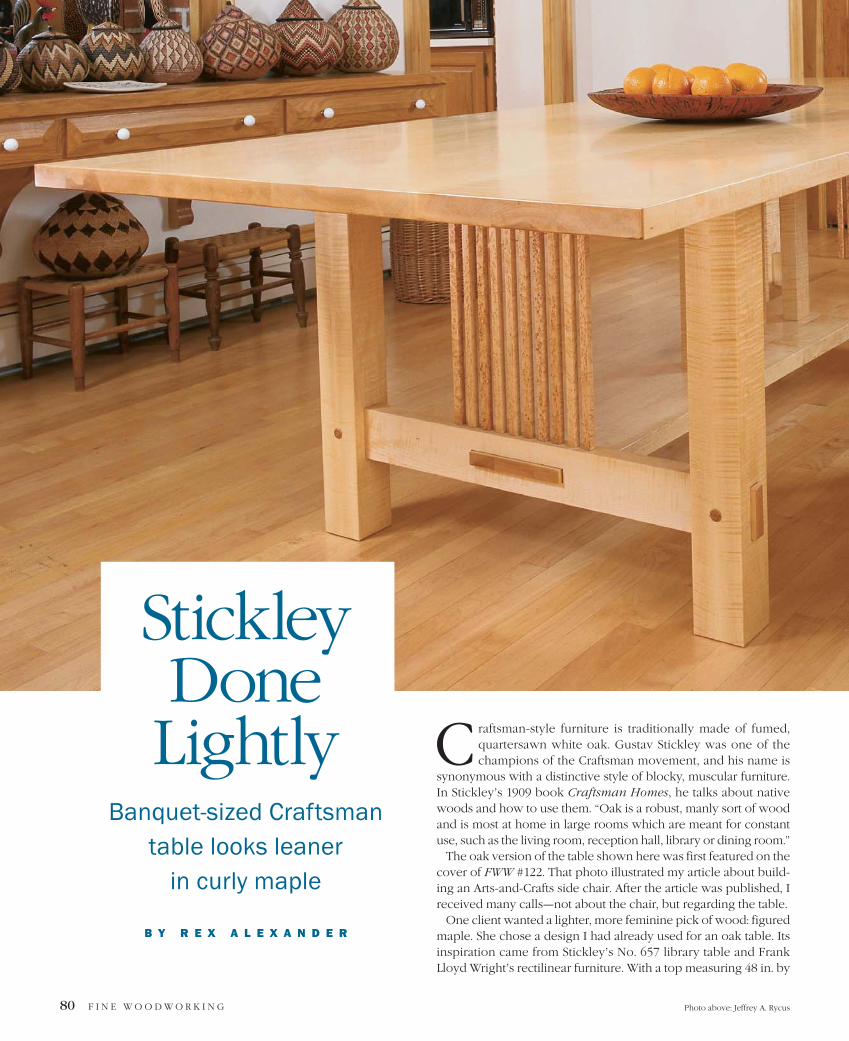
raftsman-style furniture is traditionally made of fumed,quartersawn white oak. Gustav Stickley was one of thechampions of the Craftsman movement, and his name is
synonymous with a distinctive style of blocky, muscular furniture.In Stickley’s 1909 book Craftsman Homes, he talks about nativewoods and how to use them. “Oak is a robust, manly sort of woodand is most at home in large rooms which are meant for constantuse, such as the living room, reception hall, library or dining room.”
The oak version of the table shown here was first featured on thecover of FWW #122. That photo illustrated my article about build-ing an Arts-and-Crafts side chair. After the article was published, Ireceived many calls—not about the chair, but regarding the table.
One client wanted a lighter, more feminine pick of wood: figuredmaple. She chose a design I had already used for an oak table. Itsinspiration came from Stickley’s No. 657 library table and FrankLloyd Wright’s rectilinear furniture. With a top measuring 48 in. by
C
StickleyDone
LightlyBanquet-sized Craftsman
table looks leaner in curly maple
B Y R E X A L E X A N D E R
M A Y / J U N E 1 9 9 8 81Photos except where noted: Anatole Burkin
110 in., it’s meant for entertaining large groups. Even with bulkylegs to support its mass, the use of curly maple (finished in a lighttone) gives the table a more feminine, lighter presence.
Birds-eye maple was my customer’s wood of choice. But I knewit would be nearly impossible to find birds-eye in the large di-mensions required: 8⁄4 in. thick and 10 ft. long. We settled on curlymaple. Birds-eye was selected as a secondary wood, and its usewas limited to the spindles.
Buying lumber by the log allows book-matchingFinding 200 bd. ft. of curly maple in the lengths I needed alsoproved to be difficult, so I sought out a timber broker and sawyer.I decided to buy whole logs and have them resawn, which wouldtake extra work and time. But it was worth the trouble because Iwas able to tell the sawyer just how I wanted the logs cut. Usingwood from the same tree guaranteed that I would be able to
match the figure and color. (For more on locating a sawyer andcutting logs, see FWW #128, pp. 52-55.)
My customer told me that she didn’t want her table to appear“too bossy,” that is, she didn’t want it too wild with figure. So I hadthe logs flitchsawn (sawed completely through in successive lay-ers). This method yields a combination of flat or tangential grainand quartersawn or radial grain. I ended up with boards that hada lot of curl in the quartersawn areas and calmer grain in the flat-sawn areas. The areas of greatest curl were on the outside edgesof the log.
I like to use air-dried wood because it machines cleaner, withless tearout. But air drying, I was told, wasn’t an option with thecurly maple. Curl is actually an abnormality to maple, and it caus-es stress in the wood. Kiln drying, I was told, would help stabilizethe maple. Well, I hate to imagine what that stack of lumber wouldhave looked like if I had air dried it. Curly maple was an apt de-
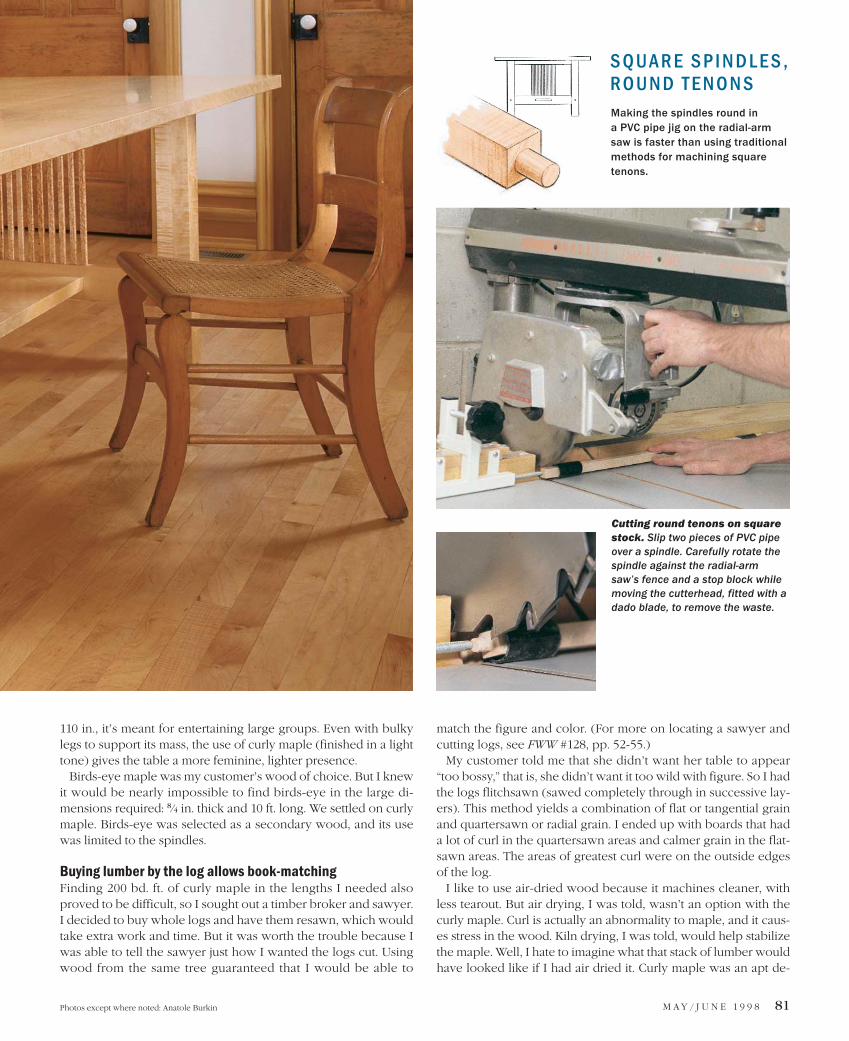
S Q U A R E S P I N D L E S , R O U N D T E N O N S
Cutting round tenons on squarestock. Slip two pieces of PVC pipeover a spindle. Carefully rotate thespindle against the radial-armsaw’s fence and a stop block whilemoving the cutterhead, fitted with adado blade, to remove the waste.
Making the spindles round in a PVC pipe jig on the radial-armsaw is faster than using traditionalmethods for machining squaretenons.
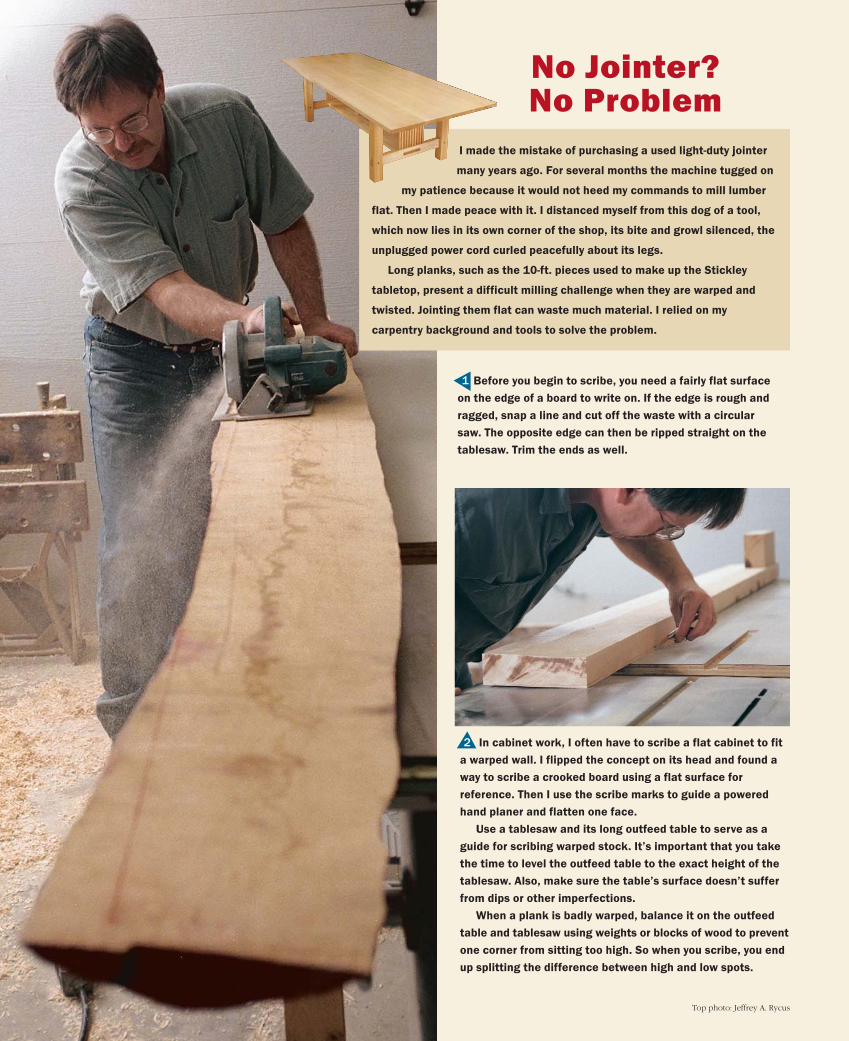
In cabinet work, I often have to scribe a flat cabinet to fit
a warped wall. I flipped the concept on its head and found a
way to scribe a crooked board using a flat surface for
reference. Then I use the scribe marks to guide a powered
hand planer and flatten one face.
Use a tablesaw and its long outfeed table to serve as a
guide for scribing warped stock. It’s important that you take
the time to level the outfeed table to the exact height of the
tablesaw. Also, make sure the table’s surface doesn’t suffer
from dips or other imperfections.
When a plank is badly warped, balance it on the outfeed
table and tablesaw using weights or blocks of wood to prevent
one corner from sitting too high. So when you scribe, you end
up splitting the difference between high and low spots.
2
I made the mistake of purchasing a used light-duty jointer
many years ago. For several months the machine tugged on
my patience because it would not heed my commands to mill lumber
flat. Then I made peace with it. I distanced myself from this dog of a tool,
which now lies in its own corner of the shop, its bite and growl silenced, the
unplugged power cord curled peacefully about its legs.
Long planks, such as the 10-ft. pieces used to make up the Stickley
tabletop, present a difficult milling challenge when they are warped and
twisted. Jointing them flat can waste much material. I relied on my
carpentry background and tools to solve the problem.
Before you begin to scribe, you need a fairly flat surface
on the edge of a board to write on. If the edge is rough and
ragged, snap a line and cut off the waste with a circular
saw. The opposite edge can then be ripped straight on the
tablesaw. Trim the ends as well.
1
No Jointer?No Problem
Top photo: Jeffrey A. Rycus
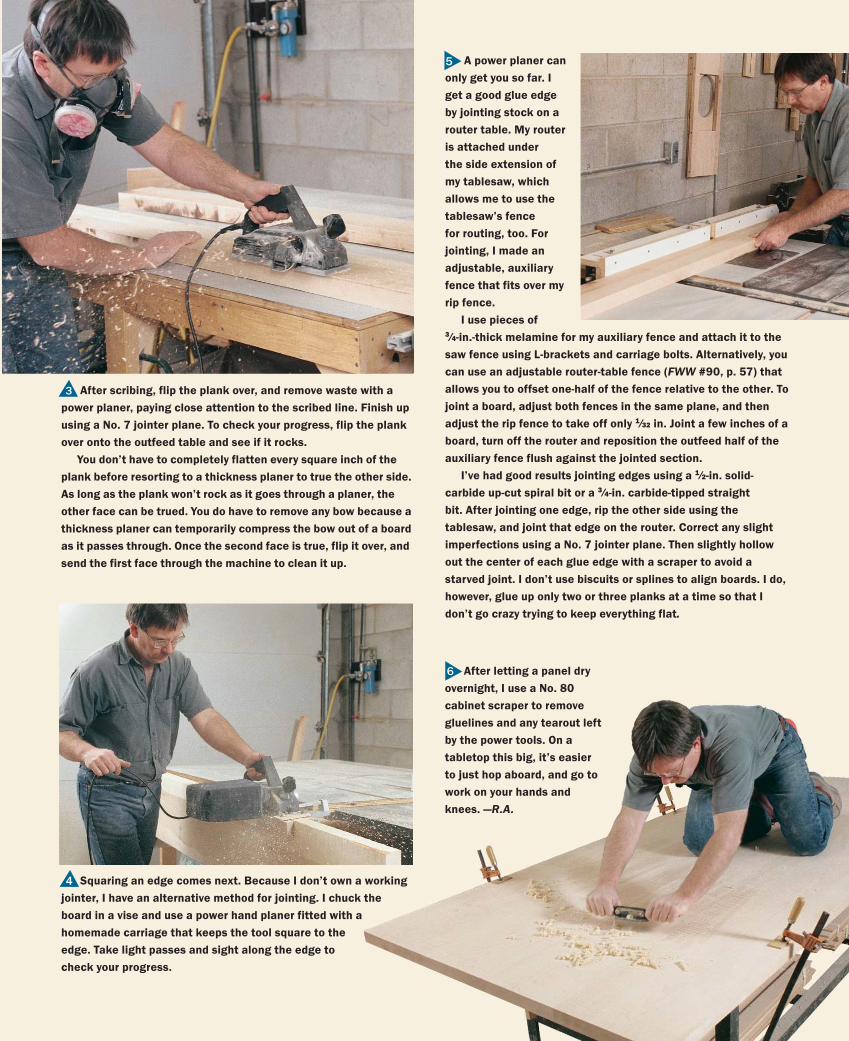
After scribing, flip the plank over, and remove waste with a
power planer, paying close attention to the scribed line. Finish up
using a No. 7 jointer plane. To check your progress, flip the plank
over onto the outfeed table and see if it rocks.
You don’t have to completely flatten every square inch of the
plank before resorting to a thickness planer to true the other side.
As long as the plank won’t rock as it goes through a planer, the
other face can be trued. You do have to remove any bow because a
thickness planer can temporarily compress the bow out of a board
as it passes through. Once the second face is true, flip it over, and
send the first face through the machine to clean it up.
A power planer can
only get you so far. I
get a good glue edge
by jointing stock on a
router table. My router
is attached under
the side extension of
my tablesaw, which
allows me to use the
tablesaw’s fence
for routing, too. For
jointing, I made an
adjustable, auxiliary
fence that fits over my
rip fence.
I use pieces of 3 ⁄4-in.-thick melamine for my auxiliary fence and attach it to the
saw fence using L-brackets and carriage bolts. Alternatively, you
can use an adjustable router-table fence (FWW #90, p. 57) that
allows you to offset one-half of the fence relative to the other. To
joint a board, adjust both fences in the same plane, and then
adjust the rip fence to take off only 1 ⁄32 in. Joint a few inches of a
board, turn off the router and reposition the outfeed half of the
auxiliary fence flush against the jointed section.
I’ve had good results jointing edges using a 1 ⁄2-in. solid-
carbide up-cut spiral bit or a 3 ⁄4-in. carbide-tipped straight
bit. After jointing one edge, rip the other side using the
tablesaw, and joint that edge on the router. Correct any slight
imperfections using a No. 7 jointer plane. Then slightly hollow
out the center of each glue edge with a scraper to avoid a
starved joint. I don’t use biscuits or splines to align boards. I do,
however, glue up only two or three planks at a time so that I
don’t go crazy trying to keep everything flat.
3
5
Squaring an edge comes next. Because I don’t own a working
jointer, I have an alternative method for jointing. I chuck the
board in a vise and use a power hand planer fitted with a
homemade carriage that keeps the tool square to the
edge. Take light passes and sight along the edge to
check your progress.
After letting a panel dry
overnight, I use a No. 80
cabinet scraper to remove
gluelines and any tearout left
by the power tools. On a
tabletop this big, it’s easier
to just hop aboard, and go to
work on your hands and
knees. —R.A.
6
4
84 F I N E W O O D W O R K I N G Photos this page: author
scription of the lumber’s condition after kiln drying (for more onflattening lumber, see pp. 82-83).
Variations on a Stickley themeThe grain—rays or flecks—found in premium quartersawn oakadds visual interest to Stickley’s rather simple furniture. I usedcurly maple to achieve a similar effect by matching up the most-figured planks and gluing them up for the massive top.
Stickley was a stickler for uniform figure on his work. Becauselegs made of solid stock only show quartersawn figure on twosides, he solved the problem by making legs from four miteredquartersawn sections (see FWW #121, pp. 54-57). Some peoplesolve the problem by simply gluing quartersawn veneer on twofaces. Because this table has an altogether different look and feel
from standard Stickley, I laminated two pieces of 8/4 book-matched stock for the legs and left it at that.
The spindles are best machined after you have dry-fit theirmatching components, which I use to mark off the location of thetenons. I machine round tenons on the ends of the spindles usinga radial-arm saw, a dado blade and two short sections of PVC pipethat allow me to rotate the stock evenly.
Using the assembled rails as a marking guide, I lay out the tenonson a piece of scrap spindle stock to set up my radial-arm saw. I fitthe radial-arm saw with a dado blade and position a stop block toestablish the tenon’s length. Before cutting, I slip a piece of plasticpipe over each end of a spindle, keeping the ends exposed. Besure there is no slop in the fit. I place the stock against the stopblock and back fence and make a cut (see the photos on p. 81).Then I rotate the spindle about 90° and make successive cuts to allfour sides to remove most of the waste. I round over the tenons bycarefully spinning the spindle/pipe fixture against the stop blockand fence while moving the dado head back and forth.
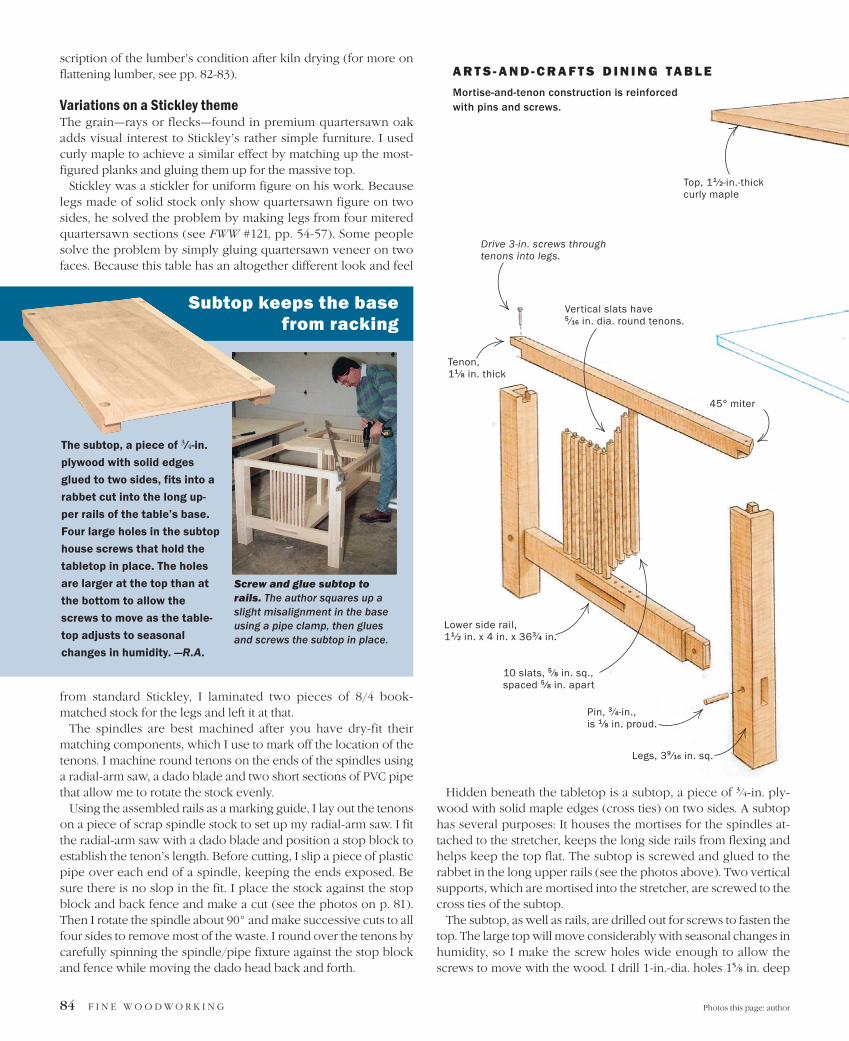
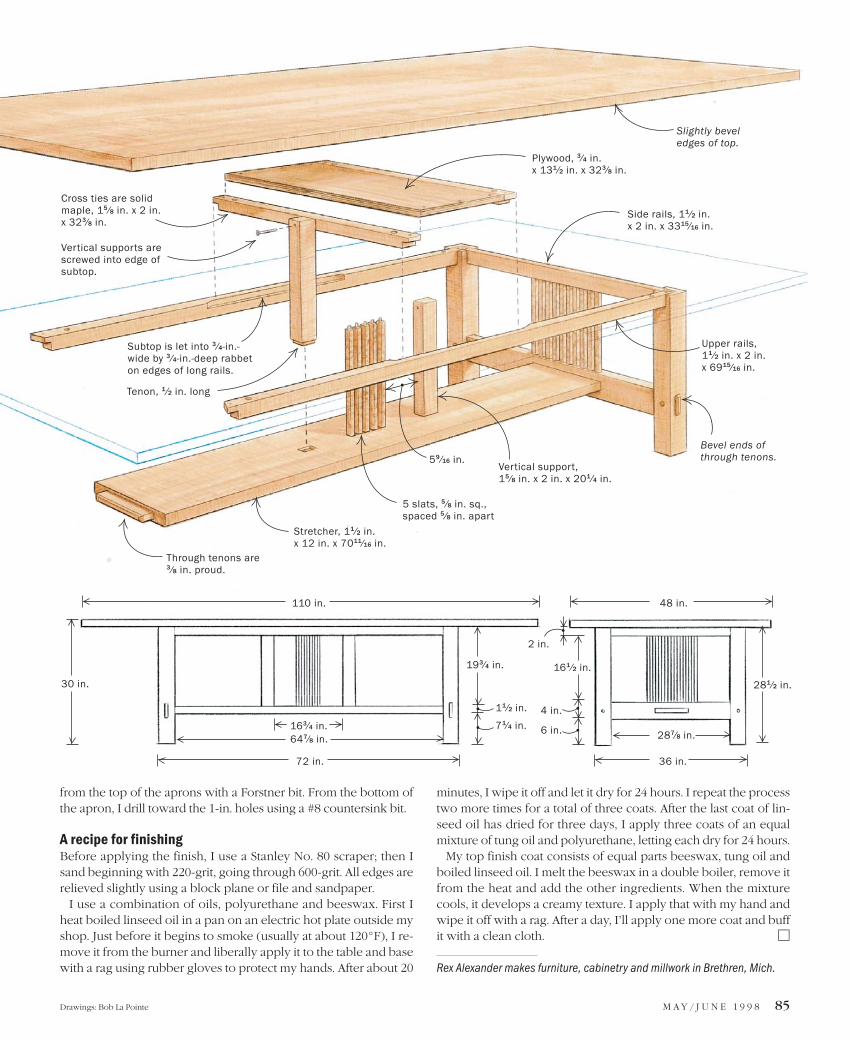
Hidden beneath the tabletop is a subtop, a piece of 3 ⁄4-in. ply-wood with solid maple edges (cross ties) on two sides. A subtophas several purposes: It houses the mortises for the spindles at-tached to the stretcher, keeps the long side rails from flexing andhelps keep the top flat. The subtop is screwed and glued to therabbet in the long upper rails (see the photos above). Two verticalsupports, which are mortised into the stretcher, are screwed to thecross ties of the subtop.
The subtop, as well as rails, are drilled out for screws to fasten thetop. The large top will move considerably with seasonal changes inhumidity, so I make the screw holes wide enough to allow thescrews to move with the wood. I drill 1-in.-dia. holes 15⁄8 in. deep
Screw and glue subtop torails. The author squares up aslight misalignment in the baseusing a pipe clamp, then gluesand screws the subtop in place.
Subtop keeps the basefrom racking
The subtop, a piece of 3 ⁄4-in.
plywood with solid edges
glued to two sides, fits into a
rabbet cut into the long up-
per rails of the table’s base.
Four large holes in the subtop
house screws that hold the
tabletop in place. The holes
are larger at the top than at
the bottom to allow the
screws to move as the table-
top adjusts to seasonal
changes in humidity. —R.A.
A R T S - A N D - C R A F T S D I N I N G TA B L E
Mortise-and-tenon construction is reinforcedwith pins and screws.
10 slats, 5 ⁄8 in. sq.,spaced 5 ⁄8 in. apart
Pin, 3 ⁄4-in., is 1 ⁄8 in. proud.
Vertical slats have 5 ⁄16 in. dia. round tenons.
Drive 3-in. screws throughtenons into legs.
45° miter
Lower side rail, 11 ⁄2 in. x 4 in. x 363⁄4 in.
Tenon,11 ⁄8 in. thick
Legs, 39 ⁄16 in. sq.
Top, 11 ⁄2-in.-thickcurly maple
M A Y / J U N E 1 9 9 8 85Drawings: Bob La Pointe
from the top of the aprons with a Forstner bit. From the bottom ofthe apron, I drill toward the 1-in. holes using a #8 countersink bit.
A recipe for finishingBefore applying the finish, I use a Stanley No. 80 scraper; then Isand beginning with 220-grit, going through 600-grit. All edges arerelieved slightly using a block plane or file and sandpaper.
I use a combination of oils, polyurethane and beeswax. First Iheat boiled linseed oil in a pan on an electric hot plate outside myshop. Just before it begins to smoke (usually at about 120°F), I re-move it from the burner and liberally apply it to the table and basewith a rag using rubber gloves to protect my hands. After about 20
minutes, I wipe it off and let it dry for 24 hours. I repeat the processtwo more times for a total of three coats. After the last coat of lin-seed oil has dried for three days, I apply three coats of an equalmixture of tung oil and polyurethane, letting each dry for 24 hours.
My top finish coat consists of equal parts beeswax, tung oil andboiled linseed oil. I melt the beeswax in a double boiler, remove itfrom the heat and add the other ingredients. When the mixturecools, it develops a creamy texture. I apply that with my hand andwipe it off with a rag. After a day, I’ll apply one more coat and buffit with a clean cloth. �
Rex Alexander makes furniture, cabinetry and millwork in Brethren, Mich.
Slightly beveledges of top.
30 in.
48 in.
5 slats, 5 ⁄8 in. sq.,spaced 5 ⁄8 in. apart
Through tenons are3 ⁄8 in. proud.
Bevel ends ofthrough tenons.
Vertical supports arescrewed into edge ofsubtop.
Subtop is let into 3 ⁄4-in.-wide by 3 ⁄4-in.-deep rabbeton edges of long rails.
Cross ties are solidmaple, 15 ⁄8 in. x 2 in.x 323⁄8 in.
Tenon, 1 ⁄2 in. long
59 ⁄16 in.Vertical support, 15 ⁄8 in. x 2 in. x 201 ⁄4 in.
Stretcher, 11 ⁄2 in. x 12 in. x 7011⁄16 in.
Upper rails, 11 ⁄2 in. x 2 in.x 6915⁄16 in.
Side rails, 11 ⁄2 in.x 2 in. x 3315⁄16 in.
Plywood, 3⁄4 in. x 131 ⁄2 in. x 323⁄8 in.
281 ⁄2 in.
287⁄8 in.
72 in.
647⁄8 in.163⁄4 in.
110 in.
36 in.
6 in.
4 in.11 ⁄2 in.
71⁄4 in.
161 ⁄2 in.193⁄4 in.
2 in.