stereo turntable system application - helpguide.sony.net · help stereo turntable system...
TRANSCRIPT

Help
Stereo Turntable System ApplicationHi-Res Audio Recorder
This Help describes the features of Hi-Res Audio Recorder and provides the instructions on using it.In this Help, screens that appear on a Windows computer connected with the turntable are used as examples.
The PDF version of this Help is also available here.
About Hi-Res Audio Recorder
What Is Hi-Res Audio Recorder?
Supported Stereo Turntable System
Audio File Formats Supported for Recording
Copyright Notice and Trademarks
Getting Ready to Use Your Computer
System Requirements
Installing Hi-Res Audio Recorder
Connecting Your Computer and the Turntable
Operation Flow from Recording to Editing to Saving
Operation Flow from Recording to Editing to Saving
Understanding the Hi-Res Audio Recorder Windows
Record Mode Window
Edit Mode Window
Recording Audio Tracks of a Vinyl Record onto Your Computer
Step 1. Turning On the Turntable
Step 2. Starting Hi-Res Audio Recorder
Step 3. Playing a Vinyl Record and Recording Audio Tracks with Hi-Res Audio Recorder
Re-recording
Precautions on Recording
Editing the Temporary File Containing Recorded Audio Tracks
Adding a Marker
1

4-589-066-12(2) Copyright 2016 Sony Corporation
Adjusting the Signal Level for the Recorded Audio Tracks (Gain Adjustment)
Exporting the Temporary File Containing Recorded Audio Tracks
Exporting the Temporary File Containing Recorded Audio Tracks
Using the Menu Bars
Using the Menu Bar (On Windows)
Using the Menu Bar (On Mac)
Error Messages
Error Messages
Troubleshooting
Installation fails.
Your computer fails to detect the connected turntable.
Hi-Res Audio Recorder does not start.
Recording does not start.
When you have recovered your computer from Sleep (Standby) mode, you do not hear audio from the computeror the turntable is not detected by the computer. (On Windows only)
Playback of the audio tracks recorded in the temporary file is interrupted (sound skipping), or waveform drawing isdelayed.
You hear electric noise in the audio currently being recorded or played.
Adjusting the signal level (gain) causes noise.
Selecting “Auto” for gain adjustment does not change the signal level.
An attempt to save a file fails.
When you are finished with saving files from one vinyl record, you are not sure how to record another one.
You are not sure how to play recorded files.
You are not sure how to edit recorded files.
You are not sure how to write recorded files to a CD.
You are not sure how to write recorded files to a disc in the DSD format.
2

Help
Stereo Turntable System ApplicationHi-Res Audio Recorder
What Is Hi-Res Audio Recorder?
Hi-Res Audio Recorder is an application to record audio tracks of a vinyl record onto your computer in the high resolutionformat.
Recording audio tracks of a vinyl record
While the turntable and your computer are connected with the USB cable supplied with the turntable, you can recordaudio tracks in the high resolution format (DSD or PCM) from the vinyl record being played on the turntable.The maximum duration available for recording is 100 minutes.
Editing the temporary file
Adding markersYou can add markers to the recorded data (temporary file) and specify ranges of data to be exported to files.Add markers to the temporary file in order to:
remove the silent section before the first audio track or the ones between tracks.divide the temporary file into individual audio track files after you have recorded all the audio tracks on either side ofa vinyl record.
You can add up to 60 markers as well as remove or move the markers.
Gain adjustmentYou can adjust the signal level (gain) for the recorded data (temporary file).You can select automatic gain adjustment as well as manual gain adjustment that allows you to increment the gain by 1dB between +1 dB and +6 dB.
Exporting the temporary file
You can export the recorded data (temporary file) to your computer.You can also enter the album name, the album artist name, track titles, and track artist names before exporting thetemporary file.
NoteHi-Res Audio Recorder is simply a recording application. It is not capable of playing recorded files stored on your computer. Toplay such files, you need to transfer the files to a high-resolution audio playback device or install a high-resolution audio playbackapplication on your computer.
You cannot import any exported files into Hi-Res Audio Recorder for re-editing.
4-589-066-12(2) Copyright 2016 Sony Corporation
3

Help
Stereo Turntable System ApplicationHi-Res Audio Recorder
Supported Stereo Turntable System
Hi-Res Audio Recorder supports the following stereo turntable system.
Supported stereo turntable systemPS-HX500(as of March, 2016)
4-589-066-12(2) Copyright 2016 Sony Corporation
4

Help
Stereo Turntable System ApplicationHi-Res Audio Recorder
Audio File Formats Supported for Recording
Hi-Res Audio Recorder supports the following audio file formats for recording.
4-589-066-12(2) Copyright 2016 Sony Corporation
DSD (DSF) PCM (WAV)
Feature
Provides wide bandwidth and great spacerepresentation to produce a smooth sound like theanalog record sound.You can play files in this format only with a computerapplication that supports the DSD (DSF) format or on ahigh-resolution audio playback device.
Provides a superb low sound to produce adynamic sound.This format is commonly used for recordingdigital audio.You can play files in this format with a widevariety of computer applications or on a high-resolution audio playback device.
Samplingfrequency
2.8 MHz, 5.6 MHz 44.1 kHz, 48 kHz, 96 kHz, 192 kHz
Bit depth 1 bit 16 bits, 24 bits
Fileextension
.dsf .wav
5
Help
Stereo Turntable System ApplicationHi-Res Audio Recorder
Copyright Notice and Trademarks
Copyright notice
The recorded music is limited to private use only. Use of the music beyond this limit requires permission of the copyrightholders.
Trademarks
IBM and PC/AT are registered trademarks of International Business Machines Corporation.Microsoft, Windows and Windows Media are either trademarks or registered trademarks of Microsoft Corporation inthe United States and/or other countries.Mac, Mac OS, OS X, macOS Sierra and macOS High Sierra are trademarks of Apple Inc., registered in the U.S. andother countries.ASIO is a trademark of Steinberg Media Technologies GmbH.DSD is a registered trademark of Sony Corporation.
All other trademarks and registered trademarks are trademarks or registered trademarks of their respective holders. Inthis Help, ® and ™ marks are not specified.
4-589-066-12(2) Copyright 2016 Sony Corporation
6

Help
Stereo Turntable System ApplicationHi-Res Audio Recorder
System Requirements
The system requirements for Hi-Res Audio Recorder are as follows:
Windows
Operating systems:Windows 7 (32/64 bit)Windows 8 (32/64 bit)Windows 8.1 (32/64 bit)Windows 10 (32/64 bit)
(The latest service pack is required.)
NoteIf the latest Windows updates are not applied, the application may not be installed successfully. Start Windows Update and installthe latest updates.
CPU:Intel Core 2 processor, 1.6 GHz or higher
Memory:1 GB or higher
Screen resolution:1,024 × 768 or higher
Audio playback device:Required
Mac
Operating systems:Mac OS X 10.9Mac OS X 10.10Mac OS X 10.11macOS Sierra (10.12)macOS High Sierra (10.13)
Screen resolution:1,024 × 768 or higher
Audio playback device:Required
Any operating systems other than the listed ones are not supported.
Note
7

Hi-Res Audio Recorder is not assured to work successfully in the following cases:
on every computer with one of the listed operating systemson a homemade computer, a computer with a user-upgraded operating system, a multi-boot computer, or a virtual computerwith the power-saving features of the computer: System Suspend or Sleep (Standby)
4-589-066-12(2) Copyright 2016 Sony Corporation
8

Help
Stereo Turntable System ApplicationHi-Res Audio Recorder
Installing Hi-Res Audio Recorder
Install Hi-Res Audio Recorder on your computer.
To uninstall Hi-Res Audio RecorderOn Windows:Click [Control Panel] - [Programs] - [Programs and Features] (when “Control Panel” is displayed in “Category” view)and uninstall “Hi-ResAudioRecorder.”The application and its driver software are uninstalled altogether.
On Mac:Drag (Hi-Res Audio Recorder icon) to the Trash and empty the Trash.
Install Hi-Res Audio Recorder on your computer.
For detailed instructions on downloading and installing the application, visit the website designated to your area ofresidency.
For customers in Europe:Access http://www.sony.eu/support, switch to the website for your country, and then search for “Hi-Res AudioRecorder.”
For customers in the U.S.A.:Access http://esupport.sony.com/ and search for “Hi-Res Audio Recorder.”
For customers in Canada:Access http://esupport.sony.com/CA/ and search for “Hi-Res Audio Recorder.”
For customers in Latin American countries:Access http://esupport.sony.com/LA and search for “Hi-Res Audio Recorder.”
For customers in China:Access https://service.sony.com.cn/ and search for “Hi-Res Audio Recorder.”
For customers in other countries/regions:Access http://www.sony-asia.com/support and search for “Hi-Res Audio Recorder.”
1
To make sure that Hi-Res Audio Recorder is installed on the computer, follow the steps below.
On Windows:
On Mac:
2
Click [Control Panel] - [Programs] - [Programs and Features] (when “Control Panel” is displayed in “Category”view) and make sure that “Hi-ResAudioRecorder” is displayed.
1.
Connect the turntable to the computer and turn it on, and then click [Control Panel] - [Hardware and Sound] -[Device Manager] (when “Control Panel” is displayed in “Category” view).
2.
Make sure that “PS-HX500” is displayed under [Sound, video and game controllers].3.
Start the Finder and click [Applications].1.Make sure that “Hi-Res Audio Recorder” is displayed.2.
9

NoteInstallation requires about 100 MB of free disk space on your computer. If the computer does not have sufficient free disk space,remove unnecessary files.
Do not abort the installation process while it is in progress.
If Hi-Res Audio Recorder is not successfully installed, uninstall the application and then install it all over again.
If you have logged onto (signed into) the computer using an account without administrator privileges (an account that is not theAdministrator account), you cannot install or uninstall Hi-Res Audio Recorder. Switch the account to the Administrator account byentering the Administrator's user name and password, or log off (sign out) the computer and then log on (sign in) with theAdministrator account once again.
4-589-066-12(2) Copyright 2016 Sony Corporation
10

Help
Stereo Turntable System ApplicationHi-Res Audio Recorder
Connecting Your Computer and the Turntable
Connect your computer and the turntable as illustrated below:
NoteThe USB output signals from the turntable can be used only for recording, not for playback.
Do not use a USB hub or a USB extension cable for connection. Be sure to use the supplied USB cable and directly connect yourcomputer and the turntable.
Be sure to insert the USB cable plug straight and all the way into the USB port. Do not force it obliquely into the port as it maycause malfunctions.
When you do not intend to record audio tracks onto your computer, it is recommended that you disconnect the USB cable fromthe turntable. With the computer connected to the turntable via the USB port, playback with another connected audio device mayproduce noise.
While the turntable and your computer are connected with the USB cable for recording, regardless of the PHONO/LINE switchselection on the back of the turntable, playing a vinyl record sends audio data optimized by the turntable's equalizer to the USBport on the computer.
To listen to the on-going recordings on the computer connected to the turntable, use the built-in speakers of the computer orconnect a pair of headphones to the computer. If the computer has any USB audio devices, except for the turntable, connected,disconnect them all.
4-589-066-12(2) Copyright 2016 Sony Corporation
Use the USB cable supplied with the turntable to connect the computer and the turntable.1
11

Help
Stereo Turntable System ApplicationHi-Res Audio Recorder
Operation Flow from Recording to Editing to Saving
The following describes a series of operations for using Hi-Res Audio Recorder to record audio tracks of a vinyl record tothe temporary file, edit the temporary file, and then save the audio tracks as recorded files on your computer.
Turn on the turntable.
For detailed information, see “Step 1. Turning On the Turntable.”
1
Start Hi-Res Audio Recorder on the computer.
For detailed information, see “Step 2. Starting Hi-Res Audio Recorder.”
2
Play a vinyl record and record its audio tracks to the temporary file with Hi-Res Audio Recorder.
For detailed information, see “Step 3. Playing a Vinyl Record and Recording Audio Tracks with Hi-Res AudioRecorder.”
3
Edit the temporary file by adding markers or adjusting the signal level (gain).
For detailed information, see “Adding a Marker” or “Adjusting the Signal Level for the Recorded Audio Tracks (GainAdjustment).”
4
12
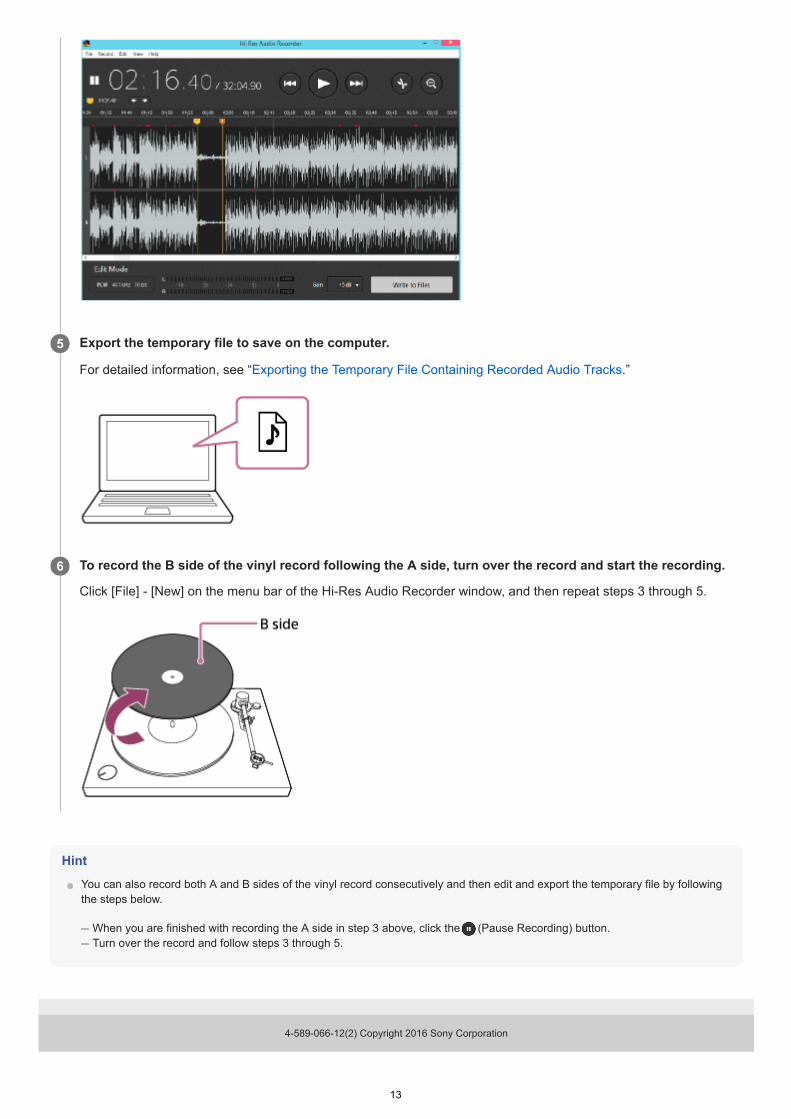
HintYou can also record both A and B sides of the vinyl record consecutively and then edit and export the temporary file by followingthe steps below.
When you are finished with recording the A side in step 3 above, click the (Pause Recording) button.Turn over the record and follow steps 3 through 5.
4-589-066-12(2) Copyright 2016 Sony Corporation
Export the temporary file to save on the computer.
For detailed information, see “Exporting the Temporary File Containing Recorded Audio Tracks.”
5
To record the B side of the vinyl record following the A side, turn over the record and start the recording.
Click [File] - [New] on the menu bar of the Hi-Res Audio Recorder window, and then repeat steps 3 through 5.
6
13

Help
Stereo Turntable System ApplicationHi-Res Audio Recorder
Record Mode Window
The following describes the Record Mode window.
Menu barProvides selectable menu options for various operations. For detailed information, see “Using the Menu Bar (OnWindows).”For the menu options on Mac, see “Using the Menu Bar (On Mac).”
1.
Time displayDisplays the duration of time from the start of the recording.
2.
OVER point indicatorsIf the signal level of the audio track being recorded reaches 0 dB (OVER point), an indicator (red dot) appears aboveevery exact OVER point on the waveforms. At the same time, lights at the right end of both or either of thesignal level meter bars as well.
3.
(Start Recording) buttonDisplays the message confirming whether to start the recording.
4.
(Pause Recording) buttonPauses the on-going recording.
5.
Waveform drawing areaDisplays waveforms of the audio track being recorded to the left of the red center line.
6.
Recording Complete buttonDisplays the Edit Mode window when you click this button upon completion of the recording.
7.
Settings display areaDisplays the window for setting the file format and the temporary file storage when you click on the area before therecording starts.
8.
Signal level meter barsLengthen or shorten according to the left and right signal levels of the audio track being recorded.
9.
14

Related TopicEdit Mode WindowStep 3. Playing a Vinyl Record and Recording Audio Tracks with Hi-Res Audio Recorder
4-589-066-12(2) Copyright 2016 Sony Corporation
If the signal level reaches 0 dB (OVER point), lights at the right end of both or either of the signal level meterbars. At the same time, an indicator (red dot) appears above the exact OVER point on the waveforms as well.The indicator for the peak level and remains lit until you click [Recording Complete] at the end of therecording.
15

Help
Stereo Turntable System ApplicationHi-Res Audio Recorder
Edit Mode Window
The following describes the Edit Mode window.
A: Edit Mode window with the zoomed-in waveform drawing areaB: Edit Mode window with the zoomed-out waveform drawing area
Menu barProvides selectable menu options for various operations. For detailed information, see “Using the Menu Bar (OnWindows).”For the menu options on Mac, see “Using the Menu Bar (On Mac).”
1.
16
Related TopicRecord Mode Window
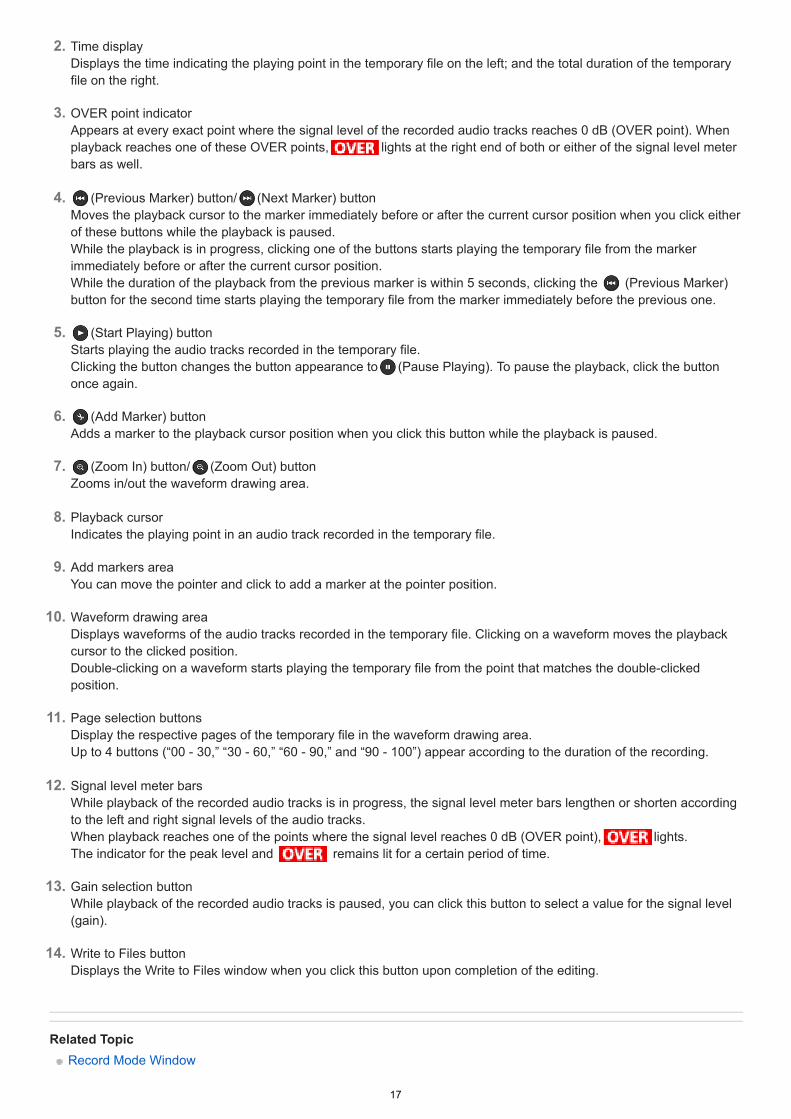
Time displayDisplays the time indicating the playing point in the temporary file on the left; and the total duration of the temporaryfile on the right.
2.
OVER point indicatorAppears at every exact point where the signal level of the recorded audio tracks reaches 0 dB (OVER point). Whenplayback reaches one of these OVER points, lights at the right end of both or either of the signal level meterbars as well.
3.
(Previous Marker) button/ (Next Marker) buttonMoves the playback cursor to the marker immediately before or after the current cursor position when you click eitherof these buttons while the playback is paused.While the playback is in progress, clicking one of the buttons starts playing the temporary file from the markerimmediately before or after the current cursor position.While the duration of the playback from the previous marker is within 5 seconds, clicking the (Previous Marker)button for the second time starts playing the temporary file from the marker immediately before the previous one.
4.
(Start Playing) buttonStarts playing the audio tracks recorded in the temporary file.Clicking the button changes the button appearance to (Pause Playing). To pause the playback, click the buttononce again.
5.
(Add Marker) buttonAdds a marker to the playback cursor position when you click this button while the playback is paused.
6.
(Zoom In) button/ (Zoom Out) buttonZooms in/out the waveform drawing area.
7.
Playback cursorIndicates the playing point in an audio track recorded in the temporary file.
8.
Add markers areaYou can move the pointer and click to add a marker at the pointer position.
9.
Waveform drawing areaDisplays waveforms of the audio tracks recorded in the temporary file. Clicking on a waveform moves the playbackcursor to the clicked position.Double-clicking on a waveform starts playing the temporary file from the point that matches the double-clickedposition.
10.
Page selection buttonsDisplay the respective pages of the temporary file in the waveform drawing area.Up to 4 buttons (“00 - 30,” “30 - 60,” “60 - 90,” and “90 - 100”) appear according to the duration of the recording.
11.
Signal level meter barsWhile playback of the recorded audio tracks is in progress, the signal level meter bars lengthen or shorten accordingto the left and right signal levels of the audio tracks.When playback reaches one of the points where the signal level reaches 0 dB (OVER point), lights.The indicator for the peak level and remains lit for a certain period of time.
12.
Gain selection buttonWhile playback of the recorded audio tracks is paused, you can click this button to select a value for the signal level(gain).
13.
Write to Files buttonDisplays the Write to Files window when you click this button upon completion of the editing.
14.
17

Adding a MarkerExporting the Temporary File Containing Recorded Audio TracksAdjusting the Signal Level for the Recorded Audio Tracks (Gain Adjustment)
4-589-066-12(2) Copyright 2016 Sony Corporation
18
Help
Stereo Turntable System ApplicationHi-Res Audio Recorder
Step 1. Turning On the Turntable
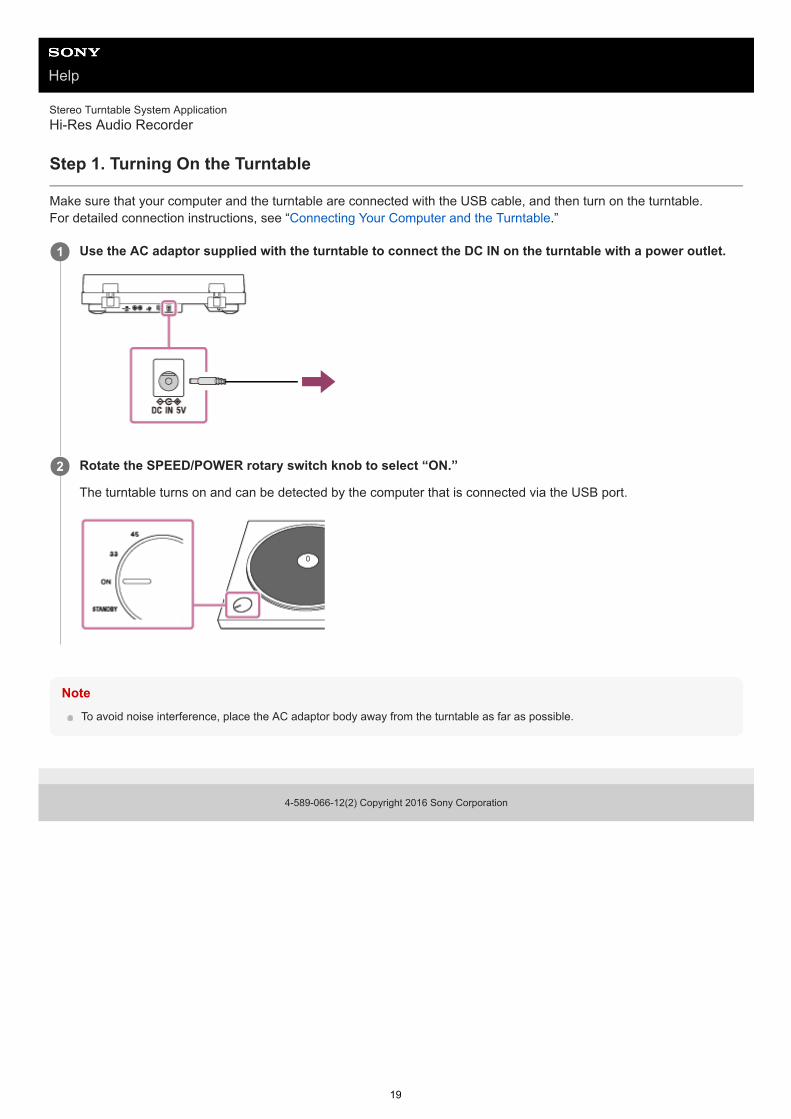
Make sure that your computer and the turntable are connected with the USB cable, and then turn on the turntable.For detailed connection instructions, see “Connecting Your Computer and the Turntable.”
NoteTo avoid noise interference, place the AC adaptor body away from the turntable as far as possible.
4-589-066-12(2) Copyright 2016 Sony Corporation
Use the AC adaptor supplied with the turntable to connect the DC IN on the turntable with a power outlet.1
Rotate the SPEED/POWER rotary switch knob to select “ON.”
The turntable turns on and can be detected by the computer that is connected via the USB port.
2
19
Help
Stereo Turntable System ApplicationHi-Res Audio Recorder
Step 2. Starting Hi-Res Audio Recorder
Start Hi-Res Audio Recorder on your computer and specify the settings, such as the recording file format and thetemporary file storage.
To exit Hi-Res Audio RecorderOn Windows:Click [File] - [Exit] on the menu bar of the Hi-Res Audio Recorder window or click [x] at the top right corner of thewindow.
On Mac:Click [Hi-Res Audio Recorder] - [Exit] on the menu bar or click [x] at the top left corner of the window.
NoteChanging the default temporary file storage may cause the delay of waveform drawing or the sound skipping.If you need to change the default temporary file storage, change it to a folder on a high-speed disk drive, such as the built-in harddisk drive.
While Hi-Res Audio Recorder is running, do not place your computer in Sleep (Standby) mode as it may cause loss of data orunsuccessful recovery.Once you have started Hi-Res Audio Recorder, it prevents the computer from automatically going into Sleep (Standby) mode.
Start Hi-Res Audio Recorder.
On Windows: Click [All Programs] ([All Apps]) - [Hi-Res Audio Recorder].On Mac: Start the Finder and double-click [Hi-Res Audio Recorder] in [Applications].
1
Click [File] - [Settings] on the menu bar at the top of the window.
On Mac, click [Hi-Res Audio Recorder] - [Settings] on the menu bar.The Settings window appears.Alternatively, you can display the Settings window by clicking the Settings display area on the Record Modewindow. For detailed information, see “Record Mode Window.”
2
On the “Format” tab, select [PCM (.wav)] or [DSD (.dsf)] and then specify the sampling frequency and thebit depth.
By default, “PCM (.wav),” “44.1 kHz” and “16 bit” are selected.
3
On the “Temporary file storage” tab, specify the destination to store the temporary file.
By default, the temporary file storage is specified as follows:On Windows: C:\Users\[user_name]\AppData\Local\Sony\Hi-Res Audio Recorder\tempOn Mac: /Users/[user_name]/Library/Caches/jp.co.sony.Hi-Res-Audio-Recorder/While the duration available for recording is less than 100 minutes, the remaining duration is displayed under thetemporary file storage path.When the specified disk drive does not have sufficient free disk space for storing the temporary file, change thetemporary file storage to another disk drive.After changing the destination, clicking [Reset to default] restores the default temporary file storage.
4
Click [OK].5
20
HintWhen an update of Hi-Res Audio Recorder is available, the message appears at the start of the application. To download a newversion of Hi-Res Audio Recorder, click [Download].For detailed instructions on updating Hi-Res Audio Recorder on Windows, see “Using the Menu Bar (On Windows).” For theinstructions on Mac, see “Using the Menu Bar (On Mac).”
Related TopicAudio File Formats Supported for Recording
4-589-066-12(2) Copyright 2016 Sony Corporation
21
Help
Stereo Turntable System ApplicationHi-Res Audio Recorder
Step 3. Playing a Vinyl Record and Recording Audio Tracks with Hi-Res AudioRecorder
Play a vinyl record of your choice on the turntable and record its audio tracks with Hi-Res Audio Recorder.
To record the B side of the vinyl record following the A sideExporting the temporary file for the A side and then recording the B side will help you reduce the exporting duration forthe B side due to a smaller size of the temporary file.To do so, when you are finished with recording the A side, turn over the vinyl record, click [File] - [New] on the menu barat the top of the window, and then repeat steps 1 through 5 above.
To record both A and B sides consecutively and then edit and export the temporary fileRecording both A and B sides of a vinyl record will help you simplify the editing of the temporary file because you canspecify the album name and other properties at one time before exporting the temporary file.
On the Record Mode window of Hi-Res Audio Recorder, click the (Start Recording) button.
The message “Play the vinyl record on the turntable and click the "Start Recording" button.” appears.
1
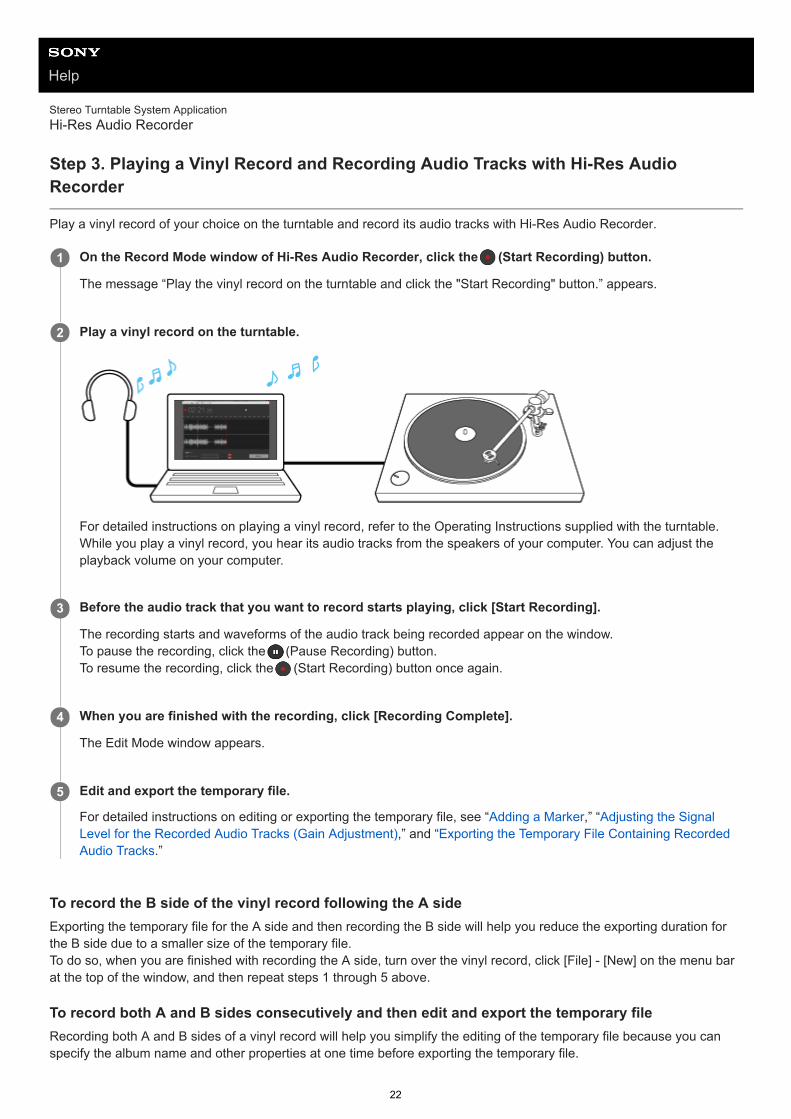
Play a vinyl record on the turntable.
For detailed instructions on playing a vinyl record, refer to the Operating Instructions supplied with the turntable.While you play a vinyl record, you hear its audio tracks from the speakers of your computer. You can adjust theplayback volume on your computer.
2
Before the audio track that you want to record starts playing, click [Start Recording].
The recording starts and waveforms of the audio track being recorded appear on the window.To pause the recording, click the (Pause Recording) button.To resume the recording, click the (Start Recording) button once again.
3
When you are finished with the recording, click [Recording Complete].
The Edit Mode window appears.
4
Edit and export the temporary file.
For detailed instructions on editing or exporting the temporary file, see “Adding a Marker,” “Adjusting the SignalLevel for the Recorded Audio Tracks (Gain Adjustment),” and “Exporting the Temporary File Containing RecordedAudio Tracks.”
5
22

To do so, follow steps 1 through 3 above and click the (Pause Recording) button instead of [Recording Complete] instep 4 when you are finished with recording the A side. Turn over and play the vinyl record, click the (Start Recording)button before the playback of the audio track of your choice starts, and then follow steps 4 and 5.
NoteWhen the duration available for recording is 0 minute, [Start Recording] is disabled and you need to change the temporary filestorage before starting the recording. For detailed information, see “Step 2. Starting Hi-Res Audio Recorder.”When your computer's disk drive does not have sufficient free disk space, increase the disk space, for example, by uninstallingunnecessary applications or change the partition size.
While you play a vinyl record, you do not hear its audio tracks unless you click the (Start Recording) button.
After you paused the recording, clicking the (Start Recording) button to resume the recording does not display the message“Play the vinyl record on the turntable and click the "Start Recording" button.” The recording resumes when you click the (StartRecording) button.
While the recording is in progress or paused, disconnecting and connecting the USB cable or turning off and on the turntable maycause the turntable to be undetectable by your computer. In such a case, restart Hi-Res Audio Recorder.
The audio you hear from your computer during the recording is not high-resolution audio. You hear the audio converted in theplayable format by the computer from the temporary file being recorded.
To listen to the on-going recordings on the computer connected to the turntable, use the built-in speakers of the computer orconnect a pair of headphones to the computer. If the computer has any USB audio devices, except for the turntable, connected,disconnect them all.
HintClicking the (Pause Recording) button to pause the recording does not stop the playback of the vinyl record. To stop theplayback, stop playing the record on the turntable.For detailed information, refer to the Operating Instructions supplied with the turntable.
The steps 2 and 3 are interchangeable. You can start the recording on Hi-Res Audio Recorder, and then play a vinyl record onthe turntable as well.
When you want to record a part of an audio track, it is recommended that you start the recording slightly before the beginning ofthe part you want to record and stop it slightly after the end of the part. Then, you can specify the unnecessary ranges on the EditMode window and exclude them from being exported.For detailed information, see “Adding a Marker” and “Exporting the Temporary File Containing Recorded Audio Tracks.”
Related TopicRecord Mode WindowEdit Mode WindowRe-recordingPrecautions on Recording
4-589-066-12(2) Copyright 2016 Sony Corporation
23
Help
Stereo Turntable System ApplicationHi-Res Audio Recorder
Re-recording
If you hear a lot of noise or see the stylus skipping while recording a vinyl record and want to start the recording all overagain, follow the steps below.
4-589-066-12(2) Copyright 2016 Sony Corporation
Click the (Pause Recording) button on the Record Mode window of Hi-Res Audio Recorder.
The recording pauses.
1
Stop playing the vinyl record on the turntable.
For detailed instructions on stopping the playback, refer to the Operating Instructions supplied with the turntable.
2
Click [File] - [New] on the menu bar at the top of the window.
The message “Are you sure you want to record newly? All unsaved data will be discarded.” appears.
3
Click [OK].
The temporary file is cleared and the Record Mode window resumes its initial state.Then, follow the steps in “Step 3. Playing a Vinyl Record and Recording Audio Tracks with Hi-Res Audio Recorder”to start the re-recording.
4
24
Help
Stereo Turntable System ApplicationHi-Res Audio Recorder
Precautions on Recording
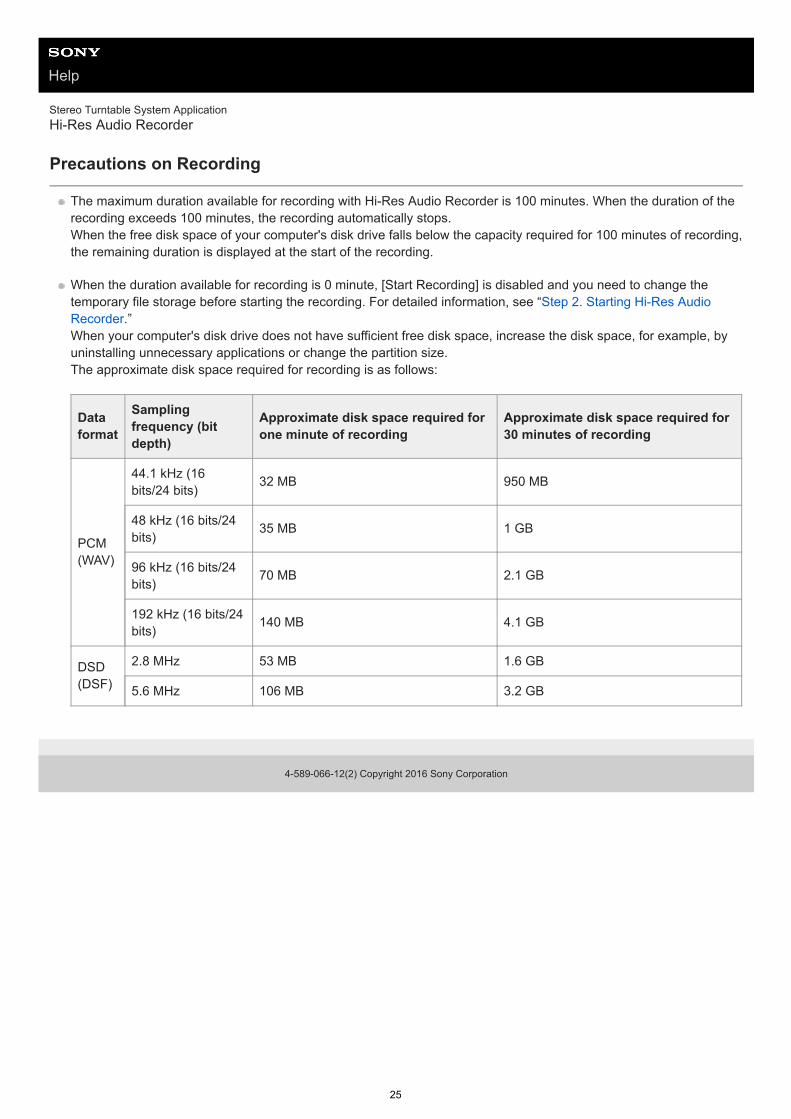
The maximum duration available for recording with Hi-Res Audio Recorder is 100 minutes. When the duration of therecording exceeds 100 minutes, the recording automatically stops.When the free disk space of your computer's disk drive falls below the capacity required for 100 minutes of recording,the remaining duration is displayed at the start of the recording.
When the duration available for recording is 0 minute, [Start Recording] is disabled and you need to change thetemporary file storage before starting the recording. For detailed information, see “Step 2. Starting Hi-Res AudioRecorder.”When your computer's disk drive does not have sufficient free disk space, increase the disk space, for example, byuninstalling unnecessary applications or change the partition size.The approximate disk space required for recording is as follows:
4-589-066-12(2) Copyright 2016 Sony Corporation
Dataformat
Samplingfrequency (bitdepth)
Approximate disk space required forone minute of recording
Approximate disk space required for30 minutes of recording
PCM(WAV)
44.1 kHz (16bits/24 bits)
32 MB 950 MB
48 kHz (16 bits/24bits)
35 MB 1 GB
96 kHz (16 bits/24bits)
70 MB 2.1 GB
192 kHz (16 bits/24bits)
140 MB 4.1 GB
DSD(DSF)
2.8 MHz 53 MB 1.6 GB
5.6 MHz 106 MB 3.2 GB
25

Help
Stereo Turntable System ApplicationHi-Res Audio Recorder
Adding a Marker
On the Edit Mode window, you can add markers to the temporary file.By adding markers, for example, between audio tracks, you can divide and export the temporary file to individual audiotrack files.
To adjust the marker positionSelect the desired marker by clicking the number ( ) assigned to it or clicking the (Previous Marker) or (NextMarker) button. Then, you can adjust the selected marker position by doing one of the following:
Click the arrow button ( / ) on the left of the window.
Drag the marker to left or right.
Press the left or right arrow key on the keyboard.
To delete a markerYou can delete a marker by doing one of the following:
Click the (Start Playing) button on the Edit Mode window of Hi-Res Audio Recorder.
Playback of the audio tracks recorded in the temporary file starts.
1
Click the (Pause Playing) button at the playing point where you want to add a marker, such as the silentsection between audio tracks.
2
Click the (Add Marker) button.
A marker is added to the playback cursor position.Alternatively, you can add a marker by doing either of the following:
Click [Edit] - [Add Marker] on the menu bar at the top of the window.
Right-click on the add markers area and select [Add Marker] from the context menu.
3
26
Select the desired marker and click [Edit] - [Delete Marker] on the menu bar at the top of the window.
Select and right-click the desired marker and then select [Delete Marker] from the context menu.
Select and double-click the desired marker.
Select the desired marker and press the Delete key on the keyboard.
To delete all the markers that you have added, click [Edit] - [Remove All Markers] on the menu bar at the top of thewindow. Alternatively, you can right-click the add marker area and select [Remove All Markers] from the contextmenu to delete them all.
NoteThe start position marker ( ) and the end position marker ( ) of the series of audio tracks recorded in the temporary file areautomatically added and you cannot move or delete these markers.
The audio you hear from your computer during the recording is not high-resolution audio. You hear the audio converted in theplayable format by the computer from the temporary file being recorded.
HintYou can add up to 60 markers.
You can also add a marker to the silent section between audio tracks recorded in the temporary file to exclude the section frombeing exported.For detailed exporting instructions, see “Exporting the Temporary File Containing Recorded Audio Tracks.”
Related TopicEdit Mode Window
4-589-066-12(2) Copyright 2016 Sony Corporation
27

Help
Stereo Turntable System ApplicationHi-Res Audio Recorder
Adjusting the Signal Level for the Recorded Audio Tracks (Gain Adjustment)
On the Edit Mode window, you can adjust the signal level (gain) for the temporary file.You can select automatic gain adjustment as well as manual gain adjustment that allows you to increment the gain by 1dB between +1 dB and +6 dB.
NoteIf the maximum signal level of the temporary file already exceeded -1 dB at recording, selecting “Auto” in step 2 will not increasethe gain.
Selecting “Auto” in step 2 will not automatically increase the gain over +6 dB.
If the DSD format is selected for exporting to files, increasing the gain will result in longer exporting time.
Depending on the vinyl record, the signal level may not reach as high as -1 dB even with gain adjustment.
While playback is paused, click the gain selection button ( ) on the Edit Mode window of Hi-Res AudioRecorder.
1
Select a value of your preference from between +1 dB and +6 dB.
Before adjustment, “0 dB” (no adjustment) is selected as the gain for the temporary file.While “Auto” is selected, the maximum signal level is automatically adjusted so as not to exceed 0 dB.
2
When you are finished with gain selection, play the temporary file to check the waveforms of the audiotracks and the signal level meter bars for signal gaining.
The signal level meter bars lengthen or shorten according to the left and right signal levels of the audio tracks.When playback reaches one of the points where the signal level reaches 0 dB (OVER points), an indicator appearsabove the exact OVER point on the waveforms. At the same time, lights at the right end of both or either ofthe signal level meter bars as well.The indicator for the peak level and remains lit for a certain period of time, and then automatically goesout.
3
28

Related TopicEdit Mode Window
4-589-066-12(2) Copyright 2016 Sony Corporation
29

Help
Stereo Turntable System ApplicationHi-Res Audio Recorder
Exporting the Temporary File Containing Recorded Audio Tracks
Export the temporary file you have edited on the Edit Mode window and save the recorded audio tracks as the recordedfiles.To exclude silent sections between audio tracks from being exported, you need to uncheck the respective check marks.For detailed instructions on adding a marker, see “Adding a Marker.”
When the files are saved, the Edit Mode window appears.To start a new recording, click [File] - [New] on the menu bar at the top of the window to display the Record Modewindow.
NoteYou cannot specify the file format when you export the temporary file. It must be specified before you start the recording.For detailed setting instructions, see “Step 2. Starting Hi-Res Audio Recorder.”
On the Edit Mode window of Hi-Res Audio Recorder, add markers and click [Write to Files].
The Write to Files window appears with the list of added markers and file names.By default, each file name is displayed in the format “(Track number)_(Year)(Date)(Time).(extension)” (for example,01_20160401012345.wav).
1
Uncheck the check marks for the sections you want to exclude from being exported.2
Click [Write to Files].
The window for selecting the destination to save the files appears.
3
Select the destination and click [OK].
A folder is created in the specified destination and the recorded files are saved in the folder.If you leave the album name blank in the Write to Files window, the folder will be named in the format “(Year)(Date)(Time)” (for example, 20160401012345).
4
30

HintAfter you have specified the markers for exporting, you can re-assign the track numbers and the dates to be included in thenames of the exported files. Click [Update File Names], and then click [OK] on the message window. The track number and datein the name of every exported file will be replaced with a new serial number and date. On the message window, you canadditionally select the number for “Initial Track No.” to specify the first track number of the exported file names.
You can replace the exported file names with the track titles. Enter the track titles and click [Options] - [Use Track Titles as FileNames.]. The track number and the extension will remain unchanged.
You can copy the album artist name to the “Track Artist” field of all audio tracks. Enter the album artist name and click [Options] -[Copy Album Artist to Track Artists].
If you enter track titles and track artist names and click [Apply], the information you have entered will be temporarily saved. Thishelps when you want to edit the temporary file all over again. To re-edit the temporary file, click [Cancel] on the Write to Fileswindow. Then, you can use the saved track titles and track artist names once again on the Edit Mode window for exporting.
Related TopicEdit Mode Window
4-589-066-12(2) Copyright 2016 Sony Corporation
31
Help
Stereo Turntable System ApplicationHi-Res Audio Recorder
Using the Menu Bar (On Windows)
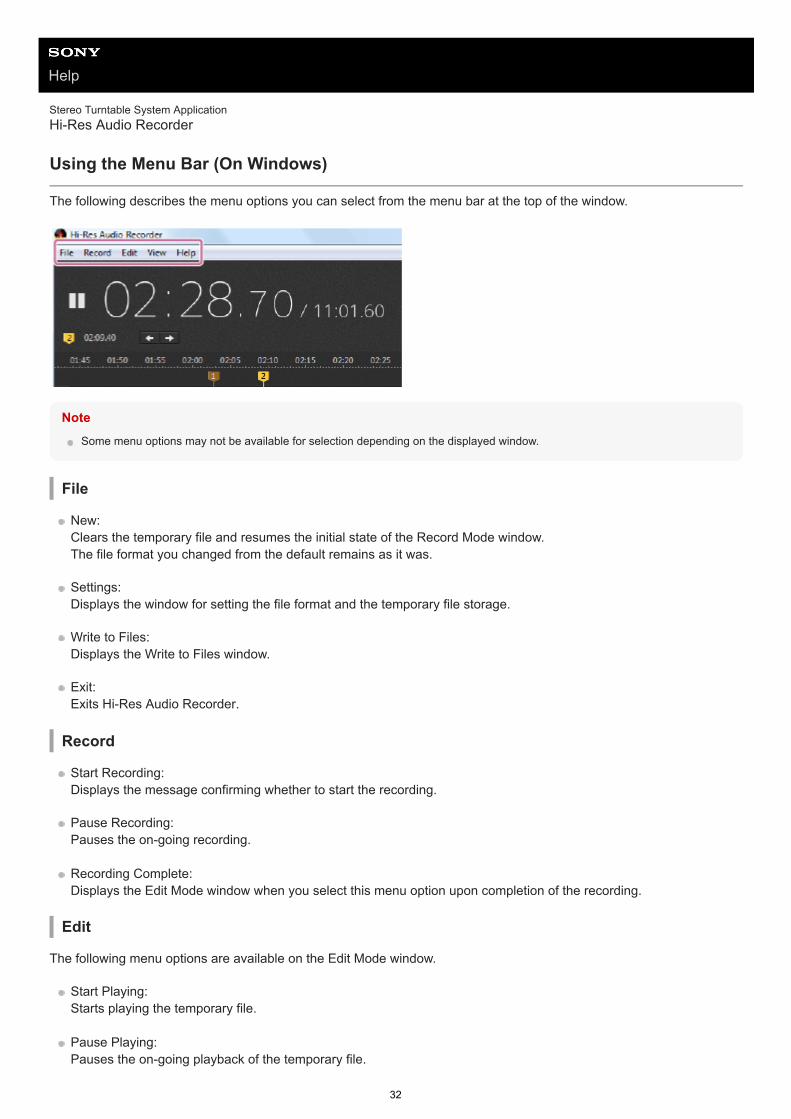
The following describes the menu options you can select from the menu bar at the top of the window.
NoteSome menu options may not be available for selection depending on the displayed window.
File
New:Clears the temporary file and resumes the initial state of the Record Mode window.The file format you changed from the default remains as it was.
Settings:Displays the window for setting the file format and the temporary file storage.
Write to Files:Displays the Write to Files window.
Exit:Exits Hi-Res Audio Recorder.
Record
Start Recording:Displays the message confirming whether to start the recording.
Pause Recording:Pauses the on-going recording.
Recording Complete:Displays the Edit Mode window when you select this menu option upon completion of the recording.
Edit
The following menu options are available on the Edit Mode window.
Start Playing:Starts playing the temporary file.
Pause Playing:Pauses the on-going playback of the temporary file.
32

Add Marker:Adds a marker to the playback cursor position when you select this menu option while the playback of the temporaryfile is paused.
Next Marker:Moves the playback cursor to the next marker position.
Previous Marker:Moves the playback cursor to the previous marker position.
Delete Marker:Deletes the selected marker.
Remove All Markers:Deletes all of the added markers.
Gain:Displays the signal level values that you can select for the recorded data (temporary file).
View
The following menu options are available on the Edit Mode window.
Zoom In:Zooms in the waveforms of the temporary file.
Zoom Out:Zooms out the waveforms of the temporary file.
Next Page:Displays the next page of the temporary file if it spans multiple pages.
Previous Page:Displays the previous page of the temporary file if it spans multiple pages.
Help
Help:Starts the web browser to display the Help of Hi-Res Audio Recorder.
Check for Updates:Displays the update information about Hi-Res Audio Recorder.When any update is available, the message appears. Click [Download] and follow the steps below.
Download a new Hi-Res Audio Recorder installer program and save it on your computer.
When the installer program is completely downloaded, exit Hi-Res Audio Recorder.
Double-click the saved installer program.Installation of the new Hi-Res Audio Recorder version starts.Upon completion of the installation, Hi-Res Audio Recorder is replaced with the new version.
About:Displays the version of Hi-Res Audio Recorder and its copyright year.
4-589-066-12(2) Copyright 2016 Sony Corporation
33

Help
Stereo Turntable System ApplicationHi-Res Audio Recorder
Using the Menu Bar (On Mac)
The following describes the menu options you can select from the menu bar.
NoteSome menu options may not be available for selection depending on the displayed window.
Hi-Res Audio Recorder
About:Displays the version of Hi-Res Audio Recorder and its copyright year.
Settings:Displays the window for setting the file format and the temporary file storage.
Exit:Exits Hi-Res Audio Recorder.
File
New:Clears the temporary file and resumes the initial state of the Record Mode window.The file format you changed from the default remains as it was.
Write to Files:Displays the Write to Files window.
Record
Start Recording:Displays the message confirming whether to start the recording.
Pause Recording:Pauses the on-going recording.
Recording Complete:Displays the Edit Mode window when you select this menu option upon completion of the recording.
Edit
The following menu options are available on the Edit Mode window.
34
Start Playing:Starts playing the temporary file.
Pause Playing:Pauses the on-going playback of the temporary file.
Add Marker:Adds a marker to the playback cursor position when you select this menu option while the playback of the temporaryfile is paused.
Next Marker:Moves the playback cursor to the next marker position.
Previous Marker:Moves the playback cursor to the previous marker position.
Delete Marker:Deletes the selected marker.
Remove All Markers:Deletes all of the added markers.
Gain:Displays the signal level values that you can select for the recorded data (temporary file).
View
The following menu options are available on the Edit Mode window.
Zoom In:Zooms in the waveforms of the temporary file.
Zoom Out:Zooms out the waveforms of the temporary file.
Next Page:Displays the next page of the temporary file if it spans multiple pages.
Previous Page:Displays the previous page of the temporary file if it spans multiple pages.
Help
Help:Starts the web browser to display the Help of Hi-Res Audio Recorder.
Check for Updates:Displays the update information about Hi-Res Audio Recorder.When any update is available, the message appears. Click [Download] and follow the steps below.
Download a new Hi-Res Audio Recorder installer program and save it on your computer.
When the installer program is completely downloaded, exit Hi-Res Audio Recorder.
Double-click the saved installer program.Installation of the new Hi-Res Audio Recorder version starts.Upon completion of the installation, Hi-Res Audio Recorder is replaced with the new version.
4-589-066-12(2) Copyright 2016 Sony Corporation
35

36

Help
Stereo Turntable System ApplicationHi-Res Audio Recorder
Error Messages
Connecting
No device found. Check the power or the connection of the device.Make sure that the turntable is turned on.Make sure that your computer is properly connected to the turntable. For detailed connection instructions, see“Connecting Your Computer and the Turntable.”While Hi-Res Audio Recorder is up and running, switching the Windows user prevents the application from workingproperly. Exit Hi-Res Audio Recorder first, and then switch the user.
Disconnected from the device. Check the power or the connection of the device.The turntable was turned off while the recording of the vinyl record was in progress or paused. Turn on the turntable.The connection between the turntable and your computer was lost while the recording of the vinyl record was inprogress or paused. Make sure that the USB cable or the AC adaptor is firmly connected.
Recording
Stopped recording because the limit of recording time has been reached.The maximum duration available for recording with Hi-Res Audio Recorder is 100 minutes. When the duration of therecording exceeds 100 minutes, the recording automatically stops.
Editing
Cannot add any more markers. Remove unnecessary markers and try again.You can add up to 60 markers. Delete unnecessary markers.
Temporary file storage
You cannot specify the folder as the temporary file storage. Select another folder.You cannot select a folder on a certain disk drive, such as a network drive or a CD drive, to be used as the temporary filestorage. Select another folder.
Failed to use the folder specified as the temporary file storage. Change the temporary file storage.You cannot use the folder you specified as the temporary file storage in the following cases. Change the temporary filestorage.
The disk drive containing the temporary file storage was disconnected from your computer or turned off.While the disk drive was in the above state, you clicked the (Start Recording) button.Due to the slow speed of the disk drive containing the temporary file storage, the delay of waveform drawing andaudio output caused a memory overflow.
With the drive other than the default one, access speed may become slower, causing the delay ofwaveform drawing or sound skipping. Are you sure you want to change the temporary file storage?Changing the default temporary file storage may cause the delay of waveform drawing or the sound skipping.Click [Yes] to change the temporary file storage. To cancel the operation, click [No].
Exporting
Unacceptable characters detected in the file name. Change the file name.37

An attempt to export the temporary file to a file(s) failed because the file name contains unacceptable characters.Change the file name.
Unacceptable characters detected in the album name. Change the album name.An attempt to export the temporary file to a file(s) failed because the album name contains unacceptable characters.Change the album name.
No file name specified. Enter a file name.An attempt to export the temporary file to a file(s) failed because the file name field is left blank.Enter a file name.
File name duplicated. Change the file name.An attempt to export the temporary file to a file(s) failed because a file with the same name already exists.Change the file name.
Saving
A file with the same name already exists in the destination. Are you sure you want to replace it?A recorded file with the same name already exists in the destination folder.If you want to overwrite it with the current recording, click [OK].If you want to keep the existing file, change the file name.
A folder with the same name as the file name exists in the destination. Change the file name.The file name is identical to the name of the folder that exists in the destination for saving files.Change the file name.
Too long file path. Change the file name or the destination.The path to the file exceeds the maximum character length.Change the file name or the destination.
A file with the same name as the folder name exists in the destination. Change the album name(folder name).The album name (folder name) of the recorded file(s) is identical to the name of the file that already exists in thedestination.Change the album name (folder name).
Insufficient free space in the destination. Remove unnecessary files or change the destination.There is not sufficient free disk space in the destination for saving the recorded files.Increase the disk space, for example, by removing unnecessary files or change the destination.
Failed to save the file. For more detail, click "Help" in menu and see the Help Guide.An attempt to save the file(s) failed. For detailed information, see “An attempt to save a file fails.”
Network
Failed to obtain version info. Please check Internet connection of your computer.An attempt to obtain the version information of Hi-Res Audio Recorder failed. Make sure that your computer is connectedto the Internet.
Failed to download new version. Please check Internet connection of your computer.An attempt to download the new version of Hi-Res Audio Recorder failed. Make sure that your computer is connected tothe Internet.
Others
38

There is a problem with an audio playback device. It might not be installed on your computer ormight be used by another app.
Install an audio playback application on your computer.If another application is using the audio playback device, exit the application.
4-589-066-12(2) Copyright 2016 Sony Corporation
39

Help
Stereo Turntable System ApplicationHi-Res Audio Recorder
Installation fails.
Make sure that you are not using a computer with an unsupported operating system. Use a computer with one of thesupported operating systems. For detailed information, see “System Requirements.”
Make sure that the disk drive has sufficient free disk space. Installation requires free disk space of about 100 MB. Ifthere is not enough free disk space, remove unnecessary files.
If you have logged onto (signed into) the computer using an account without administrator privileges (an account thatis not the Administrator account), you cannot install or uninstall Hi-Res Audio Recorder. Switch the account to theAdministrator account by entering the Administrator's user name and password, or log off (sign out) the computerand then log on (sign in) with the Administrator account once again.
4-589-066-12(2) Copyright 2016 Sony Corporation
40
Help
Stereo Turntable System ApplicationHi-Res Audio Recorder
Your computer fails to detect the connected turntable.
Disconnect the USB cable and restart your computer. Make sure that the computer is up and running, and thenconnect the computer and the turntable with the USB cable.For detailed connection instructions, see “Connecting Your Computer and the Turntable.”
Make sure that the USB device driver software is successfully installed. (On Windows)Connecting your computer to the turntable with the USB cable for the first time or using a USB port other than theone you used previously may automatically install the USB device driver software once again.Connect the turntable to the computer and turn it on, and then click [Control Panel] - [Hardware and Sound] - [DeviceManager] (when “Control Panel” is displayed in “Category” view).If “PS-HX500” is displayed under [Sound, video and game controllers] on the window, the USB device driver softwareis successfully installed.
Follow the steps below to make sure that the turntable name is displayed in “System Information.” (On Mac)
Connect the turntable to the computer and turn it on.Click [About This Mac] on the Apple menu.Click [Overview] - [System Report].Click [USB] under [Hardware] and make sure that “PS-HX500” is displayed.
NoteIf the latest Windows updates are not applied, the application may not be installed successfully. Start Windows Update and installthe latest updates.
4-589-066-12(2) Copyright 2016 Sony Corporation
41

Help
Stereo Turntable System ApplicationHi-Res Audio Recorder
Hi-Res Audio Recorder does not start.
Your computer may not be running successfully. Start another application to see if it properly works.
Your computer may not be running successfully. Restart the computer.
Make sure that Hi-Res Audio Recorder is successfully installed. (On Windows)
Click [Control Panel] - [Programs] - [Programs and Features] (when “Control Panel” is displayed in “Category”view) and make sure that “Hi-ResAudioRecorder” is displayed.Connect the turntable to the computer and turn it on, click [Control Panel] - [Hardware and Sound] - [DeviceManager] (when “Control Panel” is displayed in “Category” view), and then make sure that “PS-HX500” isdisplayed under [Sound, video and game controllers] on the window.
Make sure that Hi-Res Audio Recorder is successfully installed. (On Mac)
Start the Finder and make sure that “Hi-Res Audio Recorder” is displayed in [Applications].
If Hi-Res Audio Recorder is not successfully installed, uninstall the application and install it all over again. Fordetailed installation instructions, see “Installing Hi-Res Audio Recorder.”
4-589-066-12(2) Copyright 2016 Sony Corporation
42

Help
Stereo Turntable System ApplicationHi-Res Audio Recorder
Recording does not start.
Make sure the turntable and your computer are connected with the USB cable.
Make sure that the turntable is turned on.
Make sure that Hi-Res Audio Recorder is successfully installed. (On Windows)
Click [Control Panel] - [Programs] - [Programs and Features] (when “Control Panel” is displayed in “Category”view) and make sure that “Hi-ResAudioRecorder” is displayed.Connect the turntable to the computer and turn it on, click [Control Panel] - [Hardware and Sound] - [DeviceManager] (when “Control Panel” is displayed in “Category” view), and then make sure that “PS-HX500” isdisplayed under [Sound, video and game controllers] on the window.
Make sure that Hi-Res Audio Recorder is successfully installed. (On Mac)
Start the Finder and make sure that “Hi-Res Audio Recorder” is displayed in [Applications].
If Hi-Res Audio Recorder is not successfully installed, uninstall the application and install it all over again. Fordetailed installation instructions, see “Installing Hi-Res Audio Recorder.”
4-589-066-12(2) Copyright 2016 Sony Corporation
43
Help
Stereo Turntable System ApplicationHi-Res Audio Recorder
When you have recovered your computer from Sleep (Standby) mode, you do nothear audio from the computer or the turntable is not detected by the computer. (OnWindows only)
Some computers may fail to detect the connected turntable when they are recovered from Sleep (Standby) mode.Disconnect the USB cable and restart your computer. Make sure that the computer is up and running, and thenconnect the computer and the turntable with the USB cable.For detailed connection instructions, see “Connecting Your Computer and the Turntable.”
HintWhile Hi-Res Audio Recorder is running, your computer does not automatically go into Sleep (Standby) mode regardless of itsautomatic power-saving settings.To place the computer into Sleep (Standby) mode, exit Hi-Res Audio Recorder and then perform the required operations.
4-589-066-12(2) Copyright 2016 Sony Corporation
44
Help
Stereo Turntable System ApplicationHi-Res Audio Recorder
Playback of the audio tracks recorded in the temporary file is interrupted (soundskipping), or waveform drawing is delayed.
The CPU load is high on your computer. Exit other applications.
If you are simultaneously using other USB devices, stop using such USB devices.
The speed of the disk drive containing the temporary file storage may be slow. Change the temporary file storage toa folder on a high-speed disk drive, such as the built-in hard disk drive of your computer. For detailed instruction onchanging the temporary file storage, see “Step 2. Starting Hi-Res Audio Recorder.”
4-589-066-12(2) Copyright 2016 Sony Corporation
45
Help
Stereo Turntable System ApplicationHi-Res Audio Recorder
You hear electric noise in the audio currently being recorded or played.
If the AC adaptor or power cord of the turntable, a fluorescent desk lamp, or a mobile phone is placed near theturntable, move it away from the turntable.
4-589-066-12(2) Copyright 2016 Sony Corporation
46
Help
Stereo Turntable System ApplicationHi-Res Audio Recorder
Adjusting the signal level (gain) causes noise.
The gain value you selected may be too high.Select a lower value.For detailed instructions on selecting a gain value, see “Adjusting the Signal Level for the Recorded Audio Tracks(Gain Adjustment).”
4-589-066-12(2) Copyright 2016 Sony Corporation
47

Help
Stereo Turntable System ApplicationHi-Res Audio Recorder
Selecting “Auto” for gain adjustment does not change the signal level.
The maximum signal level of the recorded data (temporary file) is over -1 dB.In such a case, selecting “Auto” does not increase the gain.
4-589-066-12(2) Copyright 2016 Sony Corporation
48

Help
Stereo Turntable System ApplicationHi-Res Audio Recorder
An attempt to save a file fails.
Make sure that you are not attempting to save the following files:
File that another user of your computer is using
File that another application is using
The file size may have exceeded the maximum size allowed by the file system (up to 4 GB for FAT32).Change the file format or reduce the file size by reducing the duration of the recording.
The size of the WAV format file may be larger than 4 GB (the capacity available for up to 60 minutes of recordingwhen “192 kHz” and “24 bit” are selected as the sampling frequency and the bit depth, respectively).Change the file format or reduce the file size by reducing the duration of the recording.
4-589-066-12(2) Copyright 2016 Sony Corporation
49

Help
Stereo Turntable System ApplicationHi-Res Audio Recorder
When you are finished with saving files from one vinyl record, you are not sure howto record another one.
To start a new recording, click [File] - [New] on the menu bar at the top of the window to display the Record Modewindow.
4-589-066-12(2) Copyright 2016 Sony Corporation
50

Help
Stereo Turntable System ApplicationHi-Res Audio Recorder
You are not sure how to play recorded files.
Hi-Res Audio Recorder is simply a recording application. It is not capable of playback.To play recorded files, you need to transfer the files to an audio device that supports high resolution audio playbackor install a music playback application that supports high resolution audio playback on your computer.The following are recommended for playback.
High-resolution audio playback devices: UDA-1, CAS-1High-resolution audio playback applications: Sony | Music Center for PC
4-589-066-12(2) Copyright 2016 Sony Corporation
51

Help
Stereo Turntable System ApplicationHi-Res Audio Recorder
You are not sure how to edit recorded files.
Hi-Res Audio Recorder is simply a recording application. It is not capable of editing exported files.It is recommended that you finish editing the temporary file on Hi-Res Audio Recorder before you export it to save onthe computer.
4-589-066-12(2) Copyright 2016 Sony Corporation
52

Help
Stereo Turntable System ApplicationHi-Res Audio Recorder
You are not sure how to write recorded files to a CD.
Hi-Res Audio Recorder is simply a recording application. It is not capable of writing files to a disc.To write recorded files to a CD, you need to use a music editing application with the disc writing feature.
4-589-066-12(2) Copyright 2016 Sony Corporation
53

Help
Stereo Turntable System ApplicationHi-Res Audio Recorder
You are not sure how to write recorded files to a disc in the DSD format.
Hi-Res Audio Recorder is simply a recording application. It is not capable of writing files to a disc in the DSD format.To write recorded files to a disc in the DSD format, you need to use a music editing application with the disc writingfeature.
4-589-066-12(2) Copyright 2016 Sony Corporation
54