stereo cassette tape deck k-505tx...the tape will make it susceptible to being caught up in the...
TRANSCRIPT

English
Instruction Manual
Stereo Cassette Tape Deck
K-505TX Befo
re u
sing
Co
nn
ectio
ns
Op
era
tion
Oth
er In
form
atio
n
STANDBY/ON
STANDBY
STEREO CASSETTE TAPE DECK
ALBUM
DOLBY NR
REV. MODE
COUNTER RESET
REC LEVEL
CD DUBBING
FADE
CASSETTE LOADING MECHANISM

2
Thank you for purchasing ...Before using
*Dolby noise reduction and HX Pro headroomextension manufactured under license fromDolby Laboratories Licensing Corporation. HXPro originated by Bang and Olufsen.
“Dolby,” the double-D symbol and “HX Pro”are trademarks of Dolby LaboratoriesLicensing Corporation.
Thank you for purchasing Onkyo K-505TX Stereo Cassette Tape Deck.Please read this manual thoroughly before making connections and plugging in the unit.Following the instructions in this manual will enable you to obtain optimum performance andlistening enjoyment from your new K-505TX.Please retain this manual for future reference.
• Dolby HX Pro system that expands thedynamic range in higher frequenciesand constantly adjusts recordingconditions
• Manually adjustable recording levelswith signal level indicator
Main Features
• Individually designed as the high-qualitySeparate Collection Series
• Digitalized counter• Dolby* B NR and Dolby C NR systems
that reduce tape background hiss
WARNING:TO REDUCE THE RISK OF FIRE OR ELECTRIC SHOCK, DO NOT EXPOSE THIS APPLIANCE TO RAIN OR MOISTURE.
CAUTION:TO REDUCE THE RISK OF ELECTRIC SHOCK, DO NOT REMOVE COVER (OR BACK). NO USER-SERVICEABLE PARTS INSIDE. REFER SERVICING TO QUALIFIED SERVICE PERSONNEL.
The lightning flash with arrowhead symbol, within an equilateral triangle, is intended to alert the user to the presence of uninsulated “dangerous voltage” within the product’s enclosure that may be of sufficient magnitude to constitute a risk of electric shock to persons.
The exclamation point within an equilateral triangle is intended to alert the user to the presence of important operating and maintenance (servicing) instructions in the literature accompanying the appliance.
WARNINGRISK OF ELECTRIC SHOCK
DO NOT OPENRISQUE DE CHOC ELECTRIQUE
NE PAS OUVRIR
AVIS
Declaration of Conformity
We, ONKYO EUROPEELECTRONICS GmbHINDUSTRIESTRASSE 2082110 GERMERING,GERMANY
GERMERING, GERMANY
ONKYO EUROPE ELECTRONICS GmbH
A.HORIUCHI
declare in own responsibility, that the ONKYO product describedin this instruction manual is in compliance with the corresponding technical standards such as EN60065, EN55013, EN55020 and EN61000-3-2, -3-3

3
Befo
re U
sing
Co
nn
ectio
ns
Oth
er In
form
atio
nO
pera
tion
s
(Continued on the next page)
1. Read Instructions – All the safety andoperating instructions should be read beforethe appliance is operated.
2. Retain Instructions – The safety andoperating instructions should be retained forfuture reference.
3. Heed Warnings – All warnings on theappliance and in the operating instructionsshould be adhered to.
4. Follow Instructions – All operating and useinstructions should be followed.
5. Water and Moisture – The appliance shouldnot be used near water – for example, neara bathtub, washbowl, kitchen sink, laundrytub, in a wet basement, or near a swimmingpool, and the like.
6. Carts and Stands – The appliance shouldbe used only with a cart or stand that isrecommended by the manufacturer.
6A. An appliance and cartcombination shouldbe moved with care.Quick stops, excessiveforce, and unevensurfaces may causethe appliance and cartcombination tooverturn.
7. Wall or Ceiling Mounting – The applianceshould be mounted to a wall or ceiling onlyas recommended by the manufacturer.
8. Ventilation – The appliance should besituated so that its location or position doesnot interfere with its proper ventilation. Forexample, the appliance should not besituated on a bed, sofa, rug, or similar surfacethat may block the ventilation openings; orif placed in a built-in installation, such as abookcase or cabinet that may impede theflow of air through the ventilation openings,there should be at least 5 cm (2 in.) of freespace behind the appliance.
9. Heat – The appliance should be situated awayfrom heat sources such as radiators, heatregisters, stoves, or other appliances (includingamplifiers) that produce heat.
Important Safeguards
10. Power Sources – The appliance should beconnected to a power supply only of the typedescribed in the operating instructions or asmarked on the appliance.
11. Polarization – If the appliance is provided witha polarized plug having one blade wider thanthe other, please read the following information:
The polarization of the plug is a safety feature.The polarized plug will only fit the outlet oneway. If the plug does not fit fully into the outlet,try reversing it. If there is still trouble, the usershould seek the services of a qualified electrician.Under no circumstances should the user attemptto defeat the polarization of the plug.
12. Power-Cord Protection – Power-supplycords should be routed so that they are notlikely to be walked on or pinched by itemsplaced upon or against them, payingparticular attention to the cords at plugs,convenience receptacles, and the pointwhere they exit from the appliance.
13. Cleaning – The appliance should be cleanedonly as recommended by the manufacturer.
14. Nonuse Periods – The power cord of theappliance should be unplugged from the outletwhen left unused for a long period of time.
15. Object and Liquid Entry – Care should betaken so that objects do not fall and liquids arenot spilled into the enclosure through openings.
16. Damage Requiring Service – The applianceshould be serviced by qualified servicepersonnel when:A. The power-supply cord or the plug has
been damaged; orB. Objects have fallen or liquid has been
spilled into the appliance; orC. The appliance has been exposed to rain; orD. The appliance does not appear to operate
normally or exhibits a marked change inperformance; or
E. The appliance has been dropped or theenclosure damaged.
17. Servicing – The user should not attempt toservice the appliance beyond that described inthe operating instructions. All other servicingshould be referred to qualified service personnel.
PORTABLE CARTWARNING
S3125A

4
Precautions
1. Warranty ClaimYou can find the serial number on the rearpanel. In case of warranty claim, please reportthis number.
2. Recording CopyrightRecording of copyrighted material for otherthan personal use is illegal without permissionof the copyright holder.
3. Deck Location• Do not use or leave in direct sunlight or in
other places subject to high temperatureand humidity. The unit should also not beleft in potentially hot places such as nearheating appliances. Excessive heat andmoisture can lead to internal damage andserious malfunctions (this also applies tocassette tapes). The recommended ambienttemperature range is 5°C to 35°C.
• Avoid damp and dusty places and locationsprone to vibrations.
• Be extremely careful with the recording/playback heads. Clean and demagnetizethem regularly, but under no circumstancesshould magnets or other metals be usedanywhere near the heads.
• This unit is extremely sensitive to magneticfields, so do not use near large speakers orother devices which generate magnetic fields.
• Hum may even be induced by magnetic fluxleakage from the power transformer incertain amplifiers. Therefore, this unitshould also be kept clear of the amplifier.
• Do not remove the cabinet case. If any ofthe internal parts are handled, there is aconsiderable danger of electric shock.
4. Cassettes to Avoid:• Cassettes with poorly formed cases that
rattle during rewind and fast forward.• Low cost cassettes with no guide roller or
pressure pad spring should never be usedfor stereo.
• C-120 cassettes because the tape and thecoating are extremely thin, distortion levelsare high. Also, even a slight stretching ofthe tape will make it susceptible to beingcaught up in the pinch roller and capstan.
• Endless tapes, if used for a long period oftime, can overheat.
5. CareFrom time to time you should wipe the frontand rear panels and the cabinet with a softcloth. For heavier dirt, dampen a soft cloth ina weak solution of mild detergent and water,wring it out dry, and wipe off the dirt.Following this, dry immediately with a cleancloth. Do not use rough material, thinners,alcohol or other chemical solvents or clothssince these could damage the finish or removethe panel lettering.
6. PowerWARNINGBEFORE PLUGGING IN THE UNIT FOR THEFIRST TIME, READ THE FOLLOWING SECTIONCAREFULLY.The voltage of the available power supplydiffers according to country or region. Be surethat the power supply voltage of the areawhere this unit will be used meets the requiredvoltage (e.g., AC230V 50Hz or AC120V 60Hz)written on the rear panel.
For British ModelReplacement and mounting of an AC plug on thepower supply cord of this unit should be performedonly by qualified service personnel.IMPORTANT:The wires in the mains lead are coloured inaccordance with the following code:
Blue: NeutralBrown: Live
As the colours of the wires in the mains lead ofthis appliance may not correspond with thecoloured markings identifying the terminals in yourplug, proceed as follows:The wire which is coloured BLUE must beconnected to the terminal in the plug which ismarked with the letter N or coloured BLACK.The wire which is coloured BROWN must beconnected to the terminal in the plug which ismarked with the letter L or coloured RED.IMPORTANTA 5 ampere fuse is fitted in this plug. Should thefuse need to be replaced please ensure that thereplacement fuse has a rating of 5 amperes andthat it is approved by ASTA or BSI to BS 1362.Check for the ASTA mark or the BSI mark on thebody of the fuse.IF THE FITTED MOULDED PLUG IS UNSUITABLE FORTHE SOCKET OUTLET IN YOUR HOME THEN THEFUSE SHOULD BE REMOVED AND THE PLUG CUTOFF AND DISPOSED OF SAFELY. THERE IS ADANGER OF SEVERE ELECTRICAL SHOCK IF THECUT OFF PLUG IS INSERTED INTO ANY 13 AMPERESOCKET.If in any doubt please consult a qualified electrician.For Canadian modelFor models having a power cord with a polarizedplug:CAUTION: TO PREVENT ELECTRIC SHOCK, MATCHWIDE BLADE OF PLUG TO WIDE SLOT, FULLY INSERT.Modele pour les CanadienSur les modèles dont la fiche est polarisée:ATTENTION: POUR ÉVITER LES CHOCSÉLECTRIQUES, INTRODUIRE LA LAME LA PLUS LARGEDE LA FICHE DANS LA BORNE CORRESPONDANTEDE LA PRISE ET POUSSER JUSQU’AU FOND.

5
Befo
re U
sing
Co
nn
ectio
ns
Oth
er In
form
atio
nO
pera
tion
s
Table of contents
Before Using
Checking the supplied accessories ............................................... Below
Connections
Connecting to the ONKYO Separate Collection Series components .... 6Connecting to other components ....................................................... 7
Operation
Playing a tape .................................................................................... 9Recording ........................................................................................ 12CD dubbing with ONKYO Separate Collection Series ........................ 16CD/MD Synchro Recording with ONKYO Separate Collection Series . 20
Other Information
Handling cassette tapes/Maintenance............................................... 22Troubleshooting ............................................................................... 23Specifications ................................................................................... 25Index to parts and controls ............................................................... 26
Checking the supplied accessories
Check that the following accessories are supplied with this unit.
• remote control cable × 1 • Audio connection cable × 2
6
Connections
Connecting to the ONKYO Separate Collection Series componentsThis section introduces you to the other ONKYO Separate Collection Series system components andtheir convenient system functions. For the actual connecting instructions and detailed information,please refer to the Instruction Manual of the Integrated Stereo Amplifier A-905TX.
The following ONKYO Separate Collection Series components are commercially available:• A-905TX ....... Integrated Stereo Amplifier (Not available in U.S.A., Canada and Europe)• T-405TX ........ Stereo Tuner (Not available in U.S.A., Canada and Europe)• C-705TX ....... Compact Disc (CD) Player (Not available in U.S.A. and Canada)• C-707CHX .... Compact Disc (CD) Changer (Only available in U.S.A. and Canada)• MD-105TX .... Minidisc (MD) Recorder (Not available in U.S.A., Canada and Europe)• R-805TX ....... FM STEREO/AM TUNER AMPLIFIER (Not available in U.S.A. and Canada)• CDR-205TX .. Compact Disc (CD) Recorder (Not available in U.S.A. and Canada)
The R-805TX (FM STEREO/AM TUNER AMPLIFIER) can be connected in substitution for the A-905TX and T-405TX.
Note that the available components may vary according to the area.
Combination use of the unit with the above system components enables you to operate thefollowing convenient functions:
• Auto Power On– You can turn on the amplifier by pressing the STANDBY/ON button on one of the system
components. (The amplifier's POWER switch must be set to ON.)– You can turn on all the system components at the same time by pressing the STANDBY/ON
button on the amplifier. (The amplifier's POWER switch must be set to ON.)You can turn off each component not in use independently afterwards.
• Direct ChangePress the following button on the component you want to operate to switch the amplifier’s inputselector automatically to that component:– The play button on the unit, CD player, or MD recorder, or– The PRESET / buttons on the tuner.
• Remote Control OperationAll the system components can be operated using the remote controller supplied with the A-905TX or R-805TX.
• Program TimerYou can operate timer playback and recording using T-405TX or R-805TX (refer to the InstructionManual of the T-405TX or R-805TX).
• Sleep TimerYou can fall asleep to a music/radio program using the timer (refer to the Instruction Manual ofthe T-405TX or R-805TX).
• CD DubbingSimple CD dubbing with this unit is possible with the pressing of a single button (see page 16).
• CD/MD Synchro RecordingWhen using this unit to record a tape from the CD player or MD recorder, you can start recordingautomatically (while the unit is in recording standby) at the same time as you start playing a CD orMD (see page 20).
NoteWhen connected to the R-805TX, if the ENERGY SAVE function of the R-805TX is activated, even ifthe STANDBY/ON button of the main unit is pressed, the power will not be turned on. To turn onthe power, the STANDBY/ON button of the R-805TX must be pressed. (For detailed information seethe R-805TX Instruction Manual.)

7
Befo
re U
sing
Co
nn
ectio
ns
Oth
er In
form
atio
nO
pera
tion
Connecting to other components
Before connecting• Do not connect the AC power cord (mains lead) until you have completed all the other
connections including the connections on the next page.• On each pair of connectors, a red connector (marked R) corresponds to the right channel, and a
white connector (marked L) to the left channel. Connect white plugs of audio connection cablesto L connectors and connect red plugs of audio connection cables to R connectors .
• Insert the plug securely. If the connection is incomplete, noise or malfunction may result.
• Bundling an audio connection cable with the power cord or speaker cord may degrade the soundquality.
• To use the unit with the other ONKYO Separate Collection Series components, follow the connectiondiagram in the A-905TX or R-805TX instruction manual to connect the unit to the system.
Note:The 230-240 V model is shown in the following illustrations.
Audio connection cableTo L connectors (White)
To R connectors (Red)
(White) To L connectors
(Red) To R connectors
Improper connection
Insert completely
REMOTECONTROL(REC) (PLAY)
INPUT OUTPUT
L
R
To the connector on the other ONKYOcomponent (See next page.)
To a wall outlet (the mains)(See next page.)
Supplied remotecontrol cable
AC power cord(mains lead)
Red(Right)
White(Left)
Red(Right)
White(Left)
Supplied audioconnection cable
White(to L)
White(to L)
Red(to R)
Red(to R)
To the TAPEOUTPUT (REC) jacks
To the TAPEINPUT (PLAY) jacks
Amplifier
Other component
: Signal flow
To the AC OUTLET (UNSWITCHED)connectorThe AC power cord (mains lead) of theother component can be connected tothis AC OUTLET connector.
Note on the AC OUTLETconnectorThe shape, number, or totalcapacity of the AC outletsmay differ depending on thearea where the unit ispurchased.
Capacity is100 watts.
230-240 V, 50 Hzmodels
Capacity is120 watts.
120 V, 60 Hz models
8
Connecting to other components (continued)
Connecting the connectors
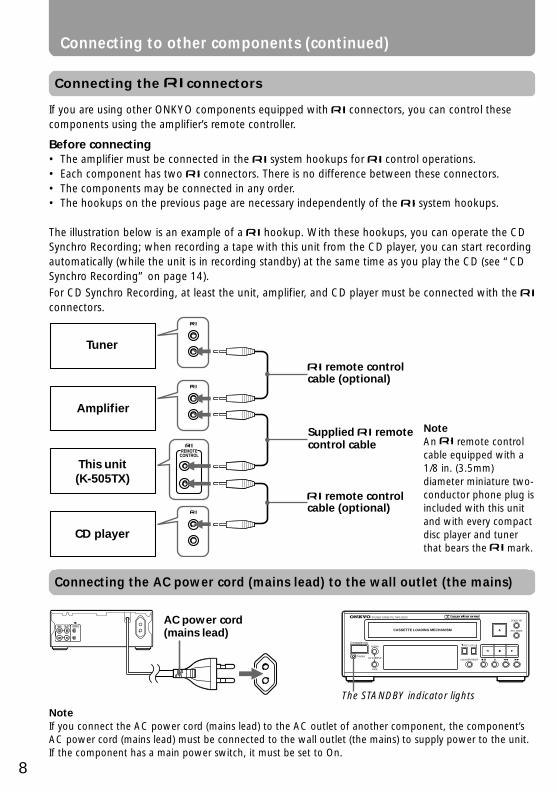
If you are using other ONKYO components equipped with connectors, you can control thesecomponents using the amplifier’s remote controller.
Before connecting• The amplifier must be connected in the system hookups for control operations.• Each component has two connectors. There is no difference between these connectors.• The components may be connected in any order.• The hookups on the previous page are necessary independently of the system hookups.
The illustration below is an example of a hookup. With these hookups, you can operate the CDSynchro Recording; when recording a tape with this unit from the CD player, you can start recordingautomatically (while the unit is in recording standby) at the same time as you play the CD (see “CDSynchro Recording” on page 14).
For CD Synchro Recording, at least the unit, amplifier, and CD player must be connected with the connectors.
NoteIf you connect the AC power cord (mains lead) to the AC outlet of another component, the component’sAC power cord (mains lead) must be connected to the wall outlet (the mains) to supply power to the unit.If the component has a main power switch, it must be set to On.
Connecting the AC power cord (mains lead) to the wall outlet (the mains)
The STANDBY indicator lights
AC power cord(mains lead)L
R
(REC) (PLAY)INPUT OUTPUT REMOTE
CONTROL
STANDBY/ON
STANDBY
STEREO CASSETTE TAPE DECK
ALBUM
DOLBY NR
REV. MODE
COUNTER RESET
REC LEVEL
CD DUBBING
FADE
CASSETTE LOADING MECHANISM
Supplied remotecontrol cable
remote controlcable (optional)
remote controlcable (optional)
REMOTECONTROL
Tuner
Amplifier
This unit(K-505TX)
CD player
NoteAn remote controlcable equipped with a1/8 in. (3.5mm)diameter miniature two-conductor phone plug isincluded with this unitand with every compactdisc player and tunerthat bears the mark.
9
Befo
re U
sing
Co
nn
ectio
ns
Oth
er In
form
atio
nO
pera
tion
Playing a tapeOperation
(This remote controller issupplied with A-905TXor R-805TX.)
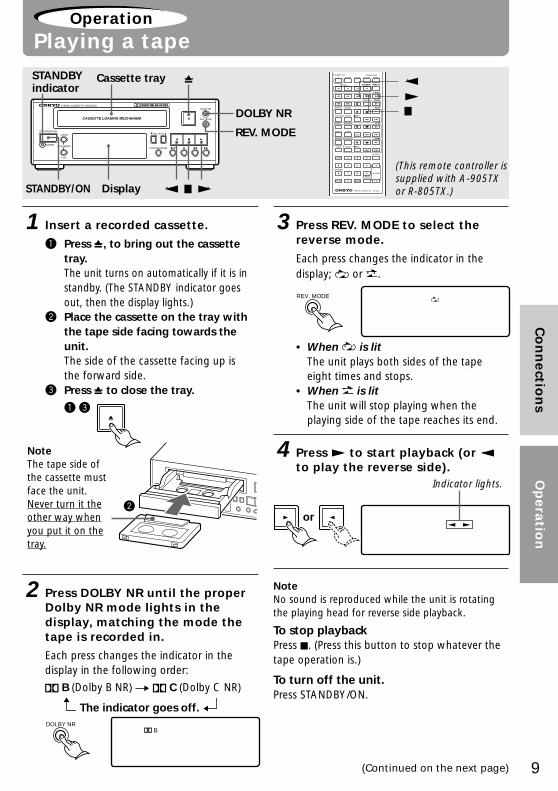
1 Insert a recorded cassette.
1 Press , to bring out the cassettetray.The unit turns on automatically if it is instandby. (The STANDBY indicator goesout, then the display lights.)
2 Place the cassette on the tray withthe tape side facing towards theunit.The side of the cassette facing up isthe forward side.
3 Press to close the tray.
2 Press DOLBY NR until the properDolby NR mode lights in thedisplay, matching the mode thetape is recorded in.
Each press changes the indicator in thedisplay in the following order:
B (Dolby B NR) C (Dolby C NR)
The indicator goes off.
(Continued on the next page)
DOLBY NR
REV. MODE
STANDBY/ON Display
Indicator lights.
NoteThe tape side ofthe cassette mustface the unit.Never turn it theother way whenyou put it on thetray.
2
1 3
B
3 Press REV. MODE to select thereverse mode.
Each press changes the indicator in thedisplay; or .
• When is litThe unit plays both sides of the tapeeight times and stops.
• When is litThe unit will stop playing when theplaying side of the tape reaches its end.
4 Press to start playback (or to play the reverse side).
NoteNo sound is reproduced while the unit is rotatingthe playing head for reverse side playback.
To stop playbackPress . (Press this button to stop whatever thetape operation is.)
To turn off the unit.Press STANDBY/ON.
STANDBY/ON
STANDBY
STEREO CASSETTE TAPE DECK
ALBUM
DOLBY NR
REV. MODE
COUNTER RESET
REC LEVEL
CD DUBBING
FADE
CASSETTE LOADING MECHANISM
Cassette traySTANDBYindicator
CLOCK SLEEP EFFECTGRAPHIC EQ
MODE
1 2 3
4 5 6
7 8 9
10 / 0- - / - - -
VOLUME
PRESET
F M A M
PLAY MODE
PLAY MODE
REPEAT
CLEAR
SCROLL
MEMORY
REPEAT
CLEAR
DISC
REPEAT
CLEAR
ACOUSTICPRESENCE
TONE
RANDOM
TIMER
UP/DOWN
ENTER
MUTING
INPUTTUNER
M D
DVD
C D
CDR
TAPE
REC
REC
PAUSE / STEP
STANDBY/ ON
REMOTE CONTROLLER RC -456S
DOLBY NR
REV. MODE
or
10
(The remote controller issupplied with A-905TXor R-805TX.)
Playing a tape (continued)
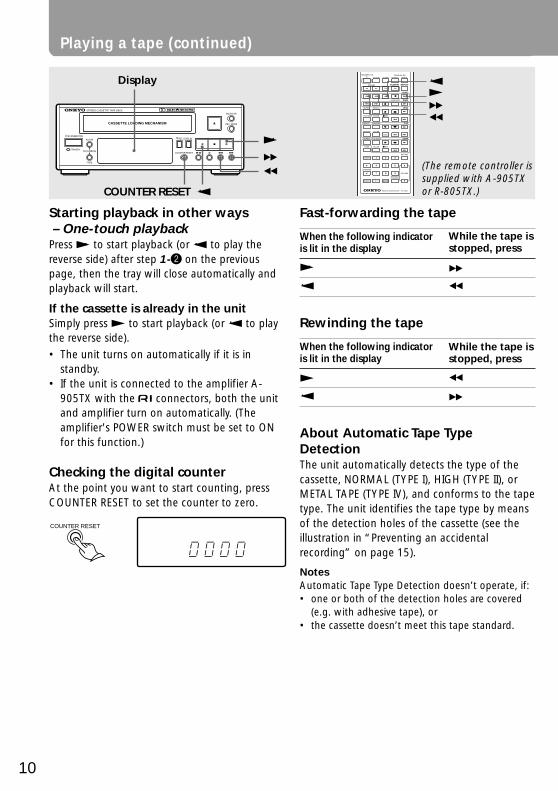
Starting playback in other ways – One-touch playbackPress to start playback (or to play thereverse side) after step 1-2 on the previouspage, then the tray will close automatically andplayback will start.
If the cassette is already in the unitSimply press to start playback (or to playthe reverse side).
• The unit turns on automatically if it is instandby.
• If the unit is connected to the amplifier A-905TX with the connectors, both the unitand amplifier turn on automatically. (Theamplifier's POWER switch must be set to ONfor this function.)
Checking the digital counterAt the point you want to start counting, pressCOUNTER RESET to set the counter to zero.
Fast-forwarding the tape
When the following indicatoris lit in the display
Rewinding the tape
When the following indicatoris lit in the display
About Automatic Tape TypeDetectionThe unit automatically detects the type of thecassette, NORMAL (TYPE I), HIGH (TYPE II), orMETAL TAPE (TYPE IV), and conforms to the tapetype. The unit identifies the tape type by meansof the detection holes of the cassette (see theillustration in “Preventing an accidentalrecording” on page 15).
NotesAutomatic Tape Type Detection doesn’t operate, if:• one or both of the detection holes are covered
(e.g. with adhesive tape), or• the cassette doesn’t meet this tape standard.
While the tape isstopped, press
COUNTER RESET
While the tape isstopped, press
Display
STANDBY/ON
STANDBY
STEREO CASSETTE TAPE DECK
ALBUM
DOLBY NR
REV. MODE
COUNTER RESET
REC LEVEL
CD DUBBING
FADE
CASSETTE LOADING MECHANISM
COUNTER RESET
CLOCK SLEEP EFFECTGRAPHIC EQ
MODE
1 2 3
4 5 6
7 8 9
10 / 0- - / - - -
VOLUME
PRESET
F M A M
PLAY MODE
PLAY MODE
REPEAT
CLEAR
SCROLL
MEMORY
REPEAT
CLEAR
DISC
REPEAT
CLEAR
ACOUSTICPRESENCE
TONE
RANDOM
TIMER
UP/DOWN
ENTER
MUTING
INPUTTUNER
M D
DVD
C D
CDR
TAPE
REC
REC
PAUSE / STEP
STANDBY/ ON
REMOTE CONTROLLER RC -456S
11
Befo
re U
sing
Co
nn
ectio
ns
Oth
er In
form
atio
nO
pera
tion
(The remote controller issupplied with A-905TXor R-805TX.)
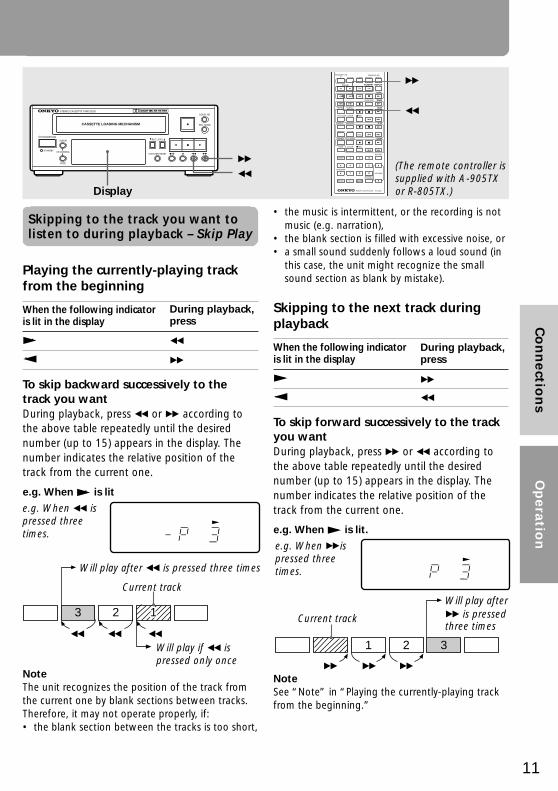
Skipping to the track you want tolisten to during playback – Skip Play
Playing the currently-playing trackfrom the beginning
When the following indicatoris lit in the display
To skip backward successively to thetrack you wantDuring playback, press or according tothe above table repeatedly until the desirednumber (up to 15) appears in the display. Thenumber indicates the relative position of thetrack from the current one.
e.g. When is lit
NoteThe unit recognizes the position of the track fromthe current one by blank sections between tracks.Therefore, it may not operate properly, if:• the blank section between the tracks is too short,
During playback,press
Current track
e.g. When ispressed threetimes.
Will play after is pressed three times
Will play if ispressed only once
• the music is intermittent, or the recording is notmusic (e.g. narration),
• the blank section is filled with excessive noise, or• a small sound suddenly follows a loud sound (in
this case, the unit might recognize the smallsound section as blank by mistake).
Skipping to the next track duringplayback
When the following indicatoris lit in the display
To skip forward successively to the trackyou wantDuring playback, press or according tothe above table repeatedly until the desirednumber (up to 15) appears in the display. Thenumber indicates the relative position of thetrack from the current one.
e.g. When is lit.
NoteSee “Note” in “Playing the currently-playing trackfrom the beginning.”
During playback,press
e.g. When ispressed threetimes.
Current track
Will play after is pressed
three times2 113
1 2 3
STANDBY/ON
STANDBY
STEREO CASSETTE TAPE DECK
ALBUM
DOLBY NR
REV. MODE
COUNTER RESET
REC LEVEL
CD DUBBING
FADE
CASSETTE LOADING MECHANISM
Display
CLOCK SLEEP EFFECTGRAPHIC EQ
MODE
1 2 3
4 5 6
7 8 9
10 / 0- - / - - -
VOLUME
PRESET
F M A M
PLAY MODE
PLAY MODE
REPEAT
CLEAR
SCROLL
MEMORY
REPEAT
CLEAR
DISC
REPEAT
CLEAR
ACOUSTICPRESENCE
TONE
RANDOM
TIMER
UP/DOWN
ENTER
MUTING
INPUTTUNER
M D
DVD
C D
CDR
TAPE
REC
REC
PAUSE / STEP
STANDBY/ ON
REMOTE CONTROLLER RC -456S

12
Recording
4 Prepare the source componentyou want to record from.
• TunerTune into the station you want to record.
• CD player/MD recorderInsert a CD (MD) into the CD player(MD recorder).
• Cassette tape deck/DATInsert a recorded cassette into thecassette tape deck or DAT.
5 Select the component youprepared in the above step withthe input selector on theamplifier.
6 Start playing the source youprepared in step 4, for recordingadjustment.
7 Press to put the unit inrecording pause.
8 Press DOLBY NR until the DolbyNR mode you want to recordwith lights in the display.
See “Dolby Noise Reduction Systems” onpage 15 for Dolby NR mode information.Each press changes the indicator in thedisplay in the following order:
Before startingThe shadowed steps are operations with theother components.
1 Press STANDYBY/ON, if the unitis not turned on.
2 Insert a cassette with its erasureprevention tabs in place,following step 1 in “Playing atape” on page 9.
See “Preventing an accidental recording”on page 15.
3 Press REV. MODE to select thereverse mode.
Each press changes the indicator in thedisplay; or .
• When is litThe unit records both sides of the tapeand stops.
NoteIf you start recording on the reverse side ofthe tape in step 11, the unit will record onlythe reverse side and then stop, even if thereverse mode is set to .
• When is litThe unit stops after recording one sideof the tape.
STANDBY/ON
REV. MODE
DOLBY NR
Display
STANDBY/ON
STANDBY
STEREO CASSETTE TAPE DECK
ALBUM
DOLBY NR
REV. MODE
COUNTER RESET
REC LEVEL
CD DUBBING
FADE
CASSETTE LOADING MECHANISM
STANDBY/ON
REV. MODE
13
Befo
re U
sing
Co
nn
ectio
ns
Oth
er In
form
atio
nO
pera
tion
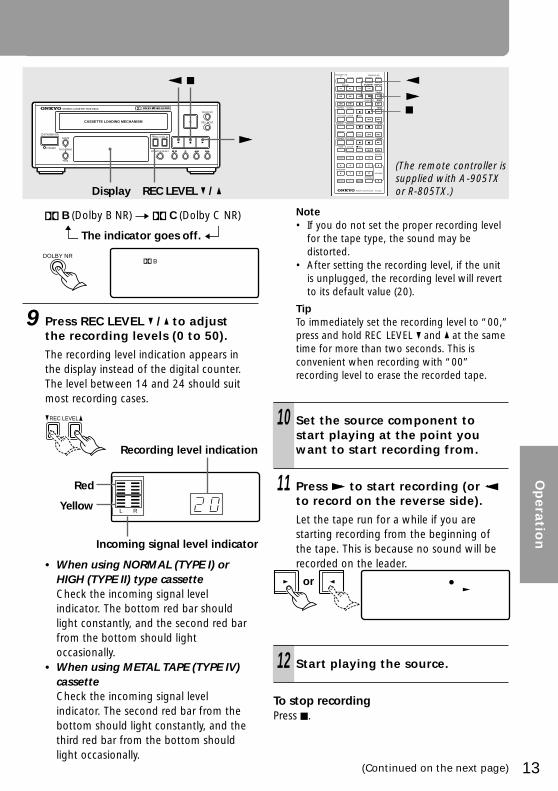
B (Dolby B NR) C (Dolby C NR)
The indicator goes off.
9 Press REC LEVEL / to adjustthe recording levels (0 to 50).
The recording level indication appears inthe display instead of the digital counter.The level between 14 and 24 should suitmost recording cases.
• When using NORMAL (TYPE I) orHIGH (TYPE II) type cassetteCheck the incoming signal levelindicator. The bottom red bar shouldlight constantly, and the second red barfrom the bottom should lightoccasionally.
• When using METAL TAPE (TYPE IV)cassetteCheck the incoming signal levelindicator. The second red bar from thebottom should light constantly, and thethird red bar from the bottom shouldlight occasionally.
(The remote controller issupplied with A-905TXor R-805TX.)
(Continued on the next page)
B
RL
Recording level indication
Red
Yellow
Incoming signal level indicator
Display REC LEVEL /
STANDBY/ON
STANDBY
STEREO CASSETTE TAPE DECK
ALBUM
DOLBY NR
REV. MODE
COUNTER RESET
REC LEVEL
CD DUBBING
FADE
CASSETTE LOADING MECHANISM
DOLBY NR
REC LEVEL
CLOCK SLEEP EFFECTGRAPHIC EQ
MODE
1 2 3
4 5 6
7 8 9
10 / 0- - / - - -
VOLUME
PRESET
F M A M
PLAY MODE
PLAY MODE
REPEAT
CLEAR
SCROLL
MEMORY
REPEAT
CLEAR
DISC
REPEAT
CLEAR
ACOUSTICPRESENCE
TONE
RANDOM
TIMER
UP/DOWN
ENTER
MUTING
INPUTTUNER
M D
DVD
C D
CDR
TAPE
REC
REC
PAUSE / STEP
STANDBY/ ON
REMOTE CONTROLLER RC -456S
or
Note• If you do not set the proper recording level
for the tape type, the sound may bedistorted.
• After setting the recording level, if the unitis unplugged, the recording level will revertto its default value (20).
TipTo immediately set the recording level to “00,”press and hold REC LEVEL and at the sametime for more than two seconds. This isconvenient when recording with “00”recording level to erase the recorded tape.
10 Set the source component tostart playing at the point youwant to start recording from.
11 Press to start recording (or to record on the reverse side).
Let the tape run for a while if you arestarting recording from the beginning ofthe tape. This is because no sound will berecorded on the leader.
12 Start playing the source.
To stop recordingPress .

14
Inserting a blank sectionbetween tracks – Auto Space
To use Skip Play on page 11, there must besufficient blank sections between tracks. If therecording source doesn’t have enough blanksections between tracks, or if you are recordingfrom various sources onto one tape, you need tomake proper blank sections between tracks.
1 While recording or recordingpause, press at the point whenone track has finished.
Pause the playing source at thesame time.
After the unit has completed making ablank section of about five seconds, itenters recording pause automatically.
2 Press or (the buttonindicated in the display) torestart recording.
Restart playing the source at thesame time.
(The remote controller issupplied with A-905TXor R-805TX.)
To make the blank section less than fivesecondsPress to enter the unit into recording pause,or or (the button indicated in the display)to start recording before five seconds elapseafter you press in step 1 above.
To make the blank section longer thanfive secondsPress and hold in step 1 above until thedesired time has elapsed. The unit entersrecording pause immediately after you releasethe button.
CD Synchro Recording
The hookups are necessary for theseoperations. See “Connecting to the connectors” on page 8.
OperationsThe operations for CD Synchro Recording arealmost the same as the recording operationsstarting from page 12.
The differences are follows:
• Skip step 11 and go to step 12.When you start playing the CD in step 12, CDrecording will start at the same time.
• Recording starts in the direction retained inthe unit memory in step 11. If the tape sideyou want to record on doesn’t match the tapetransport direction indicated in the display,press and hold , then press or tochange the starting direction in step 7.
To interrupt CD Synchro Recording• If you press on the CD player to stop the CD,
the unit will stop recording and enter recordingpause.
The recording side indicator flashes whilethe unit is making the blank section.
Display
Recording (continued)
STANDBY/ON
STANDBY
STEREO CASSETTE TAPE DECK
ALBUM
DOLBY NR
REV. MODE
COUNTER RESET
REC LEVEL
CD DUBBING
FADE
CASSETTE LOADING MECHANISM
CLOCK SLEEP EFFECTGRAPHIC EQ
MODE
1 2 3
4 5 6
7 8 9
10 / 0- - / - - -
VOLUME
PRESET
F M A M
PLAY MODE
PLAY MODE
REPEAT
CLEAR
SCROLL
MEMORY
REPEAT
CLEAR
DISC
REPEAT
CLEAR
ACOUSTICPRESENCE
TONE
RANDOM
TIMER
UP/DOWN
ENTER
MUTING
INPUTTUNER
M D
DVD
C D
CDR
TAPE
REC
REC
PAUSE / STEP
STANDBY/ ON
REMOTE CONTROLLER RC -456S

15
Befo
re U
sing
Co
nn
ectio
ns
Oth
er In
form
atio
nO
pera
tion
NoteEven if the CD player completes playing the CDwhile the unit is still recording, the unit willcontinue recording.
Additional information for recording
Dolby Noise Reduction SystemsDolby NR (Noise Reduction) systems are toreduce background hiss noise on the tape, andapplied to all types of cassettes.
This unit is equipped with the Dolby B NR andDolby C NR systems.
• Dolby B NR is most commonly applied tocommercially available stereo cassette tapedecks.
• Dolby C NR was further developed from DolbyB NR to satisfy the demand for wider dynamicrange sound reproduction, and is moreeffective in reducing tape noise than Dolby BNR.
It is recommended that a note be made on thecassette label as to which Dolby NR mode thetape was recorded in, since the tape must beplayed in the same Dolby NR mode.
Dolby HX Pro SystemThe unit is also equipped with the Dolby HX Prosystem.
Dolby HX Pro is a system that constantly adjuststhe recording bias current to the most suitablelevel. With this system, even music sourcesconsisting mostly of high frequency sounds canbe recorded in good condition because thedynamic range in higher frequencies can beexpanded.
The system operates while recording regardlessof the Dolby NR mode setting.
Preventing an accidental recordinga Cassettes have two erasure prevention tabs;
one is for side A and the other is for side Bas you see in the illustration below. Byremoving one or both of the tabs, you canprevent accidental recording over therecorded tape.
b After you remove the erasure preventiontabs, you can cover them with adhesive tapefor recording. When you do this, avoidcovering the tape type detection holes (see“About Automatic Tape Type Detection” onpage 10).
b
a
a
Tab for side A
Tab for side B
Detection holes for highposition cassettes

16
The unit must be connected to A-905TX(Integrated Stereo Amplifier) and C-705TX (CDPlayer) for these operations. (See “Connectingto the ONKYO Separate Collection Seriescomponents” on page 6.)
For CD dubbing, the following two modes areprovided:
• ALBUM (Album dubbing)If a track is not completely recorded becausethe end of the tape was reached during CDdubbing, the unit will rewind the tape to thebeginning of the incompletely recorded trackand erase it. If the unit is in the reverse mode( ), it will continue recording on the otherside of the tape starting from the erasedtrack.
• FADE OUT (Fade out dubbing)If a track is not completely recorded becausethe end of the tape was reached during CDdubbing, the unit will fade it out. If the unit isin the reverse mode ( ), it will continuerecording on the other side of the tapestarting from the beginning of the track thatwas faded out.
Before startingThe shadowed steps are the operations with theCD player or amplifier.
1 Press STANDYBY/ON on theamplifier, if the unit is notturned on.
All the system components will be turnedon.
2 Insert a cassette with its erasureprevention tabs in place,following step 1 in “Playing atape” on page 9.
See “Preventing an accidental recording”on page 15.Be sure to lay the recording side of thecassette face up.
3 Press REV. MODE to select thereverse mode.
Each press changes the indicator in thedisplay; or .
• When is litThe unit records both sides of the tapeand stops.
• When is litThe unit stops after recording theforwarding side of the tape.
K-505TX (This unit) A-905TX (Amplifier)
REV. MODE
DisplaySTANDBY/ON
Recording direction
Recording direction
1 2
45
3
5 3
3Will be erased
Will be erased
CD dubbing with ONKYO Separate Collection Series
Recording direction
Recording direction
1
4 35
3
5
2 3
Will be faded out
Will be faded out
STANDBY/ON
STANDBY
STEREO CASSETTE TAPE DECK
ALBUM
DOLBY NR
REV. MODE
COUNTER RESET
REC LEVEL
CD DUBBING
FADE
CASSETTE LOADING MECHANISM
STANDBY/ON
PHONES
STANDBY
A-905TX
INTEGRATED STEREO AMPLIFIER
TREBLEBASS BALANCE
POWER
OFF/1/2L R
PRESENCEACOUSTIC
CD MD TUNER
LINE/DVD
TAPE
CDR/PC
SOURCE DIRECTDIRECT
DIRECT
TONE
INPUT
ON OFF
VOLUME WIDE RANGE AMP TECHNOLOGY
+–+–
STANDBY/ON
REV. MODE

17
Befo
re U
sing
Co
nn
ectio
ns
Oth
er In
form
atio
nO
pera
tion
4 Insert a CD into the CD player.
5 Press DOLBY NR until the DolbyNR mode you want to recordwith lights in the display.
See “Dolby Noise Reduction Systems” onpage 15 for Dolby NR mode information.Each press changes the indicator in thedisplay in the following order:
B (Dolby B NR) C (Dolby C NR)
The indicator goes off.
6 Press CD DUBBING ALBUM forAlbum dubbing or CD DUBBINGFADE for Fade out dubbing.
CD dubbing starts after the unit hascompleted the following operations:• The unit rewinds the tape if the tape is
not completely rewound to thebeginning.
• The unit adjusts the recording level toits optimum level.
For the dubbing mode, refer to theintroduction on the previous page.
TipIf you need further fine adjustment to therecording level, use the REC LEVEL / buttons(you can adjust the level from –6 to 6).
NoteIf the initial track on the CD is very long and is notcompletely recorded on one side of the tape,Album dubbing or Fade out dubbing will notoperate. If the unit is in the reverse mode ( ), therest of the CD will be kept recording on the otherside of the tape continuously.
To stop CD dubbingPress on the unit or CD player.
K-505TX (This unit) C-705TX (CD player)
B
Indicator lights.
CD DUBB
ALBUM
FADE
ALBUM
CD DUBBING
FADE
(Continued on the next page)
Display
DOLBYNR
STANDBY/ON
STANDBY
STEREO CASSETTE TAPE DECK
ALBUM
DOLBY NR
REV. MODE
COUNTER RESET
REC LEVEL
CD DUBBING
FADE
CASSETTE LOADING MECHANISM
REC LEVEL /
CD DUBBING ALBUM/FADE
DOLBY NR
STANDBY
TR-1
DISPLAY
COMPACT DISC PLAYER
DUAL OPTICAL OUTPUT
STANDBY/ON
18
K-505TX (This unit)
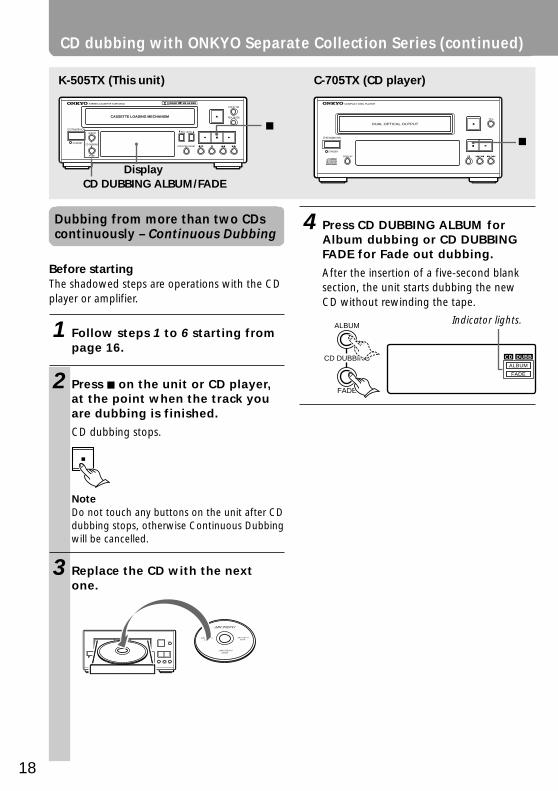
Dubbing from more than two CDscontinuously – Continuous Dubbing
Before startingThe shadowed steps are operations with the CDplayer or amplifier.
1 Follow steps 1 to 6 starting frompage 16.
2 Press on the unit or CD player,at the point when the track youare dubbing is finished.
CD dubbing stops.
NoteDo not touch any buttons on the unit after CDdubbing stops, otherwise Continuous Dubbingwill be cancelled.
3 Replace the CD with the nextone.
C-705TX (CD player)
4 Press CD DUBBING ALBUM forAlbum dubbing or CD DUBBINGFADE for Fade out dubbing.
After the insertion of a five-second blanksection, the unit starts dubbing the newCD without rewinding the tape.
Indicator lights.
CD dubbing with ONKYO Separate Collection Series (continued)
CD DUBB
ALBUM
FADE
ALBUM
CD DUBBING
FADE
STANDBY/ON
STANDBY
STEREO CASSETTE TAPE DECK
ALBUM
DOLBY NR
REV. MODE
COUNTER RESET
REC LEVEL
CD DUBBING
FADE
CASSETTE LOADING MECHANISM
DisplayCD DUBBING ALBUM/FADE
STANDBY
TR-1
DISPLAY
COMPACT DISC PLAYER
DUAL OPTICAL OUTPUT
STANDBY/ON

19
Befo
re U
sing
Co
nn
ectio
ns
Oth
er In
form
atio
nO
pera
tion
K-505TX (This unit)
Starting dubbing CD withoutrewinding the tape
1 Follow steps 1 to 5 starting frompage 16.
2 Press and hold , then press or (to record on the reverseside) to decide the recordingdirection.
The unit is set to recording pause.
3 Press CD DUBBING ALBUM forAlbum dubbing or CD DUBBINGFADE for Fade out dubbing.
The unit starts dubbing the CD withoutrewinding the tape.
Indicator lights.
ALBUM
CD DUBBING
FADE
Indicator lights.
CD DUBB
ALBUM
FADE
or
STANDBY/ON
STANDBY
STEREO CASSETTE TAPE DECK
ALBUM
DOLBY NR
REV. MODE
COUNTER RESET
REC LEVEL
CD DUBBING
FADE
CASSETTE LOADING MECHANISM
Display
CD DUBBING ALBUM/FADE

20
K-505TX (This unit)
3 Press REV. MODE to select thereverse mode.
Each press changes the indicator in thedisplay; or .
• When is litThe unit records both sides of the tapeand stops.
• When is litThe unit stops after recording one sideof the tape.
4 Insert a CD into the CD player orinsert an MD into the MDrecorder, and start playing forrecording adjustment.
5 Press and hold , then press or (to record on the reverseside) to decide the recordingdirection.
The unit is set to recording pause.
Before startingThe shadowed steps are operations with the CDplayer or MD recorder, or amplifier.
The unit must be connected to A-905TX(Integrated Stereo Amplifier), and C-705TX (CDPlayer) or MD-105TX (MD recorder) for theseoperations. (See “Connecting to the ONKYOSeparate Collection Series components” onpage 6.)
1 Press STANDYBY/ON on theamplifier, if the unit is notturned on.
All the system components will be turnedon.
2 Insert a cassette with its erasureprevention tabs in place,following step 1 in “Playing atape” on page 9.
See “Preventing an accidental recording”on page 15.
NoteIf you start recording the tape from thebeginning, wind the tape slightly forward witha pencil (see page 22 for illustration) beforeinserting the cassette. This is because thesound cannot be recorded on the leader.
C-705TX (CD player) is usedfor the illustration example.
Display
REV. MODE
CD/MD Synchro Recording with ONKYO Separate Collection Series
STANDBY/ON
STANDBY
STEREO CASSETTE TAPE DECK
ALBUM
DOLBY NR
REV. MODE
COUNTER RESET
REC LEVEL
CD DUBBING
FADE
CASSETTE LOADING MECHANISM
STANDBY/ON
STANDBY
TR-1
DISPLAY
COMPACT DISC PLAYER
DUAL OPTICAL OUTPUT
STANDBY/ON
REV. MODE
or

21
Befo
re U
sing
Co
nn
ectio
ns
Oth
er In
form
atio
nO
pera
tion
6 Press DOLBY NR until the DolbyNR mode you want to recordwith lights in the display.See “Dolby Noise Reduction Systems” onpage 15 for Dolby NR mode information.Each press changes the indicator in thedisplay in the following order:
B (Dolby B NR) C (Dolby C NR)
The indicator goes off.
7 Press REC LEVEL / to adjustthe recording levels (0 to 50).The recording level indication appears inthe display instead of the digital counter.The level between 14 and 24 should suitmost recording cases.
• When using NORMAL (TYPE I) orHIGH (TYPE II) type cassetteCheck the incoming signal level indicator.The bottom red bar should lightconstantly, and the second red bar fromthe bottom should light occasionally.
• When using METAL TAPE (TYPE IV)cassetteCheck the incoming signal levelindicator. The second red bar from thebottom should light constantly, and thethird red bar from the bottom shouldlight occasionally.
NoteIf you do not set the proper recording level forthe tape type, the sound may be distorted.
8 Set the CD player or MDrecorder to start playing at thepoint you want to startrecording from.
9 Press on the CD player or MDrecorder.
CD or MD recording starts.
NoteEven if CD playback is stopped before dubbing iscomplete, the unit continues recording.
To stop recordingPress on the unit. (The CD player or MDrecorder continues playing.)
To interrupt synchro dubbingPress or on the CD player or MD recorder.
The unit enters recording pause.
To continue recording, press or on theunit (the button indicated in the display).
K-505TX (This unit)
Display REC LEVEL /
DOLBYNR
C-705TX (CD player) is usedfor the illustration example.
B
Indicator lights.
STANDBY/ON
STANDBY
STEREO CASSETTE TAPE DECK
ALBUM
DOLBY NR
REV. MODE
COUNTER RESET
REC LEVEL
CD DUBBING
FADE
CASSETTE LOADING MECHANISM
DOLBY NR
RL
Red
Yellow
Recording level indication
Incoming signal level indicator
REC LEVEL
STANDBY
TR-1
DISPLAY
COMPACT DISC PLAYER
DUAL OPTICAL OUTPUT
STANDBY/ON

22
Handling cassette tapes/MaintenanceOther Information
If the tape is loose and hanging outof the cassetteIf you try to play the cassette when the tape isloose and hanging out, the tape won’t bepicked up properly between the capstan and thepinch roller and may be jammed inside, this willresult in damage to the tape. Tighten the loosetape as shown in the illustration below.
Caution• Do not touch the tape surface.• Do not put thick paper or cardboard labels in
the cassette holder.• Do not put cassettes near magnetic sources
like speakers, amplifiers, TVs, etc. Yourimportant recording might be erased ordamaged.
• Do not expose cassettes to direct sunlight.
Cassettes not recommended• C120 cassettes
C120 tape is thin and therefore more liable tobreak. There is a possibility that tape could getcaught in the pinch roller or capstan.
• Continuous loop (endless) tapesDo not use continuous loop (endless) tapes.
Cleaning the tape headsClean the (recording/playback/erasure) heads,capstan, and pinch roller before recording/playing in order to enjoy the best sound.Normally clean it at least after every ten hours ofuse.
Use a commercially available wet-type headcleaning cassette.
Refer to the operation manual of the headcleaning cassette for details.
Caution• Turn the amplifier volume down to the minimum
before cleaning.• Do not use any dry-type head cleaning cassette.• Wait a few minutes after cleaning until the heads
are completely dried before inserting a cassette.
De-magnetizing the tape headsWhen the cassette deck is used for a long time,magnetism will build up on the head. Thiscauses noise or a loss of high sound range onimportant recorded tapes. De-magnetize thehead after every 50 hours of use with acommercial de-magnetizer suited to this cassettedeck. Refer to the operation manual of the de-magnetizer for details.
CautionTurn the amplifier volume down to the minimumbefore de-magnetizing.
A
NO!NO!
NO! NO!
23
Befo
re U
sing
Co
nn
ectio
ns
Oth
er In
form
atio
nO
pera
tion
Troubleshooting
(Continued on the next page)
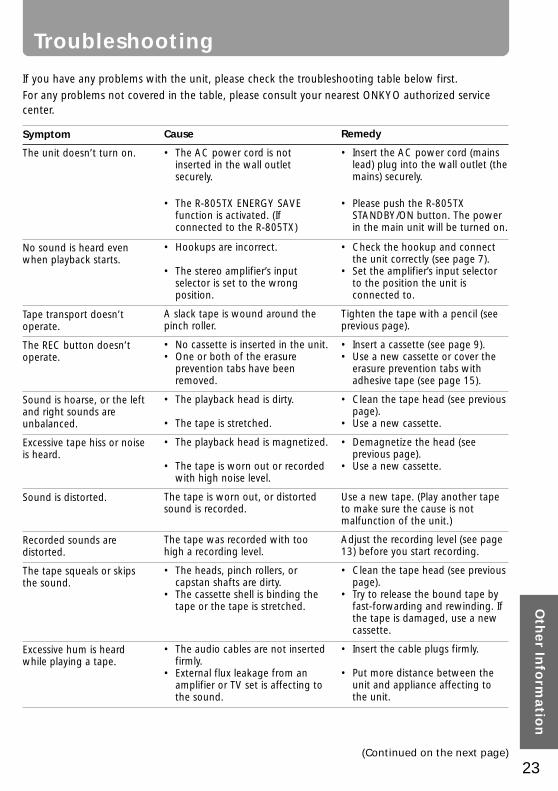
If you have any problems with the unit, please check the troubleshooting table below first.
For any problems not covered in the table, please consult your nearest ONKYO authorized servicecenter.
Symptom
The unit doesn’t turn on.
No sound is heard evenwhen playback starts.
Tape transport doesn’toperate.
The REC button doesn’toperate.
Sound is hoarse, or the leftand right sounds areunbalanced.
Excessive tape hiss or noiseis heard.
Sound is distorted.
Recorded sounds aredistorted.
The tape squeals or skipsthe sound.
Excessive hum is heardwhile playing a tape.
Cause
• The AC power cord is notinserted in the wall outletsecurely.
• The R-805TX ENERGY SAVEfunction is activated. (Ifconnected to the R-805TX)
• Hookups are incorrect.
• The stereo amplifier’s inputselector is set to the wrongposition.
A slack tape is wound around thepinch roller.
• No cassette is inserted in the unit.• One or both of the erasure
prevention tabs have beenremoved.
• The playback head is dirty.
• The tape is stretched.
• The playback head is magnetized.
• The tape is worn out or recordedwith high noise level.
The tape is worn out, or distortedsound is recorded.
The tape was recorded with toohigh a recording level.
• The heads, pinch rollers, orcapstan shafts are dirty.
• The cassette shell is binding thetape or the tape is stretched.
• The audio cables are not insertedfirmly.
• External flux leakage from anamplifier or TV set is affecting tothe sound.
Remedy
• Insert the AC power cord (mainslead) plug into the wall outlet (themains) securely.
• Please push the R-805TXSTANDBY/ON button. The powerin the main unit will be turned on.
• Check the hookup and connectthe unit correctly (see page 7).
• Set the amplifier’s input selectorto the position the unit isconnected to.
Tighten the tape with a pencil (seeprevious page).
• Insert a cassette (see page 9).• Use a new cassette or cover the
erasure prevention tabs withadhesive tape (see page 15).
• Clean the tape head (see previouspage).
• Use a new cassette.
• Demagnetize the head (seeprevious page).
• Use a new cassette.
Use a new tape. (Play another tapeto make sure the cause is notmalfunction of the unit.)
Adjust the recording level (see page13) before you start recording.
• Clean the tape head (see previouspage).
• Try to release the bound tape byfast-forwarding and rewinding. Ifthe tape is damaged, use a newcassette.
• Insert the cable plugs firmly.
• Put more distance between theunit and appliance affecting tothe unit.
24
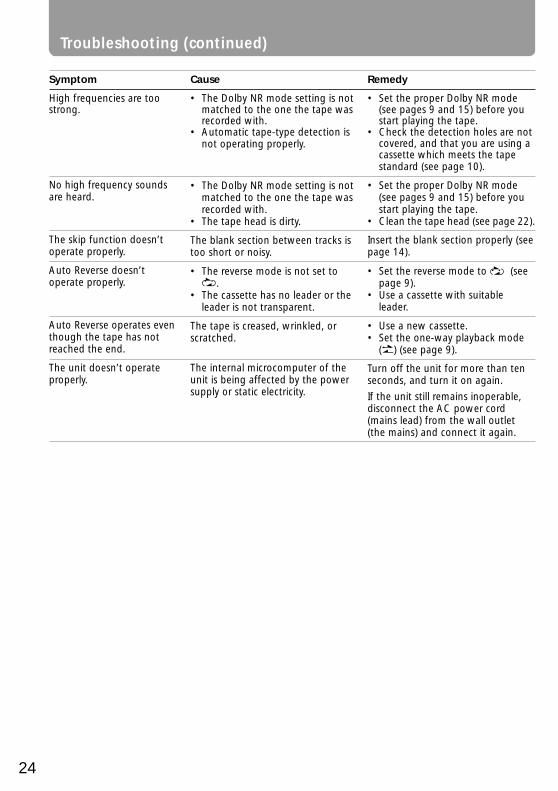
Troubleshooting (continued)
Symptom
High frequencies are toostrong.
No high frequency soundsare heard.
The skip function doesn’toperate properly.
Auto Reverse doesn’toperate properly.
Auto Reverse operates eventhough the tape has notreached the end.
The unit doesn’t operateproperly.
Remedy
• Set the proper Dolby NR mode(see pages 9 and 15) before youstart playing the tape.
• Check the detection holes are notcovered, and that you are using acassette which meets the tapestandard (see page 10).
• Set the proper Dolby NR mode(see pages 9 and 15) before youstart playing the tape.
• Clean the tape head (see page 22).
Insert the blank section properly (seepage 14).
• Set the reverse mode to (seepage 9).
• Use a cassette with suitableleader.
• Use a new cassette.• Set the one-way playback mode
( ) (see page 9).
Turn off the unit for more than tenseconds, and turn it on again.
If the unit still remains inoperable,disconnect the AC power cord(mains lead) from the wall outlet(the mains) and connect it again.
Cause
• The Dolby NR mode setting is notmatched to the one the tape wasrecorded with.
• Automatic tape-type detection isnot operating properly.
• The Dolby NR mode setting is notmatched to the one the tape wasrecorded with.
• The tape head is dirty.
The blank section between tracks istoo short or noisy.
• The reverse mode is not set to.
• The cassette has no leader or theleader is not transparent.
The tape is creased, wrinkled, orscratched.
The internal microcomputer of theunit is being affected by the powersupply or static electricity.
25
Befo
re U
sing
Co
nn
ectio
ns
Oth
er In
form
atio
nO
pera
tion
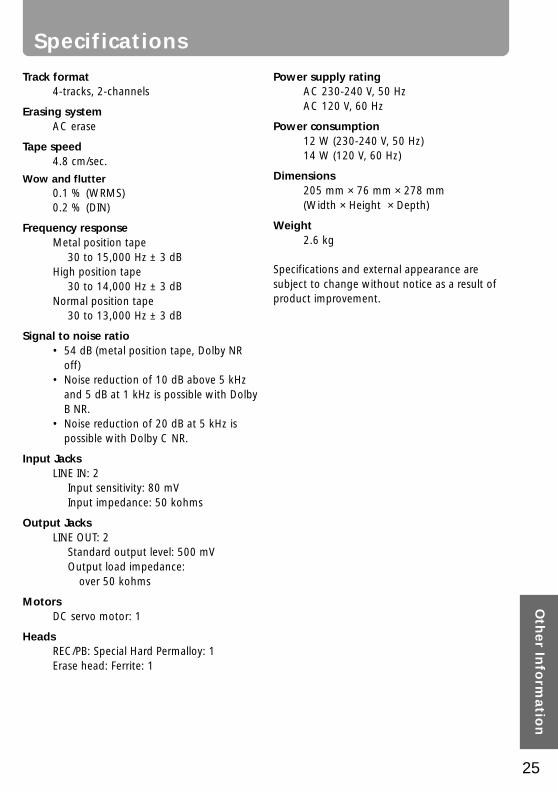
Specifications
Track format4-tracks, 2-channels
Erasing systemAC erase
Tape speed4.8 cm/sec.
Wow and flutter0.1 % (WRMS)0.2 % (DIN)
Frequency responseMetal position tape
30 to 15,000 Hz ± 3 dBHigh position tape
30 to 14,000 Hz ± 3 dBNormal position tape
30 to 13,000 Hz ± 3 dB
Signal to noise ratio• 54 dB (metal position tape, Dolby NR
off)• Noise reduction of 10 dB above 5 kHz
and 5 dB at 1 kHz is possible with DolbyB NR.
• Noise reduction of 20 dB at 5 kHz ispossible with Dolby C NR.
Input JacksLINE IN: 2
Input sensitivity: 80 mVInput impedance: 50 kohms
Output JacksLINE OUT: 2
Standard output level: 500 mVOutput load impedance:
over 50 kohms
MotorsDC servo motor: 1
HeadsREC/PB: Special Hard Permalloy: 1Erase head: Ferrite: 1
Power supply ratingAC 230-240 V, 50 HzAC 120 V, 60 Hz
Power consumption12 W (230-240 V, 50 Hz)14 W (120 V, 60 Hz)
Dimensions205 mm × 76 mm × 278 mm(Width × Height × Depth)
Weight2.6 kg
Specifications and external appearance aresubject to change without notice as a result ofproduct improvement.
26
STANDBY/ON
STANDBY
STEREO CASSETTE TAPE DECK
ALBUM
DOLBY NR
REV. MODE
COUNTER RESET
REC LEVEL
CD DUBBING
FADE
CASSETTE LOADING MECHANISM
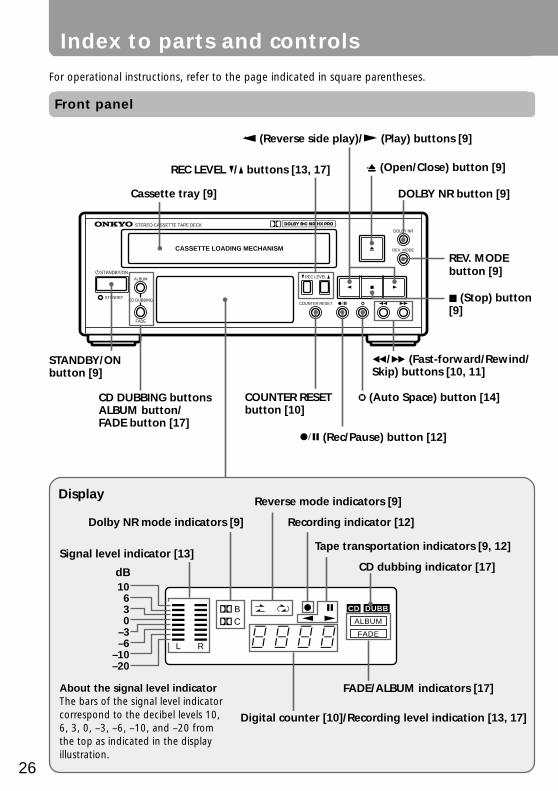
REV. MODEbutton [9]
(Stop) button[9]
Reverse mode indicators [9]Display
Index to parts and controls
For operational instructions, refer to the page indicated in square parentheses.
dB10630
–3–6
–10–20
CD DUBB
ALBUM
FADE
BC
RL
Signal level indicator [13]
Dolby NR mode indicators [9] Recording indicator [12]
Tape transportation indicators [9, 12]
CD dubbing indicator [17]
FADE/ALBUM indicators [17]About the signal level indicatorThe bars of the signal level indicatorcorrespond to the decibel levels 10,6, 3, 0, –3, –6, –10, and –20 fromthe top as indicated in the displayillustration.
Digital counter [10]/Recording level indication [13, 17]
Cassette tray [9]
REC LEVEL / buttons [13, 17]
(Reverse side play)/ (Play) buttons [9]
(Open/Close) button [9]
DOLBY NR button [9]
/ (Fast-forward/Rewind/Skip) buttons [10, 11]
(Auto Space) button [14]
(Rec/Pause) button [12]
COUNTER RESETbutton [10]
CD DUBBING buttonsALBUM button/FADE button [17]
STANDBY/ONbutton [9]
Front panel

27
Befo
re U
sing
Co
nn
ectio
ns
Oth
er In
form
atio
nO
pera
tion
Remote controller
Remote controller supplied with the A-905TX or R-805TX (RC-456S).
To operate the supplied remote controller, make the appropriate connection to the remoteconnectors.
CLOCK SLEEP EFFECTGRAPHIC EQ
MODE
1 2 3
4 5 6
7 8 9 VOLUME
PRESET
F M A M
PLAY MODE
PLAY MODE
REPEAT
CLEAR
SCROLL
MEMORY
REPEAT
CLEAR
DISC
REPEAT
CLEAR
ACOUSTIC
TONE
RANDOM
TIMER
UP/DOWN
MUTING
INPUTTUNER
M D
DVD
C D
CDR
TAPE
REC
REC
PAUSE / STEP
STANDBY/ ON
: Rewind button[10, 11]
: Reverse playbutton [9]
: Stop button [9]
: Play button [9]
: Fast-forward button[10, 11]

Sales & Product Planning Div. : 2-1, Nisshin-cho, Neyagawa-shi, OSAKA 572-8540, JAPANTel: 072-831-8111 Fax: 072-833-5222 http://www.onkyo-intl.com
ONKYO U.S.A. CORPORATION18 Park Way, Upper Saddle River, N.J. 07458, U.S.A.Tel: 201-785-2600 Fax: 201-785-2650 http://www.onkyousa.com
ONKYO EUROPE ELECTRONICS GmbHLiegnitzerstrasse 6, 82194 Groebenzell, GERMANYTel: +49-8142-4401-0 Fax: +49-8142-4401-555 http://www.onkyo.net
ONKYO CHINA LIMITEDUnits 2102-2107, Metroplaza Tower I, 223 Hing Fong Road, Kwai Chung,N.T., HONG KONG Tel: 852-2429-3118 Fax: 852-2428-9039
E
http://www.onkyo.co.jp/HOMEPAGE
SN 29343076Printed in Japan
T0103-1