steps for creating a partner central profileweb28.streamhoster.com › apfmdev ›...
TRANSCRIPT

1
At A Place for Mom, our goal is to help you be more successful by introducing you to new families, and helping increase your overall move-ins and conversion rates. Partner Central is your portal to a successful and productive partnership with A Place for Mom. Partner Central is a powerful tool that allows you to pull lead information, access competitive market reports, and customize your APFM webpage. Every family we refer receives a link inviting them to visit your APFM webpage, so it’s important to invest time in ensuring it not only clearly represents your community, but also helps you stand out from your competitors. Our Senior Living Advisors also reference this data to prequalify families for your community. Completing your Community Profile in Partner Central can take between 20-30 minutes, but it’s an essential step to ensuring a successful partnership.
STEPS FOR CREATING A Partner Central Profile

2
PRICING
CARE & STAFFING
FEATURES
CULTURE
RESIDENTS
WEB PAGE
PERSONAL
EVENTS
3
5
6
7
8
9
13
14
TABLE OF CONTENTS

3
GET STARTED: Click on the Community Profiles tab in the orange bar at the top of the page.
PRICING TAB
Completing the pricing tab is important because it provides our Senior Living Advisors with the starting rates for your community so they can pre-qualify families financially and avoid sending you financially unqualified referrals. Please note that we use the price point to prequalify the family, but we ask that our Advisors do not share the exact price with them because we understand that the actual rate is dependent on your availability and other factors.
If you do not provide this information, you may receive referrals that are not financially qualified for your community, so please take time to enter your pricing and remember to update it when your pricing changes or your have specials or concessions. We recommend creating a recurring calendar item as a reminder to check your pricing each month.
STARTING ROOM CHARGESUpdate your starting room charges and total units (both available and filled) below.

4
FEES AND RATES Not sure what something means? Hover over the question mark and a pop up will explain what each row means. Update your fees below. You may indicate negotiable pricing using the edit button below the table.
CONCESSIONS
Entering your concessions and specials into Partner Central is the fastest and most efficient way to notify all of our Senior Living Advisors in the country that your are offering a concession. Edit your current pricing concessions below. You must provide a start and end date for each concession. Click add to add additional concessions below.
PRICING If your community pricing structure includes all care fees in the room charge, be sure to check the box marked “All inclusive”.
Don’t forget to click “save” after you have entered the correct information. You will click save after each section as you enter your information.

5
CARE & STAFFING TAB
The Care and Staffing section is where you will indicate the different levels of care you offer, your staffing and additional care services available at your community. To get started, click the “Care & Staffing” tab and select the boxes that are appropriate for your community. You can either scroll down the page or click the links to jump down to a specific section. An essential part of every first conversation a Senior Living Advisor has with a family is to get an understanding of the care needs of the potential resident. Before making a referral, they check to make sure your community is a good match. If the info is incomplete, you may receive referrals that are not clinically qualified for your community.

6
FEATURES TAB
For some families specific activities and amenities are important in their decision making process. Advisors can search for communities based on specific activities and amenities they provide. For instance, if we have a family looking for a community where they can bring their dog, the advisor can search for the community based on “accepts dogs”. The features section is also where you indicate the onsite and offsite activities you offer, special events you host, the amenities you have, and any special care services. To get started, click the “Features” tab and start entering your information. You can either scroll down the page or click the links to jump down to a specific section.

7
CULTURE TAB
The culture tab is where you input the primary and different languages spoken at your community, any devotional services you offer, as well as how you accommodate cultural needs.

8
RESIDENTS TAB
It’s important that our Senior Living Advisors have information about the demographics of the residents you can accommodate. The residents tab is where you input the demographic information about the residents you accept.

9
WEB PAGE TAB
Every family we refer receives a link inviting them to visit your Community Page on A Place for Mom’s website. This information is often times the family’s first impression of your community so we recommend that you invest time in ensuring it not only clearly represents your community but also helps you stand out from your competitors. Some of our larger partners prefer that their home office manages the webpage and personnel tabs. If you are unsure, please ask your home office.
DESCRIPTIONS
To get started, click on the “descriptions” section under the “web page” tab. We recommend writing your community’s description in a Word document or something similar so you can save your work. After you have your description written, you can then copy and paste it into the field provided in Partner Central.

10
The property description should give an overview of your community that will educate families and potential residents about the care and services you provide, and encourage them to schedule a tour. The following questions provide suggestions for many of the things you may want to include in your community description. These questions are tools to get you started.
• Minimum Characters: 50• Maximum Characters: 4000• Do not include HTML coding.• Your community amenities will be auto-populated using the information you provide in the “Care and Staffing,” “Features,”
and “Culture” tabs located in your Community Profile in Partner Central. If you have additional amenities that are not specified on your live Community Page, please update your profile in Partner Central to change the displayed amenities.
BUILDING CREDIBILITY 1. How long have you been in business? When did you open?2. How much experience do you have in senior care?
(example: “Our staff members have over 30 years combined experience in senior care.”)3. Have you won any awards? Are you certified by any reputable organizations (BBB)?4. Are you part of a national chain? What is unique and special about your brand?
GEOGRAPHIC INFORMATION1. What is the name of the neighborhood/region in which your community is located?2. What would attract someone to this neighborhood?3. Are there some things close to your community like shopping, a library, bus stop, place of worship, or mall?4. What nearby doctors offices, hospitals, and recreational activities do you regularly provide transportation to?
COMMUNITY INFORMATION1. Describe the design of your campus. What makes it unique?2. What are some key features of the property?
After you have completed writing your community’s description in a Word document, don’t forget to use spell check and grammar. When you are finished simply copy and paste your description into the field provided and click “save.”
LOGOCommunity X
Community X

11
You have the option to upload a community logo. The logo will be displayed before your images. Your logo may be up to 10 MB in size and we recommend that it is of similar orientation and aspect ratio as your images to ensure that the logo and images are displayed correctly on your page. We accept .jpg, .png, or .gif file formats.
To upload a logo, click “Upload” and select the logo from your local files. After you click save, a thumbnail of your logo will be displayed and listed as “Pending.”
ADDITIONAL IMAGES
Adding high-quality images of your community to your Community Page is essential to providing a potential resident or their family a great first impression and sets expectations for when they tour.
Images may be up to 10 MB in size and we recommend that they are all of similar orientation and aspect ratio to ensure that the images are displayed correctly on your page. We accept .jpg, .png, or .gif file formats. You may upload one default photo and as many additional photos as you would like.
To upload images, simply click “Upload” and select the image from your computer. After you upload your photos, don’t forget to scroll down the page and click “save.” After you click save, a thumbnail of your image will be displayed and listed as “Pending.”

12
Please note that your content, images, and logos may not have any contact information such as email addresses, phone numbers, web addresses, or physical address. Uploaded images with this information will not be approved.
If you have any questions or need assistance when completing or updating your APFM Community Page please contact [email protected] for assistance.
Please allow up to 48 hours for content, images, and logos to go live on the A Place For Mom website after submitting them.

13
PERSONNEL TAB
The personnel tab is where you can edit, delete, and add employees at your community including who receives referral alerts, monthly community reports and who has access to Partner Central.
14
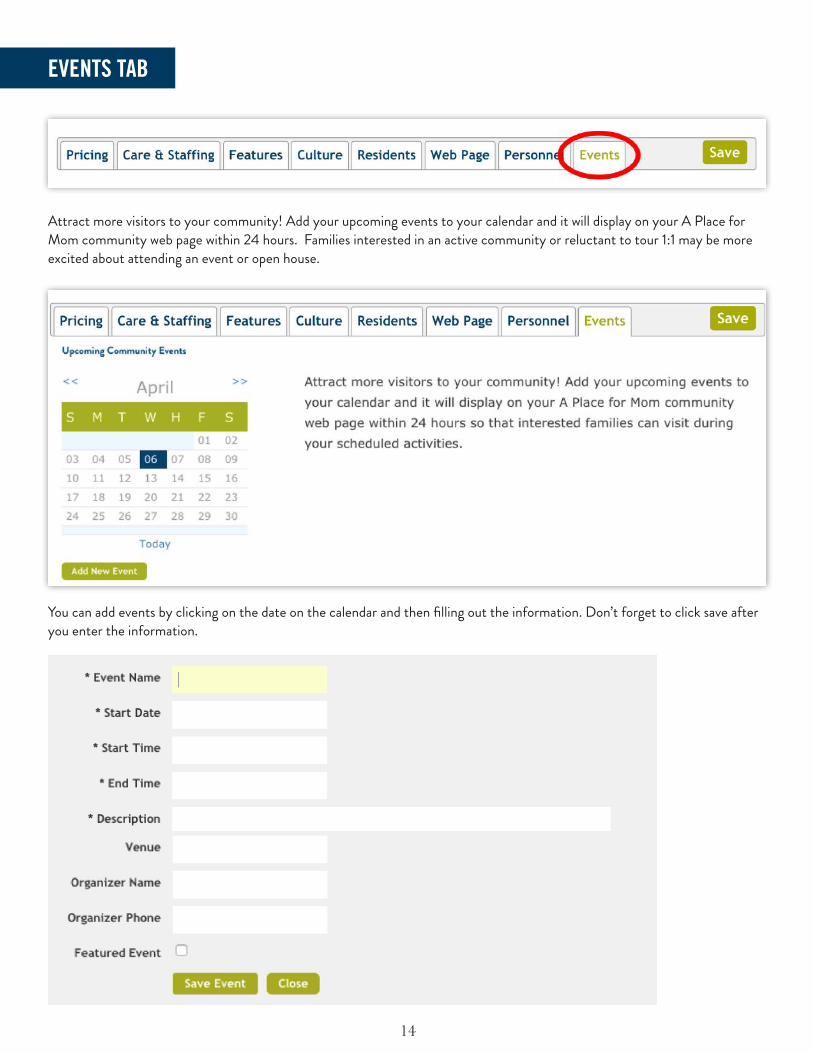
EVENTS TAB
Attract more visitors to your community! Add your upcoming events to your calendar and it will display on your A Place for Mom community web page within 24 hours. Families interested in an active community or reluctant to tour 1:1 may be more excited about attending an event or open house.
You can add events by clicking on the date on the calendar and then filling out the information. Don’t forget to click save after you enter the information.

15
Thank you for taking time to complete your Community Profile! If you have questions, please contact our dedicated Customer Experience team at 866.333.8435 or email [email protected]. You can also explore our frequently asked questions (FAQ) on Partner Central. This tool is designed to quickly provide our partners with answers to the common questions about our partnership.