step by step guide for file server resource manager in windows server 2008
DESCRIPTION
Step by Step Guide for File Server Resource Manager in Windows Server 2008TRANSCRIPT

Step-by-Step Guide for File Server Resource Manager in Windows Server 2008
Microsoft Corporation
Published: February 2008
AbstractFile Server Resource Manager enables system administrators to understand how storage is
being used and to manage the use of their storage by generating storage reports, applying
quotas to volumes and folders, and screening files on the server. This guide provides step-by-
step walkthroughs for creating quotas, creating file screens, and scheduling storage reports.
Copyright Information
Information in this document, including URL and other Internet Web site references, is subject to
change without notice. Unless otherwise noted, the companies, organizations, products, domain
names, e-mail addresses, logos, people, places, and events depicted in examples herein are
fictitious. No association with any real company, organization, product, domain name, e-mail
address, logo, person, place, or event is intended or should be inferred. Complying with all
applicable copyright laws is the responsibility of the user. Without limiting the rights under
copyright, no part of this document may be reproduced, stored in or introduced into a retrieval
system, or transmitted in any form or by any means (electronic, mechanical, photocopying,
recording, or otherwise), or for any purpose, without the express written permission of Microsoft
Corporation.
Microsoft may have patents, patent applications, trademarks, copyrights, or other intellectual
property rights covering subject matter in this document. Except as expressly provided in any
written license agreement from Microsoft, the furnishing of this document does not give you any
license to these patents, trademarks, copyrights, or other intellectual property.
© 2008 Microsoft Corporation. All rights reserved.
Active Directory, Microsoft, MS-DOS, Visual Basic, Visual Studio, Windows, Windows NT,
Windows Server, and Windows Vista are trademarks of the Microsoft group of companies.
All other trademarks are property of their respective owners.
Contents
Introduction to File Server Resource Manager...............................................................................5
Using File Server Resource Manager.............................................................................................5
Opening File Server Resource Manager.....................................................................................6
Configuring File Server Resource Manager................................................................................7
Managing Storage Resources on a Remote Computer...............................................................7
Using Command-Line Tools for File Server Resource Manager..................................................8
Working with Quotas....................................................................................................................... 9
File Server Resource Manager Quotas vs. NTFS Disk Quotas...................................................9
About Quota Templates.............................................................................................................10
Creating a Quota....................................................................................................................... 11
Creating a Quota Template........................................................................................................11
Updating Quotas by Editing a Quota Template..........................................................................13
Creating an Auto Apply Quota...................................................................................................14
Editing an Auto Apply Quota......................................................................................................15
Monitoring Quota Use................................................................................................................16
Screening Files............................................................................................................................. 17
Working with File Groups..........................................................................................................18
Creating a File Screen...............................................................................................................19
Creating a File Screen Exception..............................................................................................21
Monitoring File Screening..........................................................................................................21
Generating Storage Reports.........................................................................................................22
Storage Reports Available in File Server Resource Manager....................................................23
Configuring Report Parameters.................................................................................................24
Scheduling a Set of Reports......................................................................................................25
Generating Reports on Demand................................................................................................26
Backing up File Server Resource Manager Configurations..........................................................27
Test Scenarios for File Server Resource Manager.......................................................................28
Quota Management Scenarios.....................................................................................................29
Testing Quotas.......................................................................................................................... 29
Testing Auto Apply Quotas.........................................................................................................30
Testing Quota Templates...........................................................................................................32
File Screening Management Scenarios........................................................................................33
Testing File Groups.................................................................................................................... 34

Testing File Screens..................................................................................................................34
Testing File Screen Templates...................................................................................................36
Storage Reports Management Scenarios.....................................................................................37
Testing Scheduled Reports........................................................................................................37
Testing On-Demand Reports.....................................................................................................39
Clustering Scenarios.....................................................................................................................40
Preliminary Configuration Guidelines........................................................................................40
Template Export and Import Scenarios.........................................................................................41
Preliminary Configuration Guidelines........................................................................................42
Introduction to File Server Resource Manager
With the increasing demand on storage resources, as organizations rely more heavily on data
than ever before, IT administrators face the challenge of overseeing a larger and more complex
storage infrastructure, while at the same time, tracking the kind of information available in it.
Today, managing storage resources not only includes data size and availability but also the
enforcement of company policies and a very good understanding of how existing storage is being
used, allowing for sound strategic planning and proper response to organizational changes.
File Server Resource Manager is a suite of tools that allows administrators to understand, control,
and manage the quantity and type of data stored on their servers. By using File Server Resource
Manager, administrators can place quotas on volumes, actively screen files and folders, and
generate comprehensive storage reports. This set of advanced instruments not only helps the
administrator to efficiently monitor existing storage resources, but it also aids in the planning and
implementation of future policy changes.
By using File Server Resource Manager, you can perform the following tasks:
Create quotas to limit the space allowed for a volume or folder and generate e-mail and other
notifications when the quota limits are approached or exceeded.
Automatically generate and apply quotas to all existing subfolders and any new subfolders in
a volume or folder.
Create file screens to control the type of files that users can save, and send notifications
when users attempt to save blocked files.
Define quota and file screening templates that can be easily applied to new volumes or
folders and reused across an organization.
Schedule periodic storage reports that help identify trends in disk usage, or generate storage
reports instantly, on demand.
Using File Server Resource Manager
This section tells you how to open File Server Resource Manager and introduces its features.
In this section:
Opening File Server Resource Manager
Configuring File Server Resource Manager
Managing Storage Resources on a Remote Computer
Using Command-Line Tools for File Server Resource Manager
5

Opening File Server Resource ManagerFile Server Resource Manager is a role service of the File Services role in Windows Server 2008.
It can be installed as part of the File Services role, using Server Manager. After you install the role
service, you can use the File Server Resource Manager Microsoft Management Console (MMC)
snap-in.
Membership in the local Administrators group, or equivalent, is the minimum required to use File
Server Resource Manager
To open File Server Resource Manager
In Server Manager:
a. Expand Roles, expand File Services, and then expand Share and Storage
Management.
b. Click File Server Resource Manager.
-Or-
In Administrative Tools, click File Server Resource Manager.
Performing storage management tasksThe following is a list of tasks that you can perform from the three main nodes in the File Server
Resource Manager snap-in.
Quota management
Create, manage, and obtain information about quotas, which are used to set a space limit on
a volume or folder. By defining notification thresholds, you can send e-mail notifications, log
an event, run a command or script, or generate reports when users approach or exceed a
quota.
Create and manage quota templates to simplify quota management.
File screening management
Create, manage, and obtain information about file screens, which are used to block selected
file types from a volume or folder. When users attempt to save unauthorized files, send an e-
mail to the administrators or generate similar notifications.
Create file screen exceptions to override certain file screening rules.
Create and manage file screen templates to simplify file screening management.
Create and manage file groups. When used with file screens and file screen exceptions, file
groups determine which files will be blocked and which will be allowed.
Storage reports management
Schedule and configure storage reports.
Generate storage reports on demand.
6

Configuring File Server Resource ManagerYou can set File Server Resource Manager options in the File Server Resource Manager
Options dialog box. These options include default e-mail notification settings, default parameters
for storage reports, and other settings that apply to multiple tasks. Some of these settings can be
modified when you work with quotas or screen files, or generate storage reports.
To configure File Server Resource Manager options
1. In the console tree, right-click File Server Resource Manager, and then click Configure
Options.
2. In the File Server Resource Manager Options dialog box, click a tab: E-mail
Notifications, Notification Limits, Storage Reports, Report Locations, or File Screen
Audit.
3. Enter settings specific for your server environment.
4. Click OK.
Important
To send e-mail notifications to administrators or to users who exceed quotas or attempt to
save unauthorized files, or to send storage reports over e-mail, specify the SMTP server
to use and the default e-mail settings in the E-mail Notifications tab.
Important
If you will be generating reports to monitor file screening, select the Record file
screening activity in auditing database check box in the File Screen Audit tab. This
will log file screening activity in the auditing database, so that it can be used later to
generate File Screening Audit reports.
Managing Storage Resources on a Remote ComputerTo manage storage resources on a remote computer, you can connect to the computer from File
Server Resource Manager. While you are connected, File Server Resource Manager will display
the objects created on the remote computer, allowing you to manage them in the same way that
you can manage resources on your local computer.
To manage remote storage resources with File Server Resource Manager:
The remote computer must be running Windows Server 2008 with File Server Resource
Manager installed.
Enable the Remote File Server Resource Manager Management exception on the remote
computer. This exception can be enabled by using Windows Firewall in Control Panel.
You must be logged on to the local computer with an account that is a member of the
Administrators group on the remote computer.
7

Important
To manage storage resources on a remote computer, the stand-alone File Server
Resource Manager snap-in must be used, instead of the Server Manager snap-in. The
stand-alone snap-in is available in Administrative Tools.
To connect to a remote computer from File Server Resource Manager
1. In Administrative Tools, click File Server Resource Manager.
2. In the console tree, right-click File Server Resource Manager, and then click Connect
to Another Computer.
3. In the dialog box that opens, click Another computer, and then type the name or browse
to the server that you want to connect to.
4. Click OK to start the connection.
Using Command-Line Tools for File Server Resource ManagerIf you prefer to work from the command line, you can use the following tools:
Dirquota.exe. Use to create and manage quotas, auto apply quotas, and quota templates.
Filescrn.exe. Use to create and manage file screens, file screen exceptions, file screen
templates, and file groups.
Storrept.exe. Use to configure report parameters and generate storage reports on demand.
You can also create report tasks and then use Schtasks.exe to schedule the tasks.
The tools are added to the system path when you install File Server Resource Manager, and they
must be run from an Administrator Command Prompt window.
For more information about these command-line tools, see the following references:
Dirquota: http://go.microsoft.com/fwlink/?LinkId=92741
Filescrn: http://go.microsoft.com/fwlink/?LinkId=92742
Storrept: http://go.microsoft.com/fwlink/?LinkId=92743
Each tool has several options for performing actions similar to those that are available in the File
Server Resource Manager MMC snap-in, and each can perform actions on either a local
computer or a remote computer. To have a command perform an action on a remote computer
instead of the local computer, use the /remote:ComputerName parameter. (Additional
requirements for managing remote storage resources are listed in Managing Storage Resources
on a Remote Computer earlier in this guide.)
8

Working with Quotas
By using File Server Resource Manager to create a quota for a volume or folder, you can limit the
disk space that is allocated for it. The quota limit applies to the entire folder subtree.
You can create either a hard quota or a soft quota:
A hard quota prevents users from saving files after the space limit is reached and generates
notifications when the volume of data reaches each configured threshold.
A soft quota does not enforce the quota limit but generates all configured notifications.
To determine what happens when the quota limit approaches, you can configure notification
thresholds. For each threshold that you define, you can send e-mail notifications, log an event,
run a command or script, or generate storage reports. For example, you might want to notify the
administrator as well as the user who saved the file, when a folder reaches 85 percent of its quota
limit, and then send another notification when the quota limit is reached. In some cases, you
might want to run a script that raises the quota limit automatically when a threshold is reached.
When you create a quota on a volume or a folder, you can base the quota on a quota template or
use custom properties. We recommend that, whenever possible, you base a quota on a quota
template. A quota template can be reused for creating additional quotas and simplifies ongoing
quota maintenance.
File Server Resource Manager can also generate quotas automatically. When you configure an
auto apply quota, you apply a quota template to a parent volume or folder. A quota based on the
template is then created for each of the existing subfolders, and a quota is automatically
generated for each new subfolder that is created.
In this section:
File Server Resource Manager Quotas vs. NTFS Disk Quotas
About Quota Templates
Creating a Quota
Creating a Quota Template
Updating Quotas by Editing a Quota Template
Creating an Auto Apply Quota
Editing an Auto Apply Quota
Monitoring Quota Use
File Server Resource Manager Quotas vs. NTFS Disk QuotasThe following table outlines the advantages of using the quota management tools in File Server
Resource Manager over NTFS disk quotas.
9

Advantages of Using File Server Resource Manager
Quota features File Server Resource Manager NTFS disk quotas
Quota tracking By folder or by volume Per user on a volume
Disk usage calculation Actual disk space Logical file size
Notification mechanisms E-mail, custom reports, running
commands or scripts, event
logs
Event logs only
About Quota TemplatesFile Server Resource Manager gives you flexibility in creating, using, and managing templates,
both for quotas and for file screens.
A quota template defines a space limit, the type of quota (hard or soft), and a set of notifications
to be generated when the quota limit approaches or is exceeded.
Quota templates simplify the creation and maintenance of quotas:
By using a quota template, you can apply a standard storage limit and a standard set of
notification thresholds to many volumes and folders on servers throughout your organization.
If you base your quotas on a template, you can automatically update all quotas that are
based on a specific template by editing that template. This feature simplifies the process of
updating the properties of quotas by providing one central point where all changes can be
made.
For example, you can create a User Quota template that you use to place a 200 MB limit on the
personal folder of each user. For each user, you would then create a quota based on the User
Quota template and assign it to the user’s folder. If you later decide to allow each user additional
space on the server, you simply change the space limit in the User Quota template and choose to
automatically update each quota that is based on that quota template.
File Server Resource Manager provides several quota templates. For example:
You can use the 200 MB Limit Reports to User template to place a hard 200 MB limit on the
personal folder of each user.
For some folders, you might want to use the 200 MB Limit with 50 MB Extension template
to automatically increase the quota limit when a 200 MB quota limit is reached.
Other default templates are designed for monitoring disk usage through soft quotas—for
example, the Monitor 200 GB Volume Usage template and the Monitor 500 MB Share
template. When you use these templates, users can exceed the quota limit, but e-mail and
event log notifications are generated when they do so.
To view the default templates, click the Quota Templates node in the File Server Resource
Manager console tree.
10

Creating a QuotaThe following procedure guides you through the process of creating a quota that is based on a
template, which is recommended practice.
To create a quota that is based on a template
1. In Quota Management, click the Quota Templates node.
2. In the Results pane, select the template on which you will base your quota.
3. Right-click the template and click Create Quota from Template (or click Create Quota
from Template in the Actions pane). This opens the Create Quota dialog box with the
summary properties of the quota template displayed.
4. Under Quota path, type or browse to the volume or folder that the quota will apply to.
5. Click the Create quota on path option. Note that the quota properties will apply to the
entire volume or folder.
6. Under Derive properties from this quota template, the template you used in step 2 to
create your new quota is preselected (or you can select another template from the list).
Note that the properties of the template are displayed under Summary of quota
properties.
7. Click Create.
Note
If you do not want to base your quota on a template, or if you want to edit the properties
copied from a template, in the Create Quota dialog box you can choose Define custom
quota properties, and then click Custom Properties. Note that if you create a quota
with custom properties, you have the option of saving a quota template with the custom
quota settings when you save the new quota. If you choose that option, a new template is
saved, and then the template is applied to the new quota so that a link is maintained
between the quota and the template.
Creating a Quota TemplateThe following procedure guides you through the process of creating a new quota template.
To create a quota template
1. In Quota Management, click the Quota Templates node.
2. Right-click Quota Templates, and then click Create Quota Template (or click Create
Quota Template in the Actions pane).
3. If you want to copy the properties of an existing template to use as a base for your new
template, select a template from the Copy properties from quota template drop-down
list. Then click Copy.
4. In the Template Name text box, enter a name for the new template.
11

5. In the Label text box, enter an optional descriptive label that will appear next to any
quotas derived from the template.
6. Under Space Limit:
a. In the Limit text box, enter a number and choose a unit (KB, MB, GB, or TB) to
specify the space limit for the quota.
b. Click the Hard quota or Soft quota option. (A hard quota prevents users from saving
files after the space limit is reached and generates notifications when the volume of
data reaches each configured threshold. A soft quota does not enforce the quota
limit, but it generates all configured notifications.)
7. You can configure one or more optional threshold notifications for your quota template, as
described in the procedure that follows. After you have selected all the quota template
properties that you want to use, click OK to save the template.
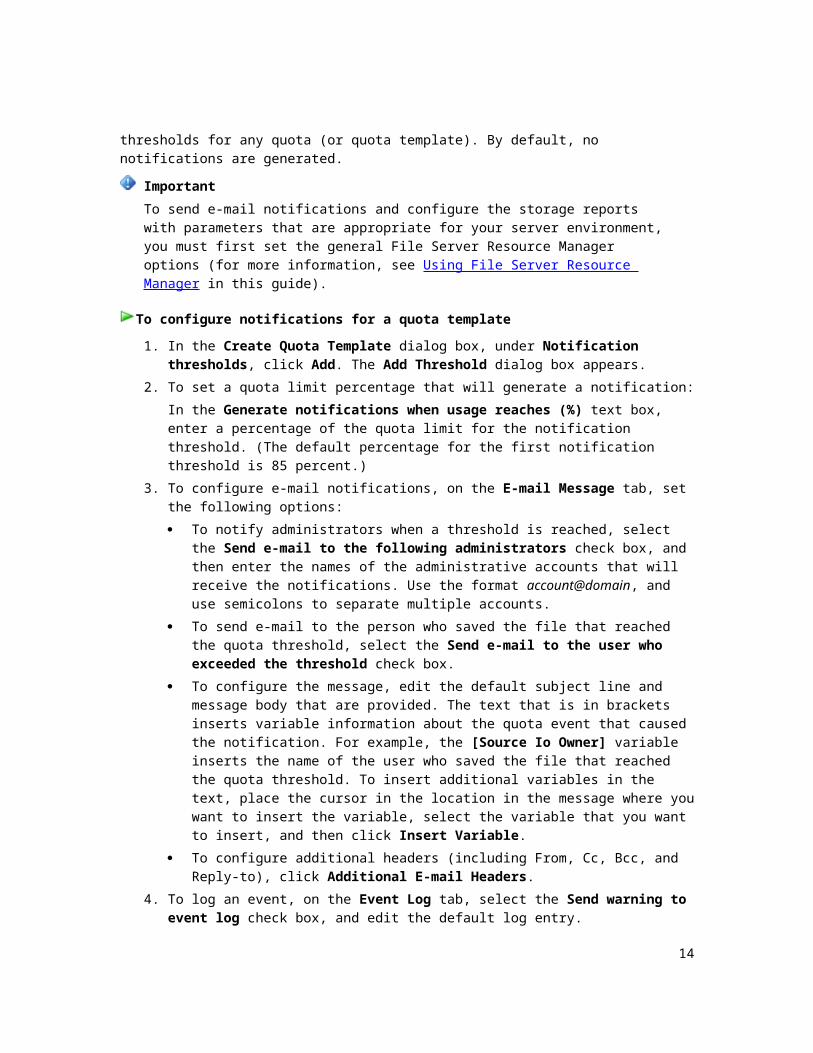
Setting optional notification thresholdsWhen storage in a volume or folder reaches a threshold level that you define, File Server
Resource Manager can send e-mail messages to administrators or specific users, log an event,
run a command or a script, or generate storage reports. You can configure more than one type of
notification for each threshold, and you can define multiple thresholds for any quota (or quota
template). By default, no notifications are generated.
Important
To send e-mail notifications and configure the storage reports with parameters that are
appropriate for your server environment, you must first set the general File Server
Resource Manager options (for more information, see Using File Server Resource
Manager in this guide).
To configure notifications for a quota template
1. In the Create Quota Template dialog box, under Notification thresholds, click Add.
The Add Threshold dialog box appears.
2. To set a quota limit percentage that will generate a notification:
In the Generate notifications when usage reaches (%) text box, enter a percentage of
the quota limit for the notification threshold. (The default percentage for the first
notification threshold is 85 percent.)
3. To configure e-mail notifications, on the E-mail Message tab, set the following options:
To notify administrators when a threshold is reached, select the Send e-mail to the
following administrators check box, and then enter the names of the administrative
accounts that will receive the notifications. Use the format account@domain, and use
semicolons to separate multiple accounts.
To send e-mail to the person who saved the file that reached the quota threshold,
select the Send e-mail to the user who exceeded the threshold check box.
12

To configure the message, edit the default subject line and message body that are
provided. The text that is in brackets inserts variable information about the quota
event that caused the notification. For example, the [Source Io Owner] variable
inserts the name of the user who saved the file that reached the quota threshold. To
insert additional variables in the text, place the cursor in the location in the message
where you want to insert the variable, select the variable that you want to insert, and
then click Insert Variable.
To configure additional headers (including From, Cc, Bcc, and Reply-to), click
Additional E-mail Headers.
4. To log an event, on the Event Log tab, select the Send warning to event log check box,
and edit the default log entry.
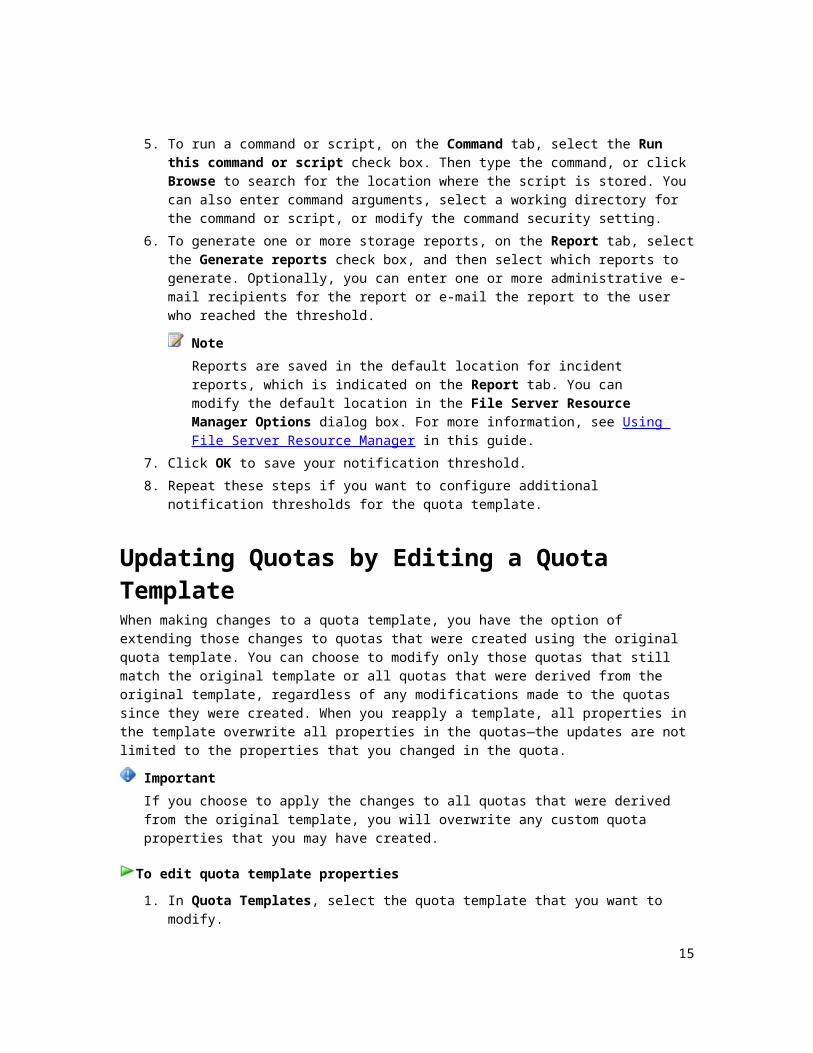
5. To run a command or script, on the Command tab, select the Run this command or
script check box. Then type the command, or click Browse to search for the location
where the script is stored. You can also enter command arguments, select a working
directory for the command or script, or modify the command security setting.
6. To generate one or more storage reports, on the Report tab, select the Generate
reports check box, and then select which reports to generate. Optionally, you can enter
one or more administrative e-mail recipients for the report or e-mail the report to the user
who reached the threshold.
Note
Reports are saved in the default location for incident reports, which is indicated
on the Report tab. You can modify the default location in the File Server
Resource Manager Options dialog box. For more information, see Using File
Server Resource Manager in this guide.
7. Click OK to save your notification threshold.
8. Repeat these steps if you want to configure additional notification thresholds for the quota
template.
Updating Quotas by Editing a Quota TemplateWhen making changes to a quota template, you have the option of extending those changes to
quotas that were created using the original quota template. You can choose to modify only those
quotas that still match the original template or all quotas that were derived from the original
template, regardless of any modifications made to the quotas since they were created. When you
reapply a template, all properties in the template overwrite all properties in the quotas—the
updates are not limited to the properties that you changed in the quota.
Important
If you choose to apply the changes to all quotas that were derived from the original
template, you will overwrite any custom quota properties that you may have created.
13
To edit quota template properties
1. In Quota Templates, select the quota template that you want to modify.
2. Right-click the quota template, and then click Edit Template Properties (or in the
Actions pane, under Selected Quota Templates, click Edit Template Properties). This
opens the Quota Template Properties dialog box.
3. Perform all necessary changes. The settings and notification options are identical to
those that you can set when you create a quota template. (For more information, see
Creating a Quota Template earlier in this guide.) Optionally, you can copy the properties
of a different template and modify them for this one.
4. When you are finished editing the template properties, click OK. This will open the
Update Quotas Derived from Template dialog box.
5. Select the type of update that you want to apply:
If you have quotas that have been modified since they were created using the original
template, and you do not want to change them, select Apply template only to
derived quotas that match the original template. This option will update only those
quotas that have not been edited since they were created with the original template.
If you want to modify all existing quotas that were created from the original template,
select Apply template to all derived quotas.
If you want to keep the existing quotas unchanged, select Do not apply template to
derived quotas.
6. Click OK.
Creating an Auto Apply QuotaAuto apply quotas allow you to assign a quota template to a volume or folder and specify that
quotas based on that template will be automatically generated and applied to the existing
subfolders, as well as to any new subfolders created in the future.
For example, you may define an auto apply quota for subfolders that are created on demand, for
roaming profile users or for new users. Every time a new subfolder is created, a new quota entry
is automatically generated for that subfolder, using the template defined in the auto apply quota
profile of its parent folder. These automatically generated quota entries can then be viewed in the
Results pane, under the Quotas node, as individually created quotas, which can be edited and
modified separately.
To create an auto apply quota
1. In Quota Management, click the Quotas node.
2. Right-click Quotas and then click Create Quota (or click Create Quota in the Actions
pane). This opens the Create Quota dialog box.
3. Under Quota Path, type the name of or browse to the volume or parent folder that the
quota profile will apply to. The auto apply quota will be applied to each of the subfolders
14
(current and future) in this volume or folder.
4. Click Auto apply template and create quotas on existing and new subfolders.
5. Under Derive properties from this quota template, select the quota template that you
want to apply from the drop-down list. Note that the properties for each template are
displayed under Summary of quota properties.
6. Click Create.
Note
You can verify all automatically generated quotas by opening the Quotas node
and then clicking Refresh. An individual quota for each subfolder and the auto
apply quota profile in the parent volume or folder are listed. Also, you can click
Filter at the top of the Results pane, and then select to display only auto apply
quotas.
Editing an Auto Apply QuotaWhen making changes to an auto apply quota, you have the option of extending those changes
to existing quotas in the auto apply quota path. You can choose to modify only those quotas that
still match the original auto apply quota, or all quotas in the auto apply quota path, regardless of
any modifications made to the quotas since they were created. Since auto apply quotas are
based on quota templates, any specific property changes have to be created either in the quota
template used for the original auto apply quota or by creating a new quota template with the
desired properties. For more information about how to modify an existing quota template, see
Updating Quotas by Editing a Quota Template earlier in this guide.
Note
If you choose to apply the changes to all quotas in the auto apply quota path, you will
overwrite any custom quota properties that you may have created.
To edit an auto apply quota
1. In Quotas, select the auto apply quota that you want to modify.
Note
To list only auto apply quotas, click Filter at the top of the Results pane, and then
select to display only auto apply quotas.
2. Right-click the auto apply quota that you want to modify, and then click Edit Quota
Properties (or in the Actions pane, under Selected Quotas, click Edit Quota
Properties). This opens the Edit Auto Apply Quota dialog box.
3. Under Derive properties from this quota template, select the new quota template that
you want to apply. You can review the properties of each quota template in the summary
list box.
4. Click OK. This will open the Update Quotas Derived from Auto Apply Quota dialog
15

box.
5. Select the type of update you want to apply:
If you have quotas that have been modified since they were automatically generated,
and you do not want to change them, select Apply auto apply quota only to
derived quotas that match the original auto apply quota. This option will update
only those quotas in the auto apply quota path that have not been edited since they
were automatically generated.
If you want to modify all existing quotas in the auto apply quota path, select Apply
auto apply quota to all derived quotas.
If you want to keep the existing quotas unchanged but make the modified auto quota
effective for new subfolders in the auto apply quota path, select Do not apply auto
apply quota to derived quotas.
6. Click OK.
Monitoring Quota UseIn addition to the information included in notifications, you can find out about quota usage by
viewing quotas in Quota Management, by generating a Quota Usage report, or by creating soft
quotas for the purpose of monitoring overall disk usage.
Viewing quota informationTo view quota information in File Server Resource Manager, in the console tree, click Quota
Management, and then click Quotas.
In the Results pane, you can quickly find out the quota limit, the percentage of the limit that is
used, whether the quota is hard or soft, and other quota attributes.
Click Filter at the top of the Results pane to limit the display to regular or auto apply
quotas, or to quotas that affect a specific path.
Click a column header to group quotas by that attribute.
To find out additional information about a quota, click the quota. The description area at the
bottom of the Results pane lists the peak usage and notes the remaining space available on
the volume on which the quota was created.
To view all quotas whose limits apply to a specific volume or folder, right-click the quota of
interest (identified by its path) in the Results pane, and click View Quotas Affecting Folder.
The Results pane shows the filtered list of applicable quotas.
-Or-
To filter the Results pane display to the quotas that affect a specific path:
a. Click Filter at the top of the pane.
b. In the Quota Filter dialog box, under Quotas affecting path, click either the Parents of
the following folder option or the Children of the following folder option.
16

c. Enter or browse to the path.
d. Click OK.
Quota Usage reportUse the Quota Usage report to identify quotas that may soon be exceeded so that you can take
the appropriate action. For instructions on generating a Quota Usage report, see Generating
Storage Reports later in this guide.
Templates for monitoring disk usageTo monitor overall disk usage, you may also want to create soft quotas for volumes or shares. File
Server Resource Manager provides the following default templates that you can use (or adapt) for
this purpose: the Monitor 200 GB Volume Usage template and the Monitor 500 MB Share
template.
Screening Files
Create file screens to block files that belong to particular file groups from being saved on a
volume or in a folder tree. A file screen affects all folders in the designated path. For example, you
might create a file screen to prevent users from storing audio and video files in their personal
folders on the server.
You can configure File Server Resource Manager to generate e-mail or other notifications when a
file screening event occurs.
A file screen can be either active or passive:
Active screening prevents users from saving unauthorized file types on the server.
Passive screening monitors users saving specific file types and generates any configured
notifications, but does not prevent users from saving files.
A file screen does not prevent users and applications from accessing files that were saved to the
path before the file screen was created, regardless of whether the files are members of blocked
file groups.
To simplify the management of file screens, we recommend that you base your file screens on file
screen templates. A file screen template defines a screening type (active or passive), a set of file
groups to block, and a set of notifications to be generated when a user attempts to save an
unauthorized file. File Server Resource Manager provides several default file screen templates,
which you can use to block audio and video files, executable files, image files, and e-mail files—
and to meet some other common administrative needs. To view the default templates, select the
File Screen Templates node in the File Server Resource Manager console tree.
For additional flexibility, you can configure a file screen exception in a subfolder of a path where
you have created a file screen. When you place a file screen exception on a subfolder, you allow
17

users to save file types there that would otherwise be blocked by the file screen applied to the
parent folder.
In this section:
Working with File Groups
Creating a File Screen
Creating a File Screen Exception
Monitoring File Screening
Working with File GroupsBefore you begin working with file screens, you must understand the role of file groups in
determining which files are screened. A file group is used to define a namespace for a file screen
or a file screen exception, or to generate a Files by File Group storage report.
A file group consists of a set of file name patterns, which are grouped into files to include and files
to exclude:
Files to include: files that belong in the group.
Files to exclude: files that do not belong in the group.
For example, an Audio Files file group might include the following file name patterns:
Files to include: *.mp*: includes all audio files created in current and future MPEG formats
(MP2, MP3, and so forth).
Files to exclude: *.mpp: excludes files created in Microsoft Project (.mpp files), which would
otherwise be included by the *.mp* inclusion rule.
File Server Resource Manager provides several default file groups, which you can view in File
Screening Management by clicking the File Groups node. You can define additional file groups,
or change the files to include and exclude. Any changes that you make to a file group affect all
existing file screens, templates, and reports to which the file group has been added.
Note
For convenience, you can modify file groups when you edit the properties of a file screen,
file screen exception, file screen template, or the Files by File Group report. Note that any
changes that you make to a file group from these property sheets will affect all items that
use that file group.
To create a file group
1. In File Screening Management, click the File Groups node.
2. In the Actions pane, click Create File Group. This opens the Create File Group
Properties dialog box.
(Alternatively, while you edit the properties of a file screen, file screen exception, file
screen template, or Files by File Group report, under Maintain file groups, click Create.)
3. In the Create File Group Properties dialog box, type a name for the file group.
18

4. Add files to include and files to exclude:
For each set of files that you want to include in the file group, in Files to include,
type a file name pattern, and then click Add.
Standard rules for wildcard characters apply. For example, *.exe selects all
executable files.
For each set of files that you want to exclude from the file group, in Files to exclude,
type a file name pattern, and then click Add.
Note that standard wildcard rules apply—for example, *.exe selects all executable files.
5. Click OK.
Creating a File ScreenIn the following procedure, you will create a new file screen, and in the process save a file screen
template based on the custom file screen properties that you defined. The new template will be
applied to the file screen so that a link is maintained between the file screen and the template. In
a similar way, you can save a new quota template based on the custom properties of a quota you
create.
To create a file screen
1. In File Screening Management, click the File Screens node.
2. Right-click File Screens, and click Create File Screen (or click Create File Screen in
the Actions pane). This opens the Create File Screen dialog box.
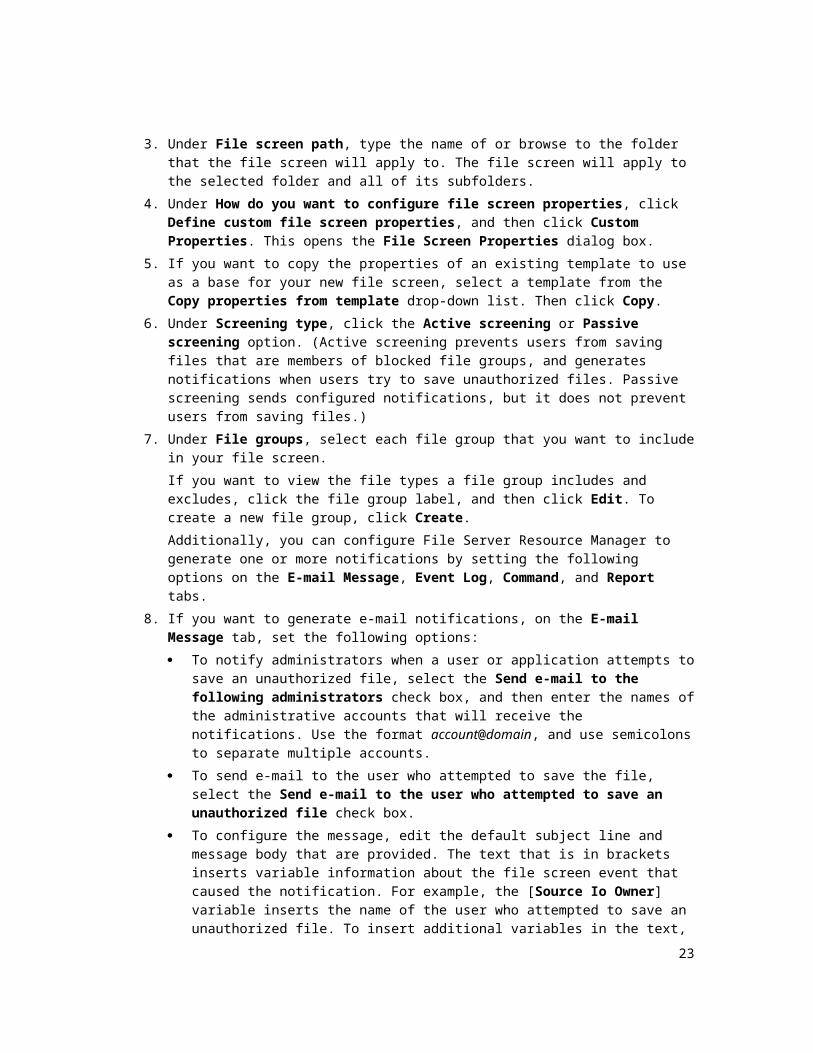
3. Under File screen path, type the name of or browse to the folder that the file screen will
apply to. The file screen will apply to the selected folder and all of its subfolders.
4. Under How do you want to configure file screen properties, click Define custom file
screen properties, and then click Custom Properties. This opens the File Screen
Properties dialog box.
5. If you want to copy the properties of an existing template to use as a base for your new
file screen, select a template from the Copy properties from template drop-down list.
Then click Copy.
6. Under Screening type, click the Active screening or Passive screening option. (Active
screening prevents users from saving files that are members of blocked file groups, and
generates notifications when users try to save unauthorized files. Passive screening
sends configured notifications, but it does not prevent users from saving files.)
7. Under File groups, select each file group that you want to include in your file screen.
If you want to view the file types a file group includes and excludes, click the file group
label, and then click Edit. To create a new file group, click Create.
Additionally, you can configure File Server Resource Manager to generate one or more
notifications by setting the following options on the E-mail Message, Event Log,
Command, and Report tabs.
19

8. If you want to generate e-mail notifications, on the E-mail Message tab, set the following
options:
To notify administrators when a user or application attempts to save an unauthorized
file, select the Send e-mail to the following administrators check box, and then
enter the names of the administrative accounts that will receive the notifications. Use
the format account@domain, and use semicolons to separate multiple accounts.
To send e-mail to the user who attempted to save the file, select the Send e-mail to
the user who attempted to save an unauthorized file check box.
To configure the message, edit the default subject line and message body that are
provided. The text that is in brackets inserts variable information about the file screen
event that caused the notification. For example, the [Source Io Owner] variable
inserts the name of the user who attempted to save an unauthorized file. To insert
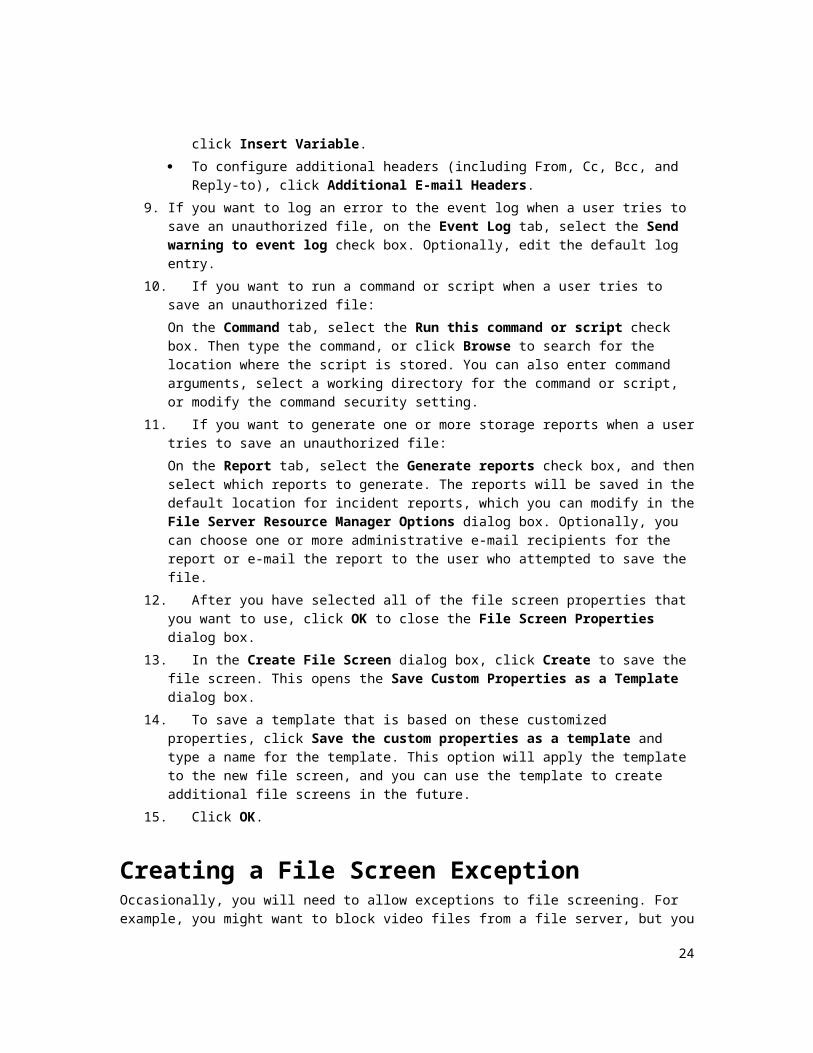
additional variables in the text, click Insert Variable.
To configure additional headers (including From, Cc, Bcc, and Reply-to), click
Additional E-mail Headers.
9. If you want to log an error to the event log when a user tries to save an unauthorized file,
on the Event Log tab, select the Send warning to event log check box. Optionally, edit
the default log entry.
10. If you want to run a command or script when a user tries to save an unauthorized file:
On the Command tab, select the Run this command or script check box. Then type
the command, or click Browse to search for the location where the script is stored. You
can also enter command arguments, select a working directory for the command or
script, or modify the command security setting.
11. If you want to generate one or more storage reports when a user tries to save an
unauthorized file:
On the Report tab, select the Generate reports check box, and then select which
reports to generate. The reports will be saved in the default location for incident reports,
which you can modify in the File Server Resource Manager Options dialog box.
Optionally, you can choose one or more administrative e-mail recipients for the report or
e-mail the report to the user who attempted to save the file.
12. After you have selected all of the file screen properties that you want to use, click OK to
close the File Screen Properties dialog box.
13. In the Create File Screen dialog box, click Create to save the file screen. This opens the
Save Custom Properties as a Template dialog box.
14. To save a template that is based on these customized properties, click Save the custom
properties as a template and type a name for the template. This option will apply the
template to the new file screen, and you can use the template to create additional file
screens in the future.
15. Click OK.
20

Creating a File Screen ExceptionOccasionally, you will need to allow exceptions to file screening. For example, you might want to
block video files from a file server, but you need to allow your training group to save the video
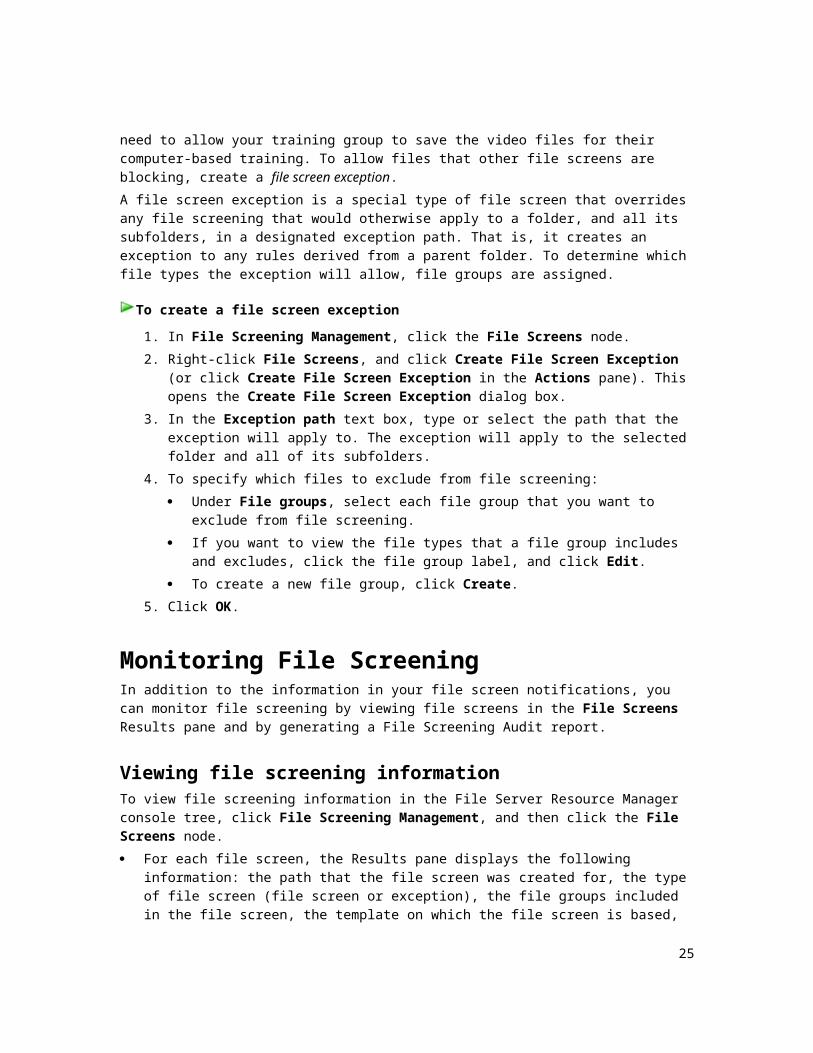
files for their computer-based training. To allow files that other file screens are blocking, create a
file screen exception.
A file screen exception is a special type of file screen that overrides any file screening that would
otherwise apply to a folder, and all its subfolders, in a designated exception path. That is, it
creates an exception to any rules derived from a parent folder. To determine which file types the
exception will allow, file groups are assigned.
To create a file screen exception
1. In File Screening Management, click the File Screens node.
2. Right-click File Screens, and click Create File Screen Exception (or click Create File
Screen Exception in the Actions pane). This opens the Create File Screen Exception
dialog box.
3. In the Exception path text box, type or select the path that the exception will apply to.
The exception will apply to the selected folder and all of its subfolders.
4. To specify which files to exclude from file screening:
Under File groups, select each file group that you want to exclude from file
screening.
If you want to view the file types that a file group includes and excludes, click the file
group label, and click Edit.
To create a new file group, click Create.
5. Click OK.
Monitoring File ScreeningIn addition to the information in your file screen notifications, you can monitor file screening by
viewing file screens in the File Screens Results pane and by generating a File Screening Audit
report.
Viewing file screening informationTo view file screening information in the File Server Resource Manager console tree, click File
Screening Management, and then click the File Screens node.
For each file screen, the Results pane displays the following information: the path that the file
screen was created for, the type of file screen (file screen or exception), the file groups
included in the file screen, the template on which the file screen is based, and whether the
current configuration of the file screen matches the configuration of the template.
21

For the selected file screen, the description area lists all file groups that are being blocked on
the file screen path. This includes file groups that are blocked by the current file screen as
well as file groups blocked by file screens created higher in the file screen path.
To filter the Results pane display to the file screens that affect a specific path:
a. Click Filter at the top of the pane.
b. In the File Screen Filter dialog box, under File Screen path, click either the Parents of
the following folder option or the Children of the following folder option.
c. Type or browse to the path.
d. Click OK.
File Screening Audit reportUse the File Screening Audit report to identify individuals or applications that violate file screening
policy. For instructions on generating a File Screening Audit report, see Generating Storage
Reports later in this guide.
Important
Before you run a File Screening Audit report, in the File Server Resource Manager
Options dialog box, on the File Screen Audit tab, verify that the Record file screening
activity in auditing database check box is selected.
Generating Storage Reports
File Server Resource Manager can generate reports that will help you understand file use on the
storage server. You can use the storage reports to monitor disk usage patterns (by file type or
user), identify duplicate files and dormant files, track quota usage, and audit file screening.
From the Storage Reports Management node, you can create report tasks, which are used to
schedule one or more periodic reports, or you can generate reports on demand. For on-demand
reports, as with scheduled reports, current data is gathered before the report is generated.
Reports can also be generated automatically to notify you when a user exceeds a quota threshold
or tries to save an unauthorized file. For more information about generating incident reports for
quota and file screen notifications, see Working with Quotas and Screening Files earlier in this
guide.
In this section:
Storage Reports Available in File Server Resource Manager
Configuring Report Parameters
Scheduling a Set of Reports
Generating Reports on Demand
22
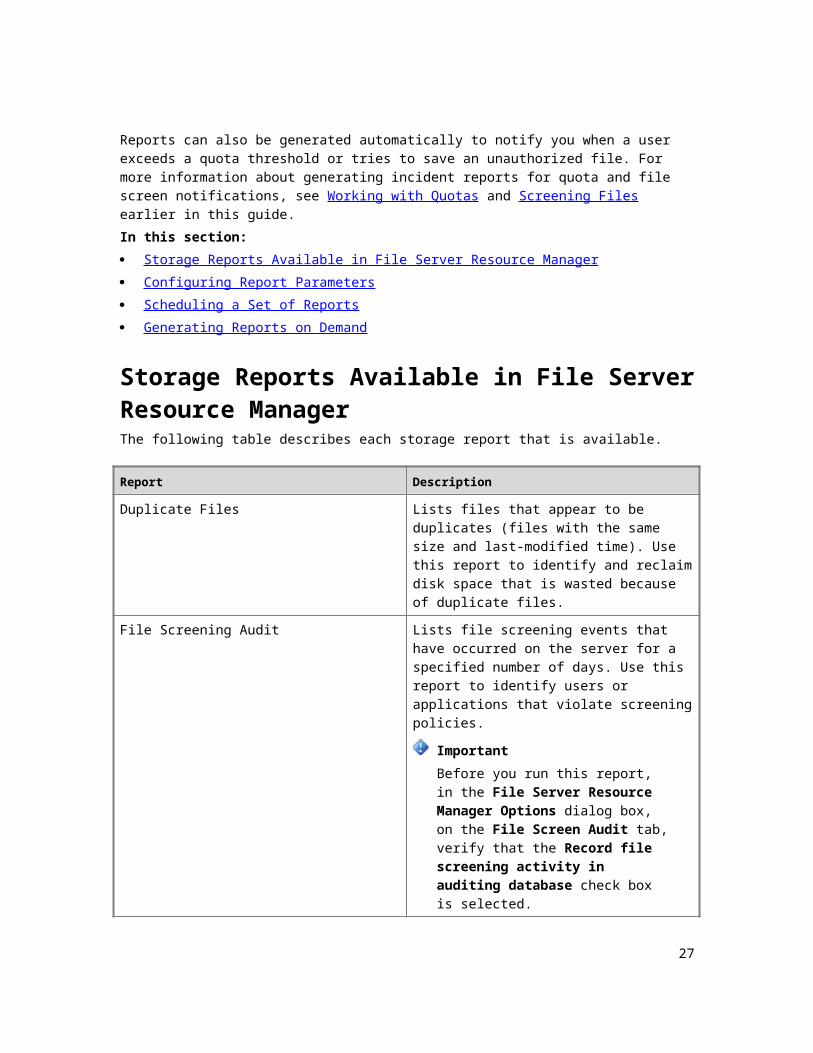
Storage Reports Available in File Server Resource ManagerThe following table describes each storage report that is available.
Report Description
Duplicate Files Lists files that appear to be duplicates (files with
the same size and last-modified time). Use this
report to identify and reclaim disk space that is
wasted because of duplicate files.
File Screening Audit Lists file screening events that have occurred
on the server for a specified number of days.
Use this report to identify users or applications
that violate screening policies.
Important
Before you run this report, in the File
Server Resource Manager Options
dialog box, on the File Screen Audit
tab, verify that the Record file
screening activity in auditing
database check box is selected.
Files by File Group Lists files that belong to specified file groups.
Use this report to identify file group usage
patterns and to identify file groups that occupy
large amounts of disk space. This can help you
determine which file screens to configure on the
server.
Files by Owner Lists files, grouped by users who own them.
Use this report to analyze usage patterns on
the server and to identify users who use large
amounts of disk space.
Large Files Lists files that are of a specified size or larger.
Use this report to identify files that are
consuming the most disk space on the server.
This can help you quickly reclaim large
quantities of disk space.
Least Recently Accessed Files Lists files that have not been accessed for a
specified number of days. This can help you
identify seldom used data that might be
23
Report Description
archived and removed from the server.
Most Recently Accessed Files Lists files that have been accessed within a
specified number of days. Use this report to
identify frequently used data that needs to be
highly available.
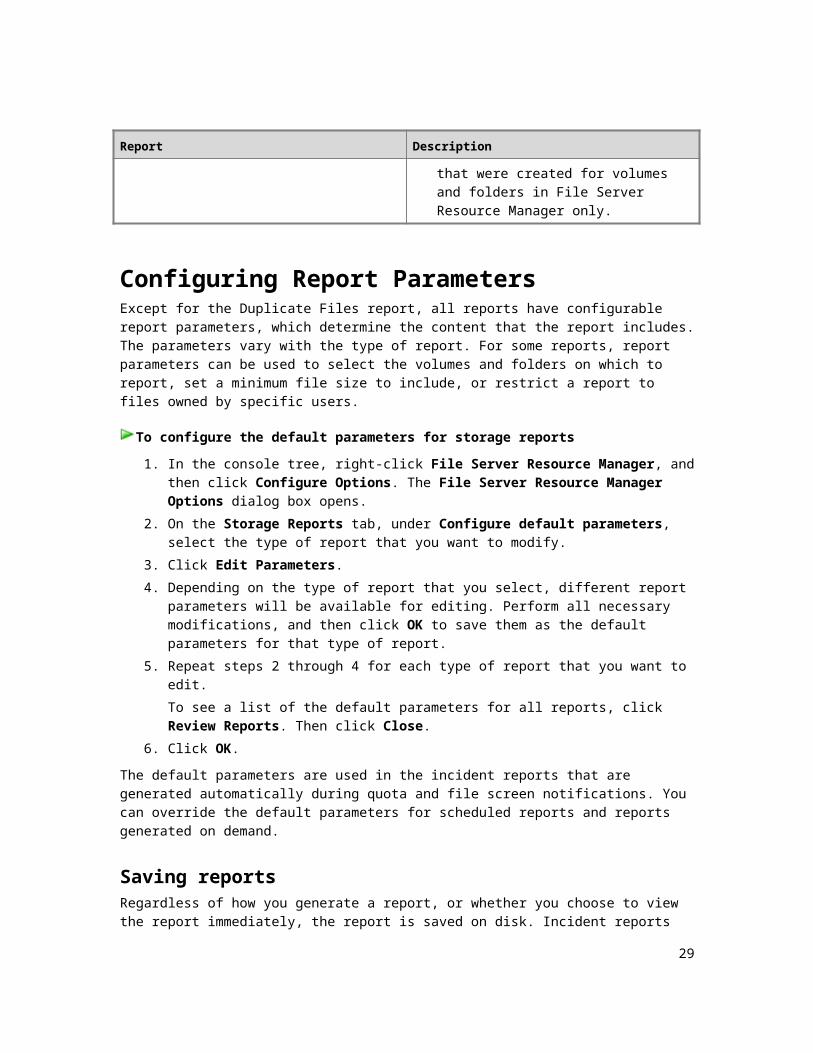
Quota Usage Lists quotas for which the quota usage is higher
than a specified percentage. Use this report to
identify quotas with high usage levels so that
appropriate action can be taken.
Note
This report includes quotas that were
created for volumes and folders in File
Server Resource Manager only.
Configuring Report ParametersExcept for the Duplicate Files report, all reports have configurable report parameters, which
determine the content that the report includes. The parameters vary with the type of report. For
some reports, report parameters can be used to select the volumes and folders on which to
report, set a minimum file size to include, or restrict a report to files owned by specific users.
To configure the default parameters for storage reports
1. In the console tree, right-click File Server Resource Manager, and then click Configure
Options. The File Server Resource Manager Options dialog box opens.
2. On the Storage Reports tab, under Configure default parameters, select the type of
report that you want to modify.
3. Click Edit Parameters.
4. Depending on the type of report that you select, different report parameters will be
available for editing. Perform all necessary modifications, and then click OK to save them
as the default parameters for that type of report.
5. Repeat steps 2 through 4 for each type of report that you want to edit.
To see a list of the default parameters for all reports, click Review Reports. Then click
Close.
6. Click OK.
The default parameters are used in the incident reports that are generated automatically during
quota and file screen notifications. You can override the default parameters for scheduled reports
and reports generated on demand.
24
Saving reportsRegardless of how you generate a report, or whether you choose to view the report immediately,
the report is saved on disk. Incident reports are saved in Dynamic HTML (DHTML) format. You
can save scheduled and on-demand reports in DHTML, HTML, XML, CSV, and text formats.
Scheduled reports, on-demand reports, and incident reports are saved in separate folders within
a designated report repository. By default, the reports are stored in subdirectories of the
%Systemdrive%\StorageReports\ folder. To change the default report locations, in the File
Server Resource Manager Options dialog box, on the Report Locations tab, specify where to
save each type of storage report.
Scheduling a Set of ReportsTo generate a set of reports on a regular schedule, you schedule a report task. The report task
specifies which reports to generate and what parameters to use, which volumes and folders to
report on, how often to generate the reports, and which file formats to save them in.
When you schedule a set of reports, the reports are saved in the report repository. You also have
the option of e-mailing the reports to a group of administrators.
To schedule a report task
1. Click the Storage Reports Management node.
2. Right-click Storage Reports Management, and then click Schedule a New Report Task
(or click Schedule a New Report Task in the Actions pane). This opens the Storage
Reports Task Properties dialog box.
3. To select volumes or folders on which to generate reports:
a. Under Scope, click Add.
b. Browse to the volume or folder that you want to generate the reports on, select it, and
then click OK to add the path to the list.
c. Add as many volumes or folders as you want to include in the reports. (To remove a
volume or folder, click the path, and then click Remove.)
4. To specify which reports to generate:
Under Report data, select each report that you want to include. By default, all reports are
generated for a scheduled report task.
To see a list of parameters for all the selected reports, click Review Selected Reports.
Then click Close.
To edit the parameters of a report:
a. Click the report label, and then click Edit Parameters.
b. In the Report Parameters dialog box, edit the parameters as needed, and then click
OK.
5. To specify the formats for saving the reports:
25

Under Report formats, select one or more formats for the scheduled reports. By default,
reports are generated in Dynamic HTML (DHTML).
6. To deliver copies of the reports to administrators by e-mail:
On the Delivery tab, select the Send reports to the following administrators check
box, and then enter the names of the administrative accounts that will receive reports.
Use the format account@domain, and use semicolons to separate multiple accounts.
7. To schedule the reports:
On the Schedule tab, click Create Schedule, and then in the Schedule dialog box, click
New. This displays a default schedule set for 9:00 A.M. daily, but you can modify the
default schedule. When you have finished configuring the schedule, click OK.
8. To save the report task, click OK.
Note
To minimize the impact of report processing on server performance, generate multiple
reports on the same schedule so that the data is only gathered once. To quickly add
reports to existing report tasks, under Storage Reports Management, click Add or
Remove Reports for a Report Task in the Actions pane. This action allows you to add
or remove reports from all existing report tasks and to edit the report parameters. To
change schedules or delivery addresses, you must edit individual report tasks.
Generating Reports on DemandDuring daily operations, you may want to generate reports on demand to analyze different
aspects of current disk usage on the server. Before the reports are generated, current data is
gathered.
When you generate reports on demand, the reports are saved in the report repository, but no
report task is created for later use. You can optionally view the reports immediately after they are
generated or e-mail the reports to a group of administrators.
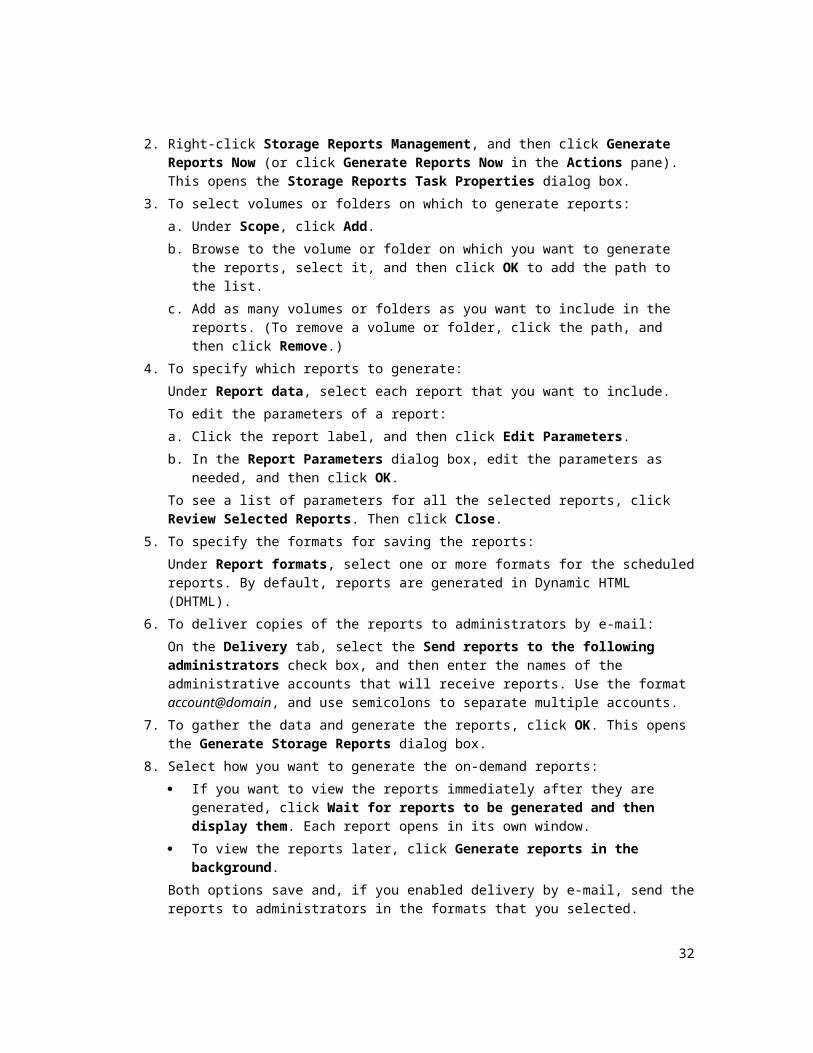
To generate reports on demand
1. Click the Storage Reports Management node.
2. Right-click Storage Reports Management, and then click Generate Reports Now (or
click Generate Reports Now in the Actions pane). This opens the Storage Reports
Task Properties dialog box.
3. To select volumes or folders on which to generate reports:
a. Under Scope, click Add.
b. Browse to the volume or folder on which you want to generate the reports, select it,
and then click OK to add the path to the list.
c. Add as many volumes or folders as you want to include in the reports. (To remove a
volume or folder, click the path, and then click Remove.)
26
4. To specify which reports to generate:
Under Report data, select each report that you want to include.
To edit the parameters of a report:
a. Click the report label, and then click Edit Parameters.
b. In the Report Parameters dialog box, edit the parameters as needed, and then click
OK.
To see a list of parameters for all the selected reports, click Review Selected Reports.
Then click Close.
5. To specify the formats for saving the reports:
Under Report formats, select one or more formats for the scheduled reports. By default,
reports are generated in Dynamic HTML (DHTML).
6. To deliver copies of the reports to administrators by e-mail:
On the Delivery tab, select the Send reports to the following administrators check
box, and then enter the names of the administrative accounts that will receive reports.
Use the format account@domain, and use semicolons to separate multiple accounts.
7. To gather the data and generate the reports, click OK. This opens the Generate Storage
Reports dialog box.
8. Select how you want to generate the on-demand reports:
If you want to view the reports immediately after they are generated, click Wait for
reports to be generated and then display them. Each report opens in its own
window.
To view the reports later, click Generate reports in the background.
Both options save and, if you enabled delivery by e-mail, send the reports to
administrators in the formats that you selected.
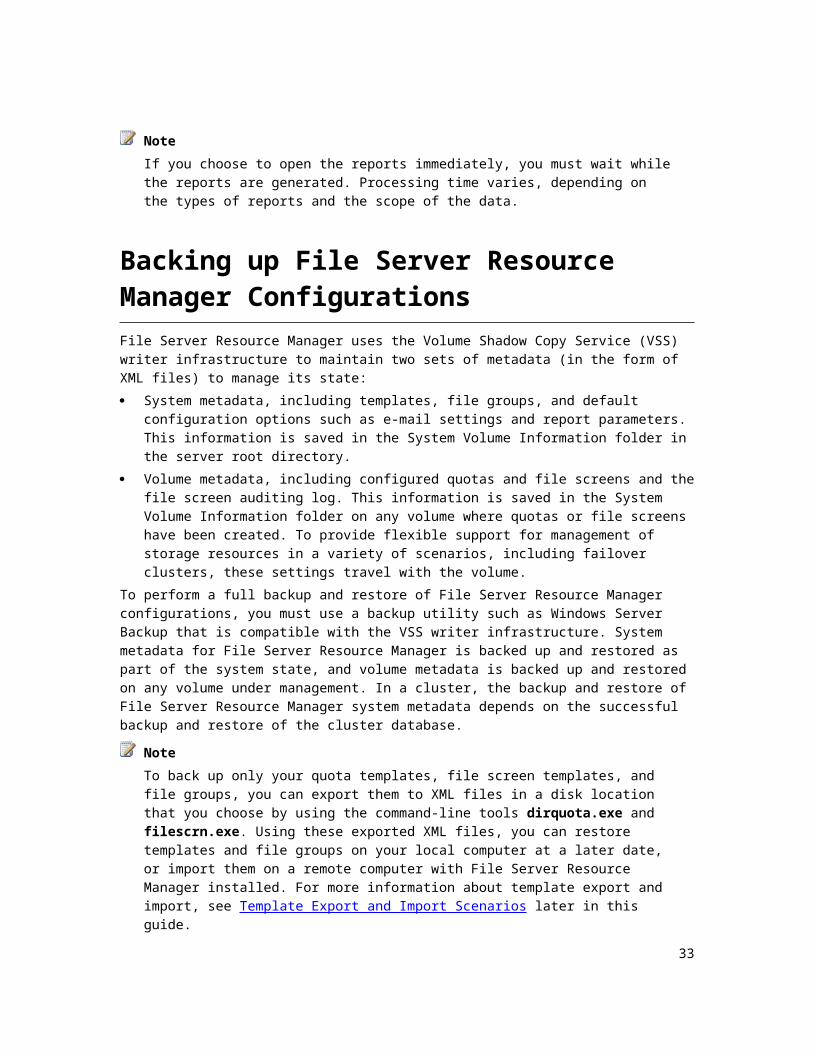
Note
If you choose to open the reports immediately, you must wait while the reports are
generated. Processing time varies, depending on the types of reports and the scope of
the data.
Backing up File Server Resource Manager Configurations
File Server Resource Manager uses the Volume Shadow Copy Service (VSS) writer infrastructure
to maintain two sets of metadata (in the form of XML files) to manage its state:
System metadata, including templates, file groups, and default configuration options such as
e-mail settings and report parameters. This information is saved in the System Volume
Information folder in the server root directory.
27

Volume metadata, including configured quotas and file screens and the file screen auditing
log. This information is saved in the System Volume Information folder on any volume where
quotas or file screens have been created. To provide flexible support for management of
storage resources in a variety of scenarios, including failover clusters, these settings travel
with the volume.
To perform a full backup and restore of File Server Resource Manager configurations, you must
use a backup utility such as Windows Server Backup that is compatible with the VSS writer
infrastructure. System metadata for File Server Resource Manager is backed up and restored as
part of the system state, and volume metadata is backed up and restored on any volume under
management. In a cluster, the backup and restore of File Server Resource Manager system
metadata depends on the successful backup and restore of the cluster database.
Note
To back up only your quota templates, file screen templates, and file groups, you can
export them to XML files in a disk location that you choose by using the command-line
tools dirquota.exe and filescrn.exe. Using these exported XML files, you can restore
templates and file groups on your local computer at a later date, or import them on a
remote computer with File Server Resource Manager installed. For more information
about template export and import, see Template Export and Import Scenarios later in this
guide.
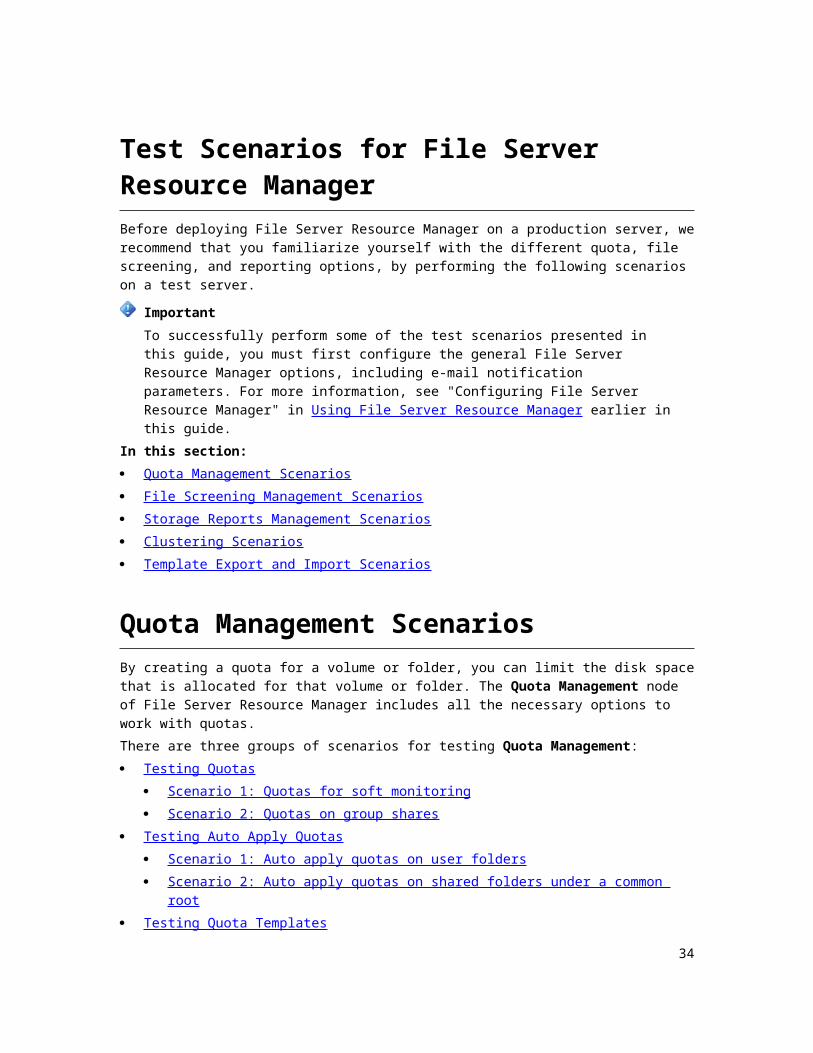
Test Scenarios for File Server Resource Manager
Before deploying File Server Resource Manager on a production server, we recommend that you
familiarize yourself with the different quota, file screening, and reporting options, by performing
the following scenarios on a test server.
Important
To successfully perform some of the test scenarios presented in this guide, you must first
configure the general File Server Resource Manager options, including e-mail notification
parameters. For more information, see "Configuring File Server Resource Manager" in
Using File Server Resource Manager earlier in this guide.
In this section:
Quota Management Scenarios
File Screening Management Scenarios
Storage Reports Management Scenarios
Clustering Scenarios
Template Export and Import Scenarios
28
Quota Management Scenarios
By creating a quota for a volume or folder, you can limit the disk space that is allocated for that
volume or folder. The Quota Management node of File Server Resource Manager includes all
the necessary options to work with quotas.
There are three groups of scenarios for testing Quota Management:
Testing Quotas
Scenario 1: Quotas for soft monitoring
Scenario 2: Quotas on group shares
Testing Auto Apply Quotas
Scenario 1: Auto apply quotas on user folders
Scenario 2: Auto apply quotas on shared folders under a common root
Testing Quota Templates
Scenario 1: Creating a new template from an existing template
Scenario 2: Using a quota template to update quotas
Note
For more information about Quota Management, the different tasks available in this
node, and step-by-step procedures, see Working with Quotas earlier in this guide.
Testing QuotasWe recommend using the following two scenarios to familiarize yourself with some of the quota
tasks in File Server Resource Manager.
Scenario 1: Quotas for soft monitoringIn some situations, rather than creating a hard limit on the amount of allocated space, you may
want to perform soft monitoring of a volume or a folder, so that you receive notifications when
predetermined usage thresholds have been exceeded. This is a very useful technique that alerts
administrators before a shortage of storage space occurs.
Test setup:
Create a soft quota on one of the volumes in your server (for example, D:\ or E:\) using the
following parameters:
Quota path: volume root directory
Space limit: total volume capacity
Quota type: soft quota
Notification thresholds:
Warning (100%): send e-mail to administrator, send warning to the event log
29
Warning (85%): send e-mail to administrator, send warning to the event log
Warning (80%): send e-mail to administrator
Warning (50%): send e-mail to administrator
Verification:
Verify that it is still possible to save files to the volume.
Copy or generate enough data in the volume to exceed any of the notification thresholds and
then verify that the notifications that you selected have been created and received.
Note
To generate large files, you can use the fsutil command with the following parameters:
fsutil file createnew <file_name> <file_size>, where file_name is the path and name of
the file that you want to create and file_size is the size of the file in bytes. For example:
fsutil file createnew D:\bigfile.txt 1024000. This will create a file called bigfile.txt on
the root directory of volume D, with an approximate size of 1 megabyte (MB).
Scenario 2: Quotas on group shared resourcesSeveral templates for working with quotas are included with File Server Resource Manager. One
of these templates is the Monitor 500 MB Share, which is intended to be used when
administering a shared folder on your server.
Test setup:
Using the Monitor 500 MB Share quota template, create a quota on a shared folder on your
server (for example: E:\Scratch). For more information about how to create a quota from a
template, see Working with Quotas earlier in this guide.
Verification:
Copy or generate enough data in the shared folder to exceed any of the notification
thresholds and then verify that the selected notifications have been created and received.
Testing Auto Apply QuotasWe recommend using the following two scenarios to familiarize yourself with some of the auto
apply quota tasks in File Server Resource Manager.
Scenario 1: Auto apply quotas on user foldersIt is common that each user in an organization has a folder hosted on a file server. Usually, all of
these user folders are located under a common root and a new folder is created every time a new
user is granted access to the server. Using auto apply quotas can simplify the creation of quotas
for user folders, as well as the administration of these quotas.
30
Test setup:
Create a folder called Users on the root directory of a volume. Under this folder, create
subfolders, one for each user. For example:
D:\Users\User01
D:\Users\User02
D:\Users\User03
…
…
…
D:\Users\User10
When you have finished creating all of the Users subfolders, create an auto apply quota on the
Users folder, using the 100 MB Limit template. For more information about how to create an auto
apply quota, see "Creating an Auto Apply Quota" in Working with Quotas earlier in this guide.
Verification:
Under Quotas, click Refresh in the Actions pane.
In the Results pane, verify that an individual quota was automatically generated for each
subfolder in the Users folder.
In the Results pane, verify that the auto apply quota template is linked to the Users (parent)
folder.
Create a new subfolder in the Users folder (for example: D:\Users\User11) and verify that a
new individual quota is automatically generated for the new subfolder. (To see the new quota,
under Quotas, click Refresh.)
Edit the auto apply quota that you just created and select to derive properties from a different
quota template (for example, the 200 MB Limit Reports to User template). Choose to apply
the auto apply quota changes to all derived quotas. Then, under Quotas, verify that all of the
individual quotas for the Users subfolders have now been updated with the properties of the
new quota template.
Scenario 2: Auto apply quotas on shared folders under a common rootAuto apply quotas can also be applied to a volume root. This scenario is especially useful when,
for example, a volume is used to directly host a number of folders shared by the organization.
Test setup:
Create several shared folders on the root directory of a volume in your server, for example:
E:\Accounting (shared as: \\Server_name\Accounting)
E:\Finance (shared as: \\Server_name\Finance)
31
E:\Marketing (shared as: \\Server_name\Marketing)
E:\Payroll (shared as: \\Server_name\Payroll)
E:\Sales (shared as: \\Server_name\Sales)
When you have finished creating the folders and their shares, create an auto apply quota on the
volume root (in this example, on E:\), using the 100 MB Limit template. For more information
about how to create an auto quota, see "Creating an Auto Apply Quota" in Working with Quotas
earlier in this guide.
Verification:
Under Quotas, in the Results pane, verify that an individual quota was automatically
generated for each of the folders in the volume and that a shared path is listed for it.
From a different server in the network, access any of the shared folders that you created, and
copy or generate enough data in that shared folder to exceed the 100 MB limit. Verify that the
quota limit is enforced on the shared folder.
Testing Quota TemplatesWe recommend using the following two scenarios to familiarize yourself with some of the quota
template tasks in File Server Resource Manager.
Scenario 1: Creating a new template from an existing templateFile Server Resource Manager has several default templates that can be easily modified to create
templates that are more appropriate for your server environment.
Test setup:
Under Quota Templates, click Create Quota Template in the Actions pane and copy the
properties from the 100 MB Limit template. Then modify the following parameters:
Template name: 50 MB Limit
Space limit: 50 MB
Quota type: soft quota
Notification thresholds:
Warning (100%): send e-mail to administrator, send warning to the event log
Warning (85%): send e-mail to administrator, send warning to the event log
Warning (50%): send e-mail to administrator
When you are finished performing these changes, click OK to save the new template.
Verification:
Under Quota Templates, in the Results pane, verify that the new 50 MB Limit template is
listed.
32
Scenario 2: Using a quota template to update quotasBy basing your quotas on templates, you can automatically update all quotas that are based on a
specific template simply by editing that template. This feature simplifies the process of updating
quota properties by providing one central point where all changes can be made.
Test setup:
If you have not already done so, perform the first scenario for testing auto apply quotas (Scenario
1: Auto apply quotas on user folders) and the first scenario for testing quota templates (Scenario
1: Create a new template from an existing template).
When you have completed these two scenarios, under Quotas, edit the auto apply quota for the
Users folder and select to derive properties from the 50 MB Limit template. When prompted,
choose to apply the auto apply quota changes to all derived quotas.
Verification:
Under Quotas, in the Results pane, verify that all the quotas created for the subfolders of the
Users folder have now been updated with the properties of the 50 MB Limit template.
Next, under Quota Templates, select to edit the 50 MB Limit template and modify the
following properties:
Space limit: 25 MB
Quota type: hard quota
When prompted, select to apply the template changes to all derived quotas. Finally, under
Quotas, verify that all the individual quotas for the Users subfolders have now been updated
with the new 25 MB quota limit and that the type of quota has been set to "hard."
File Screening Management Scenarios
File screens are used to block specific types of files from being saved on a volume or in a folder
tree. To specify which files to screen, you assign one or more file groups to a file screen. The File
Screening Management node of File Server Resource Manager includes all the necessary
options to work with file screens.
There are three groups of scenarios for testing File Screening Management:
Testing File Groups
Scenario 1: Using a file group to block specific file names
Testing File Screens
Scenario 1: File screens on user folders
Scenario 2: File screen exceptions on specific user folders
Testing File Screen Templates
Scenario 1: A file screen to monitor executable and system files saved on a shared folder
33
Scenario 2: Using a file screen template to update file screens
Note
For more information about File Screening Management, the different tasks that are
available in this node, and step-by-step procedures, see Screening Files earlier in this
guide.
Testing File GroupsWe recommend using the following scenario to familiarize yourself with some of the file group
tasks in File Server Resource Manager.
Scenario 1: Using a file group to block specific file namesFile Server Resource Manager includes several default file groups for screening, which include
various common file types, based on their file name pattern. But you may want to block specific
files that do not follow a specific pattern.
Test setup:
Under File Groups, click Create File Group in the Actions pane to create a new file group with
the following properties:
File group name: Specific Files
Files to include: file_name1.exe, file_name2.dll, file_name3.txt
Files to exclude: (leave blank)
Verification:
Under File Groups, in the Results pane, verify that the new Specific Files file group is listed
and includes the specific files.
Testing File ScreensWe recommend using the following two scenarios to familiarize yourself with some of the file
screen tasks in File Server Resource Manager.
Scenario 1: File screens on user foldersFile screens can be used to block specific types of files from being saved on shared storage
resources. When a file screen is applied on a specific folder, the screening properties apply to
that folder and all of its subfolders.
34

Test setup:
If you have not already done so, perform the first scenario for testing auto apply quotas (see
"Scenario 1: Auto apply quotas on user folders" in Quota Management Scenarios earlier in this
guide).
When you have completed this scenario and have created all of the user folders, create a file
screen on the parent Users folder, using the Block Executable Files template. For more
information about how to create a file screen based on a file screen template, see "Creating a File
Screen" in Screening Files earlier in this guide.
Verification:
Under File Screens, in the Results pane, verify that the new file screen for the Users folder is
listed.
Verify that you cannot save a file in the parent Users folder with any of the extensions
included in the Executable Files file group (for example, .exe, .cmd, .bat, and so on).
Verify that you cannot save the same type of files in any of the user folders (for example, in:
D:\Users\User01).
Create a new subfolder inside a user folder (for example: D:\Users\User01\Temp) and verify
that you cannot save the same type of files in the newly created subfolder.
Scenario 2: File screen exceptions on specific user foldersFile screen exceptions expand the flexibility of the file screening capabilities in File Server
Resource Manager by creating an exception to any screening rules derived from a parent folder.
Test setup:
If you have not already done so, perform the first scenario for testing file screens (see Scenario 1:
File screens on user folders earlier in this guide).
When you have completed this scenario, apply a file screen exception on one of the user folders
(for example: D:\Users\User02) by selecting the Executable Files file group to be excluded from
screening. For more information about how to create a file screen exception, see "Creating a File
Screen Exception" in Screening Files earlier in this guide.
Verification:
Under File Screens, in the Results pane, verify that the new file screen exception is listed for
the specific user folder that you selected.
Verify that you can now save files in this folder with any of the extensions included in the
Executable Files file group (for example, .exe, .cmd, .bat, and so on).
Verify that you still cannot save a file in the Users folder (the parent folder of the one you
selected for the file screen exception) with any of the extensions included in the Executable
Files file group.
35
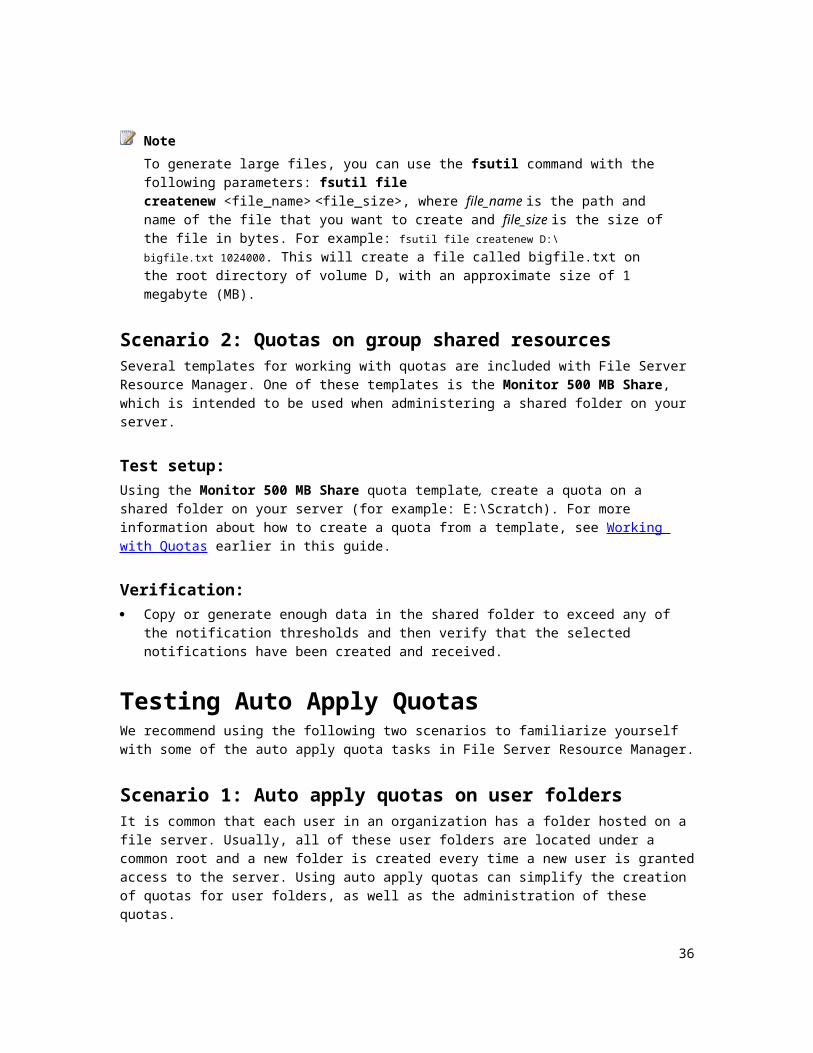
Testing File Screen TemplatesWe recommend using the following two scenarios to familiarize yourself with some of the file
screen template tasks in File Server Resource Manager.
Scenario 1: A file screen to monitor executable and system files saved on a shared folderFile screens can also be used to generate notifications when specific types of files are saved on a
volume or on a folder, without blocking the user from saving them.
Test setup:
Using the Monitor Executable and System Files template, create a file screen on a shared
folder on your server (for example, E:\Scratch). For more information about how to create a file
screen based on a file screen template, see "Creating a File Screen" in Screening Files earlier in
this guide.
Verification:
Copy or generate a file in the shared folder, with any of the extensions included in the
Executable Files file group (for example, .exe, .cmd, .bat, and so on) and then verify that the
selected notifications have been created and received.
Copy or generate a file in the shared folder, with any of the extensions included in the
System Files file group (for example, .dll, .sys, .vxd, and so on) and then verify that the
selected notifications have been created and received.
Scenario 2: Using a file screen template to update file screensAs with quota templates, if you base your file screens on file screen templates, you can
automatically update all file screens that are based on a specific template simply by editing that
template.
Test setup:
If you have not already done so, perform the first scenario for testing file screens (see Scenario 1:
File screens on user folders earlier in this guide).
When you have completed this scenario, under File Screen Templates, edit the Block
Executable Files template and select to also block files in the Backup Files file group. When
prompted, select to apply the template changes to all derived file screens.
Verification:
Under File Screens, in the Results pane, verify that the file screen for the Users folder now
includes Backup Files in the list of file groups to block.
36

Verify that you cannot save a file in the Users folder or in its subfolders with any of the
extensions included in the Backup Files file group (for example, .old, .bak, .bck).
Under File Groups, select to edit the Backup Files group and add the following parameter in
Files to exclude: test_file.bak
Finally, verify that you can now save a file called test_file.bak in the Users folder and in any of
its subfolders.
Storage Reports Management Scenarios
File Server Resource Manager offers advanced reporting capabilities to help you understand how
storage is used and how quota and file screening tasks are behaving. The Storage Reports
Management node of File Server Resource Manager includes all the necessary options to
schedule and generate storage reports.
There are two sets of scenarios for testing Storage Reports Management:
Testing Scheduled Reports
Scenario 1: Scheduling a report to monitor quota usage
Scenario 2: Adding a report to a scheduled report task
Testing On-Demand Reports
Scenario 1: Running a report of all duplicate files in a volume
Scenario 2: Running a report to monitor file screening activity
Note
For more information about Storage Reports Management, the different tasks available
in this node, and step-by-step procedures, see Generating Storage Reports earlier in this
guide.
Testing Scheduled ReportsWe recommend using the following two scenarios to familiarize yourself with some of the
scheduled report tasks in File Server Resource Manager.
Scenario 1: Scheduling a report to monitor quota usageSeveral predefined reports are included with File Server Resource Manager. One of these is the
Quota Usage report. This report lists all quotas that exceed a selected percentage of the quota
limit (for example, 85%). You can use the Quota Usage report to continuously monitor storage
resources on your server and to identify resources that may soon exceed their quota limit.
37
Test setup:
If you have not already done so, perform any of the scenarios for testing quotas or auto apply
quotas (see Quota Management Scenarios earlier in this guide).
When you are finished applying some quotas to a volume on your server, under Storage Reports
Management, click Schedule a New Report Task in the Actions pane and create a report task
with the following parameters:
Scope: the volume in your server where quotas have been applied (for example, D:\)
Report data: Quota Usage (clear all other reports)
Edit Parameters:
Minimum quota usage: 50% (if necessary, adjust to ensure that the report generates
data)
Report formats: DHTML
Delivery: send the report to your e-mail address
Schedule: click Create Schedule, and then click New
Schedule Task: Once
Start time: 5 to 10 minutes after your current time
Verification
Under Storage Reports Management, in the Results pane, verify that the new report task is
listed and that the schedule and next run time values are those that you selected.
Wait for the scheduled run time and then allow a few minutes for the report to be generated
and for the e-mail to be sent and received. When the e-mail has been received, scan through
the report information and scroll to the end of the report to see the quota usage data.
Scenario 2: Adding a report to a scheduled report taskReports can be easily added to or removed from existing report tasks.
Test setup:
If you have not already done so, perform the first scenario for testing scheduled reports (see
Scenario 1: Scheduling a report to monitor quota usage earlier in this guide).
When you have completed this scenario, under Storage Reports Management, click Add or
Remove Reports for a Report Task in the Actions pane. Edit the parameters of the Large Files
report to include files with a minimum file size of 20 MB, and then add this report to the report
task you created in the previous scenario.
Verification
Under Storage Reports Management, in the Results pane, verify that the report task now
includes the Large Files report.
38
Right-click the report task and click Run Report Task Now. When asked how you want to
proceed, click the Generate reports in the background option, and then click OK. Wait a
few minutes for the reports to be generated and for the e-mails to be sent and received. Verify
that you receive two e-mails: a separate e-mail for each report in the task.
Testing On-Demand ReportsWe recommend using the following two scenarios to familiarize yourself with some of the on-
demand report tasks in File Server Resource Manager.
Scenario 1: Running a report of all duplicate files in a volumeA very useful report to run is the Duplicate Files report. This report not only lists all duplicate files
in a volume or folder but also presents statistical data related to the space these duplicate files
occupy on disk. You can use the information collected in this report to quickly reclaim wasted disk
space.
Test setup:
Under Storage Reports Management, click Generate Reports Now in the Actions pane and
then choose the following parameters:
Scope: the volume in your server where the system root folder is located (for example, C:\)
Report data: Duplicate Files (clear all other reports)
Report formats: DHTML
When asked how you want to proceed, click the Wait for reports to be generated and then
display them option, and then click OK.
Verification
Wait a few minutes for the report to be generated. When completed, it will open automatically
in Windows Internet Explorer.
View the report information and scroll to the end of the report to see the statistical data.
Scenario 2: Running a report to monitor file screening activityFile Server Resource Manager allows you to record file screening activity in an auditing database.
The File Screening Audit report is used to view the information in this database.
Important
Before you run a File Screening Audit report, in the File Server Resource Manager
Options dialog box, on the File Screen Audit tab, verify that the Record file screening
activity in auditing database check box is selected. For more information, see
Generating Storage Reports earlier in this guide.
39

Test setup:
If you have not already done so, perform any of the scenarios for testing file screening (see File
Screening Management Scenarios earlier in this guide). Make sure that you generate some file
screening activity by attempting to save blocked files.
Under Storage Reports Management, click Generate Reports Now in the Actions pane and
then choose the following parameters:
Scope: the volume in your server where file screens have been applied (for example: D:\)
Report data: File Screening Audit (clear all other reports)
Edit Parameters:
Minimum days since file screening event occurred: 0 (zero)
Report formats: HTML
When asked how you want to proceed, select the Wait for reports to be generated and then
display them option, and then click OK.
Verification
Wait a few minutes for the report to be generated. When completed, it will open automatically
in Internet Explorer.
View the report information and verify that the screening activity that you generated is listed.
Clustering Scenarios
The quota, file screening, and reporting capabilities in File Server Resource Manager are also
available for clustered environments.
There are two scenarios for testing File Server Resource Manager in a file server failover cluster:
Scenario 1: Global configuration
Scenario 2: Volume failover
Note
You only need to perform these scenarios if you will be deploying File Server Resource
Manager in a failover cluster.
Preliminary Configuration Guidelines You will need to configure a two-node file server failover cluster with shared storage. For
computer, software, storage, and network requirements and configuration steps, see the
Step-by-Step Guide for Configuring a Two-Node File Server Failover Cluster in Windows
Server 2008 (http://go.microsoft.com/fwlink/?LinkId=110914).
Configure one of the two nodes in the cluster to own a storage volume on the shared storage.
The other node will be used for failover testing.
40

Enable the File Server role and install File Server Resource Manager on both computers in
the cluster.
Quotas and file screens on the volume exposed to the cluster must be configured by
connecting to the node that currently owns that volume.
Note
Quota templates, file screen templates, and file groups can be configured by connecting
to either node in the failover cluster but not by using the cluster's network name.
Scenario 1: Global configuration
Test setup:
Connect to either node in the cluster.
Create or make changes to a quota template, a file screen template, or a file group.
Verification:
Connect to the other node in the cluster and verify that the changes you made have
propagated to this node.
Scenario 2: Volume failover
Test setup:
Connect to the node in the cluster that owns the volume in the cluster storage.
Create quotas and file screens on that volume.
Next, fail over that volume to the other cluster node. To perform a basic test of failover, in
Failover Cluster Management, right-click the clustered file server instance, click Move this
service or application to another node, and click the name of the other cluster node. When
prompted for confirmation, click Yes.
Verification:
Connect to the node that now owns the volume and verify that the quotas and file screens
that you created continue to be enforced.
Template Export and Import Scenarios
File Server Resource Manager provides command-line tools (dirquota.exe, filescrn.exe, and
storrept.exe) that you can use to deploy configuration settings and manage storage resources
on multiple computers. Dirquota.exe and filescrn.exe are particularly useful for copying quota
and file screen template settings from one computer to another. For example, by deploying the
41
same templates to file servers in all of your branch offices, you can easily manage storage
resources throughout your organization that adhere to common quota and file screening policies.
Because templates are exported to a file, you can also export quota and file screen templates as
a way to make backup copies of templates that you have created.
We recommend using the following two scenarios to familiarize yourself with quota template
export and import using dirquota.exe. (You can use comparable functionality in filescrn.exe to
export and import customized file screen templates and file groups.)
Scenario 1: Quota template export
Scenario 2: Quota template import
Preliminary Configuration Guidelines You need two computers running Windows Server 2008, and both have to be connected to
the same local area network (LAN). You will use one as your local computer to export
template settings, and the other one as your remote computer where you will import settings.
Change the computer name of the remote computer to “REMOTE”. By doing this, you will be
able to use the exact commands listed in these scenarios.
Install File Server Resource Manager on both computers.
Enable the Remote File Server Resource Manager Management exception on the remote
computer. This exception can be enabled by using Windows Firewall in Control Panel.
You need a domain account that is a member of the Administrators group on both
computers.
Scenario 1: Quota template exportThe following scenario uses dirquota.exe with the template export option to export the settings
for a custom quota template to an XML file on the local computer.
Test setup:
If you have not already done so, on your local computer, perform the first scenario for testing
quota templates (see "Scenario 1: Creating a new template from an existing template" in
Quota Management Scenarios earlier in this guide). In that scenario, you name the new
quota template 50 MB Limit.
On your local computer, open a command prompt using the Run as administrator option.
Run the following command to export the settings for the new quota template to the file C:\
test.xml:
dirquota template export /file:C:\test.xml /template:"50 MB Limit"
Note
If you do not use the /template: option to name a quota template to export, settings for all
quota templates in File Server Resource Manager are exported.
42
Verification:
The command will report that the template exported successfully.
Verify that the file test.xml was created in C:\. You can open test.xml in
Windows Internet Explorer to view the file content.
Scenario 2: Quota template importOnce you have exported template settings to an XML file, you can use dirquota.exe with the
template import option to deploy those settings to the remote computer.
Test setup:
Log on to the local computer with a domain account that has administrative credentials on the
local and remote computers.
If you have not already done so, perform the first scenario for testing template export and
import (see Scenario 1: Quota template export earlier in this guide).
A quota template named 50 MB Limit must not already exist on the remote computer.
On your local computer, open a command prompt using the Run as administrator option.
Run the following command to import the settings on the remote computer:
dirquota template import /file:C:\test.xml /remote:REMOTE
Verification:
The command will report that the template imported successfully.
On the local computer, run the following command to list all the quota templates installed on
the remote computer:
dirquota template list /remote:REMOTE
Verify that the 50 MB Limit template appears in the command output.
On the remote computer, open File Server Resource Manager and verify, under Quota
Templates, that the 50 MB Limit quota template is listed.
43