step 1: create geometry in gambit - eecl-course · step 1: create geometry in gambit if you would...
TRANSCRIPT

Step 1: Create Geometry in GAMBIT
If you would prefer to skip the mesh generation steps, you can create a workingdirectory (see below), download the mesh from here (right click and save as pipe.msh)into the working directory and go straight to step 4.
Strategy for Creating Geometry
In order to create the rectangle, we will first create the vertices at the four corners. We'llthen join adjacent vertices by straight lines to form the "edges" of the rectangle. Lastly,we'll create a "face" corresponding to the area enclosed by the edges. In Step 2, we'llmesh the face i.e. the rectangle. Note that in 3D problems, you'll have to form a"volume" from faces. So the hierarchy of geometric objects in GAMBIT is vertices ->edges -> faces -> volumes.
Create a Working Directory
Create a folder called pipe in a convenient location. We'll use this as the working folderin which files created during the session will be stored.
Note for ACCEL computer lab users: Each user gets his/her own 100 MB of diskspace under S: at ACCEL. You can put your files in S: and it'll be accessible from anycomputer. This is where you should put files that you want to keep and access later on.
Start GAMBIT
Start your command prompt.
Start > Programs > Lab Apps > Fluent Inc Products > Gambit 2.3.16 > Gambit 2.3.16
This brings up the GAMBIT startup window. Click Browse and select the folder thatyou just created. Enter -id pipe in the options box to tell GAMBIT to use pipe as thedefault file prefix, then click Run.
In Windows, the Exceed X-server starts up before the GAMBIT interface comes up.Exceed is a third-party application needed to render the interface in Windows

(GAMBIT was originally developed under Unix). To make best use of screen realestate, move the windows and resize them so that you approximate this screenarrangement. This way you can read instructions in the browser window and implementthem in GAMBIT.
You can resize the text in the browser window to your taste and comfort:
In Internet Explorer: Menubar > View > Text Size, then choose the appropriate fontsize.
In Netscape: Menubar > View > Increase Font or Menubar > View > Decrease Font.
The GAMBIT Interface consists of the following:
Main Menu Bar:
Note that the job name pipe appears after ID: in the title bar of the Utility Menu. Operation Toolpad:
We'll more or less work our way across the Operation Toolpad as we go throughthe solution steps. Notice that as each of the top buttons is selected, a different"sub-pad" appears. The Geometry sub-pad is shown in the above snaphot.

Global Control Toolpad:
The Global Control Toolpad has options such as Fit to Screen and Undo
that are very handy during the course of geometry and mesh creation. GAMBIT Graphics:
This is the window where the graphical results of operations are displayed. GAMBIT Description Panel:
The Description Panel contains descriptions of buttons or objects that the mouseis pointing to. Move your mouse over some buttons and notice thecorresponding text in the Description Panel.

GAMBIT Transcript Window:
This is the window to which output from GAMBIT commands is written andwhich provides feedback on the actions taken by GAMBIT as you performoperations. If, at some point, you are not sure you clicked the right button orentered a value correctly, this is where to look to figure out what you just did.You can click on the arrow button in the upper right hand corner to make theTranscript window full-sized. You can click on the arrow again to return thewindow to its original size. Go ahead, give this a try.
Select Solver
If the window titlebar does not say the solver is FLUENT 5/6, then you need to specify:
Main Menu > Solver > FLUENT 5/6
Verify this has been done by looking in the Transcript Window where you should see:
The boundary types that you'll be able to select in the third step depends on the solverselected.
We can assume that the flow is axisymmetric. The problem domain is:
where r and x are the radial and axial coordinates, respectively.
Strategy for creating geometry
We will put the origin of the coordinate system at the lower left corner of the rectangle.The coordinates of the corners are shown in the figure below:

We will first create four vertices at the four corners and join adjacent vertices to get theedges of the rectangle. We will then form a face that covers the area of the rectangle.
Create Vertices
Find the buttons described below by pointing the mouse at each of the buttons andreading the Description Window.
Operation Toolpad > Geometry Command Button > Vertex Command Button >
Create Vertex
Notice that the Create Vertex button has already been selected by default. After youselect a button under a sub-pad, it becomes the default when you go to a different sub-pad and then come back to the sub-pad.
Create the vertex at the lower-left corner of the rectangle:Next to x:, enter value 0. Next to y:, enter value 0. Next to z:, enter value 0 (these valuesshould be defaults). Click Apply. This creates the vertex (0,0,0) which is displayed inthe graphics window.
In the Transcript window, GAMBIT reports that it "Created vertex: vertex.1". Thevertices are numbered vertex.1, vertex.2 etc. in the order in which they are created.
Repeat this process to create three more vertices:
Vertex 2: (0,0.1,0)Vertex 3: (8,0.1,0)Vertex 4: (8,0,0)
Note that for a 2D problem, the z-coordinate can always be left to the default value of 0.
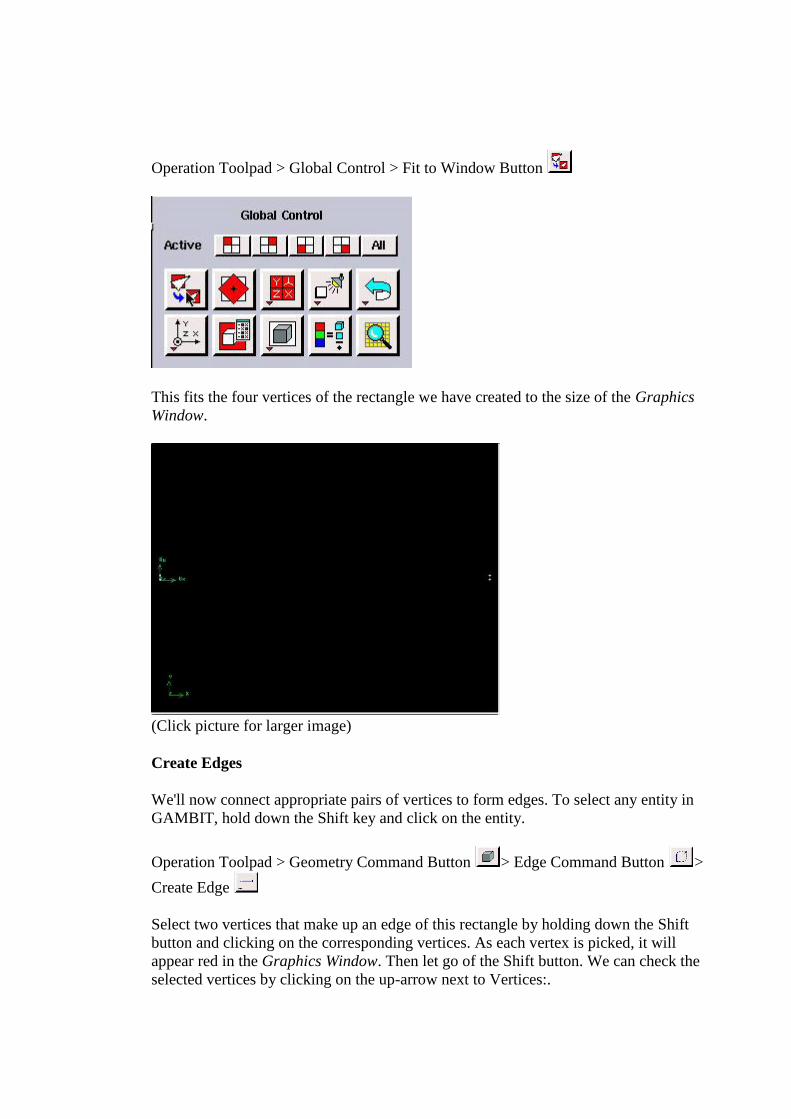
Operation Toolpad > Global Control > Fit to Window Button
This fits the four vertices of the rectangle we have created to the size of the GraphicsWindow.
(Click picture for larger image)
Create Edges
We'll now connect appropriate pairs of vertices to form edges. To select any entity inGAMBIT, hold down the Shift key and click on the entity.
Operation Toolpad > Geometry Command Button > Edge Command Button >
Create Edge
Select two vertices that make up an edge of this rectangle by holding down the Shiftbutton and clicking on the corresponding vertices. As each vertex is picked, it willappear red in the Graphics Window. Then let go of the Shift button. We can check theselected vertices by clicking on the up-arrow next to Vertices:.

This will bring up a window containing the vertices that have been selected. Verticescan be moved from the Available and Picked lists by selecting them and then pressingthe left or right arrow buttons.
After the correct vertices have been selected, click Close, then click Apply in the CreateStraight Edge window.
Repeat this process to create a rectangle.
(Click picture for larger image)
Create Face

Operation Toolpad > Geometry Command Button > Face Command Button >
Form Face
To form a face out of the area enclosed by the four lines, we need to select the fourledges that enclose this area. This can be done by holding down the Shift key, clickingon each line (notice that the currently selected line appears red), and then releasing theShift key after all four lines have been selected.
Alternatively, an easier way to do this would be to click on the up arrow next to edges:
This will bring up the Edge List window. Click on All-> to select all of the edges atonce. Click Close.
Click Apply to create the face.
Step 2: Mesh Geometry in GAMBIT
We'll now create a mesh on the rectangular face with 100 divisions in the axial directionand 5 divisions in the radial direction. We'll first mesh the four edges and then the face.The desired grid spacing is specified through the edge mesh.
Mesh Edges
Operation Toolpad > Mesh Command Button > Edge Command Button > Mesh
Edges

Shift-click or bring up the Edge List window and select both the vertical lines. If this isdifficult, one can zoom in on an edge by holding down the Ctrl button, clicking anddragging the mouse to specify an area to zoom in on, and releasing the Ctrl button. Toreturn to the main view, click on the Global Control Toolpad > Fit to Window Buttonagain. You can also hold down Ctrl and double-click in the window to zoom out to afitting window. To pan the view, hold down the middle mouse button and drag themouse.
Once a vertical edge has been selected, select Interval Count from the drop down boxthat says Interval Size in the Mesh Edges Window. Then, in the box to the left of thiscombo box, enter 5 for the interval count.
Click Apply. Nodes appear on the edges showing that they are divided into 5.
(Click picture for larger image)
Repeat the same process for the horizontal edges, but with an interval count of 100.
Now that the edges are meshed, we are ready to create a 2-D mesh for the face.
Mesh Face
Operation Toolpad > Mesh Command Button > Face Command Button > Mesh
Faces

Shift left-click on the face or use the up arrow next to Faces to select the face. ClickApply.
Step 3: Specify Boundary Types in GAMBIT
Create Boundary Types
We'll next set the boundary types in GAMBIT. The left edge is the inlet of the pipe, theright edge the outlet, the top edge the wall, and the bottom edge the axis.
Operation Toolpad > Zones Command Button > Specify Boundary Types
Command Button
This will bring up the Specify Boundary Types window on the Operation Panel. Wewill first specify that the left edge is the inlet. Under Entity:, pick Edges so thatGAMBIT knows we want to pick an edge (face is default).

Now select the left edge by Shift-clicking on it. The selected edge should appear in theyellow box next to the Edges box you just worked with as well as the Label/Type listright under the Edges box.
Next to Name:, enter inlet.
For Type:, select VELOCITY_INLET. (Note: Sometimes all the items in a dropdownmenu will not be visible. If you cannot find the VELOCITY_INLET option in the Typemenu, try maximizing the window. If it is still not visible, try auto-hiding your taskbar.Right-click on the taskbar and go to properties.)
Click Apply. You should see the new entry appear under Name/Type box near the topof the window.

Repeat this process for the other three edges according to the following table:
EdgePosition
Name Type
Left inlet VELOCITY_INLET
Right outlet PRESSURE_OUTLET
Top wall WALL
Bottom centerline AXIS
You should have the following edges in the Name/Type list when finished:
Save and Export
Main Menu > File > Save
Main Menu > File > Export > Mesh...
Type in pipe.msh for the File Name:. Select Export 2d Mesh since this is a 2dimensional mesh. Click Accept.
Check pipe.msh has been created in your working directory (the box will be filled inred).
Step 4: Set Up Problem in FLUENT
Launch Fluent 6.0
Lab Apps > FLUENT 6.3.26
Select 2ddp from the list of options and click Run.
The "2ddp" option is used to select the 2-dimensional, double-precision solver. In thedouble-precision solver, each floating point number is represented using 64 bits incontrast to the single-precision solver which uses 32 bits. The extra bits increase not

only the precision but also the range of magnitudes that can be represented. Thedownside of using double precision is that it requires more memory.
Import Grid
Main Menu > File > Read > Case...
Navigate to the working directory and select the pipe.msh file. This is the mesh file thatwas created using the preprocessor GAMBIT in the previous step. FLUENT reports themesh statistics as it reads in the mesh:
Check the number of nodes, faces (of different types) and cells. There are 500quadrilateral cells in this case. This is what we expect since we used 5 divisions in theradial direction and 100 divisions in the axial direction while generating the grid. So thetotal number of cells is 5*100 = 500.
Also, take a look under zones. We can see the four zones inlet, outlet, wall, andcenterline that we defined in GAMBIT.
Check and Display Grid
First, we check the grid to make sure that there are no errors.
Main Menu > Grid > Check
Any errors in the grid would be reported at this time. Check the output and make surethat there are no errors reported. Check the grid size:
Main Menu > Grid > Info > Size

The following statistics should appear:
Display the grid:
Main Menu > Display > Grid...
Make sure all 5 items under Surfaces is selected. Then click Display. The graphicswindow opens and the grid is displayed in it. You can now click Close in the GridDisplay menu to get back some desktop space. The graphics window will remain.
Some of the operations available in the graphics window are:
Translation: The grid can be translated in any direction by holding down the Left MouseButton and then moving the mouse in the desired direction.
Zoom In: Hold down the Middle Mouse Button and drag a box from the Upper LeftHand Corner to the Lower Right Hand Corner over the area you want to zoom in on.
Zoom Out: Hold down the Middle Mouse Button and drag a box anywhere from theLower Right Hand Corner to the Upper Left Hand Corner.
Use these operations to zoom into the grid to obtain the view shown below.
Note: The zooming operations cannot be performed without a middle mouse button.

(Click picture for larger image)
You can also look at specific parts of the grid by choosing the boundaries you wish toview under Surfaces (click to select and click again to deselect a specific boundary).Click Display again when you have selected your boundaries. For example, the wall,outlet, and centerline boundaries have been selected in the following view:
These options will display the graph:

(Click picture for larger image)
For convenience, the button next to Surfaces selects all of the boundaries while thedeselects all of the boundaries at once.
Close the Grid Display Window when you are done.
Define Solver Properties
Main Menu > Define > Models > Solver
Choose Axisymmetric under Space. We'll use the defaults of pressure based("segregated", in older versions) solver, implicit formulation, steady flow and absolutevelocity formulation. Click OK.

Main Menu > Define > Models > Viscous
Laminar flow is the default. So we don't need to change anything in this menu. ClickCancel.
Main Menu > Define > Models > Energy
For incompressible flow, the energy equation is decoupled from the continuity andmomentum equations. We need to solve the energy equation only if we are interested indetermining the temperature distribution. We will not deal with temperature in thisexample. So leave the Energy Equation unselected and click Cancel to exit the menu.
Define Material Properties
Main Menu > Define > Materials...
Change Density to 1.0 and Viscosity to 2e-3. These are the values that we specifiedunder Problem Specification. We'll take both as constant.
Click Change/Create. Close the window.
Define Operating Conditions
Main Menu > Define > Operating Conditions...
For all flows, FLUENT uses gauge pressure internally. Any time an absolute pressure isneeded, it is generated by adding the operating pressure to the gauge pressure. We'll usethe default value of 1 atm (101,325 Pa) as the Operating Pressure.
Click Cancel to leave the default in place.

Define Boundary Conditions
We'll now set the value of the velocity at the inlet and pressure at the outlet.
Main Menu > Define > Boundary Conditions...
We note here that the four types of boundaries we defined are specified as zones on theleft side of the Boundary Conditions Window. The centerline zone should be selected bydefault. Make sure it is, then make sure the Type of this boundary is selected as axis andclick Set.... Notice that there is nothing to set for the axis. Click OK.
Move down the list and select inlet under Zone. Note that FLUENT indicates that theType of this boundary is velocity-inlet. Recall that the boundary type for the "inlet" wasset in GAMBIT. If necessary, we can change the boundary type set previously inGAMBIT in this menu by selecting a different type from the list on the right.
Click on Set.... Enter 1 for Velocity Magnitude. Click OK. This sets the velocity of thefluid entering at the left boundary.
The (absolute) pressure at the outlet is 1 atm. Since the operating pressure is set to 1atm, the outlet gauge pressure = outlet absolute pressure - operating pressure = 0.

Choose outlet under Zone. The Type of this boundary is pressure-outlet. Click on Set....The default value of the Gauge Pressure is 0. Click Cancel to leave the default in place.
Lastly, click on wall under Zones and make sure Type is set as wall. Click on each ofthe tabs and note that only momentum can be changed under the current conditions.This will not be so under later exercises so make a note of the location of these options.Click OK.
Click Close to close the Boundary Conditions menu.
Step 5: Solve!
We'll use a second-order discretization scheme.
Main Menu > Solve > Controls > Solution...
Change Momentum to Second Order Upwind.
Click OK.
Set Initial Guess
Initialize the flow field to the values at the inlet:
Main Menu > Solve > Initialize > Initialize...
In the Solution Initialization menu that comes up, choose inlet under Compute From.The Axial Velocity for all cells will be set to 1 m/s, the Radial Velocity to 0 m/s and the

Gauge Pressure to 0 Pa. These values have been taken from the inlet boundarycondition.
Click Init. This completes the initialization. Close the window.
Set Convergence Criteria
FLUENT reports a residual for each governing equation being solved. The residual is ameasure of how well the current solution satisfies the discrete form of each governingequation. We'll iterate the solution until the residual for each equation falls below 1e-6.
Main Menu > Solve > Monitors > Residual...
Change the residual under Convergence Criterion for continuity, x-velocity, and y-velocity, all to 1e-6.
Also, under Options, select Plot. This will plot the residuals in the graphics window asthey are calculated.

Click OK.
This completes the problem specification. Save your work:
Main Menu > File > Write > Case...
Type in pipe.cas for Case File. Click OK. Check that the file has been created in yourworking directory. If you exit FLUENT now, you can retrieve all your work at any timeby reading in this case file.
Iterate Until Convergence
Start the calculation by running 100 iterations:
Main Menu > Solve > Iterate...
In the Iterate Window that comes up, change the Number of Iterations to 100. ClickIterate.
The residuals for each iteration is printed out as well as plotted in the graphics windowas they are calculated.

(Click picture for larger image)
The residuals fall below the specified convergence criterion of 1e-6 in about 46iterations. Actual number of convergence steps may vary slightly.
Save the solution to a data file:
Main Menu > File > Write > Data...
Enter pipe.dat for Data File and click OK. Check that the file has been created in yourworking directory. You can retrieve the current solution from this data file at any time.
Step 6: Analyze Results
Centerline Velocity
We'll plot the variation of the axial velocity along the centerline.
Main Menu > Plot > XY Plot...
Make sure that Position on X Axis is set under Options, and X is set to 1 and Y to 0under Plot Direction. This tells FLUENT to plot the x-coordinate value on the abscissaof the graph.
Under Y Axis Function, pick Velocity... and then in the box under that, pick AxialVelocity.

Please note that X Axis Function and Y Axis Function describe the x and y axes of thegraph, which should not be confused with the x and y directions of the pipe.
Finally, select centerline under Surfaces since we are plotting the axial velocity alongthe centerline. This finishes setting up the plotting parameters.
Click Plot.
This brings up a plot of the axial velocity as a function of the distance along thecenterline of the pipe.
(Click picture for larger image)
In the graph that comes up, we can see that the velocity reaches a constant value beyonda certain distance from the inlet. This is the fully-developed flow region.

Change the axes extents: In the Solution XY Plot window, click on Axes.... UnderOptions, deselect Auto Range. The boxes under Range should now be activated. SelectX under Axis. Enter 1 for Minimum and 3 for Maximum under Range.
We'll turn on the grid lines to help estimate where the flow becomes fully developed.Check the boxes next to Major Rules and Minor Rules under Options. Click Apply.
Now, pick Y under Axis and once again deselect Auto Range under Options, then enter1.8 for Minimum and 2.0 for Maximum under Range. Also select Major Rules andMinor Rules to turn on the grid lines in the Y direction. We have now finishedspecifying the range for each axes, so click Apply and then Close.
Go back to the Solution XY Plot menu and click Plot to replot the graph with the newaxes extents. We can see that the fully-developed region starts at around x=3m and thecenterline velocity in this region is 1.93 m/s.
(Click picture for larger image)

Saving the Plot
Save the data from this plot:
In the Solution XY Plot Window, check the Write to File box under Options. The Plotbutton should have changed to Write.... Click on Write.... Enter vel.xy as the XY FileName and click OK. Check that this file has been created in your FLUENT workingdirectory.
Now, save a picture of the plot:
Leave the Solution XY Plot Window and the Graphics Window open and in the mainFLUENT window click on:
File > Hardcopy ...
Under Format, choose one of the following three options:
EPS - if you have a postscript viewer, this is the best choice. EPS allows you to save thefile in vector mode, which will offer the best viewable image quality. After selectingEPS, choose Vector from under File Type.
TIFF - this will offer a high resolution image of your graph. However, the image filegenerated will be rather large, so this is not recommended if you do not have a lot ofroom on your storage device.
JPG - this is small in size and viewable from all browsers. However, the quality of theimage is not particularly good.
After selecting your desired image format and associated options, click on Save...
Enter vel.eps, vel.tif, or vel.jpg depending on your format choice and click OK.
Verify that the image file has been created in your working directory. You can nowcopy this file onto a disk or print it out for your records.
Coefficient of Skin Friction
FLUENT provides a large amount of useful information in the online help that comeswith the software. Let's probe the online help for information on calculating thecoefficient of skin friction.
Main Menu > Help > User's Guide Index...
Click on S in the links on top and scroll down to skin friction coefficient. Click on thesecond 965 link (normally, you would have to go through each of the links until you

find what you are looking for). We can see an excerpt on the skin coefficient as well asthe equation for calculating it.
Click on the link for Reference Values panel, which tells us how to set the referencevalues used in calculating the skin coefficient.
Set the reference values:
Main Menu > Report > Reference Values...
Select inlet under Compute From to tell FLUENT to calculate the reference values fromthe values at inlet. Check that density is 1 kg/m3 and velocity is 1 m/s. (Alternately, youcould have just typed in the appropriate values). Click OK.

Go back to the Solution XY Plot menu. Uncheck Write to File under Options since wewant to plot to the window right now. We can leave the other Options and PlotDirection as is since we are still plotting against the x distance along the pipe.
Under the Y Axis Function, pick Wall Fluxes..., and then Skin Friction Coefficient inthe box under that.
Under Surfaces, select wall and unselect centerline by clicking on them.
Reset axes ranges: Go to Axes... and re-select Auto-Range for the Y axis. Click Apply.Set the range of the X axis from 1 to 8 by selecting X under Axis, entering 1 underMinimum, and 8 under Maximum in the Range box (remember to de-select Auto-Rangefirst if it is checked).
Click Apply, Close, and then Plot in the Solution XY Plot Window.
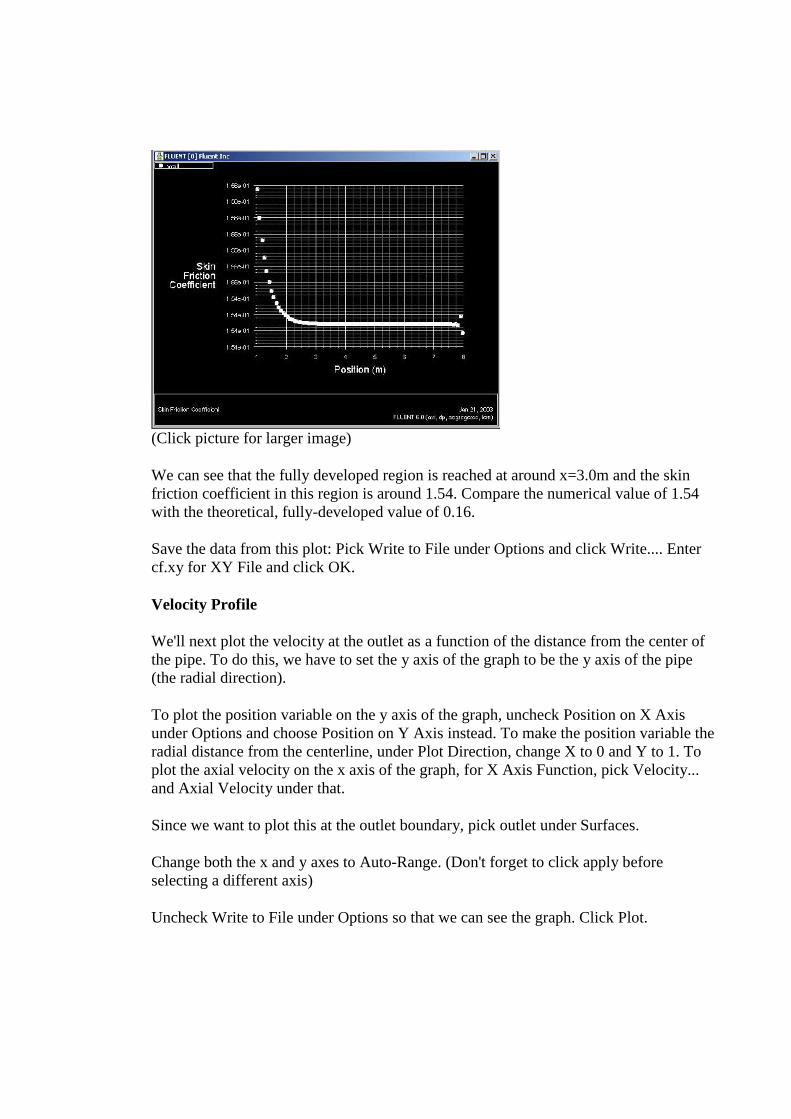
(Click picture for larger image)
We can see that the fully developed region is reached at around x=3.0m and the skinfriction coefficient in this region is around 1.54. Compare the numerical value of 1.54with the theoretical, fully-developed value of 0.16.
Save the data from this plot: Pick Write to File under Options and click Write.... Entercf.xy for XY File and click OK.
Velocity Profile
We'll next plot the velocity at the outlet as a function of the distance from the center ofthe pipe. To do this, we have to set the y axis of the graph to be the y axis of the pipe(the radial direction).
To plot the position variable on the y axis of the graph, uncheck Position on X Axisunder Options and choose Position on Y Axis instead. To make the position variable theradial distance from the centerline, under Plot Direction, change X to 0 and Y to 1. Toplot the axial velocity on the x axis of the graph, for X Axis Function, pick Velocity...and Axial Velocity under that.
Since we want to plot this at the outlet boundary, pick outlet under Surfaces.
Change both the x and y axes to Auto-Range. (Don't forget to click apply beforeselecting a different axis)
Uncheck Write to File under Options so that we can see the graph. Click Plot.

(Click picture for larger image)
Does this look like a parabolic profile?
Save the data from this plot: Pick Write to File under Options and click Write.... Enterprofile.xy for XY File and click OK.
To see how the velocity profile changes in the developing region, let us add the profilesat x=0.6m (x/D=3) and x=0.12m (x/D=6) to the above plot. First, create a line atx=0.6m using the Line/Rake tool:
Main Menu > Surface > Line/Rake
We'll create a straight line from (x0,y0)=(0.6,0) to (x1,y1)=(0.6,0.1). Select Line Toolunder Options. Enter x0=0.6, y0=0, x1=0.6, y1=0.1. Enter line1 under New SurfaceName. Click Create.

To see the line just created, select
Main Menu > Display > Grid...
Note that line1 appears in the list of surfaces. Select all surfaces except default-interior.Click Display. This displays all surfaces but not the mesh cells. Zoom into the regionnear the inlet to see the line created at x=0.6m. (Click here to review the zoomfunctionality discussion in step 4.) line1 is the white vertical line to the right in thefigure below.
Similarly, create a vertical line called line2 at x=1.2; (x0,y0)=(1.2,0) to(x1,y1)=(1.2,0.1) in this case. Display it in the graphics window to check that it hasbeen created correctly.
Now we can plot the velocity profiles at x=0.6m (x/D=3) and x=0.12m (x/D=6) alongwith the outlet profile. In the Solution XY plot menu, use the same settings as above.Under Surfaces, in addition to outlet, select line1 and line2. Make sure Node Values isselected under Options. Click Plot. Your symbols might be different from the onesbelow. You can change the symbols and line styles under the Curves... button. Click onHelp in the Curves menu if you have problems figuring out how to change thesesettings.

The profile three diameters downstream is fairly close to the fully-developed profile atthe outlet. If you redo this plot using the fine grid results in the next step, you'll see thatthis is not actually the case. The coarse grid used here doesn't capture the boundarylayer development properly and underpredicts the development length.
In FLUENT, you can choose to display the computed cell-center values or values thathave been interpolated to the nodes. By default, the Node Values option is turned on,and the interpolated values are displayed. Node-averaged data curves may be somewhatsmoother than curves for cell values.
Velocity Vectors
One can plot vectors in the entire domain, or on selected surfaces. Let us plot thevelocity vectors for the entire domain to see how the flow develops downstream of theinlet.
Main Menu > Display > Vectors... > Display
Zoom into the region near the inlet. (Click here to review the zoom functionalitydiscussion in step 4.) The length and color of the arrows represent the velocitymagnitude. The vector display is more intelligible if one makes the arrows shorter asfollows: Change Scale to 0.4 in the Vectors menu and click Display.
You can reflect the plot about the axis to get an expanded sectional view:
Main Menu > Display > Views...
Under Mirror Planes, only the axis surface is listed since that is the only symmetryboundary in the present case. Select axis and click Apply. Close the Views window.

The velocity vectors provide a picture of how the flow develops downstream of theinlet. As the boundary layer grows, the flow near the wall is retarded by viscousfriction. Note the sloping arrows in the near wall region close to the inlet. This indicatesthat the slowing of the flow in the near-wall region results in an injection of fluid intothe region away from the wall to satisfy mass conservation. Thus, the velocity outsidethe boundary layer increases.
By default, one vector is drawn at the center of each cell. This can be seen by turning onthe grid in the vector plot: Select Draw Grid in the Vectors menu and then click Displayin the Grid Display as well as the Vectors menus. Velocity vectors are the default, butyou can also plot other vector quantities. See section 27.1.3 of the user manual for moredetails about the vector plot functionality.
Step 7: Refine Mesh
It is very important to assess the dependence of your results on the mesh used byrepeating the same calculation on different meshes and comparing the results. We willre-do the previous calculation on a 100x10 mesh and compare the results with the100x5 mesh used previously. If you prefer to skip the GAMBIT steps for modifying themesh, download the 100x10 mesh (by right-clicking on the link) and go directly to theFLUENT analysis discussed below.
Modify Mesh in GAMBIT
The 100x5 mesh is saved as pipe.dbs in your working folder. Copy and paste the file inthe same folder. Rename Copy of pipe.dbs to pipe2.dbs. We will work with pipe2.dbs inorder to retain pipe.dbs as is. Launch GAMBIT and browse to where pipe2.dbs is saved.Notice that under Session ID, pipe2 is now listed. Select this and click Run. Note in themain menu bar that pipe2 is the ID of this job. Files created during this session willhave that prefix.

We will delete the face mesh, modify the edge meshes for the vertical edges and remeshthe face. To delete the original face mesh, choose
Operation Toolpad > Mesh Command Button > Face Command Button > Delete FaceMeshes
In the Delete Face Meshes Window that comes up, uncheck the Remove unused lowermesh box. This tells GAMBIT to remove the face mesh only and keep the edge meshesassociated with the face mesh. Since we will be changing the mesh on only two edgesof the rectangle, there is no need to redo the meshes for all four edges.
Select the only face of the rectangle by shift-clicking on it and then click Apply.
Modify Edge Meshes
To change the number of divisions on the vertical edges from 5 to 10, choose:
Operation Toolpad > Mesh Command Button > Edge Command Button > Mesh Edges
Select the two vertical edges by holding down the Shift button, clicking on each in turn,and then releasing the Shift button. Select Interval count from the box under Spacingthat says Interval size. Change the number in the box next to the Interval count boxfrom 5 to 10.
Make sure that the Remove old mesh box is checked under Options. This will makesure that the old edge meshes are erased before the new edge meshes are created.
Click Apply.

Remember that you can zoom in by holding down Ctrl, dragging a box across the areayou want to zoom in on, and then releasing Ctrl. Do this now and make sure that thevertical edges have 10 divisions.
(Click image for larger picture)
Recreate Face Mesh
Operation Toolpad > Mesh Command Button > Face Command Button > Mesh Faces
Shift-click on the face in the Graphics Window to select it. Click Apply.
(Click here for larger picture)
Save & Export

Main Menu > File > Save
Main Menu > File > Export > Mesh...
Type in pipe2.msh for the File Name:. Select Export 2d Mesh option. Click Accept.
Finer Mesh Analysis
Repeat steps 4 and 5 of this tutorial with the 100x10 mesh (a tad on the repetitious sidebut consider it good practice).
One you obtain the solution, plot the variation of the centerline velocity along the x-direction as described in step 6. Compare this result with that obtained on the previousmesh which is stored in the vel.xy file created earlier. To do this, after centerlinevelocity has been plotted, click on Load File... in the Solution XY Plot window.Navigate to your working folder if necessary and click on vel.xy and OK. Click Plot.
In the graphics window, we can see both of the lines plotted in the same window.Adjust the axes so that you can zoom in on the beginning of the fully developed region.
(Click image for larger picture)
In the centerline velocity plot above, the white and red symbols represent the results onthe 100x10 mesh and 100x5 meshes, respectively. The centerline velocity in the fully-developed region for the finer mesh is 1.98 m/s. This value agrees better with theanalytical value of 2 m/s that the value of 1.93 m/s obtained on the coarser mesh. Savethe data for this plot as vel2.xy. The velocity result gets more accurate on refining themesh as expected.
Plot the skin friction coefficient as described in step 6. Compare the result with thatobtained on the 100x5 mesh by loading it from cf.xy.

(Click here for larger image)
The finer mesh provides a skin friction coefficient of 0.159 in the fully-developedregion, which is much closer to the theoretical value of 0.16 than the correspondingcoarser mesh value of 0.154. Save the data for this plot as cf2.xy.
Similarly, plot the velcoity profile at the outlet and compare with the coarser grid resultin out.xy. The two results compare well with the greatest deviation occurring near thecenterline. Save the data for this plot as out2.xy.
(Click picture for larger image)
If you repeat the calculation on a 100x20 mesh, you'll see that the results on the twofinest meshes are grid-independent to a high level of accuracy. In the plots below, thewhite, red and green symbols correspond to the 100x20, 100x10 and 100x5 meshes,respectively.

Velocity along centerline:
(Click picture for larger image)
Skin Coefficient:
(Click picture for larger image)

Outlet Velocity: