stem education using lego mindstorms - … · stem education using lego mindstorms®: a guide for...
TRANSCRIPT

STEM EDUCATION USING LEGO MINDSTORMS®
A Guide for Volunteer Teachers

2 STEM Education Using LEGO Mindstorms®: A Guide For Volunteer Teachers. Published August 2017.
AcknowledgmentsWelcomeIntro to MindstormsParts OverviewSensors OverviewProgramming OverviewLesson Plans OverviewLesson 0 - Intro to RoboticsLesson 1 - Build the BotLesson 2 - Perfect Square Lesson 3 - Remote ControlLesson 4 - Goal ScorerLesson 5 - Picker-UpperLesson 6 - Table BotLesson 7 - Line StopperLesson 8 - Sumo BotLesson 9 - Maze NavigatorResources
345
6-89-10
11-1819-2021-2425-2829-3435-4142-4546-4950-5354-5859-6263-6667-68
TABLE OF CONTENTS

3STEM Education Using LEGO Mindstorms®: A Guide For Volunteer Teachers. Published August 2017.
Many thanks to the supporters and contributors, without whom this project would not have been possible.
AdvisorsJuliana Andersen, Troop LeaderPeter Antupit, Project AdvisorJoanne Louie, Girl Scouts of Northern California Gold Award Committee CoordinatorRenu Nanda, Executive Director, Ravenswood Education FoundationTait Wade, Peninsula Bridge Site Director
Community VolunteersSusan ChengRiley CohenMiles OlsonAlexander PhillipsAnnabelle TaoAnn WetterstenThe Space Cookies FRC Team 1868The Students of Peninsula Bridge, CSUS Site
In-Kind DonorsParker FamilyPeriyannan Family
Financial supportGirl Scout Troop 30541Girl Scout Troop 62868Susan Lindquist Community Service GrantThe Cohen Family
ACKNOWLEDGMENTS

4 STEM Education Using LEGO Mindstorms®: A Guide For Volunteer Teachers. Published August 2017.
Dear Community Volunteer:
This teaching guide is designed for volunteers to teach middle school students (~11-14 years old) the basics of building and programming robots using the LEGO Mindstorms® system. It was developed as part of a Girl Scout Gold Award project.
All young people should be prepared to think deeply and well so they have the chance to become the innovators, educators, researchers, and leaders who can solve the most pressing challenges facing our world, both today and tomorrow. Right now, not enough of our youth have access to quality STEM learning opportunities and too few students see these disciplines as springboards for their careers. Children’s race, zip code, or socioeconomic status should never determine their STEM fluency; we must give all children the opportunity to be college-ready and to thrive in a modern STEM economy.
Engaging younger students in STEM early and often is essential to creating confidence and competence, and closing the gap in technical careers. Continuity is important in order to maintain a strong interest in the subject; studies show that students, especially girls, are most likely to “drop out” of STEM-intensive education in middle school.
Robotics is hands-on and offers exposure to mechanical design, electronics, and programming, all of which are critical STEM skills. By teaching robotics at the middle school level, it is possible to attract and maintain student interest in STEM fields.
The lesson plans in this teaching guide were piloted at a summer academic program for underserved middle school students and reflect the experience of the instructors as well as student feedback.
This document does not replace user guides and documentation provided by LEGO. Rather, it is intended to integrate with summer or after-school programming staffed by volunteers. The nine sequential lesson plans are designed so that facilitators with no previous robotics or programming experience can run the lessons.
Thank you for taking on the important role of providing STEM experience to students!
Meredie CohenGirl Scout Troop 30541Girl Scout Troop 62868 (the Space Cookies)
WELCOME

5STEM Education Using LEGO Mindstorms®: A Guide For Volunteer Teachers. Published August 2017.
LEGO Mindstorms is a series of kits that contain software and hardware to create small, customizable, programmable robots. They include an intelligent “brick” computer that controls the system, a set of modular sensors and motors, and various LEGO parts to create the mechanical systems.
There are two generations of Mindstorms currently in use: NXT (second generation) and EV3 (third generation). Major NXT parts are orange and EV3 parts are red. EV3 software is compatible with the NXT parts with a few exceptions.
There are minor differences between the EV3 and NXT kit of parts. The NXT kit may come with a different additional motor than the EV3. The NXT kit also may include a light sensor instead of a color sensor, whereas the EV3 kit always contains a color sensor. These parts are similar, but adaptations must be made when programming an NXT light sensor with EV3 software.
Within the EV3 generation, there are two types of kits: Home and Education. These lesson plans are designed to be used with the EV3 Education kit, containing an EV3 brick, two touch sensors, an ultrasonic sensor, and a color sensor.
However, modifications can be made to the design of the robot and the sensors used in projects to accommodate for different kits. If necessary, volunteers may skip the lessons involving sensors they don’t have. This will affect the content covered and the timing. Alternatively, all EV3 sensors can be purchased online at shop.lego.com, and some NXT sensors may be compatible with EV3 parts—a chart will be shown in the parts overview.
Programming a Mindstorms robot is done via a flowchart language called Robolab, based on a language called LabVIEW. The programming structure simulates a flowchart design icon by icon and allows the robot to perform different operations autonomously.
This graphical approach allows novice programmers to build programs by dragging and dropping virtual representations of various operations such as moving, braking, or rotating an arm attached to a motor. The blocks are then conencted via a virtual “wire”. The program created via the graphical sequence of operations is then uploaded to the brick and the robot will perform the commands as programmed.
In addition to the actual kit, using Mindstorms requires a computer or tablet on which the code is created before being uploaded to the robot. Software for a computer can be downloaded from the LEGO website, and a software app for a tablet can be downloaded via the tablet’s App Store.
INTRO TO MINDSTORMS

6 STEM Education Using LEGO Mindstorms®: A Guide For Volunteer Teachers. Published August 2017.
Instructions for assembling the robot are contained in the Mindstorms User Guide and can also be found in the Resources section of this teaching guide. The Resources section also contains links to basic robot designs for NXT 1.0, NXT 2.0, NXT Education, EV3 Education, and EV3 Home.
This teaching guide does not include detail about minor parts, but all major parts and their functions are included. This includes both NXT and EV3 part photos; as noted earlier, NXT parts have orange highlights and EV3 parts have red highlights. Parts for both systems have the same function (for example, an NXT motor performs the same function as an EV3 motor).
Brick
The brick is the “brain” of the robot; sensors and motors are connected to the brick with wires via numbered and lettered ports. The brick is then connected to a computer via a USB cable to run code written using the Mindstorms software.
For an NXT brick (left):
Press the middle orange button to turn the brick on. This orange button also serves as the “select” button; the lower dark gray button is the “back” button, and the arrows are used for navigation.
Settings are accessed through the wrench icon. Volume can be turned on or off through the settings.
To turn the brick off, repeatedly press the dark gray “back” button until the Turn Off screen appears, then use the orange button to select the check mark.
USB connection: USB 2.0 Type B
PARTS OVERVIEW
NXT Brick EV3 Brick

7STEM Education Using LEGO Mindstorms®: A Guide For Volunteer Teachers. Published August 2017.
For an EV3 brick (right):
Press the middle dark gray button to turn the brick on. The middle button serves as the “select” button; the gray button in the upper left is the “back” button, and the arrows are used for navigation.
Settings are accessed through the wrench icon. Volume can be turned on or off through the settings.
To turn the brick off, repeatedly press the gray “back” button until the Turn Off screen appears, then use the middle button to select the check mark.
USB connection: USB 2.0 Mini-B 5 Pin
Motors
All motors have an orange or red round attachment. This attachment is connected to axles (plus-sign pieces) to which wheels or other rotating components may be attached. EV3 kits also include an additional medium motor (far right, which has the same function but on a different axis (the red middle hole is the rotating piece). All EV3 motors are compatible with an NXT brick and vice versa.
Motors must be connected to the brick via wires. Right and left motors are typically connected to Ports B and C, and single motors are connected to Port A.
Wires
Connect motors and sensors to ports on the brick using wires. Wires should be inserted into the port that corresponds to the port being used for that part in the program. Ensure that the tab on the wire is fully locked in (there will be a “click”).
PARTS OVERVIEW
NXT Motor EV3 Motor EV3 Medium Motor

8 STEM Education Using LEGO Mindstorms®: A Guide For Volunteer Teachers. Published August 2017.
Downloading Programs
To download a program to the robot from the computer, connect the brick via USB. Open the program, then press the downward-pointing “download” button in the bottom right corner of the screen.
Programs can also be run directly from the computer (without disconnecting the USB cable) by pressing the large green triangular “Play” button at the beginning of the code. However, it is advised to download programs and disconnect them from the computer before running them, as the USB cord often gets tangled in the wheels and limits the robot’s movement.
It is crucial to give programs a name that clearly corresponds to their function so files can be easily located. For example, a program that makes the robot go in a square could be called “Square Driver.”
To access a downloaded program:
NXT:Select “My Files,” then “Software Files,” then navigate to the desired program.
EV3:Select the second tab with an icon displaying two pages. This tab displays project folders. Select the desired folder, then select the desired program within the folder to run it.
NXT & EV3 Brick/Sensors Compatibilities (assuming use with EV3 software)
Use of NXT light sensor with NXT brick and EV3 software requires a modification in the code, which will be described in Lesson 7 and in the Resources page.
PARTS OVERVIEW
EV3 ultrasonic
sensor
EV3 color sensor
EV3 touch sensor
EV3 infrared sensor
NXT ultrasonic
sensor
NXT light sensor
NXT touch sensor
EV3 brick √ √ √ √ √ √ √
NXT brick X X X X √ √** √
9STEM Education Using LEGO Mindstorms®: A Guide For Volunteer Teachers. Published August 2017.
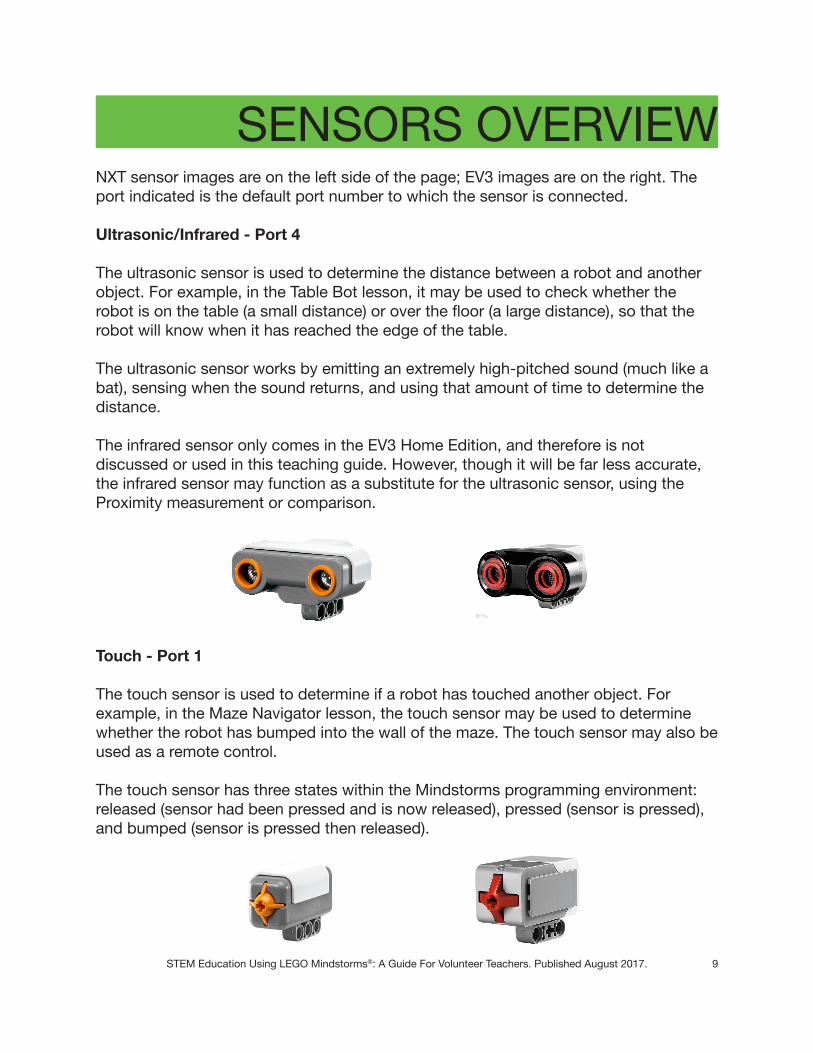
NXT sensor images are on the left side of the page; EV3 images are on the right. The port indicated is the default port number to which the sensor is connected.
Ultrasonic/Infrared - Port 4
The ultrasonic sensor is used to determine the distance between a robot and another object. For example, in the Table Bot lesson, it may be used to check whether the robot is on the table (a small distance) or over the floor (a large distance), so that the robot will know when it has reached the edge of the table.
The ultrasonic sensor works by emitting an extremely high-pitched sound (much like a bat), sensing when the sound returns, and using that amount of time to determine the distance.
The infrared sensor only comes in the EV3 Home Edition, and therefore is not discussed or used in this teaching guide. However, though it will be far less accurate, the infrared sensor may function as a substitute for the ultrasonic sensor, using the Proximity measurement or comparison.
Touch - Port 1
The touch sensor is used to determine if a robot has touched another object. For example, in the Maze Navigator lesson, the touch sensor may be used to determine whether the robot has bumped into the wall of the maze. The touch sensor may also be used as a remote control.
The touch sensor has three states within the Mindstorms programming environment: released (sensor had been pressed and is now released), pressed (sensor is pressed), and bumped (sensor is pressed then released).
SENSORS OVERVIEW

10 STEM Education Using LEGO Mindstorms®: A Guide For Volunteer Teachers. Published August 2017.
SENSORS OVERVIEWNXT sensor images are on the left side of the page; EV3 images are on the right. The port indicated is the default port number to which the sensor is connected.
Light/Color - Port 3
The light (NXT) or color (NXT or EV3) sensor is used to determine the relative intensity of light in a certain area. For example, in the Line Stopper lesson, the light/color sensor will be used to measure the reflected light from a surface in order to determine if it is a dark line or not.
The color sensor has different modes, but these lessons use only the Reflected Light mode in order to be compatible with both generations.
It is important to take a preliminary measurement with the sensor to use as a parameter for the program. This measurement will be programmed by placing a Color Sensor block and a Display block in a loop. Examples are shown in the relevant lessons.
The NXT brick and light sensor combination does not work perfectly with the EV3 software, so adaptations must be made. These adaptations are outlined in Lesson 7 and in the Resources section. However, the NXT color sensor and the EV3 color sensor work the same way. Adaptations only need to be made for an NXT light sensor and an NXT brick together.

11STEM Education Using LEGO Mindstorms®: A Guide For Volunteer Teachers. Published August 2017.
While a robot might have NXT, EV3, or a mix of parts, all robots should be programmed with the EV3 software. NXT software has been phased out and is no longer updated or easily downloadable.
For the most part, programming is the same for both bricks; the only significant difference is the sensors included in each kit. Details of sensor use are contained in the Sensors Overview section.
To program a LEGO robot, LEGO EV3 software must be installed on a laptop. An installation link can be found in the Resources section of this teaching guide.
An EV3 app can also be downloaded to a tablet, but use of this app requires a Bluetooth connection with the brick, which can be finicky and is not recommended for after school programs with time constraints.
To create a program:- Open the software: the startup screen (photo on the left) will appear.- Select the plus sign (circled) or select File --> New Project to create a new project. The blank project screen (photo on the right) will appear.
A visual guide to the software and basic programming blocks are outlined in the next few pages. Blocks are combined to make the robot move and function as designed.
Action Blocks (green) control the actions of the program. They control motor rotations, image, sound, and light.Flow Blocks (orange) control the flow of the program. All programs begin with the orange Start block.Sensor Blocks (yellow) allow the program to read input from the various sensors.Data Operations Blocks (red) controls variables and the comparison of values.Advanced Blocks (blue) manage files and Bluetooth connections.My Blocks (teal) are user-created blocks.
PROGRAMMING OVERVIEW

12 STEM Education Using LEGO Mindstorms®: A Guide For Volunteer Teachers. Published August 2017.
Programming blocks can be dragged and dropped on the screen to connect to the Start block. Hover the mouse over the blocks to see the names/functions. Adjustments can be made to the functions of the block by selecting the tabs on the bottom of the block (to change functions) or the text at the top right of the block (to change inputs or ports).
Blocks can be connected by dragging wires from the output of one block to the input of another.
Blocks can be disconnected by removing them from the set of connected blocks or deleted by dragging them off screen or selecting them and pressing the “delete” key on the keyboard.
Intro
Drag blocks from below to here
Locations of various functions/blocks
Green = action (movement, brick interaction)Orange = control (programming �ow)Yellow = sensorsRed = operations (not used in these lessons)Blue = advanced (not used in these lessons)Teal = user-created blocks
Select grayed-out icon here tohide content editor text
Start Block
PROGRAMMING OVERVIEW

13STEM Education Using LEGO Mindstorms®: A Guide For Volunteer Teachers. Published August 2017.
Move Steering
Adjust movement:o� = no movement
on = inde�nite movementseconds = number of seconds
degrees = degrees of motor rotationrotations = number of motor rotations
Adjust direction with slideror number input
Adjust power with slideror number input
Adjust # ofseconds/degrees/rotations
Adjust movement end(brake or coast)
DisplayMove tankMove steeringLarge motor
Medium motor
The green tab contains “action” blocks—blocks that control the actions of the robot. These lessons will primarily use the five blocks named above. Each is described below. For all motors, negative power will create backwards motion.
Move Steering (Action) Block
The Move Steering block is one way to control the robot’s movement. It controls two motors at once. From left to right, it allows the user to:1. Adjust the units of the period for which the robot will move (time, degrees, rotations)2. Adjust the direction of the robot’s motion3. Adjust the power (speed) of the robot’s motion4. Adjust the period for which the robot will move5. Switch between braking after motion is finished and coasting to a stop
PROGRAMMING OVERVIEW
1 5
4
3
2
14 STEM Education Using LEGO Mindstorms®: A Guide For Volunteer Teachers. Published August 2017.
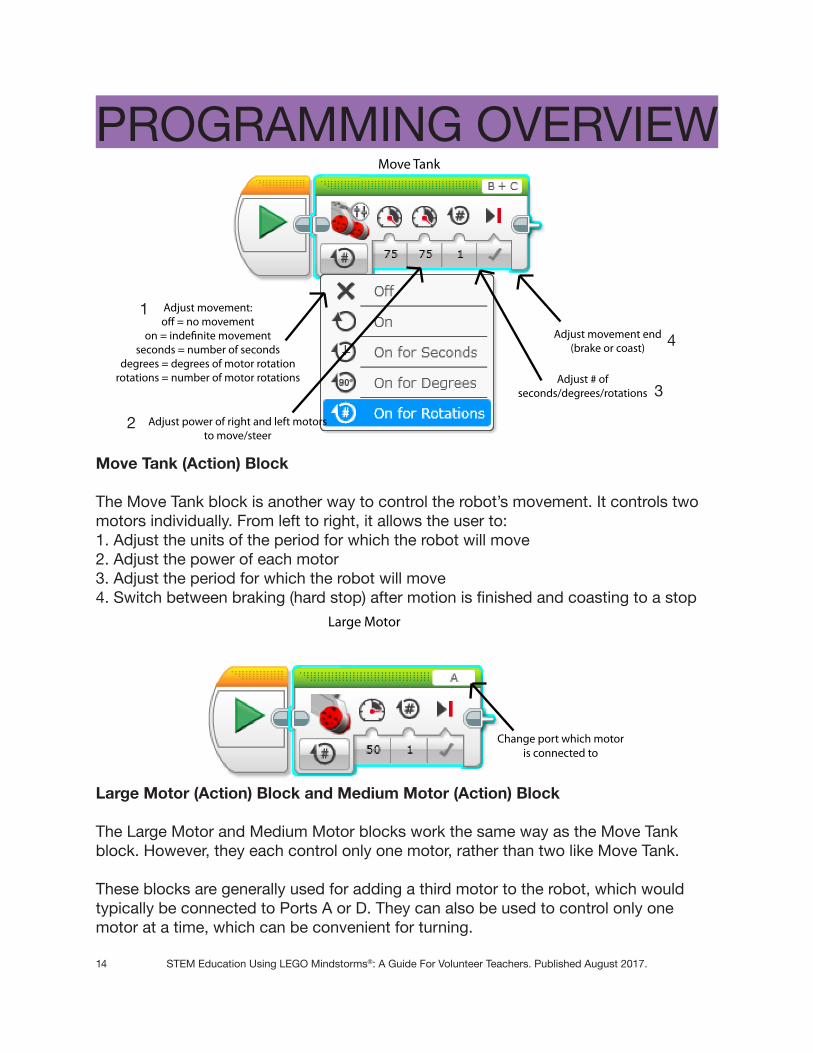
Move Tank
Adjust movement:o� = no movement
on = inde�nite movementseconds = number of seconds
degrees = degrees of motor rotationrotations = number of motor rotations
Adjust power of right and left motorsto move/steer
Adjust # ofseconds/degrees/rotations
Adjust movement end(brake or coast)
Large Motor
Change port which motoris connected to
PROGRAMMING OVERVIEW
Move Tank (Action) Block
The Move Tank block is another way to control the robot’s movement. It controls two motors individually. From left to right, it allows the user to:1. Adjust the units of the period for which the robot will move2. Adjust the power of each motor3. Adjust the period for which the robot will move4. Switch between braking (hard stop) after motion is finished and coasting to a stop
Large Motor (Action) Block and Medium Motor (Action) Block
The Large Motor and Medium Motor blocks work the same way as the Move Tank block. However, they each control only one motor, rather than two like Move Tank.
These blocks are generally used for adding a third motor to the robot, which would typically be connected to Ports A or D. They can also be used to control only one motor at a time, which can be convenient for turning.
4
3
2
1
15STEM Education Using LEGO Mindstorms®: A Guide For Volunteer Teachers. Published August 2017.
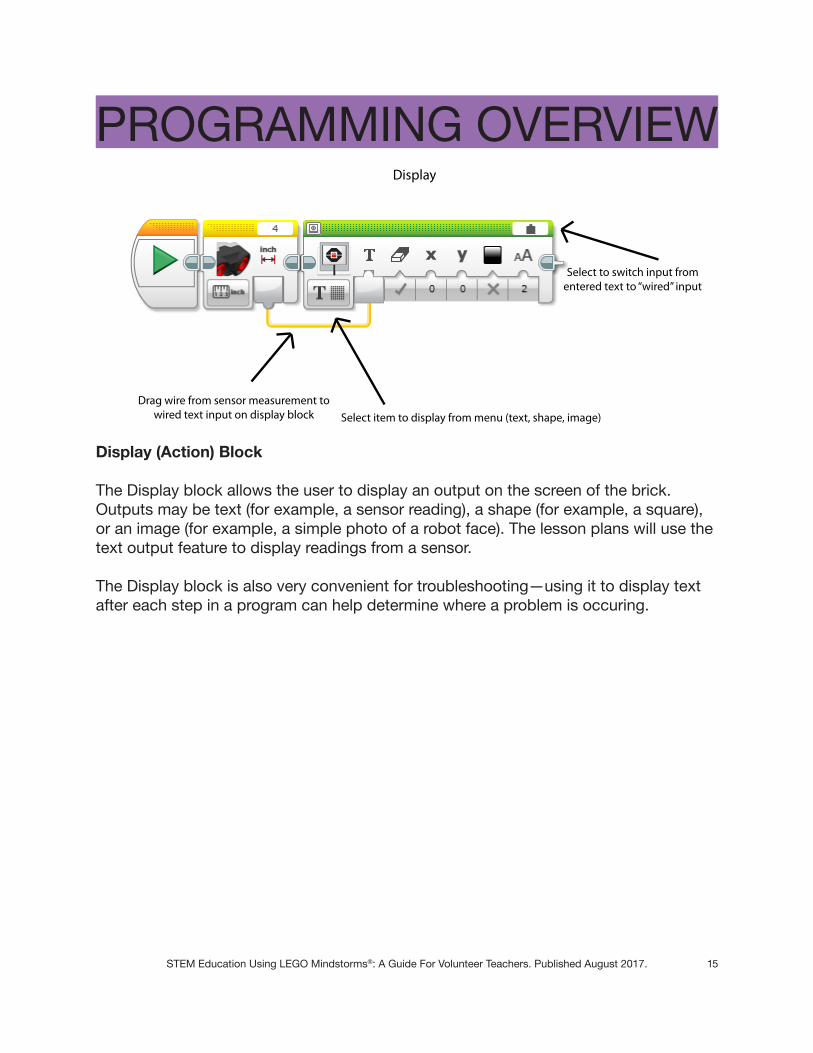
Display
Drag wire from sensor measurement towired text input on display block Select item to display from menu (text, shape, image)
Select to switch input fromentered text to “wired” input
Display (Action) Block
The Display block allows the user to display an output on the screen of the brick. Outputs may be text (for example, a sensor reading), a shape (for example, a square), or an image (for example, a simple photo of a robot face). The lesson plans will use the text output feature to display readings from a sensor.
The Display block is also very convenient for troubleshooting—using it to display text after each step in a program can help determine where a problem is occuring.
PROGRAMMING OVERVIEW
16 STEM Education Using LEGO Mindstorms®: A Guide For Volunteer Teachers. Published August 2017.
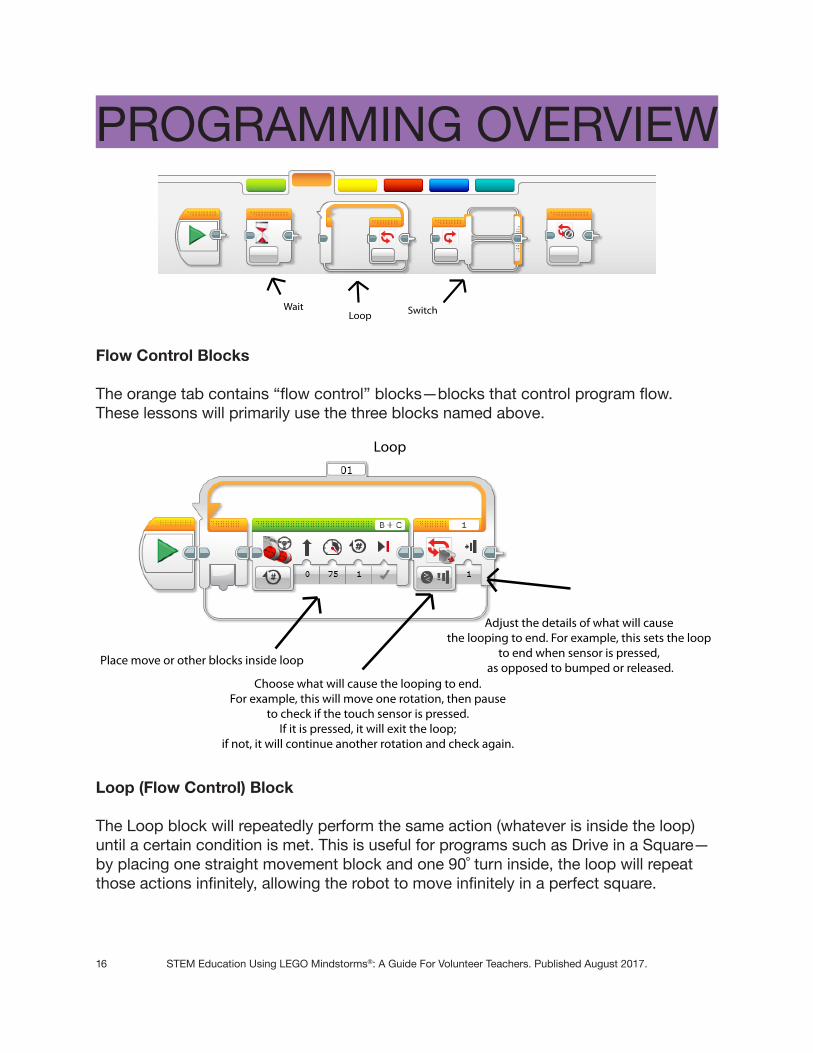
Loop
Place move or other blocks inside loop
Choose what will cause the looping to end.For example, this will move one rotation, then pause
to check if the touch sensor is pressed.If it is pressed, it will exit the loop;
if not, it will continue another rotation and check again.
Adjust the details of what will cause the looping to end. For example, this sets the loop
to end when sensor is pressed, as opposed to bumped or released.
SwitchLoopWait
Flow Control Blocks
The orange tab contains “flow control” blocks—blocks that control program flow. These lessons will primarily use the three blocks named above.
PROGRAMMING OVERVIEW
Loop (Flow Control) Block
The Loop block will repeatedly perform the same action (whatever is inside the loop) until a certain condition is met. This is useful for programs such as Drive in a Square—by placing one straight movement block and one 90˚ turn inside, the loop will repeat those actions infinitely, allowing the robot to move infinitely in a perfect square.
17STEM Education Using LEGO Mindstorms®: A Guide For Volunteer Teachers. Published August 2017.
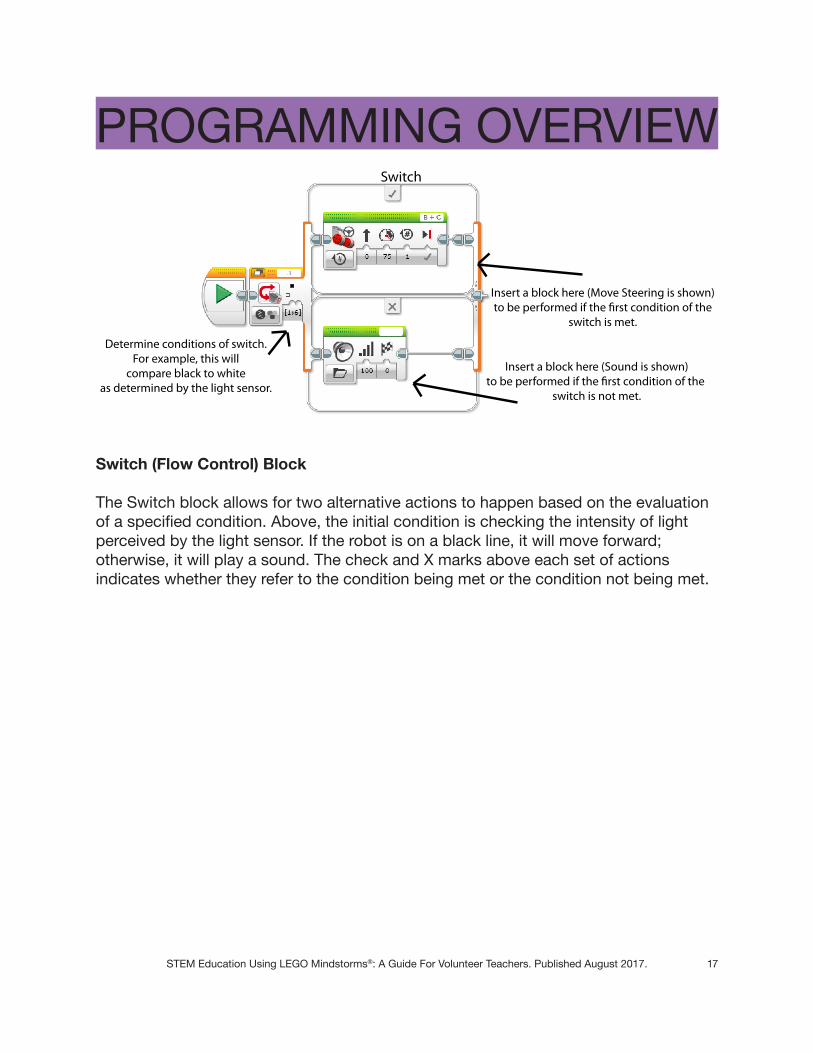
Switch
Determine conditions of switch.For example, this will
compare black to whiteas determined by the light sensor.
Insert a block here (Move Steering is shown)to be performed if the �rst condition of the
switch is met.
Insert a block here (Sound is shown)to be performed if the �rst condition of the
switch is not met.
PROGRAMMING OVERVIEW
Switch (Flow Control) Block
The Switch block allows for two alternative actions to happen based on the evaluation of a specified condition. Above, the initial condition is checking the intensity of light perceived by the light sensor. If the robot is on a black line, it will move forward; otherwise, it will play a sound. The check and X marks above each set of actions indicates whether they refer to the condition being met or the condition not being met.

18 STEM Education Using LEGO Mindstorms®: A Guide For Volunteer Teachers. Published August 2017.
Touch sensor
Ultrasonic sensor
Color/Light sensor
Sensor Blocks
The yellow tab contains “sensor” blocks—blocks that control the sensors. These lessons will primarily use the three blocks named above. It may be necessary to scroll to the right to locate all of the blocks. The ultrasonic sensor and infrared sensor icons look similar, so make sure the correct one is used by hovering the mouse over the icons to see their names.
All sensor blocks function in essentially the same way. They can measure a value pertaining to their function, then take action based on that measurement. For example, the touch sensor can measure its state (if it is pressed or not), and if it is pressed, it can tell the robot to move.
Alternatively, they can take a measurement, then compare that measurement to a standard, then perform an action based on whether or not the measurement meets that standard. For example, the ultrasonic sensor can measure its distance from a wall, then compare that to a distance set by the user. If the distance is below the set distance (nearer to the wall), it can tell the robot to stop; otherwise, it can tell the robot to continue moving.
PROGRAMMING OVERVIEW

19STEM Education Using LEGO Mindstorms®: A Guide For Volunteer Teachers. Published August 2017.
This Guide includes nine lesson plans, plus one introductory mini-lesson. Each plan includes an introduction, the lesson plan itself, a volunteer “cheat sheet”, and sample program solutions if applicable.
The introduction includes an overview summarizing the goal of the lesson, the concepts covered, the required materials, and the approximate time needed for the lesson.
The lesson plans expand on the overview, breaking the lesson down into smaller steps that a volunteer instructor can follow. They also include tips on how to manage the students during the lesson.
The volunteer cheat sheets include more details for volunteers who need them. For example, the cheat sheet may list guiding questions and their answers specific to the lesson or program, more detailed descriptions of certain parts and their functions, and/or further explanations of lesson parts.
For all lessons requiring a program, at least one solution is included. However, there are many ways to complete any given task, so it is expected that each student’s program will differ, both from each other’s and from the sample. The samples are intended to be an idea for the volunteers to guide their students towards, but students are free to take their ideas in any direction provided that they complete the task. It’s important to encourage students to be creative.
Depending on available materials, it may not be possible for students to work in small groups. This is fine. Students can discuss the best building strategies as a group and collaborate to construct the robot. If there are multiple computers but only one robot, students can split up and write their own programs, testing to see which works the best on the class robot.
If, on the other hand, there are more supplies than students, it may still be beneficial to have students work in pairs. Working with another person teaches students valuable collaboration skills.
LESSON PLANS

20 STEM Education Using LEGO Mindstorms®: A Guide For Volunteer Teachers. Published August 2017.
The lesson plans in this guide are designed to last 15 hours in total. However, by changing some of the activities, it is possible to shorten the length to 10 hours. Some lessons are abridged; some are left out entirely. These adaptations will be noted within the individual lesson plans. Schedules for each time frame are below.
Lesson schedule —15 hours
Intro to Robotics - .5 hoursBuild the Bot - 2 hoursPerfect Square - 1.5 hoursRemote Control - 1.5 hoursGoal Scorer - 1.5 hoursPicker-Upper - 1 hourTable Bot - 1 hourLine Stopper - 1 hourSumo Bot - 2 hoursMaze Navigator - 3 hours
Total = 15 hours (3 weeks x 5 days/week x 1 hour/day)
Alternative lesson schedule—10 hours
Intro to Robotics- .5 hoursBuild the Bot - 2 hoursPerfect Square - 1 hourPicker-Upper - 1.5 hoursTable Bot - 1 hourLine Stopper - 1 hourMaze Navigator - 3 hours
Total = 10 hours (2 weeks x 5 days/week x 1 hour/day)
Note: Keep in mind that times are estimates. Some lessons may take longer than expected; others may take less time. For students who are ahead of the rest, more complex challenges can be invented using the same basic format as the original challenges. If lessons get far behind schedule, some lessons may be abridged or left out at the volunteer’s discretion.
LESSON PLANS

21STEM Education Using LEGO Mindstorms®: A Guide For Volunteer Teachers. Published August 2017.
OverviewStudents will learn what they will cover throughout the lesson series and explore the basic definition of robotics.
Concepts CoveredLesson plansIntro to robotics
Required MaterialsComputer with access to YouTube
Total Time.5 hours
LESSON ZEROIntro to Robotics

22 STEM Education Using LEGO Mindstorms®: A Guide For Volunteer Teachers. Published August 2017.
Start by asking the students what their definition of “robot” is. Go around the room and come up with various definitions and examples of robots.
Show them a few cool robot videos to get them excited. Battlebots is a good one, as are FRC (FIRST Robotics Competition), FLL (FIRST LEGO League), and other LEGO Mindstorms robots. Battlebots is a competition where teams try to destroy their opponents’ robots without getting destroyed themselves. FLL robots are the most similar to the robots students will be building. See the Resources page for further information.
Explain what they will accomplish in the robotics sessions. Tell them the various activities. Tell them that the things they will learn in these sessions will give them a basis for being able to build even cooler robots, like the ones they saw in the videos.
LESSON ZEROIntro to Robotics - Lesson Plan

23STEM Education Using LEGO Mindstorms®: A Guide For Volunteer Teachers. Published August 2017.
Robot definition“a machine capable of carrying out a complex series of actions automatically, especially one programmable by a computer.”
Good YouTube videosBest of BattlebotsBest of the Best FRCAmazing LEGO Machines CompilationLego Paper Plane Machine
Activities for long versionBuild the robotDrive in a squareBuild a remote controlKick a ball into a goalPick something upStay on a tableTry to push another robot off a table/out of a ringFollow a lineGo through a maze
Activities for short versionBuild the robotDrive in a squarePick something upStay on a tableStop at a lineGo through a maze
LESSON ZEROVolunteer Cheat Sheet - Intro to Robotics

24 STEM Education Using LEGO Mindstorms®: A Guide For Volunteer Teachers. Published August 2017.
Not applicable.
LESSON ZEROIntro to Robotics - Program Solution(s)

25STEM Education Using LEGO Mindstorms®: A Guide For Volunteer Teachers. Published August 2017.
OverviewStudents will begin the lesson series by building their base robot.
Concepts CoveredRobot assembly
Required MaterialsKit of robot parts—includes:- Building materials- 2 motors- 1 brickMindstorms User Guide—see Resources section
Total Time2 hours
LESSON ONEBuild the Bot

26 STEM Education Using LEGO Mindstorms®: A Guide For Volunteer Teachers. Published August 2017.
Start by explaining how to build LEGOs. Most students are probably familiar with the concept, but these pieces are different than normal LEGO blocks so it’s good to go over it.
Next, divide into teams. Teams of 2 or 3 work best so there’s something for everyone to do. Brainstorm ideas for how to work effectively in a group.
Have the students begin building the base robot! These lesson plans are intended to be used with a basic car robot design. Links to MIndstorms User Guides for five possible kits (NXT 1.0, 2.0, Education; EV3 Education, Home) are in the Resources section. Kits generally come with a User Guide—however, some may be designed to build a three-motor car, whereas these lessons are designed for a two-motor car, so consulting the appropriate links in the Resources section may be beneficial.
Make sure to encourage creativity. If the User Guide suggests putting treads on the wheels, for example, it is perfectly acceptable to use rubber tires instead!
If possible, robots should be built using only two motors. Students will add the third motor at a later point without the help of the Mindstorms User Guide.
In the Mindstorms User Guide, stop at the point where sensors begin to be added to the robot. Students will add sensors at a later point without the help of the Mindstorms User Guide.
If it looks like students are struggling to work collaboratively, pause about halfway through to discuss their groupwork strategies. Ask what’s working, what isn’t working, and what can change to maximize efficiency but also collaboration.
LESSON ONEBuild the Bot - Lesson Plan

27STEM Education Using LEGO Mindstorms®: A Guide For Volunteer Teachers. Published August 2017.
How to build LEGOsIn the User Guides, the images of the parts are to scale, so you can check if it’s the correct length or number of holes by comparing it to the image.
For the axle rods, the number indicated in the User Guide corresponds to the number of holes on an equivalent length circle rod.
Motors, wires, sensors, and the brick are covered in the parts introduction section of this guide.
Groupwork examples• One person programs while the other person builds• One person reads out the necessary pieces while the other finds them• One person collects pieces while the other person assembles them• Switching off building sections and programming sections• Bad example: one person does all the work and the other person watches!
Creativity examples• If the Mindstorms User Guide says to build the arm such that it moves side to side,
change it so it goes backwards and forwards• If the Guide says to have 3 wheels, change it so it has 4• If the Guide says to put the ultrasonic sensor at the back of the robot, move it to the
front
LESSON ONEVolunteer Cheat Sheet - Build the Bot

28 STEM Education Using LEGO Mindstorms®: A Guide For Volunteer Teachers. Published August 2017.
LESSON ONEBuild the Bot - Program Solution(s)Not applicable.

29STEM Education Using LEGO Mindstorms®: A Guide For Volunteer Teachers. Published August 2017.
LESSON TWOPerfect Square
OverviewStudents will learn the basics of programming, starting with programming the robot to move.
Concepts Covered“Move Tank,” “Move Steering,” and “Loop” programming blocks
Required MaterialsRobot with 2 motors and wheelsLaptop with EV3 softwareUSB connector
Total Time1.5 hours (long) or 1 hour (short)
Note: for short version, stop challenges after 1 hour instead of 1.5 hours

30 STEM Education Using LEGO Mindstorms®: A Guide For Volunteer Teachers. Published August 2017.
Start by introducing programming. Describe the basic move function, including the difference between steering and tank driving (steering controls both wheels simultaneously, while tank controls them individually). Have students open laptops with EV3 programming software already on the screen. Go to File --> New Project, which will get them to a blank starting screen for the program. Point out where the move block is.
Challenges (once a group has completed one, introduce the next):- Move 3 rotations and then stop- Move for 3 seconds and then stop- For this, if possible, have the groups line their robots up together at the beginning of the run to see if they finish at the same place- Move in a square of any dimensions- Move continuously in a square of any dimensions
Groups should complete all of the above challenges by the end of the lesson. If there is still time, groups may proceed to the following challenges.
- Move in a square that is a foot by a foot (either a 12 inch foot, or the length of a student’s foot!)- Move in a square that takes 10 seconds to complete- If they were using steering move blocks, have them switch to tank and repeat the challenges, or vice versa.
LESSON TWOPerfect Square - Lesson Plan

31STEM Education Using LEGO Mindstorms®: A Guide For Volunteer Teachers. Published August 2017.
SteeringMotors are controlled together. Direction is changed directly and is indicated by the arrow on the block. Backwards movement is achieved by using a negative number in the power variable on the block.
Tank DrivingEach motor (wheel) is controlled independently. Direction is changed by adjusting the power of the respective motors. Backwards movement is achieved by using a negative number in the power variable on the block.
A more specific overview of the locations of functions on the Move blocks and the instructions to create a new program are contained in the Programming Overview.
Note: For continuous square programs, exact numbers will vary based on size of robot and wheels. For example, it may take 360˚ or even 720˚ rotation to get the robot to make a 90˚ corner, as opposed to the 180˚ shown in the solution.
LESSON TWOVolunteer Cheat Sheet - Perfect Square

32 STEM Education Using LEGO Mindstorms®: A Guide For Volunteer Teachers. Published August 2017.
LESSON TWOPerfect Square - Program Solution(s)
3 Rotations—Move Steering
3 Rotations—Move Tank
Program Flow: 3 Rotations—Move Steering1. Move Steering: Direction 0, Power 75, Rotations 32. Robot will move forward three rotations
Program Flow: 3 Rotations—Move Tank1. Move Tank: Motor 1 Power 75, Motor 2 Power 75, Rotations 32. Robot will move forward three rotations

33STEM Education Using LEGO Mindstorms®: A Guide For Volunteer Teachers. Published August 2017.
3 Seconds—Move Steering
3 Seconds—Move Tank
Program Flow: 3 Seconds—Move Steering1. Select button under the image of the motors to change from rotations to seconds2. Move Steering: Direction 0, Power 75, Seconds 33. Robot will move forward for three seconds
Program Flow: 3 Seconds—Move Tank1. Select button under the image of the motors to change from rotations to seconds2. Move Tank: Motor 1 Power 75, Motor 2 Power 75, Seconds 33. Robot will move forward for three seconds
LESSON TWOProgram Solution(s) - Perfect Square

34 STEM Education Using LEGO Mindstorms®: A Guide For Volunteer Teachers. Published August 2017.
Continuous Square—Move Steering
Continuous Square—Move Tank
Program Flow: Continuous Square—Move Steering1. Surround the entire program with an infinite loop so it will continue indefinitely2. Move Steering: Direction 0, Power 30, Rotations 2
A. Robot will move forward two rotations3. Select button under the image of the motors to change from rotations to degrees4. Move Steering: Direction 50, Power 30, Degrees 180 (will vary)
A. Robot will turn right5. Robot will continue to go straight then make a 90˚ turn to form a square
Program Flow: Continuous Square—Move Tank1. Surround the entire program with an infinite loop so it will continue indefinitely2. Move Tank: Motor 1 Power 30, Motor 2 Power 30, Rotations 2
A. Robot will move forward two rotations3. Select button under the image of the motors to change from rotations to degrees4. Move Steering: Motor 1 Power 30, Motor 2 Power -30, Degrees 180 (will vary)
A. Robot will turn right5. Robot will continue to go straight then make a 90˚ turn to form a square
LESSON TWOPerfect Square - Program Solution(s)

35STEM Education Using LEGO Mindstorms®: A Guide For Volunteer Teachers. Published August 2017.
LESSON THREERemote Control
OverviewStudents will learn more programming commands and experiment with the touch sensor by building a remote control for their robot car.
Concepts CoveredBuilding without instructions“Switch” programming blockTouch sensor
Required MaterialsAssembled robot, laptop, USBTwo touch sensors per group (adaptations can be made if there is only one)Two wires to connect control to robotExtra LEGOs to build the remote control
Total Time1 hour
Note: skip this lesson for short version

36 STEM Education Using LEGO Mindstorms®: A Guide For Volunteer Teachers. Published August 2017.
Explain the initial concept: Students are building a remote control using two touch sensors that can make their robot go forward, turn left, and turn right. If only one touch sensor is available, the control can simply make the robot move forward if pushed and stop if not pushed.
Start by having students come up with a table of possible robot movements and their correspondence to motor movement. An example is included in the Volunteer Cheat Sheet. Remind students that turning right is controlled by the left motor, not the right motor.
Introduce the Switch block. Explain how to use it with the touch sensor.
Allow students to build, program, and test their remote control.
LESSON THREERemote Control - Lesson Plan

37STEM Education Using LEGO Mindstorms®: A Guide For Volunteer Teachers. Published August 2017.
Begin with just the headings, and have students fill in the table. Give them hints if they need them, but don’t give away the answers.
An overview of the Switch block (similar to the commonly used “‘if’ statement” in regular programming) is contained in the Programming Overview. In this case, the switch will be used to determine whether or not each button is pushed. There are multiple ways of constructing this program. One option is to check each button sequentially; if Button 1 is pushed, run right motor, and if Button 2 is pushed, run left motor. Another option is to nest the Switch blocks; if Button 1 is pushed, check Button 2, and if it’s pushed go forward, otherwise go right, etc.
A remote control may look like this. Keep in mind that sensors must be connected via wires to the correct ports on the brick for them to work.
LESSON THREEVolunteer Cheat Sheet - Remote Control

38 STEM Education Using LEGO Mindstorms®: A Guide For Volunteer Teachers. Published August 2017.
Orientations Robot driving forward (towards Ports 1-4) Control held directly above robot facing same direction Left-hand button connects to Port 2, makes robot turn left, and controls Motor B (right wheel). Right-hand button connects to Port 1, makes robot turn right, and controls Motor C (left wheel).
LESSON THREERemote Control - Program Solution(s)
Program Flow: One Touch Sensor1. Surround the entire program with an infinite loop so it will continue indefinitely2. Check the state of the touch sensor (Port 1) using a switch
A. If the sensor is pressed, go to the top part of the switchi. Move Steering: Direction 0, Power 25, infinite rotationsii. Robot will move forward until button is released
B. If the sensor is not pressed, go to the bottom part of the switchi. Move Steering: no motionii. Robot will not move until button is pressed
One Touch Sensor

39STEM Education Using LEGO Mindstorms®: A Guide For Volunteer Teachers. Published August 2017.
Program Flow: Sequential Loops1. Surround the entire program with an infinite loop so it will continue indefinitely2. Check the state of the right touch sensor (Port 1) using a switch
A. If the sensor is pressed, go to the top part of the switchi. Large Motor (C): Power 50, infinite rotationsii. Robot’s left wheel will turn
B. If the sensor is not pressed, go to the bottom part of the switchi. Large Motor (C): no motionii. Robot’s left wheel will not turn
3. Check the state of the left touch sensor (Port 2) using a switchA. If the sensor is pressed, go to the top part of the switch
i. Large Motor (B): Power 50, infinite rotationsii. Robot’s right wheel will turn
B. If the sensor is not pressed, go to the bottom part of the switchi. Large Motor (B): no motionii. Robot’s right wheel will not turn
LESSON THREEProgram Solution(s) - Remote Control
Sequential Loops

40 STEM Education Using LEGO Mindstorms®: A Guide For Volunteer Teachers. Published August 2017.
LESSON THREERemote Control - Program Solution(s)
Nested Loops

41STEM Education Using LEGO Mindstorms®: A Guide For Volunteer Teachers. Published August 2017.
Program Flow: Nested Loops1. Surround the entire program with an infinite loop so it will continue indefinitely2. Check the state of the right touch sensor (Port 1) using a switch3. If the sensor is pressed, go to the top part of the switch
A. Check the state of the left touch sensor (Port 2) using a switchi. If the sensor is pressed (both are pressed), go to the top part of the switch
a. Move Steering: Direction 0, Power 50, infinite motionb. Robot will continue moving forward until a button is released
ii. If the sensor is not pressed (only right button is pressed), go to the bottom part of the switcha. Large Motor (C): Power 50, infinite motionb. Robot will turn right
4. If the sensor is not pressed, go to the bottom part of the switchA. Check the state of the left touch sensor (Port 2) using a switch
i. If the sensor is pressed (only left button is pressed), go to the top part of the switcha. Large Motor (B): Power 50, infinite motionb. Robot will turn left
ii. If the sensor is not pressed (no buttons are pressed), go to the bottom part of the switcha. Move Steering: no motionb. Robot will remain stopped until a button is pressed
LESSON THREEProgram Solution(s) - Remote Control

42 STEM Education Using LEGO Mindstorms®: A Guide For Volunteer Teachers. Published August 2017.
LESSON FOURGoal ScorerOverviewStudents will build and program their robots to be able to kick a ball into a goal.
Concepts CoveredBuilding and programming with a third motor
Required MaterialsAssembled robot, laptop, USBThird motor plus connecting wire*Materials to build robot armSome kind of ball (can be part of provided kit, paper or tinfoil ball, bouncy ball, etc)Some kind of goal (can be part of provided kit, a paper target to hit, an empty cup laying flat, etc)
Total Time1.5 hours
Note: skip this lesson for short version
*If no third motor is available, students may build a static arm that will simply run into and push the ball as opposed to using a kicking motion.

43STEM Education Using LEGO Mindstorms®: A Guide For Volunteer Teachers. Published August 2017.
Explain the initial concept: Students are adapting their robot and programs to be able to kick a ball into a goal.
Start by discussing strategies for the robot’s motion, neglecting the programming aspect for the time being. Have the students come up with a design for the arm, then build it. If they struggle to find a design, hint that using another motor and some kind of gear mechanism could help. Consult the volunteer cheat sheet for more detailed advice.
Once the mechanism has been built, students may begin programming. Before testing their program, they should predict what their arm will do—will it move fast? Go in a full circle? Go in many circles? Fall off? These questions will force them to think about attributes like power and rotation limits that they may not have considered initially.
Have students test and revise their programs. If there is remaining time, students may have a contest to see who can kick the ball a) farthest and b) most accurately.
LESSON FOURLesson Plan - Goal Scorer

44 STEM Education Using LEGO Mindstorms®: A Guide For Volunteer Teachers. Published August 2017.
The easiest way to complete this challenge is to build an arm attached to the side of the robot via a motor. The arm will be mounted on the motor and will rotate when the motor rotates. A very rudimentary arm may look like this. Arms may be much more creative, involving gears and more suitable shapes.
If students are struggling to come up with that idea themselves, give them a spare motor and have them play around with it. Discuss how a motor’s rotation can translate to an arm’s rotation.
LESSON FOURGoal Scorer - Volunteer Cheat Sheet

45STEM Education Using LEGO Mindstorms®: A Guide For Volunteer Teachers. Published August 2017.
Note: Brake on the first block is set to Off to enable the robot to coast into the ball.
LESSON FOURProgram Solution(s) - Goal Scorer
Program Flow1. Move Steering: Direction 0, Power 75, Rotations 1
A. Robot will move forward towards ball and coast2. Large Motor (A): Power 75, Rotations .25
A. Robot arm will swing and kick ball

46 STEM Education Using LEGO Mindstorms®: A Guide For Volunteer Teachers. Published August 2017.
LESSON FIVEPicker-UpperOverviewStudents will build and program their robot to be able to pick an object up using a hook mechanism with one motor and arm.
Concepts CoveredDesigning a robot to complete a more precise task
Required MaterialsAssembled robot, laptop, USBObject to be picked up (can be hollow rectangle provided in kit, object made of LEGOs, empty cup laying flat, etc—must have some kind of hole that the robot’s arm can fit into)If third arm not already built:- Third motor plus connecting wire- Materials to build robot arm
Total Time1 hour (long), 1.5 hours (short)Note: extra half hour for short version is for building the arm

47STEM Education Using LEGO Mindstorms®: A Guide For Volunteer Teachers. Published August 2017.
Explain the initial concept: Students are adapting their robot and programs to be able to pick up an object.
If the arm is not already built (short lessons): Start by discussing strategies for the robot’s motion, neglecting the programming aspect for the time being. Have the students come up with a design for the arm, then build it. If they struggle to find a design, hint that using another motor and some kind of gear mechanism could help. Consult the volunteer cheat sheet for more detailed advice.
If the arm is already built (long lessons): Start by discussing adaptations that will need to be made to the arm. Does it need to change in shape? Size? Speed? Rotations? Have students come up with answers.
Once the mechanism has been designed and built/adapted, students may begin programming. Have them test and revise their programs. If there is remaining time, students may try to program the robot to drive a short distance with the object and deposit it back on the floor.
LESSON FIVELesson Plan - Picker-Upper

48 STEM Education Using LEGO Mindstorms®: A Guide For Volunteer Teachers. Published August 2017.
For help with building the arm, see the cheat sheet from the previous lesson.
Arms should move fairly slowly. Robots will have to be lined up precisely with their target, as this program does not include any sort of vision capabilities. Arms will also need to be small enough to be able to hook onto whatever they are picking up.
LESSON FIVEPicker-Upper - Volunteer Cheat Sheet

49STEM Education Using LEGO Mindstorms®: A Guide For Volunteer Teachers. Published August 2017.
Note: Power has been significantly adjusted to ensure the stability of the object that is being picked up.
LESSON FIVEProgram Solution(s) - Picker-Upper
Program Flow1. Move Steering: Direction 0, Power 75, Rotations 1
A. Robot will move forward and hook onto object2. Large Motor (A): Power 25, Rotations .25
A. Robot arm will lift object3. Move Steering: Direction 0, Power 25, Rotations 1
A. Robot will move forward with object4. Large Motor (A): Power 25, Rotations .25
A. Robot will lower object

50 STEM Education Using LEGO Mindstorms®: A Guide For Volunteer Teachers. Published August 2017.
LESSON SIXTable BotOverviewStudents will build and program the robot so that it is able to stay on a table without falling off.
Concepts CoveredUltrasonic sensor“Display” block
Required MaterialsAssembled robot, laptop, USBUltrasonic sensor and connecting wireTable, desk, or other elevated surface
Total Time1 hour

51STEM Education Using LEGO Mindstorms®: A Guide For Volunteer Teachers. Published August 2017.
Explain the initial concept: Students are programming their robot to drive around a table without falling off.
Start by introducing the ultrasonic sensor and how it works. Ask students to brainstorm possible ways to write the program. The Volunteer Cheat Sheet has a more thorough explanation of the program.
Allow students time to mount the sensor to their robot—it should be aimed at the ground and be far enough ahead of the robot’s wheels such that the robot has time to stop once it senses the ground.
Explain the Display programming block. This will allow students to see the threshhold between the table and the ground.
Next, have the students program the robot to stop once it reaches the edge of the table. Once that is successful, have them program it to back up and turn around so that it will continuously drive around the table, backing up and turning every time it reaches an edge.
LESSON SIXLesson Plan - Table Bot

52 STEM Education Using LEGO Mindstorms®: A Guide For Volunteer Teachers. Published August 2017.
The ultrasonic sensor is covered in more detail in the Sensors Overview. For this challenge, the sensor will be used to determine the distance between the robot and either the table or the ground. If the distance is short (i.e. less than three inches), the robot will drive forward. If the distance is longer than that, the robot will stop and eventually back up and turn.
To see sensor readings and determine the parameters, it is convenient to use the Display block. The Display block is what it sounds like: it displays the sensor readings on the screen of the brick. This can be a helpful tool for debugging a program.
The program itself will rely on a Switch block, but will incorporate Display into its functioning. See the solution for details.
LESSON SIXTable Bot - Volunteer Cheat Sheet

53STEM Education Using LEGO Mindstorms®: A Guide For Volunteer Teachers. Published August 2017.
LESSON SIXProgram Solution(s) - Table Bot
Program Flow1. Surround the entire program with an infinite loop so it will continue indefinitely2. Check the reading of the ultrasonic sensor3. Display the reading4. Check the state of the sensor using a switch5. If the reading is below 5 inches (robot is on the table—numbers wll vary), go to the
top part of the switchA. Move Steering: Direction 0, Power 25, infinite motionB. Robot will continue moving forward until the ultrasonic sensor is triggered
6. If the reading is above 5 inches (robot has reached the edge of the table—numbers will vary), go to the bottom part of the switchA. Move Steering: Direction 0, Power -10, Rotations .5B. Robot will back up

54 STEM Education Using LEGO Mindstorms®: A Guide For Volunteer Teachers. Published August 2017.
LESSON SEVENLine StopperOverviewStudents will build and program the robot so that it is able to stop at a thick dark line on a table.
Concepts CoveredLight sensor and calibration
Required MaterialsAssembled robot, laptop, USBLight sensor and connecting wireThick dark line for robot to stop at (can be tape or marker on paper or any other kind of thick dark line on a light surface)
Total Time1 hour

55STEM Education Using LEGO Mindstorms®: A Guide For Volunteer Teachers. Published August 2017.
Explain the initial concept: Students are programming their robot to stop once it reaches a line.
Start by introducing the light sensor and how it works. Point out the connection between this program and the Table Bot program—they are essentially the same, just with different sensors.
Allow students to mount the sensor and write the program. Suggest that they use the display block to see the difference between the sensor’s perception of light and dark.
If robots are not stopping despite having the correct readings, suggest that students slow their robots down (lower the power) to give the sensor time to register and communicate the data to the brick.
LESSON SEVENLesson Plan - Line Stopper

56 STEM Education Using LEGO Mindstorms®: A Guide For Volunteer Teachers. Published August 2017.
For EV3 brick + either NXT or EV3 light/color sensor:Use the same method for determining the light threshhold as with the ultrasonic sensor. Use a Color Sensor block connected to a Display block to display the sensor reading. For this program, it is advisable to use the Reflected Light Intensity setting: this will measure the amount of light reflected from the surface.
For NXT brick + NXT light sensor:The method for determining the light threshhold is similar but not identical. Because the NXT light sensor differs from the EV3 color sensor, there is an adjustment that must be made in order to display the correct reading. It is shown below. It uses the NXT Sound Sensor block to take the reading and the color sensor block to turn on the sensor.
The NXT Sound Sensor block does not come as part of the software package; it must be downloaded separately from the LEGO website. See the Resources page for download instructions. The NXT color sensor functions the same way as the EV3 color sensor.
Sample readings (EV3 Sensor/NXT Brick are not compatible):White paper Blue tape Black marker
EV3 Sensor/EV3 Brick 65 10 10NXT Sensor/EV3 Brick 55 45 40NXT Sensor/NXT Brick 65 50 50
Note: Readings will vary from the above samples based on the distance between the sensor and the surface.
LESSON SEVENLine Stopper - Volunteer Cheat Sheet
57STEM Education Using LEGO Mindstorms®: A Guide For Volunteer Teachers. Published August 2017.
LESSON SEVENProgram Solution(s) - Line Stopper
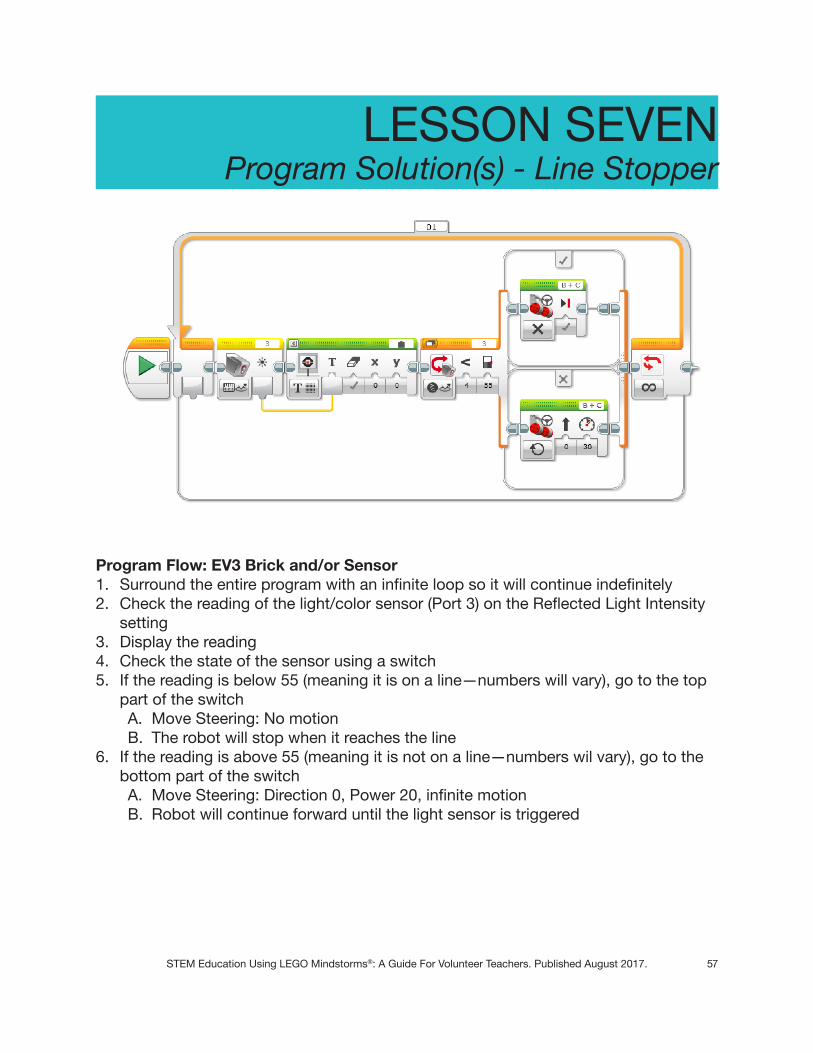
Program Flow: EV3 Brick and/or Sensor1. Surround the entire program with an infinite loop so it will continue indefinitely2. Check the reading of the light/color sensor (Port 3) on the Reflected Light Intensity
setting3. Display the reading4. Check the state of the sensor using a switch5. If the reading is below 55 (meaning it is on a line—numbers will vary), go to the top
part of the switchA. Move Steering: No motionB. The robot will stop when it reaches the line
6. If the reading is above 55 (meaning it is not on a line—numbers wil vary), go to the bottom part of the switchA. Move Steering: Direction 0, Power 20, infinite motionB. Robot will continue forward until the light sensor is triggered
58 STEM Education Using LEGO Mindstorms®: A Guide For Volunteer Teachers. Published August 2017.
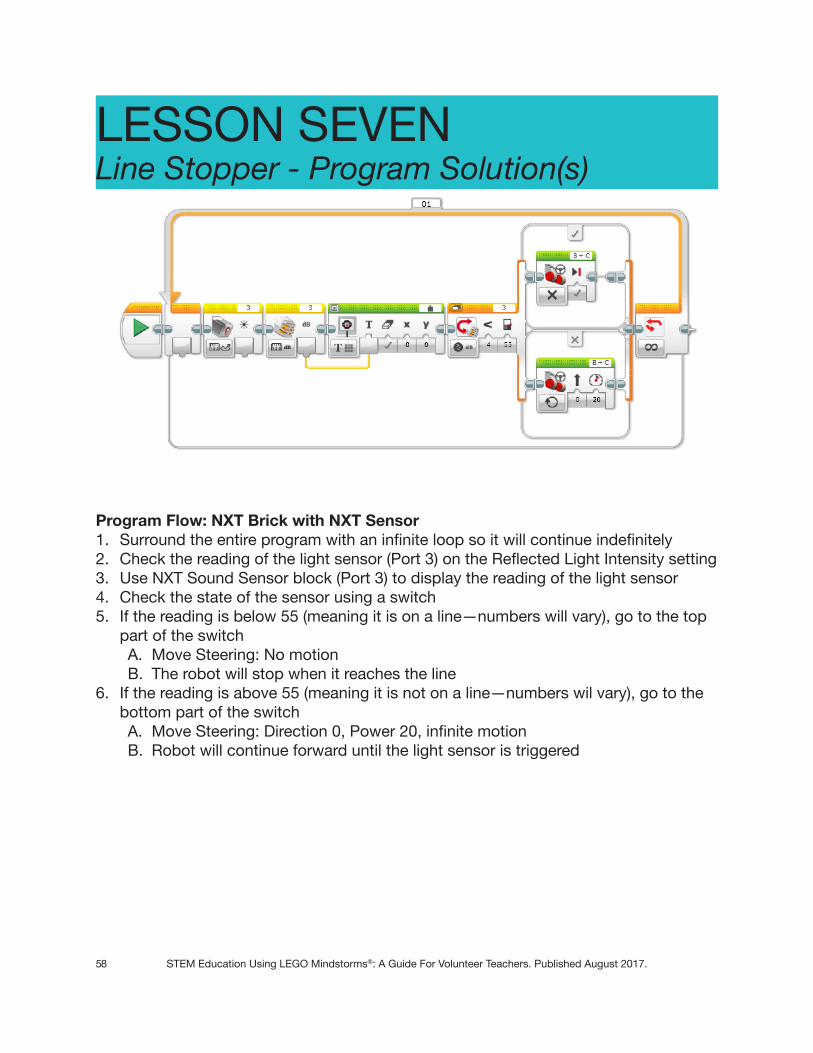
Program Flow: NXT Brick with NXT Sensor1. Surround the entire program with an infinite loop so it will continue indefinitely2. Check the reading of the light sensor (Port 3) on the Reflected Light Intensity setting3. Use NXT Sound Sensor block (Port 3) to display the reading of the light sensor4. Check the state of the sensor using a switch5. If the reading is below 55 (meaning it is on a line—numbers will vary), go to the top
part of the switchA. Move Steering: No motionB. The robot will stop when it reaches the line
6. If the reading is above 55 (meaning it is not on a line—numbers wil vary), go to the bottom part of the switchA. Move Steering: Direction 0, Power 20, infinite motionB. Robot will continue forward until the light sensor is triggered
LESSON SEVENLine Stopper - Program Solution(s)

59STEM Education Using LEGO Mindstorms®: A Guide For Volunteer Teachers. Published August 2017.
LESSON EIGHTSumo Bot
OverviewStudents will build and program the robot so that it is able to push an opponent’s robot out of a ring.
Concepts CoveredBuilding without instructionsPractical programming
Required MaterialsAssembled robot, laptop, USBLight sensor and connecting wireRing for robots to compete in (can be tape or marker on paper or floor or other dark ring on light surface)—ring can be any shape and should be 2-3 feet per side/in diameter
Total Time2 hours
Note: skip this lesson for short version
If there is only one robot for the class, one suggestion is to build a small non-autonomous car using extra LEGOs and wheels to resemble a substitute robot. This will not move on its own, but it will still be a challenge for the class robot to push it out of the ring.

60 STEM Education Using LEGO Mindstorms®: A Guide For Volunteer Teachers. Published August 2017.
Explain the initial concept: Similar to Battlebots, which they watched in the beginning of the lesson series, students are building their robots to push their opponents out of a ring.
Students must use the light sensor to ensure that they remain inside the ring. Allow them to program their robot. Suggest that the code will look similar to the code for the Table Bot.
Allow students time to construct adaptations to their robot. Examples include bumpers to fend off opposing robots, slides to go under opponents’ wheels, etc.
The rules are as follows: Robots may break off pieces of their opponents’ assembly, but they may not break the LEGO pieces themselves. Robots are considered “out” when any part of the robot that is touching the ground goes outside the ring. Robots must win two out of three matches to win the round, and they must win two out of three rounds to win the overall competition. The robot who has won the previous match must place their robot on the field first; the losing team then has the freedom to orient their robot any way they like.
Students will have no time between matches to fix their robots, but depending on how much time remains in the session, give them 15-30 minutes to adapt their robots between rounds.
LESSON EIGHTSumo Bot - Lesson Plan

61STEM Education Using LEGO Mindstorms®: A Guide For Volunteer Teachers. Published August 2017.
The program will be essentially the same as the Table Bot program, just using the light sensor instead of the ultrasonic sensor.
Students can get very creative with their adaptations. They often enjoy coming up with different weapon ideas. For example, they may use a third motor as an arm, building off their goal scorer construction.
LESSON EIGHTVolunteer Cheat Sheet - Sumo Bot

62 STEM Education Using LEGO Mindstorms®: A Guide For Volunteer Teachers. Published August 2017.
Note: for an NXT brick and light sensor, the same trick with the Sound block (as used in Lesson 7) will need to be used along with the Color Sensor blocks shown in this program. All sensors should be using Port 3.
LESSON EIGHTSumo Bot - Program Solution(s)
Program Flow1. Surround the entire program with an infinite loop so it will continue indefinitely2. Check the reading of the light/color sensor on the Reflected Light Intensity setting3. Display the reading (if NXT brick + sensor, use Sound block as the display)4. Check the state of the sensor using a switch5. If the reading is above 55 (meaning it is not on a line—numbers will vary), go to the
top part of the switchA. Move Steering: Direction 0, Power 20, infinite motionB. The robot will continue straight until the light sensor is triggered
6. If the reading is below 55 (meaning it is on a line—numbers wil vary), go to the bottom part of the switchA. Move Steering: Direction 0, Power -15, Rotations 0.5B. Move Steering: Direction 50, Power -25, Rotations 1C. Robot will move backwards and turn left

63STEM Education Using LEGO Mindstorms®: A Guide For Volunteer Teachers. Published August 2017.
LESSON NINEMaze Navigator
OverviewStudents will program their robot to navigate a maze using the ultrasonic sensor.
Concepts CoveredExtensive programming
Required MaterialsAssembled robot, laptop, USBUltrasonic sensor and connecting wireSimple maze (can be constructed from overturned desks, blocks of wood, etc)Paper maze for example
Total Time3 hours

64 STEM Education Using LEGO Mindstorms®: A Guide For Volunteer Teachers. Published August 2017.
Explain the initial concept: Students are programming their robots to navigate an unknown maze; they may not see the maze before programming the robot.
Give students a sample (easy) maze on paper. Have them discuss strategies for being able to complete the maze, keeping in mind that “just knowing” or “seeing the path” is not an option for the robot.
Suggest that following the right wall of the maze will always eventually lead to the solution. Have students try the sample maze using that strategy. Next, have them think about a robot using this strategy to navigate a maze. They should realize that at some point the robot will bump into a wall.
Ask them for ideas on how to deal with this scenario. If they do not come up with anything, suggest that they use the touch sensor as a sort of bumper to bounce off the walls.
Allow students to program their robots using the ultrasonic sensor and touch sensor to follow the right wall of a maze. They must also adapt the placement of the sensors to be useful. An example is included in the Volunteer Cheat Sheet.
While students are programming, construct the simple maze. It must be wide enough for the robot to comfortably turn around and sturdy enough for a robot to bump into the side without breaking the maze. It does not need to involve more than a few turns. An example is included in the Volunteer Cheat Sheet.
Allow students to test their robots in the maze. Give them time to make adjustments and adaptations and try again. If there is time, have students compete against each other or themselves to see who can finish the maze in the shortest amount of time.
LESSON NINEMaze Navigator - Lesson Plan

65STEM Education Using LEGO Mindstorms®: A Guide For Volunteer Teachers. Published August 2017.
This program is based on the assumption that robots only have one ultrasonic sensor and one touch sensor.
The simplest way to do this is to mount the ultrasonic sensor facing to the right and the touch sensor at the front of the robot. As long as the ultrasonic sensor is within a certain distance of the right wall of the maze (i.e., one inch), continue forward. If the touch sensor bumps into something (the wall ahead), have the robot back up, turn 90˚ to the left, and continue. If the ultrasonic sensor gets out of range of the right wall, have the robot turn to the right until it gets back in range, then continue forward.
It will likely be easiest to construct the maze out of overturned desks or cardboard taped to chair or desk legs; the walls have to be sturdy enough to withstand robots bumping into them. Cardboard boxes may also be weighted with textbooks for added stability. The maze only needs to have two or three turns. [Left: sample paper maze. Right: sample robot maze—path indicated by black lines.]
LESSON NINEVolunteer Cheat Sheet - Maze Navigator
START
FINISH

66 STEM Education Using LEGO Mindstorms®: A Guide For Volunteer Teachers. Published August 2017.
LESSON NINEMaze Navigator - Program Solution(s)
Program Flow1. Surround the entire program with an infinite loop so it will continue indefinitely2. Check the state of the touch sensor (Port 1) using a switch3. If the touch sensor is pressed (robot has hit a wall), go to the top part of the switch
A. Move Steering: Direction 0, Power -10, Rotations 0.5B. Move Steering: Direction 50, Power 25, Rotations 1C. The robot will move backwards and then turn right
1. If the touch sensor is not pressed, go to the bottom part of the programA. Check the state of the ultrasonic sensor (Port 4) using a switch
i. If the distance between the sensor and the maze is greater than 5 inches (robot is going away from wall), go to the top part of the switcha. Move Steering: Direction -50, Power 25, infinite motionb. The robot will turn left
ii. If the distance between the sensor and the maze is less than 5 inches (robot is still close to the wall), go to the bottom part of the switcha. Move Steering: Direction -0, Power 25, infinite motionb. The robot will move straight until it triggers the touch sensor or
ultrasonic sensor switches
67STEM Education Using LEGO Mindstorms®: A Guide For Volunteer Teachers. Published August 2017.
To use the NXT Sound Sensor block with EV3 software (necessary to use the NXT light sensor with the NXT brick):https://www.lego.com/en-us/mindstorms/downloads (near the bottom of the page)To install the block into the software, go to Tools --> Block Import in the menu bar at the top of the screen. This will bring a pop-up window. Click Browse, then select the block you wish to import. Select Import. The software must be restarted after downloading a new block for it to appear. A screenshot is shown on the next page.
To purchase LEGO components and Mindstorms sensors/accessories:shop.lego.comNote: To save money, parts may also be purchased from sites such as eBay. It is recommended to purchase the newest (EV3) brick, but it is not necessary to purchase matching EV3 sensors. NXT sensors will work with the EV3 brick for the purposes of these lessons and will likely be less expensive than the corresponding EV3 sensors. A full NXT kit can be purchased for around $100.
To download Mindstorms software:EV3 Education (recommended): https://education.lego.com/en-us/downloads/mindstorms-ev3EV3 Home: https://www.lego.com/en-us/mindstorms/downloads/download-software
To view Mindstorms User Guide (robot assembly instructions):NXT 1.0: http://www.nxtprograms.com/castor_bot/steps.htmlNXT 2.0: http://www.nxtprograms.com/NXT2/castor_bot/steps.htmlNXT Education (recommended): http://tinyurl.com/NXT-edu-downloadEV3 Education (recommended): http://tinyurl.com/EV3-edu-downloadEV3 Home (adaptation of EV3 Education build): http://tinyurl.com/EV3-adaptation
For more information and resources:Mindstorms: https://www.lego.com/en-us/mindstormsGirl Scouts: http://www.girlscouts.orgFIRST Robotics: https://www.firstinspires.orgFIRST LEGO League: https://www.firstinspires.org/robotics/fllBattlebots: http://www.battlebots.com
RESOURCES

68 STEM Education Using LEGO Mindstorms®: A Guide For Volunteer Teachers. Published August 2017.
RESOURCESTo import the NXT Sound Sensor block: