steel panel installation - midwest manufacturing · • lifting steel onto roof or building grab...
TRANSCRIPT

Storing, Handling, and Cutting Steel PanelsStoring• Specifically check your quantities, colors, and lengths• All materials should be used as soon as possible• Steel bundles should be stored indoors with enough of a slope to allow any moisture from condensation to drain out of the bundle• Bare galvanized panels should be installed immediately and not be stored outside• Condensation or rain water trapped on bare galvanized panels can form a wet storage stain, also known as white rust.
Handling• Do not slide steel panels across each other.• To properly lift a panel from the bundle place hands underneath the under lap side of the panel and lift up and away from the bundle.• Lifting steel onto roof or building grab the panel in the flat of the panel and not in the rib.• Bending steel is best done with a hand seamer or a brake press.
Cutting Panels
Do not use a circular saw to cut steel panels.
Cutting steel is best done with a shears, tin snips, nibblers, or panel shears.Cut edge does not require paint touch up.
Nibbler TinSnips
Shears
Panel Shears
Steel Panel Installation:
Proper lapping of steel panel is very important in the panel’s ability to prevent leaking.
The anti-syphon drain channel must be clear of debris and obstructions for the panel’s ability to minimize the potential of capillary action of water from getting under the steel panel.
UnderseatProper lapping of Steel
OverseatProper
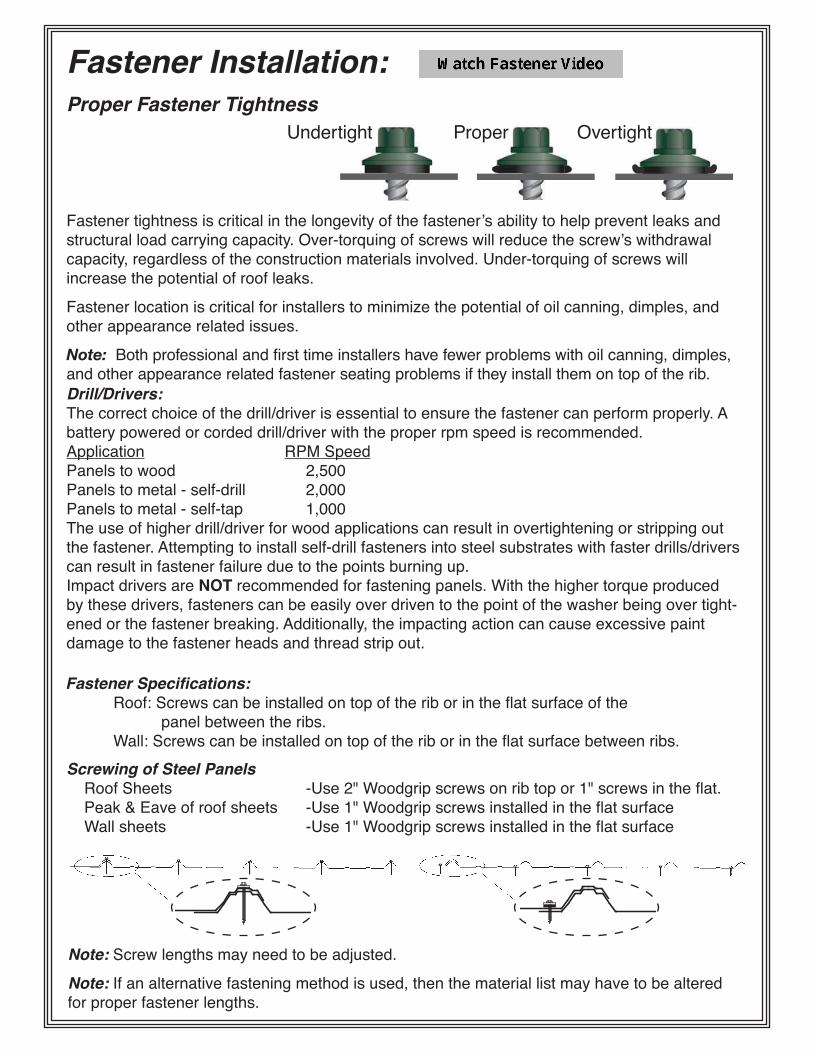
Screwing of Steel Panels Roof Sheets -Use 2" Woodgrip screws on rib top or 1" screws in the flat. Peak & Eave of roof sheets -Use 1" Woodgrip screws installed in the flat surface Wall sheets -Use 1" Woodgrip screws installed in the flat surface
Note: Screw lengths may need to be adjusted.
Note: If an alternative fastening method is used, then the material list may have to be altered for proper fastener lengths.
Fastener tightness is critical in the longevity of the fastener’s ability to help prevent leaks and structural load carrying capacity. Over-torquing of screws will reduce the screw’s withdrawal capacity, regardless of the construction materials involved. Under-torquing of screws will increase the potential of roof leaks.
Fastener location is critical for installers to minimize the potential of oil canning, dimples, and other appearance related issues.
Note: Both professional and first time installers have fewer problems with oil canning, dimples, and other appearance related fastener seating problems if they install them on top of the rib.
Fastener Specifications: Roof: Screws can be installed on top of the rib or in the flat surface of the panel between the ribs. Wall: Screws can be installed on top of the rib or in the flat surface between ribs.
UndertightProper Fastener Tightness
OvertightProper
Fastener Installation:
Drill/Drivers:The correct choice of the drill/driver is essential to ensure the fastener can perform properly. A battery powered or corded drill/driver with the proper rpm speed is recommended.Application RPM SpeedPanels to wood 2,500Panels to metal - self-drill 2,000Panels to metal - self-tap 1,000The use of higher drill/driver for wood applications can result in overtightening or stripping out the fastener. Attempting to install self-drill fasteners into steel substrates with faster drills/drivers can result in fastener failure due to the points burning up.Impact drivers are NOT recommended for fastening panels. With the higher torque produced by these drivers, fasteners can be easily over driven to the point of the washer being over tight-ened or the fastener breaking. Additionally, the impacting action can cause excessive paint damage to the fastener heads and thread strip out.

Hanging Sidewall SteelNote: Optional Bottom Trim May be installed at this time.
Note: Positioning of the first panel is critical. The first panel installed establishes the alignment and layout of the entire wall. It is very important that the first panel is accurately positioned and squared before fastening it in place.
Tip: When laying out the steel panel have the overlap side of the panel away from the main line of sight.Tip: You may want to start at a corner away from the prevailing wind.
Cut the first rib off leaving ¼” of rib on the first sheet of side steel (Fig. 1). Position the first panel so it is square in the corner. Make sure the first sheet of sidewall steel is level and the top of the sheet is even with the top edge of the edge purlin. This should leave approximately 3” of grade board exposed at the bottom (Fig.2).
Using 1” screws, secure the top and bottom of the steel panel at the lap next to the rib, to assure proper lap and seating of the steel panel. Securing the panel in this manner will assure all laps to be seated and will not allow the steel to grow or stretch as you are running it. Once all the panels are in place and secure only at the lap, snap a chalk line at each mid-girt location and finish fastening the wall with 2” screws on top of the rib. At the top and bottom of the panels use 1½” fasteners on both sides of each rib, for the length of the building.
Note: Do not put fasteners on the rib at the top and bottom of the panel. Doing this may crush the end of the panel.
Hanging Endwall SteelEndwall panels are fastened in the samemanner as the sidewall panels. The only difference is the gable sheets are always started from the middle of the building and run towards the corners. The panels should be measured and the gable angle cut off of the top before installing the panels.
Start
¼"
Fig. 1
Fig. 2
SteelPanel
CompositeGradeBoard
Grade
Post
Grade Board
WallSteel
1"
1"
1"
1"
BOTTOM TRIM

Note: Install optional Eave Trim before roof steel is installed.
Note: Install optional inside closure strips before placing each roof panel. Be careful not to stretch the closure strips.
Nail a temporary 2×4 block on the outside of each end trussextending 4" to 6" beyond the heel of the truss on both ends.The length that you extend the 2×4 will determine the overhang length.
Run a mason line the full length of the building between these blocks. This mason line determines the length of the eave.
Cut the first rib off leaving ¼" of rib on the first roof sheet of roof steel. Lay down the first roof steel panel, squaring it with the mason line. The roof panels are installed similar to the wall panels in layout.
Using screws, fasten roof at top and bottom of the sheet in the flat next to each rib. All intermediate fasteners can be put on the rib or in the flat when using screws.
DesiredSteelOverhang
Temporary 2×4
Nail
EndTruss Edge
Purlin
MasonLine
InsideClosure Strip
Edge Purlin
Installing Post Frame Roof Steel
Scratches• A scratch in the panel may only cause rust if it is deep enough to cut through the paint and zinc coat.• Color-matched touch-up paint is available if you happen to scratch a panel.• Perfect for scratches and nicks• Beveled brush great for tiny spots or thin lines.• Color matched spray paint available for accessories• 25 colors: 1 oz 156-7869
Touch-Up Paint
Color Matched Spray can
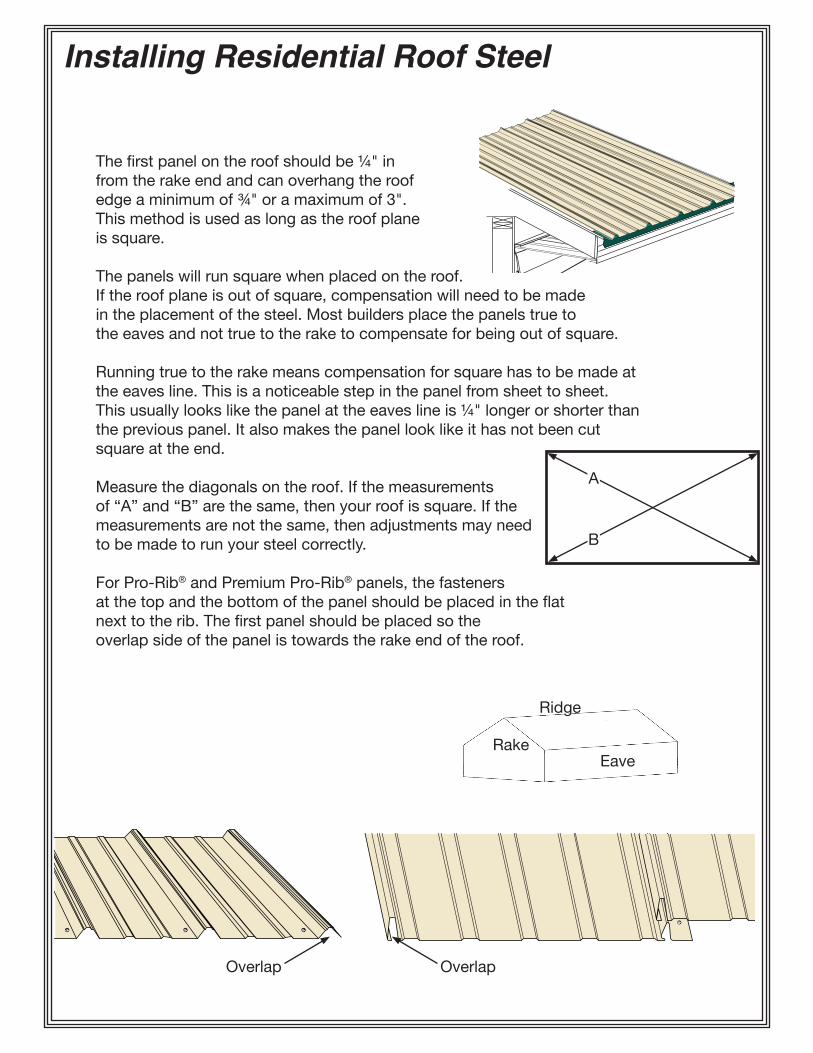
Thefirstpanelontheroofshouldbe¼"in fromtherakeendandcanoverhangtheroof edgeaminimumof¾"oramaximumof3". Thismethodisusedaslongastheroofplane issquare.
Thepanelswillrunsquarewhenplacedontheroof. Iftheroofplaneisoutofsquare,compensationwillneedtobemade intheplacementofthesteel.Mostbuildersplacethepanelstrueto theeavesandnottruetotheraketocompensateforbeingoutofsquare.
Runningtruetotherakemeanscompensationforsquarehastobemadeat theeavesline.Thisisanoticeablestepinthepanelfromsheettosheet. Thisusuallylookslikethepanelattheeaveslineis¼"longerorshorterthan thepreviouspanel.Italsomakesthepanellooklikeithasnotbeencut squareattheend.
Measurethediagonalsontheroof.Ifthemeasurements of“A”and“B”arethesame,thenyourroofissquare.Ifthe measurementsarenotthesame,thenadjustmentsmayneed tobemadetorunyoursteelcorrectly.
ForPro-Rib®andPremiumPro-Rib®panels,thefasteners atthetopandthebottomofthepanelshouldbeplacedintheflat nexttotherib.Thefirstpanelshouldbeplacedsothe overlapsideofthepanelistowardstherakeendoftheroof.
A
B
Overlap Overlap
Eave
Ridge
Rake
Installing Residential Roof Steel
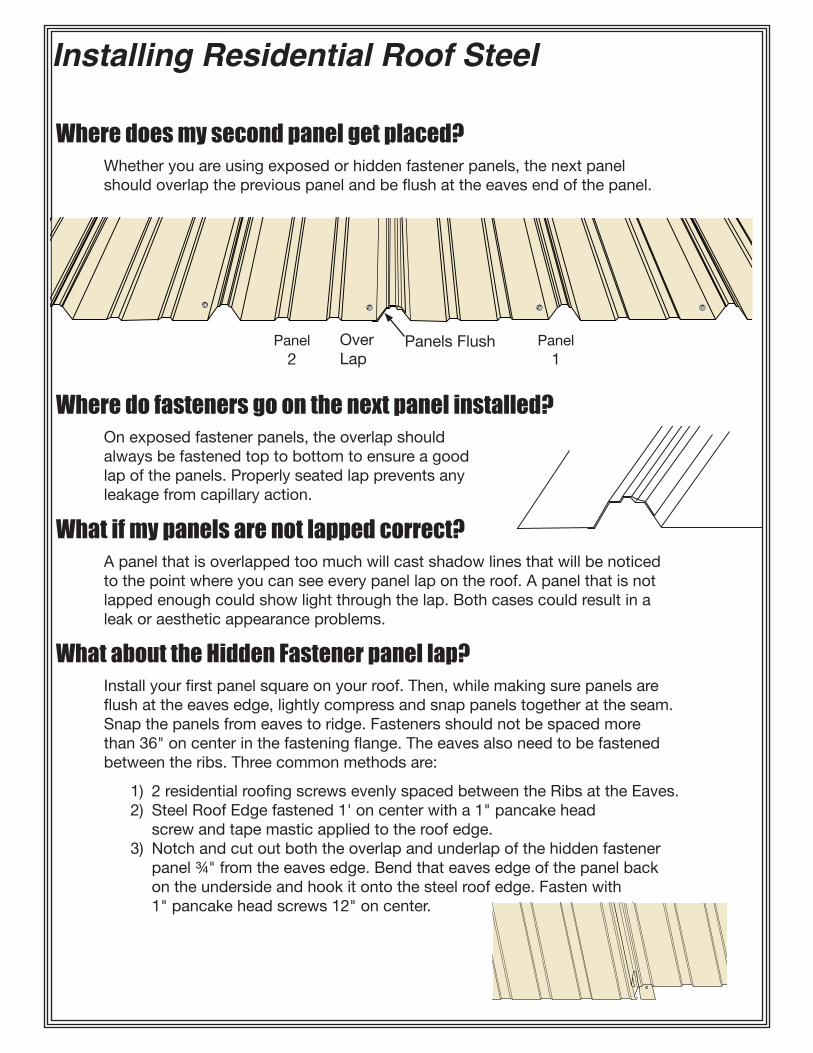
Where does my second panel get placed? Whetheryouareusingexposedorhiddenfastenerpanels,thenextpanel shouldoverlapthepreviouspanelandbeflushattheeavesendofthepanel.
Where do fasteners go on the next panel installed? Onexposedfastenerpanels,theoverlapshould alwaysbefastenedtoptobottomtoensureagood lapofthepanels.Properlyseatedlappreventsany leakagefromcapillaryaction.
What if my panels are not lapped correct? Apanelthatisoverlappedtoomuchwillcastshadowlinesthatwillbenoticed tothepointwhereyoucanseeeverypanellapontheroof.Apanelthatisnot lappedenoughcouldshowlightthroughthelap.Bothcasescouldresultina leakoraestheticappearanceproblems.
What about the Hidden Fastener panel lap? Installyourfirstpanelsquareonyourroof.Then,whilemakingsurepanelsare flushattheeavesedge,lightlycompressandsnappanelstogetherattheseam. Snapthepanelsfromeavestoridge.Fastenersshouldnotbespacedmore than36"oncenterinthefasteningflange.Theeavesalsoneedtobefastened betweentheribs.Threecommonmethodsare:
1) 2residentialroofingscrewsevenlyspacedbetweentheRibsattheEaves. 2) SteelRoofEdgefastened1'oncenterwitha1"pancakehead screwandtapemasticappliedtotheroofedge. 3) Notchandcutoutboththeoverlapandunderlapofthehiddenfastener panel¾"fromtheeavesedge.Bendthateavesedgeofthepanelback ontheundersideandhookitontothesteelroofedge.Fastenwith 1"pancakeheadscrews12"oncenter.
PanelsFlushOverLap
Panel2
Panel1
Installing Residential Roof Steel