steam lub at home key stage lesson pack
TRANSCRIPT

STEAM Club at Home
Key Stage 2
Lesson pack
This booklet contains lesson plans and activity sheets to enable parents and carers to complete
STEAM Club activities with their children at home. All sessions can be adapted to suit the envi-
ronment, resources available and the individual child.
Session 1: Lava lamp
Session 2: Computer communications
Session 3: Something to sit on
Session 4: Dream playground
Session 5: Everyday Maths bingo
Activity Pages for printing: 4, 7, 12, 15
Remember that there are alternatives to printing described in the lesson overview.
Completion certificates:
Once all the tasks have been completed your child is eligible for a digital certificate. To receive
this please email: [email protected] with ‘STEAM KS2’ as the subject.
Entries must be submitted by an adult (parent/guardian or teacher) with parental permission on behalf of the child. Your contact de-
tails will be deleted once you have been sent the certificate.
BAE Systems may process information about you that may be subject to data protection laws. For more information about how we
use and protect your personal information and your rights, please refer to our Privacy Notice at www.baesystems.com/en/privacy.

STEAM Club at Home
Key Stage 2, session 1: Science
Lava lamp
Activity aims: Time: Skills:
To build a functioning,
temporary lava lamp out of
household objects and to start
a basic explanation of density
and immiscibility (being
20+ minutes Individual working
Early laboratory skills
Communication
Fine motor
Driving questions: Key concepts:
Which liquid is the densest?
What happens to the water and the oil?
What liquid is the colouring not mixing with?
To demonstrate a basic understanding that
some liquids are more dense or ‘heavier’ than
others
To demonstrate a basic understanding that
water-based liquids and oil-based liquids don’t
mix
Resources:
• Small plastic bottle with screw top
• Vegetable oil (or similar)
• Water
• Food colouring (or water colour paint)
• Indigestion tablets (or baking soda as an alternative)
Optional Resources:
• Torch
• Salt
• Funnel
• Jug
• Scissors (for removing labels if needed)
• Digital, flat weighing scales
Want more info?
YouTube has some great videos on making a lava lamp at home.
Activity plan: Differentiation:
Starter:
Step 1: Lay out all of the equipment and ask your child to identify what each of the
liquids are. If they don’t know the names explain what it is. Ask your child why it is
Important to have all the equipment at hand and ready to go? (“It’s quicker”, “you
know you haven't forgotten anything”, “makes it easier” etc. are all good answers)
(Time: 2 minutes maximum)
If they struggle to identify the
equipment it might be easier to
put them in the order they will
use them in advance.
Main activity:
Step 2: Ask your child to pour water into their bottle until it is ¼ full. If they struggle
pouring free hand they can use a jug and funnel.
Then ask them to get a few drops of food colouring and put that in the water.
Step 3: Ask your child to pick the bottle of oil up and inspect it whilst tipping it up and
down.
Ask them what it looks like. (If there are no responses, try leading questions like “does it
look thicker than water?”, “is there a difference between this and the water you’ve just
used?”).
Ask them what they think will happen when they pour the oil into the bottle. Will it
sink or float?
Add the oil to the bottle, leaving two finger widths of space at the top.
Ask your child to explain what happens to the oil— does it sink or float? Ask them why
they think this is. Why don’t they mix? Why is the oil on top?
Explain to them the basic principles of density and the fact that water and oil don’t
mix.
Fun facts: When you mix the oil and water together in the bottle, the oil will sit on top
as it is less dense than water. The food colouring will pass through the oil and mix with
the water if more is added at this stage. Density is the measurement of how compact
a substance is - how much of it fits inside a certain space.
Step 4: Ask your child what they think adding the tablet will do. Place a quarter of the
tablet into the bottle, put the lid on and tip it up and down gently a few times.
(Time: 30 minutes maximum)
Use the lava lamp instruction
sheet (next page) which children
can follow to choose equipment
independently.
Follow up:
Once happy, put the torch underneath to light up the ‘lava lamp’! You can add the
other bits of the tablet to keep the reaction going. You can also add salt to extend the
reaction.
STEAM Club at Home
Key Stage 2, session 1: Science
Lava lamp
STEAM Club at Home
Key Stage 2, session 1: Science
Lava lamp
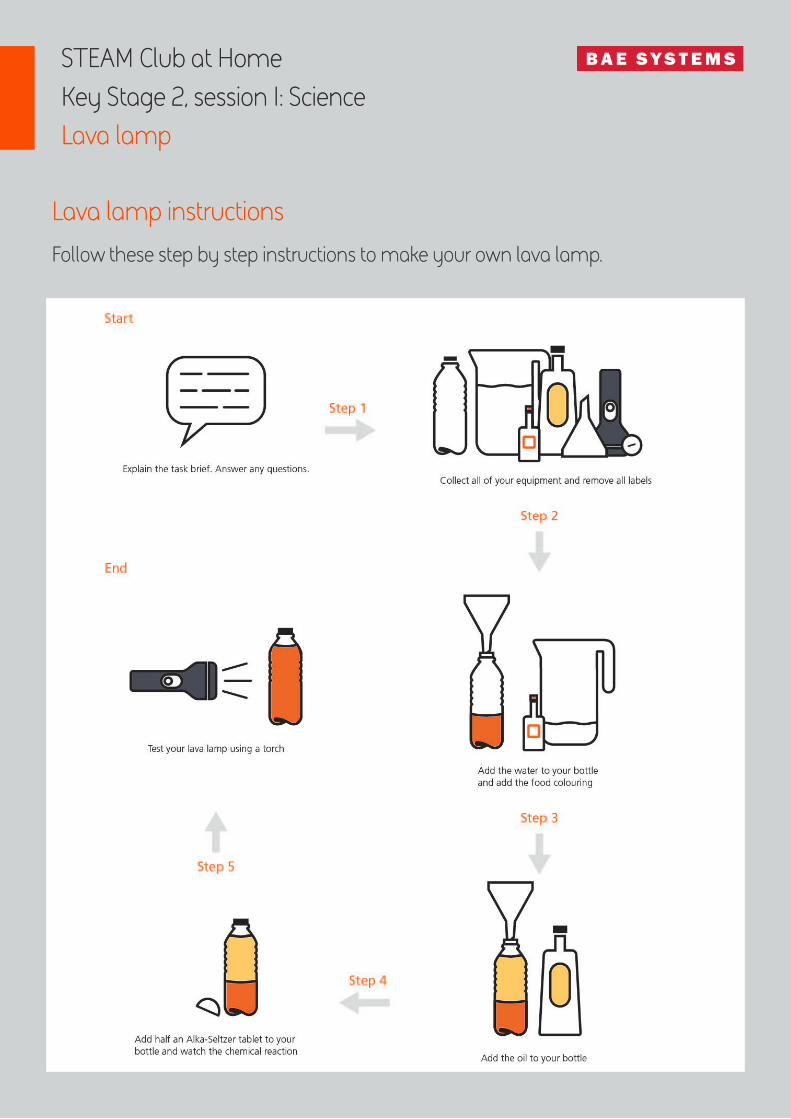
Lava lamp instructions
Follow these step by step instructions to make your own lava lamp.

STEAM Club at Home
Key Stage 2, session 2: Technology
Break the code
Activity Aims: Time Allowances: Skills:
Understand how to use binary
code to create a set of rules of
instructions.
20 Min +
Plus resources preparation
time
Analytical
Communication
Individual working
Driving questions: Key Concepts:
What can we use code for?
What types of things can we do with code on a
computer? (games etc.)
Why does code need to be in the right order?
Computers need computer programmes so
they know what to do.
Code is made out of words and numbers that
you put into order so the computer understands
what to do.
Resources:
Pencil or pen
Binary code translator sheet (print or view
digitally)
Binary Worksheet (words to use can be hand
written if no printer available)
Want More Info?
BBC Bitesize have a short video and online quiz on code: https://www.bbc.co.uk/bitesize/topics/z3tbwmn/
articles/zykx6sg
Activity Aims: Time Allowances: Skills:
Learn to create a series of step
-by Step instructions
(algorithms) with conditionals.
20 Min + Analytical
Communication
Individual working
Driving questions: Key Concepts:
What is an algorithm?
Why do computers need algorithms?
Why do some algorithms have conditional
stages?
Computers need computer programmes so
they know what to do.
An algorithm is a set of instructions needed to
complete a task.
The word “conditional” refers to something that
is subject to other requirements being met. E.g.
to go on holiday abroad you need a passport.
Conditionals in programming allow us to test
things and respond in the correct way.
Resources:
Pencil or pen
Printed algorithm work sheet or your child can
draw their own flowchart and fill in the gaps.
Want More Info?
The school run have a great webpage explaining different algorithms and what your child is expected to know by the end of Key Stage 2: https://www.theschoolrun.com/what-is-an-algorithm
Activity Aims: Time: Skills:
Understand that code is
made out of words and
numbers that you put
into order so the
computer understands
what to do.
20+ minutes
Plus resource preparation time
Analytical
Communication
Individual working
Driving questions: Key concepts:
What can we use code for?
What types of things can we do with code on a
computer? (Games etc.)
Why does code need to be in the right order?
Computers need computer programmes so
they know what to do.
Code is made out of words and numbers that
you put into order so the computer understands
what to do.
Resources:
Pencil or pen
Binary code translator sheet (print or view
digitally)
Binary worksheet (words to use can be hand
written if no printer available)
Want more info?
BBC Bitesize has a short video and online quiz on code.

Activity plan: Differentiation:
Starter:
Ask your child to tell you what they already know about code. Can they name any
jobs a computer can do with the right code?
Explain that code is a way of telling a computer what order to do tasks in to complete
a specific job. Ask your child to think of a job they do at home (e.g. putting on their
socks, making the bed) and go through each stage they would need to do this
(remembering that the instructions need to be specific—a computer doesn't know
which drawer to open to get to the socks!)
Top tip: You can act out their instructions exactly which will help them identify gaps in
the code (e.g. if they say ‘put on the socks’ put them both on the same hand rather
than different feet so they understand they need to make the instructions clearer.
(Time: 5+ minutes)
For a simple introduction to code
try watching this video on BBC
Bitesize.
Main activity:
Using the binary code translator table explain that binary code is just a way that we
can give a computer instructions in a language it understands. Like a secret code for
computers!
Ask them to translate the code from the binary worksheet to reveal the secret code.
Correct answer: “well done for solving the code”
Top tip—After completing this task you can create your own words, names,
sentences or instructions to keep going. You can ask your child to translate and check
their own work using an online convertor (select the “Windows 1252” character encod-
ing option).
(Time: flexible depending on how complex you want to make the task)
Harder option: Ask your child to
translate simple sentences into
binary.
Easier option: Write “1” and “0” on
pieces of paper and ask your child
to put them in the correct order
for each letter instead of writing.
Follow up:
Look around the house for things that need code to work (laptops, mobile phones,
tablets, TVs, games consoles etc.)
(Time: 5 minutes maximum)
For a simple game to check
understanding try this quiz.
STEAM Club at Home
Key Stage 2, session 2: Technology
Break the code

STEAM Club at Home
Key Stage 2, session 2: Technology
Break the code
Binary code translator
Using the binary code translator table translate the sentence from binary code into
English. The first word has been completed for you:
01000001 A
01000010 B
01000011 C
01000100 D
01000101 E
01000110 F
01000111 G
01001000 H
01001001 I
01001010 J
01001011 K
01001100 L 01001101 M
01001110 N
01001111 O
01010000 P
01010001 Q
01010010 R
01010011 S
01010100 T
01010101 U
01010110 V
01010111 W
01011000 X 01011001 Y
01011010 Z
01010111 01000101 01001100 01001100
W E L L
01000100 01001111 01001110 01000101
01000110 01001111 01010010
01010011 01001111 01001100 01010110 01001001 01001110 01000111
01010100 01001000 01000101
01000011 01001111 01000100 01000101

STEAM Club at Home
Key Stage 2, session 3: Engineering
Something to sit on
Activity Aims: Time: Skills:
To build a functioning seat
out of newspaper that can
hold a child’s weight at a
minimum of 30cm from the
floor.
35+ minutes Communication
Engineering specifications
Presentation
Creativity
Driving questions: Key concepts:
Is paper strong?
How can we improve the strength of paper?
How can you connect it all together?
How can you make sure you can sit on it?
To demonstrate a basic understanding of
engineering specifications and how to work to
them
To demonstrate a basic understanding of the
properties of materials and how they can be
strengthened if used in other ways
Resources:
• Newspaper/paper/left over wallpaper. If you don’t
have much paper you can design a seat for a toy in-
stead.
• Cellotape or brown tape
Optional equipment:
• Ruler/tape measure(30 cm)
Want more info?
Try an online search for “paper seat” or “paper chair” for ideas.

Activity plan: Differentiation:
Starter:
Ask your child about things around the house that they can sit on. Ask them to
identify features that make these strong enough to sit on (bracing between chair legs
etc.).
Inform them that they are going to build something to sit on, but with a twist - they
must make it out of paper, it must be able to hold their weight (or a toy if using less
paper) and they must sit 30cm above the floor.
Demonstrate that a sheet of newspaper isn't strong, and wont support any weight but
when rolled up into a tube it is stronger and able to support more weight.
(Time: 5 minutes maximum)
If your child struggles to identify
features to make seating strong,
try pointing them out and asking
what might happen if they were
taken away.
Main activity:
Give your child enough time to develop, create and test their seat. Encourage them to
be creative and try different ideas. They can draw out a range of ideas first as a
starting point and if they get stuck suggest they use seats around the house as inspi-
ration.
Top tip: Rolled pieces of news paper can be taped together (try groups of four) for
stronger legs, bases etc.
(Time: Flexible. You can set a time limit to get them working quickly or give them
more time to test and develop their design)
You can make this simpler or
more difficult by increasing or
decreasing the weight or height.
If you have limited amounts of
paper available use a toy to
create a seat for (or multiple toys
to add more challenge)
Follow up:
Ask your child to explain why they made their seat the way they did, how they made
it the right height and strength, and how they think they could make it even better
next time.
(Time: 5 minutes maximum)
STEAM Club at Home
Key Stage 2, session 3: Engineering
Something to sit on

STEAM Club at Home
Key Stage 2, session 4: Art
Dream Playground
Activity aims: Time allowances: Skills:
Learn to use your creativity to
create a dream play-
ground for a primary school.
35+ minutes Communication
Creativity
Adaptability
Problem solving
Driving questions: Key concepts:
What equipment would the playground have?
What materials would the equipment and
space be made of?
What size should the equipment be?
Can equipment be used in all weather?
Equipment must be fun but also safe to use.
Materials should be strong and long lasting but
also safe for children.
The equipment and the space should look
exciting so children want to use it.
How could the equipment be suitable for
different users e.g. wheelchair users.
Resources:
Craft Equipment which could include:
Paper or card
Coloured pencils or pens
Cardboard boxes
Glue or tape
Optional equipment:
This task is flexible. Your child could draw a picture of
their dream playground or making a model of it. The
equipment you choose should reflect this. Raid your
recycling box to see if there is anything that could be
reused , such as cereal boxes.
Want more info?
Try an online search for ’playground’ to give your child more inspiration.

Activity plan: Differentiation:
Starter:
Ask your child what equipment they like to play on in the park or at school. What is it?
What does it do? What does it look like? What is it made of?
Ask them to think about safety in a playground. Why does the equipment need to be
strong and long lasting? Why do we have soft materials on the floor and grips on
stairs and walkways?
Ask if they can think of things they would like in their dream playground. Remind
them that this can be a playground of the future—it might even have holograms or
interactive screens.
(Time: 5 minutes maximum)
If your child is struggling for ideas
use an online search for inspira-
tion.
Main activity:
Give you child enough time to develop and create their dream playground design.
Ask them to label it or write about it to explain the equipment and materials used.
Encourage them to be creative and try different or new ideas.
Top tip: if possible, give your child a range of equipment and resources and let them
find their own creative ways of designing their playground (drawing, 3D design on a
tablet or modelling from card are all good examples)
(Time: Flexible. You can set a time limit to get them working quickly or give them
more time to test and develop their design)
You can make this easier by
giving your child a space to work
e.g. “fill this piece of A4 paper“ or
“make your model inside this
shoebox”. You can also suggest
equipment they must include e.g.
“must have a slide” or a theme
“must have a pirate theme”
Follow up:
Ask your child to explain their playground design. Do they think their friends would like
to use it? Which equipment would be the most popular? How could they improve it?
(Time: 5 minutes maximum)
STEAM Club at Home
Key Stage 2:, session 4: Art
Dream Playground

STEAM Club at Home
Key Stage 2, session 4: Art
Dream Playground
Design sheet (optional)
1. Draw your dream playground in the space below.
2. Add colour to help show what your playground would look like.
3. Add labels to show:
What your equipment is and does (e.g. “swings” )
What materials equipment is made from (wood, metal, plastic)

STEAM Club at Home
Key Stage 2, session 5: Maths
Everyday Maths Bingo
Activity aims: Time: Skills:
Learn to use your problem
solving and maths skills to
solve everyday maths prob-
lems
Flexible Communication
Maths
Social interaction
Driving questions: Key concepts:
Why do we need maths?
How do we use maths in our everyday lives?
To demonstrate a basic understanding of logic,
spatial and mathematical skills
To demonstrate a basic ability to understand
information to complete the challenge
Resources:
Bingo card (hand written if required)
Selection of household items as appropriate for
the tasks including cutlery, weighing scales,
playing cards, spoons, board game, etc.
Want more info?
For child friendly explanations of addition and subtraction try BBC Bitesize.

Activity plan: Differentiation:
Starter:
Ask your child why they think maths is important and if they can think of any exam-
ples when they use it in everyday life (e.g. setting the table and working out how
many knives and forks they will need, telling the time, changing the channel on the
TV)
YouTube has some great videos with examples of everyday maths and why maths is im-
portant. zwv39j6
Main activity:
Read through each task on the bingo card with your child and discuss how they could
complete each activity (e.g. weigh ingredients could be baking a cake or weighing the
right amount of pasta for dinner)
Explain that once they complete each task you will tick it off on the bingo card and the
aim is to complete all the tasks. You could set them a time limit to do this e.g. one day
or week.
Top tip: suggest a prize for completing a row or the whole bingo card to keep your
child motivated (e.g. a sweet treat or choosing what film you watch that evening)
(Time: flexible)
Some of the tasks are flexible to
make them easier to complete at
home. To make this easier you
can tell you child what you want
them to do for each task or to
make it more difficult allow them
to discover when they are using
these techniques themselves.
Follow up:
Discuss what your child has learned and if they discovered they were using maths in
their life more than they expected. Ask them how they managed to overcome some
of the issues they may have had and which tasks they found easy or hard.
(Time: 5 minutes maximum)
STEAM Club at Home
Key Stage 2, session 5: Maths
Everyday Maths Bingo

STEAM Club at Home
Key Stage 2, session 5: Maths
Everyday Maths Bingo
Everyday Maths bingo card Try to complete all the tasks below (ask an adult to tick each task as you go). The aim is to complete each row as quickly as you can
and complete the whole card. You will need to use maths in all of these challenges.
Work out how many
forks your family will
need for dinner.
Weigh or measure out
ingredients for a meal
using weighing scales.
Play a game of cards or
snap.
Read a TV guide
(available online) and
plan what your family
could watch tonight.
Count the number of
birds you can see in the
sky in five minutes.
Play a board game with
your family (you can
even make your own!)
Count the number of
spoons in your kitchen.
Divide this number in
half.
Set an alarm to wake
you up in the morning.
Set a timer, e.g. for cook-
ing a meal.
Play a game of maths I
Spy (e.g. I spy 2+3 and
look for the number 5 or
5 of the same ob-
jects).
Go for a walk with your
family and give
directions (e.g. left, right,
straight on)
Find a pattern in your
house and count how
many times it is
repeated
(on fabric, wallpaper etc.)
When eating with your
family work out how
many portions you
would each get if you
split the food equally, e.g.
no. of sausages, slices of
pizza.
Sing or make up a maths
song. E.g. sing a song for
the 2x table.
Make a maths game for
you and your family.
Or play a game of Nim.