starting a new powerpoint presentation
TRANSCRIPT


Starting a New PowerPoint Presentation1. Click on the Start Button. 2. Click on Programs3. Click on Cross Curricular4. Click on Microsoft Office 975. Click on Microsoft PowerPoint
3
1
2
45

If at any time you require help. You can access the Help Menu the following three ways:1. The Menu bar with your mouse
2. Pressing F1
3. Pressing Alt + H and toggling through the options
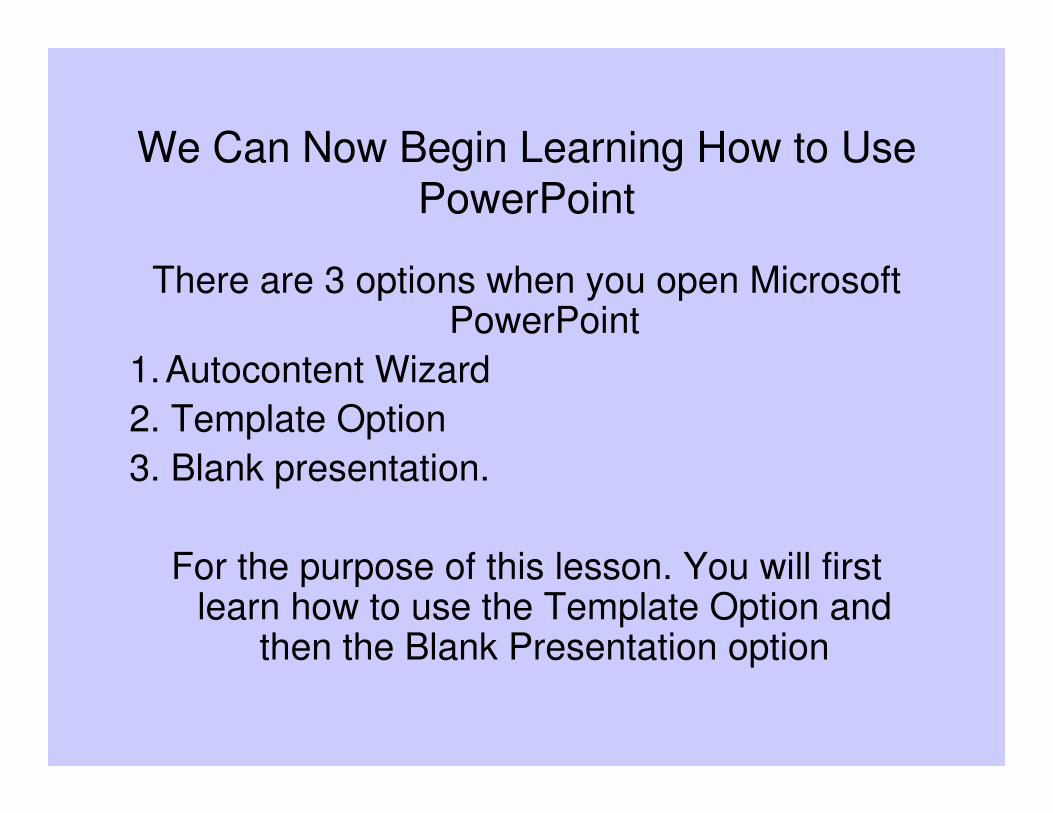
We Can Now Begin Learning How to Use PowerPoint
There are 3 options when you open Microsoft PowerPoint
1.Autocontent Wizard2. Template Option3. Blank presentation.
For the purpose of this lesson. You will first learn how to use the Template Option and
then the Blank Presentation option

The Template Option
• Microsoft PowerPoint provides design templates that you can apply to a presentation to give it a fully designed, professional look.

1. Click on Template
2. Click on OK
1
2
How to use the Template Option
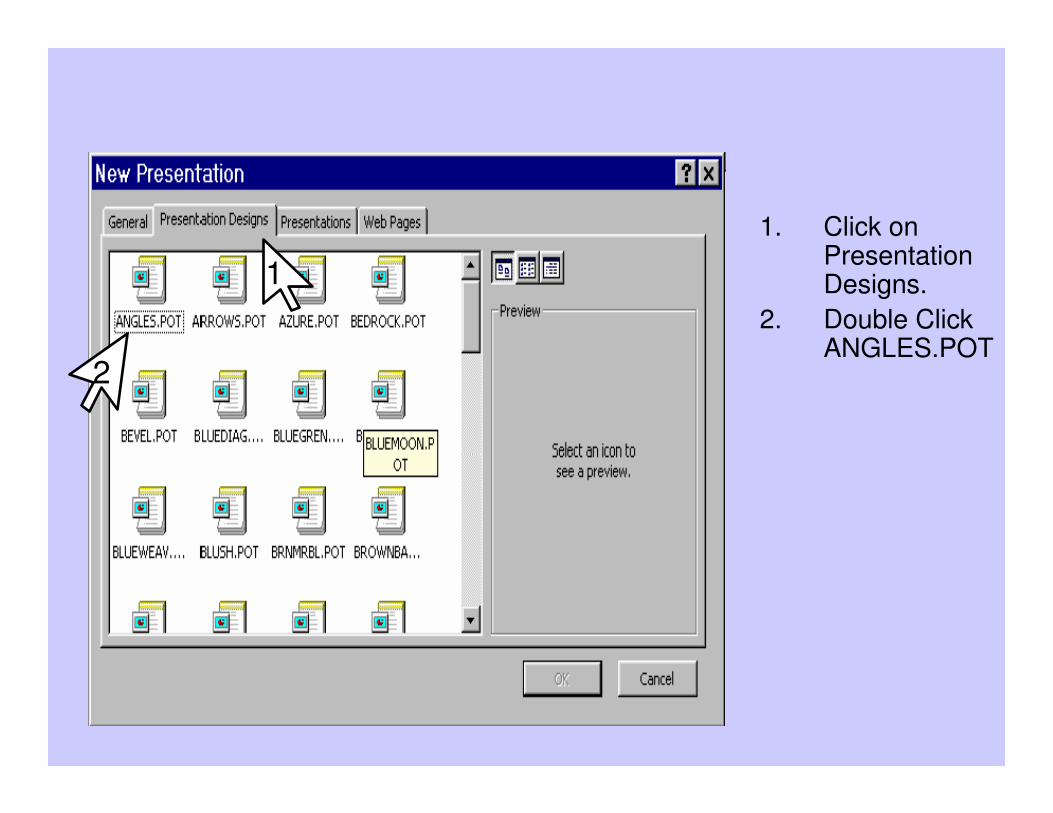
1. Click on Presentation Designs.
2. Double Click ANGLES.POT
1
2

You can also change the Slide Design by Clicking on Apply Design
1

1. Click on Angles.Pot
2. Apply
Changing the Design Template on a blank slide
1 2

1. Click on Blank Presentation
2. Click on OK
1
2
Creating a Blank Presentation

• There are many options in PowerPoint. As you can see there are many layouts.

This is the Title Slide Layout

This is the Bulleted List Layout Slide

This is a 2 Column Text Slide Layout

This is the Table Layout Slide
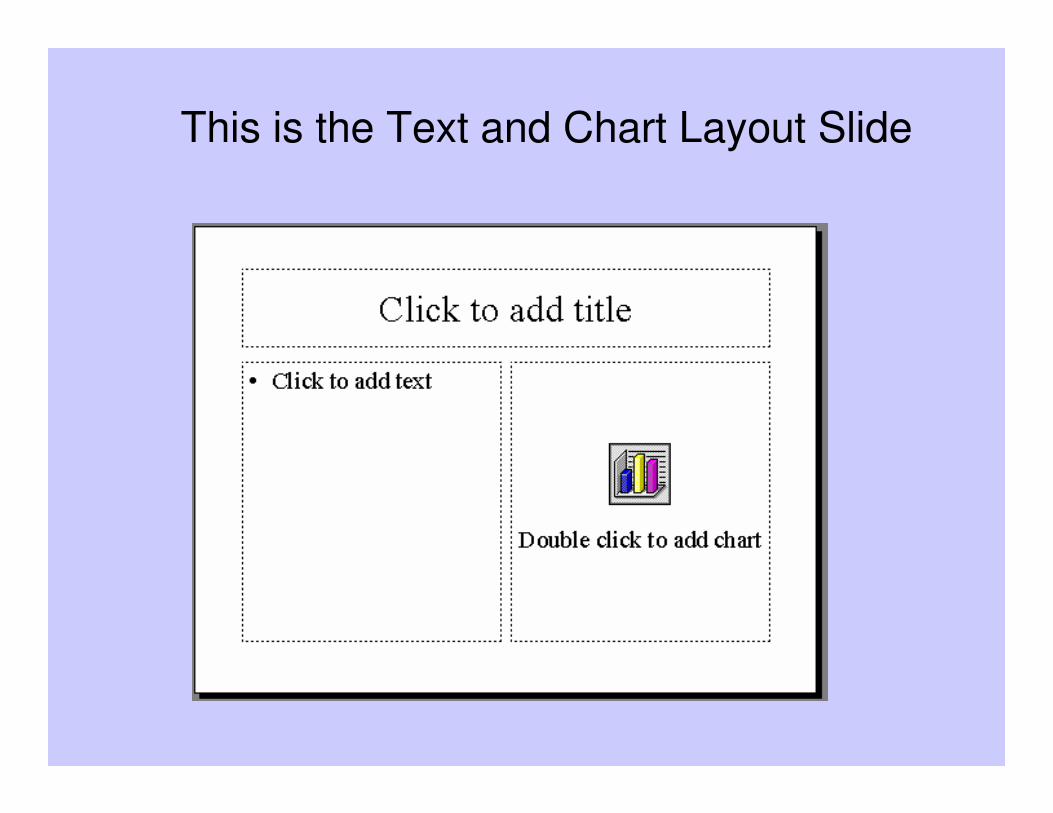
This is the Text and Chart Layout Slide

This is the Chart and Text Layout Slide

This is the Organizational Chart Layout Slide
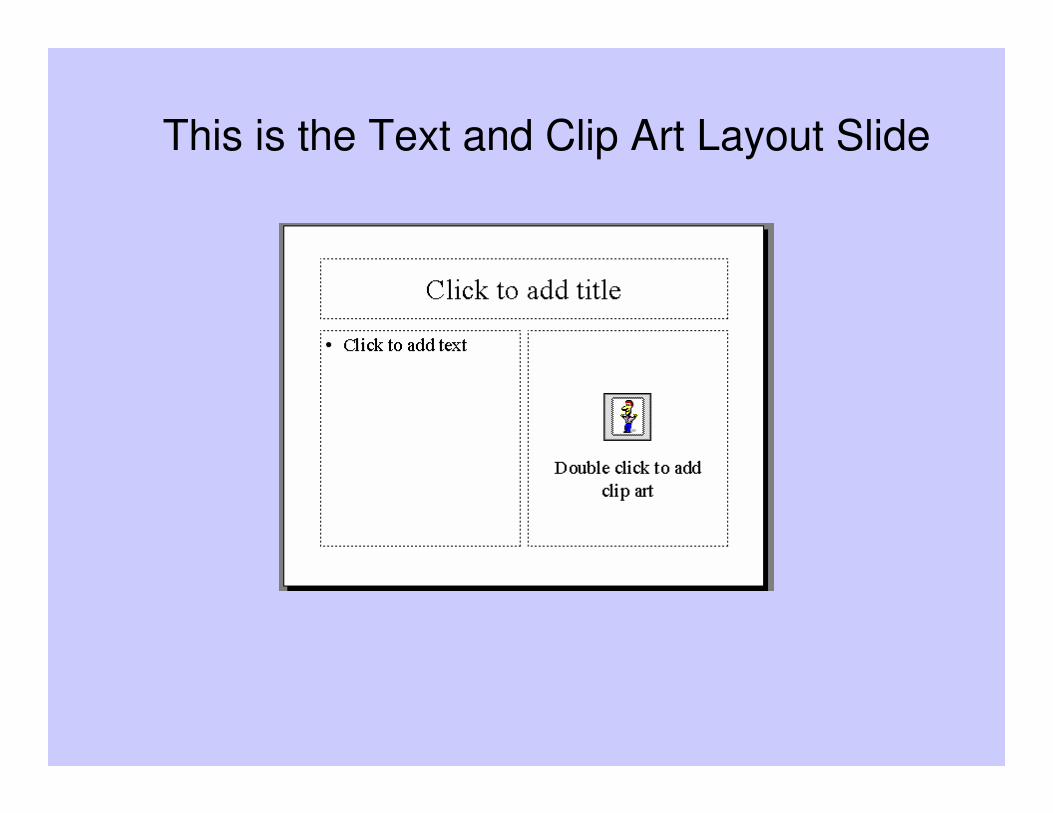
This is the Text and Clip Art Layout Slide

This is the Clip Art and Text Layout Slide

This is the Title Only Layout Slide

The is the Bulleted list Slide layout
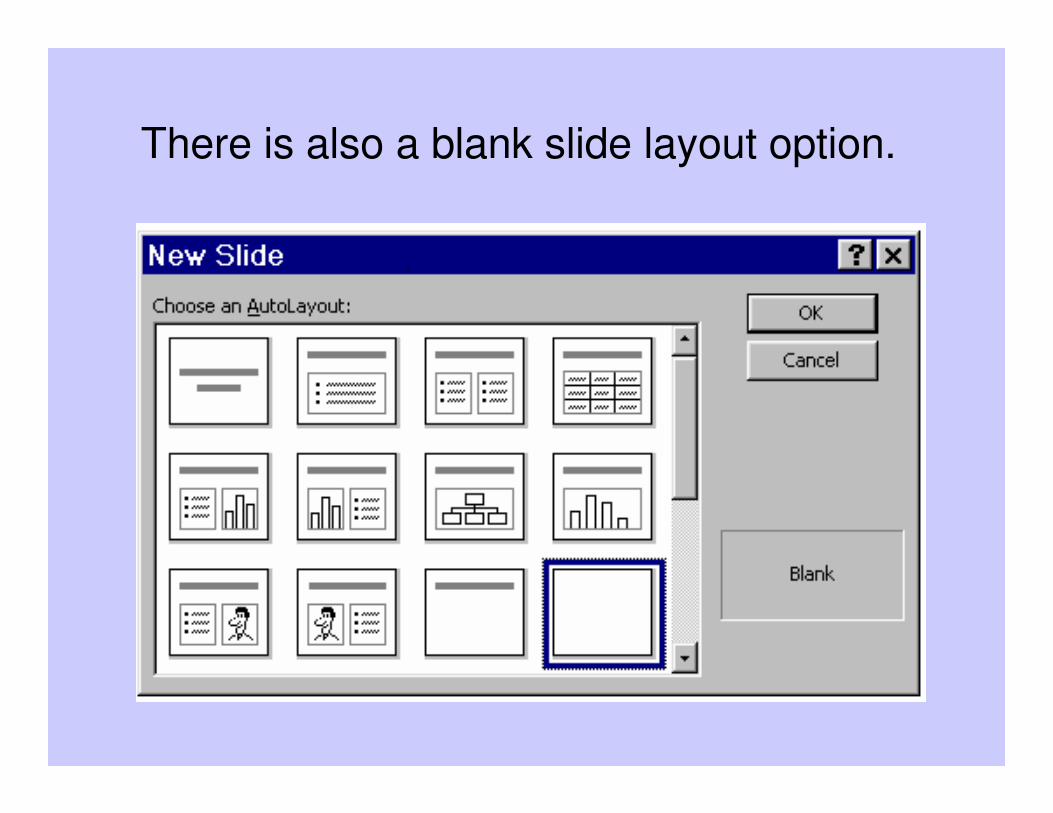
There is also a blank slide layout option.

Today we’re going to choose the bulleted list layout.
1. Click on Bulleted List
2. Click on OK
1
2

Now you can type information in a bulleted list

Before we go any further we should save our work
•Click on the Save Button on the standard tool bar
OR
•Press Ctrl + S
**Remember to Periodically save your work.**

Save under your server name which will be 1, followed by your last name, and the file name.
eg: 1ODECKI – Powerpoint 1

Once you saved the presentation the name will appear in brackets

Now you can type information in a bulleted list
1. Click in the bulleted text box.2. Type in “Mrs. Odecki” and press the enter key.3. Press the tab key.Note: pressing tab will demote us to the next level down in bulleted text.4. Type in “CITC”
1
(2) Type text and press enter
(3) Press tab

1.Type text and press enter
2. Press shift + tab
1. Type in “CITC” and press the enter key.
2. Press the tab key while holding down shift.Note pressing shift+ tab will promote us to the next level up in bulleted text.

1. Click on Format.
2. Click Bullets and Numbering.
Changing bullet style for a line
2
1

1. Click repeatedly on the size spin box to increase the size of the bullet to 140%of text.
1

1. Click in the Bullets fromdrop down box.
2. Click on Wingdings.
2
1

1. Click Click on the flowersymbol.
2. Click OK.
21

You can create a new slide either by:
1. Clicking on the New Slide Option on the Common Tasks Tool bar
Or
2. Pressing Ctrl + M
1

PowerPoint Can Be FUN!!!
Let’s begin our next slide……
1. Choose the Title slide.2. Click on “Click to Add Title”, type in YOUR NAME3.Click on “Click to Add Sub-Title”, type in All About Me
Remember this is what the title slide looks like.

������������������
All About Me
This is what your slide should look like.

• Under INSERT, choose NEW SLIDE (Bulleted list)
• Click on “Click to Add Title”, type in “My Favorite Subjects”
• Click on “Click to add text” type in four subjects.
• Click on bottom right corner of box, drag to shrink box
• Click on border of box, move to center under title
1
2
Remember this is what the Bulleted list slide looks like.
Bulleted List Slide Layout

My Favourite Subjects
• Introduction to Business • History• Introduction to Anthropology,
Psychology, and Sociology• Drama• Physical and Health Education
This is what your slide should look like.

2 Column Text Slide Layout
1. Insert, new slide: (2 column text)
2.Type in the title box: “Places I have visited”
3.Text: 4 Places on each slide
Remember this is what 2 column text slide looks like.

Places I have visited
• London• The Museum of
Civilisation• Canada’s Wonderland• Florida
• New Brunswick• Alberta• Quebec• Nova Scotia
This is what your slide should look like.

1. Insert, new slide: (text and clip art slide)
2. Type “Animals I Recognize” in the title area.
3. Type “Lion, Tortoise, Rabbit” in the text area
4. Double click on picture -choose graphic;click OK)
5. Shrink picture to fit spot (drag in on bottom right hand corner)
Remember this is what a text and clip art slide looks like.
Text and Clip Art Slide Layout

Animals I Recognise
Rabbit, Lion, Tortoise
This is what your slide should look like.
**Remember to Periodically save your work.**

1. Insert, new slide: (Table Slide)2. In the Title area type “Some
Statistics”3. Chart: Double click the Add Table
icon. The data sheet appears. 4. Select the desired cell, enter the
desired data, and press [Enter]. To delete cells, [Drag] to select them, and press [Delete].
5. Select the Close button when finished entering the data.
6. The chart will appear on the slide. Or
7. [Click] outside the Data sheet to close it. The chart will appear on the slide.
Table Slide Layout

Some Statistics
0102030405060708090
1st Term 2nd Term 3rd Term 4th Term
Ottawa University Queens UniversityToronto University
This is what your slide should look like.

Organizational Chart Layout Slide
1. Insert, new slide: (Organizational Chart)2. Type in the title “School Organization
Chart”3. Double click on “Org Chart”4. Type Mrs. Gledhill at top – Principal
° Mrs. Smith - Vice Principal° Mr. Goebel - Vice Principal
5. Delete third box in VP row. 6. Click on “Subordinate”, then click in Mrs.
Smith’s box. Do this three times.7. Repeat, using Mr. Goebel’s box.8. Type the Department Heads names in
these new boxes as follows: R. Crabtree, T. Asselstine, R. Arrigo, J. Isaac, J. Ruff, A. Green, S. Hewitt
9. Close window - click on YES

School Organization
This is what your slide should look like.
Ms. GledhillPrincipal
Ms. SmithVice Principal
Mr. GoebelVice Principal
R. CrabtreeDepartment Head
R. ArrigoDepartment Head
J. RuffDepartment Head
J. IsaacDepartment Head
S. HewittDepartment Head
A. GreenDepartment Head
T. AsselstineDepartment Head

1. Insert, new slide: (Title only slide)
2. Type in “THE END”3. Find a clip art to add to
the page (Insert - Picture - Clip Art)
4. You may move the text and art to make it look nice.
Remember this is what the Title slide looks like.

� �����
This is what my slide looks like.

The Slide Sorter
There are 2 different ways to access this option.
1. Using your mouse and clicking on the slide sorter located just above the Start Menu
2. Going to the main menu and choosing View Slide Sorter
The slide sorter shows slide thumbnails. This option allows you to drag the selected slide to a new location.
1
2
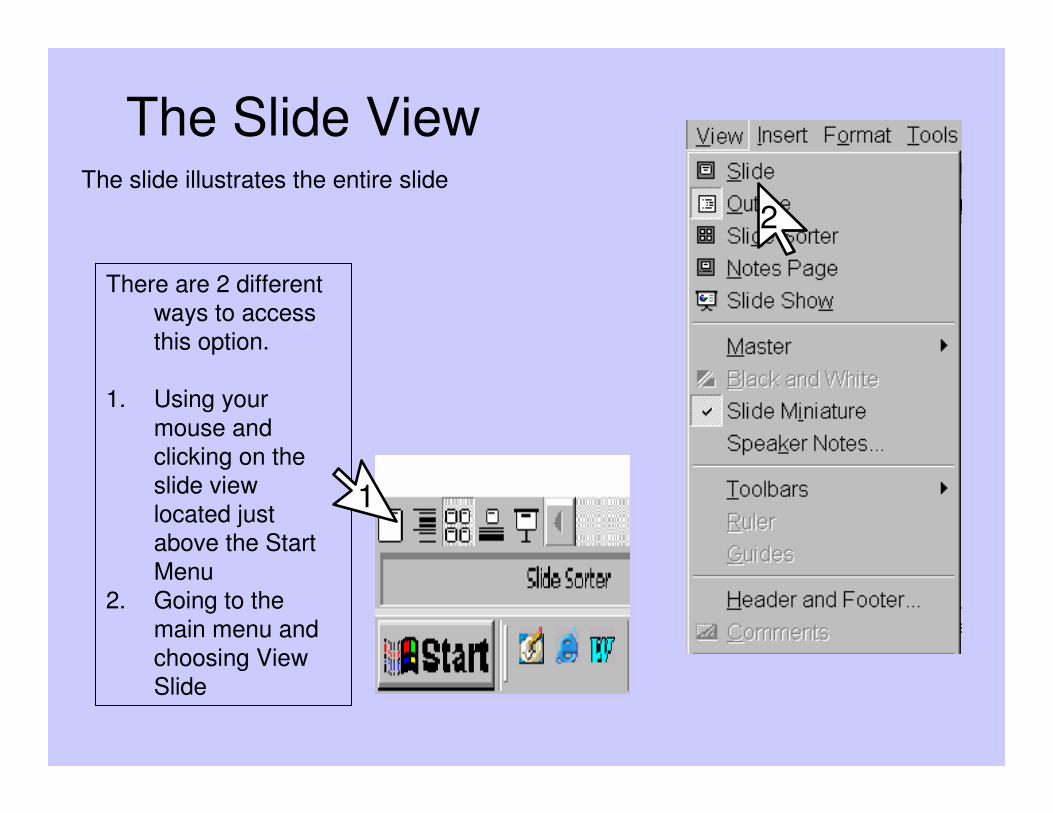
The Slide View
There are 2 different ways to access this option.
1. Using your mouse and clicking on the slide view located just above the Start Menu
2. Going to the main menu and choosing View Slide
The slide illustrates the entire slide
1
2

Slide Show
There are 2 different ways to access this option.
1. Using your mouse and clicking on the Slide Show located just above the Start Menu
2. Going to the main menu and choosing View Slide Show
Slide Show option allows you to view your slide show.
1
2

1. Choose VIEW - SLIDE SORTER2. Move page 6 to page (click and drag)3. Click on the slide that Has Mrs. Odecki
and CITC – Delete this slide by pressing delete.
4. Save your slide show. 5. Now choose View – Slide Show. Click
on mouse to see slides (Esc to quit)

Apply Design
• Now choose a design.
• Click on Apply• Choose Format –
Slide ColourScheme (Choose one, Apply (To ALL)
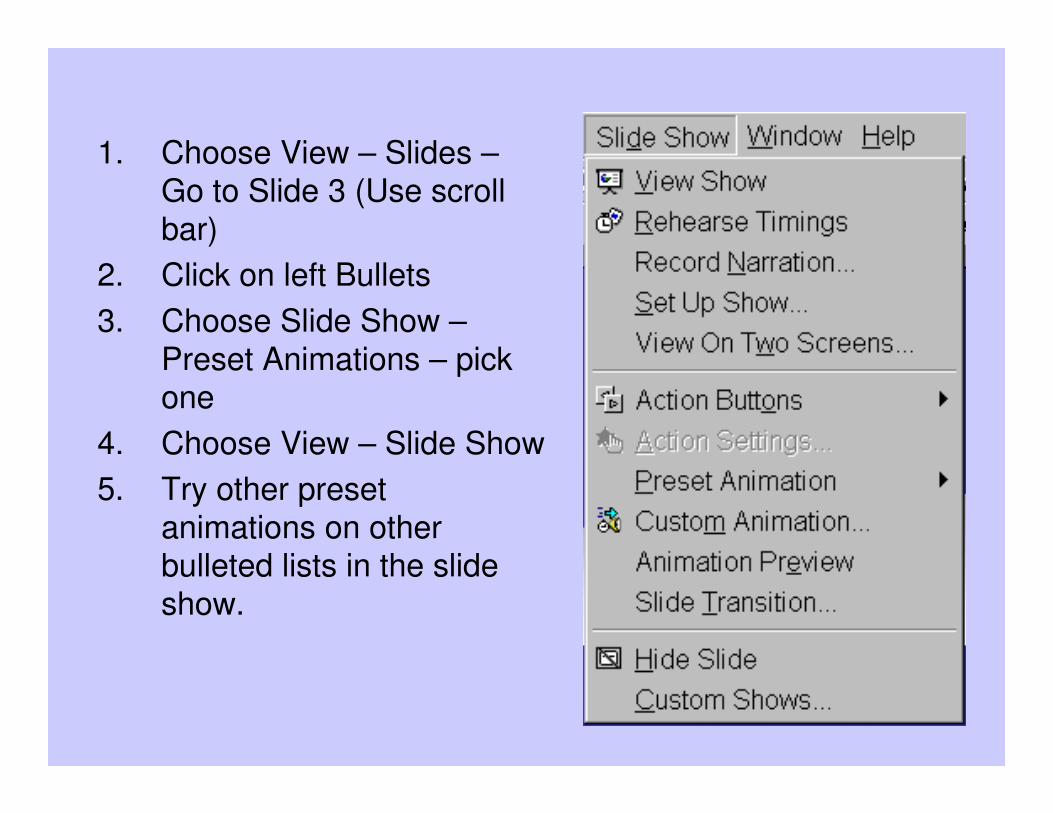
1. Choose View – Slides –Go to Slide 3 (Use scroll bar)
2. Click on left Bullets3. Choose Slide Show –
Preset Animations – pick one
4. Choose View – Slide Show5. Try other preset
animations on other bulleted lists in the slide show.

• Custom Animation allows you to Animate various aspects within your slide. Text, Images, timing, etc.

Slide Transition
Allows you to make the individual slides have a special effect. Slides can appear automatically or on mouse click or even timed.


Adding Headers and Footers
• From the View menu, click Header and Footer.• To add the information to your slides, click the Slide
tab:• To add the information to note pages and handouts,
click the Notes and Handouts tab:• Select the options you want.• To add it to all slides in the presentation, click Apply
to All.

• To add the slide number, date, or time anywhere on an individual slide, use the
• Date and Time or Slide Number command under the Insert menu.
Slide Number, Date, Time

Adding Speaker Notes
• Click Speaker Notes on the Viewmenu, and then type your notes.
• To view notes, go to the View menu, click Notes Page.

Hiding Slides
• In Slide Sorter view, select the slide you want to hide, right-click, select
• Hide Slide. A "null" sign appears over the slide number.To redisplay a slide, follow the same instructions, the null sign will disappear.

Create Handouts
• From the View menu, go to Master - Handout Master
• To preview the layout you want, use the buttons on the Handout Master toolbar
• Delete the items you don’t want to show on the handouts. Click Close.
• From the File menu, select Print• From the Print dialogue box, click the number of
slides you want on the handout, click OK.

Presentation comments and review
• You can add comments and feedback with yellow "sticky" notes
• In slide view, display the slide you want to add comments to.
• From the Insert menu, click Comment
• Type your comments, and then click outside the yellow comment box.
• Move the comments to where you want them to appear.

• On the Drawing toolbar, click WordArt
• Click the special effect you want
• Select OK• In the dialogue box, type
the text, select any other options you want, click OK.

Create a Hyperlink to…another presentation, file, or Web page
• Select the text or object you want to represent the link.
• To link to an existing file or Web page, under Link to, click Existing File or Web Page. Locate and select the file you want to link to, or type in the URL of the Web page (http://www.)
• To test the hyperlink(s), go to SlideShow > View Show

Adding music to your presentation
• From a CD: ensure the CD is in the CD_ROM.• Go to Insert > Movies & Sound > Play CD Audio Track • From the box which appears select OK
OR
From a sound file: ensure it is available on the hard drive.• Insert > Movies & Sound > From File• Find and select the file• Move the icon to where you would like it to be placed• With the icon still highlighted, go to Slideshow > Custom Animation• From the Timing Tab, select Media#, then select Animate• Click on Automatically, (1 second) for it to play continuous.
Now select the Play Settings Tab, click on Play Using Animation Order• Select While Playing Continue Slideshow, Stop Playing after ____
slides. *If you do not place a number here, it will only play on one slide• Click on More Options, select Loop Until Stopped

Adding a Video Clip
• Go to slide you want to add the video to.• From the Insert menu, select Movies and Sounds.• To insert a video from the Media Gallery, click Movie from Gallery, and
then double-click the video you want.• To insert a video from another location, click Movie from File, locate
the folder that contains the video, and then double-click the video you want.
• By default, the video will start when you click it during a slide show. • To change how a video starts click Custom Animation from the Slide
Show menu.• From the Timing tab select On Mouse Click or Automatic, from the
Play Settings tab under Options, select Rewind Movie When Done Playing

Turn your presentations into a Web page
• From the File menu, select Save as HTML, then follow the Internet Wizard instructions.
• To view animations in an online presentation use the PowerPoint Animation Player, a free Internet browser extension. See Online Help.

Bored of the packaged presentation backgrounds? Find
more at
http://www.presentersonline.com/resources/

Not enough Clipart? Here’s more
http://school.discovery.com/clipart/
http://www.coolarchive.com/
http://office.microsoft.com/clipart/default.aspx
http://dgl.microsoft.com/

Need to learn more about Microsoft PowerPoint then try one
of these websites…..
• http://www.lgta.org/• http://www.actden.com/pp/