start guide · 2019-05-20 · • patent numbers, assignee/inventor names, patent classification...
TRANSCRIPT

Start Guide
POWERED BY

Introduction
User profil: beginners
Web browsers recommended: IE10 (minimum version),
Chrome
Objective:
This guide presents the major steps to start using the main
features of RAPID4 efficiently.
ATTENTION:
The access to some features presented in this guide
depends on your level of rights and/or your RAPID
subscription.
Please contact your RAPID administrator for more
information. 2

Introduction
Securized100% proprietary | Swiss hosted
CompatiblePatents | Publications | Web | Internal data
CollaborativeCategorize | Share | Comment | Workflow
EvolutiveCustomisation | Hosting
3

Introduction
Search
Monitor
Collaborate
Share
4

Introduction
Search
SECURED
Use DocDB (EPO database)
in your private cloud
MIXED DATA
Combine public data
with professional ones
ARCHIVE
Set private archives
with access rights
5

Introduction
Monitor
AUTOMATE
Collect new data
automatically and periodically
VISUALISE
Access a dashboard and
user-friendly interface
DISTRIBUTE
Share tailored
results
6

Introduction
Collaborate
ANALYSE
Define analysis forms and ratings
to ease expert reviewing
CONTRIBUTE
Add your own
annotations and reports
CONTROL
Manage user
access rights
7

Introduction
Share
SWISS CLOUD
Strict data protection laws
regarding fishing
discoveries
WORKFLOW
Tailor the information flow for
a fluid reviewing process
CUSTOMIZE
Convey the right information
in the right form
8

Login page
https://app1.rapid.swiss/
https://app2.rapid.swiss/
https://watch.rapid.swiss/
Step 1: Log into your RAPID platform
Should you need credentials (URL, username, password),
please contact your account manager at CENTREDOC
9
On the right side of the password box, you will find an
”Eye” icon. By clicking on this button you will be able to
visualize your password

Main menuStep 2: Select your menu
The navigation pane (located on the left) allows to select the:
a. “Dashboard” (displayed by default) offers a quick overview of your
set of documents
b. “Monitoring” shows the shared and/or dedicated technology
monitoring projects
c. “Collections” gives access to your dedicated searches
d. “My Collection” is your personal workplace where you can save
your relevant documents
e. “Searches & Alerts” enables to search and set up alerts within
RAPID (i.e. the set of documents present in the monitoring and/or
collections features)
f. “PatFinder” is the online search engine to securely find patents
within the 90 millions patents collection
g. “Inpadoc” allows to monitor any change(s) in the legal status of a
patent
a
b
c
f
d
e
g
10

DashboardStep 3: Dashboard – get a quick overview of your set of documents
Dashboard displayed by default once logged into your RAPID platform
Latest update availableNumber of documents in
the last updateDate of your last visit
Total number of visitsEvolution of the
number of documents
in the latest updates
Document repartition
of your last update per
topic
The most viewed
documents in your
RAPID solution, all
users combined
Your saved searches,
ready to run !
Your assigned alerts
11

Monitoring / CollectionsStep 4: Monitoring or Collections - List your documents
To list the documents, use the “Filters” box to:
a. Select the updates and type of records to view
b. Filter documents based on the actions which have been taken on
them - Annotations, Links, Read, Unread, Updated (optional)
c. Filter by keyword in title and abstract (optional)
d. Turn on to see the number of documents in each category
e. Select the category(ies) associated with the desired records
(OR operator applied when checking multiple categories)
f. Choose to see only the documents which have been added to the
system since your last login
g. Sort the documents in your preferred order (optional)
h. Turn ON and OFF the button to maintain filters when logging out
a
b
e
g
12
d
h
c
f

Monitoring / Collections
Step 4: Monitoring or Collections - List your documents
To list the documents, use the “Filters” box to:
i. Reset individual filter sections
j. Reset all filter sections at once
k. Click on [Apply] to generate your list
i
13jk

List optionsSelect your preferred
view with this button
Toolbar available from the list
to focus on the document
directly
Select the number of records
to display per pageStep 4a: Useful options available from the list view
14
Add Publications into RAPID and Patents to My Collection
Export your selecteddocuments
Share in an email yourselected documents
Define and activate yourhighlighting profile
Manage the documents –
Admin rights required
Download from externaldatabases into RAPID thePDF of patents

Select the action based on which the
documents will be filtered (optional)
Simple text searchStep 4b: Use the ”Simple Text Search” to run quick and simple searches
15
Enter your keywords
Limitations:
• Maximum number of keywords allowed: 2
• Boolean operators not allowed
• Patent numbers, assignee/inventor names,
patent classification codes not allowed
Select the updates and type of records
to search on
Select the category(ies) to search on
Click on [Apply] to run your search or
press [Enter] on your keyboard (this
works only for ”Simple Text Search”
box)
1
2
4
6
To clear your search:
1. Empty the ”Simple Text Search” box by
deleting the word or by clicking on
button
2. Click [Apply] or press [Enter] on your
keyboard (this works only for ”Simple
Text Search” box)
3. Click on the [Reset all] button
IMPORTANT NOTICE:
Your search remains active until you clear it
3
Select to see only the documents
which have been added to the system
since your last login (optional)5

Simple text searchStep 4b: Use the ”Simple Text Search” to run quick and simple searches
16
The documents resulted from the ”Simple Text Search” will contain the searched word which will be highlighted in red.

Actions on the list
Once the option selected, the action
windows appear on the right side to let
you operate on the list
Click on the dedicated button to
complete your action: [Export] or
[Apply] or [Save]
17
Step 4c: How to work on your selected documents
There are 5 options you can choose:
a. Export your selected records
b. Download into RAPID the PDFs of patents
c. Share your selected documents
d. Define and activate your highlighting profile
e. Manage the documents – Admin rights required
To close the action windows, click
again on the dedicated button or on the
”x” button
1
2
4
a b c d e
3

Actions on the list
18
Step 4ca: Select actions to work on your selected documents
Select ”Export” to open (or close) this
feature (window located on the right) From any list, select the documents to export. There are 3
ways in which you can select documents:
o Tick ”Select all” checkbox which selects all the
documents from the list
o Tick ”Select page(s)” which allows to select only the
documents from some pages
o The checkbox (located on the left side of each
document) allows to select the desired record
1
Select the export format via the drop-down list2
Click [Export] to get your list in the required format3

Actions on the list
19
Step 4cb: Select actions to work on your selected documents
Select ”Download” to download into
RAPID the representative PDF or the
PDFs of the family members
From any list, select the documents for which you want to
download the PDF. There are 3 ways in which you can
select documents:
o Tick ”Select all” checkbox which selects all the
documents from the list
o Tick ”Select page(s)” which allows to select only the
documents from some pages
o The checkbox (located on the left side of each
document) allows to select the desired record
1
Once the action is complete you will see a log with the
summary
2
When going into the detail page of the document you will
see that the PDFs are downloaded
3

Actions on the list
20
Step 4cc: Select actions to work on your selected documents
Select ”Share” to share your selected
documents in an email
Fill in the ”Recipient(s)”, ”Subject” and ”Signature”
boxes.
The ”Body” of the email contains the title of the
documents, a short description and the link to RAPID.
2
Click [Send] to send your email3
There are 3 ways in which you can select documents:
o Tick ”Select all” checkbox which selects all the
documents from the list
o Tick ”Select page(s)” which allows to select only
the documents from some pages
o The checkbox (located on the left side of each
document) allows to select the desired record
After selecting the documents, click on ”Share” .
NOTE! You cannot share more than 100 documents in
an email.
1

Actions on the list
21
Step 4cd: Select actions to work on your selected documents
Select ”Highlights” to open (or
close) this feature (window
located on the right)
Define your highlighting profile:
o Enter keywords to highlight in documents
o Use comma to separate keywords
o Truncations are allowed
o Highlighting is limited to 5 colors per profile
[Save] your highlighting profile3
Truncations allowed:
* to replace any number of characters
? to replace zero or one character
Create multiple Highlight Profiles by
clicking on and delete a profile by
clicking on
2
1
Click on ON/OFF button to activate or deactivate
your highlighting profile on your current page
4
Export a Highlight Profile by clicking on
Import a Highlight Profile by clicking on
5

Actions on the list
22
Step 4ce: Select actions to work on your selected documents
Select ”Documents Management”
to open (or close) this feature
(window located on the right)
Use this feature to:
o Add (or remove) (sub)category(ies)
o Change the update tag
o Remove category(ies)
o Delete documents
From any list, select the documents to manage1
2
Click on [Apply] to validate your action(s)
3
Admin rights are required to use this feature

Toolbar
For a document, use the toolbar to:
a. Access the images
b. Add annotations
c. Insert an hyperlink
d. Download the original document in pdf format
e. View the legal status information
f. Apply ratings
g. Get a quick view of the record
h. Add document to ”My Collection”23
a c e gb d f
Step 4d: Use the toolbar to focus on a document
h

Quick View
Select [Action] to print
or share the record
24
Click the symbol to reach and
select the “Action” options
Step 4e: Click on to open the “Quick View” pop-up window

Ratings
Expert ratings are
color-coded
Apply your rating
Select the “Ratings” icon located in the
toolbar to have direct access to the feature
You can define your own rating form - administration rights required25
Step 4f: Click on the “Ratings” feature to apply your expert rating

Ratings
26
New display of Ratings: ”Workflow” view
From ”Views” choose ”Workflow” to see the
entire list of ratings displayed directly in the
document summary
1
Click directly on the label to activate or
deactivate one rating
2

Detailed view
Right-side window
displays the first image
Drag and drop the windows to
customize your work space
Get details on your
selected record
27
Step 4g: Click on the document title for a detailed view

Detailed view
28
Step 4h: Click on the “BIBLIOGRAPHY” tab to access additional fields
Get details on your
selected record

Detailed view
29
Step 4i: Click on the “FAMILY” tab to reach the family members
Click on the icons to view the:
1. PDF document
2. Images
3. Description
4. Claims
All the icons direct to information available on
the EPO (espacenet) web portal

Detailed view
30
Step 4j: Click on the “CLAIMS” tab to display the patent claims
Select this icon to see the claims of the other
family members imported in RAPID
To view the claims of a specific family member, go to the “FAMILY” tab to
select the corresponding icon (see previous slide)

Links feature
31
Step 4k: Click on the “LINKS” tab to view the link(s)/attachment(s) added to the document
Add your link(s)/attachment(s) to
the document via this button
Admin rights are required to use this feature

Analysis module
Select the type of analysis
template you want to fill
Define your own analysis form(s) -
administration rights required
32
Step 4l: Select the “Analysis” tab to perform strategic analyses
Example of analysis form
Subscription required to use this
feature

My Collection
33
Step 5: Save your most relevant documents in a personal space for further reviewing
a. Click on the “Star” icon to save one document in “My Collection” ->The icon will turn yellow
b. To view your saved documents, go to the menu: ”My Collection”
c. Click again on the “Star” icon to remove one document from ”My Collection” -> The icon will
turn grey
Hit the star icon
Limitations:
• My collection cannot be shared
• Only one category available in this space

Searches & AlertsStep 6: Search & Alerts – search for records & set up
alerts
A. Search for records within your dataset
(those present in your RAPID4 platform)
a. Select the “Advanced Search” interface to benefit
from all the search options available
a
34

Searches & AlertsStep 6: Search & Alerts – search for records & set up alerts
B. Set up alerts to be notified when new patents
matching your pre-defined criteria are added to your
RAPID4 platform
a. Run your search via the “Advanced Search”
interface
b. Click on the “Disk” icon from the “Last Searches”
interface
c. Select the “Alerts” tab from the pop-up window
d. Set the alert options:
i. Status: to activate/deactivate the alert
ii. Periodicity: to run the alert daily, weekly or
monthly
iii. Recipients: to notify users and/or
departments – Administration rights required
e. Click on the [Save] button to save your alert
ii
i
iii
e
c
ba
35

PatFinder beta versionStep 7: PatFinder (Beta version) - search for patents online
securely
A. Select “Patent Search”
a. Run your search using the dedicated search box
located on the right
b. Click on the [Search] button to get the matching
patents
Note:
From the resulting list, you can quickly identify the
records already present in your platform RAPID4
(with a blue stamp) and those that are not (with
the (+) sign).
A
Simple keyword search in
title and abstract directly
36
Click the (+) icon to import the patent
directly via the “Fast import” page

PatFinder beta versionStep 7: PatFinder (Beta version) - search for patents online
securely
B. Select “Fast import” to add the desired patent(s)
retrieved with PatFinder to your RAPID platform
a. To do so, you need to:
• Enter the patent number(s) of the records that
you wish to import
• Specify where your documents will be
imported: the update and category – Admin
rights required
• Click on the [Start Import] button to validate
your import
Note:
Once clicked, the RAPID4 solution imports the
bibliographic data as well as the first image of
the searched patents
B
37
Admin rights are required to select categories

InpadocStep 8: Inpadoc - monitor patent legal status
a. Enter the publication number via the dedicated box
b. Click on [View] to display the patent information in a
pop-up window
c. Select the family member to monitor by clicking (+)
38
Subscription required to use this
feature
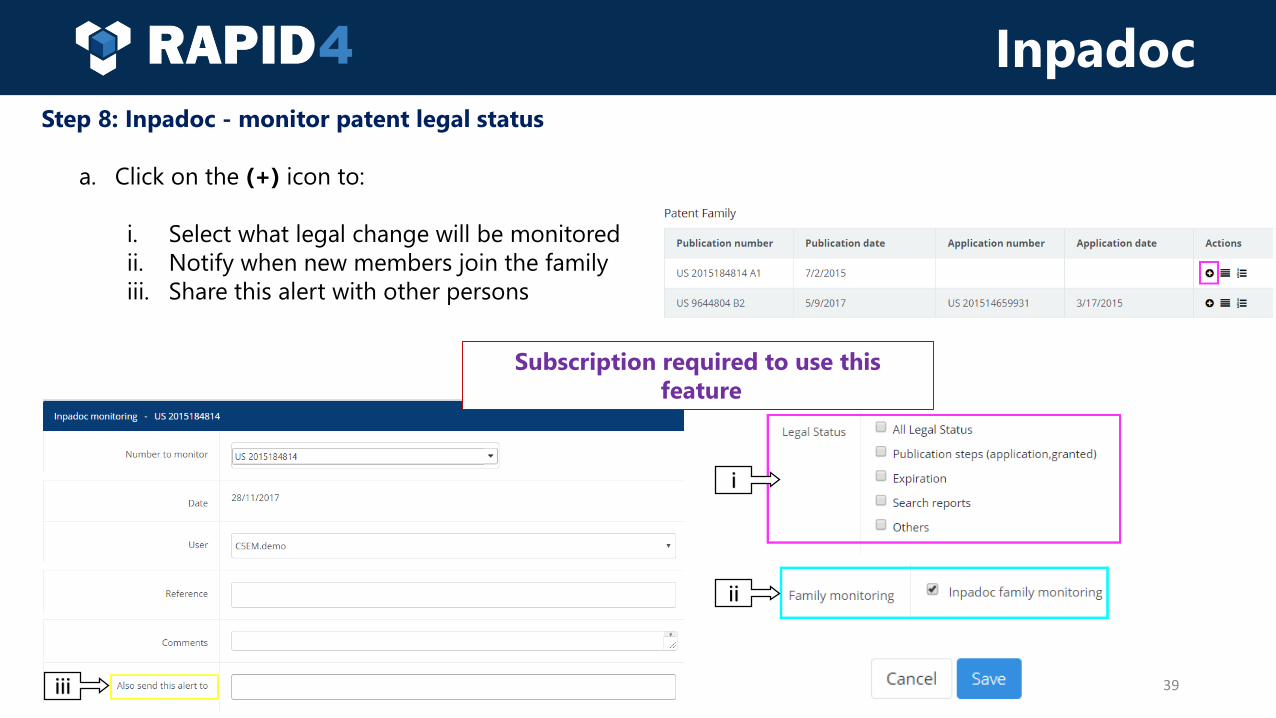
InpadocStep 8: Inpadoc - monitor patent legal status
a. Click on the (+) icon to:
i. Select what legal change will be monitored
ii. Notify when new members join the family
iii. Share this alert with other persons
iii
i
ii
39
Subscription required to use this
feature

Questions?
CENTREDOC
Business Intelligence and Technology Monitoring
Address: Jaquet-Droz 1, CH-2002 Neuchâtel
Email: [email protected]
Website: www.centredoc.swiss
Telephone: +41 32 720 51 31
POWERED BY