stargazing event pack -...
TRANSCRIPT

EVENT PACK

Weather contingencyUnfortunately you’ll need to consider the possibility that on the night of your event the weather won’t provide the perfectly clear sky needed for stargazing. Keep an eye on BBC Weather to see the latest forecast at bbc.co.uk/weather
The BBC Weather team will also be making special Space Weather reports on the three nights of the live programme on 8, 9, and 10 January on BBC Two between 8 and 9.30 pm.
You may want to think about running some activities that take place outside that don’t depend on a clear sky. Also have some indoor activities planned in case it’s raining or your stargazers need to take a break from the cold.
Practical things to ProvideEven with perfect stargazing weather there are a number of things you should either try to provide or encourage people to bring to the event:
Warm clothes and a hat and gloves
Hot drinks – these can really boost people’s enjoyment and allow longer sessions outdoors
Red light torches/red cellophane/rear bicycle lamps – provide light without hindering night vision
Telescope or binoculars
Deck chairs or camping chairs
A TV set to screen the live show and your Stargazing LIVE DVD
Copies of the Stargazing LIVE Star Guide
Smartphone or tablet with downloaded apps to help youfindyourwayaroundthesky
Compasses
safetyPut some simple measures in place to allow people to enjoy your event safely.
If you are using an indoor space, make sure everyoneknowswherethefireexitsareandwhere to meet outside if there is an evacuation.
Make sure that any outside steps are well lit.
Consider capacity – have a plan in place just in case more people turn up on the night than you were expecting.Consideraskingpeopletobookin advance,itmayfeellikeextraworkbutitwillgive youasenseofhowmanypeopletoexpecton the night.
If you have children at your event please make parents aware that they should not be left unattended. Have a lost child policy and ensure all staff know what to do if children get separated from their parents.
If you have registered your event on Things To Do take a moment to have a look at the safety section in the Terms and Conditions. bbc.co.uk/thingstodo/
Welcome to Stargazing LIVE 2013. The BBC Two series returns in January 2013 with more astronomical wonders including comets and asteroids, discussion about life on Mars and the history of the Universe.
If you’ve signed up to run a stargazing event in your area through the BBC’s Things To Do website, thank you for joining us in encouraging the nation to look up at the night sky.
Those of you who have organised Stargazing LIVE events over the past couple of years will already have a host of great ideas for running a successful event. However if this is your first Stargazing LIVE event or you just need some extra inspiration, this pack is a good place to start. We hope that you and your stargazers have a great time.
The Stargazing LIVE Team
introduction
“The entire event was extremely well received with people of all ages and abilities in attendance proving that astronomy is a truly universal subject. Many were surprised how easy it is to become involved in astronomy and that you don’t need expensive pieces of equipment.” Dr Johanna F Jarvis

There are new resources available to help you run your event. If you have signed up through BBC Things To Do then you will receive:
Star Guides: to give away to your stargazers to help them discover some of the best things to see in the night sky
Posters: to help promote your event
Editable Flyers: to promote your event, these can also be used as event programmes
DVD: an introduction from Professor Brian Cox followed by a series of amazing astrophotos from the BBC Sky at Night and Stargazing LIVE Flickr group
Stargazing Marketing Kit: a selection of photos and logos
other resourcesThere will be lots more information and downloads available on the Stargazing LIVE website that you may want to use at your event. bbc.co.uk/stargazing
Star Party Pack: offers fun and interesting ways to host your own stargazing party at home, with suggestions for games, activities, music, decorations and food
Beginners Guide to Telescopes: tells the novice stargazer everything they need to know before they buy their first piece of kit
Guide to Desktop Star Apps: There are lots of programmes available to help you stargaze, this guide gives tips to get to grips with a few of them
Guide to Mobile Star Apps: There are hundreds of apps available for a whole range of mobile phones, this guide outlines a few to get the novice started
You can source images from www.nasaimages.org And find space sounds at
solarsystem.nasa.gov/multimedia/audio.fm
or archive.org/details/opensource_audio
hoW to Promote your eventFor a successful event you’ll need to encourage novice stargazers out into the cold.
We’ve provided you with posters that have space to insert details to promote your event. There are also editableelectronicversionsofthesealongwithflyersif you need more.
If you’ve registered on BBC’s Things To Do then you will be listed on the site, but there are lots of other local listings sites where you can add your event.
You can also use social media sites such as Facebook and Twitter to publicise your event. These also allow you to continue to engage with stargazers once the events are over.
Lots of local shops, village halls, schools and leisure centres will have noticeboards where you can display posters.
Local or community newspapers might advertise your event for free and may even come along to feature the event.
“It makes the organising and setting up worthwhile and very satisfying when you hear so many wows! from adults and children alike when they are looking through a telescope - even at something very familar such as the Moon. Rarely is that reaction heard when someone looks at a screen or at a printed image. It’s the direct eye contact that seems to make the difference.” Theresa Cooper, Cardiff Astronomical Society

Constellations are arrangements of stars that are shown to represent objects, animals or mythological creatures. There are 88 official constellations, roughly two thirds of which can be seen from the UK at different times throughout the year. If you can’t get outside, or it’s too cloudy to see the real thing, why not make your own constellation viewer to see these beautiful patterns anywhere at any time.
safetyChildren will need adult supervision.
What you need Cardboard tubes from kitchen or toilet roll
Scissors
Black paper or card
Pin
Sticky tape or rubber band
A protective surface cover
What to do We recommend you photocopy the constellations onthenextpage.Gluethemontoblackcard or paper and cut each of them out carefully. Cut alongside the marked dotted lines to createflaps. Use your pin to carefully pierce each of the stars on the constellation templates. Place a magazine or protective surface beneath your cut out circles tostopthepinfromprickingyourfingeror damaging the table. Place one of the constellations with the printed side facing out over one end of your cardboard tube.Folddowntheflapsandfixittightlyusing sticky tape or if you use a rubber band instead, you can easily swap your constellations. Hold it up against the light and look through the open end with one eye. Make sure you keep your other eye tightly shut. Can you see the constellation inside the tube?
related toPics Stars
Constellations
Lifecycle of Stars
Speed of Light
Distances, Light Years and Astronomical Units
Greek Mythology
try this!The night sky is full of constellations you can recreate. Use the Star Guide from the Stargazing LIVE website to make more constellations. Or why not create a starry sky in your bedroom? Put a torch inside your constellation viewer, point it up to the ceiling and turn out the lights.
1
2
3
4
5
constellation vieWer
did you KnoW?
The constellation of Ursa Major, which means Great Bear, includes seven very bright stars which are commonly known as the Plough or the Big Dipper. It’s in the shape of a saucepan and its handle forms the bear’s tail which means that the left-hand side of the saucepan’s bowl forms the bear’s backside. Can you see it?

URSA MAJOR ORION
LEOPERSEUS

try this!Get one person to be the Sun and hold the end of the roll. Face paint, yellow clothing or sun glasses and a sun hat can help to represent the Sun. Ask the audience if they can remember which planet comes next.Thepersonwhogetsitrightcanstandonthespot and hold the piece of fruit that represents that planet. Keep going until you get all the way to Neptune.
loo roll solar systemMake your own scale model of the Solar System using one sheet of loo roll as 10,000,000 miles! The planets are represented by different pieces of fruit to give a sense of their size in relation to one another.
What you need 1 loo roll with at least 280 sheets
Pieces of fruit as specified below (alternatively you can use pictures of the different planets)
Somewhere with lots of space
What to do Takealookatthediagrambelowtofindoutwhich planet is represented by each piece of fruit. Startunrollingyourlooroll.Thefirstsheetisthe Sun. Unroll 3.6 sheets. Put your peppercorn here to represent Mercury. Roll out 3.1 more sheets (6.7 in total) – this is where Venus should be. Mark the spot with a cherry tomato. Keep going until you get all the way to Neptune.
related toPics Our Solar System
Planets
Exoplanets
Gravity
Distances, Light Years and Astronomical Units
1
2
3
4
5
did you KnoW?
In our loo roll model, the distances between the planets are to scale and separately the sizes of the planets are to scale. However, they are two different scales. If the planets were placed at the correct distance in relation to the size of the fruit you would need more than 2km of loo roll between Neptune and your Sun!The Sun is so enormous that there isn’t a fruit big enough to represent it. You can fit over one million Earths inside it. That’s a lot of cherry tomatoes!
Sheets from sun
MercuryPeppercorn
VenusCherry tomato
EarthCherry tomato
MarsBlueberry
JupiterWatermelon
SaturnLarge grapefruit
UranusApple
NeptuneLime
PlutoPea
MercuryPeppercorn
VenusCherry tomato
EarthCherry tomato
MarsBlueberry
JupiterWatermelon
SaturnLarge grapefruit
UranusApple
NeptuneLime
PlutoPea
MercuryPeppercorn
VenusCherry tomato
EarthCherry tomato
MarsBlueberry
JupiterWatermelon
SaturnLarge grapefruit
UranusApple
NeptuneLime
PlutoPea
MercuryPeppercorn
VenusCherry tomato
EarthCherry tomato
MarsBlueberry
JupiterWatermelon
SaturnLarge grapefruit
UranusApple
NeptuneLime
PlutoPea
MercuryPeppercorn
VenusCherry tomato
EarthCherry tomato
MarsBlueberry
JupiterWatermelon
SaturnLarge grapefruit
UranusApple
NeptuneLime
PlutoPea
MercuryPeppercorn
VenusCherry tomato
EarthCherry tomato
MarsBlueberry
JupiterWatermelon
SaturnLarge grapefruit
UranusApple
NeptuneLime
PlutoPea
MercuryPeppercorn
VenusCherry tomato
EarthCherry tomato
MarsBlueberry
JupiterWatermelon
SaturnLarge grapefruit
UranusApple
NeptuneLime
PlutoPea
MercuryPeppercorn
VenusCherry tomato
EarthCherry tomato
MarsBlueberry
JupiterWatermelon
SaturnLarge grapefruit
UranusApple
NeptuneLime
PlutoPea
mercuryPeppercorn
nePtuneLime
venus Cherry tomato
JuPiterWatermelon
saturnLarge grapefruit
uranusApplemars
Blueberry
earthCherry tomato
Sheets from
previous object
3.6 6.7 9.3 14.1 48.4 88.7 178.7 279.7
mercury venus earth mars JuPiter saturn uranus nePtune
3.1 2.6 4.8 34.3 40.3 90 101
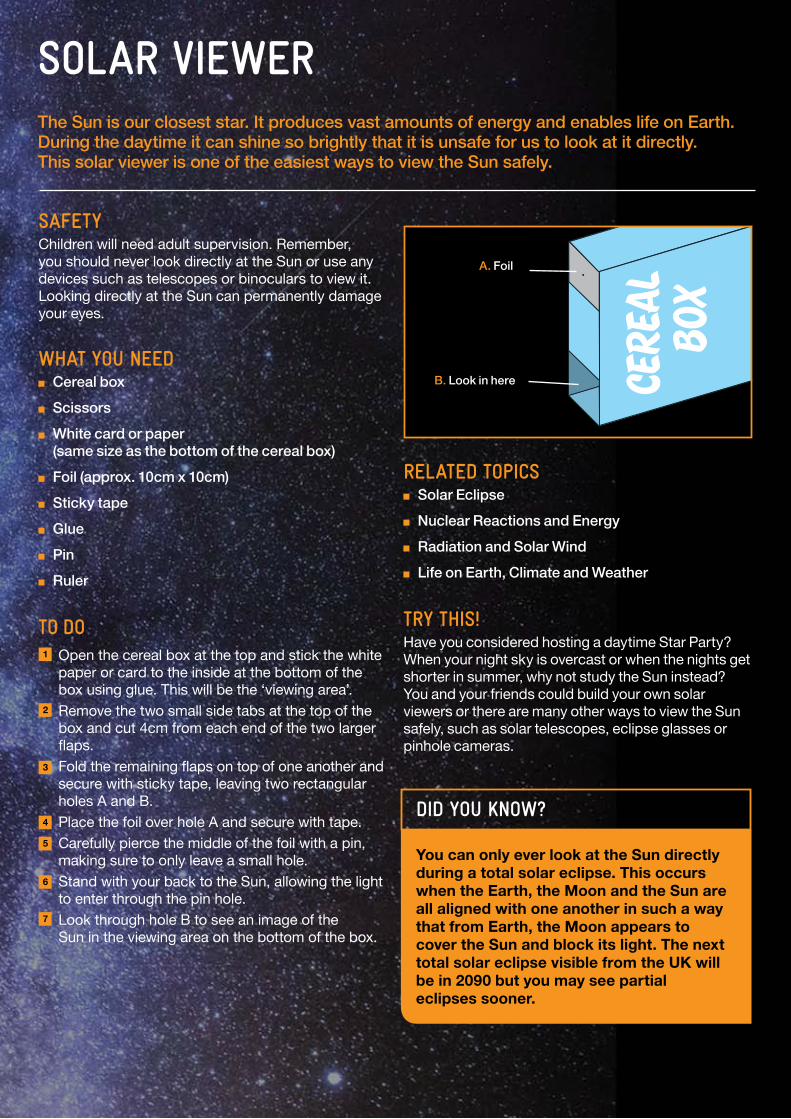
solar vieWerThe Sun is our closest star. It produces vast amounts of energy and enables life on Earth. During the daytime it can shine so brightly that it is unsafe for us to look at it directly. This solar viewer is one of the easiest ways to view the Sun safely.
safetyChildren will need adult supervision. Remember, you should never look directly at the Sun or use any devices such as telescopes or binoculars to view it. Looking directly at the Sun can permanently damage your eyes.
What you need Cereal box
Scissors
White card or paper (same size as the bottom of the cereal box)
Foil (approx. 10cm x 10cm)
Sticky tape
Glue
Pin
Ruler
to do Openthecerealboxatthetopandstickthewhite paper or card to the inside at the bottom of the boxusingglue.Thiswillbethe‘viewingarea’. Remove the two small side tabs at the top of the boxandcut4cmfromeachendofthetwolarger flaps. Foldtheremainingflapsontopofoneanotherand secure with sticky tape, leaving two rectangular holes A and B. Place the foil over hole A and secure with tape. Carefully pierce the middle of the foil with a pin, making sure to only leave a small hole. Stand with your back to the Sun, allowing the light to enter through the pin hole. Look through hole B to see an image of the Sunintheviewingareaonthebottomofthebox.
related toPics Solar Eclipse
Nuclear Reactions and Energy
Radiation and Solar Wind
Life on Earth, Climate and Weather
try this!Have you considered hosting a daytime Star Party? When your night sky is overcast or when the nights get shorter in summer, why not study the Sun instead? You and your friends could build your own solar viewers or there are many other ways to view the Sun safely, such as solar telescopes, eclipse glasses or pinhole cameras.
2
3
4
5
6
7
1
did you KnoW?
You can only ever look at the Sun directly during a total solar eclipse. This occurs when the Earth, the Moon and the Sun are all aligned with one another in such a way that from Earth, the Moon appears to cover the Sun and block its light. The next total solar eclipse visible from the UK will be in 2090 but you may see partial eclipses sooner.
A. Foil
B. Look in here

Securethetopoftheboxwithglueorstickytape. Aim the slot above the CD at a light source and look through the eyepiece. Can you see the light reflectedontotheCDandsplitintoallthecolours of the rainbow?
related toPics The Sun
Sources of Light
Energy
Radiation
Speed of Light
try this!Exploredifferentsourcesoflightwithyourspectroscope. What happens when the light comes from a candle, as compared to a light bulb, LED light, Sun or the Moon?
0.4 to 1mm slit CD
60o
maKe a sPectroscoPeA spectroscope enables you to examine the properties of light, not just of the Sun, but of any source of artificial light too. Your spectroscope will reflect light as the seven colours of the rainbow, a magnificent sight!
safetyChildren will need adult supervision. Never look at the Sun directly or your eyes may be damaged permanently.
What you need Empty cereal box
Scissors
CD
Protractor
Pen
Glue or sticky tape
What to do Takeyourcerealbox,measureabout4cm of one side on the top and cut out a square/ rectangular hole. This is to point towards a light source and let the light in. Using the protractor, measure and mark a 60° angle as shown in the image below on both frontandbackofthecerealboxunderneaththe hole. Now draw an 8cm line towards the centre ofthebox. Carefully cut down the 8cm lines and slide the CD into the slot with the shiny, silver side facing up. On the opposite side of the CD slot, cut a tiny slot, no more than 1mm wide along the widthofthebox.Thisslotshouldbeabout 3cmfromthetopofthebox.Thisisyoureyepiece. If the slot is too wide, the spectrum lines will be blurred, or if it’s too narrow, the spectrum will be too dim.
1
2
3
4
6
did you KnoW?
The colours of the rainbow indicate the different wavelengths of light. Different light sources produce different patterns and intensities of the rainbow colours.
Left to right: Incandescent light bulb, candle light, sodium lamp (modern street lamp), sunlight, moonlight
5

hoW darK is your sKy?Light pollution, caused by street lights and other artificial light sources, can be a problem because it makes it more difficult to see the stars. You can work out how dark your sky is by looking for two features in the night sky, Orion and the Milky Way. Use the Audio Guides and Star Guide on the Stargazing website to find them. You will need a clear night to try this.
What to do Study the night sky in a safe place. Can you see the eight main stars in Orion (Fig 1)? This constellation should be visible between August and April with best visibility in the winter months. If you can, try counting the stars you can see around the eight main stars. The more you can see, the darker your sky is. Canyouseeourgalaxy,theMilkyWay(Fig2)? This is very hard to spot. You are most likely to be able to see it in summer. If you can see it, your sky is very dark indeed. Try this activity again when visiting another location and compare the results. Visit bbc.co.uk/stargazing and follow the link to DarkSkyDiscoverytofindthenearestdarksky site. You can even nominate your area.
related toPics Stars
Constellations
The Milky Way
Meteors
Astronomical Technology and Equipment
Astrophotography
try this!Ifyoufindyourselfinanurbanenvironmentwithouttheability to travel to a dark sky site, don’t despair! Light pollution can help novice stargazers to identify the brighter constellations more easily as fainter stars are blocked out. On a clear night, you should be able to see at least the Moon and major constellations such as Ursa Major and Ursa Minor, including the Plough, Pole Star and Cassiopeia. Venus and Jupiter may also be seen with the unaided eye. With a telescope or binoculars, you might even be able to see the rings of Saturn, the Moon’s craters or the orangey-red glow of Mars.Thenightskyisalwaysworthexploring,nomatter where you are.
Whynotseeifyoucanorganisealocal‘switchoff’oflights to coincide with your stargazing event? Whether it is your outdoor Christmas decorations or unnecessary house lighting, the resulting darkness really can make all the difference to the objects you can see in the night sky.
Remember, it can take around 20 minutes for your eyes to adjust to the dark before you get the best views. If it’s safe, avoid using a light or your eyes will have to adjust again. A red torch is useful as this won’t ruin your night vision. A rear bike light will also do the trick.
did you KnoW?
On a clear night in darker areas of the UK you should be able to see at least 2,000 individual stars with the naked eye. In major cities this figure can drop to less than 10.
1
2
3
4
FIG 1: ORION FIG 2: THE MILKY WAY

try this!Whynottryexperimentingwithexposuretimesasthelongertheexposureyouuse,themorestarsyou’relikely to record. If you leave the shutter open for at least a minute, you might start to get images of star trails as the stars appear to move across the night sky. Basic camerasmaynotbeabletotakesuchlongexposures,however digital SLRs can. Set your DSLR onto its ‘bulb’exposuresettinganduseashutterreleasecableto hold the shutter open. If you own a telescope, have a go at taking pictures through the eye piece with your camera. You might be amazed by the results!
PhotograPh the night sKyPhotographing the night sky isn’t as hard as you might think. Most digital cameras are capable of capturing basic shots of the stars. What you can achieve depends on how much control your camera gives you over its settings.
What you need Digital camera
Tripod (optional)
Shutter release cable (optional)
What to do Position the camera. Use a tripod or rest your camera on something solid to stop camera shake. Set the focus. Turn off autofocus as it won’t work wellinthedarkandsetthefocustoinfinity(∞). Refinethefocus.Pointyourcameraatabright star and adjust the focus until it looks sharp. Adjust the aperture. If you can, set the camera’s f-number to the smallest possible. This means the lens aperture (hole) will be at its largest and will therefore let more light into your camera. Set the zoom. Make sure you use the lowest zoom setting,zoomedouttothefullestextenttogive you the widest angle shot possible. Adjust the sensitivity. Camera sensitivity is adjusted via the ISO setting. The higher the ISO number, the easier it is to capture faint objects, but it also increases the digital ‘noise’inyourpicture,whichcandistortandruin it.Ifyouthinksomeofthe‘stars’inyourimage may be due to noise, turn down the ISO setting. If you’re not sure, cover the lens with black card andtakeapicture–any‘stars’thatappearinthis image are due to digital noise. You can use a shutter release cable or a shutter delay timer to help prevent camera shake caused when you press the shutter button.
related toPics The Observable Universe
Light Pollution
Astronomical Technology and Equipment
Astrophotography
1
2
3
4
5
6
7
did you KnoW?
You can upload your astronomy photos to the official BBC Flickr group for The Sky at Night and Stargazing LIVE. Share them with other stargazers and swap tips on getting great shots of the sky. Outstanding images may even be featured in BBC programmes, websites or magazines. Find out more on bbc.co.uk/stargazing
CREDIT: Mark Humpage, the BBC Sky at Night and Stargazing LIVE Flickr group

telescoPes: maKe your oWn refractorThere are many different types of telescopes but the two most basic and common types are reflector and refractor telescopes. Reflectors use mirrors, whereas refractors use lenses to gather light and magnify objects. Follow this guide to make your own refractor.
safetyChildren will need adult supervision. Never look at the Sun directly as this may damage your eyes permanently.
What you need Two cardboard tubes (or two A4 pieces of
black card) Piece of corrugated cardboard Sticky tape Scissors Pair of compasses or pencil and ruler Two glass or plastic lenses of different sizes
(such as two magnifying glasses), both must be smaller in diameter than the cardboard tubes Glue
What to do 1 Take one of your cardboard tubes, or make a tube byrollingupapieceofblackcardandfixingitwith sticky tape along its edge. It should have a diameterofapprox.4.5cmandlengthofatleast 20cm. This is the outer tube of your telescope. 2 Take the second cardboard tube, or make one as explainedabove.Thisistheinnertubeofyour telescope. Its diameter needs to be just slightly smaller,soitfitstightlyintotheoutertubebut can slide back and forth. If you are using identical kitchen roll tubes or similar, you can make a cut along the length of the tube, slide it inside the outer tube to get an idea of the right size. Once you’ve measured it, you can put sticky tape along the cut edge.3 Takethebiggerlensandtrytofititintooneend of the outer telescope tube. You might want to glueitintoplace.Ifitistoosmall,copythenext step for both lenses. 4 Take your compass or pencil and ruler and draw a circle on the corrugated cardboard matching the diameter of the inner telescope tube.
5 Take your smaller lens and trace it in the centre of the circle on the corrugated cardboard. 6 Carefully cut out the circles, leaving you with a ring shape. 7 Slide the small lens in the centre of the ring. It needstofittightly.Youmightwanttouseglueto secure it. 8 Now slide the whole ring inside one end of the inner telescope tube. Slide the inner tube into the outer telescope tube. Lookthroughthesmallerlens,findanobjectto observe and adjust the focus by sliding the inner tube back and forth. What can you spot?
related toPics Astronomical Technology and Equipment
Astrophotography
The Observable Universe
History of the Telescope
try this!Don’t forget to decorate your telescope, observing the night sky will be more fun with a funky telescope.
did you KnoW?
Refractors are amongst the earliest types of optical telescopes. Because of their original design by Galileo Galilei over 400 years ago, they are still known as Galilean telescopes today.
9
FIG: 1 FIG: 2 FIG: 3 FIG: 4 FIG: 6 FIG: 8 FIG: 9

related toPics Mars
The Moon
Asteroids
Meteors, Meteoroids and Meteorites
Crater Formation
try this!Try carefully throwing the stones at an angle to represent the way a meteor travels through the atmosphere. See if this makes any difference to the shape of the crater – you could be surprised!
did you KnoW?
Mars has hundreds of thousands of craters but only a fraction of them have names. The International Astronomical Union is in charge of naming the most relevant craters. The larger ones (above 60km in diameter) are often named after famous, deceased scientists or authors, whereas smaller craters are named after places on Earth. What would you name your Martian craters?
martian cratersMeteoroids become meteors once they enter a planet’s atmosphere and if they hit the surface they are called meteorites. From Earth we can see some fascinating craters on the Moon’s surface. They are most commonly caused by meteorites. Craters can also exist on rocky planets such as our red neighbour Mars. Here is how to make your own Mars craters.
Warning This activity can get messy, put down a plastic sheet or newspaper to protect furniture and have a dustpan and brush handy to tidy up.
What you need Shallow, non-breakable dish at least 30cm
square and 4cm deep
Flour
Cocoa powder
Pebbles or stones of various sizes
What to do Mixtheflourandcocoapowderinabowluntilit resembles the orangey-red colour of Mars’ surface. Fill the dish with 3-4cm of the powder. To make the impacts more visible, sprinkle a layer of the cocoa on the surface. Pick out one of the smallest pebbles or stones and drop it from eye level into the powder to make a crater. Drop different sized pebbles or stones from the same height. What is different about the craters formed?
1
2
3
4
5

did you KnoW?
What generates the pressure in the rocket tube? Effervescent tablets contain sodium bicarbonate and citric acid. Added to water they mix to produce bubbles of colourless, carbon dioxide gas. This mixes with the air contained in the tube, the gas builds up and pressure inside rises. Eventually the force of the escaping gas gives the tube a mighty shove upwards.
sPace flights Scientists are constantly developing different types of vehicles to explore space, such as fuel-powered rockets or probes designed to glide through the atmosphere. Try making your own hoop atmosphere glider and a rocket to see how they move differently ‘through space’.
safetyChildren will need adult supervision. It is recommended to make your rocket outside and wear eye protection as it can get messy.
What you need Drinking straw (non-bendable) Index card or stiff paper Scissors Ruler Sticky tape Tube of fizzy vitamin tablets Water Eye protection
What to doTO MAKE YOUR HOOP ATMOSPHERE GLIDER: (SEE FIG 1) Cut the card into three pieces that each measure 2.5cmx13cm. Tape two of the pieces together into a hoop. Make sure you overlap the ends to help make a good hoop shape. Use the last strip to make a smaller hoop. Tape the hoops into the ends of the straw. Launch your glider into the atmosphere and watch it glide.
TO MAKE YOUR ROCKET: (SEE FIG 2) Taketheemptyfizzyvitamintube.Youmay want to add paper wings or decorate it with starry stickers before you launch it. Remove the lid from the empty tube and pour in two teaspoons (10ml) of water. Drop half a tablet into the tube and close the lid quickly. QuicklyputyourrocketonaflatsurfaceCAP SIDE DOWN and STAND BACK at least 2 metres. After about 10 seconds your rocket should launch into the air. If not, leave it for at least 30 seconds before retrieving it.
related toPics Space Travel
Aerodynamics
Speeds and Distances
Gravity
try this!Whenlaunchingyourglider,experimentwithdifferentthrowingstylesandpower.Haveacompetitiontofindout whose glider can stay in the air for the longest or travelthefurthest.Tryexperimentingwiththeamountof water you put into your rocket tube. How does this affect the speed or the height of the rocket launch?
1
2
3
4
1
2
3
4
5
Fizzy vitamin
Cap down
ATMOSPEHERE GLIDER
ROCKET
1
2

related toPics Phases of the Moon
Our Solar System
Solar Eclipse
Time Scales, Earth’s Rotation and Movement
try this!Why not go outside and observe the Moon for real? How much of its illuminated surface can you see? RepeatthisoverthenextfewdaystoseehowtheMoon’s appearance changes. You can study our nearest neighbour in space more closely with the Moon Guide on the Stargazing website bbc.co.uk/stargazing
did you KnoW?
A day is the length of time it takes for the Earth to completely spin on its axis, which is approximately 24 hours. A lunar month is the time it takes for the
Moon to complete one set of phases, from full Moon back to full Moon, and is approximately 29.5 days. A year is the time it takes for the Earth
to completely orbit the Sun, which is approximately 365 ¼ days.
maKe an orreryAn orrery is a mechanical model of the Solar System. It shows you how the Sun, the Earth and the Moon are positioned and how they move in relation to one another.
safety Children will need adult supervision.
What you need Scissors
Card and glue (optional)
2 paper fasteners
What to do Carefully cut out the four templates shown on the nextpage.Ifyouwanttomakethemsturdier,stick the templates onto card with glue before you cut them out. Place piece 1 on top of piece 2 as shown. Place the Earth over piece 1 and secure all three pieces together with a paper fastener. Now place piece 2 on top of the Sun where shown and secure with another paper fastener. Your orrery is now ready to use. You can orbit the Moon around the Earth and see how it seems to change over a month. You can also try orbiting the Earth around the Sun to see how it moves throughout a year.
1
2
3
4
5

One day
PIECE 1
PIECE 2
THE SUN2 X PAPER FASTENERS
January
October
September
AugustJune
May
April
NovemberMarch
DecemberFebruary
July
TheMoon
Place Earth
here
Earth
One Month
One Year
Night
Place Piece
1 here
Day
January
October
September
AugustJune
May
April
NovemberMarch
DecemberFebruary
July
Place Piece2 here
One M
onth
One Year
NightPlace Piece1 here
Day
Place Earth
here
One day
Earth
The
Moon
CREDIT: Orrery activity produced with thanks to the Wynyard Woodland Park Planetarium and Observatory
COMPLETED ORRERY
COMPLETED ORRERY

bbc.co.uk/stargazing
© Published by BBC Learning
BridgeHouse,MediaCityUK,SalfordM502BH
cover photo: Patryk Sadowski
design: fanclubgroup.com
Printed:15%recycledpaper