standard floating license manager - silvaco patrick henry drive, bldg. 2 march 20, 2007 santa clara,...
TRANSCRIPT

Standard Floating License Manager
Installation and User’s Guide
4701 Patrick Henry Drive, Bldg. 2 March 20, 2007Santa Clara, CA 95054 Telephone (408) 567-1000

Standard Floating Licensing ManagerUser’s ManualCopyright 2007
4701 Patrick Henry Drive, Building #2Santa Clara, CA 95054
Phone: (408) 567-1000
ii Standard Floating Licensing Manager

Notice
The information contained in this document is subject to change without notice.
SIMUCAD DESIGN AUTOMATION MAKES NO WARRANTY OF ANY KIND WITH REGARD TO THIS MATERIAL, INCLUDING, BUT NOT LIMITED TO, THE IMPLIED WARRANTY OF FITNESS FOR A PARTICULAR PURPOSE.
SIMUCAD DESIGN AUTOMATION INC. shall not be liable for errors contained herein, or for incidental or consequential damages in connection with the furnishing, performance, or use of this material. This document contains proprietary information, which is protected by copyright. All rights are reserved. No part of this document may be photocopied, reproduced, or translated into another language without the prior written consent of Simucad Design Automation.
GUARDIAN, GUARDIAN DRC, REALTIME DRC, GUARDIAN LVS, GUARDIAN LPE, EXPERT, EXPERTVIEWS, GATEWAY, HARMONY, SMARTSPICE, SMARTSPICERF, SMARTSPICESEE, SMARTVIEW, SMARTLIB, SDDL, TWISTER, SPRINT, HARMONY, SILOS, HYPERFAULT, TURBOLINT, LISA, QUEST, EXACT, CLEVER, STELLAR, HIPEX-C, HIPEX-CRC, HIPEX-NET, HIPEX-RC, NOMAD, SCOUT, EDA OMNI, UTMOST, UTMOST III, UTMOST IV, SPAYN, ACCUCELL, ACCUCORE, ACCUMODEL, ACCUTEST, SFLM, VYPER, INTERPRETER, DECKBUILD, SMARTLIB, CIRCUIT OPTIMIZER, PROMOST, RESILIANCE, DISCOVERY, ANALOG EXPRESS, ANALOG IC DESIGN FLOW, CELEBRITY, CELEBRITY_C++ are trademarks of SIMUCAD DESIGN AUTOMATION INC.
© 2004-2007 by Simucad Design Automation Inc.
The information contained in this document is subject to change without notice.
SILVACO INTERNATIONAL MAKES NO WARRANTY OF ANY KIND WITH REGARD TO THIS MATERIAL, INCLUDING, BUT NOT LIMITED TO, THE IMPLIED WARRANTY OF FITNESS FOR A PARTICULAR PURPOSE.
SILVACO INTERNATIONAL shall not be held liable for errors contained herein or for incidental or consequential damages in connection with the furnishing, performance, or use of this material.
This document contains proprietary information, which is protected by copyright laws of the United States. All rights are reserved. No part of this document may be photocopied, reproduced, or translated into another language without the prior written consent of SILVACO INTERNATIONAL.
VIRTUAL WAFER FAB, VWF MANUFACTURING TOOLS, VWF AUTOMATION TOOLS, VWF INTERACTIVE TOOLS DECKBUILD, TONYPLOT, DEVEDIT, TONYPLOT3D, DEVEDIT3D, MASKVIEWS, ATHENA, SSUPREM4, MC IMPLANT, OPTOLITH, ELITE, MC DEPO/ETCH, SSUPREM3, SPDB, ATLAS, S-PISCES, BLAZE/BLAZE3D, GIGA2D/3D, MIXEDMODE2D/3D, SIC, FERRO, QUANTUM2D/3D, LUMINOUS2D/3D, LED, VCSELS, LASER, TFT2D/3D, OTFT, OLED, NOISE, DEVICE3D, THERMAL3D, ATLAS INTERPRETER, MERCURY, FASTBLAZE, FASTNOISE, FASTGIGA, FAST ATLAS C-INTERPRETER, MOCASIM, VICTORY, HARM, ZENITH, VISION, MIXSIM, TCAD DRIVEN CAD, SIMULATION STANDARD, CONNECTING TCAD TO TAPEOUT, AND TCAD OMNI are trademarks of Silvaco International.
© 1990-2007 by SILVACO International Inc.
All other trademarks mentioned in this manual are the property of their respective owners.
Standard Floating Licensing Manager iii

How to Read this Manual
Style Conventions
Font Style/Convention Description Example
• This represents a list of items or terms.
• Bullet A• Bullet B• Bullet C
1.2.3.
This represents a set of directions to perform an action.
To open a door:1. Unlock the door by inserting
the key into keyhole.2. Turn key counter-clockwise.3. Pull out the key from the
keyhole.4. Grab the doorknob and turn
clockwise and pull.
→ This represents a sequence of menu options and GUI buttons to perform an action.
File→Open
Courier This represents the commands, parameters, and variables syntax.
HAPPY BIRTHDAY
New Century Schoolbook Bold
This represents the menu options and buttons in the GUI.
File
New Century Schoolbook Italics
This represents the equations. abc=xyz
Note:This represents the additional important information. Note: Make sure you save often when
working on a manual.
NEW CENTURY SCHOOLBOOK IN SMALL CAPS
This represents the names of the product names.
EXPERT, GATEWAY, HIPEX, SMARTSPICE, STELLAR, and UTMOST.
Standard Floating Licensing Manager iv

Table of Contents
Chapter 1Introduction . . . . . . . . . . . . . . . . . . . . . . . . . . . . . . . . . . . . . . . . . . . . . . . . . . . . . . . . . . . . . . . 1-1
1.1: What is SFLM . . . . . . . . . . . . . . . . . . . . . . . . . . . . . . . . . . . . . . . . . . . . . . . . . . . . . . . . . . . . . . . . . . . . . . . . . . 1-11.1.1: Installation Steps . . . . . . . . . . . . . . . . . . . . . . . . . . . . . . . . . . . . . . . . . . . . . . . . . . . . . . . . . . . . . . . . . . . 1-1
1.2: What’s New in SFLM8 . . . . . . . . . . . . . . . . . . . . . . . . . . . . . . . . . . . . . . . . . . . . . . . . . . . . . . . . . . . . . . . . . . . 1-11.2.1: What was New in SFLM7 . . . . . . . . . . . . . . . . . . . . . . . . . . . . . . . . . . . . . . . . . . . . . . . . . . . . . . . . . . . . . 1-11.2.2: What was New in SFLM6 . . . . . . . . . . . . . . . . . . . . . . . . . . . . . . . . . . . . . . . . . . . . . . . . . . . . . . . . . . . . . 1-21.2.3: Supported Platforms. . . . . . . . . . . . . . . . . . . . . . . . . . . . . . . . . . . . . . . . . . . . . . . . . . . . . . . . . . . . . . . . . 1-21.2.4: Installing Software . . . . . . . . . . . . . . . . . . . . . . . . . . . . . . . . . . . . . . . . . . . . . . . . . . . . . . . . . . . . . . . . . . 1-21.2.5: License Server Registration . . . . . . . . . . . . . . . . . . . . . . . . . . . . . . . . . . . . . . . . . . . . . . . . . . . . . . . . . . . 1-31.2.6: License Installation. . . . . . . . . . . . . . . . . . . . . . . . . . . . . . . . . . . . . . . . . . . . . . . . . . . . . . . . . . . . . . . . . . 1-41.2.7: Setting up License Server(s) for Users . . . . . . . . . . . . . . . . . . . . . . . . . . . . . . . . . . . . . . . . . . . . . . . . . . 1-41.2.8: Setting up User Environment . . . . . . . . . . . . . . . . . . . . . . . . . . . . . . . . . . . . . . . . . . . . . . . . . . . . . . . . . . 1-5
1.3: Running the Software . . . . . . . . . . . . . . . . . . . . . . . . . . . . . . . . . . . . . . . . . . . . . . . . . . . . . . . . . . . . . . . . . . . 1-51.3.1: Specifying the License Server(s) . . . . . . . . . . . . . . . . . . . . . . . . . . . . . . . . . . . . . . . . . . . . . . . . . . . . . . . 1-51.3.2: Specifying a Path to the Applications. . . . . . . . . . . . . . . . . . . . . . . . . . . . . . . . . . . . . . . . . . . . . . . . . . . . 1-5
Chapter 2Registration. . . . . . . . . . . . . . . . . . . . . . . . . . . . . . . . . . . . . . . . . . . . . . . . . . . . . . . . . . . . . . . 2-1
2.1: Overview . . . . . . . . . . . . . . . . . . . . . . . . . . . . . . . . . . . . . . . . . . . . . . . . . . . . . . . . . . . . . . . . . . . . . . . . . . . . . . 2-12.2: Online Registration . . . . . . . . . . . . . . . . . . . . . . . . . . . . . . . . . . . . . . . . . . . . . . . . . . . . . . . . . . . . . . . . . . . . . 2-52.3: Offline Registration . . . . . . . . . . . . . . . . . . . . . . . . . . . . . . . . . . . . . . . . . . . . . . . . . . . . . . . . . . . . . . . . . . . . . 2-8
Chapter 3License Installation. . . . . . . . . . . . . . . . . . . . . . . . . . . . . . . . . . . . . . . . . . . . . . . . . . . . . . . . . 3-1
3.1: Overview . . . . . . . . . . . . . . . . . . . . . . . . . . . . . . . . . . . . . . . . . . . . . . . . . . . . . . . . . . . . . . . . . . . . . . . . . . . . . . 3-13.2: Automatic Update. . . . . . . . . . . . . . . . . . . . . . . . . . . . . . . . . . . . . . . . . . . . . . . . . . . . . . . . . . . . . . . . . . . . . . . 3-33.3: Install Locally Saved License File . . . . . . . . . . . . . . . . . . . . . . . . . . . . . . . . . . . . . . . . . . . . . . . . . . . . . . . . . 3-5
Chapter 4Specifying the License Server(s) Using SFLM Access . . . . . . . . . . . . . . . . . . . . . . . . . . . . 4-1
4.1: Overview . . . . . . . . . . . . . . . . . . . . . . . . . . . . . . . . . . . . . . . . . . . . . . . . . . . . . . . . . . . . . . . . . . . . . . . . . . . . . . 4-14.1.1: Starting SFLM Access . . . . . . . . . . . . . . . . . . . . . . . . . . . . . . . . . . . . . . . . . . . . . . . . . . . . . . . . . . . . . . . 4-1
4.2: Starting the Server List Configuration Wizard . . . . . . . . . . . . . . . . . . . . . . . . . . . . . . . . . . . . . . . . . . . . . . . 4-24.3: Choosing Configuration Action . . . . . . . . . . . . . . . . . . . . . . . . . . . . . . . . . . . . . . . . . . . . . . . . . . . . . . . . . . . 4-34.4: Adding a Server . . . . . . . . . . . . . . . . . . . . . . . . . . . . . . . . . . . . . . . . . . . . . . . . . . . . . . . . . . . . . . . . . . . . . . . . 4-4
4.4.1: Adding a Server - Local / Network . . . . . . . . . . . . . . . . . . . . . . . . . . . . . . . . . . . . . . . . . . . . . . . . . . . . . . 4-54.4.2: Adding a Server - Internet (Online Billing Service). . . . . . . . . . . . . . . . . . . . . . . . . . . . . . . . . . . . . . . . . . 4-64.4.3: Logging On to a Server . . . . . . . . . . . . . . . . . . . . . . . . . . . . . . . . . . . . . . . . . . . . . . . . . . . . . . . . . . . . . . 4-74.4.4: Adding a Server - Redundant. . . . . . . . . . . . . . . . . . . . . . . . . . . . . . . . . . . . . . . . . . . . . . . . . . . . . . . . . . 4-8
Standard Floating Licensing Manager v

Standard Floating License Manager Installation and User’s Guide
Chapter 5Customer Environment Settings. . . . . . . . . . . . . . . . . . . . . . . . . . . . . . . . . . . . . . . . . . . . . . 5-1
5.1: Setting The Path To The Software . . . . . . . . . . . . . . . . . . . . . . . . . . . . . . . . . . . . . . . . . . . . . . . . . . . . . . . . . . 5-15.2: Choosing A Single License Server for a Specific User . . . . . . . . . . . . . . . . . . . . . . . . . . . . . . . . . . . . . . . . . 5-1
5.2.1: Local Settings for Individual Users . . . . . . . . . . . . . . . . . . . . . . . . . . . . . . . . . . . . . . . . . . . . . . . . . . . . . . 5-15.2.2: How to Set the SFLM_SERVERS Environment Variable . . . . . . . . . . . . . . . . . . . . . . . . . . . . . . . . . . . . . 5-1
5.3: Choosing Multiple License Servers for a Specific User . . . . . . . . . . . . . . . . . . . . . . . . . . . . . . . . . . . . . . . . 5-25.4: Choosing a Redundant Server Cluster for a Specific User . . . . . . . . . . . . . . . . . . . . . . . . . . . . . . . . . . . . . . 5-25.5: Testing User Environment . . . . . . . . . . . . . . . . . . . . . . . . . . . . . . . . . . . . . . . . . . . . . . . . . . . . . . . . . . . . . . . . 5-3
Chapter 6Administration Page. . . . . . . . . . . . . . . . . . . . . . . . . . . . . . . . . . . . . . . . . . . . . . . . . . . . . . . . 6-1
6.1: Administration Features . . . . . . . . . . . . . . . . . . . . . . . . . . . . . . . . . . . . . . . . . . . . . . . . . . . . . . . . . . . . . . . . . . 6-16.1.1: Install New License(s) . . . . . . . . . . . . . . . . . . . . . . . . . . . . . . . . . . . . . . . . . . . . . . . . . . . . . . . . . . . . . . . . 6-16.1.2: Change Password . . . . . . . . . . . . . . . . . . . . . . . . . . . . . . . . . . . . . . . . . . . . . . . . . . . . . . . . . . . . . . . . . . . 6-16.1.3: Re-Register License Server . . . . . . . . . . . . . . . . . . . . . . . . . . . . . . . . . . . . . . . . . . . . . . . . . . . . . . . . . . . 6-26.1.4: Setup Redundant Servers . . . . . . . . . . . . . . . . . . . . . . . . . . . . . . . . . . . . . . . . . . . . . . . . . . . . . . . . . . . . . 6-26.1.5: Customize Logging . . . . . . . . . . . . . . . . . . . . . . . . . . . . . . . . . . . . . . . . . . . . . . . . . . . . . . . . . . . . . . . . . . 6-46.1.6: Synchronize Server Time . . . . . . . . . . . . . . . . . . . . . . . . . . . . . . . . . . . . . . . . . . . . . . . . . . . . . . . . . . . . . 6-86.1.7: Send Test Log Message . . . . . . . . . . . . . . . . . . . . . . . . . . . . . . . . . . . . . . . . . . . . . . . . . . . . . . . . . . . . . . 6-8
Chapter 7Reports Page . . . . . . . . . . . . . . . . . . . . . . . . . . . . . . . . . . . . . . . . . . . . . . . . . . . . . . . . . . . . . 7-1
7.1: Types of Reports . . . . . . . . . . . . . . . . . . . . . . . . . . . . . . . . . . . . . . . . . . . . . . . . . . . . . . . . . . . . . . . . . . . . . . . . 7-17.1.1: Active User(s) . . . . . . . . . . . . . . . . . . . . . . . . . . . . . . . . . . . . . . . . . . . . . . . . . . . . . . . . . . . . . . . . . . . . . . 7-17.1.2: Valid License(s) . . . . . . . . . . . . . . . . . . . . . . . . . . . . . . . . . . . . . . . . . . . . . . . . . . . . . . . . . . . . . . . . . . . . . 7-27.1.3: Token Charges . . . . . . . . . . . . . . . . . . . . . . . . . . . . . . . . . . . . . . . . . . . . . . . . . . . . . . . . . . . . . . . . . . . . . 7-27.1.4: License Status . . . . . . . . . . . . . . . . . . . . . . . . . . . . . . . . . . . . . . . . . . . . . . . . . . . . . . . . . . . . . . . . . . . . . . 7-27.1.5: Installed License File(s). . . . . . . . . . . . . . . . . . . . . . . . . . . . . . . . . . . . . . . . . . . . . . . . . . . . . . . . . . . . . . . 7-3
Chapter 8Support Utilities . . . . . . . . . . . . . . . . . . . . . . . . . . . . . . . . . . . . . . . . . . . . . . . . . . . . . . . . . . . 8-1
8.1: Overview. . . . . . . . . . . . . . . . . . . . . . . . . . . . . . . . . . . . . . . . . . . . . . . . . . . . . . . . . . . . . . . . . . . . . . . . . . . . . . . 8-1
Chapter 9Virtual Private Networks (VPNs) and Firewalls . . . . . . . . . . . . . . . . . . . . . . . . . . . . . . . . . . 9-1
9.1: Virtual Private Networks (VPNs) . . . . . . . . . . . . . . . . . . . . . . . . . . . . . . . . . . . . . . . . . . . . . . . . . . . . . . . . . . . 9-19.2: Firewalls . . . . . . . . . . . . . . . . . . . . . . . . . . . . . . . . . . . . . . . . . . . . . . . . . . . . . . . . . . . . . . . . . . . . . . . . . . . . . . . 9-1
Chapter 10SFLM Compatibility . . . . . . . . . . . . . . . . . . . . . . . . . . . . . . . . . . . . . . . . . . . . . . . . . . . . . . . 10-1
10.1: Older Applications. . . . . . . . . . . . . . . . . . . . . . . . . . . . . . . . . . . . . . . . . . . . . . . . . . . . . . . . . . . . . . . . . . . . . 10-110.2: License Server ID . . . . . . . . . . . . . . . . . . . . . . . . . . . . . . . . . . . . . . . . . . . . . . . . . . . . . . . . . . . . . . . . . . . . . 10-110.3: Upgrading an SFLM4 Installation. . . . . . . . . . . . . . . . . . . . . . . . . . . . . . . . . . . . . . . . . . . . . . . . . . . . . . . . . 10-1
vi Standard Floating Licensing Manager

Table of Contents
Appendix AFrequently Asked Questions . . . . . . . . . . . . . . . . . . . . . . . . . . . . . . . . . . . . . . . . . . . . . . . . .A-1
A.1: How do I bring up the web front end to SFLM? . . . . . . . . . . . . . . . . . . . . . . . . . . . . . . . . . . . . . . . . . . . . . . A-1A.2: What version of SFLM do I have? . . . . . . . . . . . . . . . . . . . . . . . . . . . . . . . . . . . . . . . . . . . . . . . . . . . . . . . . . A-1A.3: What is registration? . . . . . . . . . . . . . . . . . . . . . . . . . . . . . . . . . . . . . . . . . . . . . . . . . . . . . . . . . . . . . . . . . . . . A-1A.4: What is activation? . . . . . . . . . . . . . . . . . . . . . . . . . . . . . . . . . . . . . . . . . . . . . . . . . . . . . . . . . . . . . . . . . . . . . A-1A.5: What should I choose - online or offline registration? . . . . . . . . . . . . . . . . . . . . . . . . . . . . . . . . . . . . . . . . A-1A.6: I have forgotten my password, what should I do? . . . . . . . . . . . . . . . . . . . . . . . . . . . . . . . . . . . . . . . . . . . . A-1A.7: When I run an application I cannot get a license, what should I do? . . . . . . . . . . . . . . . . . . . . . . . . . . . . . A-2A.8: How do I find out who has checked out a particular product license? . . . . . . . . . . . . . . . . . . . . . . . . . . . A-2A.9: What are redundant servers? . . . . . . . . . . . . . . . . . . . . . . . . . . . . . . . . . . . . . . . . . . . . . . . . . . . . . . . . . . . . . A-2A.10: How do I set up redundant servers? . . . . . . . . . . . . . . . . . . . . . . . . . . . . . . . . . . . . . . . . . . . . . . . . . . . . . . A-2A.11: What can cause me to need to re-register? . . . . . . . . . . . . . . . . . . . . . . . . . . . . . . . . . . . . . . . . . . . . . . . . A-2A.12: How can I reset the SFLM? . . . . . . . . . . . . . . . . . . . . . . . . . . . . . . . . . . . . . . . . . . . . . . . . . . . . . . . . . . . . . . A-2
Standard Floating Licensing Manager vii

Standard Floating License Manager Installation and User’s Guide
This page is intentionally left blank.
viii Standard Floating Licensing Manager

Chapter 1:Introduction
1.1: What is SFLMThis chapter introduces the license management software Standard Floating License Manager (SFLM). For those unfamiliar with SFLM, see Section 1.2: “What’s New in SFLM8”. The following chapters provide a step-by-step guide through the first time installation to show the typical screens that you will face.
1.1.1: Installation Steps
Note: Check Chapter 9: “Virtual Private Networks (VPNs) and Firewalls”for Firewall and VPN connection problems.
1.2: What’s New in SFLM8• Real-time license remix. SFLM8 is the first version that supports token licenses. Token licenses are
the basis of real-time remix. License files with token licenses (format 8 license files) cannot be used with older SFLM server versions.
• You can use multiple USB HASP keys on a single server. This allows you to transfer some licenses to laptops or home computers and later combine them onto a central server.
• License usage logging into “tab separated values” files. Summaries may be kept by product or user. Complete logs of license check-outs and check-ins may also be kept.
1.2.1: What was New in SFLM7Improved performance and bug fixes.
Step Overview Details
Install Software Section 1.2.4: “Installing Software”
Register SFLM License Server Section 1.2.5: “License Server Registration”
Chapter 2: “Registration”
Install License File Section 1.2.6: “License Installa-tion”
Chapter 3: “License Installa-tion”
Set Default License Server for this Installation Directory
Run sflm_access Chapter 4: “Specifying the License Server(s) Using SFLM Access”
Set up User Environment Add /<installdir>/bin to user path (in Unix only).
Chapter 5: “Customer Environ-ment Settings”
Test Environment Section 5.5: “Testing User Environment”
Standard Floating Licensing Manager 1-1

Standard Floating License Manager Installation and User’s Guide
1.2.2: What was New in SFLM6• Incorporated a web based front end and can use either Netscape or Internet Explorer 6.• License files are linked to the host. In the case of Windows or RedHat Linux systems, the license file
may also be linked to the HASP security key instead. USB HASP keys are supported on Linux. USB and Parallel HASP keys are supported on Windows.
• License files are now linked to information derived from the server machine hardware. This information is sent to the SFLM database through the process of registration and a license file is then generated.
• Supports Multiple Server Redundancy.• Multiple license servers may now exist on one network and an application may cycle through them
to obtain a license.
1.2.3: Supported PlatformsTable 1-1 shows currently supported platforms in SFLM server.
SFLM server uses the web browser that is supported on each platform, Internet Explorer (IE) 6.0, and Netscape 4.6.
1.2.4: Installing SoftwareThis section gives an overview of the installation process, which consists of two stages: LicenseServer Registration and License Installation. You should install software into a single installation directory, which is called <installdir>. You may have downloaded the software or received it on a CDROM. You can install multiple versions of the software in the same directory.
Installing on Windows
Software distributed for Windows is in an Install Shield self extracting archive. Run this program and follow directions. If you are installing onto a license server, select Licensing. Otherwise, select only the packages you wish to install.
Installing on Unix (Solaris and Red Hat)
These files come in a tar gzip format. First, make a directory <installdir> such as /opts/simucad. Then, change to that directory. Finally, extract the files using tar and gunzip. For example:
mkdir /opt/simucadcd /opt/simucadgunzip < /cdrom/sflm.tar.gz | tar xf -
Table 1-1: Supported Platforms for SFLM Server
Platform Operating System
Sun SPARC Solaris 9 and 10 (64 bit)
Windows XP (32-bit OS on 32-bit or 64-bit x86 CPUs)
Linux Redhat Enterprise 3 and 4 (32-bit or 64 bit OS on 32-bit or 64bit x86 CPU)
1-2 Standard Floating Licensing Manager

Introduction
1.2.5: License Server RegistrationThe first stage is called Registration (also called Activation). It is a means by which a unique description of the machine acting as a license server is generated and saved in the online SFLMdatabase. Chapter 2: “Registration” describes this stage in detail.
Figure 1-1 shows a flowchart of the registration process. After entering a password, the registration process begins and the software gathers information about the customer’s computer (e.g., computer name and hostid). This information together with the user’s name and contact information will be transmitted by way of either http (if online registration is chosen) or by E-mail (if offline registration is chosen) to the license database. Basically, Registration is a process that delivers a unique machine ID number to the SFLM database so that a license can be keyed to it.
Note: The online registration requires that the browser is able to access the internet. These are representations of web pages but not their exact content.
Figure 1-1: SFLM Registration Flowchart
Standard Floating Licensing Manager 1-3

Standard Floating License Manager Installation and User’s Guide
1.2.6: License InstallationWhen all the registration information is received, a license file will be generated and keyed to your specific machine. You will then be informed by Simucad that the license is ready and can be obtained either automatically or by E-mail. Figure 1-2 shows a flowchart of the licensing process.
The automatic route is the most convenient as SFLM server will contact the online SFLM license database, and request a license to be transmitted through http. This license file will be saved locally on your machine and no further contact will be required.
Note: The automatic update requires that the browser is able to access the internet. These are representations of web pages but not their exact content.
The alternative offline route is to send the license file by E-mail, floppy disk or some other means. You would then use a file browser to find this file and load it with your web browser.
Figure 1-2: SFLM License File(s) Flowchart
The SFLM license server should now be able to issue licenses to applications.
1.2.7: Setting up License Server(s) for UsersRun sflm_access to specify license server(s). See Chapter 4: “Specifying the License Server(s) Using SFLM Access” for more details.
1-4 Standard Floating Licensing Manager

Introduction
1.2.8: Setting up User EnvironmentOn Unix, add /<installdir>/bin to user’s path. See Chapter 5: “Customer Environment Settings”for more details.
1.3: Running the SoftwareTo run applications, you must do two things:
• Specify to the license server(s).• Specify the application you wish to run.
1.3.1: Specifying the License Server(s)There are two ways to specify license server(s). First, you can specify a list of license servers using sflm_access. That sets the default list of servers used by the applications installed in the same location as the sflm_access program. This is normally done by the person installing the software as other users may have write permission problems to the configuration file (see Section 4.2: “Starting the Server List Configuration Wizard” for more details). Alternatively, you can set the environmental variable SFLM_SERVERS (see Section 5.2.2: “How to Set the SFLM_SERVERS Environment Variable”).
1.3.2: Specifying a Path to the Applications.On Windows, you normally do not specify a path. You simply open up the shortcut screen and double click the application.
On UNIX systems (such as Solaris, Linux and HPUX), each user should add /<installdir>/bin to their path. See Chapter 5: “Customer Environment Settings” for more details.
Standard Floating Licensing Manager 1-5

Standard Floating License Manager Installation and User’s Guide
This page intentionally is left blank.
1-6 Standard Floating Licensing Manager

Chapter 2:Registration
2.1: OverviewThis chapter describes how to install the SFLM software and how the process of machine registration works using a web browser. This step must be performed by all new users of SFLM server. Figure 2-1shows how the process of SFLM registration.
Figure 2-1: SFLM Registration Flow
Standard Floating Licensing Manager 2-1

Standard Floating License Manager Installation and User’s Guide
The first step is to obtain the SFLM software from the software vendor, unpack it onto your machine and install it. Instructions for unpacking the software will be supplied with the software delivery. After unpacking the software, install SFLM on the machine designated as the license server. SFLM server software is included in all baseline release packages. Then, start SFLM server on the license server.
The SFLM installation is performed from a command line on Solaris, HPUX and Linux RedHat operating systems. As the root user, execute the following command:
/<installdir>/bin/sflm -install
where <installdir> is the installation directory where the software was unpackaged.
If you are using a parallel HASP 4 key on a Linux platform, execute:
/<installdir>/bin/sflm -install -hasp
The -hasp option is not required for USB HASP.
On Windows platforms, InstallShield will take care of this first step but you need to have administration rights.
Note: Running the sflm command requires root access. Once you run the sflm -install command, the server will automatically start when the machine boots up. The rest of the registration may be from a regular user account.
On all platforms, you will be asked to provide a new password. Some of the web pages for SFLM affect how the license server functions. Therefore, you must use give the original password before accessing these functions. All other pages that are standard reports will be accessible to users without this password.
Note: The SFLM password is only for protecting certain SFLM pages. It is not an existing system password.
After installation, bring up a web browser (either Netscape or Internet Explorer) and type in:
http://<servername>:3162
in the address bar. Here, <servername> is the hostname or machine name of the computer where sflm -install or InstallShield was run. If you do not know the name of your current machine, you can use the special name 127.0.0.1 instead of <servername>. For example, http://127.0.0.1:3162.
Figure 2-2: Browser showing the special name
Note: The web browser does not need to be run on the license server machine. After the sflm -install, you may use any machine to run the browser. The <servername>, however, MUST be the machine where sflm -installwas performed.
2-2 Standard Floating Licensing Manager

Registration
When the web browser pops up, it should display a page similar to the one shown in Figure 2-3. This is the beginning of a wizard that will guide you through the process of registration.
At anytime, you can click on Help in the browser to provide more information about the current page.
Note: Existing Simucad users can unpack the new SFLM software on top of their existing SFLM4 installation.
Figure 2-3: Set Password Page
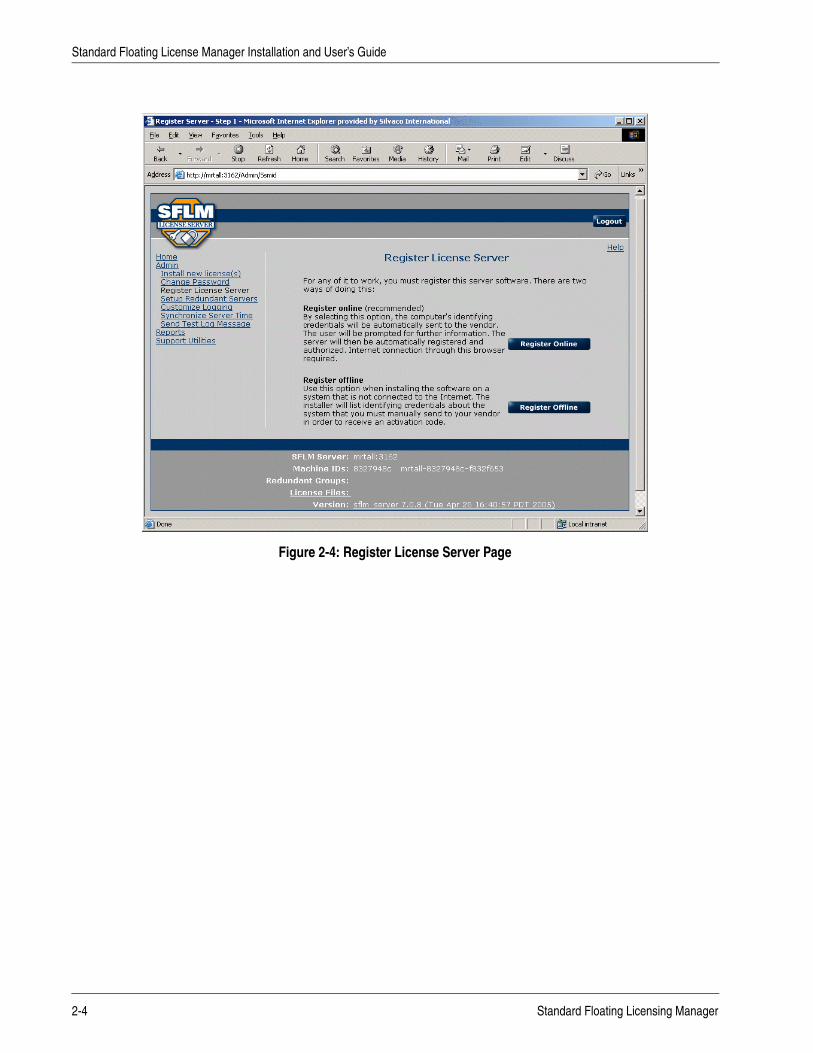
The first step is to enter the SFLM administrator password that was typed in during the initial software installation. After entering the password, the wizard proceeds to the next screen (shown in Figure 2-4) where you decide if they are registering either Online or Offline. If the machine has access to the internet, we recommend that you choose Online registration. You should only choose Offline registration if the machine has no access to the internet.
Note: For online registration, it is the machine running the web browser that needs access to the internet, and not the license server where SFLM was installed.
Note: No direct access to the internet is needed. The machine running the browser can reside behind a firewall as long as the proxy configuration is set properly.
Standard Floating Licensing Manager 2-3
Standard Floating License Manager Installation and User’s Guide
Figure 2-4: Register License Server Page
2-4 Standard Floating Licensing Manager
Registration
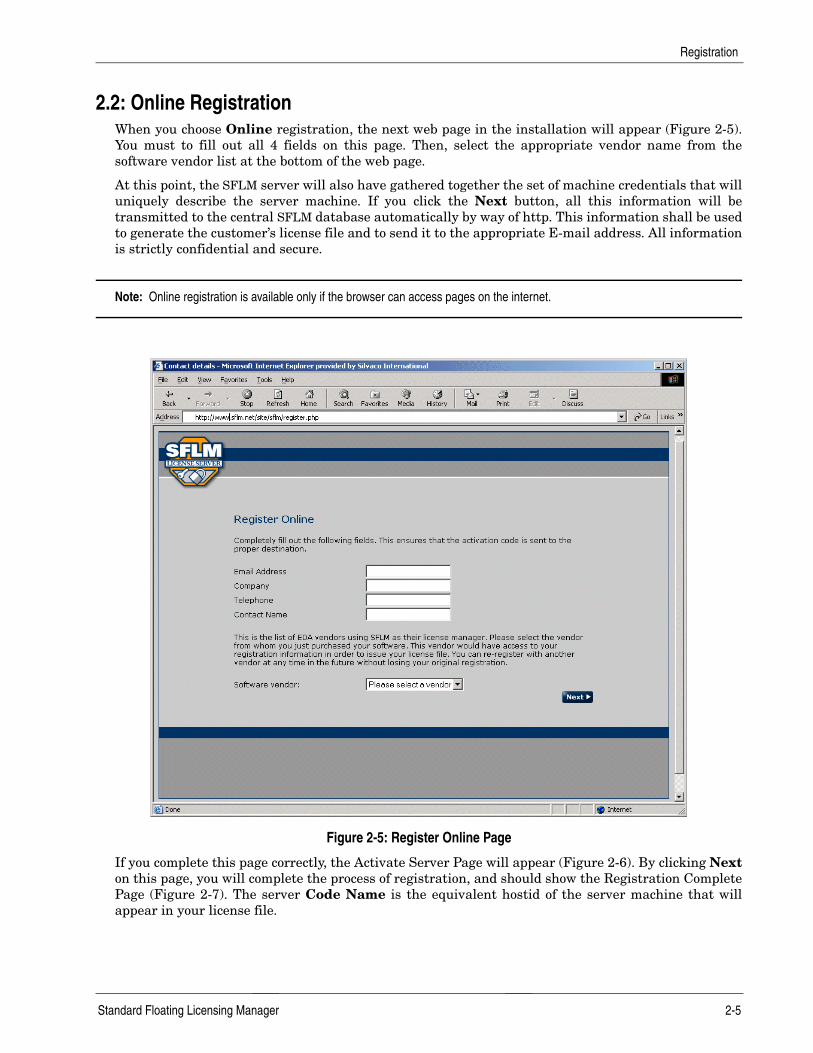
2.2: Online RegistrationWhen you choose Online registration, the next web page in the installation will appear (Figure 2-5). You must to fill out all 4 fields on this page. Then, select the appropriate vendor name from the software vendor list at the bottom of the web page.
At this point, the SFLM server will also have gathered together the set of machine credentials that will uniquely describe the server machine. If you click the Next button, all this information will be transmitted to the central SFLM database automatically by way of http. This information shall be used to generate the customer’s license file and to send it to the appropriate E-mail address. All information is strictly confidential and secure.
Note: Online registration is available only if the browser can access pages on the internet.
Figure 2-5: Register Online Page
If you complete this page correctly, the Activate Server Page will appear (Figure 2-6). By clicking Nexton this page, you will complete the process of registration, and should show the Registration Complete Page (Figure 2-7). The server Code Name is the equivalent hostid of the server machine that will appear in your license file.
Standard Floating Licensing Manager 2-5

Standard Floating License Manager Installation and User’s Guide
Figure 2-6: Activate Server Page
Registration is not yet complete. You must click the Next button to send the activation code to the server.
Figure 2-7: Registration Complete Page
2-6 Standard Floating Licensing Manager

Registration
Registration is now complete and a page similar to Figure 2-8 will appear when you click on OK. You will now wait until the software vendor informs you that a license file(s) is ready to be retrieved.
Figure 2-8: Main SFLM Home Page
Standard Floating Licensing Manager 2-7

Standard Floating License Manager Installation and User’s Guide
2.3: Offline RegistrationWhen you choose an Offline registration, we must assume that you cannot access the web from the server machine or from any other machine on the network. If you click on Offline registration, the Offline Registration Page will appear (Figure 2-9).
Figure 2-9: Offline Registration Page
You must take the Machine Credentials, MachineID and MachineKey information and send it to your software vendor. You can send them by by E-mail (if by E-mail, send it to the vendor account manager), floppy disk, and so forth.
For example, the key parts of the page shown in Figure 2-9 that must be sent are the following.
2-8 Standard Floating Licensing Manager

Registration
At this point, if you click on Next, the Code Name and Activation Code Page (Figure 2-10) will appear but cannot be completed. The Code Name and Activation Code will be issued on receipt of the registration data above. When you receive this information, return to the Offline Registration Page and enter the Code Name and Activation Code.
You can return to this page any time by opening the main SFLM home page (http://servername:3162), clicking on Admin, Re-register License Server, Register Offline, and finally Next.
When you enter the Code Name and Activation Code, you will see the Registration Complete Page (Figure 2-7) that lets you know the activation was successful. Click OK on this screen to complete the SFLM activation. The SFLM system is now ready to accept license files.
In response to your E-mail, you will receive a message like the following.
Machine Credentials are:0ID0_x5aHECTa9n/5Cze35AViGQ4Hs5biGmqulW/DPT61tkLpUkUD81UTMvdIfLklVsSKlYHiSlBRHq7iabGAaMq0rV2K+UUUr+dcGY75WX9rb33tykhcPcNO1ZQHT4WBMEKO0VO2S3cgrS22RWOu/nWN9mUM24uPMu1tX7JXgnJ9vjfMK2iQY/chkoNMvw4cBk3GfuXlQ+ujsexuStyduM0a1ZbmeNaDIjl0K2/2nQJZ8ajBcV6yL63aEBwgrgGNJjPLI4VeNURwe+BZInk6msaHTOpr4G1Wo3/pSePnTl2XEne7ZCMB7wjGhPUfQKGGC1Ab9Sl+DOikgmKHk3OQUYs1JJLIsC1Re9moJbLRzgawSuIzShock4ZYwfS8QNMLZs3QSGoEBPgF9V/A2QYrUPpIKYlKtbVWyY5GCmxXuWpCsWyEpF9jpMHDZOy0KALhe/iKQELjNFQtIUQVFMCDCMW9ymum3DRdxD1ugsq04qO/Id1eomOyamcq/T0XJDFbEAocpC8pAqqIjijUtcZwsCN6g/tyR4llDgbs61pdrNCxG3ThTKOGKHIWv4XYxDzE/4wjb1U3ps1Pd81G1Sl/tukf4kYsNzxwALztA1RUxHsCxaLOZ+CoScdhTmsolp2xmrgRoY661vr9fJ47SHhxq69tt3uLGyw8pNPc+rTt1ao2r9e/rrbZNaomoGiO658ZhFBSFtC9I1eeHx9KA3NjB70y3w==
MachineID mrtall-8327948c-f832f653MachineKey E3SX P9AD 4GJ0 GS7G 7VN1 2FYC
CodeName 0SSMID00009009ActivationCode 1234 ABCD 5678 EFGHMachineID mrtall-8327948c-f832f653MachineKey E3SX P9AD 4GJ0 GS7G 7VN1 2FYC
Standard Floating Licensing Manager 2-9

Standard Floating License Manager Installation and User’s Guide
Figure 2-10: Code Name and Activation Code Page
Figure 2-11: Registration Complete Page
2-10 Standard Floating Licensing Manager

Registration
Registration is now complete and a page similar to Figure 2-12 will appear when you click on OK.
Figure 2-12: Main SFLM Home Page
Standard Floating Licensing Manager 2-11

Standard Floating License Manager Installation and User’s Guide
This page is intentionally left blank.
2-12 Standard Floating Licensing Manager
Chapter 3:License Installation
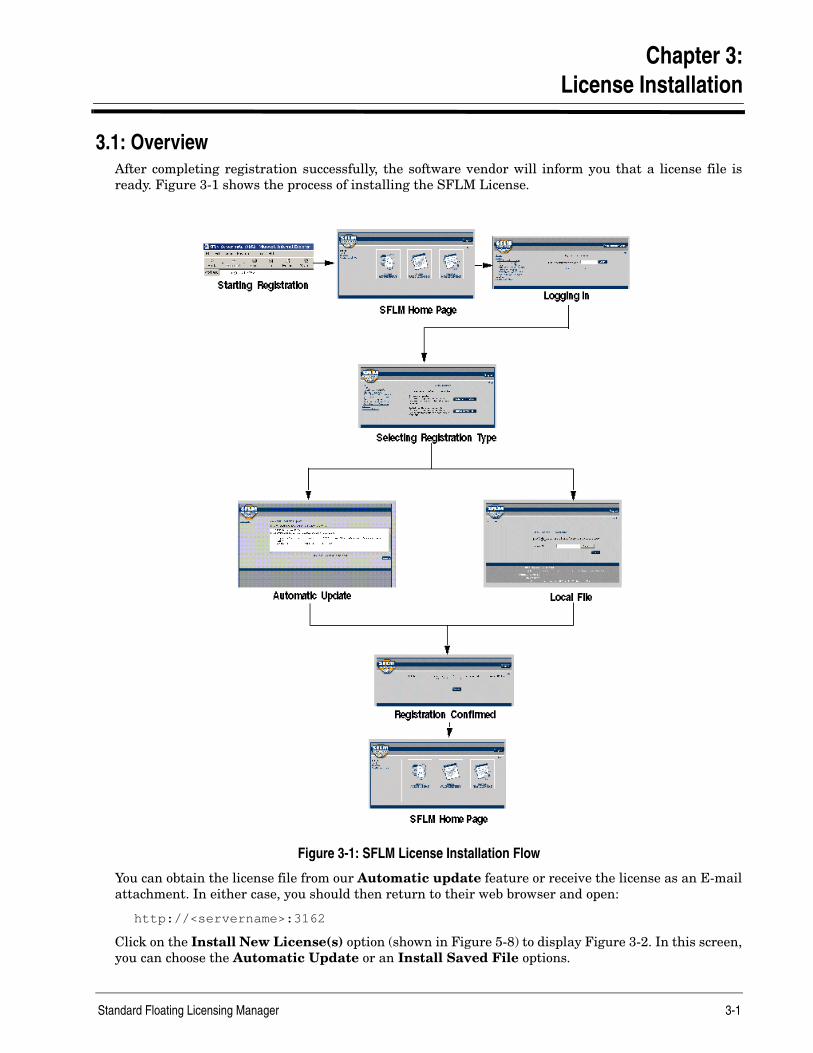
3.1: OverviewAfter completing registration successfully, the software vendor will inform you that a license file is ready. Figure 3-1 shows the process of installing the SFLM License.
Figure 3-1: SFLM License Installation Flow
You can obtain the license file from our Automatic update feature or receive the license as an E-mail attachment. In either case, you should then return to their web browser and open:
http://<servername>:3162
Click on the Install New License(s) option (shown in Figure 5-8) to display Figure 3-2. In this screen, you can choose the Automatic Update or an Install Saved File options.
Standard Floating Licensing Manager 3-1

Standard Floating License Manager Installation and User’s Guide
Figure 3-2: Install New License Page
3-2 Standard Floating Licensing Manager

License Installation
3.2: Automatic UpdateThis option will download your license file directly from the web. When you click on this button the Automatic Update Page (Figure 3-3) will appear. If you accept this, then the Automatic Update Accepted Page (Figure 3-4) will appear. Once this is complete, the server will be able to distribute licenses. By returning to the Home page (shown in Figure 2-8) and clicking on Show Valid License(s), a list of all available licenses will be displayed.
Note: The Automatic upload is available only if the browser can access pages on the internet.
Figure 3-3: Automatic Update Page
Standard Floating Licensing Manager 3-3

Standard Floating License Manager Installation and User’s Guide
Figure 3-4: Automatic Update Accepted Page
3-4 Standard Floating Licensing Manager

License Installation
3.3: Install Locally Saved License FileThis option is designed if you had to register your machine offline. Typically, you would be sent a license by E-mail or floppy disk, which should be saved to your hard disk. Clicking on this option will open the Install Locally Saved License File Page (Figure 3-5) where you will be asked to browse to the saved file and load it.
Figure 3-5: Install Locally Saved License File Page
Once you find the license file, click Next to load it. If the license file is valid, the following confirmation page will appear (Figure 3-6). Otherwise, an error message will appear.
Standard Floating Licensing Manager 3-5

Standard Floating License Manager Installation and User’s Guide
Figure 3-6: License Update Accepted Page
Once this is complete, the server will be able to distribute licenses. By returning to the Home page (shown in Figure 5-8) and clicking on Show Valid License(s), a list of all available licenses will be displayed.
3-6 Standard Floating Licensing Manager

Chapter 4:Specifying the License Server(s) Using SFLM Access
4.1: OverviewThere are two ways to specify which license server(s) to use. First, you can specify a list of license servers using sflm_access, which sets the default list of servers used by the applications installed in the same location as the sflm_access program. This is normally done by the person installing the software as other users may have write permission problems to the configuration file.
Alternatively, you can set the environmental variable SFLM_SERVERS, which is described in Chapter 5: “Customer Environment Settings”, Section 5.2.2: “How to Set the SFLM_SERVERS Environment Variable”.
4.1.1: Starting SFLM AccessOn Windows, open the Shortcuts window and double-click on the SFLM Access icon.
On UNIX systems, like Solaris, Linux and HPUX, run the command:
/<installdir>/bin/sflm_access
Figure 4-1: Current List of Servers
This shows the current list of license servers to use.
SIMUCAD Design Automation, Inc. 4-1

Standard Floating License Manager Installation and User’s Guide
4.2: Starting the Server List Configuration WizardClick on the Configure button. If this button is not highlighted and the current list is not right, you may need to change to the administrative user (root on UNIX) or to a user that has write permission to /<installdir>/bin/sflm_access.cf. Do not edit this file manually, always use sflm_access.
When you press Configure, the following window appears.
Figure 4-2: Configure License Server List
Press Next to go to the next step.
4-2 SIMUCAD Design Automation, Inc.

Specifying the License Server(s) Using SFLM Access
4.3: Choosing Configuration ActionThis screen allows four different actions. Each action must be finished or cancelled before proceeding to a different action.
1. Add a new server (to the list of servers to check for licenses). See 4.4.1: “Adding a Server - Local / Network” on page 4-5 for more details.
2. Define the order of the existing servers. This changes the order in which the servers try to obtain a license. The first server grants the license. At that time, all servers will then be searched in order for a license.
3. Modify an existing server. This allows you to change the name, or other information, of an existing server. It also allows you to change the order of a redundant server cluster.
4. Remove an existing server (from the list of license servers used to obtain a license).
Figure 4-3: Adding a New Server
SIMUCAD Design Automation, Inc. 4-3

Standard Floating License Manager Installation and User’s Guide
4.4: Adding a ServerChoose a server type:
• Local / Network (see 4.4.1: “Adding a Server - Local / Network” on page 4-5)• Internet (see 4.4.2: “Adding a Server - Internet (Online Billing Service)” on page 4-6)• Redundant (see 4.4.4: “Adding a Server - Redundant” on page 4-8)
Figure 4-4: Server Types
4-4 SIMUCAD Design Automation, Inc.

Specifying the License Server(s) Using SFLM Access
4.4.1: Adding a Server - Local / NetworkThis is the normal case of a standard server. Simply specify the name of the server (such as mrtall), press Next, rearrange the server order (if needed) and click Finished. See Figures 4-5 and 4-6.
Figure 4-5: Adding a Server - Local / Network
Figure 4-6: Server List
SIMUCAD Design Automation, Inc. 4-5

Standard Floating License Manager Installation and User’s Guide
4.4.2: Adding a Server - Internet (Online Billing Service)This option is used when you have an online billing service, such as EDAonDemand.com. Choose your billing service from the pulldown list (by clicking the box) or by typing in the server name. If you connect through a firewall, you may need to specify your http proxy and port number. Leave these fields blank if you are directly connected to the internet. If your Internet Explorer is configured to use an http proxy, this setting can be read by checking the Use IE defaults box. Click Next and arrange the order of the servers. Normally, the internet server should be the last (and only) server in the list. Click Finish to complete the adding of this server.
Figure 4-7: Adding a Server - Internet
4-6 SIMUCAD Design Automation, Inc.
Specifying the License Server(s) Using SFLM Access
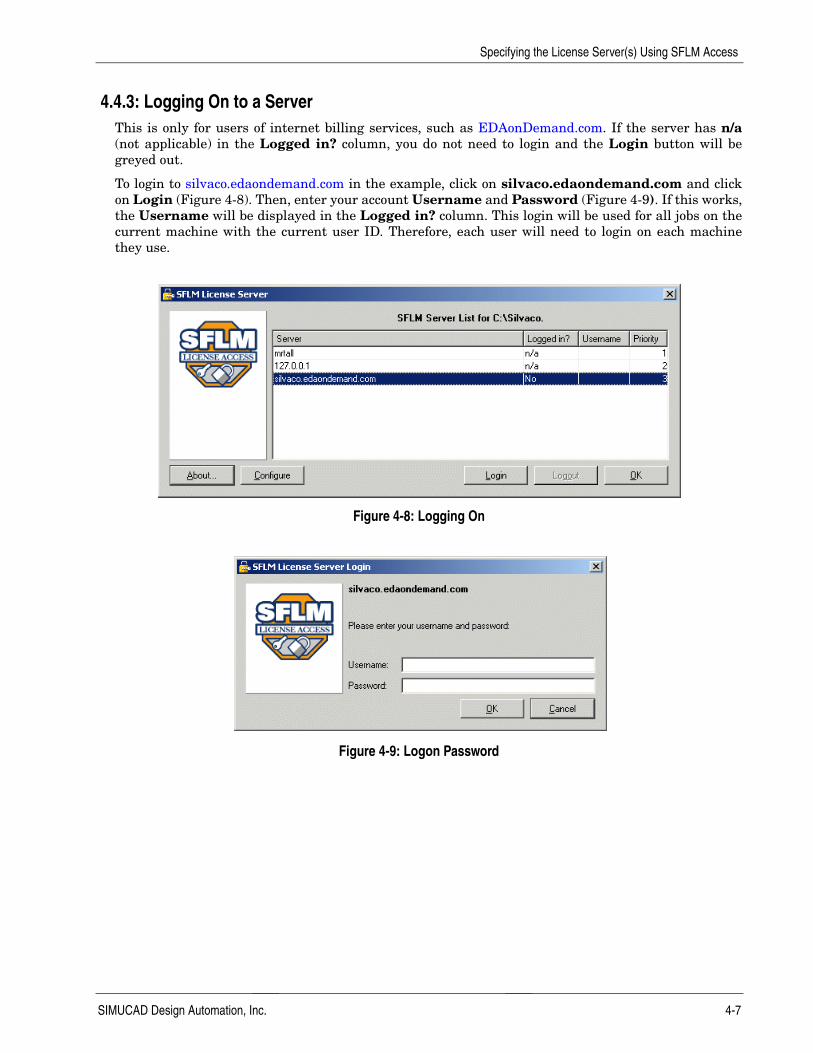
4.4.3: Logging On to a ServerThis is only for users of internet billing services, such as EDAonDemand.com. If the server has n/a(not applicable) in the Logged in? column, you do not need to login and the Login button will be greyed out.
To login to silvaco.edaondemand.com in the example, click on silvaco.edaondemand.com and click on Login (Figure 4-8). Then, enter your account Username and Password (Figure 4-9). If this works, the Username will be displayed in the Logged in? column. This login will be used for all jobs on the current machine with the current user ID. Therefore, each user will need to login on each machine they use.
Figure 4-8: Logging On
Figure 4-9: Logon Password
SIMUCAD Design Automation, Inc. 4-7

Standard Floating License Manager Installation and User’s Guide
4.4.4: Adding a Server - RedundantAdd the three servers to the list which you registered as redundant servers (see Figures 4-9 and 4-10). See “Setting Up Redundant Servers” on page 9-3 for more details.
Figure 4-10: Adding a Redundant Server
Figure 4-11: Server List
4-8 SIMUCAD Design Automation, Inc.

Chapter 5:Customer Environment Settings
5.1: Setting The Path To The SoftwareOn Windows, this is not an issue as the shortcut to start the SFLM server contains the path.
On Unix and Linux machines, you must set an environment variable in the terminal. The two most common Unix terminal shells are the C-shell and the Bourne-Again (Bash) shell. In these cases, you need the following changes.
C-Shell and test users should add the following to their .cshrc file:
set path = ( $path:q /<installdir>/bin )
Bash, sh (Bourne shell) and ksh users should add the following to their .profile file:
PATH="$PATH/<installdir>/bin"export PATH
Note: /<installdir> is the path to the top directory of the vendor's installed software.
5.2: Choosing A Single License Server for a Specific UserThere are two ways that an application will know the name of the license server. One way is by using a global setting in the installation (see Chapter 4: “Specifying the License Server(s) Using SFLM Access”). Another way is from a local users environment settings.
5.2.1: Local Settings for Individual UsersIndividual users may choose a particular license server by creating the environment variable SFLM_SERVERS in their user environment and giving it the name of their chosen server. This setting will override the global setting that was created.
5.2.2: How to Set the SFLM_SERVERS Environment VariableC-shell Unix and Linux users should add the following to their .cshrc file:
setenv SFLM_SERVERS "sflmserver"
Bash shell Unix and Linux users should add the following to their .profile file:
SFLM_SERVERS="sflmserver"export SFLM_SERVERS
Windows users should right click on My Computer and select Properties→Advanced→Environment Variables. A screen will appear that will allow the setting of environment variables.
Note: The name sflmserver is the machine name of the new license server.
SIMUCAD Design Automation, Inc. 5-1

Standard Floating License Manager Installation and User’s Guide
Note: SFLM_SERVERS has replaced the environmental variable SFLM_SERVER. If both variables are set, SFLM_SERVERS will be used for new applications (SFLM 5 and above). SFLM_SERVER will be used for old applications (SFLM4 and below).
5.3: Choosing Multiple License Servers for a Specific UserIf the network contains multiple license servers, you can change the SFLM_SERVERS environment variable to access all of them. For instance on Unix C-shell:
setenv SFLM_SERVERS "MachineA MachineB MachineC"
The application in this case will first attempt to get a license from machineA. If it fails, it will try machineB and finally try machineC.
Note: 1. It is important that spaces exist only between machine names. No spaces are allowed within one machine name. 2. Each machine has a full SFLM installation, which is stand alone. This is not a redundant server setup. 3. All the servers need to undergo the Registration process.
5.4: Choosing a Redundant Server Cluster for a Specific UserIf the license server is set up for redundant servers, first set up the single server setup (see Section 5.2:“Choosing A Single License Server for a Specific User”). Then, make one more change.
The SFLM_SERVERS environment variable should be changed to the three machines set up for redundancy each separated by the | sign. For example, for Unix C-shell:
setenv SFLM_SERVERS "MachineA|MachineB|MachineC"
Note: All the redundant servers need to undergo the Registration process and the license file is specifically generated by the vendor to allow redundant servers.
Note: No spaces should be next to the | character in the SFLM_SERVERS variable.
5-2 SIMUCAD Design Automation, Inc.

Customer Environment Settings
5.5: Testing User EnvironmentTo test the user environment, run:
sflm_monitord -env
It should return something like:
SFLM_SERVER=mrtallSFLM_SERVERS="mrtall:3162/ 127.0.0.1:3162/"SIPC_SERVER=mrtall
or with a more complex setup:
SFLM_SERVER=redundant1SFLM_SERVERS="redundant1:3162/|redundant2:3162/|redundant3:3162/ mrtall:3162/ 127.0.0.1:3162/ silvaco.edaondemand.com:80/http-proxy:80"SIPC_SERVER=redundant1
If it returns:
sflm_monitord not found
use:
/<installdir>/bin/sflm_monitord -env
or add it to you use path using the description in Section 5.1:“Setting The Path To The Software”.
SIMUCAD Design Automation, Inc. 5-3

Standard Floating License Manager Installation and User’s Guide
This page is intentionally left blank.
5-4 SIMUCAD Design Automation, Inc.

Chapter 6:Administration Page
6.1: Administration FeaturesTo access the Administration page, click the Admin link on the SFLM home page (Figure 6-1).
Figure 6-1: Main SFLM Home Page
Before you can access these pages, you need to enter password. This is entered as described at the beginning of Chapter 2: “Registration”. There are seven Admin features that will be described in the following sections.
6.1.1: Install New License(s)You can access this feature if a new license file is ready to be installed. As an example, if you purchase additional licenses of a product, the vendor will create a new license file. You can then use this feature to install the new license file. See Chapter 3: “License Installation”for more details.
6.1.2: Change PasswordWhen SFLM was first installed on the license server machine, as described at the start of Chapter 2: “Registration”, you were prompted to enter a password. This page allows you to change this password. First, enter the original or current password. Then, enter your new chosen password and re-enter this password to confirm it.
If you forget your password for the SFLM server, reset it outside the web front end. You will need to be the root or administrator user, on the machine where SFLM was originally installed, within a Unix shell.
Standard Floating Licensing Manager 6-1

Standard Floating License Manager Installation and User’s Guide
/<installdir>/bin/sflm -stop/<installdir>/bin/sflm -set-password/<installdir>/bin/sflm -start
You will need to set a password during the -set-password step. In a DOS window, use the following.
6.1.3: Re-Register License ServerIf the hardware within the license server machine changes, then the machine credentials that identify that machine as the license server may also change. This may affect the operation of the license server. If this occurs, access this option to re-register the machine credentials and reactivate the license server.
Note: You may need a new license file generated by the vendor if the re-registration process assigns a different Code Name to your server. Your Code Name is shown in the machine IDs list at the bottom of the SFLM web page http://servername:3162. For example, in Figure 6-1 it is 0SSMID10001820. This will depend on the extent of the changes on your machine.
6.1.4: Setup Redundant ServersThis feature is available to prevent engineering downtime if for any reason the SFLM server, or its machine, crashes. If this occurs, applications will hang, all current jobs will be paused, and no licenses can be issued until the server is restarted or the machine is repaired. Although all jobs shall continue once the license server is restarted, this can be a significant management issue. The SFLM redundant server system is one method to ensure that this problem does not result in any engineering downtime.
The system requires that 3 machines be designated and installed as redundant license servers. The same license file is installed on each machine. Each machine is then set up to identify the primary, secondary or tertiary server. When an application requests a license, it will attempt to contact the primary license server in normal system operation.
If it cannot contact the primary server (the machine may have failed), it will then attempt to contact the secondary server. You will experience a short pause until the secondary server takes over.
The redundant system requires that at least 2 machines are alive and communicating at any given time. The SFLM servers communicate to each other on license usage. When the primary machine returns to the system, it will then take over the license control.
Note: This system is only available to software vendor applications that are SFLM6 (or above) compliant. SFLM4applications should point to the primary server and will only run as long as that server is up and running.
DOS Commands Example
<install_drive>: C:
cd <installdir>\bin cd \simucad\bin
sflm -stop sflm -stop
sflm -set-password sflm -set-password
sflm -start sflm -start
6-2 Standard Floating Licensing Manager

Administration Page
Setting Up Redundant Servers
This feature is on a “per request” basis, so you will first need to contact your software vendor account manager and request this licensing option.
There are 4 steps to set up redundancy. Each step must be performed separately on all three redundant server machines. When connecting to a server using a web browser, you can run the web browser on any machine that is networked to the server.
1. Run sflm -install as described before on all three machines.2. Bring up a web browser on each machine, type in the URL http://<servername>:3162/ (where
machine is the hostname of the machine), and then go through the registration procedure that will be initiated (as described in Chapter 2: “Registration”). Then, wait to be contacted by your vendor.
3. Your vendor will inform you when your license file is ready to be downloaded. When you receive this message, open your web browser at http://<servername>:3162/ and click on Install new License(s) (as described in Chapter 3: “License Installation”). Download the license file from your vendor and install it with the web browser.
4. When steps 1-3 are complete, open your web browser at http://<servername>:3162/, click on Admin and then Setup Redundant Servers. The Set Up Redundant Servers Page will appear (Figure 6-2). To add a server, type in the SFLM server name of each machine chosen to be a redundant server and click Add. The SFLM server name will appear at the bottom of the web browser.
The order that servers are shown in the Server list will decide which is primary, which is secondary and so on. You can change the order any time by selecting a server from the list and using the control buttons on the right hand side (Move to Top, Move Up, Move Down, Move to Bottom, and Delete). If communication is broken with a server, a line will be drawn through the name of that server in the Redundant Groups line.
Note: All 4 steps must be performed on all 3 of the redundant servers. The servers will then be able to communicate with each other. This will be displayed at the bottom of the web browser SFLM page on the Redundant Groups line. The environment for each user then needs to be changed to specify the redundant server names.
Standard Floating Licensing Manager 6-3

Standard Floating License Manager Installation and User’s Guide
Figure 6-2: Set Up Redundant Servers Page
6.1.5: Customize LoggingAny action that SFLM server performs, such as a license check out or check in, can be logged to a file for later reference. Such information can be useful if you want to study license usage rates for different products or to examine any warnings or errors produced. All the necessary data will be in this file.
To access this feature, click on Admin and click on Customize Logging. The Custom Logging Page will then appear (Figure 6-3). This page controls two log locations: one in the system log (e.g., /etc/syslog.conf on Solaris machines) and the other in a user-defined file.
The default system log level is Notice. No file logging is done by default. A description of available logging levels is given at the end of this section. It is common to change the system log level to Information to log license check-outs and check-ins, which can the be used by the sflm -stats command.
6-4 Standard Floating Licensing Manager

Administration Page
Figure 6-3: Customize Logging Page
License Usage Logging
License Usage Logging Directory
The directory where license usage summarries and logs are kept. You can change the list of possible locations by setting the environmental variable SFLM_USAGE_DIRECTORIES before starting the server.
License Usage Logging Mode
This controls how much information is kept in the usage log directory.
Standard Floating Licensing Manager 6-5

Standard Floating License Manager Installation and User’s Guide
Note: Logging check-outs and check-ins may require significant amounts of disk space.
System Error/Message Logging
This controls the log messages passed to the system logger. On UNIX, this is passed as local5 and is controlled by /etc/syslog.conf. On Windows, they go into the Application Log that can be viewed using the Event Viewer.
System Log Level
This pull down menu controls the individual logging level for the system logging. See “Log Levels” on page 6-7. The default level is Notice.
File Error/Message Logging
Instead of using the system's logging capabilities, the SFLM server can simply write messages to a file. This is easier to set up but has dangers since nothing is monitoring the log sizes.
Verbose logging/messaging
This is Off by default. Switching to Yes will result in more details in some web pages and some log messages.
You can reload all the current server settings from the server by clicking on Restore. To save any changes you made, click on Save Changes.
Table 6-1: License Usage Logging Mode Options
Option Description
Off No logging.
ProductSummary Generates a summary of each product (license ID) usage.
UserSummary Generates a summary of each product (license ID) used by each user as well as the combined product usage for all users.
ProductLog All license check-outs and check-ins are logged. The ProductSummary is also generated.
AllLogging All license check-outs and check-ins are logged. The UserSummary is also generated, which includes the ProductSummary.
Table 6-2: File Error/Message Logging
Option Description
File Name This specifies the file to append the log message onto.
Log Level This pull down menu controls the individual logging level for the user defined log file. See “Log Levels” on page 6-7. The default level is Off.
6-6 Standard Floating Licensing Manager

Administration Page
Log Levels
These log levels control the seriousness of the messages being logged. When set to a level, messages from that level and above are logged. For example, if the log level is Error, then Error, Critical, Alert, and Emergency messages are also logged. These levels coincide with the standard UNIX log message levels.
Severity Levels
Table 6-3: Logging Levels in SFLM Server
Severity Level Description
Off No logging is performed
Emergency A panic condition.
Alert A condition that should be corrected immediately. Examples of this include:• Errors contained in the license file(s) will be reported. This could occur if the file has been corrupted or if it has been edited (which is not allowed).
• SFLM is installed on a system not specified in the license file.• System clock has been changed.• License(s) close to expiration will be reported.• License(s) that will only be active at a time in the future.• SFLM server exits.• Server is low on memory.
Critical Critical conditions. Examples of this include:• Hardware failure such as a hard disk error.• Memory corruption.
Error Errors. Examples of these include:• Cannot get MAC address.• Unable to register program.• SFLM installation failure.
Warning Warning messages. Typically non-fatal. Examples of these include:• Un-terminated string received by server.• Obsolete license(s).
Notice Conditions that are not error conditions, but that may require special handling. Examples of these include:
• Failed attempts to check out a license.• Notice that verbose mode is turned on.• Attempt(s) to connect to a port.• The machine identification has changed perhaps due to new hardware.• Server status is in the process of being cleared.• Reading of a particular license file.
Standard Floating Licensing Manager 6-7
Standard Floating License Manager Installation and User’s Guide
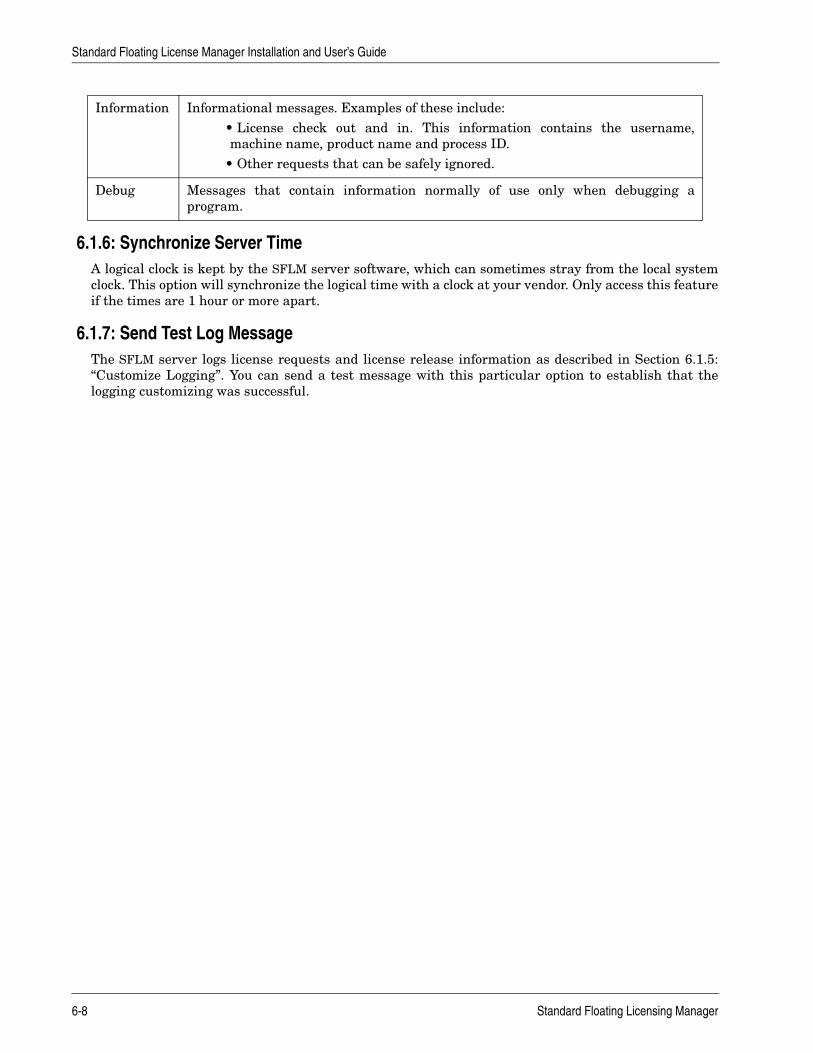
6.1.6: Synchronize Server TimeA logical clock is kept by the SFLM server software, which can sometimes stray from the local system clock. This option will synchronize the logical time with a clock at your vendor. Only access this feature if the times are 1 hour or more apart.
6.1.7: Send Test Log MessageThe SFLM server logs license requests and license release information as described in Section 6.1.5: “Customize Logging”. You can send a test message with this particular option to establish that the logging customizing was successful.
Information Informational messages. Examples of these include:• License check out and in. This information contains the username, machine name, product name and process ID.
• Other requests that can be safely ignored.
Debug Messages that contain information normally of use only when debugging a program.
6-8 Standard Floating Licensing Manager

Chapter 7:Reports Page
7.1: Types of ReportsTo access the Reports page, click the Reports link on the home page (see Figure 7-1). This gives you access to three different reports that provide detailed information the license administrator may require.
Figure 7-1: Main SFLM Home Page
7.1.1: Active User(s)This option will generate information on licenses that are currently checked out from the SFLM serverby Job. A job is an application that requests a license. A total count of jobs and a table of jobs are reported.
• User and Prorgram: User name of the person running the application and the program name and version that checked out the license(s) from the SFLM server.
• Job: The job number (a.k.a. Process ID) of the application on a particular machine. Each time an application runs, the operating system assigns a unique ID to that job. This is commonly known as the PID. Clicking on this field will give a more detailed report about the job.
• Host: Host name or machine name on which an application is running.• License: Information on which licenses the job is using. If a license request failed, it shows the
licenses that failed to be granted.
Standard Floating Licensing Manager 7-1

Standard Floating License Manager Installation and User’s Guide
7.1.2: Valid License(s)This option will generate a table that contains a complete list of all licensed applications. This list is derived from all the license files that are installed on the server. Each row of this table is dedicated to one application and gives five columns of information: Number of Licenses, Product and Users.
• ID: The ID of the license (a.k.a. product). Clicking on this link will provide a detailed list of all licenses related to this license ID in all license files installed.
• Name: The name of the license (a.k.a. product). Clicking on this link will provide a detailed list of all licenses related to this license ID in all license files installed.
• Valid: The number of valid (purchased) licenses active for this server.• Free: The number of valid licenses that are currently free.• Maintenance Date: This is date license maintenance expires for this license. There may be
multiple dates if licenses expire at different times. Applications that are newer than the maintenance date cannot use that license.
Note: Licenses that have completely expired will not show up in this list.
7.1.3: Token ChargesThis option will generate a table containing the number of active tokens and another table, which shows the number of tokens required to use as a specific license.
• ID: The ID of the license (a.k.a. product). Clicking on this link will provide a detailed list of all licenses related to this license ID in all license files installed.
• Name: The name of the license (a.k.a. product). Clicking on this link will provide a detailed list of all licenses related to this license ID in all license files installed.
• Cost: The number and type of tokens required to grant this type of license when tokens are used.• Active: The number of valid (purchased) token licenses active for this server.• Free: The number of valid licenses that are currently free.• Maintenance Date: This is the date license maintenance expires for this license. There may be
multiple dates if licenses expire at different times. Applications that are newer than the maintenance date cannot use that license.
Note: Licenses that have completely expired will not show up in this list.
7.1.4: License StatusThis option will generate a table that contains a complete list of specific licenses. This list is derived from all the license files that have been installed on the server and are valid for that server. It includes the licenses that can be granted using token licenses. The table also includes who is using licenses and how many are free.
• License ID: The ID of the license (a.k.a. product). Clicking on this link will provide a detailed list of all licenses related to this license ID in all license files installed.
• License Name: The name of the license (a.k.a. product). Clicking on this link will provide a detailed list of all licenses related to this license ID in all license files installed.
• Users: A list of users who have checked out licenses for this particular product. Users are identified by their login name. Clicking on a user name will show all jobs owned by that user.
• Used: The number of licenses used by each user.
7-2 Standard Floating Licensing Manager
Reports Page
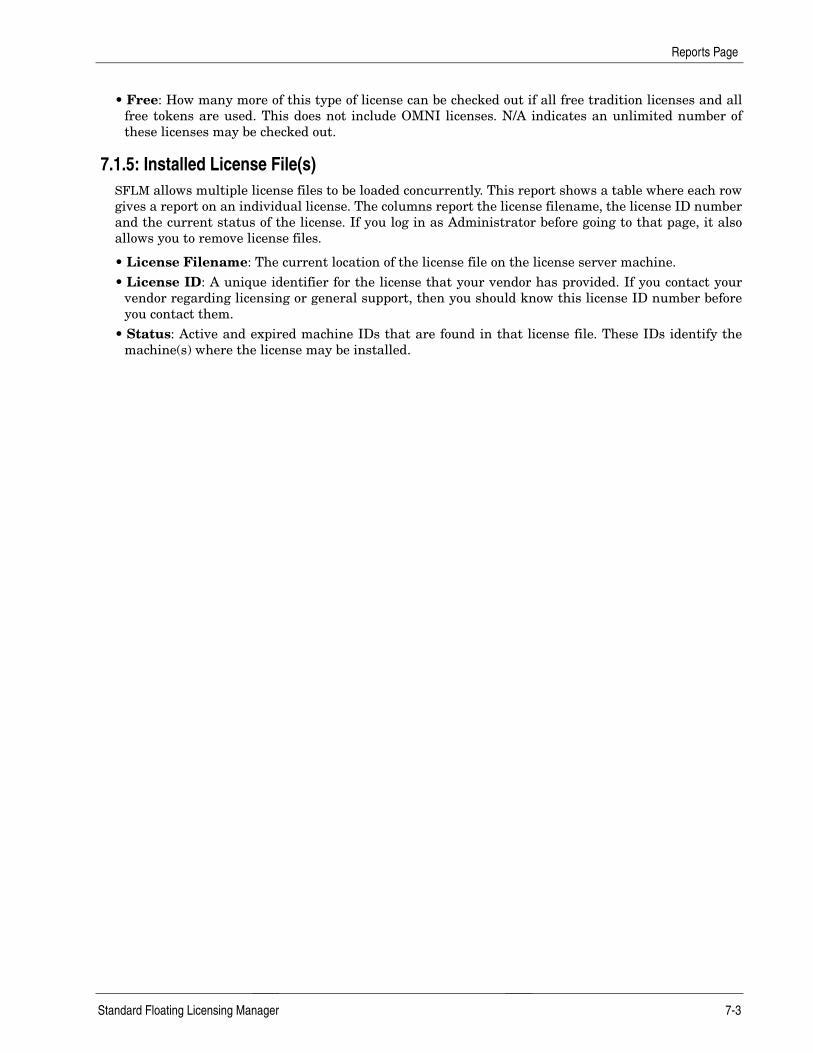
• Free: How many more of this type of license can be checked out if all free tradition licenses and all free tokens are used. This does not include OMNI licenses. N/A indicates an unlimited number of these licenses may be checked out.
7.1.5: Installed License File(s)SFLM allows multiple license files to be loaded concurrently. This report shows a table where each row gives a report on an individual license. The columns report the license filename, the license ID number and the current status of the license. If you log in as Administrator before going to that page, it also allows you to remove license files.
• License Filename: The current location of the license file on the license server machine.• License ID: A unique identifier for the license that your vendor has provided. If you contact your
vendor regarding licensing or general support, then you should know this license ID number before you contact them.
• Status: Active and expired machine IDs that are found in that license file. These IDs identify the machine(s) where the license may be installed.
Standard Floating Licensing Manager 7-3

Standard Floating License Manager Installation and User’s Guide
This page is intentionally left blank
7-4 Standard Floating Licensing Manager

Chapter 8:Support Utilities
8.1: OverviewThe support utilities are intended to be used whenever the license server has a problem and will not issue a license to a user request. It is not a part of the general operation of the SFLM license server. To access the support utilities, click on the Support Utilities link on the main SFLM home page (Figure 8-1).
Figure 8-1: Main SFLM Home Page
Four utilities are available that report information and can be used to identify the problem, list environment variable, redundant server status, server resource usage and server status & version. The information from these four options should be supplied to your vendor if (or when) it is requested. They are accessible through the web interface to your license server.
Standard Floating Licensing Manager 8-1

Standard Floating License Manager Installation and User’s Guide
This page is intentionally left blank.
8-2 Standard Floating Licensing Manager

Chapter 9:Virtual Private Networks (VPNs) and Firewalls
9.1: Virtual Private Networks (VPNs)VPNs are becoming increasingly popular as they allow workers to remain at home while still connected to the office network through their own internet connection.
To enable SFLM with a VPN setup, the ports 3162 and 111 must be open for incoming connections to the server. These ports are registered to the SFLM software and are used by it only. Port 111 is only used for older applications (using SFLM4).
Remote users connected to the internet will be able to access office SFLM servers if these two ports remain open.
9.2: FirewallsCurrently, many machines have firewalls or port blocking software especially Windows XP machines.
XP Service Pack 2 enables a firewall that prevent local Web Servers from being accessed from other machines. Because SFLM is a Web server, it cannot be accessed by other machines once Service Pack 2 has been installed. To overcome this problem, issue the following four commands.
netsh firewall set portopening proto=tcp port=3162 "SFLM-Standard Floating License Manager"
netsh firewall set portopening proto=udp port=3162 "SFLM-Standard Floating License Manager (UDP)"
netsh firewall set portopening proto=tcp port=111 "ONC/RPC portmap"
netsh firewall set portopening proto=udp port=111 "ONC/RPC portmap (UDP)"
SIPC may also have problems so include the command that opens its port.
netsh firewall set portopening proto=tcp port=2809 "SIPC-Corba Name Service"
If you wish to be more secure, you can enable certain programs to receive messages through the firewall. Since these programs are versioned, you will have to perform these procedures again when a version is installed. For example:
C:\Simucad\bin\rpc.sflmserverd -WV
returns something such as 6.4.2.R. Substitute the number returned for 6.4.2.R below.
netsh firewall set allowedprogram "C:\Simucad\lib\rpc.sflmserverd\6.4.2.R\x86-nt\rpc.sflmserverd.exe" "SFLM-Standard Floating License Manager"
netsh firewall set allowedprogram "C:\Windows\system32\portmap.exe" "ONC/RPC portmap"
Also, for example:
C:\Simucad\bin\sipc -WV
returns something such as 1.0.9.R. Substitute the number returned for 1.0.9.R below.
netsh firewall set allowedprogram C:\Simucad\lib\sipc\1.0.9.R\x86nt\sipc.exe SIPC-Corba Name Service"
Standard Floating Licensing Manager 9-1

Standard Floating License Manager Installation and User’s Guide
This page is intentionally left blank
9-2 Standard Floating Licensing Manager

Chapter 10:SFLM Compatibility
10.1: Older ApplicationsA common occurrence will be the existence of networks that have a mixture of applications from different releases. An SFLM4 application is a product that was released with an SFLM4 license server. An SFLM6 application is a product that was released with an SFLM6 license server and so on.
If an SFLM4 license server is running on the system, it will only be able to serve SFLM 1.4-4 applications. It will NOT be able to serve licenses to SFLM6-8 applications.
If an SFLM6-8 server is running, it can give licenses to SFLM4-8 application.
Only an SFLM8 server can use token licenses. SFLM4-8 applications, however, can use these licenses from the SFLM8 server.
10.2: License Server IDSFLM4 used either the hostid (from Solaris and HPUX operating systems) or a HASP key (dongle) to tie (or key) the license to a particular server. SFLM now uses an online registration process to provide a virtual hostid for all platforms or an optional HASP key for Windows and LINUX.
10.3: Upgrading an SFLM4 InstallationSFLM4 servers are no longer supported.
Standard Floating Licensing Manager 10-1

Standard Floating License Manager Installation and User’s Guide
This page is intentionally left blank.
10-2 Standard Floating Licensing Manager

Appendix A:Frequently Asked Questions
A.1: How do I bring up the web front end to SFLM?Before you can bring up the web front end, you must first install the SFLM application software. On Unix, do this by running the command:
sflm -install
as root on the license server machine. Then, you can open a web browser (e.g., netscape or internet explorer) and for the URL, type:
http://<server>:3162/
and replace the name <server> with the hostname of the machine where sflm -install was executed. The web front end will then appear.
A.2: What version of SFLM do I have?To find the version of SFLM on your machine, run the command:
sflm -WVs
If the version reported back for the rpc.sflmserverd is less than 6.0.0.R, you need to upgrade.
A.3: What is registration?Instead of being tied to a host ID, SFLM will give your machine a unique “virtual dongle” identification. To ensure that this number is unique, it must be compared with the database of all virtual dongle IDs kept by your vendor. You can do this automatically if you are online. Otherwise, you need to send this information by E-mailing to your vendor. This is called the Registration process.
A.4: What is activation?A registration process will start when you start the server. The process is complete when you enter a Code Name and Activation Code. This means the server will now accept license files. When this is done online, the Code Name and Activation Code will be set automatically. If the registration was offline, you must enter the Code Name and Activation Code sent back by your vendor.
A.5: What should I choose - online or offline registration?Choose online registration if the web browser is able to access the internet. If do not have access to the internet then register offline.
A.6: I have forgotten my password, what should I do?You can reset your password outside the web front end. You will need to be the root on the machine where SFLM was originally installed and then run the command:
sflm -stopsflm -set-passwordsflm -start
Standard Floating Licensing Manager A-1

Standard Floating License Manager Installation and User’s Guide
A.7: When I run an application I cannot get a license, what should I do?Make sure the license server is still alive. The SFLM software is designed to automatically start itself if, for any reason, it should be forced to close by any other program. You can check if the SFLM is running with the web front end. Click on Reports and then on List Installed License Files. The table that is displayed will tell you if the server is running.
If SFLM is not running, you will need to restart it from the command prompt. As root (or administrator), run the command:
sflm -start
A.8: How do I find out who has checked out a particular product license?Open the web front end and click on Reports and click on Show Active Users.
A.9: What are redundant servers? Eventually, either a machine or a network may become unreliable, and when you try to open an application, the application will be unable to contact the license server to get a license. The SFLMredundant server system is one method to get around this problem. The system requires that a minimum of 3 machines to be designated and installed as redundant license servers. The same license file is installed on each machine. Each machine is then set up as primary, secondary or tertiary servers. When an application requests a license, it will attempt to contact the primary license server. If it cannot contact the primary server, it will then attempt to contact the secondary server and so on. The redundant system requires that at least 2 machines are alive and communicating at any given time. The SFLM servers communicate to each other on license usage and when the primary machine returns to the system, it will then take over the license control. When installed, the system will be opaque.
A.10: How do I set up redundant servers?See Section 6.1.4:“Setup Redundant Servers” for more information.
A.11: What can cause me to need to re-register?The unique description of your machine is linked to many things, such as the machine name, disk number, and mac address. Typically, changing one piece of hardware (e.g., the hard disk) will not require re-registration. A number of hardware changes are necessary before re-registration will be required.
A.12: How can I reset the SFLM?Some situations may occur infrequently where the active users report shows a license checked out for an application that you know has been terminated. To free this license, you can either wait one hour for SFLM to automatically remove this phantom license check out, or perform a manual reset of the server.
To manually reset SFLM, you need to login as root (on Unix/Linux) or Administrator (Windows), open a command terminal and run:
/<installdir>/bin/sflm -stop/<installdir>/bin/sflm -start
In a DOS window, use the following.
A-2 Standard Floating Licensing Manager

Frequently Asked Questions
DOS Commands Example
<install_drive>: C:
cd <installdir>\exe cd \sedatools\exe
sflm -start sflm -start
sflm -stop sflm -stop
Standard Floating Licensing Manager A-3

Standard Floating License Manager Installation and User’s Guide
This page is intentionally left blank.
A-4 Standard Floating Licensing Manager