standard device with three cable/crimp assemblies
TRANSCRIPT
Standard Device With Three Cable/ Crimp Assemblies
Trochanteric Reattachment DeviceSurgical Technique


Trochanteric Reattachment Device Surgical Technique DePuy Synthes 1
Introduction
Surgical Technique
Product Information
Table of Contents
Trochanteric Reattachment Device 2
Indications 2 Surgical Technique 3
Product Information 12
MR Information The Trochanteric Reattachment Device System has not been evaluated for safety and compatibility in the MR environment. It has not been tested for heating, migration, or image artifact in the MR environment. The safety of Trochanteric Reattachment Device System in the MR environment is unknown. Scanning a patient who has this device may result in patient injury..

2 DePuy Synthes Trochanteric Reattachment Device Surgical Technique
Trochanteric Reattachment Device
Features– Large proximal hooks grip the osteotomized or fractured
greater trochanter and secure its location while resisting superiorly directed forces.
– Smaller distal hooks prevent rotation and migration.
– Cables are preassembled in the device for easy handling and insertion.
– Cable crimps fit into slots in the device for easy access, handling and cable alignment.
– Slots within the Trochanteric Reattachment Device (TRD) prevent crimp migration.
– Slots containing the crimps allow tension to be uniformly distributed across the TRD, resulting in a uniform load that is transmitted from the TRD to the trochanter.
– TRD is made of titanium alloy (Ti-6Al-7Nb) and cables are cobalt chromium alloy (L-605).
IndicationsThe Synthes Trochanteric Reattachment Device (TRD) is indicated for reattachment of the greater trochanter following osteotomy in total hip arthroplasty or fracture.

Trochanteric Reattachment Device Surgical Technique DePuy Synthes 3
1Reduce trochanteric fragment
Required set
105.924 Orthopaedic Cable System Instrument Set
Instrument
391.919 Impactor
Hold the femur in a slightly flexed, internally rotated, and abducted position. Reduce the trochanteric fragment into the desired position using standard bone reduction forceps, a common bone hook or trochanter forceps. The titanium trochanteric reattachment device attached to the impactor can also be used to reduce the trochanteric fragment.
Note: When reducing the greater trochanter, it is critical to make sure there is a good bed of bone upon which the trochanter will be fixed.
Surgical Technique
Reduction of the greater trochanter with forceps
Osteotomy of the greater trochanter

4 DePuy Synthes Trochanteric Reattachment Device Surgical Technique
Surgical Technique
2Prepare trochanteric reattachment device
Remove the TRD from its package and pull the free end of each of the cables out of it.
Note: It is very important to plan the direction from which the cables will be tensioned. If necessary, change the direction in which the cables pass through the TRD, to better facilitate access for the clinical situation.
Notes: To change the direction the cables pass through the TRD: 1. Hold the TRD in the palm of one hand, ensuring that
the free ends of the cables remain in the sterile field.
2. Place one finger lengthwise over the center of the TRD (directly over the crimps) to prevent the crimps from moving when the cables are removed and replaced.
3. Remove one cable from the TRD.
4. Thread it through the TRD and crimp in the opposite direction.
5. Repeat this process for the remaining cables.

Trochanteric Reattachment Device Surgical Technique DePuy Synthes 5
3Attach impactor
Instrument
391.919 Impactor
Turn the collar of the impactor counterclockwise until the jaws are fully open and the collar stops turning.
Collar
Jaws
Place the trochanteric reattachment device on a flat surface and position the impactor over the flat area on the proximal end of the TRD, just above the most proximal crimp. When the jaws are closed, they should grip the trochanteric reattachment device in the small notches on either side of the device. Turn the collar clockwise until the jaws close and hold the TRD firmly.
Notch
Flat

6 DePuy Synthes Trochanteric Reattachment Device Surgical Technique
5Impact TRD
Using a hammer, impact the TRD onto the greater trochanter, ensuring that it is fully seated. Impaction should always occur in the distal direction to prevent the trochanteric fragment from slipping proximally.
Surgical Technique
4Position TRD
Position the trochanteric reattachment device over the trochanter so that the upper hooks engage and wrap around the superior portion of the trochanter.
Trochanteric Reattachment Device Surgical Technique DePuy Synthes 7
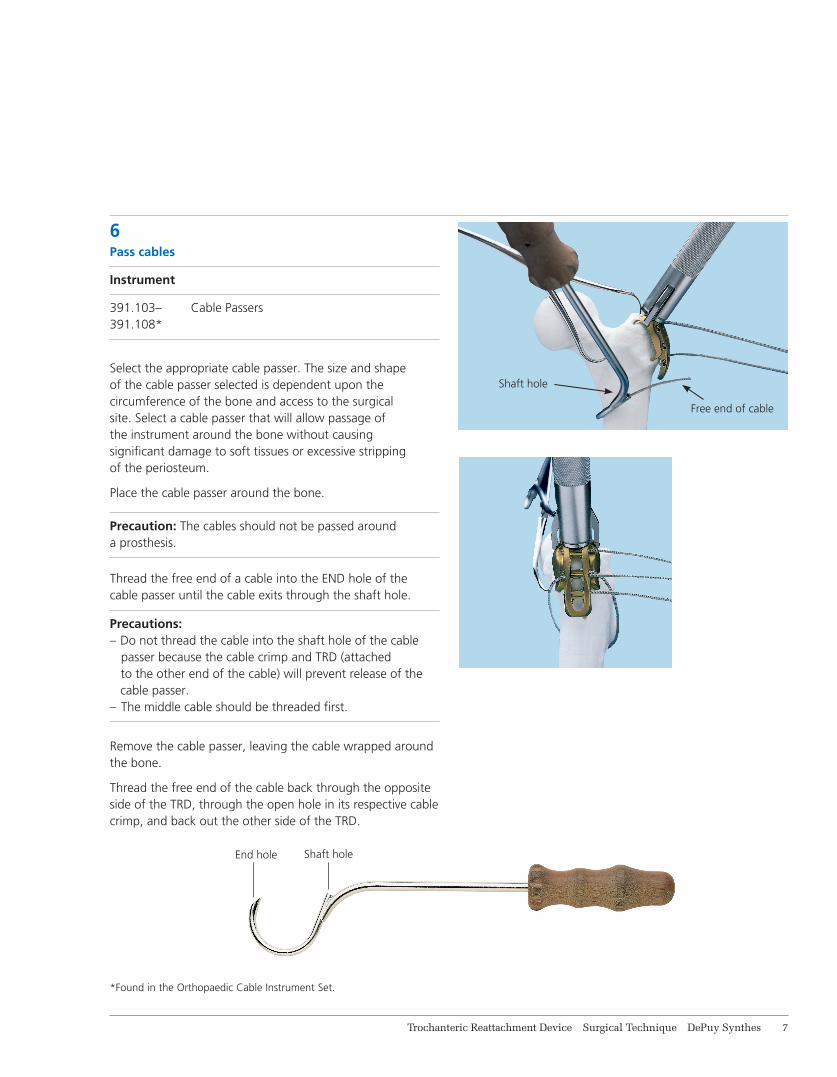
6Pass cables
Instrument
391.103– Cable Passers 391.108*
Select the appropriate cable passer. The size and shape of the cable passer selected is dependent upon the circumference of the bone and access to the surgical site. Select a cable passer that will allow passage of the instrument around the bone without causing significant damage to soft tissues or excessive stripping of the periosteum.
Place the cable passer around the bone.
Precaution: The cables should not be passed around a prosthesis.
Thread the free end of a cable into the END hole of the cable passer until the cable exits through the shaft hole.
Precautions: – Do not thread the cable into the shaft hole of the cable passer because the cable crimp and TRD (attached to the other end of the cable) will prevent release of the cable passer. – The middle cable should be threaded first.
Remove the cable passer, leaving the cable wrapped around the bone.
Thread the free end of the cable back through the opposite side of the TRD, through the open hole in its respective cable crimp, and back out the other side of the TRD.
End hole Shaft hole
Shaft hole
Free end of cable
*Found in the Orthopaedic Cable Instrument Set.

8 DePuy Synthes Trochanteric Reattachment Device Surgical Technique
7Tension cables
Instruments
391.201* Cable Tensioner
391.883* Attachment Bit
391.884* Provisional Tensioning Device
Attach the provisional tensioning device and the attachment bit to the cable tensioner. Turn the fluted knob at the end of the tensioner counterclockwise until it stops and make certain that the provisional tensioning device is in the “OPEN” position.
Note: There will be slight resistance when turning the knob for the last few turns before the tensioner is fully open. Turn the knob as far as it will go before inserting or removing the tensioner from the cable.
Beginning with the CENTRAL cable, thread the cable through the cable tensioner assembly. Advance the tensioner assembly along the cable until the attachment bit rests against the TRD. Carefully take up any slack in the cable by hand through the back of the cable tensioner.
Turn the knob on the tensioner clockwise until the desired tension is reached. The amount of tension being applied to the cable is indicated by the position of the knob relative to the numbered lines etched on the body of the tensioner. These lines indicate tension levels from 20 kg to 50 kg.
Precaution: Take care not to exceed 50 kg of tension. Applying more tension may cause the cable to cut through soft or osteoporotic bone.
When the desired tension is reached, the provisional tensioning device may be engaged to hold tension in the cable while additional cables are placed. Engage the cam lock by pulling back (into the LOCKED position) on the provisional tensioning device lever. Prior to removing the cable tensioner from the provisional tensioning device, turn the fluted knob of the tensioner counterclockwise until it stops. Remove the tensioner from the provisional tensioning device.
Surgical Technique
Open position
Locked position
*Found in the Orthopaedic Cable Instrument Set.

Trochanteric Reattachment Device Surgical Technique DePuy Synthes 9
Remove the impactor from the TRD.
Pass remaining cables (refer to Step 6).
Tension additional cables using the same procedure.
Check to be certain that the desired level of tension has been applied to each cable. At this time, further tensioning may be applied to each cable, if necessary, prior to final crimping.
Warning: Repeated tensioning of the cable at high loads may cause fraying of the cable.
The cables are ready for crimping once the desired level of tension on each cable has been confirmed.
Alternative techniquePass all three cables prior to tensioning.
391.884
391.883
391.201

10 DePuy Synthes Trochanteric Reattachment Device Surgical Technique
Surgical Technique
8Crimp cables
Instrument
391.882* Cable Crimper
Place the jaws of the cable crimper over the first cable crimp and squeeze the handles together. The ratchet mechanism in the crimper precisely controls the amount of deformation, thus preventing under- or overcrimping. The crimper will automatically release when the cable has been crimped.
Precaution: Visually check to ensure that the cable crimp is centered and fully seated in the crimper jaws prior to crimping the cable. Improper placement may lead to cable slippage or crimp failure.
Note: Use the starter handle to begin squeezing the crimper until the outer handle can be easily grasped.
After the cable has been crimped, the provisional tensioning device may be removed by pushing the lever forward (to the OPEN position). Crimp additional cables using the same procedure.
Open position for removal
*Found in the Orthopaedic Cable Instrument Set.

Trochanteric Reattachment Device Surgical Technique DePuy Synthes 11
9Cut cables
Instrument
391.905* or Cable Cutter 391.906*
To cut the cable, pass the free end of the first cable through the jaws of the cable cutter and squeeze the handles together. The cable cutters are available in the Orthopaedic Cable Instrument Set.
Cut additional cables using the same procedure.
Note: Place the cable completely in the cutter jaws, but near the tip. Cut in one motion to ensure a clean cut.
Precaution: Each cable should be cut as closely to the TRD as possible, taking care not to damage the adjacent cable.
*Found in the Orthopaedic Cable Instrument Set.

12 DePuy Synthes Trochanteric Reattachment Device Surgical Technique
Product Information
Implants498.806S Titanium Trochanteric Reattachment
Device with Cobalt Chromium Cables, standard, sterile
498.807S Titanium Trochanteric Reattachment Device with Cobalt Chromium Cables, long, sterile
498.839S 4.5 mm Titanium Cerclage Positioning Pin, sterile
04.221.003S T25 StarDrive/3.5 mm Hex Titanium Cerclage Button, sterile
611.105.01S 1.7 mm Cobalt Chromium Cable with Titanium Cr imp, 750 mm, sterile
498.806S 498.807S
611.105.01S 498.839S 04.221.003S

Trochanteric Reattachment Device Surgical Technique DePuy Synthes 13
Required Set105.924 Orthopaedic Cable System Instrument Set
Includes all necessary instrumentation for passing, tensioning, crimping and cutting cables efficiently and securely.
Required Additional Instrument391.919 Impactor
Note: For additional information, please refer to the package insert or www.e-ifu.com.
For detailed cleaning and sterilization instructions, please refer to www.depuysynthes.com/hcp/cleaning-sterilization or sterilization instructions, if provided in the instructions for use.

Limited Warranty and Disclaimer: DePuy Synthes products are sold with a limited warranty to the original purchaser against defects in workmanship and materials. Any other express or implied warranties, including warranties of merchantability or fitness, are hereby disclaimed.
Please also refer to the package insert(s) or other labeling associated with the devices identified in this surgical technique for additional information.
CAUTION: Federal Law restricts these devices to sale by or on the order of a physician.
Some devices listed in this technique guide may not have been licensed in accordance with Canadian law and may not be for sale in Canada. Please contact your sales consultant for items approved for sale in Canada.
Not all products may currently be available in all markets.
© DePuy Synthes 2002–2021. All rights reserved.DSUS/TRM/0217/1375 Rev B 05/21 DV
Synthes USA, LLC 1101 Synthes AvenueMonument, CO 80132
Manufactured or distributed by:Synthes USA Products, LLC 1302 Wrights Lane EastWest Chester, PA 19380
To order (USA): 800-523-0322 To order (Canada): 844-243-4321
Note: For recognized manufacturer, refer to the product label.
www.depuysynthes.com
Synthes GmbHLuzernstrasse 214528 Zuchwil, Switzerland