st25dv-i2c crypto demonstration · gcm galois/counter mode gmac galois message authentication code...
TRANSCRIPT

IntroductionThis user manual shows how to run the "ST25DV-I2C Crypto Demo", using the ST25DV-I2C fast transfer mode (FTM) toestablish a secure transfer channel (STC) over NFC between an STM32 microcontroller and an Android™ smartphone.
The ST25DV-I2C is a dynamic NFC tag IC able to communicate with NFC readers and smartphones, and also with amicrocontroller through an I2C interface. The FTM feature allows to speed up the communication between these two interfaces.
This demonstration establishes an STC by using cryptography to perform a mutual authentication, and to encrypt thecommunications over NFC. This STC is used during the demonstration to securely:• Send and retrieve data• Set the device settings• Upload new firmware
Only the granted user / smartphone is able to communicate with the STM32 device to perform these operations.
The STC over NFC has applications in different sectors (such as industrial, home appliance and consumer) where the control ofa device is restricted to authorized users, and when the personal data must be protected.
The following packages are available on www.st.com for this demonstration:• STSW-ST25DV003 firmware• STSW-ST25003 Android™ application
ST25DV-I2C crypto demonstration
UM2575
User manual
UM2575 - Rev 1 - May 2019For further information contact your local STMicroelectronics sales office.
www.st.com

1 General information
This document is applied to STM32L476 Arm®-based devices.
Note: Arm is a registered trademark of Arm Limited (or its subsidiaries) in the US and/or elsewhere.
1.1 Purpose and scope
The "ST25DV-I2C Crypto Demo" runs on the ST25DV-I2C-DISCO kit, featuring a ST25DV-I2C tag connected to aSTM32L476 device through the I2C bus. The ST25DV-I2C-DISCO kit represents an IOT sensor device, which iscontrolled by an Android™ smartphone through the NFC.
Figure 1. Connection scheme with ST25DV-I2C-DISCO
NFC
Secure transfer channel
ST25DV-I2C-DISCO
I2CST25DV-I2C STM32 device
When a communication between the device and a smartphone is started, a mutual authentication is done. Itensures that:• The user of the smartphone has a permission to communicate with this device• The device is not counterfeited
Once the mutual authentication is done, all the communications between the microcontroller and the Android™phone are encrypted, so the user can configure the product or retrieve data securely. Anyone who spies on thedata exchanged on the NFC is not able to interpret them. The key used to encrypt the communication changeseach time a mutual authentication is done, this action prevents someone from recording the encrypted contentand replaying it.In this demonstration, the first user of the device becomes the administrator of the product so the device refusesany request from other users.More details on the cryptographic processing used in the demonstration are provided in Section 2 Securityprocesses.Additional details on the implementation are provided in the AN5323 ST25DV-I2C crypto demonstration.
UM2575General information
UM2575 - Rev 1 page 2/23

1.2 Acronyms
Table 1. Acronyms
Acronyms Meaning
NFC Near field communication
AES Advanced encryption standard
ECC Elliptic curve cryptography
FTM Fast transfer mode
STC Secure transfer channel
GCM Galois/counter mode
GMAC Galois message authentication code
1.3 Hardware equipment
The following hardware is needed for this demonstration:• A ST25DV-I2C-DISCO kit• An Android smartphone with at least the version 6.0 (Android Marshmallow)
1.4 Installation
This demonstration requires to download the firmware (STSW-ST25DV003 on www.st.com) for the ST25DV-I2C-DISCO board and the Android executable (APK, STSW-ST25003 on www.st.com) to use on the Android phone.
1.4.1 ST25DV-I2C-DISCO kit setupThe "ST25DV-I2C Crypto Demo" application requires a ST25DV-I2C-DISCO kit composed of two boards:• The ST25DV-I2C-DISCO motherboard• The ST25DV-I2C antenna daughter board
Warning: the ST25 discovery motherboard must be based on a STM32L476 device, which is labelled MB1396(and not MB1283 which is based on a STM32F4).The ST25DV-I2C-DISCO motherboard is programmed with the regular ST25DV-I2C demonstration, thus theboard must be flashed with the "ST25DV-I2C Crypto Demo" binary (“ST25DV-I2C_CryptoDemo_MB1396.bin”,available in STSW-ST25DV003 package).To program the ST25DV-I2C-DISCO motherboard, perform following instructions:1. Install the ST-LINK USB driver, available on www.st.com.2. Connect the ST25DV-I2C-DISCO motherboard to a PC with the USB-mini port.3. The ST25DV-I2C-DISCO motherboard icon must appear in the PC directory.4. Drag-and-drop the "ST25DV-I2C Crypto Demo" binary to the ST25DV-I2C-DISCO motherboard icon.5. Restart the ST25DV-I2C-DISCO motherboard by pressing the reset button (black).
1.4.2 Android APK installationThis application is not available on Google Play™ store so it must be installed manually. By default, Androidprevents the installation of programs not coming from Google Play™ so an action is needed to allow theinstallation of this application:• Navigate to setting → Security.• Check the option "Unknown sources".• Tap “OK” on the prompt message.• Select "Trust".
Note: Depending of the Android version and the phone model, the wording may vary a little bit.Then connect the Android phone to a PC with an USB cable and copy the APK to the phone’s internal memory.
UM2575Acronyms
UM2575 - Rev 1 page 3/23

With a file explorer, browse the memory of the phone and go to the folder where the APK was copied. Click on thefile to install it.
Note: If there is no file explorer, the program "File commander" is available for free on Google Play™.The STSW-ST25DV003 package contains a second firmware binary file (“ST25DV-I2C_Demo_FwUpgrd_MB1396.bin”) intended to be used for the secure firmware upgrade demonstration. This filehas to be downloaded on the Android smartphone.
1.4.3 How to set the "Authorized User"As described in Section 2.1 Public key exchange, the first Android smartphone establishing a secure sessionwith the ST25DV-I2C-DISCO board is considered being the owner of the device. This means that only thissmartphone is able to establish a secure session from now on, and any connection from other smartphone isrejected.When no "Authorized User" has been set yet, the “key exchange” box is unchecked and a “no user” message isdisplayed on the ST25DV-I2C-DISCO screen.
Figure 2. ST25DV-I2C-DISCO screen - no user
Then by starting the demonstration and establishing a secure channel (as described in section Section 3.2.1 Secure transfer channel setup), the ST25DV-I2C-DISCO saves the connection data (smartphone "Login"and "Public key") and only accepts the forecoming connections with same smartphone credentials.
Note: As these data are saved in the flash memory of the STM32, the ST25DV-I2C-DISCO firmware restore them aftera reset.Once an "Authorized User" is set, the login (the name of the smartphone) is displayed, and the “key exchange”box is now checked.
Figure 3. ST25DV-I2C-DISCO screen - registered user
Any other user / smartphone trying to connect to this ST25DV-I2C-DISCO board is rejected.
UM2575Installation
UM2575 - Rev 1 page 4/23

Figure 4. ST25DV-I2C-DISCO screen - denied access
It is possible to set a new "Authorized User" by pushing the user button (blue) of the ST25DV-I2C-DISCOmotherboard (any previously stored "Authorized User" is erased by the firmware).
1.5 Disclaimer
The Android application and the associated firmware are provided under the SLA0052 license agreement,available on www.st.com
UM2575Disclaimer
UM2575 - Rev 1 page 5/23

2 Security processes
This section describes the security processes used to perform a mutual authentication and establish a securetransfer channel (SFC) where all the communications are encrypted.
2.1 Public key exchange
The public keys exchange is done in two steps:• The Android phone sends its "Login" and ECC "Public key".• The ST25DV-I2C-DISCO board sends its ECC "Public key".
If the ST25DV-I2C-DISCO kit has never been used before, it saves the "Login" and the "Public key" in staticmemory and consider this user to be the administrator "Authorized User" of the product. It means that theST25DV-I2C-DISCO kit only accepts requests from this smartphone user.When the Android phone receives the ST25DV-I2C-DISCO "Public key", it checks that this key is signed by amanufacturer key. This verification ensures that the product (represented by the ST25DV-I2C-DISCO kit here) isnot counterfeited.
2.2 Definition of a "Shared Secret"
To establish an encrypted channel, the Android phone and the ST25DV-I2C-DISCO kit have to agree on asymmetric key used to encrypt all the communications between the two devices. This key cannot be exchangedover NFC because someone may spy all the data exchanged and get the key.
Elliptic curve Diffie–Hellman (aka “ECDH”) is a well known “key agreement protocol” used to establish a “SharedSecret” over an insecure channel. Section 2.3 Derivation of a public key describes how this "Shared Secret" isused to define a symmetric key used to encrypt all the communications of this session.The two communicating devices must both have an ECC key pair. They exchange their public keys (the privatekey remain secret and is not shared). Each device use ECDH scheme to combine its own private key with thepublic key of the peer device. Thanks to ECC, these two operations leads to the exact same result, that is called“Shared Secret” (see Figure 5).Someone who has spied the communication has seen the public keys exchanged but this is not sufficient to findthe "Shared Secret".
Figure 5. Elliptic curve Diffie-Hellman over NFC
Discoverypublic key
Pub
Android phoneAndroid
public key
Pub
ST25DV-I2C-DISCO
The two devices have been able to define a "Shared Secret" that nobody else can find. Only the ones knowingthe private keys can get the "Shared Secret".
2.3 Derivation of a public key
The "Shared Secret" can be used to encrypt the communications between the two devices but it has a weakness:the ECC key pairs of the Android and ST25DV-I2C-DISCO devices do not change, so the "Shared Secret" isalways the same. Someone can record the data exchanged over NFC and re-execute them. This is called "replayattack".
UM2575Security processes
UM2575 - Rev 1 page 6/23

To avoid this problem, a key is derived from the "Shared Secret" plus a random number (changing every times).The key obtained is called “AES Session key” and is used to encrypt all the exchanges between the two devices.The random number changes every times so the session key is different every times.By convention, the random number used for key derivation is chosen by the ST25DV-I2C-DISCO and shared notencrypted with the Android phone.In this demonstration, an AES-256-GCM encryption is used. GCM (Galois counter mode) allows authentication ofthe encrypted messages received (GMAC). Each encrypted message is authenticated so the receiver detects ifthe received encrypted message has been modified.
2.4 Authentication of the Android phone
When the communication between the Android phone and the ST25DV-I2C-DISCO starts, the Android phonesends a “Login” to the ST25DV-I2C-DISCO. This "Login" corresponds to the "Login" received by the ST25DV-I2C-DISCO during the keys exchange phase when the product has been used for the very first time. The ST25DV-I2C-DISCO board has saved this "Login name" and the corresponding "Public key" in its static memory.The ST25DV-I2C-DISCO sends a challenge to the Android phone to check if it really knows the "Private key"corresponding to this "Public key":1. The ST25DV-I2C-DISCO generates a random number, encrypts it with the AES session key and sends it to
the Android phone.2. If the smartphone owns the "Private key" corresponding to the "Login name", it computes the "AES Session
key" and decrypts the message received.3. The smartphone sends a SHA256 hash of the random number in order to prove that it has been able to
decrypt the challenge.4. The ST25DV-I2C-DISCO also computes the SHA256 hash and then knows if the answer is correct.
Figure 6. Android phone authentication over NFC
ST25DV-I2C-DISCOAndroid phone
EncryptDecrypt
This authentication protects the device from someone trying to usurp the "Login" of a valid user. A hacker mayknow the "Login" and the associated "Public key" (since they are exchanged not encrypted over NFC) but doesnot know the "Private key" so the "Shared Secret" or the "AES Session key" cannot be computed.
2.5 Authentication of the connected device
The Android phone performs an authentication of the ST25DV-I2C-DISCO. This is done to be sure that the boardis genuine and corresponds to the "Public key" that has been saved in the smartphone during the key exchangephase.The procedure is the same but in the opposite direction: now the Android phone generates a challenge, encryptsit with the "AES Session key" and sends it to the ST25DV-I2C-DISCO.
UM2575Authentication of the Android phone
UM2575 - Rev 1 page 7/23

The ST25DV-I2C-DISCO decrypts it and sends a SHA256 hash to prove that the decryption is correct.
Figure 7. ST25DV-I2C-DISCO authentication over NFC
ST25DV-I2C-DISCOAndroid phone
Encrypt Decrypt
This authentication protects from counterfeited products: a counterfeited product can contain a valid "Public key"taken on a valid product. However it does not contain the "Secret Key" that is stored in the product and which isnot readable. So here also, the counterfeited products is not able to compute the "Shared Secret" nor the "AESSession key". So it fails to pass this authentication phase.
2.6 Encrypted data transfer
Once the mutual authentication has been run, all the forecoming communications over NFC are encrypted usingthe current AES session key, which means:• Someone spying the NFC communication is not able to decrypt the transmitted data (because the current
"AES Session key" is unknown).• A message not encrypted with the current "AES Session key" is rejected• A valid message (encrypted with the current "AES Session key") maliciously modified is rejected too (thanks
to the message authentication).
The AES encryption is performed by using the GCM.This encryption method requires to transmit additional metadata along with the encrypted data:1. An initialization vector (12 bytes) required to initialize the decryption process. This initialisation vector
changes for every new encrypted message.2. A GMAC of 16 bytes used to ensure the message integrity and source.
Note: No block-padding is required by this encryption method.
UM2575Encrypted data transfer
UM2575 - Rev 1 page 8/23

3 Android and ST25DV-I2C-DISCO screens
3.1 Home screen
Manually launch the application “ST25DV-I2C-Crypto Demo” or simply tap the ST25DV-I2C NFC tag, Androidautomatically launches the “ST25DV-I2C-Crypto Demo” application, if it is installed.
Figure 8. "ST25DV-I2C Crypto Demo" - home screen
When the application starts, it initializes the Android KeyStore and some cryptography elements.By default, the “User authentication” is disabled but this can be changed in the "Settings" menu. If enabled, theuser has to enter its pin-code or fingerprint every times this application is started.
UM2575Android and ST25DV-I2C-DISCO screens
UM2575 - Rev 1 page 9/23

3.2 "ST25DV-I2C Crypto Demo" application screen
This section describes how the "ST25DV-I2C Crypto Demo" application works.
3.2.1 Secure transfer channel setupWhen tapping the ST25DV-I2C tag, the "ST25DV-I2C Crypto Demo" application automatically executes all thesteps described from Section 2.1 Public key exchange to Section 2.5 Authentication of the connected device tosetup a secure transfer channel.
Figure 9. "ST25DV-I2C-Crypto Demo" - secure transfer channel setup
On the ST25DV-I2C-DISCO board, similar information is displayed to show what is the current security status,and which user is logged.
Figure 10. ST25DV-I2C-DISCO screen when no user has been registered
UM2575"ST25DV-I2C Crypto Demo" application screen
UM2575 - Rev 1 page 10/23

Figure 11. ST25DV-I2C-DISCO screen after mutual authentication
3.2.2 Step by step modeIn the step by step mode, the user is guided through all the “keys exchange” and “mutual authentication” process.
Figure 12. "ST25DV-I2C-Crypto Demo" - step by step mode
3.2.3 “Read and decrypt data” buttonOnce the STC is ready, click on “read and decrypt data” button to download some data from the ST25DV-I2C-DISCO.This data (an array of points) is generated by the firmware running on the ST25DV-I2C-DISCO board (it is not areal measurement) and is stored in the STM32L476 memory. This demonstration emulates the behaviour of asensor regularly recording, for instance, the temperature and transferring this data to a smartphone through NFC.The transfer occurs in the following steps:1. The Android smartphone writes an encrypted command to the ST25DV-I2C FTM buffer mailbox to request
the reading of data.
UM2575"ST25DV-I2C Crypto Demo" application screen
UM2575 - Rev 1 page 11/23

2. The ST25DV-I2C-DISCO firmware reads the mailbox buffer and decrypts the command.3. The ST25DV-I2C-DISCO firmware encrypts and writes the data through I2C to the ST25DV-I2C FTM
mailbox buffer.4. The Android phone reads over NFC and decrypts the mailbox buffer content to finally display the
corresponding graph. The same graph is displayed on the ST25DV-I2C-DISCO board.
Note: The shape of the curve can be changed, simply by touching the plot on the ST25DV-I2C-DISCO screen. Theuser then restarts the transfer to receive the new set of points.
Figure 13. "ST25DV-I2C Crypto Demo" - data transfer
3.2.4 “Read and decrypt image” buttonOnce the STC is ready, the user must click on “read and decrypt image” button to download a picture from theST25DV-I2C-DISCO.The transfer occurs by following steps:1. The Android smartphone writes an encrypted command to the ST25DV-I2C FTM mailbox buffer to request
an image.2. The ST25DV-I2C-DISCO firmware reads the mailbox buffer and decrypts the command.3. The ST25DV-I2C-DISCO firmware encrypts the picture and writes all the chunks of the picture through I2C
to the ST25DV-I2C FTM mailbox buffer.4. The Android phone reads the chunks over NFC and decrypts the encrypted picture to finally display it.The picture is also displayed on the ST25DV-I2C-DISCO board, along with the metrics of the transfer:• Picture size, in bytes• Transfer size, also considering the metadata, in bytes• The total time, in milliseconds• The time spent to encrypt the picture, in milliseconds
UM2575"ST25DV-I2C Crypto Demo" application screen
UM2575 - Rev 1 page 12/23
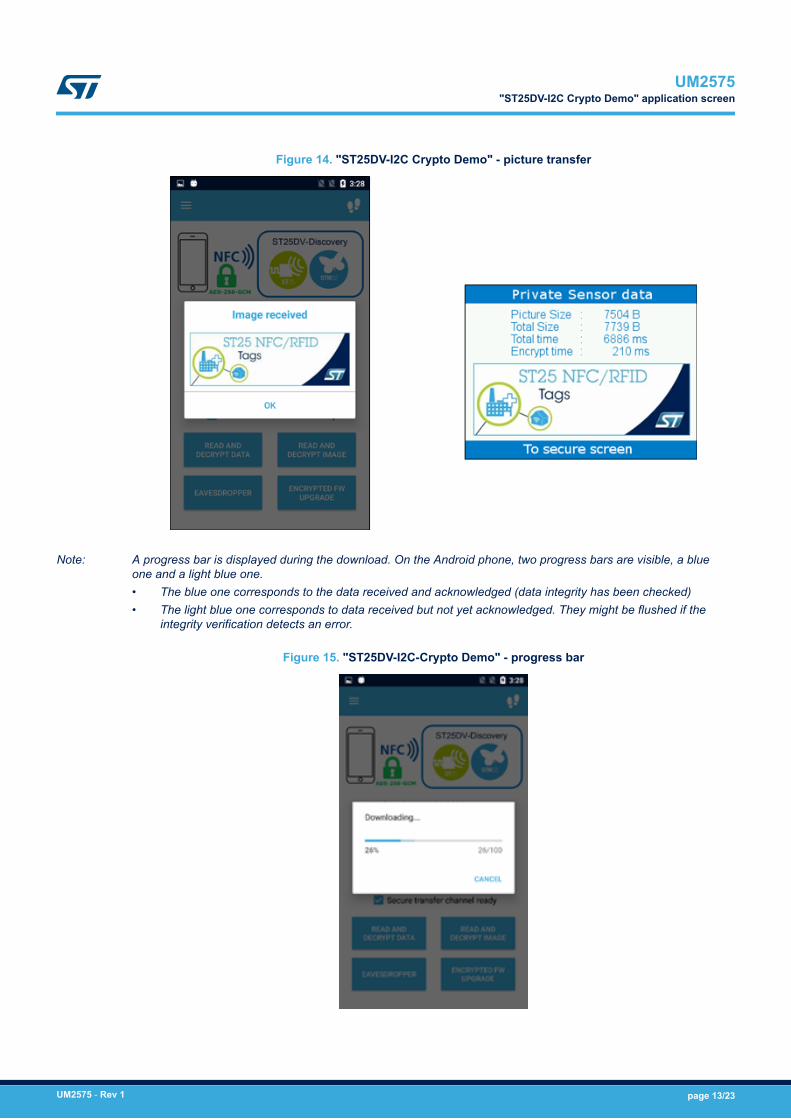
Figure 14. "ST25DV-I2C Crypto Demo" - picture transfer
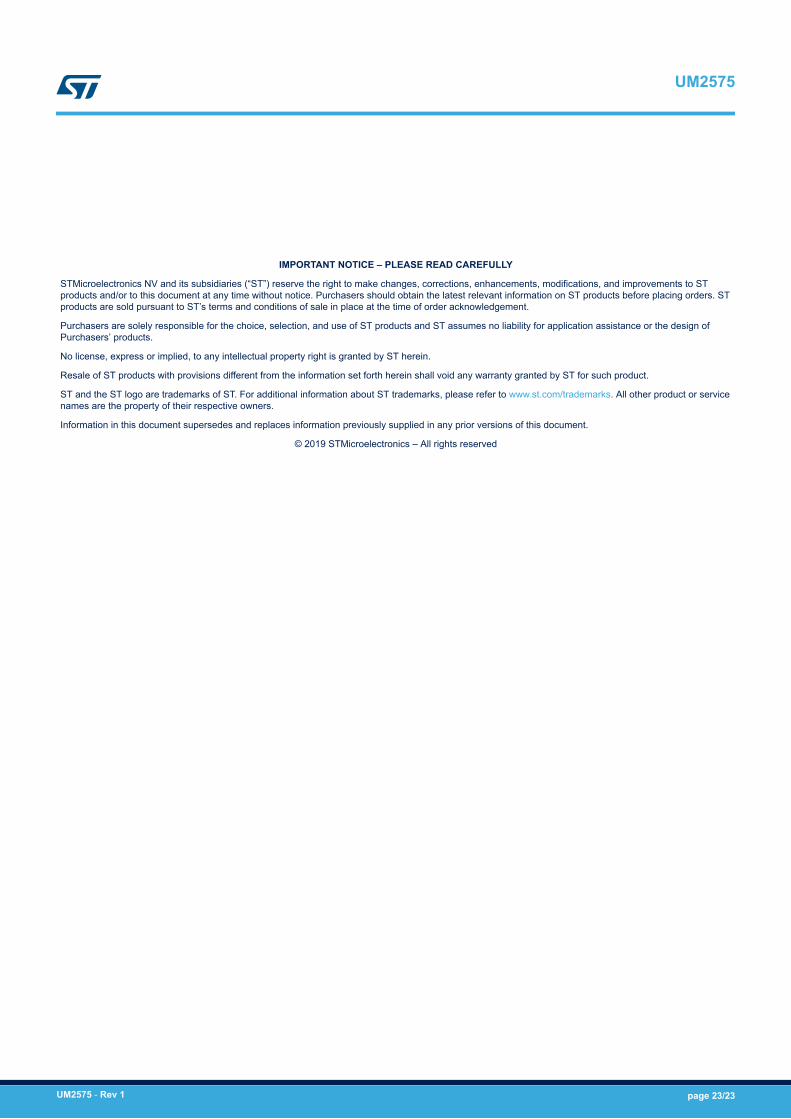
Note: A progress bar is displayed during the download. On the Android phone, two progress bars are visible, a blueone and a light blue one.• The blue one corresponds to the data received and acknowledged (data integrity has been checked)• The light blue one corresponds to data received but not yet acknowledged. They might be flushed if the
integrity verification detects an error.
Figure 15. "ST25DV-I2C-Crypto Demo" - progress bar
UM2575"ST25DV-I2C Crypto Demo" application screen
UM2575 - Rev 1 page 13/23

3.2.5 “Encrypted firmware upgrade” buttonWhen user pushes “Encrypted firmware upgrade” button, the firmware is chosen in the phone internal memory. Afirmware is provided in the STSW-ST25DV003 package, see Section 1.4.2 Android APK installation.After selecting the file, the new firmware is uploaded, encrypted to the ST25DV-I2C-DISCO board, by writingchunks to the ST25DV-I2C FTM buffer mailbox. The ST25DV-I2C-DISCO firmware checks the authenticity of thefirmware chunks (thanks to the GMAC) and flashes them in the STM32L476 static memory.Once the new firmware has been successfully programmed, the ST25DV-I2C-DISCO screen displays the transfermetrics:• Firmware size, in bytes• Total transferred data size, considering the metadata, in bytes• The total transfer time, in milliseconds• The time spent to decrypt and authenticate the firmware, in milliseconds• The time spent flashing the firmware to the static memory, in milliseconds
The user can touch the screen of the ST25DV-I2C-DISCO to reboot on the new firmware.
Note: The new firmware is flashed in a dedicated memory section, not overwriting the "ST25DV-I2C Crypto Demo"firmware, thus resetting the ST25DV-I2C-DISCO motherboard then restarts the original "ST25DV-I2C CryptoDemo" firmware.
Figure 16. "ST25DV-I2C Crypto Demo" - firmware upgrade
UM2575"ST25DV-I2C Crypto Demo" application screen
UM2575 - Rev 1 page 14/23

3.2.6 Eavesdropper screenThis screen has been added to show what someone sees when spying the NFC connection. It allows to see theencrypted data that are exchanged through NFC and what the ST25DV-I2C-DISCO gets after decryption.
Figure 17. "ST25DV-I2C Crypto Demo" - eavesdropper
The message sent is displayed as well on the screen of the ST25DV-I2C-DISCO board.
Figure 18. "ST25DV-I2C-DISCO Crypto Demo" - displayed message screen
UM2575"ST25DV-I2C Crypto Demo" application screen
UM2575 - Rev 1 page 15/23

3.3 Keys overview
Various cryptographic keys are used in the "ST25DV-I2C Crypto Demo". This screen has been added to help theuser to understand the role of each of them. In the Android applications, click on a key to get information about it.
Figure 19. "ST25DV-I2C-Crypto Demo" - keys overview
UM2575Keys overview
UM2575 - Rev 1 page 16/23

3.4 Setting screen
This screen is used to change some settings of the "ST25DV-I2C Crypto Demo" application.
Figure 20. "ST25DV-I2C-Crypto Demo" - settings
Role of each setting field:• Login: When setting up a connection with a ST25DV-I2C-DISCO board, the Android model name is used as
"Login". This "Login" can be changed here.
Note: A hacker may want to change the login name to usurp the identity of the authorized user. It is impossiblebecause the ST25DV-I2C-DISCO board saves the "Login" name plus the associated "Public key". The hackermay use the "Login" and the "Public key" of the authorized user but cannot pass the authentication phasebecause the hacker unknowns the "Private key".• User authentication: Indicates if user pin-code or fingerprint is requested every times the user starts this
application. This is an extra security to ensure that only the owner of the smartphone can use this Androidapplication to communicate with the IOT device (represented by the ST25DV-I2C-DISCO board in thisdemonstration).
• Number of Packets per Segment: The Android phone and the ST25DV-I2C-DISCO board are exchangingdata through the ST25DV-I2C FTM mailbox (which contains up to 256 bytes). When sending data bigger that256 bytes, the data is split in blocks of data fitting in the mailbox that are called “Packets”. A group of Npackets is called “Segment”. Each segment is encrypted separately, has its own GMAC for authenticationand integrity verification, and is acknowledged by the receiver (if integrity is correct). This setting is able tochange the number of packets per segment used when sending data to the ST25DV-I2C-DISCO board. Thisis the case for instance when doing a firmware upgrade.
UM2575Setting screen
UM2575 - Rev 1 page 17/23

• Use Addressed NFC command: Communication between the Android phone and the ST25DV-I2C-DISCOboard is done through NFC Type 5. Two modes are available for NFC Type5 commands:– Addressed– Non-addressed
When using addressed commands, the NFC Tag UID (on 8 bytes) is included in the command. This is saferbecause only the targeted tag processes the command but the communication is slower due to those extrabytes to send for every packet exchanged.
3.5 License screen
This screen shows the software license agreement that user accepts when using this program. It also indicatesthe version number of the program.
Figure 21. "ST25DV-I2C-Crypto Demo" - license
UM2575License screen
UM2575 - Rev 1 page 18/23

Revision history
Table 2. Document revision history
Date Version Changes
28-May-2019 1 Initial release.
UM2575
UM2575 - Rev 1 page 19/23

Contents
1 General information . . . . . . . . . . . . . . . . . . . . . . . . . . . . . . . . . . . . . . . . . . . . . . . . . . . . . . . . . . . . . . .2
1.1 Purpose and scope . . . . . . . . . . . . . . . . . . . . . . . . . . . . . . . . . . . . . . . . . . . . . . . . . . . . . . . . . . . . . 2
1.2 Acronyms . . . . . . . . . . . . . . . . . . . . . . . . . . . . . . . . . . . . . . . . . . . . . . . . . . . . . . . . . . . . . . . . . . . . . 3
1.3 Hardware equipment . . . . . . . . . . . . . . . . . . . . . . . . . . . . . . . . . . . . . . . . . . . . . . . . . . . . . . . . . . . 3
1.4 Installation . . . . . . . . . . . . . . . . . . . . . . . . . . . . . . . . . . . . . . . . . . . . . . . . . . . . . . . . . . . . . . . . . . . . 3
1.4.1 ST25DV-I2C-DISCO kit setup . . . . . . . . . . . . . . . . . . . . . . . . . . . . . . . . . . . . . . . . . . . . . . . 3
1.4.2 Android APK installation . . . . . . . . . . . . . . . . . . . . . . . . . . . . . . . . . . . . . . . . . . . . . . . . . . . 3
1.4.3 How to set the "Authorized User" . . . . . . . . . . . . . . . . . . . . . . . . . . . . . . . . . . . . . . . . . . . . 4
1.5 Disclaimer . . . . . . . . . . . . . . . . . . . . . . . . . . . . . . . . . . . . . . . . . . . . . . . . . . . . . . . . . . . . . . . . . . . . 5
2 Security processes . . . . . . . . . . . . . . . . . . . . . . . . . . . . . . . . . . . . . . . . . . . . . . . . . . . . . . . . . . . . . . . .6
2.1 Public key exchange. . . . . . . . . . . . . . . . . . . . . . . . . . . . . . . . . . . . . . . . . . . . . . . . . . . . . . . . . . . . 6
2.2 Definition of a "Shared Secret" . . . . . . . . . . . . . . . . . . . . . . . . . . . . . . . . . . . . . . . . . . . . . . . . . . . 6
2.3 Derivation of a public key . . . . . . . . . . . . . . . . . . . . . . . . . . . . . . . . . . . . . . . . . . . . . . . . . . . . . . . . 6
2.4 Authentication of the Android phone. . . . . . . . . . . . . . . . . . . . . . . . . . . . . . . . . . . . . . . . . . . . . . . 7
2.5 Authentication of the connected device . . . . . . . . . . . . . . . . . . . . . . . . . . . . . . . . . . . . . . . . . . . . 7
2.6 Encrypted data transfer . . . . . . . . . . . . . . . . . . . . . . . . . . . . . . . . . . . . . . . . . . . . . . . . . . . . . . . . . 8
3 Android and ST25DV-I2C-DISCO screens. . . . . . . . . . . . . . . . . . . . . . . . . . . . . . . . . . . . . . . . . . .9
3.1 Home screen . . . . . . . . . . . . . . . . . . . . . . . . . . . . . . . . . . . . . . . . . . . . . . . . . . . . . . . . . . . . . . . . . . 9
3.2 "ST25DV-I2C Crypto Demo" application screen . . . . . . . . . . . . . . . . . . . . . . . . . . . . . . . . . . . . 10
3.2.1 Secure transfer channel setup . . . . . . . . . . . . . . . . . . . . . . . . . . . . . . . . . . . . . . . . . . . . . 10
3.2.2 Step by step mode . . . . . . . . . . . . . . . . . . . . . . . . . . . . . . . . . . . . . . . . . . . . . . . . . . . . . . 11
3.2.3 “Read and decrypt data” button. . . . . . . . . . . . . . . . . . . . . . . . . . . . . . . . . . . . . . . . . . . . . 11
3.2.4 “Read and decrypt image” button . . . . . . . . . . . . . . . . . . . . . . . . . . . . . . . . . . . . . . . . . . . 12
3.2.5 “Encrypted firmware upgrade” button . . . . . . . . . . . . . . . . . . . . . . . . . . . . . . . . . . . . . . . . 13
3.2.6 Eavesdropper screen . . . . . . . . . . . . . . . . . . . . . . . . . . . . . . . . . . . . . . . . . . . . . . . . . . . . 15
3.3 Keys overview . . . . . . . . . . . . . . . . . . . . . . . . . . . . . . . . . . . . . . . . . . . . . . . . . . . . . . . . . . . . . . . . 16
3.4 Setting screen . . . . . . . . . . . . . . . . . . . . . . . . . . . . . . . . . . . . . . . . . . . . . . . . . . . . . . . . . . . . . . . . 17
3.5 License screen . . . . . . . . . . . . . . . . . . . . . . . . . . . . . . . . . . . . . . . . . . . . . . . . . . . . . . . . . . . . . . . 18
Revision history . . . . . . . . . . . . . . . . . . . . . . . . . . . . . . . . . . . . . . . . . . . . . . . . . . . . . . . . . . . . . . . . . . . . . . .19
UM2575Contents
UM2575 - Rev 1 page 20/23

List of tablesTable 1. Acronyms . . . . . . . . . . . . . . . . . . . . . . . . . . . . . . . . . . . . . . . . . . . . . . . . . . . . . . . . . . . . . . . . . . . . . . . . . 3Table 2. Document revision history . . . . . . . . . . . . . . . . . . . . . . . . . . . . . . . . . . . . . . . . . . . . . . . . . . . . . . . . . . . . . 19
UM2575List of tables
UM2575 - Rev 1 page 21/23

List of figuresFigure 1. Connection scheme with ST25DV-I2C-DISCO . . . . . . . . . . . . . . . . . . . . . . . . . . . . . . . . . . . . . . . . . . . . . . 2Figure 2. ST25DV-I2C-DISCO screen - no user . . . . . . . . . . . . . . . . . . . . . . . . . . . . . . . . . . . . . . . . . . . . . . . . . . . . 4Figure 3. ST25DV-I2C-DISCO screen - registered user . . . . . . . . . . . . . . . . . . . . . . . . . . . . . . . . . . . . . . . . . . . . . . . 4Figure 4. ST25DV-I2C-DISCO screen - denied access . . . . . . . . . . . . . . . . . . . . . . . . . . . . . . . . . . . . . . . . . . . . . . . 5Figure 5. Elliptic curve Diffie-Hellman over NFC . . . . . . . . . . . . . . . . . . . . . . . . . . . . . . . . . . . . . . . . . . . . . . . . . . . . 6Figure 6. Android phone authentication over NFC. . . . . . . . . . . . . . . . . . . . . . . . . . . . . . . . . . . . . . . . . . . . . . . . . . . 7Figure 7. ST25DV-I2C-DISCO authentication over NFC . . . . . . . . . . . . . . . . . . . . . . . . . . . . . . . . . . . . . . . . . . . . . . 8Figure 8. "ST25DV-I2C Crypto Demo" - home screen . . . . . . . . . . . . . . . . . . . . . . . . . . . . . . . . . . . . . . . . . . . . . . . . 9Figure 9. "ST25DV-I2C-Crypto Demo" - secure transfer channel setup . . . . . . . . . . . . . . . . . . . . . . . . . . . . . . . . . . . 10Figure 10. ST25DV-I2C-DISCO screen when no user has been registered . . . . . . . . . . . . . . . . . . . . . . . . . . . . . . . . . 10Figure 11. ST25DV-I2C-DISCO screen after mutual authentication. . . . . . . . . . . . . . . . . . . . . . . . . . . . . . . . . . . . . . . 11Figure 12. "ST25DV-I2C-Crypto Demo" - step by step mode . . . . . . . . . . . . . . . . . . . . . . . . . . . . . . . . . . . . . . . . . . . 11Figure 13. "ST25DV-I2C Crypto Demo" - data transfer . . . . . . . . . . . . . . . . . . . . . . . . . . . . . . . . . . . . . . . . . . . . . . . 12Figure 14. "ST25DV-I2C Crypto Demo" - picture transfer . . . . . . . . . . . . . . . . . . . . . . . . . . . . . . . . . . . . . . . . . . . . . . 13Figure 15. "ST25DV-I2C-Crypto Demo" - progress bar . . . . . . . . . . . . . . . . . . . . . . . . . . . . . . . . . . . . . . . . . . . . . . . 13Figure 16. "ST25DV-I2C Crypto Demo" - firmware upgrade . . . . . . . . . . . . . . . . . . . . . . . . . . . . . . . . . . . . . . . . . . . . 14Figure 17. "ST25DV-I2C Crypto Demo" - eavesdropper. . . . . . . . . . . . . . . . . . . . . . . . . . . . . . . . . . . . . . . . . . . . . . . 15Figure 18. "ST25DV-I2C-DISCO Crypto Demo" - displayed message screen . . . . . . . . . . . . . . . . . . . . . . . . . . . . . . . . 15Figure 19. "ST25DV-I2C-Crypto Demo" - keys overview . . . . . . . . . . . . . . . . . . . . . . . . . . . . . . . . . . . . . . . . . . . . . . 16Figure 20. "ST25DV-I2C-Crypto Demo" - settings . . . . . . . . . . . . . . . . . . . . . . . . . . . . . . . . . . . . . . . . . . . . . . . . . . . 17Figure 21. "ST25DV-I2C-Crypto Demo" - license . . . . . . . . . . . . . . . . . . . . . . . . . . . . . . . . . . . . . . . . . . . . . . . . . . . 18
UM2575List of figures
UM2575 - Rev 1 page 22/23
IMPORTANT NOTICE – PLEASE READ CAREFULLY
STMicroelectronics NV and its subsidiaries (“ST”) reserve the right to make changes, corrections, enhancements, modifications, and improvements to STproducts and/or to this document at any time without notice. Purchasers should obtain the latest relevant information on ST products before placing orders. STproducts are sold pursuant to ST’s terms and conditions of sale in place at the time of order acknowledgement.
Purchasers are solely responsible for the choice, selection, and use of ST products and ST assumes no liability for application assistance or the design ofPurchasers’ products.
No license, express or implied, to any intellectual property right is granted by ST herein.
Resale of ST products with provisions different from the information set forth herein shall void any warranty granted by ST for such product.
ST and the ST logo are trademarks of ST. For additional information about ST trademarks, please refer to www.st.com/trademarks. All other product or servicenames are the property of their respective owners.
Information in this document supersedes and replaces information previously supplied in any prior versions of this document.
© 2019 STMicroelectronics – All rights reserved
UM2575
UM2575 - Rev 1 page 23/23