ssb - finance user guide - occidental college self service links channel in the finance tab contains...
TRANSCRIPT

Self-Service Banner –
Finance User Guide
Budget Office Coons Administrative Building, 101
Phone: (323) 259-2967 Email: [email protected]
2
Table of Contents
Finance Tab ............................................................................................................................................. 3 Finance Information Channel ............................................................................................................... 3 Financial Advisor Channel .................................................................................................................... 3
Setting up the Financial Advisor Channel........................................................................................ 3 Subscribing to Multiple Financial Advisor Channels ..................................................................... 5
Self Service Links Channel .................................................................................................................... 6 Budget Queries.................................................................................................................................... 6
Budget Query by Account.............................................................................................................. 7 Budget Quick Query..................................................................................................................... 11
Encumbrance (Purchase Order) Query ......................................................................................... 13 Budget Transfer ................................................................................................................................ 16 Multiple Line Budget Transfer........................................................................................................ 19 Delete Finance Template .................................................................................................................. 23
Finance Helpful Hints........................................................................................................................... 24
3
Finance Tab The Finance tab contains the Financial Advisor channel, the Self Service Links channel, and the Finance information channel and is found in the myOxy portal (https://my.oxy.edu/).
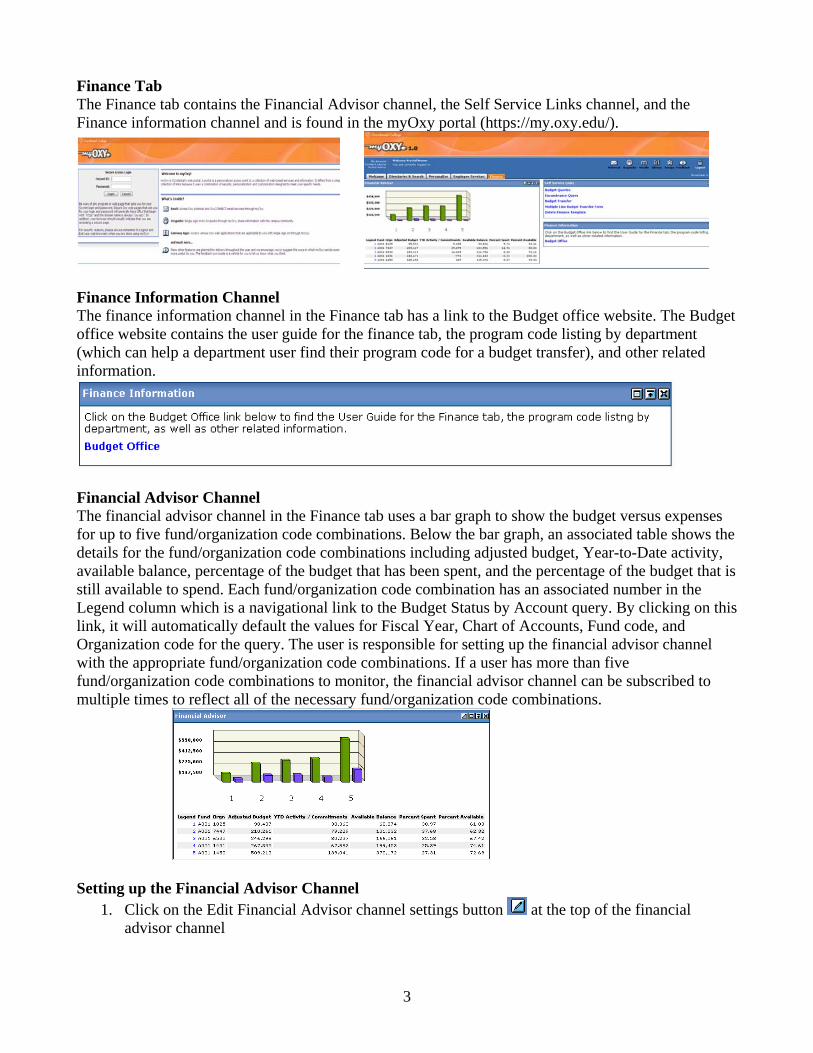
Finance Information Channel The finance information channel in the Finance tab has a link to the Budget office website. The Budget office website contains the user guide for the finance tab, the program code listing by department (which can help a department user find their program code for a budget transfer), and other related information.
Financial Advisor Channel The financial advisor channel in the Finance tab uses a bar graph to show the budget versus expenses for up to five fund/organization code combinations. Below the bar graph, an associated table shows the details for the fund/organization code combinations including adjusted budget, Year-to-Date activity, available balance, percentage of the budget that has been spent, and the percentage of the budget that is still available to spend. Each fund/organization code combination has an associated number in the Legend column which is a navigational link to the Budget Status by Account query. By clicking on this link, it will automatically default the values for Fiscal Year, Chart of Accounts, Fund code, and Organization code for the query. The user is responsible for setting up the financial advisor channel with the appropriate fund/organization code combinations. If a user has more than five fund/organization code combinations to monitor, the financial advisor channel can be subscribed to multiple times to reflect all of the necessary fund/organization code combinations.
Setting up the Financial Advisor Channel
1. Click on the Edit Financial Advisor channel settings button at the top of the financial advisor channel

4
2. At the Financial Advisor Preferences screen
a. Update the following: i. Select the Adjusted Budget Color from the drop-down menu
ii. Select the YTD Activity / Commitments Color from the drop-down menu iii. Enter the Chart of Accounts (COA) code for the fund/organization code
combination (Note: Oxy only has one chart of accounts code: 9) iv. Enter the Fund code for the fund/organization code combination v. Enter the Organization (Orgn) code for the fund/organization code combination
b. Once all fund/organization code combinations have been entered, click the Apply link i. Note: the Reset link will automatically clear all settings
c. Click the Back link to return to the financial advisor channel which will now be populated with the data for all of the fund/organization codes entered
Note: Since non-operating funds do not have budgets the only data that will be displayed in the financial advisor channel for a non-operating fund is YTD Activity / Commitments. To calculate the available balance for the fund, take the beginning balance (obtained from the Business office) and subtract the YTD Activity / Commitments amount
5
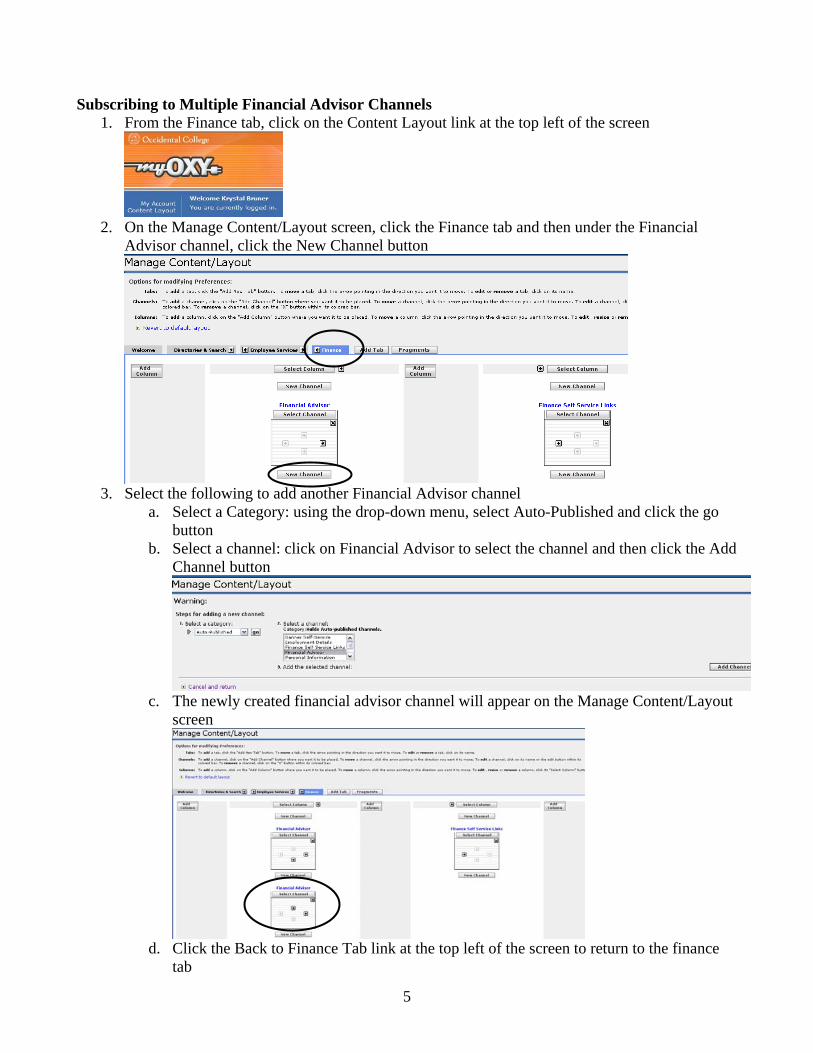
Subscribing to Multiple Financial Advisor Channels
1. From the Finance tab, click on the Content Layout link at the top left of the screen
2. On the Manage Content/Layout screen, click the Finance tab and then under the Financial
Advisor channel, click the New Channel button
3. Select the following to add another Financial Advisor channel
a. Select a Category: using the drop-down menu, select Auto-Published and click the go button
b. Select a channel: click on Financial Advisor to select the channel and then click the Add Channel button
c. The newly created financial advisor channel will appear on the Manage Content/Layout
screen
d. Click the Back to Finance Tab link at the top left of the screen to return to the finance
tab
6
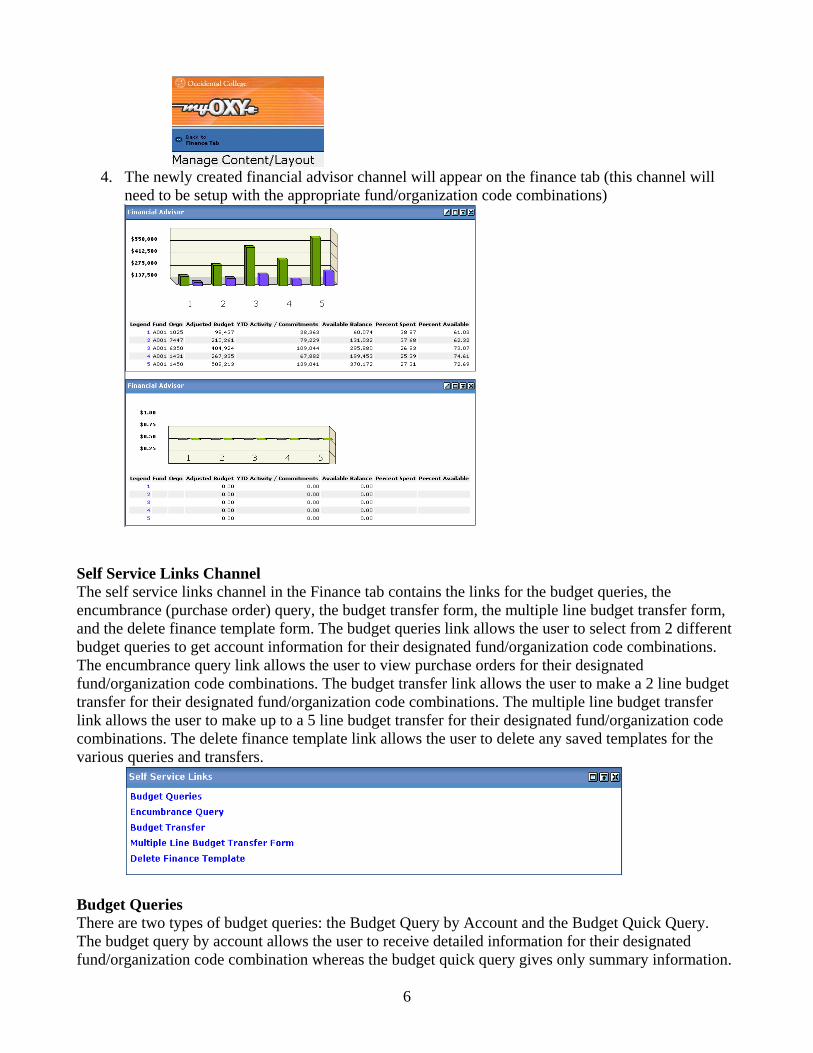
4. The newly created financial advisor channel will appear on the finance tab (this channel will
need to be setup with the appropriate fund/organization code combinations)
Self Service Links Channel The self service links channel in the Finance tab contains the links for the budget queries, the encumbrance (purchase order) query, the budget transfer form, the multiple line budget transfer form, and the delete finance template form. The budget queries link allows the user to select from 2 different budget queries to get account information for their designated fund/organization code combinations. The encumbrance query link allows the user to view purchase orders for their designated fund/organization code combinations. The budget transfer link allows the user to make a 2 line budget transfer for their designated fund/organization code combinations. The multiple line budget transfer link allows the user to make up to a 5 line budget transfer for their designated fund/organization code combinations. The delete finance template link allows the user to delete any saved templates for the various queries and transfers.
Budget Queries There are two types of budget queries: the Budget Query by Account and the Budget Quick Query. The budget query by account allows the user to receive detailed information for their designated fund/organization code combination whereas the budget quick query gives only summary information.

7
Budget Query by Account 1. From the Finance tab, in the Self Service Links channel, click on the Budget Queries link
2. Select Budget Query by Account from the drop-down menu and click the Create Query button
3. All of the data columns needed for the query will be automatically selected, click Continue
4. Select the query parameters
a. Fiscal Year: use the drop-down menu to select the fiscal year (the current fiscal year
will automatically default) b. Fiscal Period: use the drop-down menu to select the fiscal period
i. The fiscal period relates to each month of the fiscal year: 1. July – 01 2. August – 02 3. September – 03 4. October – 04 5. November – 05 6. December – 06 7. January – 07
8
8. February – 08 9. March – 09 10. April – 10 11. May – 11 12. June – 12
ii. When a fiscal period is selected, it will show all data from the start of the fiscal year through the last date of the month for that fiscal period. To see the entire fiscal year, select fiscal period 12
c. Comparison Fiscal Year: this selection allows a user to compare one fiscal year to another
i. Select None if no comparison is needed ii. Select the comparison fiscal year from the drop-down menu to add that year’s
comparison data to the query Notes: for a comparison query to work, the comparison fiscal year and the comparison fiscal period must be selected.
d. Comparison Fiscal Period: this selection is used in tandem with the comparison fiscal year selection
i. Select None if no comparison is needed ii. Select the comparison fiscal period from the drop-down menu
e. Commitment Type: use the drop-down menu to select All f. Chart of Accounts: this will automatically default with Oxy’s only chart of accounts
code – 9 g. Fund: enter the fund code h. Organization: enter the organization code or enter % to bring up all organization codes
for that fund i. Account, Program, and Activity: these codes are not necessary to run the query and can
be left blank, however, they can be entered to refine the query results j. Include Revenue Accounts: this checkbox is automatically selected, however, if the
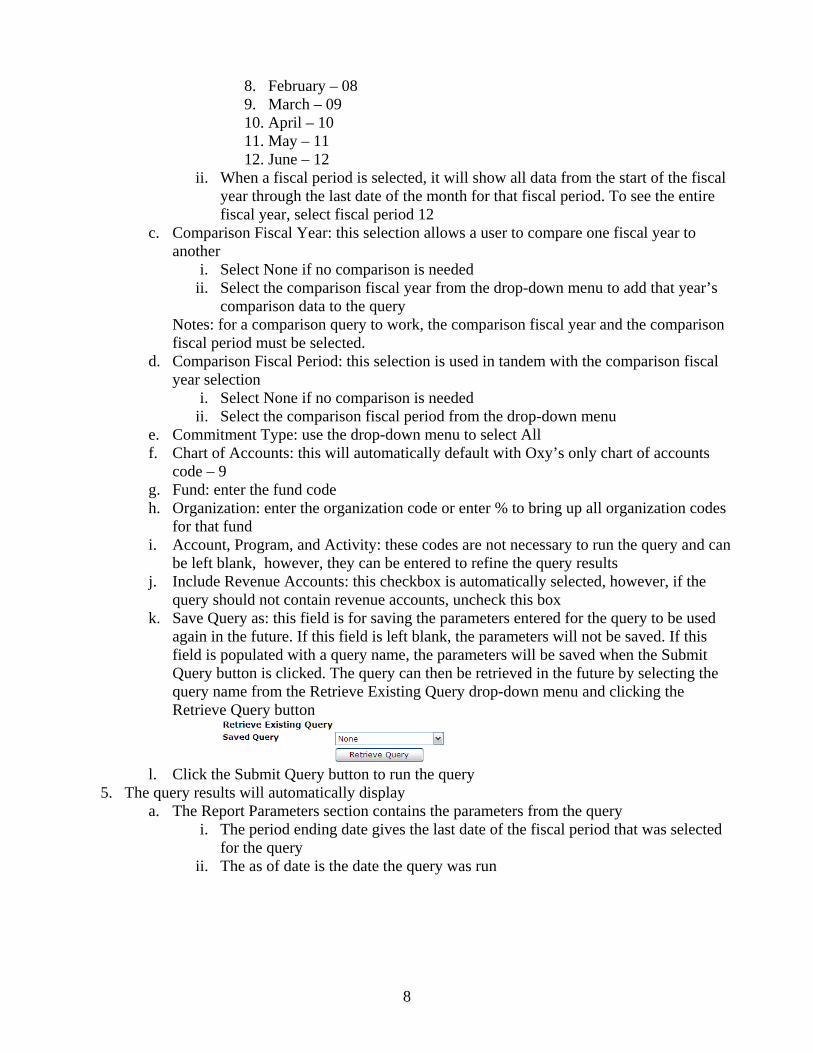
query should not contain revenue accounts, uncheck this box k. Save Query as: this field is for saving the parameters entered for the query to be used
again in the future. If this field is left blank, the parameters will not be saved. If this field is populated with a query name, the parameters will be saved when the Submit Query button is clicked. The query can then be retrieved in the future by selecting the query name from the Retrieve Existing Query drop-down menu and clicking the Retrieve Query button
l. Click the Submit Query button to run the query
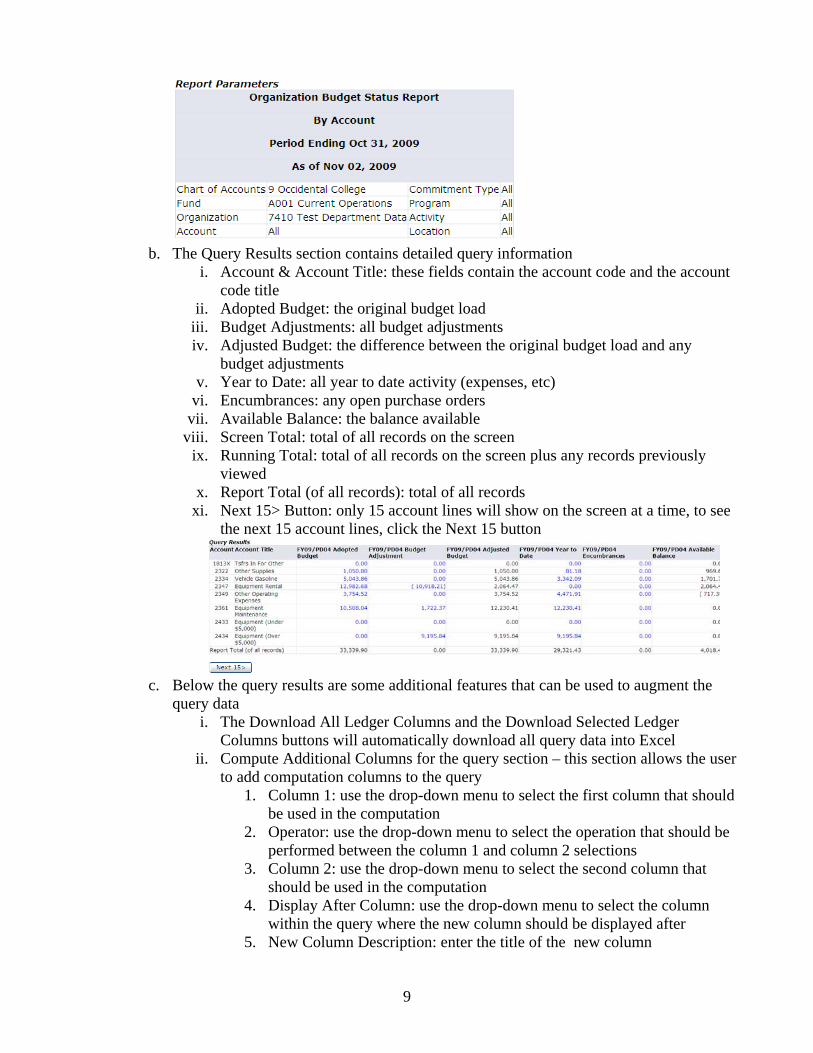
5. The query results will automatically display a. The Report Parameters section contains the parameters from the query
i. The period ending date gives the last date of the fiscal period that was selected for the query
ii. The as of date is the date the query was run
9
b. The Query Results section contains detailed query information
i. Account & Account Title: these fields contain the account code and the account code title
ii. Adopted Budget: the original budget load iii. Budget Adjustments: all budget adjustments iv. Adjusted Budget: the difference between the original budget load and any
budget adjustments v. Year to Date: all year to date activity (expenses, etc)
vi. Encumbrances: any open purchase orders vii. Available Balance: the balance available
viii. Screen Total: total of all records on the screen ix. Running Total: total of all records on the screen plus any records previously
viewed x. Report Total (of all records): total of all records
xi. Next 15> Button: only 15 account lines will show on the screen at a time, to see the next 15 account lines, click the Next 15 button
c. Below the query results are some additional features that can be used to augment the query data
i. The Download All Ledger Columns and the Download Selected Ledger Columns buttons will automatically download all query data into Excel
ii. Compute Additional Columns for the query section – this section allows the user to add computation columns to the query
1. Column 1: use the drop-down menu to select the first column that should be used in the computation
2. Operator: use the drop-down menu to select the operation that should be performed between the column 1 and column 2 selections
3. Column 2: use the drop-down menu to select the second column that should be used in the computation
4. Display After Column: use the drop-down menu to select the column within the query where the new column should be displayed after
5. New Column Description: enter the title of the new column

10
6. Click the Perform Computation button to add the computation column to the query results
d. Within the query results, click on the amount links within the query to display
additional information for that selection i. The detail screen will show the activity for that account
ii. The Document List section contains all of the transactions for the account selected
1. Click on the document code link to bring up the specific document for that transaction
a. Rule Class Code: this field indicates the type of transaction (Note: a list of commonly used rule class codes (transaction types) can be found at the end of the user guide)
iii. The Download button will download the document list into Excel
6. Click the Another Query button to run another budget query or the Back to Finance Tab link to
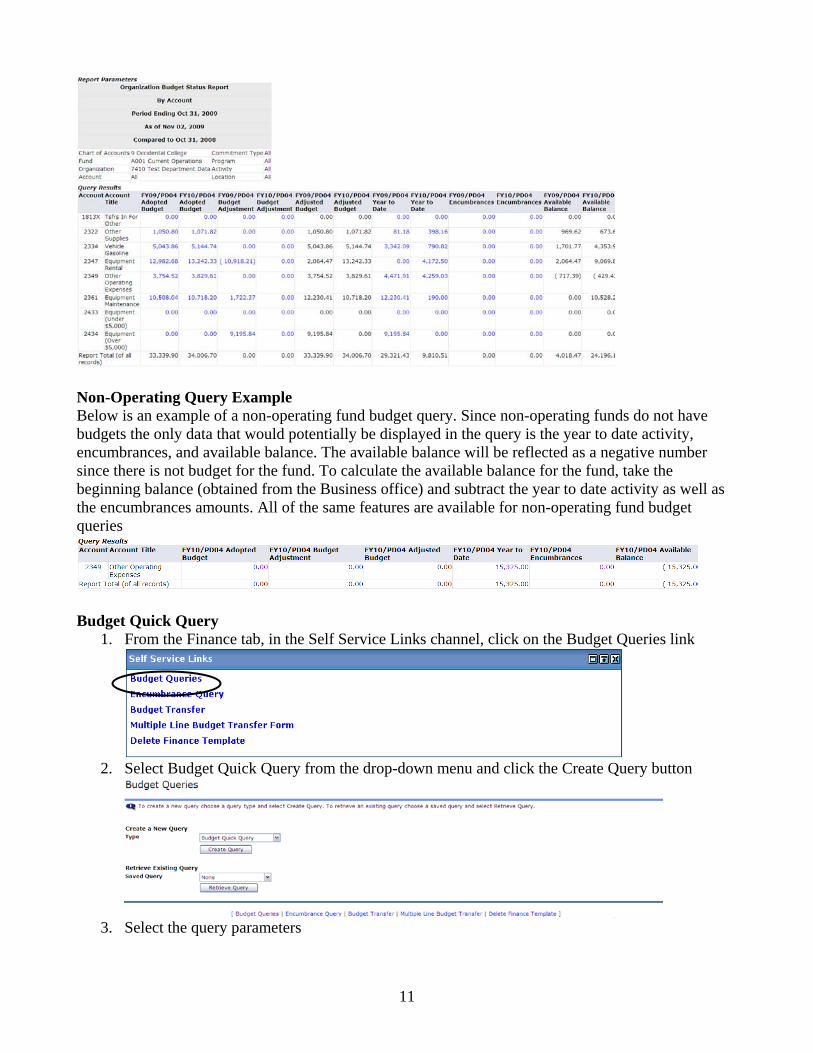
return to the finance tab Comparison Query Example Below is an example of a comparison query. The comparison query places the columns for both fiscal years next to each other for comparison purposes. All of the same features apply for comparison queries as with non-comparison queries
11
Non-Operating Query Example Below is an example of a non-operating fund budget query. Since non-operating funds do not have budgets the only data that would potentially be displayed in the query is the year to date activity, encumbrances, and available balance. The available balance will be reflected as a negative number since there is not budget for the fund. To calculate the available balance for the fund, take the beginning balance (obtained from the Business office) and subtract the year to date activity as well as the encumbrances amounts. All of the same features are available for non-operating fund budget queries
Budget Quick Query
1. From the Finance tab, in the Self Service Links channel, click on the Budget Queries link
2. Select Budget Quick Query from the drop-down menu and click the Create Query button
3. Select the query parameters

12
a. Fiscal Year: use the drop-down menu to select the fiscal year (the current fiscal year
will automatically default) b. Chart of Accounts: this will automatically default with Oxy’s only chart of accounts
code – 9 c. Fund: enter the fund code d. Organization: enter the organization code or enter % to bring up all organization codes
for that fund e. Account, Program, and Activity: these codes are not necessary to run the query and can
be left blank, however, they can be entered to refine the query results f. Commitment Type: use the drop-down menu to select All g. Include Revenue Accounts: this checkbox is not automatically selected, however, if the
query should contain revenue accounts, check this box h. Save Query as: this field is for saving the parameters entered for the query to be used
again in the future. If this field is left blank, the parameters will not be saved. If this field is populated with a query name, the parameters will be saved when the Submit Query button is clicked. The query can then be retrieved in the future by selecting the query name from the Retrieve Existing Query drop-down menu and clicking the Retrieve Query button
i. Click the Submit Query button to run the query
4. The query results will automatically display a. The Report Parameters section contains the parameters from the query
i. The period ending date gives the last date of the fiscal period that was selected for the query
ii. The as of date is the date the query was run
b. The Query Results section contains summary query information
i. Account & Account Title: these fields contain the account code and the account code title
ii. Adjusted Budget: the difference between the original budget load and any budget adjustments
13
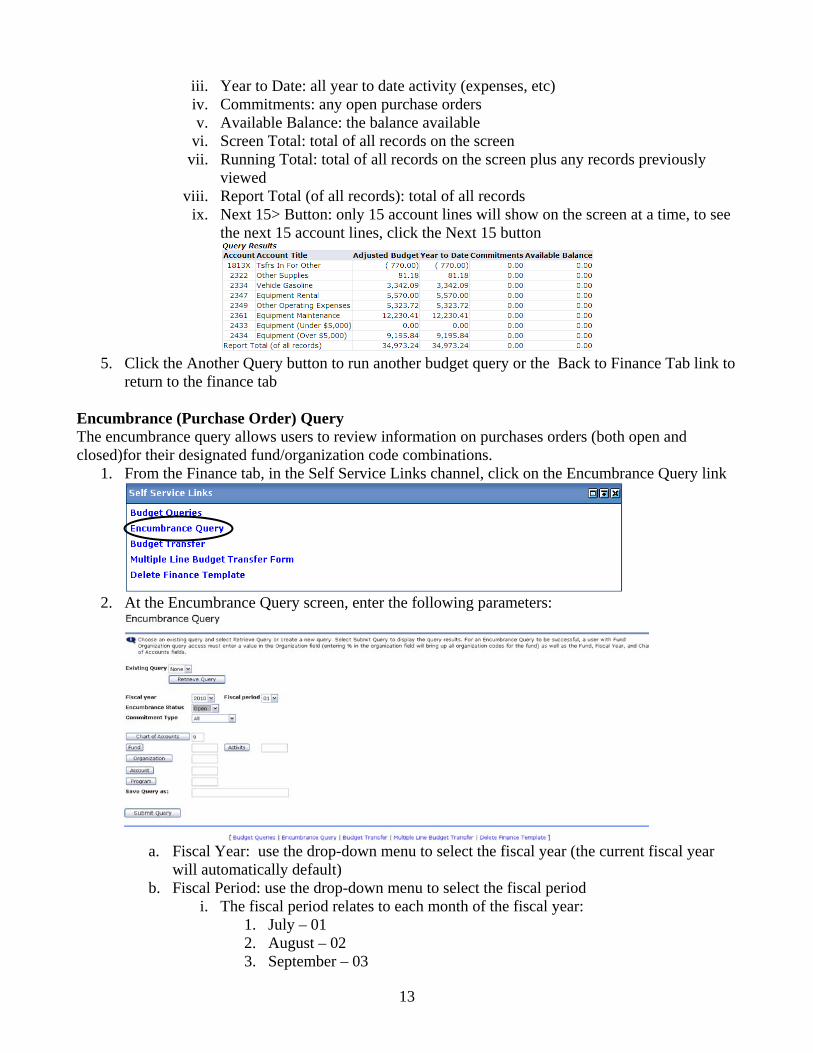
iii. Year to Date: all year to date activity (expenses, etc) iv. Commitments: any open purchase orders v. Available Balance: the balance available
vi. Screen Total: total of all records on the screen vii. Running Total: total of all records on the screen plus any records previously
viewed viii. Report Total (of all records): total of all records
ix. Next 15> Button: only 15 account lines will show on the screen at a time, to see the next 15 account lines, click the Next 15 button
5. Click the Another Query button to run another budget query or the Back to Finance Tab link to
return to the finance tab Encumbrance (Purchase Order) Query The encumbrance query allows users to review information on purchases orders (both open and closed)for their designated fund/organization code combinations.
1. From the Finance tab, in the Self Service Links channel, click on the Encumbrance Query link
2. At the Encumbrance Query screen, enter the following parameters:
a. Fiscal Year: use the drop-down menu to select the fiscal year (the current fiscal year
will automatically default) b. Fiscal Period: use the drop-down menu to select the fiscal period
i. The fiscal period relates to each month of the fiscal year: 1. July – 01 2. August – 02 3. September – 03

14
4. October – 04 5. November – 05 6. December – 06 7. January – 07 8. February – 08 9. March – 09 10. April – 10 11. May – 11 12. June – 12
ii. When a fiscal period is selected, it will show all data from the start of the fiscal year through the last date of the month for that fiscal period. To see the entire fiscal year, select fiscal period 12
c. Encumbrance Status: use the drop-down menu to select the purchase order status i. Open – will show all open purchase orders
ii. Closed – will show all closed purchase orders iii. All – will show all purchase orders
d. Commitment Type: use the drop-down menu to select All e. Chart of Accounts: this will automatically default with Oxy’s only chart of accounts
code – 9 f. Fund: enter the fund code g. Organization: enter the organization code or enter % to bring up all organization codes
for that fund h. Account, Program, and Activity: these codes are not necessary to run the encumbrance
query and can be left blank, however, they can be entered to refine the query results i. Save Query as: this field is for saving the parameters entered for the query to be used
again in the future. If this field is left blank, the parameters will not be saved. If this field is populated with a query name, the parameters will be saved when the Submit Query button is clicked. The query can then be retrieved in the future by selecting the query name from the Existing Query drop-down menu and clicking the Retrieve Query button
j. Click the Submit Query button to run the query
3. The query results will automatically display
15
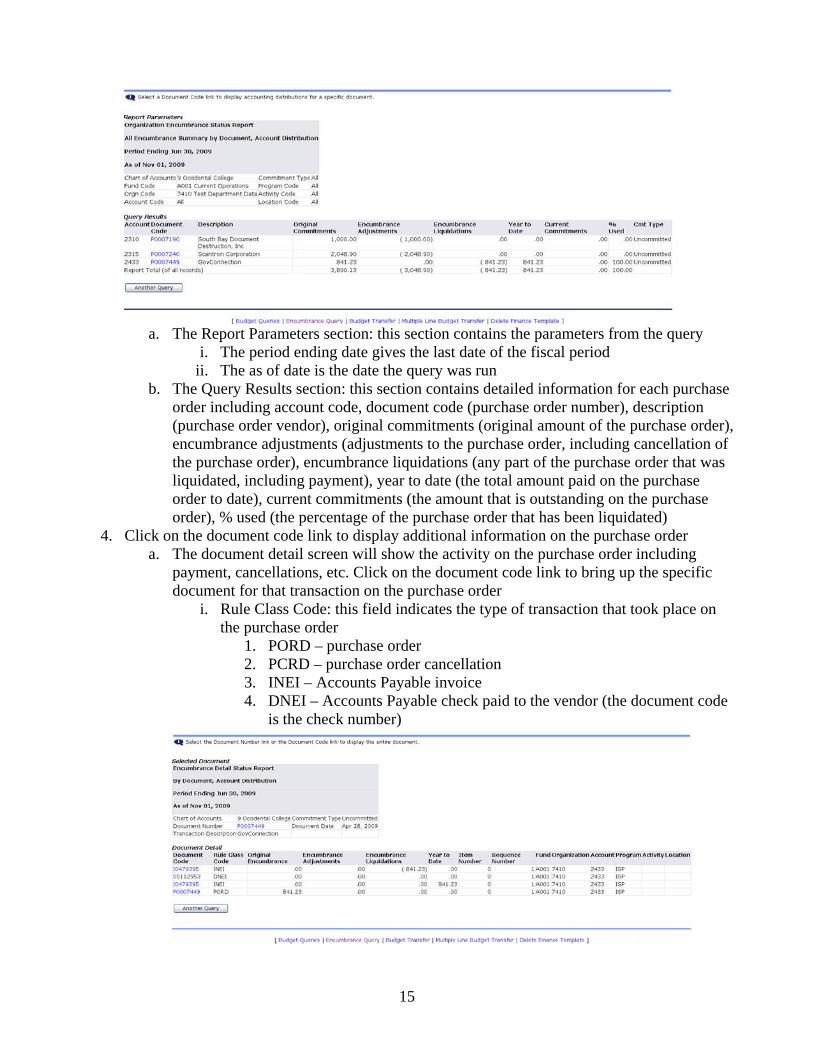
a. The Report Parameters section: this section contains the parameters from the query
i. The period ending date gives the last date of the fiscal period ii. The as of date is the date the query was run
b. The Query Results section: this section contains detailed information for each purchase order including account code, document code (purchase order number), description (purchase order vendor), original commitments (original amount of the purchase order), encumbrance adjustments (adjustments to the purchase order, including cancellation of the purchase order), encumbrance liquidations (any part of the purchase order that was liquidated, including payment), year to date (the total amount paid on the purchase order to date), current commitments (the amount that is outstanding on the purchase order), % used (the percentage of the purchase order that has been liquidated)
4. Click on the document code link to display additional information on the purchase order a. The document detail screen will show the activity on the purchase order including
payment, cancellations, etc. Click on the document code link to bring up the specific document for that transaction on the purchase order
i. Rule Class Code: this field indicates the type of transaction that took place on the purchase order
1. PORD – purchase order 2. PCRD – purchase order cancellation 3. INEI – Accounts Payable invoice 4. DNEI – Accounts Payable check paid to the vendor (the document code
is the check number)
16
5. Click the Another Query button to run another encumbrance query or the Back to Finance Tab link to return to the finance tab
Budget Transfer The budget transfer form allows users to submit a 2 line budget transfer for their designated fund/organization code combinations. Budget Transfer Helpful Hints
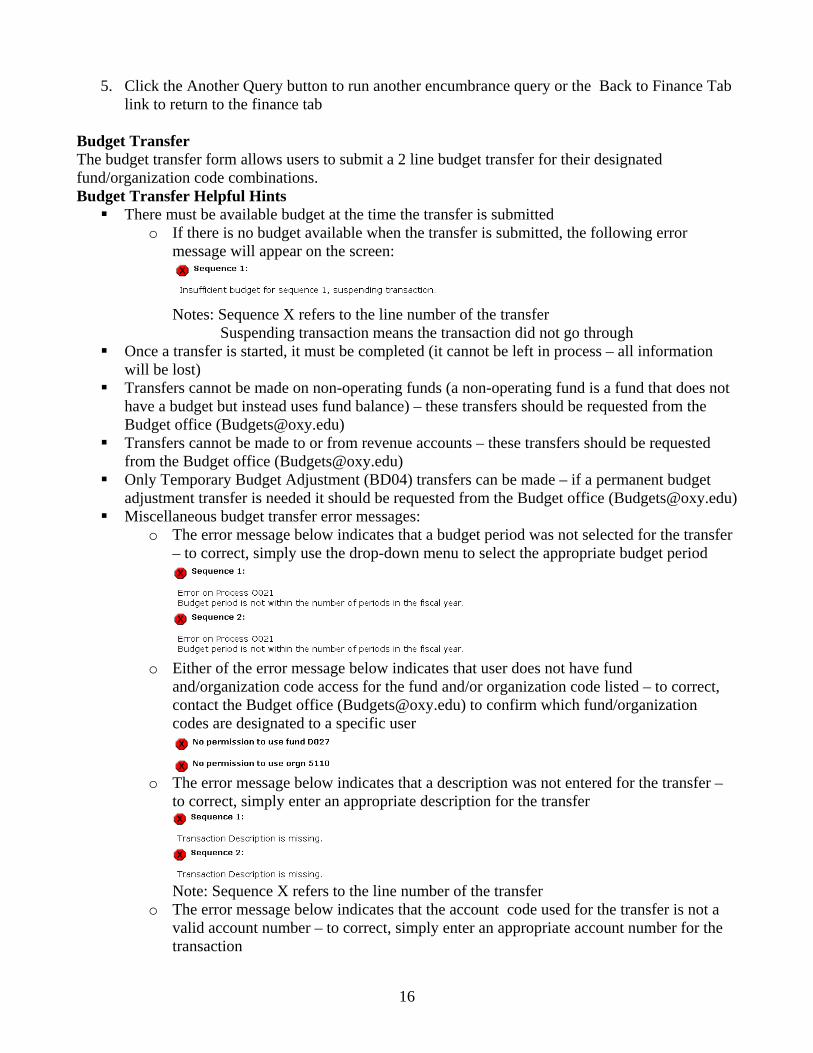
There must be available budget at the time the transfer is submitted o If there is no budget available when the transfer is submitted, the following error
message will appear on the screen:
Notes: Sequence X refers to the line number of the transfer Suspending transaction means the transaction did not go through
Once a transfer is started, it must be completed (it cannot be left in process – all information will be lost)
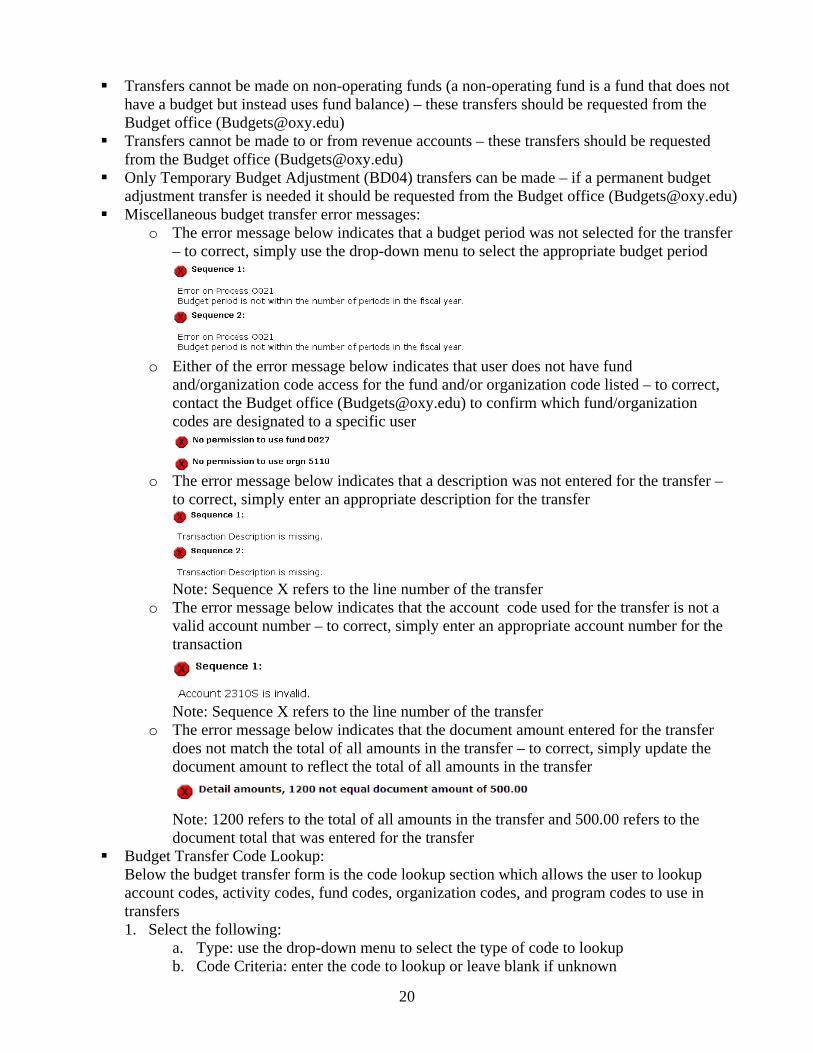
Transfers cannot be made on non-operating funds (a non-operating fund is a fund that does not have a budget but instead uses fund balance) – these transfers should be requested from the Budget office ([email protected])
Transfers cannot be made to or from revenue accounts – these transfers should be requested from the Budget office ([email protected])
Only Temporary Budget Adjustment (BD04) transfers can be made – if a permanent budget adjustment transfer is needed it should be requested from the Budget office ([email protected])
Miscellaneous budget transfer error messages: o The error message below indicates that a budget period was not selected for the transfer
– to correct, simply use the drop-down menu to select the appropriate budget period
o Either of the error message below indicates that user does not have fund
and/organization code access for the fund and/or organization code listed – to correct, contact the Budget office ([email protected]) to confirm which fund/organization codes are designated to a specific user
o The error message below indicates that a description was not entered for the transfer –
to correct, simply enter an appropriate description for the transfer
Note: Sequence X refers to the line number of the transfer
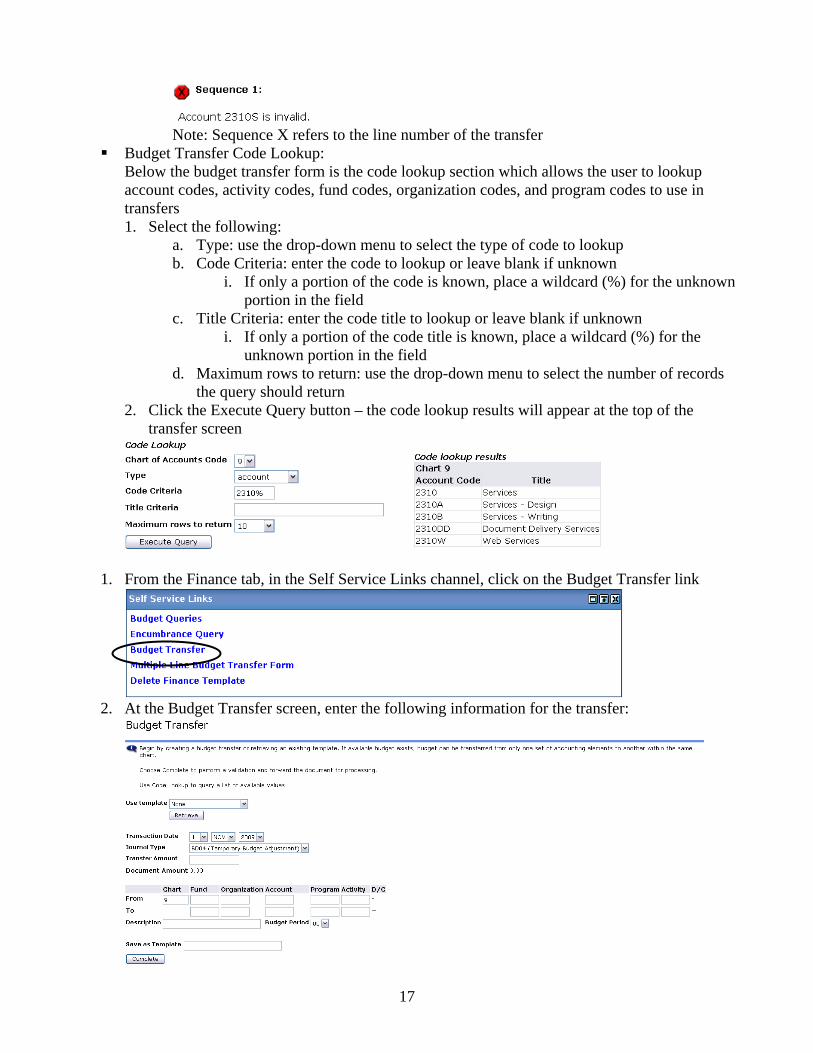
o The error message below indicates that the account code used for the transfer is not a valid account number – to correct, simply enter an appropriate account number for the transaction
17
Note: Sequence X refers to the line number of the transfer
Budget Transfer Code Lookup: Below the budget transfer form is the code lookup section which allows the user to lookup account codes, activity codes, fund codes, organization codes, and program codes to use in transfers 1. Select the following:
a. Type: use the drop-down menu to select the type of code to lookup b. Code Criteria: enter the code to lookup or leave blank if unknown
i. If only a portion of the code is known, place a wildcard (%) for the unknown portion in the field
c. Title Criteria: enter the code title to lookup or leave blank if unknown i. If only a portion of the code title is known, place a wildcard (%) for the
unknown portion in the field d. Maximum rows to return: use the drop-down menu to select the number of records
the query should return 2. Click the Execute Query button – the code lookup results will appear at the top of the
transfer screen
1. From the Finance tab, in the Self Service Links channel, click on the Budget Transfer link
2. At the Budget Transfer screen, enter the following information for the transfer:

18
a. Transaction Date: the transaction date will automatically default to the current date but can be updated as needed
i. The transaction date should coincide with the budget period selected for the transfer
ii. If posting to a previous budget period, the transaction date must be the last date of the budget period
iii. At the fiscal yearend, the transaction date is what ensures that the transfer is posted to the correct fiscal year. All transfers made after June 30th that should apply to the previous fiscal year must have a transaction date of 06/30 and a budget period of 12
b. Journal Type: the journal type automatically defaults to BD04 (Temporary Budget Adjustment)
c. Transfer Amount: this amount is the amount that needs be transferred from one account to another
d. Document Amount: this amount will automatically populate when the transfer is completed – it is the sum total of both lines of the transfer (double the transfer amount)
e. From – this is the FOAPAL information that the budget will be taken from: i. Chart: automatically populates with Oxy’s only chart of accounts code: 9
ii. Fund: enter the fund code iii. Organization: enter the organization code iv. Account: enter the account code v. Program: enter the program code associated with the organization code being
used for the transfer 1. A list of program codes by department can be found by clicking the
Budget office link in the Finance Information channel on the Finance tab vi. Activity: enter the activity code or leave blank if no activity code is needed
f. To – this is the FOAPAL information that the budget will be given to: i. Chart: automatically populates with Oxy’s only chart of accounts code: 9
ii. Fund: enter the fund code iii. Organization: enter the organization code iv. Account: enter the account code v. Program: enter the program code associated with the organization code being
used for the transfer 1. A list of program codes by department can be found by clicking the
Budget office link in the Finance Information channel on the Finance tab vi. Activity: enter the activity code or leave blank if no activity code is needed
g. Description: enter an appropriate description for the transaction i. The description should begin with: Xfr budget per First Name Initial Last Name
(Example: Xfr budget per J. Vance) h. Budget Period: use the drop-down menu to select the appropriate budget period for the
transfer i. The budget period relates to each month of the fiscal year:
1. July – 01 2. August – 02 3. September – 03 4. October – 04 5. November – 05 6. December – 06 7. January – 07
19
8. February – 08 9. March – 09 10. April – 10 11. May – 11 12. June – 12
ii. The budget period should coincide with the transaction date selected for the transfer
iii. If posting to a previous budget period, the transaction date should be the last date of the budget period
iv. At the fiscal yearend, the transaction date is what ensures that the transfer is posted to the correct fiscal year. All transfers made after June 30th that should apply to the previous fiscal year should have a transaction date of 06/30 and a budget period of 12
i. Save as Template: this field is for saving the transfer data entered for the transfer to be used again in the future. If this field is left blank, the transfer data will not be saved. If this field is populated with a transfer name, the transfer data will be saved when the Complete button is clicked. The template can then be retrieved in the future by selecting the transfer name from the Use Template drop-down menu and clicking the Retrieve button
j. Click the Complete button to submit the transfer
3. The message below will appear when the transfer has been submitted successfully
Notes: -T******** is the system generated document number and should be noted for the departmental records as departments are responsible for keeping documentation related to the transfer for future reference -The transfer that was submitted will remain on the screen until another action is selected (if the Complete button is clicked again, the transfer will submit again)
4. Click the Another Transfer button to complete another transfer or the Back to Finance Tab link to return to the finance tab
Multiple Line Budget Transfer The multiple line budget transfer form allows users to submit a multi-line budget transfer for their designated fund/organization code combinations. Budget Transfer Helpful Hints
There must be available budget at the time the transfer is submitted o If there is no budget available when the transfer is submitted, the following error
message will appear on the screen:
Notes: Sequence X refers to the line number of the transfer Suspending transaction means the transaction did not go through
Once a transfer is started, it must be completed (it cannot be left in process – all information will be lost)
20
Transfers cannot be made on non-operating funds (a non-operating fund is a fund that does not have a budget but instead uses fund balance) – these transfers should be requested from the Budget office ([email protected])
Transfers cannot be made to or from revenue accounts – these transfers should be requested from the Budget office ([email protected])
Only Temporary Budget Adjustment (BD04) transfers can be made – if a permanent budget adjustment transfer is needed it should be requested from the Budget office ([email protected])
Miscellaneous budget transfer error messages: o The error message below indicates that a budget period was not selected for the transfer
– to correct, simply use the drop-down menu to select the appropriate budget period
o Either of the error message below indicates that user does not have fund
and/organization code access for the fund and/or organization code listed – to correct, contact the Budget office ([email protected]) to confirm which fund/organization codes are designated to a specific user
o The error message below indicates that a description was not entered for the transfer –
to correct, simply enter an appropriate description for the transfer
Note: Sequence X refers to the line number of the transfer
o The error message below indicates that the account code used for the transfer is not a valid account number – to correct, simply enter an appropriate account number for the transaction
Note: Sequence X refers to the line number of the transfer
o The error message below indicates that the document amount entered for the transfer does not match the total of all amounts in the transfer – to correct, simply update the document amount to reflect the total of all amounts in the transfer
Note: 1200 refers to the total of all amounts in the transfer and 500.00 refers to the document total that was entered for the transfer
Budget Transfer Code Lookup: Below the budget transfer form is the code lookup section which allows the user to lookup account codes, activity codes, fund codes, organization codes, and program codes to use in transfers 1. Select the following:
a. Type: use the drop-down menu to select the type of code to lookup b. Code Criteria: enter the code to lookup or leave blank if unknown

21
i. If only a portion of the code is known, place a wildcard (%) for the unknown portion in the field
c. Title Criteria: enter the code title to lookup or leave blank if unknown i. If only a portion of the code title is known, place a wildcard (%) for the
unknown portion in the field d. Maximum rows to return: use the drop-down menu to select the number of records
the query should return 2. Click the Execute Query button – the code lookup results will appear at the top of the
transfer screen
1. From the Finance tab, in the Self Service Links channel, click on the Multiple Line Budget
Transfer Form link
2. At the Multiple Line Budget Transfer screen, enter the following information for the transfer:
a. Transaction Date: the transaction date will automatically default to the current date but can be
updated as needed i. The transaction date should coincide with the budget period selected for the transfer
ii. If posting to a previous budget period, the transaction date must be the last date of the budget period
iii. At the fiscal yearend, the transaction date is what ensures that the transfer is posted to the correct fiscal year. All transfers made after June 30th that should apply to the previous fiscal year must have a transaction date of 06/30 and a budget period of 12
b. Journal Type: the journal type automatically defaults to BD04 (Temporary Budget Adjustment) c. Document Amount: this amount is sum total of all amounts in the transfer request
22
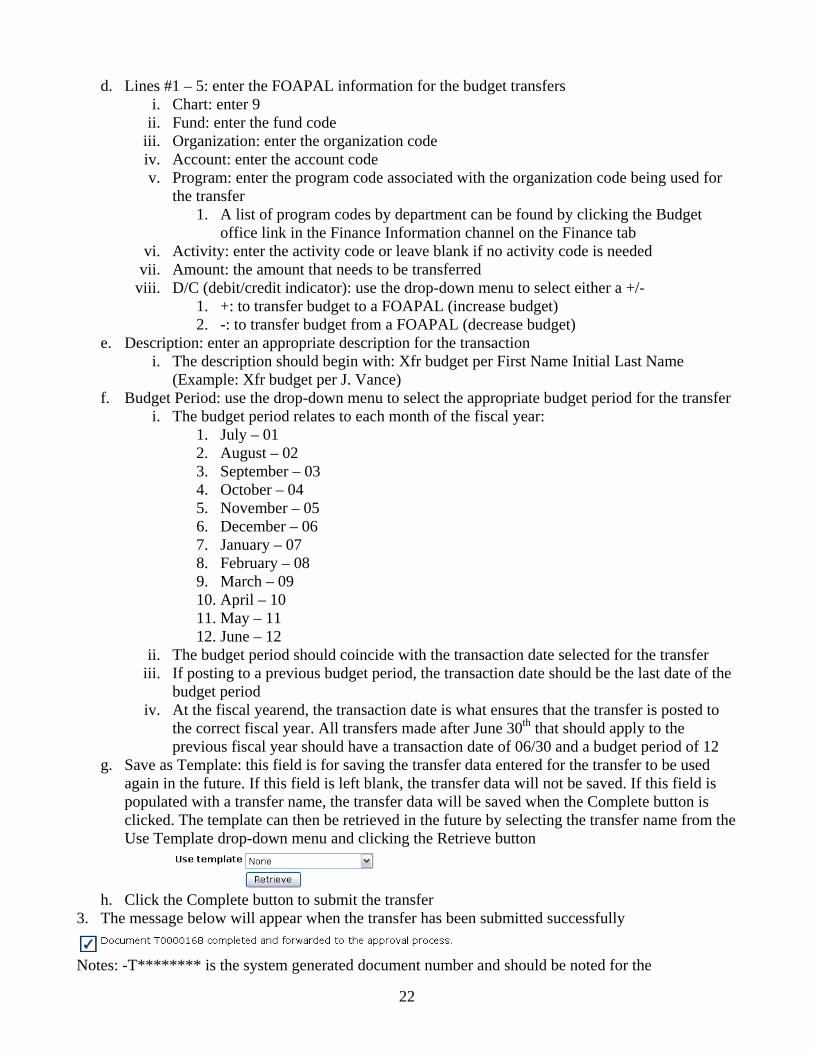
d. Lines #1 – 5: enter the FOAPAL information for the budget transfers i. Chart: enter 9
ii. Fund: enter the fund code iii. Organization: enter the organization code iv. Account: enter the account code v. Program: enter the program code associated with the organization code being used for
the transfer 1. A list of program codes by department can be found by clicking the Budget
office link in the Finance Information channel on the Finance tab vi. Activity: enter the activity code or leave blank if no activity code is needed
vii. Amount: the amount that needs to be transferred viii. D/C (debit/credit indicator): use the drop-down menu to select either a +/-
1. +: to transfer budget to a FOAPAL (increase budget) 2. -: to transfer budget from a FOAPAL (decrease budget)
e. Description: enter an appropriate description for the transaction i. The description should begin with: Xfr budget per First Name Initial Last Name
(Example: Xfr budget per J. Vance) f. Budget Period: use the drop-down menu to select the appropriate budget period for the transfer
i. The budget period relates to each month of the fiscal year: 1. July – 01 2. August – 02 3. September – 03 4. October – 04 5. November – 05 6. December – 06 7. January – 07 8. February – 08 9. March – 09 10. April – 10 11. May – 11 12. June – 12
ii. The budget period should coincide with the transaction date selected for the transfer iii. If posting to a previous budget period, the transaction date should be the last date of the
budget period iv. At the fiscal yearend, the transaction date is what ensures that the transfer is posted to
the correct fiscal year. All transfers made after June 30th that should apply to the previous fiscal year should have a transaction date of 06/30 and a budget period of 12
g. Save as Template: this field is for saving the transfer data entered for the transfer to be used again in the future. If this field is left blank, the transfer data will not be saved. If this field is populated with a transfer name, the transfer data will be saved when the Complete button is clicked. The template can then be retrieved in the future by selecting the transfer name from the Use Template drop-down menu and clicking the Retrieve button
h. Click the Complete button to submit the transfer
3. The message below will appear when the transfer has been submitted successfully
Notes: -T******** is the system generated document number and should be noted for the
23
departmental records as departments are responsible for keeping documentation related to the transfer for future reference -The transfer that was submitted will remain on the screen until another action is selected (if the Complete button is clicked again, the transfer will submit again) 4. Click the Another Transfer button to complete another transfer or the Back to Finance Tab link to
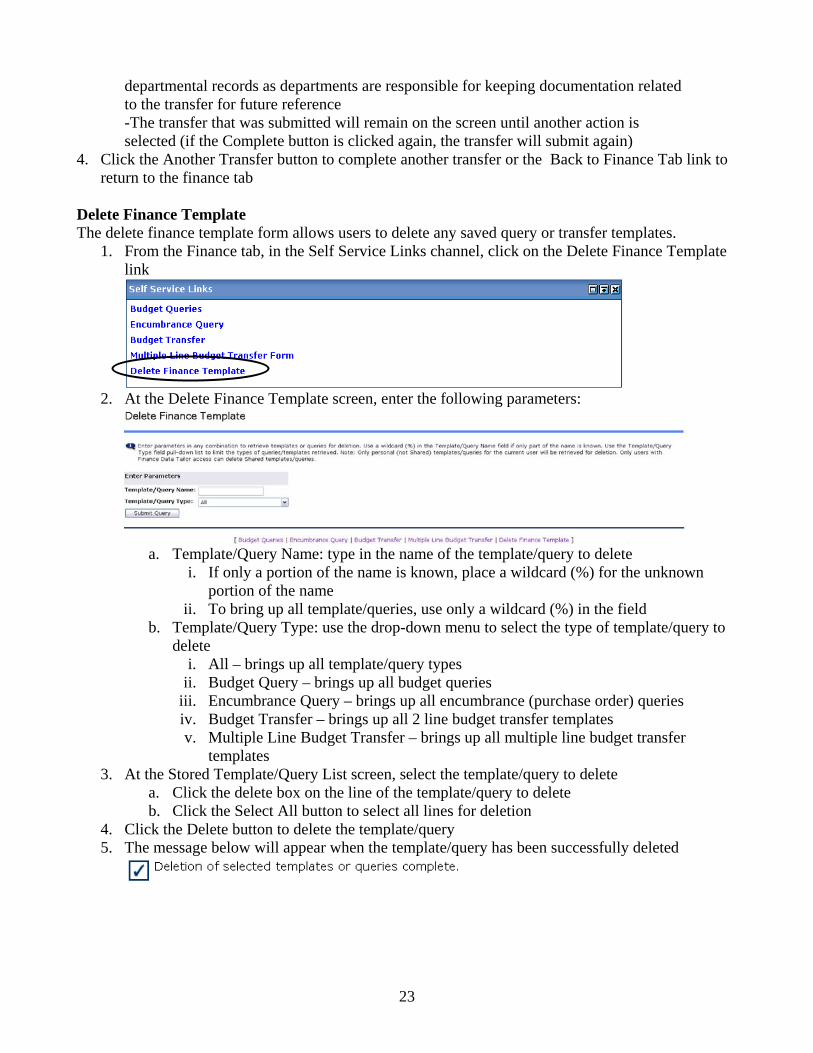
return to the finance tab Delete Finance Template The delete finance template form allows users to delete any saved query or transfer templates.
1. From the Finance tab, in the Self Service Links channel, click on the Delete Finance Template link
2. At the Delete Finance Template screen, enter the following parameters:
a. Template/Query Name: type in the name of the template/query to delete
i. If only a portion of the name is known, place a wildcard (%) for the unknown portion of the name
ii. To bring up all template/queries, use only a wildcard (%) in the field b. Template/Query Type: use the drop-down menu to select the type of template/query to
delete i. All – brings up all template/query types
ii. Budget Query – brings up all budget queries iii. Encumbrance Query – brings up all encumbrance (purchase order) queries iv. Budget Transfer – brings up all 2 line budget transfer templates v. Multiple Line Budget Transfer – brings up all multiple line budget transfer
templates 3. At the Stored Template/Query List screen, select the template/query to delete
a. Click the delete box on the line of the template/query to delete b. Click the Select All button to select all lines for deletion
4. Click the Delete button to delete the template/query 5. The message below will appear when the template/query has been successfully deleted
24
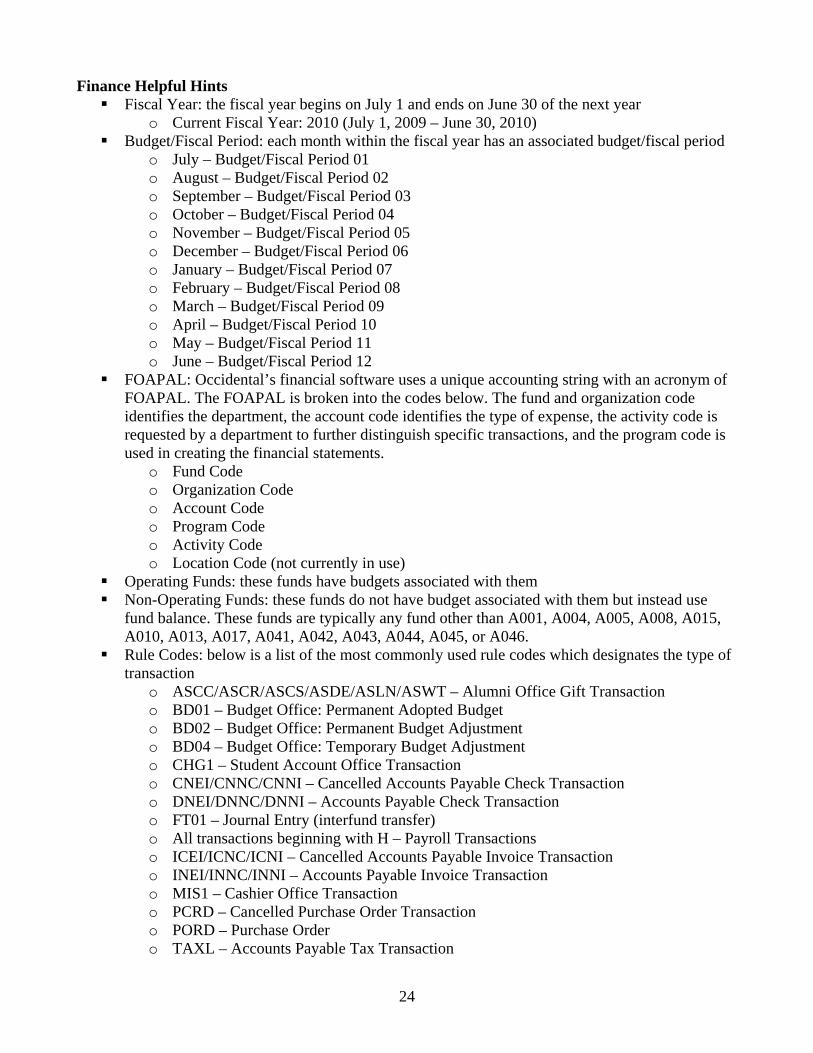
Finance Helpful Hints Fiscal Year: the fiscal year begins on July 1 and ends on June 30 of the next year
o Current Fiscal Year: 2010 (July 1, 2009 – June 30, 2010) Budget/Fiscal Period: each month within the fiscal year has an associated budget/fiscal period
o July – Budget/Fiscal Period 01 o August – Budget/Fiscal Period 02 o September – Budget/Fiscal Period 03 o October – Budget/Fiscal Period 04 o November – Budget/Fiscal Period 05 o December – Budget/Fiscal Period 06 o January – Budget/Fiscal Period 07 o February – Budget/Fiscal Period 08 o March – Budget/Fiscal Period 09 o April – Budget/Fiscal Period 10 o May – Budget/Fiscal Period 11 o June – Budget/Fiscal Period 12
FOAPAL: Occidental’s financial software uses a unique accounting string with an acronym of FOAPAL. The FOAPAL is broken into the codes below. The fund and organization code identifies the department, the account code identifies the type of expense, the activity code is requested by a department to further distinguish specific transactions, and the program code is used in creating the financial statements.
o Fund Code o Organization Code o Account Code o Program Code o Activity Code o Location Code (not currently in use)
Operating Funds: these funds have budgets associated with them Non-Operating Funds: these funds do not have budget associated with them but instead use
fund balance. These funds are typically any fund other than A001, A004, A005, A008, A015, A010, A013, A017, A041, A042, A043, A044, A045, or A046.
Rule Codes: below is a list of the most commonly used rule codes which designates the type of transaction
o ASCC/ASCR/ASCS/ASDE/ASLN/ASWT – Alumni Office Gift Transaction o BD01 – Budget Office: Permanent Adopted Budget o BD02 – Budget Office: Permanent Budget Adjustment o BD04 – Budget Office: Temporary Budget Adjustment o CHG1 – Student Account Office Transaction o CNEI/CNNC/CNNI – Cancelled Accounts Payable Check Transaction o DNEI/DNNC/DNNI – Accounts Payable Check Transaction o FT01 – Journal Entry (interfund transfer) o All transactions beginning with H – Payroll Transactions o ICEI/ICNC/ICNI – Cancelled Accounts Payable Invoice Transaction o INEI/INNC/INNI – Accounts Payable Invoice Transaction o MIS1 – Cashier Office Transaction o PCRD – Cancelled Purchase Order Transaction o PORD – Purchase Order o TAXL – Accounts Payable Tax Transaction