srs manual engelsk -...
TRANSCRIPT

0
www.hcr.as
SRS user manual

SRS user manual
1
Contents SRS in a nutshell ..................................................................................................................................... 2
Technical specifications / system requirements .................................................................................... 2
Internet access ................................................................................................................................... 2
Requirements for wireless internet (wi-‐fi) ..................................................................................... 2
Requirements for wireless broadband (3G/4G) ............................................................................. 3
Requirements for cabled internet ................................................................................................. 3
Minimum requirements for computers running the teacher client .................................................. 3
Minimum requirements for the students’ voting devices ................................................................. 3
Preparing students’ voting devices for first-‐time use ............................................................................ 4
Installing the teacher client ................................................................................................................... 5
Starting up and logging on the teacher interface .................................................................................. 5
Showing and hiding the teacher interface ............................................................................................. 7
Runing votes .......................................................................................................................................... 8
Bringing up result charts .................................................................................................................. 11
Comparing result graphs .................................................................................................................. 11
Running «live» votes ........................................................................................................................ 12
Choosing question type ....................................................................................................................... 12
Multiple-‐choice questions ............................................................................................................... 13
The question type «Tag-‐It» .............................................................................................................. 13
Other buttons and settings .................................................................................................................. 14
Changing the session code ............................................................................................................... 14
Showing the web address of the voting page .................................................................................. 14
Vise QR-‐kode for studentinnlogging ................................................................................................ 15
Changing the appearance of the interface ...................................................................................... 15
Viewing statistics ............................................................................................................................. 16
SRS and digital whiteboards ................................................................................................................ 17
Examples of SRS use in teaching .......................................................................................................... 17
Frequently asked quesions .................................................................................................................. 20
Error reporting ..................................................................................................................................... 20

SRS user manual
SRS in a nutshell SRS is a web-‐based voting system designed to enable asking multiple choice questions during teaching sessions in classroom or distance learning.
SRS consists of the following main components:
Technical specifications / system requirements
Internet access Both the computer running the teacher interface and student/pupil voting devices must have Internet access, in one or more of the following ways:
• Wireless internet (Wi-‐Fi) • Wireless broadband (3G/4G) • Cabled internet (ethernet)
It is not a requirement that all the units in the voting session are connected to the Internet in the same way -‐ some devices can be connected via Wi-‐Fi, some via 3G, other via a wired Internet etc.
Requirements for wireless internet (wi-‐fi) If voting devices are using wireless Internet, your wireless network must support the following standards and minimum requirements:
• IEEE 802.11 a, b, g or n • The wireless access point must be able to handle a number of simultaneous clients that
corresponds to the number of students/pupils to use SRS. One must take into account that each student can have multiple handheld devices online simultaneously, for instance smartphone and laptop at the same time.
1. Computer running the teacher interface
3. Server which controls communication and stores data
2. Student voting devices
Internet

SRS user manual
3
• Download and upload bandwidth to the institution must be a minimum of 5 kbit/s per student connected to the system
Requirements for wireless broadband (3G/4G) Students can connect to SRS via 3G/4G. This is, however, dependent on having such good coverage that the transmission rate is at least 5 kbit/s.
Requirements for cabled internet If students use computers connected to the Internet via wired Internet, there are no special requirements apart from a transmission rate of at least 5 kbit/s per student using this type of connection.
Minimum requirements for computers running the teacher client Minimum requirements for computers running the teacher client
• The teacher client is the program the teacher uses to run voting sessions. Note: Administrator access is required in order to install the teacher client.
• Your computer must meet the following minimum requirements: • Supported OS: Windows ® XP (with SP3), Windows Vista ® (with SP2), Windows ® 7 (with SP1),
Windows ® 8 • Processor: Intel ® Core ® 2 Duo [email protected] GHz or better, Amdt AthlonT64 X2 6000 + @ 3.0 GHz
or better • RAM: 2 GB Windows ® XP / 4 GB Windows Vista ®, Windows ® 7, Windows ® 8 • Hard drive: 5MB • Sound card and speakers • Mouse or other control device • Internet connection (wireless or wired)
Minimum requirements for the students’ voting devices
• Supported OS: Windows XP/Vista/7/8, Mac OS X 10.6 or newer, iOS 5 or newer, Android 2.3.5 or newer
• Internet access through either wireless (Wi-‐Fi), wireless broadband (3G/4G) or wired Internet • Web kit compliant browser, including (but not limited to) Safari, Google Chrome, Android
Browser

SRS user manual
Preparing students’ voting devices for first-‐time use Students/pupils can use any device with Internet access and a web browser to participate in voting sessions. This includes smartphones, tablets, laptops or even desktop computers.
Since SRS is web-‐based, students/pupils are handing in their answers (voting) through a website. In order to make voting sessions unroll as quickly and smoothly as possible, the teacher ought to kindly ask students to save the address of voting website as a bookmark/shortcut on their devices during the very first SRS session. Therefore, this procedure only needs to be done once in a given class that is using SRS.
As an example, the figure shows how to create a shortcut to the SRS page on an iPhone/iPod Touch /iPad. The exact procedure depends on the type of used device – if the student/pupil is unsure how to do this, they can check it in the user’s manual of their device.
The voting website URL that the students/pupils are supposed to enter was sent to you in the same email where you received your username and password. The URL below is fictional and is only intended as an example.
The first time the SRS page loads, a “bubble” showing you how to create a shortcut to the page pops up
Click Add to home screen
Enter a name for the shortcut
The shortcut is now an icon on your desktop, and you click on it every time you are supposed to vote
minstemmeserver.no minstemmeserver.no

SRS user manual
5
Installing the teacher client Teacher client is an Adobe AIR application, which means that this utility must be installed first. The procedure for installing the teacher client is as follows:
1. Download Adobe AIR program from http://adobe.com 2. Double-‐click the installation file that was downloaded and follow the instructions on the screen
to install Adobe AIR. 3. Download the installation file for the SRS teacher client from http://www.hcr.as 4. Double-‐click the installation file that was downloaded and follow the instructions on the screen
to install the teacher client.
Starting up and logging on the teacher interface You are now ready to log on to the teacher interface.
1. After the installation, you will find an icon on your desktop (below). Double-‐click it to launch the program.
2. Log in with your user name and password, which you received by email.
Enter your user name and password and click Connect

SRS user manual
3. You can now choose to let the system create a new session code (which is a 5-‐letter code that students enter on their devices to connect to your particular voting session), or you can use an existing code, as explained in the picture below.
4. If you click to create a new session code, the system will automatically generate a code, and the
teacher interface is now ready for use, just as the figure below shows.
Click here to generate a new session code
Click here to reuse an existing session code
Session code is shown here
SRS user manual
7
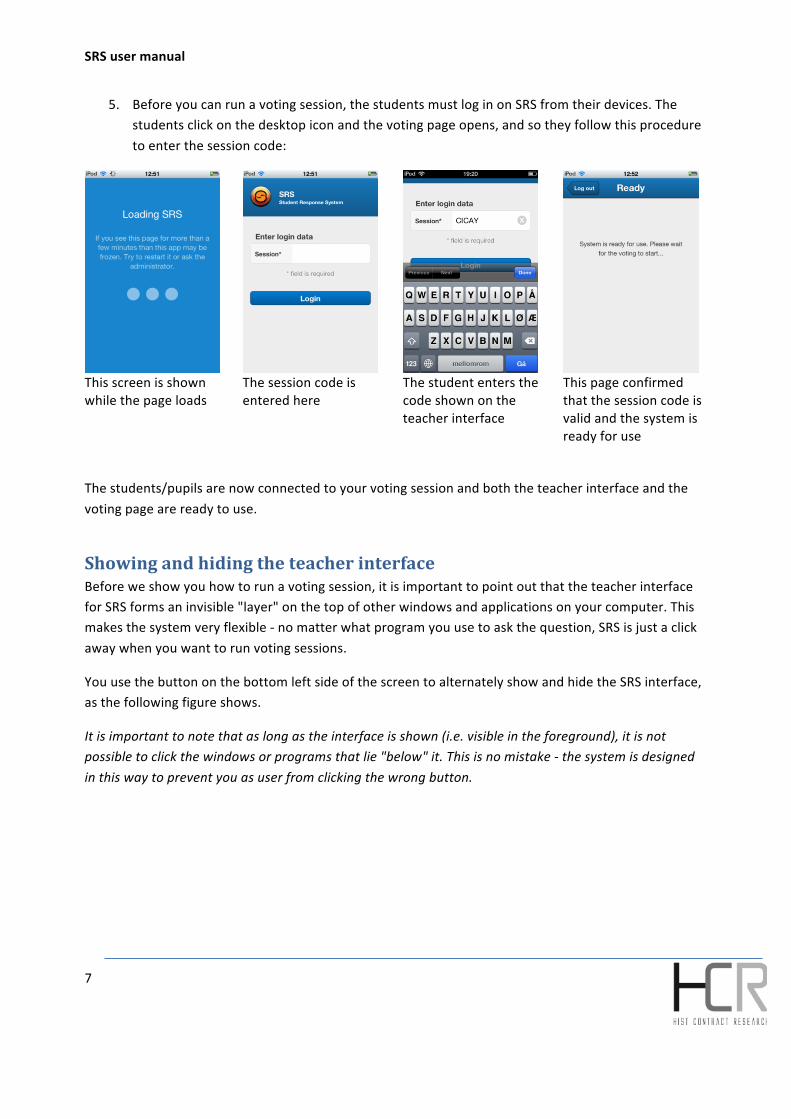
5. Before you can run a voting session, the students must log in on SRS from their devices. The students click on the desktop icon and the voting page opens, and so they follow this procedure to enter the session code:
This screen is shown while the page loads
The session code is entered here
The student enters the code shown on the teacher interface
This page confirmed that the session code is valid and the system is ready for use
The students/pupils are now connected to your voting session and both the teacher interface and the voting page are ready to use.
Showing and hiding the teacher interface Before we show you how to run a voting session, it is important to point out that the teacher interface for SRS forms an invisible "layer" on the top of other windows and applications on your computer. This makes the system very flexible -‐ no matter what program you use to ask the question, SRS is just a click away when you want to run voting sessions.
You use the button on the bottom left side of the screen to alternately show and hide the SRS interface, as the following figure shows.
It is important to note that as long as the interface is shown (i.e. visible in the foreground), it is not possible to click the windows or programs that lie "below" it. This is no mistake -‐ the system is designed in this way to prevent you as user from clicking the wrong button.

SRS user manual
Interface is visible and you wish to hide it Interface is visible and you wish to show it
Runing votes A voting session begins with you asking the students/pupils a question – it is entirely up to you what medium you want to use to ask the question. You can write the question beforehand in a text document (Word, Power Point, PDF) or other electronic format; you can write the question on a blackboard (digital or regular whiteboard/chalkboard) or you can ask the question verbally.
In addition, SRS features a unique function which enables you to ask multiple choice questions using multimedia material such as photos and video; this feature is called "Tag-‐It" and is described on page 13.
We will take a look at an example where the question is asked in advance in an electronic form, and one wants to run a poll (voting session) based on it.
6. Show the question to the students. In this example, the question is incorporated in a presentation, but it could have as well been written on a digital blackboard or a regular whiteboard. In order to retrieve the question, one should first hide the SRS interface, which enables access to the window with the question.
You can NOT access the desktop while the interface is visible!
Click here to hide the interface
Click here to show the interface
1. Make sure the interface is hidden to access the
desktop
2. Bring up the question and show it
to the students

SRS user manual
9
7. When the question appears on the screen, press the SRS button in the lower right corner to bring up the interface again. Before the voting session is started, you can select and change different settings of the session, as the figure below describes.
8. The complete procedure of running a voting session is described in the following figure. You can
go directly to step 4 if you have chosen all the additional settings.
-‐
«Live» votes – results are shown in real time as the votes come in
Timer on/off
Set countdown
Ticking sound on/off Show results
automatically?
Select more than one alternative?
1. Click here to run a vote
2. Set the number of alternatives
3. Select options (if needed)
4. Click here to start the vote
Number of alternatives

SRS user manual
9. While the vote is in progress, you as teacher have a complete overview of how many students/pupils are logged on your voting session and how many have answered the question.
10. When the countdown is finished -‐ or you have manually stopped the vote -‐ result graphs will
appear (if you chose show graphs automatically in the Settings). You can now specify how the results will be displayed: graphs can display the number of votes and percentage of votes and you can choose between different types of charts (horizontal bars, vertical bars or pie chart). The figure below shows how these different options are chosen.
70 : 95
How many have voted?
How many are logged
on?
Show numbers or percentages Choose type
of diagram
Click a graph to mark it

SRS user manual
11
11. To run a new voting session, follow the instructions in the image below. You do not have to close any of the graphs manually before running a new poll -‐ these will disappear when you click
.
Bringing up result charts If you did not select automatic display of the result graphs, or if you want to retrieve a result from a previous poll, follow the procedure described below.
Comparing result graphs It is often interesting to compare result graphs from different sessions. The teacher can, for instance, ask a question at the beginning of the lesson and then ask the same question at the end of the lesson to measure changes in knowledge or attitudes.
The figure below describes the procedure of comparing two result graphs side by side.
Click here to run a new vote
2. Each element in the list is a result graph. Click it to bring up the
graph
3. Example of a result graph 1. Click here to
bring up a list of all votes

SRS user manual
Running «live» votes You can choose to run a voting session "live" which means that the result graphs are displayed as soon as the countdown begins and being updated as the votes come in. The figure below shows the button that you press in order to run this type of voting session.
Choosing question type SRS supports a wide range of multiple-‐choice questions. Here, we will take a closer look at the different question types you can choose between.
To select the question type, press (to show the interface, if it is hidden), and then press to
bring up the question controller. The button is used to set the question type, simultaneously showing which question type has been selected (in this case A, B, C, D).
1. Click the pin to «lock» a result graph that you want to compare to
another
3. Click in the graph you want to
compare it to
2. The first graph will be «pinned» to the scren
4. Both graphs are shown for
easy comparison
Click here to select «live»
voting
Result graphs will update automatically once the vote is in progress
SRS user manual
13
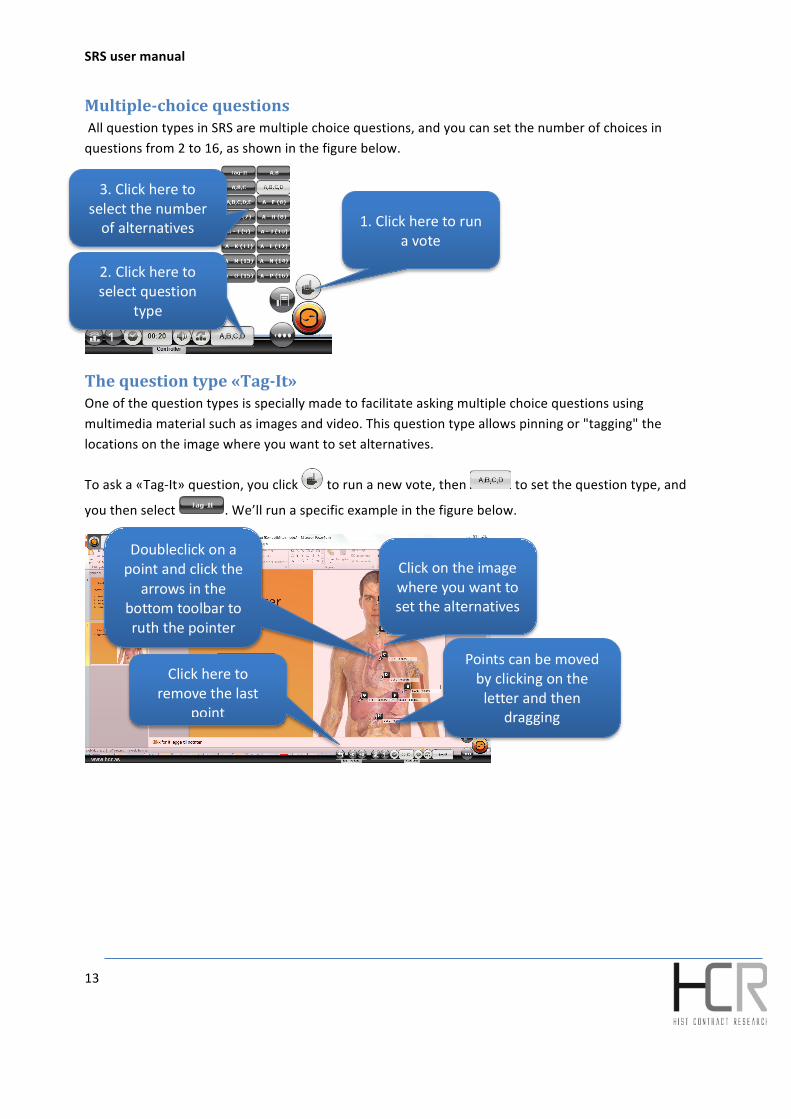
Multiple-‐choice questions All question types in SRS are multiple choice questions, and you can set the number of choices in questions from 2 to 16, as shown in the figure below.
The question type «Tag-‐It» One of the question types is specially made to facilitate asking multiple choice questions using multimedia material such as images and video. This question type allows pinning or "tagging" the locations on the image where you want to set alternatives.
To ask a «Tag-‐It» question, you click to run a new vote, then to set the question type, and
you then select . We’ll run a specific example in the figure below.
1. Click here to run a vote
2. Click here to select question
type
3. Click here to select the number of alternatives
Click on the image where you want to set the alternatives
Click here to remove the last
point
Doubleclick on a point and click the
arrows in the bottom toolbar to ruth the pointer
Points can be moved by clicking on the letter and then
dragging

SRS user manual
Other buttons and settings Functions and features that are not often used are available under the button, as shown in the figure below.
Changing the session code You can change the session code by pressing the button . You can choose to let the system generate a new session code or reuse an existing code.
Showing the web address of the voting page The button is used to display the web address (URL) of the login page on the screen, so that it can be shown to students on a projector or similar device, as the figure below shows.
The URL here is fictional and is only used as an example.
Here you can choose to display the address for anonymous login (where students just enter the session code) or registered login where students log in with a personal username and password.
Dashboard – change
session code
Show the web address of the voting page
Show QR code (easy
login)
Exit the program
Administer – see results etc.
Settings – change appearance etc.
Click here to access the menu
http://minstemmeside.no
Show address for anonymous login

SRS user manual
15
Vise QR-‐kode for studentinnlogging The menu button is used to allow students to login using a QR-‐code, which is a special pattern that can be read by mobile devices equipped with a camera and a program that can scan QR codes. The figure below shows what the QR code window looks like.
The URL here is fictional and is only used as an example.
Changing the appearance of the interface The button is used to change the appearance of the teacher interface, as explained in the figure below.
http://minstemmeside.no
Background color and opacity of the interface «layer»
Here you can create your own courses within which to organize your sessions
Show address for anonymous login
SRS user manual
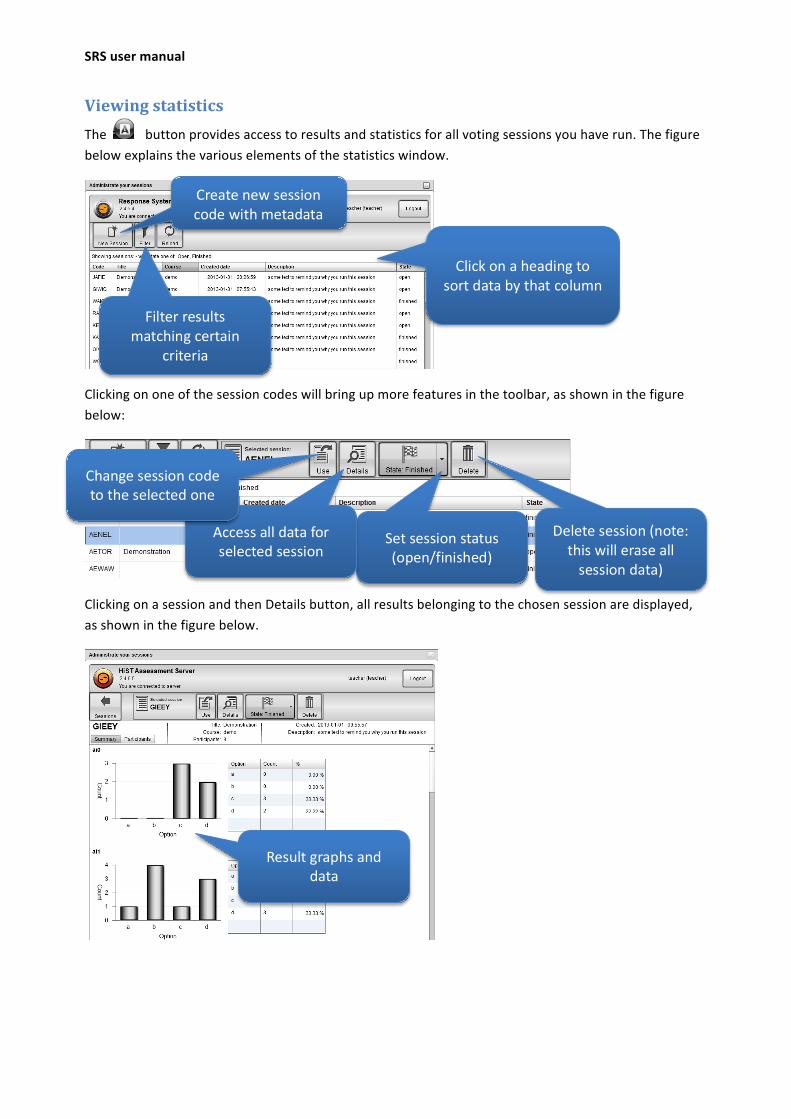
Viewing statistics The button provides access to results and statistics for all voting sessions you have run. The figure below explains the various elements of the statistics window.
Clicking on one of the session codes will bring up more features in the toolbar, as shown in the figure below:
Clicking on a session and then Details button, all results belonging to the chosen session are displayed, as shown in the figure below.
Filter results matching certain
criteria
Click on a heading to sort data by that column
Create new session code with metadata
Delete session (note: this will erase all session data)
Set session status (open/finished)
Access all data for selected session
Change session code to the selected one
Result graphs and data

SRS user manual
17
SRS and digital whiteboards The SRS teacher interface is designed to be very easy to operate from a digital whiteboard. All buttons are large enough to be easily clicked on, and all functions require just a few clicks.
A digital whiteboard is absolutely no requirement to use SRS, but SRS but goes hand in hand with the philosophy behind digital boards: it is a tool helping the teacher tell a story and fostering flow in the
classroom.
The teacher interface running on your PC is always available by pressing the button in the lower right corner. If one has access to a digital board, it means that all communication can take place in front of the board -‐ you do not need to move from a whiteboard or chalkboard and go over to the computer each time you are running a voting session.
Examples of SRS use in teaching SRS is designed to be a most flexible educational tool, and it is therefore up to you how you want to use the system. However, we would like to give you some inspiration on how the system can be used. In this section, we will present some concrete examples of how SRS has been used in teaching.
Before we mention the examples, we would like to present methodological rules that make use of SRS most time-‐efficient -‐ a kind of a checklist for you as a teacher.
To make the voting session as effective as possible, it is a great advantage for both teacher and students to log in onto the system at the very start of the lesson. In this way, the teacher interface will be ready to use before the session, and students will only need to bring up the voting page to be able to vote. Thus the checklist of what happens in the beginning of a SRS lesson can look like this:
1. You as teacher log in on the teacher interface and create a session code 2. The students log in on the voting page with your session code (this goes quickly because the
students have saved a shortcut to the voting page on their mobile devices) 3. You as teacher check if there is sound coming from the PC (so that the students clearly hear the
ticking sound that signals that a voting session is in progress)
Many teachers use SRS as an element of everyday teaching, for example, to ensure that students have understood the reasoning behind the lecture or to ask control questions during teaching. This way of using SRS is illustrated in the figure below:

SRS user manual
What happens after the question is asked and the voting is done, is up to you as a teacher. However, it is important that the student responses are discussed, as the summary made by the teacher is very important for the students’ experience of learning.
Example from mechanics
The picture on the left-‐hand side shows Roger Bergh teaching Civil Engineering students in Mechanics at the University College of Sør-‐Trøndelag (HIST). Roger has been using SRS for several years and he is particularly interested in the learning processes that occur during discussions between the students.
When Roger uses SRS in his lessons, he often lets the students discuss the question between themselves before the voting session begins. In addition, Roger often uses the
possibility to ask the same question several times, so that one can quantitatively measure the learning effect of a discussion. In these situations, he uses the possibility to compare two result graphs, as described on page 11.
The first time the question is asked, around 30% of the students might answer correctly if the question is a bit complicated. After the first voting session, each student is encouraged to have a brief discussion with the one sitting behind them, and such discussions often have a dramatic effect on the second voting session. In the second voting session, the average percentage of correct responses is significantly higher than in the first voting session, with improvement reaching up to 20-‐30 percent.
Teacher asks a question
Students vote using the mobile devices
Results are shown and discussed

SRS user manual
19
Example from mathematics
This is Knut Bjørkli who teaches Mathematics for Engineering students at HIST. Knut sometimes runs what is called "flipped classroom" where "flipped" means doing the opposite of a traditional lecture. Here, the students need to go through the theory on their own outside the classroom, and the time in class is used to review and explain the parts of the curriculum that the students found to be difficult and solve some practical problems.
In order to get some insight into how much the students have managed to acquire on their own, Knut asks multiple choice questions connected to the subject curriculum using SRS. SRS makes it easy to find problem areas and thus the lecture can be organised in a much more convenient and time-‐efficient way. Teaching can now be focused on the parts of the curriculum the students are struggling with. The fact that the students have time to discuss each SRS task before the voting session takes place helps them feel less afraid to ask questions, as one realises that they are not alone in having misunderstood.

SRS user manual
Frequently asked quesions Question Answer Help! The SRS button disappeared as I ran a slide show or another program that uses the full screen view
This can happen if another program is "competing" with SRS to "be on the top". You can fix this by pressing Alt+Tab and browsing to the SRS tab, so that it lies on “the top" again.
Can I use SRS in distance learning? Absolutely! As long as you can show the question to the students and send the session code/login information to them, SRS works in exactly the same way as in the classroom.
Can I use mobile phone «xyz» to vote? All mobile phones that meet the minimum requirements on page 3 can be used.
Error reporting SRS has an integrated tool for reporting errors: if an error occurs, it is easy to submit an error report so that our programmers can fix the problem. The figure below shows how the tool behaves when an error is detected.
If the program detects an error, this bar will
appear Click Send to submit an error report to our
experts