special notes - world of spectrum · special notes on all eight bit formats, the 'spinning...
TRANSCRIPT

Special Notes On all eight bit formats, the 'Spinning dice' has been replaced by a spinning number to be found in the top left hand corner at the start of any turn. In order to fix the number, hit 'fire' on either the joystick or keyboard. As well as deciding how many moves you are able to take, it will also decide which method of control, either keyboard or joystick, is used for that turn. Here are some helpful hints which will eliminate some of the problems normally associated with cassette games. They are as follows: The quests are stored on the cassette in the order in which they appear on the game menu, and we would recommend that they are played in this order. If this advice is followed, then there will be no need to rewind the cassette at any point during gameplay, even though this will be advised on screen. This makes playing the game very straightforward. The only time that you will need to rewind to zero on your counter is if you die, and you want to restart at an earlier quest. One useful tip would be to make a note of the tape counter number for the start of each quest, allowing you to access any particular quest when you wish. Finally, although two characters may occupy the same square, neither character may attack an enemy from the square.

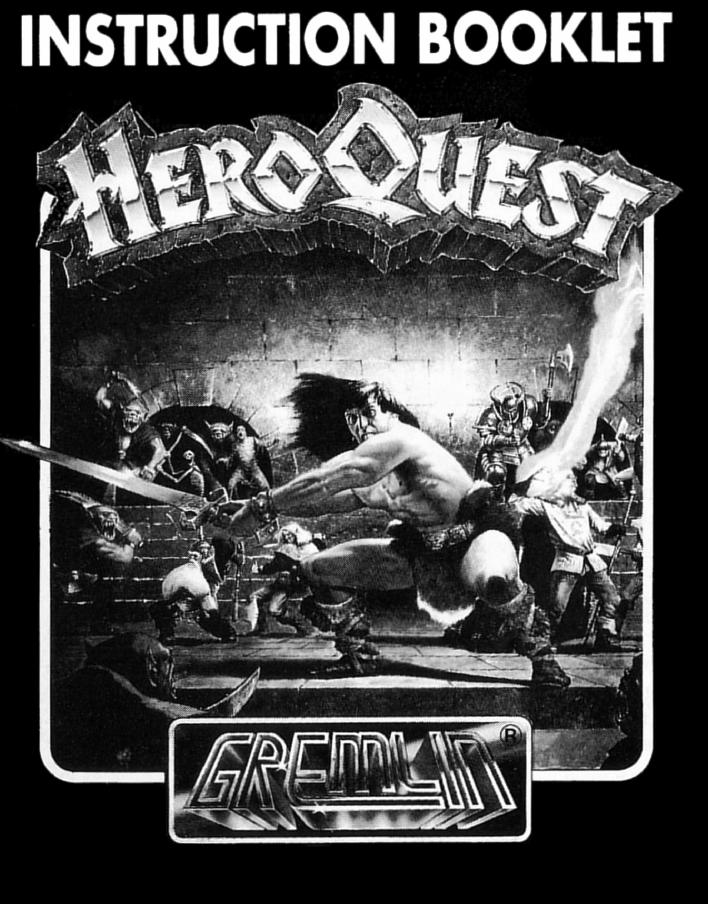
Presents
By
221B
INTRODUCTION For the last eight months, Gremlin Graphics have been working hard to recreate the excitement and skill of Hero Quest the board game on your home computer. It has been hard work, but now everyone involved in this project is justifiably proud of their achievement. For newcomers and Hero Quest veterans alike, we advise that you read through both the game rules and the computer specific instruc-tions first before attempting to play the game. Although this might take a little time, it's worth it.
CHRONICLES OF LORETOME Heed well the words of Mentor, Guardian of Loretome, and I will tell you of times past, of darker days when the empire was saved against all hope. For I fear the darkness is about to return. The fell legions of Morcar, Lord of Chaos, had swept all before them. At the sight of the Black Banner and the massed hordes of Chaos, even the bravest warriors of the Emperor had turned tail and fled, the land was laid waste and all men despaired. But then there came a mighty warrior Prince from the Borderlands named Rogar the Barbarian. He bore a glittering diamond in his brow, the Star of the West, as worn by the ancient kings of legend. Hope returned and men flocked to his standard, leaving their hiding places in the hills and forests. Other great heroes joined him, Durgin the fearless dwarven warrior from the Worlds Edge Mountains. Ladril the Elven fighter mage from distant Athelorn and Telor the Wizard whose sorcery was to save Rogar on many occasions. For many years Rogar trained his army, being careful to avoid open battle with Morcar’s General until all was ready, but ever harrying their supply lines, wiping out many Orcs and Goblins. Then came the day for which Rogar had waited. His army had grown
strong and was well practiced. Camping on the high passes, Ladril saw the Black hosts from afar and bade Durgin blow the call to arms on his mighty horn. The armies of Rogar poured down upon the enemy from two sides, and battle was joined. Many foul creatures and good men perished that day. Yet, as the light of day faded it was Darkness that fled the field. But the victory was not absolute. Morcar and his general escaped beyond the sea of Claws, and even now they plot their revenge. Soon their plots will be ready and the Empire will have need of a new Rogar. But where are the heroes to equal him? You have much to learn if you are to become as great as Rogar and his companions. I will help all I can. This book I carry, Loretome, was written when time began. All that ever was and all that ever will be is recorded in it’s countless pages. Through Loretome I may guide you, but I may not intervene, lest a greater evil befall the World, and Chaos triumphs forever.
LOADING INSTRUCTIONS
SPECTRUM 48k/128k 1. Insert the cassette into your cassette player. 2. Type LOAD “”, and press return. The game will now load
automatically. Due to the size of the game, some reloading is necessary, so watch your screen for further prompts as you play.
SPECTRUM +2 1. Use the built in cassette loader as usual, 2. Follow any on screen loading prompts for further instructions.
SPECTRUM +3 1. Insert the disk into the built in disk drive, and use the built in
loader.
2. The game will now load automatically. Follow the on screen instructions for further advice.
AMSTRAD 64k/128k 1. Insert the cassette into the cassette unit, and press CTRL and the
small ENTER key. Press play on the cassette unit, and then press any key.
2. The game will now load automatically. Follow any on screen loading prompts for further instructions.
AMSTRAD DISK 1. Insert the disk into the disk drive unit, type ICPM and press
ENTER. 2. The game will now load automatically. Follow any on screen loading
prompts for further instructions.
COMMODORE C64 CASSETTE 1. Insert the cassette into the cassette unit. 2. Press SHIFT and RUN STOP simultaneously. 3. Press PLAY on your cassette unit. The game will now load
automatically. Follow any on screen prompts for further loading instructions.
COMMODORE C64 DISK 1. Insert the Hero Quest disk into the disk drive. Type LOAD“*”,8,1
and press return. 2. The program will now load and run automatically. Follow any on
screen loading prompts for further instructions.
PLAYING HERO QUEST
BRIEFLY Hero Quest is a fantasy role playing game, in which you can represent either a Wizard, an Elf, a Barbarian or a Dwarf. Each has their own characteristics, their own strengths and weaknesses. The barbarian

and Dwarf, for example, can’t cast spells, and the Magician can’t utilise certain weapons. The board game can be played by up to five players, with one having to play the part of the Evil Wizard Morcar. In this version, however, the Evil Wizard is ‘played’ by the computer. The computer controls all the movements and actions of the Evil Wizard, and thus saves you the trouble.
THE DICE Throughout the game instructions, ‘rolling the dice’ is referred to. On the screen, the dice is replaced by a spinning coin. At the start of any players turn, the number to the right of ‘moves’ will be determined by hitting fire on the joystick, which will freeze the coin and display a number. The coin is automatically ‘moderated’. So, when you have bought a piece of equipment that will increase the number of dice that you roll, the computer will automatically incorporate this into the coin.
ON LOADING Following the loading sequence of Hero Quest you will be presented with a menu which will offer you the following choices: Play Game, Buy Equipment, Create Character, Set Controls (on Spectrum and Amstrad only) and Load Other.
CREATE A CHARACTER Having chosen this menu, a new menu will present itself, allowing you to tailor your game. Each of the four diameters you can play is represented. One character will be highlighted, and moving the joystick up and down will highlight each character in turn. Clicking on any highlighted character will make that character the current one. Initially, the players name or ‘DEAD’ will be printed to the right of the character. Moving the joystick right will toggle between the two modes. Obviously, a dead character will not take any part in the next quest. Once an active player has been chosen, hitting fire again will bring up
another menu for that player, which will have the following options: Name Player, Load and Save This menu will allow you to load and nave characters to use in later quests. Moving the joystick led and right will highlight each of the options in turn. If a player is ‘DEAD’, then the ‘SAVE’ option will not be highlighted. Name Player: Spectrum and Amstrad Choosing this option will present an alphabetic list at the bottom of the screen, and the word ‘END’. Moving the joystick left and right will highlight each of the letters in turn, and hitting fire will add that letter to the name. The maximum number of characters in a name is 6 letters. Once you have entered your chosen name, chose the ‘END’ option. This name, as well as being the name of your character, is the file name when you load or save a character file. Name Player: Commodore 64 Instead of presenting a list at the bottom of the screen, the current characters name will clear and a letter ‘A’ will result. Move the joystick up and down to change the letter, and press fire to set that letter and move onto the next. Once you have completed your name, cycle through the letters until you reach the black square, and then press fire. The maximum number of letters in a name is 6. Load This will load a previously saved file from cassette or disk. If this option is chosen, then it will look for a file under the name of the character. Make sure that you have placed your ‘saved character’ disk or cassette into the unit before you use this option. Save This option will save the current character to cassette or disk, as a file with the same name as the character. In order to use this option, follow the on screen prompts. Obviously, you are not permitted to save

a ‘DEAD’ character. Amstrad 6128 disk If you are using an Amstrad 6128 disk machine, the instructions are slightly different. Choosing ether ‘SAVE’ or ‘LOAD’ will present a menu on screen with 8 spaces for filenames. If you have chosen ‘SAVE’, then the menu will present a list of up to eight previously saved files, or ‘FREE’ if a file has not been saved in a particular slot. To save to any slot, move the joystick up and down to highlight the options, and then press fire. A file with the current character name will now be saved to this lot. Loading is very similar. Choosing ‘LOAD’ will present a list of already saved files for that particular character, and to load any, again highlight it with the joystick, and hit fire. It will then be loaded. Obviously, if four players are taking part, then all four characters will be active. If there are only two players, then they could either choose one character each, or may choose to represent two each. If there is only one player, then that player can chose whether to go it alone as one character, or to involve up to all four characters in the quest. Once you have decided which of the four characters will be playing or not, and entered names, click on the ‘EXIT’ icon, which will take you back to the main menu. Set Controls (Spectrum and Amstrad only) This will allow the player to set either joystick or keyboard controls. On the Spectrum and Amstrad the player must chose either Joystick or Keyboard, whilst on the Commodore 64 both keyboard and joystick can be used simultaneously. The commands are as follows: Spectrum/Amstrad O - Up K - Down Z - Left
X - Right Space - Fire Commodore 64 P - Up L - Down Z - Left X - Right Space - Fire
BUY EQUIPMENT As you play the game, you will find gold and jewels which will increase your wealth. This can be spent on better armour or new weapons that will affect what you can achieve in the game. This option will take you to the ‘SHOP’, where the new equipment can be bought. Once you are in the shop, buying anything is pretty straightforward. The effects and advantages of various weapons and armour are carried in the ‘BOOK OF MAGIC’ at the end of the manual. Each of the four player characters is listed in the bottom left hand comer, along with an ‘EXIT’ option. Clicking on any of them will make that character the current shopper. The gold that that character has will appear in the top left on the screen. To the right is a list of all the weapons and armour, available, along with their price which is shown to the right. To buy any particular item simply highlight it, and click on it. Providing you have enough money, that item, and the benefits it carries, will now be yours. What weapons and armour you have are shown in the window in the bottom right of the screen. Descriptions of all the items available, and their effect upon the attributes of your character are included in the BOOK OF MAGIC at the end of the manual. Once you have finished buying your equipment click on the ‘EXIT’ in the equipment/armour menu, and the next player can take his turn. Once all players have
finished, clicking on the ‘EXIT’ in the character menu in the bottom left corner will take you back to the main menu.
LOAD OTHER This menu will be used to load the Scenario and Data disks and cassettes which Gremlin will be issuing over the next few months. When you chose this option, make sure you have inserted the expansion disk or cassette first, and then just follow the on screen instructions.
PLAY GAME This option will allow you to begin the new quest, and should therefore be the last option that you choose. If you choose this option, you will be presented with a menu which will first ask the Wizard to choose his first set of spells. Once the Wizard has chosen his by moving the joystick up and down, and hit fire when his chosen spells are highlighted, the Elf will be prompted to choose his set of spells. More on magic later. Once this has been done, the player is presented with a list of the quests, which are best played in order. Clicking on any of them will present the scenario on screen. Hit fire once you have read the scenario to start the game.
HERO QUEST: THE RULES OF PLAY The following rules are primarily the rules of the board game. Veterans of the board game should read this section, however, as some of the rules have been slightly altered to enhance gameplay in the computer version. Playing Hero Quest To play the first quest, choose ‘The Maze’ from the Quest Menu. The scenario will be presented on the screen. The scenarios are also recorded at the end of this manual should you need to refer to them whilst you are playing. Before you start to play, read through the

following rules. Order of Play In each game, the Evil Wizard is represented by the computer. Each player moves in turn, starting with the player nominated by the Evil Wizard. Which character is nominated will be shown in the top left hand corner of the screen. In the majority of games, each character begins in a square next to the stairway, which is also the exit at the end of any game once the quest has been completed. When it is your turn, you are allowed to carry out two actions. You are allowed to move, and either fight, search or cast a spell. You may move first, then carry out the other action, or act first and then move. You may not move, then carry out an action, then continue to move. You are not obliged to carry out any action on your turn, and you may choose to just move. When it is the Evil Wizards turn to play, which will happen after every player has taken his turn, the Wizard may move some or all of his characters. He moves each monster in turn. The movements and actions of the Evil Wizard will be displayed on the screen. Movement The squares in the playing area are divided into rooms and passages. Which is which is pretty self evident. Each character will use the joystick, as detailed earlier under ‘Dice’, to determine the number of squares they may move on their turn. A player does not have to move the full distance indicated by the dice total, and may move any number of squares not exceeding the dice total. Monsters have a predetermined maximum number of squares without needing to roll the dice, and again the Evil Wizard can move them any number within this maximum. When moving, characters and monsters may not 1. Move diagonally

2. Move onto an occupied square. Character players and monsters may, however, pass through an occupied square, provided that the player controlling the obstructing character allows you to pass. Otherwise your move must take another route or stop. Once a player has completed a move, it will move onto the next player. How to effect movement on the computer is instructed later. Opening Doors Character players and monsters can only enter and leave rooms through open doors. Monsters cannot open doors. Character players may open a door by moving onto the square in front of it, and clicking on the ‘KEYS’ icon, as indicated later. Character players do not have to open a door if they do not wish to. Opening a door does not count as a move. Having opened a door, a character player may keep moving if he has any movement left on his turn. Once opened, a door remains opened for the remainder of the game. Door opening can be done manually, by using the ‘UNLOCK’ option, or automatically. If you use the pointer to indicate that you wish to reach a square beyond a doorway, then the computer will automatically open the door for you. You can’t go back through the same door in any move. Combat Combat is split into two stages, attack and defence, but both are moderated by the computer. Attacking To attack a monster or a character player, you must be either in front of, behind of, or directly to the side of that monster or character player. You cannot attack diagonally, except in the special instances indicated in the BOOK OF MAGIC. Once you are in a position to attack another character, click on the combat icon, and the screen will now flip to the map screen. You must indicate the character that you

wish to engage in combat by clicking the pointer over the representa-tion or that character. Once this is done, the screen will flip to the combat screen. Although from this point on the battle is moderated by the computer, what will happen is this. You will roll a number of special combat dice (with shields and skulls). The number of dice you roll is dependent upon which character you are representing, and are as follows: Wizard 1 Dwarf 2 Barbarian 3 Elf 2 For each skull you roll your opponent will lose one body point, unless he can successfully defend himself. If you fail to roll any skulls, the attack is wasted and your opponent need not defend. Defending To defend, a player rolls the number of special combat dice allowed for his character in the defend category. The character players and the monsters must try to roll shields to defend. Each shield rolled cancels one skull rolled by the attacker. Once the result of the defence has been determined, the computer will first show the results on screen, and then update the various scores for the player and the monster he was fighting. When a characters body point reaches zero, the character is eliminated. Since the vast majority of monsters have only one body point, they will be eliminated by any roll of a skull for which they fail to roll a shield. Eliminated characters and monsters are immediately removed from play. When a player is eliminated, all the gold and weaponry that the eliminated character was carrying will be returned to the place of origin. In the instance of some special weaponry, this will mean that the players left alive may have to retrace their steps to an earlier quest and capture that weapon again. If an attacker has successfully

defeated the combatant at the start of his turn, he can now continue to move. Magic There are two characters in the game who may use magic, the Elf and the Wizard. No other character can use magic. There are four sets of spells, each consisting of three different types. The sets are Earth Magic, Water Magic, Air Magic and Fire Magic. The effect of the different spells are indicated in the BOOK OF MAGIC at the end of the manual. At the start of each game the Wizard chose three sets of spells, and the Elf one. The Wizard chooses one set, then the Elf chooses his set, and the Wizard gets the two remaining sets. If either the Elf or Wizard is not playing, then the other character able to use magic will be able to choose which of the spells he wants to use. Again, the Elf is limited to one set of spells, and the Wizard to three. Casting a Spell When it is their turn, the Wizard and the Elf characters will have the option of casting a spell instead of attacking. A spell may be cast either before or after moving. You cannot use part of your move, cast a spell and then move again. Spells can be cast at monsters or characters provided they are visible to the spell caster, unless the spell indicates otherwise. Characters in the same room are always visible, whilst figures in passages or in different rooms are only visible if an unobstructed straight line can be traced between the caster and his target. If the line passes through a closed door, wall or another character, then the line is obstructed and the spell cannot be cast. The spell caster can always cast a spell on himself. Each spell may be cast just once during the course of each quest. Once cast, the spell card is discarded. To cast a spell, the Wizard or Elf go to their inventory, select the spell
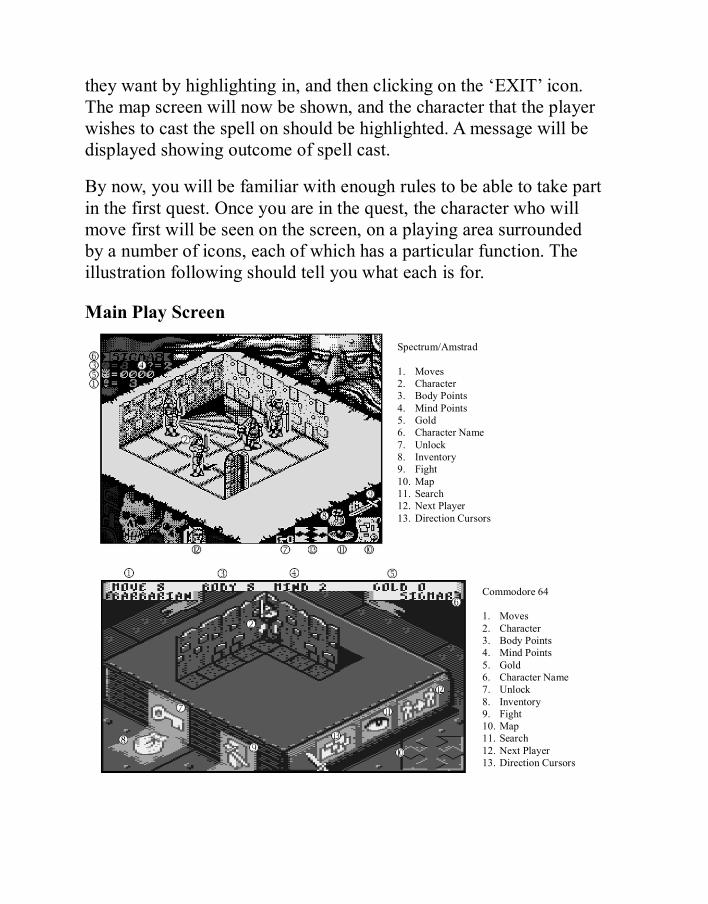
they want by highlighting in, and then clicking on the ‘EXIT’ icon. The map screen will now be shown, and the character that the player wishes to cast the spell on should be highlighted. A message will be displayed showing outcome of spell cast. By now, you will be familiar with enough rules to be able to take part in the first quest. Once you are in the quest, the character who will move first will be seen on the screen, on a playing area surrounded by a number of icons, each of which has a particular function. The illustration following should tell you what each is for. Main Play Screen
Spectrum/Amstrad 1. Moves 2. Character 3. Body Points 4. Mind Points 5. Gold 6. Character Name 7. Unlock 8. Inventory 9. Fight 10. Map 11. Search 12. Next Player 13. Direction Cursors
Commodore 64 1. Moves 2. Character 3. Body Points 4. Mind Points 5. Gold 6. Character Name 7. Unlock 8. Inventory 9. Fight 10. Map 11. Search 12. Next Player 13. Direction Cursors

Moves This will indicate the number of moves a player has on his current turn. As he moves around, thjs number will decrease. At the start of any turn the number of moves will be determined by the revolving coin. Character The current character. Body Points Current body point status. If this reaches zero, then the character is eliminated. Mind Points Current mind point status. If this reaches zero, then the character is eliminated. Gold Amount of gold the current character has. Character Name The name that a player has given to his character. Unlock Will unlock a door, provided the current player is in front of the door. Inventory The inventory screen will contain details of everything the current player is carrying in four different sections: Potions, Weapons, Quest Treasure and Armour. To use a particular weapon or potion, or to use a particular weapon, simply use the joystick to highlight it, and hit fire, and go to the ‘EXIT’. The result of this action will be displayed on the screen. Combat This will take you to the combat mode.

Map Will take you to the map screen. A map will be shown indicating the current location of all players, and all areas of the map that have been explored. Search This will search the location of the current character for any traps and hidden doors, or for treasure. Next Player Will conclude the current players turn and will start the next players turn. Direction cursors The four direction arrows. Clicking on any of these will move your player one square in that direction. An alternative way of moving is, once you know how many squares you can move, click on the square that you wish to reach, and provided that you have enough movement points, and are moving in a straight line, your player will automati-cally move to that square. Searching Characters may also search instead of making an attack or casting a spell. The search can be made either before or after moving. Charac-ters may not search if they are adjacent to a monster or if there is a monster in the same room or passage. Monsters never search. When a player searches, he searches the area presented graphically on screen. Players must identify what they are searching for, and will be prompted to identify it on the screen, They may search for either secret doors and traps, or treasure. Secret Doors and Traps Secret door tiles are only shown in the dungeon if a character player finds them by searching. Trap tiles are only placed if found by a search or if triggered by a character moving onto the trapped square.

Pit traps and falling block traps are shown when found. Spear traps are rendered harmless when found, so they are not represented graphically, but a message will tell you when one is triggered. Traps may be removed from the board if any character who has the tool kit equipment is adjacent to the trap. The Dwarf carries the toolkit with him at all times, which gives him the option to remove any trap tile he is adjacent to. He does this by going to the inventory and clicking on the toolkit. He may only remove one trap per turn. Secret doors may be found by searching on either side of the wall in which they are placed. Once found, secret doors remain visible and open for the rest of the game. Traps Traps are not shown in the dungeon until a character player either searches for traps or moves into a square containing a trap. Once a player has set off a trap, he can do nothing more until his next turn. Monsters do not set off traps. They may move freely through squares that contain hidden traps. Once a trap has been discovered, the monsters must obey the same rules as the players. Pit Once a pit trap has been triggered, it remains on the board as an obstacle. Any character who stumbles into a pit trap will automati-cally lose one body point. Jumping a Pit Characters and monsters may attempt to jump across a pit trap. They must have enough movement to get across the pit, counting the pit square as one space. There must be an unoccupied space adjacent to the pit for the character to jump onto. In order to attempt a jump, a player simply clicks on the square beyond the trap as the square he wishes to reach. There is a chance, however, that in attempting to jump a pit, a player may stumble and fall. Again, in this instance, the
player will lose one body point and his turn will be over. Falling Block When a character player moves through a square containing a falling block trap, a block will fall. It will land in the adjacent square, blocking the way. Any character or monster in the square into which the block falls must roll three combat dice. The victim will lose one body point for each skull rolled. Spear Trap Any player who triggers a spear trap may or may not be affected by it. A message on screen will tell you when you trigger a trap, and whether it has any effect on you. The spear trap will only affect the first character to enter the square. Subsequent characters who move through this square will be unaffected, as the trap can only be triggered once. Treasure Chest Traps Some of the treasure chests contain traps. The effects of these traps will be displayed on your monitor. If a player searches for traps in a room that contains a trapped treasure chest the trap is found and rendered harmless. Treasure Some of the Quests provide details about specific treasures which can be found by searching. If a character searches for treasure in the appropriate room the treasure will be revealed. Monsters may not move treasure chests. Whenever a character collects some treasure, generally in the form of gold or jewels, it’s value will be automatically recorded on their inventory. Some of the treasure is not treasure at all. Instead, it could be a ferocious wondering monster. If there is no square adjacent to the character who found the treasure, the wandering monster will appear on any other square in the room or corridor. In this case the monster may not, however, attack other characters.

You are now ready to take part in the first quest. You are acquainted with all the rules. Keep these rules by you whilst you find your way round the first quest. Once you have completed one quest, you should be able to find your way round the game without the rules to hand. The Quests Once you have played through ‘The Maze’, you are ready to undertake the other Quests. These should be played in the order they are presented. Completing a Quest The character players complete a quest successfully if they achieve the objectives described in the quest introduction. If they fail to do so, a quest may be attempted again. The Wizard always begins each game with a full complement of monsters. Characters escape the dungeons by stepping onto a stairway tile, which is also the starting point of most quests. Between Quests If your character survives, you may keep him and use him again in subsequent quests. In this case, you may keep any Quest Treasure you have found, and you may spend any treasure recorded on your character sheet to purchase better equipment (armour, weapons and so on). You may not keep ordinary Treasure. Buying Equipment The BOOK OF MAGIC indicates the spells, and a description of the equipment available for purchase, plus some of the unique weapons and equipment that you might find throughout your quests. Buying equipment is fully explained above, and once bought, any advantage that the equipment might have is automatically attributed to the character who bought it. The spear and staff, for example, allow characters to attack diagonally. A character may not buy equipment if he does not have enough money to do so, but money can be accumu-lated and kept from quest to quest.

Missile Fire Some weapons may be thrown, whilst the crossbow may be fired. When firing the crossbow or throwing a weapon the procedure for rolling combat dice in attack and defence remains the same. Your opponent must be visible, as with casting a spell. There is no maximum range for firing the crossbow or throwing a weapon. However, you may not use the crossbow or throw a weapon if you are adjacent to your opponent.
THE QUESTS OF MORCAR QUEST ONE: THE MAZE “This will be your final test, before you set forth on your real Quests. Be sure to use all the skills that you have been taught. You must attempt to find your way out. Several monsters have been placed in the maze. They will try to stop you, so take care. Whoever finds out his way first will be rewarded with 100 gold coins. This may be used to buy equipment for the adventures to come.” QUEST TWO: THE RESCUE OF SIR RAGNAR “Sir Ragnar, one of the Emperors most powerful knights has been kidnapped. He is being held prisoner by Ulag the Orc Warlord. You are to find Sir Ragnar and bring him back to safety. Prince Magnus will pay 200 gold coins to the character who rescues Sir Ragnar. The reward may be split between several adventurers, but no reward will be paid if Sir Ragnar is killed whilst escaping.” QUEST THREE: LAIR OF THE ORC WARLORD “Prince Magnus has ordered that the Orc Warlord Ulag, who was responsible for the kidnapping of Sir Ragnar, should be sought out and killed. Whoever kills Ulag will be rewarded with 100 gold coins. Any treasure found in Ulags stronghold may also be kept.”

QUEST FOUR: PRINCE MAGNUS GOLD “Three treasure chests have been stolen whilst being taken to the Emperor. A reward of 200 gold coins has been offered to anyone who can return the chest and ALL the gold. The thieves are known to be a band of Orcs hiding in the Black Mountains. They are led by Gulthor, a Chaos Warrior.” QUEST FIVE: THE MAZE OF MELAR “Long ago, a powerful sorcerer by the name of Melar created a Talisman which would enhance the wearers understanding of magic. He kept the Talisman with him at all times, fearing it might be stolen and used by the allies of Morcar. It is said that he left the Talisman in his laboratory at the heart of his Maze. Melar’s Maze is guarded by many traps and magical guardians. It also rumoured to be haunted by those who have sought the Talisman and perished in the attempt. This talisman would be a valuable asset to any warrior in our battles with Morcar.’ QUEST SIX: LEGACY OF THE ORC WARLORD “Ulags foul offspring, Grak, has sworn revenge on those who killed his father. Although it has taken him several months, he has finally tracked you down and captured you in an ambush. Now you are held prisoner in his dungeons while he racks his brains to devise a terrible punishment for you. While the guard sleeps, however, you manage to pick the lock of your cell with an old rat bone. You must find your equipment and escape.” QUEST SEVEN: THE STONE HUNTER “The Emperor’s personal wizard, Karlen, has disappeared. The emperor fears that he has been murdered or has succumbed to the lures of Chaos magic. You are to find out what has happened to Karlen and, if he is alive, bring him to safety . You will be paid 100 gold coins each upon returning.”
QUEST EIGHT: THE FIRE MAGE “The Orcs of the Black Mountains have been using Fire Magic in their raids. Balur the Fire Mage, is thought to be responsible for helping them. NO fire magic can harm him, and the Emperor’s Wizards are unable to counter his spells. You have therefore been chosen to enter his lair, deep beneath Black Fire Crag. The Emperor will reward you with 15 gold coins each for Balur,s destruction.” QUEST NINE: RACE AGAINST TIME “A guide has led you into a dungeon that is rumoured to hold a great secret. He has led you down many dark corridors and finally you find yourself in a room with three doors. Suddenly the guide puts out his torch and in the darkness you hear him laugh. Farewell my Heroes, he sneers as he makes his escape. You realize to your horror that it is a trap! You must escape or perish in this dark forgotten hole.” QUEST TEN: CASTLE OF MYSTERY “Long ago a crazy wizard, Ollar, discovered the entrance to a gold mine. Using his great powers he built a magic castle above the mine to protect it. The castle had many magic portals and was guarded by a host of monsters who were trapped in time. Can you find the entrance? Others have tried, but the castle has thwarted them every time.” QUEST ELEVEN: BASTION OF CHAOS “The lands to the east have been plagued by marauding Orcs and Goblins. The Emperor has ordered that a band of worthy heroes should be sent forth to destroy them, the Orcs are well protected in a strong underground fortress known as the Bastion of Chaos. They are led by a small group of Chaos Warriors. You must fight your way in and kill all the monsters that you find. You will be paid a bounty of 10 gold coins for each Goblin killed, 20 gold coins for each Orc killed, and 30 gold coins for each Fimir or Chaos Warrior killed.”

QUEST TWELVE: BARAK TOR-BARROW OF THE WITCH LORD “War with the Eastern Orcs is brewing, and the Emperor needs to unite the lesser kingdoms for the conflict to come. To do this, he must find the ancient Star of the West as worn by the Kings of Legend and by Rogar when he battled with Morcar in ages past. Anyone who finds the gem will be given 200 gold coins, the gem lies in Barak Tor, the resting place of the Witch Lord.” QUEST THIRTEEN: QUEST FOR THE SPIRIT BLADE “You have awoken the Witch Lord, also known as the King of the Dead, a powerful servant of Morcar. The Spirit Blade is the only weapon that can harm him. He will pose a most serious threat to the Emperor in the coming war. The Witch Lord must be destroyed before he can bring his army of Undead to attack the Emperors forces. You must first find the Spirit Blade, for only this ancient weapon can harm him. The Spirit Blade was forged by the Dwarves of the World Edge Mountains and cooled in the Elven fountain of Lebin. The sword now lies in an ancient ruined temple, and you must recover it.” QUEST FOURTEEN: RETURN TO BARAK TOR “Now that you have found the Spirit Blade, you must return to Barak Tor and defeat the Witch Lord. The Emperor has ridden forth to meet the Eastern Orcs at Black Fire Pass. If you fail, the Witch Lord will lead his army of Undead and attack the Emperors forces from the rear. Then nothing will remain to prevent the Forces of Chaos overrunning the land.”

THE BOOK OF MAGIC AIR SPELLS SWIFT WIND This spell can be cast on any one player. That player will then have the equivalent of twice as many dice the next time he moves. The spell is then disgarded. TEMPEST A small tempest is created which envelops one monster or player of your choice. That monster or player will then miss their next turn. The spell is then disgarded. GENIE This spell conjures up a Genie who will do one of the following: Open any door on the board or attack anyone on the board. He will attack only once with five combat dice. The spell is then disgarded.
FIRE SPELLS BALL OF FLAME This spell may be cast at any one monster or player. It will inflict two points of body damage. The victim may roll two defence dice, and for each shield he may reduce the damage by one. The spell is then disgarded. COURAGE This spell may be cast any one player. That player may then throw two extra dice each time he attacks, until the spell is broken. The spell is broken when there are no more monsters visible to that player. The spell is then disgarded.
FIRE OF WRATH This spell may be cast on any one player or monster, anywhere on the board. It will seek out your enemy and inflict one Body Point of damage, unless your opponent can roll a shield on one combat dice. The spell is then disgarded.
EARTH SPELLS HEAL BODY This spell may be cast on any one player. It will restore up to four Body Points that have been lost. The spell is then disgarded. PASS THROUGH ROCK This spell maybe cast on any one player, that player may then move through walls when he next moves. The player may move through as many walls as his movement will allow. The spell is then disgarded. ROCK SKIN This spell may be cast on any one player. That player may then roll two extra combat dice in defence, until the spell is broken. The spell is broken when that player is wounded. The spell is then disgarded.
WATER SPELLS WATER OF HEALING This spell may be cast on any one player. It will restore up to four Body Points that have been lost. The spell is then disgarded. SLEEP This spell will put one monster or player to sleep. He may try to defend himself by rolling one dice per Mind Point. If he rolls a shield he is unaffected. Once asleep he may not defend if attacked. He will awake if he rolls a six at the start of them turn, or if attacked. VEIL OF MIST This spell may be cast on any one player. That player may then move unseen through spaces that are occupied by other players or monsters

the next time he moves. The spell is then disgarded.
WEAPONS BROADSWORD The Broadsword allows you to roll three combat dice in attack. May not be used by the Wizard. BATTLE AXE The Battle Axe allows you to roll four combat dice in attack. You may not use a shield when using the Battle Axe. May not be used by the Wizard. CROSSBOW The Crossbow allows you to roll three combat dice in attack. You may not use the Crossbow against an opponent who is adjacent to you. May not be used by the Wizard. STAFF The Staff allows you to roll two combat dice in attack. The Staff may be used to attack diagonally. SHORT SWORD The Short Sword allows you to roll two combat dice in attack. The short sword may be used to attack diagonally. This weapon may not be used by the Wizard. SPEAR The Spear allows you to roll two combat dice in attack. The Spear may be used to attack diagonally. You may also throw the Spear, but if you do so you lose it. May not be used by the Wizard. HAND AXE The Hand Axe allows you to roll two combat dice in attack. You may also throw the Hand Axe but if you do so you lose it. May not by used by the Wizard.
ARMOUR PLATE ARMOUR Plate Armour allows you to roll four combat dice in defence, but you may only roll one dice for movement whilst wearing the plate armour May not be used by the Wizard. CHAIN MAIL Chain Mail armour allows you to roll three combat dice in defence. May not be used by the Wizard. CLOAK OF PROTECTION The Cloak allows you to roll one extra dice in defence. May only be used by the Wizard. BRACERS The Bracers allow you to roll one extra combat dice in defence. May only be used by the Wizard. THE SHIELD The Shield gives you one extra combat dice in defence. May not be used by the Wizard. THE HELMET The Helmet gives you one extra combat dice in defence. May not be used by the Wizard.
SPECIAL EQUIPMENT TOOL KIT The Tool Kit enables you to remove any trap that you find. Roll one combat dice, On the roll of a skull, the trap goes off and you lose one Body Point. Once you have rolled the dice the trap is removed. ORCS BANE The sword, Orcs Bane, allows you to roll two combat dice in attack. You may attack twice if you are fighting Orcs.

SPIRIT BLADE Spirit Blade allows you to roll three combat dice in attack or four dice in attack against undead creatures, Skeletons, Zombies and Mummies. BORIN’S ARMOUR Bonn’s Armour allows you to roll four combat dice in defence. WAND OF RECALL The Wand of Recall allows you to cast two spells instead of one during your turn. TALISMAN OF LORE The Talisman allows you to increase your Mind Points by two as long as you have the Talisman in your possession.
ANY PROBLEMS? If you have problems loading Hero Quest then return it to your retailer, or to Gremlin Graphics at the address on the packaging. If you have any questions relating to the game, then the Gremlin Graphics helpline is available between the hours of 2.00 and 4.00 U.K. time Monday to Friday, on 0742 753 423
COPYRIGHT NOTICE ©1991 GREMLIN GRAPHICS SOFTWARE LIMITED ©1990 Hasbro Bradley UK Limited. Designed in conjunction with Games Workshop. All Rights Reserved. This manual and the information contained on the floppy disks are copyrighted by Gremlin Graphics Limited. The owner of this product is entitled to use the product for his or her own personal use only. No one may transfer, give or sell any part of the manual, or the information on the disk without the prior permission of Gremlin Graphics Software Limited. Any person or persons reproducing any part of the program, in any media, for any reason, shall be guilty of copyright violation, and subject to civil liability at the discretion of the copyright holder.
PDF manual by M A Harrison 2008
