spatial data standards for facilities, infrastructure, and
TRANSCRIPT

Spatial Data Standards for Facilities, Infrastructure, and Environment (SDSFIE)
Migration Workflow User Guide
Version 1.0 (01 August 2018)
Prepared For: US Army Corps of Engineers
© 2018

Migration Workflow User Guide v 1.0
2
Revision History
Description Date Version Initial Version 08/01/18 1.0

Migration Workflow User Guide v 1.0
3
Table of Contents
1 Introduction ............................................................................................................. 5 2 Get Started .............................................................................................................. 5 2.1 Login .......................................................................................................................... 5 2.2 Launch the Application ............................................................................................... 6 3 System Requirements for Migration Workflow .................................................... 7 4 Overview ......................................................................................................................... 7 4.1 Definition of Terms ........................................................................................................ 7 4.2 Migration Workflow Session .......................................................................................... 7 5 Migration Process Steps ............................................................................................... 8 5.1 Step 1: Pre-Migration Planning ..................................................................................... 9 5.2 Step 2: Pre-Migration Preparation ................................................................................. 9
5.2.1 Preparing a Pre-Migration Master Geodatabase ................................................................................................ 9 5.2.2 Preparing metadata ............................................................................................................................................ 9 5.2.3 Renaming of feature and object classes ............................................................................................................ 9 5.2.4 Download and execution of the SDSFIE Pre-Migration Tools .......................................................................... 10
5.2.4.1 SDSFIE Pre-Migration Tool ................................................................................................................. 11 5.2.4.2 Prepare Source Features for Split Tool ................................................................................................... 13
5.2.5 Finalization of the Pre-Migration Preparation ................................................................................................... 14 5.3 Step 3: Export XML Workspace Document ................................................................. 14 5.4 Step 4: Import Source Schema ................................................................................... 15 5.5 Step 5: Generate Gathering Spreadsheet ................................................................... 15 5.6 Step 6: Edit, Import, Generate Gathering Spreadsheet............................................... 16
Gathering Sheet Workflow Best Practice .................................................................................................................. 19 5.7 Step 7: Create Mappings and Generate Crosswalk Spreadsheet ............................... 21
5.7.1 Selecting Destination for Attributes of Merged Entities .................................................................................... 21 5.7.2 Changing unmatched elements for the Target Geodatabase aka Building Complex Mappings ....................... 21 5.7.3 Rename Entities: .............................................................................................................................................. 22 5.7.4 Rename Attributes ........................................................................................................................................... 23 5.7.5 Split Entities ..................................................................................................................................................... 24 5.7.6 Split Attributes .................................................................................................................................................. 25 5.7.7 Generate Crosswalk Spreadsheet ................................................................................................................... 26
5.8 Step 8: Generate Target Model and Schema .............................................................. 28 5.9 Step 9: Create Cross Reference Geodatabase and Target Geodatabase .................. 30 5.10 Step 10: Migrate Data ............................................................................................... 31 5.11 Wrap-up and Next Steps ........................................................................................... 36
Migration Workflow User Guide v 1.0
4
Table of Figures
Figure 1: SDSFIE Online Website Home Page ......................................................................... 5 Figure 2: SDSFIE Online Login Page ....................................................................................... 6 Figure 3: SDSFIE Online Website Home Page ......................................................................... 6 Figure 4: Migration is moving data from one geodatabase to another ...................................... 7 Figure 5: Initiate or select migration session ............................................................................. 8 Figure 6: The steps in the SDSFIE Migration Workflow ............................................................ 8 Figure 7: The Prepare for Migration Tool ................................................................................ 11 Figure 8: The Prepare Source Features for Split Tool ............................................................ 13 Figure 9:The Import XML Workspace Dialog .......................................................................... 15 Figure 10: The Gathering Sheet Export Dialog ....................................................................... 16 Figure 11: The Gathering Spreadsheet .................................................................................. 17 Figure 12: The Import Gathering Sheet Dialog ....................................................................... 20 Figure 13: Complex Mapping Dialog Box ............................................................................... 22 Figure 14: Rename Entities Form ........................................................................................... 22 Figure 15: Rename Attributes Form ........................................................................................ 23 Figure 16: Split Entities Form .................................................................................................. 24 Figure 17: Split Attributes Form .............................................................................................. 25 Figure 18: Entity for Split Attributes Form ............................................................................... 26 Figure 19: The Generate Crosswalk Spreadsheet Dialog ....................................................... 27 Figure 20: The Generate Target Model Dialog ....................................................................... 28 Figure 21: The <Migration Root Folder> should look something like this after the three files have been put in place. .......................................................................................................... 29 Figure 22: The Esri Production Mapping Toolbar ................................................................... 31 Figure 23: The Preload Validate Dialog .................................................................................. 32 Figure 24: The first Data Loader Dialog .................................................................................. 34 Figure 25: The second Data Loader Dialog ............................................................................ 35 Figure 26: The final Data Loader Dialog ................................................................................. 35

Migration Workflow User Guide v 1.0
5
1 Introduction The SDSFIE Online Migration Workflow is a web application that is designed to support a successful migration of data from one version of SDSFIE to another. A successful migration is one where pre-planning and preparation result in a minimum amount of manual copying, processing, and fixing of data.
2 Get Started In order to access the Migration Workflow tool, navigate to the SDSFIE Online website home page (Figure 1).
Figure 1: SDSFIE Online Website Home Page
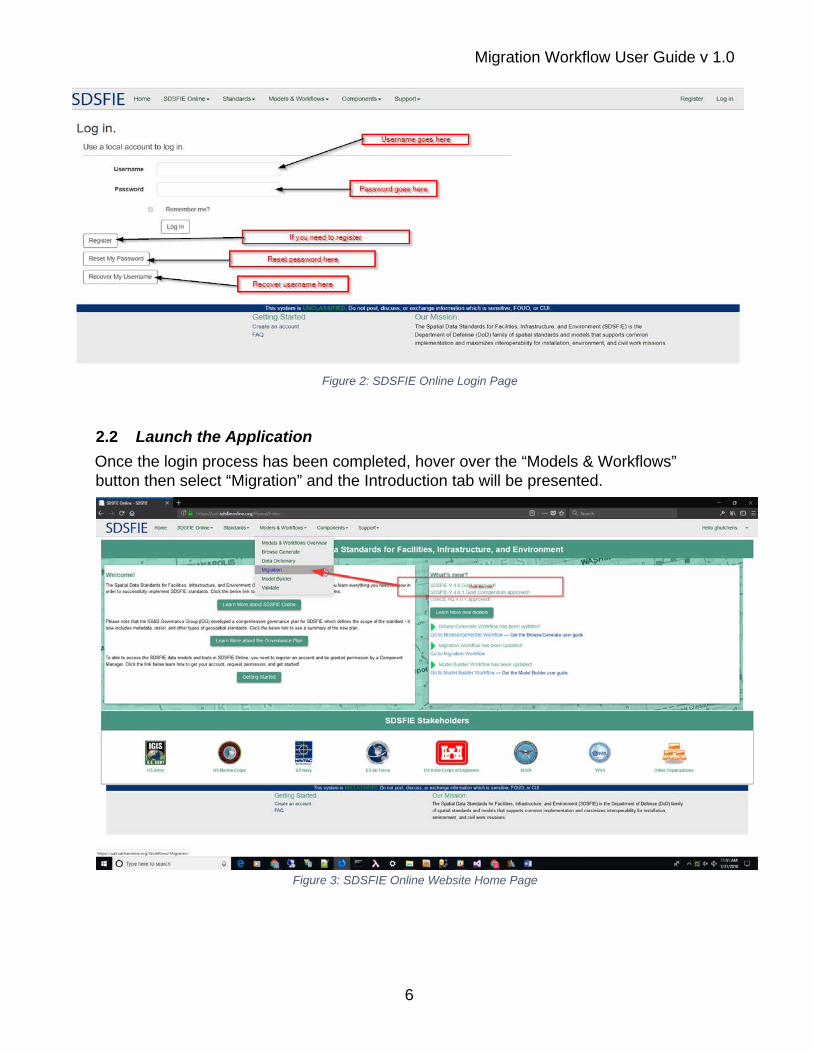
2.1 Login If an account has been registered and approved, the user can login by: Entering Username Entering Password Then, select Login to advance to the next screen. Site Registration If an account has not been registered for the SDSFIE Online website, select ‘Register’ to access the registration page. Forgotten Password Forgotten Username To retrieve a forgotten password, select ‘Reset My Password’. To recover a forgotten username, select ‘Recover My Username’.
Migration Workflow User Guide v 1.0
6
2.2 Launch the Application Once the login process has been completed, hover over the “Models & Workflows” button then select “Migration” and the Introduction tab will be presented.
Figure 3: SDSFIE Online Website Home Page
Figure 2: SDSFIE Online Login Page

Migration Workflow User Guide v 1.0
7
3 System Requirements for Migration Workflow
To fully utilize the SDSFIE Migration Workflow, you must have the following:
1. ArcGIS for Desktop Standard or Advanced, 10.3.1 or above 2. Esri Defense Mapping or Esri Production Mapping (corresponding to your version of
ArcGIS for Desktop) 3. Microsoft Office 2010 or above
4 Overview Migration is about moving data from one geodatabase to another geodatabase with a new schema (the schema is the definition of the feature and object classes in your geodatabase, along with their fields, domains, domain values, and relationship classes).
Figure 4: Migration is moving data from one geodatabase to another
4.1 Definition of Terms Before continuing the overview of the migration process a few terms are defined: Source: This is the input of a migration. Target: This is the output of a migration. Geodatabase: A database or file structure used primarily to store, query, and manipulate spatial data used by ArcGIS. This is the expected starting input and output format for a migration. Schema: An XML Workspace representation of a geodatabase structure including the metadata, but not the data.
Model: A logical data model in the SDSFIE Online Registry.
4.2 Migration Workflow Session Start up the SDSFIE Online Migration Workflow – To begin the Migration Workflow process, you must first create a migration session. To do so, please enter a Name for the batch of feature and object class that you wish to migrate, such as Natural Resources, 3.1 to 4.0, followed by a Description in the START A NEW SESSION area of the Introduction tab and then press ‘Start a New Session’. Once you have created a session, then the session, along with any progress you make, will be saved. In this way, you can return to a session multiple times until the migration is completed. To do so, please select a saved session from the Sessions pulldown menu in the LAUNCH A SAVED SESSION area of the Introduction tab and pick the saved session to which you want to return. Once you have started or launched a saved session, you will be transferred to the Migration tab.

Migration Workflow User Guide v 1.0
8
Figure 5: Initiate or select migration session
5 Migration Process Steps The migration process using the SDSFIE Migration Workflow is depicted below and each step is described immediately following.
Figure 6: The steps in the SDSFIE Migration Workflow

Migration Workflow User Guide v 1.0
9
5.1 Step 1: Pre-Migration Planning Migration can be a relatively lengthy process and can involve multiple subject matter experts (SME) from various functional areas. Because of these facts, it is best to plan how the data will be migrated. The following questions should be answered as a part of pre-migration planning to facilitate a smooth and efficient process:
1. What SMEs need to be consulted and for what feature classes? 2. Should everyone be consulted in advance, all input gathered about what data needs to
be migrated or not? 3. Should the data be processed in batches that align with the SME and functional areas
that need to be migrated? 4. What data in terms of feature classes needs to be migrated and which do not? 5. What attribution is necessary and which is not?
5.2 Step 2: Pre-Migration Preparation Once a migration plan has been developed, with a set of feature and object classes selected for migration, the remainder of these steps can be executed. Steps 2-11 should be repeated for each batch of feature and object classes to be migrated (each of these batches are referred to as a Source Geodatabase). 5.2.1 Preparing a Pre-Migration Master Geodatabase It is best to maintain a Pre-Migration Master Geodatabase that contains all data that will eventually be migrated. Create a new file geodatabase in ArcCatalog. Using the Copy tool (under Data Management->General in the System Toolbox) or simply using Copy and Paste with the right click menu in ArcCatalog, copy all feature and object classes that are to be migrated into the master geodatabase. 5.2.2 Preparing metadata Several of the SDSFIE Online tools, including the Migration Workflow, examine entity and attribute information embedded in the metadata of an XML Workspace document to determine aspects of the schema of a geodatabase. The most complete information is present if the SDSFIE-M Metadata Style for ArcGIS has been used, but the FGDC or ISO 19139 Metadata Styles are also supported. The most important portion of metadata to complete before migration are the definitions of entities (feature and object classes) and attributes (fields). If you have the SDSFIE Metadata Style, you can also populate ‘Model Name’ fields of both entities and attributes. This field will be used by the software as the name of the entity/attribute from the Source Parent Model with which the feature class/field complies. For example, if the feature class name is ‘AccessControl_L’, the ‘Model Name’ field should be ‘AccessControl’. This step should be carried out while the features and object classes are still in the master ("Pre-Migration Master Geodatabase") so that this information is retained for archival purposes once migration is finalized. 5.2.3 Renaming of feature and object classes The SDSFIE Online Migration Workflow will try to match names of feature and object classes and attributes between those in the Pre-Migration Master Geodatabase and those in the Source Parent Model. To facilitate this matching it is recommended that names be changed to align with the source parent wherever possible before the migration

Migration Workflow User Guide v 1.0
10
process begins. If you have multiple geometries for the same feature class, then you should end the name with a geometry suffix, like ‘_P’, ‘_L’ or ‘_A’ or possibly even ‘Point’, ‘Line’, or ‘Area’. Then when importing the feature classes in Step 4, the imported feature and object classes can match the proper Source Parent Model entity.
5.2.4 Download and execution of the SDSFIE Pre-Migration Tools Download the pre-migration tools from the SDSFIE Online Workflow by clicking ‘Download Pre-Migration Tool’. A zipped file will be download that contains an ArcGIS Toolbox with one tool in it. Unzip this toolbox and place it into your ‘My Toolboxes’ folder – OR - in a folder in your ArcCatalog tree near your Source Geodatabase. Once you have done this, execute the ‘Prepare for Migration’ tool. You may click on the ‘Show Help’ and then the ‘Tool Help’ button to get detailed help on the use of the tool directly from the tool. The functionality of the tool is optional, but what it does may help in a number of ways. If you have feature classes to migrate that are involved in a split, then you will need to execute the ‘Prepare Source Features for Split’ tool. You may click on the ‘Show Help’ and then the ‘Tool Help’ button to get detailed help on the use of the tool directly from the tool. Once you have executed the tool, you will need to classify each individual feature as defined in the tool documentation.
Migration Workflow User Guide v 1.0
11
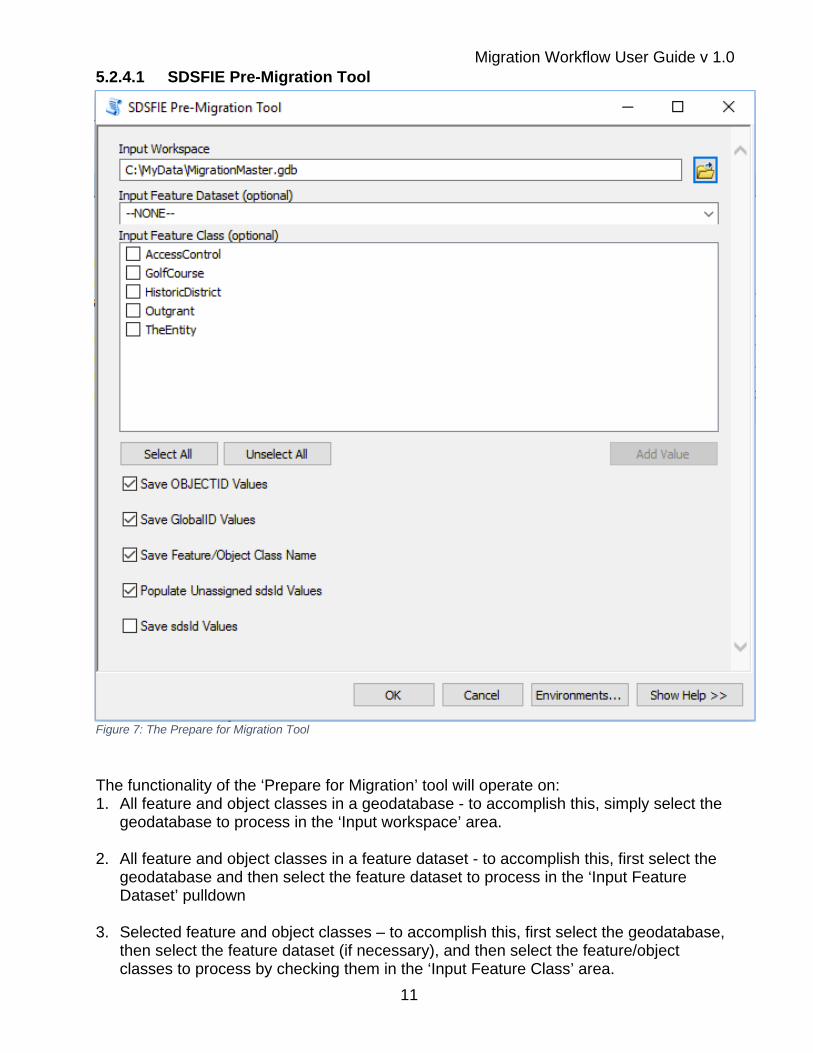
5.2.4.1 SDSFIE Pre-Migration Tool
Figure 7: The Prepare for Migration Tool
The functionality of the ‘Prepare for Migration’ tool will operate on: 1. All feature and object classes in a geodatabase - to accomplish this, simply select the
geodatabase to process in the ‘Input workspace’ area.
2. All feature and object classes in a feature dataset - to accomplish this, first select the geodatabase and then select the feature dataset to process in the ‘Input Feature Dataset’ pulldown
3. Selected feature and object classes – to accomplish this, first select the geodatabase, then select the feature dataset (if necessary), and then select the feature/object classes to process by checking them in the ‘Input Feature Class’ area.

Migration Workflow User Guide v 1.0
12
The functions that the tool can perform are:
1. Save OBJECTID Values - Checking this box causes the tool to add a field to the input target called SDSFIE_PRE_MIG_OBJECTID and to populate the values with the content of the OBJECTID field. Note that the tool will examine each feature class being processed to determine the OIDFieldName property and will populate from the field named in that value (which is most typically, OBJECTID). This parameter is checked by default and should be used to support post-migration processing.
2. Save GlobalID Values - Checking this box causes the tool to add a field to the
input target called SDSFIE_PRE_MIG_GlobalD and to populate the values with the content of the GlobalID field. Note that the tool will examine each feature class being processed to determine the globalIDFieldName property and will populate from the field named in that value (which is most typically, GlobalID). This parameter is checked by default and should be used to support post-migration processing.
3. Save Feature/Object Class Name - Checking this box causes the tool to add a
field to the input target called SDSFIE_PRE_MIG_FCName and to populate the values with name of the current feature or object class. This parameter is checked by default and should be used to support post-migration processing.
4. Populate Unassigned sdsId Values - Checking this box causes the tool to search
the sdsId field, if present, and to populate any unassigned values with a new GUID value. SDSFIE-Q recommends that the sdsId value be assigned once before distribution and not changed once populated. This parameter is checked by default and should be used to support post-migration processing.
5. Save sdsId Values - Checking this box causes the tool to add a field to the input
target called SDSFIE_PRE_MIG_sdsId and to populate the values with the content of the sdsId field. Note that the tool will examine each feature class being processed to determine if the sdsId field exists and, if so, will populate from that field. This is optional and is unchecked by default because it is not necessary in most cases. It is provided for those cases where it is needed for further post-migration processing, such as the update of relationship classes.

Migration Workflow User Guide v 1.0
13
5.2.4.2 Prepare Source Features for Split Tool
Figure 8: The Prepare Source Features for Split Tool
The ‘Prepare Source Features for Split’ tool adds a field and a domain to existing feature classes that do not have a basis attribute required for a split in the migration. Although this script will eventually contain all known such split cases between older and newer versions, the only case, at the moment, is 3.1 Gold to 4.0 Gold. As new 4.0 adaptations are approved, the others will be added. The ‘Prepare Source Features for Split’ tool will add a field entitled sdsMigFeatureType to feature classes in an Input Workspace that will participate in a split during migration and that do not have a basis attribute defined. The sdsMigFeatureType field will be assigned a domain that contains the possible values of the split. The tools will display the name of the domain as well as all of the code listed values as they are created if the Create Fields and Domains checkbox is selected. Otherwise, the fields and domains that would be added are simply displayed.
For example, in a migration with the SDSFIE Source Version of ‘SDSFIE 3.1 Gold’ and the SDSFIE Target Version of ‘SDSFIE 4.0 Gold’, the 3.1 feature class called CemeteryOrBurialSite will be split into the 4.0 feature classes Cemetery or BurialSite. After running this tool, the user will need to populate the value of the sdsMigFeatureType field for each feature to reflect whether the feature represents a cemetery or a burial site. Once this is accomplished, the migration tools will automatically process the split using the provided input data. In the example provided, CemeteryOrBurialSite features with
Migration Workflow User Guide v 1.0
14
sdsMigFeatureType set to cemetery will become a Cemetery feature class, CemeteryOrBurialSite features with sdsMigFeatureType set to burialSite will become a BurialSite feature class, and CemeteryOrBurialSite features with a NULL valued sdsMigFeatureType will not be migrated. If the code list value noneOfTheAbove is included in the domain, then the migration software will migrate the source feature to the same feature in the target for features with NULL value in the sdsMigFeatureType field. For example, the 3.1 feature class AdminstrativeBoundary, splits into either AdminBoundaryPolice (for domain value police), AdminBoundaryFire (for domain value fire), EmergencyServiceZone (for domain value emergencyServiceZone), or AdminstrativeBoundary (for doman value noneOfTheAbove or NULL).
5.2.5 Finalization of the Pre-Migration Preparation Once the Pre-Migration Master Geodatabase has been prepared by all of the steps above, the subset of feature and object classes to migrate can be copied into the migration Source Geodatabase(s). The following steps can be repeated for each Source Geodatabase. 1. Create Source Geodatabase - In ArcCatalog, create a new empty geodatabase. 2. Populate Source Geodatabase - Using the Copy tool (under Data Management-
>General in the System Toolbox) or simply using Copy and Paste with the right click menu in ArcCatalog, select and copy features from the Pre-Migration Master Geodatabase to the new Source Geodatabase.
5.3 Step 3: Export XML Workspace Document Once pre-migration preparation is complete, the SDSFIE Migration Workflow can begin in earnest. The next step is to generate an XML Workspace document, the Source Schema.
You may use ArcCatalog (or the Catalog view in ArcMap) to export an XML Workspace document for import into the SDSFIE Registry. The steps are as follows:
1. In the Catalog tree, of either application, right-click the Source Geodatabase; select
the ‘Export’ item from the dropdown menu; then select XML Workspace Document option.
2. You will want to export the schema without any records from the feature classes and tables, so click the ‘Schema Only’ option. You will want to export the metadata for the feature classes, so be sure to click the ‘Export Metadata’ check box. Specify the path and name of the new XML file you will create.
3. Click ‘Next>’ to preview the contents of the schema information to be copied. The panel that appears next lists all the data items for which schema information will be copied. If you happen to have extraneous feature classes, tables, or relationship classes in your Source Geodatabase whose schemas you don't want to export, you may remove them from further consideration by unchecking their ‘Include’ check boxes.
4. When you are ready, click ‘Finish’ to export the schema.

Migration Workflow User Guide v 1.0
15
5.4 Step 4: Import Source Schema Now that the Source Schema has been generated, return to the SDSFIE Migration Workflow. In the ‘Step 4) Import Source schema’ section, change the geometry suffixes if they are different than the default values, then click the ‘Import XML Workspace’ button to begin the import process. A simplified version of the Import XML Workspace dialog box will appear as shown below.
Figure 9:The Import XML Workspace Dialog
Follow the steps below to import the Source Schema: 1. Click ‘Browse Files’, navigate to the Source Schema document created in STEP 3,
select it, and click ‘Open’. 2. Select the Source Parent Model from the drop-down menu. 3. Press the ‘Import’ button to get the import started. The XML Workspace importer will
process the document and create a Source Model Although you have created a Source Model and it is viewable in the SDSFIE Online Registry as a model, you should refrain from editing the model in Model Builder because the SDSFIE Migration Workflow has gathered information about the model and needs it to remain as imported for the duration of the migration process.
5.5 Step 5: Generate Gathering Spreadsheet Once the Source Model has been created by importing the Source Schema, the next step is to provide additional definitions and mappings between the Source Model and the Source Parent Model. The Migration process works because the crosswalk between the

Migration Workflow User Guide v 1.0
16
Source Parent Model and the Target Parent Model is well-known. To enable the migration of data in a Source Model to the Target Model, the mappings from Source Model to the Source Parent Model are necessary. The automatic importer process is smart enough to detect ‘Model Name’ specifications in the metadata and also uses name matching to detect further matches, but it cannot catch them all. Therefore, the Gathering Spreadsheet is used to manually establish any undetected mappings from the Source Model to the Source Parent Model which are present. The Gathering Spreadsheet is also used to collect definitions for elements that were not defined in the metadata. This is important because the Target Model will be populated with the definitions and thus the Target Schema will carry them back into the ArcGIS environment where they can be used for future migrations and for in-place documentation of the elements in ArcGIS.
To generate your gathering sheet, start by pressing the ‘Generate Gathering Sheet’ button in ‘Step 5 and 6) Gathering Spreadsheet Operations’. The ‘Generate Gathering Sheet’ dialog will appear. Click ‘Generate Gathering Sheet in Excel’ to begin the process. Once the Gathering Spreadsheet has been generated, it will be downloaded.
Figure 10: The Gathering Sheet Export Dialog
5.6 Step 6: Edit, Import, Generate Gathering Spreadsheet The Gathering Spreadsheet can be edited to add/update definitions and provide additional matching information. The figure below depicts the Gathering Spreadsheet. A few highlighted items in the figure are described below to aid the discussion of how to edit the sheet.

Migration Workflow User Guide v 1.0
17
Figure 11: The Gathering Spreadsheet
The columns of the Gathering Spreadsheet are defined as follows: Element Type - The type of element defined by the row, the values are one of ‘Entity’ (Feature Class or Object Table), ‘Attribute’ (‘Field’), ‘Enumeration’ (‘Domain’), ‘Enumerant’ (‘Domain Value’), or ‘Association’ (‘Relationship Class’). Cells in the Element Type column should not be edited. Source Model - This heading exists over the two columns that contain the name of the element in the Source Schema. In the case of Feature Classes, Domains, and Relationship Classes in the ‘Source Model’, only the first column under the ‘Source Model’ column will be populated. In the case of Attributes and Enumerants, both of the columns under the ‘Source Model’ column will be populated. Cells in these two columns should not be edited, but the correct number of values should be present and, if not, then you know there is a problem.
Feature (Object) Class / Domain / Relationship Class Name - If the Element Type is ‘Entity’ (‘Feature Class or Object Table’), ‘Enumeration’ (‘Domain’), or ‘Association’ (‘Relationship Class’), then the value is set to the name of the element. If the Element Type is ‘Attribute’ (‘Field’), or ‘Enumerant’ (‘Domain Value’), then the value is set to the name of the containing element. Field / Domain Value Name - If the Element Type is ‘Entity’ (‘Feature Class’), ‘Enumeration’ (‘Domain’), or ‘Association’ (‘Relationship Class’) this cell should be blank. If the Element Type is ‘Attribute’ (‘Field’), or ‘Enumerant’ (‘Domain Value’), then the value is set to the name of the element.

Migration Workflow User Guide v 1.0
18
Definition - This column contains the definition of the element. If the element was matched either by metadata or by the matching process on import, then the definition will be populated from the Source Parent. To aid in the process, the importer inserts the string ‘*****MISSING DEFINITION*****’ to identify elements that did not have a definition at the time of import (this is highlighted case #1 in the image above). Source Parent Model- This heading exists over the two columns that contain the name of the element in the Source Parent Model that matches the element in the Source Schema. In the case of Entities, Enumerations, and Associations in the Source Parent Model, only the first column under the ‘Source Parent’ column must be completed. In the case of Attributes and Enumerants, both of the columns under the ‘Source Parent’ column must be completed.
Entity / Enumeration / Association Model Name If the Element Type is ‘Entity’ (‘Feature Class’), ‘Enumeration’
(‘Domain’), or ‘Association’ (‘Relationship Class’) and the Source matches a like element in the Source Parent Model, then the model name of the Source Parent Model element should be present (if matched automatically) or be entered into this cell (if manual matching is required). If the Element Type is ‘Attribute’ (‘Field’), or ‘Enumerant’ (Domain Value’) and the Source matches a like element in the Source Parent Model for the matched Entity or Enumeration, then the model name of that Entity or Enumeration should go into this cell. Note that if there is not an Entity / Enumeration / Association match, nothing should be in this cell. This is the highlighted example #2.
Attribute / Enumerant Model Name If the Element Type is ‘Entity’ (‘Feature Class’), ‘Enumeration’ (‘Domain’), or ‘Association’ (‘Relationship Class’) this cell should be blank. If the Element Type is ‘Attribute’ (‘Field’), or ‘Enumerant’ (‘Domain Value’) and the Source Attribute or Enumerant matches a like element associated with the matched Entity/Enumeration/Association in the Source Parent Model, then the model name of that Attribute or Enumerant should go into this cell. If there is not an Attribute or Enumerant match, nothing should be in this cell. This is the highlighted example #3.
Migration Workflow User Guide v 1.0
19
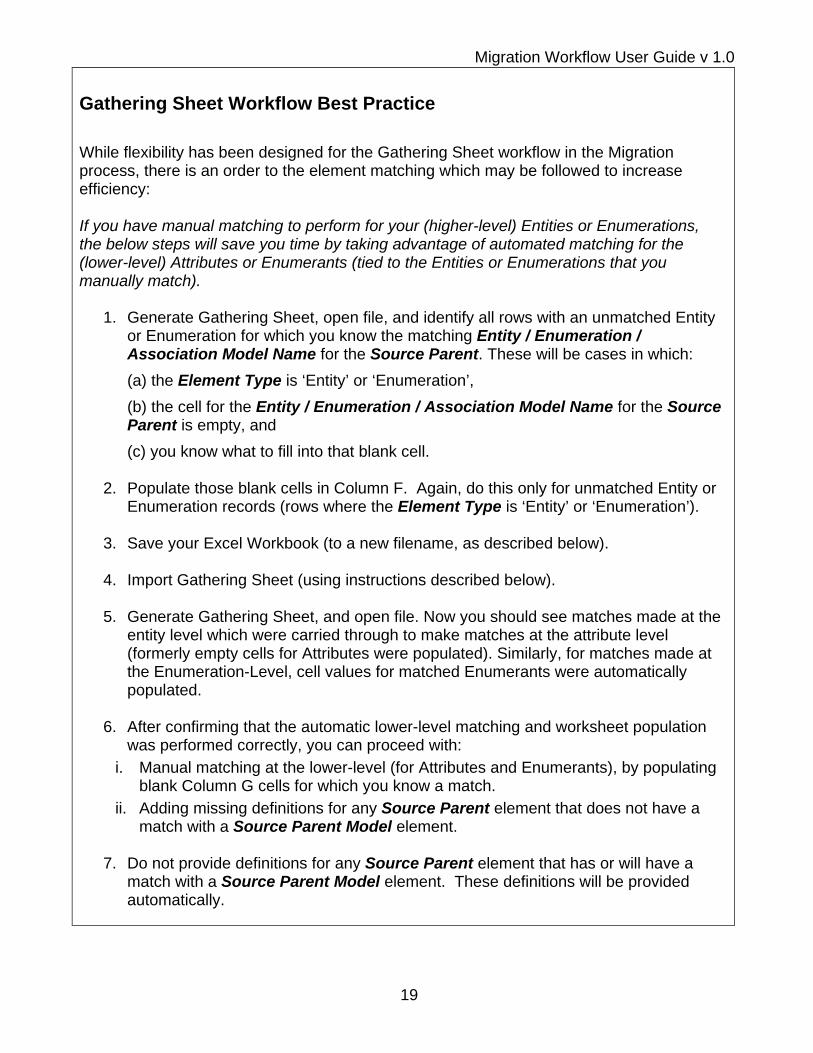
Gathering Sheet Workflow Best Practice
While flexibility has been designed for the Gathering Sheet workflow in the Migration process, there is an order to the element matching which may be followed to increase efficiency: If you have manual matching to perform for your (higher-level) Entities or Enumerations, the below steps will save you time by taking advantage of automated matching for the (lower-level) Attributes or Enumerants (tied to the Entities or Enumerations that you manually match).
1. Generate Gathering Sheet, open file, and identify all rows with an unmatched Entity or Enumeration for which you know the matching Entity / Enumeration / Association Model Name for the Source Parent. These will be cases in which: (a) the Element Type is ‘Entity’ or ‘Enumeration’, (b) the cell for the Entity / Enumeration / Association Model Name for the Source Parent is empty, and (c) you know what to fill into that blank cell.
2. Populate those blank cells in Column F. Again, do this only for unmatched Entity or
Enumeration records (rows where the Element Type is ‘Entity’ or ‘Enumeration’).
3. Save your Excel Workbook (to a new filename, as described below).
4. Import Gathering Sheet (using instructions described below).
5. Generate Gathering Sheet, and open file. Now you should see matches made at the entity level which were carried through to make matches at the attribute level (formerly empty cells for Attributes were populated). Similarly, for matches made at the Enumeration-Level, cell values for matched Enumerants were automatically populated.
6. After confirming that the automatic lower-level matching and worksheet population
was performed correctly, you can proceed with: i. Manual matching at the lower-level (for Attributes and Enumerants), by populating
blank Column G cells for which you know a match. ii. Adding missing definitions for any Source Parent element that does not have a
match with a Source Parent Model element.
7. Do not provide definitions for any Source Parent element that has or will have a match with a Source Parent Model element. These definitions will be provided automatically.

Migration Workflow User Guide v 1.0
20
With this understanding of the Gathering Spreadsheet format, we can go on to the process of completing the sheet and importing the result to effect the migration process. The following basic steps provide the envisioned process:
1. Edit the Gathering Spreadsheet in Excel, adding the missing definitions and any missing matches to the Source Parent Model.
NOTE: There is an issue with submitting the Gathering Spreadsheet for import if it has not been saved to a new file once edits are completed. Please save to a new filename before the next step!
2. Import the completed Gathering Spreadsheet by clicking on the ‘Import Gathering Sheet’ button. An ‘Import Gathering Sheet’ dialog will appear. Use the ‘Choose File’ button to select the Gathering Spreadsheet that was just edited and click the ‘Open’ button to upload the file. Once the file is uploaded, click the ‘Import’ button to start the import process. If there are errors; respond to them by editing the file and correcting the errors; repeat the import steps until you have success.
Figure 12: The Import Gathering Sheet Dialog
3. You may perform the Generate, Edit, Import cycle as many times as needed to complete adding all definitions and matches. Each time you import, the changes will show up in the next generation enabling you to carry out this step until everything is as required.

Migration Workflow User Guide v 1.0
21
4. Once you have finished importing all of your edits, you must finalize the Source Model by clicking the ‘Finalize Source Model’ button. This step checks to see if every element has a definition. The SDSFIE Online Workflow will either tell you if everything is well, or warn you if missing definitions exist. Currently, having undefined elements will not prohibit moving forward, but it is best practice to provide a definition for every element that will be retained in your Target Model.
5.7 Step 7: Create Mappings and Generate Crosswalk Spreadsheet Now that all matched elements have been dealt with it, is time to move on to the unmatched entities and attributes. If the unmatched entities and attributes should be copied over as they are in the Source Geodatabase, then move on to generating the crosswalk.
5.7.1 Selecting Destination for Attributes of Merged Entities Below the dropdown to Select Target, there is a checkbox to "Merge all attributes for entities merged in the migration". This choice specifies where non-compliant ("extra") attributes will be stored in the target model. The box is checked by default.
When there are two source entities that are going to be merged, if the box is checked, then all of the attributes from both source entities will be placed into the merged entity.
When there are two source entities that are going to be merged, if the box is unchecked, then only the intersection of the attributes from the source entities will go into the target (plus any additional attributes in the parent not found in the 2 source entities). If the box is unchecked, then all attributes not included in the intersection will go into a "merge attribute table" along with the SDSFIE_PRE_MIG_OBJECTID attribute to be used for establishing relationship classes.
1. If the box is checked, and all attributes are stored in the merged entity, then only one
crosswalk spreadsheet will be produced in Step 7: "PartA.xlsx".
2. If the box is unchecked, then the attributes are stored in two different entities, and two crosswalk spreadsheets will be produced in Step 7: "PartA.xlsx" and "PartB.xlsx".
5.7.2 Changing unmatched elements for the Target Geodatabase aka Building Complex Mappings There are four options for changing unmatched elements for the Target Geodatabase: 1. Rename entities. 2. Rename attributes. 3. Split entities. 4. Split attributes. These options can be accessed by selecting a target parent model using the drop-down, and then clicking ‘Create Mappings’ in the ‘Step 7) Generate Crosswalk Spreadsheet’ section. The following dialog box will appear.

Migration Workflow User Guide v 1.0
22
Figure 13: Complex Mapping Dialog Box
5.7.3 Rename Entities: If unmatched entities should be named differently in the Target Geodatabase than the Source Geodatabase, select ‘Rename Entities’ to specify the name of the unmatched entities in the Target Geodatabase.
Figure 14: Rename Entities Form
Use the drop-down to select an unmatched entity then fill out the new entity information. The new entity name is required and source entity information will be copied over from the Source Model for other fields which aren't populated. Use ‘Submit’ to save the changes or ‘Reset’ to clear the form. When done renaming unmatched entities, use the ‘Close’ button to return to the complex mappings dialog box.
Migration Workflow User Guide v 1.0
23
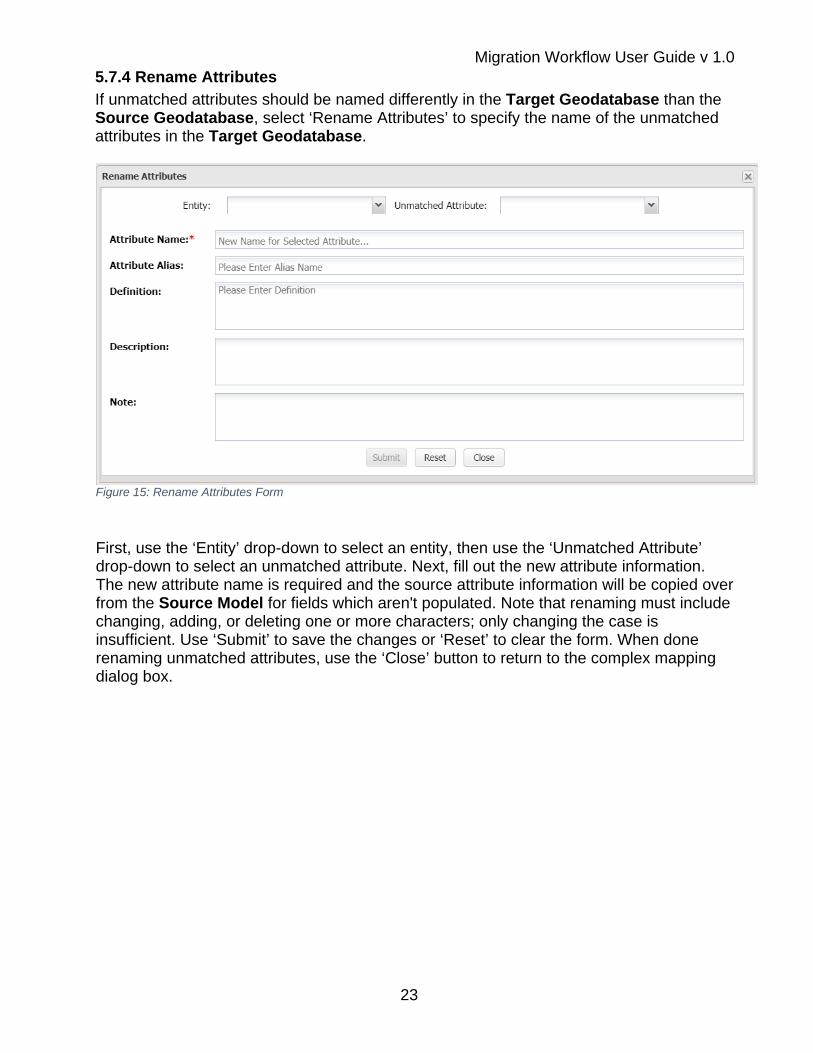
5.7.4 Rename Attributes If unmatched attributes should be named differently in the Target Geodatabase than the Source Geodatabase, select ‘Rename Attributes’ to specify the name of the unmatched attributes in the Target Geodatabase.
Figure 15: Rename Attributes Form
First, use the ‘Entity’ drop-down to select an entity, then use the ‘Unmatched Attribute’ drop-down to select an unmatched attribute. Next, fill out the new attribute information. The new attribute name is required and the source attribute information will be copied over from the Source Model for fields which aren't populated. Note that renaming must include changing, adding, or deleting one or more characters; only changing the case is insufficient. Use ‘Submit’ to save the changes or ‘Reset’ to clear the form. When done renaming unmatched attributes, use the ‘Close’ button to return to the complex mapping dialog box.

Migration Workflow User Guide v 1.0
24
5.7.5 Split Entities If unmatched entities should be split into two separate entities in the Target Geodatabase, select ‘Split Entities’ to specify an attribute subclass for the Target Geodatabase.
Figure 16: Split Entities Form
Use the drop-downs to specify an entity, basis attribute and basis attribute value to define the split information then fill in the textboxes with the new entity information. The entity name, alias and definition are required before the form can be submitted. Use the ‘Create Split Entity’ form to store the information in the database, the ‘Reset Split Entity Form’ to reset the form and the ‘Close’ button to return to the Complex Mapping dialog bow after all entity split information has been submitted and stored in the database.

Migration Workflow User Guide v 1.0
25
5.7.6 Split Attributes If unmatched attributes exist in the source model, then they will be migrated in the entity to which they belong. If you want to remove unmatched attributes from the entity to which they belong, but retain them, then you can use this capability to split them out into a related table in the Target Geodatabase. To accomplish this, select ‘Split Attributes’ to specify unmatched attributes to be split out into a new (related table) entity in the Target Geodatabase.
Figure 17: Split Attributes Form
To split attributes, first select an entity from the left grid. The unmatched attributes will be populated in the center grid and the arrow buttons can be used to select unmatched attributes to be moved to a new entity. Move the unmatched attributes to the right grid if it is to be split out into a new entity. When the attributes have been split, select ‘Create Entity’ to open a dialog box to define the new entity (as seen in the figure below). Use the ‘Reset’ button to reset the form or the ‘Close’ button to return to the Complex Mappings dialog after all attribute split information has been submitted and stored in the database.

Migration Workflow User Guide v 1.0
26
Figure 18: Entity for Split Attributes Form
Entity name, alias and definition are required before being able to submit the split attribute information. After submitting the new entity information, the data will be stored in the database and the original split attribute form will be reset and displayed for more attribute splits to be created. After all complex mappings have been created, press ‘Cancel’ to return to the migration session and continue to the Generate Crosswalk step.
5.7.7 Generate Crosswalk Spreadsheet At this stage, you are ready to starting preparing inputs for the final step of migrating data. The first input needed is a crosswalk which defines where the elements in your Source Geodatabase will end up in your Target Geodatabase. This crosswalk will be used to create a cross reference database for the Esri Production Mapping Data Loader tool which will actually perform the data migration. To create this crosswalk, select a target parent model (already completed if the complex mapping step was completed) then press the ‘Generate Crosswalk Spreadsheet’ button. Once this is accomplished the ‘Generate Crosswalk Spreadsheet’ dialog box will appear.

Migration Workflow User Guide v 1.0
27
Figure 19: The Generate Crosswalk Spreadsheet Dialog
1. Click the ‘Generate Crosswalk in Excel’ button to get the process started. 2. The SDSFIE Migration Workflow will generate the crosswalk spreadsheet and
download it for your later use in STEP 10.

Migration Workflow User Guide v 1.0
28
5.8 Step 8: Generate Target Model and Schema In this step, you will use the SDSFIE Migration Workflow for the following actions:
1. Create an adaptation of the Target Parent Model, named "Target Model", in the SDSFIE Online Registry.
2. Extract and download an ESRI Workspace XML schema of the Target Model. 3. Download tools for creating both your Cross Reference Database, and your Target
Geodatabase. If you have examined the crosswalk created in the last step, you will have a good idea of the content of the Target Model. To create the Target Model and access the schema and tool downloads, select a schema version using the drop-down, and then click on the ‘Generate Target Model and Schema and Downloads’ button in the ‘Step 8) Generate Target Model and Schema’ section. Once this is accomplished the ‘Generate Target Model’ dialog box will appear. Click ‘Begin Model Generation’ to start the Target Model generation process.
Figure 20: The Generate Target Model Dialog
After the Target Model has been generated, the software will generate the ESRI Workspace XML schema and download it, along with the ArcGIS Toolbox “SDSFIE Migration Tools”.
Migration Workflow User Guide v 1.0
29
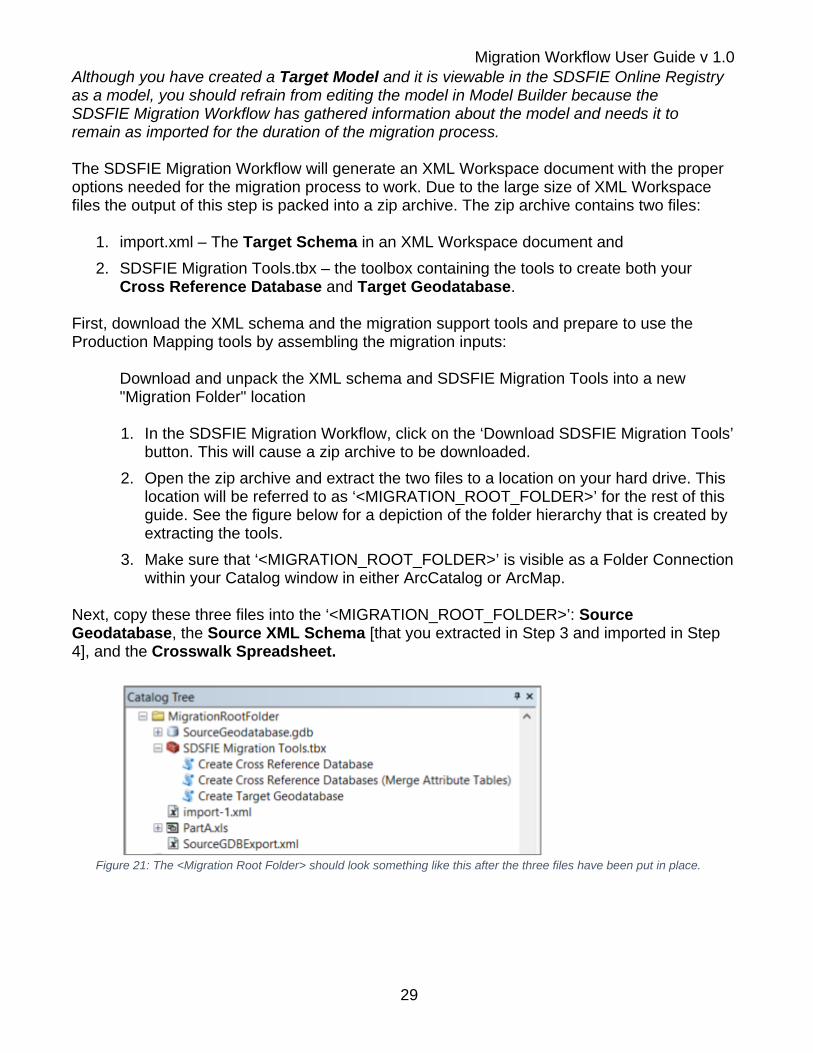
Although you have created a Target Model and it is viewable in the SDSFIE Online Registry as a model, you should refrain from editing the model in Model Builder because the SDSFIE Migration Workflow has gathered information about the model and needs it to remain as imported for the duration of the migration process. The SDSFIE Migration Workflow will generate an XML Workspace document with the proper options needed for the migration process to work. Due to the large size of XML Workspace files the output of this step is packed into a zip archive. The zip archive contains two files:
1. import.xml – The Target Schema in an XML Workspace document and 2. SDSFIE Migration Tools.tbx – the toolbox containing the tools to create both your
Cross Reference Database and Target Geodatabase. First, download the XML schema and the migration support tools and prepare to use the Production Mapping tools by assembling the migration inputs:
Download and unpack the XML schema and SDSFIE Migration Tools into a new "Migration Folder" location
1. In the SDSFIE Migration Workflow, click on the ‘Download SDSFIE Migration Tools’
button. This will cause a zip archive to be downloaded. 2. Open the zip archive and extract the two files to a location on your hard drive. This
location will be referred to as ‘<MIGRATION_ROOT_FOLDER>’ for the rest of this guide. See the figure below for a depiction of the folder hierarchy that is created by extracting the tools.
3. Make sure that ‘<MIGRATION_ROOT_FOLDER>’ is visible as a Folder Connection within your Catalog window in either ArcCatalog or ArcMap.
Next, copy these three files into the ‘<MIGRATION_ROOT_FOLDER>’: Source Geodatabase, the Source XML Schema [that you extracted in Step 3 and imported in Step 4], and the Crosswalk Spreadsheet.
Figure 21: The <Migration Root Folder> should look something like this after the three files have been put in place.

Migration Workflow User Guide v 1.0
30
5.9 Step 9: Create Cross Reference Geodatabase and Target Geodatabase NOTE #1: You MUST open the Crosswalk Spreadsheet, click the ‘Enable Content’ button, and save the file for the ‘Create Cross Reference Database’ script to operate properly.
1. If you are running Windows 10, it is likely that you may not have the ability to ‘Enable Content’ or you may experience the error:
i. Traceback (most recent call last): File "<MIGRATION_ROOT_FOLDER>\SDSFIE Migration Tools.tbx#createxrefdb.py", line 107, in <module> RuntimeError: cannot open 'C<MIGRATION_ROOT_FOLDER>\CrosswalkSpreadsheet.xlsx\Dataset Mapping$'
ii. If the above is true for you, then you will need to open the crosswalk
spreadsheet, save it as a ‘.xls’ file, and then continue using the ‘Create Cross Reference Database’ script on that file instead.
NOTE #2: We are NOT using the Esri Production Mapping Create Cross Reference Database tool at this time, in favor of our custom Python script. 1. Create a "Migration.mdb" cross-reference database from the Crosswalk Spreadsheet
using one of two scripts used to create the cross reference database. These scripts are located in the ‘SDSFIE Migration Tools’ toolbox that you just extracted into your ‘<MIGRATION_ROOT_FOLDER>’.
The script that you use depends on what destination you selected for the attributes of merged entities in Step 7: i. If you have merged entities, and you checked the "Merge all attributes for
entities merged in the migration" box in Step 7, then you will have only a "PartA" Excel file (.xlsx or .xls; see NOTE#1, below), and you should use the Create Cross Reference Database tool.
ii. If you have merged entities, and you unchecked the "Merge all attributes for
entities merged in the migration" box in Step 7, then you will have both "PartA" and "PartB" Excel files, and you should use the Create Cross Reference Databases (Merge Attribute Tables) tool.
2. Create the Target Geodatabase using the Create Target Geodatabase tool, found in
the ‘SDSFIE Migration Tools’ toolbox. The tool inputs are as follows: i. Select cross-reference database => Migration.mdb [you just made this in
section 1 of Step 8].
ii. Select source schema => The XML file that you extracted in Step 3 and imported into the Registry in Step 4.
iii. Select target schema => import-1.xml [you just downloaded this in Step 8].
Name the output geodatabase “Target”(.gdb).

Migration Workflow User Guide v 1.0
31
5.10 Step 10: Migrate Data With the Cross Reference Database and the Target Geodatabase ready and present in the same folder as the Source Geodatabase, you are ready migrate the data using Esri ArcGIS for Desktop and Esri Production Mapping (ArcCatalog is recommended for the following steps). Next, ensure that the Esri Production Mapping tools are available:
1. Start ArcCatalog 2. On the main menu, click Customize > Toolbars > Production Mapping
The Esri Production Mapping toolbar is as follows:
Figure 22: The Esri Production Mapping Toolbar
Next, you will perform the migration steps: (1) Preload Validatation, and (2) Data Loading:
1. Before loading source data into a geodatabase using a cross-reference database, you may want to ensure that the schemas of your Source Geodatabase and Target Geodatabase match the mapping information in your cross-reference database. The Preload Validate tool can be used to compare the source and target workspaces against the cross-reference database to ensure they are compatible. Initially, the schemas of the Source Geodatabase and Target Geodatabase are compared to the cross-reference database to ensure the datasets and fields match. The Preload Validate tool compares the source and target to the cross-reference database based on the names of the datasets and fields. Any discrepancies are reported in a log file. To perform the validation: a. Click the ‘Preload Validate’ button on the Production Mapping toolbar. The
Preload Validate dialog box appears. b. Click the ellipsis button (...) next to the Source Workspace text box. The Select
source workspace dialog box appears.

Migration Workflow User Guide v 1.0
32
c. Browse to the workspace that contains the Source Geodatabase. Click ‘Select’. The Preload Validate dialog box appears again with the path to the Source Geodatabase in place.
d. Click the ellipsis button next to the Target Geodatabase text box. The Select target geodatabase dialog box appears. Browse to the workspace that contains the target schema. Click ‘Select’. The Preload Validate dialog box appears again with the path to the Target Geodatabase in place.
e. Click the ellipsis button next to the cross-reference database text box. The Select cross-reference database dialog box appears. Browse to the cross-reference database you want to compare to the Source and Target Geodatabases. Click ‘Add’. The Preload Validate dialog box appears again with the path to the cross-reference database in place.
f. Click the ellipsis button next to the Log File text box. The Specify log file dialog box appears. Browse to the directory in which you want to save the log file (typically, this will be your ‘<MIGRATION_ROOT_FOLDER>’. Type a name for the log file in the Name text box. Click ‘Save’. The Preload Validate dialog box appears again with the path to the log file in place. 1. To compare the cross-reference database to the source and target workspaces,
check the Validate cross-reference against source and target check box. This option is unchecked by default. When the Validate cross-reference against source and target check box is not checked, the source and target workspaces are compared to the cross-reference database but not vice versa. When this option is checked, the log file includes tables and feature classes that are not present in the cross-reference database but are present in the source or target workspace.
g. Click ‘OK’. The Source and Target Geodatabases are compared to the cross-reference database, and any differences are reported in a log file. Once the validation process is complete, a message appears asking if you want to see the log file.
Figure 23: The Preload Validate Dialog

Migration Workflow User Guide v 1.0
33
h. Click ‘Yes’ to view the log file or ‘No’ to close the message. If you click ‘Yes’, the log file opens in a text editor. If you click ‘No’, the Preload Validate dialog box appears.
i. Click ‘Cancel’ to close the Preload Validate dialog box. 2. Using the Data Loader tool, you can load data from one geodatabase, coverages, or set of shapefiles into another geodatabase that may or may not have the same schema. This can append data to existing databases or load it into an empty schema. The target workspace must contain the schema referenced in the cross-reference database, at a minimum. In our case, we have taken care to ensure that the Source Geodatabase is mapped properly to a Target Geodatabase and have created the requisite cross-reference database to ensure a proper migration. The loading process is completed in a series of steps that are presented in a wizard. The first part of the process requires you to navigate to the cross-reference database, the Source Geodatabase, the Target Geodatabase, and an output location for the log file created. This sets up the mapping information between the data that is going to be loaded and the database into which the data is going to be loaded. The log file is generated as a text file that contains the results of the loading process. The next part of the process is to choose the feature classes that are going to be loaded into the Target Geodatabase. You can choose to load either all or only some of the features from the Source Geodatabase. You can choose to perform all the dataset mappings located in the cross-reference database or only a subset. The list in the Data Loader wizard is dependent on the DatasetMapping table in the cross-reference database, not the actual feature classes contained in the source or target. The last part is actually loading the data. After the data is loaded, a log file of the results is also generated that allows you to see the number of features that have been loaded. Please follow the steps below to migrate the data:
a. Click the ‘Data Loader’ button on the Production Mapping toolbar. The Data Loader dialog box appears.
b. Click the ellipsis (…) next to the Select cross-reference database field. The Select cross-reference database dialog box appears. Navigate to the cross-reference database, select it, and click ‘Open’. The path to the cross-reference database appears in the Select cross-reference database field. Tip:
A message appears asking if you want to upgrade if the database is out of date. Click ‘Yes’.
c. Click the ellipsis (...) next to the Select source workspace field. The Select source workspace dialog box appears. Navigate to the geodatabase or shapefile workspace that contains the data you want to load. Click ‘Open’. The path to the source workspace appears in the Select source workspace field.
d. Click the ellipsis (...) next to the Select target geodatabase field. The Select target workspace dialog box appears. Navigate to the database into which you want to load the data. Click ‘Open’. The path to the target workspace appears in the Select target geodatabase field.

Migration Workflow User Guide v 1.0
34
e. Click the ellipsis (...) next to the Select log file field. The Specify log file dialog box appears. Navigate to the directory in which you want to store the log file. Type a name for the file in the Name text box and click ‘Save’. The path to the log file appears in the Select log file field.
f. Optionally check the Log row level errors check box to include individual features and table rows that have failed to load in the log file. This check box is checked by default. When the Log row level errors check box is unchecked, the log file still shows the source and target tables that are loaded and the number of records.
Figure 24: The first Data Loader Dialog
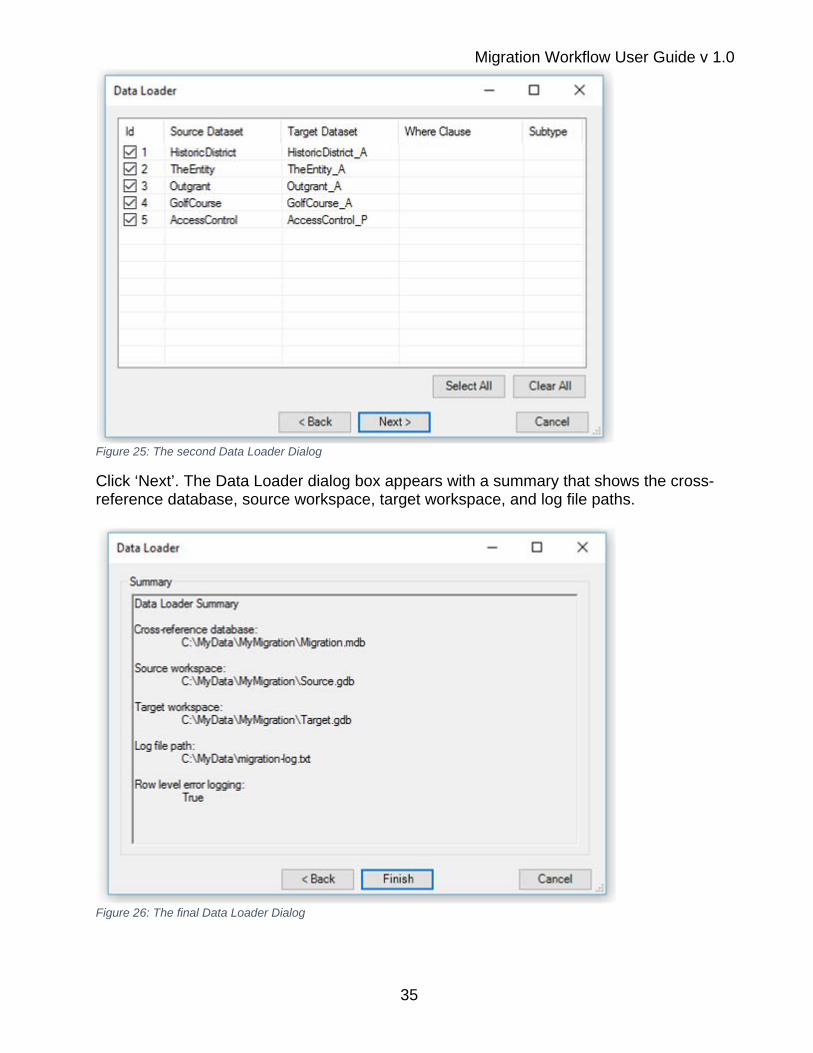
Click ‘Next’. The Data Loader dialog box appears with the names of the source and target feature classes and the where clauses for each subtype.
Note: To sort the feature classes by name, click the ‘Source Dataset’ or ‘Target Dataset’ column headers. This displays them in descending or ascending order based on their names.
g. Check the check boxes next to the feature classes you want to load into the target workspace. You can also click ‘Select All’ or ‘Clear All’ to check or uncheck all the check boxes next to the feature class names.
Migration Workflow User Guide v 1.0
35
Figure 25: The second Data Loader Dialog
Click ‘Next’. The Data Loader dialog box appears with a summary that shows the cross-reference database, source workspace, target workspace, and log file paths.
Figure 26: The final Data Loader Dialog

Migration Workflow User Guide v 1.0
36
h. Click ‘Finish’. The Data Loader window appears with a progress bar that displays the features and subtypes as they are loaded.
i. When the loading process is finished, a message appears to notify you that loading is complete.
j. Click ‘Yes’ to view the log file or ‘No’ to close the message and the Data Loader progress window.
5.11 Wrap-up and Next Steps You have now completed your migration!
If you ran the Pre-Migration Tool, you can now run any needed post-processing steps required. In the future, the team at SDSFIE Online hopes to be preparing post-migration analysis and reporting tools to help evaluate the quality and report the results of the migration.