sparkle & shimmer crochet unicorn ellie & eugene crochet ... · ellie & eugene crochet...
TRANSCRIPT
Ellie & EugeneCrochet Elephants
Stellan & Stanley Crochet Dinosaurs
Sparkle & Shimmer Crochet Unicorn
Dia & Mia Crochet Mermaids

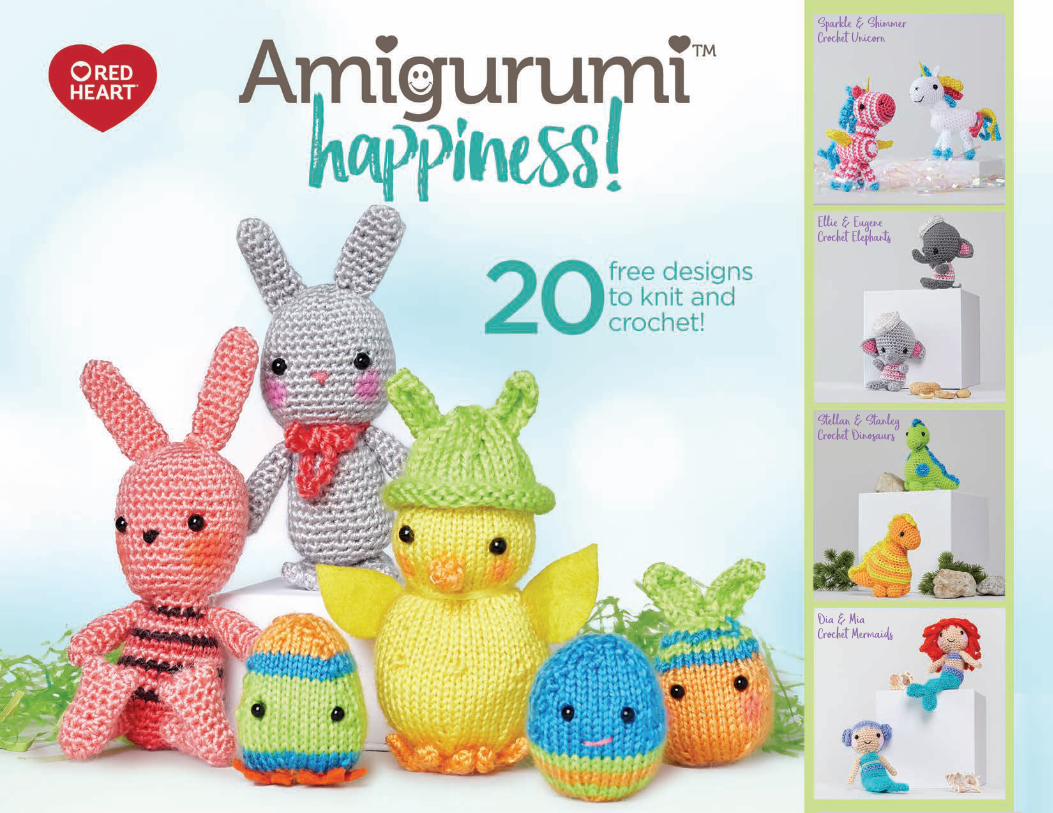
Ellie & Eugene Crochet Elephants 3Emily & Edward Knit Elephants 6Stellan & Stanley Crochet Dinosaur 9Tina & Nina Knit Mermaids 12Dia & Mia Crochet Mermaids 16Ned & Norman Crochet Narwhal 20Sparkle & Shimmer Crochet Unicorn 23Buz & Belinda Knit Bumblebee 27Henry & Honey Crochet Bumblebee 31Prickles & Pear Knit Cactus 33
Agave & Aloe Crochet Cactus 38Tasty Crochet Hamburgers 41
Yummy Knit Hamburgers 43Benedict & Bertie Crochet Bird 45George & Hubert Knit Bird 47Fiona & Fred Crochet Flamingo 49Sweet Crochet Sugar Skulls 52 Beatrice & Basil Crochet Bunnies 54Chrissy Knit Chick & the Egg-stras 58
Here is our cast of characters!

Find more ideas & inspiration: redheart.com©2018 Coats & Clark Page 1 of 3
Ellie & Eugene Crochet Elephants
RED HEART® Amigurumi: 1 ball 9745 Elephant
Susan Bates® Crochet Hook: 2.25 mm [US B-1]
Stitch markers, stuffing, two 6mm safety eyes, yarn needle, sewing needle and white sewing thread for sewing hat to head.
Optional: Knee high stocking and plastic pellets for weighted stuffing, chenille stem for trunk armature.
GAUGE: 24 sts = about 4" [10 cm]; 28 rounds = about 4" [10 cm] in single crochet (sc). EXACT GAUGE IS NOT CRITICAL TO THIS PROJECT. Use any size hook to obtain the gauge.
RED HEART® Amigurumi, Art E885 available in
3.5 oz (100 g) 239 yds (219m) cakes
LM6276
crochetDesigned by Nancy Anderson
What you will need:
BUY YARN
continued...Ellie and Eugene can’t wait to make new friends! They love meeting new
people and sharing snacks (they really enjoy peanuts, of course!)
Elephant measures about 4" [10 cm] tall, measured in seated position.
Notes1. Before beginning, separate the
different color sections of the yarn as follows: Pop the center color out by pushing gently on the center of the ball so that it comes out intact. Find the point where the color changes and cut the yarn. Repeat this process for the remaining yarn colors by carefully pushing the rings of color out of the larger ring and cutting. Wind each color into a ball to prevent tangling. You may find that one color appears both in the center, and on the outside of the ball, wind together or separately. In the pattern instructions, the light grey or dark grey color is referred to as A, the white as B, and the pink as C.
2. Elephant is made from 10 pieces: Head, body, 2 ears (2 parts each), 2 arms, 2 legs, a tail, and a hat. Unless otherwise indicated, each piece is worked in continuous rnds (spiral) with right side always facing.
3. Pieces are sewn together using yarn scraps, yarn tails or sewing thread.
4. Take care to attach safety eyes before head opening becomes too small. Do not use safety eyes if toy is intended for a child 2 years of age or younger.
5. Yarn color is changed when working Elephant's shirt. To change yarn color, work last stitch of old color to last yarn over. Yarn over with new color and draw through all loops on hook to complete stitch. Carry color not in use along the inside of the piece until next needed.
Special Stitchesjoin with sc = Place a slip knot on hook, insert hook in indicated stitch, yarn over and draw up a loop, yarn over and draw through both loops on hook.sc2tog (single crochet 2 stitches together) = [Insert hook in next stitch, yarn over and pull up a loop] twice, yarn over and draw through all 3 loops on hook.
Special TechniqueAdjustable ring = Wrap yarn into a ring, ensuring that the tail falls behind the working yarn. Grip ring and tail between middle finger and thumb. Insert hook through center of ring, yarn over (with working yarn) and draw up a loop. Work stitches of first round in the ring. After the first round of stitches is worked, pull gently on tail to tighten ring.
HEADBeginning from top of head with A, make an adjustable ring.Round 1 (right side): Work 6 sc in ring; do not join, work in continuous rounds (spiral)—6 sc.Place a marker in the last sc worked to indicate end of round. Move marker up as each round is completed.Round 2: 2 sc in each of next 6 sts—12 sc.Round 3: [Sc in next st, 2 sc in next st] 6 times—18 sc.Round 4: [Sc in next 2 sts, 2 sc in next st] 6 times—24 sc.Round 5: [Sc in next 3 sts, 2 sc in next st] 6 times—30 sc.
Ellie & Eugene Crochet ElephantsPage 3

Find more ideas & inspiration: redheart.com©2018 Coats & Clark Page 2 of 3
continued...
Round 6: [Sc in next 4 sts, 2 sc in next st] 6 times—36 sc.Round 7: [Sc in next 5 sts, 2 sc in next st] 6 times—42 sc.Rounds 8–10: Sc in each st around.Round 11: [Sc in next 5 sts, sc2tog] 6 times—36 sc.Rounds 12–14: Sc in each st around.Round 15: [Sc in next 4 sts, sc2tog] 6 times—30 sc. Begin stuffing head and continue as work progresses.Make Opening for TrunkRound 16: Ch 3, skip next 3 sts (for trunk opening), sc in next 2 sts, [sc2tog, sc in next 2 sts] 6 times, sc in last st—21 sc and 1 ch-3 space (trunk opening).Eyes: Using photograph as a guide, attach safety eyes between Rounds 14 and 15, about 3 or 4 stitches from edges of trunk opening and about 6–8 stitches apart. Take care that the washer on the back of each safety eye does not overlap into the trunk opening, so that they do not interfere with trunk stitches to be worked later.Round 17: Working in each ch of the ch-3 and each sc around, [sc in next 2 sts, sc2tog] 6 times—18 sc.Note: Now you will pause working the head so that the trunk can be made while it is easier to access the trunk from the inside of head, rather than having to stuff the trunk through the tiny opening at the tip of the trunk. The head will be completed after the trunk is made.Remove loop from hook and place it on a stitch marker or elongate it, so that it does not unravel. Cut yarn, leaving about 1yd/1m tail for completing head.TrunkRound 1 (right side): With right side facing, join A with sc in first skipped sc of trunk opening, sc in next 2 sc, sc in
side of trunk opening, sc in base of each of next 3 ch of trunk opening, sc in side of trunk opening; do not join, work in continuous rounds (spiral)—8 sc.Place a marker in the last sc worked to indicate end of round. Move marker up as each round is completed.Rounds 2–7: Sc in each st around.Round 8: [Sc2tog, sc in next 2 sts] twice—6 sc.Fasten off, leaving a long tail. Weave tail through stitches of last round and pull to close opening. Secure tail and weave to inside of trunk.Complete HeadReturn dropped loop to hook and pull until loop sits snuggly on hook.Round 18: Sc in each st around.Working from inside of head, complete stuffing head and stuff trunk inserting chenille stem for armature (if desired). Round 19: [Sc2tog] 9 times—9 sc.Fasten off. Weave in ends.
BODYBeginning at bottom of body with A, make an adjustable ring.Round 1 (right side): Work 7 sc in ring; do not join, work in continuous rounds (spiral)—7 sc.Place a marker in the last sc worked to indicate end of round. Move marker up as each round is completed.Round 2: 2 sc in each of next 7 sts—14 sc.Round 3: [Sc in next st, 2 sc in next st] 7 times—21 sc.Round 4: [Sc in next 2 sts, 2 sc in next st] 7 times—28 sc.Round 5: Sc in each st around and change to B in last st.Begin Striped Shirt
Round 6: With B, [sc2tog, sc in next 2 sts] 7 times and change to C in last st—21 sc. Do not cut B. Carry B inside piece.Round 7: With C, sc in each st around and change to B in last st. Do not cut C. Carry C inside piece.Round 8: With B, sc in each st around and change to C in last st. Do not cut B. Carry B inside piece.Round 9: With C, [sc2tog, sc in next 5 sts] 3 times and change to B in last st—18 sts. Do not cut C. Carry C inside piece.Round 10: Repeat Round 8. Round 11: Repeat Round 7. Cut C.Stuff body with stuffing or with optional knee high filled with plastic pellets.Round 12 (neck): With B, [sc in next st, sc2tog] 6 times—12 sts.Fasten off, leaving a long tail for sewing head to body.
EARS (make 2)Inner Ears (make 2)With C, ch 7.Row 1: Working in back bumps only, sc in 2nd ch from hook and remaining each ch across—6 sc.Row 2: Ch 1, turn, skip first st, sc in next 5 sts—5 sc.Row 3: Ch 1, turn, sc in first 3 sts, sc2tog—4 sc.Row 4: Ch 1, turn, sc2tog, skip next st, sc in last st—2 sc.Fasten off. Weave in and trim ends.Outer Ears (make 2)With A, make same as inner ear through Row 4—2 sc.Do not fasten off.Joining Round: Place an inner ear on top of the outer ear with stitches matching; working through both thicknesses, work sc evenly spaced all the way around the outer edge of ear
working 2 sc in each corner; join with slip st in first sc.Fasten off leaving a long tail for sewing ear to head.
ARMS (make 2)With A, leaving a long beginning tail, make an adjustable ring.Round 1 (right side): Work 5 sc in ring; do not join, work in continuous rounds (spiral)—5 sc.Place a marker in the last sc worked to indicate end of round. Move marker up as each round is completed.Rounds 2–5: Sc in each st around.Stuff arm lightly. Fasten off leaving a long tail. Weave tail through stitches of last round and pull to close opening. Weave in and trim ending tail. Do not cut beginning tail. It can be used later for sewing leg to body.
LEGS (make 2)With A, leaving a long beginning tail, make an adjustable ring.Round 1 (right side): Work 5 sc in ring; do not join, work in continuous rounds (spiral)—5 sc.Place a marker in the last sc worked to indicate end of round. Move marker up as each round is completed.Round 2: [Sc in next st, 2 sc in next st] twice, sc in last st—7 sc.Round 3: 2 sc in next st, sc in next 6 sts—8 sc.Rounds 4–6: Sc in each st around.Stuff leg lightly. Fasten off leaving a long tail. Weave tail through stitches of last round and pull to close opening. Weave in and trim ending tail. Do not cut beginning tail. It can be used later for sewing leg to body.
LM6276 Ellie & Eugene Crochet Elephants
Ellie & Eugene Crochet ElephantsPage 4
Find more ideas & inspiration: redheart.com©2018 Coats & Clark Page 3 of 3
TAILWith A, ch 4. Fasten off leaving a long tail for sewing tail to body. Trim beginning yarn tail to about ¼" [6mm] and fray yarn to form a tiny tassel.
HATWith B, make an adjustable ring.Crown (Top of Hat)Round 1 (right side): Work 6 sc in ring; do not join, work in continuous rounds (spiral)—6 sc.Place a marker in the last sc worked to indicate end of round. Move marker up as each round is completed.Round 2: 2 sc in each of next 6 sts—12 sc.Round 3: [Sc in next st, 2 sc in next st] 6 times—18 sc.Round 4: [Sc in next 2 sts, 2 sc in next st] 6 times—24 sc.Round 5: [Sc in next 3 sts, 2 sc in next st] 6 times—30 sc.Round 6 and 7: Sc in each st around.BrimRound 8 (wrong side): Ch 1, TURN, working in back loops only, sc in each st around; join with slip st in first sc of this round—30 sc.Round 9: Ch 1, hdc in same st as joining slip st and in next 3 sts, 2 hdc in next st, [hdc in next 4 sts, 2 hdc in next st] 5 times; join with slip st in first hdc—36 hdc.Round 10: Ch 1, slip st in each st around; join with slip st in first st.Fasten off. Weave in and trim ends.
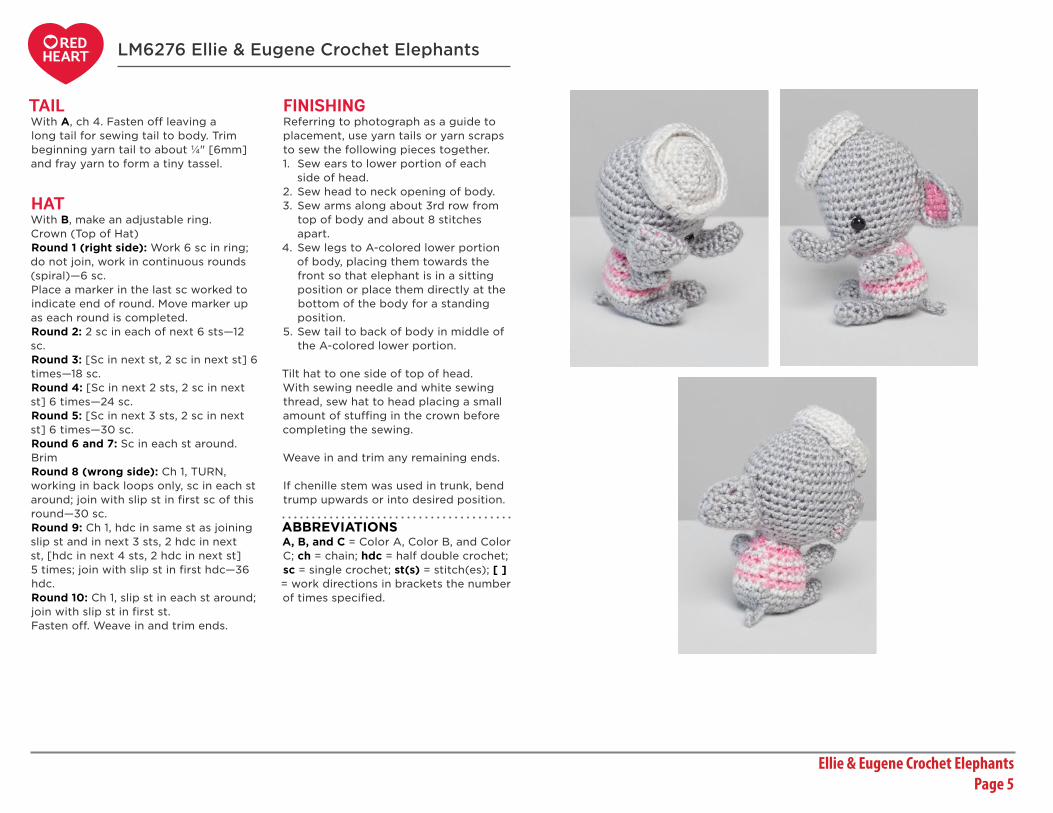
FINISHINGReferring to photograph as a guide to placement, use yarn tails or yarn scraps to sew the following pieces together.1. Sew ears to lower portion of each
side of head. 2. Sew head to neck opening of body. 3. Sew arms along about 3rd row from
top of body and about 8 stitches apart.
4. Sew legs to A-colored lower portion of body, placing them towards the front so that elephant is in a sitting position or place them directly at the bottom of the body for a standing position.
5. Sew tail to back of body in middle of the A-colored lower portion.
Tilt hat to one side of top of head. With sewing needle and white sewing thread, sew hat to head placing a small amount of stuffing in the crown before completing the sewing.
Weave in and trim any remaining ends.
If chenille stem was used in trunk, bend trump upwards or into desired position.
ABBREVIATIONS A, B, and C = Color A, Color B, and Color C; ch = chain; hdc = half double crochet; sc = single crochet; st(s) = stitch(es); [ ] = work directions in brackets the number of times specified.
LM6276 Ellie & Eugene Crochet Elephants
Ellie & Eugene Crochet ElephantsPage 5

Find more ideas & inspiration: redheart.com©2018 Coats & Clark Page 1 of 3
Emily & Edward Knit Elephants
RED HEART® Amigurumi: 1 ball 9745 Elephant
Susan Bates® Knitting Needles: 2.25 mm [US 1] double pointed needles (set of 5).
Stitch markers, stitch holders, stuffing, two 6mm safety eyes, yarn needle, sewing needle and white sewing thread for sewing hat to head.
Optional: Knee high stocking and plastic pellets for weighted stuffing, chenille stem for trunk armature.
GAUGE: 28 sts = about 4" [10 cm]; 40 rounds = about 4" [10 cm] in Stockinette stitch worked in rounds (knit every round). EXACT GAUGE IS NOT CRITICAL TO THIS PROJECT. Use any size needles to obtain the gauge.
RED HEART® Amigurumi, Art E885 available
in 3.5 oz (100 g) 239 yds (219m) cakes
LM6277
knittingDesigned by Nancy Anderson
What you will need:
BUY YARN
continued...Emily and Edward are best friends and love
traveling together. They're always on the lookout for new and exiting things to try.
Elephant measures about 4" [10 cm] tall, measured in seated position.
Special Stitcheskfb (Knit into front and back) = Knit next stitch but do not remove from needle, knit into back loop of same stitch and remove from needle – 1 st increased.ssk (slip, slip, knit) = Slip next 2 stitches, one at a time, as if to knit to right needle, insert point of left needle through front of stitches, knit these sts together through back loop – 1 st decreased.
Notes1. Before beginning, separate the
different color sections of the yarn as follows: Pop the center color out by pushing gently on the center of the ball so that it comes out intact. Find the point where the color changes and cut the yarn. Repeat this process for the remaining yarn colors by carefully pushing the rings of color out of the larger ring and cutting. Wind each color into a separate ball to prevent tangling. You may find that one color appears both in the center, and on the outside of the ball, wind together or separately. In the pattern instructions, the light grey or dark grey color is referred to as A, the white as B, and the pink as C.
2. Elephant is made from 10 pieces: Head, body, 2 ears (2 parts each), 2 arms, 2 legs, a tail, and a hat (2 parts).
3. Yarn color is changed when working Elephant's shirt. Carry color not in use along the inside of the piece until next needed.
4. Most of the pieces are worked in rounds. Ears, arms, tail, and hat brim are worked back and forth in rows using only two of the double pointed needles.
5. Pieces are sewn together using yarn scraps, yarn tails or sewing thread.
6. Take care to attach safety eyes before head opening becomes too small. Do not use safety eyes if toy is intended for a child 2 years of age or younger.
HEADBeginning from top of head with A, cast on 6 sts. Distribute stitches evenly over 3 double pointed needles (2 stitches on each needle). Place marker for beginning of round. Prepare to work in rounds.Round 1 (right side): [Kfb] 6 times—12 sts.Round 2: Knit.Round 3: [K1, kfb] 6 times—18 sts.Round 4: Knit.Round 5: [K2, kfb] 6 times—24 sts.Round 6: Knit.Round 7: [K3, kfb] 6 times—30 sts.Round 8: Knit.Round 9: [K4, kfb] 6 times—36 sts.When desired, add another double pointed needle and distribute stitches evenly over 4 needles.Round 10: Knit.Round 11: [K5, kfb] 6 times—42 sts.Round 12: Knit.Round 13: [K6, kfb] 6 times—48 sts.Rounds 14–19: Knit.Round 20: [K6, k2tog] 6 times—42 sts.Rounds 21–24: Knit.Round 25: [K5, k2tog] 6 times—36 sts.Round 26: Knit.Round 27: [K4, k2tog] 6 times—30 sts.Begin stuffing head and continue as work progresses.
Emily & Edward Knit ElephantsPage 6

Find more ideas & inspiration: redheart.com©2018 Coats & Clark Page 2 of 3
continued...
Make Opening for TrunkNotes: A trunk opening is created by working 5 sts onto scrap yarn, then knitting them again with the working yarn. Later the scrap yarn is removed to form the trunk opening and the released stitches are placed on needles to begin the trunk. This technique is often used in sock knitting and is known as the
"afterthought heel" technique.Drop but do not cut the working yarn.Cut a length of scrap yarn of same weight but different color as working yarn.Round 28: With the scrap yarn, k5; slip the 5 sts just made back onto left needle, with working yarn, knit the same 5 sts then knit the remaining sts around.Round 29: Knit.Round 30: [K3, k2tog] 6 times—24 sts.Round 31: [K2, k2tog] 6 times—18 sts.Round 32: [K1, k2tog] 6 times—12 sts.Note: Now you will pause working the head so that the trunk can be made while it is easier to access the trunk from the inside of head, rather than having to stuff the trunk through the tiny opening at the tip of the trunk. The head will be completed after the trunk is made.Place remaining 12 stitches onto stitch holders or a length of scrap yarn. Cut working yarn, leaving about 1yd/1m tail for completing head.
TrunkWith right side facing, carefully remove the scrap yarn for trunk opening and place the 10 released sts on needles, distributing them evenly. Round 1 (right side): Join A to first st along bottom row of trunk opening, k5, pick up 1 st in corner of opening, k5, pick up 1 st in corner of opening—12 sts.
Place marker for beginning of round and prepare to work in rounds.Rounds 2–6: Knit.Round 7: [K4, k2tog] twice—10 sts.Rounds 8–13: Knit.Round 14: [K3, k2tog] twice—8 sts.Round 15: Knit.Cut yarn, leaving a long tail. Weave tail through stitches of last round and pull to close opening. Secure tail and weave to inside of trunk.Eyes: Using photograph as a guide, attach safety eyes about 2 rounds above trunk and about 8 stitches apart. Working from inside of head, complete stuffing head and stuff trunk inserting chenille stem for armature (if desired).
Complete HeadReturn 12 head sts to needles, distributing them evenly. Place marker for beginning of round and prepare to work in rounds.Round 33: [K2tog, k1] 4 times—8 sts.Finish stuffing head. Cut yarn, leaving a long tail. Thread tail through stitches of last round and pull to close opening. Secure tail and weave to inside of head.
BODYBeginning at bottom of body with A, cast on 9 sts.Distribute stitches evenly over 3 double pointed needles (3 stitches on each needle). Place marker for beginning of round. Prepare to work in rounds.Round 1 (right side): [Kfb] 9 times—18 sts.Round 2: [K1, kfb] 9 times—27 sts.Round 3: Knit.Round 4: [K2, kfb] 9 times—36 sts.Rounds 5-7: Knit.Cut A.
Begin Striped ShirtJoin C. Round 8: With C, knit.Join B. Do not cut C. Carry color not in use up inside of piece.Round 9: With B, [k2, k2tog] 9 times—27 sts.Drop, but do not cut, B. Continue to drop old color and pick up next color at the beginning of each round. Do not cut colors until instructed.Round 10: With C, knit.Round 11: With B, knit.Round 12: With C, [k7, k2tog] 3 times—24 sts.Round 13: With B, knit.Rounds 14–17: Repeat Rounds 10 and 11 twice.Round 18: With C, [k2, k2tog] 6 times—18 sts.Stuff body with stuffing or with optional knee high filled with plastic pellets.Round 19: With B, knit.Round 20: With C, knit. Cut C.Round 21: With B, bind off sts while making decreases as follows, [k7, k2tog] twice.Cut B, leaving a long tail for sewing head to body.
EARS (make 2)Inner Ears (make 2)Working back and forth in rows on 2 double pointed needles with C, cast on 8 sts.Rows 1–7: Knit—8 sts.Row 8: Ssk, k4, k2tog—6 sts.Row 9: Ssk, k2, k2tog—4 sts.Bind off. Weave in and trim ends.Outer Ears (make 2)With A, make same as inner ear through Row 9—4 sts.
Bind off leaving a long tail for sewing inner and outer ears together.Place one inner ear on top of one outer ear with stitches matching. Thread long yarn tail onto yarn needle and sew pieces together all around the outer edge. Do not trim tail, leave tail for sewing ear to head.
ARMS (make 2)Working back and forth in rows on 2 double pointed needles with A, cast on 7 sts.Rows 1–9: Beginning with a wrong side (purl) row, work in Stockinette stitch (knit on right side, purl on wrong side) for 9 rows.Row 10 (right side): [K1, k2tog] twice, k1—5 sts.Cut yarn, leaving a long tail. Thread tail through stitches of last row and pull to close opening then whip stitch side edges together. Secure tail but do not trim or weave in remainder of tail, it can be used later for sewing arm to body.
LEGS (make 2)With A, leaving a long beginning tail, cast on 6 sts.Distribute stitches evenly over 3 double pointed needles (2 stitches on each needle). Place marker for beginning of round. Prepare to work in rounds.Round 1 (right side): [Kfb] twice, k2, [kfb] twice—10 sts.Stuff lightly as following rounds are completed.Rounds 2–11: Knit.
LM6277 Emily & Edward Knit Elephants
Emily & Edward Knit ElephantsPage 7

Find more ideas & inspiration: redheart.com©2018 Coats & Clark Page 3 of 3
Round 12: [K1, k2tog] 3 times, k1—7 sts.Cut yarn, leaving a long tail. Thread tail through stitches of last round and pull to close opening. Secure and weave in ending tail. Do not weave in or trim beginning tail, it can be used later for sewing leg to body.
TAILWith 2 double pointed needles and A, cast on 5 sts.Bind off all sts.Cut yarn, leaving a long tail for sewing tail to body. Trim beginning yarn tail to about ¼" [6mm] and fray yarn to form a tiny tassel.
HATBrimWorking back and forth in rows on 2 double pointed needles with B, cast on 36 sts.Row 1: Knit.Row 2: [K5, kfb] 6 times—42 sts.Rows 3 and 4: Knit.Bind off, leaving a long tail. With yarn tail, sew side edges of brim together to form a ring. Weave in and trim tail.Crown (Top of Hat)With B, leaving a long beginning tail, cast on 36 sts.Distribute stitches evenly over 3 double pointed needles (12 stitches on each needle). Place marker for beginning of round. Prepare to work in rounds.Rounds 1–4: Knit—36 sts.Round 5: [K4, k2tog] 6 times—30 sts.Round 6: Knit.Round 7: [K3, k2tog] 6 times—24 sts.Round 8: [K2, k2tog] 6 times—18 sts.Round 9: [K1, k2tog] 6 times—12 sts.Round 10: [K1, k2tog] 4 times—8 sts.
Cut yarn, leaving a long tail. Thread tail through stitches of last round and pull to close opening. Hold brim and crown together, with right side of crown facing outwards and brim encircling crown. With beginning tail, whipstitch brim to crown. Weave in and trim tail.
FINISHINGReferring to photograph as a guide to placement, use yarn tails or yarn scraps to sew the following pieces together.1. Sew ears to lower portion of each
side of head. 2. Sew head to neck opening of body. 3. Sew arms to upper sides of body
about 2 rounds below top of body.4. Sew legs to A-colored lower portion
of body, placing them towards the front, about 3 or 4 stitches apart, so that elephant is in a sitting position.
5. Sew tail to back of body in middle of the A-colored lower portion.
Tilt hat to one side of top of head. With sewing needle and white sewing thread, sew hat to head placing a small amount of stuffing in the crown before completing the sewing.
Weave in and trim any remaining ends.
If chenille stem was used in trunk, bend trump upwards or into desired position.
ABBREVIATIONS A, B, and C = Color A, Color B, and Color C; k = knit; k2tog = knit next 2 sts together; st(s) = stitch(es); [ ] = work directions in brackets the number of times specified.
LM6277 Emily & Edward Knit Elephants
Emily & Edward Knit ElephantsPage 8

Find more ideas & inspiration: redheart.com©2018 Coats & Clark Page 1 of 4
Stellan & Stanley Crochet Dinosaur
RED HEART® Amigurumi: 1 ball 9682 Dinosaur
Susan Bates® Crochet Hook: 2.25 mm [US B-1]
Stitch marker, stuffing, two 6 mm safety eyes, yarn needle, black embroidery floss and embroidery needle (for mouth embroidery).
Optional: Pins, knee high stocking and plastic pellets for weighted stuffing.
GAUGE: 32 sts = about 4" [10 cm]; 28 rounds = about 4" [10 cm] in single crochet (sc). EXACT GAUGE IS NOT CRITICAL TO THIS PROJECT. Use any size hook to obtain the gauge.
RED HEART® Amigurumi, Art E885 available
in 3.5 oz (100 g) 239 yds (219m) cakes
LM6283
crochetDesigned by Nancy Anderson
What you will need:
continued...
These two friends have known each other since the Jurassic era and still make time to hang out! They love catching up over a delicious salad
(they are vegetarians, after all).
Dinosaur measures about 4¼" [11 cm] tall and 4" [10 cm] wide (at widest).
Notes1. Before beginning, separate the
different color sections of the yarn as follows: Pop the center color out by pushing gently on the center of the ball so that it comes out intact. Find the point where the color changes and cut the yarn. Repeat this process for the remaining yarn colors by carefully pushing the rings of color out of the larger ring and cutting. Wind each color into a separate ball to prevent tangling. You may find that one color appears both in the center, and on the outside of the ball, wind together or separately. In the pattern instructions, the lime color is referred to as A, the orange as B, the yellow as C, and the blue as D.
2. Dinosaur is made from 8 pieces: Body, tail, head, 4 legs, and spikes. In addition, spots are worked separately for the spotted dinosaur.
3. Dinosaur is designed in two versions: spotted and striped. The stripe pattern of the striped dinosaur is worked in joined rounds. All other pieces and sections are worked in continuous rnds (spiral) with right side always facing.
4. Pieces are sewn together using yarn tails or yarn scraps.
5. For stripe pattern, yarn color is changed when working the slip stitch at the end of a round as follows: Insert hook in indicated sc, drop but do not cut the old color, yarn over with new color and draw through the stitch and the loop on hook (slip stitch completed and yarn color changed). Carry color not in use along the inside of the piece until next needed.
6. Do not use safety eyes if toy is intended for a child 2 years of age or younger.
Special Stitchsc2tog (single crochet 2 stitches together) = [Insert hook in next stitch, yarn over and pull up a loop] twice, yarn over and draw through all 3 loops on hook.
Special TechniqueAdjustable ring = Wrap yarn into a ring, ensuring that the tail falls behind the working yarn. Grip ring and tail between middle finger and thumb. Insert hook through center of ring, yarn over (with working yarn) and draw up a loop. Work stitches of first round in the ring. After the first round of stitches is worked, pull gently on tail to tighten ring.
SPOTTED DINOSAUR BODYBeginning at bottom of body with A, make an adjustable ring.Round 1 (right side): Work 6 sc in ring; do not join, work in continuous rounds (spiral)—6 sc.Place a marker in the last sc worked to indicate end of round. Move marker up as each round is completed.Round 2: Work 2 sc in each of next 6 sts—12 sc.Round 3: [Sc in next st, 2 sc in next st] 6 times—18 sc.Round 4: [Sc in next 2 sts, 2 sc in next st] 6 times—24 sc.Round 5: [Sc in next 3 sts, 2 sc in next st] 6 times—30 sc.Round 6: [Sc in next 4 sts, 2 sc in next st] 6 times—36 sc.Make Opening for Tail
BUY YARN
Stellan & Stanley Crochet DinosaurPage 9

Find more ideas & inspiration: redheart.com©2018 Coats & Clark Page 2 of 4
continued...
Round 7: 2 sc in next st, ch 8, skip next 8 sts, [2 sc in next st, sc in next 4 sts] twice, 2 sc in next st, sc in next 6 sts, [2 sc in next st, sc in next 4 sts] twice—34 sts and 1 ch-8 space.Round 8: Sc in each st and ch around—42 sc.Rounds 9–11: Sc in each st around.Round 12: [Sc in next 5 sts, sc2tog] 6 times—36 sc.Round 13: Sc in each st around.Round 14: [Sc in next 4 sts, sc2tog] 6 times—30 sc. Round 15: Sc in each st around.Begin stuffing piece with fiberfill or place optional knee high, filled with plastic pellets, into piece. Continue stuffing piece as work progresses.Round 16: [Sc in next 3 sts, sc2tog] 6 times—24 sc. Round 17: Sc in each st around.Round 18: [Sc in next 2 sts, sc2tog] 6 times—18 sc. Round 19: Sc in each st around.Round 20: [Sc in next 7 sts, sc2tog] twice—16 sc. Round 21: [Sc in next 6 sts, sc2tog] twice—14 sc.Rounds 22 and 23: Sc in each st around.Finish stuffing piece.Fasten off, leaving a long tail for sewing head to neck. If needed, thread beginning yarn tail through stitches at bottom of piece and pull to close opening. Secure and weave in beginning tail only.
STRIPED DINOSAUR BODYBeginning at bottom of body with B, make an adjustable ring.Rounds 1–8: Work same as Rounds 1–8 of spotted dinosaur body—42 sc.Begin Striped SectionRemove end of round marker.Reposition End of Round: Sc in next 4 sts. slip stitch in next sc and change yarn color to C (as you work the slip stitch). Note: The yarn color changes are made at the end of rounds. Repositioning the end of round to the center of the back/tail will allow the color changes to be hidden beneath the back spikes that are added later.Round 9: With C, ch 1, sc in same st as slip st and in each st around; join with slip st in first sc—42 sc.Note: Work first sc of all following stripe rounds in same stitch as joining slip stitch.Round 10: With C, ch 1, sc in each st around; join with slip st in first sc and change to B.Round 11: With B, ch 1, sc in each st around; join with slip st in first sc.Round 12: With B, ch 1, [sc in next 5 sts, sc2tog] 6 times; join with slip st in first sc and change to C—36 sc.Round 13: With C, ch 1, sc in each st around; join with slip st in first sc.Round 14: With C, [sc in next 4 sts, sc2tog] 6 times; join with slip st in first sc and change to B—30 sc. Round 15: With B, ch 1, sc in each st around; join with slip st in first sc.Begin stuffing piece with fiberfill or place optional knee high, filled with plastic pellets, into piece. Continue stuffing piece as work progresses.Round 16: With B, [sc in next 3 sts, sc2tog] 6 times; join with slip st in first sc and change to C—24 sc.
Round 17: With C, ch 1, sc in each st around; join with slip st in first sc.Round 18: With C, [sc in next 2 sts, sc2tog] 6 times; join with slip st in first sc and change to B—18 sc. Cut C. Work remaining rounds with B only.Round 19: Sc in each st around; do not join, work in continuous rounds (spiral).Place a marker in the last sc worked to indicate end of round. Move marker up as each round is completed.Round 20: [Sc in next 7 sts, sc2tog] twice—16 sc. Round 21: [Sc in next 6 sts, sc2tog] twice—14 sc.Rounds 22 and 23: Sc in each st around.Finish stuffing piece.Fasten off, leaving a long tail for sewing head to neck. If needed, thread beginning yarn tail through stitches at bottom of piece and pull to close opening. Secure and weave in beginning tail only.
TAILNote: If making spotted dinosaur, use yarn color A. If making striped dinosaur, use yarn color B.
Join yarn with slip stitch in any st of the tail opening. In the next round, stitches are worked into each stitch (including the chains of the ch-8) around the tail opening.Round 1: Ch 1, sc in same st as joining and in next 15 sts—16 sc.Place a marker in the last sc worked to indicate end of round. Move marker up as each round is completed.Rounds 2 and 3: Sc in each st aroundRound 4: [Sc in next 6 sts, sc2tog]
twice—14 sc.Round 5: [Sc in next 5 sts, sc2tog] twice—12 sc.Round 6: [Sc in next 4 sts, sc2tog] twice—10 sc.Round 7: [Sc in next 3 sts, sc2tog] twice—8 sc.Round 8: [Sc in next 2 sts, sc2tog] twice—6 sc.Fasten off leaving a long tail. Thread tail through stitches of last round and pull to close opening. Weave in and trim ends.
HEADNote: If making spotted dinosaur, use yarn color A. If making striped dinosaur, use yarn color B.
Make an adjustable ring.Round 1 (right side): Work 6 sc in ring; do not join, work in continuous rounds (spiral)—6 sc.Place a marker in the last sc worked to indicate end of round. Move marker up as each round is completed.Round 2: Work 2 sc in each of next 6 sts—12 sc.Round 3: [Sc in next st, 2 sc in next st] 6 times—18 sc.Rounds 4–7: Sc in each st around.Round 8: [Sc in next 2 sts, 2 sc in next st] 6 times—24 sc.Round 9: [Sc in next 3 sts, 2 sc in next st] 6 times—30 sc.Rounds 10 and 11: Sc in each st around.Round 12: [Sc in next 3 sts, sc2tog] 6 times—24 sc.
LM6283 Stellan & Stanley Crochet Dinosaur
Stellan & Stanley Crochet DinosaurPage 10

Find more ideas & inspiration: redheart.com©2018 Coats & Clark Page 3 of 4
Attach safety eyes between Rounds 7 and 8, about 7 stitches apart.Round 13: [Sc in next 2 sts, sc2tog] 6 times—18 sc.Round 14: [Sc in next st, sc2tog] 6 times—12 sc.Round 15: [Sc in next st, sc2tog] 4 times—8 sc.Fasten off leaving a long tail. Thread ending tail through stitches of last round and pull to close opening. If needed, thread beginning yarn tail through stitches at beginning of piece and pull to close opening. Weave in and trim tails.
LEGS (make 4 for each dinosaur)Note: If making spotted dinosaur, use yarn color A. If making striped dinosaur, use yarn color B.
Make an adjustable ring.Round 1 (right side): Work 6 sc in ring; do not join, work in continuous rounds (spiral)—6 sc.Place a marker in the last sc worked to indicate end of round. Move marker up as each round is completed.Round 2: Work 2 sc in each of next 6 sts—12 sc.Rounds 3 and 4: Sc in each st around.Stuff leg. Fasten off leaving a long tail for sewing leg to body. If needed, thread beginning yarn tail through stitches at beginning of piece and pull to close opening. Weave in and trim beginning tail only.
SPOTS (make 3 for spotted dinosaur)With D, make an adjustable ring.Round 1: Work 12 sc in ring; join with slip st in first sc.Fasten off leaving a long tail for sewing spot to body. If needed, thread beginning yarn tail through stitches at beginning of piece and pull to close opening. Weave in and trim beginning tail only.
SPIKESNote: If making spotted dinosaur, use yarn color D. If making striped dinosaur, use yarn color C.
Leaving a long beginning tail for sewing spikes to body, ch 36.Row 1: Working in back bumps only, slip st in 2nd ch from hook and in each ch across—35 slip sts.Row 2: Ch 1, turn, skip first st, (3 hdc, slip st) in next st, slip st in next st, [skip next st, (slip st, 3 hdc, slip st) in next st, slip st in next st] 10 times, skip next st, slip st in last st.Fasten off leaving a long tail for sewing spikes to body.
FINISHINGReferring to photograph as a guide to placement, use yarn tails or yarn scraps to sew the following pieces together.1. Sew head to body, positioning face
slightly to the side. 2. Sew legs to bottom-most portion
of body. Position the back two legs directly in front of the tail and the front legs directly in front of the back legs. Note: To get proper balance and make the dinosaur sit upright, it may be helpful to pin legs before sewing in place.
3. Sew spikes along back of body, beginning at top of head. Place the first spike about level with the middle of the eyes and follow the contour of the back of head, neck, back, and tail. End by sewing last slip st of spikes about even with tip of tail. Note: It may be helpful to pin spikes to body before sewing in place.
4. Sew spots to spotted dinosaur body. Position spots randomly.
With embroidery needle and 2 strands of black embroidery floss, embroider a running stitch smile on face of dinosaur, about 3 rows below last round of muzzle end of head. Weave the floss back through head and knot securely then bury yarn in head, trimming excess as needed.
Weave in and trim any remaining ends.
ABBREVIATIONS A, B, C, and D = Color A, Color B, Color C, and Color D; ch = chain; hdc = half double crochet; sc = single crochet; st(s) = stitch(es); () = work directions in parentheses into same st; [ ] = work directions in brackets the number of times specified.
LM6283 Stellan & Stanley Crochet Dinosaur
See next page for alternate photos
Find more ideas & inspiration: redheart.com©2018 Coats & Clark Page 4 of 4
LM6283 Stellan & Stanley Crochet Dinosaur
Front Back
Feet
Find more ideas & inspiration: redheart.com©2018 Coats & Clark Page 4 of 4
LM6283 Stellan & Stanley Crochet Dinosaur
Front Back
Feet
Find more ideas & inspiration: redheart.com©2018 Coats & Clark Page 4 of 4
LM6283 Stellan & Stanley Crochet Dinosaur
Front Back
Feet
Stellan & Stanley Crochet DinosaursPage 11

Find more ideas & inspiration: redheart.com©2018 Coats & Clark Page 1 of 4
Tina & Nina Mermaid
RED HEART® Amigurumi: 1 ball 9695 Mermaid
Susan Bates® Knitting Needles: 2.75 mm [US 2] double pointed needles (set of 5).
Susan Bates® Crochet Hook: Small hook for attaching hair to mermaid
Stitch markers, stitch holders, stuffing, two 6mm safety eyes, black embroidery floss and embroidery needle for mouth, scrap of pink felt for cheeks, sharp scissors, craft glue, regular size drinking straw for leg armature, and yarn needle.
Optional: Knee high stocking and plastic pellets for weighted stuffing.
GAUGE: 30 sts = about 4" [10 cm]; 36 rounds = about 4" [10 cm] in Stockinette stitch worked in rounds (knit every round). EXACT GAUGE IS NOT CRITICAL TO THIS PROJECT. Use any size needles to obtain the gauge.
RED HEART® Amigurumi, Art E885 available in 3.5 oz (100 g) 239
yds (219m) cakes.
LM6285
knittingDesigned by Nancy Anderson
What you will need:
BUY YARN
continued...
Tina & Nina are ready to swim the seas with you! Look for shells, travel the world on land or sea with these adaptable friends.
Mermaid measures about 5½" [14 cm] tall not including tail, and 7" [18 cm] tall including tail.
Special Stitcheskfb (Knit into front and back) = Knit next stitch but do not remove from needle, knit into back loop of same stitch and remove from needle – 1 st increased.
Notes1. Before beginning, separate the
different color sections of the yarn as follows: Pop the center color out by pushing gently on the center of the ball so that it comes out intact. Find the point where the color changes and cut the yarn. Repeat this process for the remaining yarn colors by carefully pushing the rings of color out of the larger ring and cutting. Wind each color into a separate ball to prevent tangling. You may find that one color appears both in the center, and on the outside of the ball, wind together or separately. In the pattern instructions, the peach color is referred to as A, the purple as B, the teal as C, and the red as D.
2. Mermaid is made from 10-12 pieces: Body, 4 limbs, head, wig base, tail, tutu, sundress, and optionally two side buns.
3. Body, head, tail, tutu, and sundress are worked in rounds.
4. Limbs (arms and legs) are made from I-cord. A drinking straw is inserted in each piece of I-cord for armature.
Tina & Nina Knit Mermaids Page 12
Find more ideas & inspiration: redheart.com©2018 Coats & Clark Page 2 of 4
continued...
5. Wig base and optional side buns are worked back and forth in rows.
6. You can personalize the mermaid by selecting your choice of bikini and hair color, hair style, and clothing.
7. Pieces are sewn together using yarn scraps, yarn tails or sewing thread.
8. Take care to attach safety eyes before head opening becomes too small. Do not use safety eyes if toy is intended for a child 2 years of age or younger.
BODYBeginning at top of body with A, leaving a long beginning tail, cast on 6 sts. Distribute stitches evenly over 3 double pointed needles (2 stitches on each needle). Place marker for beginning of round. Prepare to work in rounds.Round 1 (right side): [Kfb] 6 times—12 sts.Round 2: Knit.Round 3: [K1, kfb] 6 times—18 sts.Round 4: Knit.BikiniJoin your choice of bikini yarn color B or C. Cut A.Rounds 5–8: With bikini color, knit.Join A. Cut bikini yarn.Rounds 9–14: With A, knit.Join bikini color.Rounds 15-18: With bikini color, knit.Stuff body with stuffing or with optional knee high filled with plastic pellets.Complete piece with bikini color only.Round 19: [K1, k2tog] 6 times—12 sts.Finish stuffing body.Round 20: [K2tog] 6 times—6 sts.Cut yarn, leaving a long tail. Thread ending tail through stitches of last round and pull to close opening. Thread beginning tail through stitches of Round 1 and pull to close opening. Secure tails and weave to inside of body.
ARMS AND LEGS (make 4)Note: Arms and legs are made of I-cord
"stuffed" with drinking straw cut to size. Do not stuff with fiber.With 2 double pointed needles and A, leaving a long beginning tail, cast on 6 sts.I-Cord: K6, *slide sts to opposite end of needle; carry working yarn tightly along back of work and the knit the 6 sts again; repeat from * 12 more times for a total of 14 rounds.Cut yarn, leaving a long tail. Insert straw into limb and cut straw even with top opening of limb. Thread ending tail through stitches of last round and pull to close opening. Thread beginning tail through stitches of Round 1 and pull to close opening. Weave in and trim beginning tail. Do not weave in or trim ending tail, it can be used later for sewing limb to body.
HEADBeginning at top of head with A, leaving a long beginning tail, cast on 6 sts.Distribute stitches evenly over 3 double pointed needles (2 stitches on each needle). Place marker for beginning of round. Prepare to work in rounds.Round 1 (right side): [Kfb] 6 times—12 sts.Round 2: Knit.Round 3: [K1, kfb] 6 times—18 sts.Round 4: Knit.Round 5: [K2, kfb] 6 times—24 sts.Round 6: Knit.Round 7: [K3, kfb] 6 times—30 sts.Round 8: Knit.Round 9: [K4, kfb] 6 times—36 sts.Rounds 10–16: Knit.Attach safety eyes between Rounds 10 and 11, about 7 sts apart.
Round 17: [K2, k2tog] 9 times—27 sts.Begin stuffing head and continue stuffing head as work progresses.Round 18: Knit.Round 19: [K1, k2tog] 9 times—18 sts.Round 20: Knit.Cut yarn, leaving a long tail. Thread ending tail through stitches of last round but do not close opening. Do not weave in or trim ending tail, it can be used later for sewing head to body. Thread beginning tail through stitches of Round 1 and pull to close opening. Weave in and trim beginning tail.
WIG BASEWith your choice of yarn color B or D, leaving a long beginning tail, cast on 32 sts.Rows 1–8: Knit—32 sts.Row 9: [K2tog, k14] twice—30 sts.Row 10: [K3, k2tog] 6 times—24 sts.Row 11: Knit.Row 12: [K2, k2tog] 6 times—18 sts.Row 13: Knit.Row 14: [K2tog] 9 times—9 sts.Bind off. Weave in and trim ending tail. Use beginning yarn tail to sew wig base seam. Do not weave in or trim beginning yarn tail. It can be used later for sewing wig base to head. Note: Hair instructions are found at the end of the pattern. Hair is added very last.
TAILBeginning at waist with C, cast on 20 sts.Distribute stitches evenly over 4 double pointed needles (5 stitches on each needle). Place marker for beginning of round. Prepare to work in rounds.Rounds 1–3: Knit.Round 4: [K4, kfb] 4 times—24 sts.
Rounds 5–15: Knit.Round 16: [K2tog, k10] twice—22 sts.Round 17: Knit.Round 18: [K2tog, k9] twice—20 sts.Round 19: Knit.Round 20: [K2tog, k8] twice—18 sts.Round 21: Knit.Round 22: [K2tog, k7] twice—16 sts.Round 23: Knit.Round 24: [K2tog, k6] twice—14 sts.Rounds 25–27: Knit.Round 28: [Kfb] 14 times—28 sts.Round 29: Knit.Round 30: [K2, kfb] 9 times, kfb—38 sts.Rounds 31 and 32: Knit.
First FinWith right side of piece facing upwards and piece lying flat, find the middle of the sts. Place the 19 stitches that do not include the working yarn onto a holder for second fin. Distribute the remaining 19 stitches over 3 or 4 double pointed needles to begin first fin. Place marker for beginning of round. Prepare to work in rounds.Rounds 1 and 2: Knit.Round 3: [K1, k2tog] 6 times, k1—13 sts.Round 4: Knit.Round 5: [K1, k2tog] 4 times, k1—9 sts.Round 6: Knit.Round 7: [K1, k2tog] 3 times—6 sts.Cut yarn, leaving a long tail. Thread tail through stitches of last round and pull to close opening. Weave in and trim end.
Second FinReturn 19 fin stitches on holder to needles. Join C and repeat Rounds 1–7 of first fin.Cut yarn, leaving a long tail. Thread tail through stitches of last round and pull to close opening. Weave in and trim ends.
LM6285 Tina & Nina Mermaid
Tina & Nina Knit Mermaids Page 13

Find more ideas & inspiration: redheart.com©2018 Coats & Clark Page 3 of 4
TUTUWith B, cast on 19 sts.Distribute stitches over 3 or 4 double pointed needles. Place marker for beginning of round. Prepare to work in rounds.Rounds 1 and 2: Knit.Round 3: Kfb in each st around—38 sts.Round 4: *K1, kfb; repeat from * around—57 sts.Rounds 5–9: KnitRound 10 (hem): TURN, knit around.Bind off, leaving a long tail. With yarn tail, sew hem edges together. Weave in and trim ends. Try tutu on doll for size. Adjust tightness as needed by taking a small tuck in the waistband using a scrap of yarn.
SKIRTBeginning at lower edge with B, cast on 30 sts.Row 1 (garter ridge): Knit 1 row, turn (this is not a round).Cut B. Join C.Round 2: Knit.Distribute stitches evenly over 3 or 4 double pointed needles Place marker for beginning of round. Prepare to work in rounds.Rounds 3–16: Knit.Round 17: [K1, k2tog] 10 times—20 sts.Cut C. Join B.Rounds 18–21: Knit.Bind off. Use beginning tail to sew edges of Row 1 (garter ridge) together. Weave in and trim ends.
FINISHINGReferring to photograph as a guide to placement, use yarn tails or yarn scraps to sew the following pieces together.1. Sew head to body, taking care to
position face frontwards. 2. Sew arms to upper sides of body at
Rounds 3 and 4.3. Sew legs to lower portion of body.
Bangs: Before sewing wig base to head, embroider bangs as follows: With yarn same color as wig base, begin embroidering bangs about 2 rows above the eyes and make long stitches that will be partially hidden under the wig base. Vary the length of the bang stitches for a tousled look.
Place wig base on head, overlapping bangs by a fraction of an inch. Pin in place, for best results, and sew base to head. Weave and trim ends.
Smile: With embroidery needle and 2 strands of black embroidery floss, embroider a smile at Round 13 of head, in the middle of the face, about 3 stitches wide.
Cheeks: Cut small circles from pink felt. Referring to photo for placement, glue cheeks to face directly under and to the sides of the eyes.
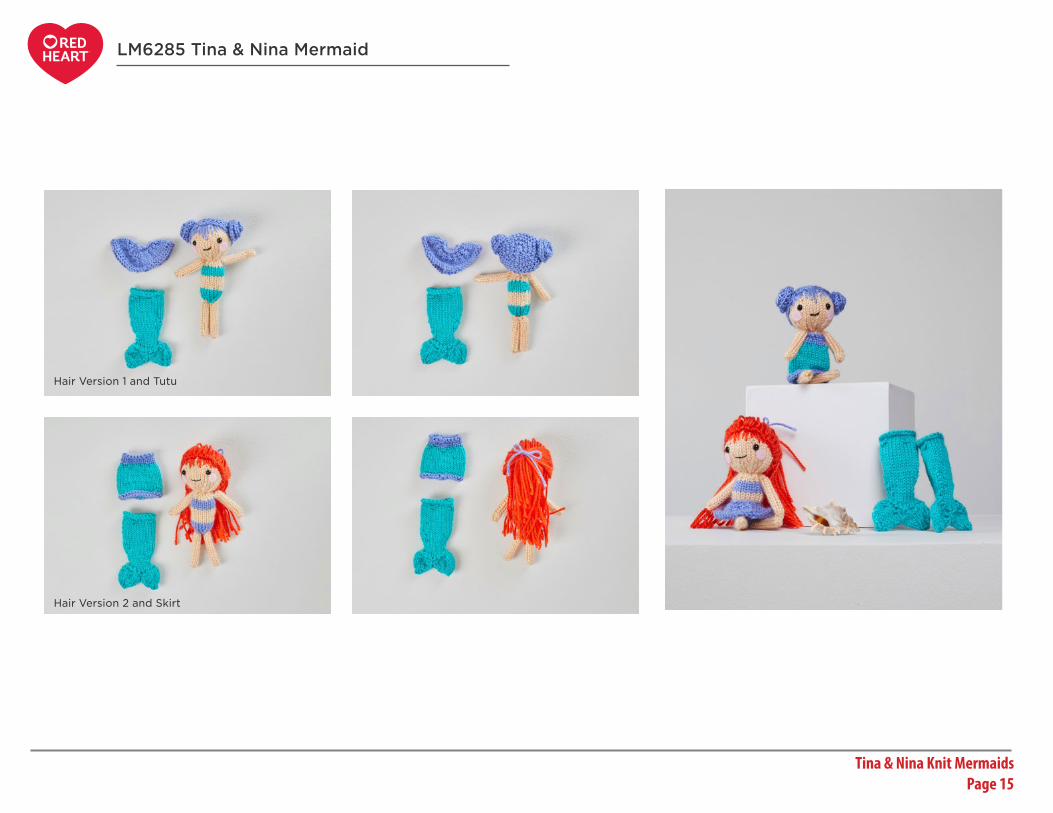
Hair Version 1 (side buns)With B, leaving a long beginning tail, cast on 18 sts.Row 1: [K2, kfb] 6 times—24 sts.Row 2: [K3, kfb] 6 times—30 sts.Row 3: [K4, kfb] 6 times—36 sts.Bind off, leaving a long tail. Roll the piece in spiral (jelly roll) fashion. With one yarn tail, sew layers to one another
to retain the shape. With the other yarn tail, sew bun to side of head, about level with the eyes. Repeat to make and attach second bun.
Hair Version 2 (long hair)Cut about 40 strands of D, about 9" [23 cm] long. Attach strands to wig base as follows: *Insert crochet hook through any stitch of outermost round of wig base. Fold a strand in half and place the fold on hook. Draw fold halfway through stitch, forming a loop. Using the hook, catch the two yarn ends and draw them through the loop. Pull the two yarn ends to tighten. Repeat from * until strands have been attached around the entire outermost round of wig base.Cut a length of B, pull the front and front side strands to back of head and tie into a ponytail with the length of B. Place a dab of glue on the bow knot to keep it from coming untied. Leave remaining hair hanging down doll's back.Fold top pony tail forward to access the wig base, with D insert a row of strands, left to right, across the back of the head, midway between crown and neck, in order to fill out hair.Adjust number and location of hair strands as desired. Excluding the upper ponytail, pull strands even along back and torso of the doll. Trim ends even using sharp craft scissors
Weave in and trim any remaining ends. Dress mermaid in outfit of your choice.
ABBREVIATIONS A, B, C, and D = Color A, Color B, Color C, and Color D; k = knit; k2tog = knit next 2 sts together; st(s) = stitch(es); [ ] = work directions in brackets the number of times specified; * = repeat whatever follows the * as indicated.
LM6285 Tina & Nina Mermaid
See next page for alternate photos
Tina & Nina Knit Mermaids Page 14
Find more ideas & inspiration: redheart.com©2018 Coats & Clark Page 4 of 4
LM6285 Tina & Nina Mermaid
Hair Version 1 and Tutu
Hair Version 2 and Skirt
Tina & Nina Knit Mermaids Page 15
Find more ideas & inspiration: redheart.com©2018 Coats & Clark Page 1 of 4
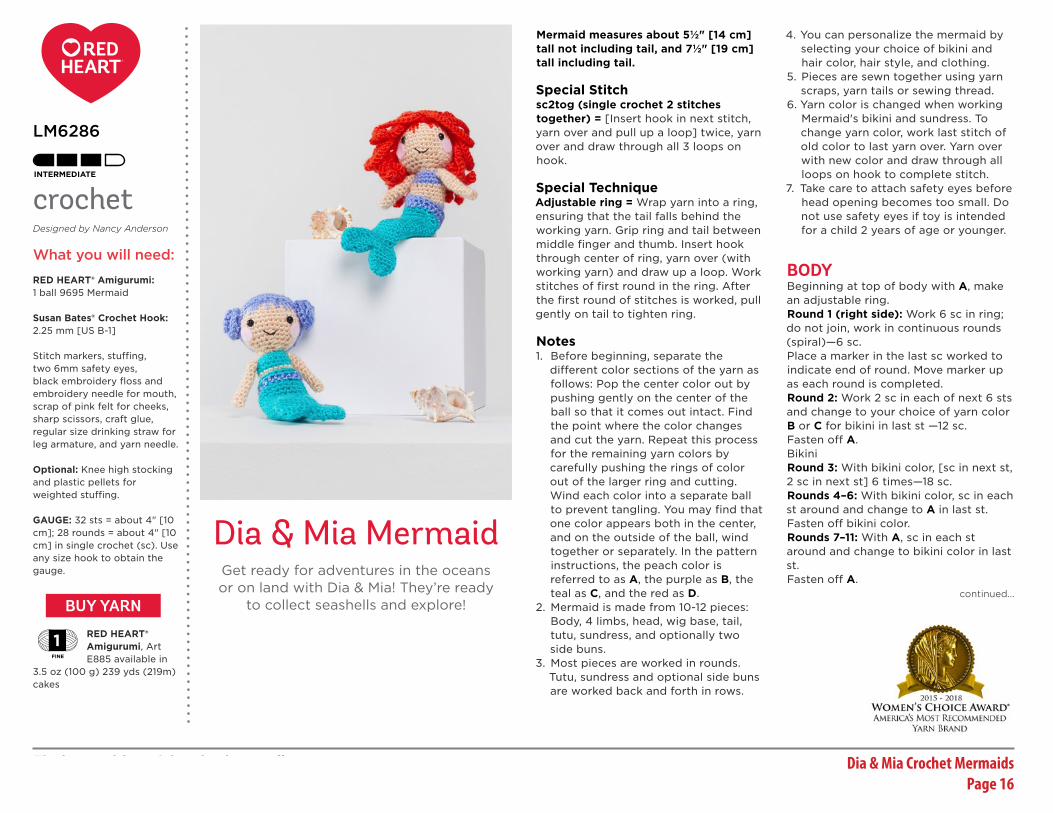
Dia & Mia Mermaid
RED HEART® Amigurumi: 1 ball 9695 Mermaid
Susan Bates® Crochet Hook: 2.25 mm [US B-1]
Stitch markers, stuffing, two 6mm safety eyes, black embroidery floss and embroidery needle for mouth, scrap of pink felt for cheeks, sharp scissors, craft glue, regular size drinking straw for leg armature, and yarn needle.
Optional: Knee high stocking and plastic pellets for weighted stuffing.
GAUGE: 32 sts = about 4" [10 cm]; 28 rounds = about 4" [10 cm] in single crochet (sc). Use any size hook to obtain the gauge.
RED HEART® Amigurumi, Art E885 available in
3.5 oz (100 g) 239 yds (219m) cakes
LM6286
crochetDesigned by Nancy Anderson
What you will need:
BUY YARNcontinued...
Get ready for adventures in the oceans or on land with Dia & Mia! They’re ready
to collect seashells and explore!
Mermaid measures about 5½" [14 cm] tall not including tail, and 7½" [19 cm] tall including tail.
Special Stitchsc2tog (single crochet 2 stitches together) = [Insert hook in next stitch, yarn over and pull up a loop] twice, yarn over and draw through all 3 loops on hook.
Special TechniqueAdjustable ring = Wrap yarn into a ring, ensuring that the tail falls behind the working yarn. Grip ring and tail between middle finger and thumb. Insert hook through center of ring, yarn over (with working yarn) and draw up a loop. Work stitches of first round in the ring. After the first round of stitches is worked, pull gently on tail to tighten ring.
Notes1. Before beginning, separate the
different color sections of the yarn as follows: Pop the center color out by pushing gently on the center of the ball so that it comes out intact. Find the point where the color changes and cut the yarn. Repeat this process for the remaining yarn colors by carefully pushing the rings of color out of the larger ring and cutting. Wind each color into a separate ball to prevent tangling. You may find that one color appears both in the center, and on the outside of the ball, wind together or separately. In the pattern instructions, the peach color is referred to as A, the purple as B, the teal as C, and the red as D.
2. Mermaid is made from 10-12 pieces: Body, 4 limbs, head, wig base, tail, tutu, sundress, and optionally two side buns.
3. Most pieces are worked in rounds. Tutu, sundress and optional side buns are worked back and forth in rows.
4. You can personalize the mermaid by selecting your choice of bikini and hair color, hair style, and clothing.
5. Pieces are sewn together using yarn scraps, yarn tails or sewing thread.
6. Yarn color is changed when working Mermaid's bikini and sundress. To change yarn color, work last stitch of old color to last yarn over. Yarn over with new color and draw through all loops on hook to complete stitch.
7. Take care to attach safety eyes before head opening becomes too small. Do not use safety eyes if toy is intended for a child 2 years of age or younger.
BODYBeginning at top of body with A, make an adjustable ring.Round 1 (right side): Work 6 sc in ring; do not join, work in continuous rounds (spiral)—6 sc.Place a marker in the last sc worked to indicate end of round. Move marker up as each round is completed.Round 2: Work 2 sc in each of next 6 sts and change to your choice of yarn color B or C for bikini in last st —12 sc.Fasten off A.BikiniRound 3: With bikini color, [sc in next st, 2 sc in next st] 6 times—18 sc.Rounds 4–6: With bikini color, sc in each st around and change to A in last st.Fasten off bikini color.Rounds 7–11: With A, sc in each st around and change to bikini color in last st.Fasten off A.
Dia & Mia Crochet Mermaids Page 16

Find more ideas & inspiration: redheart.com©2018 Coats & Clark Page 2 of 4
continued...
Rounds 12–14: With bikini color, sc in each st around.Stuff body with stuffing or with optional knee high filled with plastic pellets.Complete piece with bikini color only.Round 15: [Sc in next st, sc2tog] 6 times—12 sc. Round 16: [Sc2tog] 6 times—6 sc.Fasten off, leaving a long tail. Thread tail through stitches of last round and pull to close opening. Secure tail and weave to inside of body.
ARMS AND LEGS (make 4)Note: Arms and legs are "stuffed" with drinking straw cut to size. Do not stuff with fiber.With A, make an adjustable ring.Round 1 (right side): Work 6 sc in ring; do not join, work in continuous rounds (spiral)—6 sc.Place a marker in the last sc worked to indicate end of round. Move marker up as each round is completed.Rounds 2–11: Sc in each st around.Fasten off, leaving a long tail for sewing limb to body. Insert straw into limb and cut straw even with top opening of limb.
HEADBeginning at top of head with A, make an adjustable ring.Round 1 (right side): Work 6 sc in ring; do not join, work in continuous rounds (spiral)—6 sc.Place a marker in the last sc worked to indicate end of round. Move marker up as each round is completed.Round 2: Work 2 sc in each of next 6 sts—12 sc.Round 3: [Sc in next st, 2 sc in next st] 6 times—18 sc.
Round 4: [Sc in next 2 sts, 2 sc in next st] 6 times—24 sc.Round 5: [Sc in next 3 sts, 2 sc in next st] 6 times—30 sc.Round 6: [Sc in next 4 sts, 2 sc in next st] 6 times—36 sc.Rounds 7–12: Sc in each st around.Round 13: [Sc in next 4 sts, sc2tog] 6 times—30 sc.Round 14: [Sc in next 3 sts, sc2tog] 6 times—24 sc. Attach safety eyes between Rounds 8 and 9, about 8 sts apart.Round 15: [Sc in next 2 sts, sc2tog] 6 times—18 sc. Begin stuffing head and continue to stuff until piece is complete.Round 16: [Sc in next st, sc2tog] 6 times—12 sc. Fasten off, leaving a long tail for sewing head to body.
WIG BASEWith your choice of yarn color B or D, make an adjustable ring.Round 1 (right side): Work 8 hdc in ring; join with slip st in first hdc—8 hdc.Round 2: Ch 1 (does not count as a stitch), 2 hdc in each st around; join with slip st in first hdc—16 hdc.Round 3: Ch 1, [hdc in next st, 2 hdc in next st] 8 times; join with slip st in first hdc—24 hdc.Round 4: Ch 1, [hdc in next 2 sts, 2 hdc in next st] 8 times; join with slip st in first hdc—32 hdc.Round 5: Ch 1, hdc in each st around; join with slip st in first hdc.Rounds 6 and 7: Ch 1, sc in each st around; join with slip st in first sc.
Fasten off, leaving long tail for sewing wig base to head. Note: Hair instructions are found at the end of the pattern. Hair is added very last.
TAILBeginning at waist with C, ch 20; taking care not to twist ch, join with slip st in first ch to form a ring.Round 1: Work 2 sc in same ch as joining slip st, sc in next 9 ch, 2 sc in next ch, sc in next 9 ch; do not join, work in continuous rounds (spiral)—22 sc.Place a marker in the last sc worked to indicate end of round. Move marker up as each round is completed.Rounds 2–8: Sc in each st around.Round 9: [Sc2tog, sc in next 9 sts] twice—20 sc.Round 10: Sc in each st around.Round 11: [Sc2tog, sc in next 8 sts] twice—18 sc.Round 12: Sc in each st around.Round 13: [Sc2tog, sc in next 7 sts] twice—16 sc.Round 14: Sc in each st around.Round 15: [Sc2tog, sc in next 6 sts] twice—14 sc.Rounds 16 and 17: Sc in each st around.Round 18: [Sc2tog, sc in next 5 sts] twice—12 sc.Round 19: Sc in each st around.Round 20: Work 2 sc in each st around—24 sc.Round 21: [Sc in next 3 sts, 2 sc in next st] 6 times—30 sc.Fasten off C.
FinsFlatten piece, with decrease lines at sides. Inserting through both layers, place a marker in the middle stitch on the top and bottom layers so that there are 14 stitches on each side of the marked middle stitches.
First FinWorking through both layers, join C with slip st in the marked middle sts.Round 1: Sc in next 14 sts; leave sts on other side of marker unworked for second fin; do not join, work in continuous rounds (spiral)—14 sc.Place a marker in the last sc worked to indicate end of round. Move marker up as each round is completed.Rounds 2 and 3: Sc in each st around.Round 4: [Sc2tog, sc in next 5 sts] twice—12 sc.Round 5: [Sc in next st, sc2tog] 4 times—8 sc.Round 6: [Sc2tog] 4 times—4 sc.Fasten off, leaving a long tail. Thread tail through stitches of last round and pull to close opening. Weave in and trim ends.
Second FinWorking through both layers, join C with slip st in the marked middle sts so that you are ready to work over the 14 unworked sts. Repeat Rounds 1–6 of first fin.Fasten off, leaving a long tail. Thread tail through stitches of last round and pull to close opening. Weave in and trim ends.
LM6286 Dia & Mia Mermaid
Dia & Mia Crochet Mermaids Page 17
Find more ideas & inspiration: redheart.com©2018 Coats & Clark Page 3 of 4
WaistbandRound 1: With right side facing and working along opposite side of foundation chain at waist, draw up a loop of B in any ch, ch 1, hdc in same ch and in each ch around; join with slip st in first hdc—20 hdc.If a two-color waistband is desired, fasten off B and draw up a loop of C in any hdc.Round 2: Ch 1, sc in each st around; join with slip st in first sc.Fasten off. Weave in and trim ends.
TUTUBeginning at waist edge with B, ch 19.Row 1: Sc in 2nd ch from hook and in each remaining ch across—18 sc.Row 2: Ch 1, turn, working in back loops only, 2 sc in each st across—36 sc.Row 3: Ch 1, turn, *sc in next st, 2 sc in next st; repeat from * across—54 sc.Rows 4 and 5: Ch 1, tun, sc in each st across.Fasten off, leaving a long tail. With long yarn tail, sew edges together for back seam, leaving about ⅛" [3mm] unsewn at top waist edge. Weave in and trim ends. SashWith right side facing, join B with slip st in one top corner of waist edge, ch 22. Fasten off and weave in and trim ends. Join B with slip st in second top corner of waist edge, ch 22. Fasten off and weave in and trim ends.
SKIRTBeginning at waist edge with C, ch 19.Row 1: Sc in 2nd ch from hook and in each remaining ch across—18 sc.Row 2: Ch 1, turn, [hdc in next 2 sts, 2 hdc in next st] 6 times—24 hdc.
Rows 3–5: Ch 1, turn, hdc in each st across and change to B in last st of last row.Fasten off C, leaving a long tail for sewing edges together.Row 6: With B, turn, *ch 3, slip st in next st; repeat from * across.Fasten off, leaving a long tail. Using the long tail, sew the first and last ch-3 loops together. Weave in and trim end.With long C-colored tail from Row 5, whip stitch side edges together for back seam. Weave in and trim ends.SashWith B, ch 25, hold skirt with foundation ch at top, sc in each ch along opposite side of foundation ch, ch 25. Fasten off and weave in and trim ends.
FINISHINGReferring to photograph as a guide to placement, use yarn tails or yarn scraps to sew the following pieces together.1. Sew head to body, taking care to
position face frontwards. 2. Sew arms to upper sides of body at
Rounds 3 and 4.3. Sew legs to lower portion of body.
Bangs: Before sewing wig base to head, embroider bangs as follows: With yarn same color as wig base, begin embroidering bangs about 2 rows above the eyes and make long stitches that will be partially hidden under the wig base. Vary the length of the bang stitches for a tousled look.
Place wig base on head, overlapping bangs by a fraction of an inch. Pin in place, for best results, and sew base to head. Weave and trim ends.
Smile: With embroidery needle and 2 strands of black embroidery floss, embroider a smile at Round 13 of head, in the middle of the face, about 3 stitches wide.
Cheeks: Cut small circles from pink felt. Referring to photo for placement, glue cheeks to face directly under and to the sides of the eyes.
Hair Version 1 (side buns)With B, leaving a long beginning tail, ch 21.Row 1: Hdc in 2nd ch from hook, 2 hdc in next ch, *hdc in next ch, 2 hdc in next ch; repeat from * across—30 hdc.Fasten off, leaving a long tail. Roll the piece in spiral (jelly roll) fashion. With one yarn tail, sew layers to one another to retain the shape. With the other yarn tail, sew bun to side of head, about level with the eyes. Repeat to make and attach second bun.
Hair Version 2 (long curls)First Round of Curls: Join D with slip st in any st of last round of wig base; ch 21, slip st in each ch of ch-21 just made, slip st in same st as joining slip st (first curl made), *skip next st, slip st in next st, ch 21, slip st in each ch of ch-21 just made, slip st in same st of wig base as very first slip st of this curl (next curl made); repeat from * around last round of wig base. Fasten off, weave in and trim ends.Next Round of Curls: Working around Round 4 of wig base (or any round desired), repeat first round of curls.Notes: There is no need to fill entire wig base with curls as it will become too heavy and may make the head sag. To hide base and style the hair, pull a few
lengths of the Round 4 curls to the back of head and tie loosely in back. Slip stitch lengths will curl naturally.
Weave in and trim any remaining ends. Dress mermaid in outfit of your choice.
ABBREVIATIONS A, B, C, and D = Color A, Color B, Color C, and Color D; ch = chain; hdc = half double crochet; sc = single crochet; st(s) = stitch(es); [ ] = work directions in brackets the number of times specified;
* = repeat whatever follows the * as indicated.
LM6286 Dia & Mia Mermaid
See next page for alternate photos
Dia & Mia Crochet Mermaids Page 18

Find more ideas & inspiration: redheart.com©2018 Coats & Clark Page 4 of 4
LM6286 Dia & Mia Mermaid
Hair Version 1, Skirt
Hair Version 2, with tutu
Dia & Mia Crochet Mermaids Page 19
Find more ideas & inspiration: redheart.com©2018 Coats & Clark Page 1 of 3
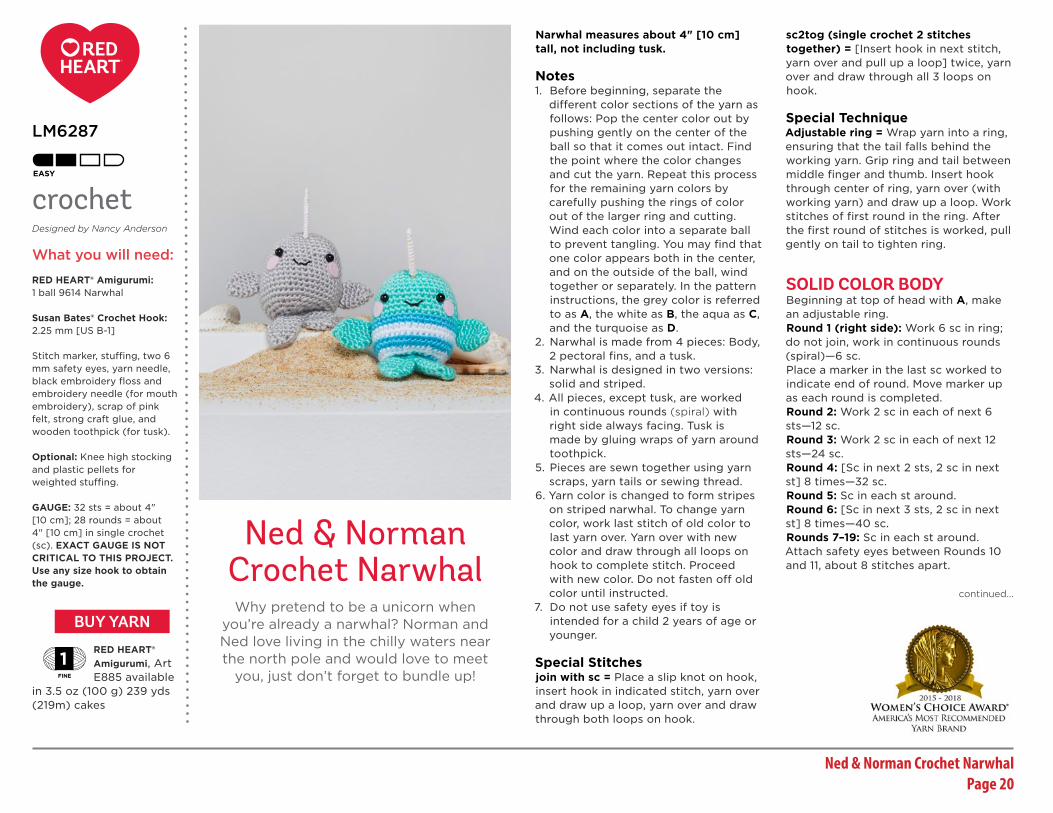
Ned & Norman Crochet Narwhal
RED HEART® Amigurumi: 1 ball 9614 Narwhal
Susan Bates® Crochet Hook: 2.25 mm [US B-1]
Stitch marker, stuffing, two 6 mm safety eyes, yarn needle, black embroidery floss and embroidery needle (for mouth embroidery), scrap of pink felt, strong craft glue, and wooden toothpick (for tusk).
Optional: Knee high stocking and plastic pellets for weighted stuffing.
GAUGE: 32 sts = about 4" [10 cm]; 28 rounds = about 4" [10 cm] in single crochet (sc). EXACT GAUGE IS NOT CRITICAL TO THIS PROJECT. Use any size hook to obtain the gauge.
RED HEART® Amigurumi, Art E885 available
in 3.5 oz (100 g) 239 yds (219m) cakes
LM6287
crochetDesigned by Nancy Anderson
What you will need:
continued...Why pretend to be a unicorn when
you’re already a narwhal? Norman and Ned love living in the chilly waters near the north pole and would love to meet
you, just don’t forget to bundle up!
Narwhal measures about 4" [10 cm] tall, not including tusk.
Notes1. Before beginning, separate the
different color sections of the yarn as follows: Pop the center color out by pushing gently on the center of the ball so that it comes out intact. Find the point where the color changes and cut the yarn. Repeat this process for the remaining yarn colors by carefully pushing the rings of color out of the larger ring and cutting. Wind each color into a separate ball to prevent tangling. You may find that one color appears both in the center, and on the outside of the ball, wind together or separately. In the pattern instructions, the grey color is referred to as A, the white as B, the aqua as C, and the turquoise as D.
2. Narwhal is made from 4 pieces: Body, 2 pectoral fins, and a tusk.
3. Narwhal is designed in two versions: solid and striped.
4. All pieces, except tusk, are worked in continuous rounds (spiral) with right side always facing. Tusk is made by gluing wraps of yarn around toothpick.
5. Pieces are sewn together using yarn scraps, yarn tails or sewing thread.
6. Yarn color is changed to form stripes on striped narwhal. To change yarn color, work last stitch of old color to last yarn over. Yarn over with new color and draw through all loops on hook to complete stitch. Proceed with new color. Do not fasten off old color until instructed.
7. Do not use safety eyes if toy is intended for a child 2 years of age or younger.
Special Stitchesjoin with sc = Place a slip knot on hook, insert hook in indicated stitch, yarn over and draw up a loop, yarn over and draw through both loops on hook.
sc2tog (single crochet 2 stitches together) = [Insert hook in next stitch, yarn over and pull up a loop] twice, yarn over and draw through all 3 loops on hook.
Special TechniqueAdjustable ring = Wrap yarn into a ring, ensuring that the tail falls behind the working yarn. Grip ring and tail between middle finger and thumb. Insert hook through center of ring, yarn over (with working yarn) and draw up a loop. Work stitches of first round in the ring. After the first round of stitches is worked, pull gently on tail to tighten ring.
SOLID COLOR BODYBeginning at top of head with A, make an adjustable ring.Round 1 (right side): Work 6 sc in ring; do not join, work in continuous rounds (spiral)—6 sc.Place a marker in the last sc worked to indicate end of round. Move marker up as each round is completed.Round 2: Work 2 sc in each of next 6 sts—12 sc.Round 3: Work 2 sc in each of next 12 sts—24 sc.Round 4: [Sc in next 2 sts, 2 sc in next st] 8 times—32 sc.Round 5: Sc in each st around.Round 6: [Sc in next 3 sts, 2 sc in next st] 8 times—40 sc.Rounds 7–19: Sc in each st around.Attach safety eyes between Rounds 10 and 11, about 8 stitches apart.
BUY YARN
Ned & Norman Crochet Narwhal Page 20

Find more ideas & inspiration: redheart.com©2018 Coats & Clark Page 2 of 3
See next page for alternate photos
Round 20: [Sc in next 3 sts, sc2tog] 8 times—32 sc.Round 21: [Sc in next 2 sts, sc2tog] 8 times—24 sc. Begin stuffing piece with fiberfill or place optional knee high, filled with plastic pellets, into piece. Continue stuffing piece as work progresses.Round 22: [Sc in next st, sc2tog] 8 times—16 sc. Round 23: [Sc in next 2 sts, sc2tog] 4 times—12 sc.Rounds 24 and 25: Sc in each st around.Round 26: Work 2 sc in each of next 12 sts—24 sc.Round 27: [Sc in next 3 sts, 2 sc in next st] 6 times—30 sc.Fasten off.
TailFlatten the last few rounds so that stitches at the back match stitches at the front, forming a double row of stitches. Working through both thicknesses, join A with a slip stitch in the center stitch. Note: When flattening the last few rounds, flatten them so that the ends of rounds are centered at the back of the piece. First Tail FinRound 1: Sc in next 14 sts; leave remaining sts unworked—14 sc.Working over these 14 sts only. Place a marker in the last sc made to indicate end of round. Move marker up as each round is completed.Rounds 2 and 3: Sc in each st around.Round 4: [Sc2tog, sc in next 5 sts] twice—12 sc.Round 5: [Sc in next st, sc2tog] 4 times—8 sc.Round 6: {Sc2tog] 4 times—4 sc.Fasten off. Weave in and trim ends.
Second Tail FinRound 1: Join A with sc in first unworked st following center stitch, sc in next 13 sts—14 sc.Rounds 2–6: Work same as Rounds 2–6 of first tail fin.Fasten off. Weave in and trim ends.
STRIPED BODYBeginning at top of head with C, make an adjustable ring.Rounds 1–13: With C, work same as Rounds 1–13 of solid narwhal body and change to D in last st of Round 13—40 sc.Rounds 14 and 15: With D, sc in each st around and change to B in last st of last round.Rounds 16 and 17: With B, sc in each st around and change to D in last st of last round.Rounds 18 and 19: Repeat Rounds 14 and 15.Attach safety eyes between Rounds 10 and 11, about 8 stitches apart.Round 20: With B, [sc in next 3 sts, sc2tog] 8 times—32 sc.Round 21: With B, [sc in next 2 sts, sc2tog] 8 times and change to D in last st—24 sc. Begin stuffing piece with fiberfill or place optional knee high, filled with plastic pellets, into piece. Continue stuffing piece as work progresses.Fasten off B.Round 22: With D, [sc in next st, sc2tog] 8 times—16 sc. Round 23: With D, [sc in next 2 sts, sc2tog] 4 times and change to C in last st—12 sc.Fasten off D. Work remainder of piece with C only.
Rounds 24–27: With C, work same as Rounds 24–27 of solid narwhal body.Fasten off.
TailFlatten the last few rounds so that stitches at the back match stitches at the front, forming a double row of stitches. Working through both thicknesses, join C with a slip stitch in the center stitch. Note: When flattening the last few rounds, flatten them so that the color changes are centered at the back of the piece.With C, work tail and tail fins same as for solid narwhal body.Fasten off. Weave in and trim ends.
PECTORAL FINS (make 2 for each narwhal)
Note: If making solid narwhal, use yarn color A. If making striped narwhal, use yarn color C.
Make an adjustable ring.Round 1 (right side): Work 6 sc in ring; do not join, work in continuous rounds (spiral)—6 sc.Place a marker in the last sc worked to indicate end of round. Move marker up as each round is completed.Round 2: [Sc in next st, 2 sc in next st] twice, sc in last 2 sts—8 sc.Round 3: [Sc in next st, 2 sc in next st] 4 times—12 sc.Rounds 4 and 5: Sc in each st around.Round 6: [Sc in next st, sc2tog] 4 times—8 sc.Round 7: Sc in each st around.Fasten off leaving a long tail for sewing fin to body. If needed, thread beginning
yarn tail through stitches at beginning of piece and pull to close opening. Weave in and trim beginning tail only.
FINISHINGReferring to photograph as a guide to placement, sew pectoral fins to sides of body, near Round 13.
With embroidery needle and 2 strands of black embroidery floss, embroider a smile in the middle of the face over Round 13, about 3 stitches wide.
Cut two small circles from pink craft felt. Referring to photograph as a guide to placement, glue cheeks to face directly under and to the outside of the eyes.
TuskGenerously coat about half of the wooden toothpick with strong craft glue. Beginning near the center of the toothpick, wrap B-colored yarn around the toothpick wrapping up to the point. Hold the wraps until the yarn adheres. Trim the yarn even when glue is dry.
After tusk is dry, place small amount of glue on unwrapped end of toothpick and insert it into Round 6 at the center of the narwhal's forehead. Allow glue to dry.
Weave in and trim any remaining ends.
ABBREVIATIONS A, B, C, and D = Color A, Color B, Color C, and Color D; ch = chain; sc = single crochet; st(s) = stitch(es); [ ] = work directions in brackets the number of times specified.
LM6287 Ned & Norman Crochet Narwhal
Ned & Norman Crochet Narwhal Page 21

Find more ideas & inspiration: redheart.com©2018 Coats & Clark Page 3 of 3
LM6287 Ned & Norman Crochet Narwhal
Ned & Norman Crochet Narwhal Page 22

Find more ideas & inspiration: redheart.com©2018 Coats & Clark Page 1 of 4
Sparkle & Shimmer Crochet Unicorn
RED HEART® Amigurumi: 1 ball 9178 Unicorn
Susan Bates® Crochet Hook: 2.25 mm [US B-1]
Stitch marker, stuffing, two 6 mm safety eyes, craft glue, yarn needle, regular sized drinking straw (for leg armatures), wooden toothpick (for horn), black embroidery floss and embroidery needle (for embroidering facial features).
Optional: Pins, knee high stocking and plastic pellets for weighted stuffing.
GAUGE: 32 sts = about 4" [10 cm]; 28 rounds = about 4" [10 cm] in single crochet (sc). EXACT GAUGE IS NOT CRITICAL TO THIS PROJECT. Use any size hook to obtain the gauge.
RED HEART® Amigurumi, Art E885 available
in 3.5 oz (100 g) 239 yds (219m) cakes
LM6288
crochetDesigned by Nancy Anderson
What you will need:
continued...Looking for some magic? You’ll find these
two friends prancing in the enchanted forest, chatting with the pixies and getting the
latest gossip from the birds.
Unicorn measures about 4" [10 cm] tall and 4" [10 cm] long (measured from tip of nose to rear end).
Notes1. Before beginning, separate the
different color sections of the yarn as follows: Pop the center color out by pushing gently on the center of the ball so that it comes out intact. Find the point where the color changes and cut the yarn. Repeat this process for the remaining yarn colors by carefully pushing the rings of color out of the larger ring and cutting. Wind each color into a separate ball to prevent tangling. You may find that one color appears both in the center, and on the outside of the ball, wind together or separately. In the pattern instructions, the white color is referred to as A, the pink as B, the turquoise as C, and the yellow as D.
2. Unicorn is made from 16 pieces: Body, head, neck, 4 legs, 2 ears, forelock, 3 mane pieces, and 3 tail pieces. In addition, 2 wings are made for striped unicorn.
3. Unicorn is designed in two versions: solid and striped.
4. Pieces are sewn together using yarn tails or yarn scraps.
5. To change yarn color, work last stitch of old color to last yarn over. Yarn over with new color and draw through all loops on hook to complete stitch. Proceed with new color. Do not fasten off old color until instructed. Carry color not in use up inside of piece when next needed.
6. Do not use safety eyes if toy is intended for a child 2 years of age or younger.
Special Stitchsc2tog (single crochet 2 stitches together) = [Insert hook in next stitch, yarn over and pull up a loop] twice, yarn over and draw through all 3 loops on hook.
Special TechniqueAdjustable ring = Wrap yarn into a ring, ensuring that the tail falls behind the working yarn. Grip ring and tail between middle finger and thumb. Insert hook through center of ring, yarn over (with working yarn) and draw up a loop. Work stitches of first round in the ring. After the first round of stitches is worked, pull gently on tail to tighten ring.
SOLID UNICORN BODYWith A, make an adjustable ring.Round 1 (right side): Work 6 sc in ring; do not join, work in continuous rounds (spiral)—6 sc.Place a marker in the last sc worked to indicate end of round. Move marker up as each round is completed.Round 2: Work 2 sc in each of next 6 sts—12 sc.Round 3: [Sc in next st, 2 sc in next st] 6 times—18 sc.Round 4: [Sc in next 8 sts, 2 sc in next st] twice—20 sc.Rounds 5–13: Sc in each st around.Begin stuffing piece with fiberfill or place optional knee high, filled with plastic pellets, into piece. Continue stuffing piece as work progresses.Round 14: [Sc in next 8 sts, sc2tog] twice—18 sc.
BUY YARN
Sparkle & Shimmer Crochet Unicorn Page 23

Find more ideas & inspiration: redheart.com©2018 Coats & Clark Page 2 of 4
continued...
Round 15: [Sc in next st, sc2tog] 6 times—12 sc.Round 16: [Sc in next st, sc2tog] 4 times—8 sc.Fasten off leaving a long tail for sewing body to tail. If needed, thread beginning yarn tail through stitches at beginning of piece and pull to close opening. Weave in and trim beginning tail only.
STRIPED UNICORN BODYWith A, make an adjustable ring.Round 1 (right side): Work 6 sc in ring and change to B in last sc made; do not join, work in continuous rounds (spiral)—6 sc.Place a marker in the last sc worked to indicate end of round. Move marker up as each round is completed.Round 2: With B, work 2 sc in each of next 6 sts and change to A in last sc made—12 sc.Round 3: With A, [sc in next st, 2 sc in next st] 6 times and change to B in last sc made—18 sc.Round 4: With B, [sc in next 8 sts, 2 sc in next st] twice and change to A in last sc made—20 sc.Rounds 5–13: Sc in each st around and continue to change yarn color at end of every round, alternating A and B.Begin stuffing piece with fiberfill or place optional knee high, filled with plastic pellets, into piece. Continue stuffing piece as work progresses.Round 14: With B, [sc in next 8 sts, sc2tog] twice and change to A in last sc made—18 sc.Round 15: With A, [sc in next st, sc2tog] 6 times and change to B in last sc made—12 sc.Fasten off A.Round 16: With B, [sc in next st, sc2tog] 4 times—8 sc.
Fasten off leaving a long tail for sewing tail to body. If needed, thread beginning yarn tail through stitches at beginning of piece and pull to close opening. Weave in and trim beginning tail only.
SOLID UNICORN HEADBeginning at muzzle with A, make an adjustable ring.Round 1 (right side): Work 6 sc in ring; do not join, work in continuous rounds (spiral)—6 sc.Place a marker in the last sc worked to indicate end of round. Move marker up as each round is completed.Round 2: Work 2 sc in each of next 6 sts—12 sc.Round 3: [Sc in next st, 2 sc in next st] 6 times—18 sc.Round 4: [Sc in next 2 sts, 2 sc in next st] 6 times—24 sc.Rounds 5–12 Sc in each st around.Round 13: [Sc in next 2 sts, sc2tog] 6 times—18 sc.Attach safety eyes between Rounds 9 and 10, about 10 or 11 stitches apart. Begin stuffing head and continue stuffing as work progresses. Do not use weighted stuffing in head.Round 14: [Sc in next st, sc2tog] 6 times—12 sc.Round 15: [Sc in next st, sc2tog] 4 times—8 sc.Fasten off, leaving a long yarn tail. Thread tail through stitches of last round and pull to close opening. If needed, thread beginning yarn tail through stitches at beginning of piece and pull to close opening. Weave in and trim both ends.
STRIPED UNICORN HEADBeginning at muzzle with B, make an adjustable ring.Round 1 (right side): Work 6 sc in ring; do not join, work in continuous rounds (spiral)—6 sc.Place a marker in the last sc worked to indicate end of round. Move marker up as each round is completed.Round 2: Work 2 sc in each of next 6 sts—12 sc.Round 3: [Sc in next st, 2 sc in next st] 6 times—18 sc.Round 4: [Sc in next 2 sts, 2 sc in next st] 6 times—24 sc.Round 5: Sc in each st around and change to A in last sc made.Begin StripesRound 6: With A, sc in each st around and change to B in last sc made.Round 7: With B, sc in each st around and change to A in last sc made.Rounds 8–11: Repeat Rounds 6 and 7 twice.Round 12: Repeat Round 6.Round 13: With B, [sc in next 2 sts, sc2tog] 6 times and change to A in last sc made—18 sc.Attach safety eyes between Rounds 9 and 10, about 10 or 11 stitches apart. Begin stuffing head and continue stuffing as work progresses. Do not use weighted stuffing in head.Round 14: With A, [sc in next st, sc2tog] 6 times and change to B in last sc made—12 sc.Fasten off A.Round 15: With B, [sc in next st, sc2tog] 4 times—8 sc.Fasten off, leaving a long yarn tail. Thread tail through stitches of last round and pull to close opening. If needed, thread beginning yarn tail
through stitches at beginning of piece and pull to close opening. Weave in and trim both ends.
SOLID UNICORN NECKWith A, leaving a long beginning tail for sewing neck to head, ch 14; taking care not to twist ch, join with slip st in first ch to form a ring.Round 1: Ch 1, sc in same ch as joining slip st and in each remaining ch around; join with slip st in first sc—14 sc.Rounds 2 and 3: Ch 1, sc in each st around; join with slip st in first sc.Fasten off, leaving a long tail for sewing neck to body.
STRIPED UNICORN NECKMake same as neck for solid unicorn, working beginning chain and Round 1 with B, Round 2 with A, and Round 3 with B.
SOLID UNICORN LEGS (make 4)Beginning at hoof with C, make an adjustable ring.Round 1 (right side): Ch 1, work 6 sc in ring; join with slip st in first sc—6 sc.Round 2: Ch 1, sc in each st around; join with slip st in first sc.Fasten off C.Round 3: Draw up a loop of A in any st, sc in each st around; do not join, work in continuous rounds (spiral).Place a marker in the last sc worked to indicate end of round. Move marker up as each round is completed.
LM6288 Sparkle & Shimmer Crochet Unicorn
Sparkle & Shimmer Crochet Unicorn Page 24

Find more ideas & inspiration: redheart.com©2018 Coats & Clark Page 3 of 4
Rounds 4–8: Sc in each st around.Fasten off leaving a long tail for sewing leg to body. If needed, thread beginning yarn tail through stitches at beginning of piece and pull to close opening. Weave in and trim beginning tail only.Insert drinking straw into leg and cut to size.
STRIPED UNICORN LEGS(make 4)Make same as legs for solid unicorn, working beginning chain, Rounds 1 and 2 with C, Round 3 with A, Round 4 with B and continue to alternate one round with A and one round with B until leg is complete.
EARS (make 2 for each unicorn)Note: If making solid unicorn, work with A. If making striped unicorn, work with B.Ch 7.Row 1: Working in back bumps only, sc in 2nd ch from hook and in next ch, hdc in next 2 ch, sc in last 2 ch.Fasten off leaving a long tail for sewing. Fold each ear in half widthwise, with tops of stitches facing frontwards. Sew the backs of ears together using yarn tail.
FORELOCKWith C, ch 6.Row 1: Work 3 sc in 2nd ch from hook and in each remaining ch across—15 sc.Fasten off, leaving a long tail for sewing forelock to head.
MANE (make 3 for each unicorn)Notes:1. Each piece of mane is a different
length. Begin first piece with ch 14, second piece with ch 12, and last piece with ch 10.
2. If making striped unicorn, make all three pieces with C. If making solid unicorn, make one piece each with B, C, and D. Use D for the longest piece, B for the middle piece, and C for the shortest piece.
Row 1: Work 3 sc in 2nd ch from hook and in each remaining ch. Note: Longest piece will have 39 sc, middle piece will have 33 sc, and shortest piece will have 27 sc.Fasten off, leaving a long tail for sewing forelock to head.
TAIL (make 3 for each unicorn)Note: If making striped unicorn, make all three pieces with C. If making solid unicorn, make one piece each with B, C, and D.
Ch 27.Row 1: Working in back bumps only, slip st in 2nd ch from hook and in each remaining ch across.Fasten off. Weave in and trim ends.
STRIPED UNICORN WINGSWith D, leaving a long beginning tail for sewing wing to body, make an adjustable ring.Round 1 (right side): Work 6 sc in ring; do not join, work in continuous rounds (spiral)—6 sc.Place a marker in the last sc worked to indicate end of round. Move marker up
continued...
as each round is completed.Round 2: Work 2 sc in each of next 6 sts—12 sc.Rounds 3 and 4: Sc in each st around.Flatten piece matching the front and back stitches of the last round to form a double layer of 6 stitches in each layer. Work now proceeds back and forth in rows.Row 5: Ch 1, working through both layers, skip first st, sc in next 5 sts.Row 6: Ch 1, turn, sc in each st across.Row 7: Ch 1, turn, (slip st, hdc, slip st) in each st across.Fasten off, weave in and trim ending tail.
FINISHINGReferring to photograph as a guide to placement, use yarn tails or yarn scraps to sew the following pieces together.1. Sew ears to top of head at Round 14,
about 2 or 3 stitches apart. 2. Sew neck to underside of head,
beginning at Round 9 of head and covering through Round 14.
3. Sew head and neck to top front of body, beginning at Round 4 of body and positioning the face slightly to the side. Sew with the yarn tail attached to neck, stuffing neck firmly before completing the seam.
4. Sew legs to bottom portion of body. Sew back legs beginning at Round 10 of body and front legs beginning at Round 6, each leg covering about 3 rounds and leaving 1 round between the front and back legs. Place back legs very close together (so they touch) and place the front legs very close together. To check for balance, pin or baste legs in place first then sew securely in place.
5. Sew forelock to forehead, between ears.
6. Sew mane pieces to back of head, positioning the shortest piece at the top and the longest piece at the end.
7. Hold all three tail pieces together and fold in half. With yarn tail from end of body, insert needle through tail pieces at fold and sew to rear of body.
8. Sew wings to back of striped unicorn, positioning wings in shoulder area of body (about Round 8). Sew the wings angled upwards and backwards with tips facing back and up.
With embroidery needle and 2 strands of black embroidery floss, embroider an "X" for each nostril, about 4 or 5 rounds from the beginning round at muzzle and about 5 stitches apart. Embroider a curved smile, following Round 3 or 4 at muzzle, about 4 or 5 stitches long. Weave the floss ends back through head and knot securely then bury yarn in head, trimming excess as needed.
HornGenerously coat about one third of a wooden toothpick with strong craft glue. Wrap D-colored yarn around the toothpick wrapping from beginning of the glue up to the point. Hold the wraps until the yarn adheres. Trim the yarn even when glue is dry.
After horn is dry, place small amount of glue on unwrapped end of toothpick and insert it at the center of the unicorn's forehead, about 2 rounds down from ears. Allow glue to dry.
Weave in and trim any remaining ends.
LM6288 Sparkle & Shimmer Crochet Unicorn
Sparkle & Shimmer Crochet Unicorn Page 25

Find more ideas & inspiration: redheart.com©2018 Coats & Clark Page 4 of 4
ABBREVIATIONSA, B, C, and D = Color A, Color B, Color C, and Color D; ch = chain; hdc = half double crochet; sc = single crochet; st(s) = stitch(es); () = work directions in parentheses into same st; [ ] = work directions in brackets the number of times specified.
LM6288 Sparkle & Shimmer Crochet Unicorn
Sparkle & Shimmer Crochet Unicorn Page 26

Find more ideas & inspiration: redheart.com©2018 Coats & Clark Page 1 of 4
Buz & Belinda Bumblebee
RED HEART® Amigurumi: 1 ball 9247 Bumble Bee
Susan Bates® Knitting Needles: 2.75 mm [US 2] needles for working small circumferences and I-cord. Choose double pointed needles, 2 short circulars or 1 long circular, whichever you prefer.
Stitch marker, stuffing, four 20 mm safety eyes (two for each bee), pins, yarn needle.
Optional: Knee high stocking and plastic pellets for weighted stuffing,
GAUGE: 25 sts = about 4" [10 cm]; 32 rounds = about 4" [10 cm] in Stockinette stitch worked in rounds (knit every round). EXACT GAUGE IS NOT CRITICAL TO THIS PROJECT. Use any size needles to obtain the gauge.
RED HEART® Amigurumi, Art E885 available in
3.5 oz (100 g) 239 yds (219m) cakes
LM6289
knittingDesigned by Rebecca Olson
What you will need:
BUY YARN
continued...
Get your honey jars ready for these two! They’re ready to go looking for flowers
while they buzz around with you.
Bee measures about 5½" [14 cm] long and about 3½" [9 cm] tall, not including wings and legs.
Special Stitcheskfb (Knit into front and back) = Knit next stitch but do not remove from needle, knit into back loop of same stitch and remove from needle – 1 st increased.M1L (make 1 left) = Insert left needle from front to back under strand between needles, knit strand through the back loop, twisting it to prevent a hole – 1 st increased.ssk (slip, slip, knit) = Slip next 2 stitches, one at a time, as if to knit to right needle, insert point of left needle through front of stitches, knit these sts together through back loop – 1 st decreased.
Special TechniqueI-Cord: Working with two double-pointed needles, knit all the sts, *do not turn work. Slide all the stitches to opposite end of needle. Carry yarn tightly across back of work, and knit all the stitches; repeat from * until the desired number of rounds have been worked or I-cord measures desired length.
Notes1. Before beginning, separate the
different color sections of the yarn as follows: Pop the center color out by pushing gently on the center of the ball so that it comes out intact. Find the point where the color changes and cut the yarn. Repeat this process for the remaining yarn colors by carefully pushing the rings of color out of the larger ring and cutting. Wind each color into a separate ball
to prevent tangling. You may find that one color appears both in the center, and on the outside of the ball, wind together or separately. In the pattern instructions, the yellow color is referred to as A, the black as B, the white as C, and the silver as D.
2. Each bee is made from 10 pieces: Body, stinger, 2 wings, and 6 legs.
3. Pieces are worked in rounds.4. Pieces are sewn together using yarn
tails or yarn scraps. 5. Pattern contains instructions for
making two bees in one colorway each.
6. Yarn color is changed to form stripes on bee's body. To change yarn color on bee's body, simply break the yarn at the end of the round and tie it in a firm square knot with the new color. Because no one will see the inside of the toy, there is no need to weave in ends.
7. To prevent a step up, or jog, between one yarn color and the next, do the following: Work one round in the new color. On the first stitch of the next round, slip the stitch directly below the first stitch onto the needle. Knit the slipped stitch and the first stitch together. Work the rest of the round as normal.
8. Take care to attach safety eyes before head opening becomes too small. Do not use safety eyes if toy is intended for a child 2 years of age or younger.
Buz & Belinda Knit BumblebeePage 27
Find more ideas & inspiration: redheart.com©2018 Coats & Clark Page 2 of 4
See next 2 pages for chart and alternate photos
BODYNote: Before beginning, choose a colorway and refer to colorway lists to determine when to change yarn color.Colorway #1: Work Rounds 1-17 with B, Rounds 18-27 with A, Rounds 28-32 with B, and Rounds 33-51 with A.Colorway #2: Work Rounds 1-23 with A, Rounds 24-27 with B, Rounds 28-32 with A, and Rounds 33-51 with B.
Beginning from at bottom of bee, cast on 3 sts. Place marker for beginning of round. Taking care not to twist sts; prepare to work in rounds.Round 1 (right side): [Kfb] 3 times—6 sts.Round 2: [Kfb, k1] 3 times—9 sts.Round 3: [Kfb] 9 times—18 sts.Round 4: Knit.Round 5: [Kfb, k2] 6 times—24 sts.Round 6: Knit.Round 7: [Kfb, k3] 6 times—30 sts.Round 8: Knit.Round 9: [Kfb, k4] 6 times—36 sts.Round 10: Knit.Round 11: [Kfb, k5] 6 times—42 sts.Round 12: Knit.Round 13: [Kfb, k6] 6 times—48 sts.Round 14: Knit.Round 15: [Kfb, k7] 6 times—54 sts.Round 16: Knit.Round 17: [Kfb, k8] 6 times—60 sts.Rounds 18–31: Knit.Round 32: [K2tog, k8] 6 times—54 sts.Rounds 33–35: Knit.Round 36: [K2tog, k7] 6 times—48 sts.Rounds 37–39: Knit.Round 40: [K2tog, k6] 6 times—42 sts.Rounds 41–43: Knit.Round 44: [K2tog, k5] 6 times—36 sts.Rounds 45 and 46: Knit.Using photograph as a guide for placement, attach safety eyes. Begin filling body with stuffing or a
combination of optional knee high filled with plastic pellets, and stuffing. Continue as work progresses.Round 47: [K2tog, k4] 6 times—30 sts.Round 48: [K2tog, k3] 6 times—24 sts.Round 49: [K2tog, k2] 6 times—18 sts.Round 50: [K2tog, k1] 6 times—12 sts.Round 51: [K2tog] 6 times—6 sts.Cut yarn, leaving a long tail. Weave tail through stitches of last round and pull to close opening. Secure tail and weave to inside of body.
STINGERNote: This back part of bee is a small half sphere stinger base and stinger. Later, it is sewn to the bottom of body.With B, cast on 30 sts.Place marker for beginning of round. Taking care not to twist sts, prepare to work in rounds.Rounds 1–3: Knit.Round 4: [K2tog, k3] 6 times—24 sts.Rounds 5 and 6: Knit.Round 7: [K2tog, k2] 6 times—18 sts.Rounds 8 and 9: Knit.Note: When stitches have been sufficiently decreased, you may prefer to work the rounds as I-cord (see Special Technique above).Round 10: [K3tog] 6 times—6 sts.Round 11: [K2tog] 3 times—3 sts.Rounds 12–14: Knit.Cut yarn, leaving a long tail. Weave tail through stitches of last round and pull to close opening. Secure tail and weave to inside of piece.
WINGS (make 2 for each bee)Use C for colorway #1 bee and use D for colorway #2 bee.Cast on 6 sts.
Place marker for beginning of round. Taking care not to twist sts, prepare to work in rounds.Round 1: [Kfb] 6 times—12 sts.Round 2: Knit.Round 3: [K1, M1L, k1, M1L, k2, M1L, k1, M1L, k1] twice—20 sts.Round 4: Knit.Round 5: [K1, M1L, k1, M1L, k6, M1L, k1, M1L, k1] twice—28 sts.Round 6: Knit.Round 7: [K1, M1, k12, M1L, k1] twice—32 sts.Rounds 8–11: Knit.Round 12: [Ssk, k12, k2tog] twice—28 sts.Rounds 13 and 14: Knit.Round 15: [Ssk, k10, k2tog] twice—24 sts.Round 16: Knit.Round 17: [Ssk, k8, k2tog] twice—20 sts.Round 18: Knit.Round 19: [Ssk, k6, k2tog] twice—16 sts.Round 20: [Ssk, k4, k2tog] twice—12 sts.Round 21: [K2tog] 6 times—6 sts.Cut yarn, leaving a 15" [38 cm] tail. Weave tail through stitches of last round and pull to close opening. Do not weave in tail; remainder of tail will be used later to sew wing to body.
LEGS (make 6 for each bee)With B, leaving a long beginning tail, cast on 5 sts.Rounds 1–7: Using I-Cord technique, knit 7 rounds.Cut yarn, leaving a long tail. Weave tail through stitches of last round and pull to close opening. Secure tail and weave to inside of leg. Do not weave in beginning tail, it will be used later to sew leg to body.
FINISHINGReferring to photograph as a guide to placement, pin the following pieces together and then use yarn tails or yarn scraps to sew the pieces together.1. Sew stinger base over bottom of
body, stuffing the base of the stinger before completing seam. Note: Designer recommends using mattress stitch.
2. Sew points of two wings together. 3. Sew the pair of wings to center top
of bee's back. Sew only the center part of the wings to the back, about 1" [2.5 cm] from where the wings meet.
4. Sew legs to underside of body.
Weave in any remaining ends.
ABBREVIATIONS A, B, C, and D = Color A, Color B, Color C, and Color D; k = knit; k2tog = knit next 2 sts together; k3tog = knit 3 sts together; st(s) = stitch(es); [ ] = work directions in brackets the number of times specified; * = repeat whatever follows the * as indicated.
LM6289 Buz & Belinda Bumblebee
Buz & Belinda Knit BumblebeePage 28

Find more ideas & inspiration: redheart.com©2018 Coats & Clark Page 3 of 4
LM6289 Buz & Belinda Bumblebee
Buz & Belinda Knit BumblebeePage 29

Find more ideas & inspiration: redheart.com©2018 Coats & Clark Page 4 of 4
LM6289 Buz & Belinda Bumblebee
Buz & Belinda Knit BumblebeePage 30

Find more ideas & inspiration: redheart.com©2018 Coats & Clark Page 1 of 2
Henry & Honey Bumblebee
RED HEART® Amigurumi: 1 ball 9247 Bumble Bee
Susan Bates® Crochet Hook: 2.75 mm [US C-2]
Stitch marker, four 20 mm safety eyes (two for each bee), stuffing, yarn needle
Optional: Knee high stocking and plastic pellets for weighted stuffing
GAUGE: 28 sts = about 4" [10 cm]; 32 rounds = about 4" [10 cm] in single crochet (sc). EXACT GAUGE IS NOT CRITICAL TO THIS PROJECT. Use any size hook to obtain the gauge.
RED HEART® Amigurumi, Art E885 available in
3.5 oz (100 g) 239 yds (219m) cakes
LM6290
crochetDesigned by Michelle Wilcox
What you will need:
BUY YARNcontinued...
Henry & Honey are always out and about looking for pretty flowers! Get your honey
jar ready, they’ll fill it in no time!
Bee measures about 4¼" [11 cm] long.
Special Stitchsc2tog (single crochet 2 stitches together) = [Insert hook in next stitch, yarn over and pull up a loop] twice, yarn over and draw through all 3 loops on hook.
Notes1. Before beginning, separate the
different color sections of the yarn as follows: Pop the center color out by pushing gently on the center of the ball so that it comes out intact. Find the point where the color changes and cut the yarn. Repeat this process for the remaining yarn colors by carefully pushing the rings of color out of the larger ring and cutting. Wind each color into a ball to prevent tangling. You may find that one color appears both in the center, and on the outside of the ball, wind together or separately. In the pattern instructions, the yellow color is referred to as A, the black as B, the white as C, and the silver as D.
2. Bee is made from 9 pieces: Head/body, 2 wings, and 6 legs.
3. Head/body and wings are worked in continuous rnds (spiral) with right side always facing. Legs are worked in one row.
4. Pieces are sewn together using yarn tails or yarn scraps.
5. Pattern contains instructions for making two identical bees in different colorways, colorway #1 and colorway #2.
6. Yarn color is changed to form stripes on bee's body. To change yarn color, work last stitch of old color to last yarn over. Yarn over with new color and draw through all loops on hook
to complete stitch. Carry color not in use along the inside of the piece until next needed.
7. Take care to attach safety eyes before head opening becomes too small. Do not use safety eyes if toy is intended for a child 2 years of age or younger.
HEAD/BODYNote: Before beginning, choose a colorway and refer to colorway lists to determine when to change yarn color.
Colorway #1: Work Rounds 1-11 with A, Rounds 12-14 with B, Rounds 15-20 with A, and Rounds 21-31 with B.
Colorway #2: Work Rounds 1-11 with B, Rounds 12-15 with A, Rounds 16-18 with B, Rounds 19-27 with A, and Rounds 28-31 with B.
Beginning at top of head, ch 2.Round 1 (right side): Work 6 sc in 2nd ch from hook; do not join, work in continuous rounds (spiral)—6 sc.Place a marker in the last sc worked to indicate end of round. Move marker up as each round is completed.Round 2: Work 2 sc in each of next 6 sts—12 sc.Round 3: [Sc in next st, 2 sc in next st] 6 times—18 sc.Round 4: [Sc in next 2 sts, 2 sc in next st] 6 times—24 sc.Round 5: [Sc in next 3 sts, 2 sc in next st] 6 times—30 sc.Round 6: [Sc in next 4 sts, 2 sc in next st] 6 times—36 sc.
Henry & Honey Crochet BumblebeePage 31
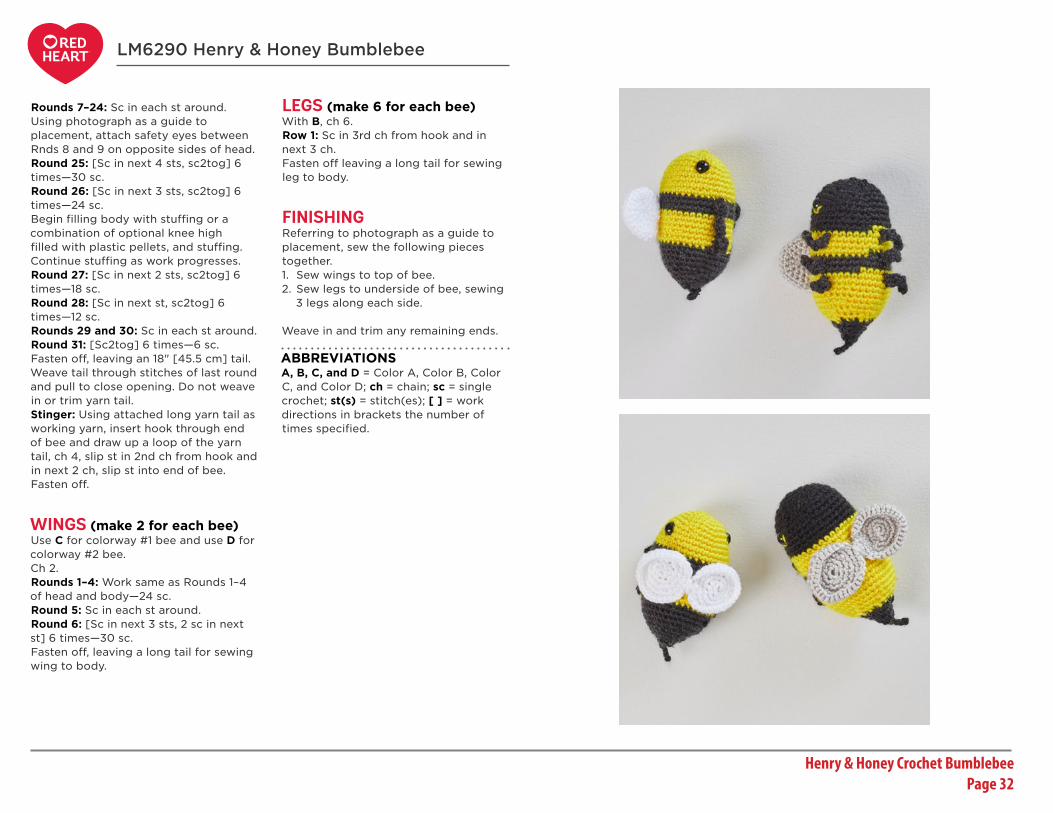
Find more ideas & inspiration: redheart.com©2018 Coats & Clark Page 2 of 2
Rounds 7–24: Sc in each st around.Using photograph as a guide to placement, attach safety eyes between Rnds 8 and 9 on opposite sides of head.Round 25: [Sc in next 4 sts, sc2tog] 6 times—30 sc.Round 26: [Sc in next 3 sts, sc2tog] 6 times—24 sc.Begin filling body with stuffing or a combination of optional knee high filled with plastic pellets, and stuffing. Continue stuffing as work progresses.Round 27: [Sc in next 2 sts, sc2tog] 6 times—18 sc.Round 28: [Sc in next st, sc2tog] 6 times—12 sc.Rounds 29 and 30: Sc in each st around.Round 31: [Sc2tog] 6 times—6 sc.Fasten off, leaving an 18" [45.5 cm] tail. Weave tail through stitches of last round and pull to close opening. Do not weave in or trim yarn tail.Stinger: Using attached long yarn tail as working yarn, insert hook through end of bee and draw up a loop of the yarn tail, ch 4, slip st in 2nd ch from hook and in next 2 ch, slip st into end of bee. Fasten off.
WINGS (make 2 for each bee)Use C for colorway #1 bee and use D for colorway #2 bee.Ch 2.Rounds 1–4: Work same as Rounds 1–4 of head and body—24 sc. Round 5: Sc in each st around.Round 6: [Sc in next 3 sts, 2 sc in next st] 6 times—30 sc.Fasten off, leaving a long tail for sewing wing to body.
LEGS (make 6 for each bee)With B, ch 6.Row 1: Sc in 3rd ch from hook and in next 3 ch.Fasten off leaving a long tail for sewing leg to body.
FINISHINGReferring to photograph as a guide to placement, sew the following pieces together.1. Sew wings to top of bee.2. Sew legs to underside of bee, sewing
3 legs along each side.
Weave in and trim any remaining ends.
ABBREVIATIONS A, B, C, and D = Color A, Color B, Color C, and Color D; ch = chain; sc = single crochet; st(s) = stitch(es); [ ] = work directions in brackets the number of times specified.
LM6290 Henry & Honey Bumblebee
Henry & Honey Crochet BumblebeePage 32
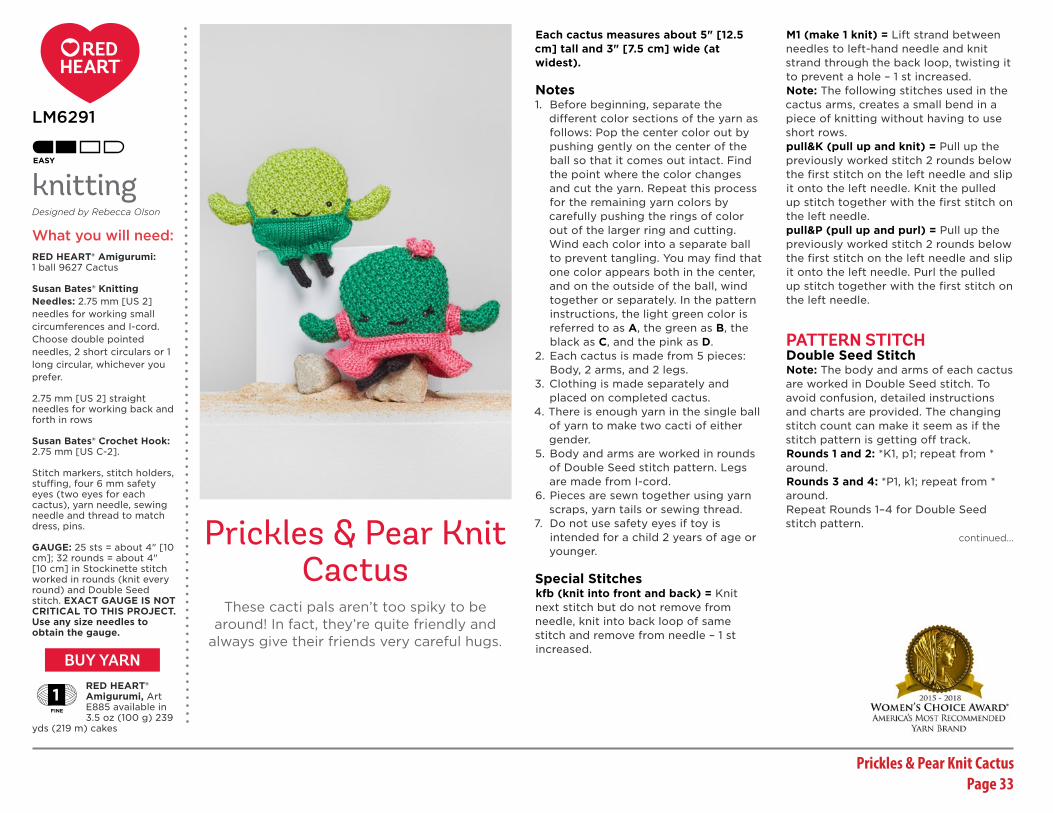
Find more ideas & inspiration: redheart.com©2018 Coats & Clark Page 1 of 5
Prickles & Pear Knit Cactus
RED HEART® Amigurumi: 1 ball 9627 Cactus
Susan Bates® Knitting Needles: 2.75 mm [US 2] needles for working small circumferences and I-cord. Choose double pointed needles, 2 short circulars or 1 long circular, whichever you prefer.
2.75 mm [US 2] straight needles for working back and forth in rows
Susan Bates® Crochet Hook: 2.75 mm [US C-2].
Stitch markers, stitch holders, stuffing, four 6 mm safety eyes (two eyes for each cactus), yarn needle, sewing needle and thread to match dress, pins.
GAUGE: 25 sts = about 4" [10 cm]; 32 rounds = about 4" [10 cm] in Stockinette stitch worked in rounds (knit every round) and Double Seed stitch. EXACT GAUGE IS NOT CRITICAL TO THIS PROJECT. Use any size needles to obtain the gauge.
RED HEART® Amigurumi, Art E885 available in 3.5 oz (100 g) 239
yds (219 m) cakes
LM6291
knittingDesigned by Rebecca Olson
What you will need:
BUY YARN
continued...
These cacti pals aren’t too spiky to be around! In fact, they’re quite friendly and
always give their friends very careful hugs.
Each cactus measures about 5" [12.5 cm] tall and 3" [7.5 cm] wide (at widest).
Notes1. Before beginning, separate the
different color sections of the yarn as follows: Pop the center color out by pushing gently on the center of the ball so that it comes out intact. Find the point where the color changes and cut the yarn. Repeat this process for the remaining yarn colors by carefully pushing the rings of color out of the larger ring and cutting. Wind each color into a separate ball to prevent tangling. You may find that one color appears both in the center, and on the outside of the ball, wind together or separately. In the pattern instructions, the light green color is referred to as A, the green as B, the black as C, and the pink as D.
2. Each cactus is made from 5 pieces: Body, 2 arms, and 2 legs.
3. Clothing is made separately and placed on completed cactus.
4. There is enough yarn in the single ball of yarn to make two cacti of either gender.
5. Body and arms are worked in rounds of Double Seed stitch pattern. Legs are made from I-cord.
6. Pieces are sewn together using yarn scraps, yarn tails or sewing thread.
7. Do not use safety eyes if toy is intended for a child 2 years of age or younger.
Special Stitcheskfb (knit into front and back) = Knit next stitch but do not remove from needle, knit into back loop of same stitch and remove from needle – 1 st increased.
M1 (make 1 knit) = Lift strand between needles to left-hand needle and knit strand through the back loop, twisting it to prevent a hole – 1 st increased.Note: The following stitches used in the cactus arms, creates a small bend in a piece of knitting without having to use short rows.pull&K (pull up and knit) = Pull up the previously worked stitch 2 rounds below the first stitch on the left needle and slip it onto the left needle. Knit the pulled up stitch together with the first stitch on the left needle.pull&P (pull up and purl) = Pull up the previously worked stitch 2 rounds below the first stitch on the left needle and slip it onto the left needle. Purl the pulled up stitch together with the first stitch on the left needle.
PATTERN STITCHDouble Seed StitchNote: The body and arms of each cactus are worked in Double Seed stitch. To avoid confusion, detailed instructions and charts are provided. The changing stitch count can make it seem as if the stitch pattern is getting off track.Rounds 1 and 2: *K1, p1; repeat from * around.Rounds 3 and 4: *P1, k1; repeat from * around.Repeat Rounds 1–4 for Double Seed stitch pattern.
Prickles & Pear Knit Cactus Page 33

Find more ideas & inspiration: redheart.com©2018 Coats & Clark Page 2 of 5
continued...
BODYNotes1. Body is worked from the bottom to
the top. Markers are placed around the body to keep track of increase locations. Once the markers are placed, slip them as you come to them unless otherwise specified.
2. Body can be worked by following written instructions or reading chart. Read all rows of chart from right to left.
With A or B, cast on 36 sts. Place marker for beginning of round. Prepare to work in rounds.Rounds 1–4: Beginning with Round 1 of pattern, work in Double Seed stitch for 4 rounds. Round 5 (increase round): [K1, place marker, M1, *p1, k1; repeat from * 7 more times, place marker, M1, p1] twice—40 sts. Note: There should now be five markers on the needle(s), including the beginning of round marker.Rounds 6–9: Beginning with Round 4 of pattern, work in Double Seed stitch for 4 rounds.Round 10 (increase round): [P1, slip marker, M1, *k1, p1; repeat from * to next marker, slip marker, M1, k1] twice—44 sts.Rounds 11–14: Beginning with Round 3 of pattern, work in Double Seed stitch for 4 rounds.Round 15 (increase round): Repeat Round 10—48 sts.Rounds 16-19: Beginning with Round 2 of pattern, work in Double Seed stitch for 4 rounds.Round 20 (increase round): [K1, slip marker, M1, *p1, k1; repeat from * to next marker, slip marker, M1, p1] twice—52 sts.
Rounds 21–24: Beginning with Round 1 of pattern, work in Double Seed stitch for 4 rounds.Round 25 (increase round): [K1, remove marker, M1, *p1, k1; repeat from * to next marker, remove marker, M1, p1, place marker; k1, remove marker, M1, *p1, k1; repeat from * to next marker, remove marker, M1, p1—56 sts. Note: There should now be only two markers on the needle(s), including the beginning of round marker. Rounds 26–32: Beginning with Round 4 of pattern, work in Double Seed stitch for 7 rounds.Rounds 33 (decrease round): [K2tog,
*p1, k1; repeat from * to 2 sts before next marker, p2tog, slip marker] twice—52 sts. Note: The final decrease (p2tog) is worked at the end of the round, just before slipping the beginning of round marker.Round 34: *K1, p1; repeat from * around.Round 35 (decrease round): Repeat Round 33—48 sts.Rounds 36 and 37 (decrease rounds): [P2tog, *k1, p1; repeat from * to 2 sts before next marker, k2tog, slip marker] twice—40 sts.Round 38 (decrease round): [P2tog, k2tog, *p1, k1; repeat from * to 4 sts before next marker, p2tog, k2tog, slip marker] twice—32 sts.Rounds 39 and 40 (decrease rounds): [K2tog, p2tog, *k1, p1; repeat from * to 4 sts before next marker, k2tog, p2tog, slip marker] twice—16 sts.Remove markers while working next round.
Round 41 (decrease round): [P2tog, k2tog] 4 times—8 sts.Cut yarn, leaving a long tail. Thread tail through stitches of last round and pull to close opening. Secure tail and weave to inside of body.Using photograph as a guide, attach safety eyes, about 1½" [4 cm] above lower edge and about 10 stitches apart. Stuff the body and sew lower edges together, using mattress stitch.
ARMS (make 2 for each cactus)Notes 1. Arms are worked from the shoulder
to the hand.2. Arms can be worked by following
written instructions or reading chart. Read all rows of chart from right to left.
With same yarn color as used for body and leaving a long beginning tail for sewing, cast on 12 sts.Place marker for beginning of round. Prepare to work in rounds.Rounds 1–6: Beginning with Round 1 of pattern, work in Double Seed stitch for 6 rounds.Round 7: P1, [pull&K, pull&P] twice, k1,
*p1, k1; repeat from * around.Rounds 8–10: Beginning with Round 4 of pattern, work in Double Seed stitch for 3 rounds.Round 11: Repeat Round 7.Rounds 12–17: Beginning with Round 4 of pattern, work in Double Seed stitch for 6 rounds.
Round 18: [K2tog, p2tog] 3 times—6 sts.Cut yarn, leaving a long tail. Thread tail through stitches of last round and pull to close opening. Secure tail and weave to inside of arm.Stuff the arms, shaping the stuffing to emphasize the bend.
LEGS (make 2 for each cactus)Note: Legs are made from I-cord.
With C, cast on 6 sts, knit all the sts, *do not turn work. Slide all the stitches to opposite end of needle. Carry yarn tightly across back of work, and knit all the stitches; repeat from * 14 more times.Cut yarn, leaving a long tail. Thread tail through stitches of last round and pull. Do not trim tail, it can be used later to sew leg to body.
OVERALLS (make for boy cactus)Notes1. Overalls are worked from the pant
legs up to the waistband.2. Each pant leg is worked separately
then joined together and body of pants worked.
Pant Leg (make 2)With B, cast on 12 sts. Place marker for beginning of round. Prepare to work in rounds.Rounds 1–4: Knit.Cut yarn, leaving a long tail for sewing. Place these stitches on a holder then make second pant leg and keep the stitches of the second pant leg on the needle(s).
LM6291 Prickles & Pear Knit Cactus
Prickles & Pear Knit Cactus Page 34
Find more ideas & inspiration: redheart.com©2018 Coats & Clark Page 3 of 5
Join Pant LegsRound 5: Beginning with second pant leg, k6; working over first pant leg sts on holder, k12; continuing over second pant leg sts, k6—24 sts.Round 6: [K1, M1, k10, M1, k1] twice—28 sts.Round 7: Knit.Round 8: [K1, M1, k12, M1, k1] twice—32 sts.Round 9: [K1, M1, k1, M1, k12, M1, k1, M1, k1] twice—40 sts.Round 10: [K1, M1, k1, M1, k16, M1, k1, M1, k1] twice—48 sts.Round 11: Knit.Round 12: [K1, M1, k1, M1, k20, M1, k1, M1, k1] twice—56 sts.Rounds 13-16: Knit.Bind off.Carefully press the overalls flat with an iron to prevent the waistband from curling.
StrapsWith right side of overalls facing, place two markers on top edge of front and back, centered over side edges and about 4 stitches apart.Note: The two straps are slightly different lengths. When you sew the arms to the body, sew one arm lower than the other to fit the overall straps.left strap: With crochet hook, draw up a loop of B in left front marked stitch, chain 12 or until chain measures about 2½" [6.5 cm]; slip stitch in left back marked stitch. Remove left side markers. Fasten off and weave in ends.right strap: With crochet hook, draw up a loop of B in right back marked stitch, chain 9 or until chain measures about 2" [5 cm]; slip stitch in right front marked stitch. Remove right side markers. Fasten off and weave in ends.
DRESS (make for girl cactus)Notes1. Dress is made from 4 pieces: 2
sleeves, a bodice, and a skirt.2. Pieces are sewn together to form
dress.
Sleeves (make 2)With D, cast on 14 sts. Place marker for beginning of round. Prepare to work in rounds.Round 1: Knit.Round 2: K3, kfb, k6, kfb, k3—16 sts.Rounds 3 and 4: Knit.Bind off, leaving a long tail. BodiceNote: Bodice is worked back and forth in rows.With D, cast on 45 sts.Rows 1–5: Beginning with a wrong side (purl) row, work in Stockinette stitch (knit on right side, purl on wrong side) for 5 rows.Bind off, leaving a long tail for sewing.
SkirtWith D, cast on 14 sts. Place marker for beginning of round. Prepare to work in rounds.Rounds 1–8: knit.Bind off, leaving a long tail for sewing.
Attach SleevesFold the bodice in half, bringing the side edges together. Beginning at cast-on edge, sew the first 3 rows of side edges together, using mattress stitch.first sleeve: Place one sleeve in the remaining opening, with bind-off edge of sleeve to the outside and cast-on edge against side edge opening. Sew the bottom third of the sleeve into the side seam.
second sleeve: Place remaining sleeve on top of bodice fold, directly across from first sleeve with bind-off edge of sleeve to the outside and cast-on edge against bind-off edge of bodice. Sew the bottom 4 stitches of the sleeve cast-on edge to the top of the bodice.
Attach SkirtWith sewing needle and thread, loosely baste around the bind-off edge of skirt. Pull on the end of the basting thread to gather the skirt into ruffles. Pin the gathered top of skirt to the cast-on edge of the bodice and sew in place, using mattress stitch.
FLOWER (make for girl cactus)Crochet hook and D, chain 6, slip st in 6th chain from hook to make first petal, [chain 5, slip stitch in same chain to make next petal] 4 times to make a total of 5 petals.Fasten off, leaving a long tail for sewing. Thread long tail through base of petals to secure. Do not trim tail.
FINISHINGReferring to photograph as a guide to placement, use yarn tails or yarn scraps to sew the following pieces together.1. Sew arms to body. Sew one arm lower
than other arm to fit the dress sleeves or overall straps. Lower arm should be slightly below the eyes and higher arm should be slightly above the eyes.
2. Sew legs to bottom of body, each about 1" [2.5 cm] from the side edge.
3. For girl cactus, sew flower to top of side of head.
Dress the cactus in the dress or overalls.
Weave in and trim any remaining ends.
ABBREVIATIONS A, B, C, and D = Color A, Color B, Color C, and Color D; k = knit; k2tog = knit next 2 sts together; p = purl; p2tog = purl next 2 sts together; st(s) = stitch(es); [ ] = work directions in brackets the number of times specified;
* = repeat whatever follows the * as indicated.
LM6291 Prickles & Pear Knit Cactus
See next 2 pages for alternate photos and charts
Prickles & Pear Knit Cactus Page 35
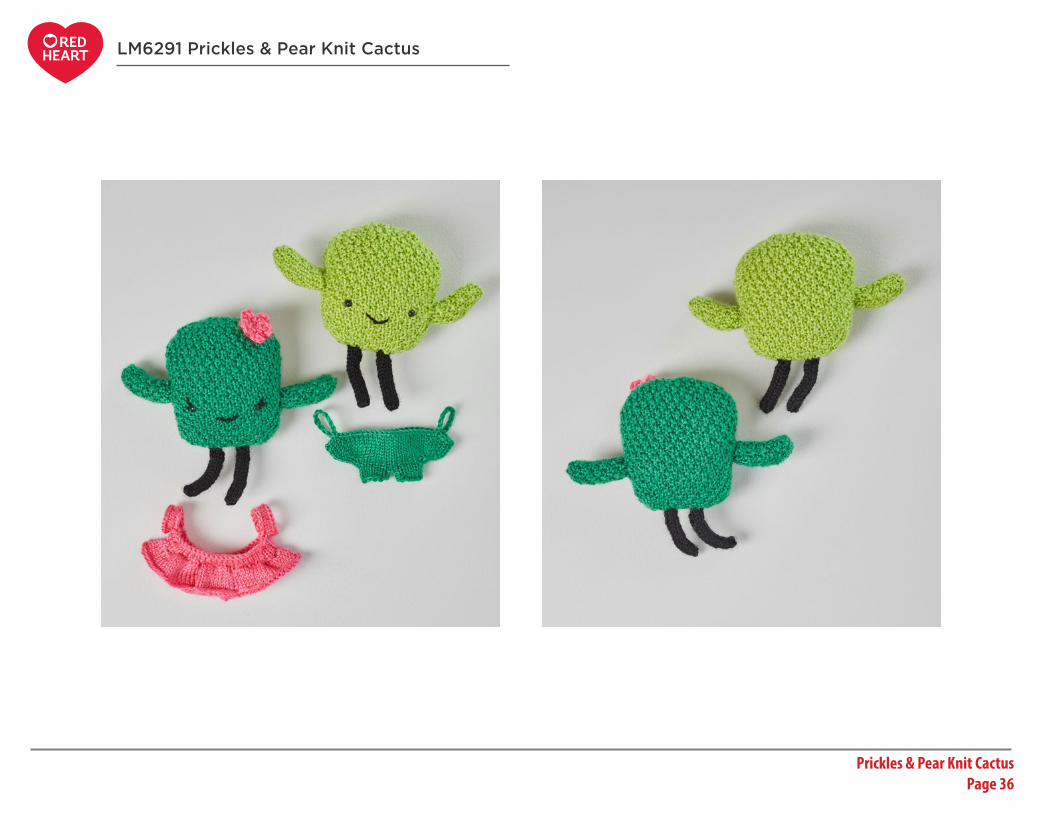
Find more ideas & inspiration: redheart.com©2018 Coats & Clark Page 4 of 5
LM6291 Prickles & Pear Knit Cactus
Prickles & Pear Knit Cactus Page 36

Find more ideas & inspiration: redheart.com©2018 Coats & Clark Page 5 of 5
LM6291 Prickles & Pear Knit Cactus
1234
Arm Chart
567891011121314151617
18
1234
56789
1011121314
1516171819
2021222324
2526272829303132
3334
3536
3738
3940
41
work twice
Body Chart
knit on right side, purl on wrong side
purl on right side, knit on wrong side
make 1 (M1)
KEY
k2tog (knit 2 stitches together)
p2tog (purl 2 stitches together)
pull&P (pull up and purl)
pull&K (pull up and knit)
Prickles & Pear Knit Cactus Page 37
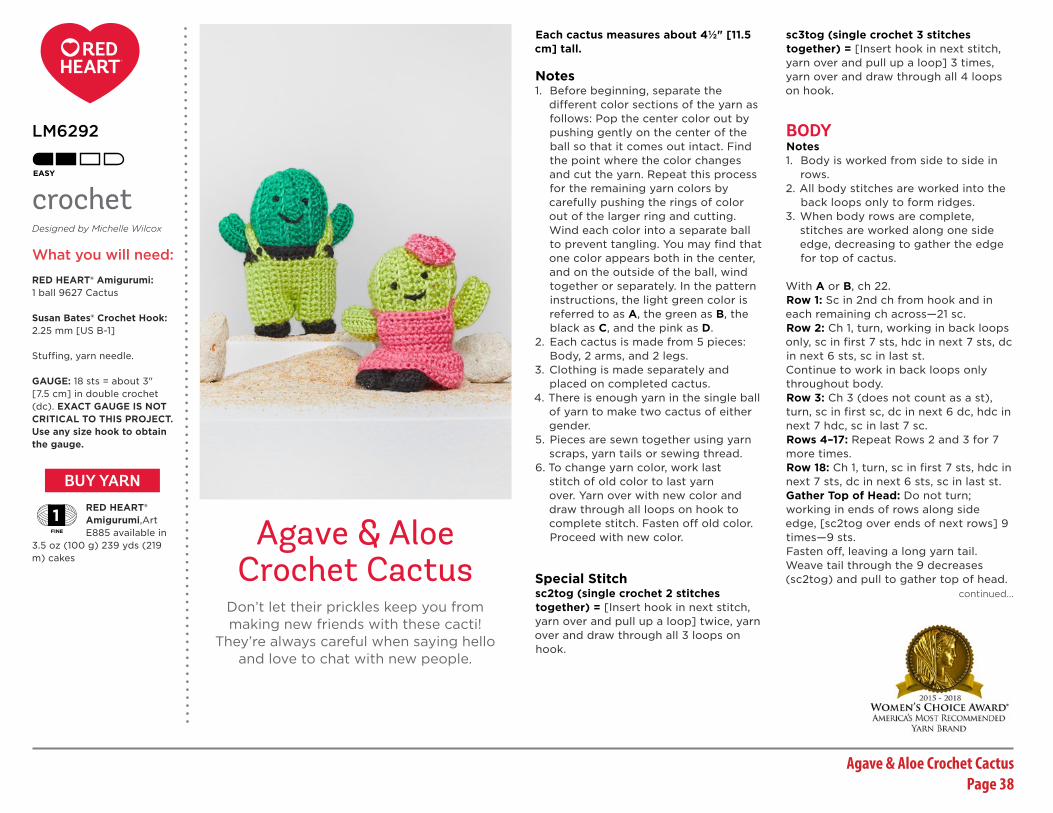
Find more ideas & inspiration: redheart.com©2018 Coats & Clark Page 1 of 3
Agave & Aloe Crochet Cactus
RED HEART® Amigurumi: 1 ball 9627 Cactus
Susan Bates® Crochet Hook: 2.25 mm [US B-1]
Stuffing, yarn needle.
GAUGE: 18 sts = about 3" [7.5 cm] in double crochet (dc). EXACT GAUGE IS NOT CRITICAL TO THIS PROJECT. Use any size hook to obtain the gauge.
RED HEART® Amigurumi,Art E885 available in
3.5 oz (100 g) 239 yds (219 m) cakes
LM6292
crochetDesigned by Michelle Wilcox
What you will need:
BUY YARN
continued...Don’t let their prickles keep you from making new friends with these cacti!
They’re always careful when saying hello and love to chat with new people.
Each cactus measures about 4½" [11.5 cm] tall.
Notes1. Before beginning, separate the
different color sections of the yarn as follows: Pop the center color out by pushing gently on the center of the ball so that it comes out intact. Find the point where the color changes and cut the yarn. Repeat this process for the remaining yarn colors by carefully pushing the rings of color out of the larger ring and cutting. Wind each color into a separate ball to prevent tangling. You may find that one color appears both in the center, and on the outside of the ball, wind together or separately. In the pattern instructions, the light green color is referred to as A, the green as B, the black as C, and the pink as D.
2. Each cactus is made from 5 pieces: Body, 2 arms, and 2 legs.
3. Clothing is made separately and placed on completed cactus.
4. There is enough yarn in the single ball of yarn to make two cactus of either gender.
5. Pieces are sewn together using yarn scraps, yarn tails or sewing thread.
6. To change yarn color, work last stitch of old color to last yarn over. Yarn over with new color and draw through all loops on hook to complete stitch. Fasten off old color. Proceed with new color.
Special Stitchsc2tog (single crochet 2 stitches together) = [Insert hook in next stitch, yarn over and pull up a loop] twice, yarn over and draw through all 3 loops on hook.
sc3tog (single crochet 3 stitches together) = [Insert hook in next stitch, yarn over and pull up a loop] 3 times, yarn over and draw through all 4 loops on hook.
BODYNotes1. Body is worked from side to side in
rows.2. All body stitches are worked into the
back loops only to form ridges.3. When body rows are complete,
stitches are worked along one side edge, decreasing to gather the edge for top of cactus.
With A or B, ch 22.Row 1: Sc in 2nd ch from hook and in each remaining ch across—21 sc.Row 2: Ch 1, turn, working in back loops only, sc in first 7 sts, hdc in next 7 sts, dc in next 6 sts, sc in last st.Continue to work in back loops only throughout body.Row 3: Ch 3 (does not count as a st), turn, sc in first sc, dc in next 6 dc, hdc in next 7 hdc, sc in last 7 sc.Rows 4–17: Repeat Rows 2 and 3 for 7 more times.Row 18: Ch 1, turn, sc in first 7 sts, hdc in next 7 sts, dc in next 6 sts, sc in last st.Gather Top of Head: Do not turn; working in ends of rows along side edge, [sc2tog over ends of next rows] 9 times—9 sts.Fasten off, leaving a long yarn tail. Weave tail through the 9 decreases (sc2tog) and pull to gather top of head.
Agave & Aloe Crochet CactusPage 38

Find more ideas & inspiration: redheart.com©2018 Coats & Clark Page 2 of 3
continued...
Thread remainder of tail onto yarn needle and sew edges of first and last row together. Stuff body then sew lower edges together for bottom of cactus.Facial features: Using photograph as a guide, with C embroider French knot eyes and couched st mouth.
ARMS (make 2 for each cactus)Notes 1. Arms worked from side to side in
rows.2. All arm stitches are worked into the
back loops only to form ridges.
With same yarn color as used for body, ch 10.Row 1: Sc in 2nd ch from hook and in each rem ch across—9 sc. Rows 2–9: Ch 1, turn, working in back loops only, sc in each st across.Fasten off, leaving a long tail for sewing. Weave tail through ends of rows along one side edge and pull to gather for hand end of arm. Thread remainder of tail onto yarn needle and sew edges of first and last row together. Stuff arm. Bend arm in middle and sew a few stitches to maintain the bend and make hand end point upwards.
LEGS (make 2 for each cactus)Beginning at bottom of foot, with C, ch 13.Row 1: Sc in 2nd ch from hook and in each rem ch across—12 sc. Row 2: Ch 1, turn, sc in first 3 sts, [sc2tog] 3 times, sc in last 3 sts—9 sc.Row 3: Ch 1, turn, sc in first 3 sts, sc3tog, sc in last 3 sts—7 sc.Rows 4–7: Ch 1, turn, sc in each st across.
Fasten off, leaving a long tail for sewing. Fold piece in half and sew side and lower edges together. Stuff piece.
OVERALLS (make for boy cactus) Notes1. Overalls are worked side to side,
beginning at one side, worked all the way across the front then across the back.
2. At the center of the front and back, stitches are left unworked to separate the legs and form the crotch.
With A, ch 11.Row 1 (right side): Sc in 2nd ch from hook and in each rem ch across—10 sc. Rows 2–10: Ch 1, turn, sc in each st across.Row 11 (crotch): Ch 1, turn, sc in first 7 sts; leave remaining sts unworked—7 sc.Row 12: Ch 4, turn, sc in 2nd ch from hook and in next 2 ch, sc in next 7 sc—10 sc.Rows 13–30: Ch 1, turn, sc in each st across.Rows 31 and 32: Repeat Rows 11 and 12.Rows 33–40: Ch 1, turn, sc in each st across.Do not fasten off.
WaistbandRow 1: Do not turn, working in ends of rows along long side edge (waist edge), work sc evenly spaced along edge and change to C in last st. Leave a long yarn tail when fastening off A, for sewing.Rows 2 and 3: With C, ch 1, turn, sc in each st across.Fasten off, leaving a long yarn tail for sewing.
Sew beginning and ending edges together for one side seam. Sew inseam and crotch seam.
Strap (make 2)With A, ch 15.Row 1: Sc in 2nd ch from hook and in each rem ch across—14 sc. Fasten off, leaving a long tail for sewing. Sew ends of each strap to front and back, in front of waistband, about 1" [2.5 cm] from side edges. With C, embroider a French knot button on front at end of each strap.
DRESS (make for girl cactus)Notes1. Dress is made from 3 pieces: Front,
back, and tie.2. Side edges of front and back skirt are
sewn together.3. Tie is worked and attached to top of
front edge. Ends of tie are crossed at back of dress and sewn to top of back edge.
FrontWith D, ch 13.Row 1: Sc in 2nd ch from hook and in each rem ch across—12 sc. Rows 2–7: Ch 1, turn, sc in each st across.Row 8 (begin skirt): Ch 3 (counts as dc here and throughout), turn, dc in first st, 2 dc in each remaining st across—24 dc.Rows 9 and 10: Ch 3, turn, dc in each st across.Fasten off, leaving a long tail for sewing.
BackWith D, ch 13.Row 1: Sc in 2nd ch from hook and in each rem ch across—12 sc.
Row 2: Ch 1, turn, sc in each st across.Row 3 (begin skirt): Ch 3 (counts as dc here and throughout), turn, dc in first st, 2 dc in each remaining st across—24 dc.Rows 4 and 5: Ch 3, turn, dc in each st across.Fasten off, leaving a long tail for sewing.Hold front and back together with side edges of skirt sections matching. Sew side edges of skirt sections together.
TieWith D, ch 40, slip st in 2nd ch from hook and in each remaining ch across (first strap made), do not turn or fasten off. To attach tie to dress, hold dress with front facing. Working along opposite side of front foundation ch, sc in each ch across; ch 40, slip st in 2nd ch from hook and in each remaining ch across. Fasten off and weave in ends.Cross straps at back of dress and thread each end through a space between stitches at top of back, about 2 stitches from center back. Tie the ends into a bow.
FLOWER (make for girl cactus)With D, ch 4.Round 1: Work 11 dc in the 4th ch from hook (3 skipped ch count as dc); join with slip st in top of beg ch—12 dc.Round 2: Ch 2 (does not count as a st), 3 hdc in next st, [slip st in next st, 3 hdc in next st] 5 times, slip st in same st as joining slip st.Fasten off, leaving a long tail for sewing.
LM6292 Agave & Aloe Crochet Cactus
Agave & Aloe Crochet CactusPage 39
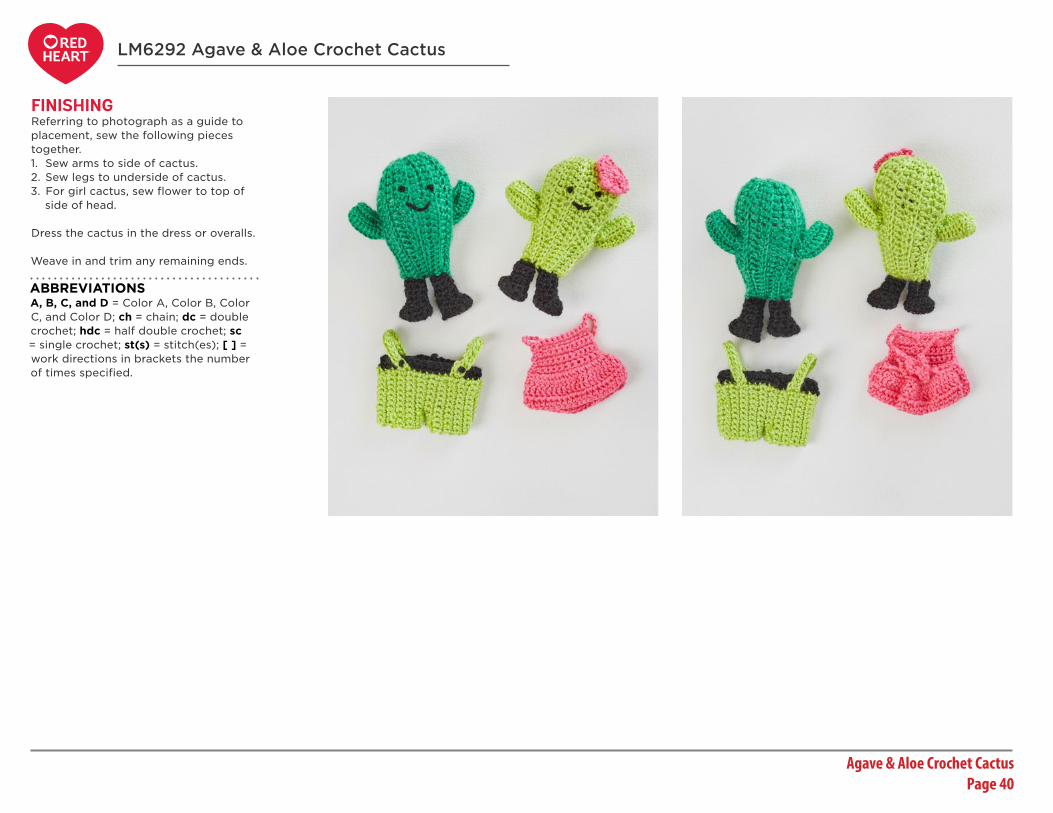
Find more ideas & inspiration: redheart.com©2018 Coats & Clark Page 3 of 3
FINISHINGReferring to photograph as a guide to placement, sew the following pieces together.1. Sew arms to side of cactus.2. Sew legs to underside of cactus.3. For girl cactus, sew flower to top of
side of head.
Dress the cactus in the dress or overalls.
Weave in and trim any remaining ends.
ABBREVIATIONS A, B, C, and D = Color A, Color B, Color C, and Color D; ch = chain; dc = double crochet; hdc = half double crochet; sc = single crochet; st(s) = stitch(es); [ ] = work directions in brackets the number of times specified.
LM6292 Agave & Aloe Crochet Cactus
Agave & Aloe Crochet CactusPage 40

Find more ideas & inspiration: redheart.com©2018 Coats & Clark Page 1 of 2
Tasty Crochet Hamburgers
RED HEART® Amigurumi: 1 ball 9392 Hamburger
Susan Bates® Crochet Hook: 2.25 mm [US B-1]
Stitch marker, stuffing, yarn needle.
Optional: Plastic pellets for weighted stuffing and thin bag to hold pellets.
GAUGE: 26 sts = about 4" [10 cm]; 22 rounds = about 4" [10 cm] in single crochet (sc). EXACT GAUGE IS NOT CRITICAL TO THIS PROJECT. Use any size hook to obtain the gauge.
RED HEART® Amigurumi, Art E885 available in
3.5 oz (100 g) 239 yds (219m) cakes
LM6293
crochetDesigned by Cassandra Bibler
What you will need:
BUY YARNcontinued...
We’re always up to grab a delicious burger with friends! Make two, and give one to your
best burger eating pal.
Burger measures about 3¾" [9.5 cm] tall and 5" [12.5 cm] wide (at widest)
Notes1. Before beginning, separate the
different color sections of the yarn as follows: Pop the center color out by pushing gently on the center of the ball so that it comes out intact. Find the point where the color changes and cut the yarn. Repeat this process for the remaining yarn colors by carefully pushing the rings of color out of the larger ring and cutting. Wind each color into a separate ball to prevent tangling. You may find that one color appears both in the center, and on the outside of the ball, wind together or separately. In the pattern instructions, the light brown color is referred to as A, the dark brown as B, the red as C, and the green as D.
2. Burger is made from 3 pieces: Lower half, lettuce, and top bun. The lower half includes the bottom bun, patty, and tomato. Each section of the lower half is worked with a different yarn color.
3. To change yarn color, work last stitch of old color to last yarn over. Yarn over with new color and draw through all loops on hook. Fasten off old color. Proceed with new color.
4. Pieces are sewn together using yarn tails or yarn scraps.
Special Stitchsc2tog (single crochet 2 stitches together) = [Insert hook in next stitch, yarn over and pull up a loop] twice, yarn over and draw through all 3 loops on hook.
Special TechniqueAdjustable-ring = Wrap yarn into a ring, ensuring that the tail falls behind the working yarn. Grip ring and tail between middle finger and thumb. Insert hook through center of ring, yarn over (with
working yarn) and draw up a loop. Work stitches of first round in the ring. After the first round of stitches is worked, pull gently on tail to tighten ring.
LOWER HALFBottom BunWith B, make an adjustable ring.Round 1 (right side): Ch 1, work 6 sc in ring; do not join, work in continuous rounds (spiral)—6 sc.Place a marker in the last sc worked to indicate end of round. Move marker up as each round is completed.Round 2: Work 2 sc in each of next 6 sts—12 sc.Round 3: [2 sc in next st, sc in next st] 6 times—18 sc.Round 4: [2 sc in next st, sc in next 2 sts] 6 times—24 sc.Round 5: [2 sc in next st, sc in next 3 sts] 6 times—30 sc.Round 6: [2 sc in next st, sc in next 4 sts] 6 times—36 sc.Round 7: [2 sc in next st, sc in next 5 sts] 6 times—42 sc.Round 8: [2 sc in next st, sc in next 6 sts] 6 times—48 sc.Round 9: [2 sc in next st, sc in next 7 sts] 6 times—54 sc.Round 10: [2 sc in next st, sc in next 8 sts] 6 times—60 sc.Round 11: Sc in each st around, and change to A in last st.Rounds 12-14: Sc in each st around.Slip st in next stitch and cut yarn. Weave in ends.
Tasty Crochet Hamburgers Page 41

Find more ideas & inspiration: redheart.com©2018 Coats & Clark Page 2 of 2
PattyWith right side of bottom bun facing, draw up a loop of B in back loop of any st of last round of bun.Round 1: Ch 1, working in back loops only, sc in each st around.Place a marker in the last sc worked to indicate end of round. Move marker up as each round is completed.Round 2: Sc in each st around.Round 3: [2 sc in next st, sc in next 9 sts] 6 times—66 sc.Round 4: Sc in each st around.Round 5: [Sc2tog, sc in next 9 sts] 6 times—60 sc.Round 6: [Sc2tog, sc in next 8 sts] 6 times—54 sc.Slip st in next stitch and cut yarn. Weave in ends.
TomatoWith right side of patty facing, draw up a loop of C in back loop of any st of last round of patty.Round 1: Ch 1, working in back loops only, sc in each st around.Place a marker in the last sc worked to indicate end of round. Move marker up as each round is completed.Round 2: [2 sc in next st, sc in next 8 sts] 6 times—60 sc.Rounds 3 and 4: Sc in each st around.Slip st in next stitch and cut yarn, leaving a long tail for sewing.
LETTUCEWith D, ch 60; taking care not to twist ch, join with slip st in first ch to form a ring.Round 1: Ch 1, sc in same ch as joining slip st and in each remaining ch around—60 sc.
Place a marker in the last sc worked to indicate end of round. Move marker up as each round is completed.Round 2: [2 sc in next st, sc in next 15 sts] 3 times, sc in next 12 sts—63 sc.Round 3: [2 sc in next st, sc in next 6 sts] 9 times—72 sc.Round 4: [Sc in next st, hdc in next st, dc in next 2 sts, hdc in next st, 2 sc in next st] 12 times—84 sts.Slip st in next stitch and cut yarn. weave in ends. If desired, fill thin cloth bag with weighted pellets and place bag in lower half of burger.
TOP BUNWith B, make an adjustable ring.Round 1 (right side): Ch 1, work 6 sc in ring; do not join, work in continuous rounds (spiral)—6 sc.Place a marker in the last sc worked to indicate end of round. Move marker up as each round is completed.Round 2: Work 2 sc in each of next 6 sts—12 sc.Round 3: [2 sc in next st, sc in next st] 6 times—18 sc.Round 4: [2 sc in next st, sc in next 2 sts] 6 times—24 sc.Round 5: [2 sc in next st, sc in next 3 sts] 6 times—30 sc.Round 6: [2 sc in next st, sc in next 4 sts] 6 times—36 sc.Round 7: [2 sc in next st, sc in next 5 sts] 6 times—42 sc.Round 8: [2 sc in next st, sc in next 6 sts] 6 times—48 sc.Round 9: [2 sc in next st, sc in next 7 sts] 6 times—54 sc.Round 10: [2 sc in next st, sc in next 8 sts] 6 times—60 sc.Rounds 11–14: Sc in each st around.Slip st in next stitch and cut yarn, leaving a long tail for sewing.
FINISHINGReferring to photograph as a guide to placement, use yarn tails or yarn scraps to sew the following pieces together.1. Using whipstitch, and holding wrong
side of lettuce facing right side of tomato, sew Round 1 of lettuce to last round of tomato, sewing through front loops only of tomato stitches.
2. Sew top bun to lettuce, firmly stuffing burger before completing seam.
Shape Patty: Thread a long strand of A onto yarn needle. Working around outer edge of patty, insert needle through any st in first round of patty, then straight up through patty and out through the corresponding st of last round of patty. Insert needle in next st of last round of patty, then straight down through patty and out through the corresponding st of first round of patty. Pull on yarn to plump the patty. Repeat this process as needed to achieve a pleasing shape.
Weave in and trim any remaining ends.
ABBREVIATIONS A, B, C, and D = Color A, Color B, Color C, and Color D; ch = chain; sc = single crochet; st(s) = stitch(es); [ ] = work directions in brackets the number of times specified.
LM6293 Tasty Crochet Hamburgers
Top
Bottom
Tasty Crochet Hamburgers Page 42

Find more ideas & inspiration: redheart.com©2018 Coats & Clark Page 1 of 2
Yummy Knit Hamburgers
RED HEART® Amigurumi: 1 ball 9392 Hamburger
Susan Bates® Knitting Needles: 3.25 mm [US 3]
Stuffing, yarn needle.
GAUGE: 20 sts = about 4" [10 cm] in Stockinette stitch (knit on right side, purl on wrong side). EXACT GAUGE IS NOT CRITICAL TO THIS PROJECT. Use any size needles to obtain the gauge.
RED HEART® Amigurumi, Art E885 available in
3.5 oz (100 g) 239 yds (219m) cakes
LM6294
knittingDesigned by Michele Wilcox
What you will need:
BUY YARN
continued...A silly way to show your love for a good hamburger! Make two and give one to
someone you love sharing burgers with.
Burger measures about 3¾" [9.5 cm] diameter at top.
Notes1. Before beginning, separate the
different color sections of the yarn as follows: Pop the center color out by pushing gently on the center of the ball so that it comes out intact. Find the point where the color changes and cut the yarn. Repeat this process for the remaining yarn colors by carefully pushing the rings of color out of the larger ring and cutting. Wind each color into a separate ball to prevent tangling. You may find that one color appears both in the center, and on the outside of the ball, wind together or separately. In the pattern instructions, the beige color is referred to as A, the red as B, the green as C, and the brown as D.
2. Burger is made in one piece and worked back and forth in rows. Side edges of piece are sewn together using matching yarn and stuffed to complete burger.
3. Yarn color is changed for each section: Bun, tomato, lettuce, patty, and bun.
4. A lettuce ruffle is worked separately and sewn to lettuce section of burger.
Special Stitchkfb (knit into front and back) = Knit next stitch but do not remove from needle, knit into back loop of same stitch and remove from needle – 1 st increased.
HAMBURGERWith A, cast on 8 sts.BunRow 1 (right side): [Kfb] 8 times—16 sts. Row 2: Purl.Row 3: [K1, kfb] 8 times—24 sts.Row 4: Purl.Row 5: [K2, kfb] 8 times—32 sts.Row 6: Purl.Row 7: [K3, kfb] 8 times—40 sts.Row 8: Purl.Row 9: [K4, kfb] 8 times—48 sts.Row 10: Purl.Row 11: Knit.Row 12 (wrong side): Knit.
TomatoChange to B.Row 13: Knit.Row 14: Purl.
LettuceChange to C.Row 15: Knit.Row 16: Purl.
PattyChange to D.Rows 17–20: Knit.
BunChange to A.Rows 21 and 22: Knit.Row 23: [K4, k2tog] 8 times—40 sts.Row 24: Purl.Row 25: [K3, k2tog] 8 times—32 sts.Row 26: Purl.Row 27: [K2, k2tog] 8 times—24 sts.Row 28: Purl.Row 29: [K1, k2tog] 8 times—16 sts.
Yummy Knit Hamburgers Page 43
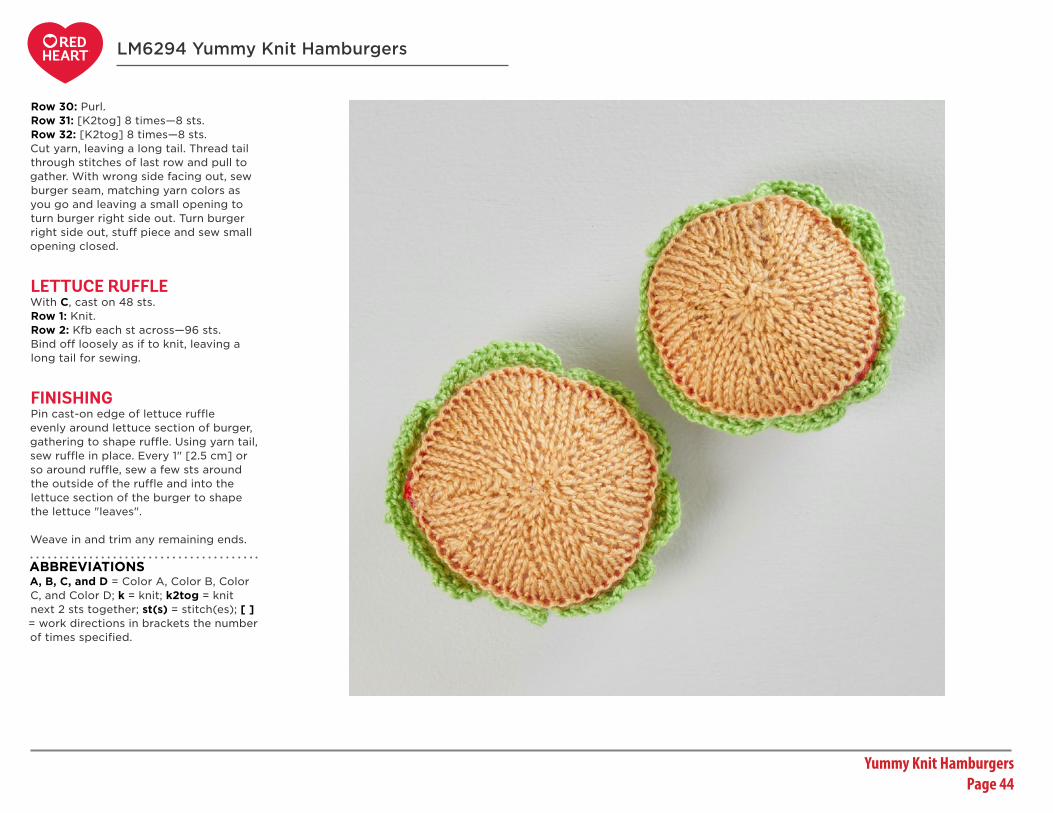
Find more ideas & inspiration: redheart.com©2018 Coats & Clark Page 2 of 2
Row 30: Purl.Row 31: [K2tog] 8 times—8 sts.Row 32: [K2tog] 8 times—8 sts.Cut yarn, leaving a long tail. Thread tail through stitches of last row and pull to gather. With wrong side facing out, sew burger seam, matching yarn colors as you go and leaving a small opening to turn burger right side out. Turn burger right side out, stuff piece and sew small opening closed.
LETTUCE RUFFLEWith C, cast on 48 sts.Row 1: Knit.Row 2: Kfb each st across—96 sts.Bind off loosely as if to knit, leaving a long tail for sewing.
FINISHINGPin cast-on edge of lettuce ruffle evenly around lettuce section of burger, gathering to shape ruffle. Using yarn tail, sew ruffle in place. Every 1" [2.5 cm] or so around ruffle, sew a few sts around the outside of the ruffle and into the lettuce section of the burger to shape the lettuce "leaves". Weave in and trim any remaining ends.
ABBREVIATIONS A, B, C, and D = Color A, Color B, Color C, and Color D; k = knit; k2tog = knit next 2 sts together; st(s) = stitch(es); [ ] = work directions in brackets the number of times specified.
LM6294 Yummy Knit Hamburgers
Yummy Knit Hamburgers Page 44
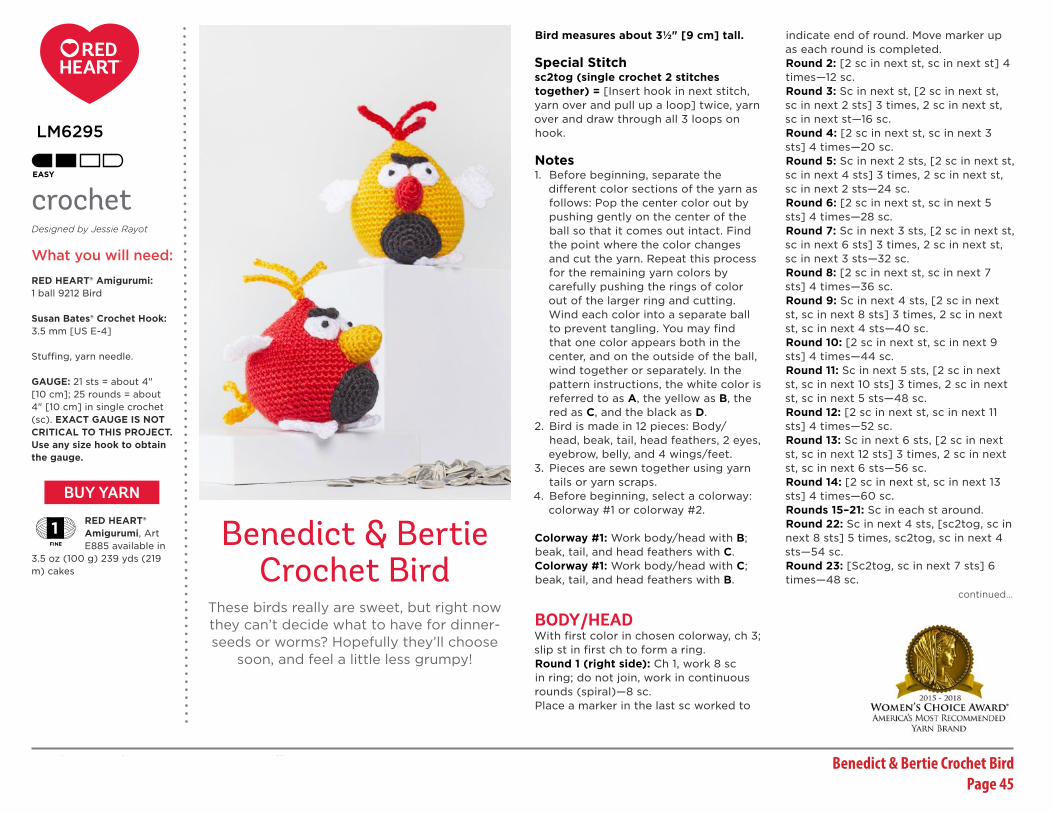
Find more ideas & inspiration: redheart.com©2018 Coats & Clark Page 1 of 2
Benedict & Bertie Crochet Bird
RED HEART® Amigurumi: 1 ball 9212 Bird
Susan Bates® Crochet Hook: 3.5 mm [US E-4]
Stuffing, yarn needle.
GAUGE: 21 sts = about 4" [10 cm]; 25 rounds = about 4" [10 cm] in single crochet (sc). EXACT GAUGE IS NOT CRITICAL TO THIS PROJECT. Use any size hook to obtain the gauge.
RED HEART® Amigurumi, Art E885 available in
3.5 oz (100 g) 239 yds (219 m) cakes
LM6295
crochetDesigned by Jessie Rayot
What you will need:
BUY YARN
continued...These birds really are sweet, but right now they can’t decide what to have for dinner- seeds or worms? Hopefully they’ll choose
soon, and feel a little less grumpy!
Bird measures about 3½" [9 cm] tall.
Special Stitchsc2tog (single crochet 2 stitches together) = [Insert hook in next stitch, yarn over and pull up a loop] twice, yarn over and draw through all 3 loops on hook.
Notes1. Before beginning, separate the
different color sections of the yarn as follows: Pop the center color out by pushing gently on the center of the ball so that it comes out intact. Find the point where the color changes and cut the yarn. Repeat this process for the remaining yarn colors by carefully pushing the rings of color out of the larger ring and cutting. Wind each color into a separate ball to prevent tangling. You may find that one color appears both in the center, and on the outside of the ball, wind together or separately. In the pattern instructions, the white color is referred to as A, the yellow as B, the red as C, and the black as D.
2. Bird is made in 12 pieces: Body/head, beak, tail, head feathers, 2 eyes, eyebrow, belly, and 4 wings/feet.
3. Pieces are sewn together using yarn tails or yarn scraps.
4. Before beginning, select a colorway: colorway #1 or colorway #2.
Colorway #1: Work body/head with B; beak, tail, and head feathers with C.Colorway #1: Work body/head with C; beak, tail, and head feathers with B.
BODY/HEADWith first color in chosen colorway, ch 3; slip st in first ch to form a ring.Round 1 (right side): Ch 1, work 8 sc in ring; do not join, work in continuous rounds (spiral)—8 sc.Place a marker in the last sc worked to
indicate end of round. Move marker up as each round is completed.Round 2: [2 sc in next st, sc in next st] 4 times—12 sc.Round 3: Sc in next st, [2 sc in next st, sc in next 2 sts] 3 times, 2 sc in next st, sc in next st—16 sc.Round 4: [2 sc in next st, sc in next 3 sts] 4 times—20 sc.Round 5: Sc in next 2 sts, [2 sc in next st, sc in next 4 sts] 3 times, 2 sc in next st, sc in next 2 sts—24 sc.Round 6: [2 sc in next st, sc in next 5 sts] 4 times—28 sc.Round 7: Sc in next 3 sts, [2 sc in next st, sc in next 6 sts] 3 times, 2 sc in next st, sc in next 3 sts—32 sc.Round 8: [2 sc in next st, sc in next 7 sts] 4 times—36 sc.Round 9: Sc in next 4 sts, [2 sc in next st, sc in next 8 sts] 3 times, 2 sc in next st, sc in next 4 sts—40 sc.Round 10: [2 sc in next st, sc in next 9 sts] 4 times—44 sc.Round 11: Sc in next 5 sts, [2 sc in next st, sc in next 10 sts] 3 times, 2 sc in next st, sc in next 5 sts—48 sc.Round 12: [2 sc in next st, sc in next 11 sts] 4 times—52 sc.Round 13: Sc in next 6 sts, [2 sc in next st, sc in next 12 sts] 3 times, 2 sc in next st, sc in next 6 sts—56 sc.Round 14: [2 sc in next st, sc in next 13 sts] 4 times—60 sc.Rounds 15–21: Sc in each st around.Round 22: Sc in next 4 sts, [sc2tog, sc in next 8 sts] 5 times, sc2tog, sc in next 4 sts—54 sc.Round 23: [Sc2tog, sc in next 7 sts] 6 times—48 sc.
Benedict & Bertie Crochet BirdPage 45
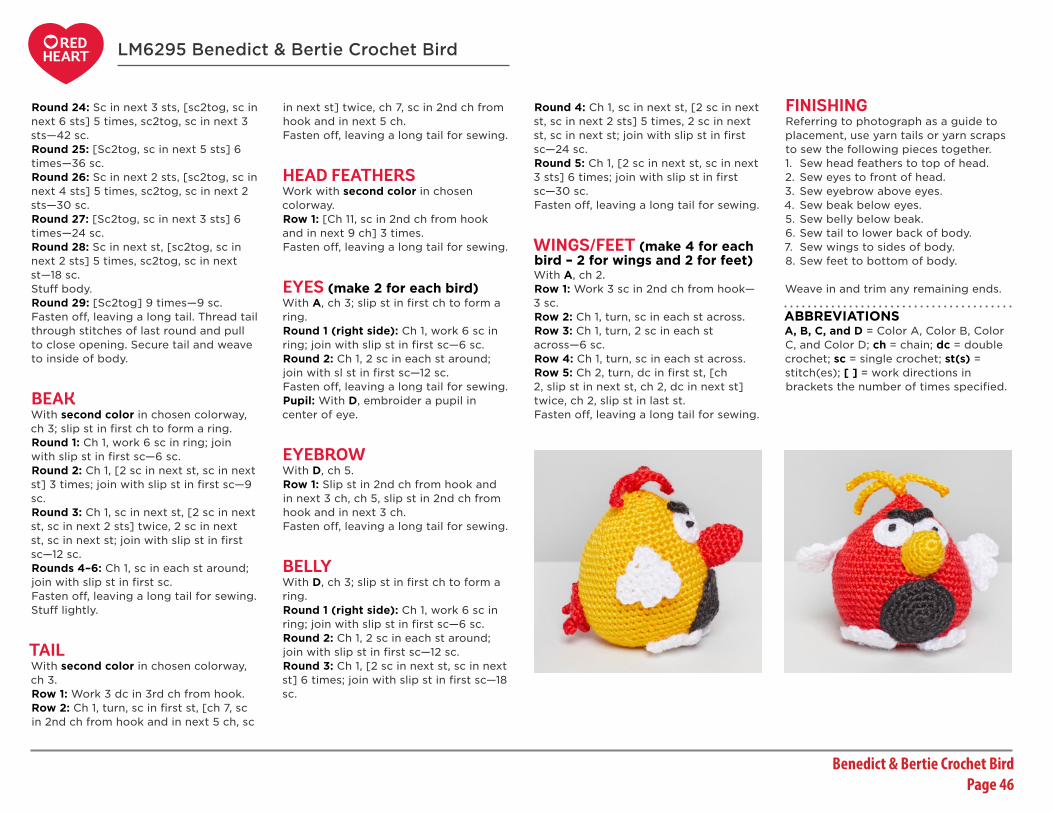
Find more ideas & inspiration: redheart.com©2018 Coats & Clark Page 2 of 2
Round 24: Sc in next 3 sts, [sc2tog, sc in next 6 sts] 5 times, sc2tog, sc in next 3 sts—42 sc.Round 25: [Sc2tog, sc in next 5 sts] 6 times—36 sc.Round 26: Sc in next 2 sts, [sc2tog, sc in next 4 sts] 5 times, sc2tog, sc in next 2 sts—30 sc.Round 27: [Sc2tog, sc in next 3 sts] 6 times—24 sc.Round 28: Sc in next st, [sc2tog, sc in next 2 sts] 5 times, sc2tog, sc in next st—18 sc.Stuff body.Round 29: [Sc2tog] 9 times—9 sc.Fasten off, leaving a long tail. Thread tail through stitches of last round and pull to close opening. Secure tail and weave to inside of body.
BEAKWith second color in chosen colorway, ch 3; slip st in first ch to form a ring.Round 1: Ch 1, work 6 sc in ring; join with slip st in first sc—6 sc.Round 2: Ch 1, [2 sc in next st, sc in next st] 3 times; join with slip st in first sc—9 sc.Round 3: Ch 1, sc in next st, [2 sc in next st, sc in next 2 sts] twice, 2 sc in next st, sc in next st; join with slip st in first sc—12 sc.Rounds 4–6: Ch 1, sc in each st around; join with slip st in first sc.Fasten off, leaving a long tail for sewing. Stuff lightly.
TAILWith second color in chosen colorway, ch 3.Row 1: Work 3 dc in 3rd ch from hook.Row 2: Ch 1, turn, sc in first st, [ch 7, sc in 2nd ch from hook and in next 5 ch, sc
in next st] twice, ch 7, sc in 2nd ch from hook and in next 5 ch.Fasten off, leaving a long tail for sewing.
HEAD FEATHERSWork with second color in chosen colorway.Row 1: [Ch 11, sc in 2nd ch from hook and in next 9 ch] 3 times.Fasten off, leaving a long tail for sewing.
EYES (make 2 for each bird)With A, ch 3; slip st in first ch to form a ring.Round 1 (right side): Ch 1, work 6 sc in ring; join with slip st in first sc—6 sc.Round 2: Ch 1, 2 sc in each st around; join with sl st in first sc—12 sc.Fasten off, leaving a long tail for sewing.Pupil: With D, embroider a pupil in center of eye.
EYEBROWWith D, ch 5.Row 1: Slip st in 2nd ch from hook and in next 3 ch, ch 5, slip st in 2nd ch from hook and in next 3 ch.Fasten off, leaving a long tail for sewing.
BELLYWith D, ch 3; slip st in first ch to form a ring.Round 1 (right side): Ch 1, work 6 sc in ring; join with slip st in first sc—6 sc.Round 2: Ch 1, 2 sc in each st around; join with slip st in first sc—12 sc.Round 3: Ch 1, [2 sc in next st, sc in next st] 6 times; join with slip st in first sc—18 sc.
Round 4: Ch 1, sc in next st, [2 sc in next st, sc in next 2 sts] 5 times, 2 sc in next st, sc in next st; join with slip st in first sc—24 sc.Round 5: Ch 1, [2 sc in next st, sc in next 3 sts] 6 times; join with slip st in first sc—30 sc.Fasten off, leaving a long tail for sewing.
WINGS/FEET (make 4 for each bird – 2 for wings and 2 for feet)With A, ch 2.Row 1: Work 3 sc in 2nd ch from hook—3 sc.Row 2: Ch 1, turn, sc in each st across.Row 3: Ch 1, turn, 2 sc in each st across—6 sc.Row 4: Ch 1, turn, sc in each st across.Row 5: Ch 2, turn, dc in first st, [ch 2, slip st in next st, ch 2, dc in next st] twice, ch 2, slip st in last st.Fasten off, leaving a long tail for sewing.
FINISHINGReferring to photograph as a guide to placement, use yarn tails or yarn scraps to sew the following pieces together.1. Sew head feathers to top of head.2. Sew eyes to front of head.3. Sew eyebrow above eyes.4. Sew beak below eyes.5. Sew belly below beak.6. Sew tail to lower back of body.7. Sew wings to sides of body.8. Sew feet to bottom of body.
Weave in and trim any remaining ends.
ABBREVIATIONS A, B, C, and D = Color A, Color B, Color C, and Color D; ch = chain; dc = double crochet; sc = single crochet; st(s) = stitch(es); [ ] = work directions in brackets the number of times specified.
LM6295 Benedict & Bertie Crochet Bird
Benedict & Bertie Crochet BirdPage 46
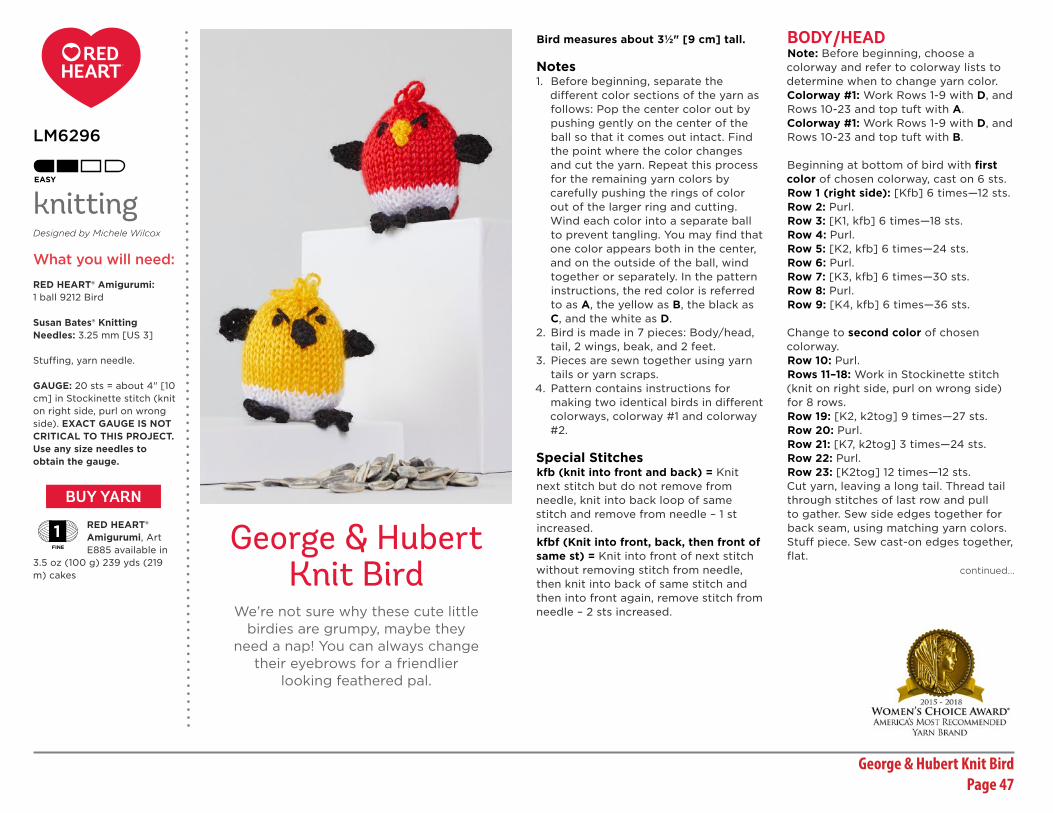
Find more ideas & inspiration: redheart.com©2018 Coats & Clark Page 1 of 2
George & Hubert Knit Bird
RED HEART® Amigurumi: 1 ball 9212 Bird
Susan Bates® Knitting Needles: 3.25 mm [US 3]
Stuffing, yarn needle.
GAUGE: 20 sts = about 4" [10 cm] in Stockinette stitch (knit on right side, purl on wrong side). EXACT GAUGE IS NOT CRITICAL TO THIS PROJECT. Use any size needles to obtain the gauge.
RED HEART® Amigurumi, Art E885 available in
3.5 oz (100 g) 239 yds (219 m) cakes
LM6296
knittingDesigned by Michele Wilcox
What you will need:
BUY YARN
continued...
We’re not sure why these cute little birdies are grumpy, maybe they
need a nap! You can always change their eyebrows for a friendlier
looking feathered pal.
Bird measures about 3½" [9 cm] tall.
Notes1. Before beginning, separate the
different color sections of the yarn as follows: Pop the center color out by pushing gently on the center of the ball so that it comes out intact. Find the point where the color changes and cut the yarn. Repeat this process for the remaining yarn colors by carefully pushing the rings of color out of the larger ring and cutting. Wind each color into a separate ball to prevent tangling. You may find that one color appears both in the center, and on the outside of the ball, wind together or separately. In the pattern instructions, the red color is referred to as A, the yellow as B, the black as C, and the white as D.
2. Bird is made in 7 pieces: Body/head, tail, 2 wings, beak, and 2 feet.
3. Pieces are sewn together using yarn tails or yarn scraps.
4. Pattern contains instructions for making two identical birds in different colorways, colorway #1 and colorway #2.
Special Stitcheskfb (knit into front and back) = Knit next stitch but do not remove from needle, knit into back loop of same stitch and remove from needle – 1 st increased.kfbf (Knit into front, back, then front of same st) = Knit into front of next stitch without removing stitch from needle, then knit into back of same stitch and then into front again, remove stitch from needle – 2 sts increased.
BODY/HEADNote: Before beginning, choose a colorway and refer to colorway lists to determine when to change yarn color.Colorway #1: Work Rows 1-9 with D, and Rows 10-23 and top tuft with A.Colorway #1: Work Rows 1-9 with D, and Rows 10-23 and top tuft with B.
Beginning at bottom of bird with first color of chosen colorway, cast on 6 sts.Row 1 (right side): [Kfb] 6 times—12 sts. Row 2: Purl.Row 3: [K1, kfb] 6 times—18 sts.Row 4: Purl.Row 5: [K2, kfb] 6 times—24 sts.Row 6: Purl.Row 7: [K3, kfb] 6 times—30 sts.Row 8: Purl.Row 9: [K4, kfb] 6 times—36 sts.
Change to second color of chosen colorway.Row 10: Purl.Rows 11–18: Work in Stockinette stitch (knit on right side, purl on wrong side) for 8 rows.Row 19: [K2, k2tog] 9 times—27 sts.Row 20: Purl.Row 21: [K7, k2tog] 3 times—24 sts.Row 22: Purl.Row 23: [K2tog] 12 times—12 sts.Cut yarn, leaving a long tail. Thread tail through stitches of last row and pull to gather. Sew side edges together for back seam, using matching yarn colors. Stuff piece. Sew cast-on edges together, flat.
George & Hubert Knit BirdPage 47

Find more ideas & inspiration: redheart.com©2018 Coats & Clark Page 2 of 2
Top Tuft: With second color of chosen colorway, embroider 5 loop stitches on top of head.Facial features: Using photograph as a guide, with C embroider French knot eyes and straight stitch eyebrows.
TAILWith second color of chosen colorway as used for top section of body/head, cast on 15 sts.Rows 1–6: Work in Stockinette stitch for 6 rowsRow 7: [K3, k2tog] 3 times—12 sts.Row 8: Purl.Row 9: [K1, k2tog] 4 times—8 sts.Row 10: Purl.Row 11: [K2tog] 4 times—4 sts.Cut yarn, leaving a long tail. Thread tail through stitches of last row and pull to gather. Sew side edges together for bottom center seam. Stuff lightly.
WINGS (make 2 for each bird)With C, cast on 1 st.Row 1: Kfbf—3 sts.Row 2: Purl.Row 3: Kfb, k1, kfb—5 sts.Row 4: Purl.Row 5: Knit.Row 6: Purl.Cut yarn, leaving a long tail. Thread tail through stitches of last row and pull to gather. Secure tail but do not trim. It can be used later for sewing wing to body.
BEAK (make 1 for each bird)Notes 1. Beak is worked from top down to tip.2. For colorway #1, use B for beak. For
colorway #2, use C for beak.
Leaving a long beginning tail for sewing, cast on 2 sts.Row 1: [Kfb] twice—4 sts.Rows 2 and 3: Knit.Row 4: [K2tog] twice—2 sts.Row 5: K2tog—1 st.Fasten off.
FEET (make 2 for each bird)With C, cast on 4 sts.First Toe: Bind off 3 sts, slip the 1 st remaining on right needle back to left needle—1 st remains.Second and Third Toes: *Cast on 3 sts then bind off 3 sts, slip the 1 st remaining on right needle back to left needle; repeat from * once more.Fasten off, leaving a long tail. Thread the tail through the back end of the toes and pull to gather. Do not trim tail. It can be used later to sew foot to bird.
FINISHINGReferring to photograph as a guide to placement, use yarn tails or yarn scraps to sew the following pieces together.1. Sew tail to lower back of body.2. Sew wings to sides of body.3. Sew beak to front of head.4. Sew feet to bottom of body.
Weave in and trim any remaining ends.
ABBREVIATIONS A, B, C, and D = Color A, Color B, Color C, and Color D; k = knit; k2tog = knit next 2 sts together; st(s) = stitch(es); [ ] = work directions in brackets the number of times specified; * = repeat whatever follows the * as indicated.
LM6296 George & Hubert Knit Birds
George & Hubert Knit BirdPage 48

Find more ideas & inspiration: redheart.com©2018 Coats & Clark Page 1 of 3
Fiona & Fred Crochet Flamingo
RED HEART® Amigurumi: 1 ball 9741 Flamingo
Susan Bates® Crochet Hook: 2.25 mm [US B-1]
Stitch marker, two 6 mm safety eyes, stuffing, yarn needle.
Optional: Plastic pellets for weighted stuffing and thin pouch to hold pellets.
GAUGE: 26 sts = about 4" [10 cm]; 22 rounds = about 4" [10 cm] in single crochet (sc). EXACT GAUGE IS NOT CRITICAL TO THIS PROJECT. Use any size hook to obtain the gauge.
RED HEART® Amigurumi, Art E885 available
in 3.5 oz (100 g) 239 yds (219m) cakes
LM6297
crochetDesigned by Cassandra Bibler
What you will need:
continued...If you’ve been looking for a pair of party birds, these two are your answer! They love all sorts of celebrations, but lawn
parties are their favorite.
Flamingo measures about 3¾" [9.5 cm] tall.
Notes1. Before beginning, separate the
different color sections of the yarn as follows: Pop the center color out by pushing gently on the center of the ball so that it comes out intact. Find the point where the color changes and cut the yarn. Repeat this process for the remaining yarn colors by carefully pushing the rings of color out of the larger ring and cutting. Wind each color into a separate ball to prevent tangling. You may find that one color appears both in the center, and on the outside of the ball, wind together or separately. In the pattern instructions, the light pink color is referred to as A, the bright pink as B, the grey as C, and the black as D.
2. Flamingo is made from 6 pieces: Body/head, beak, 2 legs, and 2 wings
3. To change yarn color, work last stitch of old color to last yarn over. Yarn over with new color and draw through all loops on hook. Fasten off old color. Proceed with new color.
4. Pieces are sewn together using yarn tails or yarn scraps.
Special Stitchsc2tog (single crochet 2 stitches together) = [Insert hook in next stitch, yarn over and pull up a loop] twice, yarn over and draw through all 3 loops on hook.
Special TechniqueAdjustable-ring = Wrap yarn into a ring, ensuring that the tail falls behind the working yarn. Grip ring and tail between middle finger and thumb. Insert hook through center of ring, yarn over (with
working yarn) and draw up a loop. Work stitches of first round in the ring. After the first round of stitches is worked, pull gently on tail to tighten ring.
BODY/HEADBeginning at bottom of body, with A or B, make an adjustable ring.Round 1 (right side): Ch 1, work 6 sc in ring; do not join, work in continuous rounds (spiral)—6 sc.Place a marker in the last sc worked to indicate end of round. Move marker up as each round is completed.Round 2: Work 2 sc in each of next 6 sts—12 sc.Round 3: [2 sc in next st, sc in next st] 6 times—18 sc.Round 4: [2 sc in next st, sc in next 2 sts] 6 times—24 sc.Round 5: [2 sc in next st, sc in next 3 sts] 6 times—30 sc.Round 6: [2 sc in next st, sc in next 4 sts] 6 times—36 sc.Rounds 7–10: Sc in each st around.Round 11: [Sc2tog, sc in next 4 sts] 6 times—30 sc.Rounds 12–14: Sc in each st around.Round 15: [Sc2tog, sc in next 3 sts] 6 times—24 sc.Round 16: Sc in each st around.Round 17: [Sc2tog, sc in next 2 sts] 6 times—18 sc.Before stuffing piece, if using weighted pellets, fill thin cloth pouch with weighted pellets and place pouch in bottom of piece. Then stuff piece, packing stuffing on top of pouch.BUY YARN
Fiona & Fred Crochet Flamingo Page 49
Find more ideas & inspiration: redheart.com©2018 Coats & Clark Page 2 of 3
See next page for alternate photos
Round 18: [Sc2tog, sc in next st] 6 times—12 sc.Rounds 19–22: Sc in each st around.Begin HeadRound 23: Work 2 sc in each st around—24 sc.Rounds 24–26: Sc in each st around.Round 27: [Sc2tog, sc in next 2 sts] 6 times—18 sc.Round 28: Sc in each st around.Attach safety eyes between Rounds 25 and 26, about 4 stitches apart.Round 29: [Sc2tog, sc in next st] 6 times—12 sc.If needed, add a little more stuffing to piece.Round 30: [Sc2tog] 6 times—6 sc.Fasten off leaving a long tail. Thread tail through stitches of last round and pull to close opening. Weave in and trim ends.
BEAKWith D, make an adjustable ring.Round 1 (right side): Ch 1, work 6 sc in ring; do not join, work in continuous rounds (spiral)—6 sc.Place a marker in the last sc worked to indicate end of round. Move marker up as each round is completed.Round 2: Work 2 sc in each of next 2 sts, sc in next 4 sts and change to C in last st—8 sc.Rounds 3 and 4: With C, sc in each st around.Fasten off leaving a long tail for sewing beak to head.
LEGS (make 2 for each flamingo)With C, leaving a long beginning tail for sewing leg to body, make an adjustable ring.Round 1 (right side): Ch 1, work 6 sc in ring; do not join, work in continuous rounds (spiral)—6 sc.Place a marker in the last sc worked to indicate end of round. Move marker up as each round is completed.Round 2: [2 sc in next st, sc in next 2 sts] twice—8 sc.Rounds 3–14: Sc in each st around.
FootFlatten the top of the tube, matching stitches in back and front of last round to make a double layer with 4 stitches in each layer. Work now proceeds back and forth in rows.Row 15: Working through both thicknesses, skip the first st, sc in next 3 sts.Row 16: Ch 1, turn, working in front loops only, 2 sc in first st, sc in next st, 2 sc in last st—5 sc. Row 17: Ch 1, turn, 2 sc in first st, sc in next 3 sts, 2 sc in last st—7 sc.Row 18: Ch 1, turn, sc in first st, hdc in next st, dc in next 3 sts, hdc in next st, sc in last st.Fasten off. Weave in and trim the ending tail. Do not cut the beginning tail, it can be used later to sew leg to body.
WINGS (make 2 for each flamingo)With same yarn color as used for body, make an adjustable ring.Round 1 (right side): Ch 1, work 6 sc in ring; do not join, work in continuous rounds (spiral)—6 sc.Place a marker in the last sc worked to indicate end of round. Move marker up as each round is completed.Round 2: Work 2 sc in each of next 6 sts—12 sc.Round 3: [2 sc in next st, sc in next st] 6 times—18 sc.Round 4 (wing tips): Slip st in next st, ch 4, slip st in next st, ch 6, slip st in next st, ch 8, slip st in next st, ch 6, slip st in next st, ch 4, slip st in next st; leave remaining sts unworked.Fasten off leaving a long tail for sewing wing to body.
FINISHINGReferring to photograph as a guide to placement, use yarn tails or yarn scraps to sew the following pieces together.1. Sew beak to head between eyes,
positioning so that the beak curves downwards.
2. Sew legs to bottom of body, positioning the feet to face forwards with the small ridge at ankle on the front side.
3. Sew wings to sides of body, with about 10 stitches on front belly between the wings Point the wing tips toward the back and sew around the outside of Round 3 leaving wing tips unsewn.
Weave in and trim any remaining ends.
ABBREVIATIONS A, B, C, and D = Color A, Color B, Color C, and Color D; ch = chain; sc = single crochet; st(s) = stitch(es); [ ] = work directions in brackets the number of times specified.
LM6297 Fiona & Fred Crochet Flamingo
Fiona & Fred Crochet Flamingo Page 50

Find more ideas & inspiration: redheart.com©2018 Coats & Clark Page 3 of 3
LM6297 Fiona & Fred Crochet Flamingo
Fiona & Fred Crochet Flamingo Page 51

Find more ideas & inspiration: redheart.com©2018 Coats & Clark Page 1 of 2
Sweet Crochet Sugar Skulls
RED HEART® Amigurumi: 1 ball 9521 Sugar Skull
Susan Bates® Crochet Hook: 3.5 mm [US E-4]
Stitch marker, stuffing, yarn needle.
Optional: Knee high stocking and plastic pellets for weighted stuffing.
GAUGE: 21 sts = about 4" [10 cm]; 25 rounds = about 4" [10 cm] in single crochet (sc). EXACT GAUGE IS NOT CRITICAL TO THIS PROJECT. Use any size hook to obtain the gauge.
RED HEART® Amigurumi, Art E885 available
in 3.5 oz (100 g) 239 yds (219m) cakes
LM6298
crochetDesigned by Jessie Rayot
What you will need:
continued...
Take the time to sit down with these skulls and reminisce about days gone by. They’re
always ready to listen to new stories.
Skull measures about 3½" [9 cm] tall.
Special Stitchsc2tog (single crochet 2 stitches together) = [Insert hook in next stitch, yarn over and pull up a loop] twice, yarn over and draw through all 3 loops on hook.
Notes1. Before beginning, separate the
different color sections of the yarn as follows: Pop the center color out by pushing gently on the center of the ball so that it comes out intact. Find the point where the color changes and cut the yarn. Repeat this process for the remaining yarn colors by carefully pushing the rings of color out of the larger ring and cutting. Wind each color into a separate ball to prevent tangling. You may find that one color appears both in the center, and on the outside of the ball, wind together or separately. In the pattern instructions, the white color is referred to as A, the purple as B, the orange as C, and the green as D.
2. Skull is made in 6 pieces: Skull, 2 flower eyes, and 3 head flowers.
3. Pieces are sewn together using yarn tails or yarn scraps.
4. Facial features are embroidered onto finished skull.
SKULLBeginning at top of skull, with A or B, ch 3; slip st in first ch to form a ring.Round 1 (right side): Ch 1, work 6 sc in ring; do not join, work in continuous rounds (spiral)—6 sc.Place a marker in the last sc worked to indicate end of round. Move marker up as each round is completed.
Round 2: Work 2 sc in each st around—12 sc.Round 3: [2 sc in next st, sc in next st] 6 times—18 sc.Round 4: Sc in next st, [2 sc in next st, sc in next 2 sts] 5 times, 2 sc in next st, sc in last st—24 sc.Round 5: [2 sc in next st, sc in next 3 sts] 6 times—30 sc.Round 6: Sc in next 2 sts, [2 sc in next st, sc in next 4 sts] 5 times, 2 sc in next st, sc in next 2 sts—36 sc.Round 7: [2 sc in next st, sc in next 5 sts] 6 times—42 sc.Round 8: Sc in next 3 sts, [2 sc in next st, sc in next 6 sts] 5 times, 2 sc in next st, sc in next 3 sts—48 sc.Rounds 9–17: Sc in each st around.Begin stuffing piece with fiberfill or place optional knee high, filled with plastic pellets, into place. Continue stuffing piece with fiberfill as work progresses.Round 18: Sc in next 3 sts, [sc2tog, sc in next 6 sts] 5 times, sc2tog, sc in next 3 sts—42 sc.Round 19: [Sc2tog, sc in next 5 sts] 6 times—36 sc.Round 20: Sc in next 2 sts, [sc2tog, sc in next 4 sts] 5 times, sc2tog, sc in next 2 sts—30 sc.Rounds 21–26: Sc in each st around.Round 27: [Sc2tog, sc in next 3 sts] 6 times—24 sc.Stuff piece.Round 28: Sc in next st, [sc2tog, sc in next 2 sts] 5 times, sc2tog, sc in next st—18 sc.
BUY YARN
Sweet Crochet Sugar Skulls Page 52

Find more ideas & inspiration: redheart.com©2018 Coats & Clark Page 2 of 2
Round 29: [Sc2tog] 9 times—9 sc.Fasten off, leaving a long tail. Thread tail through stitches of last round and pull to close opening. Secure tail and weave to inside of skull.
FLOWER EYES (make 2 for each skull)Note: If you are making A-colored skull, work Round 1 with C and Round 2 with D. If you are making B-colored skull, work Round 1 with D and Round 2 with C.
Ch 3; slip st in first ch to form a ring.Round 1 (right side): Ch 1, work 10 sc in ring; join with slip st in first sc—10 sc.Fasten off.Round 2: With right side facing, draw up a loop of next color in same sc as joining slip st, [ch 2, 2 dc in next st, ch 2, slip st in next st] 5 times—5 petals.Fasten off, leaving a long tail for sewing flower eye to skull. Weave in beginning tail.
HEAD FLOWERS (make 3 for each skull)Note: If you are making A-colored skull, make 1 flower each with B, C and D. If you are making B-colored skull, make 1 flower each with A, C and D.
Ch 3; slip st in first ch to form a ring.Round 1 (right side): Ch 1, work 10 sc in ring; join with slip st in first sc—10 sc.Round 2: Ch 2, 2 dc in same st as joining slip st, ch 2, slip st in next st, [ch 2, 2 dc in next st, ch 2, slip st in next st] 4 times—5 petals.Fasten off, leaving a long tail for sewing flower to skull. Weave in beginning tail.
FINISHINGReferring to photograph as a guide to placement, use yarn tails or yarn scraps to sew the following pieces together.1. Sew flower eyes to front of skull.2. Sew head flowers to top of
skull, positioned as desired. Use contrasting color yarn to embroider a star stitch through the center of flowers and to top of head, leaving petals free.
Facial FeaturesNote: If you are making A-colored skull, embroider features with B. If you are making B-colored skull, embroider features with A.
Mouth: Using photograph as a guide, embroider straight stitch mouth. Embroider a long horizontal line then embroider short vertical lines evenly spaced over the top of the horizontal line.
Nose: Using photograph as a guide, embroider two chain stitches for nostrils. Position the narrow ends of the chain stitches together at top and between eyes for top of nose. Position the wide ends of the chain stitches about two rounds below and side by side.
Weave in and trim any remaining ends.
ABBREVIATIONS A, B, C, and D = Color A, Color B, Color C, and Color D; ch = chain; dc = double crochet; sc = single crochet; st(s) = stitch(es); [ ] = work directions in brackets the number of times specified.
LM6298 Sweet Crochet Sugar Skulls
Sweet Crochet Sugar Skulls Page 53

Find more ideas & inspiration: redheart.com©2019 Coats & Clark Page 1 of 4
Beatrice & Basil Crochet Bunnies
RED HEART® Amigurumi: 1 ball 9741 Flamingo
Susan Bates® Crochet Hook: 2.75 mm [US C-2]
Stitch marker, stuffing, four 6mm safety eyes (two for each bunny), yarn needle, black and pink embroidery floss and embroidery needle for nose.Optional: Knee high stockings and plastic pellets for weighted stuffing, dark pink powder face blusher and cotton swabs for cheek detail
GAUGE: 32 sts = 4" [10 cm]; 28 rounds = 4" [10 cm] in single crochet (sc). EXACT GAUGE IS NOT CRITICAL TO THIS PROJECT. Use any size hook to obtain the gauge.
RED HEART® Amigurumi, Art E885 available in
3.5 oz (100 g) 239 yds (219m) cakes
LW6559
crochetDesigned by Nancy Anderson
What you will need:
BUY YARN continued...
LACE
This loving bunny couple enjoys cuddling. So we won’t be surprised if they soon multiply
into a whole family of bunnies.
Solid Bunny measures about 5¼" [13.5 cm], standing.Striped Bunny measures about 5½" [14 cm], seated.
Special Stitchsc2tog (single crochet 2 stitches together) = [Insert hook in next stitch, yarn over and pull up a loop] twice, yarn over and draw through all 3 loops on hook.
Notes1. Bunny is designed in two versions: a
solid standing bunny and a striped seated bunny.
2. Solid bunny is made from 9 pieces: Head, body, 2 arms, 2 ears, 2 feet, and bow tie.
3. Striped bunny is made from 10 pieces: Head, body, 2 arms, 2 ears, 2 feet, and 2 legs.
4. Pieces are sewn together using yarn tails or yarn scraps.
5. Before beginning, separate the different color sections of the yarn as follows: Pop the center color out by pushing gently on the center of the ball so that it comes out intact. Find the point where the color changes and cut the yarn. Repeat this process for the remaining yarn colors by carefully pushing the rings of color out of the larger ring and cutting. Roll each color into a separate ball to prevent tangling. In the pattern instructions, the light pink color is referred to as A, the grey as B, the bright pink as C, and the black as D.
6. To change yarn color, work last stitch of old color to last yarn over. Yarn over with new color and draw through all loops on hook to complete stitch. Proceed with new color. Do not fasten off old color until instructed. Carry colors not in use up inside of piece when next needed.
7. Do not use safety eyes if toy is intended for a child 2 years of age or younger. Tip: If washers are too tight
to snap onto post, hold them with tweezers and heat with hair dryer for about 15 seconds.
Special TechniqueAdjustable ring = Wrap yarn into a ring, ensuring that the tail falls behind the working yarn. Grip ring and tail between middle finger and thumb. Insert hook through center of ring, yarn over (with working yarn) and draw up a loop. Work stitches of first round in the ring. After the first round of stitches is worked, pull gently on tail to tighten ring.
HEADNote: If making striped bunny, use yarn color A. If making solid bunny, use yarn color B.Beginning at top of head, make an adjustable ring.Round 1 (right side): Work 6 sc in ring; do not join, work in continuous rounds (spiral)—6 sc.Place a marker in the last sc worked to indicate end of round. Move marker up as each round is completed.Round 2: Work 2 sc in each of next 6 sts—12 sc.Round 3: [Sc in next st, 2 sc in next st] 6 times—18 sc.Round 4: [Sc in next 2 sts, 2 sc in next st] 6 times—24 sc.Round 5: [Sc in next 3 sts, 2 sc in next st] 6 times—30 sc.Round 6: [Sc in next 4 sts, 2 sc in next st] 6 times—36 sc.Rounds 7–14: Sc in each st around.Round 15: [Sc in next 4 sts, sc2tog] 6 times—30 sc.
Beatrice & Basil Crochet BunniesPage 54
Find more ideas & inspiration: redheart.com©2019 Coats & Clark Page 2 of 4
continued...
Round 16: Sc in each st around.Round 17: [Sc in next 3 sts, sc2tog] 6 times—24 sc.Attach safety eyes between Rounds 11 and 12, about 6 stitches apart. Begin stuffing head and continue stuffing as work progresses. Do not use weighted stuffing in head.Round 18: Sc in each st around.Round 19: [Sc in next 2 sts, sc2tog] 6 times—18 sc.Round 20 (neck): [Sc in next st, sc2tog] 6 times—12 sc.Fasten off leaving a long tail for sewing head to body. If needed, thread beginning yarn tail through stitches at beginning of piece and pull to close opening. Weave in and trim beginning tail only. Do not close opening at neck.
SOLID BUNNY BODYBeginning at neck with B, make an adjustable ring.Round 1 (right side): Work 6 sc in ring; do not join, work in continuous rounds (spiral)—6 sc.Place a marker in the last sc worked to indicate end of round. Move marker up as each round is completed.Round 2: Work 2 sc in each of next 6 sts—12 sc.Rounds 3 and 4: Sc in each st around.Round 5: [Sc in next st, 2 sc in next st] 6 times—18 sc.Round 6: [Sc in next 2 sts, 2 sc in next st] 6 times—24 sc.Rounds 7–11: Sc in each st around.Round 12: [Sc in next 3 sts, 2 sc in next st] 6 times—30 sc.Rounds 13–15: Sc in each st around.Begin stuffing piece and continue stuffing as work progresses.Round 16: [Sc in next st, sc2tog] 10 times—20 sc.
Place optional knee high, filled with plastic pellets, into piece.Round 17: Sc in each st around.Round 18: [Sc in next 2 sts, sc2tog] 5 times—15 sc.Round 19: [Sc in next st, sc2tog] 5 times—10 sc.Fasten off. Weave in and trim tails.
STRIPED BUNNY BODYBeginning at neck with A, make an adjustable ring.Round 1 (right side): Work 6 sc in ring; do not join, work in continuous rounds (spiral)—6 sc.Place a marker in the last sc worked to indicate end of round. Move marker up as each round is completed.Round 2: Work 2 sc in each of next 6 sts—12 sc.Rounds 3 and 4: Sc in each st around, change to D in last sc of Round 4. Do not cut A until instructed. Carry A inside piece.Round 5: With D, sc in each st around and change to C in last sc made. Do not cut D until instructed. Carry D inside piece.Round 6: With C, [sc in next st, 2 sc in next st] 6 times and change to A in last sc made—18 sc. Do not cut C until instructed. Carry C inside piece.Round 7: With A, [sc in next 2 sts, 2 sc in next st] 6 times and change to D in last sc made—24 sc.Round 8: With D, sc in each st around and change to C in last sc made.Round 9: With C, sc in each st around and change to A in last sc made.Round 10: With A, sc in each st around and change to D in last sc made.Rounds 11 and 12: Repeat Rounds 8 and 9.
Round 13: With A, [sc in next 3 sts, 2 sc in next st] 6 times and change to D in last sc made—30 sc. Fasten off A.Round 14: With D, sc in each st around and change to C in last sc made. Begin stuffing piece and continue stuffing as work progresses.Fasten off D. Work all remaining rounds with C only.Rounds 15 and 16: Sc in each st around.Round 17: [Sc in next st, sc2tog] 10 times—20 sc.Place optional knee high, filled with plastic pellets, into piece.Round 18: Sc in each st around.Round 19: [Sc in next 2 sts, sc2tog] 5 times—15 sc.Round 20: [Sc in next st, sc2tog] 5 times—10 sc.Fasten off. Weave in and trim tails.
ARMS (make 2 for each bunny)Note: If making striped bunny, use yarn color A. If making solid bunny, use yarn color B.Make an adjustable ring.Round 1 (right side): Work 6 sc in ring; do not join, work in continuous rounds (spiral)—6 sc.Place a marker in the last sc worked to indicate end of round. Move marker up as each round is completed.Rounds 2–10: Sc in each st around.Fasten off, leaving a long tail. If needed, thread beginning yarn tail through stitches at beginning of piece and pull to close opening. Weave in and trim beginning tail. Stuff arm lightly. Do not trim ending tail. It can be used later for sewing arm to body.
FEET (make 2 for each bunny)Note: If making striped bunny, use yarn color A. If making solid bunny, use yarn color B.Make an adjustable ring.Round 1 (right side): Work 6 sc in ring; do not join, work in continuous rounds (spiral)—6 sc.Place a marker in the last sc worked to indicate end of round. Move marker up as each round is completed.Round 2: [Sc in next st, 2 sc in next st] 3 times—9 sc.Rounds 3–8: Sc in each st around.Round 9: [Sc in next st, 2 sc in next st] 4 times, sc in last st—13 sc.Do not fasten off. Stuff lightly. Seaming Row: Hold top edges together, working through both thicknesses and inserting hook into inner loops only, slip st in each st across and into last st. Fasten off, leaving a long tail. Make Toes: Thread the ending tail onto needle and use it to form toes as follows:1. Insert needle through inside of foot,
coming out at top of foot about 3 rounds from seaming row (toe edge).
2. Take needle over toe edge then insert needle into bottom of foot immediately below top insertion point. Bring needle through inside of foot and out the top of the foot about 2 stitches to the side of the insertion point.
3. Take needle over toe edge again then insert needle into bottom of foot immediately below top insertion point. Bring needle through inside of foot to back of foot and out at heel. Make a few small stitches at heel to secure, then knot end and take it back inside foot to hide end.
LW6559 Beatrice & Basil Crochet Bunnies
Beatrice & Basil Crochet BunniesPage 55

Find more ideas & inspiration: redheart.com©2019 Coats & Clark Page 3 of 4
STRIPED BUNNY LEGS (make 2)
With A, leaving a long beginning tail, make an adjustable ring.Round 1 (right side): Work 6 sc in ring; do not join, work in continuous rounds (spiral)—6 sc.Place a marker in the last sc worked to indicate end of round. Move marker up as each round is completed.Rounds 2–5: Sc in each st around.Fasten off, leaving a long tail for sewing. Use ending yarn tail to sew leg to top of a foot, about 5 rounds from toe edge. Weave in and trim ending tail. Do not trim beginning tail. It can be used later for sewing leg/foot to body.
TAILNote: If making striped bunny, use yarn color A. If making solid bunny, use yarn color B.Make an adjustable ring.Round 1 (right side): Work 6 sc in ring; do not join, work in continuous rounds (spiral)—6 sc.Place a marker in the last sc worked to indicate end of round. Move marker up as each round is completed.Round 2: [Sc in next st, 2 sc in next st] 3 times—9 sc.Round 3: Sc in each st around.Fasten off, leaving a long tail. If needed, thread beginning yarn tail through stitches at beginning of piece and pull to close opening. Weave in and trim beginning tail. Do not stuff tail. Do not trim ending tail. It can be used later for sewing tail to body.
SOLID BUNNY EARS (make 2)With B, make an adjustable ring.Round 1 (right side): Work 6 sc in ring; do not join, work in continuous rounds (spiral)—6 sc.Place a marker in the last sc worked to indicate end of round. Move marker up as each round is completed.Round 2: [Sc in next st, 2 sc in next st] 3 times—9 sc.Rounds 3–9: Sc in each st around.Fasten off, leaving a long tail. If needed, thread beginning yarn tail through stitches at beginning of piece and pull to close opening. Weave in and trim beginning tail. Do not stuff. Do not trim ending tail. It can be used later for sewing ear to head.
STRIPED BUNNY EARS (make 2)
With A, make an adjustable ring.Round 1 (right side): Work 6 sc in ring; do not join, work in continuous rounds (spiral)—6 sc.Place a marker in the last sc worked to indicate end of round. Move marker up as each round is completed.Round 2: [Sc in next st, 2 sc in next st] 3 times—9 sc.Rounds 3–11: Sc in each st around.Fasten off, leaving a long tail. If needed, thread beginning yarn tail through stitches at beginning of piece and pull to close opening. Weave in and trim beginning tail. Do not stuff. Do not trim ending tail. It can be used later for sewing ear to head.
SOLID BUNNY BOW TIEWith C, ch 50.Fasten off. Weave in and trim tails.
FINISHINGReferring to photograph as a guide to placement, use yarn tails or yarn scraps to sew the following pieces together.1. Insert body neck into neck opening
at bottom of head and sew pieces together, taking care to position eyes facing forward.
2. For solid bunny, sew feet to bottommost portion of body, side by side, taking care that toes are facing forward.
3. For striped bunny, sew leg/feet to front of lower body at about Round 16 and 3 or 4 stitches apart.
4. Sew arms to sides of upper body at round just beneath neck indentation.
5. Sew ears to top of head at Round 2, about 1 stitch apart.
6. Sew tail to lower backside of body.
With embroidery needle and pink embroidery floss for solid bunny or black embroidery floss for stiped bunny, embroider a small triangle on face for nose, centered about 1 row below eyes. Weave the floss ends back through head and knot securely then bury yarn in head, trimming excess as needed.Optional Cheeks: Using cotton swabs, apply powder face blusher to face, as follows: Load swab with blusher, tap to release excess powder. Apply powder in circular rubbing motion to form round cheeks. Apply cheeks about 1 round below eyes and about 4 stitches wide.
Tie bow tie around solid bunny's neck, tying ends into a bow..
Weave in and trim any remaining ends.
ABBREVIATIONS A, B, C, and D = Color A, Color B, Color C, and Color D; ch = chain; sc = single crochet; st(s) = stitch(es); [ ] = work directions in brackets the number of times specified.
LW6559 Beatrice & Basil Crochet Bunnies
See next page for alternate photo
Beatrice & Basil Crochet BunniesPage 56
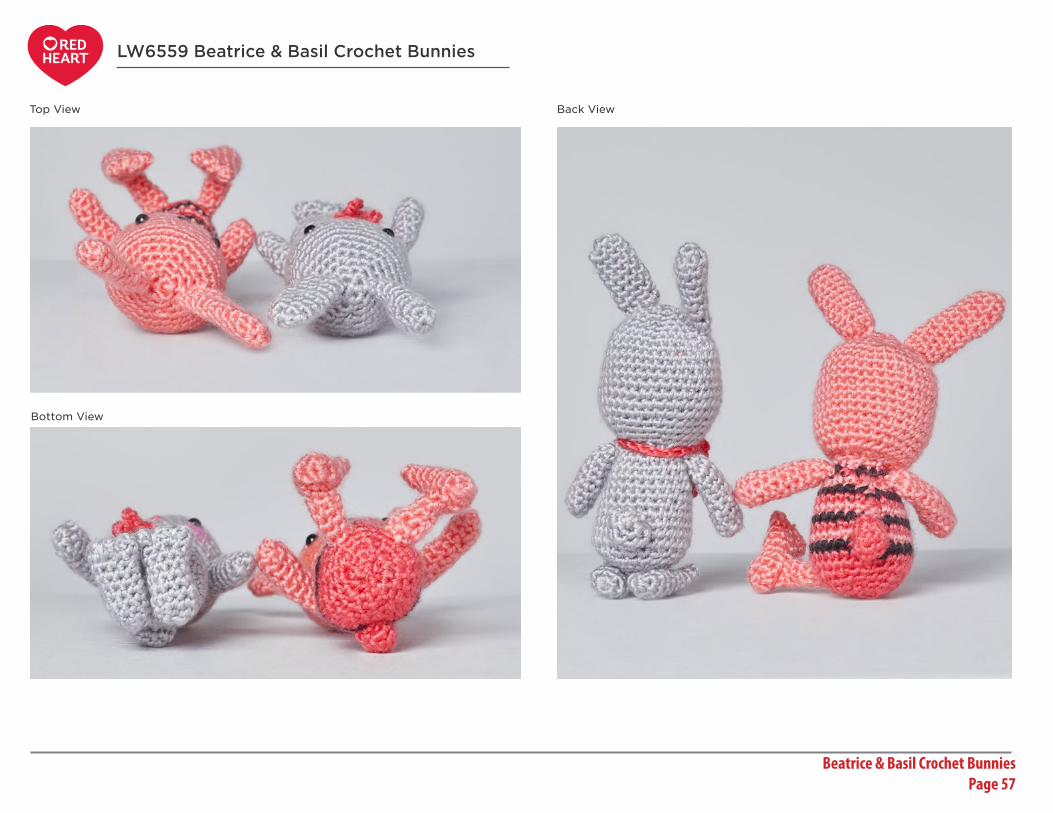
Find more ideas & inspiration: redheart.com©2019 Coats & Clark Page 4 of 4
LW6559 Beatrice & Basil Crochet Bunnies
Top View
Bottom View
Back View
Beatrice & Basil Crochet BunniesPage 57
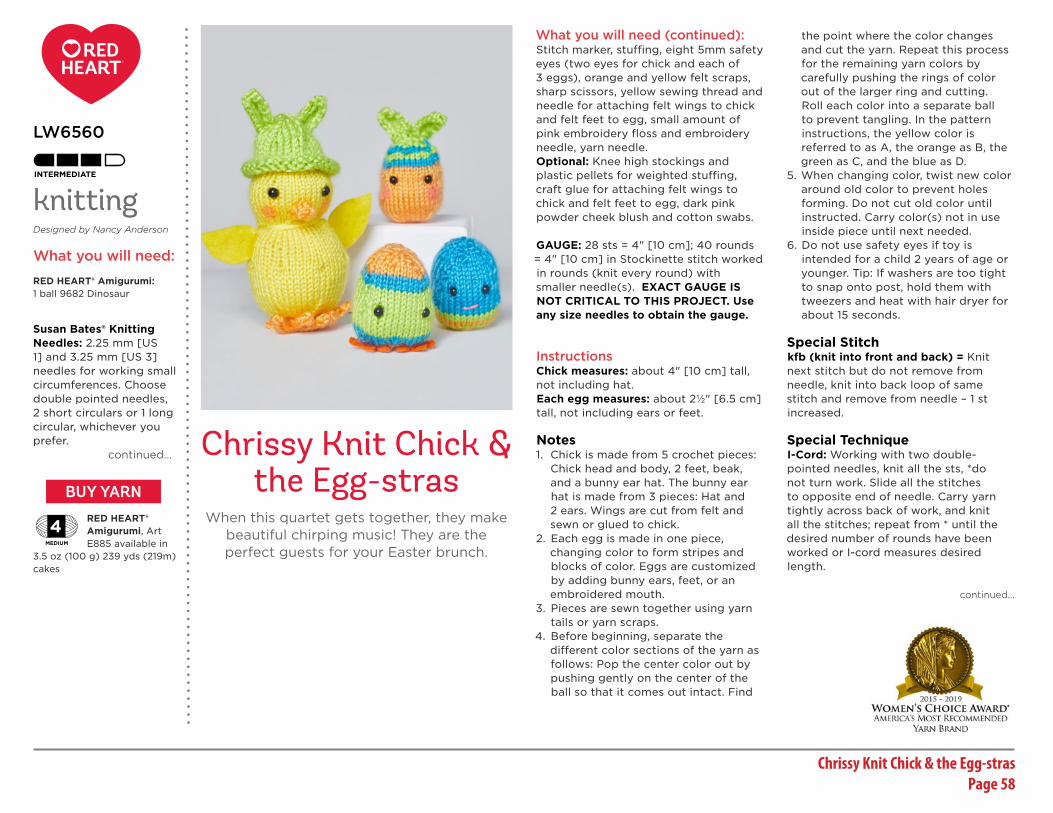
Find more ideas & inspiration: redheart.com©2019 Coats & Clark Page 1 of 3
Chrissy Knit Chick & the Egg-stras
RED HEART® Amigurumi: 1 ball 9682 Dinosaur
Susan Bates® Knitting Needles: 2.25 mm [US 1] and 3.25 mm [US 3] needles for working small circumferences. Choose double pointed needles, 2 short circulars or 1 long circular, whichever you prefer. continued...
RED HEART® Amigurumi, Art E885 available in
3.5 oz (100 g) 239 yds (219m) cakes
LW6560
knittingDesigned by Nancy Anderson
What you will need:
BUY YARN
continued...
LACE
When this quartet gets together, they make beautiful chirping music! They are the perfect guests for your Easter brunch.
What you will need (continued):Stitch marker, stuffing, eight 5mm safety eyes (two eyes for chick and each of 3 eggs), orange and yellow felt scraps, sharp scissors, yellow sewing thread and needle for attaching felt wings to chick and felt feet to egg, small amount of pink embroidery floss and embroidery needle, yarn needle.Optional: Knee high stockings and plastic pellets for weighted stuffing, craft glue for attaching felt wings to chick and felt feet to egg, dark pink powder cheek blush and cotton swabs.
GAUGE: 28 sts = 4" [10 cm]; 40 rounds = 4" [10 cm] in Stockinette stitch worked in rounds (knit every round) with smaller needle(s). EXACT GAUGE IS NOT CRITICAL TO THIS PROJECT. Use any size needles to obtain the gauge.
InstructionsChick measures: about 4" [10 cm] tall, not including hat.Each egg measures: about 2½" [6.5 cm] tall, not including ears or feet.
Notes1. Chick is made from 5 crochet pieces:
Chick head and body, 2 feet, beak, and a bunny ear hat. The bunny ear hat is made from 3 pieces: Hat and 2 ears. Wings are cut from felt and sewn or glued to chick.
2. Each egg is made in one piece, changing color to form stripes and blocks of color. Eggs are customized by adding bunny ears, feet, or an embroidered mouth.
3. Pieces are sewn together using yarn tails or yarn scraps.
4. Before beginning, separate the different color sections of the yarn as follows: Pop the center color out by pushing gently on the center of the ball so that it comes out intact. Find
the point where the color changes and cut the yarn. Repeat this process for the remaining yarn colors by carefully pushing the rings of color out of the larger ring and cutting. Roll each color into a separate ball to prevent tangling. In the pattern instructions, the yellow color is referred to as A, the orange as B, the green as C, and the blue as D.
5. When changing color, twist new color around old color to prevent holes forming. Do not cut old color until instructed. Carry color(s) not in use inside piece until next needed.
6. Do not use safety eyes if toy is intended for a child 2 years of age or younger. Tip: If washers are too tight to snap onto post, hold them with tweezers and heat with hair dryer for about 15 seconds.
Special Stitchkfb (knit into front and back) = Knit next stitch but do not remove from needle, knit into back loop of same stitch and remove from needle – 1 st increased.
Special TechniqueI-Cord: Working with two double-pointed needles, knit all the sts, *do not turn work. Slide all the stitches to opposite end of needle. Carry yarn tightly across back of work, and knit all the stitches; repeat from * until the desired number of rounds have been worked or I-cord measures desired length.
Chrissy Knit Chick & the Egg-strasPage 58

Find more ideas & inspiration: redheart.com©2019 Coats & Clark Page 2 of 3
CHICK HEAD AND BODYHeadBeginning at top of head, with smaller needle(s) and A, cast on 6 sts. Place marker for beginning of round. Taking care not to twist sts; prepare to work in rounds.Round 1 (right side): [Kfb] 6 times—12 sts.Round 2: Knit.Round 3: [K1, kfb] 6 times—18 sts.Round 4: Knit.Round 5: [K2, kfb] 6 times—24 sts.Round 6: Knit.Round 7: [K3, kfb] 6 times—30 sts.Round 8: Knit.Round 9: [K4, kfb] 6 times—36 sts.Rounds 10–20: Knit.Weave beginning tail through cast-on edge and pull to close hole at top of head. Weave in and trim beginning tail.Round 21: [K4, k2tog] 6 times—30 sts.Round 22 (neck): Knit.
BodyRound 23: [K2, kfb] 10 times—40 sts.Rounds 24–32: Knit.Attach safety eyes, at or near Round 15 and about 8 or 9 stitches apart. Begin stuffing piece firmly and continue stuffing as work progresses.Round 33: [K4, kfb] 8 times—48 sts.Rounds 34–42: Knit.Round 43: [K4, k2tog] 8 times—40 sts.Round 44: Knit.Round 45: [K8, k2tog] 4 times—36 sts.Round 46: Knit.Round 47: [K4, k2tog] 6 times—30 sts.Round 48: [K3, k2tog] 6 times—24 sts.Round 49: [K2, k2tog] 6 times—18 sts.Place optional knee high, filled with plastic pellets, into piece.Round 50: [K1, k2tog] 6 times—12 sts.Cut yarn, leaving a long tail. Thread
ending tail through stitches of last round and pull to close opening. Weave in and trim tails.Shape Neck: Cut a 10" [25.5 cm] length of A. Wrap the length twice around neck of chick and tie snugly (but not too tightly) to shape neck.
CHICK FEET (make 4)With smaller needle(s) and B, leaving a long beginning tail, cast on 3 sts.Rounds 1–12: Using I-Cord technique, knit 12 rounds.Cut yarn, leaving a long tail. Weave tail through stitches of last round and pull to close opening. Secure tails but do not weave in. Tails will be used later to sew I-cords into foot shape. Make all four I-cords before proceeding.
Form FootTwo I-cords are needed to make each foot. Lay one I-cord straight and flat. Fold second I-cord in half and sew the fold to the first cord about ¾" [19 mm] from tip of first cord. The two halves of the folded I-cord form two toes, the tip of the first cord forms the third toe, and the remaining end of the first cord forms the back toe. Repeat this process to make the second foot.Using yarn tails or scraps, sew feet to bottom of chick, side by side, with the three-toe groupings pointing forward.
BEAKWith smaller needle(s) and B, leaving a long beginning tail, cast on 6 sts.Work back and forth in rows.Row 1: Purl.Row 2: K2tog, k1, lift k2tog st over k1
st and off right needle (1 st bound off), ssk, k1, lift ssk st over k1 st and off right needle (1 st bound off)—2 sts.Cut yarn, leaving a long tail. Thread ending tail through stitches of last row and pull to tighten. Then sew side edges together to cast-on edge. Tie beginning tail and ending tail together to complete cone-like shape. Sew beak to chick face, centered about 3 rounds below the eyes. Weave in and trim tails.
BUNNY EARS HATHatWith larger needle(s) and C, cast on 30 sts. Place marker for beginning of round. Taking care not to twist sts; prepare to work in rounds.Rounds 1–10: Knit.Round 11: [K3, k2tog] 6 times—24 sts.Round 12: Knit.Weave beginning tail through cast-on edge and pull to close hole at top of hat. Weave in and trim beginning tail.Round 13: [K2, k2tog] 6 times—18 sts.Round 14: Knit.Round 15: [K1, k2tog] 6 times—12 sts.Round 16: [K2tog] 6 times—6 sts.Cut yarn, leaving a long tail. Thread tail through stitches of last round and pull to close opening. Weave in and trim tails.
Ears (make 2)With smaller needle(s) and C, cast on 6 sts.Rows 1–7: Beginning with a wrong side row (purl), work in Stockinette stitch worked in rows (knit on right side, purl on wrong side) for 7 rows.Row 8: K1, [k2tog] twice, k1—4 sts.Cut yarn, leaving a long tail. Thread
ending tail through stitches of last row and pull to tighten. Then thread ending tail along side to cast-on edge. Use tails to sew ears to top of hat about ¼" [6 mm] apart. Weave in and trim tails.
BLUE-FACED EGGEggBeginning at top of egg, with smaller needle(s) and D, leaving a long beginning tail, cast on 6 sts. Place marker for beginning of round. Taking care not to twist sts; prepare to work in rounds.Round 1 (right side): [Kfb] 6 times—12 sts.Round 2: [K1, kfb] 6 times—18 sts.Round 3: Knit.Round 4: [K2, kfb] 6 times—24 sts.Round 5: Knit.Round 6: [K7, kfb] 3 times—27 sts.Round 7: Knit.Round 8: [K8, kfb] 3 times—30 sts.Rounds 9 and 10: Knit.Round 11: [K9, kfb] 3 times—33 sts.Weave beginning tail through cast-on edge and pull to close hole at top of egg. Weave in and trim beginning tail.Rounds 12–14: Knit.Round 15: [K10, kfb] 3 times—36 sts.Round 16: Knit.Change to C. Cut D.Rounds 17 and 18: With C, knit.Change to B. Do not cut C.Rounds 19 and 20: With B, knit.Change to C. Do not cut B.Round 21: With C, knit.Round 22: With C, [k4, k2tog] 6 times—30 sts.Change to B. Do not cut C.Round 23: With B, knit.Attach safety eyes at Round 12, about 5 or 6 stitches apart.
LW6560 Chrissy Knit Chick & the Egg-stras
continued...
Chrissy Knit Chick & the Egg-strasPage 59

Find more ideas & inspiration: redheart.com©2019 Coats & Clark Page 3 of 3
Round 24: With B, [k3, k2tog] 6 times—24 sts.Place optional knee high, filled with plastic pellets, into piece.Change to C. Do not cut B.Round 25: With C, knit.Round 26: With C, [k1, k2tog] 8 times—16 sts.Change to B. Cut C.Round 27: With B, [k2tog] 8 times—8 sts.Cut yarn, leaving a long tail. Thread tail through stitches of last round and pull to close opening. Weave in and trim tails.Embroider Mouth: With embroidery needle and pink embroidery floss: 1. Insert needle from right side (outside)
to wrong side (inside) of egg in place that will be side of mouth,
2. Bring needle straight across under about 4 sts to other side of mouth and insert back to right side of egg.
3. Insert needle back into egg, through initial insertion point, leaving floss slightly loose across face for mouth.
4. Bring needle to right side of egg again about one round below middle of mouth.
5. Insert needle back into egg, wrapping around the horizontal line of floss so that it forms a slightly bowed shape when pulled taught.
6. Bring needle back out through back of head. Knot and insert back into inside of egg to hide end.
7. Thread remaining floss end onto needle and insert into egg then out back of egg. Knot and insert back into inside of egg to hide end.
ORANGE-FACED EGG WITH
BUNNY EARSEggMake egg same as for Blue-Faced Egg, changing yarn color as follows: Work Rounds 1 and 2 with C, Rounds 3 and 4 with D, Rounds 5 and 6 with C, cut C at the end of Round 6, Rounds 7 and 8 with D, cut D at the end of Round 8, Rounds 9–27 with B.
Bunny Ears (make 2)With smaller needle(s) and C, cast on 6 sts.Rows 1–7: Beginning with a wrong side row (purl), work in Stockinette stitch worked in rows (knit on right side, purl on wrong side) for 7 rows.Row 8: K1, [k2tog] twice, k1—4 sts.Cut yarn, leaving a long tail. Thread ending tail through stitches of last row and pull to tighten. Then thread ending tail along side to cast-on edge. Use tails to sew ears to top of egg with no space between ears. Weave in and trim tails.
GREEN-FACED EGG WITH FELT FEETEggMake egg same as for Blue-Faced Egg, changing yarn color as follows: Work Rounds 1–6 with B, cut B at the end of Round 6, Rounds 7–9 with D, cut D at the end of Round 9, Rounds 10–19 with C, cut C at the end of Round 19, Rounds 20–22 with D, cut D at the end of Round 22, Rounds 23-27 with B.
Feet (make 2)Using sharp scissors, cut two feet out of orange felt. Each foot is shaped like a "Y" with an additional line (toe) between the top two lines. With sewing needle and yellow thread sew feet to bottom of egg.
Note: Feet can be glued in place instead of sewn, if desired.
FINISHINGWings (make 2): Cut two teardrop shapes out of yellow felt, about 1½" [4 cm} long and 1" [2.5 cm] wide at widest. With sewing needle and yellow thread sew wings to sides of chick, placing top edge (top end is wide end of teardrop) of wings on row just below neck indentation. Sew around curved top portion of teardrop shape, allowing the pointed tip to hang freely. Note: Wings can be glued in place instead of sewn, if desired.Optional Cheeks: Using cotton swab, apply powder blusher to face, as follows: Load swab with blusher, tap to release excess powder. Apply powder in circular rubbing motion to form round cheeks. Using photograph as a guide to placement, apply ¼" [6 mm] round cheeks below eyes of chick and/or eggs.
Weave in and trim any remaining tails.
ABBREVIATIONS A, B, C, and D = Color A, Color B, Color C, and Color D; k = knit; k2tog = knit next 2 sts together; st(s) = stitch(es); [ ] = work directions in brackets the number of times specified; * = repeat whatever follows the * as indicated.
Back View of Chick
Bottom View of Egg-stras
Back View of Egg with Bunny Ears
LW6560 Chrissy Knit Chick & the Egg-stras
Find more ideas & inspiration: redheart.com©2019 Coats & Clark Page 3 of 3
Round 24: With B, [k3, k2tog] 6 times—24 sts.Place optional knee high, filled with plastic pellets, into piece.Change to C. Do not cut B.Round 25: With C, knit.Round 26: With C, [k1, k2tog] 8 times—16 sts.Change to B. Cut C.Round 27: With B, [k2tog] 8 times—8 sts.Cut yarn, leaving a long tail. Thread tail through stitches of last round and pull to close opening. Weave in and trim tails.Embroider Mouth: With embroidery needle and pink embroidery floss: 1. Insert needle from right side (outside)
to wrong side (inside) of egg in place that will be side of mouth,
2. Bring needle straight across under about 4 sts to other side of mouth and insert back to right side of egg.
3. Insert needle back into egg, through initial insertion point, leaving floss slightly loose across face for mouth.
4. Bring needle to right side of egg again about one round below middle of mouth.
5. Insert needle back into egg, wrapping around the horizontal line of floss so that it forms a slightly bowed shape when pulled taught.
6. Bring needle back out through back of head. Knot and insert back into inside of egg to hide end.
7. Thread remaining floss end onto needle and insert into egg then out back of egg. Knot and insert back into inside of egg to hide end.
ORANGE-FACED EGG WITH
BUNNY EARSEggMake egg same as for Blue-Faced Egg, changing yarn color as follows: Work Rounds 1 and 2 with C, Rounds 3 and 4 with D, Rounds 5 and 6 with C, cut C at the end of Round 6, Rounds 7 and 8 with D, cut D at the end of Round 8, Rounds 9–27 with B.
Bunny Ears (make 2)With smaller needle(s) and C, cast on 6 sts.Rows 1–7: Beginning with a wrong side row (purl), work in Stockinette stitch worked in rows (knit on right side, purl on wrong side) for 7 rows.Row 8: K1, [k2tog] twice, k1—4 sts.Cut yarn, leaving a long tail. Thread ending tail through stitches of last row and pull to tighten. Then thread ending tail along side to cast-on edge. Use tails to sew ears to top of egg with no space between ears. Weave in and trim tails.
GREEN-FACED EGG WITH FELT FEETEggMake egg same as for Blue-Faced Egg, changing yarn color as follows: Work Rounds 1–6 with B, cut B at the end of Round 6, Rounds 7–9 with D, cut D at the end of Round 9, Rounds 10–19 with C, cut C at the end of Round 19, Rounds 20–22 with D, cut D at the end of Round 22, Rounds 23-27 with B.
Feet (make 2)Using sharp scissors, cut two feet out of orange felt. Each foot is shaped like a
"Y" with an additional line (toe) between the top two lines. With sewing needle and yellow thread sew feet to bottom of egg.
Note: Feet can be glued in place instead of sewn, if desired.
FINISHINGWings (make 2): Cut two teardrop shapes out of yellow felt, about 1½" [4 cm} long and 1" [2.5 cm] wide at widest. With sewing needle and yellow thread sew wings to sides of chick, placing top edge (top end is wide end of teardrop) of wings on row just below neck indentation. Sew around curved top portion of teardrop shape, allowing the pointed tip to hang freely. Note: Wings can be glued in place instead of sewn, if desired.Optional Cheeks: Using cotton swab, apply powder blusher to face, as follows: Load swab with blusher, tap to release excess powder. Apply powder in circular rubbing motion to form round cheeks. Using photograph as a guide to placement, apply ¼" [6 mm] round cheeks below eyes of chick and/or eggs.
Weave in and trim any remaining tails.
ABBREVIATIONS A, B, C, and D = Color A, Color B, Color C, and Color D; k = knit; k2tog = knit next 2 sts together; st(s) = stitch(es); [ ] = work directions in brackets the number of times specified; * = repeat whatever follows the * as indicated.
Back View of Chick
Bottom View of Egg-stras
Back View of Egg with Bunny Ears
LW6560 Chrissy Knit Chick & the Egg-stras
Chrissy Knit Chick & the Egg-strasPage 60