sparkle dress instructions - art gallery fabrics
TRANSCRIPT

F R E E P A T T E R N
f e a t u r i n g W E S T P A L M C O L L E C T I O N B Y K A T I E S K O O G

© 2019 Courtesy of Art Gallery Quilts LLC. All Rights Reserved.
F A B R I C C O L L E C T I O N D E S I G N E D B Y K A T I E S K O O G
F e a t u r i n g
100% RAYON | 54-56" WIDE | 76g/sqm
/ R-54505 PLAYFUL SEAWEED NIGHTGLOW /
FABR IC REQUIREMENTS
CUTT ING D IRECT IONS
3 yards of your favorite fabric
We decided to use rayon because it has an ultra smooth hand and delicate drape without sheerness, but this dress could also work well with our poplin or knit substrates.
• Cut 3 (three) 35 ½" squares
• Cut 2 (two) 2½" x 22½" strips

ar tga l le ry fabr ics.com
DRESS CONSTRUCT ION
Sew all rights sides together with ½" seam allowance. Press open.
• Start by hemming the edges of all the squares.
• Then begin constructing the front side of the dress. To accomplish this, take two 35 ½" squares and layer one on top of the other, right sides together.
• Make a mark measuring 6 ¾" from the top right corner down.
• Make a mark measuring 10¾" from the bottom right corner to the left.
• Trace a diagonal line that joins both marks with a fabric erasable marker.
• Sew on top of the line to attach both squares together.
• After you are done sewing, trim the excess fabric on the side and leave ½" seam allowance. Press open.
• Take the remaining 35½" square, and from a corner measure 9½" down on both sides of the corner, and make a mark
• Measure ½" in on the other two corners, (See Diagram 3 for reference)
• Measure 9½" from the top (inside) corners on both sides and make a mark, and ½" on the other corners (outside). See Diagram 2 for reference
• Starting on the left side, align the both squares (top & bottom) aligning the marks of 9½" at the top and the ½" at the bottom.
• Sew from the bottom mark diagonally up to the 9½ mark. ( Repeat the same step on the other side)
6 ¾"
10¾"
9½"
½"
9½"
sew here
• Position the 35 ½" square on point on top of the front side of the dress, right sides together as shown in the diagram below.
½"
½" ½"
9½" 9½"
½" Mark
9½" Mark
Diagram 1 Diagram 4
Diagram 5
Diagram 3
Diagram 2
ar tga l le ry fabr ics.com
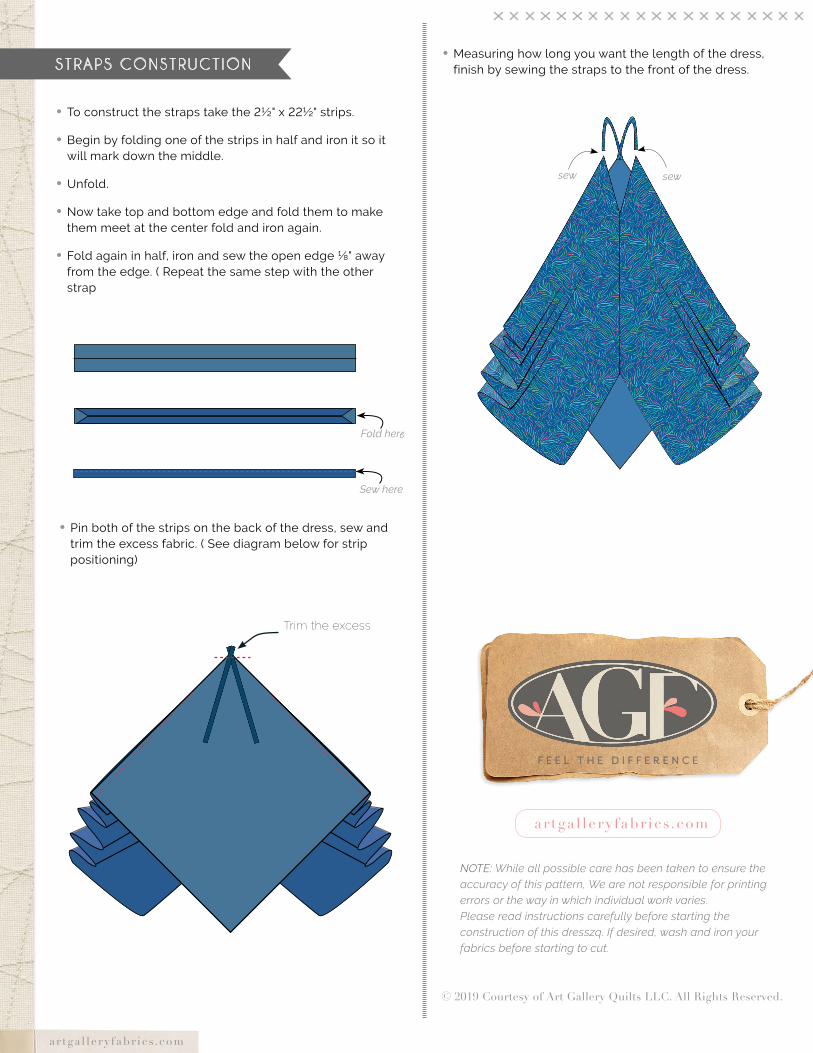
• To construct the straps take the 2½" x 22½" strips.
• Begin by folding one of the strips in half and iron it so it will mark down the middle.
• Unfold.
• Now take top and bottom edge and fold them to make them meet at the center fold and iron again.
• Fold again in half, iron and sew the open edge ⅛" away from the edge. ( Repeat the same step with the other strap
Sew here
Fold here
STRAPS CONSTRUCT ION
NOTE: While all possible care has been taken to ensure the accuracy of this pattern, We are not responsible for printing errors or the way in which individual work varies.Please read instructions carefully before starting the construction of this dresszq. If desired, wash and iron your fabrics before starting to cut.
ar tga l le ry fabr ics.com
© 2019 Courtesy of Art Gallery Quilts LLC. All Rights Reserved.
Trim the excess
• Pin both of the strips on the back of the dress, sew and trim the excess fabric. ( See diagram below for strip positioning)
• Measuring how long you want the length of the dress, finish by sewing the straps to the front of the dress.
sew sew

ar tga l le ry fabr ics.com