soyal ar-721(h) / ar-725 (h) / ar-757 (h) ar-321 (h) / ar-331 … · 2017-08-16 · don’t equip...
TRANSCRIPT

SOYALACCESS CONTROL SYSTEM
® AR-321 (H) / AR-331 (H)/AR-721(H) / AR-725 (H) / AR-757 (H) V130111
e x1
e x1
f x2
f x2
f x2
c x2
A.
A1.
A2. A3.
B.
E.
B.
C.
F.
C. H.G. D.
D.
b x2
a x2
c x2
d x2
c x2
g x1 h x1
P1
P1
P1
P1
P1
P7
P2
P2
P2
P2
P2
P3
P3
P3
P3
P3
P4
P4
P4
P4
P4
P6
AR-331 (H) AR-331 (H-S)
AR-721RB
AR-821RB
Contents
AR-331 (H):Touch-panel Metal Housing / AR-331 (H-S):Metal Housing
AR-321 (H):Touch-panel Metal Housing
AR-721 (H)
AR-725 (H):Illuminated Touch-panel
AR-757 (H)
AR-725 (H-M)
or
[Optional]
Digital Relay
Original RelayWG keyboard
or
AR-725 (H)
AR-725 (X)
1 Product
1 Product
1 Product
1 Product
1 Products
1 Products
1 Products
3 User Guide2 Optional
2 User Guide
2 User Guide
2 User Guide
2 User Guide
2 User Guide
4 Terminal Cables
3 Terminal Cables
3 Terminal Cables
3 Terminal Cables
3 Terminal Cables
3 Terminal Cables
5 Tools
4 Tools
4 Tools
4 Tools
4 Tools
4 Tools
2 Tools
5 Water proof Strip
Parts Description
Button Head PozidrivTapping Screw: M3x10
Security Torx Screw: M3.5x15
Flat Head Cap PhilipsTapping Screw: 4x19.1
Button Head PozidrivSlotting Screw: 2.5x10
Flat Head Hex Socket Screw: M3x8
Flat Head Cap PhilipsTapping Screw: 4x38
a.
e. f.
b. c. d.
Security Torx Screw: M3x10 Security Torx Wrenchesg. h.
※ Must to purchase relay
V130111
4
2 C.
1
c.
A.
B.
3
45
A. B. C.6
A.
B.
D.
7
8
A.
C.
d.
F.1 A1.
F.E.
2
4
5e.
3
A3.A1.
G.
1
2
3
e.
b. A2.
A1.+A3.H.
4
5
5
a.
D.
4
4 12
3
2
3
4
51 6
Access ControllerTouch-panel Metal Housing / Illuminated Touch-panel
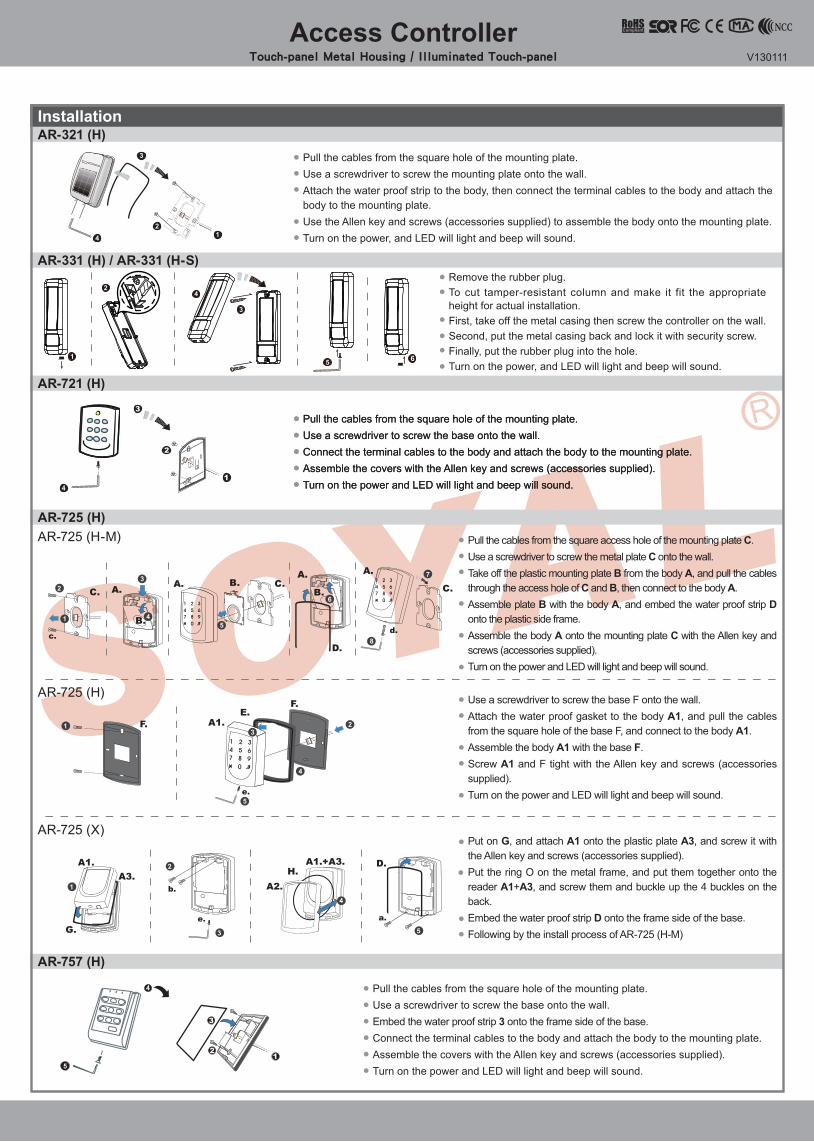
InstallationAR-321 (H)
AR-721 (H)
AR-725 (H)
AR-331 (H) / AR-331 (H-S)
AR-757 (H)
AR-725 (H-M)
AR-725 (H)
AR-725 (X)
Pull the cables from the square hole of the mounting plate. Use a screwdriver to screw the mounting plate onto the wall. Attach the water proof strip to the body, then connect the terminal cables to the body and attach the body to the mounting plate. Use the Allen key and screws (accessories supplied) to assemble the body onto the mounting plate. Turn on the power, and LED will light and beep will sound.
Pull the cables from the square hole of the mounting plate.Use a screwdriver to screw the base onto the wall. Connect the terminal cables to the body and attach the body to the mounting plate.Assemble the covers with the Allen key and screws (accessories supplied). Turn on the power and LED will light and beep will sound.
Pull the cables from the square hole of the mounting plate.Use a screwdriver to screw the base onto the wall. Connect the terminal cables to the body and attach the body to the mounting plate.Assemble the covers with the Allen key and screws (accessories supplied). Turn on the power and LED will light and beep will sound.
Pull the cables from the square hole of the mounting plate.Use a screwdriver to screw the base onto the wall.Embed the water proof strip 3 onto the frame side of the base. Connect the terminal cables to the body and attach the body to the mounting plate.Assemble the covers with the Allen key and screws (accessories supplied). Turn on the power and LED will light and beep will sound.
Pull the cables from the square access hole of the mounting plate C. Use a screwdriver to screw the metal plate C onto the wall. Take off the plastic mounting plate B from the body A, and pull the cables through the access hole of C and B, then connect to the body A. Assemble plate B with the body A, and embed the water proof strip D onto the plastic side frame. Assemble the body A onto the mounting plate C with the Allen key and screws (accessories supplied).Turn on the power and LED will light and beep will sound.
Use a screwdriver to screw the base F onto the wall. Attach the water proof gasket to the body A1, and pull the cables from the square hole of the base F, and connect to the body A1. Assemble the body A1 with the base F. Screw A1 and F tight with the Allen key and screws (accessories supplied).Turn on the power and LED will light and beep will sound.
Put on G, and attach A1 onto the plastic plate A3, and screw it with the Allen key and screws (accessories supplied).Put the ring O on the metal frame, and put them together onto the reader A1+A3, and screw them and buckle up the 4 buckles on the back. Embed the water proof strip D onto the frame side of the base. Following by the install process of AR-725 (H-M)
Remove the rubber plug.To cut tamper-resistant column and make it fit the appropriate height for actual installation.First, take off the metal casing then screw the controller on the wall.Second, put the metal casing back and lock it with security screw.Finally, put the rubber plug into the hole. Turn on the power, and LED will light and beep will sound.

SOYALACCESS CONTROL SYSTEM
® AR-321 (H) / AR-331 (H)/AR-721(H) / AR-725 (H) / AR-757 (H) V130111
AR-321H
P4
P6
P1
P2 P3
P4
P5P1
P2
P3P4
P5
P1P2
P3
P4 P5
P1P2
P3
P1
P2P3
P4 P5
P1P2
P3P4P5
125kHz
125kHz
125kHz
125kHz
13.56MHz
13.56MHz
13.56MHz
13.56MHz
P7
LED
LED
10 9 8 7 6 5 4 3 2
P4
P6
P1P2
P3
125kHz 13.56MHz
P1Cable :
P2Cable :
P3Cable :
P4Cable : (Contact Rating: 1A 125VAC/24VDC)
P5Cable : (Optional)
P6Cable :
P7Cable : (Directly connected at the Access controller)
Wire ApplicationWiegand
Beeper
Wiegand
Pin12345
ColorThin Blue
Thin GreenPink
BrownYellow
DescriptionWiegand DAT:1 InputWiegand DAT:0 InputBeeper Output 5V/100mA, Low LED Green Output 5V/20mA, MaxLED Red Output 5V/20mA, Max
Wire ApplicationNetworking Module
Pin12
ColorThick GreenThick Blue
DescriptionRS-485(B-)RS-485(A+)
※After S/N: 0706-XXXXXX
Wire ApplicationTamper Switch
Pin123
ColorRed
OrangeYellow
DescriptionN.C.COMN.O.
Wire Application3-PIN Connector
Pin123
ColorBlackWhitePurple
DescriptionGND.DuressArming/ Security trigger signal
Wire ApplicationDoor bellArmingDuressLED indicator
Pin1234
ColorBrown WhiteRed White
Yellow WhiteGreen White
DescriptionBE OutputAR Output/ Security trigger signal OutputDU Output/ TTL outHi input/ Green light brighten
AR-321 (H)
AR-721 (H)
AR-331 (H) / AR-331 (H-S)
AR-725 (H)
AR-757 (H)
Wire ApplicationLock Relay
Common-COM-PointDoor contactExit SwitchAlarm RelayPower
Wire Application
Exit SwitchNetworking Module
Networking Module
Alarm RelayDoor contact
Beeper
Tamper Switch
Lock Relay
Power
Pin12345678
Pin1234
6789101112131415
5
ColorBlue White
Purple WhiteWhite
OrangePurpleGray
Thick RedThick Black
ColorThick BlackThick Red
PurpleThick Green
Thick BlueYellow WhiteOrange White
GrayOrangeBrownYellowPink
Thin BlueThin Green
Description(N.O.) DC24V1Amp(N.C.) DC24V1Amp(COM) DC24V1AmpNegative Trigger InputNegative Trigger InputLow output; Max 12V/100mA (Open Collector)DC Power 12VDC Power 0V
DescriptionDC Power 0VDC Power 12VNegative Trigger InputRS-485(B-)Low output; Max 12V/100mA (Open Collector)/Security trigger signal OutputRS-485(A+)N.O.COMLow output; Max 12V/100mA (Open Collector)Negative Trigger InputLED Green Negative Output 5V/20mA, MaxLED Red Negative Output 5V/20mA, MaxBeeper Negative Output 5V/100mA, Low Wiegand DAT:1 InputWiegand DAT:0 Input
Connector Table
AR-321 (H)AR-331 (H)AR-721 (H)AR-725 (H)AR-757 (H)
Connectors ComparisonP1 P2 P3 P4 ( Optional)P5P7 P8P1 P2 P3 P4 ( Optional)P5P1 P2 P3 P4 ( Optional)P5P1 P2 P3 P4 P6
NoticeThe communication wires and power line should NOT be bound in the same conduit or tubing.
Don’t equip controller and lock with the same power supply. The power for controller may be unstable when the lock is activating, that may make the controller malfunction.The standard installation: Door relay and lock use the same power supply, and controller use independent power supply.
Use AWG 22-24 Shielded Twist Pair to avoid star wiring.1.Tubing:2.Wire selection:3.Power supply:
White

V130111
WG 1WG 0
BZGLEDRLED12VGND
12345678
12345
WG 1WG 0BZGLEDRLED
GND12V
12VGND
P2
P1
B-A+B-A+B-A+
Host
CH1
CH2
12
12
12
12
12
GND12VA+
B-
B-A+
B-A+B-
A+
B-A+
B-A+P3
P3
P3
P3
P3
Node 1
Node 9
Node 8
Node 16
EXIT
12345678
1 2 3
N.C.N.O.
COMCTL12VGND
PB
12VGND
12VGND
12VGND
ARM P1
P5
AR-721RB
N.C.N.O.
COMCTL
12345678
12V
Door Contact
ALM12V
GND
12VGND
12VGND
N.C.
12VGND
P1
EXIT
12345678
N.C.COM
PB
12VGND
12VGND
12VGND
12VGND
N.O.
P1
EXIT
12345678
12VGND
12VGND
12VGND
N.O.
N.O.
COM
PB
12VGND
P1
N.O.
12VGND
EXIT
N.C.N.O.
COMCTL12V
10987654321
P7
N.O.
12VGND
Lock
PB12V
GND
N.C.N.O.
COMCTL12V
1098765
5
4
4
3
3
2
2
1
11111
1
N.C.N.O.
COMCTL12V
P7
N.C.Door
ContactALMCOMN.O.
12VGND
5432
11111
1
AR-331 (H)AR-331 (H)
Access ControllerTouch-panel Metal Housing / Illuminated Touch-panel
Strengthen security with AR-721RB
Connect to Access Control for Connect to arming tools for
Connect to Reader
Alarm
Alarm
Tamper Alarm
Controller Reader
Controller
Controller
AR-716E
Controller Controller
Controller
Controller
Controller
Converter
Node ID 001
Node ID 254
Door Contact
Door Contact
Relay Outpot Module
Relay Outpot Module
Alarm Relay
Tamper Relay
POWER12VDC
POWER12VDC
POWER12VDC
POWER12VDC
POWER12VDC
POWER12VDC POWER
12VDC
POWER12VDC
POWER12VDC
Connect to Door Sensor
Connect to Networking
Request To Exit
Request To Exit
Electric Bolt
Electric Bolt
※ 1.Enable the security trigger signal: Please refer to the 34 DDD 2.Disable the door open button input. (Please refer to the 20 DDD of function default value.)
Connect to Magnet Lock or Electric Bolt
Electric Boltor
Magnet Lock
Controller
Request To Exit
POWER12VDC
POWER12VDC
Connect to Electric StrikeWiring Diagram
Electric Strike
Controller
Request To Exit
POWER12VDC
POWER12VDC
If use the AR-721RB, please refer to the top of the wiring diagram.
P7 P7
SOYALACCESS CONTROL SYSTEM
® AR-321 (H) / AR-331 (H)/AR-721(H) / AR-725 (H) / AR-757 (H) V130111
AR-321H
B-A+B-A+B-A+
Host
CH1
CH2
10987654321
12VGND
AR-331 (H)
AR-331 (H)
P7
A+B-
A+
B-
AR-716E
1
2
3
GLEDRLED
BZWG 1WG 0GND12V
P7
GND12V
12VGND
331 (HB):125kHz 331 (HD):13.56MHz
CARD
CARD
5432
11111
1
109
12345678
5432
111111
External WG keyboard
Adding and Deleting TagMode4/Mode8
Delete All TagsInput 123456 (or Master Code) → 29 29
Delete a Single TagInput 123456 (or Master Code) → 10 SSSSS EEEEE[e.g.] Delete User Address: 00058 Access programming mode → 10 00058 00058
9
9Delete a batch of TagsInput 123456 (or Master Code) → 10 SSSSS EEEEE[e.g.] Delete User Address: 00101~00245 Access programming mode → 10 00101 00245
9
9
Add Single Tag or Random tagsInput 123456 (or Master Code) → 19 UUUUU 00001 → Present the tag(s) with Controller (single tag or random numbered cards one by one) → Done[e.g.] 2 readom cards with user addresses No. 100 and No. 101: Access programming mode → 19 00100 00001 → Present the tags one by one → Done
Input 123456 (or Master Code) → 19 UUUUU QQQQQ → Present the tags (Present the tag with the lowest number first.) → OKAdd the Sequential tags
[e.g.] User Address NO.101 to NO.120 have 20 pcs of sequential tags:(62312~62332): Access programming mode → 19 00101 00120 → Close Tag into RF Area(only use the tag NO.62312) → OK
Tag Information
SITE CODE
CARD CODE
SITE CODE
CARD CODE
Mode6 ※At this mode, User Address = Card Code
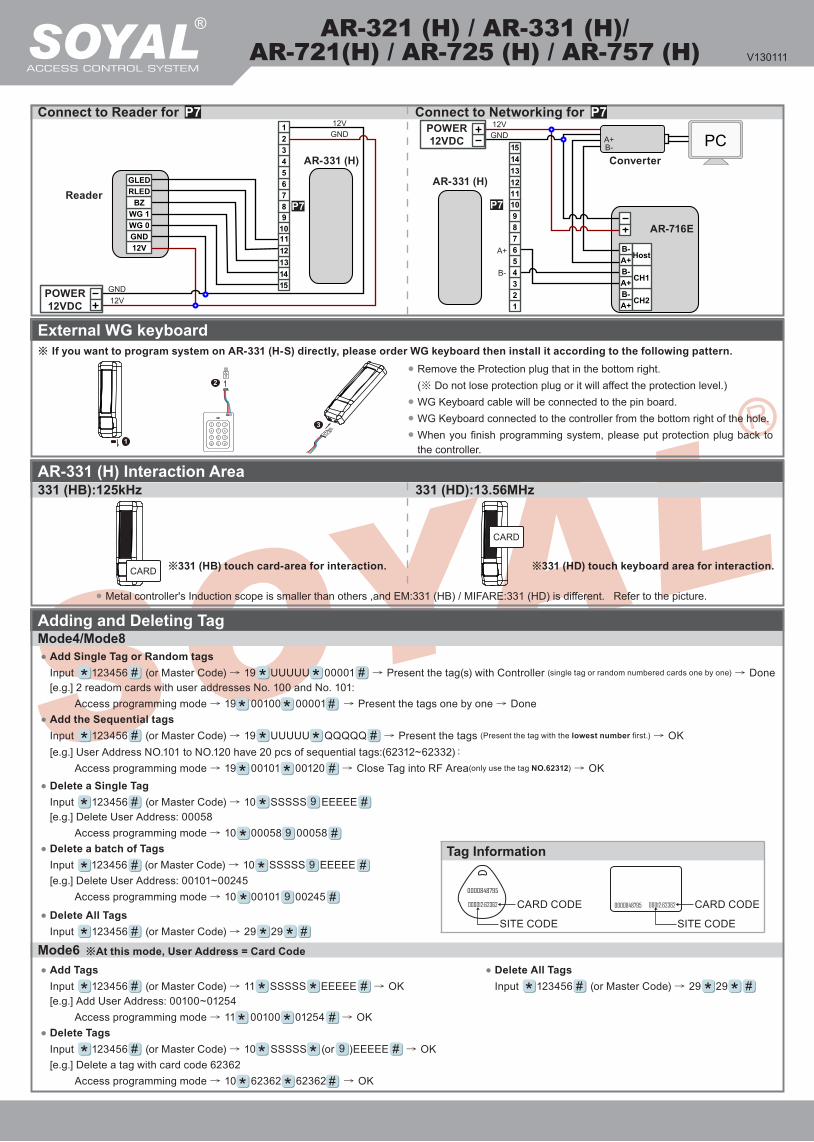
※ If you want to program system on AR-331 (H-S) directly, please order WG keyboard then install it according to the following pattern.
Add TagsInput 123456 (or Master Code) → 11 SSSSS EEEEE → OK [e.g.] Add User Address: 00100~01254 Access programming mode → 11 00100 01254 → OK
Delete All TagsInput 123456 (or Master Code) → 29 29
Delete TagsInput 123456 (or Master Code) → 10 SSSSS (or )EEEEE → OK[e.g.] Delete a tag with card code 62362 Access programming mode → 10 62362 62362 → OK
9
Reader
POWER12VDC
Converter
POWER12VDC
Connect to Reader for Connect to Networking for P7P7
Remove the Protection plug that in the bottom right.(※ Do not lose protection plug or it will affect the protection level.)WG Keyboard cable will be connected to the pin board.WG Keyboard connected to the controller from the bottom right of the hole.When you finish programming system, please put protection plug back to the controller.
AR-331 (H) Interaction Area
Metal controller's Induction scope is smaller than others ,and EM:331 (HB) / MIFARE:331 (HD) is different. Refer to the picture.
※331 (HB) touch card-area for interaction. ※331 (HD) touch keyboard area for interaction.
V130111
Access ControllerTouch-panel Metal Housing / Illuminated Touch-panel
Enable/Disable auto open zoneAccess programming mode → 20 004 [004= enable Auto-Open Time Zone; 000= disable Auto-Open Time Zone]
Enable/Disable auto open door without presenting cardAccess programming mode → 24 001 [001= enable Auto-Open Time Zone; 000= disable Auto-Open Time Zone]
[e.g.] No. 154 enable the anti-pass-back, and induction into the door has not been induced to leave. When he represent into the door will become invalid , then he needs to set the reset. Access programming mode → 26 00154 00154 2 → Reset
[e.g.] User address from 00152 to 00684 enable the anti-pass-back function: 26 00152 00684 0
Enable cardAccess programming mode → 26 SSSSS EEEEE N [SSSSS= User address start; EEEEE= User address end; N=0(control)/ 1(Not control)/ 2(reset)]
Enable controllerAccess programming mode → 20 DDD [128= Anti-pass-back(0=Disable; 1=Enable)/ 064=Access/Exit(0=Exit; 1=Access).]
Access programming mode → 20 128 (Please refer to function default value for details.)[e.g.] Enable Anti-pass-back, and set to Exit door= (128 x 1) + (064 x 0) = 128
N: 2 sets of auto-open zone (N=0=1st set; N=1=2nd set)HHMMhhmm=Staring time to ending time (e.g. 08301200=08:30 to 12:00)7123456H= 7 days of week + Holiday (Sun/Mon/Tue/Wed/Thu/Fri/Sat) (H= 0: disable; 1: enable); Holidays establish by the software.
Set up open timeAccess programming mode → 08 N HHMMhhmm 7123456H
[e.g.] To set the second time zone as 9:30 AM to 4:20 PM, Monday, Wednesday and Friday: 08 1 09301612 01010100 → Done
M4/M8: Individual pass codeCard or PIN: Access programming mode → 12 UUUUU PPPP [e.g. User address: 00001 and pass code: 1234, input 12 00001 1234 ]Card and PIN: Access programming mode → 13 UUUUU PPPP [e.g. User address: 00001 and pass code: 1234, input 13 00001 1234 ]M6: Public pass wordCard or PIN: Access programming mode → 15 PPPP [Input 4-digit pass code, default value: 4321]Card and PIN: Access programming mode → 17 PPPP [Input 4-digit pass code, default value: 1234; PPPP=0000: change into Card Only]
Access programming mode → 00 NNN [Node ID: 001~254]
Usually, anti-pass-back is commonly applied to parking areas in order to prevent from multi-entry with one card at a time, or to situations need access and exit monitor.
Door will keep open after the first flashing card.There are 2 time zones supported when Stand-Alone, and 63 time zones when it connect to AR-716E.
Access programming mode → 28 064 [064= Dual Door Control]Controller with an reader to do the "Dual Door Control".
Access programming mode → 04 N [N=4/6/8]D. Set up the password
E. Dual Door Control(M4/M8)
F. Anti-pass-back(M4/M8)
G. Auto Open Time Zone
B. Chang the Node ID of Controller
C.Set up M4/M6/M8
H. Lift control
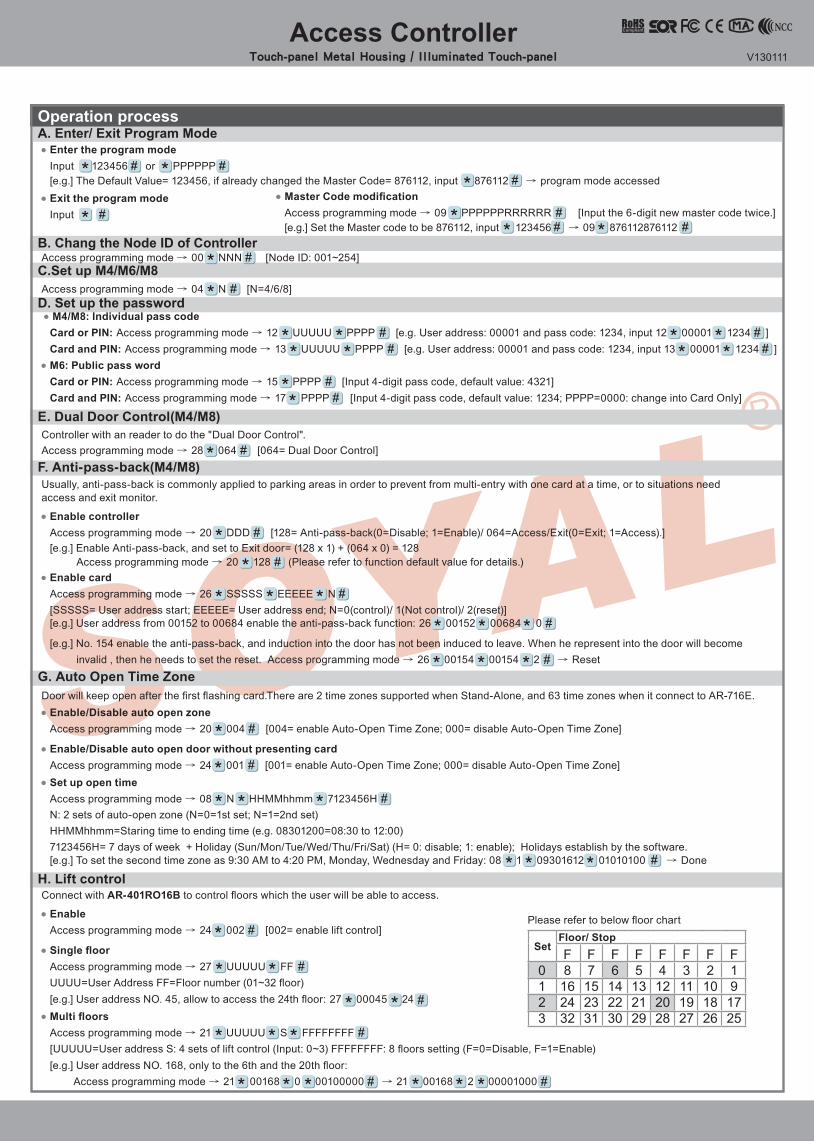
EnableAccess programming mode → 24 002 [002= enable lift control]
[e.g.] User address NO. 168, only to the 6th and the 20th floor: Access programming mode → 21 00168 0 00100000 → 21 00168 2 00001000
Multi floorsAccess programming mode → 21 UUUUU S FFFFFFFF[UUUUU=User address S: 4 sets of lift control (Input: 0~3) FFFFFFFF: 8 floors setting (F=0=Disable, F=1=Enable)
Single floor
[e.g.] User address NO. 45, allow to access the 24th floor: 27 00045 24
Access programming mode → 27 UUUUU FFUUUU=User Address FF=Floor number (01~32 floor)
Connect with AR-401RO16B to control floors which the user will be able to access.
SetFloor/ StopF8162432
0123
F6142230
F7152331
F5132129
F4122028
F3111927
F2
101826
F19
1725
Please refer to below floor chart
Master Code modificationAccess programming mode → 09 PPPPPPRRRRRR [Input the 6-digit new master code twice.][e.g.] Set the Master code to be 876112, input 123456 → 09 876112876112
Enter the program modeInput 123456 or PPPPPP[e.g.] The Default Value= 123456, if already changed the Master Code= 876112, input 876112 → program mode accessedExit the program modeInput
Operation processA. Enter/ Exit Program Mode

SOYALACCESS CONTROL SYSTEM
® AR-321 (H) / AR-331 (H)/AR-721(H) / AR-725 (H) / AR-757 (H) V130111
Enable: Access programming mode → Disable: Access programming mode →
Factory Reset by its commandsWhen the device is stand-alone (not networking)Access programming mode → 20 016 → 24 064 → 26 00000 01023 1 → 28 000 → 29 29※Note: After the Master Code is changed, factory reset doesn’t restore the Master Code back to 123456.
Enable/Disable Arming status (for M4/M8; Factory default armingcode is: 1234) :
Standby Mode
Enter Program Mode
After door open
The normal procedure to open door → Input 4 digit arming code →
Do not open the door
→ Input 4 digit arming code → Present valid card
※ [The normal procedure to open door] can refer to [Access Mode].
I. Setting Up the ArmingAlarm conditions:1. Arming is enabled2.Alarm system connected
Application:1. Door open too long: Door is open longer than door relay time plus door close time.2. Force open (Opened without a valid user card): Access by force or illegal procedure.3. Door position abnormal: Arming is enabled and the power is suddenly off then on.
Function Default Value
Mode4 / Mode6 / Mode8
AR-321 (H) / AR-331 (H) / AR-721 (H) / AR-725 (H) / AR-757 (H)
AR-321 (H) / AR-331 (H) / AR-721 (H) / AR-725 (H) AR-757 (H)
20 DDDFunction Selection Value Application
※Default Value
AttendanceAuto Re-lockAuto OpenDoor open button inputMaster Controller of NetworkAccess/Exit Anti-pass-back
※0: Yes※0: Disable※0: Disable 0: Disable※0: Slave※0: Exit※0: Disable
NetworkingNetworking/Stand-AloneNetworking/Stand-AloneNetworking/Stand-AloneNetworkingNetworkingNetworking
001002004016032064128
1: No 1: Enable 1: Enable※1: Enable 1: Mater 1: Access 1: Enable
24 DDDFunction Selection ValueApplication
※Default Value
Auto-open door without cards at auto open zoneAlarm Output/ Lift ControlStop Alarm by door close or by push buttonDoor bell
※0: Disable
※0: Alarm Output
0: None
※0: Disable
Networking/Stand-Alone
Networking/Stand-Alone
Networking/Stand-Alone
Networking/Stand-Alone
001
002
064
128
1: Enable
1: Lift Control
※ 1: Yes
1: Enable
Function Selection Value ApplicationAuto-open door without cards at auto open zoneLift Control/ Duress FunctionStop Alarm by door open or door close button
※0: Disable
※0: Duress
0: None
Networking/Stand-Alone
Networking/Stand-Alone
Networking/Stand-Alone
1: Enable
1:Lift Control
※1: Yes
24 DDD ※Default Value
001
002
064
28 DDDFunction Selection Value Application
※Default Value
Dual Door ControlForce Open Alarm Output
※0: Disable※0: Disable
Networking/Stand-AloneNetworking/Stand-Alone
064128
1: Enable1: Enable
※ Mode 6, the number of users up to 65535, since it reads CARD CODE(5 digits) only, unlike that Mode4/Mode8 read SITE CODE and CARD CODE(10 digits).
Selection= 0(none value)/ 1(1 x each value) [e.g.] DDD value of Enable “Auto Open” + ”Exit by Push Button +”Anti-pass-back” =004+016+128=148; As a result of that, the command will be 20 148 .
65,535
Mode
Networking/Stand-Alone
Stand-Alone
Networking/Stand-Alone
Networking/Stand-Alone
User Capacity Access Mode
M4
M6
M8
Yes
No
Yes
Yes
No
Yes
Yes
No
Yes
Yes
No
Yes
32
No
32
11
No
11
No
Auto-show Duty time
Event log Capacity
120 Holidays
Anti force
Time Zone
Lift Control
Anti-pass-back
1.Card only2.Card and PIN (4-digit PIN)+ 3.Card or User address (5-digit) + Individual PIN (4-digit
individual PIN) +
1.Card only2.Card and PIN (4-digit public PIN= Arming PWD)+ 3.Card or PIN (4-digit public PIN= Duress code)
1.Card only2.Card and PIN (4-digit individual PIN)+ 3.Card or PIN (4-digit individual PIN)
1,024
3,000{721 (H)/757 (H)}
{321 (H)/331 (H)/725 (H)}
1,024
3,000
1,200 721 (H)1,500
321 (H)/331 (H)/725 (H)
3,000 757 (H)
{721 (H)/757 (H)}
{321 (H)/331 (H)/725 (H)}
1,200 721 (H)1,500
321 (H)/331 (H)/725 (H)
3,000 757 (H)

V130111
Access ControllerTouch-panel Metal Housing / Illuminated Touch-panel
Command ListModeM4/M6/M8
M4//M6M8
M4/M8
M4/M8
M4/M8
M4/M8
M4/M6M8
M4/M6/M8
M4/M6/M8
M4/M6/M8
M4/M6/M8
M4/M8
M4/M6/M8
M4/M6/M8
M4/M6/M8
M6
M4/M8
M4/M8
M4/M8
M4/M8
M4/M6/M8
M4/M8
M4/M6/M8
M4/M6/M8
M4/M8
M4/M6/M8
M4/M8
M6
M4/M8
M4/M6/M8
M4/M6/M8
M4/M8
M4/M8
M4/M6/M8
M4/M6/M8
M4/M6/M8
FunctionEntering programming mode
Exiting programming mode
Exiting programming mode and enabling arming status
Node ID setting (Connecting to 716E)
Node ID setting (Connecting to PC directly
without via 716E)
Mifare tag / card format (Optional)
Door relay time setting
Alarm relay time setting
Control mode setting
Arming delay time setting
Alarm delay time setting
Master card setting
Auto-open time zone setting
Master code setting
Suspend / Delete tag
Set a sequence of cards as "read and access"
Active the suspended cards
Set the cards as Card mode OR PIN mode
by user address
Set the cards as Card AND PIN mode
by user address
Arming output time setting
M4/M8: Duress code setting
M6: Public PIN setting (Card or PIN)
Card number modification
M4/M8: Arming pass code setting
M6: Public PIN setting (Card and PIN)
Door open waiting time
Set the card by induction(M4/M8)
Reader additional setting
Lift control setting: multi-doors
Add/Delete tag by induction (M6 only)
AR-401RO16 Lift Relay Activated TM
Controller parameter setting
Controller time clock setting
Anti-pass-back (Enable user)
Single floor setting
Dual door control/ Active or inactive arming for force open
Delete all tags
Enable the security trigger signal ( with AR-721RB)
DescriptionPPPPPP=Master Code, default value=123456
NNN=Node ID, range: 001~254
NNN=Node ID of Access Controller, VVV=Virtual 716E Node ID,
nnn=Door number; range:001~254
N: 0=ISO14443A; 1=ISO14443B; 2=ISO15693;
3=I Code1; 4=I Code2
PS.1. Please select the compliance,first.
2. Make sure reader and card using the same compliance.
TTT=Door relay time 000= Output constantly
001~600=1~600 sec.
601~609=0.1~0.9 sec.
TTT=Alarm relay time 000= Output constantly 001~600=1~600 sec.
N=Mode 4=Mode4;6=Mode6;8=Mode8
TTT=Arming delay time 001~600=1~600 sec.
TTT=Alarm delay time 001~600=1~600 sec.
SSSSS-EEEEE=00000-01023 (00000-03000 for AR-725H);
SSSSS=Starting user address; EEEEE=Ending user address
N= 0(1st time zone) / 1(2nd time zone)
HHMM= Starting time; hhmm= ending time
(i.e.: 08301200=08:30 to 12:00)
7123456H= 7 days of week (Sun/Mon/Tue/Wed/Thu/Fri/Sat)+ Holiday
(H= 0: disable; 1: enable); Holidays establish by the software.
PPPPPP=New master code
RRRRRR=Repeat the new master code
=Suspend =Delete;
SSSSS=Starting user address, EEEEE=Ending user address
SSSSS=Starting card number
EEEEE=Ending card number
SSSSS=Starting user address
EEEEE=Ending user address
Access mode: Card or PIN; UUUUU=user address;
PPPP=4-digit pass code 0001~9999
Access mode: Card and PIN; UUUUU=user address;
PPPP=4-digit pass code 0001~9999
TTT=Arming output time; 000~250=0~2.5 sec.
PPPP=4-digit pass code ( default value=0000 )
P.S. Duress code will be unavailable and become a public PIN at access mode “Card or PIN” of M6
UUUUU= User address; SSSSS=5-digit site code; CCCCC=5-digit card code
PPPP=4-digit pass code ( default value=1234; disable Arming PWD=0000)
P.S. Arming PWD code will be unavailable and become a public PIN at access mode “Card PIN” and of M6
TTT=Door open waiting time: 001~600=1~600 sec.; default value: 15 sec.
UUUUU=User address;
QQQQQ=Card quantity(00001=Continuously inducting)
Please refer to function default value for details.
UUUUU=User address, S=4 sets of lift control(0~3); FFFFFFFF=8 assigned floor
(F=0: Disable, 1: Enable)
N=0(Delete tag); N=1(Add tag)
NNN=site number, TTT= relay time: 000~600=1~600 sec.
Please refer to function default value for details.
YYMMDDHHmmss: Year/ Month/ Day/ Hour/ Min./ Sec.
SSSSS=Starting user address; EEEEE=Ending user address;
N=0/Enable; N=1/Disable; N=2/Initial
UUUUU=User Address; FF=Floor (01~32 floor)
Please refer to function default value for details.
To Change the "Arming" (in ) become the security trigger signal,
when controller is connected with AR-721RB.
9
P5
Command PPPPPP
00 NNN00 NNN VVV nnn
01 N
02 TTT
03 TTT04 N05 TTT06 TTT07 SSSSS EEEEE
08 N HHMMhhmm 7123456H
09 PPPPPPRRRRRR
10 SSSSS EEEEE10 SSSSS EEEEE11 SSSSS EEEEE
11 SSSSS EEEEE
12 UUUUU PPPP
13 UUUUU PPPP
14 TTT15 PPPP
16 UUUUU SSSSSCCCCC17 PPPP
18 TTT19 UUUUU QQQQQ
20 DDD21 UUUUU S FFFFFFFF
22 N23 NNN TTT24 DDD25 YYMMDDHHmmss26 SSSSS EEEEE N
27 UUUUU FF28 DDD29 2934 128 (321H/721H/725H/757H)
34 064 (331H) 34 000 (Disable)
9