solaris 10 installation guide: basic installations - oracle · preface this book describes how to...
TRANSCRIPT
Solaris 10 Installation Guide: BasicInstallations
Sun Microsystems, Inc.4150 Network CircleSanta Clara, CA 95054U.S.A.
Part No: 817–0544–12December 2005

Copyright 2005 Sun Microsystems, Inc. 4150 Network Circle, Santa Clara, CA 95054 U.S.A. All rights reserved.
Sun Microsystems, Inc. has intellectual property rights relating to technology embodied in the product that is described in this document. Inparticular, and without limitation, these intellectual property rights may include one or more U.S. patents or pending patent applications in the U.S.and in other countries.
U.S. Government Rights – Commercial software. Government users are subject to the Sun Microsystems, Inc. standard license agreement andapplicable provisions of the FAR and its supplements.
This distribution may include materials developed by third parties.
Parts of the product may be derived from Berkeley BSD systems, licensed from the University of California. UNIX is a registered trademark in the U.S.and other countries, exclusively licensed through X/Open Company, Ltd.
Sun, Sun Microsystems, the Sun logo, the Solaris logo, the Java Coffee Cup logo, docs.sun.com, JumpStart, Solaris Flash, Power Management, Java,and Solaris are trademarks or registered trademarks of Sun Microsystems, Inc. in the U.S. and other countries. All SPARC trademarks are used underlicense and are trademarks or registered trademarks of SPARC International, Inc. in the U.S. and other countries. Products bearing SPARC trademarksare based upon an architecture developed by Sun Microsystems, Inc.
The OPEN LOOK and Sun™ Graphical User Interface was developed by Sun Microsystems, Inc. for its users and licensees. Sun acknowledges thepioneering efforts of Xerox in researching and developing the concept of visual or graphical user interfaces for the computer industry. Sun holds anon-exclusive license from Xerox to the Xerox Graphical User Interface, which license also covers Sun’s licensees who implement OPEN LOOK GUIsand otherwise comply with Sun’s written license agreements.
Products covered by and information contained in this publication are controlled by U.S. Export Control laws and may be subject to the export orimport laws in other countries. Nuclear, missile, chemical or biological weapons or nuclear maritime end uses or end users, whether direct or indirect,are strictly prohibited. Export or reexport to countries subject to U.S. embargo or to entities identified on U.S. export exclusion lists, including, but notlimited to, the denied persons and specially designated nationals lists is strictly prohibited.
DOCUMENTATION IS PROVIDED “AS IS” AND ALL EXPRESS OR IMPLIED CONDITIONS, REPRESENTATIONS AND WARRANTIES,INCLUDING ANY IMPLIED WARRANTY OF MERCHANTABILITY, FITNESS FOR A PARTICULAR PURPOSE OR NON-INFRINGEMENT, AREDISCLAIMED, EXCEPT TO THE EXTENT THAT SUCH DISCLAIMERS ARE HELD TO BE LEGALLY INVALID.
Copyright 2005 Sun Microsystems, Inc. 4150 Network Circle, Santa Clara, CA 95054 U.S.A. Tous droits réservés.
Sun Microsystems, Inc. détient les droits de propriété intellectuelle relatifs à la technologie incorporée dans le produit qui est décrit dans ce document.En particulier, et ce sans limitation, ces droits de propriété intellectuelle peuvent inclure un ou plusieurs brevets américains ou des applications debrevet en attente aux Etats-Unis et dans d’autres pays.
Cette distribution peut comprendre des composants développés par des tierces personnes.
Certaines composants de ce produit peuvent être dérivées du logiciel Berkeley BSD, licenciés par l’Université de Californie. UNIX est une marquedéposée aux Etats-Unis et dans d’autres pays; elle est licenciée exclusivement par X/Open Company, Ltd.
Sun, Sun Microsystems, le logo Sun, le logo Solaris, le logo Java Coffee Cup, docs.sun.com, JumpStart, Solaris Flash, Power Management, Java etSolaris sont des marques de fabrique ou des marques déposées de Sun Microsystems, Inc. aux Etats-Unis et dans d’autres pays. Toutes les marquesSPARC sont utilisées sous licence et sont des marques de fabrique ou des marques déposées de SPARC International, Inc. aux Etats-Unis et dansd’autres pays. Les produits portant les marques SPARC sont basés sur une architecture développée par Sun Microsystems, Inc.
L’interface d’utilisation graphique OPEN LOOK et Sun™ a été développée par Sun Microsystems, Inc. pour ses utilisateurs et licenciés. Sun reconnaîtles efforts de pionniers de Xerox pour la recherche et le développement du concept des interfaces d’utilisation visuelle ou graphique pour l’industriede l’informatique. Sun détient une licence non exclusive de Xerox sur l’interface d’utilisation graphique Xerox, cette licence couvrant également leslicenciés de Sun qui mettent en place l’interface d’utilisation graphique OPEN LOOK et qui, en outre, se conforment aux licences écrites de Sun.
Les produits qui font l’objet de cette publication et les informations qu’il contient sont régis par la legislation américaine en matière de contrôle desexportations et peuvent être soumis au droit d’autres pays dans le domaine des exportations et importations. Les utilisations finales, ou utilisateursfinaux, pour des armes nucléaires, des missiles, des armes chimiques ou biologiques ou pour le nucléaire maritime, directement ou indirectement, sontstrictement interdites. Les exportations ou réexportations vers des pays sous embargo des Etats-Unis, ou vers des entités figurant sur les listesd’exclusion d’exportation américaines, y compris, mais de manière non exclusive, la liste de personnes qui font objet d’un ordre de ne pas participer,d’une façon directe ou indirecte, aux exportations des produits ou des services qui sont régis par la legislation américaine en matière de contrôle desexportations et la liste de ressortissants spécifiquement designés, sont rigoureusement interdites.
LA DOCUMENTATION EST FOURNIE "EN L’ETAT" ET TOUTES AUTRES CONDITIONS, DECLARATIONS ET GARANTIES EXPRESSES OUTACITES SONT FORMELLEMENT EXCLUES, DANS LA MESURE AUTORISEE PAR LA LOI APPLICABLE, Y COMPRIS NOTAMMENT TOUTEGARANTIE IMPLICITE RELATIVE A LA QUALITE MARCHANDE, A L’APTITUDE A UNE UTILISATION PARTICULIERE OU A L’ABSENCE DECONTREFACON.
051031@13215

Contents
Preface 5
1 Planning for a Solaris Installation From CD or DVD Media (Tasks) 9
System Requirements and Recommendations 9
Solaris Installation Program GUI or Text Installer Requirements 10
Disk Space Recommendations for Software Groups 12
Checklist for Installation 14
Where to Find Additional Installation Information 21
2 Installing With the Solaris Installation Program (Tasks) 23
SPARC: Performing an Installation or Upgrade With the Solaris InstallationProgram 23
� SPARC: To Install or Upgrade With the Solaris Installation Program 24
x86: Performing an Installation or Upgrade With the Solaris InstallationProgram 31
� x86: To Install or Upgrade With the Solaris Installation Program 31
� x86: To Install or Upgrade With the Solaris Installation Program WithGRUB 42
Index 55
3

4 Solaris 10 Installation Guide: Basic Installations • December 2005
Preface
This book describes how to use CD or DVD media to install the Solaris™ OperatingSystem (Solaris OS) on a nonnetworked system.
This book does not include instructions about how to set up system hardware or otherperipherals.
Note – This Solaris release supports systems that use the SPARC® and x86 families ofprocessor architectures: UltraSPARC®, SPARC64, AMD64, Pentium, and Xeon EM64T.The supported systems appear in the Solaris 10 Hardware Compatibility List athttp://www.sun.com/bigadmin/hcl. This document cites any implementationdifferences between the platform types.
In this document these x86 related terms mean the following:
� “x86” refers to the larger family of 64-bit and 32-bit x86 compatible products.
� “x64” points out specific 64-bit information about AMD64 or EM64T systems.
� “32-bit x86” points out specific 32-bit information about x86 based systems.
For supported systems, see the Solaris 10 Hardware Compatibility List.
Who Should Use This BookThis book is intended for system administrators who are responsible for installing theSolaris OS. This book provides basic Solaris installation information for systemadministrators who perform infrequent Solaris installations or upgrades.
If you need advanced Solaris installation information, see “Related Books” on page6 to find the book that describes the information.
5
Related BooksTable P–1 lists related information that you need when you install the Solaris software.
TABLE P–1 Related Information
Information Description
Solaris 10 Installation Guide: Network-BasedInstallations
This book describes how to perform a remote Solarisinstallation over a local area network or a wide area network.
Solaris 10 Installation Guide: Solaris Live Upgrade andUpgrade Planning
This book describes how to use CD or DVD media toupgrade a system to the Solaris OS. This book also describeshow to use the Solaris Live Upgrade feature to create andmaintain boot environments, and how to upgrade systems tothese boot environments.
Solaris 10 Installation Guide: Custom JumpStart andAdvanced Installations
This book describes how to create the files and directoriesnecessary to perform an unattended custom JumpStartinstallation. This book also describes how to create RAID-1volumes during a JumpStart installation.
Solaris 10 Installation Guide: Solaris Flash Archives(Creation and Installation)
This book describes how to create a Solaris Flash archive anddeploy the archive over the network to quickly install theSolaris OS. This book also describes how to maintain thesearchives, and how to quickly update clone systems by usingdifferential Flash archives.
System Administration Guide: Devices and FileSystems
This book describes how to back up system files.
Solaris 10 Release Notes This book describes any bugs, known problems, softwarethat is being discontinued, and patches that are related to theSolaris release.
SPARC: Solaris 10 Sun Hardware Platform Guide onhttp://docs.sun.com
This book contains information about supported hardware.
Solaris 10 Package List This book lists and describes the packages in the Solaris 10OS.
x86: Solaris Hardware Compatibility List This list contains supported hardware information anddevice configuration details.
6 Solaris 10 Installation Guide: Basic Installations • December 2005
Documentation, Support, and TrainingThe Sun web site provides information about the following additional resources:
� Documentation (http://www.sun.com/documentation/)� Support (http://www.sun.com/support/)� Training (http://www.sun.com/training/)
Typographic ConventionsThe following table describes the typographic conventions that are used in this book.
TABLE P–2 Typographic Conventions
Typeface Meaning Example
AaBbCc123 The names of commands, files, anddirectories, and onscreen computeroutput
Edit your .login file.
Use ls -a to list all files.
machine_name% you havemail.
AaBbCc123 What you type, contrasted with onscreencomputer output
machine_name% su
Password:
aabbcc123 Placeholder: replace with a real name orvalue
The command to remove a fileis rm filename.
AaBbCc123 Book titles, new terms, and terms to beemphasized
Read Chapter 6 in the User’sGuide.
A cache is a copy that is storedlocally.
Do not save the file.
Note: Some emphasized itemsappear bold online.
7

Shell Prompts in Command ExamplesThe following table shows the default UNIX® system prompt and superuser promptfor the C shell, Bourne shell, and Korn shell.
TABLE P–3 Shell Prompts
Shell Prompt
C shell machine_name%
C shell for superuser machine_name#
Bourne shell and Korn shell $
Bourne shell and Korn shell for superuser #
Platform ConventionsThe following keyboard and mouse conventions are applicable to SPARC and x86based systems:
� The key referred to as Return is labeled Enter on some keyboards.
� From left to right on a three-button mouse, the default settings for CDE areSELECT, ADJUST, and MENU. For example, the text says, “Click SELECT” insteadof “Click the left mouse button.” Otherwise, these keys are referred to as mousebutton 1, mouse button 2, and mouse button 3.
� From left to right on a two-button mouse, the default settings are SELECT andMENU. The ADJUST function is obtained by simultaneously pressing SELECT andthe Shift key on the keyboard (Shift-SELECT).
8 Solaris 10 Installation Guide: Basic Installations • December 2005
CHAPTER 1
Planning for a Solaris Installation FromCD or DVD Media (Tasks)
This chapter provides you with system requirements and planning information to helpyou install the Solaris OS. This chapter describes the following topics.
� “System Requirements and Recommendations” on page 9� “Checklist for Installation” on page 14� “Where to Find Additional Installation Information” on page 21
Note – This book uses the term slice, but some Solaris documentation and programsmight refer to a slice as a partition. To avoid confusion, this book distinguishesbetween fdisk partitions (which are supported only in Solaris for x86 based systems)and the divisions within the Solaris fdisk partition, which might be called slices orpartitions.
System Requirements andRecommendationsThe following tables list basic system requirements to install the Solaris OS.
9

TABLE 1–1 SPARC: Memory, Swap, and Processor Recommendations
SPARC Based System Size
Memory to install or upgrade 256 MB is the recommended size. 128 MB is the minimum size.
Note – Some optional installation features are enabled only when sufficientmemory is present. For example, if you install from a DVD with insufficientmemory, you install through the Solaris installation program’s text installer,not through the GUI. For more information about these memory requirements,see Table 1–3.
Swap area 512 MB is the default size.
Note – You might need to customize the swap space. Swap space is based onthe size of the system’s hard disk.
Processor requirements 200–MHz or faster processor is required.
TABLE 1–2 x86: Memory, Swap, and Processor Recommendations
x86 Based System Size
Memory to install or upgrade � Starting with the Solaris 10 1/06 release, 512 MB is the recommended size.256 MB is the minimum size.
� For the Solaris 10 3/05 release, 256 MB is the recommended size. 128 MBis the minimum size.
Note – Some optional installation features are enabled only when sufficientmemory is present. For example, if you install from a DVD with insufficientmemory, you install through the Solaris installation program’s text installer,not through the GUI. For more information about these memory requirements,see Table 1–3.
Swap area 512 MB is the default size.
Note – You might need to customize the swap space. Swap space is based onthe size of the system’s hard disk.
Processor requirements 120–MHz or faster processor is recommended. Hardware floating-pointsupport is required.
Solaris Installation Program GUI or Text InstallerRequirementsThe Solaris installation program on the Solaris 10 Operating System DVD or Solaris 10Software - 1 CD can be run with a graphical user interface (GUI) or as an interactivetext installer in a desktop or console session. For x86 based systems, the Solaris DeviceConfiguration Assistant is included in the Solaris installation program.
10 Solaris 10 Installation Guide: Basic Installations • December 2005

� GUI – The Solaris installation GUI provides windows, pull-down menus, buttons,scrollbars, and iconic images to enable you to interact with the installationprogram. The GUI requires a local or remote DVD-ROM or CD-ROM drive ornetwork connection, video adapter, keyboard, monitor, and enough memory. Formore information about these memory requirements, see Table 1–3 and Table 1–4.
� Text installer – The Solaris interactive text installer enables you to type informationin a terminal or console window to interact with the installation program. You canrun the text installer in a desktop session with a windowing environment, or in aconsole session. The text installer requires a local or remote DVD-ROM orCD-ROM drive or network connection, keyboard, and monitor. You can run theSolaris installation text installer with the tip command. For more information, seethe man page, tip(1).
You can choose to install the software with a GUI or with or without a windowingenvironment. If there is sufficient memory, the GUI is displayed by default. Otherenvironments are displayed by default if memory is insufficient for the GUI. You canoverride defaults with the nowin or text boot options. But, you are limited by theamount of memory in your system or by installing remotely. Also if the Solarisinstallation program does not detect a video adapter, it automatically displays in aconsole-based environment. Table 1–3 and Table 1–4 describe these environments andlist memory requirements for displaying them.
TABLE 1–3 SPARC: Memory Requirements for Display Options
SPARC: Memory Type of Installation Description
128–383 MB Text-based Contains no graphics, but provides a window andthe ability to open other windows.
If you install by using the text boot option andthe system has enough memory, you are installingin a windowing environment. If you are installingremotely through a tip line or using the nowinboot option, you are limited to the console-basedinstallation.
384 MB or greater GUI-based Provides windows, pull-down menus, buttons,scrollbars, and iconic images.
Chapter 1 • Planning for a Solaris Installation From CD or DVD Media (Tasks) 11

TABLE 1–4 x86: Memory Requirements for Display Options
x86: Memory Type of Installation Description
� Starting with the Solaris 10 1/06release: 256–511 MB
� For the Solaris 10 3/05 release:128–383 MB
Text-based Contains no graphics, but provides a window andthe ability to open other windows.
If you install by using the text boot option andthe system has enough memory, you are installingin a windowing environment. If you are installingremotely through a tip line or using the nowinboot option, you are limited to the console-basedinstallation.
� Starting with the Solaris 10 1/06release: 512 MB
� For the Solaris 10 3/05 release:384 MB
GUI-based Provides windows, pull-down menus, buttons,scrollbars, and iconic images.
You can also specify the installer you want to use during the installation by entering aselection or special command at a prompt. For instructions, see the procedures inChapter 2.
Disk Space Recommendations for Software GroupsThe Solaris software groups are collections of Solaris packages. Each software groupincludes support for different functions and hardware drivers.
� For an initial installation, you select the software group to install, based on thefunctions that you want to perform on the system.
� For an upgrade, you must upgrade to a software group that is installed on thesystem. For example, if you previously installed the End User Solaris SoftwareGroup on your system, you cannot use the upgrade option to upgrade to theDeveloper Solaris Software Group. However, during the upgrade you can addsoftware to the system that is not part of the currently installed software group.
When you are installing the Solaris software, you can choose to add or removepackages from the Solaris software group that you selected. When you are selectingwhich packages to add or remove, you need to know about software dependenciesand how the Solaris software is packaged.
The following figure shows the grouping of software packages. Reduced NetworkSupport contains the minimal number of packages and Entire Solaris Software GroupPlus OEM Support contains all the packages.
12 Solaris 10 Installation Guide: Basic Installations • December 2005

ReducedNetworkSupport
Core
End User
Developer
Entire
Entire Plus OEM
FIGURE 1–1 Solaris Software Groups
Table 1–5 lists the Solaris software groups and the recommended amount of disk spacethat you need to install each group.
Note – The disk space recommendations in Table 1–5 include space for the followingitems.
� Swap space� Patches� Additional software packages
You might find that the software groups require less disk space than the amount thatis listed in this table.
For additional information about how to plan your disk space, see “Allocating Diskand Swap Space” in Solaris 10 Installation Guide: Network-Based Installations.
Chapter 1 • Planning for a Solaris Installation From CD or DVD Media (Tasks) 13
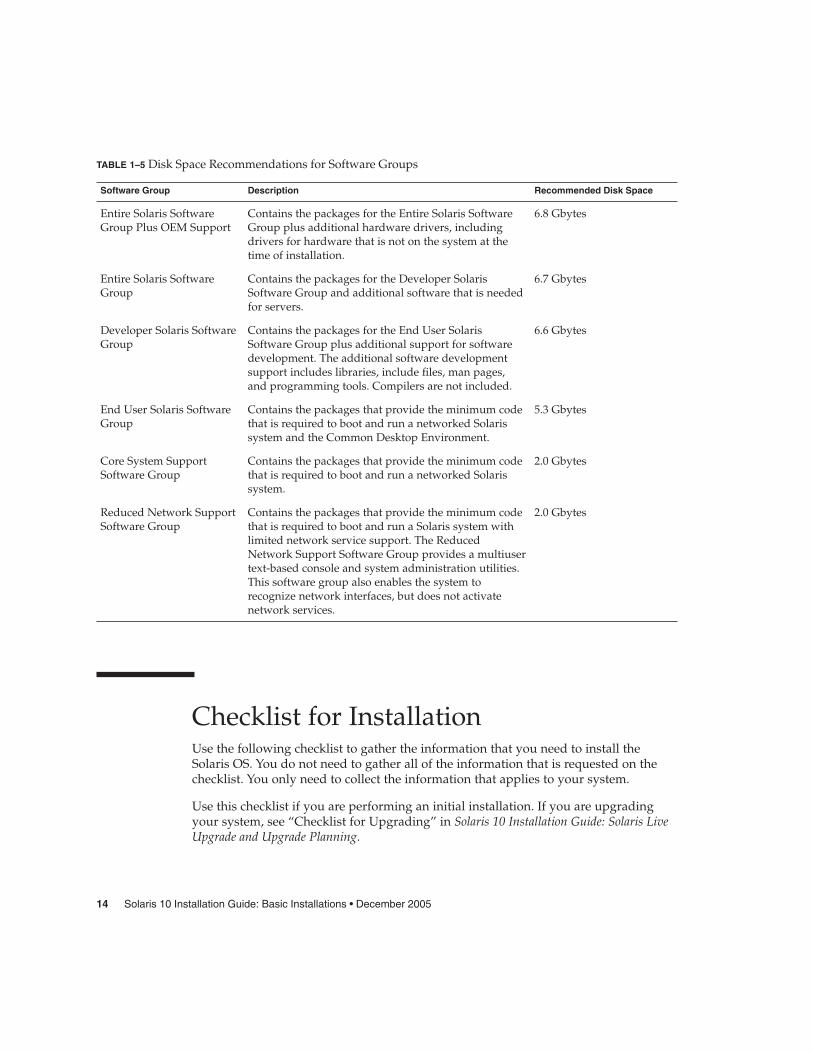
TABLE 1–5 Disk Space Recommendations for Software Groups
Software Group Description Recommended Disk Space
Entire Solaris SoftwareGroup Plus OEM Support
Contains the packages for the Entire Solaris SoftwareGroup plus additional hardware drivers, includingdrivers for hardware that is not on the system at thetime of installation.
6.8 Gbytes
Entire Solaris SoftwareGroup
Contains the packages for the Developer SolarisSoftware Group and additional software that is neededfor servers.
6.7 Gbytes
Developer Solaris SoftwareGroup
Contains the packages for the End User SolarisSoftware Group plus additional support for softwaredevelopment. The additional software developmentsupport includes libraries, include files, man pages,and programming tools. Compilers are not included.
6.6 Gbytes
End User Solaris SoftwareGroup
Contains the packages that provide the minimum codethat is required to boot and run a networked Solarissystem and the Common Desktop Environment.
5.3 Gbytes
Core System SupportSoftware Group
Contains the packages that provide the minimum codethat is required to boot and run a networked Solarissystem.
2.0 Gbytes
Reduced Network SupportSoftware Group
Contains the packages that provide the minimum codethat is required to boot and run a Solaris system withlimited network service support. The ReducedNetwork Support Software Group provides a multiusertext-based console and system administration utilities.This software group also enables the system torecognize network interfaces, but does not activatenetwork services.
2.0 Gbytes
Checklist for InstallationUse the following checklist to gather the information that you need to install theSolaris OS. You do not need to gather all of the information that is requested on thechecklist. You only need to collect the information that applies to your system.
Use this checklist if you are performing an initial installation. If you are upgradingyour system, see “Checklist for Upgrading” in Solaris 10 Installation Guide: Solaris LiveUpgrade and Upgrade Planning.
14 Solaris 10 Installation Guide: Basic Installations • December 2005
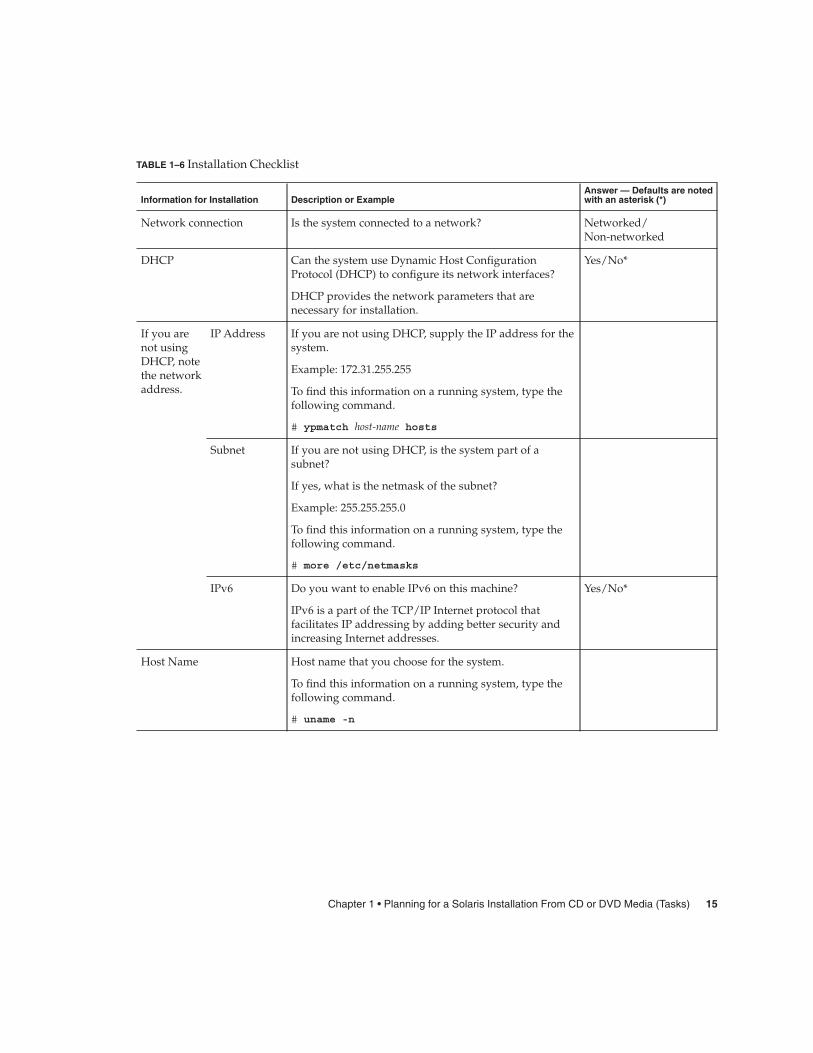
TABLE 1–6 Installation Checklist
Information for Installation Description or ExampleAnswer — Defaults are notedwith an asterisk (*)
Network connection Is the system connected to a network? Networked/Non-networked
DHCP Can the system use Dynamic Host ConfigurationProtocol (DHCP) to configure its network interfaces?
DHCP provides the network parameters that arenecessary for installation.
Yes/No*
If you arenot usingDHCP, notethe networkaddress.
IP Address If you are not using DHCP, supply the IP address for thesystem.
Example: 172.31.255.255
To find this information on a running system, type thefollowing command.
# ypmatch host-name hosts
Subnet If you are not using DHCP, is the system part of asubnet?
If yes, what is the netmask of the subnet?
Example: 255.255.255.0
To find this information on a running system, type thefollowing command.
# more /etc/netmasks
IPv6 Do you want to enable IPv6 on this machine?
IPv6 is a part of the TCP/IP Internet protocol thatfacilitates IP addressing by adding better security andincreasing Internet addresses.
Yes/No*
Host Name Host name that you choose for the system.
To find this information on a running system, type thefollowing command.
# uname -n
Chapter 1 • Planning for a Solaris Installation From CD or DVD Media (Tasks) 15
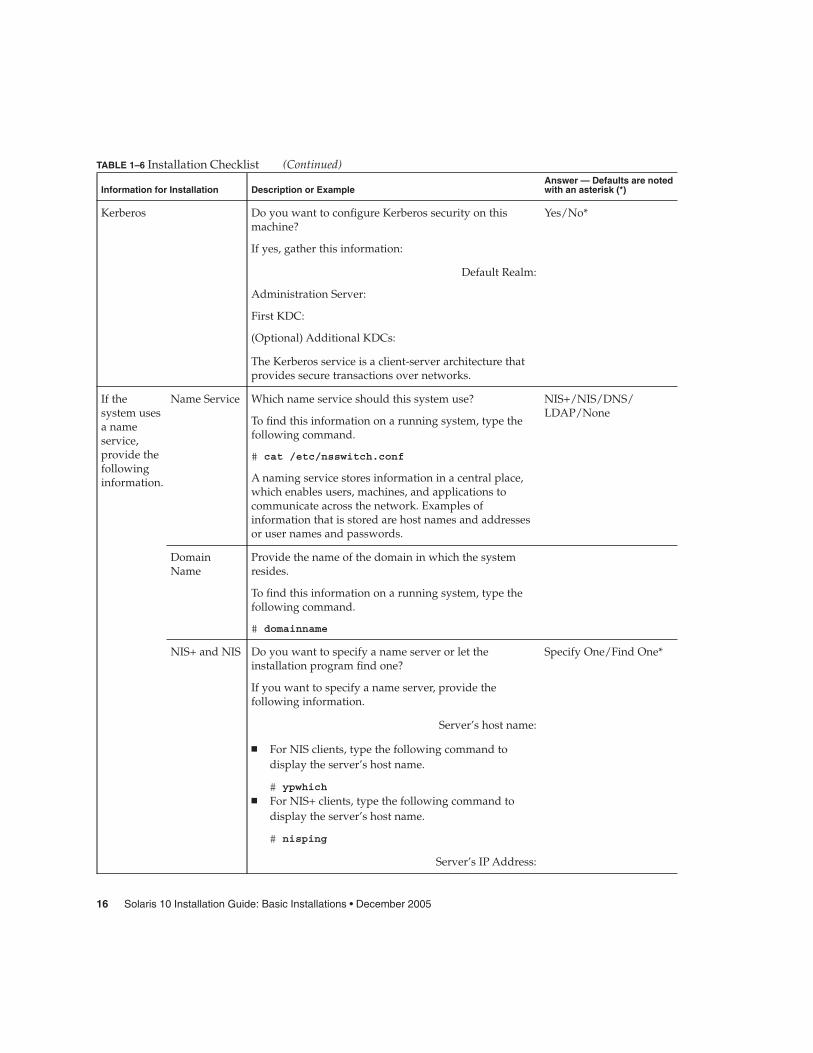
TABLE 1–6 Installation Checklist (Continued)
Information for Installation Description or ExampleAnswer — Defaults are notedwith an asterisk (*)
Kerberos Do you want to configure Kerberos security on thismachine?
If yes, gather this information:
Yes/No*
Default Realm:
Administration Server:
First KDC:
(Optional) Additional KDCs:
The Kerberos service is a client-server architecture thatprovides secure transactions over networks.
If thesystem usesa nameservice,provide thefollowinginformation.
Name Service Which name service should this system use?
To find this information on a running system, type thefollowing command.
# cat /etc/nsswitch.conf
A naming service stores information in a central place,which enables users, machines, and applications tocommunicate across the network. Examples ofinformation that is stored are host names and addressesor user names and passwords.
NIS+/NIS/DNS/LDAP/None
DomainName
Provide the name of the domain in which the systemresides.
To find this information on a running system, type thefollowing command.
# domainname
NIS+ and NIS Do you want to specify a name server or let theinstallation program find one?
If you want to specify a name server, provide thefollowing information.
Specify One/Find One*
Server’s host name:
� For NIS clients, type the following command todisplay the server’s host name.
# ypwhich� For NIS+ clients, type the following command to
display the server’s host name.
# nisping
Server’s IP Address:
16 Solaris 10 Installation Guide: Basic Installations • December 2005
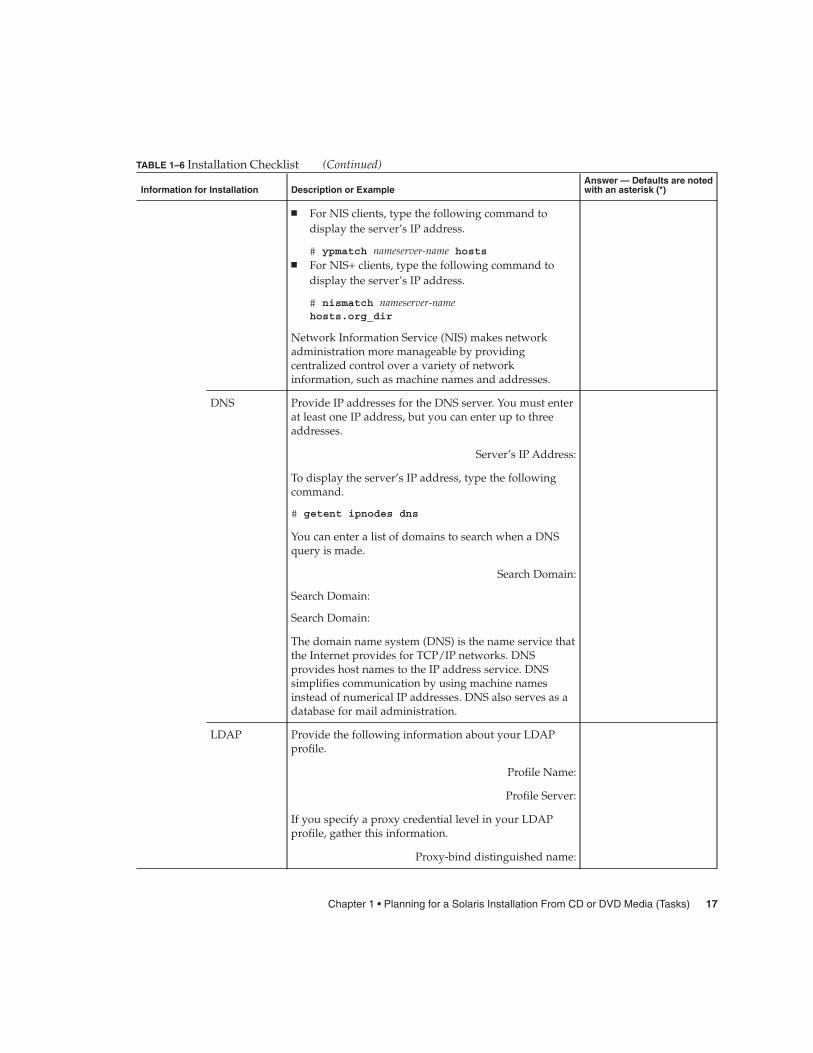
TABLE 1–6 Installation Checklist (Continued)
Information for Installation Description or ExampleAnswer — Defaults are notedwith an asterisk (*)
� For NIS clients, type the following command todisplay the server’s IP address.
# ypmatch nameserver-name hosts� For NIS+ clients, type the following command to
display the server’s IP address.
# nismatch nameserver-namehosts.org_dir
Network Information Service (NIS) makes networkadministration more manageable by providingcentralized control over a variety of networkinformation, such as machine names and addresses.
DNS Provide IP addresses for the DNS server. You must enterat least one IP address, but you can enter up to threeaddresses.
Server’s IP Address:
To display the server’s IP address, type the followingcommand.
# getent ipnodes dns
You can enter a list of domains to search when a DNSquery is made.
Search Domain:
Search Domain:
Search Domain:
The domain name system (DNS) is the name service thatthe Internet provides for TCP/IP networks. DNSprovides host names to the IP address service. DNSsimplifies communication by using machine namesinstead of numerical IP addresses. DNS also serves as adatabase for mail administration.
LDAP Provide the following information about your LDAPprofile.
Profile Name:
Profile Server:
If you specify a proxy credential level in your LDAPprofile, gather this information.
Proxy-bind distinguished name:
Chapter 1 • Planning for a Solaris Installation From CD or DVD Media (Tasks) 17
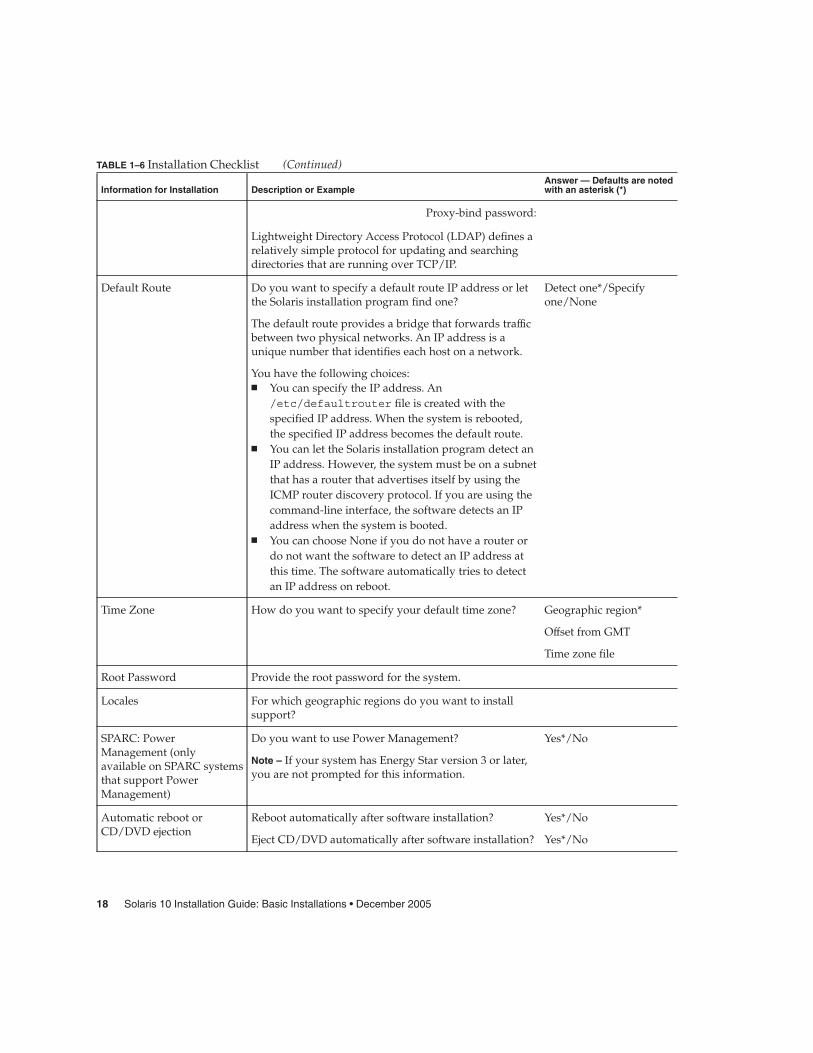
TABLE 1–6 Installation Checklist (Continued)
Information for Installation Description or ExampleAnswer — Defaults are notedwith an asterisk (*)
Proxy-bind password:
Lightweight Directory Access Protocol (LDAP) defines arelatively simple protocol for updating and searchingdirectories that are running over TCP/IP.
Default Route Do you want to specify a default route IP address or letthe Solaris installation program find one?
The default route provides a bridge that forwards trafficbetween two physical networks. An IP address is aunique number that identifies each host on a network.
You have the following choices:� You can specify the IP address. An
/etc/defaultrouter file is created with thespecified IP address. When the system is rebooted,the specified IP address becomes the default route.
� You can let the Solaris installation program detect anIP address. However, the system must be on a subnetthat has a router that advertises itself by using theICMP router discovery protocol. If you are using thecommand-line interface, the software detects an IPaddress when the system is booted.
� You can choose None if you do not have a router ordo not want the software to detect an IP address atthis time. The software automatically tries to detectan IP address on reboot.
Detect one*/Specifyone/None
Time Zone How do you want to specify your default time zone? Geographic region*
Offset from GMT
Time zone file
Root Password Provide the root password for the system.
Locales For which geographic regions do you want to installsupport?
SPARC: PowerManagement (onlyavailable on SPARC systemsthat support PowerManagement)
Do you want to use Power Management?
Note – If your system has Energy Star version 3 or later,you are not prompted for this information.
Yes*/No
Automatic reboot orCD/DVD ejection
Reboot automatically after software installation?
Eject CD/DVD automatically after software installation?
Yes*/No
Yes*/No
18 Solaris 10 Installation Guide: Basic Installations • December 2005

TABLE 1–6 Installation Checklist (Continued)
Information for Installation Description or ExampleAnswer — Defaults are notedwith an asterisk (*)
Default or Custom Install Do you want to perform a default installation, orcustomize the installation?� Select Default installation to format the entire hard
disk and install a preselected set of software.� Select Custom installation to modify the hard disk
layout and select the software that you want toinstall.
Note – The text installer does not prompt you to select aDefault or Custom Installation. To perform a defaultinstallation, accept the default values that are providedin the text installer. To perform a custom installation,edit the values in the text installer screens.
Defaultinstallation*/Custominstallation
Software Group Which Solaris Software Group do you want to install? Entire Plus OEM
Entire*
Developer
End User
Core
Reduced Networking
Custom Package Selection Do you want to add or remove software packages fromthe Solaris Software Group that you install?
Note – When you select which packages to add orremove, you need to know about software dependenciesand how Solaris software is packaged.
Select Disks On which disks do you want to install the Solarissoftware?
Example: c0t0d0
x86: fdisk partitioning Do you want to create, delete, or modify a Solaris fdiskpartition?
Each disk that is selected for file system layout musthave a Solaris fdisk partition.
If your system currently has a service partition, theSolaris installation program preserves the servicepartition by default. If you do not want to preserve theservice partition, you must customize the fdiskpartitions. For more information about preserving aservice partition, see “Default Boot-Disk PartitionLayout Preserves the Service Partition” in Solaris 10Installation Guide: Network-Based Installations.
Chapter 1 • Planning for a Solaris Installation From CD or DVD Media (Tasks) 19
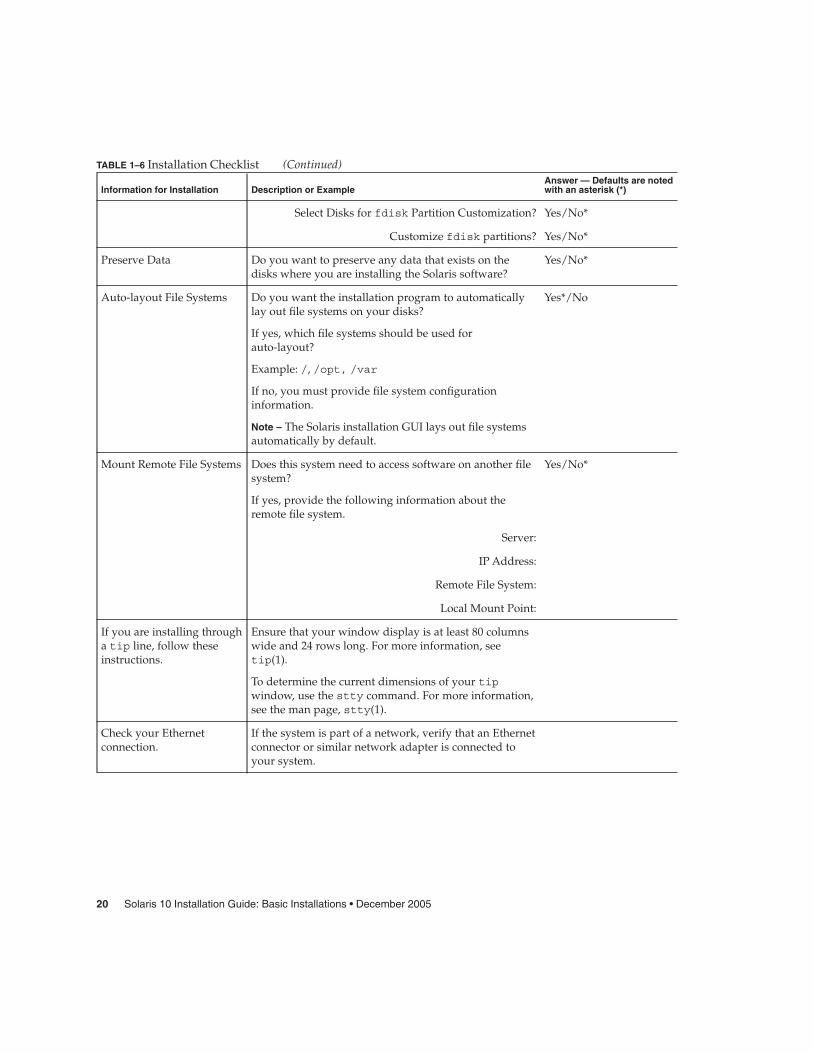
TABLE 1–6 Installation Checklist (Continued)
Information for Installation Description or ExampleAnswer — Defaults are notedwith an asterisk (*)
Select Disks for fdisk Partition Customization? Yes/No*
Customize fdisk partitions? Yes/No*
Preserve Data Do you want to preserve any data that exists on thedisks where you are installing the Solaris software?
Yes/No*
Auto-layout File Systems Do you want the installation program to automaticallylay out file systems on your disks?
If yes, which file systems should be used forauto-layout?
Example: /, /opt, /var
If no, you must provide file system configurationinformation.
Note – The Solaris installation GUI lays out file systemsautomatically by default.
Yes*/No
Mount Remote File Systems Does this system need to access software on another filesystem?
If yes, provide the following information about theremote file system.
Yes/No*
Server:
IP Address:
Remote File System:
Local Mount Point:
If you are installing througha tip line, follow theseinstructions.
Ensure that your window display is at least 80 columnswide and 24 rows long. For more information, seetip(1).
To determine the current dimensions of your tipwindow, use the stty command. For more information,see the man page, stty(1).
Check your Ethernetconnection.
If the system is part of a network, verify that an Ethernetconnector or similar network adapter is connected toyour system.
20 Solaris 10 Installation Guide: Basic Installations • December 2005
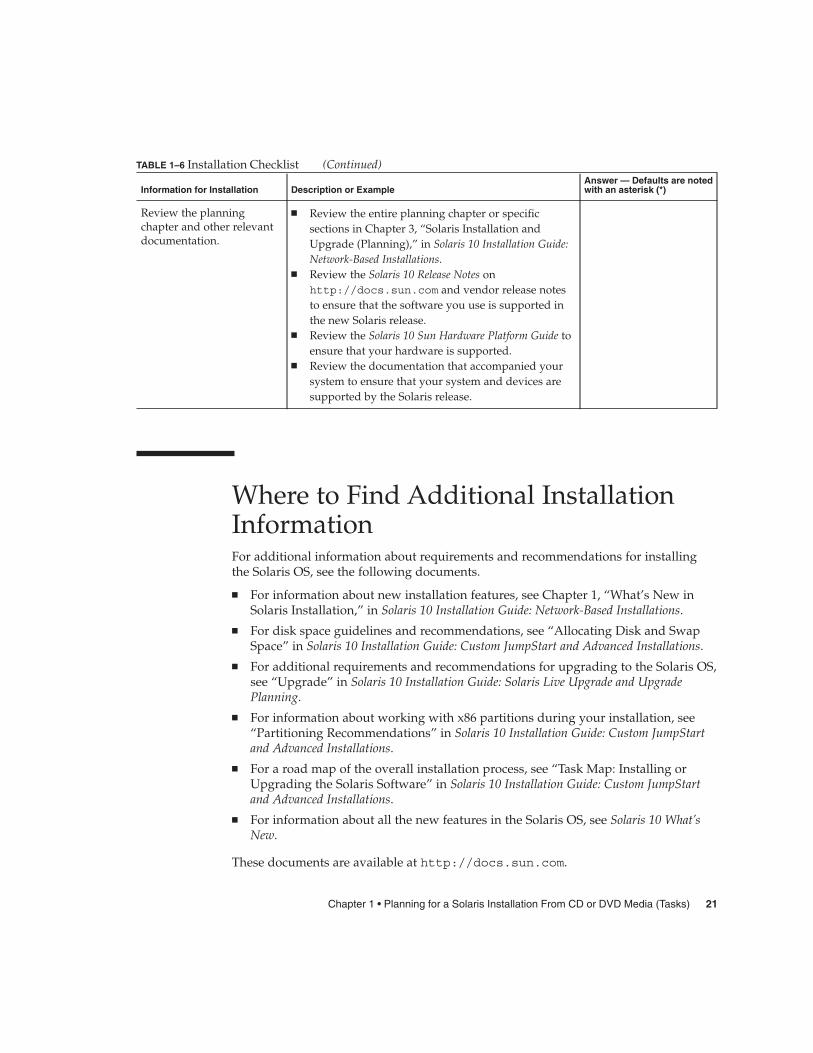
TABLE 1–6 Installation Checklist (Continued)
Information for Installation Description or ExampleAnswer — Defaults are notedwith an asterisk (*)
Review the planningchapter and other relevantdocumentation.
� Review the entire planning chapter or specificsections in Chapter 3, “Solaris Installation andUpgrade (Planning),” in Solaris 10 Installation Guide:Network-Based Installations.
� Review the Solaris 10 Release Notes onhttp://docs.sun.com and vendor release notesto ensure that the software you use is supported inthe new Solaris release.
� Review the Solaris 10 Sun Hardware Platform Guide toensure that your hardware is supported.
� Review the documentation that accompanied yoursystem to ensure that your system and devices aresupported by the Solaris release.
Where to Find Additional InstallationInformationFor additional information about requirements and recommendations for installingthe Solaris OS, see the following documents.
� For information about new installation features, see Chapter 1, “What’s New inSolaris Installation,” in Solaris 10 Installation Guide: Network-Based Installations.
� For disk space guidelines and recommendations, see “Allocating Disk and SwapSpace” in Solaris 10 Installation Guide: Custom JumpStart and Advanced Installations.
� For additional requirements and recommendations for upgrading to the Solaris OS,see “Upgrade” in Solaris 10 Installation Guide: Solaris Live Upgrade and UpgradePlanning.
� For information about working with x86 partitions during your installation, see“Partitioning Recommendations” in Solaris 10 Installation Guide: Custom JumpStartand Advanced Installations.
� For a road map of the overall installation process, see “Task Map: Installing orUpgrading the Solaris Software” in Solaris 10 Installation Guide: Custom JumpStartand Advanced Installations.
� For information about all the new features in the Solaris OS, see Solaris 10 What’sNew.
These documents are available at http://docs.sun.com.
Chapter 1 • Planning for a Solaris Installation From CD or DVD Media (Tasks) 21

22 Solaris 10 Installation Guide: Basic Installations • December 2005
CHAPTER 2
Installing With the Solaris InstallationProgram (Tasks)
This chapter explains how to use the Solaris installation program on the Solaris 10Operating System DVD or Solaris 10 Software - 1 CD to install or upgrade Solarissoftware.
This chapter contains the following topics:
� “SPARC: Performing an Installation or Upgrade With the Solaris InstallationProgram” on page 23
� “x86: Performing an Installation or Upgrade With the Solaris Installation Program”on page 31
For information about new installation features, see Chapter 1, “What’s New in SolarisInstallation,” in Solaris 10 Installation Guide: Network-Based Installations. For informationabout all the new features in the Solaris OS, see Solaris 10 What’s New.
SPARC: Performing an Installation orUpgrade With the Solaris InstallationProgramYou can either install or upgrade the Solaris OS by using the Solaris installationprogram. This section lists the tasks you need to perform to install the Solaris OS, andprovides detailed instructions about how to install the Solaris OS from DVD or CDmedia.
23

� SPARC: To Install or Upgrade With the SolarisInstallation ProgramThis procedure describes how to install a standalone SPARC based system from CD orDVD media.
Note – If you want to install the Solaris OS on a machine or domain that does not havea directly attached DVD-ROM or CD-ROM drive, you can use a DVD-ROM orCD-ROM drive that is attached to another machine. For detailed instructions, refer toAppendix B, “Installing or Upgrading Remotely (Tasks),” in Solaris 10 InstallationGuide: Network-Based Installations.
Perform the following tasks before you begin your installation.
� Ensure that you have the following media.
� For a DVD installation, the Solaris 10 Operating System for SPARC PlatformsDVD
� For a CD installation:
� Solaris 10 Software CDs.� Solaris 10 Languages for SPARC Platforms CD – The installation program
prompts you for this CD if necessary to support languages for specificgeographic regions.
Note – If you want to upgrade a system that has non-global zones installed,you cannot use the Solaris 10 Software CDs. You must use the Solaris 10Operating System DVD or a DVD-based network installation image.
� Verify that your system meets the minimum requirements.
Your system should meet the following requirements.
� Memory – 128 Mbytes or greater� Disk space – 6.8 Gbytes or greater� Processor speed – 200 MHz or greater
For detailed information about system requirements, see “System Requirementsand Recommendations” on page 9.
� Gather the information you need to install the Solaris OS.
� For a nonnetworked system, gather the following information.
� Host name of the system that you are installing� Language and locales that you intend to use on the system
� For a networked system, gather the following information.
Before YouBegin
24 Solaris 10 Installation Guide: Basic Installations • December 2005

� Host name of the system that you are installing� Language and locales that you intend to use on the system� Host IP address� Subnet mask� Type of name service (for example, DNS, NIS, or NIS+)� Domain name� Host name of the name server� Host IP address of the name server� Root password
For information that you need to gather to install your system, see “Checklist forInstallation” on page 14. If you are upgrading your system, see “Checklist forUpgrading” in Solaris 10 Installation Guide: Solaris Live Upgrade and UpgradePlanning.
� (Optional) Back up your system.
If you want to preserve any existing data or applications, back up the system. Fordetailed instructions about how to back up your system, see Chapter 24, “BackingUp and Restoring File Systems (Overview),” in System Administration Guide: Devicesand File Systems.
1. Insert the Solaris 10 Operating System for SPARC Platforms DVD or Solaris 10Software for SPARC Platforms - 1 CD.
2. Boot the system.
� If the system is new, out-of-the-box, turn on the system.
� If you want to install a system that is currently running, shut down thesystem.
The ok prompt is displayed.
3. Start the Solaris installation program.
� To boot from the local DVD or CD and start the Solaris installation GUI, typethe following command.
ok boot cdrom
� To boot from the local DVD or CD and start the text installer in a desktopsession, type the following command.
ok boot cdrom - text
text Specifies to run the text installer in a desktop session. Use this optionto override the default GUI installer.
� To boot from the local DVD or CD and start the text installer in a consolesession, type the following command.
ok boot cdrom - nowin
Steps
Chapter 2 • Installing With the Solaris Installation Program (Tasks) 25
nowin Specifies to run the text installer in a console session. Use this optionto override the default GUI installer.
For detailed information about the Solaris installation GUI and text installer, see“Solaris Installation Program GUI or Text Installer Requirements” on page 10.
The installation begins. The installation program prompts you to select a languageto use during the installation.
4. Select the language you want to use during the installation, and press Enter.
After a few seconds, the Solaris Installation Program Welcome screen appears.
� If you are running the Solaris GUI installation program, the screen that isshown in Figure 2–1 is displayed.
� If you are running the Solaris text installer in a desktop session, the screen thatis shown in Figure 2–2 is displayed.
FIGURE 2–1 Solaris GUI Installation Program Welcome Screen
26 Solaris 10 Installation Guide: Basic Installations • December 2005

FIGURE 2–2 Solaris Text Installer Welcome Screen
5. Click Next to begin the installation. If you are prompted, answer the systemconfiguration questions.
� If you preconfigured all of the system information, the installation programdoes not prompt you to enter any configuration information. See Chapter 6,“Preconfiguring System Configuration Information (Tasks),” in Solaris 10Installation Guide: Network-Based Installations for more information.
� If you did not preconfigure all the system information, the installation programprompts you for this information on several screens. Use the “Checklist forInstallation” on page 14 to help you answer the configuration questions.
After you answer the configuration questions, the Welcome to Solaris dialog boxappears.
Chapter 2 • Installing With the Solaris Installation Program (Tasks) 27
FIGURE 2–3 Welcome to Solaris Screen
The Installer Questions screen appears.
6. Decide if you want to reboot the system automatically and if you want toautomatically eject the disc. Click Next.
The Specify Media screen appears.
7. Specify the media you are using to install. Click Next.
The License panel appears.
8. Accept the license agreement to continue the installation. Click Next.
The Solaris installation program then determines if the system can be upgraded. Toupgrade, the system must have an existing Solaris root (/) file system. The Solarisinstallation program detects the necessary conditions and then upgrades thesystem.
The Select Upgrade or Initial Install screen appears.
9. Decide if you want to perform an initial installation or an upgrade. Click Next.
If you are upgrading a system that has non-global zones installed, follow thesesteps.
a. When you are prompted to select initial installation or upgrade, chooseUpgrade. Click Next.
28 Solaris 10 Installation Guide: Basic Installations • December 2005
b. If your system has multiple root (/) partitions, select the partition that youwant to upgrade on the Select Version to Upgrade panel.
The Solaris installation program displays a message that indicates that youcannot customize your upgrade. The Solaris installation program analyzes yoursystem to determine if the system can be upgraded. The Ready to Upgradepanel is displayed.
If your system has only one root partition, the Solaris installation program doesnot prompt you to select a partition to upgrade. The partition is automaticallyselected.
c. If you want to continue the upgrade, click Install Now on the Ready toUpgrade panel.
The Solaris installation program begins to upgrade your system. After theupgrade is completed, you might need to correct some local modifications thatwere not preserved. For more information, go to Step a in Step 12.
If you do not want to continue the upgrade, click Back to perform an initialinstallation.
10. Select the type of installation you want to perform. Click Next.
� Select Default Install to install the Entire Solaris Software Group.
� Select Custom Install if you want to perform the following tasks.
� Install a specific software group� Install additional software� Install specific software packages� Install a specific locale� Customize the disk layout
For more information about software groups, see “Disk SpaceRecommendations for Software Groups” on page 12.
Note – The text installer does not prompt you to select a Default or CustomInstallation. To perform a default installation, accept the default values that areprovided in the text installer. To perform a custom installation, edit the values inthe text installer screens.
11. If you are prompted, answer any additional configuration questions.
When you have provided the information that is required to install the system, theReady to Install screen is displayed.
Chapter 2 • Installing With the Solaris Installation Program (Tasks) 29
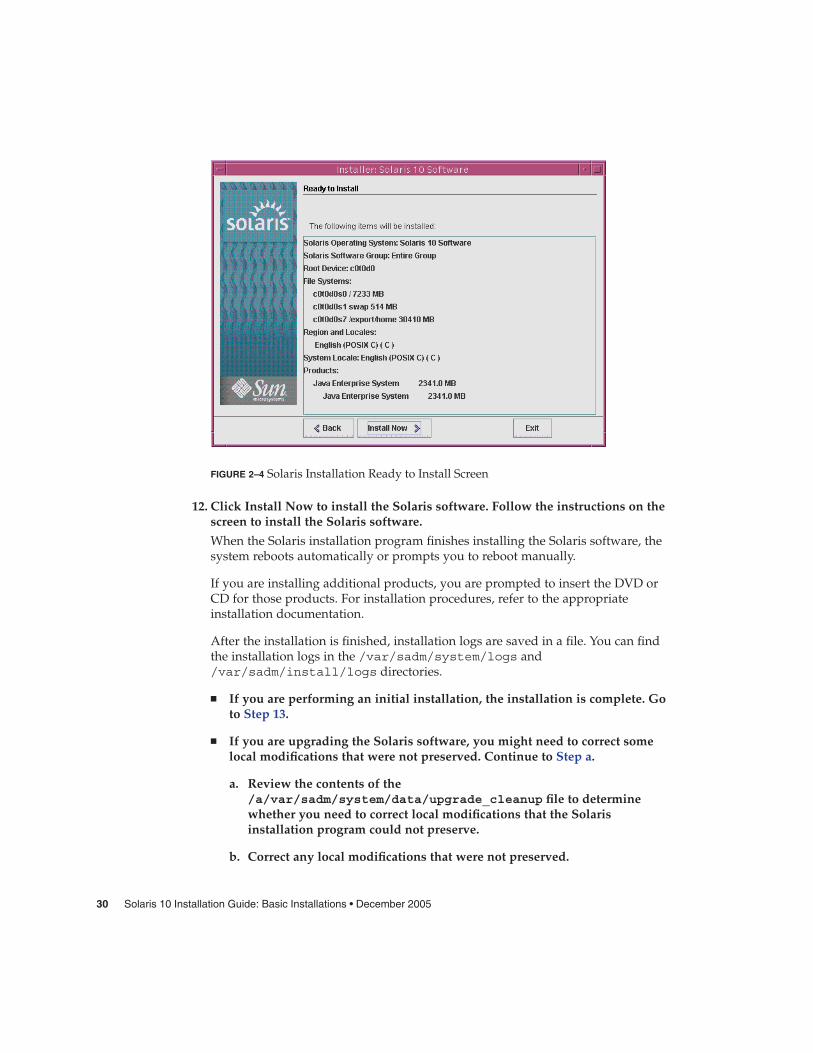
FIGURE 2–4 Solaris Installation Ready to Install Screen
12. Click Install Now to install the Solaris software. Follow the instructions on thescreen to install the Solaris software.
When the Solaris installation program finishes installing the Solaris software, thesystem reboots automatically or prompts you to reboot manually.
If you are installing additional products, you are prompted to insert the DVD orCD for those products. For installation procedures, refer to the appropriateinstallation documentation.
After the installation is finished, installation logs are saved in a file. You can findthe installation logs in the /var/sadm/system/logs and/var/sadm/install/logs directories.
� If you are performing an initial installation, the installation is complete. Goto Step 13.
� If you are upgrading the Solaris software, you might need to correct somelocal modifications that were not preserved. Continue to Step a.
a. Review the contents of the/a/var/sadm/system/data/upgrade_cleanup file to determinewhether you need to correct local modifications that the Solarisinstallation program could not preserve.
b. Correct any local modifications that were not preserved.
30 Solaris 10 Installation Guide: Basic Installations • December 2005

13. If you did not select automatic reboot during the installation, reboot the system.
# reboot
If you encountered any problems during the installation or upgrade, see Appendix A,“Troubleshooting (Tasks),” in Solaris 10 Installation Guide: Custom JumpStart andAdvanced Installations.
x86: Performing an Installation orUpgrade With the Solaris InstallationProgramYou can either install or upgrade the Solaris OS by using the Solaris installationprogram. This section lists the task you need to perform to install the Solaris OS, andprovides detailed instructions about how to install the Solaris OS from DVD or CDmedia.
Choose one of the following procedures.
� For the Solaris 10 3/05 release, see “x86: To Install or Upgrade With the SolarisInstallation Program” on page 31 for instructions about how to install the SolarisOS.
� Starting with the Solaris 10 1/06 release, see “x86: To Install or Upgrade With theSolaris Installation Program With GRUB” on page 42 for instructions about howto install the Solaris OS.
� x86: To Install or Upgrade With the SolarisInstallation ProgramFor the Solaris 10 3/05 release, follow this procedure to install a standalone x86 basedsystem from CD or DVD media.
Starting with the Solaris 10 1/06 release, the Solaris installation programs for x86based systems use the GRUB boot loader. For instructions about how to install theSolaris OS with GRUB, see “x86: To Install or Upgrade With the Solaris InstallationProgram With GRUB” on page 42.
Troubleshooting
Chapter 2 • Installing With the Solaris Installation Program (Tasks) 31

Note – If you want to install the Solaris OS on a machine or domain that does not havea directly attached DVD-ROM or CD-ROM drive, you can use a DVD-ROM orCD-ROM drive that is attached to another machine. For detailed instructions, refer toAppendix B, “Installing or Upgrading Remotely (Tasks),” in Solaris 10 InstallationGuide: Network-Based Installations.
Perform the following tasks before you begin your installation.
� Ensure that you have the following media.
� If you are installing from a DVD, use the Solaris 10 Operating System for x86Platforms DVD.
� If you are installing from CD media, use the following:
� Solaris 10 Software CDs.
� Solaris 10 Languages for x86 Platforms CD – The installation programprompts you for this CD if necessary to support languages for specificgeographic regions.
Note – If you want to upgrade a system that has non-global zones installed,you cannot use the Solaris 10 Software CDs. You must use the Solaris 10Operating System DVD or a network installation image.
� Check your system BIOS to make sure you can boot from CD or DVD media. Ifyour system must boot from a diskette, complete the steps described in“Solaris 10 3/05 for x86: Copying the Boot Software to a Diskette” in Solaris 10Installation Guide: Network-Based Installations.
� Acquire any install time updates (ITUs) or drivers that you need to install theSolaris OS on your hardware. To determine if you need an ITU or additionaldrivers, see your hardware documentation.
� Verify that your system meets the minimum requirements.
Your system should meet the following requirements.
� Memory – 128 Mbytes or greater� Disk space – 6.8 Gbytes or greater� Processor speed – 120 MHz or greater with hardware floating point
For detailed information about system requirements, see “System Requirementsand Recommendations” on page 9.
If you are installing the Solaris OS on a system that is not produced by SunMicrosystems, Inc., check the Solaris Hardware Compatibility List athttp://www.sun.com/bigadmin/hcl before you begin to install.
Before YouBegin
32 Solaris 10 Installation Guide: Basic Installations • December 2005
� You cannot use the Solaris installation program to upgrade to the Solaris 10 7/05release on a system that has non-global zones installed. For information about howto upgrade a system that has non-global zones installed, see Chapter 27,“Upgrading a Solaris 10 System That Has Installed Non-Global Zones,” in SystemAdministration Guide: Solaris Containers-Resource Management and Solaris Zones.
� Gather the information you need to install the Solaris OS.
� For a nonnetworked system, gather the following information.
� Host name of the system that you are installing� Language and locales that you intend to use on the system
� For a networked system, gather the following information.
� Host name of the system that you are installing� Language and locales that you intend to use on the system� Host IP address� Subnet mask� Type of name service (for example, DNS, NIS, or NIS+)� Domain name� Host name of the name server� Host IP address of the name server� Root password
For information that you need to gather to install your system, see “Checklist forInstallation” on page 14. If you are upgrading your system, see “Checklist forUpgrading” in Solaris 10 Installation Guide: Solaris Live Upgrade and UpgradePlanning.
� If your system must boot from diskette, copy the Solaris Device ConfigurationAssistant to diskette. To determine if your system must boot from diskette, checkthe system BIOS.
For instructions, see “Solaris 10 3/05 for x86: Copying the Boot Software to aDiskette” in Solaris 10 Installation Guide: Network-Based Installations.
� (Optional) Back up your system.
If you want to preserve any existing data or applications, back up the system. Fordetailed instructions about how to back up your system, see Chapter 24, “BackingUp and Restoring File Systems (Overview),” in System Administration Guide: Devicesand File Systems.
1. Insert the appropriate media in your system.
� If you boot from the Solaris 10 Operating System DVD or the Solaris 10Software - 1 CD, insert the disc. Your system’s BIOS must support booting froma DVD or CD.
You might need to manually set your BIOS to boot from a DVD or CD. See yourhardware documentation for more information about how to set the BIOS.
Steps
Chapter 2 • Installing With the Solaris Installation Program (Tasks) 33
� If you boot from a diskette, insert a Solaris 10 Device Configuration Assistantdiskette into the system’s diskette drive.
2. Boot the system by shutting it down and then turning it off and on.
3. If you need to manually set the BIOS to boot from CD or DVD, type theappropriate key sequence to interrupt your system boot process.
Modify the boot priority in the BIOS, and exit the BIOS to return to the installationprogram.
A memory test and hardware detection are executed. The screen refreshes. TheSolaris Booting System screen is displayed.
4. Decide if you need to modify device settings.
You might need to modify device settings if you want to perform the followingtasks:
� Install device drivers� Install ITUs� Disable Advanced Configuration and Power Interface (ACPI)� Set up a serial console� Reset the default boot device
� If you do not need to modify device settings, continue.
� If you need to modify device settings with the Solaris Device ConfigurationAssistant, press the ESC key.
Note – You must press the ESC key within five seconds to interrupt theinstallation and modify device settings.
The Solaris Device Configuration Assistant (DCA) screen is displayed. Followthe instructions on the DCA screens to modify the device settings.
The Solaris installation program checks the default boot disk for the requirementsto install or upgrade the system. If the Solaris installation cannot detect the systemconfiguration, the program prompts you for any missing information.
When the check is completed, the installation selection screen is displayed.
5. Select an installation type.
The installation selection screen displays the following options.
Select the type of installation you want to perform:
1 Solaris Interactive2 Custom JumpStart
34 Solaris 10 Installation Guide: Basic Installations • December 2005

3 Solaris Interactive Text (Desktop session)4 Solaris Interactive Text (Console session)
Enter the number of your choice followed by the <ENTER> key.Alternatively, enter custom boot arguments directly.
If you wait 30 seconds without typing anything,an interactive installation will be started.
� To install with the Solaris installation GUI, type 1, then press Enter.
� To perform an unattended custom JumpStart installation, type 2, then pressEnter.
For information about the custom JumpStart installation method, see Solaris 10Installation Guide: Custom JumpStart and Advanced Installations.
� To install with the text installer in a desktop session, type 3, then press Enter.You can also type b - text at the prompt.
Select this installation type to override the default GUI installer and run the textinstaller.
� To install with the text installer in a console session, type 4, then press Enter.You can also type b - nowin at the prompt.
Select this installation type to override the default GUI installer and run the textinstaller.
For detailed information about the Solaris installation GUI and text installer, see“Solaris Installation Program GUI or Text Installer Requirements” on page 10.
The system configures the devices and interfaces, and searches for configurationfiles. After a few seconds, the Solaris Installation Program screen is displayed.
6. On the Solaris Installation Program screen, press F2_Continue.
� If the installation program detects the type of keyboard, display, and mouse onyour system, the Select a Language screen is displayed. Go to Step 12.
� If the installation program does not detect the type of keyboard, display, andmouse on your system, the kdmconfig – Introduction screen is displayed. Go toStep 7.
7. (Optional) Configure your system to use the keyboard, display, and mouse.
� If you want to install the Solaris OS with the text installer in a consolesession, press F4_Bypass. Go to Step 12.
Chapter 2 • Installing With the Solaris Installation Program (Tasks) 35
� If you want to install the Solaris OS with the Solaris interactive installationGUI or the text program in a desktop session, press F2_Continue.
The kdmconfig utility detects the drivers that are necessary to configure thekeyboard, display, and mouse on your system. The kdmconfig utility displaysthe results of this search in the kdmconfig – View and Edit Window SystemConfiguration screen.
Note – If the kdmconfig utility cannot detect the video driver for your system,the kdmconfig utility selects the 640x480 VGA driver. The Solaris installationGUI cannot be displayed with the 640x480 VGA driver. As a result, the Solarisinstallation text installer is displayed. To use the Solaris installation GUI, usethe kdmconfig utility to select the correct video driver for your system.
8. Examine the configuration information on the kdmconfig – View and EditWindow System Configuration screen and make any changes you need.
If any of the devices that are listed are not properly configured, follow these steps.
a. Select the device you want to change, and press F2_Continue.
b. Select the appropriate driver for the device, and press F2_Continue.
c. Repeat Step a through Step b for each device you need to change.
9. When you are finished, select No changes needed – Test/Save and Exit and pressF2_Continue.
The kdmconfig Window System Configuration Test screen appears.
10. Press F2_Continue.
The screen refreshes and the kdmconfig Window System Configuration Test paletteand pattern screen appears.
11. Move the pointer and examine the colors that are shown on the palette to ensurethat they are displayed accurately.
� If the colors are not displayed accurately, click No. If possible, press any keyon the keyboard, or wait until kdmconfig exits the kdmconfig WindowSystem Configuration Test screen automatically. Repeat Step 7 throughStep 11 until the colors are displayed accurately and you can move thepointer as expected.
� If the colors are displayed accurately, click Yes.
After a few seconds, the Select a Language screen is displayed.
12. Select the language you want to use during the installation, and press Enter.
After a few seconds, the Solaris Installation Program screen appears.
36 Solaris 10 Installation Guide: Basic Installations • December 2005

� If you are running the Solaris GUI installation program, the screen that isshown in Figure 2–5 is displayed.
� If you are running the Solaris text installer in a desktop session, the screen thatis shown in Figure 2–6 is displayed.
FIGURE 2–5 Solaris GUI Installation Program Welcome Screen
Chapter 2 • Installing With the Solaris Installation Program (Tasks) 37
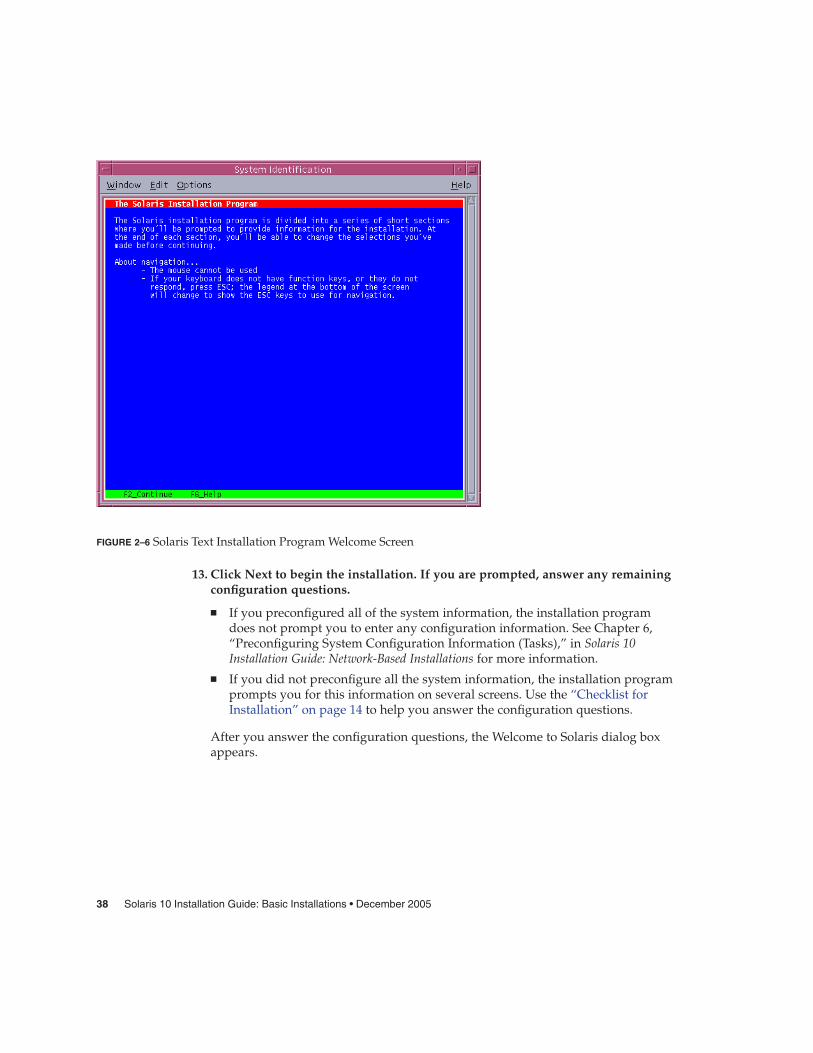
FIGURE 2–6 Solaris Text Installation Program Welcome Screen
13. Click Next to begin the installation. If you are prompted, answer any remainingconfiguration questions.
� If you preconfigured all of the system information, the installation programdoes not prompt you to enter any configuration information. See Chapter 6,“Preconfiguring System Configuration Information (Tasks),” in Solaris 10Installation Guide: Network-Based Installations for more information.
� If you did not preconfigure all the system information, the installation programprompts you for this information on several screens. Use the “Checklist forInstallation” on page 14 to help you answer the configuration questions.
After you answer the configuration questions, the Welcome to Solaris dialog boxappears.
38 Solaris 10 Installation Guide: Basic Installations • December 2005
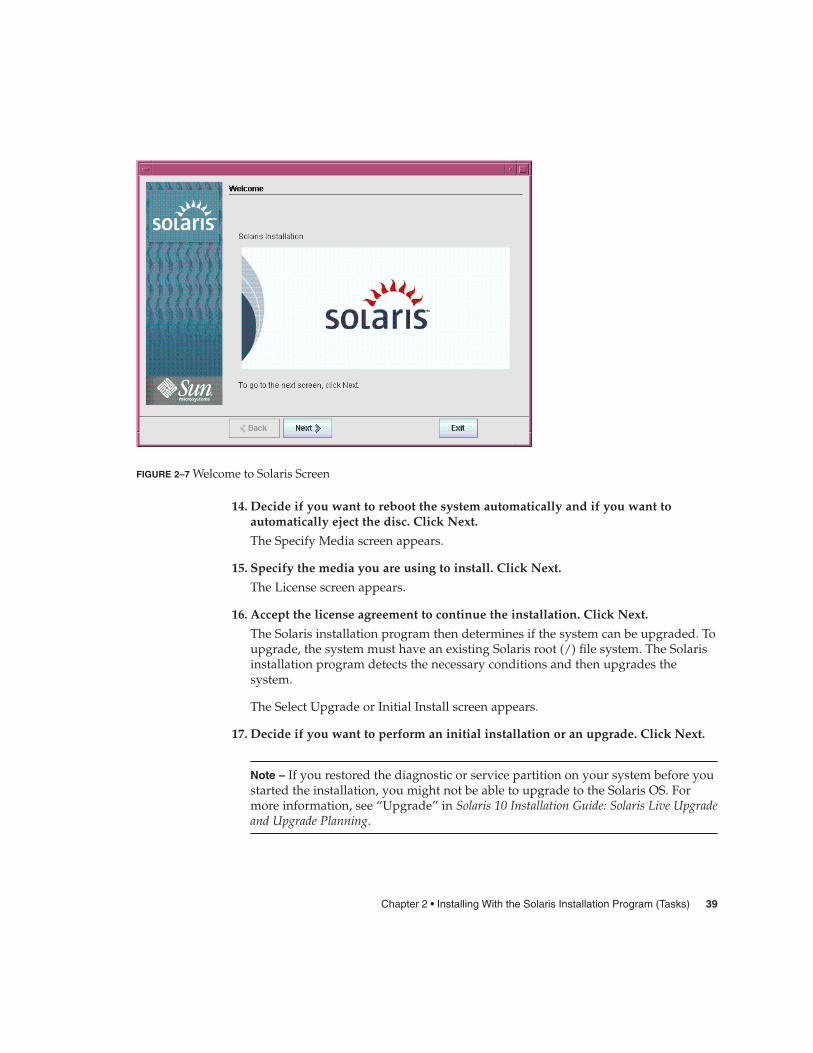
FIGURE 2–7 Welcome to Solaris Screen
14. Decide if you want to reboot the system automatically and if you want toautomatically eject the disc. Click Next.
The Specify Media screen appears.
15. Specify the media you are using to install. Click Next.
The License screen appears.
16. Accept the license agreement to continue the installation. Click Next.
The Solaris installation program then determines if the system can be upgraded. Toupgrade, the system must have an existing Solaris root (/) file system. The Solarisinstallation program detects the necessary conditions and then upgrades thesystem.
The Select Upgrade or Initial Install screen appears.
17. Decide if you want to perform an initial installation or an upgrade. Click Next.
Note – If you restored the diagnostic or service partition on your system before youstarted the installation, you might not be able to upgrade to the Solaris OS. Formore information, see “Upgrade” in Solaris 10 Installation Guide: Solaris Live Upgradeand Upgrade Planning.
Chapter 2 • Installing With the Solaris Installation Program (Tasks) 39
18. Select the type of installation you want to perform. Click Next.
� Select Default Install to install the Entire Solaris Software Group.
� Select Custom Install if you want to perform the following tasks.
� Install a specific software group� Install additional software� Install specific software packages� Install a specific locale� Customize the disk layout
For more information about software groups, see “Disk Space Recommendationsfor Software Groups” on page 12. For information about customizing fdiskpartitions, see “Partitioning Recommendations” in Solaris 10 Installation Guide:Custom JumpStart and Advanced Installations.
Note – The text installer does not prompt you to select a Default or CustomInstallation. To perform a default installation, accept the default values that areprovided in the text installer. To perform a custom installation, edit the values inthe text installer screens.
19. If you are prompted, answer any additional configuration questions.
When you have provided the information that is required to install the system, theReady to Install screen is displayed.
40 Solaris 10 Installation Guide: Basic Installations • December 2005
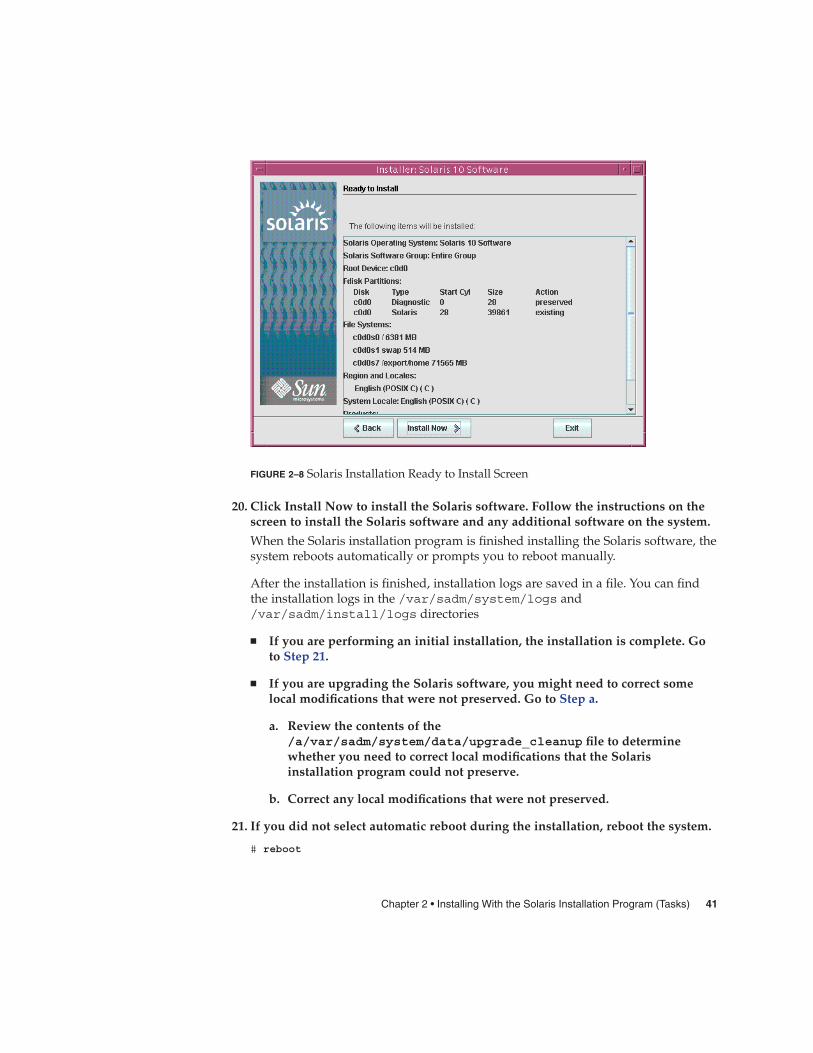
FIGURE 2–8 Solaris Installation Ready to Install Screen
20. Click Install Now to install the Solaris software. Follow the instructions on thescreen to install the Solaris software and any additional software on the system.
When the Solaris installation program is finished installing the Solaris software, thesystem reboots automatically or prompts you to reboot manually.
After the installation is finished, installation logs are saved in a file. You can findthe installation logs in the /var/sadm/system/logs and/var/sadm/install/logs directories
� If you are performing an initial installation, the installation is complete. Goto Step 21.
� If you are upgrading the Solaris software, you might need to correct somelocal modifications that were not preserved. Go to Step a.
a. Review the contents of the/a/var/sadm/system/data/upgrade_cleanup file to determinewhether you need to correct local modifications that the Solarisinstallation program could not preserve.
b. Correct any local modifications that were not preserved.
21. If you did not select automatic reboot during the installation, reboot the system.
# reboot
Chapter 2 • Installing With the Solaris Installation Program (Tasks) 41
If you encounter any problems during the installation or upgrade, see Appendix A,“Troubleshooting (Tasks),” in Solaris 10 Installation Guide: Custom JumpStart andAdvanced Installations.
� x86: To Install or Upgrade With the SolarisInstallation Program With GRUBStarting with the Solaris 10 1/06 release, the Solaris installation programs for x86based systems use the GRUB boot loader. This procedure describes how to install astandalone x86 based system with the GRUB bootloader from CD or DVD media. Foroverview information about the GRUB boot loader, see Chapter 4, “GRUB BasedBooting For Solaris Installation,” in Solaris 10 Installation Guide: Network-BasedInstallations.
For the Solaris 10 3/05 release, see “x86: To Install or Upgrade With the SolarisInstallation Program” on page 31 for instructions about how to install the Solaris OSfrom CD or DVD.
Note – If you want to install the Solaris OS on a machine or domain that does not havea directly attached DVD-ROM or CD-ROM drive, you can use a DVD-ROM orCD-ROM drive that is attached to another machine. For detailed instructions, refer toAppendix B, “Installing or Upgrading Remotely (Tasks),” in Solaris 10 InstallationGuide: Network-Based Installations.
Perform the following tasks before you begin your installation.
� Ensure that you have the following media.
� If you are installing from a DVD, use the Solaris 10 Operating System for x86Platforms DVD.
� If you are installing from CD media, use the following:
� Solaris 10 Software CDs.
� Solaris 10 Languages for x86 Platforms CD – The installation programprompts you for this CD if necessary to support languages for specificgeographic regions.
Note – If you want to upgrade a system that has non-global zones installed,you cannot use the Solaris 10 Software CDs. You must use the Solaris 10Operating System DVD or a DVD-based network installation image.
Troubleshooting
Before YouBegin
42 Solaris 10 Installation Guide: Basic Installations • December 2005
� Check your system BIOS to make sure you can boot from CD or DVD media.
� Acquire any install time updates (ITUs) or drivers that you need to install theSolaris OS on your hardware. To determine if you need an ITU or additionaldrivers, see your hardware documentation.
� Verify that your system meets the minimum requirements.
Your system should meet the following requirements.
� Memory – 256 Mbytes or greater� Disk space – 6.8 Gbytes or greater� Processor speed – 120 MHz or greater with hardware floating point
For detailed information about system requirements, see “System Requirementsand Recommendations” on page 9.
If you are installing the Solaris OS on a system that is not produced by SunMicrosystems, Inc., check the Solaris Hardware Compatibility List athttp://www.sun.com/bigadmin/hcl before you begin to install.
� Gather the information you need to install the Solaris OS.
� For a nonnetworked system, gather the following information.
� Host name of the system that you are installing� Language and locales that you intend to use on the system
� For a networked system, gather the following information.
� Host name of the system that you are installing� Language and locales that you intend to use on the system� Host IP address� Subnet mask� Type of name service (for example, DNS, NIS, or NIS+)� Domain name� Host name of the name server� Host IP address of the name server� Root password
For information that you need to gather to install your system, see “Checklist forInstallation” on page 14. If you are upgrading your system, see “Checklist forUpgrading” in Solaris 10 Installation Guide: Solaris Live Upgrade and UpgradePlanning.
� (Optional) Back up your system.
If you want to preserve any existing data or applications, back up the system. Fordetailed instructions about how to back up your system, see Chapter 24, “BackingUp and Restoring File Systems (Overview),” in System Administration Guide: Devicesand File Systems.
Chapter 2 • Installing With the Solaris Installation Program (Tasks) 43
1. Insert the appropriate media in your system.
If you boot from the Solaris 10 Operating System DVD or the Solaris 10 Software -1 CD, insert the disc. Your system’s BIOS must support booting from a DVD or CD.
You might need to manually set your BIOS to boot from a DVD or CD. See yourhardware documentation for more information about how to set the BIOS.
2. Boot the system by shutting it down and then turning it off and on.
3. If you need to manually set the BIOS to boot from CD or DVD, type theappropriate key sequence to interrupt your system boot process.
Modify the boot priority in the BIOS, and exit the BIOS to return to the installationprogram.
A memory test and hardware detection are executed. The screen refreshes. TheGRUB menu is displayed.
GNU GRUB version 0.95 (631K lower / 2095488K upper memory)+-------------------------------------------------------------------------+| Solaris || Solaris Serial Console ttya || Solaris Serial Console ttyb (for lx50, v60x and v65x) || || |+-------------------------------------------------------------------------+Use the ^ and v keys to select which entry is highlighted.Press enter to boot the selected OS, ’e’ to edit thecommands before booting, or ’c’ for a command-line.
4. Select the appropriate installation option.
� If you want to install the Solaris OS from CD or DVD on your currentsystem, select Solaris, then press Enter.
Select this option if you want to install the system by using the default values.
� If you want to install the Solaris OS and send the screen output to serialconsole ttya (COM1), select Solaris Serial Console ttya.
Select this option if you want to change the system display to a device that isconnected to serial port COM1.
� If you want to install the Solaris OS and send the screen output to serialconsole ttyb (COM2), select Solaris Serial Console ttyb.
Select this option if you want to change the system display to a device that isconnected to serial port COM2.
� If you want to install the Solaris OS with specific boot arguments, followthese steps.
You might want to use specific boot arguments to customize the systemconfiguration during the installation.
Steps
44 Solaris 10 Installation Guide: Basic Installations • December 2005
a. On the GRUB menu, select the installation option you want to edit, thenpress e.
Boot commands that are similar to the following text are displayed in theGRUB menu.
kernel /boot/multiboot kernel/unix -B install_media=cdrommodule /boot/x86.miniroot
b. Use the arrow keys to select the boot entry that you want to edit, thenpress e.
The boot command that you want to edit is displayed in the GRUB editwindow.
c. Edit the command by typing the boot arguments or options you want touse.
The command syntax for the Grub edit menu is as follows.
grub edit>kernel /boot/multiboot kernel/unix/ \install [url|ask] -B options install_media=media_type
For information about boot arguments and command syntax, see Chapter10, “Preparing to Install From the Network (Command Reference),” inSolaris 10 Installation Guide: Network-Based Installations.
d. To go back to the GRUB menu, press Enter.
The GRUB menu is displayed. The edits you made to the boot command aredisplayed.
e. To begin the installation, type b in the GRUB menu.
The Solaris installation program checks the default boot disk for the requirementsto install or upgrade the system. If the Solaris installation cannot detect the systemconfiguration, the program prompts you for any missing information.
When the check is completed, the installation selection screen is displayed.
5. Select an installation type.
The installation selection screen displays the following options.
Select the type of installation you want to perform:
1 Solaris Interactive2 Custom JumpStart3 Solaris Interactive Text (Desktop session)4 Solaris Interactive Text (Console session)5 Apply driver updates6 Single user shell
Enter the number of your choice followed by the <ENTER> key.Alternatively, enter custom boot arguments directly.
Chapter 2 • Installing With the Solaris Installation Program (Tasks) 45
If you wait 30 seconds without typing anything,an interactive installation will be started.
� To install the Solaris OS, choose from the following options.
� To install with the Solaris interactive installation GUI, type 1, then pressEnter.
� To install with the interactive text installer in a desktop session, type 3,then press Enter.
Select this installation type to override the default GUI installer and run thetext installer.
� To install with the interactive text installer in a console session, type 4,then press Enter.
Select this installation type to override the default GUI installer and run thetext installer.
If you want to perform an unattended custom JumpStart installation (option 2),see Solaris 10 Installation Guide: Custom JumpStart and Advanced Installations.
For detailed information about the Solaris installation GUI and text installer, see“System Requirements and Recommendations” on page 9.
The system configures the devices and interfaces, and searches for configurationfiles. The kdmconfig utility detects the drivers that are necessary to configurethe keyboard, display, and mouse on your system. The installation programbegins. Go to Step 6 to continue the installation.
� To perform system administration tasks before your installation, choose fromthe following options.
� To update drivers or install an install time update (ITU), insert the updatemedia, type 5, then press Enter.
You might need to update drivers or install an ITU to enable the Solaris OSto run on your system. Follow the instructions for your driver update or ITUto install the update.
� To perform system administration tasks, type 6, then press Enter.
You might want to launch a single user shell if you need to perform anysystem administration tasks on your system before you install. Forinformation about system administration tasks you can perform prior toinstallation, see System Administration Guide: Basic Administration.
After you perform these system administration tasks, the previous list ofoptions is displayed. Select the appropriate option to continue the installation.
6. Decide if you need to modify the configuration settings.
46 Solaris 10 Installation Guide: Basic Installations • December 2005
Note – If the kdmconfig utility cannot detect the video driver for your system, thekdmconfig utility selects the 640x480 VGA driver. The Solaris installation GUIcannot be displayed with the 640x480 VGA driver. As a result, the Solarisinstallation text installer is displayed. To use the Solaris installation GUI, use thekdmconfig utility to select the correct video driver for your system.
� If you do not need to modify the configuration settings, let the WindowSystem Configuration for Installation screen time out. Go to Step 12.
� If you need to modify the configuration settings follow these steps,
a. Press the ESC key.
Note – You must press the ESC key within five seconds to interrupt theinstallation and modify device settings.
The kdmconfig – Introduction screen is displayed.
b. Examine the configuration information on the kdmconfig – View and EditWindow System Configuration screen, and determine which devices youneed to edit.
c. Select the device you want to change, and press F2_Continue.
d. Select the appropriate driver for the device, and press F2_Continue.
e. Repeat Step a through Step b for each device you need to change.
f. When you are finished, select No changes needed – Test/Save and Exit andpress F2_Continue.
The kdmconfig Window System Configuration Test screen appears.
g. Press F2_Continue.
The screen refreshes and the kdmconfig Window System Configuration Testpalette and pattern screen appears.
h. Move the pointer and examine the colors that are shown on the palette toensure that they are displayed accurately.
� If the colors are not displayed accurately, click No. If possible, pressany key on the keyboard, or wait until kdmconfig exits the kdmconfigWindow System Configuration Test screen automatically. Repeat Step 7through Step 11 until the colors are displayed accurately and you canmove the pointer as expected.
Chapter 2 • Installing With the Solaris Installation Program (Tasks) 47
� If the colors are displayed accurately, click Yes.
After a few seconds, the Select a Language screen is displayed.
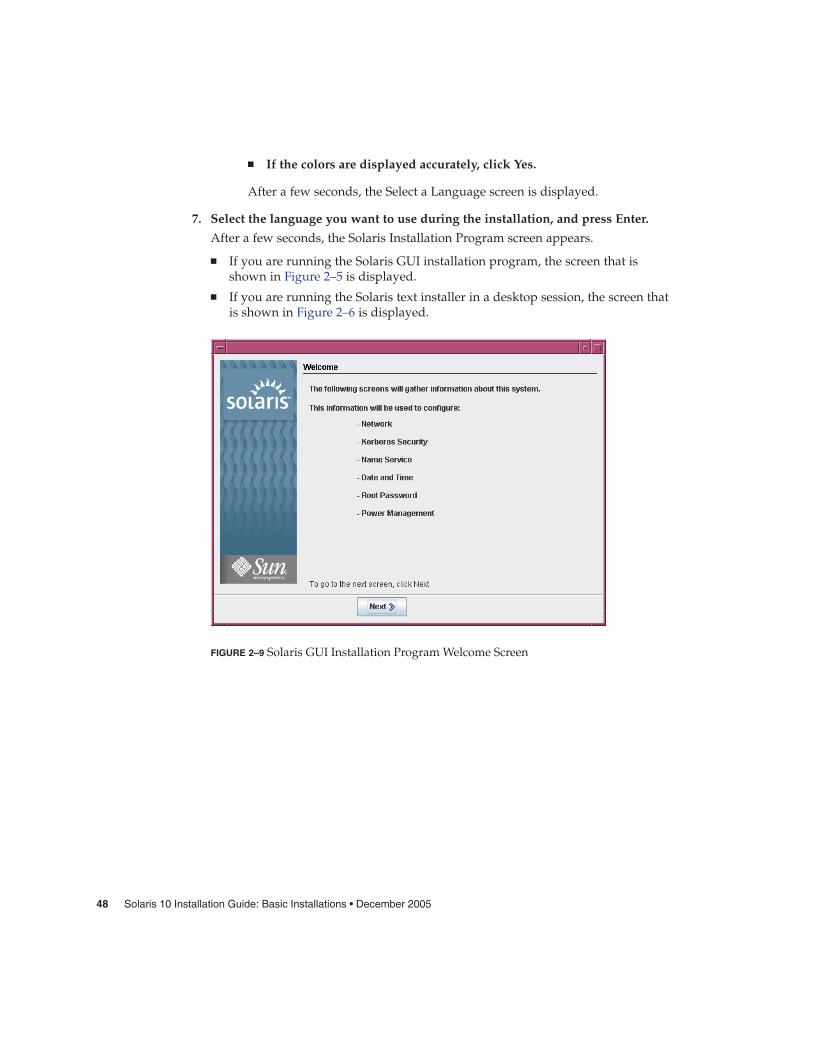
7. Select the language you want to use during the installation, and press Enter.
After a few seconds, the Solaris Installation Program screen appears.
� If you are running the Solaris GUI installation program, the screen that isshown in Figure 2–5 is displayed.
� If you are running the Solaris text installer in a desktop session, the screen thatis shown in Figure 2–6 is displayed.
FIGURE 2–9 Solaris GUI Installation Program Welcome Screen
48 Solaris 10 Installation Guide: Basic Installations • December 2005
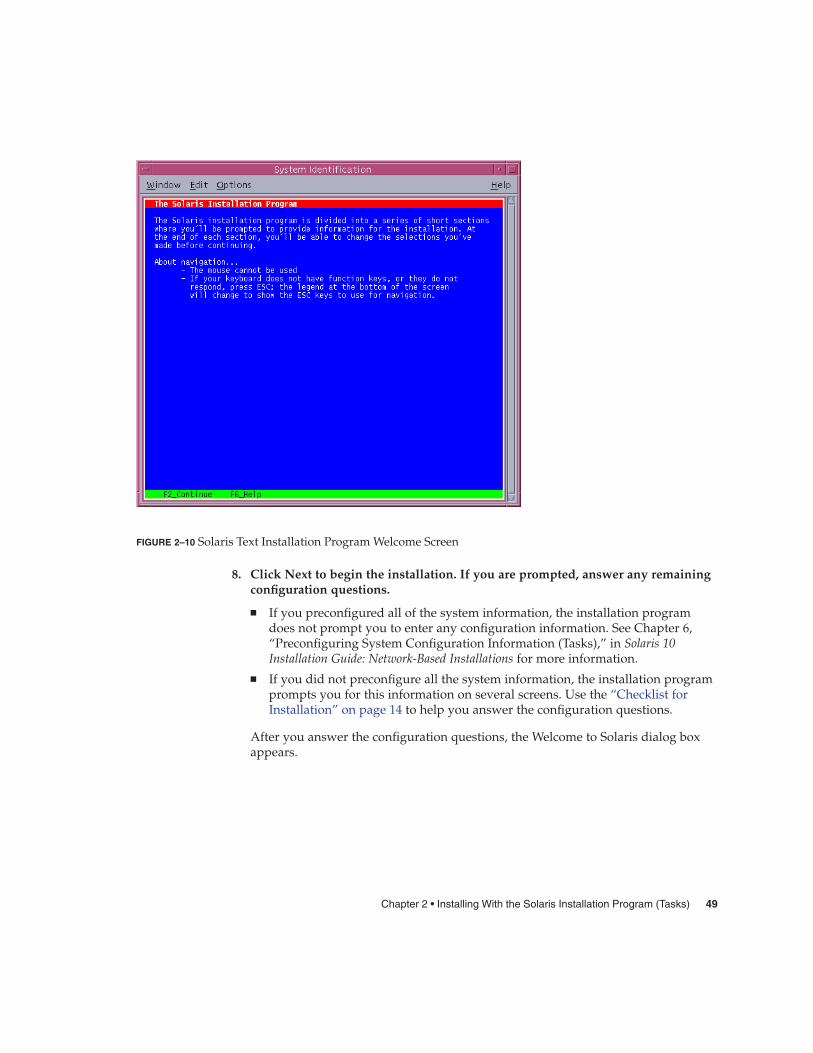
FIGURE 2–10 Solaris Text Installation Program Welcome Screen
8. Click Next to begin the installation. If you are prompted, answer any remainingconfiguration questions.
� If you preconfigured all of the system information, the installation programdoes not prompt you to enter any configuration information. See Chapter 6,“Preconfiguring System Configuration Information (Tasks),” in Solaris 10Installation Guide: Network-Based Installations for more information.
� If you did not preconfigure all the system information, the installation programprompts you for this information on several screens. Use the “Checklist forInstallation” on page 14 to help you answer the configuration questions.
After you answer the configuration questions, the Welcome to Solaris dialog boxappears.
Chapter 2 • Installing With the Solaris Installation Program (Tasks) 49
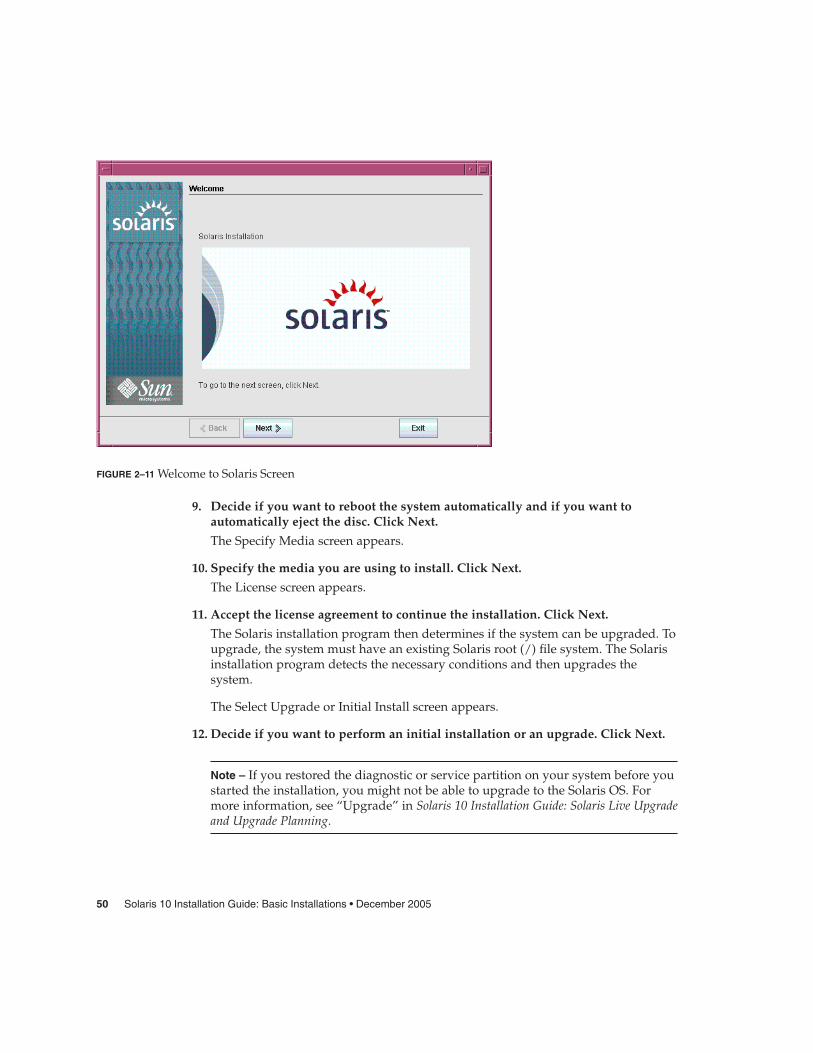
FIGURE 2–11 Welcome to Solaris Screen
9. Decide if you want to reboot the system automatically and if you want toautomatically eject the disc. Click Next.
The Specify Media screen appears.
10. Specify the media you are using to install. Click Next.
The License screen appears.
11. Accept the license agreement to continue the installation. Click Next.
The Solaris installation program then determines if the system can be upgraded. Toupgrade, the system must have an existing Solaris root (/) file system. The Solarisinstallation program detects the necessary conditions and then upgrades thesystem.
The Select Upgrade or Initial Install screen appears.
12. Decide if you want to perform an initial installation or an upgrade. Click Next.
Note – If you restored the diagnostic or service partition on your system before youstarted the installation, you might not be able to upgrade to the Solaris OS. Formore information, see “Upgrade” in Solaris 10 Installation Guide: Solaris Live Upgradeand Upgrade Planning.
50 Solaris 10 Installation Guide: Basic Installations • December 2005
If you are upgrading a system that has non-global zones installed, follow thesesteps.
a. When you are prompted to select initial installation or upgrade, chooseUpgrade. Click Next.
b. If your system has multiple root (/) partitions, select the partition that youwant to upgrade on the Select Version to Upgrade panel.
The Solaris installation program displays a message that indicates that youcannot customize your upgrade. The Solaris installation program analyzes yoursystem to determine if the system can be upgraded. The Ready to Upgradepanel is displayed.
If your system has only one root partition, the Solaris installation program doesnot prompt you to select a partition to upgrade. The partition is automaticallyselected.
c. If you want to continue the upgrade, click Install Now on the Ready toUpgrade panel.
The Solaris installation program begins to upgrade your system. After theupgrade is completed, you might need to correct some local modifications thatwere not preserved. For more information, go to Step a in Step 15.
If you do not want to continue the upgrade, click Back to perform an initialinstallation.
13. Select the type of installation you want to perform. Click Next.
� Select Default Install to install the Entire Solaris Software Group.
� Select Custom Install if you want to perform the following tasks.
� Install a specific software group� Install additional software� Install specific software packages� Install a specific locale� Customize the disk layout
For more information about software groups, see “Disk Space Recommendationsfor Software Groups” on page 12. For information about customizing fdiskpartitions, see “Partitioning Recommendations” in Solaris 10 Installation Guide:Custom JumpStart and Advanced Installations.
Note – The text installer does not prompt you to select a Default or CustomInstallation. To perform a default installation, accept the default values that areprovided in the text installer. To perform a custom installation, edit the values inthe text installer screens.
Chapter 2 • Installing With the Solaris Installation Program (Tasks) 51

14. If you are prompted, answer any additional configuration questions.
When you have provided the information that is required to install the system, theReady to Install screen is displayed.
FIGURE 2–12 Solaris Installation Ready to Install Screen
15. Click Install Now to install the Solaris software. Follow the instructions on thescreen to install the Solaris software and any additional software on the system.
When the Solaris installation program is finished installing the Solaris software, thesystem reboots automatically or prompts you to reboot manually.
After the installation is finished, installation logs are saved in a file. You can findthe installation logs in the /var/sadm/system/logs and/var/sadm/install/logs directories
� If you are performing an initial installation, the installation is complete. Goto Step 21.
� If you are upgrading the Solaris software, you might need to correct somelocal modifications that were not preserved. Go to Step a.
a. Review the contents of the/a/var/sadm/system/data/upgrade_cleanup file to determinewhether you need to correct local modifications that the Solarisinstallation program could not preserve.
b. Correct any local modifications that were not preserved.
52 Solaris 10 Installation Guide: Basic Installations • December 2005

16. If you did not select automatic reboot during the installation, reboot the system.
# reboot
Next Steps
If you install multiple operating systems on your machine, you need to instruct theGRUB boot loader to recognize these operating systems in order to boot. For moreinformation, see “Modifying the Solaris Boot Behavior by Editing the GRUB Menu” inSystem Administration Guide: Basic Administration.
If you encounter any problems during the installation or upgrade, see Appendix A,“Troubleshooting (Tasks),” in Solaris 10 Installation Guide: Custom JumpStart andAdvanced Installations.
MoreInformation
Troubleshooting
Chapter 2 • Installing With the Solaris Installation Program (Tasks) 53

54 Solaris 10 Installation Guide: Basic Installations • December 2005

Index
AAdvanced Configuration and Power Interface
(ACPI), disabling, 34
BBIOS
requirements, 32, 43setting boot priority, 34, 44
boot prioritysetting in system BIOS, 34, 44
booting the systemSPARC based systems, 25x86 based systems, 34, 44
Cchecklist of installation information, 14-21commands to start an installation
SPARC based systems, 25x86 based systems, 34, 45
configuring the keyboard, display, and pointingdevice, 35, 46
Core System Support Software Groupdescription, 12-14size, 13
custom installation, description, 29
Ddefault boot device, resetting, 34Developer Solaris Software Group
description, 12-14size, 13
device drivers, installing, 34, 45device settings, modifying, 34, 46disabling Advanced Configuration and Power
Interface (ACPI), 34disk space
requirementsfor software groups, 13
display, configuring for x86 based systems, 35,46
EEnd User Solaris Software Group
description, 12-14size, 13
Entire Solaris Software Groupdescription, 12-14size, 13
Entire Solaris Software Group Plus OEMSupportdescription, 12-14size, 13
Ggathering information before installing, 14-21
55
graphical user interface (GUI)command to start (SPARC based
systems), 25command to start (x86 based systems), 35,
46description, 11memory requirements, 11
GRUB, installing x86 based systems with, 42-53
Iinformation required for installation, 14-21install time updates (ITUs), installing, 34, 45installing
device drivers, 34, 45information required, 14-21install time updates (ITUs), 34, 45SPARC based systems, 23-31x86 based systems, 31-53, 44
installing, x86 systems with GRUB, 42-53instructions
installing SPARC based systems, 23-31installing x86 based systems, 31-53
IP addresses, specifying a default route, 18
Kkdmconfig, configuring peripheral devices
with, 35, 46Kerberos, information to configure, 16keyboard, configuring for x86 based
systems, 35, 46
Llanguages, selecting during installation, 26, 36,
48log files, upgrade installation, 30
Mmedia required to install
SPARC based systems, 24x86 based systems, 32, 42
memory requirements for displaying the Solarisinstallation program, 11
modifying device settings duringinstallation, 34, 46
mouse, configuring for x86 based systems, 35,46
Ooutput files, upgrade log, 30
Ppartition, description, 9preparing for installation
information you need beforeinstalling, 14-21
SPARC based systems, 24x86 based systems, 32, 42
prerequisites for installingSPARC based systems, 24x86 based systems, 32, 42
RReady to Install screen, 29-30Reduced Network Support Software Group
description, 12-14size, 13
requirements, 9-14BIOS, 32, 43for displaying Solaris installation
program, 11media
SPARC based systems, 24x86 based systems, 32, 42
memory, 10resetting the default boot device, 34
Sserial console, 34, 44setting boot priority in system BIOS, 34, 44setting up a serial console, 34, 44
56 Solaris 10 Installation Guide: Basic Installations • December 2005

slice, description, 9software groups
descriptions, 13sizes, 13
Solaris Device Configuration Assistant,accessing, 34
Solaris installation program, 23-53description, 10-12graphical user interface (GUI)
command to start (SPARC basedsystems), 25
command to start (x86 basedsystems), 35, 46
description, 11GRUB instructions, 42-53memory requirements, 11Ready to Install screen
SPARC based systems, 29-30x86 based systems, 40-41, 52
text installercommand to start in console session
(SPARC based systems), 25command to start in console session (x86
based systems), 35, 46command to start in desktop session
(SPARC based systems), 25command to start in desktop session (x86
based systems), 35, 46description, 11
upgrading systems with non-global zonesinstalledSPARC based systems instructions, 24-31x86 based systems instructions, 42-53
SPARC based systemsinstructions to install, 23-31preparing to install, 24upgrading with non-global zones
installed, 24-31starting an installation
SPARC based systems, 25x86 based systems, 35, 46
stty command, 20system requirements, 9-14
Ttext installer
command to start in console session (SPARCbased systems), 25
command to start in console session (x86based systems), 35, 46
command to start in desktop session (SPARCbased systems), 25
command to start in desktop session (x86based systems), 35, 46
description, 11memory requirements, 11
Uupgrade, log file, 30upgrading
postinstallation tasksSPARC based systems, 30x86 based systems, 41, 52
SPARC based systems, 23-31systems with non-global zones installed
SPARC based systems instructions, 24-31x86 based systems instructions, 42-53
x86 based systems, 31-53
Xx86 based systems
BIOS requirements, 32, 43booting, 34, 44installing with GRUB, 42-53instructions to install, 31-53preparing to install, 32, 42upgrading with non-global zones
installed, 42-53
Zzones, upgrading systems with
SPARC based systems instructions, 24-31x86 based systems instructions, 42-53
57

58 Solaris 10 Installation Guide: Basic Installations • December 2005