soil sampling standard operating procedure: august … · hand auger with replaceable sleeves...
TRANSCRIPT

Title: SOIL SAMPLING
Category: ENV 3.13
Revised: August 1997
i i
SOIL SAMPLING
ecology and environment, inc. 368 Pleasant V ew Dr ve / Lancaster, New York 14086 / (716) 684-8060
ST
AN
DA
RD
OP
ER
AT
ING
PR
OC
ED
UR
E
© 1997 Ecology and Environment, Inc.
TITLE: SOIL SAMPLING
CATEGORY: ENV 3.13 REVISED: August 1997
None of the information contained in this Ecology and Environment, Inc., (E & E) publication is to be construed as granting any right, by implication or otherwise, for the manufacture, sale, or use in connection with any method, apparatus, or product covered by letters patent, nor as ensuring anyone against liability for infringement of letters patent.
Anyone wishing to use this E & E publication should first seek permission from the company. Every effort has been made by E & E to ensure the accuracy and reliability of the information contained in the document; however, the company makes no representations, warranty, or guarantee in connection with this E & E publication and hereby expressly disclaims any liability or responsibility for loss or damage resulting from its use; for any violation of any federal, state, or municipal regulation with which this E & E publication may conflict; or for the infringement of any patent resulting from the use of the E & E publication.
TITLE: SOIL SAMPLING
CATEGORY: ENV 3.13 REVISED: August 1997
TABLE OF CONTENTS
Section Page
1. Introduction ......................................................................................................................... 1
2. Scope ................................................................................................................................... 1
3. Method Summary................................................................................................................ 1
4. Sample Preservation, Containers, Handling, and Storage................................................... 1
5. Potential Problems............................................................................................................... 2
6. Soil Sampling Equipment ................................................................................................... 3
6.1 Geophysical Equipment .......................................................................................... 5
7. Reagents .............................................................................................................................. 5
8. Procedures ........................................................................................................................... 5
8.1 Office Preparation ................................................................................................... 5
8.2 Field Preparation ..................................................................................................... 6
8.3 Representative Sample Collection .......................................................................... 6
8.3.1 Sampling Approaches ............................................................................. 6 8.3.2 Surface Soil Samples ............................................................................ 10 8.3.3 Sampling at Depth with Augers and Thin-Walled Tube
Samplers ............................................................................................... 11 8.3.4 Sampling at Depth with a Trier ............................................................ 13 8.3.5 Sampling at Depth with a Split-Spoon (Barrel) Sampler ..................... 14 8.3.6 Test Pit/Trench Excavation................................................................... 15
8.4 Sample Preparation ............................................................................................... 16
8.4.1 Sample Quantity and Volume............................................................... 16 8.4.2 Sample Preservation and Holding Time ............................................... 16 8.4.3 Removing Extraneous Material ............................................................ 16 8.4.4 Homogenizing Samples ........................................................................ 16 8.4.5 Compositing Samples ........................................................................... 20 8.4.6 Splitting Samples .................................................................................. 20
iii

TITLE: SOIL SAMPLING
CATEGORY: ENV 3.13 REVISED: August 1997
8.5 Post-Operations ..................................................................................................... 20
8.5.1 Field ...................................................................................................... 20 8.5.2 Office .................................................................................................... 20
9. Calculations....................................................................................................................... 20
10. Quality Assurance/Quality Control ................................................................................... 20
10.1 Sampling Documentation...................................................................................... 21
10.1.1 Soil Sample Label................................................................................. 21 10.1.2 Logbook ................................................................................................ 22 10.1.3 Chain of Custody .................................................................................. 22
10.2 Sampling Design ................................................................................................... 22
11. Data Validation ................................................................................................................. 22
11.1 Quality Assurance/Quality Control Samples ........................................................ 23
11.1.1 Field Duplicates (Replicates)................................................................ 23 11.1.2 Collocated Samples .............................................................................. 23 11.1.3 Background Samples ............................................................................ 23 11.1.4 Rinsate (Equipment) Blanks ................................................................. 23 11.1.5 Performance Evaluation Samples ......................................................... 23 11.1.6 Matrix Spike/Matrix Spike Duplicates (MS/MSDs) ............................ 23 11.1.7 Field Blanks .......................................................................................... 23 11.1.8 Trip Blanks ........................................................................................... 24
12. Health and Safety .............................................................................................................. 24
12.1 Hazards Associated with On-Site Contaminants .................................................. 24
13. References ......................................................................................................................... 24
Appendix
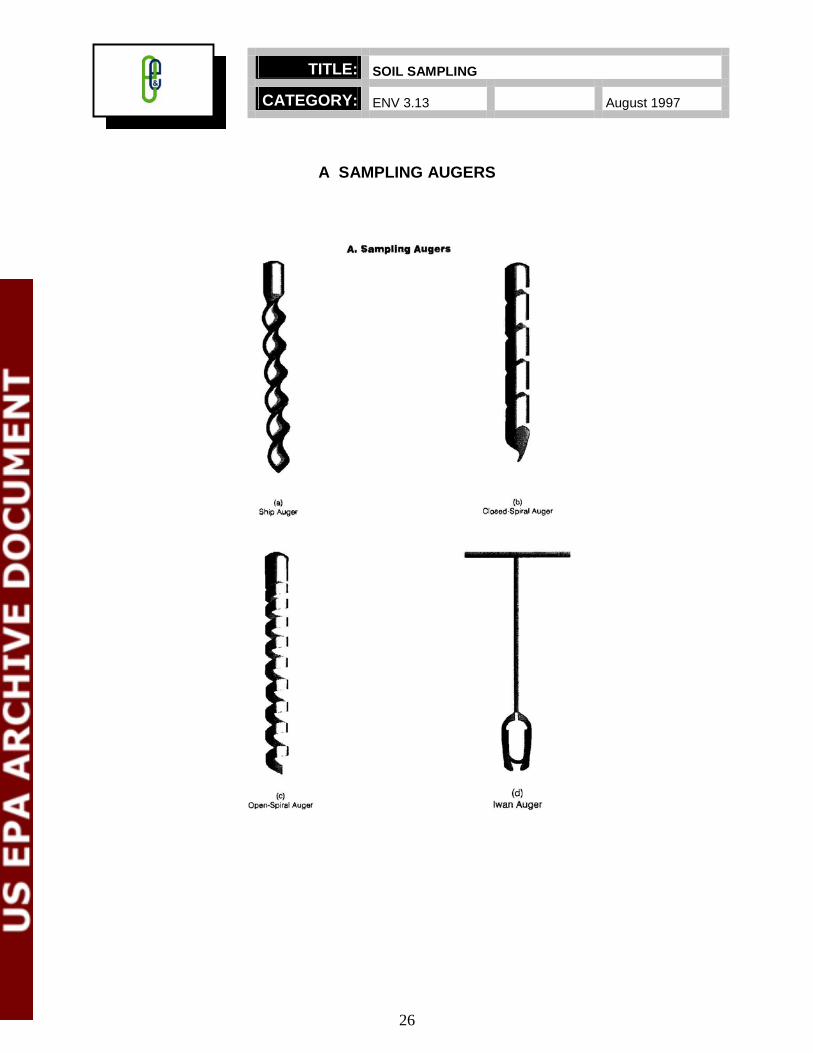
A Sampling Augers ............................................................................................................... 26
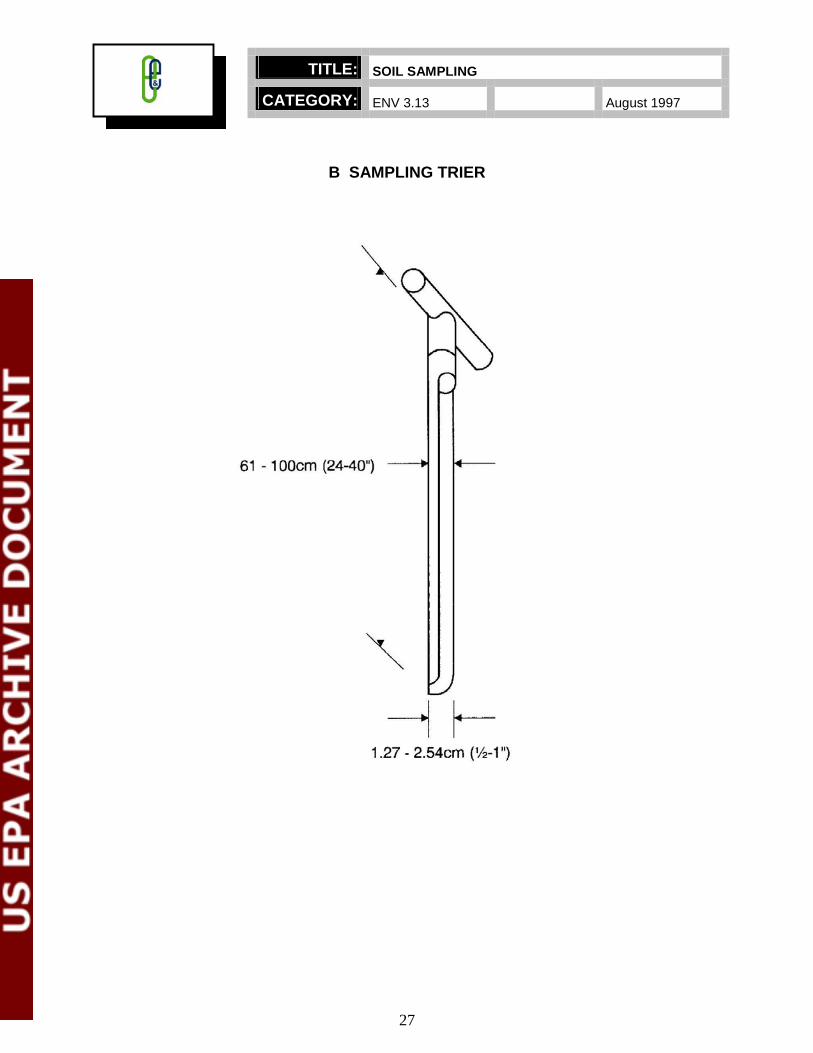
B Sampling Trier .................................................................................................................... 27
Split-Spoon Sampler ........................................................................................................... 28
iv
C

TITLE: SOIL SAMPLING
CATEGORY: ENV 3.13 REVISED: August 1997
LIST OF TABLES
Table Page
5-1 Soil Sampling Equipment ............................................................................................. 2
8-1 Representative Sampling Approach Comparison ......................................................... 7
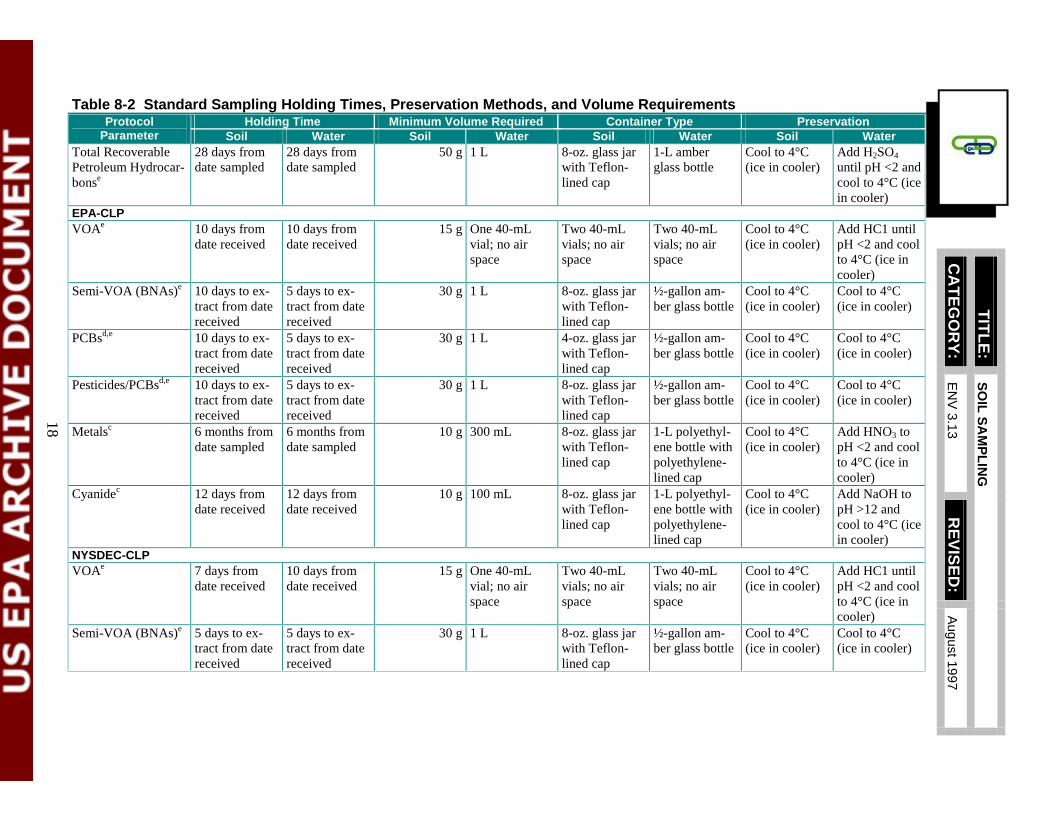
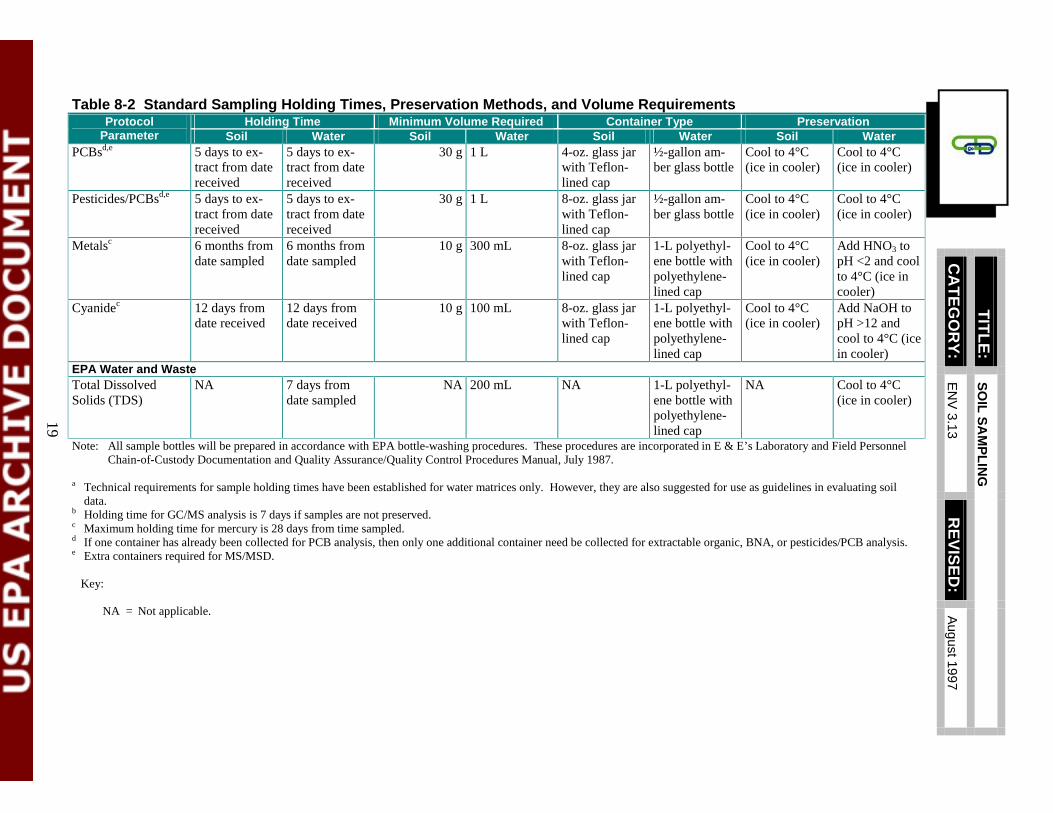
8-2 Standard Sampling Holding Times, Preservation Methods, and Volume Requirements............................................................................................................... 17
v
TITLE: SOIL SAMPLING
CATEGORY: ENV 3.13 REVISED: August 1997
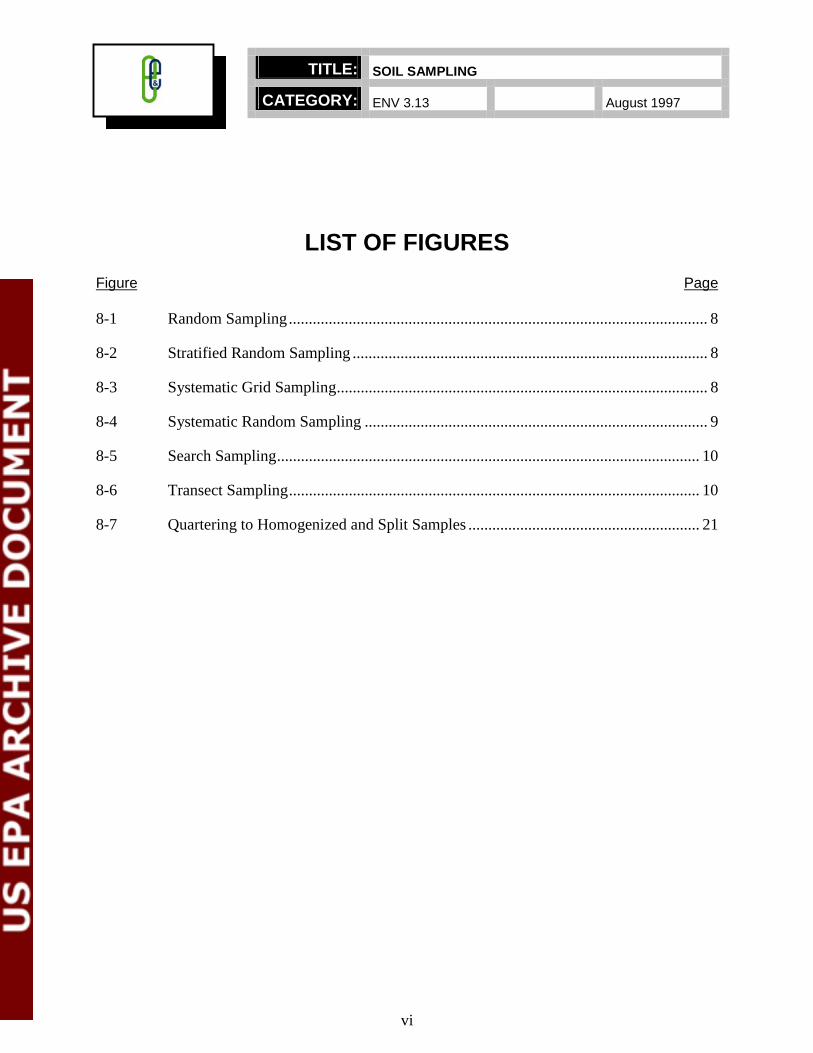
LIST OF FIGURES
Figure Page
8-1 Random Sampling ......................................................................................................... 8
8-2 Stratified Random Sampling ......................................................................................... 8
8-3 Systematic Grid Sampling............................................................................................. 8
8-4 Systematic Random Sampling ...................................................................................... 9
8-5 Search Sampling.......................................................................................................... 10
8-6 Transect Sampling....................................................................................................... 10
8-7 Quartering to Homogenized and Split Samples .......................................................... 21
vi

TITLE: SOIL SAMPLING
CATEGORY: ENV 3.13 REVISED: August 1997
1. Introduction
This document describes the procedures for the collection of representative soil samples. Representative sampling ensures the accurate characterization of site conditions. Analysis of soil samples may determine pollutant concentrations and the accompanying risks to public health, welfare, or the environment.
2. Scope
Included in this discussion are procedures for obtaining representative samples, quality assurance/quality control (QA/QC) measures, proper documentation of sampling activities, and recommendations for personnel safety.
3. Method Summary
Soil samples may be recovered using a variety of methods and equipment. These are dependent on the depth of the desired sample, the type of sample required (disturbed vs. undisturbed), and the soil type.
Samples of near-surface soils may be easily obtained using a spade, stainless-steel spoon, trowel, or scoop. Sampling at greater depths may be performed using a hand auger; a power auger; or, if a test pit is required, a backhoe.
All sampling devices should be cleaned using pesticide-grade acetone (assuming that acetone is not a target compound) or methanol, then wrapped in clean aluminum foil, and custody sealed for identification. The sampling equipment should remain in this wrapping until it is needed. Each sampler should be used for one sample only. However, dedicated tools may be impractical if there is a large number of soil samples required. In this case, samplers should be cleaned in the field using standard decontamination procedures as outlined in E & E’s Standard Operating Procedure (SOP) for Sampling Equipment Decontamination (see ENV 3.15).
4. Sample Preservation, Containers, Handling, and Storage
The chemical preservation of solids is not generally recommended. Refrigeration is usually the best approach, supplemented by a minimal holding time.
Soil samples should be handled according to the procedures outlined in E & E’s SOP for Sample Packaging (see ENV 3.16).
1

TITLE: SOIL SAMPLING
CATEGORY: ENV 3.13 REVISED: August 1997
5. Potential Problems
Potential problems with soil sampling include cross-contamination of samples and improper sample collection. Cross-contamination problems can be eliminated or minimized through the use of dedicated sampling equipment and bottles. If this is not possible or practical, then decontamination of sampling equipment is necessary. Improper sample collection is generally the result of the use of contaminated equipment; the disturbance of the matrix, resulting in compaction of the sample; and inadequate homogenization of the sample where required, resulting in variable, nonrepresentative results. Specific advantages and disadvantages of soil sampling equipment are presented in Table 5-1.
Table 5-1 Soil Sampling Equipment Equipment Applicability Advantages and Disadvantages
Trier Soft surface soil Inexpensive; easy to use and decontaminate; difficult to use in stony, dry, or sandy soil.
Scoop, trowel, spoon, Soft surface soil Inexpensive; easy to use and decontaminate; trow-or spatula els with painted surfaces should be avoided. Tulip bulb planter Soft soil, 0 to 6 inches Easy to use and decontaminate; uniform diameter
and sample volume; preserves soil core (suitable for volatile organic analysis (VOA) and undisturbed sample collection); limited depth capability; not useful for hard soils.
Spade or shovel Medium soil, 0 to 12 Easy to use and decontaminate; inexpensive; can inches result in sample mixing and loss of volatile or
ganic compounds (VOCs). Vehimeyer soil outfit Soil, 0 to 10 feet Difficult to drive into dense or hard material; can
be difficult to pull from ground. Soil coring device and Soft soil, 0 to 24 inches Relatively easy to use; preserves soil core (suitauger able for VOA and undisturbed sample collection);
limited depth capability; can be difficult to decontaminate.
Thin-walled tube sampler
Soft soil, 0 to 10 feet Easy to use; preserves soil core (suitable for VOA and undisturbed sample collection); may be used to help maintain integrity of VOA samples; easy to decontaminate; can be difficult to remove cores from sampler.
Split-spoon sampler Soil, 0 inches to bedrock
Excellent depth range; preserves soil core (suitable for VOA and undisturbed sample collection); acetate sleeve may be used to help maintain integrity of VOA samples; useful for hard soils; often used in conjunction with drill rig for obtaining deep cores.
2
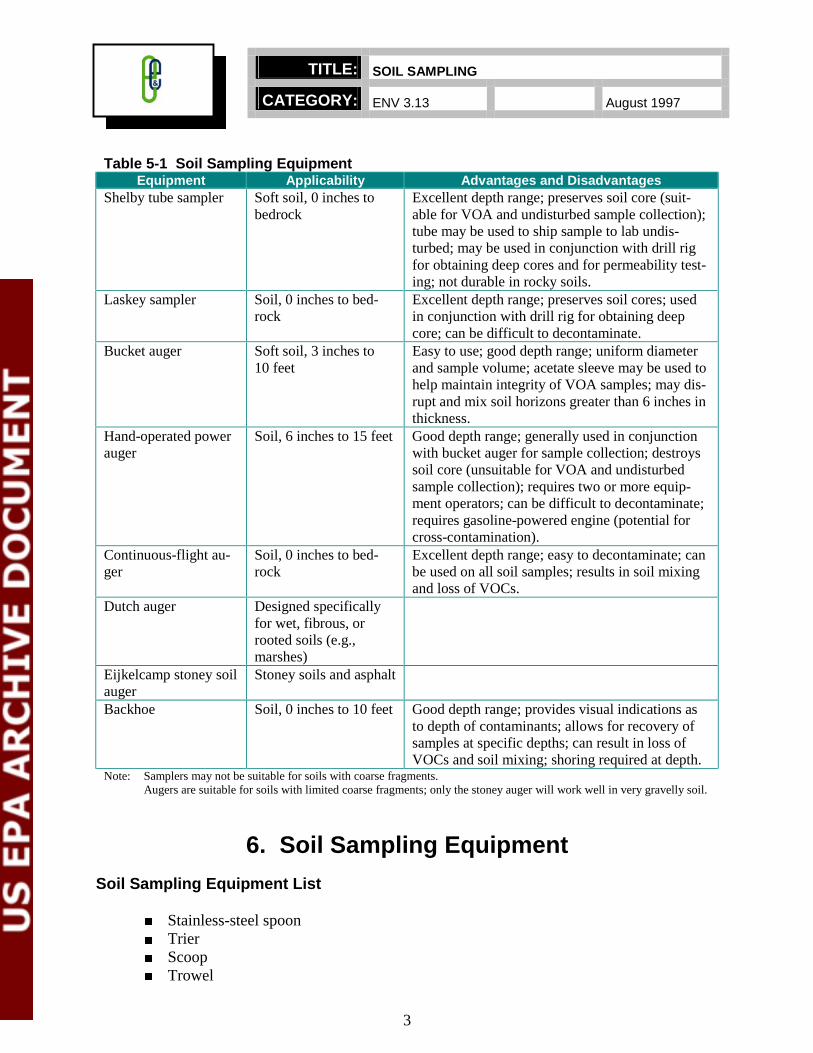
TITLE: SOIL SAMPLING
CATEGORY: ENV 3.13 REVISED: August 1997
Table 5-1 Soil Sampling Equipment Equipment Applicability Advantages and Disadvantages
Shelby tube sampler Soft soil, 0 inches to Excellent depth range; preserves soil core (suitbedrock able for VOA and undisturbed sample collection);
tube may be used to ship sample to lab undisturbed; may be used in conjunction with drill rig for obtaining deep cores and for permeability testing; not durable in rocky soils.
Laskey sampler Soil, 0 inches to bed- Excellent depth range; preserves soil cores; used rock in conjunction with drill rig for obtaining deep
core; can be difficult to decontaminate. Bucket auger Soft soil, 3 inches to Easy to use; good depth range; uniform diameter
10 feet and sample volume; acetate sleeve may be used to help maintain integrity of VOA samples; may disrupt and mix soil horizons greater than 6 inches in thickness.
Hand-operated power auger
Soil, 6 inches to 15 feet Good depth range; generally used in conjunction with bucket auger for sample collection; destroys soil core (unsuitable for VOA and undisturbed sample collection); requires two or more equipment operators; can be difficult to decontaminate; requires gasoline-powered engine (potential for cross-contamination).
Continuous-flight auger
Soil, 0 inches to bedrock
Excellent depth range; easy to decontaminate; can be used on all soil samples; results in soil mixing and loss of VOCs.
Dutch auger Designed specifically for wet, fibrous, or rooted soils (e.g., marshes)
Eijkelcamp stoney soil Stoney soils and asphalt auger Backhoe Soil, 0 inches to 10 feet Good depth range; provides visual indications as
to depth of contaminants; allows for recovery of samples at specific depths; can result in loss of VOCs and soil mixing; shoring required at depth.
Note: Samplers may not be suitable for soils with coarse fragments. Augers are suitable for soils with limited coarse fragments; only the stoney auger will work well in very gravelly soil.
6. Soil Sampling Equipment
Soil Sampling Equipment List
Stainless-steel spoon Trier Scoop Trowel
3
TITLE: SOIL SAMPLING
CATEGORY: ENV 3.13 REVISED: August 1997
Spatula Stainless-steel tulip bulb planter Spade or shovel Vehimeyer soil sampler outfit - tubes - points - drive head - drop hammer - fuller jack and grip
Soil-coring device Thin-walled tube sampler
Split-spoon sampler Shelby tube sampler
Laskey sampler Bucket auger Hand-operated power auger Continuous-flight auger Dutch auger
Eijkelcamp stoney soil auger Backhoe
Hand auger with replaceable sleeves
Sampling Support Equipment and Documentation List
Sampling plan Sample location map Safety equipment, as specified in the Health and Safety Plan
Decontamination supplies and equipment, as described in the Work Plan Compass
Tape measure Survey stakes or flags
Camera Stainless-steel buckets or bowls Sample containers, precleaned (e.g., I-Chem)
Logbook Chain-of-custody forms Plastic sheet
Soil gas probes Infiltrometer Pounding sleeve Extension rods
T-handle
4
TITLE: SOIL SAMPLING
CATEGORY: ENV 3.13 REVISED: August 1997
Labeling, Packaging, and Shipping Supplies
Coolers Labels for sample containers and coolers (e.g., “fragile”)
Ice Plastic bags for sample containers and ice ESC paint cans and clamps for polychlorinated biphenyl sampling
Vermiculite Duct and strapping tape Federal Express airbills and pouches
6.1 Geophysical Equipment
Geophysical techniques can be integrated with field analytical and soil sampling equipment to help define areas of subsurface contamination. For a description of the geophysical techniques and associated applications, refer to E & E’s SOP for Surface Geophysical Techniques (see GEO 4.2).
7. Reagents
This procedures does not require the use of reagents except for decontamination of equipment, as required. Refer to E & E’s SOP for Sampling Equipment Decontamination (see ENV 3.15) and the Site-Specific Work Plan for proper decontamination procedures and appropriate solvents.
8. Procedures
8.1 Office Preparation
1. The preparation of a Health and Safety Plan is required prior to any sampling. The plan must be approved and signed by the Corporate Health and Safety Officer or his/her designee (i.e., the Regional Safety Coordinator).
2. Prepare a Sampling Plan to meet the data quality objectives of the project in accordance with contract requirements. Review available background information (i.e., topographic maps, soil survey maps, geologic maps, other site reports, etc.) to determine the extent of the sampling effort, the sampling method to be employed, and the type and amounts of equipment and supplies required.
3. Obtain necessary sampling and monitoring equipment (see Section 6), decontaminate or preclean the equipment, and ensure that it is in working order.
5

TITLE: SOIL SAMPLING
CATEGORY: ENV 3.13 REVISED: August 1997
4. Contact the delivery service to confirm the ability to ship all equipment and samples. Determine whether shipping restrictions exist.
5. Prepare schedules and coordinate with staff, clients, and regulatory agencies, if appropriate.
8.2 Field Preparation
1. Identify local suppliers of sampling expendables (e.g., ice and plastic bags) and overnight delivery services (e.g., Federal Express).
2. Decontaminate or preclean all equipment before soil sampling, as described in E & E’s SOP for Sampling Equipment Decontamination (see ENV 3.15), or as deemed necessary.
3. A general site survey should be performed prior to site entry in accordance with the Health and Safety Plan, followed by a site safety meeting.
4. Identify and stake all sampling locations. If required, the proposed locations may be adjusted based on site access, property boundaries, and surface obstructions. All staked locations will be utility-cleared by the property owner or field team prior to soil sampling.
8.3 Representative Sample Collection
The objective of representative sampling is to ensure that a sample or group of samples adequately reflects site conditions.
8.3.1 Sampling Approaches
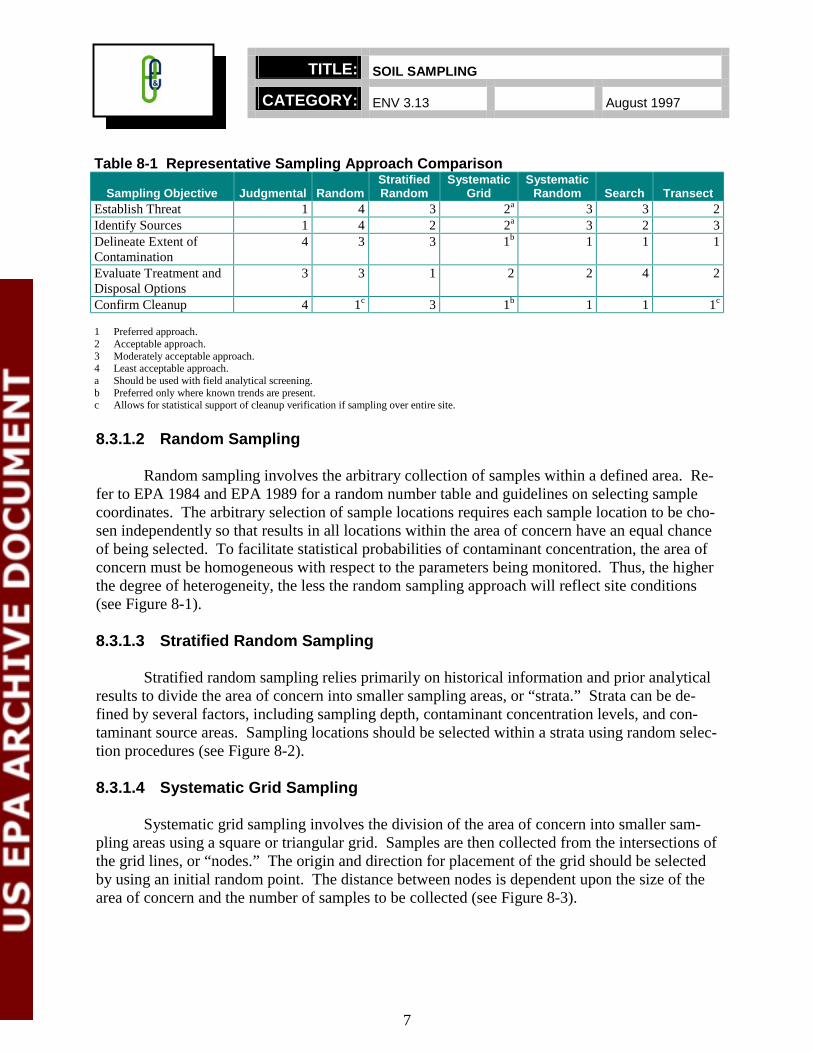
It is important to select an appropriate sampling approach for accurate characterization of site conditions. Each approach is defined below. Table 8-1 summarizes the following sampling approaches and ranks them from most to least suitable based on the sampling objective.
8.3.1.1 Judgmental Sampling
Judgmental sampling is based on the subjective selection of sampling locations relative to historical site information, on-site investigation (site walk-over), etc. There is no randomization associated with this sampling approach because samples are collected primarily at areas of suspected highest contaminant concentrations. Therefore, any statistical calculations based on the sampling results would be unfairly biased.
6
TITLE: SOIL SAMPLING
CATEGORY: ENV 3.13 REVISED: August 1997
Table 8-1 Representative Sampling Approach Comparison
Sampling Objective Judgmental Random Stratified Random
Systematic Grid
Systematic Random Search Transect
Establish Threat 1 4 3 2a 3 3 2 Identify Sources 1 4 2 2a 3 2 3 Delineate Extent of Contamination
4 3 3 1b 1 1 1
Evaluate Treatment and Disposal Options
3 3 1 2 2 4 2
Confirm Cleanup 4 1c 3 1b 1 1 1c
1 Preferred approach. 2 Acceptable approach. 3 Moderately acceptable approach. 4 Least acceptable approach. a Should be used with field analytical screening. b Preferred only where known trends are present. c Allows for statistical support of cleanup verification if sampling over entire site.
8.3.1.2 Random Sampling
Random sampling involves the arbitrary collection of samples within a defined area. Refer to EPA 1984 and EPA 1989 for a random number table and guidelines on selecting sample coordinates. The arbitrary selection of sample locations requires each sample location to be chosen independently so that results in all locations within the area of concern have an equal chance of being selected. To facilitate statistical probabilities of contaminant concentration, the area of concern must be homogeneous with respect to the parameters being monitored. Thus, the higher the degree of heterogeneity, the less the random sampling approach will reflect site conditions (see Figure 8-1).
8.3.1.3 Stratified Random Sampling
Stratified random sampling relies primarily on historical information and prior analytical results to divide the area of concern into smaller sampling areas, or “strata.” Strata can be defined by several factors, including sampling depth, contaminant concentration levels, and contaminant source areas. Sampling locations should be selected within a strata using random selection procedures (see Figure 8-2).
8.3.1.4 Systematic Grid Sampling
Systematic grid sampling involves the division of the area of concern into smaller sampling areas using a square or triangular grid. Samples are then collected from the intersections of the grid lines, or “nodes.” The origin and direction for placement of the grid should be selected by using an initial random point. The distance between nodes is dependent upon the size of the area of concern and the number of samples to be collected (see Figure 8-3).
7

TITLE: SOIL SAMPLING
CATEGORY: ENV 3.13 REVISED: August 1997
Figure 8-1 Random Sampling**
Figure 8-2 Stratified Random Sampling
Figure 8-3 Systematic Grid Sampling**
8
TITLE: SOIL SAMPLING
CATEGORY: ENV 3.13 REVISED: August 1997
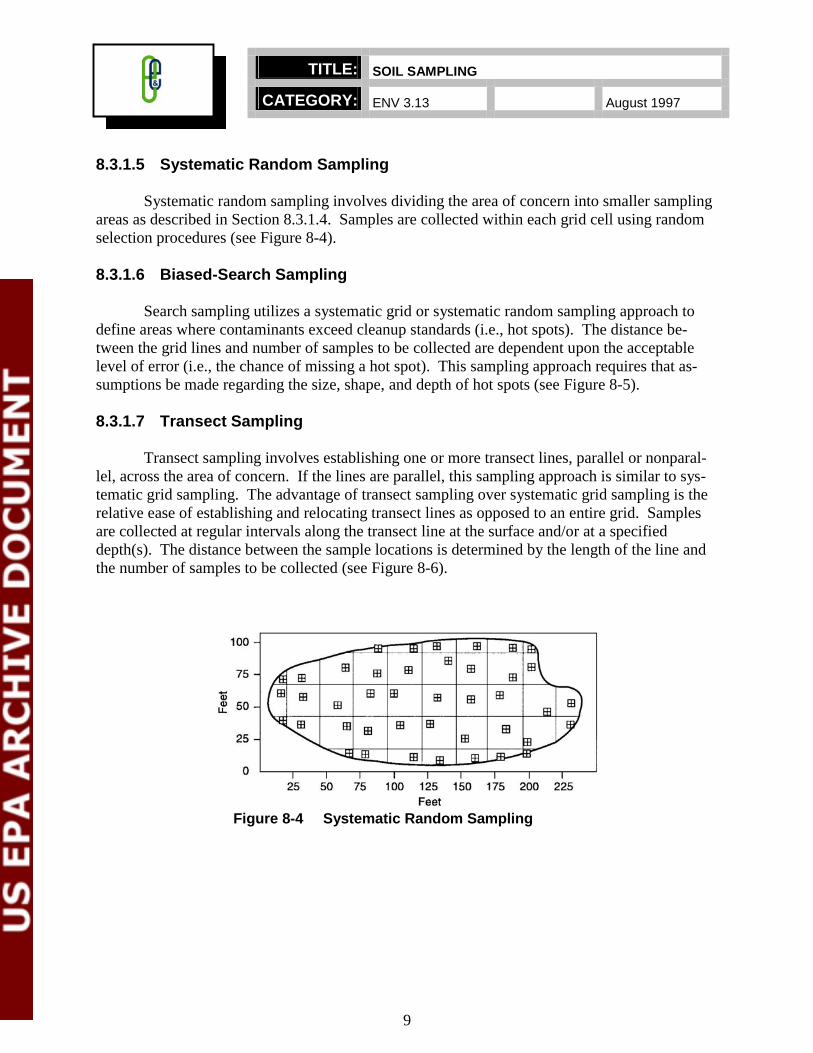
8.3.1.5 Systematic Random Sampling
Systematic random sampling involves dividing the area of concern into smaller sampling areas as described in Section 8.3.1.4. Samples are collected within each grid cell using random selection procedures (see Figure 8-4).
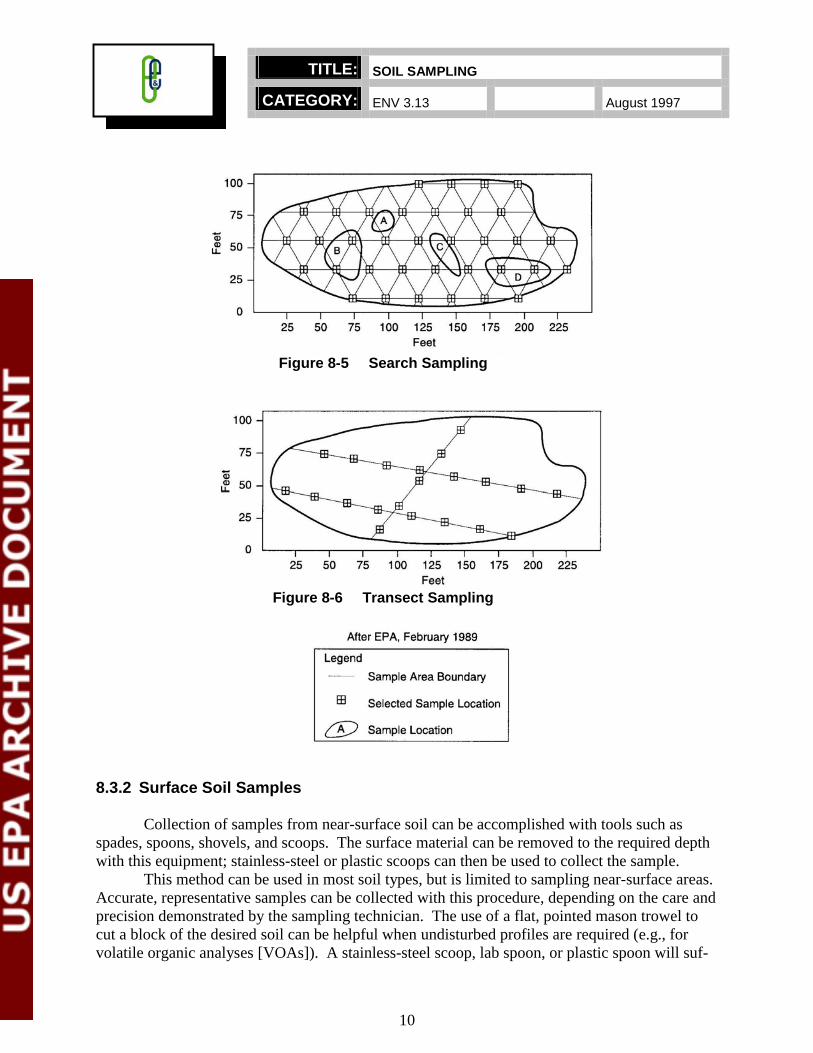
8.3.1.6 Biased-Search Sampling
Search sampling utilizes a systematic grid or systematic random sampling approach to define areas where contaminants exceed cleanup standards (i.e., hot spots). The distance between the grid lines and number of samples to be collected are dependent upon the acceptable level of error (i.e., the chance of missing a hot spot). This sampling approach requires that assumptions be made regarding the size, shape, and depth of hot spots (see Figure 8-5).
8.3.1.7 Transect Sampling
Transect sampling involves establishing one or more transect lines, parallel or nonparallel, across the area of concern. If the lines are parallel, this sampling approach is similar to systematic grid sampling. The advantage of transect sampling over systematic grid sampling is the relative ease of establishing and relocating transect lines as opposed to an entire grid. Samples are collected at regular intervals along the transect line at the surface and/or at a specified depth(s). The distance between the sample locations is determined by the length of the line and the number of samples to be collected (see Figure 8-6).
Figure 8-4 Systematic Random Sampling
9
TITLE: SOIL SAMPLING
CATEGORY: ENV 3.13 REVISED: August 1997
Figure 8-5 Search Sampling
Figure 8-6 Transect Sampling
8.3.2 Surface Soil Samples
Collection of samples from near-surface soil can be accomplished with tools such as spades, spoons, shovels, and scoops. The surface material can be removed to the required depth with this equipment; stainless-steel or plastic scoops can then be used to collect the sample.
This method can be used in most soil types, but is limited to sampling near-surface areas. Accurate, representative samples can be collected with this procedure, depending on the care and precision demonstrated by the sampling technician. The use of a flat, pointed mason trowel to cut a block of the desired soil can be helpful when undisturbed profiles are required (e.g., for volatile organic analyses [VOAs]). A stainless-steel scoop, lab spoon, or plastic spoon will suf
10
TITLE: SOIL SAMPLING
CATEGORY: ENV 3.13 REVISED: August 1997
fice in most other applications. Care should be exercised to avoid the use of devices plated with chrome or other materials, as is common with garden implements such as potting trowels.
Soil samples are collected using the following procedure:
1. Carefully remove the top layer of soil to the desired sample depth with a precleaned spade;
2. Using a precleaned, stainless-steel scoop, spoon, trowel, or plastic spoon, remove and discard the thin layer of soil from the area that came into contact with the shovel;
3. Transfer the sample into an appropriate container using a stainless-steel or plastic lab spoon or equivalent. If composite samples are to be collected, place the soil sample in a stainless-steel or plastic bucket and mix thoroughly to obtain a homogeneous sample representative of the entire sampling interval. Place the soil samples into labeled containers. (Caution: Never composite VOA samples);
4. VOA samples should be collected directly from the bottom of the hole before mixing the sample to minimize volatilization of contaminants;
5. Check to ensure that the VOA vial Teflon liner is present in the cap, if required. Fill the VOA vial fully to the top to reduce headspace. Secure the cap tightly. The chemical preservation of solids is generally not recommended. Refrigeration is usually the best approach, supplemented by a minimal holding time;
6. Ensure that a sufficient sample size has been collected for the desired analysis, as specified in the Sampling Plan;
7. Decontaminate equipment between samples according to E & E’s SOP for Sampling Equipment Decontamination (see ENV 3.15); and
8. Fill in the hole and replace grass turf, if necessary.
QA/QC samples should be collected as specified, according to the Work Plan.
8.3.3 Sampling at Depth with Augers and Thin-Walled Tube Samplers
This system consists of an auger, a series of extensions, a T-handle, and a thin-walled tube. The auger is used to bore a hole to a desired sampling depth and is then withdrawn. The auger tip is then replaced with a tube core sampler, lowered down the borehole, and driven into the soil to the completion depth. The core is then withdrawn and the sample is collected.
Several augers are available, including bucket type, continuous-flight (screw), and posthole augers. Because they provide a large volume of sample in a short time, bucket types are better for direct sample recovery. When continuous-flight augers are used, the sample can be collected directly off the flights, usually at 5-foot intervals. The continuous-flight augers are sat
11
TITLE: SOIL SAMPLING
CATEGORY: ENV 3.13 REVISED: August 1997
isfactory for use when a composite of the complete soil column is desired. Posthole augers have limited utility for sample collection because they are designed to cut through fibrous, rooted, swampy soil.
The following procedures will be used for collecting soil samples with the hand auger:
1. Attach the auger bit to a drill rod extension, and attach the T-handle to the drill rod.
2. Clear the area to be sampled of any surface debris (e.g., twigs, rocks, and litter). It may be advisable to remove the first 3 to 6 inches of surface soil from an area approximately 6 inches in radius around the drilling location.
3. Begin augering, periodically removing and depositing accumulated soils onto a canvas or plastic sheet spread near the hole. This prevents accidental brushing of loose material back down the borehole when removing the auger or adding drill rods. It also facilitates refilling the hole and avoids possible contamination of the surrounding area.
4. After reaching the desired depth, slowly and carefully remove the auger from the boring. When sampling directly from the auger, collect the sample after the auger is removed from the boring and proceed to Step 11.
5. A precleaned stainless-steel auger sleeve can also be used to collect a sample. After reaching the desired sampling depth, remove the auger and place the sleeve inside the auger. Collect the sample with the auger. Remove the auger from the boring. The sample will be collected only from the sleeve. The soil from the auger tip should never be used for the sample.
6. Remove the auger tip from the dill rods and replace with a precleaned thin-walled tube sampler. Install the proper cutting tip.
7. Carefully lower the tube sampler down the borehole. Gradually force the tube sampler into the soil. Care should be taken to avoid scraping the borehole sides. Avoid hammering the drill rods to facilitate coring, because the vibrations may cause the boring walls to collapse.
8. Remove the tube sampler and unscrew the drill rods.
9. Remove the cutting tip and core from the device.
10. Discard the top of the core (approximately 1 inch), because this represents material collected before penetration of the layer in question. Place the remaining core into the sample container.
12

TITLE: SOIL SAMPLING
CATEGORY: ENV 3.13 REVISED: August 1997
11. If required, ensure that a Teflon liner is present in the cap. Secure the cap tightly onto the sample container. Place the sample bottle in a plastic bag and put on ice to keep the sample at 4°Celsius.
12. Carefully and clearly label the container with the appropriate sample tag, addressing all the categories or parameters listed in E & E’s SOP for Sample Packaging and Shipping (see ENV 3.16).
13. Use the chain-of-custody form to document the types and numbers of soil samples collected and logged. Verify that the chain-of-custody form is correctly and completely filled out.
14. Record the time and date of sample collection, as well as a description of the sample, in the field logbook.
15. If another sample is to be collected in the sample hole, but at a greater depth, re-attach the auger bit to the drill and assembly, and follow Steps 3 through 11, making sure to decontaminate the auger and tube sampler between samples.
16. Abandon the hole according to applicable regulations. Generally, shallow holes can simply be backfilled with the removed soil material.
17. Decontaminate the sampling equipment per E & E’s SOP for Sampling Equipment Decontamination (see ENV 3.15).
8.3.4 Sampling at Depth with a Trier
1. Insert the trier into the material to be sampled at a 0( to 45( angle from horizontal. This orientation minimizes the spillage of sample material. Extraction of samples may require tilting of the containers.
2. Rotate the trier once or twice to cut a core of material.
3. Slowly withdraw the trier, making sure that the slot is facing upward.
4. Transfer the sample into a suitable container with the aid of a spatula and brush.
5. If required, ensure that a Teflon liner is present in the cap. Secure the cap tightly onto the sample container. Samples are handled in accordance with E & E’s SOP for Sample Packaging and Shipping (see ENV 3.16).
6. Carefully and clearly label the container with the appropriate sample tag, addressing all the categories or parameters listed in E & E’s SOP for Sample Packaging and Shipping (see ENV 3.16).
13
TITLE: SOIL SAMPLING
CATEGORY: ENV 3.13 REVISED: August 1997
7. Use the chain-of-custody form to document the types and numbers of soil samples collected and logged.
8. Record the time and date of sample collection as well as a description of the sample and any associated air monitoring measurements in the field logbook.
9. Abandon the hole according to applicable regulations. Generally, shallow holes can simply be backfilled with the removed soil material.
10. Decontaminate sampling equipment per E & E’s SOP for Sampling Equipment Decontamination (see ENV 3.15).
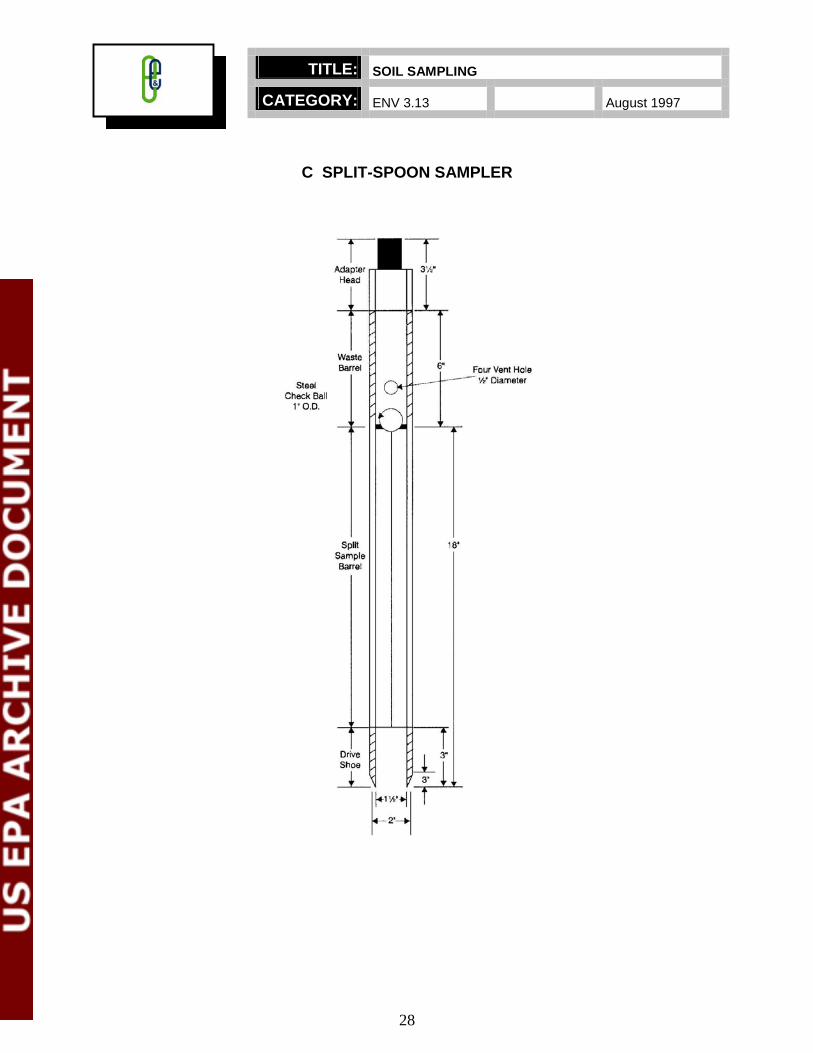
8.3.5 Sampling at Depth with a Split-Spoon (Barrel) Sampler
The procedure for split-spoon sampling describes the extraction of undisturbed soil cores of 18 or 24 inches in length. A series of consecutive cores may be sampled to give a complete soil column, or an auger may be used to drill down to the desired depth for sampling. The split spoon is then driven to its sampling depth through the bottom of the augured hole and the core extraction.
This sampling device may be used to collect information such as soil density. All work should be performed in accordance with American Society for Testing and Materials (ASTM) D 1586-84, Penetration Test and Split Barrel Sampling of Soils.
1. Assemble the sampler by aligning both sides of the barrel and then screwing the bit on the bottom and the heavier head piece on top. Install a retaining cap in the head piece if necessary.
2. Place the sampler in a perpendicular position on the sample material.
3. Using a sledge hammer or well ring, if available, drive the tube. Do not drive past the bottom of the head piece because compression of the sample will result.
4. Record the length of the tube used to penetrate the material being sampled and the number of blows required to obtain this depth.
5. Withdraw the split spoon and open by unscrewing the bit and head. If a split sample is desired, a clean stainless-steel knife should be used to divide the tube contents in half, lengthwise. This sampler is available in 2- and 3.5-inch diameters. The required sample volume may dictate the use of the larger barrel. If needed, stainless-steel or Teflon sleeves can be used inside the split-spoon. If sleeves removed from the split-spoon are capped immediately, volatilization of contaminants can be reduced. When split-spoon sampling is performed to gain geologic information, all work should be performed in accordance with ASTM D 1586-67 (reapproved in 1974).
14
TITLE: SOIL SAMPLING
CATEGORY: ENV 3.13 REVISED: August 1997
6. Cap the sample container, place in a double plastic bag, and attach the label and custody seal. Record all pertinent data in the field logbook and complete the sample analysis request form and chain-of-custody record before collecting the next sample.
7. If required, preserve or place the sample on ice.
8. Follow proper decontamination procedures and deliver samples to the laboratory for analysis.
8.3.6 Test Pit/Trench Excavation
These relatively large excavations are used to remove sections of soils when detailed examination of soil characteristics (horizontal, structure, color, etc.) is required. It is the least cost-effective sampling method because of the relatively high cost of backhoe operation.
1. Prior to any excavations with a backhoe, it is important to ensure that all sampling locations are clear of utility lines and poles (subsurface as well as above surface).
2. Using the backhoe, a trench is dug to approximately 3 feet in width and approximately 1 foot below the cleared sampling depth. Place removed or excavated soils on canvas or plastic sheets, if necessary. Trenches greater than 4 feet deep must be sloped or protected by a shoring system, as required by Occupational Safety and Health Administration (OSHA) regulations.
3. A shovel is used to remove a 1- to 2-inch layer of soil from the vertical face of the pit where sampling is to be done.
4. Samples are collected using a trowel, scoop, or coring device at the desired intervals. Be sure to scrape the vertical face at the point of sampling to remove any soil that may have fallen from above, and to expose soil for sampling. Samples are removed and placed in an appropriate container.
5. If required, ensure that a Teflon liner is present in the cap. Secure the cap tightly onto the sample container. Samples are handled in accordance with E & E’s SOP for Sample Packaging and Shipping (see ENV 3.16).
6. Carefully and clearly label the container with the appropriate sample tag, addressing all the categories or parameters listed in E & E’s SOP for Sample Packaging and Shipping (see ENV 3.16).
7. Use the chain-of-custody form to document the types and numbers of soil samples collected and logged.
8. Record the time and date of sample collection as well as a description of the sample and any associated air monitoring measurements in the field logbook.
15
TITLE: SOIL SAMPLING
CATEGORY: ENV 3.13 REVISED: August 1997
9. Abandon the hole according to applicable state regulations. Generally, excavated holes can simply be backfilled with the removed soil material.
10. Decontaminate sampling equipment, including the backhoe bucket, per E & E’s SOP for Sampling Equipment Decontamination (see ENV 3.15).
8.4 Sample Preparation
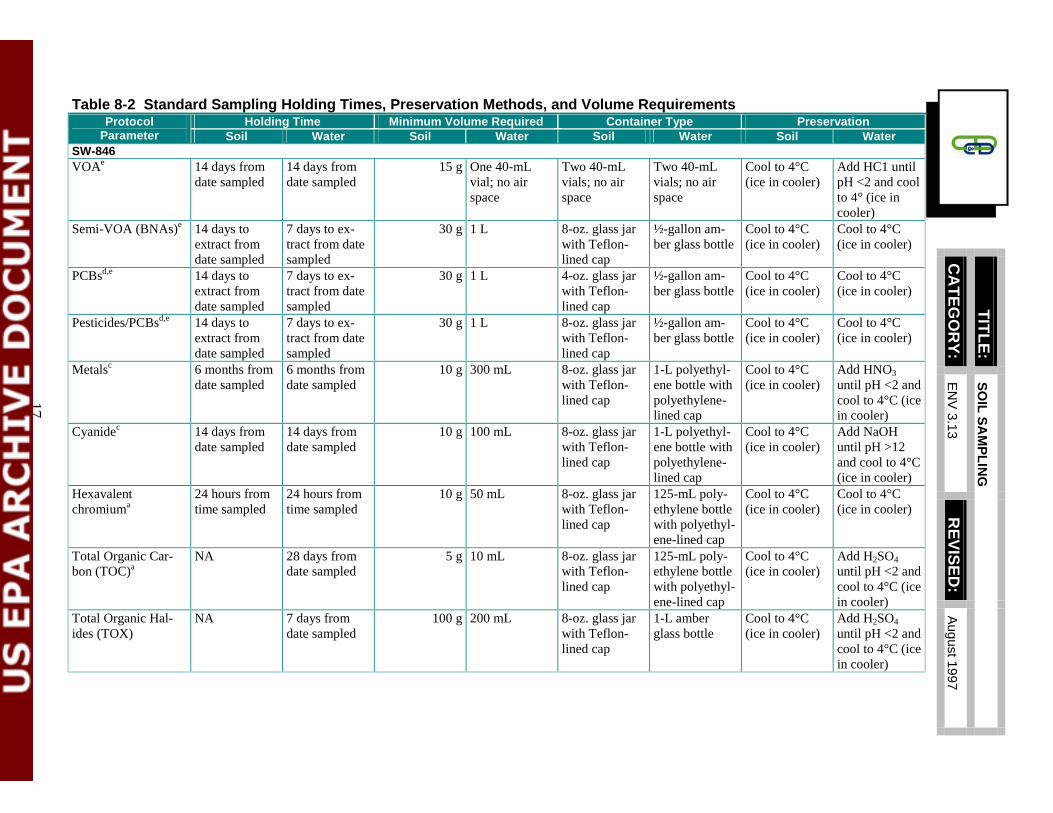
In addition to sampling equipment, representative sample collection includes sample quantity, volume, preservation, and holding time (see Table 8-2). Sample preparation refers to all aspects of sample handling after collection. How a sample is prepared can affect its representativeness. For example, homogenizing can result in a loss of volatiles and is therefore inappropriate when volatile contaminants are the concern.
8.4.1 Sample Quantity and Volume
The volume and number of samples necessary for site characterization will vary according to the budget, project schedule, and sampling approach.
8.4.2 Sample Preservation and Holding Time
Sample preservation and holding times are as discussed in Section 4.
8.4.3 Removing Extraneous Material
Discard materials in a sample that are not relevant for site or sample characterization (e.g., glass, rocks, and leaves), because their presence may introduce an error in analytical procedures.
8.4.4 Homogenizing Samples
Homogenizing is the mixing of a sample to provide a uniform distribution of the contaminants. Proper homogenization ensures that the containerized samples are representative of the total soil sample collected. All samples to be composited or split should be homogenized after all aliquots have been combined. Do not homogenize samples for volatile compound analysis.
16
CA
TE
GO
RY
:
TIT
LE
:
RE
VIS
ED
:
17
Protocol Soil Water Soil Water Soil Water Soil Water
SW-846 e 15 g
e 30 g 1 L j
30 g 1 L j
30 g 1 L j
Metalsc 10 g j 3
c 10 g j
a 10 g j
a 5 g j 2SO4
100 g j 2SO4
EN
V 3.13
August 1997
SO
IL S
AM
PL
ING
Table 8-2 Standard Sampling Holding Times, Preservation Methods, and Volume Requirements Holding Time Minimum Volume Required Container Type Preservation
Parameter
VOA 14 days from date sampled
14 days from date sampled
One 40-mL vial; no air space
Two 40-mL vials; no air space
Two 40-mL vials; no air space
Cool to 4°C (ice in cooler)
Add HC1 until pH <2 and cool to 4° (ice in cooler)
Semi-VOA (BNAs) 14 days to extract from date sampled
7 days to extract from date sampled
8-oz. glass ar with Teflon-lined cap
½-gallon amber glass bottle
Cool to 4°C (ice in cooler)
Cool to 4°C (ice in cooler)
PCBsd,e 14 days to extract from date sampled
7 days to extract from date sampled
4-oz. glass ar with Teflon-lined cap
½-gallon amber glass bottle
Cool to 4°C (ice in cooler)
Cool to 4°C (ice in cooler)
Pesticides/PCBsd,e 14 days to extract from date sampled
7 days to extract from date sampled
8-oz. glass ar with Teflon-lined cap
½-gallon amber glass bottle
Cool to 4°C (ice in cooler)
Cool to 4°C (ice in cooler)
6 months from date sampled
6 months from date sampled
300 mL 8-oz. glass ar with Teflon-lined cap
1-L polyethylene bottle with polyethylene-lined cap
Cool to 4°C (ice in cooler)
Add HNOuntil pH <2 and cool to 4°C (ice in cooler)
Cyanide 14 days from date sampled
14 days from date sampled
100 mL 8-oz. glass ar with Teflon-lined cap
1-L polyethylene bottle with polyethylene-lined cap
Cool to 4°C (ice in cooler)
Add NaOH until pH >12 and cool to 4°C (ice in cooler)
Hexavalent chromium
24 hours from time sampled
24 hours from time sampled
50 mL 8-oz. glass ar with Teflon-lined cap
125-mL polyethylene bottle with polyethyl-ene-lined cap
Cool to 4°C (ice in cooler)
Cool to 4°C (ice in cooler)
Total Organic Carbon (TOC)
NA 28 days from date sampled
10 mL 8-oz. glass ar with Teflon-lined cap
125-mL polyethylene bottle with polyethyl-ene-lined cap
Cool to 4°C (ice in cooler)
Add Huntil pH <2 and cool to 4°C (ice in cooler)
Total Organic Halides (TOX)
NA 7 days from date sampled
200 mL 8-oz. glass ar with Teflon-lined cap
1-L amber glass bottle
Cool to 4°C (ice in cooler)
Add Huntil pH <2 and cool to 4°C (ice in cooler)
CA
TE
GO
RY
:
TIT
LE
:
RE
VIS
ED
:
18
Protocol Soil Water Soil Water Soil Water Soil Water
e
50 g 1 L j 2SO4
e 15 g
e 30 g 1 L j
30 g 1 L j
30 g 1 L j
Metalsc 10 g j 3 to
c 10 g j
NYSDEC-CLP e 15 g
e 30 g 1 L j
EN
V 3.13
August 1997
SO
IL S
AM
PL
ING
Table 8-2 Standard Sampling Holding Times, Preservation Methods, and Volume Requirements Holding Time Minimum Volume Required Container Type Preservation
Parameter Total Recoverable Petroleum Hydrocarbons
28 days from date sampled
28 days from date sampled
8-oz. glass ar with Teflon-lined cap
1-L amber glass bottle
Cool to 4°C (ice in cooler)
Add Huntil pH <2 and cool to 4°C (ice in cooler)
EPA-CLP VOA 10 days from
date received 10 days from date received
One 40-mL vial; no air space
Two 40-mL vials; no air space
Two 40-mL vials; no air space
Cool to 4°C (ice in cooler)
Add HC1 until pH <2 and cool to 4°C (ice in cooler)
Semi-VOA (BNAs) 10 days to extract from date received
5 days to extract from date received
8-oz. glass ar with Teflon-lined cap
½-gallon amber glass bottle
Cool to 4°C (ice in cooler)
Cool to 4°C (ice in cooler)
PCBsd,e 10 days to extract from date received
5 days to extract from date received
4-oz. glass ar with Teflon-lined cap
½-gallon amber glass bottle
Cool to 4°C (ice in cooler)
Cool to 4°C (ice in cooler)
Pesticides/PCBsd,e 10 days to extract from date received
5 days to extract from date received
8-oz. glass ar with Teflon-lined cap
½-gallon amber glass bottle
Cool to 4°C (ice in cooler)
Cool to 4°C (ice in cooler)
6 months from date sampled
6 months from date sampled
300 mL 8-oz. glass ar with Teflon-lined cap
1-L polyethylene bottle with polyethylene-lined cap
Cool to 4°C (ice in cooler)
Add HNOpH <2 and cool to 4°C (ice in cooler)
Cyanide 12 days from date received
12 days from date received
100 mL 8-oz. glass ar with Teflon-lined cap
1-L polyethylene bottle with polyethylene-lined cap
Cool to 4°C (ice in cooler)
Add NaOH to pH >12 and cool to 4°C (ice in cooler)
VOA 7 days from date received
10 days from date received
One 40-mL vial; no air space
Two 40-mL vials; no air space
Two 40-mL vials; no air space
Cool to 4°C (ice in cooler)
Add HC1 until pH <2 and cool to 4°C (ice in cooler)
Semi-VOA (BNAs) 5 days to extract from date received
5 days to extract from date received
8-oz. glass ar with Teflon-lined cap
½-gallon amber glass bottle
Cool to 4°C (ice in cooler)
Cool to 4°C (ice in cooler)
CA
TE
GO
RY
:
TIT
LE
:
RE
VIS
ED
:
19
Protocol Soil Water Soil Water Soil Water Soil Water
30 g 1 L j
30 g 1 L j
Metalsc 10 g j 3 to
c 10 g j
NA
/
a
b /c
d
e /
NA =
EN
V 3.13
August 1997
SO
IL S
AM
PL
ING
Table 8-2 Standard Sampling Holding Times, Preservation Methods, and Volume Requirements Holding Time Minimum Volume Required Container Type Preservation
Parameter PCBsd,e 5 days to ex
tract from date received
5 days to extract from date received
4-oz. glass ar with Teflon-lined cap
½-gallon amber glass bottle
Cool to 4°C (ice in cooler)
Cool to 4°C (ice in cooler)
Pesticides/PCBsd,e 5 days to extract from date received
5 days to extract from date received
8-oz. glass ar with Teflon-lined cap
½-gallon amber glass bottle
Cool to 4°C (ice in cooler)
Cool to 4°C (ice in cooler)
6 months from date sampled
6 months from date sampled
300 mL 8-oz. glass ar with Teflon-lined cap
1-L polyethylene bottle with polyethylene-lined cap
Cool to 4°C (ice in cooler)
Add HNOpH <2 and cool to 4°C (ice in cooler)
Cyanide 12 days from date received
12 days from date received
100 mL 8-oz. glass ar with Teflon-lined cap
1-L polyethylene bottle with polyethylene-lined cap
Cool to 4°C (ice in cooler)
Add NaOH to pH >12 and cool to 4°C (ice in cooler)
EPA Water and Waste Total Dissolved Solids (TDS)
NA 7 days from date sampled
200 mL NA 1-L polyethylene bottle with polyethylene-lined cap
NA Cool to 4°C (ice in cooler)
Note: All sample bottles will be prepared in accordance with EPA bottle-washing procedures. These procedures are incorporated in E & E’s Laboratory and Field Personnel Chain-of-Custody Documentation and Quality Assurance Quality Control Procedures Manual, July 1987.
Technical requirements for sample holding times have been established for water matrices only. However, they are also suggested for use as guidelines in evaluating soil data. Holding time for GC MS analysis is 7 days if samples are not preserved. Maximum holding time for mercury is 28 days from time sampled. If one container has already been collected for PCB analysis, then only one additional container need be collected for extractable organic, BNA, or pesticides/PCB analysis. Extra containers required for MS MSD.
Key:
Not applicable.

TITLE: SOIL SAMPLING
CATEGORY: ENV 3.13 REVISED: August 1997
8.4.5 Compositing Samples
Compositing is the process of physically combining and homogenizing several individual soil aliquots of the same volume or weight. Compositing samples provides an average concentration of contaminants over a certain number of sampling points. Compositing dilutes high-concentration aliquots; therefore, detection limits should be reduced accordingly. If the composite area is heterogeneous in concentration and its composite value is to be compared to a particular action level, then that action level must be divided by the total number of aliquots making up the composite for accurate determination of the detection limit.
8.4.6 Splitting Samples
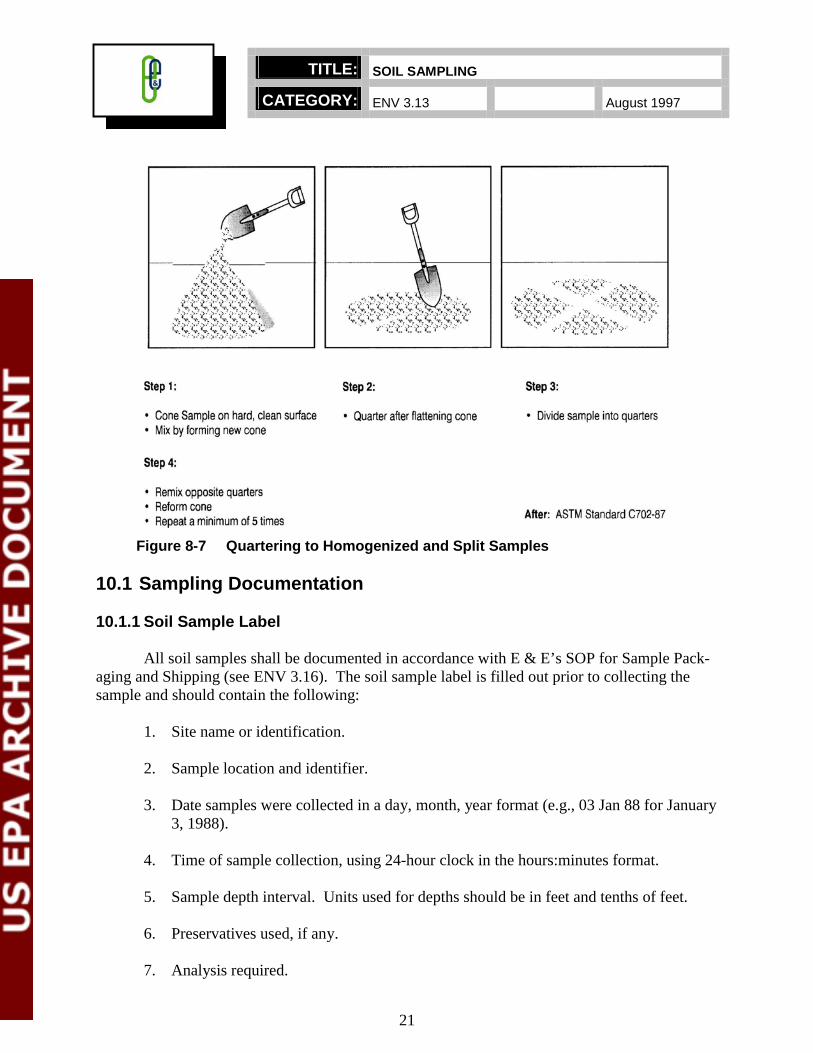
Splitting samples (after preparation) is performed when multiple portions of the same samples are required to be analyzed separately. Fill the sample containers simultaneously with alternate spoonfuls of the homogenized sample (see Figure 8-7).
8.5 Post-Operations
8.5.1 Field
Decontaminate all equipment according to E & E’s SOP for Sampling Equipment Decontamination (see ENV 3.15).
8.5.2 Office
Organize field notes into a report format and transfer logging information to appropriate forms.
9. Calculations
There are no specific calculations required for these procedures.
10. Quality Assurance/Quality Control
The objective of QA/QC is to identify and implement methodologies that limit the introduction of error into sampling and analytical procedures.
20
TITLE: SOIL SAMPLING
CATEGORY: ENV 3.13 REVISED: August 1997
Figure 8-7 Quartering to Homogenized and Split Samples
10.1 Sampling Documentation
10.1.1 Soil Sample Label
All soil samples shall be documented in accordance with E & E’s SOP for Sample Packaging and Shipping (see ENV 3.16). The soil sample label is filled out prior to collecting the sample and should contain the following:
1. Site name or identification.
2. Sample location and identifier.
3. Date samples were collected in a day, month, year format (e.g., 03 Jan 88 for January 3, 1988).
4. Time of sample collection, using 24-hour clock in the hours:minutes format.
5. Sample depth interval. Units used for depths should be in feet and tenths of feet.
6. Preservatives used, if any.
7. Analysis required.
21
TITLE: SOIL SAMPLING
CATEGORY: ENV 3.13 REVISED: August 1997
8. Sampling personnel.
9. Comments and other relevant observations (e.g., color, odor, sample technique).
10.1.2 Logbook
A bound field notebook will be maintained by field personnel to record daily activities, including sample collection and tracking information. A separate entry will be made for each sample collected. These entries should include information from the sample label and a complete physical description of the soil sample, including texture, color (including notation of soil mottling), consistency, moisture content, cementation, and structure.
10.1.3 Chain of Custody
Use the chain-of-custody form to document the types and numbers of soil samples collected and logged. Refer to E & E’s SOP for Sample Packaging and Shipping (see ENV 3.16) for directions on filling out this form.
10.2 Sampling Design
1. Sampling situations vary widely; thus, no universal sampling procedure can be recommended. However, a Sampling Plan should be implemented before any sampling operation is attempted, with attention paid to contaminant type and potential concentration variations.
2. Any of the sampling methods described here should allow a representative soil sample to be obtained, if the Sampling Plan is properly designed.
3. Consideration must also be given to the collection of a sample representative of all horizons present in the soil. Selection of the proper sampler will facilitate this procedure.
4. A stringent QA Project Plan should be outlined before any sampling operation is attempted. This should include, but not be limited to, properly cleaned samplers and sample containers, appropriate sample collection procedures, chain-of-custody procedures, and QA/QC samples.
11. Data Validation
The data generated will be reviewed according to the QA/QC considerations that are identified in Section 10.
22

TITLE: SOIL SAMPLING
CATEGORY: ENV 3.13 REVISED: August 1997
11.1 Quality Assurance/Quality Control Samples
QA/QC samples are used to identify error due to sampling and/or analytical methodologies and chain-of-custody procedures.
11.1.1 Field Duplicates (Replicates)
Field duplicates are collected from one location and treated as separate samples throughout the sample handling and analytical processes. These samples are used to assess total error for critical samples with contaminant concentrations near the action level.
11.1.2 Collocated Samples
Collocated samples are generally collected 1.5 to 3.0 feet away from selected field samples to determine both local soil and contaminant variations on site. These samples are used to evaluate site variation within the immediate vicinity of sample collection.
11.1.3 Background Samples
Background or “clean” samples are collected from an area upgradient from the contamination area and representative of the typical conditions. These samples provide a standard for comparison of on-site contaminant concentration levels.
11.1.4 Rinsate (Equipment) Blanks
Rinsate blanks are collected by pouring analyte-free water (i.e., laboratory de-ionized water) on decontaminated sampling equipment to test for residual contamination. These samples are used to assess potential cross contamination due to improper decontamination procedures.
11.1.5 Performance Evaluation Samples
Performance evaluation samples are generally prepared by a third party, using a quantity of analyte(s) known to the preparer but unknown to the laboratory. The percentage of analyte(s) identified in the sample is used to evaluate laboratory procedural error.
11.1.6 Matrix Spike/Matrix Spike Duplicates (MS/MSDs)
MS/MSD samples are spiked in the laboratory with a known quantity of analyte(s) to confirm percent recoveries. They are primarily used to check sample matrix interferences.
11.1.7 Field Blanks
Field blanks are prepared in the field with certified clean sand, soil, or water. These samples are used to evaluate contamination error associated with sampling methodology and laboratory procedures.
23
TITLE: SOIL SAMPLING
CATEGORY: ENV 3.13 REVISED: August 1997
11.1.8 Trip Blanks
Trip blanks are prepared prior to going into the field using certified clean sand, soil, or water. These samples are used to assess error associated with sampling methodology and analytical procedures for volatile organics.
12. Health and Safety
12.1 Hazards Associated with On-Site Contaminants
Depending on site-specific contaminants, various protective programs must be implemented prior to soil sampling. The site Health and Safety Plan should be reviewed with specific emphasis placed on a protection program planned for direct-contact tasks. Standard safe operating practices should be followed, including minimization of contact with potential contaminants in both the vapor phase and solid matrix by using both respirators and disposable clothing.
Use appropriate safe work practices for the type of contaminant expected (or determined from previous sampling efforts):
Particulate or Metals Contaminants - Avoid skin contact with, and ingestion of, soils and dusts. - Use protective gloves.
Volatile Organic Contaminants - Pre-survey the site with an HNu 101 or OVA 128 prior to collecting soil samples. - If monitoring results indicate organic constituents, sampling activities may be conducted in Level C protection. At a minimum, skin protection will be afforded by disposable protective clothing.
13. References
ASTM D 1586-67 (reapproved 1974), ASTM Committee on Standards, Philadelphia, PA.
ASTM D 1586-84, Penetration Test and Split Barrel Sampling of Soils.
Barth, D. S. and B. J. Mason, 1984, Soil Sampling Quality Assurance User’s Guide, EPA-600/4-84-043.
24
TITLE: SOIL SAMPLING
CATEGORY: ENV 3.13 REVISED: August 1997
de Vera, E. R., B. P. Simmons, R. D. Stephen, and D. L. Storm, 1980, Samplers and Sampling Procedures for Hazardous Waste Streams, EPA-600/2-80-018.
Ecology and Environment, Inc., 1990, Standard Operating Procedures: “Equipment Decontamination,” and “Sample Packaging and Shipping.”
Mason, B. J., 1983, Preparation of Soil Sampling Protocol: Technique and Strategies, EPA-600/4-83-020.
U.S. Environmental Protection Agency (EPA), 1984, Characterization of Hazardous Waste Sites – A Methods Manual: Volume II, Available Sampling Methods, (2nd ed.), 1984, EPA-600/4-84-076.
__________, 1991, Removal Program Representative Sampling Guidance: Volume I – Soil, (Interim Final), EPA-9360.4-10.
__________, 1984, Characterization of Hazardous Waste Sites – A Methods Manual: Volume I, Site Investigations, Section 7: Environmental Monitoring Systems Laboratory, Las Vegas, Nevada, EPA/600/4-84/075.
__________, February 1989, Methods for Evaluating the Attainment of Cleanup Standards: Volume I, Soils and Solid Media, EPA/230/02-89/042.
25
TITLE: SOIL SAMPLING
CATEGORY: ENV 3.13 REVISED: August 1997
A SAMPLING AUGERS
26
TITLE: SOIL SAMPLING
CATEGORY: ENV 3.13 REVISED: August 1997
B SAMPLING TRIER
27
TITLE: SOIL SAMPLING
CATEGORY: ENV 3.13 REVISED: August 1997
C SPLIT-SPOON SAMPLER
28