soil erosion control and veld … · could also be used in the control of soil erosion, but the...
TRANSCRIPT

SOIL EROSION CONTROL
AND VELD REHABILITATION
FOR THE
GOURITZ CLUSTER BIOSPHERE
RESERVE
AUGUST 2015

THIS PUBLICATION IS A COLLABORATION
BETWEEN THE GOURITZ CLUSTER BIOSPHERE
RESERVE AND CONSERVATION MANAGEMENT
SERVICES
COMPILED BY KEN COETZEE AND
WALLIE STROEBEL OF CONSERVATION
MANAGEMENT SERVICES


CONTENTS
1. A preamble to soil erosion control.
2. Introduction to soil erosion control.
3. The objectives of soil erosion control actions
4. Hollows or pits.
5. Erosion control fences.
6. Treating footpaths.
7. Reshaping gulley systems.
8. Combining different treatments.
9. Installing stone gabions.
10. Mulches and ground covers.
11. Below ground rehabilitation.
12. Establishing plants on treatment sites.
13. Maintenance is critical.
14. Manpower.
15. Materials.
16. Suggested reading.
17. Who to contact for practical advice.

Soil erosion control and veld
rehabilitation
“Rehabilitation efforts should not attempt to restore the ecosystem to some
particular condition; they should rather be aimed at “kick-starting” the process of natural succession and healing.”
1. A PREAMBLE TO SOIL EROSION CONTROL Ecological rehabilitation is a great deal more than a technical management challenge. Working on rehabilitation projects is a way in which we can establish a balanced and healthy ethical relationship with our natural environment. Working with our hands in the soil literally brings us “back to earth”. If properly done, rehabilitation projects heal more than the scars of man’s careless actions, it also inspires people to care more for their natural environment. Rehabilitation works should not attempt to restore the ecosystem to some particular condition; they should rather be aimed at “kick-starting” the process of natural succession and healing. If this natural process can be restored, or even partially restored, nature will continue the process and develop into whatever it is able to. In degraded areas, we should thus aim to give nature a helping hand wherever we can, thereafter it will take over and do the rest. Our rehabilitation efforts, whatever they may be, will rarely result in a completely finished product or condition. They will result in a beginning, an early stage of a natural succession. Our efforts will set a process in motion by creating the dynamics for natural development in the long run. One must, however, think about the end result and what it may look like when the system is beginning to function. You need to create a vision of what you would like to achieve. Once this is done the planning of erosion control work can commence.

Because we care about nature and our natural habitats, we must make others aware that their use of the land has environmental consequences. We need to give them incentives to change their use of the land to be more environmentally appropriate and to use natural resources more sustainably, for their own benefit. Redirecting long-standing and harmful land-use behaviour is much more difficult than actually rehabilitating the wounds and scars that result from the ill-considered actions of the uninformed. The rehabilitation practitioner must therefore also be something of a teacher because after all, “prevention is always better than a cure”. Combatting soil erosion is based on a land ethic that drives the practitioner to repair what has been damaged. It is something of an art and the truly committed person drives in every peg, or places every stone, with the insight that is derived from experience and some instruction. Successful soil erosion control can never be based only on the remuneration that is involved in a rehabilitation contract; it must be based on something more human, something from the heart, an ethical relationship with the land.
2. INTRODUCTION TO SOIL EROSION CONTROL
In this booklet, the methods that can be used to rehabilitate the degraded parts of the landscape in the GCBR are described in detail and some of the good results that can be relatively easily (and fairly inexpensively) achieved are shown. The first step in the rehabilitation process is to eliminate the cause of habitat degradation. If the cause is historical overgrazing, then all that is required is to exclude rehabilitation sites from grazing until the protective vegetation cover is again well established and can be safely utilized. This may require a number of growing seasons, a realistic period of no less than two or three years with normal rainfall for the area is probably a practical guideline but it very much depends on the particular site and how degraded it was to begin with. The methods recommended are easy to implement using unskilled, but carefully supervised workers. The cost of implementation is a major consideration and the methods show the minimum of effort and costs required for the effective rehabilitation of degraded habitat. It is an unfortunate fact that if rehabilitation is seen by landowners to be too costly, it will simply not be done. It is important to appreciate that habitat rehabilitation often needs to be done in areas of extreme climatic conditions, which makes successful rehabilitation difficult. The methods shown here focus on the rehydration of the soil and the creation of a more favourable micro-climate that will give germinating plants the best chance for survival on treated sites. An important aspect of rehabilitation work which is often completely neglected, is the much needed follow-up maintenance of rehabilitation efforts. After installation, the erosion control structures and treatments need constant attention (particularly after heavy rainfall) to ensure that they remain effective and that they will continue to contribute to gradual but significant habitat improvement.

This chapter will hopefully help the rehabilitation practitioner, or landowner, to identify the degraded sites that need to be treated and to provide a guideline for practical and cost effective methods that can be used to combat each type of soil erosion. Careful attention to detail is a prerequisite for the planning and implementation of soil erosion control work irrespective of the habitat type, or environment, in which it is to be done. As with all kinds of field practice, the methods described must be suitably modified in order to accommodate any particular site or condition, but it is critical that the basic principles, as described for each method, are used as a guide. There are many additional methods that could also be used in the control of soil erosion, but the methods described have been very well tested, and have proved to be practical in terms of cost, ease of implementation and also suitable for most habitat conditions.
3. THE OBJECTIVES OF SOIL EROSION CONTROL ACTIONS In order to effectively control soil erosion, it is necessary to determine exactly what must be achieved, how to go about achieving it and what methods must be employed. Objectives for soil erosion control treatments may differ from one site to another and from one type of erosion to another, but in essence, these objectives can be broadly summarised as follows:
To reduce the effects of raindrop splash erosion on exposed soil surfaces.
To keep rainwater on the soil surface for as long as possible and thus increase the rate at which water infiltrates the soil.
To slow down the speed of runoff water and thus reduce the erosive force of water on unprotected soil surfaces.
Provide the methods to hold back and retain soil, plant debris, animal droppings and seeds that are usually carried away from the soil surface by runoff water.
To provide stable and protected sites for pioneer vegetation re-establishment.
To change mineral and organic imbalances in degraded soils and thereby improving them for pioneer plant establishment.
To improve water retention in the soil. The following is a step by step guide to a number of well tested soil erosion control methods. Modify them to suit your particular set of circumstances.

4. HOLLOWS OR PITS
Hollows or pits are simple and cheap to make, they can completely transform bare, capped soil and they help to rehydrate aridified soil by capturing rainwater runoff.
Before: Bare capped soil which is After: Hollows vegetated and impervious to water infiltration. rehydrating the aridified soil.
IMPORTANT PRINCIPLES AND GUIDELINES: Useful where soils have become exposed, aridified and capped.
Not suitable for use on slopes.
Rooted plants on the site should not be disturbed.
Livestock and game must be removed or excluded to eliminate grazing
impact for at least three years.
Mulching and seeding will speed up the recovery rate.
Useful where surface water flow needs to be slowed.
Useful where soil is washed away each time that it rains. WHY USE HOLLOWS? They facilitate water infiltration on bare, capped soil surfaces where very little
rain water infiltrates into the subsoil. Each hollow traps ± 50 liters of water. 500 hollows will thus trap 25 000 liters of
water, all of which goes into the soil and is not just lost to the nearest drainage.
Hollows also trap windblown plant litter, animal droppings and plant seeds which help to kick-start topsoil formation.

Each hollow develops a moist, fertile microclimate and becomes a seed production site as pioneer plants mature in and around the hollows.
With minimal instruction, hollows are cheap and very easy to prepare by hand.
1. Hollows (±500 x 500m x 200mm deep) 2. Mulching the hollows with wood - chips or made by hand across the bare area. chopped brush and branches.
3. Seedlings germinating in the protected 4. Plants establishing in hollows produce environment in the hollows. seeds for further plant establishment
and also bind the soil.

5. EROSION CONTROL FENCES These are simple, low wire netting and geotextile fences which, backed up by a thick layer of organic mulch, can slow-down and trap runoff water and silt. The fences become productive and vegetated bands across degraded areas, or they can help to stabilize small erosion gullies and drainages.
Fences can be used on slopes to treat Fences with mulch help to check the water small rills or eroding paths. flow and stabilize small gullies.
IMPORTANT PRINCIPLES AND GUIDELINES: Fences are suitable for use on flat areas and on moderate slopes. It is important to preserve and work around existing vegetation. Mulching is important for effective water control and microclimate
creation. Livestock and game must be removed or excluded to eliminate the impact
of grazing and trampling. WHY USE FENCES? They slow down the speed of destructive runoff water flow.
Water filters through the fence but silt and plant litter remains behind, helping to
build up a new and fertile topsoil layer behind the fence.
The fence also acts as a windbreak, trapping windblown dust and seeds.
Old low- grade fencing materials can be used together with geotextiles.
The method is very quick to install but must be carefully planned to be effective.
Vegetated strips are created across barren sites, stabilizing the soil and producing seeds for the dispersal of pioneer plants.

1. A sturdy low fence of iron standards and 2. With the fence complete, a thick layer of wire netting is made across the site. mulch is applied over the full length of the fence. In some cases geotextiles are also used to help trap organic material.
3. Geotextiles can be used together with the 4. On steeper sites, the fences are installed wire netting to create a more effective in series down the slope. Note the areas silt and organic material trap. of mulch between the fences.
5. The synthetic Grassfence is a much simpler 6. The Grassfence is installed like the other alternative method for erosion fence fences but it is partly buried underground. construction.

6. TREATING FOOTPATHS This is a simple method for preventing soil erosion and rehabilitating eroded animal footpaths in the veld. The method makes use of mulch which protects the soil, creating favourable conditions for plant establishment.
Before: A typical eroded footpath. After: Mulch on the path with an establishing protective plant cover.
IMPORTANT PRINCIPLES AND GUIDELINES:
The method is suitable for flat sites and moderate slopes.
It is important not to remove any rooted plants in the paths.
Water flow along the path must be stopped.
Path-forming animals must be removed or reduced. WHY FIX PATHS? Footpaths channel runoff water and eventually become erosion gullies.
Valuable water and topsoil is lost from the veld along eroding footpaths.
Excessive path networks contribute to the drying out of the soil.
Exposed path surfaces increase soil vulnerability to wind erosion.

1. Hard capped soil in the paths can 2. Jute jeotextile (Soilsaver) is cut and laid be loosened by hand. along the paths.
3. The covered paths are then given a 4. The complete treated network of fairly thick layer of mulch. footpaths.
7. RESHAPING GULLEY SYSTEMS
In many cases, it is more practical to completely reshape very severely eroded gulley systems, which typically have numerous crumbling, dried-out and collapsing vertical sidewalls.
Before: A typical eroded gulley. After: A shaped and rehabilitating gulley system.

IMPORTANT PRINCIPLES AND GUIDELINES: Erosion gullies are the symptoms of a problem; to rehabilitate them, the
cause of the accelerated soil erosion must first be removed.
Treat only “young” gulley systems that have the potential to become a great deal more eroded, resulting in a loss of topsoil, moisture and productive rangeland.
The method is best used in conjunction with other water slowing methods
upstream from the treatment site.
Larger shrubs and trees should not be removed from the gulley treatment site.
Geotextiles and mulch are very important for the stabilization of the newly
shaped soil surfaces.
Fences may also be necessary across the treated area to slow down the water flow. It must be remembered that gullies form in drainages and water will continue to flow along them.
WHY RESHAPE GULLIES? Aridified erosion systems with numerous gullies never recover, even with
gabions in place, the sides will continue to crumble and soil moisture will be lost.
“Reshaping” provides a gentler slope on which plants can establish and grow.
Many of the plants (like succulent dwarf shrubs) that are removed before “shaping” can later be replanted on the new more gently sloping soil surfaces.
The soil of the entire treatment area can be rehydrated by applying a protective
mulch layer which will improve rainwater infiltration.
1. A severely eroded site that will not recover 2. The gulley sides can be sloped by hand without intervention. or by machine.

3. Jute geotextile (Soilsaver) is spread over 4. The entire shaped and stabilized area is and pinned onto the surface with wooden then covered with mulch and seeded.
pegs made from fencing droppers
8. COMBINING DIFFERENT TREATMENTS Some sites contain a mixture of different soil erosion types which may require a combination of different treatments methods. In most cases it is a combination of bare, capped soil surfaces and a network of minor erosion rills and gullies.
Before: A site with sheet erosion After: A combination of treatment types. and small rill erosion.
IMPORTANT PRINCIPLES AND GUIDELINES:
It is important to “read” the natural flow of the runoff water correctly.
Existing rooted vegetation should not be disturbed.
Each method (hollows, fences, paths and reshaping) should be used
where it will be most effective.
Experience has shown that the use of a suitable mulch is critical for success.

Livestock and game must be removed from the site or the site can be
fenced off to eliminate grazing impact. WHY COMBINE METHODS? It can be done where bare, capped soil occurs with small rills and gullies and the
destructive runoff is spread over a wider area.
Sometimes the fences are needed to prevent the hollows from silting up the first time it rains after their construction.
Using a combination of methods will be more effective for overall rehabilitation
and also more cost-effective.
1. Many sites have sheet, rill and gulley 2. First treat the sheet eroded sites with erosion in combination. mulched hollows.
3. Erosion fences are added where the 4. Reshaping and mulching of small gullies water flow must be checked. in between the sheet eroded areas.

9. INSTALLING STONE GABIONS
Traditional stone gabions have a place in any rehabilitation plan and are particularly useful for rehabilitating degraded drainage channel and eroded gulley systems.
Before: Severe gulley erosion. After: A functional stone gabion slows runoff water and traps silt and debris.
IMPORTANT PRINCIPLES AND GUIDELINES: Use stone gabions only if an adequate source of stone is available nearby
- avoid collecting stones from the veld as this may cause further soil erosion and destroy the natural habitat of small wildlife.
The correct shape, foundation and height of a stone gabion is critical and
must be very carefully planned because the cost of failure is very high.
Gabions must be enclosed in wire netting to prevent stones from rolling downstream during flooding.
The velocity of water flow must be slowed, but also channelled in a non-
erosive way. Silt and organic material should be trapped by geotextile in the gabion.
Use gabions only if absolutely necessary and if the erosion problem
cannot be solved with a quicker, cheaper method like erosion fences.
WHY CONSTRUCT STONE GABIONS? Gabions are used where a more robust “calming” of runoff flow is required.
Gabions are used where it is necessary to trap and hold large volumes of silt.
Gabions can be used to stabilize roads across drainages. Gabions can be used in series to stabilize degraded drainage banks.

1. First a trench is dug into the gulley 2. The trench is lined with wire netting and floor and sides. the gabion constructed with stones.
3. When at the correct height, the wire 4. The upstream side of the gabion is then netting is closed tightly over the gabion. lined with geotextile to trap silt and fine plant material.
IMPORTANT TIP: Do not underestimate the destructive force of runoff water. It is
always much more, and much faster flowing, than you think.
10. MULCHES AND GROUND COVERS Mulches and ground covers can be seen as critical for the rehabilitation of soil erodes sites and other degraded areas. Figure 3.1 shows a variety of the most accessible and widely used types of mulch and it also points out what the advantages and disadvantages in the use of each are. In some areas, a very handy source of excellent wood chip and brush packing mulch is the abundant Acacia karroo trees (now called Vachellia karroo) which occur along drainages. The thorn trees are a valuable renewable resource and if carefully harvested will leave no visible impact or have any adverse ecological impact. When cut down, the trees readily

coppice and quickly replace the stems and branches lost. A source of mulch is often something of a problem in many areas, particularly in the drier regions like the Karoo. If not enough thorn tree material is available, then an alternative source of mulch material will have to be found. Alien gum trees and pepper trees which are abundant in many dry areas can be sourced. Care must, however, be taken to apply mulch from these trees only once dried out, as the live branches and leaves have an allelopathic (chemical) impact on soil and green material may still contain seeds that can spread and invade new sites. Another potential source of mulch is the common reed (Phragmites australis), but it must be roughly cut, otherwise it blows away in windy weather if it is cut up too fine. Although finding suitable, and enough, mulch material can be a problem in some areas, every effort must be made to provide an adequate supply of mulch material because of the very important function that it has in the rehabilitation process. In densely bushed areas, harvesting can be done by cutting down every third or fourth tree or large shrub, about 300mm above ground level. Along drainages, trees that are displaced by flooding can be used. Along the undisturbed drainages, a selective approach, removing only some of the trees and shrubs will ensure that the habitat is not too drastically altered. While the preparation work of soil erosion projects is being done (such as gabion or erosion fence construction is done and while the gulley sides are being shaped) a team of workers can be put onto the cutting out of thorn or other trees for mulch. By cutting in a wide area around each site to be mulched, the complete removal of trees on site is avoided. Over a large area selective tree thinning is thus spread along the length of the erosion area. The cut branches of the thorn trees are then fed through a PTO-driven (or motorised) chip mulch machine. The chip mulch machine can be positioned at each core rehabilitation site and enough mulch produced, at each site, to adequately cover the newly shaped area. It is important to appreciate that a great deal of mulch will be required and that this requirement may significantly reduce the ready supply of some areas. It is, however, also important to understand that the temporary loss of material from the thorn trees and other bigger shrubs is invaluable for the rehabilitation work. The cut trees will resprout with time and completely replace what was removed. The chip mulch machine must be set to produce a rough mulch consisting of bits that are approximately 100 – 150 mm long. This will ensure that the mulch will form a dense mat on the surface rather than lie ineffectively above it, as is often the case with branch mulch or brush packing. The mulch should be put down to completely cover the surface but not seal it or shade it out too much. A layer of about 40 to 80 mm should be suitable but this must be tested on each particular site to establish the ideal thickness of the mulch. Experimenting with varying thickness of mulch will be the best guide. There must be enough mulch to create a microclimate suitable for plant germination, which means adequate but not too much shading. Treated surfaces that are shaped and covered with geotextile should also be covered with a layer of plant chip mulch or must be densely brush packed. See Figure 2 for more information about the use of organic Geotextiles.

STONE COBBLING: Stones are tightly packed over the soil surface to form a complete and protective cover. This is a good option where stones are freely available such as where cleared off cultivated lands or removed from roadways. Stones should not be removed from undisturbed natural habitats where they provide habitat cover for many organisms. Quarried stone can also be used but it must not be too fine to prevent sunlight penetration.
BRUSH PACKING: Branches that are sustainably harvested from local trees and shrubs or from alien plant control operations are chopped into short bits, each no longer than about 300mm. The bits are then densely packed over the soil surface to a depth of about 50 - 100mm, but not too deep to prevent sunlight penetration. Most of the branch material should be in contact with the ground for maximum effectivity
WOOD CHIP MULCH: This is only available as a waste by-product from sawmills. It consists of thick wood shavings and tree bark that is heavy enough to resist movement by wind and soil surface water flow. It is the ideal mulch for rehabilitation work but it is costly to transport and sources are limited to commercial forestry regions or wherever sawmills are operational. The mulch can be spread over the soil surface to a depth of about 40 to 80mm.
GEOTEXTILE COVER: This is material made from bio-degradable sisal or jute fibres woven into threads of varying thickness. The treads are then loosely woven into material with varying hole sizes. It is effective when used together with other mulches but can also be useful for soil stabilization where other mulches cannot be used such as on steep slopes. The material is spread over the soil surface and then firmly pinned in place with wooden or steel pegs
FIGURE 3.1: THE TYPES OF MULCH MOST USED FOR SOIL EROSION CONTROL

The chip mulch can also be used without the geotextile layer on very slight slopes and flat areas and it can also be used on the aprons of the “fences” that were described in the previous section. It is important to remember that the function of the mulch is to reduce solar radiation, trap and hold moisture and provide a protective microclimate for germinating seedlings. If you want to know whether a particular mulch will be suitable, then first determine whether these requirements will be met. If they are, then consider the practical implications of the volume available, getting the mulch together (cutting, dragging, carrying) and the costs of loading and transport to the rehabilitation site.
11. BELOW GROUND REHABILITATION When soils are exposed, eroded and degraded, they invariably lose most of their biotic biomass, the critical below ground ecosystem component that is composed of organic humus containing microbes, bacteria, fungi and a host of other micro-organisms that are critically important for soil ecosystem functioning. Of particular importance for veld rehabilitation are the mychorrhizal fungi which benefit plants, particularly those of nutrient-poor soils. Mychorrhizal fungi attach to the younger roots of host plants and increase the capacity of the plant roots to absorb nutrients. They aid in the translocation of nutrients, particularly nitrogen and phosphorous from the soil into the root tissue and are often plant species specific. In return, the roots of the host plants provide support and a constant supply of carbohydrates in a symbiotically mutual relationship. Mycorrhizae effectively increase the surface area of the host plants roots for mineral and water uptake and they mobilize nutrients in infertile soil which improves conditions for permanent plant establishment. It has also been shown that mychorrhiza provide protection for the host plant against harmful pathogens. Roots of most plants form mychorrhiza within the surface strata of healthy topsoil.
Studies have shown that grasses benefit greatly from mychorrhizal colonization and that mychorrhiza significantly facilitate the early successional stages for pioneer grass establishment in poor quality or degraded soils. This implies that mychorrhizal fungi can greatly benefit habitat rehabilitation projects, particularly in the initial and secondary establishment phases of developing a protective vegetation cover.
Brush-pack the rehabilitation area as already described. The branch mulch will
help to trap the windblown fungal spores of mychorrhiza and the brush will also help to moderate the microclimate of the treated soil surfaces, protecting the germinating seeded plants above the ground and the beneficial soil organisms below the surface.
Seed the treatment sites primarily with hardy pioneer plants. These plants are specially adapted to colonise harsh sites of low fertility. Once established, these pioneer plants will promote mycorrhizal establishment, although they will not be entirely dependent on them, and will help to produce favourable topsoil habitat for both follow-up perennial plants and the mychorrhiza on which they are more dependent. Use a diverse mixture of plant species for rehabilitation planting, as this will help to encourage a range of useful mychorrhiza fungal types to develop. Mycorrhizal diversity is dependent on host plant diversity. Some papers show that plant diversity is dependent on mycorrhizal fungal diversity!

1. Stabilizing slope erosion: Exposed and erodable soil can be held in place by draping a geotextile cover over the exposed surface and pegging the material with wood or steel pegs to lie flat on the soil surface. The geotextile prevents soil movement, traps plant seeds and moisture and helps to moderate the soil surface temperature. The geotextile layer can also be covered with a layer of wood chip mulch or finely chopped brush.
2. Making mulch filled rolls: Geotextiles can be made into erosion control berms by rolling organic material like cut reeds, hay or leafy branches in them and then securing them to the slope with wood or steel pegs. The mulch rolls will trap soil and create sites for plant establishment behind them. The mulch rolls will also provide cover and preserved moisture for plant establishment through them.
3. Underlying stone cobbling and organic mulch ground covers: The geotextiles are laid over the exposed soil surface to hold it in place. Silt, seeds and moisture are trapped and held in place by the material. Without the geotextile layer, the soil surface under the stone layer can easily erode. The geotextile material need not be pegged down as the stones will keep it in place. Where wood chip mulch or brush-packing is used, it will be necessary to peg the material in place.
4. Lining erosion control structures: A lining of geotextile on the flow side of the structure will slow down the erosive force of water and it will trap silt, sticks, leaves, animal droppings and plant seeds. The geotextile prevents water from undercutting and eating around the sides of the structure. The geotextile must be firmly pegged to the gulley sides and can be secured to the gulley floor with stones. The material must be firmly fixed to the wire netting of the gabion using binding wire ties.
FIGURE 3.2: SOME OF THE MANY USES OF ORGANIC GEOTEXTILES

Introduce healthy, micro-organism-rich, natural topsoil from undisturbed nearby (local) sites by either collecting and spreading it on the rehabilitation area in patches, establishing it in hollows, or transplanting together with inoculated nursery-grown plants. The topsoil will contain many of the organisms that are critical for soil and plant health, including the fungal mychorrhiza and their spores.
Apply dry, weathered animal (kraal) manure onto rehabilitation sites. The partially decomposed manure of cattle, sheep and horses is rich in beneficial soil micro-organisms and fungal spores. This application works particularly well where hollows are used to collect rainwater. The manure also helps to moderate the soil surface microclimate. If mycorrhizae are not present in the manure, manuring will certainly help the establishment of plants and the mycorrhiza will follow soon thereafter. A note of caution: The application of kraal manure may lead to the introduction of persistent and troublesome weeds.
Establish plants for transplanting into rehabilitation sites in healthy micro-organism-rich topsoil. Use soil from nearby (local) undisturbed sites to fill the nursery bags. Once planted out in the treatment area, the potted topsoil will introduce the soil organisms needed to inoculate the rehabilitation site. Plants grown in this manner can be transplanted throughout the rehabilitation site, creating numerous points of mycorrhizal inoculation. Grass plants re-inoculated with local mycorrhizal fungi have shown much better development through following seasons than plants that were not inoculated.
As a last resort, the use of a commercially produced inoculant can be considered. This, however, means that the organisms introduced will not necessarily be locally adapted, and may thus not be as effective as a natural inoculant. The inoculant is available as a microbial mixture containing a variety of beneficial micro-organisms, primarily bacteria, and its application stimulates organisms still in the soil, like mycorrhizae, and introduces those that have been lost, effectively helping to restore the microbial community in the topsoil. The inoculant is easily applied, diluted in water, by spraying directly onto the soil as a pre-planting treatment. Nursery-grown plants can be inoculated at both the planting and transplanting stages. The commercial products are widely known as EM (Effective Micro-organisms) and are available from a limited number of outlets. In the Western Cape, contact Rupert Organic Consulting at [email protected] or 082 336 1780 / 021 880 2079.
The establishment of mycorrhizal fungi on habitat rehabilitation sites will speed up the revegetation process by helping to ensure that the established plants survive and produce seed for a permanent and spreading protective cover. The methods recommended here, however, require dedicated and long-term commitment to rehabilitation work. This inoculation practice is still in its infancy and needs to be tested in a range of habitat and vegetation types. In some field experiments, plant communities reacted differently to different types of mycorrhizae and the success rate of mycorrhizal inoculation is also variable, depending on soil, source and environmental conditions. Research and trial results have thus far, however, shown that mycorrhizal inoculation - in fact, the inoculation of all soil micro-organisms - is critical for the successful rehabilitation of degraded areas.

Inoculating degraded soil must not be seen as a miracle rehabilitation method, but it is clear that linking plants to the soil with suitable mycorrhizal fungi certainly improves the chances for plant establishment success.
12. ESTABLISHING PLANTS ON THE TREATMENT SITES
The most important objective for any rehabilitation project is to establish a permanent and dense cover of soil protecting plants as quickly as possible. It is critical that locally adapted plants be used as they will have the best chance of surviving the harsh environmental conditions on degraded sites. All sowing or planting must be accompanied by some form of micro-habitat treatment such as moisture-capturing hollows, mulching with local plant material, surface covering geotextile or over-mulching with wood chip mulch. Simply seeding and planting into bare, eroded sites will usually NOT be very successful. In many cases, simply providing some kind of treatment that results in an improved microclimate will also result in the germination of self-seeded plants. These seeds blow in with the wind or are inadvertently brought in by animals in their faeces. Self -seeding plants are often cosmopolitan weeds like rolbos (Salsola kali), Mexican poppy (Argemone mexicana) or pigweed (Amaranthus hybridus), the seeds of which are often already present at the treatment site and which require only some kind of disturbance and some rain to stimulate their germination, These weeds are not really cause for concern because they will ultimately be replaced by the locally indigenous plants, and the weeds do help to stabilize the site The indigenous plants suitable for use in the Little Karoo area are as follows (please see the end of the pamphlet for the common names of these plants):
SEEDING
PLANTING
Fingerhuthia africana Tetragonia fruticosa Osteospermum sinuatum Salsola aphylla Zygophyllum retrofractum Pteronia glauca
Pentzia incana Malephora lutea Leipoldtia schultzii Ruschia approximata
Other suitable plant species that can also be used in rehabilitation projects in other areas are the grasses:
Cenchrus ciliaris - bloubuffelgras / blue buffalo grass Eragrostis curvula - oulandsgras / weeping love grass Digitaria eriantha - vingergras / common finger grass Cynodon dactylon - kweekgras / couch grass Chloris guyana - Rhodes vingergras / Rhodes grass

Seeds and plants are obtainable from: Renu-Karoo Veld Restoration CC Sue Milton-Dean and Richard Dean Tel: 023 - 5411 828 Mobile: 082 7700 206 Email: [email protected] [email protected].
13. MAINTENANCE IS CRITICAL
Efforts at soil erosion control and habitat rehabilitation will certainly fail without regular checking and maintenance. Treatment sites should be inspected after each rainfall event to check if any physical repairs are necessary and then the repairs must be done without delay. Follow-up maintenance is not only an essential part of any soil erosion control project, it is in fact the most critical part of it. One frequently comes across examples of where well intentioned rehabilitation efforts actually contributed to the further accelerated erosion of the site, simply because follow-up inspection and maintenance did not take place after the initial work was done. It can therefore be said that if there is no intention (or the finances) to do follow-up maintenance, then the erosion control project should not be attempted. This may seem to be a negative approach, but soil erosion control is a costly activity and the typically insufficient funding that is usually allocated for it must be used in the most cost effective way possible. This means that the initial erosion control efforts must be followed-up by inspection and maintenance, until the site is fully rehabilitated, no matter how long this may take. This implies the fullest commitment of all involved and sustainable funding to see the project through to its completion. One must thus walk through the erosion treatment sites after rains, making notes about the repairs that may be needed, the mulch that may need to be reinforced and the other actions that may improve or speed up the rehabilitation success. Failing to do this follow-up will certainly lead to the failure of the initial rehabilitation effort. Typical maintenance requirements and the actions required after rains are as follows:
HOLLOWS:
Hollows silted up.
ACTION REQUIRED:
Empty out hollows, add erosion fences to trap silt.
Earth walls of the hollows break. Reconstruct walls, add erosion fences.
Mulch is washed away. Re-mulch hollows, add erosion fences.
Seed is washed away. Reseed.
Still sign of significant water flow. Dig more hollows and install fences.
FENCES:
Fence undermined by water.
Fix and apply wider and thicker mulch layer.
Mulch washed/blown away .
Re-mulch with heavier material or thicker layer.
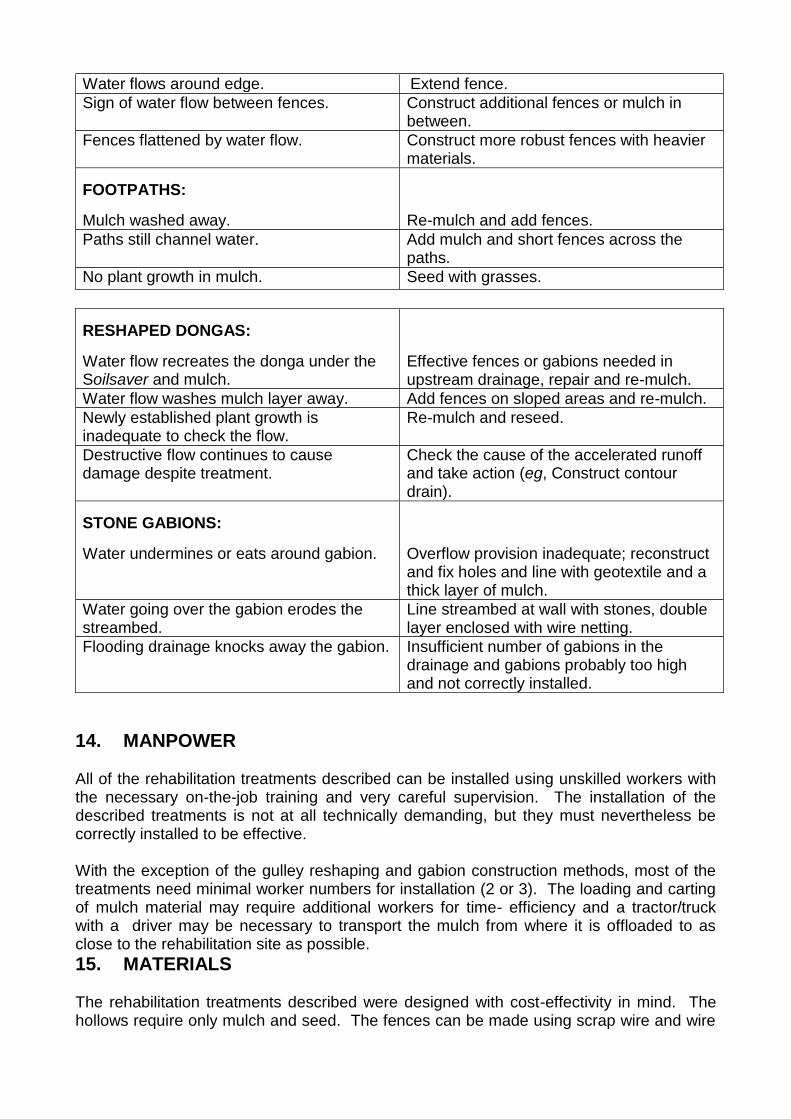
Water flows around edge. Extend fence.
Sign of water flow between fences. Construct additional fences or mulch in between.
Fences flattened by water flow. Construct more robust fences with heavier materials.
FOOTPATHS:
Mulch washed away.
Re-mulch and add fences.
Paths still channel water. Add mulch and short fences across the paths.
No plant growth in mulch. Seed with grasses.
RESHAPED DONGAS:
Water flow recreates the donga under the Soilsaver and mulch.
Effective fences or gabions needed in upstream drainage, repair and re-mulch.
Water flow washes mulch layer away. Add fences on sloped areas and re-mulch.
Newly established plant growth is inadequate to check the flow.
Re-mulch and reseed.
Destructive flow continues to cause damage despite treatment.
Check the cause of the accelerated runoff and take action (eg, Construct contour drain).
STONE GABIONS:
Water undermines or eats around gabion.
Overflow provision inadequate; reconstruct and fix holes and line with geotextile and a thick layer of mulch.
Water going over the gabion erodes the streambed.
Line streambed at wall with stones, double layer enclosed with wire netting.
Flooding drainage knocks away the gabion. Insufficient number of gabions in the drainage and gabions probably too high and not correctly installed.
14. MANPOWER All of the rehabilitation treatments described can be installed using unskilled workers with the necessary on-the-job training and very careful supervision. The installation of the described treatments is not at all technically demanding, but they must nevertheless be correctly installed to be effective. With the exception of the gulley reshaping and gabion construction methods, most of the treatments need minimal worker numbers for installation (2 or 3). The loading and carting of mulch material may require additional workers for time- efficiency and a tractor/truck with a driver may be necessary to transport the mulch from where it is offloaded to as close to the rehabilitation site as possible.
15. MATERIALS
The rehabilitation treatments described were designed with cost-effectivity in mind. The hollows require only mulch and seed. The fences can be made using scrap wire and wire

netting and old rusty and bent iron fencing standards cut up into short sections. It would not be cost-effective to purchase new standards, wire and wire netting material. The reshaping treatments require jute geotextile (Soilsaver) and mulch. The Soilsaver is pinned to the ground, by hammering sharpened sections of old wooden fencing droppers into the material.
The construction of stone gabions requires either fabricated wire gabion baskets or wire netting to enclose the stone-packed structure. Any wire netting that is used for fencing is suitable, but if netting is specially purchased for rehabilitation work, it is best to purchase fully galvanised material. The Soilsaver and Grassfence is available from Kaytech Engineered Fabrics, tel: 043 - 727 1055 and website: http://www.kaytech.co.za. Soilsaver is sold in bales of 350 kg each and a bale consists of 1 004m3 of jute netting. Grassfence is available in rolls that are 700 or 500mm wide and 100m long. The best mulch to use is a rough wood-chip mulch which is obtainable from sawmills. Do not use sawdust, or other fine material like hay, because it is too light and will blow away in the wind. In most areas, obtain wood chip mulch from the nearest sawmill. The mulch is very cheap, but sawmills charge to transport it in 30m3 loads to the rehabilitation site.
16. SUGGESTED READING
The following books contain useful information about rehabilitation and habitat management: Caring for Natural Rangelands. Author: Ken Coetzee. Published: 2005. Published by: Kwazulu Natal University Press. Game Ranch Management - 5th Edition. Editors: J du P Bothma & J G du Toit. Published 2010. Published by: Van Schaik Publishers, Pretoria. Karoo Veld - Ecology and Management. Editors: K J Esler, S J Milton and W R Dean. Published: 2006. Published by: Briza Publications, Pretoria.
17. WHO TO CONTACT FOR PRACTICAL ADVICE: a) Sue Milton Dean Renu-Karoo Veld Restoration CC (Prince Albert) tel: 023 - 5411 828 cell: 082 7700 206
email: [email protected] / [email protected].

b) Ken Coetzee Conservation Management Services (George) tel: 044 - 8708 472 email: [email protected]. c) Wallie Stroebel
Conservation Management Services (Graaff Reinet) tel: 049 - 891 9017 cell: 082 493 1441 email: [email protected]. THE COMMON NAMES OF THE PLANTS RECOMMENDED FOR REHABILITATION PLANTING IN THE LITTLE KAROO:
Fingerhuthia africana Vingerhoedgras / thimble grass Tetragonia fruticosa klappiesbrak Osteospermum sinuatum Karoobietou Salsola aphylla gannabos / saltbush Zygophyllum retrofractum spekbos Pteronia glauca boegoekaroo
Pentzia incana ankerkaroo Malephora lutea springbokvygie Leipoldtia schultzii rankvygie Ruschia approximata vygie