softwareversion:9.4 · contents quickstartguide 1 legalnotices 2 documentationupdates 3 support 3...
TRANSCRIPT

HP Data Protector Reporter
Software Version: 9.4.1
Quick Start Guide
Document Release Date: Friday, February 17, 2012
Software Release Date: July 2011

Legal NoticesWarranty
The only warranties for HP products and services are set forth in the express warrantystatements accompanying such products and services. Nothing herein should be construed asconstituting an additional warranty. HP shall not be liable for technical or editorial errors oromissions contained herein.
The information contained herein is subject to change without notice.
Restricted Rights Legend
Confidential computer software. Valid license from HP required for possession, use or copying.Consistent with FAR 12.211 and 12.212, Commercial Computer Software, Computer SoftwareDocumentation, and Technical Data for Commercial Items are licensed to the U.S. Governmentunder vendor's standard commercial license.
Copyright Notices
© Copyright 2002-2011 Hewlett-Packard Development Company, L.P.
Trademark Notices
Java is a registered trademark of Oracle and/or its affiliates.
Microsoft® andWindows® are registered trademarks of Microsoft Corporation.
Oracle is a registered trademark of Oracle Corporation.
UNIX® is a registered trademark of the OpenGroup.
Acknowledgements
This product includes software developed by the Apache Software Foundation(http://www.apache.org/).
This product includes software developed by the JDOM Project (http://www.jdom.org/).
This product includes cryptographic software written by Eric Young ([email protected]).
This product includes software developed by theOpenSSL Project for use in the OpenSSL Toolkit(http://www.openssl.org/).
This product includes software written by Tim Hudson ([email protected]).
This product includes an interface of the 'zlib' general purpose compression library, which isCopyright © 1995-2002 Jean-loupGailly andMark Adler.

Documentation UpdatesThe title page of this document contains the following identifying information:
l Software Version number, which indicates the software version.
l Document Release Date, which changes each time the document is updated.
l Software Release Date, which indicates the release date of this version of the software.
To check for recent updates or to verify that you are using themost recent edition of a document,go to:
http://h20230.www2.hp.com/selfsolve/manuals
This site requires that you register for an HP Passport and sign in. To register for an HP PassportID, go to:
http://h20229.www2.hp.com/passport-registration.html
Or click theNew users – please register link on the HP Passport login page.
You will also receive updated or new editions if you subscribe to the appropriate product supportservice. Contact your HP sales representative for details.
SupportVisit the HP Software Support Online web site at:
http://www.hp.com/go/hpsoftwaresupport
This web site provides contact information and details about the products, services, and supportthat HP Software offers.
HP Software online support provides customer self-solve capabilities. It provides a fast andefficient way to access interactive technical support tools needed tomanage your business. As avalued support customer, you can benefit by using the support web site to:
l Search for knowledge documents of interest
l Submit and track support cases and enhancement requests
l Download software patches
l Manage support contracts
l Look up HP support contacts
l Review information about available services
l Enter into discussions with other software customers
l Research and register for software training
Most of the support areas require that you register as an HP Passport user and sign in. Many alsorequire a support contract. To register for an HP Passport ID, go to:
http://h20229.www2.hp.com/passport-registration.html

To findmore information about access levels, go to:
http://h20230.www2.hp.com/new_access_levels.jsp

Contents
Quick Start Guide 1
Legal Notices 2
Documentation Updates 3
Support 3
Contents 5
1 Installing the Data Protector Reporter Edition on Microsoft Windows 9
Pre-installation Checklist (Installations) 9
Installation and Upgrade Requirements (Cannot Proceed with Install if Not Met) 9
Ports Used by the Product 12
Turn Off Internet Information Services (IIS) and Third-Party Web Servers 16
Disable User Access Control onWindows 2008 16
Verify Networking 17
Install a Supported Browser 17
Installing the Product 18
Windows Installation Checklist 18
Step 1 – Read the Release Notes and the Support Matrix 19
Step 2 – LogOn to theWindows Server 19
Step 3 –Open Several Ports (Windows 2008 R2Only) 19
Step 4 – Start the HP Storage Essentials forWindows InstallationWizard 20
Step 5 –Obtain a License Key 23
Step 6 – Check for the Latest Service Pack 24
Removing the Product 24
Log Files from the Installation/Upgrade onWindows 25
2 Installing the Data Protector Reporter Edition on Linux 27
Pre-installation Checklist 27
Ports Used by the Product 27
Prerequisite RPMs for Oracle 32
Software Dependencies 34
Verify Network Settings 35

Linux Installation Checklist 36
Step 1 – Read the Release Notes and the Support Matrix 36
Step 2 – Install theManagement Server 37
Accessing the Linux Host 42
Step 3 – Verify that Processes Can Start 44
Step 4 –Obtain a License Key 44
Step 5 – Verify Your Connection to theManagement Server 45
Step 6 – Check for the Latest Service Pack 47
Step 7 – Install the Java Plug-in on a Linux Client 47
Log Files from the Installation on Linux 49
Removing the Product 49
3 Required Configuration Steps after Installing Reporter 51
Changing the Passwords for Report Optimizer Accounts 51
Changing the Password for the Administrator Account 51
Changing the Password for "SA" User 51
Installing HP Live Network Connector (LNc) 53
Configuring the Report Database to Point to theManagement Server 53
Configuring aGlobal Report Database 54
Accessing the Central Management Console for Report Optimizer 54
Adding the Report Optimizer Server as a Trusted Site 55
Installing a NamedUser Permanent License Key 55
Setting the Report Parameters in HP Storage Essentials 55
Modifying the Server Session Timeout Value 56
Configuring Drill-DownOptions 56
Disabling Browser Access to Desktop Intelligence 57
Adding the Report Designers Group 58
Assigning Report Designing Privileges to Report Designers 58
Best Practices 60
Adding New Users to Report Optimizer 60
Best Practices 60

Changing the Server Intelligence Agent’s User Account (for Monitoring RemotelyLocated Files) 61
Configuring Active Directory (AD) Authentication 61
Create a Service Account 61
Register an SPN Account 62
Grant Rights to Service Account 63
(Optional) Set Delegation Option 63
Assign Account to Server Intelligence Agent 63
CreateWINNT Directory 64
Set File Locations in Tomcat 65
Configure Active Directory Plug-In in RO 65
Restart Tomcat 66
Sheduling Reports Based on File Based Events 66
Setting Up an Email Server 66
Best Practices 67
Tuning the Report Optimizer Server 67
Recreating Emailed Report Schedules 67
Configuring a Set of User Groups as Read-Only Users 67
Disabling Servers that are Not Required 70
Increasing theMemory Heap Size Value 71
Creating a Server Group 71
Adding a Folder for User-Created Custom Reports 72
Best Practices 73
Deleting Duplicate Folders 73
Changing the Passwords for Report Optimizer Accounts 73
Changing the Password for the Administrator Account 73
Changing the Password for "SA" User 73
4 Required Configuration Steps for the Data Protector Reporter Edition 77
Prerequisites for Agentless Discovery of Data Protector 77
Step 1 – Install the Data Protector Client 78
Linux Installation Steps 78

Windows Installation Steps 78
Step 2 – Create a User Group for Data Protector Reporter 81
Step 3 – Create a User in the DPREPORTER User Group 82
Step 4 – Install the Data Protector Patch 83
Launching the Backup Host Configuration and Discovery Wizard 85
Step 1 – Discover Backup Host Address 85
Step 2 – Set Retention Value for Backup Session Data 87
Step 3 – Set Up Email Notifications 88
Step 4 – Configure Report Optimizer Settings 88
5 Troubleshooting Installations/Upgrades 91
Troubleshooting a Failed Installation or Upgrade 91
Log Files from the Installation/Upgrade onWindows 92
Log Files from the Installation on Linux 93
“The environment variable ‘perl5lib’ is set.” Message 93
Additional Entries Appear in the Discovery Pages 94
Troubleshooting the Oracle Database (Windows) 94
UseOnly the InstallationWizard (or UNIX Scripts) to Install/UpgradeOracle 95
Existing Oracle Database Is Detected 95
Receiving HTTP ERROR: 503When Accessing theManagement Server 95
Windows 95
UNIX 95
Web Intelligence Processing Server Does Not Start 96

1 Installing the Data Protector ReporterEdition on Microsoft Windows
Caution: HP Storage Essentials is designed for operation in a secure corporate intranet. All otherconfigurations are not recommended or supported.
The following topics are provided:
l Pre-installation Checklist (Installations) below
l Installing the Product on page 18
l Removing the Product on page 24
For information on how to install the product on Linux, see Installing the Data Protector ReporterEdition on Linux on page 27.
Pre-installation Checklist (Installations)The following basic requirements must bemet before beginning an installation or upgrade. If themanagement server installation wizard detects missing requirements during system verificationyou will need tomake changes to your system. The basic system requirements are explainedalong with additional information on how tomeet these requirements:
l Installation and Upgrade Requirements (Cannot Proceed with Install if Not Met) below
l Verify Networking on page 17
l Install a Supported Browser on page 17
Installation and Upgrade Requirements (Cannot Proceed with Install if NotMet)
The requirements listed in the following table must bemet.
Requirement Must Meet or Exceed
NTFS File System Installations: The NTFS file system is required to install theproduct.
Upgrades (Contact Your Account Representative BeforeUpgrading): If Oracle is installed on a volume using the FAT32 filesystem, youmust convert the volume to NTFS before you canupgrade. Contact customer support for information about convertingthe volume to NTFS.
9

Chapter 1
Requirement Must Meet or Exceed
Screen Resolution Screen resolutions less than 800 pixels by 600 pixels will cause theinstallation or upgrade to fail. The installation/upgrade wizard canrun on a screen resolution of 600 x 800 pixels, and can be resized.
Windows Account The account used to log onmust be in the Administrators group.
Operating System Refer to the support matrix.
MS InternetExplorer and Firefox
Refer to the Browser tab in the support matrix.
TCP/IP TCP/IPv4must be enabled.
Minimum DiskSpace for theInstallation/UpgradeWizard
When the installation/upgrade wizard is running, it creates atemporary directory named <system-drive:>\InstallSRMTemp thatcontains the files required by the installation/upgrade wizard. Thisdirectory must have at least 2 GB of free space.
MinimumRecommendedDisk Space for theProduct
Single Server = HP Storage Essentials, SRM Report Optimizer,and Report Database installed on the same server (32-bit and 64-bitservers).
• With ARCHIVING and RMAN backup off: recommended diskspace 300GB.
• With ARCHIVING and RMAN backup on: recommended diskspace 450GB.
Dual Server = HP Storage Essentials on oneWindows server andSRMReport Optimizer\Report Database installed on a separateWindows server.
• With ARCHIVING and RMAN backup off: recommended diskspace: 200GB.
• With ARCHIVING and RMAN backup on: recommended diskspace: 350GB.
Virtual Machines Installations on virtual machines are supported. Refer to the "MgrPlatform" tab in the support matrix.
Physical AddressExtension (PAE)
PAE is aWindows setting to utilize amounts of RAM greater than 4GB on certain versions of Windows. See yourWindowsdocumentation for more information about PAE settings. Theinstallation or upgrade continues regardless of PAE.
Required RAM Refer to the support matrix.
10

1 Installing the Data Protector Reporter Edition onMicrosoft Windows
Requirement Must Meet or Exceed
Required Ports Themanagement server requires certain ports be available. Formore information about the ports used, see Ports Used by theProduct on page 27.
If you see a warning in the Ports Availability requirement, check tomake sure that the ports listed are not currently in use andmakeany changes that are necessary.The installation will continue evenif a required port is not available.
Firewalls If themanagement server is behind a firewall, the firewall must bedisabled if you want the client Web browser to be able to accessHP Storage Essentials from outside of the firewall. Windows 2008has a firewall enabled by default.
DNS Resolution The installation/upgrade wizard verifies the IPv4 address and DNSname of the server using nslookup. If nslookup is not successful,the installation will not continue.
DNS Resolution failure prevents the product from runningsuccessfully. If the DNS Resolution requirement fails, seeTroubleshooting Installations/Upgrades on page 91.
%perl5lib%EnvironmentVariable
The%perl5lib% environment variable cannot be set to any value.For more information, see Troubleshooting Installations/Upgradeson page 91.
Data ExecutionPrevention (DEP)
Data Execution Prevention (DEP)must be set for "EssentialWindows Programs and Services Only." For information onmodifying the DEP setting, see the documentation for yourWindows operating system.
The paths specifiedin the Options tabfor the followingshare theserequirements:
l HP StorageEssentials
l Oracle Database
l CIM extensions
l ReporterDatabase
l Report Optimizer
TheOptions tab has the following requirements for entering paths:
l Only the following characters are supported: A-z, 0-9, hyphens,underscores, periods, and backslashes.
l Paths cannot contain spaces.
l The drive letter must be a fixed drive.
11

Chapter 1
Ports Used by the Product
HP Storage Essentials and Report Optimizer use a number of ports that cannot be used byanother program.
Ports Used by the HP Storage Essentials Management Server
Port Description Protocol In/Out
22 Used by SSH to deploy host agents (optional – only needif using the internal agent deployment tool)
TCP O
80 An external port used for discovery and the HTTP webserver. You can use port 443 instead for security.
l NetApp
l WebBrowser Interface
l HP Accelerator Pack for Operations Orchestration
SNMP I/O
161 l SNMP Agent
l Cisco SNMP
This port is not required and is optional for SNMPtrapping. HP Storage Essentials uses SNMP version 2.Device alerts can also be delivered to HP StorageEssentials via API or SMI-S for certain devices.
SNMP I/O
162 An external port that is used for the SNMP trap listener.SNMP can be disabled, but no traps will be received.
l Cisco SNMP
This port is not required, but it is optional for SNMPtrapping. HP Storage Essentials uses SNMP version 2.Device alerts can also be delivered to HP StorageEssentials via API or SMI-S for certain devices.
SNMP I/O
389 LDAP directory service TCP O
12

1 Installing the Data Protector Reporter Edition onMicrosoft Windows
Port Description Protocol In/Out
443 An external port used for Secure Socket Layer (SSL) withthe web interface. Port 80 can be used instead, but therewill be no SSL.
l Celerra
l HP Storage Essentials OM SPI v2.0
l NetApp
l VMWare VC/ESX
l WebBrowser interface
l BSAE LiveNetwork Connector (LnC) for ReportOptimizer
TCP I
863 EVA Performance collection "Pluto" EVA Perf O
1099 l HP Storage EssentialsConnector for HP BSA ServerAutomation
l RMI Registry
l XP Arrays via Built-in XP Provider
TCP I
1443 Microsoft SQL Server Database (optional – only used ifMSSQLDatabase Viewer is used)
O
1521 l Oracle Transparent Name Substrate (TNS) ListenerPort (Used for reporter access to HP StorageEssentials, as well as optional Oracle DatabaseViewer discovery)
l HP uCMDB DDM Probe
TCP >I
1972 Intersystems Caché Database JDBC O
2001 Device discovery port for the following devices:
l XPs via CV-AE
l HDS via HDvM
l SUN StorEdge 9900
HiCommandAPI(HTTP/HTTPS)
O
2372 Device discovery port for EVAs discovered through built-in EVA provider "Pluto" (Command View Instances priorto 9.1)
RSM SALBORGAPI
O
13

Chapter 1
Port Description Protocol In/Out
2443 Device discovery port for the following devices:
l XPs via CV-AE
l HDS via HDvM
l SUN StorEdge 9900
l VMWare VC/ESX
HiCommandAPI(HTTP/HTTPS)
>O
2463 Device discovery port for the following devices:
l SUN through the Engenio/LSI provider
l Enginio/LSI based arrays
TCP O
2707 Device discovery port for the EMC storage systemsdiscovered through Solutions Enabler/SYMAPI
SYMAPI O
4444 JBoss RMI/JRMP Invoker
HP Storage EssentialsConnector for HP BSA ServerAutomation
TCP I
4445 JBoss Pooled Invoker TCP >L*
4673 l CIM Extension/Product Health Agent(Tuneable)
l IBM VIO
TCP O
5432 PostgreSEQServer Database JDBC O
5555 Data Protector Agentless TCP O
5962 Discovery Group 12 CIMOMRMI TCP >L*
5964 Discovery Group 11 CIMOMRMI TCP L*
5966 Discovery Group 10 CIMOMRMI TCP L*
5968 Discovery Group 9 CIMOMRMI TCP L*
5970 Discovery Group 8 CIMOMRMI TCP >L*
5972 Discovery Group 7 CIMOMRMI TCP L*
5974 Discovery Group 6 CIMOMRMI TCP L*
5976 Discovery Group 5 CIMOMRMI TCP L*
5978 Discovery Group 4 CIMOMRMI TCP >L*
5980 Discovery Group 3 CIMOMRMI TCP L*
14

1 Installing the Data Protector Reporter Edition onMicrosoft Windows
Port Description Protocol In/Out
5982 Discovery Group 2 CIMOMRMI TCP L*
5984 Discovery Group 1 CIMOMRMI TCP L*
5986 Default Discovery Group CIMOMRMI TCP >L*
5988/5989
l 3PAR SMI-S
l Brocade SMI-A
l Cisco SMI-S
l Compellent SMI-S
l EVAs via CV-EVA SMI-S v4.xx
l EVAs via CV-EVA SMI-S v9.1 or later
l ESL/EML via CV-TL SMI-S v1.7/1.8/2.0
l ESL/EML via CV-TL SMI-S v2.2/2.3
l HP VLS 9000 (port 5988 only)
l HSG-80 via EML SMI-S
l IBM XIV
l McDATA SMI-S
l MSA 1000/1500 via MSA SMI-S
l MSA 2000 viaMSA SMI-S Proxy Provider
l MSA 2300G2 viaMSA SMI-S Proxy Provider
l MSA P2000G3 (port 5989 only)
l IBM CIM Agent
l QLogic SMI-S
l SMI-S and SMI-S secure
l WBEM/WMI Mapper
TCP/SMI-S O
6389 Device discovery port for CLARiiON storage systemsdiscovered through the NaviSphere CLI
Navisphere CLI O
8009 JBoss Embedded Tomcat Service TCP L*
8083 JBoss Web Service L*
8093 JBoss UIL Server IL Service
HP Storage EssentialsConnector for HP BSA ServerAutomation
TCP I
15

Chapter 1
Port Description Protocol In/Out
8443 BSAE DataMiner TCP O
8873 BSAE DataMiner TCP O
9088 IBM Informix Dynamic Server Database JDBC O
12443 HP X9000 HTTPS O
16022 Lefthand Network SSH O
49152 WBEM TCP SMI-S O
49153 WBEM Secure Port TCP SMI-S >O
50000 IBM DB2Database JDBC O
55988 WBEM TCP SMI-S O
55989 WBEM Secure Port TCP SMI-S O
60000 WBEM TCP SMI-S >O
60001 WBEM Secure Port TCP SMI-S O
I = That port numbermust be opened on the Source Server; for example, the HP StorageEssentials management server, the Report Optimizer server, or the SMIAgent (to receiveinformation from a switch).
O = That port numbermust be opened on the target device.
I/O = That port numbermust be opened on both HP Storage Essentials server and target device.
*L = A loopback port that must be available to the source server but not exposed outside.
Ports Used by Report Optimizer
Port Description
3306 MySQL for the Report Database uses this port.
6400, 6410, 6420, and 80 SI Agent uses these ports.
8080, 8005, 8443 TomCat uses these ports.
Turn Off Internet Information Services (IIS) and Third-Party Web ServersTo turn off Internet Information Services (IIS) and third-party Web servers, verify that InternetInformation Services (IIS) is either not installed or the service is set to manual and stopped.
Disable User Access Control on Windows 2008(Windows 2008 servers only)
16

1 Installing the Data Protector Reporter Edition onMicrosoft Windows
Do one of the following:
l Windows 2008 SP1 and SP2. Disable user access control (UAC).
l Windows 2008 R2. Set UAC to the lowest level available.
For more information on how to change your settings for UAC, see theMicrosoft Windowsdocumentation for your operating system.
Verify NetworkingThemanagement server must have static or dynamic host name resolution.
The following steps are forWindows 2003. They can be used forWindows 2008, but may notexactly match the user interface.
To verify that the server’s name can be resolved through DNS:
1. Right-click My Computer in the Start menu.
2. Select Properties.
3. Click theComputer Name tab to see the fully qualified name of the computer under the labelFull Computer Name. Computer Name appears on the Properties page onWindows 2008.The server must be in the domain in which it is going to be used.
4. From a command prompt, type nslookup <FQDN>. FQDN (fully qualified domain name) isthe fully qualified computer name obtained in the previous step.
5. In the command prompt, type nslookup <IP address>. IP address is the IP address ofthe server.Both results from nslookup should have the same fully qualified computer name and IPaddress.
6. In the command prompt, type nslookup <Short name of computer>. Results shouldresolve to the computer’s fully qualified computer name and IP address.
Themanagement server uses nslookup to resolve the names and IP addresses of managedsystems. If the DNS suffix com is listed in the TCP/IP properties as one to append, problemssuch as inaccurate system status and incorrect IP addresses for systems HP Storage Essentialsmanages might occur. To correct this, remove com from the TCP/IP DNS suffix list:
1. OpenControl Panel > Network Connections > Local Area Connection > Properties andselect the Internet Protocol > Properties > Advanced > DNS tab.
2. If com is in theAppend these suffixes (in order) box, remove it.
Caution: If you plan to browse to HP Storage Essentials from a server in a different domain,verify that the DNS suffix of themanagement server is added to the suffix list of the web client.
Install a Supported BrowserInstall a supported browser on any machine from which you intend to view HP Storage Essentialspages. See the support matrix for your edition for a list of supported browsers.
17
Chapter 1
Installing the ProductCaution: Do not manually install the Oracle database using the Oracle DVD set. The HP StorageEssentials installation wizard prompts you for the Oracle installation files when theOracleinstallation components are required.
This section contains the following information:
l Windows Installation Checklist below
l Step 1 – Read the Release Notes and the Support Matrix on the facing page
l Step 2 – LogOn to theWindows Server on the facing page
l Step 3 –Open Several Ports (Windows 2008 R2Only) on the facing page
l Step 4 – Start the HP Storage Essentials forWindows InstallationWizard on page 20
l Step 5 –Obtain a License Key on page 23
l Step 6 – Check for the Latest Service Pack on page 24
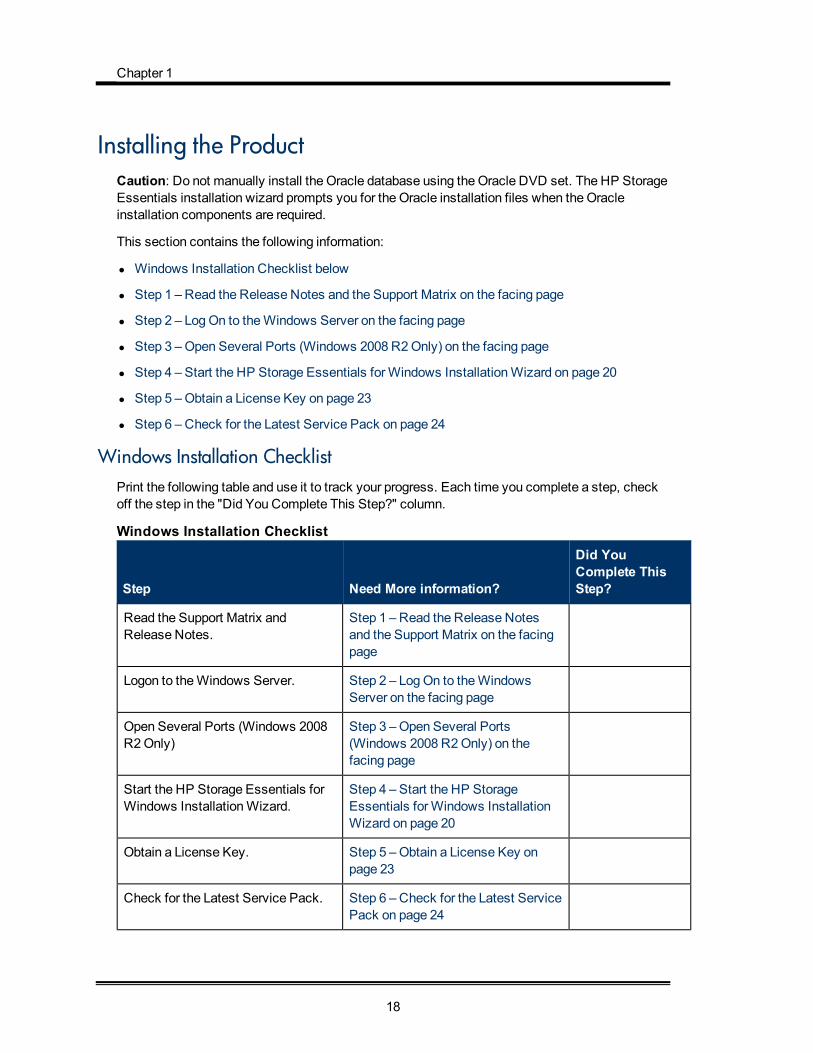
Windows Installation ChecklistPrint the following table and use it to track your progress. Each time you complete a step, checkoff the step in the "Did You Complete This Step?" column.
Step Need More information?
Did YouComplete ThisStep?
Read the Support Matrix andRelease Notes.
Step 1 – Read the Release Notesand the Support Matrix on the facingpage
Logon to theWindows Server. Step 2 – LogOn to theWindowsServer on the facing page
Open Several Ports (Windows 2008R2Only)
Step 3 –Open Several Ports(Windows 2008 R2Only) on thefacing page
Start the HP Storage Essentials forWindows InstallationWizard.
Step 4 – Start the HP StorageEssentials forWindows InstallationWizard on page 20
Obtain a License Key. Step 5 –Obtain a License Key onpage 23
Check for the Latest Service Pack. Step 6 – Check for the Latest ServicePack on page 24
Windows Installation Checklist
18

1 Installing the Data Protector Reporter Edition onMicrosoft Windows
Step 1 – Read the Release Notes and the Support MatrixTheRelease Notes discuss late-breaking issues not covered in the Installation Guide. Read thesupport matrix to make sure the server on which you plan to install themanagement server meetsor exceeds the requirements. Management server requirements are listed on theManagerPlatform (Mgr Platform) tab of the support matrix. TheRelease Notes and support matrix can befound in any of the top-level directories of the StorageEssentials DVD.
Step 2 – Log On to the Windows ServerCreate a new account or log on to an existing account on theWindows system onwhich you areinstalling HP Storage Essentials that is amember of the Administrators group.
If you are installing HP Storage Essentials onWindows 2008, disable UAC as described inDisable User Access Control onWindows 2008 on page 16.
Step 3 – Open Several Ports (Windows 2008 R2 Only)If you plan to install the Data Protector Reporter Edition onWindows 2008 R2, youmust openseveral ports before you begin the installation.
To open ports 6400 and 8080:
1. OpenWindows Firewall with Advanced Security by selectingStart > Administrative Tools>Windows Firewall Advanced Security.
2. Create a new Inbound Rule, as follows:
a. Click Inbound Rules, and then right-click Inbound Rules.
b. Select New Rule from the right-click menu.
3. Select thePort option and click Next.
4. Select the TCP option.
5. Enter 6400, 8080 for specific local ports. Make sure there is a space between the commaand 8080.
6. Click Next.
7. Select theAllow the connection option and then click Next.
8. In theWhen does this rule apply? window, select theDomain, Private, andPublic options.
9. Click Next.
10. Type a name for the rule; for example, Reporter ports.
11. Click Finish.
12. Refer to the next section for information about the installation. During the installation you areshownWindows Security Alerts. Keep the defaults in theWindows Security Alerts andalways click Allow Access.
19

Chapter 1
Step 4 – Start the HP Storage Essentials for Windows Installation WizardDo not install the Oracle database separately.
Keep inmind the following:
l The drive on which you install themanagement server must be NTFS format or the installationwizard will fail.
l Before you start the installation wizard, make sure all applications are closed. If the wizarddetects locked files, youmust unlock those files by closing their corresponding application.Continue with the installation/upgrade after you unlock the files. If the wizard detects lockedfiles, it provides a link to the locked files log. If the locked files log says that the processexplorer.exe is locked, youmust exit the wizard, reboot the server and restart the wizard.
l The Reporter installation provides default passwords for the Administrator and "sa" accounts.It is strongly recommended that you change passwords for these accounts after you install theproduct. For more information, see Changing the Passwords for Report Optimizer Accounts onpage 73.
To install the product:
1. Verify the following:
n The designated HP Storage Essentials server meets or exceeds the requirements listedin the Pre-installation Checklist (Installations) on page 9 and in the support matrix.
n The file system format on the HP Storage Essentials server is NTFS. The HP StorageEssentials installation wizard will display an error message if the file system is notNTFS.
The directory in which you install themanagement server must have write access for thelocal Administrators group. Installing themanagement server in a directory created byanother program— for example, the Proliant Support Pack — is not recommended.
2. Log on as a user that is amember of the Administrators group.
3. Do one of the following:
The installation bits must be local. Youmust either insert the DVD locally or copy the bits tothe server where you are planning to install the product.
n DVD. Put the StorageEssentials DVD in the DVD drive of the designated HP StorageEssentials server. Double-click setup.exe in theManagerCDWindows directory on theDVD.
Or
n Copied locally. Copy the bits of the StorageEssentialsDVD to the server where you areplanning to install the product. Double-click setup.exe in theManagerCDWindowsdirectory on the DVD.
20

1 Installing the Data Protector Reporter Edition onMicrosoft Windows
If you copy theOracle DVD, copy it to a top-level directory where the directory path is notmore than 20 characters long.
When you copy the bits from aDVD to the server, preserve directory names andstructures. The directory structure you copiedmust match the folder structure exactly.
The HP Storage Essentials forWindows installer starts, and theWelcome page is displayed.
4. Click Next.
n The installation wizard scans the server to ensure the server is ready for the installation.
n The installation wizard displays the status of the scan in the Scan tab.
5. Click Next.
6. Options tab:
TheOptions tab has the following requirements for entering paths:
n Only the following characters are supported: A-z, 0-9, hyphens, underscores, periods,and backslashes.
n Paths cannot contain spaces.
n The drive letter must be a fixed drive.
TheOptions tab displays information about the following:
Note: If the installation detects installed components, it selects them by default. You cannotunselect components that need to be upgraded.
n Data Protector Reporter Edition. Select this option to install the Data ProtectorReporter Edition, which lets youmanage Data Protector and provides detailed reportingon backup resources. It also provides the following subset of features from the StorageResourceManagement Edition:
o Element Manager. Element Manager provides a fast and contextualized way tofind information about backup elements, enabling you to quickly verify informationand troubleshoot problems. Element Manager also enables you to use folders tocreate hierarchical groups of backup elements.
o Backup Manager. BackupManager helps you to keep track of element backups.
o System Manager. SystemManager is the gateway tomany features that let youview details about the backup elements. SystemManager provides a topology thatlets you view how the devices in your network are connected.
o Event Manager. Event Manager lets you view, clear, sort, and filter events frombackup elements. An event can be anything that occurs on the element.
o Reporter. Report Optimizer provides detailed reporting on the backupinfrastructure, such as statistics and usage trends. If you want to use ReportOptimizer to create reports, contact support for a license that grants you this
21
Chapter 1
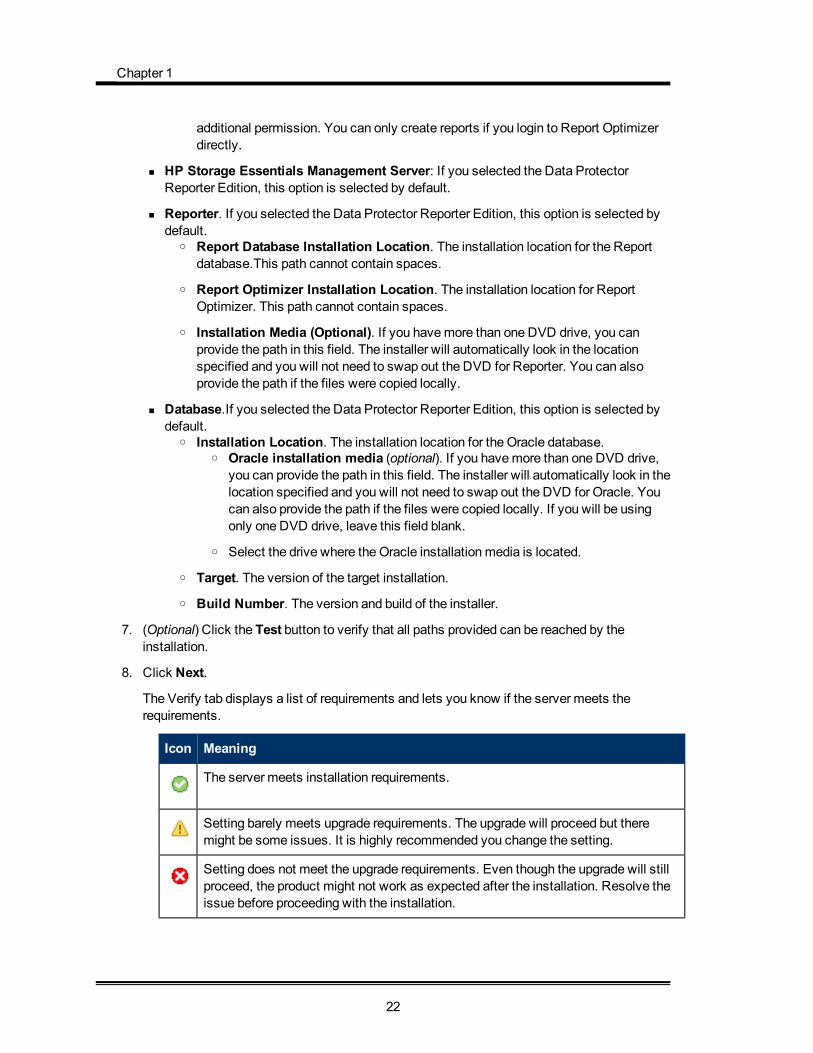
additional permission. You can only create reports if you login to Report Optimizerdirectly.
n HP Storage Essentials Management Server: If you selected the Data ProtectorReporter Edition, this option is selected by default.
n Reporter. If you selected the Data Protector Reporter Edition, this option is selected bydefault.
o Report Database Installation Location. The installation location for the Reportdatabase.This path cannot contain spaces.
o Report Optimizer Installation Location. The installation location for ReportOptimizer. This path cannot contain spaces.
o Installation Media (Optional). If you havemore than one DVD drive, you canprovide the path in this field. The installer will automatically look in the locationspecified and you will not need to swap out the DVD for Reporter. You can alsoprovide the path if the files were copied locally.
n Database.If you selected the Data Protector Reporter Edition, this option is selected bydefault.
o Installation Location. The installation location for the Oracle database.o Oracle installation media (optional). If you havemore than one DVD drive,
you can provide the path in this field. The installer will automatically look in thelocation specified and you will not need to swap out the DVD for Oracle. Youcan also provide the path if the files were copied locally. If you will be usingonly one DVD drive, leave this field blank.
o Select the drive where the Oracle installationmedia is located.
o Target. The version of the target installation.
o Build Number. The version and build of the installer.
7. (Optional) Click the Test button to verify that all paths provided can be reached by theinstallation.
8. Click Next.
The Verify tab displays a list of requirements and lets you know if the server meets therequirements.
Icon Meaning
The server meets installation requirements.
Setting barely meets upgrade requirements. The upgrade will proceed but theremight be some issues. It is highly recommended you change the setting.
Setting does not meet the upgrade requirements. Even though the upgrade will stillproceed, the product might not work as expected after the installation. Resolve theissue before proceeding with the installation.
22

1 Installing the Data Protector Reporter Edition onMicrosoft Windows
9. Click theRe-Verify button after youmodify a setting tomake sure that it meets theinstallation requirement.
10. Click Next.
The Summary tab displays the components to be installed and an estimate of the time inminutes:seconds it will take to complete installing each component.
11. Click InstallThe Progress tab provides a status of the installation for each component.
12. Copy the Unique Client ID number displayed on the Finish tab.
13. Select one of the following options on the Finish page:
n Start HP Storage Essentials when "Finish" is clicked. This option starts theAppStorManager service after you click the Finish button so you can access themanagement server. It might take a few minutes for AppStorManager to finish starting.
n Start HP Storage Essentials later. This option starts the AppStorManager service at alater time. Users will not be able to access themanagement server unless theAppStorManager service is running.
14. Restart the OracleServiceAPPIQ service, which is the service for the Oracle databaseembedded in HP Storage Essentials.
Refer to yourWindows documentation for information on how to restart a service.
When you restart the OracleServiceAPPIQ service, the AppStorManager service is alsorestarted. The AppStorManager service is the service for HP Storage Essentials. You will notbe able to access themanagement console until the AppStorManager service hascompletely started.
15. If you specified any customized changes using theProduct Health > Advanced option in aprior release, a record of those changes is saved in the%MGR_DIST%\logs\custom.txt fileafter upgrading. For example, if youmodified the value of thediscovery.exclude.NetAppFilerProvider property to true to exclude NetApp Filers discovery,youmust add that information again to the Custom Properties box after the upgrade.
For details about accessing the HP Storage Essentials installation log files, see Log Filesfrom the Installation/Upgrade onWindows on page 92.
Step 5 – Obtain a License KeySee your product invoice for important information about licensing. If you are required to import alicense, copy your Unique Client ID number and follow the instructions in your product invoicedocumentation to obtain and apply your license key. A license key is required to start themanagement server for the first time. Follow these steps to obtain and import your HP StorageEssentials license:
If you are installing the HP Storage Essentials for the first time, youmust obtain a license key tostart and run the product.
Verify that the following are enabled on your web browser:
23

Chapter 1
l Cookies
l JavaScript
l Java
To obtain and import your HP Storage Essentials license:
1. Copy (Ctrl + C) the Unique Client ID (UID) displayed on the Finish page.
If you did not have a chance to copy the Unique Client ID number from the Finish tab, you willsee the Unique Client ID again after you log on for the first time into HP Storage Essentials.HP Storage Essentials guides you through the process for importing a license.
2. Go to http://webware.hp.com and select theGenerate New Licenses option. Follow thesteps for obtaining your license key. You will need to provide your UID and HP Order ID(found on the entitlement certificate).
3. Make sure the AppStorManager service is running. This servicemust be running for theproduct to work.
4. Open a web browser and enter the URL of the server running themanagement server; forexample, http://www.myserver.com
5. Type admin for the user name, and password for the password.
6. Import the license key:
a. Click theSecuritymenu.
b. Click Licenses from themenu.
c. Click the Import License File button.
d. Click theBrowse button. The file system of the computer used to access themanagement server is shown.
e. Select the license file.
f. Click OK.
Step 6 – Check for the Latest Service PackA service pack might have been created since this release. Obtain the latest service pack at thefollowing location:
http://h20230.www2.hp.com/selfsolve/patches
Removing the ProductHP Storage Essentials provides scripts for removing the following themanagement server,Reporter and theOracle database. Run these scripts if you want to remove themanagementserver and Reporter (Report Optimizer and the Report Database). If themanagement server andReporter are on separate servers, run the script on each server.
24

1 Installing the Data Protector Reporter Edition onMicrosoft Windows
Use the removal scripts instead of Add/Remove programs. If you try Add/Remove programs, youare prompted to use the uninstall scripts and Add\Remove programs does not continue.
The removal scripts stops all Java processes. Other applications on the server running java.exeare stopped during the uninstall of HP Storage Essentials. After reboot, all processes continue asnormal.
To remove the product fromWindows:
1. Do one of the following:
n To run the uninstall script from the server, go to the following directory:
C:\hp\SRM_Uninstall_9_4\support
In this instance, C:\ is the drive where the product was installed.
Or
n To run the uninstall script from the installation DVD, insert the StorageEssentials DVDinto a server that has themanagement server installed. Open a command prompt windowand navigate to the following directory:
ManagerCDWindows\install\support
2. Type the following command at the command prompt:
removeAll.cmd
The removeAll.cmd script removes the following components from the server:
n Themanagement server
n The database instance for themanagement server
n The Report Database
n Report Optimizer
n The database instance for Reporter
n The CIM extension installation files
3. Type the following command to remove theOracle software:
RemoveOracle.cmd
4. Reboot the Server. This step is required to finish the cleanup of the files.
Log Files from the Installation/Upgrade on WindowsThe installation/upgrade wizard generates log files in the C:\srmInstallLogs directory. Log filesprovided at the top level of the C:\srmInstallLogs directory are for the current session of theinstallation/upgrade wizard or for the last session the installation/upgrade wizard was run. Filesfrom a previous session are stored in a subdirectory with a date and time stamp.
25

Chapter 1
Log files are generated by the installation/upgrade wizard. Some log files also provide an<logfilename>_output.log file. The <logfilename>_output.log file displays information about anyerrors, and is generated by the component itself instead of the installation/upgrade wizard.
The log files are zipped into a file in the root of the system drive. The zip file can be sent to supportto help diagnose installation and upgrade issues, for example: C:\srmLog02-01-2011-16_21_49.zip.
26
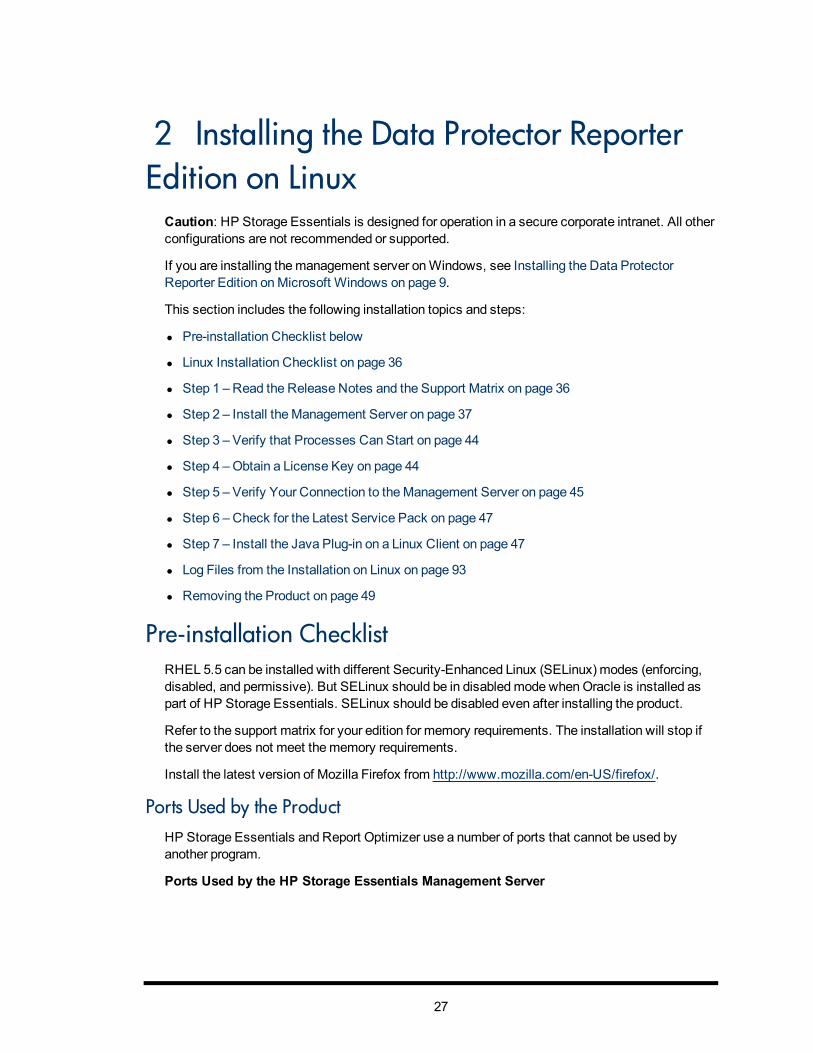
2 Installing the Data Protector ReporterEdition on Linux
Caution: HP Storage Essentials is designed for operation in a secure corporate intranet. All otherconfigurations are not recommended or supported.
If you are installing themanagement server onWindows, see Installing the Data ProtectorReporter Edition onMicrosoft Windows on page 9.
This section includes the following installation topics and steps:
l Pre-installation Checklist below
l Linux Installation Checklist on page 36
l Step 1 – Read the Release Notes and the Support Matrix on page 36
l Step 2 – Install theManagement Server on page 37
l Step 3 – Verify that Processes Can Start on page 44
l Step 4 –Obtain a License Key on page 44
l Step 5 – Verify Your Connection to theManagement Server on page 45
l Step 6 – Check for the Latest Service Pack on page 47
l Step 7 – Install the Java Plug-in on a Linux Client on page 47
l Log Files from the Installation on Linux on page 93
l Removing the Product on page 49
Pre-installation ChecklistRHEL 5.5 can be installed with different Security-Enhanced Linux (SELinux) modes (enforcing,disabled, and permissive). But SELinux should be in disabledmode whenOracle is installed aspart of HP Storage Essentials. SELinux should be disabled even after installing the product.
Refer to the support matrix for your edition for memory requirements. The installation will stop ifthe server does not meet thememory requirements.
Install the latest version of Mozilla Firefox from http://www.mozilla.com/en-US/firefox/.
Ports Used by the ProductHP Storage Essentials and Report Optimizer use a number of ports that cannot be used byanother program.
Ports Used by the HP Storage Essentials Management Server
27

Chapter 2
Port Description Protocol In/Out
22 Used by SSH to deploy host agents (optional – only needif using the internal agent deployment tool)
TCP O
80 An external port used for discovery and the HTTP webserver. You can use port 443 instead for security.
l NetApp
l WebBrowser Interface
l HP Accelerator Pack for Operations Orchestration
SNMP I/O
161 l SNMP Agent
l Cisco SNMP
This port is not required and is optional for SNMPtrapping. HP Storage Essentials uses SNMP version 2.Device alerts can also be delivered to HP StorageEssentials via API or SMI-S for certain devices.
SNMP I/O
162 An external port that is used for the SNMP trap listener.SNMP can be disabled, but no traps will be received.
l Cisco SNMP
This port is not required, but it is optional for SNMPtrapping. HP Storage Essentials uses SNMP version 2.Device alerts can also be delivered to HP StorageEssentials via API or SMI-S for certain devices.
SNMP I/O
389 LDAP directory service TCP O
443 An external port used for Secure Socket Layer (SSL) withthe web interface. Port 80 can be used instead, but therewill be no SSL.
l Celerra
l HP Storage Essentials OM SPI v2.0
l NetApp
l VMWare VC/ESX
l WebBrowser interface
l BSAE LiveNetwork Connector (LnC) for ReportOptimizer
TCP I
863 EVA Performance collection "Pluto" EVA Perf O
28

2 Installing the Data Protector Reporter Edition on Linux
Port Description Protocol In/Out
1099 l HP Storage EssentialsConnector for HP BSA ServerAutomation
l RMI Registry
l XP Arrays via Built-in XP Provider
TCP I
1443 Microsoft SQL Server Database (optional – only used ifMSSQLDatabase Viewer is used)
O
1521 l Oracle Transparent Name Substrate (TNS) ListenerPort (Used for reporter access to HP StorageEssentials, as well as optional Oracle DatabaseViewer discovery)
l HP uCMDB DDM Probe
TCP >I
1972 Intersystems Caché Database JDBC O
2001 Device discovery port for the following devices:
l XPs via CV-AE
l HDS via HDvM
l SUN StorEdge 9900
HiCommandAPI(HTTP/HTTPS)
O
2372 Device discovery port for EVAs discovered through built-in EVA provider "Pluto" (Command View Instances priorto 9.1)
RSM SALBORGAPI
O
2443 Device discovery port for the following devices:
l XPs via CV-AE
l HDS via HDvM
l SUN StorEdge 9900
l VMWare VC/ESX
HiCommandAPI(HTTP/HTTPS)
>O
2463 Device discovery port for the following devices:
l SUN through the Engenio/LSI provider
l Enginio/LSI based arrays
TCP O
2707 Device discovery port for the EMC storage systemsdiscovered through Solutions Enabler/SYMAPI
SYMAPI O
29

Chapter 2
Port Description Protocol In/Out
4444 JBoss RMI/JRMP Invoker
HP Storage EssentialsConnector for HP BSA ServerAutomation
TCP I
4445 JBoss Pooled Invoker TCP >L*
4673 l CIM Extension/Product Health Agent(Tuneable)
l IBM VIO
TCP O
5432 PostgreSEQServer Database JDBC O
5555 Data Protector Agentless TCP O
5962 Discovery Group 12 CIMOMRMI TCP >L*
5964 Discovery Group 11 CIMOMRMI TCP L*
5966 Discovery Group 10 CIMOMRMI TCP L*
5968 Discovery Group 9 CIMOMRMI TCP L*
5970 Discovery Group 8 CIMOMRMI TCP >L*
5972 Discovery Group 7 CIMOMRMI TCP L*
5974 Discovery Group 6 CIMOMRMI TCP L*
5976 Discovery Group 5 CIMOMRMI TCP L*
5978 Discovery Group 4 CIMOMRMI TCP >L*
5980 Discovery Group 3 CIMOMRMI TCP L*
5982 Discovery Group 2 CIMOMRMI TCP L*
5984 Discovery Group 1 CIMOMRMI TCP L*
5986 Default Discovery Group CIMOMRMI TCP >L*
30

2 Installing the Data Protector Reporter Edition on Linux
Port Description Protocol In/Out
5988/5989
l 3PAR SMI-S
l Brocade SMI-A
l Cisco SMI-S
l Compellent SMI-S
l EVAs via CV-EVA SMI-S v4.xx
l EVAs via CV-EVA SMI-S v9.1 or later
l ESL/EML via CV-TL SMI-S v1.7/1.8/2.0
l ESL/EML via CV-TL SMI-S v2.2/2.3
l HP VLS 9000 (port 5988 only)
l HSG-80 via EML SMI-S
l IBM XIV
l McDATA SMI-S
l MSA 1000/1500 via MSA SMI-S
l MSA 2000 viaMSA SMI-S Proxy Provider
l MSA 2300G2 viaMSA SMI-S Proxy Provider
l MSA P2000G3 (port 5989 only)
l IBM CIM Agent
l QLogic SMI-S
l SMI-S and SMI-S secure
l WBEM/WMI Mapper
TCP/SMI-S O
6389 Device discovery port for CLARiiON storage systemsdiscovered through the NaviSphere CLI
Navisphere CLI O
8009 JBoss Embedded Tomcat Service TCP L*
8083 JBoss Web Service L*
8093 JBoss UIL Server IL Service
HP Storage EssentialsConnector for HP BSA ServerAutomation
TCP I
8443 BSAE DataMiner TCP O
8873 BSAE DataMiner TCP O
9088 IBM Informix Dynamic Server Database JDBC O
31

Chapter 2
Port Description Protocol In/Out
12443 HP X9000 HTTPS O
16022 Lefthand Network SSH O
49152 WBEM TCP SMI-S O
49153 WBEM Secure Port TCP SMI-S >O
50000 IBM DB2Database JDBC O
55988 WBEM TCP SMI-S O
55989 WBEM Secure Port TCP SMI-S O
60000 WBEM TCP SMI-S >O
60001 WBEM Secure Port TCP SMI-S O
I = That port numbermust be opened on the Source Server; for example, the HP StorageEssentials management server, the Report Optimizer server, or the SMIAgent (to receiveinformation from a switch).
O = That port numbermust be opened on the target device.
I/O = That port numbermust be opened on both HP Storage Essentials server and target device.
*L = A loopback port that must be available to the source server but not exposed outside.
Ports Used by Report Optimizer
Port Description
3306 MySQL for the Report Database uses this port.
6400, 6410, 6420, and 80 SI Agent uses these ports.
8080, 8005, 8443 TomCat uses these ports.
Prerequisite RPMs for OracleVerify that your system includes the required packages for Oracle by using the followingcommand:
# rpm –q <package-name>
Install the required packages from the DVD for your operating system. The following list includesthe packages needed for the Oracle installation. Some of these packages might be selectivelyinstalled depending on themode selected during an installation of the operating system.
Install the following packages or later versions for RHEL 5.5 systems (64-bit):All packages listed are 64 bit unless otherwise stated.
32

2 Installing the Data Protector Reporter Edition on Linux
l binutils-2.17.50.0.6
l compat-libstdc++-33-3.2.3
l compat-libstdc++-33-3.2.3(32 bit)
l elfutils-libelf-0.125
l elfutils-libelf-devel-0.125
l gcc-4.1.2
l gcc-c++-4.1.2
l glibc-2.5
l glibc-2.5 (32 bit)
l glibc-common-2.5
l glibc-devel 2.5
l glibc-devel 2.5 (32 bit)
l glibc-headers-2.5
l kernel-headers-2.6.18
l ksh-20060214
l libaio-0.3.106
l libaio -0.3.106 (32 bit)
l libaio-devel-0.3.106
l libaio-devel-0.3.106 (32 bit)
l libgcc-4.1.2
l libgcc-4.1.2 (32 bit)
l libgomp-4.1.2
l libstdc++-4.1.2
l libstdc++-4.1.2 (32 bit)
l libstdc++-devel-4.1.2
l make-3.81
l redhat-lsb-3.1
l numactl-devel-0.9.8
l selinux-policy-targeted-2.4.6
l sysstat-7.0.2
l unixODBC-2.2.11
33

Chapter 2
l unixODBC-2.2.11 (32 bit)
l unixODBC-devel - 2.2.11
l unixODBC-devel - 2.2.11 (32 bit)
Install the following packages or later versions for SUSE 10 SP2 (64 bit):All packages listed are 64 bit unless otherwise stated.
l binutils-2.16.91.0.5
l compat-libstdc-5.0.7
l gcc-4.1.0
l gcc-c++-4.1.2
l glibc-2.4-31.63
l glibc-devel-2.4-31.63
l glibc-devel-32bit-2.4-31.63
l ksh-93r-12.9
l libaio- 0.3.104
l libaio-32bit-0.3.104
l libaio-devel -0.3.104
l libaio-devel-32bit-0.3.104
l libelf-0.8.5
l libgcc-4.1.2
l libstdc++-4.1.2
l libstdc++-devel-4.1.2
l make-3.80
l numactl-0.9.6.x86_64
l orarun-1.9
l sysstat-8.0.4
Software DependenciesVerify that the following required software is available on your system, and install any that aremissing:
l Perl 5.8.3 or above. By default, the operating system installs Perl as follows:n RedHat Linux (RHEL) 5.5 installs Perl 5.8.8
n SUSE Linux Enterprise 10 SP2 installs Perl 5.8.8Make sure Linux systems are configured with a swap size equal to their physical memory (up to16GB). If the physical memory is greater than 32GB, the swap size can stay at 16GB.
34
2 Installing the Data Protector Reporter Edition on Linux
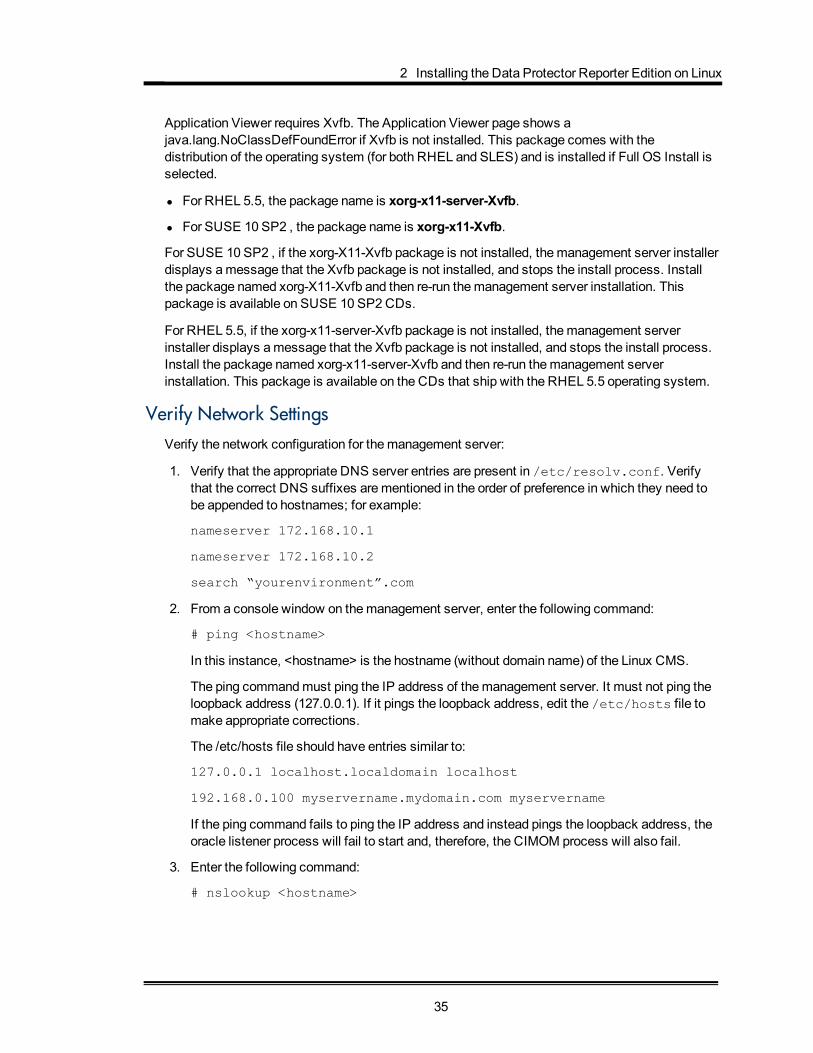
Application Viewer requires Xvfb. The Application Viewer page shows ajava.lang.NoClassDefFoundError if Xvfb is not installed. This package comes with thedistribution of the operating system (for both RHEL and SLES) and is installed if Full OS Install isselected.
l For RHEL 5.5, the package name is xorg-x11-server-Xvfb.
l For SUSE 10 SP2 , the package name is xorg-x11-Xvfb.
For SUSE 10 SP2 , if the xorg-X11-Xvfb package is not installed, themanagement server installerdisplays amessage that the Xvfb package is not installed, and stops the install process. Installthe package named xorg-X11-Xvfb and then re-run themanagement server installation. Thispackage is available on SUSE 10 SP2CDs.
For RHEL 5.5, if the xorg-x11-server-Xvfb package is not installed, themanagement serverinstaller displays amessage that the Xvfb package is not installed, and stops the install process.Install the package named xorg-x11-server-Xvfb and then re-run themanagement serverinstallation. This package is available on the CDs that ship with the RHEL 5.5 operating system.
Verify Network SettingsVerify the network configuration for themanagement server:
1. Verify that the appropriate DNS server entries are present in /etc/resolv.conf. Verifythat the correct DNS suffixes arementioned in the order of preference in which they need tobe appended to hostnames; for example:
nameserver 172.168.10.1
nameserver 172.168.10.2
search “yourenvironment”.com
2. From a console window on themanagement server, enter the following command:
# ping <hostname>
In this instance, <hostname> is the hostname (without domain name) of the Linux CMS.
The ping commandmust ping the IP address of themanagement server. It must not ping theloopback address (127.0.0.1). If it pings the loopback address, edit the /etc/hosts file tomake appropriate corrections.
The /etc/hosts file should have entries similar to:
127.0.0.1 localhost.localdomain localhost
192.168.0.100 myservername.mydomain.com myservername
If the ping command fails to ping the IP address and instead pings the loopback address, theoracle listener process will fail to start and, therefore, the CIMOM process will also fail.
3. Enter the following command:
# nslookup <hostname>
35

Chapter 2
In this instance, <hostname> is the hostname (without domain name) of themanagementserver.
4. Enter the following command:
# nslookup <IP address>
In this instance, <IP address> is the IP address of the server.
5. Verify that both results from nslookup have the same fully qualified computer name and IPaddress.
Linux Installation ChecklistPrint the following table and use it to track your progress. Check off each step as you complete it.
Step Need More information?
Did YouComplete ThisStep?
Read the Release Notesand the Support Matrix
Step 1 – Read the Release Notes andthe Support Matrix below
Install theManagementServer
Step 2 – Install theManagement Serveron the facing page
Verify that Processes CanStart
Step 3 – Verify that Processes CanStart on page 44
Obtain a License Key Step 4 –Obtain a License Key on page44
Verify Your Connection totheManagement Server
Step 5 – Verify Your Connection to theManagement Server on page 45
Check for the LatestService Pack
Step 6 – Check for the Latest ServicePack on page 47
Step 1 – Read the Release Notes and the Support MatrixRead the Release Notes for late-breaking information not covered in the the Installation Guide.
Read the support matrix to make sure the server on which you plan to install themanagementserver meet or exceed the requirements. Management server requirements are listed on theManager Platform (Mgr Platform) tab of the support matrix.
The Release Notes and support matrix can be found in any of the top-level directories of theStorageEssentials DVD.
36
2 Installing the Data Protector Reporter Edition on Linux
Step 2 – Install the Management ServerKeep inmind the following:
l Refer to the release notes for late breaking information.
l Do not install the product on a host containing a hyphen in its name.
l (Report Optimizer on Linux) If theWeb Intelligence Processing Server does not start or you areshown the error message "Cannot initialize Report Engine server (RWI: 00226) (Error: INF)"when you try to run a report, see the steps inWeb Intelligence Processing Server Does NotStart on page 96.
l Your screen resolution should be at least 1024 pixels by 768 pixels; otherwise, youmight runinto issues with viewing the user interface for the software.
l If you receive amessage saying there is not enough room in the temp directory to perform theinstallation, set the %TEMP% and %TMP% variables to another directory. The installation usesthe directory set in the%TEMP% and%TMP% variables to extract the installation files. Bothof these variables must point to the same directory. For information on how to set thesevariables, see the documentation for your operating system.
l Verify that the required software is available on your system as described in SoftwareDependencies on page 34.
l The installation of the Oracle database on Linux does not work when the dba group exists in anexternal database, such as LDAP. Disable LDAP authentication on the system when installingHP Storage Essentials. Also ensure that the Linux group lookup is performed with files beforeldap. For more information, see Unable to Install the Oracle Database on Linux on page 1.
l Themanagement server installation on Linux requires a non-loopback IP address to start theManagement Server (appstormanager service). Linux requires the Fully Qualified DomainName and the IP address on separate lines on /etc/hosts for themanagement server to start.This is the operating system default.)
l In this release, no RPM entry is created for management server on Linux.
l When you install themanagement server on computer, youmust install the software using aPOSIX (Portable Operating System Interface) shell, such as sh. C Shell is not supported.
l Youmust install themanagement server on a server with a static IP address.
l Do not mount the DVD to any system-level directory, such as /home, /tmp, /root, or /var.If youmount the DVD to any of the system-level directories, the installation will not run. Youcan, however, create a directory below /home, such as /home/Oracle_bits andmount/home/Oracle_bits is a valid mount point. Youmust be careful about the permissioninherited from the parent directory. Some permissions might be restricted, such as executablepermission in setting up in a user profile. Make sure the directory you aremounting the DVDhas executable permissions. Verify that the disk device where DVD is mounted hasexecutable permissions.
The following is an example of the acceptable format:
# cat /etc/hosts
37

Chapter 2
127.0.0.1 localhost.localdomain
localhost15.115.235.13 meet.lab.usa.co.com meet
The following format is unacceptable:
# cat /etc/hosts meet.lab.usa.co.com.meet
localhost.localdomain.localhost
SLES10might have an entry for 127.0.0.2 in /etc/hosts against the host name for thatsystem. Comment out or remove the line that maps the IP address 127.0.0.2 to the system's fullyqualified hostname. Retain only that line that contains the actual IP address mapped to the fullyqualified host name; for example:
# cat /etc/hosts
127.0.0.1 localhost
#127.0.0.2 demo.novell.com demo
192.168.1.5 demo.novell.com demo
In the example, remove or comment the line in bold as shown in themiddle line.
1. Access the Linux host as described in Accessing the Linux Host on page 42. Yourinstallation options are the following:
n Install from the DVD:
i. Insert the StorageEssentialsDVD in the DVD drive of the server andmount it withthe following commands:
# mkdir -p /mnt/installer
# mount /dev/DVD /mnt/installer
In this instance, /dev/DVD is the DVD device.
ii. Log on to the server as a user with root privileges.
iii. Verify themount point and disk device by entering the following command at thecommand prompt:
# df -k
The following is an example of what is displayed:
Filesystem 1K-blocks Used Available Use%
Mounted on
/dev/cciss/c0d0p1 52924244 33893460 16880004 67% /
udev 12344632 132 12344500 1%
/dev
38

2 Installing the Data Protector Reporter Edition on Linux
/dev/scd1 85616 85616 0 100%
/media/ManagementServerDVD
In this instance, /dev/scd1 is the name of the disk device.
iv. Verify that the disk device where the DVD is mounted has executablepermissions by entering the following command at the command prompt:
#mount | grep /dev/scd1
In this instance, /dev/scd1 is the name of the disk device and/media/ManagementServerDVD is amount point.
The word "noexec" is displayed if the directory you aremounting does not haveexecutable permissions, as shown in the following example:
/dev/scd1 on /media/ManagementServerDVD type iso9660
(ro,noexec,nosuid,nodev,uid=0)
v. If the directory does not have executable permissions, remount the directory byentering the following command:
# mount -o remount,exec /dev/scd1/
In this instance, /dev/scd1 is themount point.
n Install from ISO Copied to Local Server:
i. Create a directory on which the drive will bemounted:
# mkdir /InstallProduct
ii. Loopmount the Report OptimizerDVD.iso to the /mnt/installer directory.
# mount -o loop,ro /InstallProduct/StorageEssentials
DVD.iso /mnt/installer
2. Set the display for X Windows by entering the following at the command prompt.
Note: Youmust run the setup.bin script, which uses X Windows.
# /usr/X11R6/bin/xhost +
3. Set the display to your client. Refer to the documentation for your shell for more information.
4. Access the Linux host from a remoteWindows client.
Before running X Windows from a client system, make sure that X server is running on theserver that you plan to install the software. Start up a local X server, and connect throughxterm to the remote system. The xterm session automatically sets the DISPLAY variable to“localhost:displaynumber:screennumber”. Change the display variable to point to the IPaddress of the client from which installer is launched with the correct display number andscreen number by entering the following command:
# DISPLAY=<ip-address>:displaynumber.screennumber
39

Chapter 2
In this instance, <ip-address> is the address of the client from which the Installer script islaunched.
If you do not modify the value of the DISPLAY variable, the installer will launch with thedefault display setting, and theOracle installation will stop prematurely with a timeout error.
The following is an example of the display command:
# DISPLAY=172.168.10.15:0.0
5. Export the display by entering the following command:
# export DISPLAY
6. Enter the following at the command prompt.
# /mnt/installer/ManagerCDLinux/setup.bin
In this instance, youmounted the DVD to the /mnt/installer location.
7. When you see the introduction screen, read through the information. You should already haveread the release notes and verified that youmeet the requirements stated in the supportmatrix. Click Next.
8. The installation scans the system to ensure that it meets the requirements. When the scan iscomplete, click Next to proceed with the installation.
9. Select the Data Protector Reporter Edition option.
n Data Protector Reporter Edition. Contains the following components:
o Element Manager provides a fast and contextualized way to find information aboutbackup elements, allowing you to quickly verify information and troubleshootproblems. It also enables you to use folders to create hierarchical groups of backupelements.
o Backup Manager helps you keep track of element backups.
o System Manager is the gateway tomany features that let you view details aboutthe backup elements. It provides a topology that enables you to view how thedevices in your network are connected.
o Event Manager enables you to view, clear, sort, and filter events from backupelements. An event can be anything that occurs on the element.
o Reporter provides detailed reporting on the backup infrastructure, such asstatistics and usage trends. To use Report Optimizer to create reports, contactsupport for a license that grants you this additional permission. You can only createreports if you log on to Report Optimizer directly.
10. Click Next.
11. In the Install Option window, provide the Installation Location for the product. The defaultinstallation location is the following: /opt/HP.
40
2 Installing the Data Protector Reporter Edition on Linux
You can browse to a location by clicking theBrowse button or you can provide the defaultlocation by clicking theRestore Default Folder button. The installation directory must notcontain spaces or special characters, such as the dollar sign ($).
12. Select management server if you want to install only themanagement server. If you want toinstall themanagement server and Reporter on the same server, select both options:
n Management Server. Themanagement server is installed when this option is selected.
n Reporter. This option is selected by default. Reporter is automatically installed on thesame server with themanagement server.
13. Under the Oracle section, provide the location where you want to install Oracle. The defaultlocation is /opt/oracle
14. (Optional) Provide the path to the Oracle installation in theMedia Path box. You will beasked for it during the installation.
15. Click Next.
16. Check the pre-installation summary. You are shown the following:
n Product Name
n Selected Components and the Installation Folder
n Disk Space Information
n Memory Requirements
n Operating System
n Port Availability
Refer to the support matrix for your edition for information about supported hardware.
17. Select one of the following:
n Install: if you agree with the pre-installation summary.
Or
n Previous: to modify your selections.
18. You are shown a listing of the components that are to be installed. You are shown a status ofthe installation of each component.
19. Copy the Unique Client ID number displayed on the Finish tab.
20. You are asked to select one of the following options on the Finish page:
n Start HP Storage Essentials When "Finish" is Clicked. This option starts theAppStorManager service after you click the Finish button so you can access themanagement server. It might take a few minutes for AppStorManager to finish starting.
41

Chapter 2
n Start HP Storage Essentials later. This option lets you start the AppStorManagerservice at a later time. Users will not be able to access themanagement server unlessthe AppStorManager service is running.
21. Restart the dora and appstormanager services as mentioned in the following steps:
a. Stop the appstormanager service, which is the service for HP Storage Essentials, byentering the following command at the command prompt:
/etc/init.d/appstormanager stop
b. Restart the dora service, which is the service for the Oracle database embedded in HPStorage Essentials, by entering the following command at the command prompt:
/etc/init.d/dbora restart
c. Start the appstormanager service by entering the following command at the commandprompt:
/etc/init.d/appstormanager start
Youwill not be able to access themanagement console until the appstormanagerservice has completely started.
22. Set the new Oracle database to ARCHIVE MODE to enable automatic RMAN backups. Seethe User Guide in the Documentation Center (Help > Documentation Center) for steps.
Accessing the Linux HostAccess the Linux host by doing one of the following:
l Use the graphics console on the localhost
Run the following command at the command prompt:
# /usr/X11R6/bin/xhost +
Or
l Access from a remote Linux client
Make sure that the X server on the remote client can accept TCP connections:
a. Open /etc/X11/xdm/Xservers.
b. Verify that the line for the screen number 0 (the line containing :0 local) does not containthe -nolisten tcp option. Remove the -nolisten tcp option if present. The line should looklike the following:
:0 local /usr/X11R6/bin/X
c. Enable TCP connections on the X server of the remote client:
o SUSE – Edit /etc/sysconfig/displaymanager and set the followingoptions to yes:
42

2 Installing the Data Protector Reporter Edition on Linux
DISPLAYMANAGER_REMOTE_ACCESS
DISPLAYMANAGER_XSERVER_TCP_PORT_6000_OPEN
Here is an example:
DISPLAYMANAGER_REMOTE_ACCESS="yes"DISPLAYMANAGER_XSERVER_
TCP_PORT_6000_OPEN="yes"
o RHEL (for gnome) – Edit /etc/X11/gdm/gdm.conf and set the DisallowTCPoption to false (uncomment if commented); for example:
DisallowTCP=false
d. If youmade any changes in the configuration files during the previous steps, reboot thesystem for the changes to take effect.
e. Run the following command at the command prompt:
# /usr/X11R6/bin/xhost +
f. Set the display to your client. Refer to the documentation for your shell for moreinformation.
Accessing the Linux Host from a Remote Client Using RealVNC
HP Storage Essentials supports the use of RealVNC Viewer Free Edition version 4.1 or later toaccess the Linux host from a remote client. Refer to the RealVNC documentation for informationon how to configure the RealVNC server and how to use it to access the Linux host. Once youhave configured the RealVNC server, follow the instructions in the section, Use the graphicsconsole on the localhost on previous page.
Accessing the Linux Host from a Remote Windows Client
Before running X Windows from a client system, make sure that X server is running on the HPStorage Essentials management server. Start up a local X server, connect through xterm to theremote system and set your DISPLAY environment variable appropriately by using the followingcommands:
# DISPLAY=<ip-address>:displaynumber.screennumber
In this instance, <ip-address> is the address of the client from which the Installer script islaunched.
# export DISPLAY
Here is an example:
# DISPLAY=172.168.10.15:0.0
# export DISPLAY
43
Chapter 2
Step 3 – Verify that Processes Can StartAfter you install themanagement server, verify the process for themanagement server hasstarted. It might take some time for the process to start depending on the server's hardware. Theprocess must be running tomonitor andmanage your elements. Refer to the appropriate sectionfor your operating system.
Verify that the process for themanagement server started. Enter the following at the commandprompt:
# /etc/init.d/appstormanager status
The following is displayed if the process started:
Checking for Cimom Service...
Cimom Service - RUNNING.
Checking for appstormanager service...
appstormanager service - RUNNING.
If the process did not start, enter the following at the command prompt:
# /etc/init.d/appstormanager start
To stop the process, enter the following at the command prompt:
# /etc/init.d/appstormanager stop
The appstormanager service is available with the following options:
# /etc/init.d/appstormanager
Usage: /etc/init.d/appstormanager { start | stop | restart | status |
force-reload }
If the status indicates that the CIMOM service is not running, wait a few minutes. It usually takessome time for the CIMOM process to start.
Step 4 – Obtain a License KeySee your product invoice for important information about licensing. If you are required to import alicense, copy your Unique Client ID number and follow the instructions in your product invoicedocumentation to obtain and apply your license key. A license key is required to start themanagement server for the first time. Follow these steps to obtain and import your HP StorageEssentials license:
If you are installing the HP Storage Essentials for the first time, youmust obtain a license key tostart and run the product.
Verify that the following are enabled on your web browser:
44
2 Installing the Data Protector Reporter Edition on Linux
l Cookies
l JavaScript
l Java
To obtain and import your HP Storage Essentials license:
1. Copy (Ctrl + C) the Unique Client ID (UID) displayed on the Finish page.
If you did not have a chance to copy the Unique Client ID number from the Finish tab, you willsee the Unique Client ID again after you log on for the first time into HP Storage Essentials.HP Storage Essentials guides you through the process for importing a license.
2. Go to http://webware.hp.com and select theGenerate New Licenses option. Follow thesteps for obtaining your license key. You will need to provide your UID and HP Order ID(found on the entitlement certificate).
3. Make sure the AppStorManager service is running. This servicemust be running for theproduct to work.
4. Open a web browser and enter the URL of the server running themanagement server; forexample, http://www.myserver.com
5. Type admin for the user name, and password for the password.
6. Import the license key:
a. Click theSecuritymenu.
b. Click Licenses from themenu.
c. Click the Import License File button.
d. Click theBrowse button. The file system of the computer used to access themanagement server is shown.
e. Select the license file.
f. Click OK.
Step 5 – Verify Your Connection to the ManagementServer
The appstormanager process must be running for you to connect to themanagement server.
Keep inmind the following:
l The license agreement, which is in PDF format, is displayed the first time you access HPStorage Essentials. Install the latest version of a PDF reader, such as Adobe Acrobat Reader,on the client you plan to use to access HP Storage Essentials for the first time. You canaccess the latest version of Adobe Acrobat Reader at the following URL:http://www.adobe.com
45

Chapter 2
l If you do not have a license installed, you are asked to install the license. If you do not have avalid license, contact customer support, as mentioned in the Documentation Center (Help >Documentation Center). To install the license, select the Import License File button on theLicenses tab (Security > Licenses).
l Make sure you do not have pop-up blocking software enabled. If yourWeb browser has anoption for blocking pop-ups, disable it. Themanagement server uses pop-ups for dialog boxes.
l Make sure JavaScript is enabled.
To access themanagement server:
1. Type one of the following in aWeb browser:
n For secure connections:
https://machinename
In this instance, machinename is the name of themanagement server.
n For nonsecure connections:
http://machinename
In this instance, machinename is the name of themanagement server.
2. If you receive an error message when you attempt to connect to themanagement server, theappstromanger process might be still starting. Wait for it to complete its start script.
Youmight see amessage like the following:
Receiving HTTP ERROR: 503 javax.ejb.EJBException: null;
CausedByException is: Unexpected Error; nested exception is:
java.lang.NoClassDefFoundError
Formore information, see Receiving HTTP ERROR: 503When Accessing theManagementServer on page 95.
3. In themanagement server login page, type admin in theName box and password in thePassword box, and then click Login.
4. If you are shown the software license agreement and you agree with its terms, click theAccept button.
To prevent the license agreement from being displayed each time you log on to themanagement server, select Do not show me this again.
5. When you first log on to themanagement server, you are asked to provide a license.
a. To obtain a license, youmust provide the unique client ID from themanagementserver. To access the unique client ID, select Security > Licenses in themanagementserver.
b. At the top of the page, select the unique client ID and press CTRL + C to copy it.
c. Paste the unique client ID into a text file.
46
2 Installing the Data Protector Reporter Edition on Linux
d. Access theWeb site specified on the Activation Card for the product.
e. Follow the instructions provided at theWeb site.
f. Once you obtain your license, return to the license page (Security > Licenses).
g. Click the Import License File button.
h. Select the license file you obtained from theWeb site and click OK.
6. If themanagement server does not detect a license, you are asked to import the license.Click the Import License File button to install the license.
The license file can be obtained from customer support.
Step 6 – Check for the Latest Service PackA service pack could have been created since this release. Obtain the latest service pack at thefollowing location:
http://h20230.www2.hp.com/selfsolve/patches
Step 7 – Install the Java Plug-in on a Linux ClientSeveral of the features in HP Storage Essentials require the Java plug-in. Install the Java plug-inon the clients that will be accessing HP Storage Essentials through a web browser.
ForWindows clients, install the Java plug-in by following the prompts in the user interface.
For Linux clients, follow the steps described in this section.
To install the Java plug-in on a Linux 32-bit client:
1. Go to the following URL and download the installation file for the Sun JRE when asked:
http://<management_server>/servlet.html?page=JavaPluginLinux
In this instance, <management_server> is the hostname of themanagement server.
2. Set the executable permission of the downloaded file:
# chmod +x downloaded_file_name
3. In a terminal window, run the downloaded file in a directory where you want the JRE to beinstalled. The executable installs the Sun JRE on your computer.
The Java plug-in for yourWeb browser is available in the following file:
$JRE_HOME/plugin/i386/ns7/libjavaplugin_oji.so
In this instance, $JRE_HOME is the directory containing the JRE installation.
4. In a terminal window, go to the $HOME/.mozilla/plugins directory. Create a pluginsdirectory if it does not exist.
47

Chapter 2
5. Remove any existing links to the Java plug-in that are in this directory. You can use therm libjavaplugin_oji.so command in a terminal window to remove an existingsymbolic link to the Java plug-in.
6. Create a symbolic link to the Java plug-in by using the following command:
# ln -s $JRE_HOME/plugin/i386/ns7/libjavaplugin_oji.so .
Youmust include the dot at the end of the command.
If you create this symbolic link in any directory other than $HOME/.mozilla/plugins,your browser will not be able to use this new Java plug-in.
7. If you are a root user on the server and you want to make the plug-in available to all users,create a symbolic link to the Java plug-in that is in the plugins directory under thebrowser's installation directory.
Any existing plug-ins in a user's home directory take precedence over this system-wide plug-in.
8. Restart yourWeb browser.
At times, the Linux agent might hang on startup on systems due to low entropy.
The Linux kernel uses keyboard timings, mousemovements, and IDE timings to generateentropy for /dev/random. Entropy gathered from these sources is stored in an “entropy pool,”and random values returned by /dev/random use this pool as source. This means that/dev/random will not return any values if the entropy counter is too low, and programs readingfrom /dev/random will be blocked until there is enough collected entropy. This can happen onservers with no keyboards, nomice, and no IDE disks.
9. To determine if the Linux agent is hung due to this problem, run the following command:
# kill -3 java_process_id
In this instance, java_porcess_id is the process id of the Java process for the Linux agent.This is not the process id returned by the #./status command.
The preceding commandwill generate the stack trace, which should look like the following:
INFO | jvm 1 | 2006/11/22 10:56:58 | at
java.security.SecureRandom.next(Unknown Source)
INFO | jvm 1 | 2006/11/22 10:56:58 | at
java.util.Random.nextInt(Unknown Source)
INFO | jvm 1 | 2006/11/22 10:56:58 | at
com.sun.net.ssl.internal.ssl.SSLContextImpl.engineInit(Unknown
Source)
INFO | jvm 1 | 2006/11/22 10:56:58 | at
javax.net.ssl.SSLContext.init(Unknown Source)
48
2 Installing the Data Protector Reporter Edition on Linux
INFO | jvm 1 | 2006/11/22 10:56:58 | at
com.appiq.cxws.agency.agent.AgentMessageDispatcher.
createServerSocket(AgentMessageDispatcher.java:1
INFO | jvm 1 | 2006/11/22 10:56:58 | at
com.appiq.cxws.agency.agent.AgentMessageDispatcher.
startAccepting(AgentMessageDispatcher.java:74)
10. To fix the problem, in the /opt/APPQcime/conf/wrapper.conf file, under the "# Javaadditional Properties" section, search for the property, wrapper.java.additional.N=-Djava.security.egd=file:/dev/random and change random to urandom.
After the change, the property should look like the following:
wrapper.java.additional.N=-Djava.security.egd=file:/dev/urandom
Log Files from the Installation on LinuxWhen an installation is successful, the installation wizard zips up the log files and places them inthe Installation_Directory/logs directory. In this instance, Installation_Directory is the directory where the product was installed.
The name of the zip file has a date stamp InstallWizard_MMDD-HHMM.zip; for example,InstallWizard_1212-0754.zip.
The zip file includes two internal log files created by the installation. These files contain debuggingfor internal use only. You do not need to look at them.
l /tmp/InstallSRMTemp/InstallWizard.err
l /tmp/InstallSRMTemp/InstallWizard.out
The log files in the following directories are for users:
l productInstallDir + "/logs" – Log files for the product installation in general.
l srmInstallDir + "/logs" – Log files for the installation of themanagement server.
l rdInstallDir + "/logs" – Log files for the Report Database installation.
l roInstallDir + "/logs" – Log files for the Report Optimizer installation.
l oracleInstallDir + "/oraInventory/logs" – Log files for the Oracle installation.
If the installation failed, you can find the log files in the %Installation_Directory%/logsdirectory.
Removing the ProductYoumust have root privileges to run the uninstall scripts.
To remove themanagement server, enter the following at the command prompt:
49

Chapter 2
/<management_server_install_directory>/Uninstall_HP_Storage_
Essentials/Uninstall_HP_Storage_Essentials
To remove the Report Database, enter the following at the command prompt:
/<InstallDIR>/ReportDatabase/Uninstall_Storage\ Report\
Database/Uninstall\ Storage\ Report\ Database
To remove Report Optimizer, enter the following at the command prompt:
/<Report Optimizer install directory>/Uninstall_
HPSRMReportOptimizer/Uninstall_HPSRMReportOptimizer
To remove theOracle database, insert the Oracle DVD into the DVD drive and enter the followingcommand:
./<Mount_Point>/UninstallDatabase
In this instance, <Mount_Point> is themount point for the DVD drive containing the Oracle DVD.
50

3 Required Configuration Steps after Installing Reporter
3 Required Configuration Steps afterInstalling Reporter
Youmust configure Reporter.
If you see the followingmessage when you try to run reports in Report Optimizer, see""Connection failed." MessageWhenGenerating Reports":
Connection failed. The server has reached the maximum number of
simultaneous connections. (Error: RWI 00239)
Changing the Passwords for Report Optimizer AccountsThe Reporter installation provides the following default passwords:
l Administrator user account: Changeme123
l MySQL "sa" user account: Password123
Changing the Password for the Administrator AccountTo change the password for the Administrator account:
1. Log on to Central Management Console as described in Accessing the Central ManagementConsole for Report Optimizer on page 54.
2. In the Organize section, click Users and Groups.
3. Double-click Administrators.
4. Right-click Administrator and then select Account Manager.
5. Enter the new password in the Enterprise Password Settings section.
6. Click Save and Close for the new password to take effect.
Changing the Password for "SA" UserTo change the password for "SA" User:
Linux:
Enter the following at the command prompt on one line:
<Report Optimizer install dir>/bobje/mysql/bin/mysqladmin –u sa -
pPassword123 password <new password> --socket <Report Optimizer
installdir>/bobje//mysql/mysql.sock
In this instance, Password123 is the old password for sa user and NewPassword is the newpassword for sa user.
51
Chapter 3
There is a space between password and <new password> and socket and <Report Optimizer.
Windows:
1. To change the password for the “sa” user:
a. Select Start Menu > Business Objects XI 3.1 > Business Objects Enterprise >Central Configuration Manager and stop the Server Intelligence Agent.
b. To connect to MySQL :
INSTALLDIR\MySQL5\bin\mysql.exe -u root –p
c. Enter the password when prompted.
d. Enter the following SQL command to change the password:
mysql>UPDATE mysql.user SET Password=PASSWORD('MyNewPass')
WHERE user='sa';
In this instance, MyNewPass is the new password.
e. Enter the following SQL command:
mysql> FLUSH PRIVILEGES;
2. Select Start Menu > Business Objects XI 3.1 > Business Objects Enterprise > 32-bitdata sorce(ODBC).
a. Click theSystem DSN tab.
b. Select Business Objects Audit server.
c. Click Configure and update the password for “sa” user.
d. Select Business Objects CMS, click Configure, and update the password for “sa”user.
3. Select Start Menu > Business Objects XI 3.1 > Business Objects Enterprise >CentralConfiguration Manager.
a. Right-click Server Intelligence Agent > properties > configuration.
b. Click BOE120.
c. Select Update Data source settings.
d. Click OK.
e. Selectmysql driver.
f. Enter the new password for “sa” user.
g. Repeat steps a through f for BOE120_AUDIT.
h. Restart BOE120MySQL service from the services console.
i. Start the “Server Intelligence Agent” service.
4. See the following web sites for more information about changing the passwords for sa:
52

3 Required Configuration Steps after Installing Reporter
n http://dev.mysql.com/doc/refman/5.0/en/default-privileges.html
n http://dev.mysql.com/doc/refman/5.0/en/resetting-permissions.html#resetting-permissions-windows
Installing HP Live Network Connector (LNc)Install and configure LNc on a server running SRMReport Optimizer as soon as possible so youcan receive new and updated report templates that are provided periodically through LNc.
Configure LNc for HP Storage Essentials product streams, and use the LNc command lineinterface to preview and download content.
See theHP Live Network Installation and Configuration Guide for instructions. The LNc downloadand its guide is available on the LNc home page at https://h20034.www2.hp.com/.
Configuring the Report Database to Point to theManagement Server
If you are installing Reporter on the same server as the HP Storage Essentials managementserver, you do not need to configure the Report Database to point to themanagement server.
To configure the Report Database to point to themanagement server:
1. To access the Report Database Admin Utility:
n Windows
Go to %REPORT_DATABASE_HOME% and double-click ReportAdmin.bat.
n Linux
i. Set the display if you are accessing the Report Database Admin Utility remotely.
ii. Go to the $REPORT_DATABASE_HOME directory by entering the following at thecommand prompt:
# cd $REPORT_DATABASE_HOME
iii. Run the Report Admin Utility by entering the following at the command prompt:
# sh ./ReportAdmin.sh
2. Click Add.
3. Enter a site name in the Site Name box. The site name is used to differentiate the server fromother servers.
4. Enter the IP address of themanagement server. The Report Database uses this IP addressto contact themanagement server for report data.
5. Click OK. Themanagement server is set as the local management server.
53

Chapter 3
Configuring a Global Report DatabaseConfiguring a global report database enables you to use theGlobal Reports in Report Optimizer.
To configure a global report database:
1. Add additional management servers on the “Set up report sources” screen.
2. By default, the first management server you enter is configured as the local managementserver. Data from the local management server is used for the Standard Reports in ReportOptimizer. Tomake one of the other management servers the local server, click ConfigureReport Database in the left pane.
3. Select another management server from the Standard Reports Use drop-downmenu, andclick Submit.
4. Click Set up report sources in the left pane. The selectedmanagement server becomes thelocal management server.
5. To view updated reports immediately, click Refresh Data Now. Otherwise, updated reportsare available after the next report cache refresh is processed.
For additional details about configuring the Report Database, see the Report Database onlinehelp.
Accessing the Central Management Console for ReportOptimizer
Before you access the central management console for Report Optimizer, verify the following:
l JavaScript is enabled.
l Pop-ups are disabled.
If you are runningWindows Server 2008 with Internet Explorer Enhanced Security Configuration”(IEESC) enabled, the server running Report Optimizer was added as a trusted site. See Addingthe Report Optimizer Server as a Trusted Site on the facing page.
1. Use a web browser to go to:
http://<fqdn_or_ip_address_of_>:8080/CmcApp/logon.faces
2. Log on to the Central Management Console with the following credentials:
n Username: Administrator
n Password:
HP Storage Essentials 9.4: The default password is Changeme123.
Versions earlier than 9.4: The default password is <blank>.
54

3 Required Configuration Steps after Installing Reporter
Adding the Report Optimizer Server as a Trusted SiteIf you are runningWindows Server 2008 with the Internet Explorer Enhanced SecurityConfiguration (IEESC) enabled, youmust add the server running Report Optimizer as a trustedsite.
When you access Report Optimizer directly, you are prompted to add the site as a trusted site.
When you access Report Optimizer from within HP Storage Essentials, you are not prompted toadd the server as a trusted site and thus, youmight run into difficulty with accessing ReportOptimizer from within HP Storage Essentials.
Tomanually add Report Optimizer server as a trusted site:
1. In Internet Explorer, click Tools > Internet Options > Security.
2. Click Trusted Sites and then click Sites.
3. Add several variations of the server name. For example, if the server running ReportOptimizer is named reportserver.usa.mycompany.com with IP address 192.168.1.1, you canenter the following variations of the site name:
n The IP address of the server; in this example, http://192.168.1.1
n The full name of the computer; in this example, http://reportserver.usa.mycompany.com
n The computer name; in this example, http://reportserver
Installing a Named User Permanent License KeyAdding a named user permanent license key enables you to log on as Administrator withoutconsuming a concurrent license.
To install a named user permanent license key:
1. Launch the Central Management Console as described in Accessing the CentralManagement Console for Report Optimizer on previous page.
2. In theManage section, click License Keys.
3. In the Add Key box, enter the named user license key. Click Add.
4. Return to the Central Management Console home page. In the Organize section, click Usersand Groups.
5. Select User List and then double-click Administrator.
6. In the Connection Type section, select theNamed User radio button.
7. Click Save and Close.
Setting the Report Parameters in HP Storage EssentialsTo set the report parameters in HP Storage Essentials:
55

Chapter 3
1. In HP Storage Essentials, select Configuration > Reports, and click theReporterConfiguration tab.
2. In the Host Name or IP box, enter the host name or IP address of the server running ReportOptimizer.
3. In the Port Number box, enter the port number for accessing Report Optimizer. The default is8080.
4. (Optional)Change the password for the ReportUser user account. Youmust have alreadychanged the password on the Report Optimizer server.
a. Click Change Password.
b. Enter the old password (Welcome), enter a new password, and confirm the newpassword.
c. Click Submit.
Modifying the Server Session Timeout ValueYoumust change the server session timeout value to 120minutes, as follows:
1. Launch the Central Management Console as described in Accessing the CentralManagement Console for Report Optimizer on page 54.
2. In the Organize section, click Servers.
3. Expand the Server Categories node, and clickWeb Intelligence.
4. Double-click theWebIntelligenceProcessingServer. The Properties window opens.
5. In theWeb Intelligence Processing Service section, enter 120 in the Idle ConnectionTimeout box.
6. Click Save and Close.
Configuring Drill-Down OptionsThe drill-down options must be properly configured to synchronize graphs with drill-down reports.
To configure the drill-down options:
1. Log on to InfoView, as follows:
a. Go to http://<fqdn_or_ip_address_of_Report_Server>:8080/InfoViewApp/logon.jsp
b. Log on with a valid username and password.
2. In the upper-right corner of your browser, click thePreferences button.
3. ClickWeb Intelligence to expand that section.
4. In the Drill Options section, click the “Synchronize drill on report blocks” check box.
5. Click OK.
56

3 Required Configuration Steps after Installing Reporter
Disabling Browser Access to Desktop IntelligenceDesktop Intelligence is not installed with Report Optimizer, so references to that feature shouldbe removed from the user interface.
To remove these references by disabling browser access to Desktop Intelligence:
1. Launch the Central Management Console as described in Accessing the CentralManagement Console for Report Optimizer on page 54.
2. In theManage section on the home page, click Applications.
3. Right-click Desktop Intelligence, and select User Security.
4. Click User Security, select Administrators, and click Assign Security.
5. Click theAdvanced tab.
6. Click Add/Remove Rights.
7. Click General under the General node.
8. Click theDenied radio button for every option:
n Edit this object.
n Log on to Desktop Intelligence and view this object in the CMC.
n Modify the rights users have to this object.
n Securely modify rights users have to objects.
9. Click OK.
10. Click Desktop Intelligence under the Application node.
11. Click theDenied radio button for the following options:
n Create Desktop Intelligence Documents
n Create Templates
n Save Desktop Intelligence Documents
n Save Documents for all users
n Use Templates
12. Click OK.
13. Click OK to apply the chosen settings.
14. Repeat these steps for the Everyone group.
57

Chapter 3
Adding the Report Designers GroupReport Optimizer does not support Report Optimizer role-based security. The reports visible to auser are determined by the access and security levels set in Report Optimizer.
Add the Report Designers group to allow easy addition andmodification of rights for users whowill have report creation, modification, and deletion rights.
To add the Report Designers group:
1. Launch the Central Management Console as described in Accessing the CentralManagement Console for Report Optimizer on page 54.
2. Click Users and Groups in the Organize section.
3. Right-click Group List, and select New Group.
4. Enter Report Designers in the Group Name box.
5. Add the following text to the description:
Report Designers group. Users added to this group will have the
rights and privileges to create, modify, and delete new and
existing reports.
6. Click OK.
Assigning Report Designing Privileges to ReportDesigners
The Report Designers groupmust be assigned the appropriate application rights.
To assign the appropriate rights:
1. Launch the Central Management Console as described in Accessing the CentralManagement Console for Report Optimizer on page 54.
2. In theManage section, click Applications.
3. Right-clickWeb Intelligence, and select Properties.
4. Click User Security in the left panel, and click Add Principals.
5. Select Report Designers and click > to add it to the Selected users/groups list.
6. Click Add and Assign Security. The Assign Security window opens.
7. Select Full Control and click > to add it to the Assigned Access Levels pane.
8. Click OK.
9. Return to the Central Management Console Home page.
10. In the Organize section, click Folders.
58
3 Required Configuration Steps after Installing Reporter
11. Right-click All Folders, and select Properties.
12. Click User Security, and then click Add Principals.
13. Select Report Designers and click > to add it to the Selected users/groups list.
14. Click Add and Assign Security. The Assign Security window opens.
15. Select Full Control and click > to add it to the Assigned Access Levels pane.
16. Click OK.
17. Return to the Central Management Console Home page.
18. In the Organize section, click Folders.
19. Expand the All Folders node, right-click Report Pack, and select User Security.
20. Click Add Principals, select Report Designers, and click > to add it to the Selectedusers/groups list.
21. Click Add and Assign Security. The Assign Security window opens.
22. Select Full Control and click > to add it to the Assigned Access Levels pane.
23. Click OK.
24. Return to the Central Management Console Home page.
25. In the Organize section, click Universes.
26. In the right-hand pane, right-click Report Connector, and select User Security.
27. Click Add Principals, select Report Designers, and click > to add it to the Selectedusers/groups list.
28. Click Add and Assign Security. The Assign Security window opens.
29. Select Full Control and click > to add it to the Assigned Access Levels pane.
30. Click OK.
31. Return to the Central Management Console Home page.
32. In the Organize section, click Connections.
33. Right-click DB Connection, and select User Security.
34. Click Add Principals, select Report Designers, and click > to add it to the Selectedusers/groups list.
35. Click Add and Assign Security. The Assign Security window opens.
36. Select Full Control and click > to add it to the Assigned Access Levels pane.
37. Click OK.
59
Chapter 3
Best PracticesAlways use the Report Designers group to add new users who can add, modify, and deletereports and perform report relatedmanagement operations. This simplifies maintenance whenprivileges and rights aremodified for all users who have report modification andmaintenance-related tasks.
Adding New Users to Report OptimizerTo add new users:
1. Launch the Central Management Console as described in Accessing the CentralManagement Console for Report Optimizer on page 54.
2. Click Users and Groups in the Organize section, and click User List in the left-hand pane.All of the valid users are listed in the right-hand pane.
3. Click Manage, and select New > New User.
4. Choose the Authentication type and enter user details. If you select LDAP/Windows orAD/Windows NT, enter the username qualified with the appropriate domain; for example,americas\username.
5. Select Concurrent User or Named User for the Connection type at the bottom of the page.
6. Click Create orCreate and Close.
7. Right-click the new user, and selectMember of.
8. Click Join Group.
9. Select theReport Designers group and click > to add it to the Destination Group(s) list.Remove the Everyone group from the Destination Group(s) list if it is included there.
10. Click OK.
The new user can now log on to the web interface at http://<fqdn_or_ip_address_of_Report_Server>:8080/InfoViewApp/logon.jsp
If you changed the port number during installation, enter the selected port number instead of 8080.
For more information, see the “Managing Enterprise and general accounts” section of the“Managing Users andGroups” chapter of theAdministrator’s Guide.
Best PracticesAssign rights to groups instead of individual users.
All users who need rights for the creation, modification, or deletion of reports should be added tothe Report Designers group.
All users who need view-only rights should be added to the Everyone group. The Everyone grouphas view-only rights by default.
60

3 Required Configuration Steps after Installing Reporter
Changing the Server Intelligence Agent’s User Account(for Monitoring Remotely Located Files)
To change the Server Intelligence Agent’s user account:
1. Use the Central ConfigurationManager to stop the Server Intelligence Agent.
2. Right-click the Server Intelligence Agent, and select Properties.
3. Uncheck the System Account check box.
4. Enter theWindows user name and password:
Report Optimizer and themanagement server are installed on different machines. Bothmachines must be in the same domain.
n Click the button to the right of the User field. The Browse User window opens.
n Click theChange button, and select the domain name.
n Click OK to return to the Browse User window.
n Select the appropriate user, and click OK to return to the Server Intelligence Agentwindow.
5. Click Apply, and then click OK.
6. Start the Server Intelligence Agent. The server process logs on to the local machine with thespecified user account. All reports processed by this server are formatted using the printersettings associated with the user account you entered.
Configuring Active Directory (AD) AuthenticationActive Directory is only supported onWindows for Report Optimizer.
Youmust configure Active Directory (AD) Authentication.
Create a Service AccountCreate a domain account that can be used as a service account, and add this account to the localAdministrators group on the RO server.
1. Open the Account tab for the user you created andmake sure the "Password never expires"checkbox is selected.
61

Chapter 3
2. Add the Service Account user to the local Administrators group.
Register an SPN AccountTo add an SPN for the service account of the Central Management Server (CMS):
1. Open a commandwindow.
2. Type the following command as a Domain Admin user:
SETSPN.exe –A<service_class>/<domain_name> <service_account>
In this instance:
n <service_class> means any desired name; for example, ROCentralMS)
n <domain_name> means the domain and server name of the service account; forexample, DFDEV.COMPANY.COM)
n <service_account> means the domain user account you configured; for example, saser01
Input example:
Setspn.exe –A ROCentralMS/DFDEV.COMPANY.COM sa sero1
Output example:
Registering ServicePrincipalNames for CN=sa sero1,OU=Service
Accounts,OU=NCSUS,D
C=dfdev,DC=company,DC=com
ROCentralMS/dfdev.company.com
Updated object
62

3 Required Configuration Steps after Installing Reporter
Grant Rights to Service AccountGrant the service account the rights to act as part of the operating system on each RO server:
1. On the RO server go toStart > Control Panel > Administrative Tools > Local SecurityPolicy.
2. Expand Local Policies, and then click User Rights Assignment.
3. Double-click Act as part of the operating system and select Add.
4. Enter the name of service account you created and click OK.
5. Make sure the Local Policy Setting box is selected and click OK.
(Optional) Set Delegation OptionTo set the Delegation option for the user:
1. Open the AD Service Account User within the AD Users and Computers tool.
2. Select the Delegation tab for the User.
3. Select Trust this user for delegation to specified services only andUse KerberosOnly.
n OnWindows 2000, select theAccount is trusted for delegation check box on theaccount tab.
n OnWindows 2003 orWindows 2008, a delegation tab appears after an SPN is assigned.Select Trust this user for delegation (Kerberos only).
4. Select Add > Users and Computers and enter the Service Account user.
5. Select the <service_class> name you specified in step 2.
6. Click OK.
Assign Account to Server Intelligence AgentTo set the AD service account to run the Server Intelligence Agent service:
1. Go toStart Menu > Business Objects XI 3.1 > Business Objects Enterprise > CentralConfiguration Manager and stop the Server Intelligence Agent.
63

Chapter 3
2. Right-click the Server Intelligent Agent and select Properties.
3. In the LogOn As section, deselect the System Account and use the new AD account createdin step 1. The format should be selab\ro_svc.
4. Restart the Server Intelligence Agent.
If the service does not start properly, you have an account issue (such as password or rights)
Create WINNT DirectoryCreate the C:\WINNT directory and then create the krb5.ini and bscLogin.conf files in theWINNT directory as follows:
1. Create the bscLogin.conf file, and copy and paste the following information into the file:
com.businessobjects.security.jgss.initiate {
com.sun.security.auth.module.Krb5LoginModule required;
};
2. Create the krb5.ini file, and copy and paste the following information into the file:
}[libdefaults]
}default_realm = <DOMAIN.COM>
}dns_lookup_kdc = true
}dns_lookup_realm = true
}[realms]
}<DOMAIN.COM> = {
}kdc = <ADSERVER>.<DOMAIN.COM>
}default_domain = <DOMAIN.COM>
}
64

3 Required Configuration Steps after Installing Reporter
In this instance, <DOMAIN.COM> means theWindows Fully Qualified Domain Name(FQDN) and <ADSERVER> means the Active Directory Domain Controller name. All namesmust include only capital letters.
Set File Locations in TomcatTo set the locations for the files in the Tomcat configuration:
1. Select Start > Programs > Tomcat > Tomcat configuration and click the Java tab.
2. Copy and paste the following lines into the JavaOptions section:
}-Djava.security.auth.login.config=C:\WINNT\bscLogin.conf
}-Djava.security.krb5.conf=C:\WINNT\krb5.ini
3. Open Central ConfigurationManager (Start > All Programs > BusinessObjects XI 3.1 >BusinessObjects Enterprise > Central Configuration Manager).
4. Select the Apache Tomcat service and restart it.
Configure Active Directory Plug-In in ROTo configure the AD plug-in within the ConfigurationManagement Console of RO:
1. Log on as Administrator to the ConfigurationManagement Console.
2. On the Central Management Console home page, select Authentication from the drop-downmenu, and double-clickWindows AD.
3. Make sure the EnableWindows Active Directory (AD) check box is selected.
4. Set settings in the AD Configuration Summary section:
a. Click “” beside the AD Administration Name, and enter an AD account that can readthe AD. This is used to bind to the domain and search for users trying to authenticate.
65

Chapter 3
b. In the Default AD Domain box, enter the Fully Qualified Domain Name (using capitalletters).
5. Add any AD Groups in theMapped AD Member groups section.
6. In the Authentication Options section, select the Use Kerberos authentication radio buttonand enter <service_account>@<SERVER.DOMAIN.COM> (see step 2) as the Serviceprincipal name of the service account. The domain namemust be in capital letters.
7. Make sure the following options are selected in the AD Alias Options section:
n "Assign each new AD alias to an existing User Account with the same name."
n "Create new aliases when the Alias Update occurs."
n "New users are created as concurrent users."
8. Click Update.
9. Make sure that AD Users or Groups is amember of the SE Report or Report Designer groupswithin the ConfigurationManagement Console of RO.
Restart TomcatStop and restart the Tomcat service using the Central ConfigurationManager.
Sheduling Reports Based on File Based EventsIf you scheduled reports based on file based events, youmust reschedule those reports afterupgrading. See the “Using file-based events with scheduled reports” section of theQuick StartGuide.
Setting Up an Email ServerTo set up an email server:
1. Launch the Central Management Console as described in Accessing the CentralManagement Console for Report Optimizer on page 54.
2. Click Servers. A list of all of the server processes running on your Report Optimizer server isdisplayed.
3. Click Servers.
4. Double-click <your_servername>.destinationjobserver.
5. Click Destination.
6. Select Email from the Destination drop-downmenu, click Add, and populate your SMTPserver details.
7. Click Save orSave andClose.
8. Double-click <your_servername>.AdaptiveJobServer.
66

3 Required Configuration Steps after Installing Reporter
9. Click Destination.
10. Select Email from the Destination drop-downmenu, click Add, and populate your SMTPserver details.
11. Click Save orSave and Close.
For more information, see the “Configuring the destination properties for job servers” section of the“Managing and Configuring Servers” chapter of theBusinessObjects Enterprise Administrator’sGuide.
Best PracticesSet up an email account like [email protected] and use this account for SMTPmailings.
Tuning the Report Optimizer ServerThe following are optional steps for further configuring your server.
This section contains the following topics:
l Recreating Emailed Report Schedules below
l Configuring a Set of User Groups as Read-Only Users below
l Disabling Servers that are Not Required on page 70
l Increasing theMemory Heap Size Value on page 71
l Adding a Folder for User-Created Custom Reports on page 72
l Deleting Duplicate Folders on page 73
Recreating Emailed Report Schedules(JReporter Users Only)If you upgraded from a previous version of the product, youmight want torecreate your emailed report schedules. During the upgrade, information about the current emailedreport schedules is saved in the%MGR_DIST%\Data directory in theEmailJReporterSchedules.txt file on the HP Storage Essentials server. The information in this filecan be used to schedule emailed reports in Report Optimizer. For details about emailing reports,see the “Emailing Reports” section of theHP Storage Essentials Report Optimizer Quick StartGuide.
Configuring a Set of User Groups as Read-Only UsersTo configure a set of user groups as read-only users:
1. Log on to the Central Management Console as an administrative user.
2. In the Organize section, click Users and Groups.
3. Click theManage drop-downmenu, and select New > New Group.
67

Chapter 3
4. Enter a group name, such as Report Viewers, in the Group Name box. Enter a description inthe Description box, and then click OK.
5. Click theManage drop-downmenu and select New > New User.
6. Enter an account name in the Account Name box, enter other details as appropriate, and thenclick Create. Repeat this step to create additional users.
7. After entering the last user, click Create and Close.
To integrate Active Directory users, see Configuring Active Directory (AD) Authentication onpage 61.
8. Select all the users you just created, right-click, and select Join Group.
9. From the Available Groups section, select the Report Viewers group, click > to move it to theDestination Group(s) section, and then click OK.
10. Return to the Central Management Console Home page.
11. In the Define section, click Access Levels.
12. Click theManage drop-downmenu and select New > Create Access Level.
13. Enter a title in the Title box and click OK.
14. Double-click the access level you just created, and then click Included Rights.
15. In the right pane, click Add/Remove Rights.
16. In the left pane, select General > General, and then select the Granted radio button for thefollowing rights:
n Reschedule instances
n Reschedule instances that the user owns
n Schedule document that the user owns to run
n Schedule document to run
n Schedule objects that the user owns to destinations
n Schedule on behalf of other users
n Schedule on behalf of other users that the user owns
n Schedule to destinations
n View objects
n View objects that the user owns
17. In the left pane, select Content >Web Intelligence Report, and then select the Grantedradio button for the following rights:
n Download files associated with the object
n Export the report's data
68

3 Required Configuration Steps after Installing Reporter
n Refresh List of Values
n Refresh the report's data
n Save as CSV
n Save as excel
n Save as PDF
n Use Lists of Values
18. In the left pane, select Application > InfoView, and then select the Granted radio button forthe following rights:
n View the favorites folder
n View the Inbox
19. In the left pane, select Application >Web Intelligence, and then select the Granted radiobutton for the following rights:
n Enable drill mode
n Enable Java Report Panel
20. In the left pane, select System > Connection, and then select the Granted radio button forthe following rights:
n Data Access
n Use connection for Stored Procedures
21. In the left pane, select System > Universe, and then select the Granted radio button for thefollowing right:
n Data Access
22. Click OK andClose.
23. Return to the Central Management Console Home page.
24. In the Organize section, click Folders.
25. Click All Folders.
26. Click theManage drop-downmenu and select Top Level Security > All Folders.
27. Select Everyone, and click Assign Security.
28. Select View from the Available Access Levels section, and click > to move to the AssignedAccess Levels section.
29. Click Apply, OK, andClose.
30. Expand the All Folder node and select Report Pack. Right-click and select User Security.
31. Click Add Principals.
69

Chapter 3
32. In the Available users/groups section, select Report Viewers and click > to move it to theSelected users/groups section.
33. Click Add and Assign Security.
34. Uncheck the Inherit From Parent Folder and Inherit From Parent Group check boxes.
35. In the Available Access Levels section, select Report Viewers Access Level and click > tomove it to the Assigned Access Levels section.
36. Click Apply, OK, andClose.
37. Return to the Central Management Console Home page.
38. In theManage section, selectWeb Intelligence, right-click, and select User Security.
39. Repeat step 31 through step 37.
40. In the Organize section, click Connections.
41. Click theManage drop-downmenu, and select Top-Level Security > All Connections.
42. Repeat step 31 through step 37.
43. In the Organize section, click Universes.
44. Click theManage drop-downmenu, and select Top-Level Security > All Universes.
45. Repeat step 31 through step 37.
Disabling Servers that are Not RequiredThe following servers are not required by Report Optimizer and should be stopped and set to theDisabled state:
l Crystal Reports Cache Server
l Crystal Reports Job Server
l Crystal Reports Processing Server
l Desktop Intelligence Cache Server
l Desktop Intelligence Job Server
l Desktop Intelligence Processing Server
l Report Application Server
To disable these servers:
1. Launch the Central Management Console as described in Accessing the CentralManagement Console for Report Optimizer on page 54.
2. In the Organize section, click Servers.
3. Select the servers, right-click, and select Disable Server.
70

3 Required Configuration Steps after Installing Reporter
Increasing the Memory Heap Size ValueIncreasing thememory heap size value size will prevent potential error messages.
To increase thememory heap size value:
1. Click Start > Run. The Run dialog box appears.
2. Enter regedit in the Open text field.
3. Click OK. The Registry Editor appears.
4. Navigate to HKEY_LOCAL_MACHINE/SYSTEM/CurrentControlSet/Control/Session
Manager/Subsystems.
5. Right-click theWindows key and selectModify.
6. Edit the SharedSection value from 1024,3072,512 to 1024,3072,1024.
7. Navigate to either of the following:
n Windows 32-bit servers:
HKEY_LOCAL_MACHINE\SOFTWARE\Business Objects\Suite
12.0\default\WebIntelligence\Server\Admin\SwapTimeOut
n Windows 2008 64-bit servers:
HKEY_LOCAL_MACHINE\SOFTWARE\Wow6432Node\Business Objects\Suite
12.0\default\WebIntelligence\Server\Admin\SwapTimeOut
8. Edit this value to 1500 seconds. Alternatively, set this to a value higher than theWebIntelligence Processing Server connection time out value found in the Central ManagementConsole. This value is written in minutes. The default value is 20.
9. Close the Registry Editor.
10. Restart theWeb Intelligence Report Server for the changes to take effect.
Creating a Server GroupCreating a server group that contains all of the Report Optimizer servers enables you tomodifythe status of the servers from the Central Management Console.
To create a server group:
1. Launch the Central Management Console as described in Accessing the CentralManagement Console for Report Optimizer on page 54.
2. In the Organize section, click Servers.
3. Right-click Server Groups, and select New > Create Server Group.
4. In the Name box, enter Report Connector Services.
5. Click OK.
71

Chapter 3
6. Click Servers List.
7. Select the following servers:
n AdaptiveJobServer
n AdaptiveProcessingServer
n CentralManagementServer
n ConnectionServer
n DestinationJobServer
n EventServer
n InputFileRepository
n ListOfValuesJobServer
n MultiDimensionalAnalysisServicesServer
n OutputFileRepository
n ProgramJobServer
n PublicationJobServer
n ReportApplicationServer
n WebIntelligenceProcessingServer
8. Right-click the selected servers, and select Add to Server Group.
9. Select theReport Connector Services group, and click the > button.
10. Click OK.
Adding a Folder for User-Created Custom ReportsTo add a folder for user-created custom reports:
1. Log on to InfoView.
n Go to http://<fqdn_or_ip_address_of_Report_Server>:8080/InfoViewApp/logon.jsp
If you changed the port number during installation, enter the selected port number insteadof 8080.
n Log on with a valid username and password.
2. Right-click Public Folders, and select New > Folder.
3. Enter the following name for the folder:
<Customer Name> <Management Server Name> reports
72

3 Required Configuration Steps after Installing Reporter
Best Practices
Follow the naming convention described in Adding a Folder for User-Created Custom Reports onprevious page. If multiple installations are being configured at the same time, specify themanagement server name to uniquely identify each installation.
When exporting and importing end-user created reports for backup or support purposes, a uniquetop-level folder name for the reports ensures that the reports are not overwritten. Unique foldernames for end-user reports also ensure that Report Pack updates do not overwrite user-createdcustom reports.
Deleting Duplicate FoldersTo delete duplicate folders:
1. Right-click the folder you want to remove.
2. Select Organize > Delete.
3. Click OK.
Changing the Passwords for Report Optimizer AccountsThe Reporter installation provides the following default passwords:
l Administrator user account: Changeme123
l MySQL "sa" user account: Password123
Changing the Password for the Administrator AccountTo change the password for the Administrator account:
1. Log on to Central Management Console as described in Accessing the Central ManagementConsole for Report Optimizer on page 54.
2. In the Organize section, click Users and Groups.
3. Double-click Administrators.
4. Right-click Administrator and then select Account Manager.
5. Enter the new password in the Enterprise Password Settings section.
6. Click Save and Close for the new password to take effect.
Changing the Password for "SA" UserTo change the password for "SA" User:
Linux:
Enter the following at the command prompt on one line:
73

Chapter 3
<Report Optimizer install dir>/bobje/mysql/bin/mysqladmin –u sa -
pPassword123 password <new password> --socket <Report Optimizer
installdir>/bobje//mysql/mysql.sock
In this instance, Password123 is the old password for sa user and NewPassword is the newpassword for sa user.
There is a space between password and <new password> and socket and <Report Optimizer.
Windows:
1. To change the password for the “sa” user:
a. Select Start Menu > Business Objects XI 3.1 > Business Objects Enterprise >Central Configuration Manager and stop the Server Intelligence Agent.
b. To connect to MySQL :
INSTALLDIR\MySQL5\bin\mysql.exe -u root –p
c. Enter the password when prompted.
d. Enter the following SQL command to change the password:
mysql>UPDATE mysql.user SET Password=PASSWORD('MyNewPass')
WHERE user='sa';
In this instance, MyNewPass is the new password.
e. Enter the following SQL command:
mysql> FLUSH PRIVILEGES;
2. Select Start Menu > Business Objects XI 3.1 > Business Objects Enterprise > 32-bitdata sorce(ODBC).
a. Click theSystem DSN tab.
b. Select Business Objects Audit server.
c. Click Configure and update the password for “sa” user.
d. Select Business Objects CMS, click Configure, and update the password for “sa”user.
3. Select Start Menu > Business Objects XI 3.1 > Business Objects Enterprise >CentralConfiguration Manager.
a. Right-click Server Intelligence Agent > properties > configuration.
b. Click BOE120.
c. Select Update Data source settings.
d. Click OK.
e. Selectmysql driver.
f. Enter the new password for “sa” user.
74

3 Required Configuration Steps after Installing Reporter
g. Repeat steps a through f for BOE120_AUDIT.
h. Restart BOE120MySQL service from the services console.
i. Start the “Server Intelligence Agent” service.
4. See the following web sites for more information about changing the passwords for sa:
n http://dev.mysql.com/doc/refman/5.0/en/default-privileges.html
n http://dev.mysql.com/doc/refman/5.0/en/resetting-permissions.html#resetting-permissions-windows
75


4 Required Configuration Steps for the Data Protector Reporter Edition
4 Required Configuration Steps for theData Protector Reporter Edition
First, follow the steps on theGetting Started page.
To access the Getting Started page:
1. Open a web browser and enter the following URL:
http://<name_of_the_management_server>
In this instance, <name_of_the_management_server> is the name of the server on whichyou installed themanagement server. You can also provide an IP address.
2. In the Name text box, enter the following:
admin
3. In the Password text box, enter the following:
password
4. If the Getting Started page does not automatically appear, click Startup in the upper-rightcorner.
Follow the steps on theGetting Started page. Make sure you import the license as directed.Also, run the ConfigurationWizard from theGetting Started page. For more information aboutthe ConfigurationWizard, see Launching the Backup Host Configuration and DiscoveryWizard on page 85.
Prerequisites for Agentless Discovery of Data ProtectorIf you have a CIM extension installed, the product will automatically use the CIM extension todiscover Data Protector.
Before you discover a Data Protector server that does not have a CIM extension installed, youmust do the following:
1. Install the Data Protector Client on themanagement server. See Step 1 – Install the DataProtector Client on next page.
2. Create the DPREPORTER user group for Data Protector Reporter. See Step 2 – Create aUser Group for Data Protector Reporter on page 81
3. Create a user in the DPREPORTER user group. See Step 3 – Create a User in theDPREPORTER User Group on page 82
4. Install the Data Protector 6.1 patches on top of the Data Protector 6.1 client or upgrade to theData Protector 6.11 client. See Step 4 – Install the Data Protector Patch on page 83
77

Chapter 4
Step 1 – Install the Data Protector ClientInstall the Data Protector Client on the HP Storage Essentials management server as describedin the following steps. These steps apply to Data Protector 6.11, 6.1 and 6.0.
l Linux Installation Steps below
l Windows Installation Steps below
Linux Installation Steps
To install the Data Protector Client:
1. Open the /etc/services file in a text editor, such as vi.
2. Search for 5555 in the text editor.
3. Comment the following two lines in the text editor as follows:
#personal-agent 5555/tcp # Personal Agent
#personal-agent 5555/udp # Personal Agent
4. Save the services file, and exit the text editor.
5. Copy the Data Protector tar file and extract the tar file.
6. Go to the LOCAL_INSTALL directory.
7. Run the Data Protector installation by entering the following command at the commandprompt:
./omnisetup.sh
8. When asked which components to install, select only the following:
n User Interface
n JavaGUI Interface
Windows Installation Steps
To install the Data Protector Client:
78
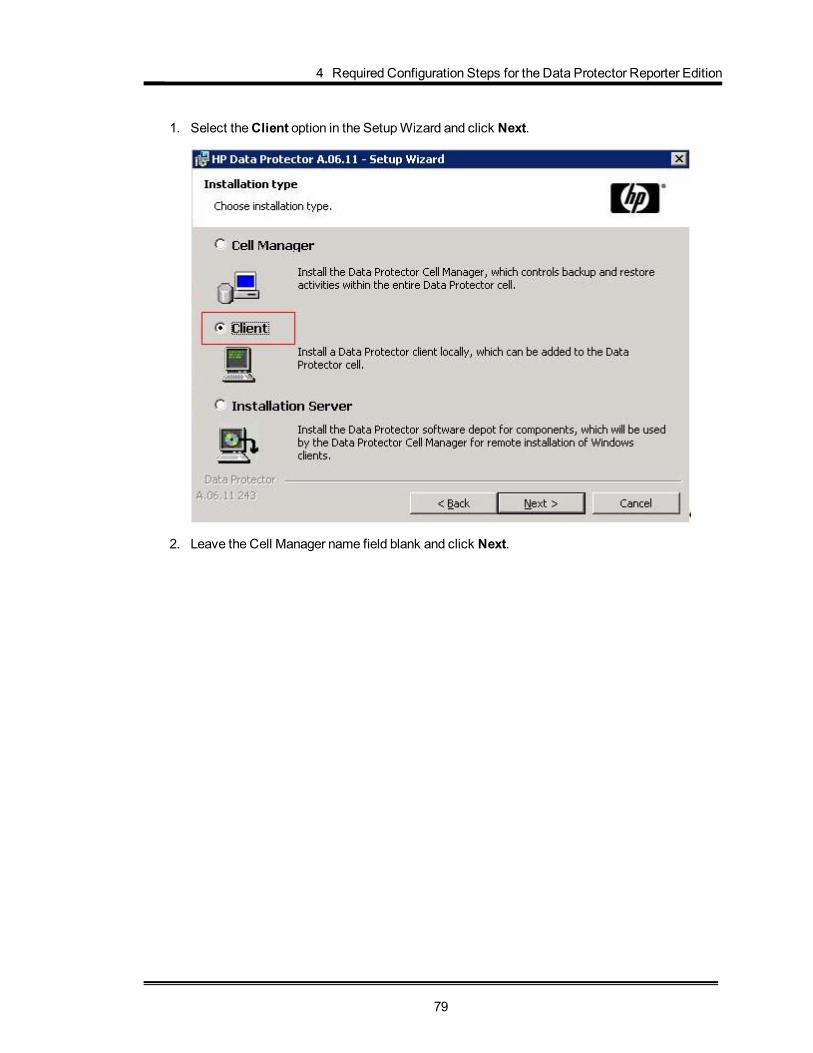
4 Required Configuration Steps for the Data Protector Reporter Edition
1. Select theClient option in the SetupWizard and click Next.
2. Leave the Cell Manager name field blank and click Next.
79

Chapter 4
3. Deselect all options, except for the User Interface option, which is selected in the followingfigure. Click Nextwhen done.
80

4 Required Configuration Steps for the Data Protector Reporter Edition
4. Complete the installation by following the steps in theWizard.
Step 2 – Create a User Group for Data Protector ReporterAsk your Data Protector Administrator to create a user group for Data Protector Reporter in theData Protector Cell Manager Console Client as follows:
1. Open the Data Protector Cell Manager Console Client.
2. Go toUsers. Right-click Users, and then click Add User Group.
3. Provide the user group name DPREPORTER.
4. Deselect theStart restore option in the Data Protector User Rights pane. This option isselected by default.
5. Select the following user rights in the Data Protector User Rights pane:
n Device Configuration
n Media Configuration
n Reporting notifications
The selections should resemble the following:
6. Click Finish to create the new user group.
81

Chapter 4
Step 3 – Create a User in the DPREPORTER User GroupAsk your Data Protector Administrator to create a user within the DPREPORTER User Group asfollows:
1. (Windows only) Before creating the user, make sure that the AppStorManager service, whichis the service for HP Storage Essentials, is started on the Storage Essentials managementserver with the context of a Local Administrator user as the LogOnUser. You can check inthe properties of the Service as follows:
2. Right-click the DPREPORTER group and select Add/Delete Users.
3. In the Name field, provide one of the following:
n Linux: The name of the user under which the HP Storage Essentials server process isrunning. By default, this name is the ‘root’ user.
n Windows: The name of the user with which the HP Storage Essentials AppStorManagerservice is running. You can determine the user by looking for the account specified in theThis Account field on the LogOn tab. In this case, the user is Administrator.
4. In the Group/Domain field, provide one of the following:
n Linux: The group information of the user under which the process is running. This can beverified by running the command ‘id root’ on the HP Storage Essentials managementserver.
82
4 Required Configuration Steps for the Data Protector Reporter Edition
n Windows: The host name of the HP Storage Essentials management server, since theAppStorManager service is started as the Local Administrator User.
5. In the Client field, select the DNS name or IP address of the HP Storage Essentialsmanagement server.
6. Click >> to apply your new user.
7. Click Finish to add your new user to the user group.
Step 4 – Install the Data Protector PatchYou need to install the following patch, depending the operating system of the HP StorageEssentials management server, on top of the Data Protector 6.1 client or upgrade to the DataProtector 6.11 client:
l Linux: DPLNX_00077
l Windows: DPWIN_00417
If you own a valid support contract, you can download patches fromhttp://support.openview.hp.com/selfsolve/patches. You need an HP Passport Account for login.When you access the Patches Search page, select All Products SPIs and enter the name ofpatch, such as DPWIN_00417, in the Optional: Enter keyword(s) or phrases field. Click Search.The link to the patch appears under the Search button.
83

Chapter 4
If you do not install the patch or do not upgrade to Data Protector 6.11, the following occurs inBackupManager:
l Media andmedia pools details do not appear for discovered backup hosts.
l Policy Details for any session are not displayed in the Policy Detail tab.
l Schedule Details for any session are not displayed in the Schedule Detail tab.
84

4 Required Configuration Steps for the Data Protector Reporter Edition
Launching the Backup Host Configuration and DiscoveryWizard
If you installed the Data Protector Reporter Edition, the Backup Host Configuration andDiscovery Wizard is available to you. The Backup Host Configuration and Discovery Wizardassists you perform the initial discovery and configuration tasks using a single user interface. Youcan invoke theBackup Host Configuration and Discovery Wizard from theGetting Startedpage.
Caution: Before you can discover Data Protector, youmust complete the requirements providedin Prerequisites for Agentless Discovery of Data Protector on page 77.
The Backup Host Configuration and Discovery Wizard page displays the following tabs:
l Discovery – Helps you discover the hosts running the Data Protector server. It also providesoptions to configure the discovery details and backup server schedule. See Step 1 – DiscoverBackup Host Address below.
l Backup – Enables you to set values to retain the backup sessions in the database. See Step 2– Set Retention Value for Backup Session Data on page 87.
l System –Helps you configure email notifications on reports and policies. You can assign anSMT server from which themanagement server can send email notifications. Step 2 – SetRetention Value for Backup Session Data on page 87.
l Reports – Provides options to schedule the Report Cache Refresh and configure the ReporterLogin. It also provides options to configure the Report Optimizer email and FTP server. SeeStep 4 – Configure Report Optimizer Settings on page 88.
Step 1 – Discover Backup Host AddressTheDiscovery tab of the configuration wizard helps you configure and discover single or multiplebackup servers. Before you discover the backup hosts, youmust add and configure the backuphosts.
Data Protector Reporter Edition, by default, does not comewith MAPs. Therefore, you cannotdiscover devices that haveMAPs, such as switches, arrays and CIM extension, even though thisfunctionality is displayed in the product andmentioned in the documentation. If you are runningData Protector Reporter without MAPs, you can only discover the backup servers without a CIMextension installed, as described inPrerequisites for Agentless Discovery of Data Protector onpage 77.
To configure a backup host:
85

Chapter 4
1. Provide the backup host's IP address, user name, and password as follows:
n Single server:
In the IP Address/ DNS Name box, type the IP address of the device and provide thehost's user credentials.
n Multiple servers:
o In the From IP address box, type the lowest IP address in the range of elementsyou want to discover.
o In the To IP address box, type the highest IP address of the range of elements youwant to discover.
o Provide the host's user credentials (optional); otherwise, the default credentials willbe used.
n Select Import to import the IP addresses for discovery, and do one of the following:
o Click Browse to find an XML file containing the list of IP addresses to bediscovered.
Or
o In the Filename box, provide a complete path to the file.
o In thePassword box, type the password for the discovery list. If the discovery listdoes not have a password assigned to it, leave this field blank.
2. Configure the Discovery Details Schedule as follows:
n Select Add the Address to this schedule option.
n Select a name from theSchedule Name list, or select New Schedule to create yourown schedule name. Provide a name for the schedule.
n Type a description for the schedule.
n Set Next Schedule Run date and time. Click the calendar icon to select a date and time.
n Set Repeat Interval period. Type a value for interval and select an unit of time from thelist.
However, you can choose to skip the above step.
3. Configure the Backup server schedule. You can enable the schedules for the following:
n Image collection
n Sessions collection
n Media collection
n Sessionmonitoring
n Drivemonitoring
86

4 Required Configuration Steps for the Data Protector Reporter Edition
4. Click Add. This validates the backup configuration details and saves it to the database. Thevalidated IP addresses of the Data Protector backup servers are listed in theAddresses toDiscover table.
After you configure the backup hosts, youmust discover them. You can also edit or delete thebackup hosts.
To discover the IP addresses from theAddress to Discover table:
1. Select the IP addresses you want to discover.
2. Click Discover. The followingmessage appears: "Are you sure you want to discover theselected IP addresses?"
3. Click OK to start the discovery process. This initiates Discovery Step 1 and Backup DataCollection. The discovery status is displayed as "Discovery is in progress.." You can click onthe link to view the discovery logs.
To edit IP addresses from the Address to Discover table:
1. Select the IP addresses you want to edit.
2. Click Edit. The Edit window opens.
3. Edit the settings, and then click Save. The changes will apply to all the selected backupservers.
You can also reset your changes by clicking theReset button.
To delete the IP addresses from the Address to Discover table:
1. Select the IP addresses you want to delete.
2. Click Delete. The followingmessage appears: "Are you sure you want to delete theaddresses?"
3. Click OK to delete the selected discovery addresses from the table.
After the configuration and discovery of backup hosts are complete, click Next to go to theBackup tab.
Step 2 – Set Retention Value for Backup Session DataTheBackup tab of the configuration wizard provides options to set the retention value for theSessions to be stored in the database.
To set the retention value:
1. Type the number of days (a value between 30 and 1098) in the box.
2. Click Submit.
3. Click Next to go to theSystem tab.
87

Chapter 4
Step 3 – Set Up Email NotificationsTheSystem tab of the configuration wizard helps you set notifications from themanagementserver on reports and policies.
To configure email notification:
1. Select Enable.
2. In theServer Name or IP Address box, type the DNS name or IP address of the SimpleMail Transfer Protocol (SMTP) server, you want to use to send the email notification.
3. In thePort box, type the Port number.
4. In the User Name box, type the user name for the SMTP server.
5. In the Password box, type the password of the above user.
6. In the Verify Password box, re-type the password.
7. In the Sender box, type the email address of the sender. This address is displayed in theFrom box in the email.
8. If you want the replies to go to an email address other than the one specified In the Senderbox, type an email address you want to receive the replies to in the Reply box.
9. Click Save.
Click Next to go to theReports tab.
Step 4 – Configure Report Optimizer SettingsThe Reports tab enables you to schedule a reports cache refresh and configure the reporter login.You can also specify the email server to be used for sending the reports and the FTP server topost the reports.
To schedule a reports cache refresh:
1. Select Enable.
2. Click the calendar icon to set the date and time for a scheduled task.
3. In the Time box, type the time in 24-hour format with the hour andminutes separate by acolon. For example, 22:15. Click the date on which you want the task to run.
4. Click Set.
5. In theRepeat Interval box, type an interval. Select a unit of time from the list.
6. Click Save.
To configure the reporter login settings:
1. In theHost Name or IP box, type the IP of the Reporter Optimizer system.
2. In thePort Number box, type the port number.
3. Click Save.
88

4 Required Configuration Steps for the Data Protector Reporter Edition
You can also reset or change the password. When you click Reset the password, the passwordis set to default.
To configure the Report Optimizer E-mail server:
1. Select a Job Server from the list.
2. In the Domain Name box, type the domain name.
3. In the Host box, type the IP address of the host.
4. In the Port box, type the port number.
5. In the User name box, type the user name.
6. Click Save.
To specify the Report Optimizer FTP server:
1. In the Host box, type the IP address of the host.
2. In the Port box, type the port number.
3. In the Account box, type the user name.
4. In the User name box, re-type the user name as above.
5. Type password for the user.
6. Click Save.
Click Close to complete the discovery and configuration tasks and exit the wizard.
l Select Do not automatically display this page again option if you do not want to invoke theBackup Host and Configuration wizard each time you log on to themanagement server.
l Click Close to exit the wizard without completing your configuration tasks. You can, at a laterstage, access the wizard by using theDiscoverymenu (Discovery >Wizard) orConfigurationmenu (Configuration >Wizard).
89

5 Troubleshooting Installations/Upgrades
5 TroubleshootingInstallations/Upgrades
The following topics provide information on troubleshooting installations and upgrades.
l Troubleshooting a Failed Installation or Upgrade below
l “The environment variable ‘perl5lib’ is set.” Message on page 93
l Additional Entries Appear in the Discovery Pages on page 94
l Troubleshooting the Oracle Database (Windows) on page 94
l Receiving HTTP ERROR: 503When Accessing theManagement Server on page 95
l Web Intelligence Processing Server Does Not Start on page 96
Troubleshooting a Failed Installation or Upgrade(Windows management servers only) You can quickly gather system information and log files fortroubleshooting by running the srmCapture.cmd program in <installationdirectory>/tools. The program provides a date and time-stamped zip file with thisinformation.
The srmCapture.cmd program requires that zip.exe be in the same folder as srmCapture.cmd. Ifyou aremissing zip.exe, you can find it in the tools directory in both theManagerCDLinux andManagerCDWindows directories on the StorageEssentialsDVD.
To run the srmCapture.cmd program:
1. Open a command prompt window on theWindows management server, and go to the<installation directory>/tools directory.
2. Type the srmCapture command. The command has several parameters:
srmCapture [/nowait] [/listmodules] [/?] [/help] [/usage]
n /nowait
Non-interactivemode. The srmCapture command runs without prompting you with themessage "press any key to continue."
n /listmodules
Shows the dll files in use by each process (written to srmListProcesses.txt). If you usethe /listmodules parameter, youmust also include the /nowait parameter.
n /?, /help or /usage
Provides information on how to use srmCapture.
91

Chapter 5
The following are examples of srmCapture commands:
n srmCapture
n srmCapture /?
n srmCapture /nowait
n srmCapture /nowait /listmodules
The following information is gathered by srmCapture.cmd:
l List of environment variables, look for the srmListEnvVar.txt file.
l Results from running ipconfig /all, look for the srmListIpconfigAll.txt file.
l Results from running netstat -noab, look for the srmListNetstatNoab.txt file.
l Results from running netstat -rte, look for the srmListNetstatRte.txt file.
l Results from running netsh diag show test, look for thesrmListNetshDiagShowTest.txt file.
l Install wizard log files (all files are located in %systemdrive%\srmInstallLogs).
l srmwiz.ini
l Oracle export log file
l File SRM log files
l File SRM configuration files
l Oracle log files
l Zero G registry content
If a message similar to Current location, d:\Tools, is not writable appears, thecurrent working subdirectory is not writable. The srmCapture.cmd program goes through thefollowing directories, in order, until it finds one that is writeable:
1. %temp%
2. %tmp%
3. %systemdrive%
Log Files from the Installation/Upgrade on WindowsThe installation/upgrade wizard generates log files in the C:\srmInstallLogs directory. Log filesprovided at the top level of the C:\srmInstallLogs directory are for the current session of theinstallation/upgrade wizard or for the last session the installation/upgrade wizard was run. Filesfrom a previous session are stored in a subdirectory with a date and time stamp.
Log files are generated by the installation/upgrade wizard. Some log files also provide an<logfilename>_output.log file. The <logfilename>_output.log file displays information about anyerrors, and is generated by the component itself instead of the installation/upgrade wizard.
92

5 Troubleshooting Installations/Upgrades
The log files are zipped into a file in the root of the system drive. The zip file can be sent to supportto help diagnose installation and upgrade issues, for example: C:\srmLog02-01-2011-16_21_49.zip.
Log Files from the Installation on LinuxWhen an installation is successful, the installation wizard zips up the log files and places them inthe Installation_Directory/logs directory. In this instance, Installation_Directory is the directory where the product was installed.
The name of the zip file has a date stamp InstallWizard_MMDD-HHMM.zip; for example,InstallWizard_1212-0754.zip.
The zip file includes two internal log files created by the installation. These files contain debuggingfor internal use only. You do not need to look at them.
l /tmp/InstallSRMTemp/InstallWizard.err
l /tmp/InstallSRMTemp/InstallWizard.out
The log files in the following directories are for users:
l productInstallDir + "/logs" – Log files for the product installation in general.
l srmInstallDir + "/logs" – Log files for the installation of themanagement server.
l rdInstallDir + "/logs" – Log files for the Report Database installation.
l roInstallDir + "/logs" – Log files for the Report Optimizer installation.
l oracleInstallDir + "/oraInventory/logs" – Log files for the Oracle installation.
If the installation failed, you can find the log files in the %Installation_Directory%/logsdirectory.
“The environment variable ‘perl5lib’ is set.” Message(Windows Only) If the perl5lib environment variable is set, the installation/upgrade fails with thefollowingmessage:
Perl5lib Environment Variable Message
93

Chapter 5
This variable could have been set by another application. The environment variable could alsohave been set if your upgrade of Oracle was suddenly stopped; for example, as a result of a poweroutage. Youmust remove the perl5lib environment variable before you can run theinstallation/upgrade again. For information about removing environment variables, refer to thedocumentation for theWindows operating system.
Additional Entries Appear in the Discovery PagesYoumight see additional entries in the Discovery pages after an upgrade.
For example, assume you have a Brocade SMI Agent running on 192.168.1.2 at 8959 and thereare three switches added to this SMI-A, as shown in the following figure. In this example, twoentries are created for 192.168.1.2 and six entries are created for three switches: two for eachswitch.
HP Storage Essentials places a checkmark next to items added in Discovery Step 1 but cannotobtain additional information in Discovery Step 2 or Discovery Step 3.
All entries with a checkmark can be deleted. In this example, seven entries can be deleted.
Duplicate Entries on the Discovery Pages
Troubleshooting the Oracle Database (Windows)When installing or upgrading anOracle database, be aware of these known considerations:
94

5 Troubleshooting Installations/Upgrades
l UseOnly the InstallationWizard (or UNIX Scripts) to Install/UpgradeOracle below
l Existing Oracle Database Is Detected below
l "Unable to Install the Oracle Database on Linux" (on page 1)
Use Only the Installation Wizard (or UNIX Scripts) to Install/UpgradeOracle
With this release of the product, the Oracle database is automatically installed using the newInstallationWizard (or UNIX scripts) developed to install themanagement server along with theOracle database used by themanagement server. Installing Oracle separately is no longerrecommended.
Do not install the Oracle database separately, themanagement server InstallationWizard (orUNIX scripts) automatically configures the Oracle database for use with themanagement server.If you install the Oracle database separately, the database will not meet the configuration settingsrequired by themanagement server.
Existing Oracle Database Is Detected(Linux installations Only) If the UNIX installation scripts detect an existing Oracle database, thefollowingmessage is displayed: “Existing Oracle Database is Detected.”
Receiving HTTP ERROR: 503 When Accessing theManagement Server
If you receive amessage resembling the following when you try to access themanagementserver, make sure your database for themanagement server is running. If it is not, start thedatabase.
Receiving HTTP ERROR: 503 javax.ejb.EJBException: null;
WindowsIn the Services window, make sure the OracleOraHome11gR2TNSListener service has startedand is set to automatic. For information on how to access the Services window, see theWindowsdocumentation.
If the OracleOraHome11gR2TNSListener service has not started, but the AppStorManagerservice has started, start the OracleOraHome11gR2TNSListener service, and then restartAppStorManager.
UNIXTo verify that the Oracle service started, enter the following at the command prompt:
# ps -ef | grep ora
If the service started, output similar to the following is displayed:
95
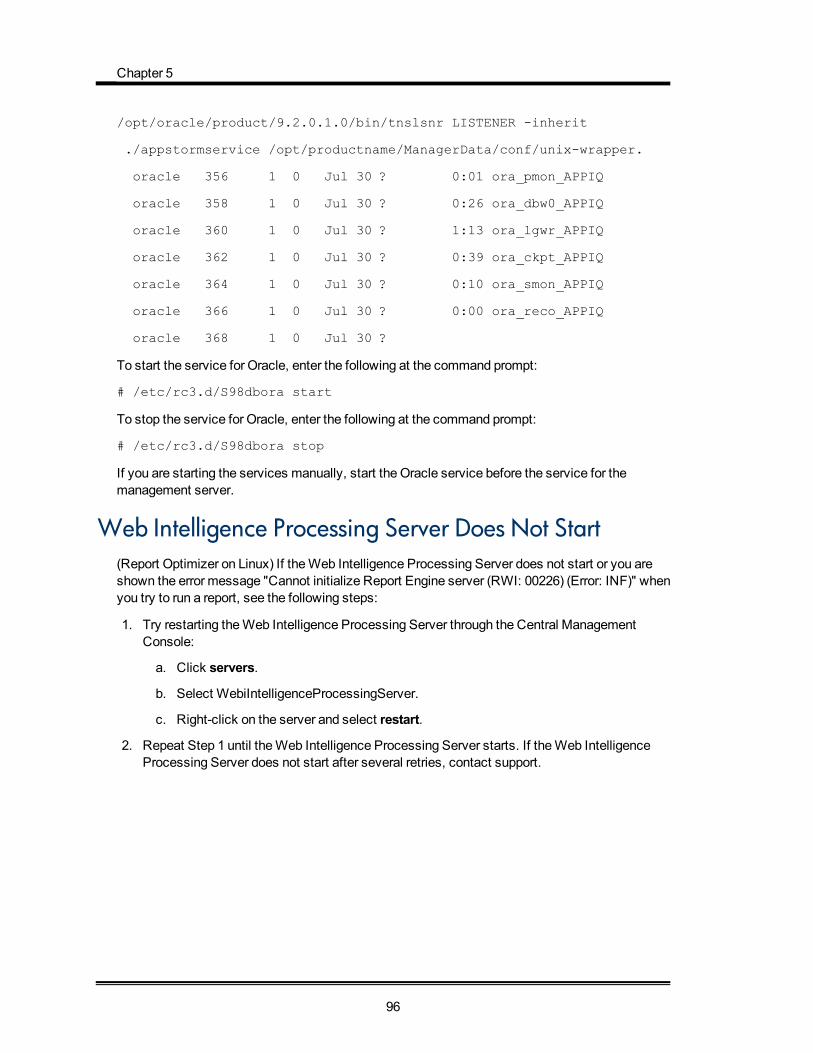
Chapter 5
/opt/oracle/product/9.2.0.1.0/bin/tnslsnr LISTENER -inherit
./appstormservice /opt/productname/ManagerData/conf/unix-wrapper.
oracle 356 1 0 Jul 30 ? 0:01 ora_pmon_APPIQ
oracle 358 1 0 Jul 30 ? 0:26 ora_dbw0_APPIQ
oracle 360 1 0 Jul 30 ? 1:13 ora_lgwr_APPIQ
oracle 362 1 0 Jul 30 ? 0:39 ora_ckpt_APPIQ
oracle 364 1 0 Jul 30 ? 0:10 ora_smon_APPIQ
oracle 366 1 0 Jul 30 ? 0:00 ora_reco_APPIQ
oracle 368 1 0 Jul 30 ?
To start the service for Oracle, enter the following at the command prompt:
# /etc/rc3.d/S98dbora start
To stop the service for Oracle, enter the following at the command prompt:
# /etc/rc3.d/S98dbora stop
If you are starting the services manually, start the Oracle service before the service for themanagement server.
Web Intelligence Processing Server Does Not Start(Report Optimizer on Linux) If theWeb Intelligence Processing Server does not start or you areshown the error message "Cannot initialize Report Engine server (RWI: 00226) (Error: INF)" whenyou try to run a report, see the following steps:
1. Try restarting theWeb Intelligence Processing Server through the Central ManagementConsole:
a. Click servers.
b. Select WebiIntelligenceProcessingServer.
c. Right-click on the server and select restart.
2. Repeat Step 1 until theWeb Intelligence Processing Server starts. If theWeb IntelligenceProcessing Server does not start after several retries, contact support.
96