software manual net configuration tool - download - … manual net configuration tool pos printer...
TRANSCRIPT

Software Manual
Net Configuration Tool
POS Printer
Rev. 2.03
http://www.bixolon.com

Net Configuration Tool
Rev.2.03 - 2 -
■ Table of Contents 1. Manual Information ........................................................................................................ 3 2. Operating System (OS) Environment ........................................................................... 3 3. Software Installation & Uninstallation .......................................................................... 4
3-1 Installation................................................................................................................ 4 3-2 Uninstallation ........................................................................................................... 6
4. Configuration Tool ......................................................................................................... 8
4-1 Configuration Tool .................................................................................................... 8 4-1-1 Ethernet Configuration .................................................................................... 8 4-1-2 WLAN Configuration ..................................................................................... 14 4-1-3 WLAN Configuration via Serial/ USB ............................................................ 19
4-2 Web Server ............................................................................................................ 24

Net Configuration Tool
Rev.2.03 - 3 -
1. Manual Information
This Net Configuration Tool Manual provides information on the utility program used to set
printer operation conditions.
2. Operating System (OS) Environment
The following operating systems are supported for usage.
- Microsoft Windows XP (32bit/64bit)
- Microsoft Windows Server 2003 (32bit/64bit)
- Microsoft Windows Vista (32bit/64bit)
- Microsoft Windows Server 2008 (32bit/64bit)
- Microsoft Windows Server 2008 R2 (64bit)
- Microsoft Windows 7 (32bit/64bit)
- Microsoft Windows 8 (32bit/64bit)
- Microsoft Windows Server 2012 (64bit)

Net Configuration Tool
Rev.2.03 - 4 -
3. Software Installation & Uninstallation
3-1 Installation
1) Execute the “Net Configuration Setup_V2.x.x.exe” file.
(This file must first be downloaded.)
2) Click the “Next” button.

Net Configuration Tool
Rev.2.03 - 5 -
3) Click the “Next” button.
(Install to: C:\Program Files\ BIXOLON \ Net Configuration Setup\)
4) The following message appears upon the successful completion of installation.
Net Configuration Tool
Rev.2.03 - 6 -
3-2 Uninstallation
(1) Windows XP
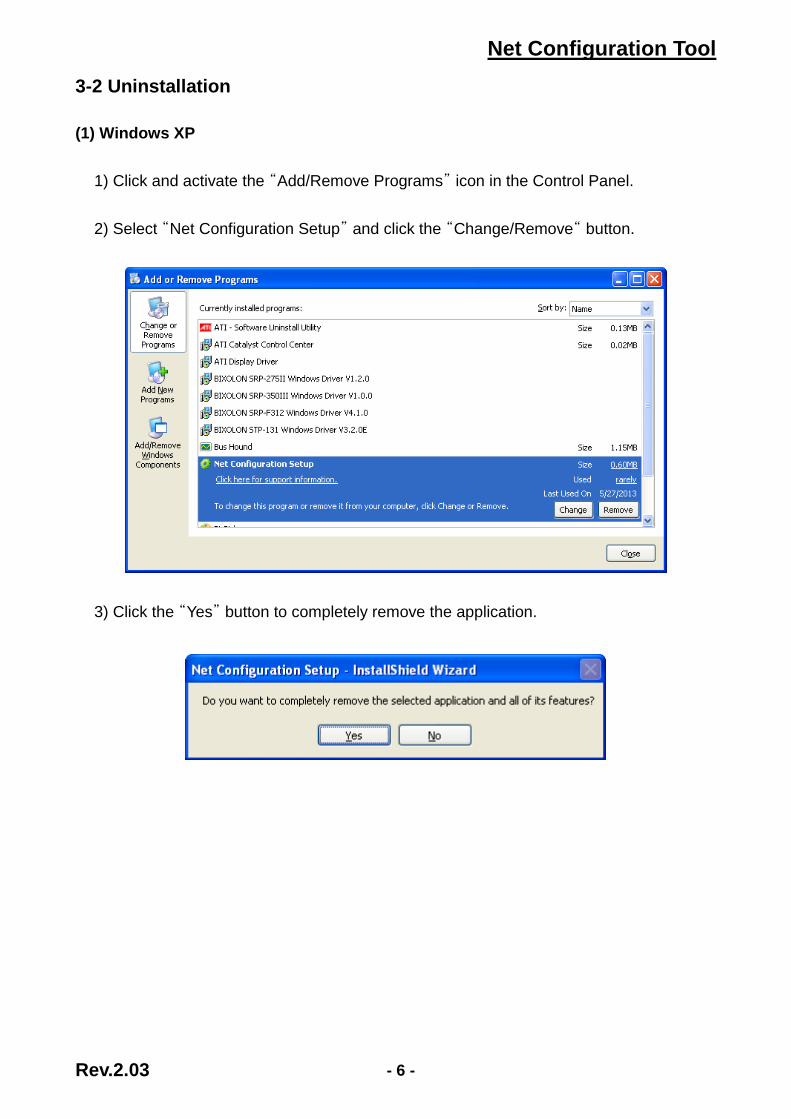
1) Click and activate the “Add/Remove Programs” icon in the Control Panel.
2) Select “Net Configuration Setup” and click the “Change/Remove“ button.
3) Click the “Yes” button to completely remove the application.

Net Configuration Tool
Rev.2.03 - 7 -
(2) Windows 7
1) Click and activate the “Programs and Features” icon in the Control Panel.
2) Select “Net Configuration Setup” and click the “Uninstall” button.
3) Click the “Yes” button to completely remove the application.

Net Configuration Tool
Rev.2.03 - 8 -
4. Configuration Tool
4-1 Configuration Tool
Install and execute Net Configuration Setup_V2.x.x.exe involved in CD.
(Start>> BIXOLON >> Net Configuration.exe)
Click the Ethernet Configuration button when the printer is connected to the
Ethernet, or click the WLAN button when the printer is connected through WLAN.
4-1-1 Ethernet Configuration

Net Configuration Tool
Rev.2.03 - 9 -
1) When you press the Search button, the printer connected to the network will be shown
in the list.
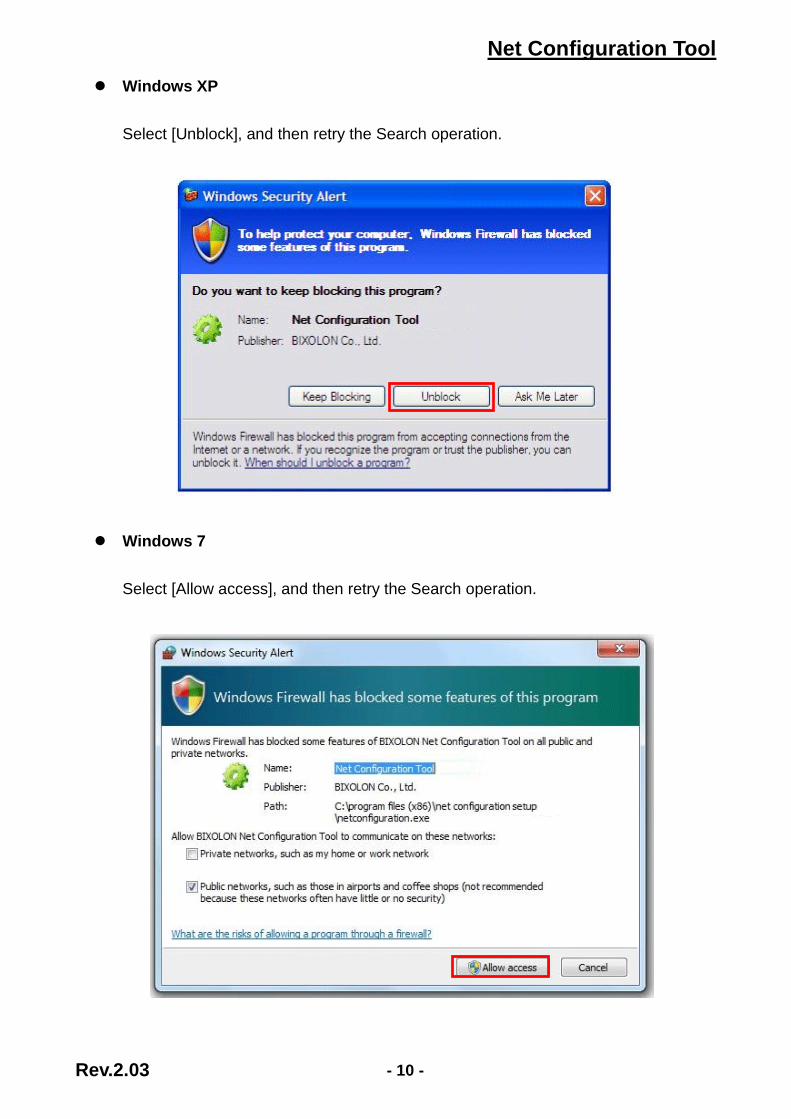
The following warning message may pop up if the firewall is installed.
Net Configuration Tool
Rev.2.03 - 10 -
Windows XP
Select [Unblock], and then retry the Search operation.
Windows 7
Select [Allow access], and then retry the Search operation.

Net Configuration Tool
Rev.2.03 - 11 -
2) Select the IP address from the list to search the printer and click the "OK" button.
The list of printers connected to the selected IP will be displayed.
3) Select the printer from the list and press the [Setting] button, and then the following
window for setting Ethernet settings will pop up.

Net Configuration Tool
Rev.2.03 - 12 -
4) Enter the proper IP Address, Subnet Mask, and Gateway for the currently used network,
and then press the Save button to save the settings.
* By setting “Inactivity Time”, you can disconnect the printer to host device when the data
is not transferred while inactivity time.
* Device Baudrate setting, which is used for other models, is not necessary for our printer.
5) Select the printer from the list and press the [Configuration(Web)] button you will see
the web browser for changing the Ethernet and WLAN settings as shown below.

Net Configuration Tool
Rev.2.03 - 13 -
(1) SRP-350 series / SRP-350plus series / SRP-330 / 350plusIII series
(2) SRP-F310 series

Net Configuration Tool
Rev.2.03 - 14 -
4-1-2 WLAN Configuration

Net Configuration Tool
Rev.2.03 - 15 -
1) When you press the Search button, the printer connected to the network will be shown
in the list.
2) Select the IP address from the list to search the printer and click the "OK" button.
The list of printers connected to the selected IP will be displayed.
3) Select the printer from the list and press the [Setting] button, and then the following
window for changing the WLAN settings will pop up.

Net Configuration Tool
Rev.2.03 - 16 -
4) Enter the proper IP Address, Subnet Mask, and Gateway of the currently used network,
and then click the [Save] button to save the settings.
* By setting “Inactivity Time”, you can disconnect the printer to host device when the data
is not transferred while inactivity time.
* Device Baudrate setting, which is used for other models, is not necessary for our printer.
5) Select the printer from the list and press the [Configuration(web)] button, and then the
Login window will pop up.
Net Configuration Tool
Rev.2.03 - 17 -
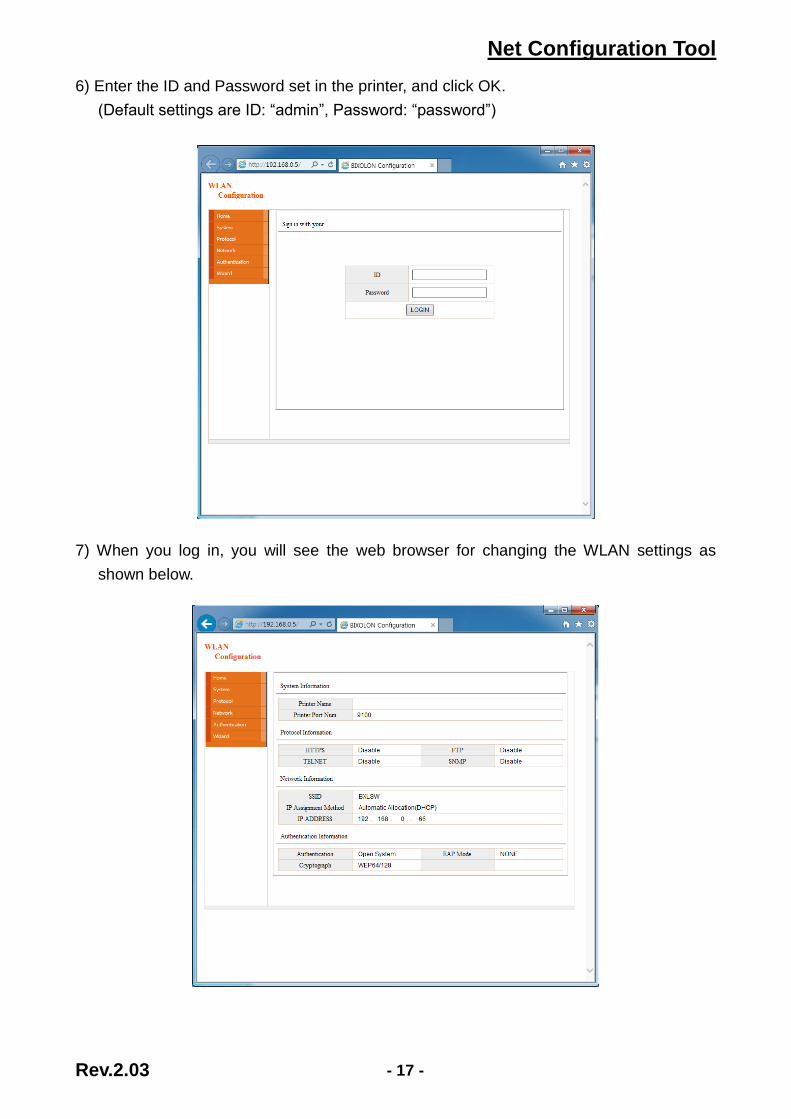
6) Enter the ID and Password set in the printer, and click OK.
(Default settings are ID: “admin”, Password: “password”)
7) When you log in, you will see the web browser for changing the WLAN settings as
shown below.

Net Configuration Tool
Rev.2.03 - 18 -
8) You can search for the information of the wireless network by pressing the BSS Info
button.
9) When you press the BSS Info button, information about the SSID, BSSID, Network
Model, and Encryption information of the network in close range will be shown as
follows.

Net Configuration Tool
Rev.2.03 - 19 -
4-1-3 WLAN Configuration via Serial/ USB
Connect to printer via Serial/USB cable, then click “WLAN Configuration(Serial/USB)”.
※ This function is supported only WLAN Mobile and WLAN POS printers
(SRP-350plusIII, SRP-352plusIII).

Net Configuration Tool
Rev.2.03 - 20 -
(1) Choose "POS" as the Printer Type.
Choose the “Port”, then click “Connect”.
(You can only use USB cable for POS Printer.)
If it is properly connected, “Succeeded to printer connection” will be shown.
Then the configuration of the printer will be listed.
(2) System & Information
Printer Name, Printer Port, User ID, User password can be set.

Net Configuration Tool
Rev.2.03 - 21 -
(3) Protocol
You can set HTTPS, TELNET, FTP and SNMP protocol as able or disable.
SNMP can be also set.
(4) BSS Information
When you click “Get BSS information”, close AP information will be listed.

Net Configuration Tool
Rev.2.03 - 22 -
(5) Network
You can set Infrastructure/Adhoc, SSID, IP, Subnet Mask and Gateway.
1) Inactivity Time
By setting “Inactivity Time”, you can disconnect the printer to host device when the
data is not transferred while inactivity time. If multiple host devices are used with one
printer, “Inactivity Time” is recommended. (Other host devices are restricted to use a
printer if one host device keep connecting to a printer.)
2) Wi-Fi Direct
Use Channel when configuring Wi-Fi Direct channels.
Conn Mode is classified into PIN or PBC type.
- PIN Type: PIN Type: Enter the same PIN CODE you set for "P2P PIN" on your
smartphone using the utility to connect.
(PIN CODE must be entered in four- or eight-digit format.
- PBC Type : PBC Type: Accept the request for approval on your smart phone to
connect.

Net Configuration Tool
Rev.2.03 - 23 -
(6) Authentication You can set Authentication and Cryptograph. If it is Infrastructure mode, you need to set Cryptograph with AP for proper connection. Then if it is Adhoc mode, you need to set Cryptograph with host device.
(7) Certificate
Printer can save the certificate file for EAP-TLS certification. When you use TLS certification, CA certificate(PEM, Client Key(KEY/PEM), and client certificate(PEM) file should be uploaded. The key size of certificate recommended is 512. If the size of certificate is more than 512, it will take some time for EAP certification.

Net Configuration Tool
Rev.2.03 - 24 -
4-2 Web Server
(1) SRP-350 series / SRP-350plus series / SRP-330 / 350plusIII series
1) Execute Internet Explorer.
2) Enter IP address of the printer at Address of Internet Explorer and click go.
[Note]
- If you are not aware of IP address, check IP address by pushing Function key. - Ask Network administrator IP Address and its related information.
3) When Configuration Window appears, enter new Network Setting.
* By setting “Inactivity Time”, you can disconnect the printer to host device when the data
is not transferred while inactivity time.
* Device Baudrate setting, which is used for other models, is not necessary for our printer.

Net Configuration Tool
Rev.2.03 - 25 -
(2) SRP-F310 series
1) Execute Internet Explorer. 2) Enter IP address of the printer at Address of Internet Explorer and click go.
When SSL of the web-server is enabled,
* A security warning window will pop when you try to connect with https.
Accept the certificate provided by the printer in the warning window and continue.
When SSL of the web-server is disabled,
enter the IP address of the printer in the address bar, and the following login window will
pop up.
Enter the ID and Password set for the printer, and then click [OK]
(Default setting values are ID: “admin”, Password: “password”.)

Net Configuration Tool
Rev.2.03 - 26 -
When the ID and Password match the ones registered in the printer, the following
window will be opened.
Both LAN and WLAN can be configured from this window.

Net Configuration Tool
Rev.2.03 - 27 -
LAN Configuration Selection Settings related to Home, System, Protocol, and Network (LAN) can be configured in this window.
Wireless LAN selection Home, System, Protocol, Network (WLAN), and Authentication can be configured from this window, and the wizard mode is also provided for easier step by step configuration.
[Note] More information about options, please refer to ‘Ethernet Interface Manual’ or ‘Network User Manual’.