software and hardware installation manual
TRANSCRIPT

Software and Hardware Installation Manual
©2016 BrainMaster Technologies, Inc.


BrainMaster Software and Hardware Installation Manual
531-319 v6.2 4/19/2016 Page 1 of 23
REF
Contents MINIMUM PC COMPUTER REQUIREMENTS............................................................................................. 2 Main Software ....................................................................................................................................................... 3
Where to find it ........................................................................................................................... 3 Which version of software should be installed ........................................................................... 4 Installation Process ..................................................................................................................... 6
Add-On Software ................................................................................................................................................ 15 Where to find it ......................................................................................................................... 15 Installation Process ................................................................................................................... 16 BrainMaster Add-on Package Installation Guide ..................................................................... 17
Hardware Settings .............................................................................................................................................. 20 Changing/Identifying the COM Port ........................................................................................ 20

BrainMaster Software and Hardware Installation Manual
531-319 v6.2 4/19/2016 Page 2 of 23
REF
MINIMUM PC COMPUTER REQUIREMENTS
BrainMaster 3.0 Software or Discovery 1.0 Software with up to 4-Channel LZT* CPU: Dual-Core 2.2GHz Processor Operating System: Windows XP, Windows Vista, Windows 7, Windows 8/8.1, Windows 10 Memory (RAM): Windows XP - 1GB (Minimum) 2GB (Recommended)
Windows Vista - 2GB (Minimum) 4GB (Recommended) Windows 7 - 2GB (Minimum) 4GB (Recommended) Windows 8 - 2GB (Minimum) 4GB (Recommended)
Graphics Card: 512MB Dedicated OR 1GB Shared Graphics Optical Drives: DVD-ROM Drive: Required for BMrDVD Input: 1 USB Port Additional SW: Microsoft Office: Required for Certain reports and EEGAudio
Windows Media Player or 3rd Party DVD Decoder: Required for BMrDVD Adobe Acrobat Reader Adobe Flash Player: Required for BMrFlash Player Adobe Shockwave Player: Required for BMrFlash Player
Discovery 1.0 Software with BMrMMP** and up to 19-Channel LZT*
CPU: Quad-core or above (Intel i7 or equivalent preferred) Operating System: Windows Vista, Windows 7, Windows 8/8.1, Windows 10 Memory (RAM): 4GB Graphics Card: Direct x 10 or above compatible graphics card 1GB Dedicated Optical Drives: DVD-ROM Drive: Required for BMrDVD** Input: 1 USB Port Additional SW: Microsoft Office: Required for certain reports and EEGAudio**
Windows Media Player or 3rd Party DVD Decoder: Required for BMrDVD** Adobe Acrobat Reader Adobe Flash Player: Required for BMrFlash Player Adobe Shockwave Player: Required for BMrFlash Player
BrainAvatar™ 4.0 Software
CPU: Quad-core or above (Intel i7 or equivalent preferred) Operating System: Windows Vista, Windows 7, Windows 8/8.1, Windows 10 Memory (RAM): 4GB Graphics Card: Direct x 10 or above compatible graphics card 1GB Dedicated Optical Drives: DVD-ROM Drive: Required for BMrDVD** Input: 1 USB Port Additional SW: Microsoft Office: Required for certain reports and EEGAudio**
Windows Media Player or 3rd Party DVD Decoder: Required for BMrDVD** Adobe Acrobat Reader Adobe Flash Player: Required for BMrFlash Player Adobe Shockwave Player: Required for BMrFlash Player
*Live Z-Score Training is an optional purchase **BMrMMP is an optional purchase

BrainMaster Software and Hardware Installation Manual
531-319 v6.2 4/19/2016 Page 3 of 23
REF
Main Software
Where to find it
BrainMaster software can be found in two different locations: 1. The BrainMaster Installation Disc* included
with your BrainMaster Hardware 2. Online at www.brainm.com/ There are two different versions of the software. One version that can be installed on 32-Bit versions of the Windows operating system. One version that can be installed on 64-Bit versions of the Windows operating system. *This disc is supplied when initially purchased, and is also available for purchase.

BrainMaster Software and Hardware Installation Manual
531-319 v6.2 4/19/2016 Page 4 of 23
REF
Which version of software should be installed
NameOfSoftwarex32: This software is intended to only be installed on versions of Windows that are 32-Bit
How to tell your version of Windows is 32-Bit: If your version of Windows is 32-Bit, then on the C Drive, you will have a single directory labelled Program Files If an attempt is made to install NameOfSoftwarex32 on a 64-Bit version of windows, you will see the following error message.
NameOfSoftwarex64: This software is intended to only be installed on versions of Windows that are 64-Bit
How to tell your version of Windows is 64-Bit: If your version of Windows is 64-Bit, then on the C Drive, you will have two directories. One labelled Program Files and one labelled Program Files (x86).

BrainMaster Software and Hardware Installation Manual
531-319 v6.2 4/19/2016 Page 5 of 23
REF
If an attempt is made to install NameOfSoftwarex64 on a 32-Bit version of windows, you will see the following error message.

BrainMaster Software and Hardware Installation Manual
531-319 v6.2 4/19/2016 Page 6 of 23
REF
Installation Process 1. After beginning the software installation, an
extraction screen will appear. No action is needed, but this process will take a few minutes, depending on your computer.
2. When this is completed, the InstallShield Wizard screen will appear. Click “Next” to continue.
3. In order to continue through the installation process, the license agreement will need to be accepted. Do this by clicking “I accept the terms in the license agreement,” then click “Next” to continue.
BrainMaster Software and Hardware Installation Manual
531-319 v6.2 4/19/2016 Page 7 of 23
REF
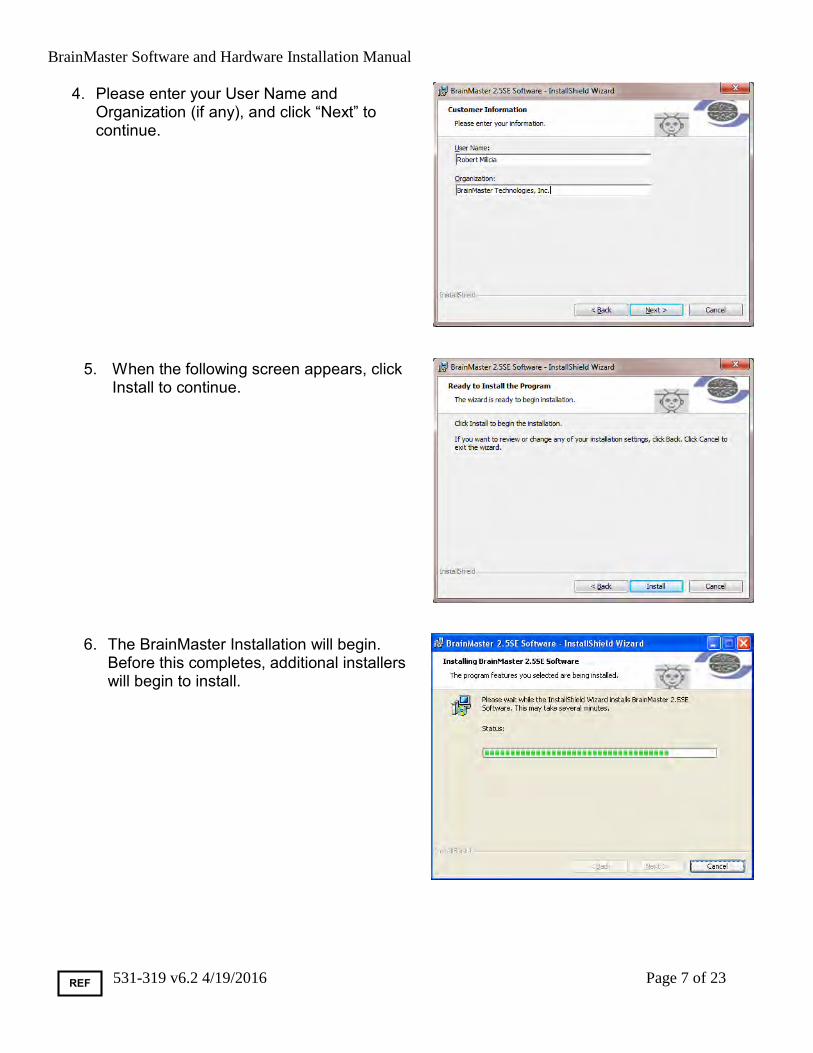
4. Please enter your User Name and
Organization (if any), and click “Next” to continue.
5. When the following screen appears, click Install to continue.
6. The BrainMaster Installation will begin. Before this completes, additional installers will begin to install.

BrainMaster Software and Hardware Installation Manual
531-319 v6.2 4/19/2016 Page 8 of 23
REF
7. A command prompt screen stating that it
is installing DScaler 5 will appear. Nothing is needed from you. It will complete on its own, and may take a few minutes depending on your computer.
8. A command prompt screen stating that it is installing the K-Lite Mega Codec pack will appear. Nothing is needed from you. It will complete on its own, and may take a few minutes depending on your computer.
9. PLEASE NOTE: If you are installing any software besides the BrainAvatar Software, please proceed to step 11. A command prompt screen stating that it is installing a Microsoft Redistributable will appear. Nothing is needed from you. It will complete on its own, and may take a few minutes depending on your computer.
10. A command prompt screen stating that it is
installing a DirectX Redistributable will appear. Nothing is needed from you. It will complete on its own, and may take a few minutes depending on your computer.

BrainMaster Software and Hardware Installation Manual
531-319 v6.2 4/19/2016 Page 9 of 23
REF
11. If you have not installed any prior BrainMaster
Software. Or, you have not checked the “Always Trust software from BrainMaster Technologies, Inc.” checkbox in your previous installation, the following Windows Security Window will appear asking if you would like to install the USB Drivers for the BrainMaster Hardware. To avoid seeing an additional screen, click the always trust software from “BrainMaster Technologies, Inc.”. Then, click the Install Button.
12. If you did not click on the box above, another
Windows Security Windows Window will appear asking you would like to install the VCP for the BrainMaster Hardware. Click the Install Button to continue.
13. If you did not click on the box above, another Windows Security Windows Window will appear asking you would like to install the VCP for the BrainMaster Hardware. Click the Install Button to continue.
14. A command prompt screen stating that it is installing a Microsoft Form Add-on will appear. Nothing is needed from you. It will complete on its own, and may take a few minutes depending on your computer.

BrainMaster Software and Hardware Installation Manual
531-319 v6.2 4/19/2016 Page 10 of 23
REF
15. A command prompt screen stating that it is
installing the National Instruments CVIRTE will appear. Nothing is needed from you. It will complete on its own, and may take a few minutes depending on your computer
16. The CoolSynth MIDI Synthesizer Application will now begin its installation process. Please select the preferred language for this program and click OK to continue.
17. The Welcome Screen for the CoolSynth software will appear. Click Next to Continue.

BrainMaster Software and Hardware Installation Manual
531-319 v6.2 4/19/2016 Page 11 of 23
REF
18. CoolSoft Setup will now look for a list of
possible applications that might prevent the installation of the VirtualMIDI Synth.
19. The following screen will appear, to let you know the changelog for the MIDI Synth. Click Install to continue.
20. The Installation process will now begin. Once the installation process has completed, click the Next Button to continue.

BrainMaster Software and Hardware Installation Manual
531-319 v6.2 4/19/2016 Page 12 of 23
REF
21. The Post setup Configuration Menu will
appear. Uncheck “VirtualMIDISynth needs sound font files to work, open CoolSoft website to download them now”, and ‘Automatically check for updates”. When this is completed, click the Next Button to continue.
22. The Configurator will open, and you will need to choose the SoundFont file that was installed with your software. Click the “+” Button to find this.
23. You will need to navigate to the SoundFont File location. If you installed the BrainAvatar Software, the SoundFont file can be found at C:\Progam Files (x86)\BrainMaster\Avatar\Additional Downloads, and is named WeedsGM3.sf2. If you installed any other Software, the SoundFont file can be found at C:\brainm.20\Additional Downloads, and is still named WeedsGM3.sf2. When you have selected the file click Open to continue.

BrainMaster Software and Hardware Installation Manual
531-319 v6.2 4/19/2016 Page 13 of 23
REF
24. After the SoundFont has been selected, it
will be available for use in the Configurator. On the Configurator Page, click Apply, then click OK.
25. The CoolSoft VirtualMIDISynth is now Setup and configured. Click Finish to continue.
26. The following screen will appear to confirm that the the selected BrainMaster Software has been successfully installed. Click Finish to Continue.

BrainMaster Software and Hardware Installation Manual
531-319 v6.2 4/19/2016 Page 14 of 23
REF
The BrainMaster Software is now installed on your PC. You will be able to see that this is successful by the shortcut newly created on the Desktop. At this time, it is recommended to restart your PC.

BrainMaster Software and Hardware Installation Manual
531-319 v6.2 4/19/2016 Page 15 of 23
REF
Add-On Software
Where to find it
BrainMaster Add-On software can be found in two different locations: 3. The BrainMaster Installation Disc* included
with your BrainMaster Hardware 4. Online at www.brainm.com/ *This disc is supplied when initially purchased, and is also available for purchase.

BrainMaster Software and Hardware Installation Manual
531-319 v6.2 4/19/2016 Page 16 of 23
REF
Installation Process
1. After beginning the software installation, an extraction screen will appear. Click yes to continue the installation.
2. The following pop-up will appear. No
action is required. When completed, the screen will close on its own.
The BrainMaster Protocol Package will now be available for use for the selected BrainMaster Software. You will be able to see that this is successful by viewing the Settings in the Read or Write Settings Files.
BrainMaster Software and Hardware Installation Manual
531-319 v6.2 4/19/2016 Page 17 of 23
REF
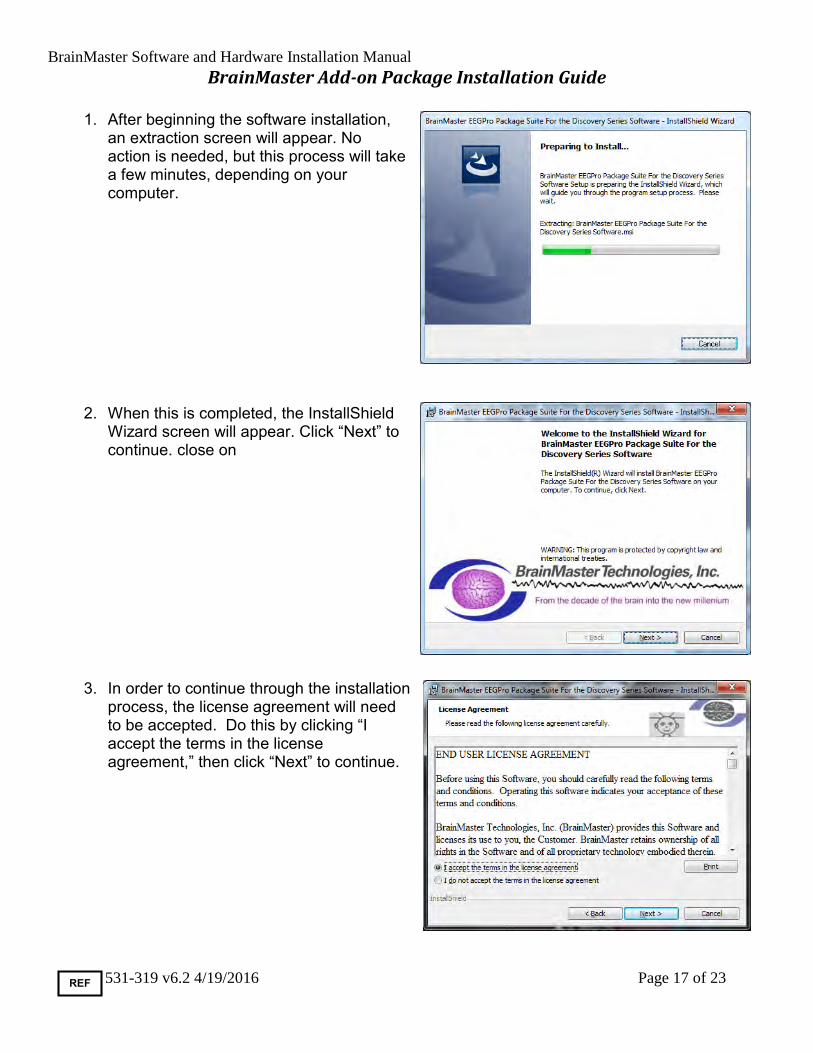
BrainMaster Add-on Package Installation Guide 1. After beginning the software installation,
an extraction screen will appear. No action is needed, but this process will take a few minutes, depending on your computer.
2. When this is completed, the InstallShield Wizard screen will appear. Click “Next” to continue. close on
3. In order to continue through the installation process, the license agreement will need to be accepted. Do this by clicking “I accept the terms in the license agreement,” then click “Next” to continue.
BrainMaster Software and Hardware Installation Manual
531-319 v6.2 4/19/2016 Page 18 of 23
REF
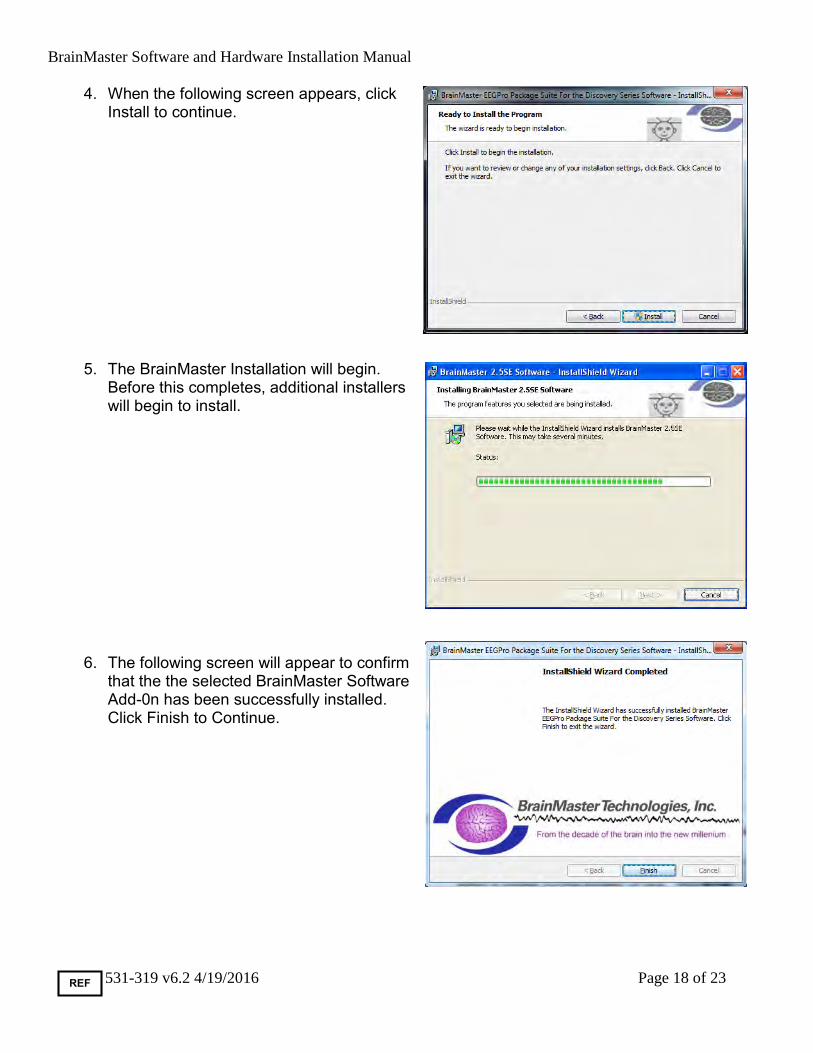
4. When the following screen appears, click
Install to continue.
5. The BrainMaster Installation will begin. Before this completes, additional installers will begin to install.
6. The following screen will appear to confirm that the the selected BrainMaster Software Add-0n has been successfully installed. Click Finish to Continue.

BrainMaster Software and Hardware Installation Manual
531-319 v6.2 4/19/2016 Page 19 of 23
REF
The BrainMaster Software is now installed on your PC. You will be able to see that this is successful by seeing the name of the add-on in the Programs and Features Menu.

BrainMaster Software and Hardware Installation Manual
531-319 v6.2 4/19/2016 Page 20 of 23
REF
Hardware Settings
Changing/Identifying the COM Port
If you need to change which COM Port the BrainMaster device is assigned to, or simply would like to know what COM Port your unit is assigned to, follow these steps. PLEASE NOTE: The BrainMaster unit must be assigned to a COM between COM 3 and COM 32. If it assigned to another COM Port outside of these numbers, it will not function.
1. Get to the Device Manager. This can be found at Control PanelSystem and SecurityDevice Manger. The BrainMaster Module, will be located under the section “Ports (COM & LPT)”. If you are simply looking for what COM Port your device is on, this will tell you. If you are looking to change your COM Port, proceed to the next step
2. Right-click on the BrainMaster Module listing,
and then on the drop-down menu, left-click on “Properties”:
3. Click the “Port Settings” tab. Under the “Port Settings” tab, click the “Advanced” button.

BrainMaster Software and Hardware Installation Manual
531-319 v6.2 4/19/2016 Page 21 of 23
REF
4. On the drop-down menu next to “COM Port
Number,” choose, by clicking and highlighting a COM Port number that does not have the words “in use” next to it. When this is complete, click “OK” in the upper right corner.
Click “OK” on the “Properties” screen to properly set the COM Port. Once this has been completed, the COM Port will now be set to the COM selected. Please make sure that you always keep track of the COM Port that your unit has been assigned.

BrainMaster Software and Hardware Installation Manual
531-319 v6.2 4/19/2016 Page 22 of 23
REF
BrainMaster Products are manufactured by:
BrainMaster Technologies Inc.
195 Willis St.
Bedford, OH 44146
United States
1-440-232-6000
European Representative: mdi Europa GmbH Langenhagener Straße 71
D-30855 Langenhagen
Phone: +49-511-39 08 95 30
Fax: +49-511-39 08 95 39
Email: [email protected]
Internet: www.mdi-europa.com
EC REP