snake skin blanks
TRANSCRIPT
8/8/2019 Snake Skin Blanks
http://slidepdf.com/reader/full/snake-skin-blanks 1/11
Snake Skin Blanks---How I make them---
A couple of years ago I was searching for pens and wandered upon a snake skin slimmade by master pen maker and Pen Maker’s Guild member Jay Pickens. Locating Jay inWorth, Texas was even more exciting since I live just 120 miles away and travel throuoften. I contacted Jay and stopped for a visit and the rest is history. Jay and I have b
experimented with PR casting and sharing with each other our experiments, successes, aailures. My polyester resin casting was learned from articles written by Jay Pickens and frvisiting with Jay on my trips through Ft. Worth. Jay also has an excellent article on embeddn polyester resin...anything that can be glued to the pen tubes can be embedded. Thanks Jor all you have taught me!
But, I think the real credit for snake skin blanks should go to the person who made the fones...as far as I can determine. The idea came while visiting at the first Penturners Rendezvoduring the Utah Woodturners Symposium in Provo, Utah. The challenge was accepted an
short time later the first snake skin blank cast with polyester resin came onto the scene. Tblank was made by Dave Baldwin. Dave and his brother Bob now make many of the blanks purchase from our suppliers. Thanks Dave for introducing us to this beautiful medium making pen blanks. Next to wood, I must say that these snake skin blanks and especially pens are some of the most beautiful ones around. Not everyone will agree. Most peoeither love or hate these pens.
At the last Penturner’s Rendezvous Dave and I visited and compared notes on successand failures. Both of us have several casts that are not even close to useable. Dave
boxes of them and I have one box of failures. Yes, failures. Many failures for me befoperfecting the process I use.
Air bubbles were the most difficult for me to eliminate. There is an additive that will reducebubbles. I never tried it. Pressure casting was found on some casting forums and I set on perfecting pressure casting without buying an expensive pressure tank. Hence the nnfamous Harbor Freight Pressure Paint Tank. Pressure casting helped tremendously,
was not 100% successful for me. But after adding the vacuum step I have cast several blocand each one has been 100% useable. Casting smaller blocks using pressure only has be
successful for Jay Pickens. Jay casts 4 tubes at a time and does not vacuum. He only uspressure and is quite successful. But casting 10-12 tubes at a time was a problem for mHEAT was the real problem along with the bubbles. Reducing the catalyst and using vacuand pressure worked for me. Good luck with your casting and I hope this tutorial will get ystarted making these blanks.
8/8/2019 Snake Skin Blanks
http://slidepdf.com/reader/full/snake-skin-blanks 2/11
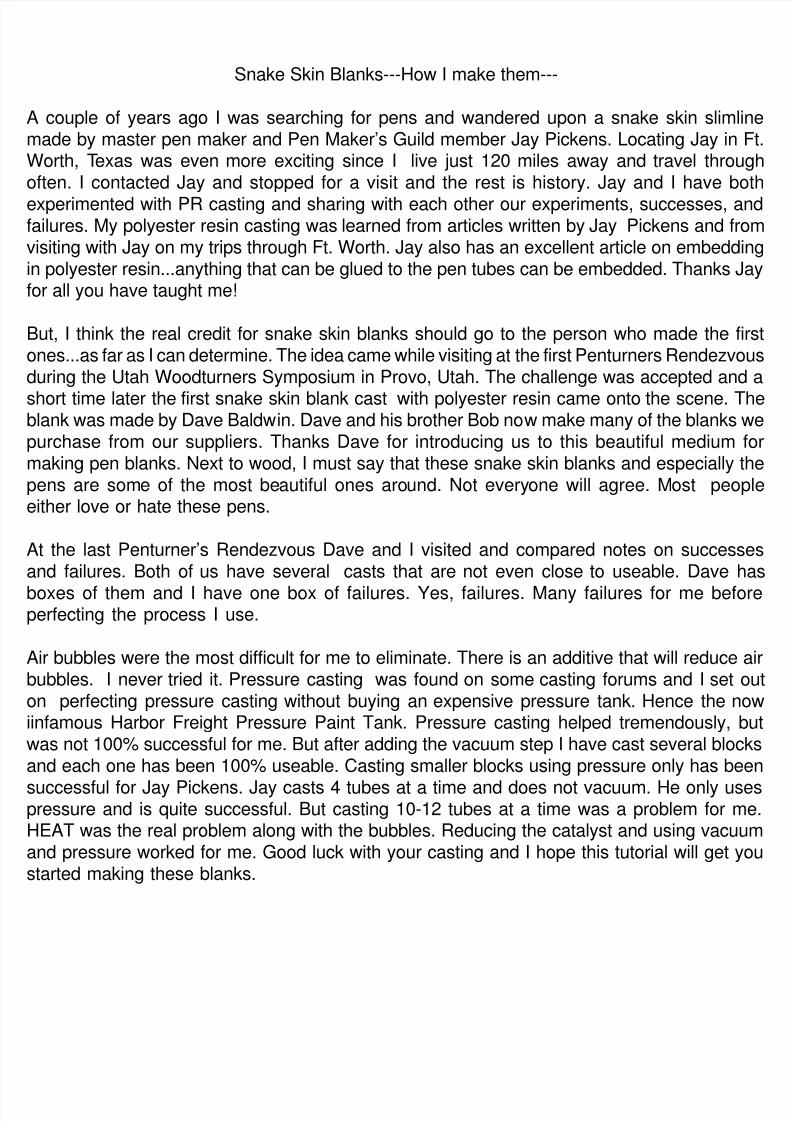
Here are some or most of the items you will neecast the snake skin blanks. The use of each itembe explained as they are needed. You msubstitute other similar items in place of the oI’ve used.
The pictures I’m using were taken from the cas
sessions of different kits so the tubes may be nobe from the same kit. I do hope there is no confuseeing different kit tubes.
Measure and cut a section of skin long enoughthe two tubes of the kit being made. Then, cutsection of skin into two parts, one for each tuleaving the sections a little longer than the tub
Notice that the tubes are painted. I use sppaint...camo green...satin finish. I also use flat blPainted tubes keeps the brass from showing throthe skins.
Trim off the belly scales, but be sure not to the skin too much. The skin section needs toable to wrap around the tube and overlap itby about 1/16 inch.
Dry fit the skin to the tube to make sure the lenand width are what is needed. When thisatisfactory, the gluing of the skin to the tube is n
Place a bead of CA down the middle of the sI use medium CA to give a little more working t
8/8/2019 Snake Skin Blanks
http://slidepdf.com/reader/full/snake-skin-blanks 3/11
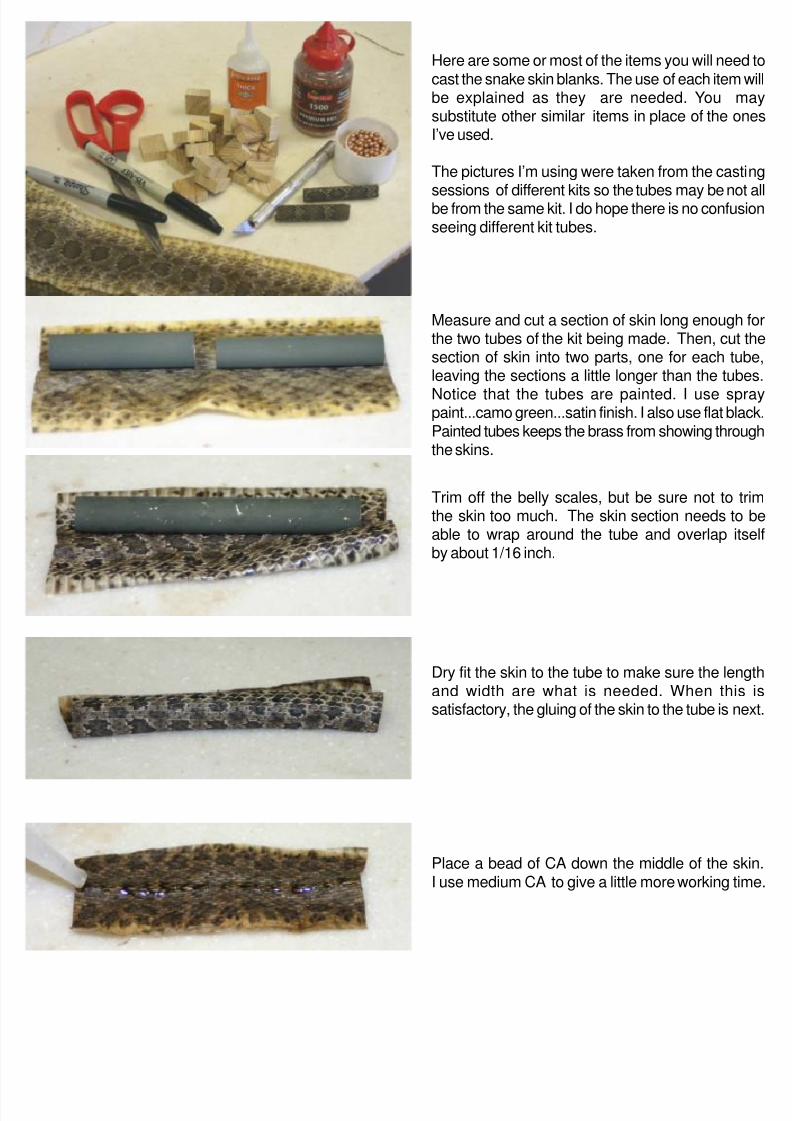
Set the tube on the glue bead and hold until set. Troll the tube to one side and the glue will squeegfront of it. Turn the tube/skin around and place anobead of glue next to the tube and roll it towardend. Overlap this second edge over the first edDo not try a butt joint. The overlapping joint isonly one to use.
Roll the tube under your fingers to insure the sktightly glued to the tube. Pay close attention toseam and the edges. Apply moderate pressurpress the seam together and the edges againstends of the tubes.
Two finished slim line tubes ready to prepare toeternally encapsulated in polyester resin. The seside is the side being viewed. Looks good, huh
Close-up of the same tubes showing seam sidetop) and the “show” side on the bottom tube. Futhing happens when people look at a snake skin pMost people look and comment how nice it lo
and how much they hate snakes. When anopenturner looks, he/she turns the pen over examines the seam...and if I’m lucky, they havlook hard to find it.
8/8/2019 Snake Skin Blanks
http://slidepdf.com/reader/full/snake-skin-blanks 4/11
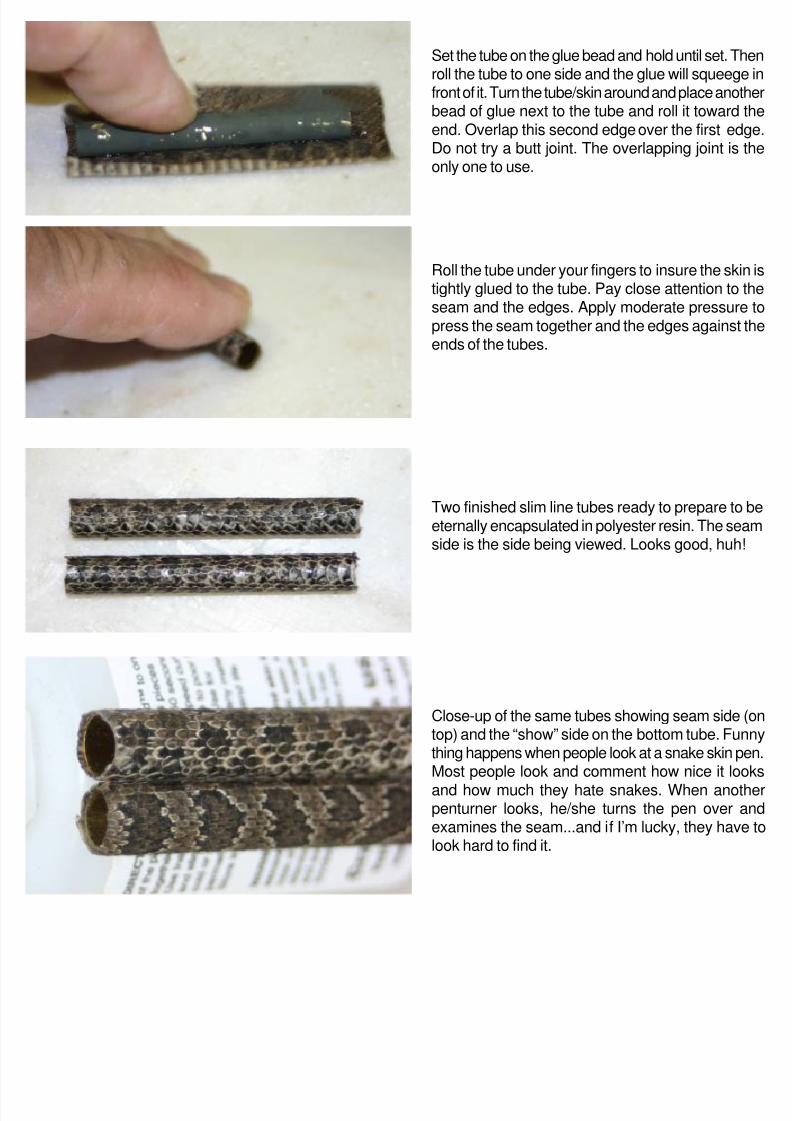
Now, let’s move one. Corks are needed to closethe ends of the tubes. Now, lets move to the nstep...preparing the tubes for casting. The mproblem is to hold the tube off the bottom of the mMany things were tried and corks proved to bebest choice, for me and others, at least. Others mdiscover a better or easier way to do this. Anth
Turchetta explains how to cast skins using a two pcasting in his excellent article on PR casting.
After corking both ends and filling the tubes with B(not our friend Bill B. but little copper spheres uin air rifles) the tubes are now ready to glue tosquare stand-offs. One drop of CA on each cend and place the cork in the center of the squcut stand-offs. The square are cut from 3/4 isquare stock of any available scrap wood. Cutsquares thin and the tubes will not want to float inPR as readily as using thicker squares. Some ofpictures may show thicker squares, but I now cut thvery thin...maybe 1/16”.
Finished tube with snake skin, weights, corks, standoffs. This snake skin tube is now ready to cMake a few more and cast all at once. I cast 10tubes at time, but casting tubes for one or two pwill work.
Run a bead of medium CA around the cork securely place it in one end of the tube. Fill wweights (remember, I use BB’s), then CA other cork and place it in the other end. Be sthe glue makes a good seal all of the way arothe cork and the brass tube’s end.
8/8/2019 Snake Skin Blanks
http://slidepdf.com/reader/full/snake-skin-blanks 5/11
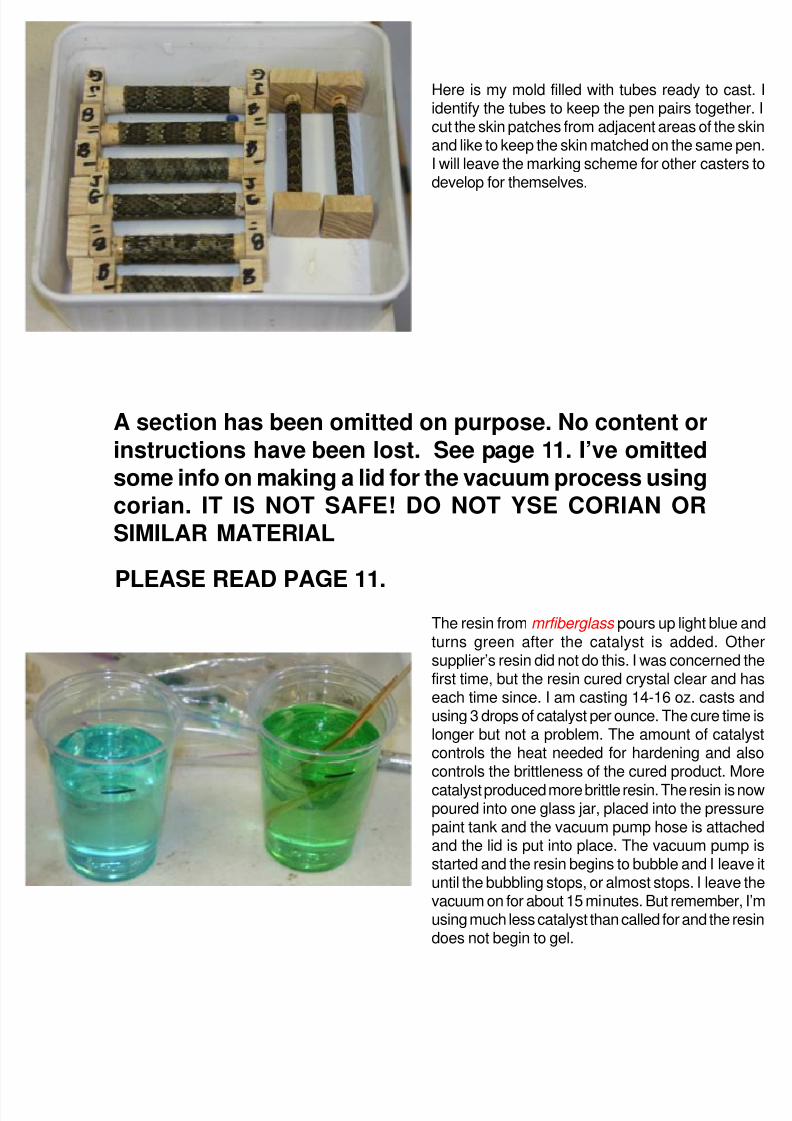
Here is my mold filled with tubes ready to caidentify the tubes to keep the pen pairs togethcut the skin patches from adjacent areas of the and like to keep the skin matched on the same pI will leave the marking scheme for other casterdevelop for themselves.
The resin from mrfiberglass pours up light blue turns green after the catalyst is added. Otsupplier’s resin did not do this. I was concernedfirst time, but the resin cured crystal clear and each time since. I am casting 14-16 oz. casts using 3 drops of catalyst per ounce. The cure timlonger but not a problem. The amount of catacontrols the heat needed for hardening and acontrols the brittleness of the cured product. M
catalyst produced more brittle resin. The resin is poured into one glass jar, placed into the presspaint tank and the vacuum pump hose is attacand the lid is put into place. The vacuum pumstarted and the resin begins to bubble and I leauntil the bubbling stops, or almost stops. I leavevacuum on for about 15 minutes. But rememberusing much less catalyst than called for and the redoes not begin to gel.
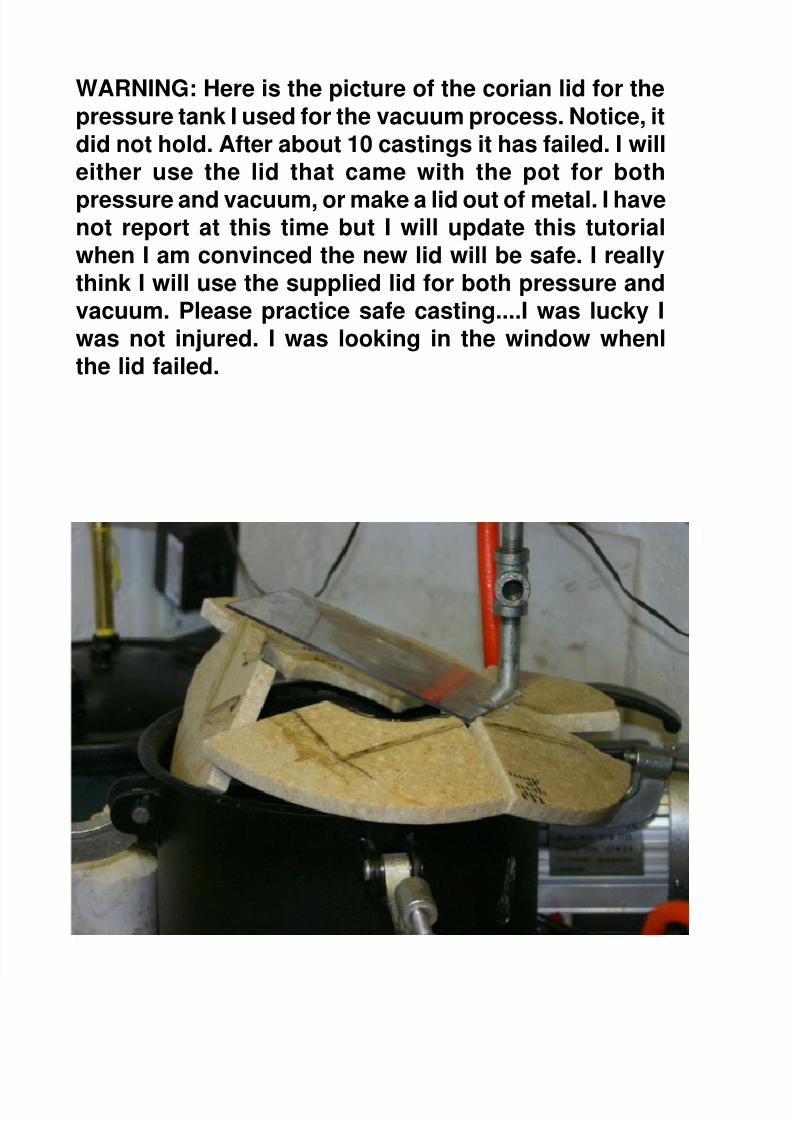
A section has been omitted on purpose. No content or
instructions have been lost. See page 11. I’ve omittedsome info on making a lid for the vacuum process usingcorian. IT IS NOT SAFE! DO NOT YSE CORIAN ORSIMILAR MATERIAL
PLEASE READ PAGE 11.
8/8/2019 Snake Skin Blanks
http://slidepdf.com/reader/full/snake-skin-blanks 6/11
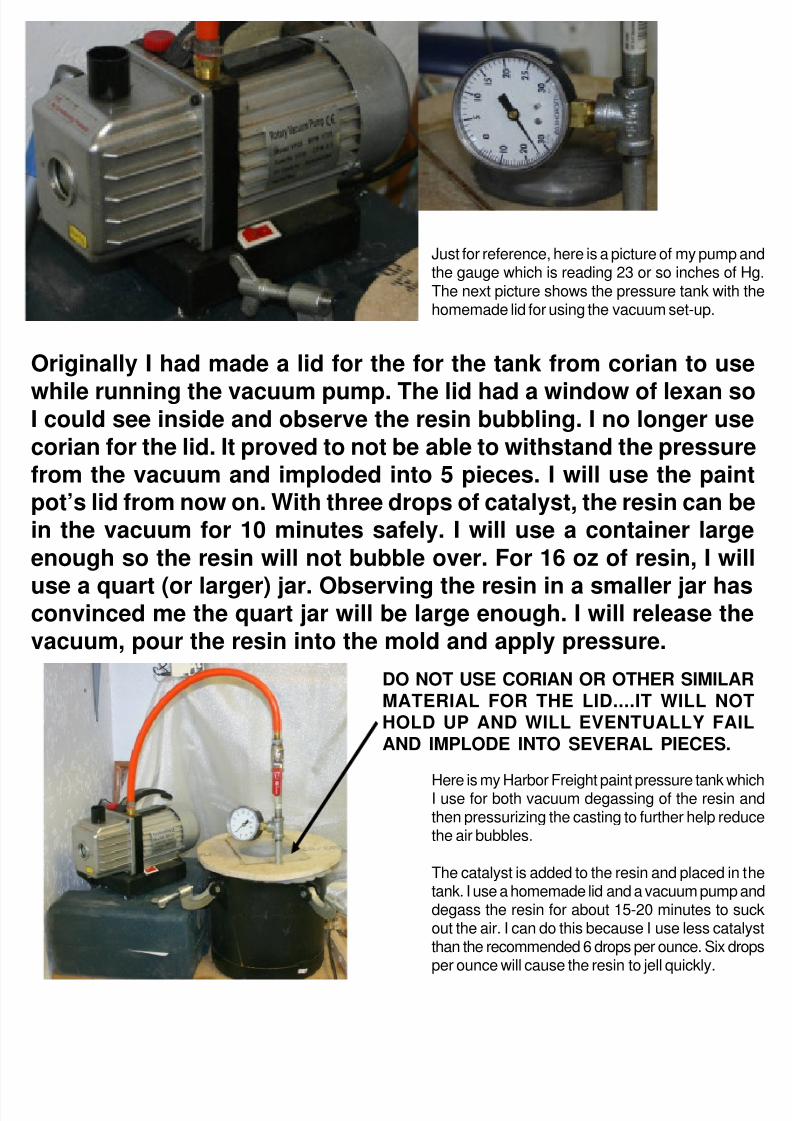
Here is my Harbor Freight paint pressure tank wI use for both vacuum degassing of the resin then pressurizing the casting to further help redthe air bubbles.
The catalyst is added to the resin and placed intank. I use a homemade lid and a vacuum pump degass the resin for about 15-20 minutes to sout the air. I can do this because I use less catathan the recommended 6 drops per ounce. Six drper ounce will cause the resin to jell quickly.
Just for reference, here is a picture of my pump the gauge which is reading 23 or so inches of The next picture shows the pressure tank withhomemade lid for using the vacuum set-up.
Originally I had made a lid for the for the tank from corian to us
while running the vacuum pump. The lid had a window of lexan sI could see inside and observe the resin bubbling. I no longer uscorian for the lid. It proved to not be able to withstand the pressurfrom the vacuum and imploded into 5 pieces. I will use the painpot’s lid from now on. With three drops of catalyst, the resin can bin the vacuum for 10 minutes safely. I will use a container larg
enough so the resin will not bubble over. For 16 oz of resin, I wi
use a quart (or larger) jar. Observing the resin in a smaller jar haconvinced me the quart jar will be large enough. I will release thvacuum, pour the resin into the mold and apply pressure.
DO NOT USE CORIAN OR OTHER SIMILAMATERIAL FOR THE LID....IT WILL NOHOLD UP AND WILL EVENTUALLY FAIAND IMPLODE INTO SEVERAL PIECES.
8/8/2019 Snake Skin Blanks
http://slidepdf.com/reader/full/snake-skin-blanks 7/11
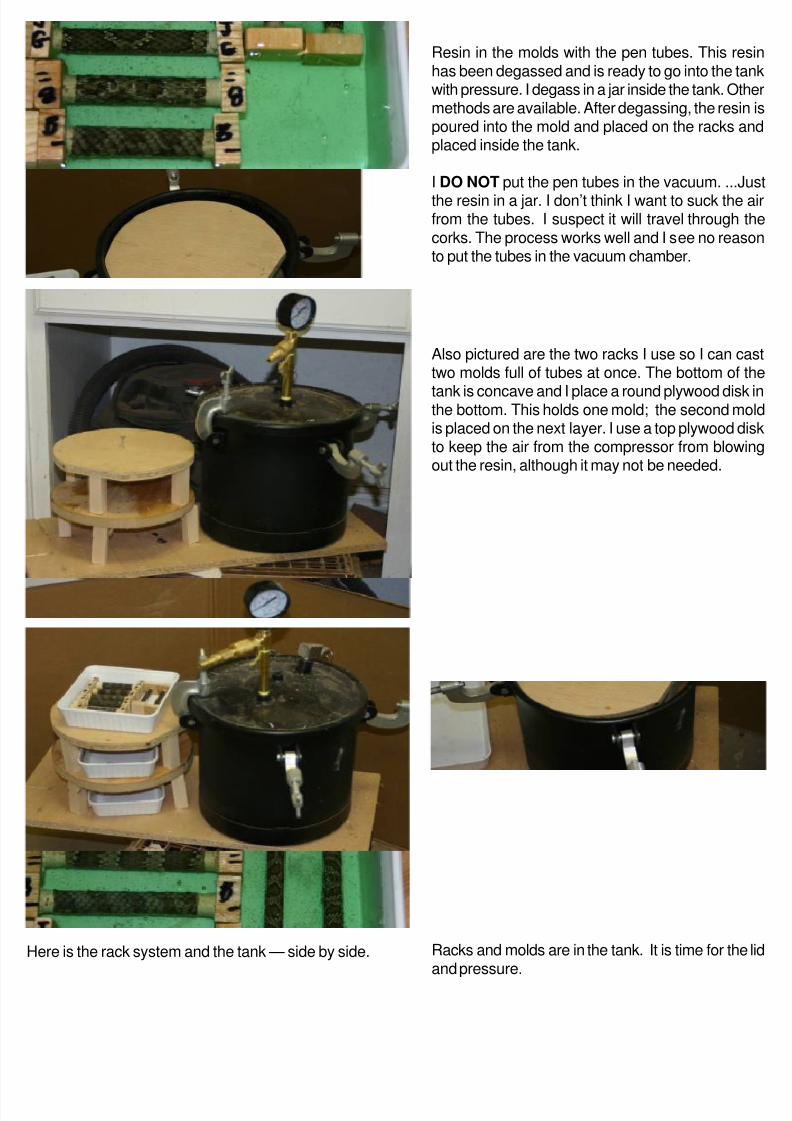
Also pictured are the two racks I use so I can ctwo molds full of tubes at once. The bottom of
tank is concave and I place a round plywood disthe bottom. This holds one mold; the second mis placed on the next layer. I use a top plywood dto keep the air from the compressor from blowout the resin, although it may not be needed.
Resin in the molds with the pen tubes. This rehas been degassed and is ready to go into the twith pressure. I degass in a jar inside the tank. Omethods are available. After degassing, the respoured into the mold and placed on the racks placed inside the tank.
I DO NOT put the pen tubes in the vacuum. ...J
the resin in a jar. I don’t think I want to suck thefrom the tubes. I suspect it will travel throughcorks. The process works well and I see no reato put the tubes in the vacuum chamber.
Here is the rack system and the tank — side by side. Racks and molds are in the tank. It is time for thand pressure.

8/8/2019 Snake Skin Blanks
http://slidepdf.com/reader/full/snake-skin-blanks 8/11
The air hose is attached from the compressor totank. I set the pressure regulator on the compresand leave the hose hooked up until the resin is cuI had problems at first just pressurizing the tank removing the hose. The pressure would leak doand air inside the tubes would get between the reand skin and cause the skins to look silvery with of cruddy looking stuff. These castings were useable. Leaving the hose attached and holding
pressure constant throughout the curing solved mproblems I was having.
Before the vacuum step I was pressurizing the tto 50 psi. Now that I degass the resin with vacuI’ve dropped the pressure back to 25-30 psindicated on the gauge in the next photo.
A finished cast ready to be cut apart, corks and removed and turned into a great looking peseparate the tube/blanks with the bandsaw. corks are not reusable. I do collect the BBs to reuexcept for the ones I spill on the floor. I recently foa large coffee can filled with small lead shot usedreloading shotgun shells at a garage sell purchased it for just a couple of dollars. I’ve busing the lead shot in the last few casts. Jay Pick
uses metal rods cut into the proper lengths. Otthings could be used to achieve the same resuused small nails the first few times.
8/8/2019 Snake Skin Blanks
http://slidepdf.com/reader/full/snake-skin-blanks 9/11
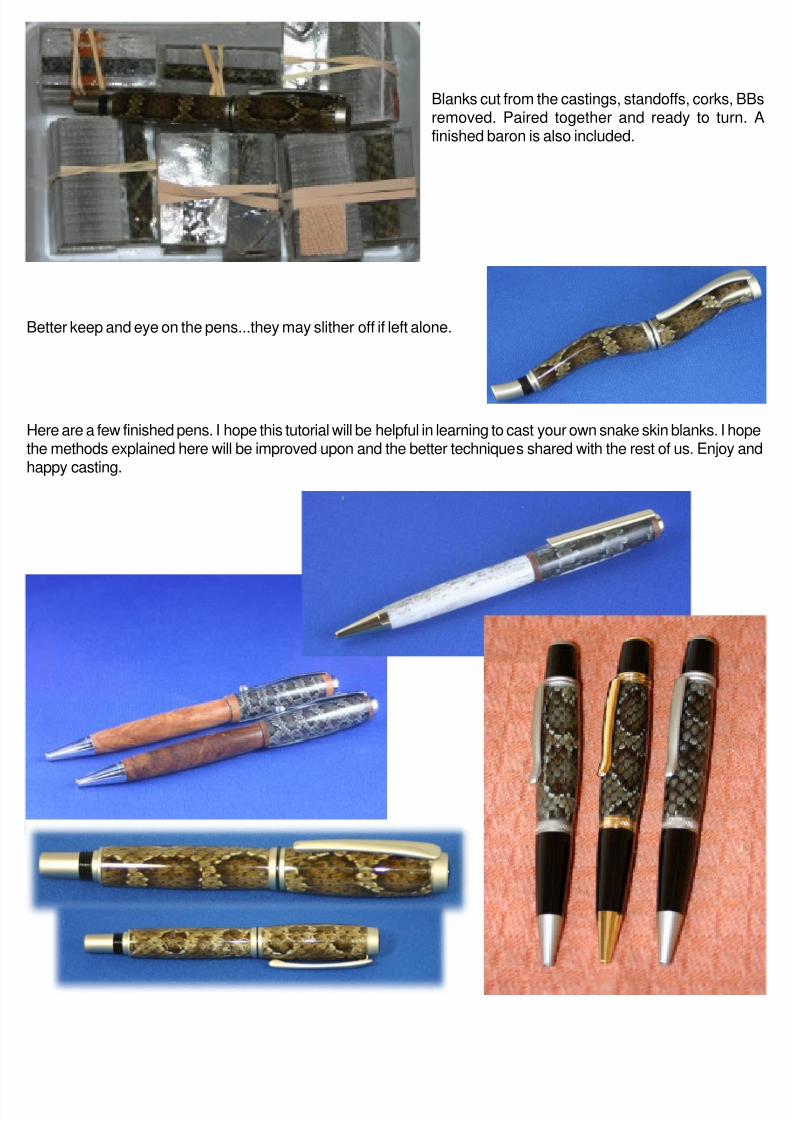
Here are a few finished pens. I hope this tutorial will be helpful in learning to cast your own snake skin blanks. I hhe methods explained here will be improved upon and the better techniques shared with the rest of us. Enjoy happy casting.
Blanks cut from the castings, standoffs, corks, Bremoved. Paired together and ready to turnfinished baron is also included.
Better keep and eye on the pens...they may slither off if left alone.
8/8/2019 Snake Skin Blanks
http://slidepdf.com/reader/full/snake-skin-blanks 10/11
Sources for the materials I use:
. I spray paint the tubes with either flat black or a flat green used in camo. It came from SutherlanHome Center but should be available from any store selling spray paint. Other paint typescould be used. Magic marker and Sharpie type inks do not hold up well to the CA.
2. Corks are available from: http://www.sunburstbottle.com Navigate to accessories and click on“cork stoppers”. I use sizes #00, #0, #1, #2, #3, and #4. These sizes have worked for kits fromslimlines to the Gent.
3. I purchase snake skins from Steve Thompson at http://sdsnake.com/SnDen.htm, but Steve isselling his last skins and will not be selling skins after his supply is depleted. We need to be proing the internet for find another source for rattle snake skins.
4. The BBs used for weights were from a sporting goods store. My Walmart did not carry BBs.
5. Pen kits and glue from your favorite supplier.
Notes:
A. I cut the slab into blanks with my bandsaw.
B. I use an ice pick to pry out the cork on one end, empty the BBs and reuse them. Knock out theother cork with a punch or old mandrel.
C. If you use a sander to get the blanks square or to reduce them to length, then I recommend usthin CA on the ends to keep the white dust from getting between the skin and the resin.
D. My mold is a square cake pan from one of the dollar stores or molds can be ordered from sourc
available in the other PR casting articles.
E. If the casting is dropped onto a concrete floor, you may need to start over...I know this from firshand knowledge. It is a sickening feeling to see the cracks spiderwebbing throughout the cast.careful.
F. Pressure and vacuum can be omitted with good results. Others cast without either of these.Anthony Turchetta has an excellent article on PR casting in the library of the IAP athttp://www.penturners.org . Other articles are available at http:www.penmakersguild.com and the files of the Y! PPenturners Group at http://www.groups.yahoo.com/group/penturners
G. Turn carefully taking light cuts as with any plastic or acrylic blank. Sand and polish with yourfavorite regiment. I sand 220, 320, 400, and MM to 6000. Then I buff with tripoli, white diamond HUT Ultra Gloss Plastic Polish.
H. An excelent suggesiton was made by Janet Smith. She suggests working with wax paper on thwork surface. CA glue will not stick to it and clean up is easier. I actually work on a 3 ft. square ocorian and scrape off the glue after each session. But, I’m not allowed to work inside the house longer because fo CA glue on table tops. Thanks Janet for that suggestion.
8/8/2019 Snake Skin Blanks
http://slidepdf.com/reader/full/snake-skin-blanks 11/11
WARNING: Here is the picture of the corian lid for the
pressure tank I used for the vacuum process. Notice, itdid not hold. After about 10 castings it has failed. I willeither use the lid that came with the pot for both
pressure and vacuum, or make a lid out of metal. I havenot report at this time but I will update this tutorial
when I am convinced the new lid will be safe. I reallythink I will use the supplied lid for both pressure andvacuum. Please practice safe casting....I was lucky Iwas not injured. I was looking in the window whenlthe lid failed.