snack plus easy combo - tech 2 success · vision snack plus/easy combo // vending mnp86v03usv00...
TRANSCRIPT

vision Snack Plus/Easy Combo // Vending
MNP86V03USV00 Date: 2008/12/01 Rev. 0 PAGE 1 OF 62
vision Snack Plus Easy Combo
TECHNICAL MANUAL

vision Snack Plus/Easy Combo // Vending
MNP86V03USV00 Date: 2008/12/01 Rev. 0 PAGE 2 OF 62
WARNING! Read the following instructions carefully before using your machine: ◊ Remove plastic plugs from bottom of machine and place it on the floor before opening and unpacking. ◊ When discarding packaging material or an old machine, please consult about recycling. ◊ Since the machine has a cooling unit, it should be transported in vertical position and it should not be connected to mains until 2 hours have elapsed after concluding the unpacking and installation process. ◊ Before connecting to mains, make sure that the power supply characteristics coincide with those of the machine. ◊ The power cable plug should be installed so the machine can be easily disconnected from mains. ◊ If the power cable is damaged, it should be replaced by the manufacturer or after sales service or similar qualified personnel to prevent hazards. ◊ Place a rubber protection around the power cable in the slot of the lid of the cable winding recess. ◊ Do not burn or throw away the battery. Batteries should be disposed of in accordance with local laws and regulations and may be recyclable. ◊ Protect the machine against humidity, dust, dirt, etc. You should particularly avoid any obstruction of the ventilation grids. ◊ Do not clean the machine with concentrated products as they may attack the painted and wood surfaces and alter the colour. ◊ Frequent cleaning, can prevent breakdowns and extend the machine's service life. ◊ The machine should be installed in a vertical position, with a maximum back to front or lateral tilt of 5% (~2°). ◊ If you need to replace the power supply cable, please replace it with the appropriate one for your country:
Argentina, Jofemar code 5500014. Australia, Jofemar code 5500006.
Spain (STANDARD), Jofemar code 5500000. UK, Jofemar code 5500011.
Switzerland, Jofemar code 5500004. USA, Jofemar code 5500010.
AVT Inc.341 Bonnie Circle Ste. 102Corona, CA 92880951.737.1057

vision Snack Plus/Easy Combo // Vending
MNP86V03USV00 Date: 2008/12/01 Rev. 0 PAGE 3 OF 62
TABLE OF CONTENTS 1. Symbols .........................................................................................................................4 2. Operating conditions......................................................................................................4 3. Description of components ............................................................................................4
3.1. Main technical features .........................................................................................5 3.1.1. Door ............................................................................................................6 3.1.2. Cabinet........................................................................................................9
3.2. Volume and weight ..............................................................................................14 4. Electric-electronic specifications .............................................................................15
4.1. Initial electrical installation ..............................................................................15 4.2. Product dispenser channel ..................................................................................15 4.3. Display card.........................................................................................................16 4.4. Control card .........................................................................................................16 4.5. Relay card ...........................................................................................................17 4.6. Photodiode and phototransistor cards.................................................................17 4.7. Electronic thermometer card ...............................................................................18 4.8. Modem communications interface card...............................................................19 4.9. R 134A CFC-free cooling unit .............................................................................19 4.10. Electronic control system ..................................................................................19 4.11. T-15 validator (selector).....................................................................................20 4.12. Compact J-2000 ................................................................................................20
4.12.1. Coin separator.........................................................................................21 4.12.2. Return carriage .......................................................................................21
4.13. Recovery motor .................................................................................................21 4.14. BT-10 banknote reader .....................................................................................22 4.15. Electrical diagram..............................................................................................22
5. Installation and start up................................................................................................24 5.1. Installation ...........................................................................................................24 5.2. Start up ................................................................................................................24 5.3. Memory reset.......................................................................................................24 5.4. Restocking machine trays ...................................................................................25 5.5. Product selection.................................................................................................25 5.6. Updating the machine program ...........................................................................26 5.7. Machine programming mode...............................................................................27
5.7.1. Standby menu without credit (standby status) ..........................................27 5.7.2. Standby menu with credit (working status) ...............................................28 5.7.3. Programming menu (programming status) ...............................................28
5.8. Programming addresses .....................................................................................30 6. Troubleshooting ...........................................................................................................33 7. Annexes .......................................................................................................................33
7.1. Peripherals ..........................................................................................................33 7.2. Jams and changes in the J-2000 compact tubes ................................................33 7.3. Installing and removing channels ........................................................................33 7.4. Transport feet and adjustable levelling feet.........................................................58 7.5. Cleaning and Maintenance..................................................................................33 7.6. Recycling .............................................................................................................33 7.7. Environment ........................................................................................................33
8. Regulation....................................................................................................................33

vision Snack Plus/Easy Combo // Vending
MNP86V03USV00 Date: 2008/12/01 Rev. 0 PAGE 4 OF 62
1. Symbols
This symbol means there are more detailed explanations on this subject elsewhere in the manual.
This symbol means that the text in question refers to programming.
This symbol indicates very important information.
This symbol is a warning of high voltage hazard.
This symbol indicates that a given material should not be disposed of as domestic waste.
This symbol indicates that a given material is recyclable.
This symbol indicates that AVT is committed to the environment. 2. Operating conditions This machine has been specifically designed to work in interiors. The machine leaves the factory adjusted to work properly at an ambient temperature between 5° C and 32° C (41º F and 89.6º F) with a maximum humidity of 60% and a maximum load of 100 kg (220.462 lb) of products. 3. Description of components

vision Snack Plus/Easy Combo // Vending
MNP86V03USV00 Date: 2008/12/01 Rev. 0 PAGE 5 OF 62
Position Description Position Description
A Door M Fluorescent lamps B Display N Cabinet C Coin return pushbutton Ñ Trays and channels D Coin inlet O Door microswitch E Lock P Vault F Selection pushbutton panel Q Electronics support G Coin outlet R RS-232 and DEX connection H Product delivery opening S Fuse/Fuse holder I Compact T Main switch J Selector U Cooling unit K Programming pushbutton V Product delivery bin L Safety glass
3.1. Main technical features ► Dispenses a wide range of products of different sizes and shapes —different types of drinks and snacks, sandwiches, different objects, etc.
► Flexible configuration and programming, up to 8 height-adjustable trays with up to 10 channels each for including various product formats.
► FIFO product delivery system alternating dispensing from different channels if they are linked through programming.
► LCD screen with direct status and programming messages.
► Telemetry-ready, including remote reading of audits, sales, incidents and changes in programming options.
► Sales accounting and control, as well as data output via RS-232-C and DEX. The machine can also be programmed via an AVT electronic terminal.
► Product pushing force can be programmed independently for each selection.
► Continuous operational self-testing.
► Automatic safety system that prevents the machine from selling products not fit for consumption thanks to the option of programming an expiry date for each selection number or channel.
► Easily dividable into temperature zones, cooled and ambient and adjustable.
► Programmable machine light on and off.
► Metal parts are built with 1.5 mm (0.05906 in) gauge galvanised plate treated against corrosion and an external rustproof paint layer.
vision Snack Plus/Easy Combo // Vending
MNP86V03USV00 Date: 2008/12/01 Rev. 0 PAGE 6 OF 62
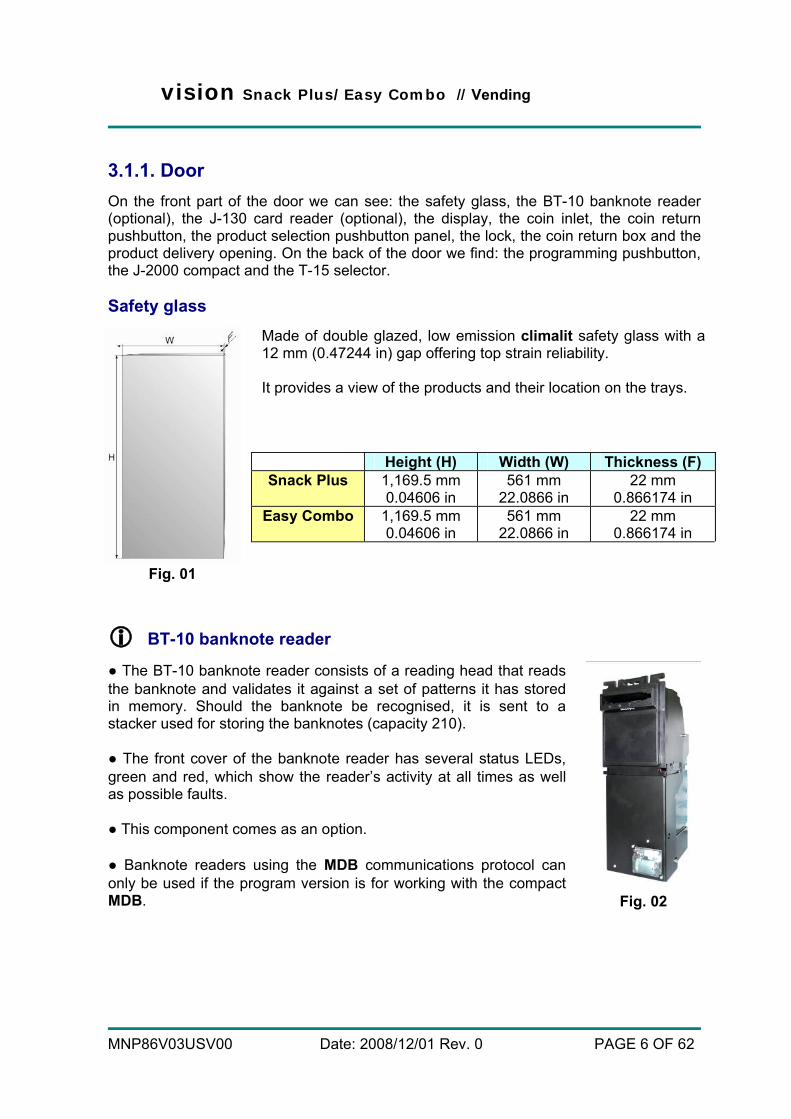
3.1.1. Door On the front part of the door we can see: the safety glass, the BT-10 banknote reader (optional), the J-130 card reader (optional), the display, the coin inlet, the coin return pushbutton, the product selection pushbutton panel, the lock, the coin return box and the product delivery opening. On the back of the door we find: the programming pushbutton, the J-2000 compact and the T-15 selector. Safety glass
Made of double glazed, low emission climalit safety glass with a 12 mm (0.47244 in) gap offering top strain reliability. It provides a view of the products and their location on the trays.
Height (H) Width (W) Thickness (F) Snack Plus 1,169.5 mm
0.04606 in 561 mm
22.0866 in 22 mm
0.866174 in Easy Combo 1,169.5 mm
0.04606 in 561 mm
22.0866 in 22 mm
0.866174 in
Fig. 01
BT-10 banknote reader
● The BT-10 banknote reader consists of a reading head that reads the banknote and validates it against a set of patterns it has stored in memory. Should the banknote be recognised, it is sent to a stacker used for storing the banknotes (capacity 210). ● The front cover of the banknote reader has several status LEDs, green and red, which show the reader’s activity at all times as well as possible faults. ● This component comes as an option. ● Banknote readers using the MDB communications protocol can only be used if the program version is for working with the compact MDB. Fig. 02

vision Snack Plus/Easy Combo // Vending
MNP86V03USV00 Date: 2008/12/01 Rev. 0 PAGE 7 OF 62
•
.
•
•
Display
It is essentially used in machine programming operations to display accounting data and technical incidents and shows the credits entered or the sale prices of the products.
Fig. 04 Coin inlet There are two types of coin inlet: the standard coin slot (fig. 05) and the vandal-proof, security model (fig. 06) which is optional.
Fig. 05 Fig. 06
Coin return pushbutton It is located to the right of the coin inlet, its function is to return coins, (if you wish to recover the amount that you have inserted in the machine).

vision Snack Plus/Easy Combo // Vending
MNP86V03USV00 Date: 2008/12/01 Rev. 0 PAGE 8 OF 62
Product selection pushbutton panel
The pushbutton panel consists of 16 keys divided into numerical and alphabetical (fig. 07). In addition to being use to select a product, they are also used in machine programming and the configuration.
Fig. 07 Lock These machines feature a secure locking system consisting of a plate with three vandal-proof anchoring points. Programming pushbutton It is located inside the door. This pushbutton is used to access all programming functions: sale prices, messages shown by the display, resets, etc.
J-2000 compact (MDB)
The machine can work with two different coin changers. The machine program changes depending on the coin changer being used.
• J-2000 MDB coin changer without recovery motor (see the manual for the J-2000 MDB). The communication between machine and compact takes place using the MDB protocol. The machine works as master while the compact works as slave.
When the machine is in service, the display shows the time and the temperature if the type of sales programming is simple or mixed single 2 ( address 15). In single sales mode only the coins or banknotes whose value can be returned will be accepted and the maximum credit that we can enter can never exceed the maximum recovery ( address 16). Furthermore the maximum recovery is updated automatically with the higher price in the case where such price exceeds the value of the maximum recovery. In mixed single sales mode 2, when accepting coins or banknotes no whether they can be returned or not is not taken into account. In the two types of sales the credit that can be accepted is limited by the higher price programmed. Therefore to ensure the proper operation of the machine check that the maximum recovery and the prices are properly programmed ( address 16 and address 00 respectively). In single sale mode you need to insert money until you reach or exceed the price of the desired product. When you use they key pad to enter the product selection, the display shows the price of the product. If such price is less than or equal to the money inserted, the product is not out of stock and there is enough change, se concede the sale.

vision Snack Plus/Easy Combo // Vending
MNP86V03USV00 Date: 2008/12/01 Rev. 0 PAGE 9 OF 62
• J-2000 EXECUTIVE coin changer without recovery motor (see the manual for the J-2000 EXECUTIVE). The communication between machine and compact takes place using protocol A. The machine is slave of the compact, which acts as master.
If the machine has not detected an executive coin changer connected to it (because it has not received any command), the display will show an error message. The same error will be shown on the display after the communication between coin changer and machine has been interrupted for 30 seconds. When you are inside the programming addresses, the machine voluntarily interrupts communication with the compact. Communication is re-established when you access standby without credit.
You can work both in coin changer price storage mode and in machine price storage mode. In both cases you should program the option in the coin changer that makes it refresh the machine display, to be able to consult the price of each product without inserting credit.
Dimensions
Fig. 08
353 x 137 x 82 mm 13.8976x5.39370x3.22835 in
2,8 kg 6.17294 lb
T-15 coin selector
Fig. 10
The T-15 coin selector is a premium validation device that can recognise up to 24 different coins or tokens. It has a coin separator coil that allows it to accept or reject coins.
COIN AND TOKEN CHARACTERISTICS
Thickness range Diameter range 1 mm to 3.2 mm
0.03937 in to 0.12598 in 16 mm to 32 mm
0.62992 in to 1.25984 in
3.1.2. Cabinet The cabinet holds the product trays, the vault, the electronic control system, the cooling unit (for vision Easy Combo) and the product delivery bin. The structure of the cabinet is injected with polythene foam for improved insulation and better consistency.
Weight

vision Snack Plus/Easy Combo // Vending
MNP86V03USV00 Date: 2008/12/01 Rev. 0 PAGE 10 OF 62
Trays and channels
Fig. 11
There are two types of trays and they are the part of the machine where the product is stored, as there are various configurations, one machine can have up to 8 trays maximum depending on the products that you wish to dispense.
Dimensions TRAYS Height (H) Width (W) Depth (D) Weight
Large 115 mm 4.52756 in
642.2 mm 25.2835 in
675 mm 26.5748 in
5.250 kg 11.5743 lb
Small 115 mm 4.52756 in
428 mm 16.8504 in
675 mm 26.5748 in
3.900 kg 8.59802 lb
Capacity up to 10 channels per tray depending on configuration.
Small tray with 1 to 7 channels Large tray with 1 to 10 channels
Fig. 12 Fig. 13
The vision machines sell the products shown in the following table:
vision SNACKS DRINKS SANDWICHES PRODUCTS Sachets Cans Non-edible Snack
Plus Sweets Bottles Pastries Tetra bricks Of any type Easy
Combo Chocolates Dairy products
NOTE: For other types of products or special sizes please
contact AVT.

vision Snack Plus/Easy Combo // Vending
MNP86V03USV00 Date: 2008/12/01 Rev. 0 PAGE 11 OF 62
Vault
The vault has a lock and large capacity, with a self-locking option enabled when it is removed. There are several options: plastic, with door and lock, and self-locking.
Plastic With door Self-locking Capacity 2 litres 2 litres 2 litres
Fig. 14
Electronic control system
It consist of several printed circuit cards:
• Control card, which governs all of the machine’s movements, as well as programming of options and product audits, and also power sources that supply appropriate voltages for logic control, to move the tray motors, to supply peripherals on bus 485 and to supply the product detection system. The program is recorded in FLASH memory.
• Relay card, which has the relays that control the connection to the compressor,
electrovalve and showcase light. The connection for these systems that work at 110 VAC is synchronised by setting the voltage to zero.
• Custom display card, which has the LCD display, the buzzer control and
connections for the product selection pushbutton panel and programming button. It is a peripheral controlled by the control card with which it communicates using bus 485. It is possible to adjust the contrast of the messages on the display by turning a potentiometer.
• Photodiode and phototransistor cards of the product detection system.
• Electronic thermometer card.
• Modem communication interface card.
R 134A CFC-free cooling unit (Optional)
It is managed by a program which controls the temperature of the machine product hold electronically. The machine is equipped with a cooling unit and a turbine to keep a constant working temperature in the product hold. This temperature, also called cooling unit cut-off temperature, is programmable ( address 18). When the internal temperature rises 2.5 °C (36.5º F) above the cooling unit cut-off temperature, the cooling unit turns on. When the internal temperature again matches the cut-off temperature, the cooling unit turns off.
vision Snack Plus/Easy Combo // Vending
MNP86V03USV00 Date: 2008/12/01 Rev. 0 PAGE 12 OF 62
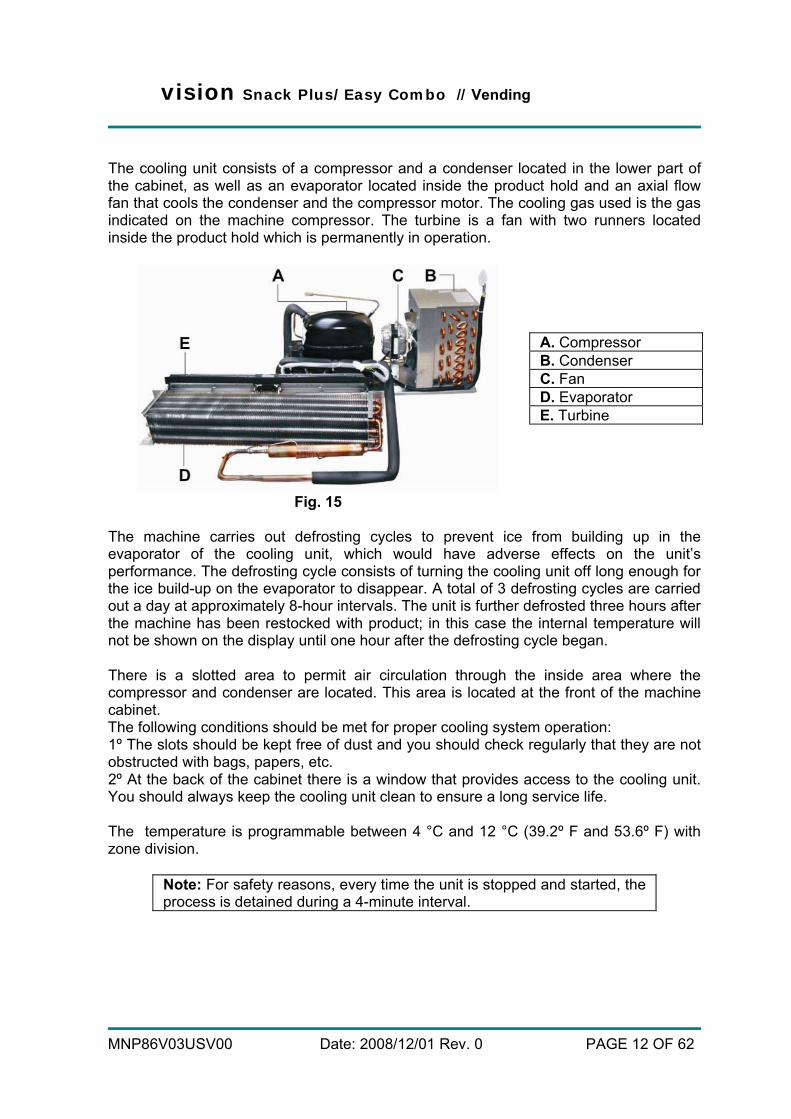
The cooling unit consists of a compressor and a condenser located in the lower part of the cabinet, as well as an evaporator located inside the product hold and an axial flow fan that cools the condenser and the compressor motor. The cooling gas used is the gas indicated on the machine compressor. The turbine is a fan with two runners located inside the product hold which is permanently in operation.
A. Compressor B. Condenser C. Fan D. Evaporator E. Turbine
Fig. 15 The machine carries out defrosting cycles to prevent ice from building up in the evaporator of the cooling unit, which would have adverse effects on the unit’s performance. The defrosting cycle consists of turning the cooling unit off long enough for the ice build-up on the evaporator to disappear. A total of 3 defrosting cycles are carried out a day at approximately 8-hour intervals. The unit is further defrosted three hours after the machine has been restocked with product; in this case the internal temperature will not be shown on the display until one hour after the defrosting cycle began. There is a slotted area to permit air circulation through the inside area where the compressor and condenser are located. This area is located at the front of the machine cabinet. The following conditions should be met for proper cooling system operation: 1º The slots should be kept free of dust and you should check regularly that they are not obstructed with bags, papers, etc. 2º At the back of the cabinet there is a window that provides access to the cooling unit. You should always keep the cooling unit clean to ensure a long service life. The temperature is programmable between 4 °C and 12 °C (39.2º F and 53.6º F) with zone division.
Note: For safety reasons, every time the unit is stopped and started, the process is detained during a 4-minute interval.

vision Snack Plus/Easy Combo // Vending
MNP86V03USV00 Date: 2008/12/01 Rev. 0 PAGE 13 OF 62
Product delivery bin
Dimensions Height (H) Width (W) Depth (D)
465 mm 18.3071 in
505 mm 19.8819 in
240,5 mm 9.46850 in
Fig. 16
The product detection system located in the product delivery bin has a product detector based on photodiodes and phototransistors; so that when the infrared beam is interrupted, the system knows a product has fallen inside the bin.
Anchoring
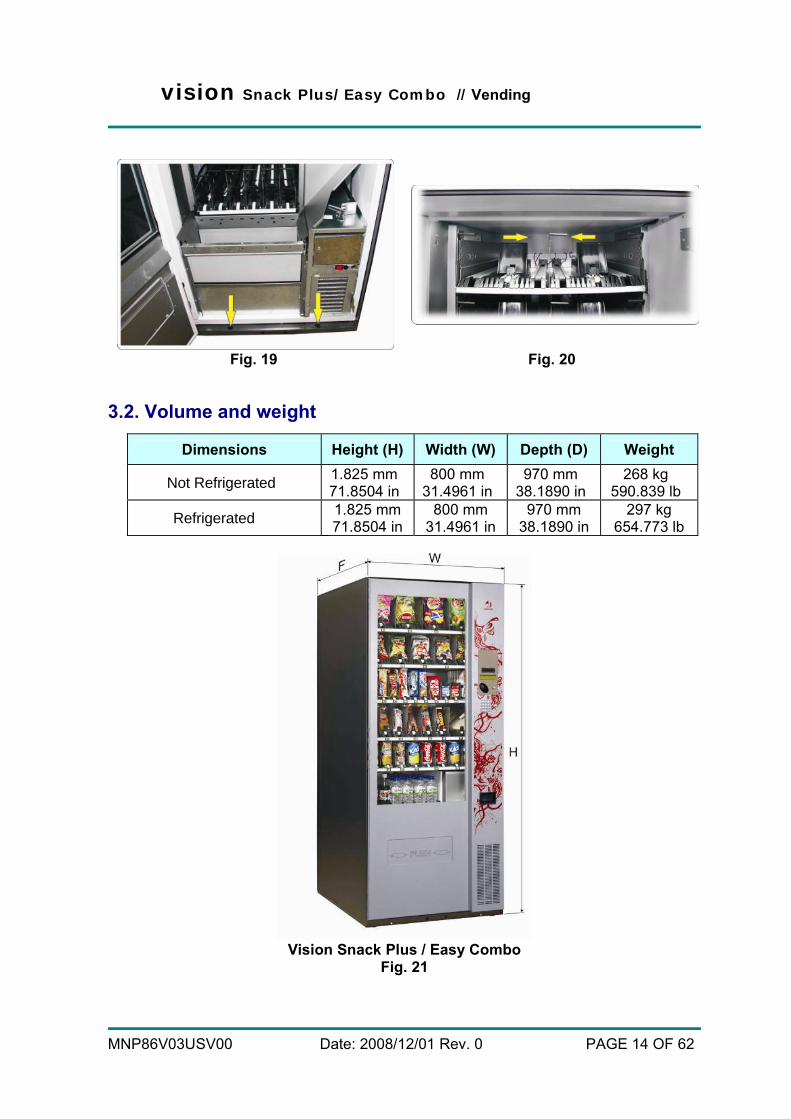
These machines are fitted with holes and supplied with an anchoring kit (fig. 18) that can be used to anchor the machine to the floor (fig. 19) or to the wall (fig. 20) for greater stability and support and to prevent thefts.
Fig. 18
vision Snack Plus/Easy Combo // Vending
MNP86V03USV00 Date: 2008/12/01 Rev. 0 PAGE 14 OF 62
Fig. 19 Fig. 20
3.2. Volume and weight
Dimensions Height (H) Width (W) Depth (D) Weight
Not Refrigerated 1.825 mm 71.8504 in
800 mm 31.4961 in
970 mm 38.1890 in
268 kg 590.839 lb
Refrigerated 1.825 mm 71.8504 in
800 mm 31.4961 in
970 mm 38.1890 in
297 kg 654.773 lb
Vision Snack Plus / Easy Combo
Fig. 21

vision Snack Plus/Easy Combo // Vending
MNP86V03USV00 Date: 2008/12/01 Rev. 0 PAGE 15 OF 62
4. Electric-electronic specifications
The cooling unit, fluorescent lamps, turbine and transformer are supplied with mains voltage (110 VAC). They should therefore not be handled without disconnecting the machine from mains.
Power supply voltage 110 ± 10% VAC. vision
Maximum power Maximum intensityNot Refrigerated 80 W Refrigerated 935 W 8,5 A
4.1. Initial electrical installation Prepare a 110-125 VAC, 60 Hz / 15A socket, protected with an automatic connection system. The socket should match the machine plug (USA, with ground connection). Follow all Low Voltage Installation Regulations and check that ground connection works properly once the machine has been installed. 4.2. Product dispenser channel There are three types of different product dispensers. Depending on the type of product to be served, you can interchange these channels, offering a wide range of combinations. A maximum of 10 dispenser channels can be added to each tray.
Fig. 22 Fig. 23
Ref. code 8210061 (Fig. 22) 8210062 (Fig. 23) Motor power supply 12 Vdc 12 Vdc
Max. power consumption 3 W 3 W
To properly dispense a product, the dispenser motor operation voltage has to be programmed ( address 25) to ensure the most appropriate dispensing speed for each product.

vision Snack Plus/Easy Combo // Vending
MNP86V03USV00 Date: 2008/12/01 Rev. 0 PAGE 16 OF 62
4.3. Display card The display tells the control card what keys have been pressed, showing messages on screen and issuing the beeps sent by the control card.
DISPLAY CARD CONNECTORS
A. Pushbutton panel B. (Not in use) C. (Not in use) D. (Not in use) E. Potentiometer for the contrast of the display F. Programming pushbutton G. Backlight H. (Not in use) I. Power supply connection, Bus 485 J. Power supply connection, Bus 485
Fig. 25
4.4. Control card Communication with the J-2000 compact and with the peripherals takes place under different protocols.
CONTROL CARD CONNECTORS
A. Transformer secondary and relays K. (Not in use) B. Connection bin product sensor L. Door microswitch connection C. Connection tray motors M. RS-232 port connection (1) D. Connection recovery motor N. RS-232 port connection (2) E. Connection tray motors Ñ. 485 peripherals connection F. (Not in use) O. MDB peripherals connection G. (Not in use) P. LCD backlighting power supply H. Thermometer connection Q. Connection Executive I. (Not in use) R. Connection peripherals MDB J. Battery connection (temperature controller)
S. Connection peripherals 485

vision Snack Plus/Easy Combo // Vending
MNP86V03USV00 Date: 2008/12/01 Rev. 0 PAGE 17 OF 62
Fig. 26
4.5. Relay card
RELAY CARD CONNECTORS
A. Cooling unit enabling and lighting B. Control card power supply C. (Not in use) D. Transformer connection
Fig. 27 4.6. Photodiode and phototransistor cards
Phototransistor Front photodiode Side photodiode A. (Not in use) H. (Not in use) K. Power supply and
lateral sensing B. Branch enabling: power supply and status LED
I. Branch enabling: power supply and status LED
C. (Not in use) J. Connection to side photodiode
D. Machine power supply control
E. (Not in use) F. (Not in use)

vision Snack Plus/Easy Combo // Vending
MNP86V03USV00 Date: 2008/12/01 Rev. 0 PAGE 18 OF 62
G. Power supply and lateral sensing
Fig. 28
The following graph (fig. 29) shows communication and distance between the photodiodes, phototransistors and the side photodiode of the product delivery bin (top view).
Fig. 29
4.7. Electronic thermometer card
The temperature of the product hold is measured with an electronic thermometer which can be placed in different locations of the product hold. Normally, it is located half way up the hold.
Fig. 30

vision Snack Plus/Easy Combo // Vending
MNP86V03USV00 Date: 2008/12/01 Rev. 0 PAGE 19 OF 62
4.8. Modem communications interface card A. MODEM connection B. Input/output power supply, communication protocol 485 C. Input/output power supply, communication protocol 485 D. Battery charger E. Power supply MODEM F. (Not in use)
Fig. 31 4.9. R 134A CFC-free cooling unit
EASY COMBO Compressor make L´UNITE H. Model CAE 4440 Y Compressor power 3/8 HP Coolant R-134 A Displacement 12,05 cm3 Coolant charge 0.66139 lb Power supply of the fan of the condenser 110 Vac Maximum flow moving evaporator turbine 325 m3/hour
4.10. Electronic control system The electronic control system is mounted on rails inside the cabinet, so that if any component has to be changed, it is easily accessible. Just remove three screws and pull the assembly out to leave the whole system exposed.
Main switch Bipolar EMI filter 3 A. Transformer power 80 W Transformer primary 110 Vac Transformer secondary 24 Vac , 15 Vac , 11 Vca 110 Vac mains protection fuse 15 AT.

vision Snack Plus/Easy Combo // Vending
MNP86V03USV00 Date: 2008/12/01 Rev. 0 PAGE 20 OF 62
Fig. 32
4.11. T-15 validator (selector)
Its is supplied with 12 Vdc through a cable connected to the control card of the compact. A. Coin inlet B. Rejected coins C. Accepted coins D. Switches E. 4-way recording connector F. CCTALK connector (Not in use) G. Main 10-way connector
Fig. 33
4.12. Compact J-2000
Power consumption in standby Maximum current peak Power supply voltage
≈ 150 mA 4 A DC ⇒ 12V The J-2000 validation unit is an integrated electronic coin validator and return system for automatic vending machines with 485 communications protocol. It features an electronic coin validator, a 5-way separator and 5 return tubes, providing large amounts of change. Its water-resistant protection system allows for seamless performance in adverse environments.

vision Snack Plus/Easy Combo // Vending
MNP86V03USV00 Date: 2008/12/01 Rev. 0 PAGE 21 OF 62
A. T-15 validator B. Coin separator C. Display and pushbuttons D. U-shaped plate E. Photocells F. Return motor G. Change tubes H. Vault acceptance channel I. Recovery channel J. Return carriage K. Safety stops
Fig. 34 4.12.1. Coin separator It sends the coins accepted by the coin selector to one of the five tubes or to the vault, through the vault acceptance channel. The photocell assembly at the bottom of the coin separator allows for quick coin location and detection of possible jams (see fig. 34). 4.12.2. Return carriage This is the system that extracts the coins from each of the five return tubes with the help of catches. There are also two stops that prevent coins from accidentally dropping from the tubes (see fig. 34). 4.13. Recovery motor
Fig.35
This is the component that allows the machine to recover a coin from the selector. It is screwed and clipped onto a the coin guide in the product delivery bin. It works on a 12 VDC supply through a wire connected to the control card.

vision Snack Plus/Easy Combo // Vending
MNP86V03USV00 Date: 2008/12/01 Rev. 0 PAGE 22 OF 62
4.14. BT-10 banknote reader ■ BT-10 MDB banknote reader
• 4 optical sensors explore the complete light spectrum. • Magnetic sensor to check additional security features in euro banknotes. • Standard MDB communication, pulses or serial (RS-232). • Validates banknotes in any of four possible positions. • Flash memory for easy program updating. • Banknote patterns can be reprogrammed via a PC • Operating temperature range: -10 to +60 °C (-50º F to + 140º F) • MDB input voltage range: 20 ... 42 Vdc. • Peak current 1 Amp. • Power consumption at 32 V: Standby, 100 mA. Accepting banknotes, 320 mA

vision Snack Plus/Easy Combo // Vending
MNP86V03USV00 Date: 2008/12/01 Rev. 0 PAGE 23 OF 62
4.15. Electrical diagram

vision Snack Plus/Easy Combo // Vending
MNP86V03USV00 Date: 2008/12/01 Rev. 0 PAGE 24 OF 62
5. Installation and start up 5.1. Installation Do not install the machine near active heat sources (heaters, radiators, etc.). Avoid obstructing the grids located at the front of the cabinet to ensure air circulation inside, where the cooling unit motor is located (if the machine has one). Leave a distance of at least 7centimetres (2.75591 in) between the back of machine and the wall or other items.
IMPORTANT: It is important for the machine to be level, as it should operate in a vertical position, both laterally and front-to back, placed so the mains plug is readily accessible and with a maximum tilt of 5% (~2°). This will also prevent noise and vibration and will extend the cooling unit service life.
5.2. Start up As a safety measure to avoid damaging the cooling circuit (if the machine has one), wait to connect the machine to mains for 2 hours after finishing unpacking and installing the machine.
VERY IMPORTANT: To ensure the machine works properly it is essential that the first reloading of the J-2000 compact take place through address 25 (see the manual for the compact), this should be done with at least three coins per tube, as indicated on this manual.
5.3. Memory reset
In the standby menu without credit press the programming button and when the
display shows the message press key .
The display will show a data enter menu with a message .
To enter the key digits use pushbuttons to .
Use key to cancel the digits you have entered, so you can enter a new key.
The master key to carry out the memory reset is . During reset, all memories are reset to zero except: prices, machine configuration and the clock. The showcase light is programmed to always be on, the buzzer enabled, single sales selected, coin return possible and maximum coin return set at the highest value.
RESET PASSWORD:
PROGRAMMING
ADDRESSES

vision Snack Plus/Easy Combo // Vending
MNP86V03USV00 Date: 2008/12/01 Rev. 0 PAGE 25 OF 62
5.4. Restocking machine trays Open the machine door, press the tray anchoring system (on the side), slide out the tray to be restocked and place the products in their channel until all of the machine’s trays have been restocked.
Fig. 36
5.5. Product selection To select the desired product enter the two-digit number associated to that product, found under each channel in the front of each tray (see fig. 37).
Fig. 37 You can program in ( address 09) all the product selection numbers and the channels associated to these selection numbers. Detection of existing channels occurs when the machine is turned on and when you exit programming mode, so if you change any connector tray you need to turn the machine off and on again or exit programming options. If the channel is not present in the machine, we cannot select it to do any kind of vending or programming operation with it. If coins have not been inserted and you select a product, the price will appear on the display. If the price is set to zero, the program will not do any operation with this product. When you select this product, the display will automatically show the time again and not show the price. If you have inserted money, when you select a product, the price blinks on the display while the sale takes place, but if the price is set to zero, no sale will take place and the credit for the money inserted will be shown.

vision Snack Plus/Easy Combo // Vending
MNP86V03USV00 Date: 2008/12/01 Rev. 0 PAGE 26 OF 62
5.6. Updating the machine program The control card of the machine has been designed to use flash technology. This allows you to update the program in the card without needing to remove any part of the machine, as this task can be done through a 180 degree 5 pin DIN connector in the RS-232 port. You can update the program with a PC or a J-120 reprogramming card reader. ■ USING A PC Follow these steps to update the program: 1.- With the machine turned off, connect the PC to the machine using the RS-232 cable. 2.- Choose the program to install in flash memory:
• The program files should be stored in the subdirectory of the hard drive corresponding to the VISION V3 machine. • Run the PC program. Choose the menu option FLASH - RECORD - VISION V3 and choose the *.h00 file.
3.- Turn the machine on. 4.- When the program has been updated, a message will appear on the PC screen indicating that the flash memory has been successfully recorded.
•
• ■ USING THE EASYFLASH REPROGRAMMING DEVICE
Follow these steps to update the program: 1.- With the machine turned off, connect the EASYFLASH device to the machine using any of the cables supplied. 2.- As soon as the program is loaded, it will load the data from the file TYPES.DAT for the machines with which you wish to communicate. 3.- The first thing the program requests is the type of operation you wish to carry out.
- Recording a program in flash memory. - Erasing the card’s flash memory.

vision Snack Plus/Easy Combo // Vending
MNP86V03USV00 Date: 2008/12/01 Rev. 0 PAGE 27 OF 62
- Identifying the program recorded in a card.
4.- After choosing the operation, you have to select the machine with which you wish to communicate.
5.- You need to select the file you are going to record.
-The program can work with two standard reference file formats, .HEX (Intel) and .BIN. When the program has more than one bank, the file extensions will be .H00, .H01, .H02 … (or .B00, .B01, .B02 …) and so on until all banks are completed. In these cases, the program will only show the file of the first bank (.H00 or .B00).
-When you select a file, if the extension is .HEX or .BIN the program will know that there is only one bank, while if it is .H00 or .B00 it will search for files with consecutive extensions until it does not find any more (maximum .H09 or .B09) and the number of files will be the number of banks recorded.
6.- After all the data has been recognised, the program will begin the operation chosen.
- This process is divided in two parts, the first is erasing the flash memory and the second is the program recording.
7.- When the recording program has finished communicating with the machine, a new window will appear showing the result of the process. (For more information, consult the manual of the EASYFLASH reprogramming device)
5.7. Machine programming mode
5.7.1. Standby menu without credit (standby status) This menu will be in standby status, shown on the display by rotating, in small intervals, the advertising message, the time, the temperature (if there is a cooling unit) and the program version. Press the product selection pushbutton pane and the display will show the price of the product and the position of the channel previously assigned in the programming menu.
Note: If the machine is out of service, the cause will be shown on the display. In such cases, the machine does not accept any coin nor is any sale allowed. The machine may be out of service due to temperature expiry, because no connected motor has been detected (this may be because no tray has been connected to the machine or because the cable between the trays and the control card has not been connected), or because of a breakdown in the product detection system.
PUSH BUTTON TO D
11:00 +23.0ºC PRODUCT PRICE
X.XX EUR
SELECTION N
XX
JOFEMAR S.A.
WWW.JOFEMAR.COM
PUSH BUTTON TO D
11:00 +23.0ºC PUsh button
TO DISPLAY PRICE
VISION V.3
11:00 +23.0ºC

vision Snack Plus/Easy Combo // Vending
MNP86V03USV00 Date: 2008/12/01 Rev. 0 PAGE 28 OF 62
5.7.2. Standby menu with credit (working status) This menu is accessed by inserting credit and you can then select the product. If the credit inserted is insufficient the machine will indicate this on the display. In this menu you cannot change the values shown on the display.
5.7.3. Programming menu (programming status)
To enter and access the programming addresses, press located inside the door. When you enter this menu you can modify all the values of the machine programming functions.
To access the different programming addresses you can move forward if you press
or backward if you press . The order of the programming addresses is the same found in this manual. You can also get an audit ticket when you connect a printer to the DIN 5 pin connector,
establish communication with a J1xx card reader by pressing to obtain the audits or program the machine and access the menu to enter the reset key ( section 5.3) by
pressing key .
► Addresses shown by the display in descriptive mode (default) ◄
REFUND
OPTION
LIGHTS
PROGRAMMING
MAXIMUM
REFUND
SALE
OPTIONS
COMMUNICATION
VIA MODEM
UNLOADING OF
CHANGE TUBES
CLEARING ALL
FAULTS
COIN
INHIBITION
MACHINE
COMPOSITION
CHECKING MOTORS
OF THE MACHINE
FAULT
CHECKING
SETTING OF
THE CLOCK
money
ACCOUNTINGS
RELOADING OF
CHANGE TUBES
PRODUCT
ACCOUNTINGS
PRICES
PROGRAMMING
PROGRAMMING
ADDRESSES
PUSH BUTTON TO D
11:00 +23.0ºC YOUR PRODUCT
THANK YOU
PRODUCT PRICE
X.XX EUR
SELECTION N
XX
CREDIT
X.XX EUR
PUSH BUTTON TO D
11:00 +23.0ºC

vision Snack Plus/Easy Combo // Vending
MNP86V03USV00 Date: 2008/12/01 Rev. 0 PAGE 29 OF 62
NOTE: To modify the content of programming addresses, use the machine selection pushbuttons. These should be used in the order and in the way indicated below for each address.
Access to programming
A to access the menu B to exit programming mode C to cancel the option D to view the option on the display * to go to the next function
Press…
# to go to the previous function
You can choose whether you wish the programming address shown as descriptive text
( ) or whether you wish the display to show the address number
( ). To do this, press key to toggle between the two modes of operation. The descriptive one is used by default.
Press key to automatically exit programming mode. A small check of machine mechanisms will be performed and the machine will return to vending mode. The machine can also exit programming mode automatically and return to standby without credit mode if the door is closed and 40 seconds elapse without any key being pressed or without any coin being inserted (in the case of tube reloading).
NOTE: The addresses marked with the text (MDB) are only available for program versions for the J-2000 MDB coin changer. The other addresses are common to all regardless of the compact being used in the machine.
aDDRESS 00
*- #- A-ENTER
PRICES
PROGRAMMING
PROGRAMMING
MESSAGE
GSM PIN
PROGRAMMING
CHECKING
ALARMS
PASSWORD
PROGRAMMING
PHONE NUMBER
PROGRAMMING
PHONE TIMES
PROGRAMMING
BEEP
PROGRAMMING
TEMPERATURE
OPTIONS
BILL READER
OPTIONS
SELLING HOURS
LOCK OUT
LANGUAGE
PROGRAMMING
MONETARY UNIT
PROGRAMMING
PROGRAM
VERSION
PRICES FOR
CARD SALES
VOLTAGE FOR
CHANNELS MOTORS
TOKENS
OPTIONS
RS232
communication
CODES
PROGRAMMING
EXPIRATION
OPTIONS

vision Snack Plus/Easy Combo // Vending
MNP86V03USV00 Date: 2008/12/01 Rev. 0 PAGE 30 OF 62
Press to enter programming.
5.8. Programming addresses
Press to move through the various options.
COMMUNICATION VIA MODEM (MDB) This address will appear if the machine has been connected to a modem interface card.
At this address you can make a call from the machine to the management centre. To do this the telephone number and the GSM PIN must have been programmed (in the case of calling through a FonoVending they do not have to be programmed).
The machine will send the management centre a request that the options that have been modified be programmed.
The machine will send the management centre a request that all the options be programmed.
You can check whether the modem is functioning correctly or not.
[00] PRICE PROGRAMMING At this address you can program the prices for sales with money (coins or banknotes). When you access this address you will see the programming menu for a given price.
To consult programmed prices.
You can enter the selection number whose price you wish to consult.
To navigate through selection numbers.
………………………………………………………….
*- #- C-EXIT
22 3.00
*- #- C-EXIT 21 2.00
*- #- C-EXIT XX 2.00
*- #- C-EXIT 11 2.75
Price 0.00
D-Display prices
PROGRAMMING
ADDRESSES
PRICES
PROGRAMMING
MODEM
ok
Connection
is established
seding data
to terminal
Phone to number
1
Connection
is established
seding data
to terminal
Phone to number 1
1&2-COMMUNIC.
3-CHECK MODEM
COMMUNICATION
VIA MODEM

vision Snack Plus/Easy Combo // Vending
MNP86V03USV00 Date: 2008/12/01 Rev. 0 PAGE 31 OF 62
Returns to the previous menu.
You can change the price by pressing…
To increase the price in small steps.
To increase the price in larger steps.
To reduce the price in small steps.
The price is set to zero.
Once you have selected the desired price you access the selection number menu. The selection numbers chosen will be programmed with the price you have previously selected (you can only enter those selection numbers that you have programmed in address 09 ). At the same time that you program the new price for sales with money, you program the same value for sales with cards ( address 26).
If you wish to program a different price you should…
and you will return to the programming menu of the price.
► When the coin changer is an MDB the maximum price that you can program is the result of the sum of 15 coins of each type present in the coin changer tubes. For example, with a combination of change of 0.05, 0.10, 0.20, 0.50 and 1.00 euros in the tubes, the result would be: (15x0.05) + (15x0.10) + (15x0.20) + (15x0.50) + (15x1.00) = 27.75
[01] ACCOUNTING OF MADE AND LOST SALES
……………………………………………………………
The options available are: • Total and partial accounting of sales made per product.
The accounting data will be displayed. This will be the sum of sales made by the channels containing the product in question.
Returns to the previous menu.
SELECTION NUMBER _
tOTAL:
xx
In period:
xx
SALES OF
EACH PRODUCT
SELECTION NUMBER_
SALES OF
EACH PRODUCT
PRODUCT
ACCOUNTINGS
SELECTION NUMBER _
SAVED
SELECTION NUMBER
SELECTION NUMBER_
Price 0.00
D-Display prices
Price 0.04
D-Display prices
Price 0.05
D-Display prices
Price 0.01
D-Display prices
Price 0.00
D-Display prices

vision Snack Plus/Easy Combo // Vending
MNP86V03USV00 Date: 2008/12/01 Rev. 0 PAGE 32 OF 62
• Total and partial accounting of lost sales per product. It works just like the previous one.
Returns to the previous menu.
• Total and partial accounting of sales made by the machine.
• Erasing partial audits. The display will blink to indicate that partial figures have been deleted.
Note: You should remember that partial audits will be erased when you request a ticket
through RS-232.
• • Erasing total audits.
Enter the key “ ” to delete total and partial audits. The ticket number is programmed with the value zero to tell the vending management program that the audits have been deleted.
The display will blink to indicate that they have been deleted.
• Counter of total and partial free sales with cards. Sales carried out by all the channels of the machine.
[02] RELOADING AND ACCOUNTING IN CHANGE TUBES (MDB) • Reloading.
When you insert coins in the machine using the coin slot, only those coins that are to go to the coin changer change tubes are admitted. The display will show the number of coins in the tubes with the value of the inserted coin. When the maximum number of coins has been inserted the machine will reject any further coins.
Do not reload the tubes manually!! ● Accounting.
Value X.XX
COINS: XXX1
Value 0.00
COINS: XXXX
RELOADING OF
CHANGE TUBES
TOTAL:
XX
FREE SALES
WITH CARDS
In period:
xx
PASSWORD:
9972
PASSWORD:
- - -
ERASING ACCOUNTS
IN PERIOD
ERASING ACCOUNTS
IN PERIOD
ERASING ACCOUNTS
IN PERIOD
In period:
xx
tOTAL:
xx
SALES
ACCOUNTING
LOST SALES
OF EACH PRODUCT
SELECTION NUMBER _
tOTAL:
xx
In period:
xx
SELECTION NUMBER_
LOST SALES
OF EACH PRODUCT

vision Snack Plus/Easy Combo // Vending
MNP86V03USV00 Date: 2008/12/01 Rev. 0 PAGE 33 OF 62
To display the accounting of the change tubes press …
The display will show the number of coins in the coin return tubes. If more than one tube is used for coins of the same value, the display will show the sum of the coins in all such tubes.
[03] DISCHARGING CHANGE TUBES (MDB) To discharge coins from compact tubes.
After discharging each coin the display will show the number of coins left in the tube. Coin extraction motors will only work if the number of coins in the tube is not zero.
[04] MONEY ACCOUNTING (MDB)
The machine offers 14 different audits. The audits is shown in the following order:
……………………..…………………………………..
The display shows the value of the total audits.
DISCOUNTS
x.xx EUR
CARD REVALUATION
x.xx EUR
FREE CARD SALES
x.xx EUR
SALES FROM CARD
x.xx EUR
BILLS IN STACKER
x.xx EUR
TOKENS
x.xx EUR
EXACT CHANGE
x.xx EUR
TOTAL OF SALES
x.xx EUR
OVERPAY
x.xx EUR
DISCHARGED
x.xx EUR
CHANGE DISPENSED
x.xx EUR
TO CASHBOX
x.xx EUR
TO TUBES
x.xx EUR
IN THE TUBES
x.xx EUR
money
ACCOUNTINGS
Value 0.05
COINS: X998
Value 0.05
COINS: X999
Value 0.10
COINS: XX35
Value 0.10
COINS: XX36
Value 0.20
COINS: XX99
Value 0.20
COINS: X100
Value 0.50
COINS: XX29
Value 0.50
COINS: XX30
Value 1.00
COINS: XX49
Value 1.00
COINS: XX50
UNLOADING OF
CHANGE TUBES
Value 0.05
COINS: XXXX
Value 0.10
COINS: XXXX
Value 0.20
COINS: XXXX
Value 0.50
COINS: XXXX
Value 1.00
COINS: XXXX
vision Snack Plus/Easy Combo // Vending
MNP86V03USV00 Date: 2008/12/01 Rev. 0 PAGE 34 OF 62
[05] SETTING THE CLOCK At this address you can program from minutes to years and even chose the format used to display time on the display. The setting you can change at any given time will be blinking. The data that can be programmed appear on four windows.
The setting is changed.
…………………………………………………………. The value of the chosen setting is changed by increasing or decreasing it.
……………………………………………….............
[06] FAULT REVIEW The display will show the machine’s general faults.
[07] FAULT RESETTING The machine’s general faults and the temperature expired product marks are reset. (To reset faults in the J-2000 compact consult the compact manual). The display will blink to indicate this.
[08] MANUAL OPERATION OF MOTORS AND CHECKS OF MACHINE
COMPONENTS
…………………………………………………………. The available options are as follows:
● Move the channel motors: when you choose this option, you access the motor voltage selection menu for the motors you are going to move.
CHECKING MOTORS
OF THE MACHINE
CLEARING ALL
FAULTS
CLEARING ALL
FAULTS
CLEARING ALL
FAULTS
FAULT
CHECKING
KEYBOARD
OK
COIN MECANISM
OK
FAULT
CHECKING
AM-PM CLOCK 24 H CLOCK
THURSDAY
DAY-MONTH-YEAR
14-07-08
DAY-MONTH-YEAR
14-07-08
DAY-MONTH-YEAR
14-07-08
HOURS:MINUTES
10:42
HOURS:MINUTES
10:42
SETTING OF
THE CLOCK
vision Snack Plus/Easy Combo // Vending
MNP86V03USV00 Date: 2008/12/01 Rev. 0 PAGE 35 OF 62
To increase or to reduce the voltage by 0.5 Vdc.
Validate the voltage chosen and access the channel number selection menu.
You can choose the channel by entering the 3 digits using the keys to or by
moving from one channel to the next using key to move forward or using key to move backward.
Validates the selection.
Press key and that channel’s motor will move, supplied by the chosen voltage.
To return to the previous menu.
● Checking the product detection system: if there is a communication error with the product detection system, it will be shown on the display and you will not be able to access this option. Otherwise, when you access this option, you enter a menu where there are several options from which you can choose
Available options:
All branches of IR emitters turned off.
After selecting the desired option: You access another menu where you can select the phototransistor whose voltage value you wish to consult.
The display shows on the top line the phototransistor chosen and on the bottom line the value of the voltage.
.................................................................................
Returns to the previous menu.
TEST OF
BRANCHS OFF
TEST OF
PRO.DET. SYSTEM
P.D.S. PHOT. 03
945
P.D.S. PHOT. 02
961
P.D.S. PHOT. 01
964
TEST OF
BRANCH 3
TEST OF
BRANCH 2
TEST OF
BRANCH 1
TEST OF
BRANCHS OFF
TEST OF
PRO.DET. SYSTEM
*- #- A-CHOOSE 113
1-MOVE
CHANNEL XXX
*- #- A-CHOOSE XXX
Voltage:
5.0 VDC
Voltage:
5.0 VDC
Voltage:
5.5 VDC
MOVE MOTORS
OF CHANNELS

vision Snack Plus/Easy Combo // Vending
MNP86V03USV00 Date: 2008/12/01 Rev. 0 PAGE 36 OF 62
[09] CHANNEL CONFIGURATION At this address you can program, consult and erase channel configurations. Access the configuration programming option.
First enter the selection number. You can program the following numbers: 11-19, 21-29, 31-39, 41-49, 51-59, 61-69 and 71-79. Then enter the channel numbers to be associated to the selection number chosen (110-116, 120-126, 130-139, 140-149, 150-159, 160-169, 170-179 and 180-189). You can only enter the numbers of the channels that the machine has detected as connected.
Validates the selection.
Returns to the previous menu.
You can choose the channel by entering the 3 digits using the keys to or by
moving from one channel to the next using key to move forward or using key to move backward.
Access programmed data consultation. Enter the selection number you wish to consult. The display will show the numbers of the channels associated to this selection number.
Access the menu to enter the key.
If you enter the key “ ”,all detected and not connected channels will be left without an association to any selection number (i.e., they will all be associated to selection number 0) and the display will blink.
If you enter the key “ ”you will access a channel selection menu that allows you use the keypad to enter detected and connected channels which you do not wish to be associated to any selection number. [10] COIN INHIBITION (MDB) When you access this address it shows the value of the coin and its status (inhibited or enabled).
COIN
INHIBITION
PASSWORD:
---
CHANNEL NUMBER:
XXX
ASSOCIATED
CHANNELS:
SELECTION NUMBER _
SELECTION NUMBER _
*- #- A-CHOOSE SAVED
*- #- A-CHOOSE XXX
SELECTION NUMBER _
1-PROG. 2-CHECK
CONFIG. C-DEL
MACHINE
COMPOSITION

vision Snack Plus/Easy Combo // Vending
MNP86V03USV00 Date: 2008/12/01 Rev. 0 PAGE 37 OF 62
To switch from one coin to the next.
...............................................................................
Changes the status of the selected coin.
To replace the display of the value of the coin with the display of the coin code and vice versa. If you insert a coin in the compact you will see on the display its value or code and whether it is inhibited or not.
[11] RETURN OPTION (MDB) When you access this address, you see the option that is currently programmed. You can choose between two options or modes of operation: ● Coin return possible: you can recover the money inserted if there is change in the tube.
● Compulsory sale: You cannot recover any money until after you have made a purchase.
[15] SALES OPTIONS This address works differently depending on the compact installed in the machine. In both cases when you access this address, the display shows the type of sale that is currently programmed. When working with an MDB compact there are 3 options. ● Single sales: When a sale is made, the machine will automatically return the change. When a sale is requested, the sale will be made provided the credit is equal to the price or if there are coins available to give the exact change, should the credit be higher than the price. If the sale is not granted because there is insufficient change available, an out of change message will appear on the display. Credit will only be accepted until the amount of the maximum price has been exceeded and the maximum credit that can be accepted is the value of maximum return. Also, only coins or banknotes for which change can be provided will be accepted.
SALE
OPTIONS
Obligatory
sale
Possible
refund
REFUND
OPTION
Coin code 02
ENABLED
ValUE 0.02
DISABLED
ValUE 0.02
ENABLED
ValUE 0.05
ENABLED
ValUE 0.02
ENABLED
ValUE 0.01
ENABLED

vision Snack Plus/Easy Combo // Vending
MNP86V03USV00 Date: 2008/12/01 Rev. 0 PAGE 38 OF 62
● Free sales: All coins, banknotes and cards are inhibited because no money is needed to make a purchase and the accounting for such sales will not be stored.
● Mixed single sales mode 2: Availability of change for coins or banknotes is not taken into account when coins or banknotes are accepted. The machine will cease to accept money when the credit has reached the highest programmed value. When you press coin return or after a sale, the machine will return the credit available in the tubes and the remaining credit will be shown on the display. In this type of sale you can program prices up to 9999.
When working with an EXECUTIVE compact there are 2 options. ● Sales with money: The sales mode depends on the setting programmed in address 2_30 in the compact (see the manual for the J-2000 EXECUTIVE compact).
● Free sales: It works the same way as with the MDB version of the program.
[16] MAXIMUM RETURN (MDB) At this address the maximum return value is programmed when in single sale mode. This value coincides with the maximum credit value that can be entered in the machine. When you enter this address, the display shows the currently programmed setting.
To increase the price in small steps.
To increase the price in larger steps.
To reduce the price in small steps.
To initialise it with the highest programmed value.
The maximum value that can be programmed is the result of adding the value of 15 coins of each type in the tubes. You should remember that the maximum return value is automatically updated to match the highest price programmed, should such price be higher than the current value.
ValUE 3.01
ValUE 3.00
MAXIMUM
REFUND
Kind of sale:
FREE
Kind of sale:
NORMAL
Kind of sale:
SINGLE MIXED 2
Kind of sale:
FREE
Kind of sale:
SINGLE
ValUE 3.05
ValUE 3.06
ValUE 3.00

vision Snack Plus/Easy Combo // Vending
MNP86V03USV00 Date: 2008/12/01 Rev. 0 PAGE 39 OF 62
[17] INTERIOR LIGHT PROGRAMMING
There are three options: ● Lights on
The last window selected will appear.
............................................................................... ● Time programming
to show on the display the current programmed setting for the time when the machine lights should go on and off. The setting that can be modified will blink on the display.
Change the setting.
................................................................................ Change the setting by increasing or decreasing it.
.............................................................................
If you wish to return to the main menu of the address. ● Lights turned off
[18] TEMPERATURE OPTIONS After choosing the desired option.
The display shows the currently programmed setting.
At this address there are several options among which you can toggle.
................................................................................ The options are as follows:
• Temperature expiry: you can enable or disable the temperature expired product alarm.
ENABLED DISABLED EXPIRATION DUE
TO TEMPERATURE
EXPIRATION DUE
TO TEMPERATURE
TEMPERATURE
OPTIONS
lights
switched off
Light time
programming
Switch off
11:XX PM
Switch off
XX:00 PM
Switch on
10:XX AM
Switch on
XX:00 AM
Light time
programming
lights
switched on
LIGHTS
PROGRAMMING
vision Snack Plus/Easy Combo // Vending
MNP86V03USV00 Date: 2008/12/01 Rev. 0 PAGE 40 OF 62
• Temperature on display: it is possible to display the machine internal temperature
at the same time that the time is shown on the display.
• Cut-off temperature: you can program the cooling unit cut-off temperature with values between 4 °C and 12 °C. (39.2º F and 53.6º F)
The value is increased or decreased in steps of 0.5 °C. (32.9º F)
• Expiry temperature: this is the temperature from which the ATMEGA begins to count the time to consider the product as expired.
The value is increased or decreased in steps of 0.5 °C. (32.9º F)
Records the new value in the ATMEGA microprocessor
If the new value has been properly recorded the display will show a message saying so.
• Expiry period: is the period that the product hold has to be at a temperature equal or greater than the expiry temperature to consider that the product has expired. When you access this option, the value (hours) currently programmed in the ATMEGA is displayed.
Records the new value in the ATMEGA microprocessor
To return from the menu of any of the options to the main menu of the address.
[19] DATE EXPIRY OPTIONS At this address you can program individual expiry dates both for products and for channels.
• Programming the expiry date for each product: Enter the product selection menu (day – month). Once you have entered the date correctly, you will access the menu to choose the selection number where you can select all the selection numbers to be programmed with the date you have previously
EXPIRATION
OPTIONS
TEMPERATURE
OPTIONS
Period (hours)
SAVED
Period (hours)
05
Period (hours)
04
Period (hours)
04
Period (hours)
03
EXPIRATION
PERIOD
SAVED
VALUE
Value
+00.5ºC Value
00.0ºC Value
00.0ºC
Value
-00.5ºC EXPIRATION
TEMPERATURE
Value
+04.5ºC Value
+04.0ºC
Value
+04.0ºC WORKING
TEMPERATURE
Do not display
temperature
Display the
temperature
TEMPERATURE
ON DISPLAY

vision Snack Plus/Easy Combo // Vending
MNP86V03USV00 Date: 2008/12/01 Rev. 0 PAGE 41 OF 62
entered.
Entered settings are cancelled. Goes to the next option.
................................................................................
• Displaying the expiry dates programmed for each product: Access the channel number selection menu. Once you have entered a selection number, the display will show the expiry date programmed for that number.
• Deleting the expiry dates for each product: Delete all programmed product expiry dates.
Access the menu where you choose the selection number where you can choose the products whose expiry date will be deleted.
• Programming the expiry date for each channel: Enter the date programming menu (day – month). Once you have entered the date correctly, you will access the menu to choose the channel number where you can select all the channels to be programmed with the date you have previously entered.
You can choose the channel by entering the 3 digits using the keys to or by
moving from one channel to the next using key to move forward or using key to move backward.
• Displaying the expiry dates programmed for each channel:
Enter the menu where you choose the channel number. Once you have entered a selection number, the display will show the expiry date programmed for that channel.
You can choose the channel by entering the 3 digits using the keys to or by
moving from one channel to the next using key to move forward or using key to move backward. • Deleting the expiry dates for each channel:
Delete all programmed channel expiry dates.
DAY-MONTH
xx-xx
*- #- A-CHOOSE XXX
EXPIRATION DATE
PER CHANNEL
*- #- A-CHOOSE XXX
DAY-MONTH
_-_ _ DAY-MONTH
xx-xx
EXPIRATION DATE
PER CHANNEL
SELECTION NUMBER _
SELECTION NUMBER_
ERASE EXP. DATE
PER PRODUCT
ERASE EXP. DATE
PER PRODUCT
ERASE EXP. DATE
PER PRODUCT
WATCH EXP. DATE
PER PRODUCT
DAY-MONTH
XX-XX
SELECTION NUMBER_
DAY-MONTH _-_ _
DAY-MONTH _-_ _
DAY-MONTH
xx-xx
EXPIRATION DATE
PER PRODUCT

vision Snack Plus/Easy Combo // Vending
MNP86V03USV00 Date: 2008/12/01 Rev. 0 PAGE 42 OF 62
Access the menu where you choose the channel number where you can choose the channels with an expiry date to be deleted.
In any of the previous options menus, if you wish to return to previous menu.
[20] PRODUCT AND MACHINE CODES
The last window selected will appear.
Goes to the next option.
................................................................................
• In the machine code programming option, on display se will show the code currently programmed and then you will have the option of entering the 6 numbers to change this code.
To do this use the keys to .
• In the product code programming option access the menu where you choose the selection number. Once you have chosen this number, the display will show the code currently programmed for that selection number and then you will have the option of entering the 4 numbers to change this code.
To do this use the keys to .
In any of the previous options menus, the numbers we have entered are cancelled and pressing the same key again will take you back to the main menu.
RS232
communication
New code
_ _ _ _ Code:0000
SELECtION number
_
PRODUCT
CODES
MACHINE
CODE
New code
_ _ _ _ _ Code:000000
PRODUCT
CODES
CODES
PROGRAMMING
SELECTION NUMBER _
SELECTION NUMBER_
ERASE EXP. DATE
PER CHANNEL
ERASE EXP. DATE
PER CHANNEL
ERASE EXP. DATE
PER CHANNEL

vision Snack Plus/Easy Combo // Vending
MNP86V03USV00 Date: 2008/12/01 Rev. 0 PAGE 44 OF 62
Fig. 39
[22] BANKNOTE ACCEPTANCE CHECK AND PROGRAMMING OF BANKNOTE
INHIBITIONS (MDB) This address only appears if communications have been properly established between the machine and an MDB banknote reader.
You will see the currently programmed value.
Change the value of the banknote.
Return to the previous menu.
To switch options.
In the main menu of this address there are two options. In the checking option of the banknote reader you can insert banknotes to check whether they are accepted. The inserted banknote will always be rejected and, if it has been recognised, the display will show its value.
The other option is the banknote inhibition programming menu. The operation of this menu will be different depending on whether the banknote reader can keep the banknote in the escrow position.
• Banknote reader with escrow option: you can program three options for each
banknote: banknote enabled without escrow, banknote enabled with escrow and disabled banknote.
To change banknotes.
Value 20.00
ENAB. ESCROW-NO
Value 10.00
ENAB. ESCROW-NO
Value 5.00
ENAB. ESCROW-NO
BILL VALUE
XX.XX
INSERT
BILL
VERIFYING
MDB BILL READER
Value 10.00
ENAB. ESCROW-NO
Value 20.00
ENAB. ESCROW-NO
Value 10.00
ENAB. ESCROW-NO
Value 5.00
ENAB. ESCROW-NO
BILL
INHIBITIONS
BILL READER
OPTIONS

vision Snack Plus/Easy Combo // Vending
MNP86V03USV00 Date: 2008/12/01 Rev. 0 PAGE 45 OF 62
…………………………………………………………
Return to the main menu.
• Banknote reader without escrow option: you can program two options for each
banknote: banknote enabled or banknote disabled.
To change banknotes.
…………………………………………………………
Return to the main menu.
In both cases, if a banknote inserted in the banknote reader is recognized, the display will automatically show its value and current status.
[24] TOKEN VALUES (MDB) At this address you can program the value of the three tokens that you can record in the compact. Note: Tokens incompatible with TOOLS software.
To move between the tokens
................................................................................ Once you have located the desired token.
You will see the currently programmed value.
to set the token value to zero.
To return to the menu where you choose the token.
You can also access the programming menu of the value of the token just by inserting it in the compact.
Token 0X
Value 0.00
Token 0X
Value X.X5
Token 0X
Value X.X6
Token 0X
Value X.X1
Token 0X
Value X.XX
Token 0X
TOKENS
OPTIONS
Value 20.00
DISABLED
Value 20.00
ENABLED
Value 20.00
ENAB. ESCROW-NO
Value 10.00
ENAB. ESCROW-NO
Value 5.00
ENAB. ESCROW-NO
Value 20.00
DISABLEd
Value 20.00
ENAB. ESCROW-YES
Value 20.00
ENAB. ESCROW-NO

vision Snack Plus/Easy Combo // Vending
MNP86V03USV00 Date: 2008/12/01 Rev. 0 PAGE 46 OF 62
[25] CHANNEL MOTOR VOLTAGE
In the menu of this address there are 2 options that you can change . ● Programming of the voltage for the channels of each product
Access the option that you have selected. You can change the voltage by increasing or decreasing it in steps of 0.5 Vdc.
Record the voltage in the desired selection.
● Consult the voltage programmed.
Access the option that you have selected.
Returns to the previous menu.
[27] INHIBITED SALES SCHEDULE (H.V.I.) In the main menu of this address you will find several options.
• Program inhibited sales time: this option allows you to program the beginning and end of the inhibited sales period. The digit that can currently be modified will blink on the display.
Lock out begins
00:00
SELLING HOURS
LOCK OUT PROG.
SELLING HOURS
LOCK OUT
Voltage:
5.0 VDC
SELECtION number _
SELECtION number_
CHECK PROGRAMMED
VOLTAGE
SELECtION number _
saved
SELECtION number
SELECtION number_
Voltage:
5.0 VDC
Voltage:
5.5 VDC
Voltage:
5.0 VDC
VOLTAGE
PROGRAMMING
VOLTAGE FOR
CHANNELS MOTORS

vision Snack Plus/Easy Combo // Vending
MNP86V03USV00 Date: 2008/12/01 Rev. 0 PAGE 47 OF 62
.................................................................................
..............................................................................
To return to previous menu.
• Program days with H.V.I. : this option allows you to choose days in the week when you want to apply the inhibited sale times.
................................................................................
Once you have chosen the desired day of the week
To return to previous menu.
• Program products with H.V.I. : this option allows you to choose the product selection numbers which you wish to be affected by the inhibited sales schedule.
You will see a menu where you can select all the products.
If you only wish to choose a product.
To return to previous menu. • See programmed settings: the display will show all the settings that you have
programmed in this programming address in the following order: start time, end time, days of the week with h.v.i. and products with h.v.i.
• Delete settings: all the settings programmed at this address will be deleted so that
the inhibited sales schedule is completely disabled.
CLEAR LOCK OUT
CHECK LOCK
OUT PROGRAMMED
SELECTION NUMBER _
SELECTIONS TO
BE LOCK OUT
Select all ?
1 Yes 2 No Lock out select.
Lock out days
ERASED
Lock out days
SAVED
Lock out days
MONDAY
Lock out days
TUESDAY
Lock out days
MONDAY
LOCK OUT
DAYS PROG.
Lock out begins
00:00
Lock out begins
01:00
Lock out ends
00:00
Lock out ends
00:00
Lock out begins
00:00

vision Snack Plus/Easy Combo // Vending
MNP86V03USV00 Date: 2008/12/01 Rev. 0 PAGE 48 OF 62
[30] PROGRAM VERSION When you access this address the display will show the name of the program recorded in the flash memory of the machine control card.
The display shows the program recorded in the ATMEGA microprocessor which controls the digital thermometer located in the product hold.
The display shows the program of the product detection system.
[31] CURRENCY CHARACTERS When you access this address the display will show the three characters currently programmed. The cursor will highlight the character that can be changed at this time.
If you wish to leave the character blank
[32] DISPLAY LANGUAGE When you access this address the display will show the language currently programmed for the texts that appear on the display and on the tickets printed via RS232 using a printer or terminal.
[33] BUZZER You can enable or disable the buzzer located on the display control card and the pushbutton panel. When you access this address the display will show the buzzer status that is currently programmed.
DESABLED
BEEP
ENABLED
BEEP
BEEP
PROGRAMMING
MONETARY UNIT
PROGRAMMING
LANGUAGE
PROGRAMMING
PRO.DET. SYSTEM
CRPR0D00
ATMEGA Program:
ctrtmp07
Program:
VISD0001
PROGRAM
VERSION
1 2 3+ 4- c-del" "
1 2 3+ 4- c-del" "
1 2 3+ 4- c-del" "
1 2 3+ 4- c-del" "
1 2 3+ 4- c-del"G "
1 2 3+ 4- c-del"E "
Francais
English
Castellano

vision Snack Plus/Easy Combo // Vending
MNP86V03USV00 Date: 2008/12/01 Rev. 0 PAGE 52 OF 62
6. Troubleshooting The following table will help you diagnose the most common machine and compact failures. It describes a series of anomalies, their possible causes and the steps to take in solving them or at least in determining as far as possible the cause of such failures before contacting our technical support service.
PROBLEM CAUSE SOLUTION
● Coins are not accepted and the J-2000 display is off. You cannot access compact programming
mode.
● The J-2000 has no power supply or the wrong
power supply.
● Check that the supply voltage is within the range
admitted by the device.
● Check continuity of cables between the
machine and the J-2000.
● You can enter programming mode in the compact but there is no
communication.
● The cables are incorrectly connected.
● Connect the cables properly.
● The compact
communicates properly and you can enter programming
mode but all coins are rejected and the display
shows a 2.
● The T-15 selector does not accept the coins.
● Go to compact address 51 and check coin
acceptance.
● The J-2000 sends all
coins to the vault. ● Change is incorrectly
programmed.
● The change tubes are broken down.
● Maximum values programmed for coins in
the tube have been exceeded.
● Check the values of compact address 22.
● Check compact address 51 to see whether coins
should go to the right change tube.
● Check compact address
27. Reset the fault and empty the change tubes.
● Check compact
addresses 21 and 29 to make sure maximum values have not been
reached.

vision Snack Plus/Easy Combo // Vending
MNP86V03USV00 Date: 2008/12/01 Rev. 0 PAGE 53 OF 62
PROBLEM CAUSE SOLUTION ● Coins get stuck at the entrance of the tubes.
● Change is incorrectly programmed.
● Separators are sticking
● You have the wrong tube model for this change
combination.
● Check the values of compact address 22.
● Send the J-2000 to
customer service.
● Replace the tubes.
● The J-2000 rejects a high
percentage of coins. In sales monitoring mode, the display shows a "2" each time a coin is inserted.
● Measuring channel is dirty.
● The selector door is not completely closed.
● Clean the selector with a cloth moistened with
alcohol. If the problem continues, send the selector to customer
service for adjustment.
● Check return motor operation. Get rid of any
other obstruction.
● The J-2000 does not accept any coin. When you
insert a coin no digit appears.
● The connection cable between the selector and the control card is broken
or disconnected.
● Connect the cable.
● Coins not accepted and a non-blinking "1" appears on
the display.
● The machine does not respond to
communications properly.
● Check the cables connecting the machine to
the compact.
● The programmed settings have been lost.
● Electric noise. ● Make sure the machine is properly grounded.
● In address 25 coins are not accepted for tubes 1
and 5.
● First reloading was not carried out properly.
● Consult first reloading procedure in compact
manual.
● Coins with a given value are not accepted.
● Inhibitions wrongly programmed or return
failure.
● Check general inhibitions in machine address 10.
● Check that coin return
tubes have coins (Machine address 02 ) and that they
are working (Compact address 27).

vision Snack Plus/Easy Combo // Vending
MNP86V03USV00 Date: 2008/12/01 Rev. 0 PAGE 54 OF 62
PROBLEM CAUSE SOLUTION
● All coins are rejected. No sale is possible and the
display shows a message saying the machine is out of
service.
● Machine out of service because of internal
elevator break down, expired product because of temperature or because no
motor is connected.
● Check the failure in machine address 06.
● If there is a fault in the internal elevator, try to reset it in address 07. ● In case of product
expiration because of temperature, remove the product from the machine
and reset the failure in machine address 07. ● Should no connected
motor be detected, check the three motor assembly located on the transformer
bracket.
● No sales from a channel with product.
● Insufficient change. Product expired.
● Problems with the inside
door opening switch.
● Check that when you select the product the
display shows an out of change message.
● If a product sold out
message is displayed: the product may be considered expired because the date
programmed in address 19 has passed.
● Check that the internal
door opening switch works properly. otherwise the
product sold out marks will be deleted.
● No banknotes accepted. ● Insufficient change.
● The banknote has been inhibited.
● Banknote not recognised
by banknote reader.
● Check whether when the banknote is rejected there
is an out of change message on the display.
● Check address 22 for
banknote inhibitions.
● Check banknote acceptance in address 22.

vision Snack Plus/Easy Combo // Vending
MNP86V03USV00 Date: 2008/12/01 Rev. 0 PAGE 55 OF 62
PROBLEM CAUSE SOLUTION
● The display shows the message "EXECUTIVE
master not detected”
● Defective connection between compact and
machine.
● Compact is not in programming mode.
● Check power supply and communications
connections.
● Exit programming mode so the compact will resend commands to the machine.
● You can not communicate with the machine from the
PC via modem.
● Incorrect modem options programming.
● Incorrect connection between machine and
modem interface card. The result is that the modem
addresses do not appear.
● The program recorded in the Flash memory of the
machine control card is not the right one.
● Check the modem's addresses or reset the machine to initialise the
modem's options.
● Check connection.
● Check address 30 for the program version and if it is
the wrong one, load the right program version.
7. Annexes
7.1. Peripherals ● Landline modem or GSM modem with modem interface card (ref. code 8590049). Available if the program version is for working with an MDB compact. ● The main function of the “EASYFLASH” reprogramming device is to run applications that help manage the product range. It is thus an independent, compact, manageable instrument that allows the user to carry out tasks such as reprogramming the software of the machines, reading audits, monitoring processes, storing information, etc.
It is accessible through a USB bus, so modern operating systems (starting with Windows XP) do not require installing drivers to access its file system. All you have to do is connect it to a USB port for the operating system to recognize it.
Thanks to the use of batteries, it is very compact and easy to manage. To charge the batteries, no external charger is required and the batteries are recharged when the unit is connected to a USB port or to a vending machine that is on.
It has an application called Monitor, which is an operating system. The Monitor allows you to control available resources. In addition to the Monitor there are Applications,

vision Snack Plus/Easy Combo // Vending
MNP86V03USV00 Date: 2008/12/01 Rev. 0 PAGE 56 OF 62
which are programs that are run in the device that use resources to carry out certain functions.
Fig. 40
The Monitor allows you to loads up to 4 applications in the main memory from among those available in the SD memory card.
You can determine the version that is currently running in your device by looking at the top of all the windows of the main menu of the Monitor. The format is vXX.YY. A correct version should have values between YY and 00. If this is not the case, please contact AVT Technical Support Service to obtain a stable version
It comes with the following cables so it can be used with the full range of AVT devices:
USB Device harness SUBD-
9/Selector USB Device harness
MDB/RS485/DIN 5 pin USB cable
Fig. 41 Fig. 42 Fig. 43

vision Snack Plus/Easy Combo // Vending
MNP86V03USV00 Date: 2008/12/01 Rev. 0 PAGE 57 OF 62
7.2. Jams and changes in the J-2000 compact tubes To disassemble the compact follow the steps below:
● Empty the compact's tubes completely. ● Remove the front cover (1). ● Loosen the selector by moving the catch (2). ● Remove the screws located in the selector catch and on both sides of the U-shaped plate (3).
Fig. 44
After these steps, place the compact on a horizontal surface and remove the U-shaped plate (see fig. 45). Now the tubes can be accessed by moving the coin separator assembly and display sideways. Once the necessary changes have been made, follow the above steps in reverse order to re-assemble the unit.
Fig. 45 7.3. Installing and removing channels You can replace tray channels quite easily, as explained below. The channels are adjustable and do not require any tools. 1. Check the location and type of channel to be installed, according to the product that you wish to dispense.

vision Snack Plus/Easy Combo // Vending
MNP86V03USV00 Date: 2008/12/01 Rev. 0 PAGE 58 OF 62
2. Fit the two metal tabs on the front of the channel into the front guides of the tray that you have selected or which correspond.
3. Let the channel come down to the base of the tray and assemble or fit in the two metal tabs at the back of the channel (motor area) on the guides of the back part of the tray (check whether the channel is aligned with the centre of the tray).
4. Insert the tray connector in the channel motor. Fig. 46
To remove it, follow the same steps in reverse order.
7.4. Transport feet and adjustable levelling feet Once the machine is on the ground (see fig. 49), it is advisable to remove the four (plastic) transport feet for better stability, aided with the lifting jack as follows: 1. Raise the back, unscrew and remove the two plastic feet and let the machine rest on the floor. 2. Raise the front, unscrew and remove the two plastic feet and replace with the two adjustable levelling feet, making sure that they are fully screwed into the machine bottom and slide the machine on its wheels to the desired position.
3. Once the machine has been placed in its permanent position, raise the front again with the lifting jack and level the door of the adjustable levelling feet (left and right see fig. 50), with this system you can help to level the door perfectly, thereby preventing scarping of he door.
Fig. 47 Fig. 48

vision Snack Plus/Easy Combo // Vending
MNP86V03USV00 Date: 2008/12/01 Rev. 0 PAGE 59 OF 62
7.5. Cleaning and Maintenance
Cleaning the machine To ensure the machine works properly at all times, we recommend that the following components be cleaned periodically: ► The outside glass should be cleaned periodically with a moist cloth or sponge and a neutral product suitable for cleaning glass. ► Whenever there is a spill in the product delivery bin, it should be cleaned with a cloth moistened with water and all moving parts should be checked to ensure that they move freely. ► If there is a spill on a tray, remove the tray from the machine and clean it using a cloth moistened with water, never with alcohol or acids. Remove the channels from their slots to better be able to clean the whole surface. Check that the belt moves freely and that it is not obstructed anywhere along its path. Wait until it is completely dry before reinstalling it. ► In general, keeping all internal areas that are visible to consumers clean increases sales and improves the image of the machines. ► To access the lower trays (restocking area) open the machine’s exterior door and take out the trays one at a time sliding them along their guides.. ► There is a slotted opening at the front, on the lower right-hand side, that allows air to circulate inside the machine. This area, as well as the cooling unit condenser, which is just behind the opening, should be cleaned regularly with a broom, brush or compressed air to make sure that they are not obstructed by papers, bags or dust. ► The machine should never be cleaned with a water jet. ► The machine’s interior should always be dry to ensure it works properly. ► When handling the cooling unit, always do so with the machine turned off and make sure that you do not bend any pipes, as they could break and produce a gas leak. ► Never touch those areas powered at 110 V, such as the ballast box, the power box and the cables leading to the fluorescent light. To access areas where there are components powered at 110 V, open the machine’s outside door and use a Philips screw driver to remove the metal boxes protecting these components. ► Access to servicing area should only be permitted to persons with a knowledge of and practical experience in the machine, particularly with regard to health and safety.

vision Snack Plus/Easy Combo // Vending
MNP86V03USV00 Date: 2008/12/01 Rev. 0 PAGE 60 OF 62
► To clean the exterior of the machine, use a moist cloth with warm water and dry with a soft cloth. ► In case of persistent stains (grease, drinks, etc.), do not apply abrasive products. Do not use a cleaning spray! Use a solution of water and alcohol. Cleaning of the selector
The walls and ramps of the coin selector where coins circulate should be cleaned regularly (see fig. 49) with a soft brush and a moist cloth.
Fig. 49
7.6. Recycling If you need to dispose of packaging materials consult your local authorities for recycling information.
Do not throw away any electronic circuit as many of the materials that they are made of are recyclable.
To manage the equipment as waste once the client has decided to dispose of it, AVT has set up a collection system with an Integrated Management System (ECOLEC). Please consult us for information about recycling.
7.7. Environment Saving energy contributes to preserving the environment and, in the long run, helps save a considerable amount of money. This section contains advice on optimising the machine's use of energy as much as possible. ► The machine should be located in a cool, dry, well-ventilated place, so a location meeting these requirements should be sought within the facilities. ► Avoid the machine’s direct exposure to sunlight. Use a parasol or sunshade if necessary.

vision Snack Plus/Easy Combo // Vending
MNP86V03USV00 Date: 2008/12/01 Rev. 0 PAGE 61 OF 62
► Ensuring the cooling unit grilles are always clean and well ventilated will result in significant energy savings and longer machine life. ► There is an option to control when the machine lights are turned on and off ( address 17). If you program the showcase lights to be on during the time when there is less light and visibility, your yearly energy savings will be considerable. In place with sufficient light, you can program the lights to always be off, thereby achieving considerable energy savings. ► Open the machine door only when necessary and keep it open for as short a period as possible. In locations without temperature regulation, product should be restocked during the coolest time of the day. The machine’s design process has been studied to ensure its has as little impact as possible on the environment, both in the use of raw materials and in its assembly, transport, service life and collection for recycling. This section describes several material measures that show how AVT stands firm in its commitment: ► Lower energy consumption.
► Wood being replaced with plastic feet.
► The entire box made of cardboard has been avoided.
► Improving the machine thermal isolation.
8. Regulation The machines of the vision product range have been designed to European standards. AVT guarantees that these machines meet applicable directives.

vision Snack Plus/Easy Combo // Vending
MNP86V03USV00 Date: 2008/12/01 Rev. 0 PAGE 62 OF 62
AVT Inc. reserves the right to introduce
improvements in this model arising from its continuous research without prior
notice.