smv series wiring lab - wolf automation · ac variable frequency drives ... smv series wiring lab...
TRANSCRIPT

AC Variable Frequency Drives | Servo Drives & Motors | Electro-Mechanical Drives & Gearmotors | Clutches & Brakes | Machine Automation
SMVector
1
SMV Series Wiring Lab
3-Wire Start / Stop
2-Wire Start / Stop
2-Wire Start / Stop W Preset Speed
2-Wire Start / Stop W/ Speed Pot
2-Wire W/ Forward, Reverse & Pot
2-Wire W/ Forward, Reverse and Jog Fwd
3-Wire W/ MOP Speed Reference
SMVector Labs

AC Variable Frequency Drives | Servo Drives & Motors | Electro-Mechanical Drives & Gearmotors | Clutches & Brakes | Machine Automation
SMVector
2
3 Wire Start / Stop
Three Wire Control
• Push-buttons wire directly to
drive
• Low Power
SMVector Labs
Programmable
Terminals
1 2 5 6 25 4 11 13A 13B 13C 14 16 17
Form A
Relay
Start Button Stop Button

AC Variable Frequency Drives | Servo Drives & Motors | Electro-Mechanical Drives & Gearmotors | Clutches & Brakes | Machine Automation
SMVector
3
3 Wire Start/Stop We want to set the drive up to use external
inputs to start and stop the motor.
To do this we need to set
Parameter P100 – “Start Control Source”
to
1 - “Use start/stop circuit wired into the
terminal strip”.

AC Variable Frequency Drives | Servo Drives & Motors | Electro-Mechanical Drives & Gearmotors | Clutches & Brakes | Machine Automation
SMVector
4
3 Wire Start/Stop We want to set the drive up to use the TB-13A Input as the
start switch to start the motor in the forward direction.
To do this we need to set
Parameter P121 – “TB-13A Input Function”
to
11 – “Start Forward”
SMVector Labs

AC Variable Frequency Drives | Servo Drives & Motors | Electro-Mechanical Drives & Gearmotors | Clutches & Brakes | Machine Automation
SMVector
5
3 Wire Start/Stop
Red
Gre
en
Re
d
Gre
en
Programmable
Terminals
1 2 5 6 25 4 11 13A 13B 13C 14 16 17
Form A
Relay
Parameter Settings:
P100 Set to 01 (terminal strip control)
P121 Set to 11 (terminal 13A as start forward)
Start Button
(PB2 N.O.) Stop Button
(PB1 N.C.) Wire the drive up according to the drawing.
Use the GREEN PB2 button to Start the motor.
Use the RED PB1 button to Stop the motor.
SMVector Labs
30

AC Variable Frequency Drives | Servo Drives & Motors | Electro-Mechanical Drives & Gearmotors | Clutches & Brakes | Machine Automation
SMVector
6
SMV Series Wiring Lab
3-Wire Start / Stop
2-Wire Start / Stop
2-Wire Start / Stop W/ Preset Speed
2-Wire Start / Stop W/ Speed Pot
2-Wire W/ Forward, Reverse & Pot
2-Wire W/ Forward, Reverse and Jog Fwd
3-Wire W/ MOP Speed Reference
SMVector Labs
AC Variable Frequency Drives | Servo Drives & Motors | Electro-Mechanical Drives & Gearmotors | Clutches & Brakes | Machine Automation
SMVector
7
Programmable
Terminals
1 2 5 6 25 4 11 13A 13B 13C 14 16 17
Form A
Relay
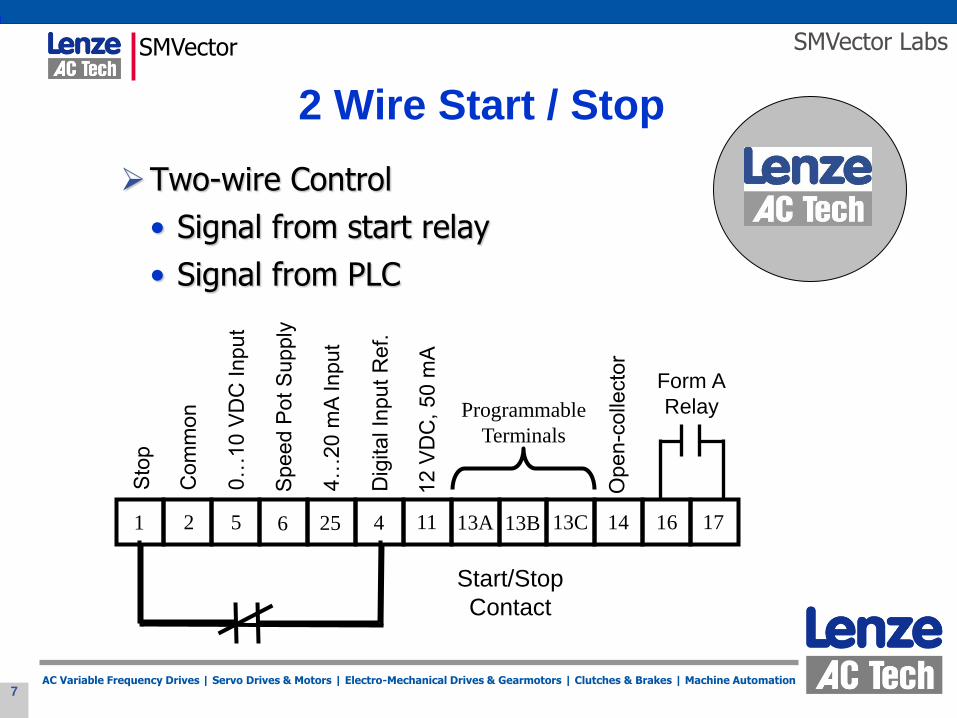
2 Wire Start / Stop
Two-wire Control
• Signal from start relay
• Signal from PLC
SMVector Labs
Start/Stop
Contact
AC Variable Frequency Drives | Servo Drives & Motors | Electro-Mechanical Drives & Gearmotors | Clutches & Brakes | Machine Automation
SMVector
8
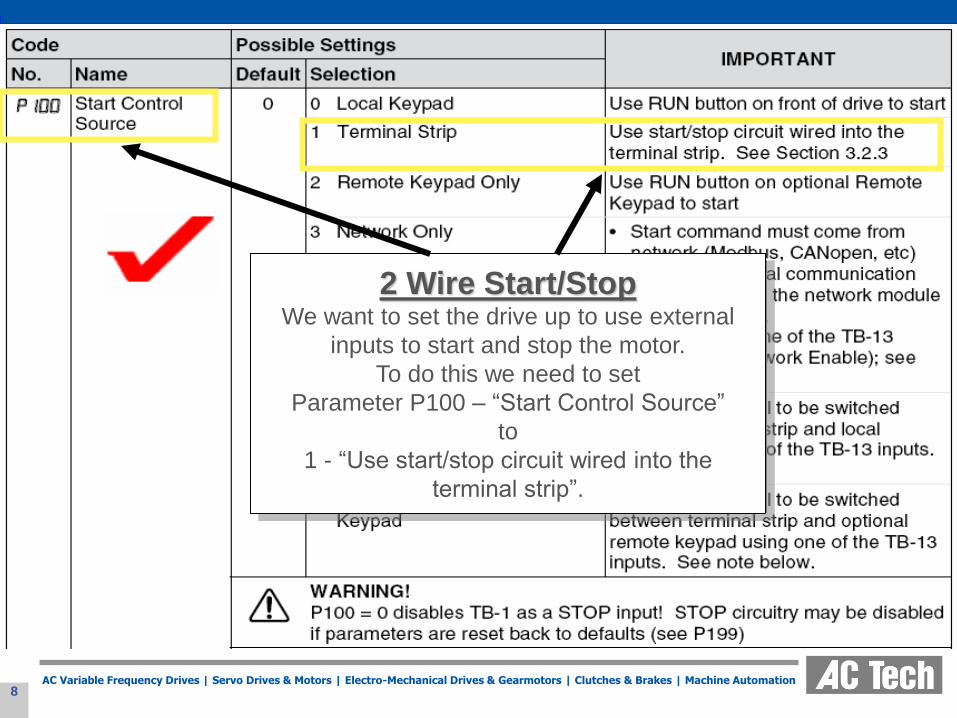
2 Wire Start/Stop We want to set the drive up to use external
inputs to start and stop the motor.
To do this we need to set
Parameter P100 – “Start Control Source”
to
1 - “Use start/stop circuit wired into the
terminal strip”.

AC Variable Frequency Drives | Servo Drives & Motors | Electro-Mechanical Drives & Gearmotors | Clutches & Brakes | Machine Automation
SMVector
9
2 Wire Start/Stop We want to reset the TB-13A Input Function to have
no effect on the drive.
To do this we need to reset
Parameter P121 – “TB-13A Input Function”
Back to
0 – “Disables Input”
SMVector Labs

AC Variable Frequency Drives | Servo Drives & Motors | Electro-Mechanical Drives & Gearmotors | Clutches & Brakes | Machine Automation
SMVector
10
Gra
y
Gra
y
Programmable
Terminals
1 2 5 6 25 4 11 13A 13B 13C 14 16 17
Form A
Relay
Start/Stop
Contact (S1)
Parameter Settings:
P100 Set to 01 (terminal strip control)
Wire the drive up according to the drawing.
Turn on S1 to Start the motor.
Turn off S1 to Stop the motor.
2 Wire Start/Stop Control SMVector Labs
30

AC Variable Frequency Drives | Servo Drives & Motors | Electro-Mechanical Drives & Gearmotors | Clutches & Brakes | Machine Automation
SMVector
11
SMV Series Wiring Lab
3-Wire Start / Stop
2-Wire Start / Stop
2-Wire Start / Stop W/ Preset Speed
2-Wire Start / Stop W/ Speed Pot
2-Wire W/ Forward, Reverse & Pot
2-Wire W/ Forward, Reverse and Jog Fwd
3-Wire W/ MOP Speed Reference
SMVector Labs

AC Variable Frequency Drives | Servo Drives & Motors | Electro-Mechanical Drives & Gearmotors | Clutches & Brakes | Machine Automation
SMVector
12
2 Wire Start/Stop W/Preset Speeds
Up to 8 preset speeds
1st preset speed is “Minimum speed setting” One input - 2 preset speeds Two inputs – 4 preset speeds Three inputs – 8 preset speeds
Binary Counting Speed 1 = 13A
Speed 2 = 13B - Speed 5 = 13A & 13C
Speed 3 = 13C - Speed 6 = 13B & 13C
Speed 4 = 13A & 13B - Speed 7 = 13A & 13B & 13C
13A 13B 13C com

AC Variable Frequency Drives | Servo Drives & Motors | Electro-Mechanical Drives & Gearmotors | Clutches & Brakes | Machine Automation
SMVector
13
2 Wire Start/Stop w/Preset
Speed We want to set the drive up to use external
inputs to start and stop the motor.
To do this we need to set
Parameter P100 – “Start Control Source”
to
1 - “Use start/stop circuit wired into the
terminal strip”.

AC Variable Frequency Drives | Servo Drives & Motors | Electro-Mechanical Drives & Gearmotors | Clutches & Brakes | Machine Automation
SMVector
14
2 Wire Start/Stop w/Preset Speed We want to set the drive up to use the TB-13A as a preset
speed selector switch.
To do this we need to set
Parameter P121 – “TB-13A Input Function”
to
3 – “AUTO Reference: Preset”
SMVector Labs

AC Variable Frequency Drives | Servo Drives & Motors | Electro-Mechanical Drives & Gearmotors | Clutches & Brakes | Machine Automation
SMVector
15
2 Wire Start/Stop w/Preset Speed We want to set the drive up to use the TB-13B as the second
preset speed selector switch.
To do this we need to set
Parameter P122 – “TB-13B Input Function”
to
3 – “AUTO Reference: Preset”
SMVector Labs

AC Variable Frequency Drives | Servo Drives & Motors | Electro-Mechanical Drives & Gearmotors | Clutches & Brakes | Machine Automation
SMVector
16
2 Wire Start/Stop w/Preset
Speed Set the appropriate parameters to get all of
your preset speeds.
How many preset speeds do we
have?
SMVector Labs

AC Variable Frequency Drives | Servo Drives & Motors | Electro-Mechanical Drives & Gearmotors | Clutches & Brakes | Machine Automation
SMVector
17
2 Wire Start/Stop w/Preset
Speed We want to set up the Preset Speed when
input TB-13A is made
To do this we need to set
Parameter P131 – “Preset Speed #1”
to
60 – “Sets speed to 60 Hz”
Note The table below shows which
preset speed is selected when
the various inputs are made.
SMVector Labs
60

AC Variable Frequency Drives | Servo Drives & Motors | Electro-Mechanical Drives & Gearmotors | Clutches & Brakes | Machine Automation
SMVector
18
2 Wire Start/Stop w/Preset
Speed We want to set up the Preset Speed when
input TB-13B is made
To do this we need to set
Parameter P132 – “Preset Speed #2”
to
10 – “Sets speed to 10 Hz”
Note The table below shows which
preset speed is selected when
the various inputs are made.
SMVector Labs
10
60

AC Variable Frequency Drives | Servo Drives & Motors | Electro-Mechanical Drives & Gearmotors | Clutches & Brakes | Machine Automation
SMVector
19
2 Wire Start/Stop w/Preset
Speed We want to set up the Preset Speed when
input TB-13A and TB-13B are made
To do this we need to set
Parameter P134 – “Preset Speed #4”
to
30 – “Sets speed to 30 Hz”
Note The table below shows which
preset speed is selected when
the various inputs are made.
SMVector Labs
30
10
60
AC Variable Frequency Drives | Servo Drives & Motors | Electro-Mechanical Drives & Gearmotors | Clutches & Brakes | Machine Automation
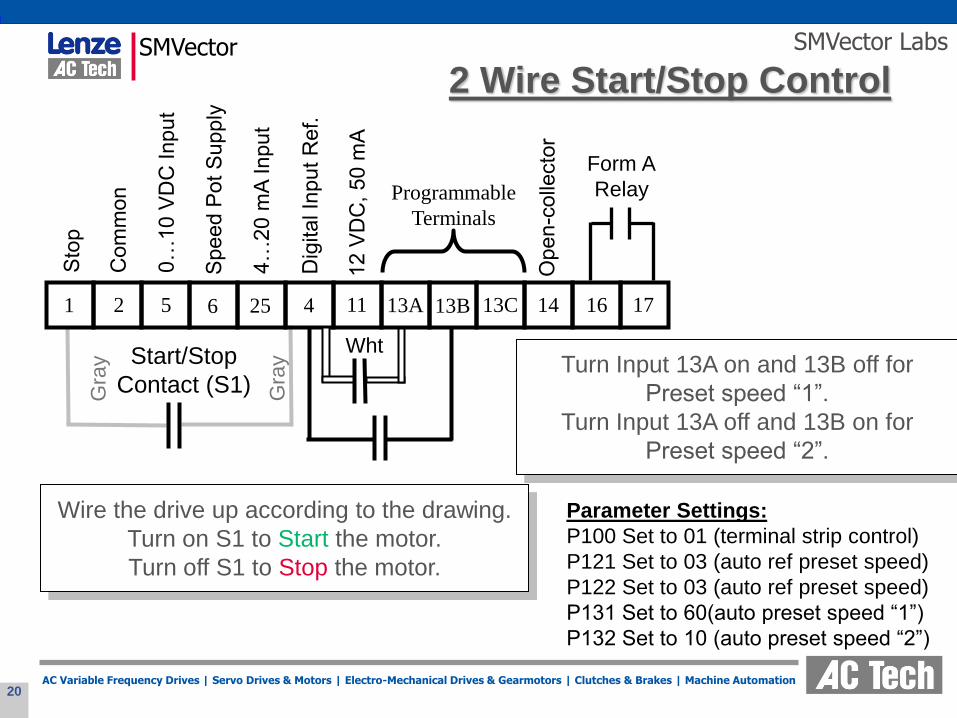
SMVector
20
Gra
y
Gra
y Start/Stop
Contact (S1)
Parameter Settings:
P100 Set to 01 (terminal strip control)
P121 Set to 03 (auto ref preset speed)
P122 Set to 03 (auto ref preset speed)
P131 Set to 60(auto preset speed “1”)
P132 Set to 10 (auto preset speed “2”)
Wire the drive up according to the drawing.
Turn on S1 to Start the motor.
Turn off S1 to Stop the motor.
2 Wire Start/Stop Control SMVector Labs
Programmable
Terminals
1 2 5 6 25 4 11 13A 13B 13C 14 16 17
Form A
Relay
Wht Turn Input 13A on and 13B off for
Preset speed “1”.
Turn Input 13A off and 13B on for
Preset speed “2”.

AC Variable Frequency Drives | Servo Drives & Motors | Electro-Mechanical Drives & Gearmotors | Clutches & Brakes | Machine Automation
SMVector
21
SMV Series Wiring Lab
3-Wire Start / Stop
2-Wire Start / Stop
2-Wire Start / Stop W/ Preset Speed
2-Wire Start / Stop W/ Speed Pot
2-Wire W/ Forward, Reverse & Pot
2-Wire W/ Forward, Reverse and Jog Fwd
3-Wire W/ MOP Speed Reference
SMVector Labs

AC Variable Frequency Drives | Servo Drives & Motors | Electro-Mechanical Drives & Gearmotors | Clutches & Brakes | Machine Automation
SMVector
22
2 Wire Start/Stop w/Speed Pot We want to set the drive up to use external
inputs to start and stop the motor.
To do this we need to set
Parameter P100 – “Start Control Source”
to
1 - “Use start/stop circuit wired into the
terminal strip”.

AC Variable Frequency Drives | Servo Drives & Motors | Electro-Mechanical Drives & Gearmotors | Clutches & Brakes | Machine Automation
SMVector
23
2 Wire Start/Stop w/Speed Pot We want to reset the input reference source to the
drive to be 0 – 10 VDC.
To do this we need to set
Parameter P101 – “Standard Reference Source”
to
1 – “0 – 10 VDC”

AC Variable Frequency Drives | Servo Drives & Motors | Electro-Mechanical Drives & Gearmotors | Clutches & Brakes | Machine Automation
SMVector
24
Start/Stop
Contact (S1)
Yello
w
Bro
wn
Blu
e
POT
Speed
Pot
Programmable
Terminals
1 2 5 6 25 4 11 13A 13B 13C 14 16 17
Form A
Relay
Gra
y
Gra
y
Parameter Settings:
P100 Set to 01 (terminal strip control)
P101 Set to 01 (0-10 VDC speed reference)
2 Wire Start/Stop
Control w/ Speed Pot
Wire the drive up according to the drawing.
Turn on S1 to Start the motor.
Turn off S1 to Stop the motor.
Turn the Speed Pot to change analog signal
and the speed of the motor
SMVector Labs

AC Variable Frequency Drives | Servo Drives & Motors | Electro-Mechanical Drives & Gearmotors | Clutches & Brakes | Machine Automation
SMVector
25
SMV Series Wiring Lab
3-Wire Start / Stop
2-Wire Start / Stop
2-Wire Start / Stop W/ Preset Speed
2-Wire Start / Stop W/ Speed Pot
2-Wire W/ Forward, Reverse & Pot
2-Wire W/ Forward, Reverse and Jog Fwd
3-Wire W/ MOP Speed Reference
SMVector Labs

AC Variable Frequency Drives | Servo Drives & Motors | Electro-Mechanical Drives & Gearmotors | Clutches & Brakes | Machine Automation
SMVector
26
2 Wire w/ Forward & Reverse We want to set the drive up to use external
inputs to start and stop the motor.
To do this we need to set
Parameter P100 – “Start Control Source”
to
1 - “Use start/stop circuit wired into the
terminal strip”.

AC Variable Frequency Drives | Servo Drives & Motors | Electro-Mechanical Drives & Gearmotors | Clutches & Brakes | Machine Automation
SMVector
27
2 Wire w/ Forward & Reverse We want to reset the input reference source to the
drive to be 0 – 10 VDC.
To do this we need to set
Parameter P101 – “Standard Reference Source”
to
1 – “0 – 10 VDC”

AC Variable Frequency Drives | Servo Drives & Motors | Electro-Mechanical Drives & Gearmotors | Clutches & Brakes | Machine Automation
SMVector
28
2 Wire w/ Forward & Reverse We want to enable the Forward and Reverse
Rotation Parameter.
To do this we need to set
Parameter P112 – “Rotation”
to
1 – “Forward and Reverse”

AC Variable Frequency Drives | Servo Drives & Motors | Electro-Mechanical Drives & Gearmotors | Clutches & Brakes | Machine Automation
SMVector
29
2 Wire w/ Forward & Reverse We want to set the drive up to use the TB-13A Input as a
toggle switch to change the direction of the motor.
To do this we need to set
Parameter P121 – “TB-13A Input Function”
to
10 – “Reverse Rotation”
SMVector Labs

AC Variable Frequency Drives | Servo Drives & Motors | Electro-Mechanical Drives & Gearmotors | Clutches & Brakes | Machine Automation
SMVector
30
FWD / REV
Contact (S3)
Bla
ck
Bla
ck
Gra
y
Gra
y
Programmable
Terminals
1 2 5 6 25 4 11 13A 13B 13C 14 16 17
Form A
Relay
Start/Stop
Contact (S1)
Parameter Settings:
P100 Set to 01 (terminal strip control)
P101 Set to 01 (0-10 VDC speed reference)
P112 Set to enable the FWD / REV parameter
P121 Set to 10 (Term 13A FWD / REV selection)
Wire the drive up according to the drawing.
Turn on S1 to Start the motor.
Turn off S1 to Stop the motor.
Toggle S3 to change direction
2 Wire Forward / Reverse Y
ello
w
POT
Speed
Pot
Bro
wn
Blu
e
SMVector Labs

AC Variable Frequency Drives | Servo Drives & Motors | Electro-Mechanical Drives & Gearmotors | Clutches & Brakes | Machine Automation
SMVector
31
SMV Series Wiring Lab
3-Wire Start / Stop
2-Wire Start / Stop
2-Wire Start / Stop W/ Preset Speed
2-Wire Start / Stop W/ Speed Pot
2-Wire W/ Forward, Reverse & Pot
2-Wire W/ Forward, Reverse and Jog Fwd
3-Wire W/ MOP Speed Reference
SMVector Labs

AC Variable Frequency Drives | Servo Drives & Motors | Electro-Mechanical Drives & Gearmotors | Clutches & Brakes | Machine Automation
SMVector
32
Jog
Typically used for machine set up
• Push-button
Starts when pushed
Stops when released
• Set to run at low speed
Drive’s stop circuit is disabled.
Motor should be at stop when jogging
Runs at preset speed #2
SMVector Labs

AC Variable Frequency Drives | Servo Drives & Motors | Electro-Mechanical Drives & Gearmotors | Clutches & Brakes | Machine Automation
SMVector
33
2 Wire w/ Forward & Reverse We want to set the drive up to use external
inputs to start and stop the motor.
To do this we need to set
Parameter P100 – “Start Control Source”
to
1 - “Use start/stop circuit wired into the
terminal strip”.

AC Variable Frequency Drives | Servo Drives & Motors | Electro-Mechanical Drives & Gearmotors | Clutches & Brakes | Machine Automation
SMVector
34
2 Wire w/ FWD & REV and Jog We want to reset the input reference source to the
drive to be 0 – 10 VDC.
To do this we need to set
Parameter P101 – “Standard Reference Source”
to
1 – “0 – 10 VDC”

AC Variable Frequency Drives | Servo Drives & Motors | Electro-Mechanical Drives & Gearmotors | Clutches & Brakes | Machine Automation
SMVector
35
2 Wire w/ FWD & REV and Jog We want to enable the Forward and Reverse
Rotation Parameter.
To do this we need to set
Parameter P112 – “Rotation”
to
1 – “Forward and Reverse”

AC Variable Frequency Drives | Servo Drives & Motors | Electro-Mechanical Drives & Gearmotors | Clutches & Brakes | Machine Automation
SMVector
36
2 Wire w/FWD & REV and Jog We want to set the drive up to use the TB-13A Input as a
toggle switch to change the direction of the motor.
To do this we need to set
Parameter P121 – “TB-13A Input Function”
to
10 – “Reverse Rotation”
SMVector Labs

AC Variable Frequency Drives | Servo Drives & Motors | Electro-Mechanical Drives & Gearmotors | Clutches & Brakes | Machine Automation
SMVector
37
2 Wire w/ FWD & REV and Jog We want to set the drive up to use the TB-13B
Input as the Jog Forward switch.
To do this we need to set
Parameter P122 – “TB-13B Input Function”
to
15 – “Jog Forward”
Note Parameter P134 is used to set the
Jog Forward speed
SMVector Labs

AC Variable Frequency Drives | Servo Drives & Motors | Electro-Mechanical Drives & Gearmotors | Clutches & Brakes | Machine Automation
SMVector
38
2 Wire w/ FWD & REV and Jog We want to set up the Jog Speed when
input TB-13B is made
To do this we need to set
Parameter P134 – “Preset Speed #4”
to
10 – “Sets speed to 10 Hz” Note
Because Parameter P134 is the
default Jog Forward speed the
table below is not applicable
SMVector Labs
10
AC Variable Frequency Drives | Servo Drives & Motors | Electro-Mechanical Drives & Gearmotors | Clutches & Brakes | Machine Automation
SMVector
39
Gre
en
Jog
PB2 (N.O.)
FWD / REV
Contact (S3)
Bla
ck
Bla
ck
Programmable
Terminals
1 2 5 6 25 4 11 13A 13B 13C 14 16 17
Form A
Relay
Start / Stop
Contact (S1)
Gre
en
Parameter Settings: P100 Set to 01 (terminal strip control)
P101 Set to 01 (0-10 VDC speed reference)
P121 Set to 10 (Term 13A FWD / REV selection)
P122 Set to 15 (Term 13B = JOG FWD)
P134 Set to 10.0 (10 Hz JOG speed)
Wire the drive up per the drawing.
Turn on S1 to Start the motor.
Turn off S1 to Stop the motor.
Toggle S3 to change direction
To Jog the motor use PB2
2 Wire FWD / REV & Jog
POT
SMVector Labs

AC Variable Frequency Drives | Servo Drives & Motors | Electro-Mechanical Drives & Gearmotors | Clutches & Brakes | Machine Automation
SMVector
40
SMV Series Wiring Lab
3-Wire Start / Stop
2-Wire Start / Stop
2-Wire Start / Stop W/ Preset Speed
2-Wire Start / Stop W/ Speed Pot
2-Wire W/ Forward, Reverse & Pot
2-Wire W/ Forward, Reverse and Jog Fwd
3-Wire W/ MOP Speed Reference
SMVector Labs

AC Variable Frequency Drives | Servo Drives & Motors | Electro-Mechanical Drives & Gearmotors | Clutches & Brakes | Machine Automation
SMVector
41
M - O - P
“Motor Operated Pot”
Increase & Decrease speed by input
• Work just like buttons on front of drive
• Sometimes referred as “Floating Point control”
Standard on all MC and SC Series drives
Use where speed needs to be set from more than one
location
Use for some basic set-point control applications
SMVector Labs

AC Variable Frequency Drives | Servo Drives & Motors | Electro-Mechanical Drives & Gearmotors | Clutches & Brakes | Machine Automation
SMVector
42
3 Wire Start / Stop Control w/ MOP Speed
Reference We want to set the drive up to use external inputs to start
and stop the motor.
To do this we need to set
Parameter P100 – “Start Control Source”
to
1 - “Use start/stop circuit wired into the terminal strip”.

AC Variable Frequency Drives | Servo Drives & Motors | Electro-Mechanical Drives & Gearmotors | Clutches & Brakes | Machine Automation
SMVector
43
3 Wire Start / Stop Control w/ MOP Speed
Reference We want to set the drive up to use the TB-13A Input as a Start
Forward switch.
To do this we need to set
Parameter P121 – “TB-13A Input Function”
to
11 – “Start Forward”
SMVector Labs

AC Variable Frequency Drives | Servo Drives & Motors | Electro-Mechanical Drives & Gearmotors | Clutches & Brakes | Machine Automation
SMVector
44
3 Wire Start / Stop Control w/ MOP
Speed Reference We want to set the drive up to use the TB-13B
Input as a MOP Up switch.
To do this we need to set
Parameter P122 – “TB-13B Input Function”
to
4 – “AUTO Reference : MOP Up”
SMVector Labs

AC Variable Frequency Drives | Servo Drives & Motors | Electro-Mechanical Drives & Gearmotors | Clutches & Brakes | Machine Automation
SMVector
45
Customer Interface At this point you will See
F.IL On your display
This is an Error Code. To find
out what the fault is we need to
go to section 5.3 of the manual
“Fault Messages”
F.IL
SMVector Labs

AC Variable Frequency Drives | Servo Drives & Motors | Electro-Mechanical Drives & Gearmotors | Clutches & Brakes | Machine Automation
SMVector
46
Note The issue is that we just set the TB-13B Input as a
MOP Up switch. We also need to configure one of
the inputs as a MOP Down switch.

AC Variable Frequency Drives | Servo Drives & Motors | Electro-Mechanical Drives & Gearmotors | Clutches & Brakes | Machine Automation
SMVector
47
3 Wire Start / Stop Control w/MOP
Speed Reference We want to set the drive up to use the TB-13C
Input as a MOP Down switch.
To do this we need to set
Parameter P123 – “TB-13C Input Function”
to
5 – “AUTO Reference : MOP Down”
SMVector Labs

AC Variable Frequency Drives | Servo Drives & Motors | Electro-Mechanical Drives & Gearmotors | Clutches & Brakes | Machine Automation
SMVector
48
3-Wire Start / Stop Control
w/ MOP Speed Reference
Parameter Settings:
P100 Set to 01 (terminal strip control)
P121 Set to 11 (terminal 13A as start forward)
P122 Set to 04 (terminal 13B MOP Up)
P123 Set to 05 (terminal 13C MOP Down)
Red
Gre
en
Re
d
Gre
en
Programmable
Terminals
1 2 5 6 25 4 11 13A 13B 13C 14 16 17
Form A
Relay
Start Button
(PB2 N.O.) Stop Button
(PB1 N.C.)
Inc. Speed Contact (S1)
Dec. Speed Contact (S3)
Gra
y
Bla
ck
Wire the drive up according to
the drawing.
Use the GREEN PB2 button to
Start the motor.
Use the RED PB1 button to
Stop the motor.
Use S1 to increase speed
Use S3 to decrease speed
Disconnect all
external wiring
Bla
ck
Reset P104 & 105 to 20

AC Variable Frequency Drives | Servo Drives & Motors | Electro-Mechanical Drives & Gearmotors | Clutches & Brakes | Machine Automation
SMVector
49
Model 940
Questions?
Thank You