smoke for mac os x installation and licensing guide
TRANSCRIPT

Autodesk® Smoke® 2011A Discreet® Systems product
For Mac OS® X
Installation and Licensing Guide

Autodesk® Visual Effects and Finishing 2011
© 2010 Autodesk, Inc. All rights reserved. Except as otherwise permitted by Autodesk, Inc., this publication, orparts thereof, may not be reproduced in any form, by any method, for any purpose.
Certain materials included in this publication are reprinted with the permission of the copyright holder.Portions relating to MD5 Copyright © 1991-2, RSA Data Security, Inc. Created 1991. All rights reserved. License to copy and use this softwareis granted provided that it is identified as the “RSA Data Security, Inc. MD5 Message-Digest Algorithm” in all material mentioning or referencingthis software or this function. License is also granted to make and use derivative works provided that such works are identified as “derived fromthe RSA Data Security, Inc. MD5 Message-Digest Algorithm” in all material mentioning or referencing the derived work. RSA Data Security, Inc.makes no representations concerning either the merchantability of this software or the suitability of this software for any particular purpose. Itis provided “as is” without express or implied warranty of any kind. These notices must be retained in any copies of any part of this documentationand/or software.
TrademarksThe following are registered trademarks or trademarks of Autodesk, Inc., and/or its subsidiaries and/or affiliates in the USA and other countries:3DEC (design/logo), 3December, 3December.com, 3ds Max, Algor, Alias, Alias (swirl design/logo), AliasStudio, Alias|Wavefront (design/logo),ATC, AUGI, AutoCAD, AutoCAD Learning Assistance, AutoCAD LT, AutoCAD Simulator, AutoCAD SQL Extension, AutoCAD SQL Interface,Autodesk, Autodesk Envision, Autodesk Intent, Autodesk Inventor, Autodesk Map, Autodesk MapGuide, Autodesk Streamline, AutoLISP, AutoSnap,AutoSketch, AutoTrack, Backburner, Backdraft, Built with ObjectARX (logo), Burn, Buzzsaw, CAiCE, Civil 3D, Cleaner, Cleaner Central, ClearScale,Colour Warper, Combustion, Communication Specification, Constructware, Content Explorer, Dancing Baby (image), DesignCenter, DesignDoctor, Designer's Toolkit, DesignKids, DesignProf, DesignServer, DesignStudio, Design Web Format, Discreet, DWF, DWG, DWG (logo), DWGExtreme, DWG TrueConvert, DWG TrueView, DXF, Ecotect, Exposure, Extending the Design Team, Face Robot, FBX, Fempro, Fire, Flame, Flare,Flint, FMDesktop, Freewheel, GDX Driver, Green Building Studio, Heads-up Design, Heidi, HumanIK, IDEA Server, i-drop, ImageModeler, iMOUT,Incinerator, Inferno, Inventor, Inventor LT, Kaydara, Kaydara (design/logo), Kynapse, Kynogon, LandXplorer, Lustre, MatchMover, Maya,Mechanical Desktop, Moldflow, Moonbox, MotionBuilder, Movimento, MPA, MPA (design/logo), Moldflow Plastics Advisers, MPI, MoldflowPlastics Insight, MPX, MPX (design/logo), Moldflow Plastics Xpert, Mudbox, Multi-Master Editing, Navisworks, ObjectARX, ObjectDBX, OpenReality, Opticore, Opticore Opus, Pipeplus, PolarSnap, PortfolioWall, Powered with Autodesk Technology, Productstream, ProjectPoint, ProMaterials,RasterDWG, RealDWG, Real-time Roto, Recognize, Render Queue, Retimer, Reveal, Revit, Showcase, ShowMotion, SketchBook, Smoke, Softimage,Softimage|XSI (design/logo), Sparks, SteeringWheels, Stitcher, Stone, StudioTools, ToolClip, Topobase, Toxik, TrustedDWG, ViewCube, Visual,Visual LISP, Volo, Vtour, Wire, Wiretap, WiretapCentral, XSI, and XSI (design/logo).Adobe, Flash and Reader are either trademarks or registered trademarks of Adobe Systems Incorporated in the United States and/or countries.Automatic Duck and the duck logo are trademarks of Automatic Duck, Inc.FFmpeg is a trademark of Fabrice Bellard, originator of the FFmpeg project.Python is a registered trademark of Python Software Foundation.All other brand names, product names or trademarks belong to their respective holders.
DisclaimerTHIS PUBLICATION AND THE INFORMATION CONTAINED HEREIN IS MADE AVAILABLE BY AUTODESK, INC. “AS IS.” AUTODESK, INC. DISCLAIMSALL WARRANTIES, EITHER EXPRESS OR IMPLIED, INCLUDING BUT NOT LIMITED TO ANY IMPLIED WARRANTIES OF MERCHANTABILITY ORFITNESS FOR A PARTICULAR PURPOSE REGARDING THESE MATERIALS. Published by: Autodesk, Inc.111 Mclnnis ParkwaySan Rafael, CA 94903, USA Title: Autodesk Smoke 2011 for Mac OS X Installation and Licensing GuideDocument Version: 1Date: August 17, 2010

Contents
Chapter 1 Introduction . . . . . . . . . . . . . . . . . . . . . . . . . . . . . . . . . . . . . . . . . . . 1About this Guide . . . . . . . . . . . . . . . . . . . . . . . . . . . . . . . . . . . . . . . . . . . . . . 1Notation Conventions . . . . . . . . . . . . . . . . . . . . . . . . . . . . . . . . . . . . . . . . . . . 1Related Documentation . . . . . . . . . . . . . . . . . . . . . . . . . . . . . . . . . . . . . . . . . . . 2Contacting Customer Support . . . . . . . . . . . . . . . . . . . . . . . . . . . . . . . . . . . . . . . 2
Chapter 2 Preparing Your Workstation . . . . . . . . . . . . . . . . . . . . . . . . . . . . . . . . . . . 3Preparing Your Hardware . . . . . . . . . . . . . . . . . . . . . . . . . . . . . . . . . . . . . . . . . . 3Preparing Your Media Storage . . . . . . . . . . . . . . . . . . . . . . . . . . . . . . . . . . . . . . . . 3
Recommended File System . . . . . . . . . . . . . . . . . . . . . . . . . . . . . . . . . . . . . . 4Updating Your Operating System . . . . . . . . . . . . . . . . . . . . . . . . . . . . . . . . . . . . . . 4Installing or Updating Hardware Drivers . . . . . . . . . . . . . . . . . . . . . . . . . . . . . . . . . . 4Setting System Preferences . . . . . . . . . . . . . . . . . . . . . . . . . . . . . . . . . . . . . . . . . 4Configuring Your Network . . . . . . . . . . . . . . . . . . . . . . . . . . . . . . . . . . . . . . . . . 5Configuring Mac OS X Keyboard Shortcuts . . . . . . . . . . . . . . . . . . . . . . . . . . . . . . . . 5Configuring Wacom Pen Buttons . . . . . . . . . . . . . . . . . . . . . . . . . . . . . . . . . . . . . . 6Configuring Display Arrangement in Dual Monitor Configurations . . . . . . . . . . . . . . . . . . . 7
Chapter 3 Installing and Licensing Smoke . . . . . . . . . . . . . . . . . . . . . . . . . . . . . . . . . 9About Licensing . . . . . . . . . . . . . . . . . . . . . . . . . . . . . . . . . . . . . . . . . . . . . . . 9About Trial License Installation . . . . . . . . . . . . . . . . . . . . . . . . . . . . . . . . . . . . . . 10
Installing the Trial Version Smoke . . . . . . . . . . . . . . . . . . . . . . . . . . . . . . . . . . 10Converting from Trial to a Network License . . . . . . . . . . . . . . . . . . . . . . . . . 12
About Installing Smoke with the Network License Server . . . . . . . . . . . . . . . . . . . . . . . . 12Do not use the Activate button, unless you have a Student edition . . . . . . . . . . . . . . . . 13Installing Smoke with a Local Network License Server . . . . . . . . . . . . . . . . . . . . . . . 13
Get Your License Server Hostname and Server ID Manually . . . . . . . . . . . . . . . . . 19About Standalone License Installation . . . . . . . . . . . . . . . . . . . . . . . . . . . . . . . . . . 19
Installing and Activating the Student Edition of Smoke . . . . . . . . . . . . . . . . . . . . . . 20Offline Registration and Activation . . . . . . . . . . . . . . . . . . . . . . . . . . . . . . . . . . . . 23Uninstalling Smoke . . . . . . . . . . . . . . . . . . . . . . . . . . . . . . . . . . . . . . . . . . . . 24Other Software . . . . . . . . . . . . . . . . . . . . . . . . . . . . . . . . . . . . . . . . . . . . . . . 24
Installing and Licensing Wiretap Gateway . . . . . . . . . . . . . . . . . . . . . . . . . . . . . 25Installing and Licensing Autodesk Burn . . . . . . . . . . . . . . . . . . . . . . . . . . . . . . . 25
Chapter 4 Configuring Smoke . . . . . . . . . . . . . . . . . . . . . . . . . . . . . . . . . . . . . . . 27About Configuring Smoke . . . . . . . . . . . . . . . . . . . . . . . . . . . . . . . . . . . . . . . . . 27Configuring General Settings . . . . . . . . . . . . . . . . . . . . . . . . . . . . . . . . . . . . . . . 27Defining the Video Preview Device . . . . . . . . . . . . . . . . . . . . . . . . . . . . . . . . . . . . 29Defining VTRs . . . . . . . . . . . . . . . . . . . . . . . . . . . . . . . . . . . . . . . . . . . . . . . 30Configuring VTR Emulation . . . . . . . . . . . . . . . . . . . . . . . . . . . . . . . . . . . . . . . . 30Adding or Editing Media Storage Volumes . . . . . . . . . . . . . . . . . . . . . . . . . . . . . . . . 31Configuring Backburner Settings . . . . . . . . . . . . . . . . . . . . . . . . . . . . . . . . . . . . . 32Configuring the License Server . . . . . . . . . . . . . . . . . . . . . . . . . . . . . . . . . . . . . . 34
Chapter 5 Troubleshooting Smoke Installation, Licensing and Configuration . . . . . . . . . . . . . . 35Invalid Serial Number Error . . . . . . . . . . . . . . . . . . . . . . . . . . . . . . . . . . . . . . . . 35
iii

Troubleshooting License Errors . . . . . . . . . . . . . . . . . . . . . . . . . . . . . . . . . . . . . . 36Verifying the License Server . . . . . . . . . . . . . . . . . . . . . . . . . . . . . . . . . . . . . 36Restarting the License Server . . . . . . . . . . . . . . . . . . . . . . . . . . . . . . . . . . . . 37Verifying the License File . . . . . . . . . . . . . . . . . . . . . . . . . . . . . . . . . . . . . . 37
Enabling Remote Login . . . . . . . . . . . . . . . . . . . . . . . . . . . . . . . . . . . . . . . . . . 38Viewing Application Error Messages . . . . . . . . . . . . . . . . . . . . . . . . . . . . . . . . . . . . 39Checking that Background Services are Running . . . . . . . . . . . . . . . . . . . . . . . . . . . . . 39Troubleshooting Hostname Changes . . . . . . . . . . . . . . . . . . . . . . . . . . . . . . . . . . . 40Forcing Smoke to Exit . . . . . . . . . . . . . . . . . . . . . . . . . . . . . . . . . . . . . . . . . . . 40Handling System Freezes . . . . . . . . . . . . . . . . . . . . . . . . . . . . . . . . . . . . . . . . . . 41Repairing Media Storage Mount Points . . . . . . . . . . . . . . . . . . . . . . . . . . . . . . . . . . 42Fixing VOLUMEMGT and No Volume Errors . . . . . . . . . . . . . . . . . . . . . . . . . . . . . . . 42Rebooting after an IP Address or Host Name Change . . . . . . . . . . . . . . . . . . . . . . . . . . . 42Sending Application Logs to Autodesk Customer Support . . . . . . . . . . . . . . . . . . . . . . . . 43Switching Your Mac OS X Kernel between 32-bit Mode and 64-bit Mode . . . . . . . . . . . . . . . . 43
Appendix: Autodesk Licensing . . . . . . . . . . . . . . . . . . . . . . . . . . . . 45
Appendix A Network Licensing . . . . . . . . . . . . . . . . . . . . . . . . . . . . . . . . . . . . . . . 47Introduction . . . . . . . . . . . . . . . . . . . . . . . . . . . . . . . . . . . . . . . . . . . . . . . . 47Plan Your Network Licensing . . . . . . . . . . . . . . . . . . . . . . . . . . . . . . . . . . . . . . . 47
System Requirements for the Network License Manager (Windows) . . . . . . . . . . . . . . . . 47System Requirements for the Network License Manager (Mac OS X) . . . . . . . . . . . . . . . 49System Requirements for the Network License Manager (Linux) . . . . . . . . . . . . . . . . . . 49Plan Your License Server Configuration . . . . . . . . . . . . . . . . . . . . . . . . . . . . . . . 50Learn About Your License . . . . . . . . . . . . . . . . . . . . . . . . . . . . . . . . . . . . . . 51
Network License Manager . . . . . . . . . . . . . . . . . . . . . . . . . . . . . . . . . . . . . . . . . 56Install the Network License Manager . . . . . . . . . . . . . . . . . . . . . . . . . . . . . . . . 56Install the Network License Manager (Mac OS X) . . . . . . . . . . . . . . . . . . . . . . . . . . 56Install the Network License Manager (Linux) . . . . . . . . . . . . . . . . . . . . . . . . . . . . 57Obtain a License Through autodesk.com . . . . . . . . . . . . . . . . . . . . . . . . . . . . . . 57Obtain the Server Host Name and Host ID Manually . . . . . . . . . . . . . . . . . . . . . . . . 57Uninstall the Network License Manager . . . . . . . . . . . . . . . . . . . . . . . . . . . . . . 58
Network Licensing Tools . . . . . . . . . . . . . . . . . . . . . . . . . . . . . . . . . . . . . . . . . . 59FLEXnet Configuration Tools . . . . . . . . . . . . . . . . . . . . . . . . . . . . . . . . . . . . 59
License Borrowing . . . . . . . . . . . . . . . . . . . . . . . . . . . . . . . . . . . . . . . . . . . . . 60Overview . . . . . . . . . . . . . . . . . . . . . . . . . . . . . . . . . . . . . . . . . . . . . . 60Borrow a License . . . . . . . . . . . . . . . . . . . . . . . . . . . . . . . . . . . . . . . . . . 61BORROWLICENSE Command . . . . . . . . . . . . . . . . . . . . . . . . . . . . . . . . . . . . 62Return a License . . . . . . . . . . . . . . . . . . . . . . . . . . . . . . . . . . . . . . . . . . . 62RETURNLICENSE Command . . . . . . . . . . . . . . . . . . . . . . . . . . . . . . . . . . . . 63
Appendix B Stand-Alone Licensing . . . . . . . . . . . . . . . . . . . . . . . . . . . . . . . . . . . . . 65Introduction . . . . . . . . . . . . . . . . . . . . . . . . . . . . . . . . . . . . . . . . . . . . . . . . 65
Multi-Seat Stand-Alone License . . . . . . . . . . . . . . . . . . . . . . . . . . . . . . . . . . . 66Activate Your Product . . . . . . . . . . . . . . . . . . . . . . . . . . . . . . . . . . . . . . . . . . . 66Register Your Product . . . . . . . . . . . . . . . . . . . . . . . . . . . . . . . . . . . . . . . . . . . 66Manage Your Stand-Alone License . . . . . . . . . . . . . . . . . . . . . . . . . . . . . . . . . . . . . 66
Check Product Information . . . . . . . . . . . . . . . . . . . . . . . . . . . . . . . . . . . . . 66View Product Information . . . . . . . . . . . . . . . . . . . . . . . . . . . . . . . . . . . . . . 67Save License Information as a Text File . . . . . . . . . . . . . . . . . . . . . . . . . . . . . . . 67Update Your Serial Number . . . . . . . . . . . . . . . . . . . . . . . . . . . . . . . . . . . . . 67
Transfer Your Stand-Alone License . . . . . . . . . . . . . . . . . . . . . . . . . . . . . . . . . . . . 68About the Licence Transfer Utility . . . . . . . . . . . . . . . . . . . . . . . . . . . . . . . . . . 68Install the Autodesk Product . . . . . . . . . . . . . . . . . . . . . . . . . . . . . . . . . . . . 68Export a License . . . . . . . . . . . . . . . . . . . . . . . . . . . . . . . . . . . . . . . . . . . 68Import a License . . . . . . . . . . . . . . . . . . . . . . . . . . . . . . . . . . . . . . . . . . . 68
Troubleshoot a Stand-Alone License Error . . . . . . . . . . . . . . . . . . . . . . . . . . . . . . . . . 68Hardware Changes . . . . . . . . . . . . . . . . . . . . . . . . . . . . . . . . . . . . . . . . . . 68
iv | Contents

Reinstalling an Operating System . . . . . . . . . . . . . . . . . . . . . . . . . . . . . . . . . . 69Changing the System Date and Time . . . . . . . . . . . . . . . . . . . . . . . . . . . . . . . . 69Distributing Software Image to Multiple Computers . . . . . . . . . . . . . . . . . . . . . . . . 69Preserving Licenses on Re-Imaged Computers . . . . . . . . . . . . . . . . . . . . . . . . . . . 69
Appendix C Licensing Glossary . . . . . . . . . . . . . . . . . . . . . . . . . . . . . . . . . . . . . . . 71Glossary . . . . . . . . . . . . . . . . . . . . . . . . . . . . . . . . . . . . . . . . . . . . . . . . . . 71
Index . . . . . . . . . . . . . . . . . . . . . . . . . . . . . . . . . . . . . . . . . . . . . . 73
Contents | v

vi

Introduction
Topics in this chapter:
■ About this Guide on page 1■ Notation Conventions on page 1■ Related Documentation on page 2■ Contacting Customer Support on page 2
About this GuideThis guide contains detailed information about installing and licensing Autodesk® Smoke® 2011 for MacOS® X. The document also contains general guidelines about preparing your workstation and operatingsystem before you install the Smoke software.
This document assumes that you have regular user knowledge of Apple® workstations and Mac OS X. Youdo not need prior knowledge of Autodesk Visual Effects and Finishing software.
Notation ConventionsA number of style conventions are used throughout your documentation. These conventions and examplesof their use are shown as follows.
ExampleConvention
install rpm -qaText that you enter in a command line or shell appearsin Courier bold. Press the Enter key after each com-mand.
<filename>Variable names appear in Courier, enclosed in anglebrackets.
1
1

ExampleConvention
limit coredumpsizeFeedback from the command line or shell appears inCourier.
/usr/discreetDirectory names, filenames, URLs, and command lineutilities appear in italics.
Related DocumentationDocumentation for this release is installed with the product as PDF files and as an HTML help system, andis also available on the Autodesk web site at http://www.autodesk.com/me-documentation. From this page youcan access the complete documentation library.
You should also refer to the product release notes for all late-breaking release information.
Contacting Customer SupportYou can obtain support for Smoke on the Mac by making a Service Request at the Autodesk SubscriptionCenter (registration required).
Go to http://www.autodesk.com/subscriptionlogin. Once logged into your account at the Subscription Center,select "Support Requests".
Customer support is also available through your Autodesk reseller. To find a reseller near you, consultthereseller look-up database at http://www.autodesk.com/resellers.
Before calling Autodesk Customer Support, run the platforminfo command-line utility to gather importantinformation on your system.
To obtain system information:
1 Open the Terminal from the Applications / Utilities folder.
2 Type the following command:
platforminfo
The output looks similar to the following:
Workstation: MacPro4,1
CPU: 2 Quad-Core Intel Xeon @ 2.93 GHz, 8 cores
RAM: 12 GB of RAM
Graphics: NVIDIA Quadro FX 4800 Driver: 19.5.2f10
OS: Mac OS X 10.6.3 (10D561)
Kernel: Darwin 10.3.0
3 Send this information to Autodesk Customer Support.
2 | Chapter 1 Introduction

Preparing YourWorkstation
Topics in this chapter:
■ Preparing Your Hardware on page 3■ Preparing Your Media Storage on page 3■ Updating Your Operating System on page 4■ Installing or Updating Hardware Drivers on page 4■ Setting System Preferences on page 4■ Configuring Your Network on page 5■ Configuring Mac OS X Keyboard Shortcuts on page 5■ Configuring Wacom Pen Buttons on page 6■ Configuring Display Arrangement in Dual Monitor Configurations on page 7
Preparing Your HardwareBefore you set up your workstation, consult the Autodesk Smoke for Mac OS X System Requirements Webpage at www.autodesk.com/smoke-systemrequirements, and make sure your hardware meets the minimumrequirements for your version of Smoke for Mac OS X.
Consult your hardware documentation for information on how to install the necessary add-on cards in yoursystem (such as the NVIDIA® graphics card, and the AJA Kona card), and how to connect your workstationto the peripherals you want to use it with (such as a pen tablet, graphics monitor, broadcast monitor, orVTR).
Preparing Your Media StorageBefore configuring storage to work with Autodesk Smoke, contact your storage vendor to make sure yourstorage fulfills the requirements for the frame format you will be working with.
2
3

Remember that, in order to ensure the best quality results, Autodesk Smoke does not apply compression torendered intermediates. This means that the storage bandwidth requirements are higher than those forapplications that use compressed media. Select the appropriate storage solution to achieve sustained real-timeplayback.
Consult the Autodesk Smoke for Mac OS X System Requirements Web page atwww.autodesk.com/smoke-systemrequirements for guidelines about the throughput your storage should supportfor various frame formats.
Consult your vendor documentation for information on connecting the media storage disks to your Mac,and on using the Mac OS X Disk Utility to perform the RAID striping of your media storage device.
Recommended File SystemFor optimal performance, Autodesk recommends using the default Mac OS Extended Journaled (HFS+) filesystem, for your system drive and your media storage volume.
Use the Mac OS X Disk Utility to format your media storage volume to the recommended file system. Consultyour Mac OS X documentation for information.
Updating Your Operating SystemConsult the Autodesk Smoke for Mac OS X System Requirements Web page atwww.autodesk.com/smoke-systemrequirements for information on the version of the Mac OS X operating systemrequired for Autodesk Smoke.
To find out which version of Mac OS X your workstation is currently running, select About this Mac fromthe Apple menu. The version number appears below the Mac OS X heading.
If your workstation is not running the required version of Mac OS X, click Software Update to upgrade youroperating system.
WARNING Do not update your operating system or hardware drivers to versions other than the ones recommendedby Autodesk. Ignore any updates offered by the Apple Software Update utility, unless instructed otherwise byAutodesk.
Installing or Updating Hardware DriversBefore installing Smoke, install or upgrade the drivers for your hardware devices.
Consult the Autodesk Smoke for Mac OS X System Requirements Web page atwww.autodesk.com/smoke-systemrequirements for information on the supported driver versions.
You can update some of the drivers, such as the NVIDIA graphics card driver, through the Apple SoftwareUpdate utility. To get drivers that are not installed by the Software Update utility (such as the AJA Konavideo card driver, or the Wacom® pen tablet driver), refer to the Web site of your hardware device vendor.
WARNING Do not install any driver versions other than the ones recommended by Autodesk. Ignore any driverupdates offered by the Apple Software Update utility, unless instructed otherwise by Autodesk.
Setting System PreferencesOpen the System Preferences application, and set the following options as indicated in the table below.
4 | Chapter 2 Preparing Your Workstation

WARNING These settings are mandatory and will prevent Smoke from working correctly if they are not set asdocumented.
NOTE These system preferences are set per Mac OS X user account. Make sure you apply them to all the MacOS X user accounts you plan to use with Smoke.
Option to ModifySystem Preference
In the Screen Saver tab, set Start screen saver to Never.Desktop & Screen Saver
Energy Saver ■ Set Computer sleep to never.
■ Disable Put the hard disk(s) to sleep when possible.
In the Privacy tab, add the Smoke media storage volume to the list of locationsSpotlight does not search.
Spotlight
In the Scheduled Check tab, disable Check for updates.Software Update
NOTE Before installing Mac OS X or QuickTime® updates, consult the AutodeskSmoke for Mac OS X System Requirements Web page at www.autodesk.com/smoke-systemrequirements, to see if these updates are compatible with the installed versionof Smoke.
In the Output tab, make sure the device selected for sound output is not the AJAcard.
Sound
Select, for example, Internal Speakers, or Line Out.
Configuring Your NetworkSmoke for Mac OS X supports both static IP and DHCP network configurations.
If your Mac uses DHCP to obtain its hostname or IP address, make sure the hostname and IP address assignedto your computer do not change when the DHCP lease is renewed.
WARNING If the hostname or IP address of your Mac change while Smoke is running (for example, if your Macswitches from a wired network to a wireless connection), close Smoke and restart your computer, to avoid anyissues with the application.
Configuring Mac OS X Keyboard ShortcutsThe Smoke application uses many keyboard shortcuts that are also used by Mac OS X.
As a general guideline, make sure your operating system does not use any single-key shortcuts (such as F1,F2, etc.) or shortcuts that include the CTRL and OPTION key modifiers, as these could overlap with Smokehotkey combinations.
It is recommended to include the COMMAND key when defining OS-level shortcuts, as Smoke does not usethis key.
Update your keyboard preferences as suggested below. These changes are optional but will minimize keyboardshortcut conflicts.
NOTE The keyboard preferences are set per Mac OS X user account. Make sure you apply them to all the MacOS X user accounts you plan to use with Smoke.
Configuring Your Network | 5

To edit OS keyboard shortcuts:
1 Open the System Preferences application.
2 Click Keyboard.
3 In the Keyboard tab, enable Use all F1, F2, etc. keys as standard function keys.
NOTE This option is available only if you are using an Apple keyboard.
4 Click the Keyboard Shortcuts tab.
5 Select each section in the left panel, and then disable all its keyboard shortcuts, or change the shortcutsto include the COMMAND key.
Configuring Wacom Pen ButtonsTo make sure the Wacom pen buttons work properly in Smoke, configure them as follows.
1 Open the System Preferences > Wacom Tablet panel.
6 | Chapter 2 Preparing Your Workstation

2 If Grip Pen does not appear in the Tool section, touch the pen on the tablet.
3 Select the Pen tab.
4 Make sure the top pen button is assigned to the double-click function, and that the bottom pen buttonis assigned to the right-click function.
Configuring Display Arrangement in Dual MonitorConfigurationsIf your Mac uses two monitors, set the display arrangement to “Mirror Displays” in the Display Preferencespanel for best Wacom pen tablet usability in Smoke.
Using any other dual display mode will result in the pen tablet mapping to the incorrect screen or lackingprecision in Smoke.
Configuring Display Arrangement in Dual Monitor Configurations | 7

8

Installing and LicensingSmoke
Topics in this chapter:
■ About Licensing on page 9■ About Trial License Installation on page 10■ About Installing Smoke with the Network License Server on page 12■ About Standalone License Installation on page 19■ Offline Registration and Activation on page 23■ Uninstalling Smoke on page 24■ Other Software on page 24
About LicensingYour license determines how you install, register and activate your Smoke software.
■ Trial license: gives you 30 days to evaluate the software. See About Trial License Installation on page 10.
■ Network license: provided when you purchase commercial or educational editions of Smoke. See AboutInstalling Smoke with the Network License Server on page 12.If you have the trial installed, you must re-install Smoke to install and configure the network licenseserver.
■ Standalone license: provided for the student edition of Smoke. See About Standalone License Installationon page 19.
With the network license, you get:
■ Two seats of Autodesk Wiretap Gateway, which can be installed remotely
■ One remote seat of Autodesk Burn
3
9

With the standalone license, you get:
■ One seat of Wiretap Gateway that can only be installed locally
About Trial License InstallationA trial license of Smoke lasts for 30-days. The “Days Remaining” in your trial appears in the Product LicenseActivation window each time you start Smoke.
NOTE Do not use the Activate button from the Product License Activation window to activate a network license,which you receive for commercial and educational editions of Smoke. You must re-install Smoke to activate yournetwork license. See About Installing Smoke with the Network License Server on page 12.
Installing the Trial Version Smoke
To install the trial version Smoke:
1 Locate the Smoke installer. Do one of the following:
■ If you are installing Smoke from a DVD, insert the DVD, and then double-click the DVD icon thatappears on your desktop.
■ If you are installing Smoke from a downloaded .dmg disk image file, double-click the file.The contents of the DVD or .dmg disk image are displayed.
2 Double-click Install Smoke 2011.
The installer starts.
3 Click Continue.
The Important Licensing Information window appears.
4 Click Continue.
The Product Information window appears.
10 | Chapter 3 Installing and Licensing Smoke

5 Select “I want to try this product for 30 days”.
6 Depending on your OS configuration, the Select a Destination window may appear.
Click “Install for all users of this computer”, and then click Continue.
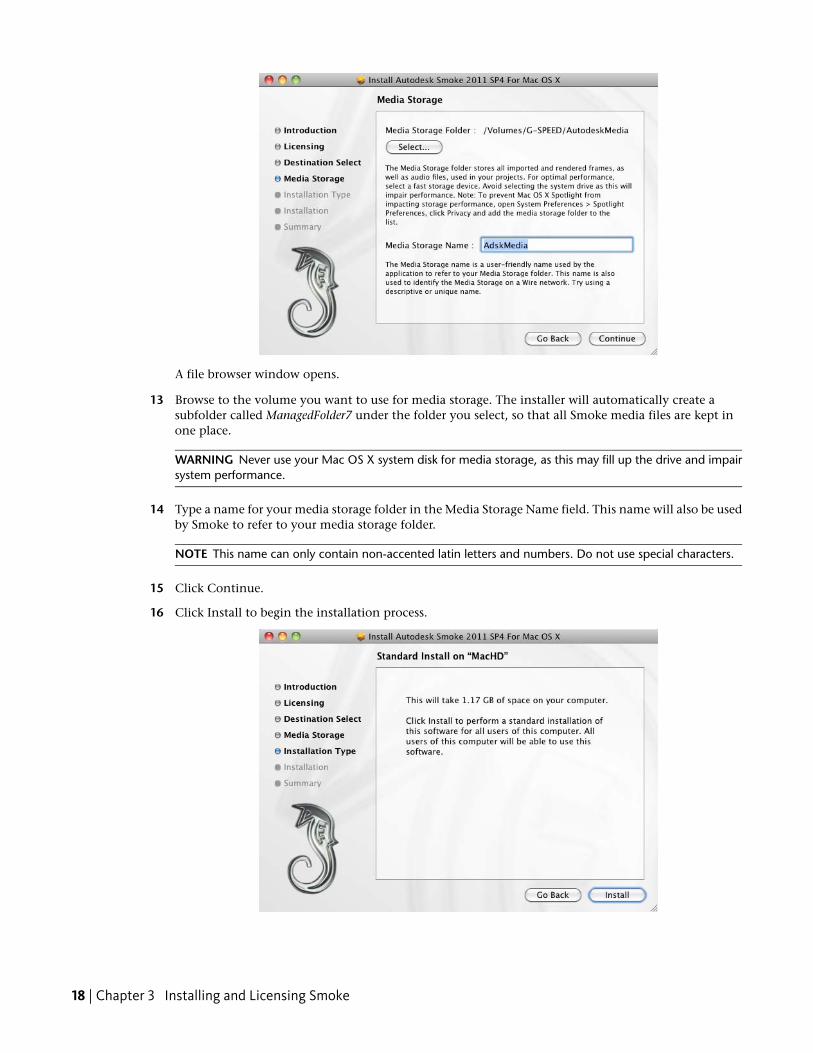
7 The Media Storage window appears. This windows enables you to define an internal or external storagevolume for your media. Click Select.
Installing the Trial Version Smoke | 11

A file browser window opens.
8 Browse to the volume you want to use for media storage. The installer will automatically create asubfolder called ManagedFolder7 under the folder you select, so that all Smoke media files are kept inone place.
WARNING Never use your Mac OS X system disk for media storage, as this may fill up the drive and impairsystem performance.
9 Type a name for your media storage folder in the Media Storage Name field. This name will also be usedby Smoke to refer to your media storage folder.
NOTE This name can only contain non-accented latin letters and numbers. Do not use special characters.
10 Click Continue.
11 Click Install to begin the installation process.
Smoke is installed.
12 Start Smoke. In the Product License Activation window, click Try.
Converting from Trial to a Network LicenseWhen you purchase the commercial or educational edition of Smoke, you receive a network serial numberand license.
You must re-install Smoke to install and configure the network license server. Do not click the Activatebutton to activate a commercial or educational edition of Smoke.
See About Installing Smoke with the Network License Server on page 12.
About Installing Smoke with the Network License ServerA network license is required for commercial and educational editions of Smoke.
12 | Chapter 3 Installing and Licensing Smoke

NOTE If you have a trial version of Smoke installed, you must re-install Smoke to install and configure the licenseserver. Do not use the Activate button from the Product License Activation window to activate a network licenseof Smoke.
With a network license, you must install a license server to manage the license.
■ If you have only one Autodesk product running on a single workstation, the license server can be installedand set up for you automatically on the same workstation as Smoke. See Installing Smoke with a LocalNetwork License Server on page 13.
■ If you must manage multiple Autodesk licenses across your network, you must install and configure thelicense server on a dedicated workstation before you install Smoke. See Network Licensing on page 47.
Do not use the Activate button, unless you have a Student editionIf you have a Trial version of Smoke installed and you want to license it, do not use the Activate button inthe Product License Activation window to activate your license. You must re-install Smoke. See InstallingSmoke with a Local Network License Server on page 13.
Installing Smoke with a Local Network License ServerIf you have a trial installed, you must reinstall Smoke to install and configure the license server.
Follow this procedure to install the license server on the same machine as Smoke.
NOTE If you have a version of Smoke older than Service Pack 4 installed on your workstation, you must uninstallit before you install, register, and activate Service Pack 4.
To install Smoke with a local network license server:
1 Locate your serial number. The serial number is located on the outside of the product packaging, or inthe Autodesk® Upgrade and Licensing Information email.
NOTE If you have lost your serial number, contact the Autodesk Business Center (ABC) at 800-538-6401 forassistance.
2 Locate the Smoke installer. Do one of the following:
■ If you are installing Smoke from a DVD, insert the DVD, and then double-click the DVD icon thatappears on your desktop.
■ If you are installing Smoke from a downloaded .dmg disk image file, double-click the file.The contents of the DVD or .dmg disk image are displayed.
3 Double-click Install Smoke 2011.
The installer starts.
4 Click Continue.
The Important Licensing Information window appears.
5 Click Continue.
Do not use the Activate button, unless you have a Student edition | 13

The Product Information window appears.
6 Select “I have my product information” and enter your serial number.
The License Type window appears.
7 Select Network License.
14 | Chapter 3 Installing and Licensing Smoke

Network License Configuration window opens.
8 If you do not have your license file, you must register your product to receive your license file andcontinue the installation process.
Click the “Click here” link.
A browser window opens. You must create an Autodesk User ID, if you do not have one, and fill in allof the required information, including your serial number, Server host name and Server ID.
If you do not know the Server host name or Server ID of your machine:
■ Look in the installer. This information appears in the Network License Configuration window ifyou have Use Local Machine selected.
■ If you have advanced to another screen, you can get this information in the About This Mac window.See Get Your License Server Hostname and Server ID Manually on page 19.
NOTE Remove the colons “:” from the Mac address when you register your product on the Autodesk website.
Installing Smoke with a Local Network License Server | 15

You license appears in your browser window. Keep the window open while you continue the installationprocess. You can save this file anywhere on your machine with any name.
Continue with the installation.
9 In the Network License Configuration window, select the following:
■ Single license server
■ Use local machine
NOTE Make sure Use local machine is selected.
16 | Chapter 3 Installing and Licensing Smoke

10 Copy and paste your license information into the window. Be sure not to overwrite any previous licenseentries.
11 Depending on your OS configuration, the Select a Destination window may appear.
Click “Install for all users of this computer”, and then click Continue.
12 The Media Storage window appears. This windows enables you to define an internal or external storagevolume for your media. Click Select.
Installing Smoke with a Local Network License Server | 17
A file browser window opens.
13 Browse to the volume you want to use for media storage. The installer will automatically create asubfolder called ManagedFolder7 under the folder you select, so that all Smoke media files are kept inone place.
WARNING Never use your Mac OS X system disk for media storage, as this may fill up the drive and impairsystem performance.
14 Type a name for your media storage folder in the Media Storage Name field. This name will also be usedby Smoke to refer to your media storage folder.
NOTE This name can only contain non-accented latin letters and numbers. Do not use special characters.
15 Click Continue.
16 Click Install to begin the installation process.
18 | Chapter 3 Installing and Licensing Smoke
Smoke is installed and ready to run.
If Smoke does not start, see Troubleshooting License Errors on page 36.
Get Your License Server Hostname and Server ID ManuallyYou must provide your license server hostname and server ID during the installation process.
In most cases, you will install the license server on the same machine as Smoke. You may consider installingthe license server on another machine if you have multiple Autodesk products to manage.
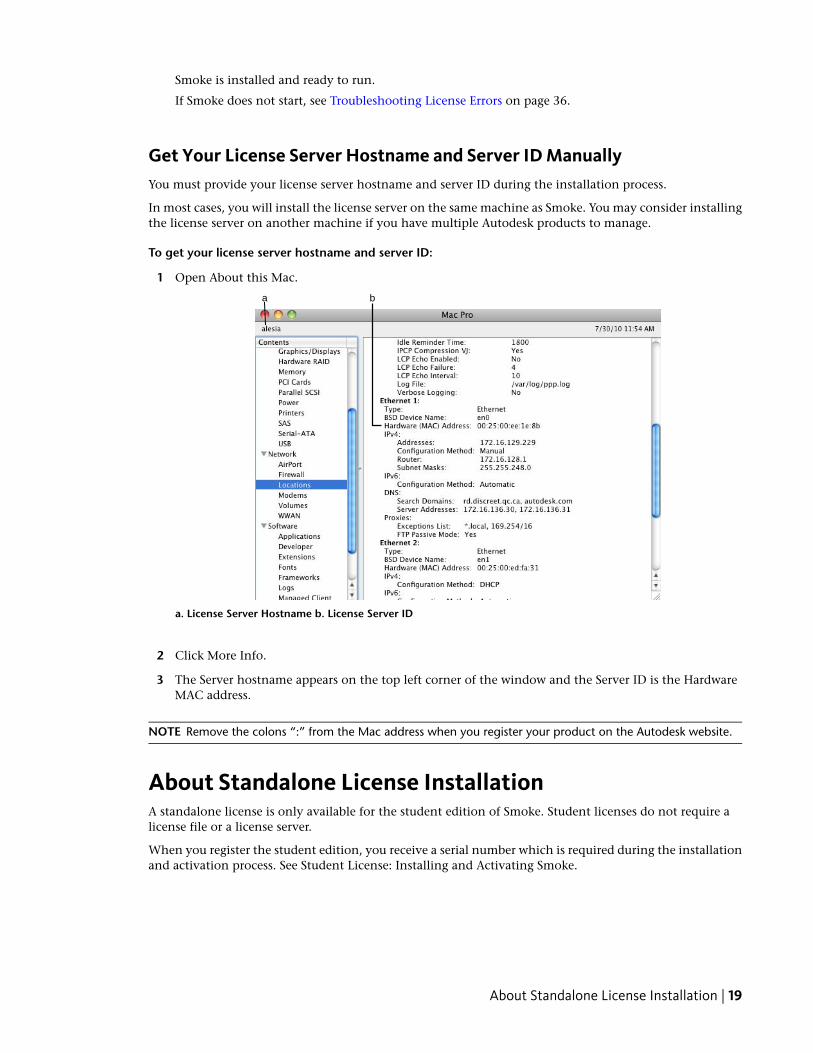
To get your license server hostname and server ID:
1 Open About this Mac.
a b
a. License Server Hostname b. License Server ID
2 Click More Info.
3 The Server hostname appears on the top left corner of the window and the Server ID is the HardwareMAC address.
NOTE Remove the colons “:” from the Mac address when you register your product on the Autodesk website.
About Standalone License InstallationA standalone license is only available for the student edition of Smoke. Student licenses do not require alicense file or a license server.
When you register the student edition, you receive a serial number which is required during the installationand activation process. See Student License: Installing and Activating Smoke.
About Standalone License Installation | 19

Installing and Activating the Student Edition of Smoke■ If you have a Trial installed, start Smoke, click Activate and follow the instructions on the website. You
must have your serial number.
■ If Smoke is not installed, use the following instructions.
NOTE If you have a version of Smoke older than Service Pack 4 installed on your workstation, you must uninstallit before you install, register, and activate Service Pack 4.
To install Smoke (student edition):
1 Locate your serial number. The serial number is located on the outside of the product packaging, or inthe Autodesk® Upgrade and Licensing Information email.
NOTE If you have lost your serial number, contact the Autodesk Business Center (ABC) at 800-538-6401 forassistance.
2 Locate the Smoke installer. Do one of the following:
■ If you are installing Smoke from a DVD, insert the DVD, and then double-click the DVD icon thatappears on your desktop.
■ If you are installing Smoke from a downloaded .dmg disk image file, double-click the file.The contents of the DVD or .dmg disk image are displayed.
3 Double-click Install Smoke 2011.
The installer starts.
4 Click Continue.
The Important Licensing Information window appears.
5 Click Continue.
The Product Information window appears.
6 Select “I have my product information” and enter your serial number.
20 | Chapter 3 Installing and Licensing Smoke
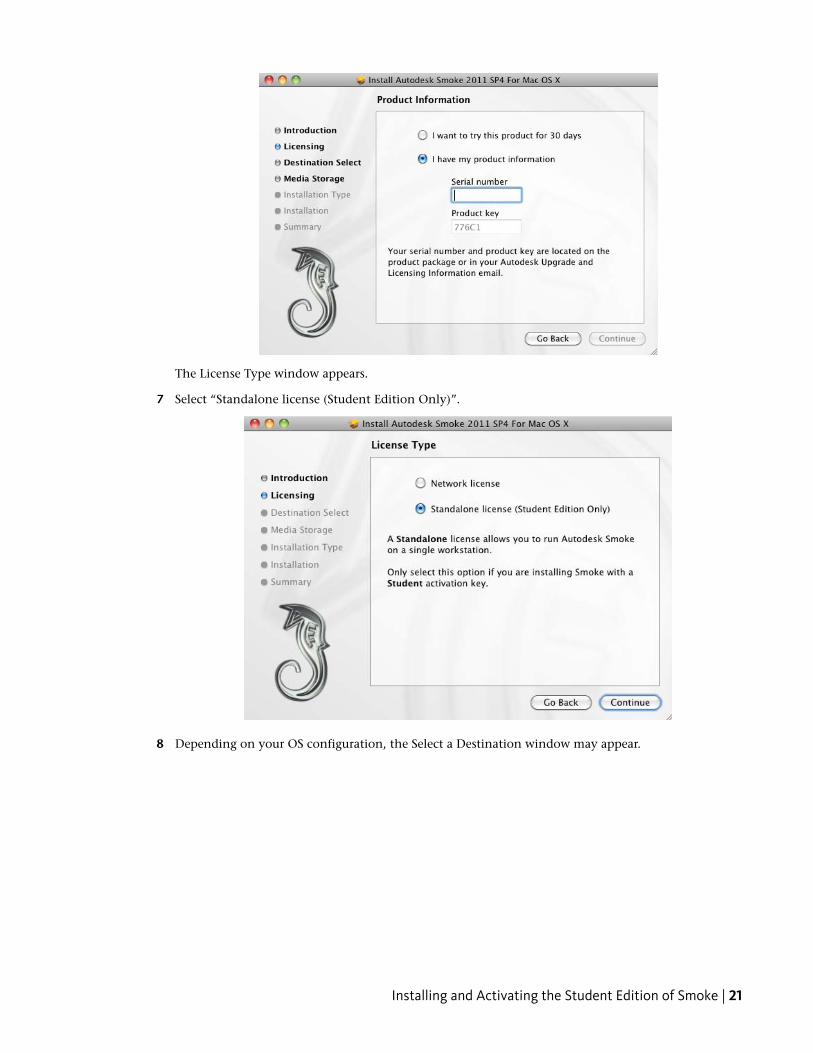
The License Type window appears.
7 Select “Standalone license (Student Edition Only)”.
8 Depending on your OS configuration, the Select a Destination window may appear.
Installing and Activating the Student Edition of Smoke | 21

Click “Install for all users of this computer”, and then click Continue.
The Media Storage window appears. This windows enables you to define an internal or external storagevolume for your media.
9 Click Select.
A file browser window opens.
22 | Chapter 3 Installing and Licensing Smoke

10 Browse to the volume you want to use for media storage. The installer will automatically create asubfolder called ManagedFolder7 under the folder you select, so that all Smoke media files are kept inone place.
WARNING Never use your Mac OS X system disk for media storage, as this may fill up the drive and impairsystem performance.
11 Type a name for your media storage folder in the Media Storage Name field. This name will also be usedby Smoke to refer to your media storage folder.
NOTE This name can only contain non-accented latin letters and numbers. Do not use special characters.
12 Click Continue.
13 Click Install to begin the installation process.
Smoke is installed.
14 Start Smoke.
15 In the Product License Activation window, click Activate.
16 Enter your serial number and follow the steps to register and activate your product online. If you donot have an internet connection, see Offline Registration and Activation on page 23.
Offline Registration and ActivationIf for some reason online registration and activation is not possible, you can still register and activate yourproduct offline. Contact Autodesk by mail, fax, or phone. Your activation code is sent back to you by mailor fax.
E-mail Create an e-mail message with your registration information and send it to Autodesk.
Fax Enter your registration information, and fax the information to Autodesk.
Phone Provide your registration information to one of our representatives over the phone.
Use the numbers or e-mail address that correspond to your area:
Fax and Phone Numberse-mailArea
FAX:[email protected] States,800.225.6490 orCanada415.507.4937Latin AmericaPhone:800.551.1490
Fax:[email protected]+41 (32) 7239169Middle East
Africa
Fax: [email protected] Pacific
Offline registration and activation is necessary under the following conditions:
■ An online request has timed out
■ A processing error occurred such as an invalid serial number
Offline Registration and Activation | 23

Uninstalling SmokePerform the following procedure to uninstall Autodesk Smoke from your Mac.
NOTE The License Server is not uninstalled when you uninstall Smoke. See Content reference to: Uninstall theNetwork License Manager.
To uninstall Smoke from your Mac:
1 If Smoke is running, exit it.
2 In Finder, go to the Applications / Autodesk / Smoke 2011 folder.
3 Run the Smoke 2011 Uninstaller application, and follow the on-screen instructions to uninstall Smoke.
4 (Optional, for advanced users) Perform the following steps to completely remove all the files installedby Smoke on your system drive:
■ Open Finder, and click COMMAND+SHIFT+G.
■ In the dialog box that opens, enter /usr/discreet.The contents of the /usr/discreet folder are displayed.
■ Delete all the subfolders under the discreet folder, with the exception of the clip, project and userfolders. These folders contain the data files of the projects and clips you created in Smoke, and mightbe useful next time you install Smoke.
Other SoftwareThe following components are installed by default with Smoke:
■ Autodesk Backburner Manager
■ Autodesk Backburner Server
■ Autodesk WiretapCentral
■ Autodesk Wiretap Gateway
24 | Chapter 3 Installing and Licensing Smoke

■ Autodesk Backburner Media I / O Adapter
■ License Server
Installing and Licensing Wiretap GatewayWiretap Gateway reads image media in any format from any storage device, and streams it live as raw RGBto local or remote clients. When you import files using a Gateway Library from the Clip Library in Smoke,it is Wiretap Gateway that gives you access to those files.
By default, Wiretap Gateway is installed with Smoke and there is nothing more you have to do to make itwork for your local installation of Smoke.
If you have a network license of Smoke, you can install up to two remote Wiretap Gateway servers to providetranscoding services to a number of other workstations throughout your network.
You must license remote Wiretap Gateway servers.
For instructions on installing and licensing Wiretap Gateway on remote workstations, see the Autodesk WiretapCentral and Autodesk Wiretap Gateway Installation Guide.
Installing and Licensing Autodesk BurnAutodesk Burn is a Linux-based network processing solution. Burn allows you to render images in thebackground using low-cost systems and frees your workstation for more creative tasks.
Your distribution of Smoke comes with a distribution of Burn, which you can deploy on a Linux workstationon your network.
For information on installing and licensing Burn, see the Autodesk Burn Installation and User Guide.
Installing and Licensing Wiretap Gateway | 25

26

Configuring Smoke
Topics in this chapter:
■ About Configuring Smoke on page 27■ Configuring General Settings on page 27■ Defining the Video Preview Device on page 29■ Defining VTRs on page 30■ Configuring VTR Emulation on page 30■ Adding or Editing Media Storage Volumes on page 31■ Configuring Backburner Settings on page 32■ Configuring the License Server on page 34
About Configuring SmokeThe Smoke Setup utility allows you to easily configure general Smoke settings, add or edit the media storage,configure background rendering, and configure licensing.
Run the Smoke Setup utility from the Applications / Autodesk / Smoke 2011 / Utilities folder.
Configuring General SettingsThe General tab of the Smoke Setup utility enables you to configure the following application settings.
4
27

■ Video Device Use this setting to specify the video output device to be used with Smoke. If your Macis equipped with an AJA Kona 3 card, select KONA 3.
■ Audio Device Use this setting to specify the audio output device to be used with Smoke. If your Macis equipped with an AJA Kona 3 card, select AJA. Otherwise, select CoreAudio to use the default soundcard of your workstation.
NOTE You can only use the AJA card as an audio device if you also set the AJA card as the video device. Similarly,you can only use CoreAudio if the AJA card is not set as the video device.
■ Reserved Application Memory Use this field to specify the amount of memory allocated for Smokeframe buffers. In most cases, you should leave this setting to Automatic. The default configuration issufficient for most projects, regardless of the different resolutions you may be working with.
■ Max Library Size Use this setting to define the maximum size of any single clip library, in megabytes.The higher the value, the more memory the application uses. Using a larger value reduces memoryfragmentation, which optimizes memory use.
NOTE To run Smoke, you must have at least 10 megabytes of free hard drive space in addition to the valueset by this field.
■ Network Panel Display Use this setting to filter the list of remote media storage volumes that aredisplayed in the Network panel. Select ShowMounted to see only media storage volumes that are mountedand available on the Wire network, or ShowAll to show all media storage volumes available on the networkwithout checking whether they are mounted.
NOTE Using ShowAll slightly reduces the time needed for your application to start, as no checks are performedon remote media storage volumes.
■ Default Web Browser Use this setting to specify the Web browser used by Smoke to browse the Helpand view HTML tables of contents for archives. Set this option to open to use the default Web browser.
28 | Chapter 4 Configuring Smoke

■ Cleaner Export Destination Path If you are using Autodesk® Cleaner® XL digital video mastering andencoding software, use this field to define the default path on a Microsoft® Windows® workstation whereclips are saved after encoding by Cleaner XL. The default path you enter appears in the Cleaner DestinationPath field when you select Cleaner in the Format Box of the Image Export menu. You can edit the paththere. If there is an ftp path in the output profile, the ftp path is used as an additional destination forencoded jobs. See your application help.
■ Archive Size Use this field to define the maximum size for a file archive in MB. The default value is1024MB.
■ Default Location Use this field to define the default location for archives created in Smoke. The defaultlocation is /var/tmp/archive.
■ Table of Contents Location Use this field to define the location where online HTML and ASCII tablesof contents are saved when archiving. The default location is /usr/discreet/archive.
NOTE If you prefer to edit these parameters directly in the application configuration file, click Manual Edit. Bevery careful when working with the configuration file. Incorrect settings may make your application unusable.
When you have finished configuring these settings, click Apply to save them. If you want to revert to thelast saved configuration, click Reload. Note that this will undo unsaved changes in all the tabs of the SmokeSetup utility.
Defining the Video Preview DeviceUse the Preview tab of the Smoke Setup utility to specify the device used for the graphics-to-video display.
Enable entries for the resolutions of the projects on which you will be working, as well as the resolutionssupported by your hardware configuration.
If necessary, you can also add new entries, and duplicate or delete existing entries.
Defining the Video Preview Device | 29
When you have finished configuring these settings, click Apply to save them. If you want to revert to thelast saved configuration, click Reload. Note that this will undo unsaved changes in all the tabs of the SmokeSetup utility.
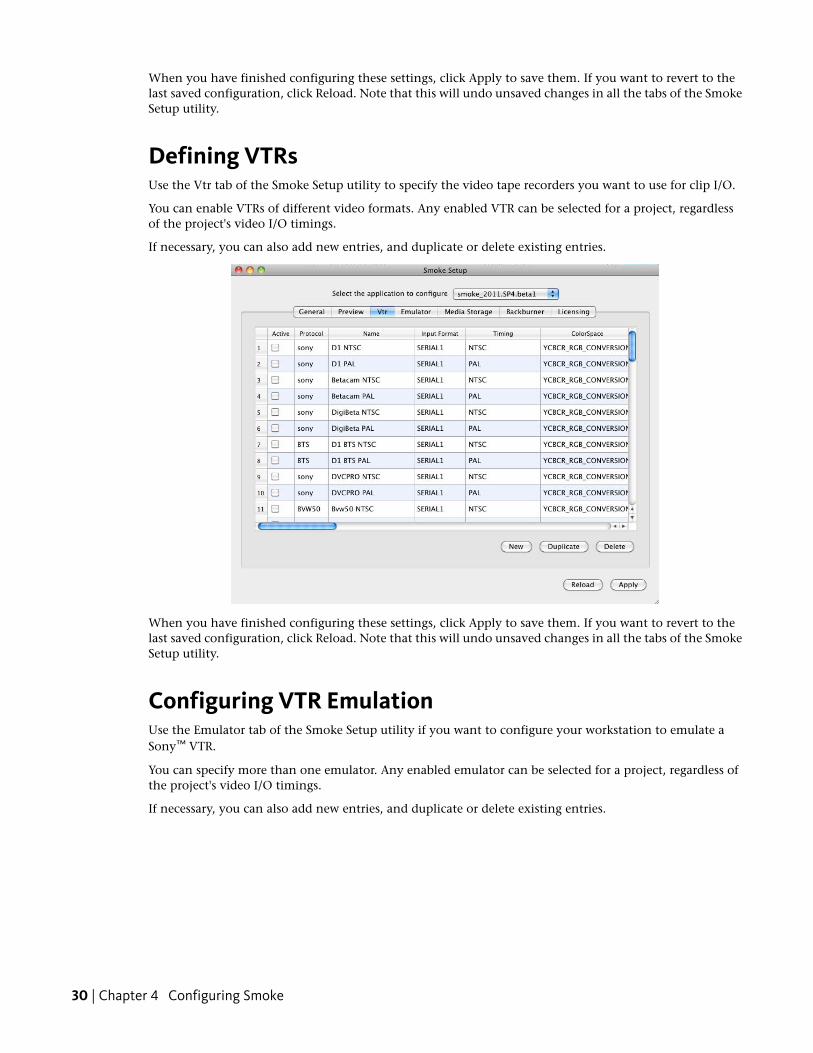
Defining VTRsUse the Vtr tab of the Smoke Setup utility to specify the video tape recorders you want to use for clip I/O.
You can enable VTRs of different video formats. Any enabled VTR can be selected for a project, regardlessof the project's video I/O timings.
If necessary, you can also add new entries, and duplicate or delete existing entries.
When you have finished configuring these settings, click Apply to save them. If you want to revert to thelast saved configuration, click Reload. Note that this will undo unsaved changes in all the tabs of the SmokeSetup utility.
Configuring VTR EmulationUse the Emulator tab of the Smoke Setup utility if you want to configure your workstation to emulate aSony™ VTR.
You can specify more than one emulator. Any enabled emulator can be selected for a project, regardless ofthe project's video I/O timings.
If necessary, you can also add new entries, and duplicate or delete existing entries.
30 | Chapter 4 Configuring Smoke

When you have finished configuring these settings, click Apply to save them. If you want to revert to thelast saved configuration, click Reload. Note that this will undo unsaved changes in all the tabs of the SmokeSetup utility.
Adding or Editing Media Storage VolumesUse the Media Storage tab of the Smoke Setup utility to define new media storage volumes for use withSmoke, or to edit the settings of existing media storage volumes.
Adding or Editing Media Storage Volumes | 31
To define a new media storage volume, click Add.
A new entry is created in the media storage list, and is populated with default values.
NOTE For safety reasons, the Name and Location fields are blank by default. You are required to fill in these fieldsbefore you can click Apply.
To edit the settings of a media storage folder:
1 Double-click the Name field and enter a meaningful label for the media storage. For example, MyMedia.
This label identifies the media storage in Smoke.
2 Double-click the Location field, and browse to the directory that will contain the Smoke media files onyour storage device. For example, / Volumes/G-SPEED/ManagedFolder7.
WARNING Do not select the root of a drive as your media storage folder. Create a subfolder to hold all yourmedia files in one place. We recommend that you name the subfolder ManagedFolder<x>, where <x> is thenumber that appears in the Id column in the Smoke Setup utility.
3 (Optional) Double-click the 8-bit Integer, 10-bit Integer, 12-bit Integer and 12-bit Packed Integer fields,and choose the file formats that Smoke will use when writing frames of those bit depths to the storage.
4 (Optional) If you plan to use the JPG file format, double-click the Jpeg Compression field, and set JPEGcompression to a value between 0 (lowest compression, highest quality) and 100 (highest compression,lowest quality).
5 Click Apply to save your configuration.
If you want to revert to the last saved configuration, click Reload. Note that this will also undo anyunsaved changes in the other tabs of the Smoke Setup application.
NOTE If you prefer to edit these parameters directly in the storage configuration file, click Manual Edit. Be verycareful when working with the configuration file. Incorrect settings may make your application unusable.
Configuring Backburner SettingsIf you want to use an Autodesk® Burn® background processing network, or to use your Mac as a backgroundprocessing node, define Backburner settings in the Backburner tab of the Smoke Setup utility.
To configure background processing for Smoke, use the four fields in the Application Settings Section.
To use your Mac as a background processing node, define the hostname of the Backburner Manager thatwill distribute processing jobs to your Mac, in the Local Server Settings section.
32 | Chapter 4 Configuring Smoke
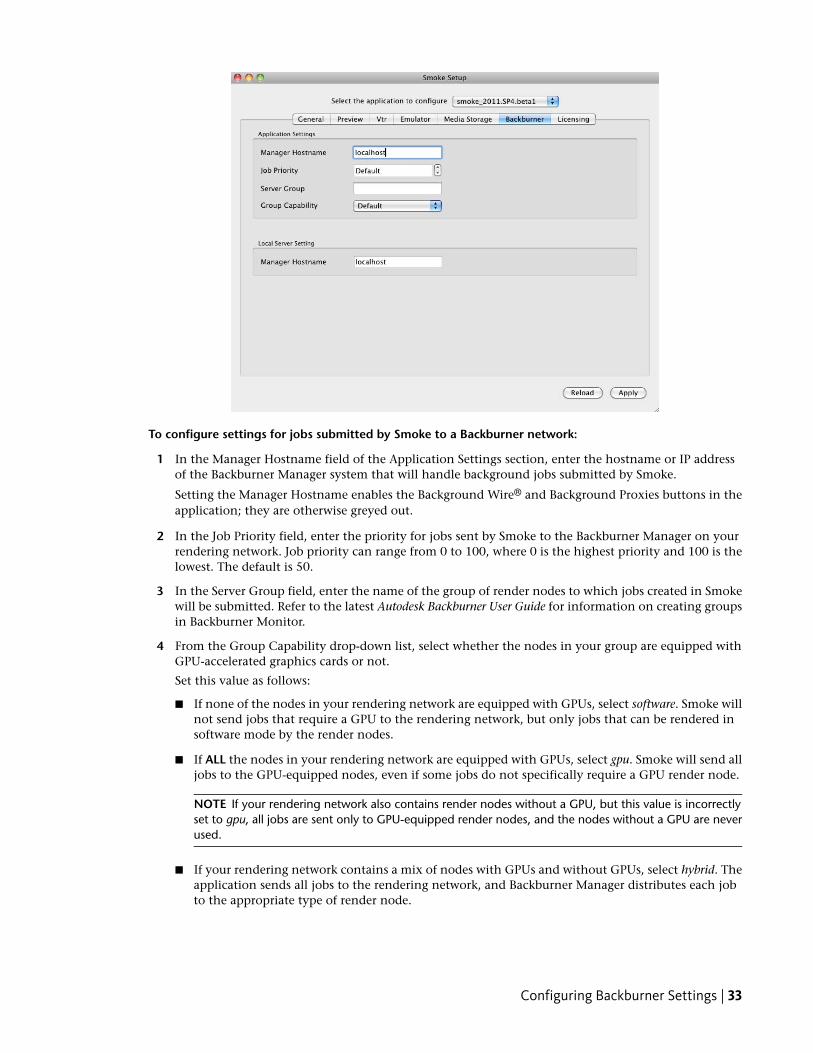
To configure settings for jobs submitted by Smoke to a Backburner network:
1 In the Manager Hostname field of the Application Settings section, enter the hostname or IP addressof the Backburner Manager system that will handle background jobs submitted by Smoke.
Setting the Manager Hostname enables the Background Wire® and Background Proxies buttons in theapplication; they are otherwise greyed out.
2 In the Job Priority field, enter the priority for jobs sent by Smoke to the Backburner Manager on yourrendering network. Job priority can range from 0 to 100, where 0 is the highest priority and 100 is thelowest. The default is 50.
3 In the Server Group field, enter the name of the group of render nodes to which jobs created in Smokewill be submitted. Refer to the latest Autodesk Backburner User Guide for information on creating groupsin Backburner Monitor.
4 From the Group Capability drop-down list, select whether the nodes in your group are equipped withGPU-accelerated graphics cards or not.
Set this value as follows:
■ If none of the nodes in your rendering network are equipped with GPUs, select software. Smoke willnot send jobs that require a GPU to the rendering network, but only jobs that can be rendered insoftware mode by the render nodes.
■ If ALL the nodes in your rendering network are equipped with GPUs, select gpu. Smoke will send alljobs to the GPU-equipped nodes, even if some jobs do not specifically require a GPU render node.
NOTE If your rendering network also contains render nodes without a GPU, but this value is incorrectlyset to gpu, all jobs are sent only to GPU-equipped render nodes, and the nodes without a GPU are neverused.
■ If your rendering network contains a mix of nodes with GPUs and without GPUs, select hybrid. Theapplication sends all jobs to the rendering network, and Backburner Manager distributes each jobto the appropriate type of render node.
Configuring Backburner Settings | 33

NOTE Select gpu or hybrid only if you are sure that at least one node in your rendering network isequipped with a GPU. Attempting to submit a job that requires a GPU to a rendering network with noGPU-equipped render node results in the job being stuck in the rendering queue indefinitely.
Configuring the License ServerYou can use the Licensing tab to configure the location of your license server.
■ To set the current workstation as your license server, click Add Localhost and click Apply.The license server must be installed on the local workstation. See Installing Smoke with a Local NetworkLicense Server on page 13.
■ To identify another workstation as the license server, enter the name in the hostname field, click + andclick Apply.The license server must be installed on the remote workstation. See Network License Manager on page56.
34 | Chapter 4 Configuring Smoke
Troubleshooting SmokeInstallation, Licensing andConfiguration
Topics in this chapter:
■ Invalid Serial Number Error on page 35■ Troubleshooting License Errors on page 36■ Enabling Remote Login on page 38■ Viewing Application Error Messages on page 39■ Checking that Background Services are Running on page 39■ Troubleshooting Hostname Changes on page 40■ Forcing Smoke to Exit on page 40■ Handling System Freezes on page 41■ Repairing Media Storage Mount Points on page 42■ Fixing VOLUMEMGT and No Volume Errors on page 42■ Rebooting after an IP Address or Host Name Change on page 42■ Sending Application Logs to Autodesk Customer Support on page 43■ Switching Your Mac OS X Kernel between 32-bit Mode and 64-bit Mode on page 43
Invalid Serial Number ErrorIf you click the Activate button and enter a network license serial number, you will get an “Invalid serialnumber” error.
To go from a trial to commercial or educational license of Smoke, you must re-install Smoke to install andconfigure the network license server.
See About Installing Smoke with the Network License Server on page 12.
5
35

Troubleshooting License ErrorsFollow these procedures if you are unable to start Smoke due to license errors.
To troubleshoot license errors:
1 Check that Smoke is using the right license server. See Verifying the License Server on page 36.
2 If Smoke does not start and you are still getting license errors, restart the license server using the LicenseServer Configurator. See Restarting the License Server on page 37.
3 If Smoke does not start and you are still getting license errors, check the license and then restart thelicense server. See Verifying the License File on page 37.
Verifying the License ServerIf you are getting license errors when starting Smoke, you should first check that Smoke is pointing to theright license server.
In most cases, the license server is installed on the same workstation as Smoke.
To verify the license server:
1 Start Smoke Setup. Smoke Setup can be found in the Applications/ Smoke 2011/Utilities folder.
2 Open the Licensing tab.
3 Click the - button to remove a license server from the list.
4 Do one of the following:
■ Click Add localhost to use the current workstation as the license server.
■ Click + and then type the hostname of the license server in the Hostname field.
36 | Chapter 5 Troubleshooting Smoke Installation, Licensing and Configuration
5 Click Apply to confirm any changes.
You must restart Smoke to confirm if it starts with the new license server.
If Smoke does not start, try re-starting the license server. See Restarting the License Server on page 37.
Restarting the License ServerThe License Server can be installed on the same workstation as Smoke. Or, it may be installed on anotherworkstation to manage multiple Autodesk licenses across a facility.
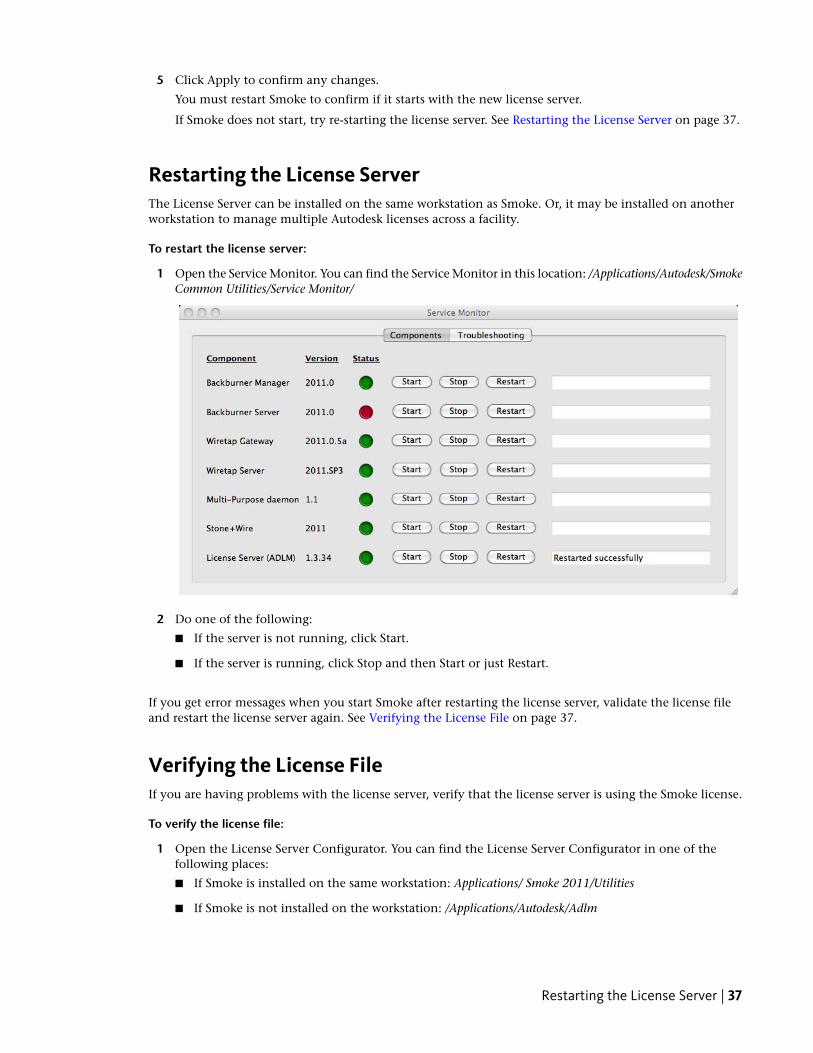
To restart the license server:
1 Open the Service Monitor. You can find the Service Monitor in this location: /Applications/Autodesk/SmokeCommon Utilities/Service Monitor/
2 Do one of the following:
■ If the server is not running, click Start.
■ If the server is running, click Stop and then Start or just Restart.
If you get error messages when you start Smoke after restarting the license server, validate the license fileand restart the license server again. See Verifying the License File on page 37.
Verifying the License FileIf you are having problems with the license server, verify that the license server is using the Smoke license.
To verify the license file:
1 Open the License Server Configurator. You can find the License Server Configurator in one of thefollowing places:
■ If Smoke is installed on the same workstation: Applications/ Smoke 2011/Utilities
■ If Smoke is not installed on the workstation: /Applications/Autodesk/Adlm
Restarting the License Server | 37

2 Click the Licenses tab.
3 Cut and paste the license into the Licenses window or open the license file that you saved locally.
4 Click Apply and then restart the license server.
Enabling Remote LoginTo ensure you will be able to reboot your workstation if it freezes, it is recommended that you enable remotelogin on your Mac.
To enable remote login:
1 Open System Preferences, and click Sharing.
2 Enable Remote Login. Allow access to all users by selecting “All users”.
3 Close System Preferences.
38 | Chapter 5 Troubleshooting Smoke Installation, Licensing and Configuration

Viewing Application Error MessagesIf you experience problems with Smoke or any of its related components, checking the error messages inthe Mac OS X system console might help you to identify the issue.
To view Smoke error messages:
1 Open the Console application from the Applications / Utilities folder.
2 From the File menu, click New Database Search.
3 Give your search a meaningful name. You will be able to reuse it later.
4 Define the search criteria as illustrated in the previous screenshot, and click OK.
A new Console window opens and displays all messages sent by Autodesk applications or services, andcontaining the words “error”, “failed” or “failure”. The search settings are saved in the left panel of theConsole window, under Database Searches.
5 Look through the error messages to find any information that might help you identify the problem. Ifyou encounter error messages about Backburner or Stone and Wire, refer to the following section forinformation on restarting these services.
Checking that Background Services are RunningTo check that all necessary background services are running, open the Service Monitor application from theApplications / Autodesk / Smoke Common Utilities folder.
Viewing Application Error Messages | 39

A green status light means that a service is running. A red light means that the service is not running. ClickRestart to activate it.
WARNING Before stopping or restarting a background service, make sure Smoke is not running, and that thereare no network connections to your media storage.
Troubleshooting Hostname ChangesThe hostname of the license server is listed in the license file.
If the hostname of your license server changes, either manually or through DHCP (Dynamic HostnameConfiguration Protocol), it is possible that the license will become unavailable and applications will not beable to run.
To resolve license issues caused by a hostname change:
■ Edit the files /usr/local/flexnetserver/ads_server.lic and the file /var/flexlm/autodesk.lic so that the seconditem on the SERVER line matches the current workstation hostname.
NOTE Do not change the Mac ID serial number (third item on the SERVER line). This will disable the license.
■ Restart the license server in the Smoke Service Monitor. You can find it in Applications/ Smoke 2011/Utilitiesfolder.
■ To prevent further issues with hostname changes, you can edit the above files and replace the hostnamewith “127.0.0.1”. This will make the license insensitive to hostname changes.
NOTE Do not use “localhost” for a hostname.
Forcing Smoke to ExitIf Smoke crashes but does not close, use the following procedures to force it to quit.
1 Run the Service Monitor application from the Applications / Autodesk / Smoke Common Utilities folder.
40 | Chapter 5 Troubleshooting Smoke Installation, Licensing and Configuration

2 Click the Troubleshooting tab.
3 Click NOW! to force Smoke to quit.
4 If Smoke still does not quit, use the following procedure to exit Smoke from the Terminal.
To exit Smoke from the Terminal:
1 Open the Terminal from the Applications / Utilities folder.
2 Type: sudo killall -9 smoke
3 Press Enter.
4 Enter your password and press Enter.
Handling System FreezesIf your workstation “freezes” for any reason, DO NOT force it to power off using the Power button, as thismay cause problems with your media storage.
To avoid any problems, always use the following procedure to safely restart your workstation when it freezes.
To reboot your Mac OS X workstation:
1 On a Linux® system or another Mac on your network, open a terminal and type the following commandto connect remotely to the Smoke Mac OS X workstation:
ssh <user_name>@<Mac_IP_Address>
Where <user_name> is a user that exists on the Smoke Mac OS X workstation, or a NIS (network)user, and <Mac_IP_Address> is the IP address of the Smoke Mac OS X workstation. You can alsouse the workstation hostname instead of the IP address.
NOTE You can also connect from a Windows® system, by installing a SSH client such as OpenSSH.
2 Enter your password when prompted.
3 When you are logged into the Mac OS X workstation, type the following command to reboot it:
sudo reboot
4 Enter your password when prompted.
The workstation reboots.
Handling System Freezes | 41

Repairing Media Storage Mount PointsIf you force your workstation to power off, the operating system may mount the storage on an incorrectmount point folder when it restarts (for example, /Volumes/Storage1 instead of /Volumes/Storage). This issueprevents Smoke from being able to access the media storage.
To avoid this problem, NEVER use the Power button to force a shutdown if your workstation freezes. Usethe procedure described in the previous section to safely reboot your workstation.
If you did force the workstation to power off, and are now experiencing storage issues, perform the followingprocedure to delete the incorrect mount point, and to mount your storage to the proper mount point.
To delete an incorrect mount point:
1 Log into your workstation as a user with administrative privileges.
2 Open System Preferences, click Sharing, and disable all the file services.
3 Open Finder.
4 Press COMMAND+Shift+G, and type /Volumes in the text field.
5 In the /Volumes folder, locate the incorrect mount point folder. It should have the name of the originalmount point (for example, Storage), but its icon depicts a folder instead of a disk drive.
6 Right-click the incorrect mount point folder, and select “Move to Trash” from the context menu. Enteryour password if prompted.
The folder is deleted.
7 Restart your workstation.
The media storage should mount to the proper location (for example, /Volumes/Storage) after the reboot.
NOTE If the media storage is still not available after restart, open Disk Utility from the Applications / Utilities folder,select your media storage disk, and click Repair Disk in the First Aid tab. See the Mac OS X documentation fordetails.
Fixing VOLUMEMGT and No Volume ErrorsFollow the steps below if you ever start Smoke and cannot select your framestore volume, or if you get thefollowing error:
Error: VOLUMEMGT : Failed to initialize Stone+Wire connection.
To solve the errors listed above:
1 Exit Smoke.
2 Open the Service Monitor application from the Applications / Autodesk / Smoke Common Utilities folder.
3 Restart the Stone+Wire service.
4 Start Smoke.
Rebooting after an IP Address or Host Name ChangeIf your workstation uses DHCP to obtain its network configuration, it is advisable to restart it after a changeof IP address, for instance, when switching from a wired to a wireless connection.
42 | Chapter 5 Troubleshooting Smoke Installation, Licensing and Configuration

Furthermore, ensure that your workstation’s hostname remains constant and is resolvable at all times in theDHCP environment, as the media storage and networking components of Smoke (known as “Stone andWire”) do not support dynamic hostname changes.
Sending Application Logs to Autodesk Customer SupportIf you have called Autodesk Customer Support to troubleshoot an issue with your application, you may beasked to submit the application log files.
To submit Smoke log files to Autodesk:
1 Make sure your Mac is connected to the Internet.
2 Run the Service Monitor application from the Applications / Autodesk / Smoke Common Utilities folder.
3 Click the Troubleshooting tab.
4 Click Send.
Smoke and system log files are automatically sent to Autodesk.
Switching Your Mac OS X Kernel between 32-bit Mode and64-bit ModeSmoke 2011 for Mac OS X is a 64-bit application that can run on either the 32-bit Mac OS X kernel or the64-bit kernel, while Smoke 2010 for Mac OS X specifically required the 64-bit kernel.
If you are running Smoke 2011 for Mac OS X on a workstation where Smoke 2010 for Mac OS X was previouslyinstalled, you may need to switch the Mac OS X kernel into 32-bit mode for certain third-party drivers andsoftware to work properly.
Skip this section if you are running Smoke 2011 for Mac OS X on a workstation where Smoke 2010 for MacOS X was never installed. By default, Mac OS X comes with the 32-bit kernel activated, which can run most64-bit applications, including Smoke 2011.
To switch the kernel between 32-bit mode and 64-bit mode:
1 Run the Service Monitor application from the Applications / Autodesk / Smoke Common Utilities folder.
2 Click the Troubleshooting tab.
Sending Application Logs to Autodesk Customer Support | 43

3 Click the 32 bit or 64-bit button.
4 Reboot your Mac for the change to take effect.
44 | Chapter 5 Troubleshooting Smoke Installation, Licensing and Configuration

Appendix: AutodeskLicensing
Includes these chapters:
■ Network Licensing on page 47
■ Stand-Alone Licensing on page 65
■ Licensing Glossary on page 71
45

46 | Part 1 Appendix: Autodesk Licensing

Network Licensing
Topics in this chapter:
■ Introduction on page 47■ Plan Your Network Licensing on page 47■ Network License Manager on page 56■ Network Licensing Tools on page 59■ License Borrowing on page 60
IntroductionA network license allows you to run an Autodesk product on a network. Network licenses can be purchasedthrough your Authorized Autodesk Reseller.
Setting up network licenses for an Autodesk product requires careful planning and execution. This sectiongives you instructions about how to set up a network licensed environment, and assumes that you arefamiliar with the terminology and processes required to set up an Autodesk product to run on a network.
Plan Your Network LicensingThis section contains information that you need to know before you set up a network license server. Thesection includes information about supported license server models, license operation and availability,network license file definitions and parameters, license file examples, license types and behaviors, and thelicense server heartbeat signal.
System Requirements for the Network License Manager (Windows)Make sure that your network license server meets the minimum recommended requirements. See the followingtables for hardware and software requirements.
A
47
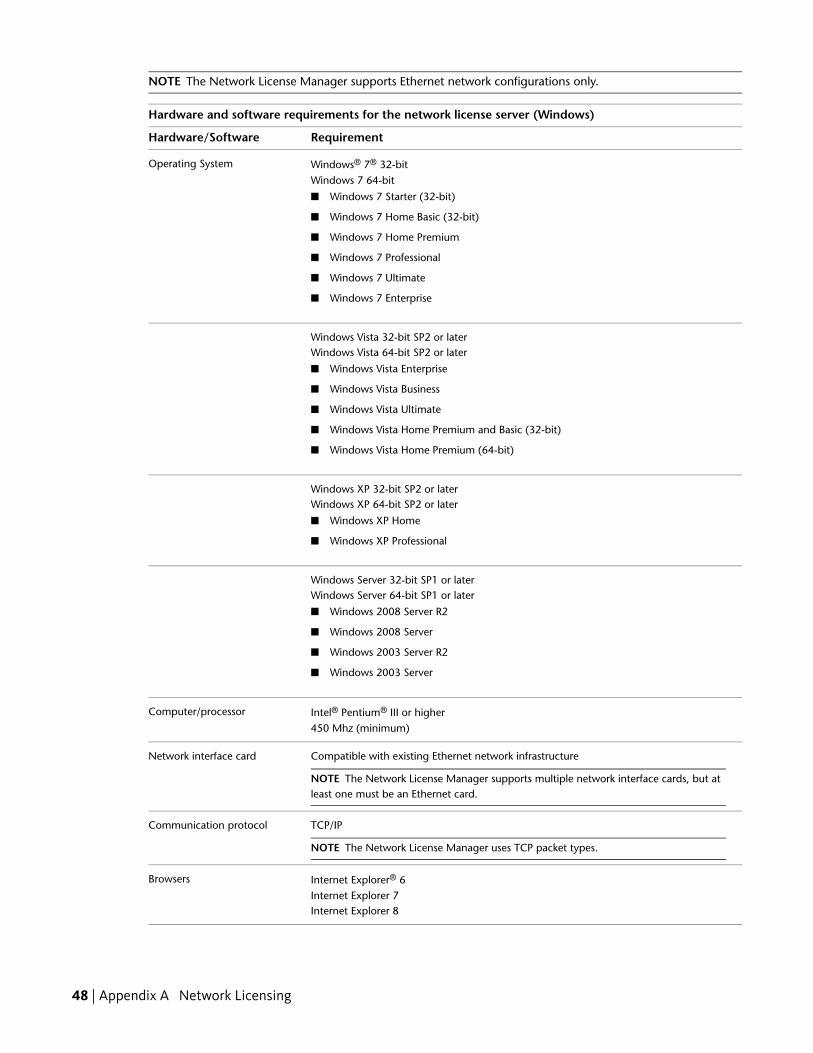
NOTE The Network License Manager supports Ethernet network configurations only.
Hardware and software requirements for the network license server (Windows)
RequirementHardware/Software
Windows® 7® 32-bitOperating System
Windows 7 64-bit
■ Windows 7 Starter (32-bit)
■ Windows 7 Home Basic (32-bit)
■ Windows 7 Home Premium
■ Windows 7 Professional
■ Windows 7 Ultimate
■ Windows 7 Enterprise
Windows Vista 32-bit SP2 or laterWindows Vista 64-bit SP2 or later
■ Windows Vista Enterprise
■ Windows Vista Business
■ Windows Vista Ultimate
■ Windows Vista Home Premium and Basic (32-bit)
■ Windows Vista Home Premium (64-bit)
Windows XP 32-bit SP2 or laterWindows XP 64-bit SP2 or later
■ Windows XP Home
■ Windows XP Professional
Windows Server 32-bit SP1 or laterWindows Server 64-bit SP1 or later
■ Windows 2008 Server R2
■ Windows 2008 Server
■ Windows 2003 Server R2
■ Windows 2003 Server
Intel® Pentium® III or higherComputer/processor
450 Mhz (minimum)
Compatible with existing Ethernet network infrastructureNetwork interface card
NOTE The Network License Manager supports multiple network interface cards, but atleast one must be an Ethernet card.
TCP/IPCommunication protocol
NOTE The Network License Manager uses TCP packet types.
Internet Explorer® 6Browsers
Internet Explorer 7Internet Explorer 8
48 | Appendix A Network Licensing

Hardware and software requirements for the network license server (Windows)
RequirementHardware/Software
11.7.0.0FLEXnet
Virtual Machine Support (Windows)
Virtual OSVirtualizerHardware
Vista 64-bit, Vista 32-bit, Windows XP 32-bit,Windows 7 32-bit (Home Premium, Profes-
Windows 2008 or Windows 2003R2
servers running on VMware® ESX3.5 Up-date 3 (License Manager Only)
Intel PC 64
sional, Ultimate, and Enterprise), Windows 764-bit, Windows Server 32-bit, WindowsServer 64-bit
System Requirements for the Network License Manager (Mac OS X)Make sure that your network license server meets the minimum recommended requirements. See the followingtables for hardware and software requirements.
NOTE The Network License Manager supports Ethernet network configurations only.
Hardware and software requirements for the network license server (Mac OS X)
RequirementHardware/Software
Mac OS® X version 10.6 and laterOperating system
Intel MacComputer/processor
Compatible with existing Ethernet network infrastructureNetwork interface card
NOTE The Network License Manager supports multiple network interface cards, but atleast one must be an Ethernet card.
TCP/IPCommunication protocol
NOTE The Network License Manager uses TCP packet types
Safari 4.0Browsers
11.7.0.0FLEXnet
System Requirements for the Network License Manager (Linux)Make sure that your network license server meets the minimum recommended requirements. See the followingtables for hardware and software requirements.
NOTE The Network License Manager supports Ethernet network configurations only.
Hardware and software requirements for the network license server (Linux)
RequirementHardware/Software
Linux® 64-bitOperating system
Red Hat® Enterprise Linux 5.0 WS (U4)
System Requirements for the Network License Manager (Mac OS X) | 49

Hardware and software requirements for the network license server (Linux)
RequirementHardware/Software
Intel Pentium 3 or higherComputer/processor450 Mhz (minimum)
Compatible with existing Ethernet network infrastructureNetwork interface card
NOTE The Network License Manager supports multiple network interface cards, but atleast one must be an Ethernet card.
TCP/IPCommunication protocol
NOTE The Network License Manager uses TCP packet types
11.7.0.0FLEXnet
Plan Your License Server ConfigurationYou must decide which license server model to use for managing your Autodesk product licenses on a server.Autodesk supports the following network license server models:
■ Single license server model
■ Distributed license server model
■ Redundant license server model
Single License Server ModelIn the single license server model, the Network License Manager is installed on a single server, so licensemanagement and activity is restricted to this server. A single license file represents the total number oflicenses available on the server.
Advantages of the Single License Server Model
■ Because all license management takes place on a single server, you have just one point of administrationand one point of failure.
■ Of the three license server models, this configuration requires the least amount of maintenance.
Disadvantage of the Single License Server Model
■ If the single license server fails, the Autodesk product cannot run until the server is back online.
Distributed License Server ModelIn the distributed license server model, licenses are distributed across more than one server. A unique licensefile is required for each server. To create a distributed license server, you must run the Network LicenseManager on each server that is part of the distributed server pool.
Advantages of the Distributed License Server Model
■ Servers can be distributed across a wide area network (WAN); they do not need to exist on the samesubnet.
50 | Appendix A Network Licensing

■ If one server in the distributed server pool fails, the licenses on the remaining servers are still available.
■ If you need to replace a server in the distributed server pool, you do not need to rebuild the entire pool.
■ Server replacement is easier than in a redundant server pool, where you must reactivate the entire pool.
Disadvantage of the Distributed License Server Model
■ If a server in the distributed server pool fails, the licenses on that server are unavailable.
Redundant License Server ModelIn the redundant license server model, you use three servers to authenticate a single license file. One serveracts as the master, while the other two provide backup if the master server fails. With this configuration,licenses continue to be monitored and issued as long as at least two servers are still functional. The licensefile on all three servers is the same. You must install the Network License Manager on each server.
In the redundant license server model, all servers must reside on the same subnet and have consistentnetwork communications. (Slow, erratic, or dial-up connections are not supported.)
Advantage of the Redundant License Server Model
■ If one of the three servers fails, all licenses that are managed in the server pool are still available.
Disadvantages of the Redundant License Server Model
■ If more than one server fails, no licenses are available.
■ All three servers must reside on the same subnet and have reliable network communications. Theredundant server pool does not provide network fault tolerance.
■ If one of the three servers is replaced, the complete redundant server pool must be rebuilt.
■ If your Autodesk product supports license borrowing and licenses are borrowed from a redundant licenseserver pool, you must restart the license server after you stop the Network License Manager.
Learn About Your LicenseIn this section, you learn about license operation and availability, the license file, license types and behaviors,and the heartbeat signal.
License Operation and AvailabilityWhen you start an Autodesk product, the product determines the server from which it should try to obtaina license. The product then requests a license through the TCP/IP network protocol to the license server.
If the number of available licenses has not been exceeded on the license server, the Network License Managerassigns a license to the workstation. A product session then starts on the workstation, and the number ofavailable licenses on the license server is reduced by one.
Likewise, when you exit a product, the Network License Manager frees a license for another user. If you runmultiple sessions of an Autodesk product on an individual workstation, only one license is used. When thelast session is closed, the license is freed.
Learn About Your License | 51

The following three processes manage the distribution and availability of licenses:
■ License manager daemon (lmgrd.exe). Handles the original contact with the application, and then passesthe connection to the vendor daemon. The lmgrd.exe daemon is used to communicate with the vendordaemon only; lmgrd.exe does not authenticate or dispense licenses, but rather passes user requests to thevendor daemon. By using this approach, a single lmgrd.exe daemon can be used by multiple softwarevendors to provide license authentication. The lmgrd.exe daemon starts and restarts the vendor daemonsas needed.
■ Autodesk vendor daemon (adskflex.exe). Tracks the licenses that are checked out and the workstationsthat are using them. Each software vendor has a unique vendor daemon to manage vendor-specificlicensing. As its name implies, the adskflex.exe vendor daemon is specific to Autodesk products.
NOTE If the adskflex.exe vendor daemon terminates for any reason, all users lose their licenses until lmgrd.exerestarts the vendor daemon or the problem causing the termination is resolved.
■ License file. A text file that has vendor-specific license information.
License FilesThe network license file you receive from Autodesk contains licensing information required for a networkinstallation. You obtain license file data when you register your Autodesk product.
The license file contains information about network server nodes and vendor daemons. It also contains anencrypted digital signature that is created when Autodesk generates the file.
The license file is located in a network location that you specify in the Deployment wizard. That networklocation must be accessible to every user who runs the product from a network installation.
The following table defines each license file parameter.
Definitions of license file parameters
ExampleDefinitionParameterLine
LABSERVERHost name of the server where the NetworkLicense Manager resides
Host NameSERVER
03D054C0149BEthernet address of the server where theNetwork License Manager resides
Host ID
[None]USE_SERVER
adskflex.exeName of the server-side Autodesk vendordaemon
Vendor DaemonVENDOR
port=2080Network port number reserved and assignedfor use only by Autodesk products runningthe Autodesk vendor daemon
Port Number
SERIES_1Name of feature code groupNamePACKAGE
1.000Internal version number referenceVersion
COMPONENTS="526000REVIT_9_OF\
List of feature codes supported in the pack-age
COMPONENTS
51200ACD_2007_OF\513001INVBUN_11_OF"
52 | Appendix A Network Licensing

Definitions of license file parameters
ExampleDefinitionParameterLine
OPTIONS=SUITEOPTIONS
SUPERSEDEReplacement for any existing Increment lineof the same feature code from any license
SUPERSEDE
files on the same license server that have adate earlier than the defined Issue Date
SIGN=0 SIGN2=0Encrypted signature used to authenticatethe attributes of the license file
SIGN
51200ACD_2007_0FProduct supported by the license fileFeature CodeINCREMENT
permanentAmount of time the licenses are availableExpiration Date
25Number of licenses supported by the licensefile
Number of Licenses
COMMERCIALLicense usage type and license behavior ofthe product that is supported by the licensefile
VENDOR_STRING
BORROW=4320Definition of the license borrowing periodfor the licenses defined under the same in-crement line.
BORROW
In this example, the maximum period thatlicenses can be borrowed is 4320 hours (180days), unless otherwise noted (for example,BORROW=2880 means that licenses can beborrowed for a maximum of 2880 hours,or 120 days).License borrowing is disabled when thisparameter is absent in the license file.
DUP_GROUP=UHDefinition of multiple license requests whenthe same user and same host share the samelicense
DUP_GROUP
15-jul-2006Date that the license file was generated byAutodesk
ISSUED
123-12345678Serial number of the Autodesk productSerial Number
SIGN=6E88EFA8D44CEncrypted signature used to authenticatethe attributes of the license file
SIGN
License File ExamplesLicense file examples are provided in this document to help you understand how the license files work foryour particular network setup. Autodesk provides a standard license file for individual products and a licensefile with additional parameters for products that are sold both individually and as part of a product set.
■ Standard License File. If you purchase one or more individual products that are not offered as part of asuite of products, you receive a standard license file.
Learn About Your License | 53
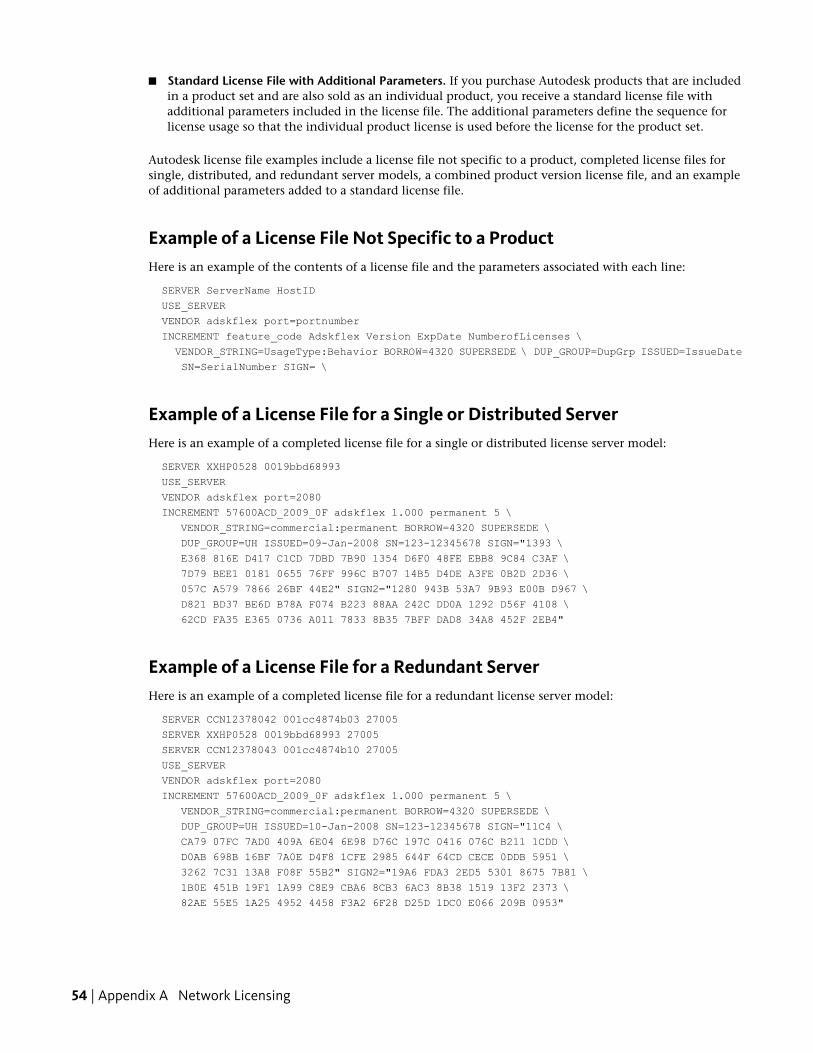
■ Standard License File with Additional Parameters. If you purchase Autodesk products that are includedin a product set and are also sold as an individual product, you receive a standard license file withadditional parameters included in the license file. The additional parameters define the sequence forlicense usage so that the individual product license is used before the license for the product set.
Autodesk license file examples include a license file not specific to a product, completed license files forsingle, distributed, and redundant server models, a combined product version license file, and an exampleof additional parameters added to a standard license file.
Example of a License File Not Specific to a ProductHere is an example of the contents of a license file and the parameters associated with each line:
SERVER ServerName HostID
USE_SERVER
VENDOR adskflex port=portnumber
INCREMENT feature_code Adskflex Version ExpDate NumberofLicenses \
VENDOR_STRING=UsageType:Behavior BORROW=4320 SUPERSEDE \ DUP_GROUP=DupGrp ISSUED=IssueDate
SN=SerialNumber SIGN= \
Example of a License File for a Single or Distributed ServerHere is an example of a completed license file for a single or distributed license server model:
SERVER XXHP0528 0019bbd68993
USE_SERVER
VENDOR adskflex port=2080
INCREMENT 57600ACD_2009_0F adskflex 1.000 permanent 5 \
VENDOR_STRING=commercial:permanent BORROW=4320 SUPERSEDE \
DUP_GROUP=UH ISSUED=09-Jan-2008 SN=123-12345678 SIGN="1393 \
E368 816E D417 C1CD 7DBD 7B90 1354 D6F0 48FE EBB8 9C84 C3AF \
7D79 BEE1 0181 0655 76FF 996C B707 14B5 D4DE A3FE 0B2D 2D36 \
057C A579 7866 26BF 44E2" SIGN2="1280 943B 53A7 9B93 E00B D967 \
D821 BD37 BE6D B78A F074 B223 88AA 242C DD0A 1292 D56F 4108 \
62CD FA35 E365 0736 A011 7833 8B35 7BFF DAD8 34A8 452F 2EB4"
Example of a License File for a Redundant ServerHere is an example of a completed license file for a redundant license server model:
SERVER CCN12378042 001cc4874b03 27005
SERVER XXHP0528 0019bbd68993 27005
SERVER CCN12378043 001cc4874b10 27005
USE_SERVER
VENDOR adskflex port=2080
INCREMENT 57600ACD_2009_0F adskflex 1.000 permanent 5 \
VENDOR_STRING=commercial:permanent BORROW=4320 SUPERSEDE \
DUP_GROUP=UH ISSUED=10-Jan-2008 SN=123-12345678 SIGN="11C4 \
CA79 07FC 7AD0 409A 6E04 6E98 D76C 197C 0416 076C B211 1CDD \
D0AB 698B 16BF 7A0E D4F8 1CFE 2985 644F 64CD CECE 0DDB 5951 \
3262 7C31 13A8 F08F 55B2" SIGN2="19A6 FDA3 2ED5 5301 8675 7B81 \
1B0E 451B 19F1 1A99 C8E9 CBA6 8CB3 6AC3 8B38 1519 13F2 2373 \
82AE 55E5 1A25 4952 4458 F3A2 6F28 D25D 1DC0 E066 209B 0953"
54 | Appendix A Network Licensing
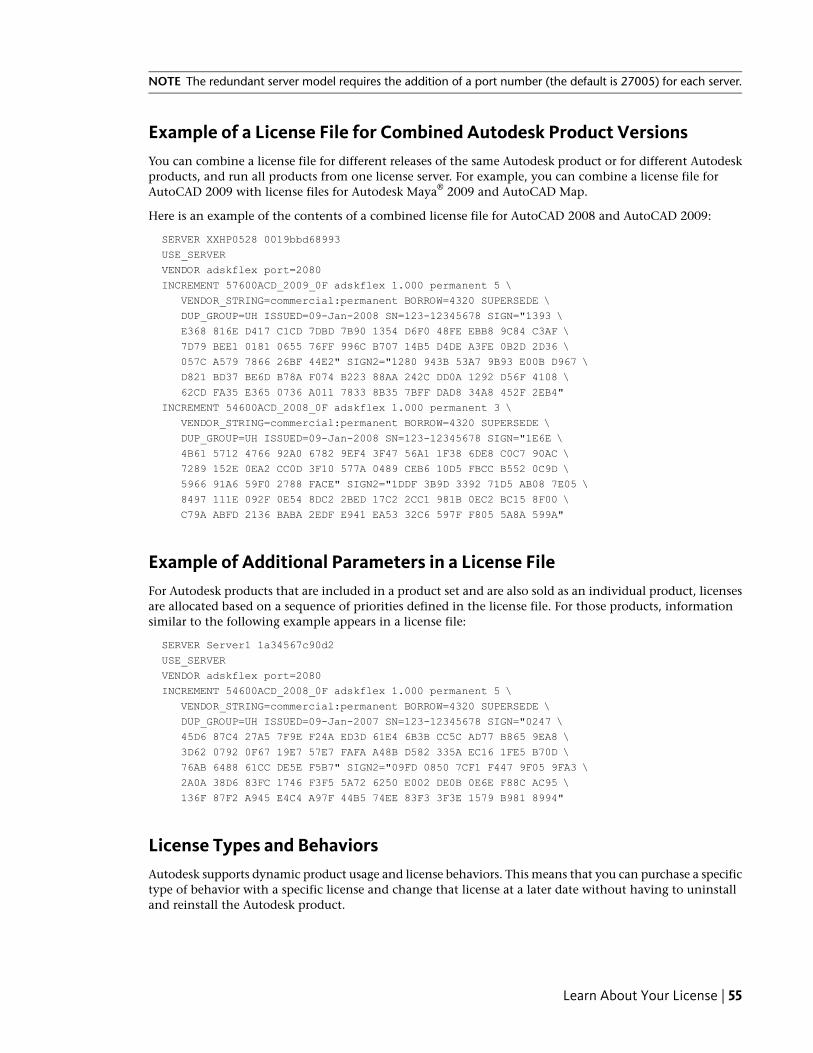
NOTE The redundant server model requires the addition of a port number (the default is 27005) for each server.
Example of a License File for Combined Autodesk Product VersionsYou can combine a license file for different releases of the same Autodesk product or for different Autodeskproducts, and run all products from one license server. For example, you can combine a license file forAutoCAD 2009 with license files for Autodesk Maya® 2009 and AutoCAD Map.
Here is an example of the contents of a combined license file for AutoCAD 2008 and AutoCAD 2009:
SERVER XXHP0528 0019bbd68993
USE_SERVER
VENDOR adskflex port=2080
INCREMENT 57600ACD_2009_0F adskflex 1.000 permanent 5 \
VENDOR_STRING=commercial:permanent BORROW=4320 SUPERSEDE \
DUP_GROUP=UH ISSUED=09-Jan-2008 SN=123-12345678 SIGN="1393 \
E368 816E D417 C1CD 7DBD 7B90 1354 D6F0 48FE EBB8 9C84 C3AF \
7D79 BEE1 0181 0655 76FF 996C B707 14B5 D4DE A3FE 0B2D 2D36 \
057C A579 7866 26BF 44E2" SIGN2="1280 943B 53A7 9B93 E00B D967 \
D821 BD37 BE6D B78A F074 B223 88AA 242C DD0A 1292 D56F 4108 \
62CD FA35 E365 0736 A011 7833 8B35 7BFF DAD8 34A8 452F 2EB4"
INCREMENT 54600ACD_2008_0F adskflex 1.000 permanent 3 \
VENDOR_STRING=commercial:permanent BORROW=4320 SUPERSEDE \
DUP_GROUP=UH ISSUED=09-Jan-2008 SN=123-12345678 SIGN="1E6E \
4B61 5712 4766 92A0 6782 9EF4 3F47 56A1 1F38 6DE8 C0C7 90AC \
7289 152E 0EA2 CC0D 3F10 577A 0489 CEB6 10D5 FBCC B552 0C9D \
5966 91A6 59F0 2788 FACE" SIGN2="1DDF 3B9D 3392 71D5 AB08 7E05 \
8497 111E 092F 0E54 8DC2 2BED 17C2 2CC1 981B 0EC2 BC15 8F00 \
C79A ABFD 2136 BABA 2EDF E941 EA53 32C6 597F F805 5A8A 599A"
Example of Additional Parameters in a License FileFor Autodesk products that are included in a product set and are also sold as an individual product, licensesare allocated based on a sequence of priorities defined in the license file. For those products, informationsimilar to the following example appears in a license file:
SERVER Server1 1a34567c90d2
USE_SERVER
VENDOR adskflex port=2080
INCREMENT 54600ACD_2008_0F adskflex 1.000 permanent 5 \
VENDOR_STRING=commercial:permanent BORROW=4320 SUPERSEDE \
DUP_GROUP=UH ISSUED=09-Jan-2007 SN=123-12345678 SIGN="0247 \
45D6 87C4 27A5 7F9E F24A ED3D 61E4 6B3B CC5C AD77 B865 9EA8 \
3D62 0792 0F67 19E7 57E7 FAFA A48B D582 335A EC16 1FE5 B70D \
76AB 6488 61CC DE5E F5B7" SIGN2="09FD 0850 7CF1 F447 9F05 9FA3 \
2A0A 38D6 83FC 1746 F3F5 5A72 6250 E002 DE0B 0E6E F88C AC95 \
136F 87F2 A945 E4C4 A97F 44B5 74EE 83F3 3F3E 1579 B981 8994"
License Types and BehaviorsAutodesk supports dynamic product usage and license behaviors. This means that you can purchase a specifictype of behavior with a specific license and change that license at a later date without having to uninstalland reinstall the Autodesk product.
Learn About Your License | 55

NOTE All license types are available as stand-alone and network except for the Student Portfolio license, whichis available as stand-alone only.
License types include the following:
■ Commercial. A license for a product that was purchased commercially.
■ Not for Resale. A license for a product that is not sold commercially. Not for Resale products are forevaluation or demonstration purposes only and may not be used for commercial or production use.
■ Educational (EDU)/Institution. A license designed specifically for educational institutions.
■ Student Portfolio. A license for students who are using an Autodesk product as part of their curriculum.
License behaviors are as follows:
■ Permanent. Enables permanent use of an Autodesk product.
■ Term Extendable. Enables access to an Autodesk product for a limited time. The term can be extendedat any time.
■ Term Non-Extendable. Enables an Autodesk product for a limited time. The term cannot be extended.
Heartbeat SignalWhen an Autodesk product is running, it communicates with the license server at regular intervals using acommunication method known as the “heartbeat” signal. If the heartbeat signal is lost, the server tries toreconnect. If the server cannot reconnect, the user receives a license error.
If the product stops working because it has lost a connection to the server, you must shut down the product,and then restart it. If the problem causing the original loss of the heartbeat signal is resolved and there areavailable licenses on the server, the program can be restarted.
Network License Manager
Install the Network License ManagerYou can install the Network License Manager before or after you use the Installation wizard. The order inwhich you install the network applications does not matter, as long as you install everything you need andyou provide consistent license server information across the network applications.
If an earlier version of the Network License Manager is already installed on the computer, you should upgradeby installing the Autodesk Network License Manager into the folder where the older version was located.
Install the Network License Manager (Mac OS X)
To install the network license manager on Mac OS X:
1 Locate the Smoke installation media.
2 Open the Standalone Installers folder.
3 Start the Install License Server installation.
4 Follow the on-screen instructions to complete the installation.
56 | Appendix A Network Licensing

Install the Network License Manager (Linux)
To install the network license manager (Linux):
1 Locate the Standalone Installer folder on the Smoke installation media.
2 Copy the Burn folder to a Linux machine.
3 Log in as root.
4 Unzip the tar file. Type:
tar -xzvf Burn_*tar.gz
5 Open the Burn folder created when you unzipped the package.
6 Install Burn. Type:
./INSTALL_LICSERV
Follow the instructions in to complete the installation.
Obtain a License Through autodesk.comYou can register and activate your network license by going to https://registeronce.autodesk.com and followingthe on-screen instructions.
Obtain the Server Host Name and Host ID ManuallyAutodesk uses the server host name, host ID, and product serial number to generate a license file.
To obtain the information manually, you can use the command prompt or you can run the lmtools.exeutility. If you use lmtools.exe, do not run it on a remote workstation.
To obtain the host name and ID using the Windows command prompt
1 Do the following:
■ (Windows XP/Windows Vista) Click Start ➤ All Programs ➤ Autodesk ➤ [Autodesk Product] ➤
License Transfer Utility.
2 At the Windows command prompt, enter the following command, and then press ENTER:
ipconfig /all
3 Locate the Host Name line, and write down the host name.
4 Locate the Physical Address line. Write down the physical address without the dashes. This is yourtwelve-character host ID.
NOTE If your server has more than one network adapter, select the one that corresponds to a physicalnetwork adapter. To determine which adapters are physical: in the Windows command prompt, enter ipconfig/all, and then view the Description field above each physical address. If there is more than one physicalnetwork adapter, it does not matter which one you use. Devices such as VPN adapters, PPP adapters, andmodems are not valid.
5 Close the Windows command prompt.
To obtain the host name and ID using lmtools.exe
You should be logged in with Administrator rights when working with the LMTOOLS utility.
Install the Network License Manager (Linux) | 57

1 Click Start ➤ All Programs ➤ Autodesk ➤ Network License Manager ➤ LMTOOLS Utility.
2 In the LMTOOLS program, click the Systems Settings tab.
3 On the Systems Settings tab, locate the Computer/Hostname box. Copy the host name and paste theinformation into a text editor.
4 Locate the Ethernet Address box. The Ethernet address is the host ID. It consists of twelve characters.Write down the information. If your Ethernet address is more than twelve characters, write down thefirst twelve characters only.
NOTE If your server has more than one Ethernet adapter, select one that corresponds to a physical networkadapter.
5 Close lmtools.exe.
To obtain the host name and ID using the Mac OS X or Linux terminal window
1 Launch a Terminal window.
2 Go to the directory where lmutil is installed.
3 Retrieve the host name by entering the following in Terminal:
<prompt>./lmutil lmhostid -hostname
The host name is displayed.
4 Retrieve the host ID by entering the following in Terminal:
<prompt>./lmutil lmhostid
The twelve-character host ID is displayed.
5 Close the Terminal Window.
Uninstall the Network License ManagerYou can uninstall the Network License Manager from the license server. When you uninstall the NetworkLicense Manager, licenses are no longer available to your users.
To uninstall the Network License Manager
1 Click Start ➤ All Programs ➤ Autodesk ➤ Network License Manager ➤ LMTOOLS Utility.
2 In the LMTOOLS program, click the Start/Stop/Reread tab.
3 On the Start/Stop/Reread tab, click Stop Server.
4 Close lmtools.exe.
5 In the Windows Control Panel, do one of the following:
■ (Windows XP) Double-click Add/Remove Programs.
■ (Windows 7/Windows Vista) Double-click Programs and Features.
Do one of the following:
■ (Windows XP) In the Add/Remove Programs window, click Autodesk Network License Manager.Click Remove.
■ (Windows 7/Windows Vista) In the Programs and Features window, click Autodesk Network LicenseManager. Click Remove.
58 | Appendix A Network Licensing

6 If prompted, restart your computer.
NOTE You must manually delete files that you created for use with the Network License Manager (such as logfiles, license files, and the Options file). They are not automatically deleted when you uninstall the Network LicenseManager.
Network Licensing ToolsAutodesk Network licensing tools include FLEXnet configuration tools, license borrowing, and SAMreport-Lite.Each tool is described in the sections that follow.
This section also includes information for updating FLEXnet and installing and configuring the AutodeskNetwork License Manager on a network.
FLEXnet Configuration ToolsThe Network License Manager uses FLEXnet® license management technology from Acresso Software.FLEXnet provides administrative tools that help to simplify management of network licenses. You can useFLEXnet tools to monitor network license status, reset licenses lost to a system failure, troubleshoot licenseservers, and update existing license files on the fly.
Utilities for License Server ManagementFLEXnet provides two utilities for managing the license server. These tools are located in the C:\ProgramFiles\Autodesk Network License Manager folder.
lmtools.exe Provides a Microsoft® Windows graphical user interface for managing the license server.
lmutil.exe Provides a set of command line options for managing the license server.
You can use lmtools.exe or lmutil.exe to perform the following server management tasks:
■ Start, stop, and restart the server.
■ Configure, update, and reread the license file.
■ Diagnose system or license problems.
■ View server status, including active license status.
Stop and Restart the License ServerBefore you can perform any system maintenance on your license server, you must stop the license server.When you have completed maintenance, you can restart the license server.
To restart the license server (Mac OS X)
To restart the license server:
1 Open the License Server Configurator. You can find the License Server Configurator in one of thefollowing places:
■ If Smoke is installed on the same workstation: Applications/ Smoke 2011/Utilities
■ If Smoke is not installed on the workstation: /Applications/Autodesk/Adlm
Network Licensing Tools | 59

2 Do one of the following:
■ If the server is not running, click Start.
■ If the server is running, click Restart.
To restart the license server (Linux)
Enter the following in Terminal:
/etc/init.d/license_server_adlm stop
/etc/init.d/license_server_adlm restart
License BorrowingIf you are running a network-licensed version of the program, you can borrow a license from a license serverto use the program for a specified time when your computer is not connected to the network.
NOTE If you have a stand-alone version of the program, you cannot borrow a license. To check your license type,click Help menu ➤ About ➤ Product Information. In the Product Information dialog box, view your productlicense type.
OverviewIf you are using a network-licensed version of your Autodesk product and your network administratorsupports the license borrowing feature, you can borrow a product license from your network license serverto use the program when your computer is not connected to the network. Your license is automaticallyreturned to the license server at the end of the day on the return date you set when you borrowed the license.You can also return a license early.
NOTE There is a limit to the number of licenses available for borrowing. If you try to borrow a license and arenotified that no licenses are available, all network licenses may already be borrowed by other users. If you areunable to borrow a license, see your network administrator for help.
60 | Appendix A Network Licensing
Borrow a LicenseYou can run the program when your computer is not connected to the network until your license-borrowingperiod ends. If you don't remember the date that a license expires, you can check the date by placing yourcursor over the Borrowing icon in the program's status tray or by clicking Help ➤ About and using theProduct Information dialog box.
When the license-borrowing period expires, the borrowed license is automatically returned to the licenseserver. Once your computer is reconnected to the network, you can run the program from the network orborrow a license again.
Interaction with Other License-Borrowing Tools
Using the license borrowing feature in the program is the recommended way to borrow a license; however,some third-party borrowing tools may also be available to you. These tools are not supported or compatiblewith the license borrowing feature in the program. Other third-party or legacy license-borrowing tools thatmay be available to you are the Autodesk License Borrowing utility (shipped with Autodesk products) andthe borrowing feature in lmtools.exe, a component of the Autodesk Network License Manager.
If another license-borrowing tool is active when you attempt to use the license borrowing feature, you shouldproceed as follows to borrow a license for the program:
■ If you run the Autodesk License Borrowing utility that shipped with your Autodesk product and thenturn on the borrowing flag for the Adskflex option or the All option, a license can be borrowed whenyou start the program. However, you cannot return a license until you exit and then restart the program.
■ If borrowing is set in lmtools.exe for all products, you can either (a) use the other tool to borrow licensesfor the program or (b) stop the borrowing process in lmtools.exe and then use the license borrowing featurein the program.
■ If borrowing is set in lmtools.exe for non-Autodesk products only, you must stop the borrowing processin lmtools.exe. You can then use the license borrowing feature to borrow licenses for your Autodeskproduct. If you do not stop the borrowing process in lmtools.exe, the license borrowing feature will notfunction.
To borrow a license using the Tools menu
1 Click Tools menu ➤ License Borrowing ➤ Borrow License.
2 In the Borrow a License window, on the calendar, click the date when you want to return the license.
This date must be within the valid date range set by your network administrator. The valid date rangeis displayed in this window.
3 Click Borrow License.
4 In the License Borrowed message, click OK. The license is borrowed, and you can now use the programwhile your computer is disconnected from the network.
NOTE You can verify that your license is borrowed by placing your cursor over the Borrowing icon in thestatus tray, which is in the lower-right corner of the program.
To borrow a license using the Help menu
1 Click Help menu ➤ About.
2 In the About product window, click Product Information.
3 In the Product Information window, click Borrow License.
4 In the Borrow a License window, on the calendar, click the date when you want to return the license.
Borrow a License | 61

This date must be within the valid date range set by your network administrator. The valid date rangeis displayed in this window.
5 Click Borrow License.
6 In the License Borrowed message, click OK. The license is borrowed, and you can now use the programwhile your computer is disconnected from the network.
BORROWLICENSE CommandBorrows a product license so that you can run the product outside the network environment.
Tools menu: License Borrowing ➤ Borrow License
Help menu: About ➤ Product Information ➤ Borrow License
Command line: borrowlicense
The Borrow a License Window on page 62 is displayed.
Borrow a License Window
Tools menu: License Borrowing ➤ Borrow License
Help menu: About ➤ Product Information ➤ Borrow License
Command line: borrowlicense
Using the license borrowing feature, you can borrow a license from your network license server, and thenuse the license when your computer is disconnected from the license server; for example, when you aretraveling for work.
The Borrow a License window has the following options:
Calendar Sets the date when you plan to return a borrowed license. The return date must be within therange specified by your network administrator.
Borrow a License Borrows the license from the network license server based on the return date that youspecified.
Cancel Cancels the borrowing action; no license is borrowed.
Return a LicenseYour network license is automatically returned to the network license server on the day that the licenseexpires. You can also return a license earlier than the date you originally selected, as long as your computeris connected to the network license server when you attempt to return the borrowed license.
Once a borrowed license is returned, you can borrow a license again as long as your computer is connectedto the network license server and a license is available on the server.
To return a borrowed license early, do one of the following:
■ Click Tools menu ➤ License Borrowing ➤ Return License Early.
■ Click Help menu ➤ About ➤ Product Information. In the Product Information dialog box, click ReturnLicense, and then click Yes.
■ In the status tray, right-click the License Borrowing icon. Click Return License Early.
62 | Appendix A Network Licensing

NOTE To use the status tray to return a borrowed license early, the display settings for the status tray must beturned on. To turn on the display settings, right-click an empty area on the status bar. Click Tray Settings.
Your license is returned to the network license server. After you return the borrowed license, you can borrowa license again immediately as long as a license for that product is available on the network.
To check the license return date, do one of the following:
■ In the status tray, right-click the License Borrowing icon. View the expiration date for the borrowedlicense.
■ Click Help menu ➤ About ➤ Product Information. In the Product Information dialog box, underLicense Expiration Date, view the license return date.
RETURNLICENSE CommandReturns a borrowed Autodesk product license earlier than the original return date that you specified whenyou borrowed the license.
Tools menu: License Borrowing ➤ Return License
Help menu: About ➤ Product Information ➤ Return License
Status tray: Right-click the License Borrowing icon. Click Return License Early.
Command line: returnlicense
RETURNLICENSE Command | 63

64
Stand-Alone Licensing
Topics in this chapter:
■ Introduction on page 65■ Activate Your Product on page 66■ Register Your Product on page 66■ Manage Your Stand-Alone License on page 66■ Transfer Your Stand-Alone License on page 68■ Troubleshoot a Stand-Alone License Error on page 68
Introduction
NOTE Standalone licensing is only available for the student edition of Smoke. The commercial edition requiresnetwork licensing.
Stand-alone licensing allows you to use your Autodesk product in trial mode for a given number of daysfrom the first time you launch the product. The number of days that a trial mode is active differs betweenAutodesk products. You can activate your license at any time before the trial period expires.
When you activate your product, you receive an activation code. If you activate online, your activation codeis automatically retrieved from Autodesk and the product starts. Activations are also available through email,fax, phone, or the Autodesk website.
NOTE If you are installing and using an Autodesk product on both operating systems of a dual-boot operatingsystem, you must obtain a separate activation code for each operating system.
The license file stays on your workstation when you uninstall your product. If you reinstall your Autodeskproduct on the same workstation, the license information is still valid. You do not have to reactivate theproduct.
B
65
Multi-Seat Stand-Alone LicenseA multi-seat stand-alone license allows you to install, register, and activate an Autodesk product on severalworkstations using a single serial number. Multi-seat licenses can be purchased through your AuthorizedAutodesk Reseller.
NOTE Multi-seat standalone licensing is only available for the student edition of Smoke.
Activate Your ProductYou can activate your Autodesk product either on startup or while you are running the product. If youcannot activate online, offline activation is available.
Register Your ProductDepending on your product, registration is optional or required. If required, you are asked to create a userAutodesk ID and associate this ID with an individual or company account. If registration is optional, youcan choose to postpone it, and you will be reminded periodically to register.
Manage Your Stand-Alone LicenseThis section provides information about advanced stand-alone licensing tasks such as license types andbehaviors, viewing product information, saving your license file as a text file, updating your serial number,and transferring a license.
Check Product InformationYou can view detailed information about your Autodesk product and your product license (such as thelicense usage type and the license behavior), and then save this information as a text file.
License usage types
NOTE All license types are available as stand-alone and network except for the Student Portfolio license, whichis available as stand-alone only.
Commercial A license for a product that was purchased commercially.
Not for Resale A license for a product that is not sold commercially.
Educational (EDU)/Institution A license designed specifically for educational institutions.
Student Portfolio A license for students who are using an Autodesk product as part of their curriculum.
License behaviorsTrial A license that allows individuals to try the product in trial mode for a specified number of days. Thetrial period starts the first time you launch your product. When the trial period expires, the product mustbe registered and activated to continue use.
Permanent Allows permanent use of an Autodesk product.
Term Extendable Allows access to an Autodesk product for a limited time. The term can be extended atany time.
Term Non-Extendable Allows access to an Autodesk product for a limited time. The term cannot be extended.
66 | Appendix B Stand-Alone Licensing

View Product InformationYou can view detailed information about your Autodesk product and your product license, such as thelicense usage type and the license behavior.
To view product information
1 Launch your Autodesk product.
2 On the Help menu, click About.
3 In the About [Autodesk Product] window, click Product Information.
4 In the Product Information dialog box, view details about your product and the product license.
5 In the Product Information dialog box, click Close.
Save License Information as a Text FileYou can save your product license information as a text file.
To save license information as a text file
1 Launch your Autodesk product.
2 On the Help menu, click About.
3 In the About [Autodesk Product] window, click Product Information.
4 In the Product Information dialog box, click Save As.
5 In the Save As dialog box, name the file, choose a location where you want to save the file, and thenclick Save.
6 In the Product Information dialog box, click Close.
Update Your Serial NumberYour valid serial number is located on the outside of the product packaging or in the Autodesk Upgrade andLicensing Information email you received if you downloaded your product.
When you register and activate your product, you are asked for the product serial number, which isautomatically entered upon completion of the activation process.
If you have a multi-product bundle of software that uses a single serial number, only the first product youregister and activate displays the updated serial number. For other products to display the serial number,you must update it from the Help menu.
NOTE For the updated serial number to display, you must be logged into the system with Administrator rights.
To update your serial number
1 Launch your Autodesk product.
2 On the Help menu, click About.
3 In the About [Autodesk Product] window, click Product Information.
4 In the Product Information dialog box, click Update.
5 In the Update the Serial Number dialog box, enter your product serial number.
View Product Information | 67

The serial number is located on the outside of the product packaging or in the Autodesk Upgrade andLicensing Information email you received if you downloaded your product.
NOTE If you have lost your serial number, contact the Autodesk Business Center (ABC) at 800-538-6401 forassistance.
6 Click OK. You can now see the updated serial number.
Transfer Your Stand-Alone License
About the Licence Transfer Utility
Install the Autodesk Product
Export a License
Import a License
Troubleshoot a Stand-Alone License ErrorWhen you activate your Autodesk product, only the computer that you used to activate the product islicensed to run the product. If you make certain changes to your computer, your stand-alone license mightfail. You will receive a license error and you will not be able to use your product. This section discusses waysin which you can troubleshoot a license error.
Some license errors require you to reactivate your product. If you need to reactivate your product, the ProductActivation wizard is displayed when you try to run the product. To reactivate your product, follow theinstructions in the Product Activation wizard.
The following topics offer more details regarding specific errors.
Hardware ChangesIf you replace or reconfigure hardware on the computer where your Autodesk product license resides, thestand-alone license might fail. You will not be able to use your product.
To prevent damage to your product license, use the License Transfer Utility to export your license file. Afteryou make the hardware change, you can import the license file back. For instructions about using the LicenseTransfer Utility, see Transfer Your Stand-Alone License.
NOTE If you get a license error when you change your hardware, you may have to reactivate your license. SeeActivate Your Product on page 66.
68 | Appendix B Stand-Alone Licensing

Reinstalling an Operating SystemIf you reinstall your operating system on the computer where your Autodesk license resides, the licensemight fail. You will not be able to use your product.
To resolve a license error in this case, you must reactivate your product. See Activate Your Product on page66.
To prevent a license error when you reinstall an operating system
NOTE If using Norton Ghost™ or another image utility, do not include the Master Boot Record.
1 Locate one of the following folders and make a backup copy:
■ (Windows XP) C:\Documents And Settings\All Users\Application Data\FLEXnet
■ (Windows 7/Windows Vista) C:\ProgramData\FLEXnet
2 Reinstall the operating system and reinstall the Autodesk product.
3 Paste the license folder to the same location from which you originally copied the folder in step 1.
You can now run your Autodesk product.
Changing the System Date and TimeYour product license allows for time changes to the system clock within two days of the current time. If youset your system clock back more than two days, the next time you start your product, you will receive amessage that gives you the option of correcting the system clock. If you do not correct the system clock,you receive a license error.
To prevent a license error due to a change in system date and time
■ Make sure that your computer's system date and time are accurate when you install and activate yourAutodesk product.
Distributing Software Image to Multiple ComputersYou can use the Deployment Wizard’s Stand-alone option to create a software installation image on yourserver. You can distribute this image by making it available on your computer network. During creation ofthis image, you are prompted for registration information, which is stored with the image and deployed toall installations.
Additionally, you can manually distribute the software using the installation CD that comes with yourAutodesk product. However, if your computers do not have an Internet connection, make sure the registrationdata for each computer matches exactly. Inconsistent registration data can cause activation failures.
To prevent a license error when distributing software image to multiple computers
■ The distribution of applications using “ghosting” is not recommended, and can result in incompleteinstallations and activation problems.
Preserving Licenses on Re-Imaged ComputersOn a network license server, licenses are maintained on the server. No additional steps are needed to preservenetwork licenses.
Reinstalling an Operating System | 69

For stand-alone licenses, you need to export the licenses to a safe place before re-imaging the computers.You can use the License Transfer Utility to export the licenses. After the re-imaging, import the licenses tothe correct computer. Each license only works on the computer for which it was created.
70 | Appendix B Stand-Alone Licensing

Licensing Glossary
Topics in this chapter:
■ Glossary on page 71
GlossaryADSKFLEX_LICENSE_FILE In a distributed license server configuration, the environment variable used topoint a workstation to the distributed license servers.
adskflex.exe The Autodesk vendor daemon used with the FLEXnet license technology. This daemon keepstrack of the Autodesk licenses that are checked out and the workstations that are using the licenses.
borrowed license A license that allows you to use an Autodesk product for a limited period of time withouthaving to buy a separate license or have network access to the license server.
daemon A program that runs continuously in the background of a computer. The daemon handles requestsfrom the computer and then forwards the requests to other programs or processes. The Network LicenseManager uses two daemons: the vendor daemon (adskflex.exe) and the license manager daemon (lmgrd.exe).
debug log file A file used with FLEXnet to log connection activity (such as license failure or starting andstopping) between the Network License Manager and the workstation.
deployment The files and folders created on a server and used by workstations to install Autodesk programs.
distributed server A license server configuration option in which several servers are used to manage licensedistribution. Each distributed license server has a unique license file and a fixed number of licenses. If onedistributed license server fails, the other servers are still able to distribute their licenses.
Ethernet address See host ID.
feature code A license file parameter that represents the product that is supported by that license file.
FLEXnet The Acresso Software license management technology implemented in the Autodesk family ofproducts.
C
71

heartbeat signal The communication signal between the Network License Manager and the workstation toverify that the workstation is accessible and has an active Autodesk product session running.
host ID The unique hardware address of a network adapter. Also known as Ethernet address or physical address.
host name The TCP/IP name associated with a computer. FLEXnet technology uses the host name as aparameter; the host name must be distinguished from the NetBIOS (server) name.
idle A state of inactivity in your product that prompts a network license server to reclaim a license. Inactivityis due to no mouse or keyboard activity and no commands, LISP expressions, menu macros, or scripts inprogress for the period of time that is defined in the Options file. See also license timeout.
JRE (Java Runtime Environment) A program that is required to run Java programs. This program must beinstalled with SAMreport-Lite.
license file A file used with FLEXnet that controls the number of available seats. This file must be in ASCIIplain text format.
license server A server that contains the Network License Manager.
license timeout A feature that allows you to set up a timeout period on your license server to automaticallyreturn an idle license to the server so that it is available for use again.
licpath.lic In both single and redundant server configurations, the file used to point the workstation to theFLEXnet license server. Licpath.lic is located in the root installation folder.
lmgrd.exe The license manager daemon. This daemon handles the original contact with the program, andthen passes the connection to the vendor daemon, adskflex.exe.
lmtools.exe A graphical user interface utility used to administer the FLEXnet license technology. (Lmutil.exeis the command line version of this utility.)
lmutil.exe A command line utility used to administer the FLEXnet license technology. (Lmtools.exe is thegraphical user interface version of this utility.)
master daemon See lmgrd.exe.
network license installation A type of installation that requires you to install and run the Network LicenseManager from a network server. You must install and configure the Network License Manager before clientscan run the Autodesk product.
Network License Manager The technology used by Autodesk for network license management.
Options file The file used by FLEXnet to control license manager parameters, such as reserving licenses andcreating report logs used with SAMreport-Lite.
physical address See host ID.
redundant server A license server configuration option in which three servers are used to administer licenses.The redundant servers share a license file and a pool of licenses. The redundant server pool remains functionalas long as two of the three servers are running and communicating with each other.
report log file A file used with FLEXnet and SAMreport-Lite. This log file provides information about networklicense usage. The Options file creates the report log.
SAMreport-Lite A version of Acresso Software's SAMreport tool. SAMreport-Lite is included on the Autodeskproduct discs.
vendor daemon See adskflex.exe.
workstation A desktop computer used by an individual user on a network.
72 | Appendix C Licensing Glossary

Index
A
activating programs 66Adskflex option 61adskflex.exe (Autodesk vendor daemon) 52Autodesk License Borrowing utility 61Autodesk Network License Manager 61Autodesk products
activating 66borrowing network licenses for 60reinstalling 69using off network 60
B
borrowing licensesabout 60reconnecting and borrowing again 61–62returning licenses 62
borrowing periods 61BORROWLICENSE command
about 62
C
Commercial licenses 56, 66computers
re-imaged 69copying
licenses 68customer support
contacting 2
D
daemonslicense manager daemons 52vendor daemons 52
datesexpiration 61system dates 69
Deployment wizard 69DHCP
hostname changes 40displaying
product license information 67distributed license server model
about 50license file example 54
distributingsoftware installation images 69
documentationconventions 1
documentation for this release 2
E
early returns of licenses 62Educational (EDU)/Institution licenses 56, 66email registration 23Ethernet address 57expiration dates for licenses
about 61
F
fax registration 23FLEXnet tools
about 59
G
glossary 72
H
hardwarelicense errors and 68
hardware requirementsNetwork License Manager 47, 49
heartbeat signals 56host IDs 57host names 57hostname
changing 40
I
Imtools.exe 61installation
Network License Manager 56
L
license borrowingabout 60borrowing licenses 60–61
73 | Index

expiration dates 61returning licenses 62third-party licensing tools 61
license filesabout 52additional parameters in 55combined products 55examples 53
license manager daemon 52license server
troubleshooting 36license servers
borrowing licenses 60–61heartbeat signals 56host IDs and host names 57installing on Mac OS X 56limited number of licenses 60management utilities 59models 50returning licenses 62stopping and restarting 59third-party licensing tools 61types of 50
licensesabout 51assigning 51availability 51behaviors (term limits) 56copying 68FLEXnet tools 59glossary 72license errors 68license files 52moving between computers 68single-user 65troubleshooting 68types of 56
limits on number of licenses 60Linux
Network License Manager 49lmgrd.exe (license manager daemon) 52lmtools.exe utility 57, 59lmutil.exe utility 59
M
Mac OS Xinstalling license server 56Network License Manager 49
Microsoft WindowsNetwork License Manager 47
N
network license installationsplanning 47tools and utilities 59types of 56
Network License Managerassigning licenses 51glossary 72installing 56license server models 50uninstalling 58upgrading 56
network license serversborrowing licenses 60–61limited number of licenses 60returning licenses 62third-party licensing tools 61
Not for Resale licenses 56, 66
O
offline registration 23operating systems
reinstalling 69OS X
Network License Manager 49
P
parameters in license files 55periods for licenses
about 61Permanent licenses 56, 66physical address 57Product Activation wizard 68
R
re-imaged computers 69reactivating programs 68redundant license server model
about 51license file example 54
registeringoffline 23
registering programs 66reinstalling
operating systems 69return dates for licenses
about 61returning borrowed licenses 61–62RETURNLICENSE command 63
S
serial numbersupdatng 67
servershost IDs and host names 57stopping and restarting 59
single license server modelabout 50license file example 54
74 | Index
single-user licenses 65software requirements
Network License Manager 47, 49stand-alone licenses 65Student Portfolio licenses 56, 66support
contacting 2system dates 69system requirements
Network License Manager 47, 49system times 69
T
TCP/IP names 57Term Extendable licenses 56, 66Term Non-Extendable licenses 56, 66third-party licensing tools 61time
system time 69time periods for licenses
about 61
Trial licenses 66troubleshooting
hostname changes 40license server status 36
troubleshooting license errors 68
U
uninstallingNetwork License Manager 58
upgradingNetwork License Manager 56
V
vendor daemons 52
W
WindowsNetwork License Manager 47
Index | 75

76