smart pet feeder user manual
TRANSCRIPT

PP003 V1.0 EN
Smart Pet Feeder
User Manual

Contents
Hardware Installation and Introduction .............................................. 1
Software Installation ............................................................................. 3
Add pet feeder via QR code mode .............................................. 3
Add pet feeder via AP mode ......................................................... 8
Add pet feeder via Auto Scan mode .......................................... 10
Feeding ................................................................................................ 11
Manual feeding ............................................................................. 11
Timed feeding ............................................................................... 12
Feeding voice recording .............................................................. 13
Feeding records and alarm ......................................................... 14
Others .................................................................................................. 15
Advanced settings ........................................................................ 15
Battery ........................................................................................... 17
Reset .............................................................................................. 18
FAQ ................................................................................................ 18
Notice:
This user manual is based on the current feeder and App when it was
written. If the feeder or App changes, this user manual will be updated
on our website.

1
Hardware Installation and Introduction
1. Open the battery compartment at the bottom of the feeder, insert the
Micro USB power cord into the connector at the bottom; and extend
the power cord out along the designed wire guide. You can also insert
3 pieces of D cell batteries which will enable the feeder to work
automatically according to your scheduled feeding plan even without
an external power supply. Turn on the power switch.
2. Rotate the knob on the top cover. The feeding tray is in the grain
bucket. Place the feeding tray into the feeder from the front, then pour
pet food into the feeder.
OFF
ON
Power
switch

2
Note: Due to the wide variety of pet foods on the market, it cannot be
guaranteed 100% that the mechanical structure of the feeder will fit all
types of pet food. We recommend using only dry food within 5–15mm
in size. Wet food and damp food are strictly prohibited from being
placed in the feeder.
3. For your pet's health, please wash the feeding bucket and feeding tray
regularly. The feeder body should not be filled with water. Please wipe
it with a wring-able wet cloth.
4. Pet Feeder introduction
Power Indicator Wi- Fi Indicator
Wi-Fi Settings
Button
Manual
Feeding Button
Microphone
Photosensor
Camera

3
5. You can push the camera to turn down to observe the feeding tray. The
feeder supports up to 4 levels of angle adjustment. It supports
Micro-SD card recording, and the SD card slot is visible when the
camera is turned to the bottom.
Software Installation
Add pet feeder via QR code mode
1. Search the App Store or scan the QR code below to download and
install Pet Zero.
2. Run the App, read and agree to the privacy policy, and register a new
account or login to a registered account. When you register or login to
Pet Zero
Download Website 1 Download Website 2
SD card slot

4
the account, please choose the correct country or area.
3. When you login, the App will ask you to access certain permissions.
These permissions are very important for the App so please allow
them.
Click Add Device or + to add a new pet feeder. Choose the Add
Manually tab and select Smart Pet Feeder.
4. After turning the feeder on, wait for about 1 minute for it to boot up.
Then check whether the Wi-Fi indicator is flashing RED 2 times per

5
second.
If yes, then click next step to go to the next step.
If not, please long press the Wi-Fi Settings button for 5 seconds until
you hear a beep. After a few seconds, the feeder's indicator LED will
flash RED rapidly.
Wi-Fi Indicator status:
Flashing rapidly in RED Feeder is waiting for Wi-Fi network
configuration; it is in QR code mode and
auto scan mode.
Flashing slowly in RED Feeder is waiting for Wi-Fi network
configuration; it is in AP mode.
Always on in RED Feeder is configured for the Wi-Fi network
and trying to connect. If the connection
fails, it will always be red.
Always on in GREEN Feeder is connected to the Wi-Fi network. It
can be turned off in the settings.
Notice: When the feeder is only powered by batteries, the power
indicator and Wi-Fi indicator will turn off.
Flashing RED rapidly Long press

6
5. If the App asks for the location permission of your mobile phone,
please allow it. The name of your Wi-Fi network will then appear in the
textbox automatically.
Please note that the feeder does not support 5Ghz Wi-Fi networks, but
only 2.4Ghz networks. Please check that the Wi-Fi name is the name of
a 2.4Ghz Wi-Fi network. If not, please switch the mobile phone's Wi-Fi
network to a 2.4Ghz Wi-Fi network.
Next, please enter the corresponding Wi-Fi password and click
Confirm.
Important Notice:
a. Please choose a 2.4Ghz Wi-Fi signal instead of a 5Ghz signal. The
feeder does not support 5Ghz Wi-Fi networks.
b. When entering the password, be aware that it is case sensitive.
c. Please choose a Wi-Fi network with WPA or WPA2 encryption
instead of WEP encryption.
d. Make sure that MAC address filtering and wireless device isolation is
turned off on the wireless router.
e. The feeder may not support the Wi-Fi signal of the wireless repeater.
If the connection fails, try connecting to the wireless router.
6. The App will then ask you to scan a QR code that contains your Wi-Fi
7
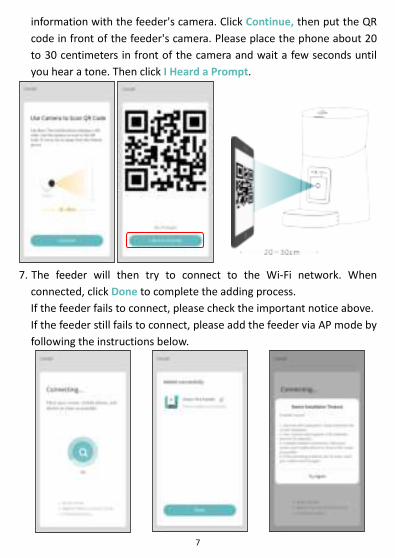
information with the feeder's camera. Click Continue, then put the QR
code in front of the feeder's camera. Please place the phone about 20
to 30 centimeters in front of the camera and wait a few seconds until
you hear a tone. Then click I Heard a Prompt.
7. The feeder will then try to connect to the Wi-Fi network. When
connected, click Done to complete the adding process.
If the feeder fails to connect, please check the important notice above.
If the feeder still fails to connect, please add the feeder via AP mode by
following the instructions below.

8
8. The App will be then directed to the video interface for the pet feeder.
Notice:
a. The WLAN signal shows on video is only for checking the internal
network's status. It does not represent the internet connection's
status.
b. To enable certain functions, the App needs to obtain corresponding
permissions on the phone. Please allow them when prompted.
Add pet feeder via AP mode
1. If the feeder fails to connect to the Wi-Fi network, the AP mode is plan
B for adding the feeder.
Choose AP Mode manually in the adding process.
Check that the Wi-Fi indicator LED is flashing RED once every 3 seconds.
Then click next step.
If the indicator is in another status, please long press the Wi-Fi button
for 3 seconds until you hear a beep to switch Wi-Fi indicator's flashing
status to flashing rapidly. Then long press the Wi-Fi button again to
Full screen
WLAN signal
Advanced settings
Record to phone
Set up feeding plan
Speak to pet feeder
Play videos back in SD card
Take snapshot to phone
Check snapshots and
video records in phone;
only available for
android phones.
Listen to feeder
Switch video resolution

9
switch the Wi-Fi indicator's flashing status to flashing slowly.
2. Please check the name of the 2.4Ghz Wi-Fi network and enter the
password in the same way as in QR code mode. Click Confirm and the
App will ask you to switch your mobile phone's Wi-Fi network to a new
network broadcast by the feeder.
3. Please go to Wi-Fi settings on the mobile phone and connect to the
Wi-Fi which starts with SmartLife- . No password is necessary.
Return to the App after the Wi-Fi is connected. The adding process is
the same as in QR code mode covered above.

10
Add pet feeder via Auto Scan mode
Please note that in auto scan mode, 100% success rate of connecting the
feeder to the Wi-Fi network cannot be guaranteed.
Choose Auto Scan Mode on the Wi-Fi pet feeder page and enter the
correct name and password of the 2.4GHz Wi-Fi network. Make sure the
feeder's indicator LED is flashing RED rapidly.
Wait for the feeder to connect to the Wi-Fi network and appear in the
App.

11
Feeding
Manual feeding
1. Click Feed in live video page. Choose the feeding portions and click
Feed. The feeder will feed immediately.
2. You can also click the Manual feed button on the feeder to feed
manually.
Double click

12
Timed feeding
1. The pet feeder supports the scheduled feeding of exact portions at
exact times. Click the Feeding Plan button , click Add timing, choose
Feeding time, Repeat rules for each day of the week, and Feed
portions, then click Save.
2. The feeder supports up to 12 feeding schedules. If you need to disable
a schedule, you can disable it by disabling its switch.
You can also delete it by long pressing the feeding schedule to access
the delete option.
Long press

13
Feeding voice recording
1. To develop good feeding habits for pets, the feeder supports
pre-recording a maximum of 10 seconds of audio, which is played
during feeding.
2. Click the Feeding audio button on the manual feed page, then start
talking near the microphone of the feeder. The feeder will start
recording your voice. When you want to stop, click the Feeding audio
button again, or wait for 10seconds when it stops automatically. The
closer you are to the microphone, the louder your voice can be
recorded.
3. After recording is complete, the feeder will play a preview of the
recorded audio. If you need to change the recording, please re-record
it. The default voice recording playback is 3 times.
Notice:
a. When the pet feeder is connected by the regular power adapter, the
pet feeder recording will be played during feeding.
b. If pet food blocks the food tray, the pet feeder will stop feeding and
wait for 10 minutes. The voice recording will be played 3 times
every 2 minutes to call the pets. If the pets finish the food in the tray,
Microphone

14
the pet feeder will work as scheduled in the feeding plan. Otherwise,
it will stop feeding if the pets still do not finish feeding after 10
minutes. The feeder cannot operate until feeding resumes.
c. The voice recording will not play when feeding by button and
battery supply only.
Feeding records and alarm
1. After feeding, there will be feeding records in the App. Click Feeding
record on the manual feed page to check the feeding records. In the
snapshot below, there is a feeding record that 5 portions were fed
between 3:00 pm to 3:59 pm of May 8th, 2020.
2. Machine malfunctions include low or empty food storage, low battery
and food jammed in the feeding bucket or feeding tray.
3. When a malfunction occurs, a message will appear in the App. You can
check error messages in the message center. Make sure that prompt
message (notification) is enabled.

15
Others
Advanced settings Click to access the advanced settings page.
Device information: Check feeder information. Please make sure that the
time zone of the feeder is correct. It should be same as the mobile
phone's time zone when adding the feeder. If it is incorrect, the feeder
may feed at incorrect times, so please remove the feeder and add it
again.

16
Tap-to-Run and Automation: It is not suitable for this feeder, please
ignore it.
Basic Function Settings: In basic function settings, you can turn indicators
on/off. Notice that when feeder is feeding, the power indicator will flash
even if it is turned off. You can turn on/off the timestamp shown in the
live video. You can also switch talk mode to 2-way audio communication.
IR Night Vision: Turn on/off/auto the IR night LED.
Storage Settings: When you insert a Micro SD card before turning the
feeder on, it will be shown in the settings. You can turn SD card recording
on/off. There are 2 recording modes; the feeder will record 5 minutes
after feeding in Event recording mode, and the feeder will record all the
time in Non-stop mode.
Offline Notification: When the feeder is offline, a notification will be sent
to your mobile phone.
Share Device: If you want to add the feeder to another mobile phone,
register a new account on the new mobile phone, then share the device

17
with the new account. Please make sure that both accounts are in the
same country or area when registering them.
Remove Device: You can re-configure the feeder's Wi-Fi network and
restore the feeder to factory default settings with this option.
Battery
The back-up battery is designed as a short-term alternative for when the
external power supply is cut. With battery supply only, when the feeder
reaches the time set for timed feeding, the feeder will feed as normal.
When the pet feeder works on battery back-up, it will go into sleep mode
and some functions will be limited:
a. When there is battery supply only, the feeding voice recording will
not be played.
b. When there is battery supply only, all functions related to the
camera on the feeder will be unavailable.
c. When there is battery supply only, the feeder's Wi-Fi connection will
be disconnected. All operations on the App will be unavailable.
d. The power indicator and Wi-Fi indicator will turn off during standby

18
Reset
When you want to reset the feeder to factory default settings, turn on
the feeder with external power and wait for it to boot up. Long press the
Wi-Fi settings button for 5 seconds until you hear a prompt voice. Then
the feeder will reset to factory default settings
FAQ
Q1: Why did the feeder fail to connect to my Wi-Fi network?
A: Please check the important notice on Page 6 for help. You can try to
add the feeder via AP mode instead of QR code mode and auto scan
mode.
Q2: Why does the feeder feed at the wrong time?
A: Please check that the time zone of the feeder is correct. You can find
help about time zone information on Page 15.
Q3: Why does it always prompt that food is blocking the feeding tray
when this is not actually the case?
A:Once food falls into the tray, the feeder will wait for 10 minutes for the
pet to eat the food. If the pet does not come to eat during this time, the
feeder will send a message that food is blocking the feeding tray. If the
pet ate the food after 10 minutes, you will still receive the message. It is
also possible that food is stuck in the food slot. If that is the case, clean
the food slot.
Q4: Why is the indicator LED still flashing after I disabled it?
A: When it is feeding, the indicator LED cannot be disabled.
Q5: Why is the screen black or the video frozen when the feeder is
online?
A: It depends on the network status. This may happen if the feeder's
Wi-Fi network is not good or the phone is connected to an unstable
network. You can try to switch a lower resolution to improve this.