small parts miter-maker bench hook
TRANSCRIPT

1 WOOD magazine Dec/Jan 2012/2013
EXPLODED VIEW
Cutting perfect miters in small project parts using a tablesaw or mitersaw can be dicey. But with a
handsaw and this bench-hook miter box, you’ll cut those angles with ease.
As its name implies, this jig hooks over the edge of your workbench. You apply forward pressure with your non-cutting hand during the cut to keep it locked in place.
1Edge-glue a 3⁄4"-thick hardwood blank to 12" wide. Cut it to length
for the bench hook’s body (A) [Exploded View]. Cut two 12"-long 1×1" strips for the fences (B). Glue them to opposite ends and opposite faces of the body.
Bench Hook
Small Parts Miter-Maker
FILENAME: 216BnchHook_#100673519.aiDate: 8-12Lorna J.
1 EXPLODED VIEWFilename: 216 BenchHook/MiterLj 6-15,
12"
12"
2"
4"
45°
45°
¾"
12"
1"
1"2"
2"
B
A
B
2woodmagazine.com
For free help in learning the basics of choosing and using a handsaw, see woodmagazine.com/helpfulhandsaws.
For free handsaw reviews, visit woodmagazine.com/handsawreview.
More Resources
2To cut precise guide slots (which capture your saw blade for accurate
cuts) in the fences (B), first make a set of blade guides. To do this, use your table-saw or mitersaw to make a 45° miter cut in the center of a 1 1⁄2×1 1⁄2×10" piece of scrap. Keep both pieces.
3Mark the guide-slot locations on the fences (B). If you’re right-handed,
make the marks toward the right end of the fence; if you’re left-handed, mark toward the left. This leaves room to grip the workpiece and fence during the cut.
4You should make this bench hook to perfectly fit a specific saw, so first
select a short backsaw (a handsaw with a stiff rib on the edge opposite the blade’s teeth) with 14–22 teeth per inch. Follow the steps in Photos A, B, and C to cut the guide slots.
5After cutting all four guide slots in the fences, install a 3 ⁄4" round-
over bit in your router table and rout the outside edges of the fences (B) using a scrap spacer [Photo D] to give the bench hook a polished
appearance. Be sure to note which saw the bench hook fits.
A
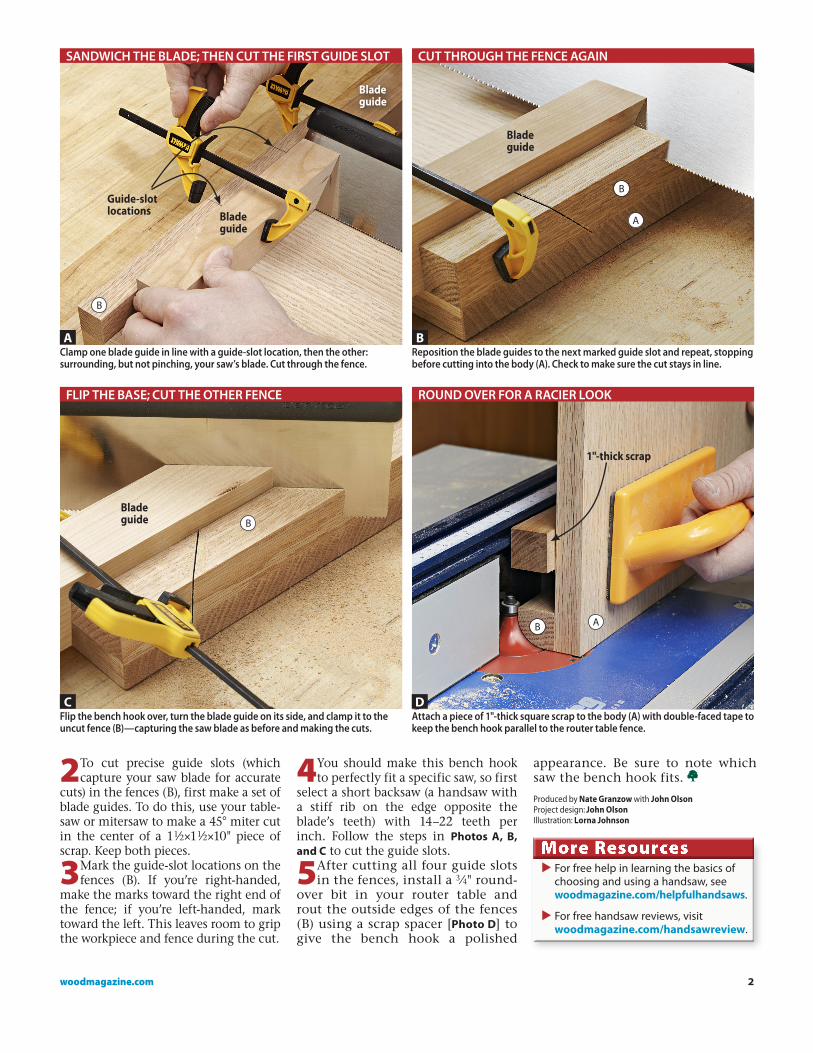
SANDWICH THE BLADE; THEN CUT THE FIRST GUIDE SLOT
B
CUT THROUGH THE FENCE AGAIN
Clamp one blade guide in line with a guide-slot location, then the other: surrounding, but not pinching, your saw’s blade. Cut through the fence.
Reposition the blade guides to the next marked guide slot and repeat, stopping before cutting into the body (A). Check to make sure the cut stays in line.
C
FLIP THE BASE; CUT THE OTHER FENCE
D
ROUND OVER FOR A RACIER LOOK
Flip the bench hook over, turn the blade guide on its side, and clamp it to the uncut fence (B)—capturing the saw blade as before and making the cuts.
Attach a piece of 1"-thick square scrap to the body (A) with double-faced tape to keep the bench hook parallel to the router table fence.
Produced by Nate Granzow with John Olson Project design: John OlsonIllustration: Lorna Johnson
Blade guide
Blade guide
Blade guide
Guide-slot locations
1"-thick scrap
B
B
Blade guide
B A
A
B