small block series - traynor ampstraynoramps.com/downloads/ownersman/om_smallblock200.pdf · small...
TRANSCRIPT

Small Block SeriesB A S S G U I T A R A M P L I F I E R S

The exclamation point within an equilatereal triangle is intended to alert the user to the presence of important operating and maintenance (servicing) instructions in the literature accompanying the appliance.
Le point d’exclamation à l’intérieur d’un triangle équilatéral est prévu pour alerter l’utilisateur de la présence d’instructions importantes dans la littérature accompagnant l’appareil en ce qui concerne l’opération et la maintenance de cet appareil.
This lightning flash with arrowhead symbol, within an equilateral triangle, is intended to alert the user to the presence of uninsulated “dangerous voltage” within the product’s enclosure that may be of sufficient magnitude to constitute a risk of electric shock to persons.
Ce symbole d’éclair avec tête de flèche dans un triangle équilatéral est prévu pour alerter l’utilisateur de la présence d’un «voltage dangereux» non-isolé à proximité de l’enceinte du produit qui pourrait être d’ampleur suffisante pour présenter un risque de choque électrique.
_safety-5v0+UL60065-00-1v1 • February 13, 2017
CAUTION: TO REDUCE THE RISK OF ELECTRIC SHOCK, DO NOT REMOVE COVER (OR BACK).
NO USER SERVICEABLE PARTS INSIDE.
REFER SERVICING TO QUALIFIED SERVICE PERSONNEL.
THIS DEVICE IS FOR INDOOR USE ONLY!
Instructions pertaining to a risk of fire, electric shock, or injury to a person
Read Instructions: The Owner’s Manual should be read and understood before operation of your unit. Please, save these instructions for future reference and heed all warnings.
Clean only with dry cloth.
Packaging: Keep the box and packaging materials, in case the unit needs to be returned for service.
Warning: To reduce the risk or fire or electric shock, do not expose this apparatus to rain or moisture. Do not use this apparatus near water!
Warning: When using electric products, basic precautions should always be followed, including the following:
Power SourcesYour unit should be connected to a power source only of the voltage specified in the owners manual or as marked on the unit. This unit has a polarized plug. Do not use with an extension cord or receptacle unless the plug can be fully inserted. Precautions should be taken so that the grounding scheme on the unit is not defeated. An apparatus with CLASS I construction shall be connected to a Mains socket outlet with a protective earthing ground. Where the MAINS plug or an appliance coupler is used as the disconnect device, the disconnect device shall remain readily operable.
HazardsDo not place this product on an unstable cart, stand, tripod, bracket or table. The product may fall, causing serious personal injury and serious damage to the product. Use only with cart, stand, tripod, bracket, or table recommended by the manufacturer or sold with the product. Follow the manufacturer’s instructions when installing the product and use mounting accessories recommended by the manufacturer. Only use attachments/accessories specified by the manufacturerNote: Prolonged use of headphones at a high volume may cause health damage on your ears.
The apparatus should not be exposed to dripping or splashing water; no objects filled with liquids should be placed on the apparatus.
Terminals marked with the “lightning bolt” are hazardous live; the external wiring connected to these terminals require installation by an instructed person or the use of ready made leads or cords.
Ensure that proper ventilation is provided around the appliance. Do not install near any heat sources such as radiators, heat registers, stoves, or other apparatus (including amplifiers) that produce heat.
No naked flame sources, such as lighted candles, should be placed on the apparatus.
Power CordDo not defeat the safety purpose of the polarized or grounding-type plug. A polarized plug has two blades with one wider than the other. A grounding type plug has two blades and a third grounding prong. The wide blade or the third prong are provided for your safety. If the provided plug does not fit into your outlet, consult an electrician for replacement of the obsolete outlet. The AC supply cord should be routed so that it is unlikely that it will be damaged. Protect the power cord from being walked on or pinched particularly at plugs. If the AC supply cord is damaged DO NOT OPERATE THE UNIT. To completely disconnect this apparatus from the AC Mains, disconnect the power supply cord plug from the AC receptacle. The mains plug of the power supply cord shall remain readily operable.
Unplug this apparatus during lightning storms or when unused for long periods of time.
ServiceThe unit should be serviced only by qualified service personnel. Servicing is required when the apparatus has been damaged in any way, such as power-supply cord or plug is damaged, liquid has been spilled or objects have fallen into the apparatus, the apparatus has been exposed to rain or moisture, does not operate normally, or has been dropped.
AVIS: AFIN DE REDUIRE LES RISQUE DE CHOC ELECTRIQUE, N’ENLEVEZ PAS LE COUVERT
(OU LE PANNEAU ARRIERE)
NE CONTIENT AUCUNE PIECE REPARABLE PAR L’UTILISATEUR.
CONSULTEZ UN TECHNICIEN QUALIFIE POUR L’ENTRETIENT
CE PRODUIT EST POUR L’USAGE À L’INTÉREUR SEULEMENT
Instructions relatives au risque de feu, choc électrique, ou blessures aux personnes
Veuillez Lire le Manuel: Il contient des informations qui devraient êtres comprises avant l’opération de votre appareil. Conservez. Gardez S.V.P. ces instructions pour consultations ultérieures et observez tous les avertissements.
Nettoyez seulement avec le tissu sec.
Emballage: Conservez la boite au cas ou l’appareil devait être retourner pour réparation.
Avertissement: Pour réduire le risque de feu ou la décharge électrique, n'exposez pas cet appareil à la pluie ou à l'humidité. N’utilisez pas cet appareil près de l’eau!
Attention: Lors de l’utilisation de produits électrique, assurez-vous d’adhérer à des précautions de bases incluant celle qui suivent:
AlimentationL’appareil ne doit être branché qu’à une source d’alimentation correspondant au voltage spécifié dans le manuel ou tel qu’indiqué sur l’appareil. Cet appareil est équipé d’une prise d’alimentation polarisée. Ne pas utiliser cet appareil avec un cordon de raccordement à moins qu’il soit possible d’insérer complètement les trois lames. Des précautions doivent êtres prises afin d’eviter que le système de mise à la terre de l’appareil ne soit désengagé. Un appareil construit selon les normes de CLASS I devrait être raccordé à une prise murale d’alimentation avec connexion intacte de mise à la masse. Lorsqu’une prise de branchement ou un coupleur d'appareils est utilisée comme dispositif de débranchement, ce dispositif de débranchement devra demeurer pleinement fonctionnel avec raccordement à la masse.
RisqueNe pas placer cet appareil sur un chariot, un support, un trépied ou une table instables. L’appareil pourrait tomber et blesser quelqu’un ou subir des dommages importants. Utiliser seulement un chariot, un support, un trépied ou une table recommandés par le fabricant ou vendus avec le produit. Suivre les instructions du fabricant pour installer l’appareil et utiliser les accessoires recommandés par le fabricant. Utilisez seulement les attachements/accessoires indiqués par le fabricantNote: L'utilisation prolongée des écouteurs à un volume élevé peut avoir des conséquences néfastes sur la santé sur vos oreilles. .
Il convient de ne pas placer sur l’appareil de sources de flammes nues, telles que des bougies allumées.
L’appeil ne doit pas être exposé à des égouttements d’eau ou des éclaboussures et qu’aucun objet rempli de liquide tel que des vases ne doit être placé sur l’appareil.
Assurez que lappareil est fourni de la propre ventilation. Ne procédez pas à l’installation près de source de chaleur tels que radiateurs, registre de chaleur, fours ou autres appareils (incluant les amplificateurs) qui produisent de la chaleur.
Les dispositifs marqués d’une symbole “d’éclair” sont des parties dangereuses au toucher et que les câblages extérieurs connectés à ces dispositifs de connection extérieure doivent être effectivés par un opérateur formé ou en utilisant des cordons déjà préparés.
Cordon d’AlimentationNe pas enlever le dispositif de sécurité sur la prise polarisée ou la prise avec tige de mise à la masse du cordon d’alimentation. Une prise polarisée dispose de deux lames dont une plus large que l’autre. Une prise avec tige de mise à la masse dispose de deux lames en plus d’une troisième tige qui connecte à la masse. La lame plus large ou la tige de mise à la masse est prévu pour votre sécurité. La prise murale est désuète si elle n’est pas conçue pour accepter ce type de prise avec dispositif de sécurité. Dans ce cas, contactez un électricien pour faire remplacer la prise murale. Évitez d’endommager le cordon d’alimentation. Protégez le cordon d’alimentation. Assurez-vous qu’on ne marche pas dessus et qu’on ne le pince pas en particulier aux prises. N’UTILISEZ PAS L’APPAREIL si le cordon d’alimentation est endommagé. Pour débrancher complètement cet appareil de l’alimentation CA principale, déconnectez le cordon d’alimentation de la prise d’alimentation murale. Le cordon d’alimentation du bloc d’alimentation de l’appareil doit demeurer pleinement fonctionnel.
Débranchez cet appareil durant les orages ou si inutilisé pendant de longues périodes.
ServiceConsultez un technicien qualifié pour l’entretien de votre appareil. L'entretien est nécessaire quand l'appareil a été endommagé de quelque façon que se soit. Par exemple si le cordon d’alimentation ou la prise du cordon sont endommagés, si il y a eu du liquide qui a été renversé à l’intérieur ou des objets sont tombés dans l'appareil, si l'appareil a été exposé à la pluie ou à l'humidité, si il ne fonctionne pas normalement, ou a été échappé.
S2125ACaution: hot surfaceAttention: surface chaude
IEC 60417-5041
IMPORTANT SAFETY INSTRUCTIONS
IMPORTANT SAFETY INSTRUCTIONS (UL60065)
FOLLOW ALL INSTRUCTIONS SUIVEZ TOUTES LES INSTRUCTIONS
The Lightning Flash with arrowhead symbol within an equilateral triangle, is intended to alert the user to the presence of uninsulated "dangerous voltage" within the product enclosure that may be of sufficient magnitude to constitute a risk of shock to persons
The exclamation point within an equilateral triangle is intended to alert the user to the presence of important operating and maintenance (servicing) instructions in the literature accompanying the product
1. Read these instructions.
2. Keep these instructions.
3. Heed all warnings.
4. Follow all instructions.
5. Do not use this apparatus near water.
6. Clean only with dry cloth.
7. Do not block any ventilation openings. Install in accordance with the manufacturer’s instructions.
8. Do not install near any heat sources such as radiators, heat registers, stoves, or other apparatus (including amplifiers) that produce heat.
9. Do not defeat the safety purpose of the polarized or grounding-type plug. A polarized plug has two blades with one wider than the other. A grounding type plug has two blades and a third grounding prong. The wide blade or the third prongs are provided for your safety. If the provided plug does not fit into your outlet, consult an electrician for replacement of the obsolete outlet.
10. Protect the power cord from being walked on or pinched particularly at plugs, convenience receptacles, and the point where they exit from the apparatus.
11. Only use attachments/accessories specified by the manufacturer.
12. Use only with the cart, stand, tripod, bracket, or table specified by the manufacturer, or sold with the apparatus. When a cart is used, use caution when moving the cart/apparatus combination to avoid injury from tip-over.
13. Unplug this apparatus during lightning storms or when unused for long periods of time.
14. Refer all servicing to qualified service personnel. Servicing is required when the apparatus has been damaged in any way, such as power-supply cord or plug is damaged, liquid has been spilled or objects have fallen into the apparatus, the apparatus has been exposed to rain or moisture, does not operate normally, or has been dropped.
WARNING: • To reduce the risk of fire or electric shock, do not expose this apparatus to rain or moisture and objects filled with liquids, such as vases, should not be placed on this apparatus.
• To completely disconnect this apparatus from the ac mains, disconnect the power supply cord plug from the ac receptacle.
• The mains plug of the power supply cord or appliance coupler shall remain readily accessible.
Le symbole représentant un éclair avec une flèche à l’intérieur d’un triangle équilatéral est utilisé pour prévenir l’utilisateur de la présence d’une tension électrique dangereuse non isolée à l’intérieur de l’appareil. Cette tension est d’un niveau suffisamment élevé pour représenter un risque d’électrocution
Le symbole représentant un point d’exclamation à l’intérieur d’un triangle équilatéral, signale à l’utilisateur la présence d’instructions importantes relatives au fonctionnement et à l’entretien de l’appareil dans cette notice d’installation
1. Lisez ces instructions.
2. Conservez ces instructions.
3. Respecter tous les avertissements.
4. Suivez toutes les instructions.
5. N'utilisez pas l'appareil près de l'eau.
6. Nettoyer uniquement avec chiffon sec.
7. Ne bloquez pas les ouvertures de ventilation. Installer en suivant les instructions du fabricant.
8. Ne pas installer près des sources de chaleur telles que radiateurs, bouches de chaleur, four ou autres appareils (y compris les amplificateurs) produisant de la chaleur.
9. N'annulez pas l'objectif sécuritaire de la fiche polarisée ou de la tige de mise à la terre. Une fiche polarisée possède deux lames avec une plus large que l'autre. Une prise avec mise à la terre possède deux lames et une troisième tige. La lame large ou la troisième tige sont fournis pour votre sécurité. Si la fiche n'entre pas dans votre prise, consultez un électricien pour remplacer la prise obsolète.
10. Protéger le cordon d'alimentation des piétinements ou pincements en particulier près des fiches, des prises de courant et au point de sortie de l'appareil.
11. Utilisez uniquement les accessoires spécifiés par le fabricant.
12. Utiliser uniquement avec un charriot, stand, trépied ou une table spécifiée par le fabricant, ou vendus avec l'appareil.
13. Débranchez l'appareil durant un orage ou lorsqu'il reste inutilisé pendant de longues périodes de temps.
14. Confiez toute réparation à un technicien qualifié. Une réparation est nécessaire lorsque l'appareil a été endommagé de quelque façon que ce soit; comme lorsque le cordon d'alimentation ou la fiche est endommagé, lorsque du liquide a été renversé ou des objets sont tombés à l'intérieur, lorsque l'appareil a été exposé à la pluie ou l'humidité, ne fonctionne pas normalement, ou est tombé.
AVERTISSEMENT: • Pour réduire les risques d'incendie ou de choc électrique, ne pas exposer cet appareil à la pluie ou à l'humidité et ne placez pas d’objets contenant des liquides, tels que des vases, sur l’appareil.
• Pour isoler totalement cet appareil de l'alimentation secteur, débranchez totalement son cordon d'alimentation du réceptacle CA.
• La prise du cordon d’alimentation ou du prolongateur, si vous en utilisez un comme dispositif de débranchement, doit rester facilement accessible
CAUTION TO PREVENT ELECTRIC SHOCK HAZARD,
DO NOT CONNECT TO MAINS POWER SUPPLYWHILE GRILLE IS REMOVED.
AVISPOUR PRÉVENIR LES RISQUES D'ÉLECTROCUTION,
NE PAS RACCORDER A L’ALIMENTATION ÉLECTRIQUE ALORS QUE LA GRILLE EST RETIRÉE.

1
SB110SB112
SB115
Line Out
GND
LIFT
OUT
IN
Limiter Ground
0 -6
Low-Mid Hi-Mid Treble Aux In Phones Tweeter
IN OUT
MASTERLowExpanderBassGainPassive Active
Input
Tweeter
IN OUT
0 -6
LowExpander
Bass Low-Mid Hi-Mid Treble
GND
LIFT
Line OutAux In PhonesGainPassive Active
Input Line Out Tweeter
IN OUT
Traynor Small Block 200 Bass Guitar AmplifiersTraynor Small Block SB110, SB112 and SB115Thank you for choosing one of the Traynor Small Block series amplifiers. You’ll discover that these bass amps sound “right” with a minimum amount of effort and knob twirling, delivering great tone and making them perfect for practically any performance. Best of all, its extremely lightweight and compact; this will make setups and tear-downs a great deal easier.
When you need the extras, they’re all here:• ThepowerLEDdisplaysthestatusoftheamplifier,includingpowerup,readyandfault.• InputsareprovidedforstandardPassivepickups(0dB)andextra-hotorActivepickups(-6dB).• AnAUXinputjackforplayingexternalaudiofrommediaplayers.• TheGaincontrolletsyoudial-intheperfectamountofvolume,sensitivity,clarity,
warmth(orevenoverdrive).• TheMastervolumecontrol(SB115only)controlstheoverallvolume.• TheLowexpandercontroltailorsyoursoundpreciselyanduniquelybyextendingthe
lows while reducing the mids.• ActiveBass,Low-Mid,Hi-MidandTrebletonecontrolsprovideupto15dBofcutorboost.• TheMutebuttoncutstheaudiosignaltothespeakerwithoutaffectingtheTuneroutput.• ThebalancedXLRLineOutispost-EQontheSB110andSB112whiletheSB115it'spre-EQ.• Phonesjackconnectsheadphonesforpracticingsilently,orformonitoringinthestudio;
please note that connected to headphones disconnects signal to the main amp.• Afull-rangespeakersystemwithacousticallymatchedandpreciselycrossed-over
lowandhigh-frequencydrivers(SmallBlockcombosonly).• ATweeterDefeat/ActiveswitchontheTraynorSmallBlockSB110,SB112andSB115
combo amps allow greater note definition or a softer vintage sound.
Please take a little time to read the following instructions; then plug in, switch on, and unleash your musical creativity!
1. Status LED and Power SwitchThepowerLEDdisplaysthestatusandconditionoftheamplifier.WhenpoweringuptheTraynorSmallBlock,theLEDwillilluminateredforafewmomentsandthenturnbluewhentheampisreadytogo.Ifafaultisdetected,theLEDwillconstantlyilluminatered.
2. 0dB/Passive and -6dB/Active Inputs and Clip LEDThe Traynor Small Block input circuit has been designed for most basses but all basses arenotcreatedequally.Sincesomebasseshavehighersignalswhileothershaveverylowsignals, the Traynor Small Blocks feature accommodating inputs.

2
SB110SB112
SB115
Line Out
GND
LIFT
OUT
IN
Limiter Ground
0 -6
Low-Mid Hi-Mid Treble Aux In Phones Tweeter
IN OUT
MASTERLowExpanderBassGainPassive Active
Input
Tweeter
IN OUT
0 -6
LowExpander
Bass Low-Mid Hi-Mid Treble
GND
LIFT
Line OutAux In PhonesGainPassive Active
Input Line Out Tweeter
IN OUT
1 Status LED and Power Switch (switchlocatedonrear)2 0dB/Passive and -6dB/Active Inputs and Clip LED–¼-inchphonejacks3 Gain Control 4 Tone Controls–Bass,Low-Mid,Hi-MidandTreble.5 Low Expander Control6 Master Volume Control (SB115only)7 Aux Input –¼-inchphonejack8 Phones Jack –¼-inchTRSjack9 GND Lift Switch (SB112andSB115only)
10 Line Out –XLRjack11 Limiter Switch (SB115only)12 Tweeter Defeat/Active Switch (SB110andSB112only)
Forbassguitarswithstandardsingle-coilpickupswesuggestyouusethe0dBinput;foractiveorextremely‘hot’pickups,suchashumbuckers,tryusingthe-6dBinput.Ifyouwantanoverdrivenedgeor“crunch,”usethe0dBinput.Inallcases,theGaincontrolsettingwillestablish the type of clean or overdriven sound being produced by the amp.
Note: Do not use both inputs at the same time!. The preamp is not designed for more than one instrument to be played at a time.
3. Gain ControlTheTraynorSmallBlockseriesGaincontrolallowsyoutosetthelevelofthesignalbeforeit’s sent to the tone controls. This allows control of the tonal ‘sensitivity’ or ‘definition’ of the amplifier.HigherGainsettingswillgivemore‘growl’toyourbass.
92
2
73
3
81
1
4
4
5
5
6
10 12 12
7 8
11
910
10
12

3
4. Tone ControlsAwiderangeofsonicadjustment,coveringtheentireaudiospectrum,isachievedbythefouractivetonecontrols.Eachtonecontrolhasagreatrangeof±15db.Thecenterpositiondenotesaneutralornominalsettingforallcontrols.TheBasscontroladjuststhelevelofthelowfrequencyandworkswiththeLowMid,thenextfrequencyrangeup.TheHiMidcoversthenexthigherfrequencyrangeandtheTreblecontroladjuststheupperfrequencyrange.
User Tip: When starting out, it’s a good idea to center all tone controls, adjust these while playing until the desired tone is achieved. Keep in mind that all tone and EQ circuits are gain-related, which means it may be necessary to re-adjust the Gain control once the desired tone is achieved. This will help you to retain the amount of clarity or ‘growl’ you desire.
5. Low Expander ControlTheLowExpandershapesthetoneofthebassbyextendingthelowfrequencyandreducingthemidfrequencies(around400Hz).Byre-shapingthefrequenciesinthismannerthisprovides an expanded tonal palette.
6. Master Volume Control (SB115 only)TheMastervolumecontroladjuststheoverallsignalleveloftheamplifier;considerityour “loudness” control.
7. Aux InputThe1/4-inchjackcanbeusedaninputforanexternalsoundsourcesuchasadigitalaudioplayerorsmartphonesetc.AstereosourcewillbesummedelectronicallywhenfedintotheAUXInputjackusingaTRS(stereojack).TheAUXInputisfedtothesignalflowafterthetone controls, which does not affect its tonality.
8. Phones JackAPhonejackhasbeenprovidedforconnectingheadphonessothatyoucanpracticeorrecordwithoutmakinganyaudiblesoundforthespeakers.Whenyouplugyourheadphonesin,theamplifier’sspeakersaredisconnected;theXLRLineOut,TunerjackandEffectsSendjackstillfunction.
9. GND Lift Switch (SB112 and SB115 only)TheGNDLiftswitch(SB112andSB115only)enablesthegroundpintobeliftedontheLineOutXLRjack.IntheLiftposition,thebuttondisconnectsPin1oftheXLRwhichmighthelpreducegroundloophumwhenroutingsignalsdirectlytootherequipmentormixingconsoles.Ifgroundloophumisnotpresent,youmaygetsuperiorshieldingfromoutsidenoisesourceswiththebuttonintheGNDsetting.Inmostcases,itisrecommendedtohavetheswitchsettoGND.
User Tip: When using the XLR Line out for recording direct-to-computer, we would recommend you insert a suitable device between the amp and computer such as A.R.T.’s TubeMP with USB for extra gain control and USB conversion.
10. Line Out XLRTheXLRLineOutallowstheusertoconnecttheSmallBlockpreampdirectlytoamixingconsoleorotheraudiodevicewhenperformingliveorrecording.Dependingontheavailableinputsonthemixer,orotheraudiodevice,useastandardXLRmiccable.Ifonly1/4-inchinputsareavailableonthemixer,orotheraudiodevice,itisrecommendedtouseanXLRfemaletoa1/4-inchTRSpatchcable.It’susuallybestifa1/4-inchTRSline-levelinputisusedonthemixer(orotheraudiodevice)tohelpmatchgainlevels.
11. Limiter Switch (SB115 ONLY)To prevent hard clipping of the power amp, a selectable peak limiter is provided.
12. Tweeter Defeat/Active Switch (SB110, SB112 and SB115 combos only)Inthedefeatposition,theTweeterDefeatswitchdisconnectstheinternaltweeterwhich provides a softer and more classic bass amplifier tone, for more brightness set theswitchtotheActiveposition..

4
SpecificationsModel: SB110
Type: bass ampCabinet Impedance (ohms): 4 ohms
Power @ min. impedance (watts): 120 wattsMinimum Impedance (ohms): 4 ohms
Burst Power - 2 cycle: 125 wattsSpeaker Configuration - LF (Size / Power): 10-inch/200W
Input Channels: 2Channel 1 - inputs: passive 0 dB, active -6 dB
Channel 1 - controls: Gain, Bass, Low Mid, High Mid, Treble and Low ExpanderChannel 1 - switches: Tweeter enable/disable
Channel 2 - inputs: Aux In - 1/4-inchLine Out (type / configuration): Balanced Post-EQ, AUX is Pre-EQ
Line Out Sensitivity (Vrms): 1 VrmsEffects Loop / Location: none
LED Indicators: red,blue protect, powerProtection: clip,thermal, overcurrent.
External speaker output / location: noneOther Features: Tweeter/30W enable/disable switch, 1/4-inch head phone jack
Dimensions (DWH, inches): 14 x 14 x 14Dimensions (DWH, cm): 35.6 x 35.6 x 35.6
Weight (lbs / kg): 21/9.5SpecificationsModel: SB112, SB115
Type: bass ampCabinet Impedance (ohms): 4 ohms
Power @ min. impedance (watts): 200 wattsMinimum Impedance (ohms): 4 ohms
Burst Power - 2 cycle: 250 wattsSpeaker Configuration - LF (Size / Power): 12-inch/200W (SB112), 15-inch/200W (SB115)
Input Channels: 2Channel 1 - inputs: passive 0 dB, active -6 dB
Channel 1 - controls: Gain, Bass, Low Mid, High Mid, Treble, Low Expander and Master* (Master on SB115 only)
Channel 1 - switches: Ground Lift, Limiter* (Limiter on SB115 only)Channel 2 - inputs: Aux In - 1/4-inch
Master Volume Control: Yes (on SB115 only)Line Out (type / configuration): Balanced Post-EQ, AUX is Pre-EQ,
Ground Lift (on SB115 only)Line Out Sensitivity (Vrms): 1 Vrms
Effects Loop / Location: noneLED Indicators: Blue Power and Red (status)
Protection: Clip, thermal and overcurrent.External speaker output / location: none
Other Features: Tweeter/30W enable/disable switch, 1/4-inch head phone jackDimensions (DWH, inches): 14 x 15.5 x 17.5 (SB112), 15 x 18 x 21.5 (SB115)
Dimensions (DWH, cm): 35.6 x 39.5 x 44.5 (SB112), 38.25 x 45.75 x 55.75 (SB115)Weight (lbs / kg): 25/11.3 (SB112), 31/14 (SB115)

5
SB110SB112
SB115
Line Out
GND
LIFT
OUT
IN
Limiter Ground
0 -6
Low-Mid Hi-Mid Treble Aux In Phones Tweeter
IN OUT
MASTERLowExpanderBassGainPassive Active
Input
Tweeter
IN OUT
0 -6
LowExpander
Bass Low-Mid Hi-Mid Treble
GND
LIFT
Line OutAux In PhonesGainPassive Active
Input Line Out Tweeter
IN OUT
Amplificateurs Pour Guitare Basse Traynor Small Block 200 Traynor Small Block SB110, SB112 et SB115Mercid’avoirchoisiundesamplificateursdelasérieTraynorSmallBlock.Cesamplificateurspourbassevousoffrirontavecunminimumd’ajustementetd’effort,labonnesonorité,unetonalitésuperbequilesrendparfaitpourpratiquementtouttypedeperformance.Encoremieux,ilssontextrêmementlégeretcompacts;cequifaciliteragrandementlemontageetledémontage.
Lorsque vous avez besoin d’extra, ils sont tous là:• LaDELd’alimentationaffichel’étatdel’amplificateur,incluantmiseenmarche,le
statut et si il est en faute.• Desentréessontprévuespourlesmicrospassifsstandards(0dB)etdesmicros
puissantsouactifs(-6dB).• Uneprised’entréeAUXpourlareproductionaudiod’appareilsexternescommelecteurmultimédia.• LacommandedeGainvouspermetderéglerlaquantitéparfaitedevolumes,de
sensibilité,declartéetdechaleur(oumêmelasaturation).• LacommandeMasterVolume(SB115seulement)ajusteleniveaudeVolumeglobal.• LacommandeLowExpanderestunefaçonuniquedemodelerprécisémentvotreson
enrehaussantlesgravealorsquelesmédianesnesontréduites.• CommandedetonalitéactivedeBass,Low-Mid,Hi-MidetTreblequioffrentdes
augmentationsoudescoupuresdejusqu’à15dB.• LeboutonMutecoupelesignalaudioauxhaut-parleurssansaffecterlasortiepouraccordeur.• LasortiedeligneXLRsymétriqueestpost-EQsurleSB110etSB112alorsquele
SB115elleestpré-EQ.• LaprisePhonepermetleraccordementd’uncasqued’écoutepourunepratique
silencieuse,oupourl’écouteenstudio;notezs’ilvousplaîtquelorsqu’uncasqued’écouteestconnecté,lesignaleàl’amplificateurprincipalestdéconnecté.
• Unsystèmedehaut-parleurspleine-bandeavecDriversdegravesetaiguesacoustiquementappariésetprécisémentcroisé(comboSmallBlockseulement).
• Unsélecteurd’activation/désactivationdeTweetersurlesamplificateurscombosTraynorSmallBlockSB110,SB112etSB115permetd’obtenirunegrandedéfinitiondenoteouun son vintage plus doux.
Nous vous prions de bien vouloir prendre le temps de vous familiariser avec les instructions suivantes; vous pourrez ensuite vous branchez, mettre l’appareil en marche et laissez aller votre créativité musicale!
1. DEL de Statut et Commutateurs de Mise en MarcheLaDELd’alimentationaffichelestatutetlaconditiondel’amplificateur.LorsdelamiseenmarcheduTraynorSmallBlock,laDELs’illumineenrougepourquelquesinstantspuistourneaubleulorsquel’amplificateurestprêtàêtreutilisé.SiunefauteestdétectéelaDELdemeureraconstammentilluminéenrouge.
6
SB110SB112
SB115
Line Out
GND
LIFT
OUT
IN
Limiter Ground
0 -6
Low-Mid Hi-Mid Treble Aux In Phones Tweeter
IN OUT
MASTERLowExpanderBassGainPassive Active
Input
Tweeter
IN OUT
0 -6
LowExpander
Bass Low-Mid Hi-Mid Treble
GND
LIFT
Line OutAux In PhonesGainPassive Active
Input Line Out Tweeter
IN OUT
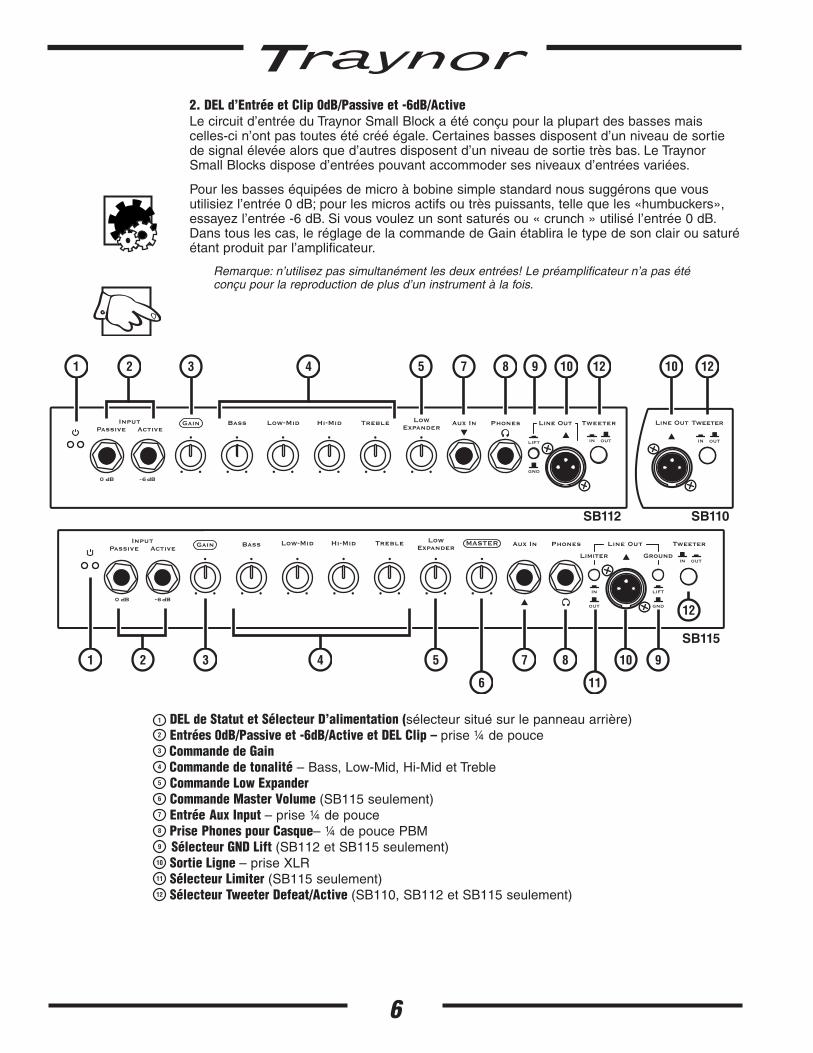
1 DEL de Statut et Sélecteur D’alimentation (sélecteursituésurlepanneauarrière) 2 Entrées 0dB/Passive et -6dB/Active et DEL Clip – prise ¼ de pouce 3 Commande de Gain 4 Commande de tonalité–Bass,Low-Mid,Hi-MidetTreble 5 Commande Low Expander 6 Commande Master Volume (SB115seulement) 7 Entrée Aux Input – prise ¼ de pouce 8 Prise Phones pour Casque–¼depoucePBM 9 Sélecteur GND Lift (SB112etSB115seulement) 10 Sortie Ligne –priseXLR 11 Sélecteur Limiter (SB115seulement) 12 Sélecteur Tweeter Defeat/Active (SB110,SB112etSB115seulement)
2. DEL d’Entrée et Clip 0dB/Passive et -6dB/Active Lecircuitd’entréeduTraynorSmallBlockaétéconçupourlaplupartdesbassesmaiscelles-cin’ontpastoutesétécrééégale.Certainesbassesdisposentd’unniveaudesortiedesignalélevéealorsqued’autresdisposentd’unniveaudesortietrèsbas.LeTraynorSmallBlocksdisposed’entréespouvantaccommodersesniveauxd’entréesvariées.
Pourlesbasseséquipéesdemicroàbobinesimplestandardnoussuggéronsquevousutilisiezl’entrée0dB;pourlesmicrosactifsoutrèspuissants,tellequeles«humbuckers»,essayezl’entrée-6dB.Sivousvoulezunsontsaturésou«crunch»utilisél’entrée0dB.Danstouslescas,leréglagedelacommandedeGainétabliraletypedesonclairousaturéétantproduitparl’amplificateur.
Remarque: n’utilisez pas simultanément les deux entrées! Le préamplificateur n’a pas été conçu pour la reproduction de plus d’un instrument à la fois.
92
2
73
3
81
1
4
4
5
5
6
10 12 12
7 8
11
910
10
12

7
3. Commande GainLacommandedegainduTraynorSmallBlockvouspermetd’ajusterleniveaudusignalavantqu’ilsoitacheminéauxcommandesdetonalité.Cecivouspermetdecontrôlerlasensibilitéouladéfinitiontonaldel’amplificateur.DesréglagesdeGainplusélevésdonnerontplusde«grondement»àvotrebasse.
4. Commande De TonalitéUnegammeétendued’ajustementsonore,couvranttoutlespectreaudio,estréaliséeparlesquatrecommandesdetonalitéactives.Chaquecommandedetonalitépermetl’ajustementsurunevasteplagederéglagede±15db.Lapositioncentraleindiqueleréglageneutreounominalpourtouteslescommandes.LacommandeBassajusteleniveaudesfréquencesgravesettravailenconjonctionafinquelacommandeLowMid,laprochainegammedefréquencesplusélevées.LacommandeHiMidcouvrelaprochainebandedefréquenceplusélevéesetlacommandeTrebleajustedelagammedesfréquenceslesplusaigües.
Conseille à l’utilisateur: c’est une bonne idée de commencer avec toutes les commandes de tonalités réglées à leur position centrale, ajuster les ensuite alors que vous jouez jusqu’à ce que vous ayez obtenu la tonalité désirer. N’oubliez pas que tous les circuits de tonalité et d’égalisation sont liés au Gain, cela signifie qu’il pourrait être nécessaire de réajuster la commande de Gain une fois la tonalité désirez obtenue. Cela vous aidera à maintenir le niveau de clarté ou de «grondement» que vous désirez.
5. Commande Low Expander LacommandeLowExpandersculptelatonalitédesbassesenrehaussantlesfréquencesgravesetenréduisantlesfréquencesmédianes(àenviron400Hz).Cettefaçondefaçonnervotretonalitévousoffreunepalettesonoreétendue.
6. Commande Master Volume (SB115 seulement)LacommandeMasterVolumerègleleniveauglobaldusignaldel’amplificateur;c’estlacommande de volume.
7. Entrée Aux Laprise1/4-poucepeutêtreutiliséecommeentréepourunesourcesonoreexternetelunlecteuraudionumériqueoulestéléphonesintelligents,etc.Lessignauxd’unesourcestéréosontadditionnésparvoieélectroniquelorsqueintroduitdanslaprised'entréeauxiliaireàl'aided'uneprisePBM(prisestéréo).Lesignaldel'entréeauxiliaireestacheminéaufluxdesignalaprèslescontrôlesdetonalité,quin'affectentdoncpassatonalité.
8. Prise Phones UneprisePhoneestprévuepourleraccordementdecasqued’écouteafinquevouspuissiezpratiquerouenregistrersansquelehaut-parleurdel’amplificateurnereproduisedessonsaudibles.Quandvousbrancheruncasqued’écoute,leshaut-parleursdel’amplificateursontdéconnectés;lesprisesdesortieligneXLR,pouraccordeur,etd’envoiau effet continuent de fonctionner.
9. Sélecteur GND Lift (SB112 et SB115 seulement)LesélecteurGNDLift(SB112etSB115seulement)permetdeleverlatigedemiseàlaterresurlaprisesortieligneXLR.EnpositionLevé,leboutondéconnectelaTige1delapriseXLRcequipeutparfoisaideràréduirelebourdonnementcauséparuneboucledemassequandlesignalestacheminédirectementàd’autreéquipementouconsolesdemixage.Danslecasouiln’yapasdebourdonnementdeboucledemasse,vouspourriezobtenirunblindagesupérieurcontrelessourcesdebruitsexternesavecleboutonrégléàlapositionGND.Danslaplupartdescas,Ilestrecommandéd’avoirl’interrupteurrégléàGND
Conseil: lorsque vous utilisez la prise de sortie ligne XLR pour l’enregistrement directement à un ordinateur, nous vous recommandons l’utilisation d’un périphérique approprié entre l’amplificateur et l’ordinateur tel que le A.R.T.’s TubeMP avec USB pour un contrôle de Gain additionnel et la conversion USB.

8
10. Sortie Ligne XLRLaprisedesortieligneXLRpermetàl’utilisateurdeconnecterlepréamplificateurduSmallBlockdirectementàuneconsoledemixageouautresappareilsaudiodurantuneperformanceenconcertoul’enregistrement.Silemixeurouautresappareilsaudiodisposed’entréesXLR,utiliseruncâblepourmicrophonestandardXLR.Silesseulesentréessurlatabledemixageauautreappareilaudio,sontdutype¼depouce,ilestpréférabled’utiliseruncâblederaccordementavecpriseXLRfemelleàuneextrémitéetuneprise¼depoucePBM(PointeBagueManchon)àl’autre.Ilesthabituellementpréférabled’utiliseruneentréeniveauligneavecprise¼depoucePBMsurlaconsoledemixage(ouautresappareilsaudio)pourapparierlesniveauxdeGain.
11. Sélecteur Limiter (SB115 SEULEMENT)Pouréviterl’écrêtagesévèredel’amplificateurdepuissance,unlimiteurcommutableestfourni.
12. Sélecteur Tweeter Defeat/Active (SB110, SB112 et SB115 combos seulement)Àlaposition«defeat»,lesélecteurTweeterDefeatdéconnecte le tweeter permettant dereproduireunsonplusdoux,plusclassique.PourunsonplusclairréglerlesélecteuràlapositionActive.
SpécificationsModèle SB110
Type: amplificateur pour basseImpédance d'Enceinte (ohms): 4 ohms
Puissance @ min. impédance (watts): 120 wattsImpédance Minimum(ohms): 4 ohms
Puissance de Pointe - 2 cycles: 125 wattsConfiguration de Haut-Parleur - FG (Dimensions / Puissance): 10 pouces/200W
Canaux d'entrée: 2Canal 1 - entrées: passive 0 dB, active -6 dB
Canal 1 - contrôles: Gain, Bass, Low Mid, High Mid, Treble et Low ExpanderCanal 1 - sélecteurs: Tweeter actif / désactif
Canal 2 - entrées: Entrée Aux - 1/4 de pouceSortie Ligne (type / configuration): Symétrique Post-EQ, Aux est Pré-EQ
Sortie Ligne Sensibilitée (Vrms): 1 VrmsBoucle d'Effets / emplacement: Non
DEL indicatrices: rouge, bleue, protect, alimentationProtection: clip,thermique,srucharge.
Haut-parleur externe - sortie/emplacement: nonAutres Caractéristiques: Tweeter/30W avec sélecteur actif/déactif, prise pour
casque 1/4 de pouceDimensions (PLH, pouces): 14 x 14 x 14
Dimensions (PLH, cm): 35.6 x 35.6 x 35.6Poids (livres / kg): 21/9.5
SpécificationsModèle SB112, SB115
Type: amplificateur pour basseImpédance d'Enceinte (ohms): 4 ohms
Puissance @ min. impédance (watts): 200 wattsImpédance Minimum(ohms): 4 ohms
Puissance de Pointe - 2 cycles: 250 wattsConfiguration de Haut-Parleur - FG (Dimensions / Puissance): 12 pouces/200W (SB112), 15 pouces/200W (SB115)
Canaux d'entrée: 2Canal 1 - entrées: passive 0 dB, active -6 dB
Canal 1 - contrôles: Gain, Bass, Low Mid, High Mid, Treble, Low Expander et Master* (Master sur le SB115 seulement)
Canal 1 - sélecteurs: Ground Lift, Limiter* (Limiteur sur le SB115 seulement)Canal 2 - entrées: Entrée Aux - 1/4 de pouce
Commande Master Volumel: Oui (sur le SB115 seulement)Sortie Ligne (type / configuration): Symétrique Post-EQ, Aux est Pré-EQ
Ground Lift (sur le SB115 seulement)Sortie Ligne Sensibilitée (Vrms): 1 Vrms
Boucle d'Effets / emplacement: NonDEL indicatrices: Bleue Alimentation et Rouge (status)
Protection: clip,thermique,srucharge.Haut-parleur externe - sortie/emplacement: Non
Autres Caractéristiques: Tweeter/30W avec sélecteur actif/déactif, prise pour casque 1/4 de pouce
Dimensions (PLH, pouces): 14 x 15.5 x 17.5 (SB112), 15 x 18 x 21.5 (SB115)Dimensions (PLH, cm): 35.6 x 39.5 x 44.5 (SB112), 38.25 x 45.75 x 55.75 (SB115)
Poids (livres / kg): 25/11.3 (SB112), 31/14 (SB115)

Blo
ck
Dia
gr
am
fo
r S
ma
ll B
loc
k 1
12
/11
5
BLOC
K-DI
AG-S
MALL
BLOC
K110
-SB1
12-S
B115
-00-
1v0
DE
SIG
NE
D A
ND
MA
NU
FA
CT
UR
ED
BY
YO
RK
VIL
LE
SO
UN
D
MO
DE
L T
YP
E: Y
S11
09
Blo
ck
Dia
gr
am
fo
r S
ma
ll B
loc
k 1
10
BLOC
K-DI
AG-S
MALL
BLOC
K110
-00-
1v0
DE
SIG
NE
D A
ND
MA
NU
FA
CT
UR
ED
BY
YO
RK
VIL
LE
SO
UN
D
MO
DE
L T
YP
E: Y
S11
09
SB112
12-in
chW
oofe
r4-
ohm
s
SB115
15-in
chW
oofe
r4-
ohm
s
Inpu
t Gain
Pot
EQ
Inpu
ts
AUX
In
Spea
ker,
Line
& H
eadp
hone
Out
puts
SB11
5 ONL
Y
SB11
5 (Pr
e-EQ
)SB112 (Post-EQ)
Low
/ Mid
/ Hig
hBu
ffer
TRS
1/4-in
ch
TRS
1/4-in
ch
+
TRS
1/4-in
ch
Balan
ced
Line
Out
(rear
)
Low
Expa
nder
Buffe
r
EQ
Hi-M
idMa
ster
Tw. D
efea
t(re
ar)
GND
Sw.
Twee
ter
8 ohm
s
Phon
es
+
0 dB
Unba
lance
d In
put
(for p
assiv
e elec
troni
cs)
-6 d
B Un
balan
ced
Inpu
t(fo
r act
ive el
ectro
nics
)
M
Red
Blue
AMP
SB110
10-in
chW
oofe
r4-
ohm
s
EQ
Inpu
ts
AUX
In
Spea
ker,
Line
& H
eadp
hone
Out
puts
Low
/ Mid
/ Hig
hBu
ffer
TRS
1/4-in
ch
TRS
1/4-in
ch
TRS
1/4-in
ch
Balan
ced
Line
Out
(rear
)
Low
Expa
nder
EQ
Hi
-Mid
Tw. D
efea
t(re
ar)
Phon
es
+
0 dB
Unba
lance
d In
put
(for p
assiv
e elec
troni
cs)
-6 d
B Un
balan
ced
Inpu
t(fo
r act
ive el
ectro
nics
)
M
Red
Blue
Inpu
t Gain
Pot
AMP
Twee
ter
8 ohm
s
Lim
iter
+

1/4-inch T.R.S. Phone Plug
Balanced 1/4-inch T.R.S. to Balanced XLR
XLR Plug(Male)
Tip = 0°Ring = 180°
Sleeve = Ground
1Pin 1 = GroundPin 2 = 0°Pin 3 = 180°
23

Unlimited WarrantyYour Traynor two year unlimited warranty on this product is transferable and does not require registration with Yorkville Sound or your dealer. If this product should fail for any reason within two years of the original purchase date, simply return it to your Traynor dealer with original proof of purchase and it will be repaired free of charge.
Freight charges, consequential damages, weather damage, damage as a result of improper installation, damages due to exposure to extreme humidity, accident or natural disaster are excluded under the terms of this warranty. Warranty does not cover consumables such as vacuum tubes, bulbs or batteries beyond 90 days of original purchase. See your Yorkville dealer for more details. Warranty valid only in Canada and the United States.
Garantie IllimitéeLa garantie illimitée de deux ans de ce produit est transférable. Il n`est pas nécessaire de faire enregistrer votre nom auprès de Yorkville Sound ou de votre détaillant. Si, pour une raison quelconque, ce produit devient défectueux durant les deux années qui suivent la date d`achat initial, retournez-le simplement à votre détaillant Traynor avec la preuve d`achat original et il sera réparé gratuitement.
Les frais de port et de manutention ainsi que les dommages indirects ou dommages causés par désastres naturels, extrême humidité ou mauvaise installation ne sont pas couverts par cette garantie. Cette garantie ne couvre pas les produits consommables tels que lampes ou les piles. Les produits consommables ne sont garantie que pour 90 jours suivant la date d'achat. Voir votre détaillant Yorkville pour plus de détails. Cette garantie n’est valide qu’au Canada et aux États Unis d’Amérique.
w w w . y o r k v i l l e . c o m
REAL Gear.
REAL People.
Yorkville Sound550 Granite CourtPickering, Ontario
L1W-3Y8 CANADA
CanadaVoice: (905) 837-8481
Fax: (905) 837-8746
Yorkville Sound Inc.4625 Witmer Industrial EstateNiagara Falls, New York14305 USA
U.S.A.Voice: (716) 297-2920Fax: (716) 297-3689
Prin
ted
in C
anad
a
Traynor Two Year Warranty

U.S.A.
Yorkville Sound Inc.4625 Witmer Industrial Estate
Niagara Falls, New York14305 USA
Voice: (716) 297-2920Fax: (716) 297-3689
WORLD HEADQUARTERSCANADA
Yorkville Sound550 Granite CourtPickering, Ontario
L1W-3Y8 CANADA
Voice: (905) 837-8481Fax: (905) 837-8746
Manual-Owners-SMALLBLOCK200-00-1v8 • May 15, 2017