slip-casting - · pdf filewhat is slip-casting? 2 advantages • complex forms can easily...
TRANSCRIPT

SLIP-CASTINGLearning the basics
To find out more, visit: http://virginiadecolombani.wordpress.com/

INDEX
02. What is slip-casting?
03. Slip-casting manifesto
04. Making a ptototype
05. Planning mould sections
06. Making a casting mould
09. Casting
11. Glossary
12. References

2WHAT IS SLIP-CASTING?
Advantages
• Complex forms can easily be achieved• Ideal for producing hollow ware• Does not require much finishing (usually only fettling)• Efficient use of material• Slip is fairly inexpensive• Lets itself well to small-scale production runs or limited editions
Disadvantages
• Slow production rate• Limited control over tolerances• Labour intensive• Moulds may be heavy to handle• Large scale production requires many moulds, which themselves require storage
“Slip-casting is a technique for the mass-production of pottery, especially for shapes not easily made on a wheel. A liquid clay body slip is poured into plaster moulds and allowed to form a layer, the cast, on the inside cavity of the mould. For a hollow cast mould, once the plaster has absorbed most of the liquid from the outside layer of clay the remaining slip is poured off for later use. The cast piece is removed from the mould, “fettled” (trimmed neatly) and allowed to dry. This produces a greenware piece which is then dried before firing, with or without decoration and glaze.”
This process was introduced into many European porcelain factories in the eighteenth century, and was commonly employed for the casting of terra cotta sculpture in the nineteenth century.
3
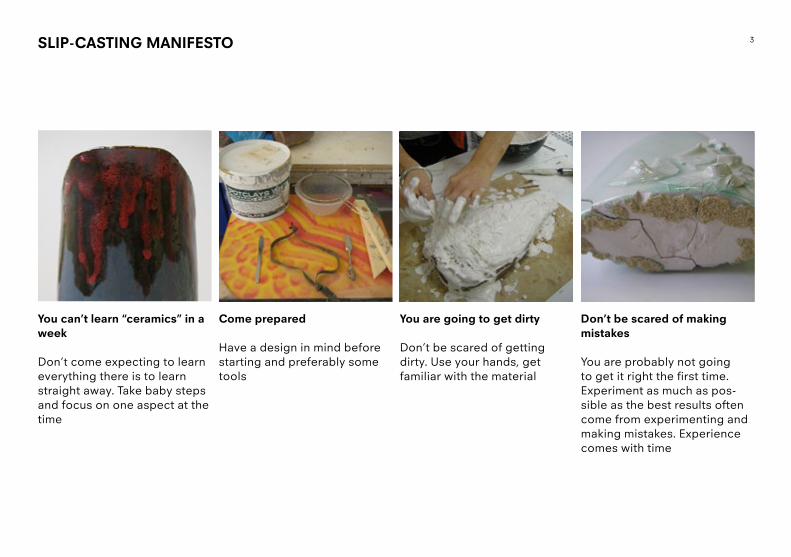
Come prepared Have a design in mind before starting and preferably some tools
You are going to get dirty Don’t be scared of getting dirty. Use your hands, get familiar with the material
Don’t be scared of making mistakes You are probably not going to get it right the first time. Experiment as much as pos-sible as the best results often come from experimenting and making mistakes. Experience comes with time
You can’t learn “ceramics” in a week Don’t come expecting to learn everything there is to learn straight away. Take baby steps and focus on one aspect at the time
SLIP-CASTING MANIFESTO

4
Clay A model can easily be made with clay. It is preferable to allow the model to dry to the leatherhard stage before making the mould. You should preferably use a clay body that is similar in color to the work after firing it to avoid traces of clay of a different color in the final piece.
Blue Foam This is a material that is relatively easy to handle and very light. It is quite expensive so use it reasonably. While moulding it is very delicate and can get scratches easily so you have to handle it with care. Otherwise it is ideal for more organic shapes that can be hard to obtain with wood.
Other Materials A model may also consist of very soft materials such as mattress foam or textiles. However, during the construction of the mould, deformation may occur due to the weight exerted by the mould. The material can become compressed, resulting in staggered mould seams.
MDF Easy to work and tool with, more durable. Prototype is safe and intact, great for achieving sharp, transitional lines and edges. Laminating together with wood glue might take a long to dry etc. but once it’s glued, it’s firm and stable.
MAKING A PROTOTYPE

5
One Piece Ideal for hollow shapes such as bowls or glasses. This option is a time saving technique that results in an accurate mould which also minimizes seam lines.
Two or Multi-piece The purpose of making the mould in two or more pieces is to permit certain shaped castings, when leather hard, to be removed from the mould without breaking.
PLANNING MOULD SECTIONS
• Each undercut makes another mould section necessary
• Manageability of the mould is another factor determining the placement of mould sections.
• The weight of each mould section and of the entire mould
• The way the mould is filled and emptied
• How to hold together the different sections together (straps, tape or wires)
• Where to position your pouring hole
• How the mould is going to stand; its stability and strength (especially when doing multi-sectioned moulds)
Factors to take into consideration

6
Fill the bottom half of the mould box with clay (preferably recycled) and place your model on it. Create a pouring hole by adding some extra clay where you are going to want an opening.
Carve a couple of keys into the clay surface by using any rounded end, such as a marker. These round depressions will help hold the mould together when casting. Then, with a soft brush, cover the model with a thin layer of vaseline.
Make sure your model is well placed and that your parting line is somewhat parallel to your work cottles. When it is in place, smoothen the clay surface.
Prepare your cottles. Rectangular cottles are made from wooden planks, often held together by clamps. The wood should be soaped to keep the plaster from sticking and the cottles should be sealed with clay to prevent plaster from leaking out. Be careful, as the pressure of the liquid can be surprising
MAKING A CASTING MOULD

7
Put some water into a clean bowl. Avoid lumps and make sure to have enough water. Slowly add plaster to the water until you start seeing small “islands” that don’t sink. Place your hand in bottom of bowl and shake it from left to right (to remove lumps and air bubbles).
Fill the mould box with plaster. The plaster should cover at least 1 inch over the highest point of the model. Let it set for around 20 minutes. It should start feeling warm when it is dry enough to handle.
Turn the mould over and proceed to lift off the clay from model and plaster half of the mould. Make sure to keep the clay in the pouring hole and all the cottles in place.
Gently clean the surfaces and remove any crums or lumps.Add some vaseline to the model.

8
Once the second half of the mould has been filled, let it set for around one hour. Once it is dry, remove the cottles.
Remove the clay from the pouring hole with the help of a knife, making sure not to ruin the mould
Pour some water in the mould and let it rest for a minute or so. This procedure should facilitate the opening of the mould.
Carefully open the mould. With a soft brush, wash both halves with water, making sure to remove any remainders of clay. Set it to dry in a warm place. The time it takes for the mould to dry depends on a lot of things but, to be sure, let it rest for at least a couple of days. When it starts to feel warm, you will know it is almost if not fully dry

9
Seal the mould parts with either straps, wires or tape. It doesn’t really matter what you use, as long as you make sure they don’t move. Once the mould is sealed, set it in a vertical position with the pouring hole facing upwards.
While the slip is drying, remove the excess slip that spilled outside of the mould with a knife. The longer you leave the slip inside the mould, the thicker it will become.
Pour the slip into the mould. You will notice that after one minute or so, the level of the slip will lower. This is because it starts to set inside the mould. When this happens, pour more slip into the hole.
If you buy an already-made slip, make sure to stir it well before using it. It is always good to pour some (better too much than not enough) in a smaller pitcher. Make sure to sieve it. This is necessary to remove any dry bits that might have falled into the bucket.
CASTING

10
Once you believe that your product is thick enough, gently tilt the mould and slowly drain out all the excess slip into a container. Position it upside-down, vertically, and place it on two parallel pieces of wood. Leave it there until the slip stops dripping. Make sure that the outflowing slip does not block the gate.
After 10 minutes, whe the slip stops dripping, turn the mould straight up again. Let the mould rest in this upright position for 30 or more minutes.
Lay the mould on a side. Remove the straps and gently tap the upper mould piece before lifting it all the way. Use the help of a knife if necessary. Cut off the excess clay from the pouring hole. See if the casting will lift out by hand. If it is too fragile, let it rest for 10-15 mins before carefully removing it and positioning it vertically
After the removed casting has dried 30 mins, fettle it until the surfaces are even. If there are any air holes, they can be filled by hand with soft clay. Set the casting away until it is bone-dry. You may then sandpaper the surfaces very gently, where necessary. It is now ready to be fired in the kiln.
11
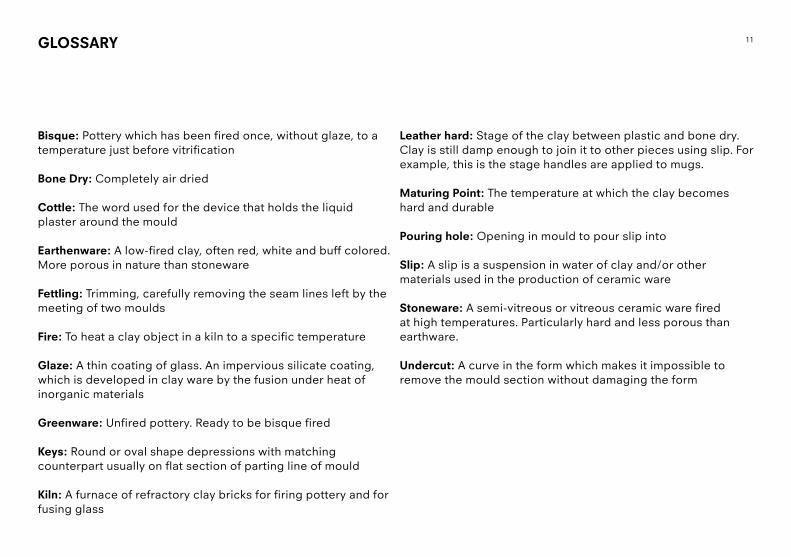
Bisque: Pottery which has been fired once, without glaze, to a temperature just before vitrification
Bone Dry: Completely air dried
Cottle: The word used for the device that holds the liquid plaster around the mould
Earthenware: A low-fired clay, often red, white and buff colored. More porous in nature than stoneware
Fettling: Trimming, carefully removing the seam lines left by the meeting of two moulds
Fire: To heat a clay object in a kiln to a specific temperature
Glaze: A thin coating of glass. An impervious silicate coating, which is developed in clay ware by the fusion under heat of inorganic materials
Greenware: Unfired pottery. Ready to be bisque fired
Keys: Round or oval shape depressions with matching counterpart usually on flat section of parting line of mould
Kiln: A furnace of refractory clay bricks for firing pottery and for fusing glass
Leather hard: Stage of the clay between plastic and bone dry. Clay is still damp enough to join it to other pieces using slip. For example, this is the stage handles are applied to mugs.
Maturing Point: The temperature at which the clay becomes hard and durable
Pouring hole: Opening in mould to pour slip into
Slip: A slip is a suspension in water of clay and/or other materials used in the production of ceramic ware
Stoneware: A semi-vitreous or vitreous ceramic ware fired at high temperatures. Particularly hard and less porous than earthware.
Undercut: A curve in the form which makes it impossible to remove the mould section without damaging the form
GLOSSARY

12
My Blog: http://virginiadecolombani.wordpress.com/ http://en.wikipedia.org/wiki/Slipcasting http://www.buzzle.com/articles/earthenware-vs-stoneware.html http://www.jnevins.com/glossary.htm http://www.lagunaclay.com/support/art-of-ceramicmoldmaking.php http://www.basic-stuff.com/hobbies/ceramics/slip-casting.htm http://kissmekateceramics.co.uk/wp-content/uploads/2013/09/moulds.jpg http://www.dezeen.com/2010/07/05/pixel-mould-by-julian-bond/
REFERENCES