slide rail kit - bosch globalstna.resource.bosch.com/documents/installation_guide...slide rail kit |...
TRANSCRIPT

Slide Rail KitDVA-ASRK-28A | DVA-ASRK-36A
en Installation Manual


Slide Rail Kit | Installation Manual Table of Contents | en 3
Bosch Securtiy Systems F.01U.027.804 | V1 | 2006.05
Table of Contents
1 Introduction. . . . . . . . . . . . . . . . . . . . . . . . . . . . . . . . . . . . . . . . . . . . . . . . . . . . . . . . . . . . . . . . . . . . . . . 4
2 Package Contents . . . . . . . . . . . . . . . . . . . . . . . . . . . . . . . . . . . . . . . . . . . . . . . . . . . . . . . . . . . . . . . . . . 4
3 Installation Prerequisites . . . . . . . . . . . . . . . . . . . . . . . . . . . . . . . . . . . . . . . . . . . . . . . . . . . . . . . . . . . . 5
4 Rackmounting Steps . . . . . . . . . . . . . . . . . . . . . . . . . . . . . . . . . . . . . . . . . . . . . . . . . . . . . . . . . . . . . . . . 5
4 en | Introduction Slide Rail Kit | Installation Manual
1 IntroductionThis document describes the slide rails for the DVA-08E, DVA-08K, and DVA-12K RAID sub-
systems and provides instructions on rackmounting an enhanced 2U-profile Bosch subsystem
enclosure. These slide rails are compatible with a variety of 19-inch-wide server racks.
• DVA-ASRK-28A (533 mm - 724 mm)
Slide rails for 21" to 28.5" deep racks
• DVA-ASRK-36A (647 mm - 914 mm)
Slide rails for 25.5" to 36" deep racks
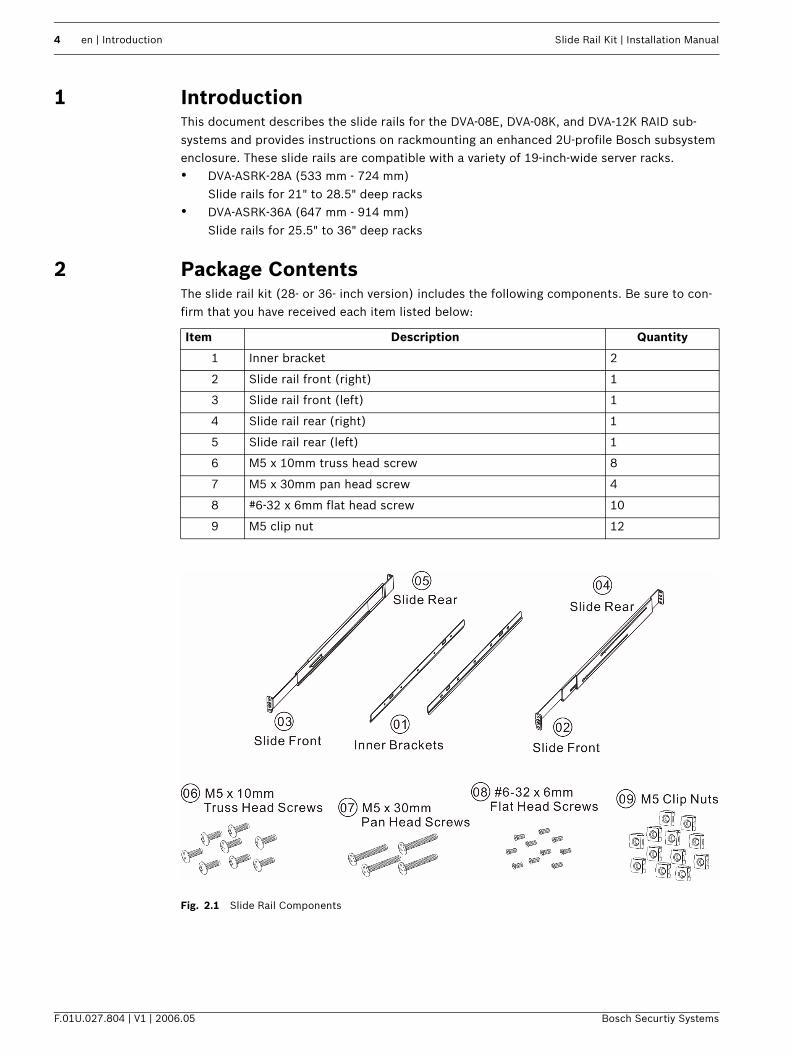
2 Package ContentsThe slide rail kit (28- or 36- inch version) includes the following components. Be sure to con-
firm that you have received each item listed below:
Fig. 2.1 Slide Rail Components
Item Description Quantity
1 Inner bracket 2
2 Slide rail front (right) 1
3 Slide rail front (left) 1
4 Slide rail rear (right) 1
5 Slide rail rear (left) 1
6 M5 x 10mm truss head screw 8
7 M5 x 30mm pan head screw 4
8 #6-32 x 6mm flat head screw 10
9 M5 clip nut 12
F.01U.027.804 | V1 | 2006.05 Bosch Securtiy Systems
Slide Rail Kit | Installation Manual Installation Prerequisites | en 5
3 Installation Prerequisites• 1 medium-sized and 1 small-sized Phillips screwdriver
• Because the RAID subsystem is heavy, at least 2 people are required to lift the system
into the rack.
4 Rackmounting StepsFollowing all the instructions below can minimize the subsystem rackmounting time.
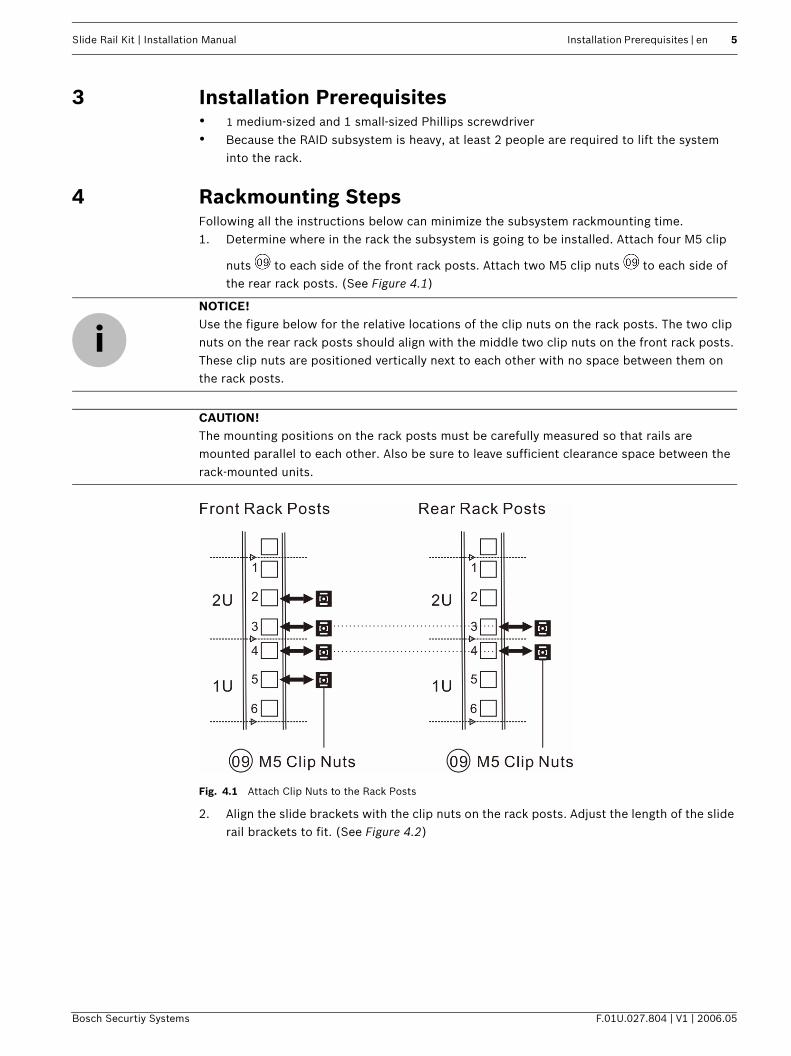
1. Determine where in the rack the subsystem is going to be installed. Attach four M5 clip
nuts to each side of the front rack posts. Attach two M5 clip nuts to each side of
the rear rack posts. (See Figure 4.1)
Fig. 4.1 Attach Clip Nuts to the Rack Posts
2. Align the slide brackets with the clip nuts on the rack posts. Adjust the length of the slide
rail brackets to fit. (See Figure 4.2)
iNOTICE! Use the figure below for the relative locations of the clip nuts on the rack posts. The two clip
nuts on the rear rack posts should align with the middle two clip nuts on the front rack posts.
These clip nuts are positioned vertically next to each other with no space between them on
the rack posts.
CAUTION! The mounting positions on the rack posts must be carefully measured so that rails are
mounted parallel to each other. Also be sure to leave sufficient clearance space between the
rack-mounted units.
Bosch Securtiy Systems F.01U.027.804 | V1 | 2006.05

6 en | Rackmounting Steps Slide Rail Kit | Installation Manual
Fig. 4.2 Adjust the Slide Brackets
3. Fasten two M5 x 10mm truss head screws through the middle two screw holes on the
front side of the slide brackets to the middle two clip nuts on the front rack posts. (See
Figure 4.3)
4. Fasten two M5 x 10mm truss head screws through the middle two screw holes on the
rear slide brackets to the clip nuts on the rear rack posts. (See Figure 4.3)
Fig. 4.3 Installing the Slide Brackets to the Rack
5. Attach the inner brackets to the sides of the subsystem chassis using five #6-32 x
6mm flat head screws for each inner bracket. (See Figure 4.4)
F.01U.027.804 | V1 | 2006.05 Bosch Securtiy Systems

Slide Rail Kit | Installation Manual Rackmounting Steps | en 7
Fig. 4.4 Attach the Inner Brackets to the Chassis
6. Gently lift the subsystem chassis to align with the slide brackets on the rack. Position the
chassis so that the inner brackets on the chassis can be inserted into the slide brackets.
Gently press the subsystem into the rack keeping the pressure even on both sides. (See
Figure 4.5)
Fig. 4.5 Slide the Subsystem into the Rack
7. Secure the subsystem enclosure in the server rack by fastening two M5 x 30mm pan head
screws on each side through the enclosure forearm handle. (See Figure 4.6)
CAUTION! It is recommended that at least two (2) people install each subsystem: One people lift the
subsystem chassis while the second person adjust the inner brackets on both sides of the
subsystem to insert them into the slide brackets installed on the rack cabinet. This is crucial
to avoid dropping the subsystem or resulting any personal injury.
iNOTICE!
When sliding the subsystem into or out of the rack, do not force it. If the subsystem does not
slide smoothly, check the following:
Check that both rails mounted in the rack are exactly horizontal, so that one end is not higher
than the other end.
Make sure that both rails on the subsystem chassis are parallel.
Bosch Securtiy Systems F.01U.027.804 | V1 | 2006.05

8 en | Rackmounting Steps Slide Rail Kit | Installation Manual
Fig. 4.6 Secure Enclosure through the Chassis Front
The subsystem should now be securely mounted into the rack/cabinet.
F.01U.027.804 | V1 | 2006.05 Bosch Securtiy Systems


Bosch Securtiy Systems Robert-Koch-Straße 100D-85521 OttobrunnGermanyTelefon +49 (89) 6290-0Fax +49 (89) 6290-1020www.bosch-securitysystems.com © Bosch Securtiy Systems, 2006