skype for business user guide - amazon s3 · skype for business user guide document version...
TRANSCRIPT

Skype for BusinessUser Guide
1

Skype for BusinessUser Guide
Document Version ControlDocument Information
File Name: Skype for Business User Guide
Author(s): Accenture
Version: 1.1
Date Published 04/04/2017
2

Table of ContentsSkype for Business User Guide......................................................................................................................................................... 1Document Version Control......................................................................................................................................................... 2Using Bookmarks......................................................................................................................................................... 3Peer-to-Peer Calls......................................................................................................................................................... 5
Making a call......................................................................................................................................................... 5
Receiving a call......................................................................................................................................................... 6Call Controls......................................................................................................................................................... 7
Using video......................................................................................................................................................... 7
Editing call controls......................................................................................................................................................... 8
Adding someone to a call......................................................................................................................................................... 8
Instant messaging......................................................................................................................................................... 9
Viewing call participants......................................................................................................................................................... 9
Editing other call settings......................................................................................................................................................... 10
Checking your connectivity......................................................................................................................................................... 10
Audio settings......................................................................................................................................................... 11
Video settings......................................................................................................................................................... 12Presenting Content......................................................................................................................................................... 14
Present your desktop......................................................................................................................................................... 14
Presenting a specific programme......................................................................................................................................................... 15
Presenting a PowerPoint file......................................................................................................................................................... 16
Whiteboards......................................................................................................................................................... 17
Polls......................................................................................................................................................... 19
Q&As......................................................................................................................................................... 21
Manage Content......................................................................................................................................................... 22Skype for Business Meetings......................................................................................................................................................... 23
Scheduling a Skype for Business Meeting......................................................................................................................................................... 23
Outlook Desktop Application......................................................................................................................................................... 23
Meeting Options......................................................................................................................................................... 24
Web Scheduler......................................................................................................................................................... 26
Joining a Skype for Business Meeting......................................................................................................................................................... 28
Joining a meeting via the Skype for Business Desktop Application......................................................................................................................................................... 28
Joining a meeting via Outlook

......................................................................................................................................................... 28Joining a meeting via dial-in
......................................................................................................................................................... 29Joining via Skype for Business Web App
......................................................................................................................................................... 29Admitting a participant in the lobby
......................................................................................................................................................... 31Participant actions
......................................................................................................................................................... 31Ending a meeting
......................................................................................................................................................... 32Meet now
......................................................................................................................................................... 33Skype for Business Mobile Application......................................................................................................................................................... 34
Calling a contact via the Skype for Business Mobile App......................................................................................................................................................... 34
Joining a meeting......................................................................................................................................................... 35
View meeting partipants......................................................................................................................................................... 35

Using Bookmarks Using this guide
This guide has been formatted with Bookmarks so you can intuitively navigate around each of the sections and easily find the content you wish to learn about. Each Bookmark goes to a different page within the guide.
To use Bookmarks in a guide that you have downloaded and opened in a PDF reader:
1 Click the Bookmark icon in the toolbar on the left side of the screen
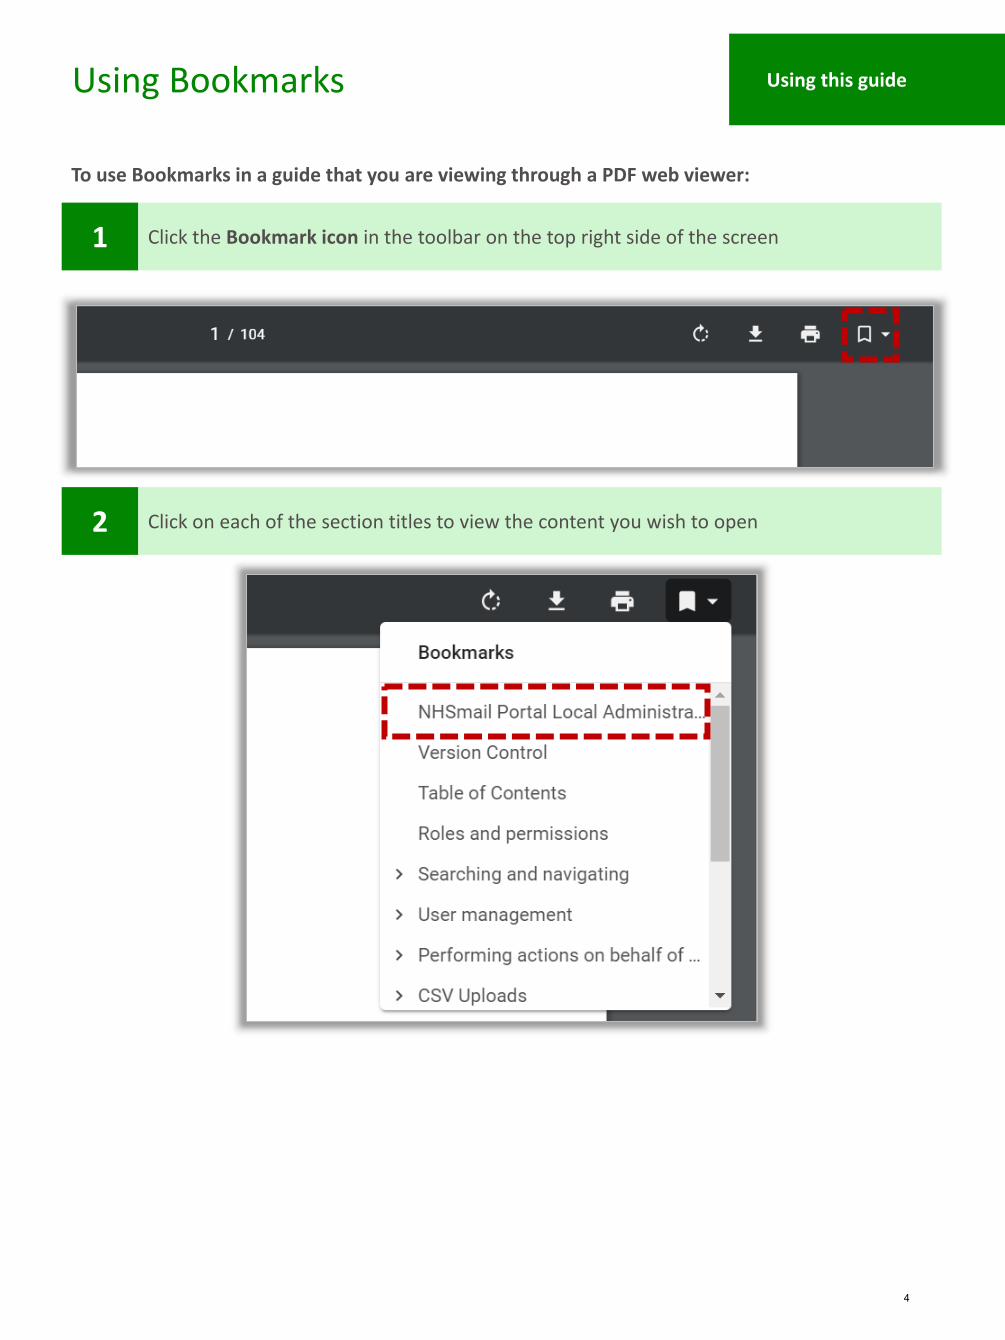
2 Click on each of the section titles to view the content you wish to open
3
Using Bookmarks Using this guide
To use Bookmarks in a guide that you are viewing through a PDF web viewer:
1 Click the Bookmark icon in the toolbar on the top right side of the screen
2 Click on each of the section titles to view the content you wish to open
4

Making a call
If your organisation has enabled your account with Audio and Video Conferencing features, you will be able to connect with your colleagues using voice and video. You will need a webcam to be able to use video to see your colleagues during a call. Refer to Using video for more information on using video. Audio and Video Conferencing is a top-up service, which is available to users in organisations who have purchased this service. If you are unsure, contact your local IT department or Local Administrator. Note: the terminology and user interface of the version of Skype for Business deployed in your organisation may vary from that depicted in this guide
To call someone using Skype for Business:
2 Type a name or email address in the search bar at the top of the window or look for acontact in your contact list
Peer-to-Peer Calls
Mary Margot
3 Select the correct contact and double click their name to openthe instant message window
4 Click the phone icon at the bottom of the window and select Skype for Business call
If the recipient accepts your phone call, the call will then begin
1 Sign into Skype for Business
WarningMake sure you are contacting the right person. Confirm their identity by clicking See Contact Card
Handy HintAs a short cut, you can click the silhouette icon / contact picture and then click the phone icon
5

Receiving a call
1 Click anywhere within the notification the appears on screen
Peer-to-Peer Calls
To accept a call via Skype for Business:
You will then be taken to the Skype for Business call window and the call will start
Accepting a call
Ignoring a call
1 Click Ignore in the notification that appears on screen
To ignore a call via Skype for Business:
The call will not start and the caller will be notified that you did not answer
Handy HintIf you use Outlook Desktop and miss a call from someone, you will receive a ‘missed conversation’ email from the person who tried to contact you
If they do not answer your call, a notification will appear in the instant message window to let you know that the recipient may be offline or unavailable
If they reject the call, you will receive a notification that they did not answer your call
Handy HintYou can ignore calls from everyone by setting your status as Do Not Disturb
6

Audio and Video Conferencing Controls Call Controls
To start your video:
The other person will then be able to see your video
To go on mute:
When you are on mute, the microphone will have a line through it
1 Click the video icon at the bottom of the call window and select Start My Video
2 To turn off your video, select the video icon again and a line will appear through it
1 Click the microphone icon at the bottom of the call window
2 To unmute, click the microphone icon again
Using video
Using mute
Handy HintGoing on mute when not speaking helps reduce background noise on the call
Handy HintAs a short cut, you can click the silhouette icon / contact picture and then click the video icon
7

Call Controls
4 By sliding the volume bar left and right, you can change the volume of the call
Call controls allow you to put the call on hold, change the device being used for the call e.g. thespeaker and microphone and the volume of the call:
2 Select Hold, to put the person on hold
1 Click the settings icon at the bottom of the call window
3 Select Devices, to change the devices currently being used for the call, for example speaker and microphone
Editing call controls
To add someone else to an ongoing call:
1 Click the plus icon at the top of the call window, search for and select a name and click OK at the bottom of the window
Adding someone to a call
8

Call Controls
Send an instant message to someone during a call:
You can now start sending messages from the conversation panel which opens on the left of thecall window. For more information on sending messages, refer to the Sending and receivingmessages module in the Skype for Business Learning Series
1 Click the instant message icon at the bottom of the call window to open an instant message conversation
1 You can view the participants of a group call by clicking the open participants icon at the top of the window
The names will then appear at the top left of the call window
Instant messaging
Viewing call participants
9

Call Controls
To edit other within-call settings:
1 Click the three dots at the bottom right of the call window
2 From the drop down list you can choose to set as High Priority, change the IM Text DisplaySize, Change Font, and access Skype for Business Help
Editing other call settings
1 Click the Call Quality Icon at the top right of the meeting window
2 A connection quality summary will pop up
During a call, you can check the quality of the audio or video to make sure participants can see and hear you clearly.
3 If your connection is poor, follow the suggestions in the pop up and speak to your local ITsupport. Consider connecting a different way such as via Skype for Business Mobile App
Checking your connectivity
Note: it is not possible to record Skype for Business calls, therefore there will be no content in Manage Recordings. The list of settings may change slightly depending on the call and your version of Skype for Business
10

Audio and video settings
2 Click the down arrow under Select the device you want to use for audio calls to select a device
Call Controls
3 Select the down arrow to the right of Speaker and Microphone to choose what speaker and microphone you would like to use for audio calls
Use Audio Settings adjust a range of setting including the device you use for calls and testwhether your speakers are working. You can also make a test call to check your call quality.
4 Click the Play button to the right of Ringer to test your sound by listening to your ringtone
You can change the volume of each of these settings by moving the slider to the left or right
5 If you select Check Call Quality, you can make a test call where you will be asked to record a message that is played back to you
6 Under Secondary ringer you can choose to set a Secondary Ringer and to Unmute When Your Phone Rings e.g. if you want both your headset and speakers to ring
7 You can choose to allow Stereo Audio Playback when available by selecting the box at the bottom of the page
Audio settings
1 Click the settings icon at the top right of the main Skype for Business window and select Audio Device on the left side of the window
11

2 Click the down arrow under Select the camera you want to use for video calls to select awebcam
Call Controls
3 Select Camera Settings to change your video settings
Video setting allow you to select the device you want to use for video calls, see a preview of yourwebcam and adjust camera setting to get a better picture
Video settings
1 Click the settings icon at the top right of the main Skype for Business window and select Video Device on the left side of the window
12

Call Controls
4 On the Video Proc Amp tab you can change settings such as camera brightness, contrastand hue
5 On the Camera Control tab you can change settings such as exposure and zoom
13

Presenting Content Presenting content
Skype for Business allows you to present content during a call or in a Skype for Business meeting. This can aide the meeting by allowing participants to follow along a PowerPoint presentation, content on your desktop or a specific program.
To share your screen:
1 Click the screen icon at the bottom of the call window and select Present Desktop
Present your desktop
3 Click Stop Presenting in the bar at the top of your screen when you have finishedpresenting your desktop
• Ensure prior to sharing that you have closed any documents, clinical programmes, browsers,emails that may be of a confidential or sensitive nature and shouldn’t be shared. Tip: sharingonly a specific application or a secondary monitor screen can help reduce this risk.
• Be aware that your audience can take a screenshot of any content you share and store it in anunsecure location. Inform the audience that doing this could breach local InformationGovernance Policy. Please make sure you only share clinical information of a highly sensitivenature with a trusted audience
• When you have finished sharing the content with your audience, click Stop Presenting at thetop of the meeting window. Your desktop will be visible to participants up to this point
Considerations When Sharing Sensitive Data
Note: user interface and terminology may vary slightly depending on your version of Skype forBusiness. Present desktop may be referred to as Share desktop
2 Click OK to acknowledge the warning that all content on yourscreen will be visible to meeting participants
WarningWhen you share your desktop everything that is visible to you will be visible to all participants on the call.
If you have multiple screens, select the one you want to share
14

Presenting content
1 Click the screen icon at the bottom of the call window and select Present Program
Presenting a specific programme
2 Click on the programme you want to present and then click Present
4 Click Stop Presenting in the bar at the top of your screen when you have finished presenting your desktop
3 Click OK to acknowledge the warning that all content within the program will be visible to meeting participants
Note: user interface and terminology may vary slightly depending on your version of Skype forBusiness. Present program may be referred to as Share window
Rather than sharing your entire desktop, you can share a specific programme that is open onyour computer. Participants on the call will only be able to see the content within this onewindow as it appears on your screen.
15

Presenting content
1 Click the screen icon at the bottom of the call window and select Present PowerPoint file
Presenting a PowerPoint file
2 Select the PowerPoint file you want to present from the file browser and then click Open
4 Click Stop Presenting in the bar at the top of the of the Skype for Business window whenyou have finished presenting the PowerPoint
3 Click on the arrows either side of the slide numbers to advance the slide or go back tothe previous slide
WarningAll users can download local copies of PowerPoints shared on the call including after you stop presenting. Ensure highly confidential content is not shared as a PowerPoint file
Handy HintClick Thumbnails at the bottom right to view thumbnails of slides in the PowerPoint or click Notes to view any notes on the slides. This will only be viewable by presenters
16

Presenting content
1 Click the screen icon at the bottom of the call window and select More
Whiteboard
2 Click on Whiteboard
3 Click on the drawing tool you wish you use from the tool bar on the right hand side ofthe whiteboard. Use it to draw in the white space.
You can start a Whiteboard within a Skype for Business meeting. This allows participants on the call to draw on a virtual whiteboard. It is also possible to import an image to draw on within the virtual whiteboard.
17

Presenting content
4 Click Stop Presenting in the bar at the top of the of the Skype for Business window whenyou have finished presenting the whiteboard
Handy HintYou can save a picture of the whiteboard by clicking the three dots in the whiteboard toolbar and selecting Save As
18

Presenting content
1 Click the screen icon at the bottom of the call window and select More
Poll
2 Click on Poll
4 Ask participants to select their choice.
3 Fill in the name of the poll, the question and choices. Click Create
Under poll options you can open and close the poll, share the results with everyone, cleareveryone’s votes, edit the poll and save the results of the poll
Polls are a useful tool to get an answer to a question from the audience on a call. It allows you topost a question to the group with up to seven choices. You can control when the results of thepoll is shared with the audience. Individual’s answers are not identifiable.
19
Presenting content
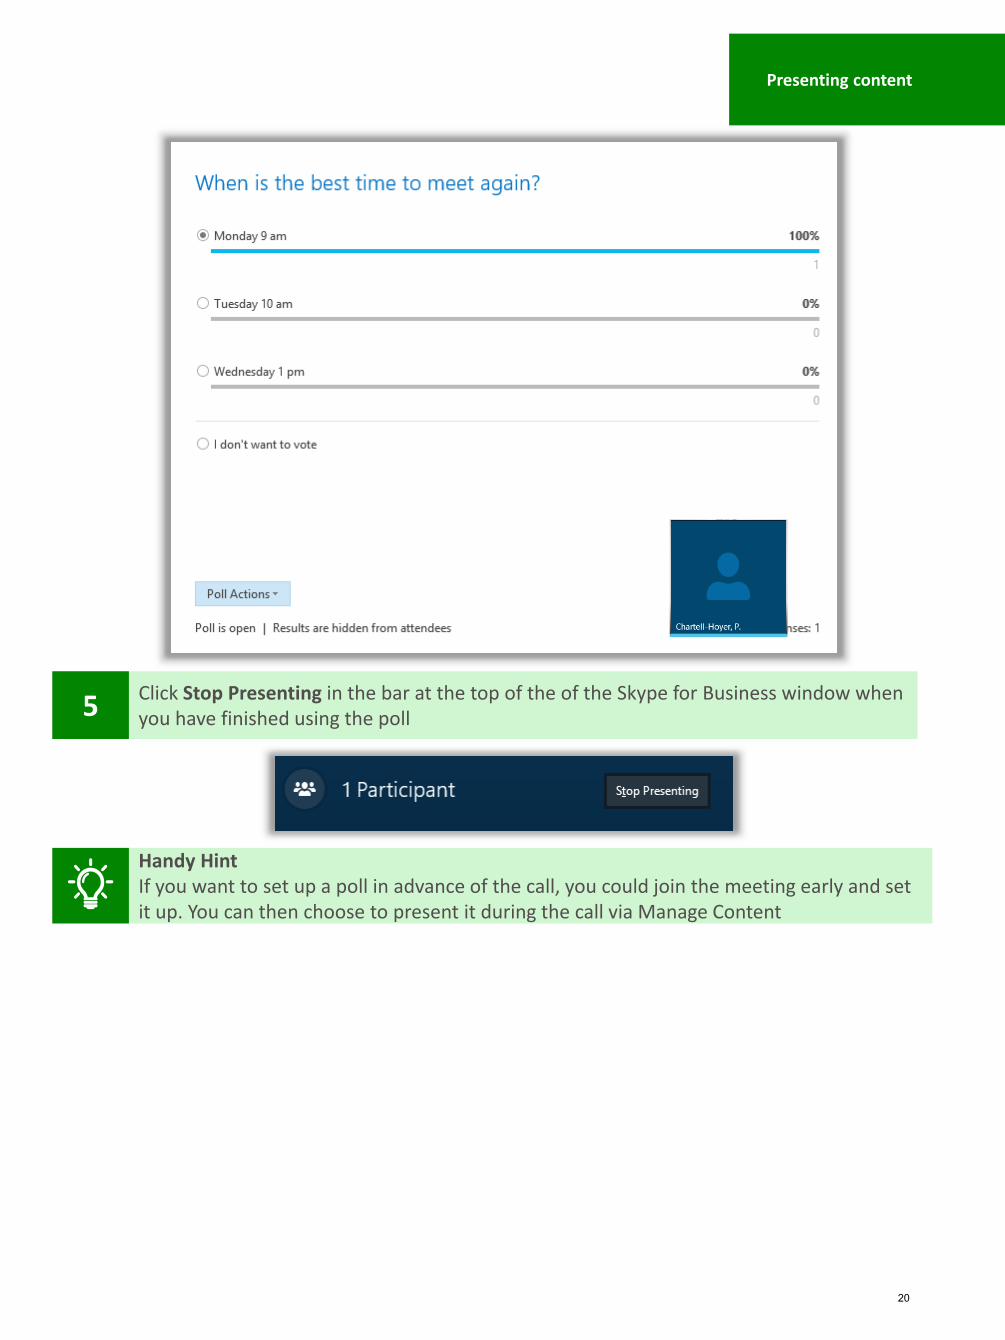
5 Click Stop Presenting in the bar at the top of the of the Skype for Business window whenyou have finished using the poll
Handy HintIf you want to set up a poll in advance of the call, you could join the meeting early and set it up. You can then choose to present it during the call via Manage Content
20

Presenting content
1 Click the screen icon at the bottom of the call window and select More
Q&A
2 Click on Q&A
4 Click Stop Q&A to end the Q&A session
3 Answer questions posed by the audience by clicking the “Answer” button, entering your response and pressing enter on your keyboard
Q&A can be useful for a large Skype for Business meeting as it allows the audience to askquestions on a separate tab during the meeting – you can continue to share other contentsimultaneously. Questions won’t be visible until you or another presenter enters a response
Handy HintYou can save the Q&A by clicking Save as. The Q&A will be saved as a .txt file on your computer
21
Presenting content
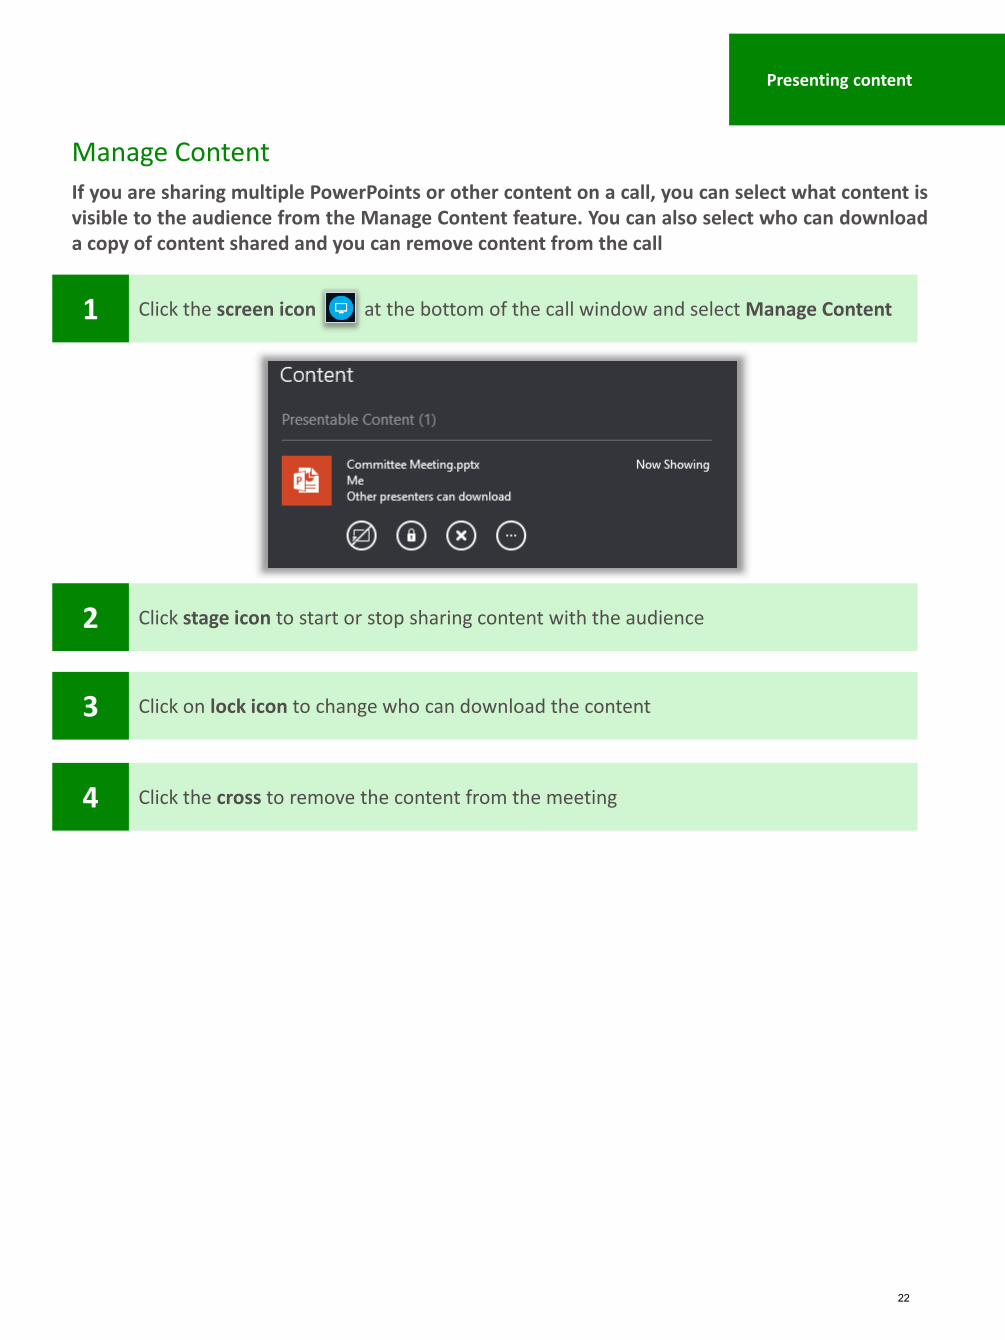
1 Click the screen icon at the bottom of the call window and select Manage Content
Manage Content
2 Click stage icon to start or stop sharing content with the audience
4 Click the cross to remove the content from the meeting
3 Click on lock icon to change who can download the content
If you are sharing multiple PowerPoints or other content on a call, you can select what content isvisible to the audience from the Manage Content feature. You can also select who can downloada copy of content shared and you can remove content from the call
22

Scheduling a Skype for Business Meeting
A Skype for Business Meeting is a prescheduled Audio & Video Conference call. It contains all the same functionality as regular A&VC call. Participants without Skype for Business installed can join the conference via the Skype for Business web application or dialling into the call on a telephone. Note: dial-in will only be available if your organisation has purchased this service in addition to A&VC. You can schedule a Skype for Business meeting via the Outlook Desktop App. If you do not have the Outlook Desktop App, use the Web Scheduler
1 In the Home Ribbon of Outlook Desktop Application Calendar, click New Skype Meeting
Skype for Business Meetings
2 Add the meeting participants in the To field and select Start time and End time for yourmeeting
3 Click Send
Handy HintYou can also schedule a Skype for Business Meeting in the Home Ribbon of the Outlook Desktop Application Inbox by clicking New Items and selecting New Skype Meeting
Outlook Desktop Application
Handy HintYou can add meeting participants from other organisations and outside the NHS
23

1 Click Meeting Options in the Meeting ribbon
Meeting OptionsWhen you organise a Skype for Business meeting, you should check you have applied the correct settings before sending the invitation. Use ‘Meeting Options’ to determine who will have direct access to the meeting vs. those that must wait in a virtual lobby before being admitted. Skype for Business comes with a range of different permissions and security settings. It is important to consider what options are selected in a clinical context
To manage permissions:
2 Select A new meeting space (I control permissions) from the list of options
Selecting “My dedicated meeting space” is not recommended as it is less secure
3 Select who does not have to wait in the lobby from the drop down
This option allows you to decide who can get into the meeting immediately and who will have to wait until you decide to let them in. This is option is useful when you are running meetings of a sensitive or confidential nature:
Control Level Description“Only me the meeting organiser”
All guests must wait in the lobby before the meeting organiser arrives and admits all attendee. This is the most secure option and should be selected formeetings of a clinical nature.
“People I invite from my Company”
If a meeting invitation is forwarded on beyond the initial invite list, these guests must wait in the lobby for the meeting organiser to admit them.
“Anyone from my organisation” Guests external to your organisation must wait in the lobby for the meeting organiser to admit.
“Anyone” No restrictions on entry, everyone can enter before the meeting organiser. This is the least secure option.
Handy HintRegardless of meeting options set, as a meeting organiser, it is good practice to run a roll call at the beginning to check that everyone on the call is authorised to be on the call
Skype for Business Meetings
24

4 Select whether callers get in directly and whether Skype for Business will announce whenpeople enter or leave
For those dialling-in to a conference, you can configure your settings so that each individual requires a personal PIN code to enter the call. Do not select ‘Callers get in directly’ if calls are clinically sensitive to reduce the risk of unauthorised callers dialling in. Note: these options will only be available if your organisation has purchased dial-in functionality in addition to A&VC.
Selecting ‘Announce when people enter or leave’ adds a level of security throughout the duration of the call. All attendees can monitor who has joined/ left a call and ensure all on the conference are authorised
5 Select Who’s a presenter from the drop down list
Presenters can share content and let people into the meeting
Control Level Description“Only me the meeting organiser” Only you can share content on the call and let people into the meeting
“People I choose” Only individuals you have selected by clicking “Choose presenters” can share content on the call and let people into the meeting
“Anyone from my organisation” Only participants who are from the NHS (i.e. have an @nhs.net email address) will be able to share content on the call and let people into the meeting
“Anyone (no restrictions)” No restrictions on who can share content on the call and let people into the meeting
6 Select whether you want to Disable IM, Mute all attendees and Block attendees’ video bychecking the appropriate boxes
You may wish to enforce these controls if you have multiple external users or large numbers on a conference call
7 To apply these setting to all subsequent meetings, click Remember Settings otherwise clickOK
Handy HintYou can only select individual presenters if you have already invited them to the meeting
It is strongly recommended that you click Remember Settings to save your security settings
Skype for Business Meetings
25

1 Access the Web Scheduler at webscheduler.nhs.net
Web Scheduler
2 Complete the fields on the meeting scheduling form and click Save
The Web Scheduler allows you create a Skype for Business Meeting if you do not have theOutlook Desktop Application. The Web Scheduler will create a Skype Meeting and provide youwith a link to join it online. You can then copy this information into a meeting invite you send viathe Outlook Web App
Skype for Business Meetings
26

3 Copy the details of the Skype for Business meeting
4 In the Outlook Web App, schedule a meeting and paste the details of Skype for BusinessMeeting in the body of invitation
For details on how to schedule a meeting in Outlook Web App, refer to the OWA User Guide
Skype for Business Meetings
27

Joining a Skype for Business Meeting
1 Click on the meeting icon in the Skype for Business toolbar
2 Double click the meeting you want to join
The Skype for Business meeting will open in a new window
If the meeting organiser has set up a lobby:
You can join a Skype for Business meeting that you have scheduled or that you have been invited via the Outlook Desktop Application or directly in Skype for Business. It is also possible to dial into a Skype for Business meeting. If you dial in, you will not be able to view content being shared on the call and you may experience lower audio quality. Note: dial-in will only be available if purchased by your organisation has purchased this service.
Joining a meeting via the Skype for Business Desktop Application
3 Wait until the presenter lets you in
1 Open a Skype for Business Meeting in your Outlook calendar
Joining a meeting via Outlook
Skype for Business Meetings
28

1 Open a Skype for Business Meeting in your Outlook Desktop Application calendar
2 Locate the phone number and Conference ID at the bottom of the invitation
3 Dial the number and enter the conference ID when prompted
Joining a meeting via dial-in
Joining via Skype for Business Web App
1 Open a Skype for Business Meeting in your Outlook calendar
2 Click Skype for Business Web App, located beneath the Join Skype Meeting link
2 Click Join Skype Meeting at the bottom of the invitation body text
If your organisation subscribes to dial-in, you will see a join by phone option in Skype for Business Meeting invites. To join by phone:
Skype for Business Meetings
29

3 If it is your first time using the Web App, click to download the Skype for Business WebApp plug-in
4 If the Web App does not launch automatically, click Join the meeting
Skype for Business Meetings
30

1 In the Skype for Business Meeting, wait for the yellow banner at the bottom of yourscreen to appear indicating that there are participants waiting in the lobby
2 Click See Lobby
3 Click Admit next to the name of the individual you want to admit. If you want to admit allthe individuals on the list, click Admit All
Admitting participants in the lobby
The list of participants in the lobby will appear above the list of people on the call in the top left hand corner of the window
Participant ActionsIf you are on a prescheduled Skype for Business meeting, use Participant Actions to apply certainactions to a large group of participants
1 Click the Participant Actions button below the list of participants on the meeting
2 Click Mute Audience to put all participants on mute and minimise background noise
3 Click No Meeting IM to disable participants from sending instant messages
Note: this happens automatically if you set up a Q&A
If you deny access to someone in the lobby, they will be informed they’ve been denied access
Skype for Business Meetings
31

4 Click No Attendee Video to disable participant’s webcams
5 Click Hide Names to make the list of participants hidden from people who are not presenters
6 Click Everyone an Attendee to make everyone except yourself an attendee. This restricts everyone but you to present content and admit participants to the meeting
7 Click Invite by Email to invite a participant to the meeting via email
Ending a meeting When your Skype for Business meeting is complete you should end the meeting:
1 Click the three dots at the bottom right of the meeting window
2 From the drop down select End Meeting
3 Click OK when warned that this action will end the meeting
WarningIf you hang up by pressing the red phone button, the meeting will continue without you. If you are sharing your screen, this will continue until you click Stop Presenting
Skype for Business Meetings
32

1 Click the drop down arrow next to the cogwheel and select Meet Now
2 Add people to the meeting by clicking Invite More People
Meet NowSkype for Business allows you to start an impromptu meeting via the Meet Now feature without having to schedule it in Outlook. Meet now allows you present your desktop to a user who is connecting via the mobile app. Unlike a scheduled meeting, participants are added directly by you rather than joining via an invitation
To meet now:
3 Type the name or email address of the person you want to add in the box. Select themfrom the list and click OK
Skype for Business Meetings
33

Using the Skype for Business MobileApp
1 Enter the name or email address of the individual you want to contact
Mobile App
3 Click the Camera or Phone icon to start the Audio or Video call
If you’re on the go, the Skype for Business mobile app is a great way to communicate with colleagues. The app is available for iOS, Android and Windows Phone – refer to the Microsoft Support Site for instructions on how to download it. For assistance on getting started, you can refer to the Mobile Application Quick Start guide.
Calling a contact via Skype for Business Mobile App
2 Click the name or email address of the individual you want to contact
34

Mobile App
Joining a meeting
1 Click on the meeting icon in the toolbar
2 Click Join next to the meeting you want to join
View meeting participants
1 Click on the name of the meeting after you have joined
The meeting will now open on your phone and you will be able to see view video and PowerPoints. You can navigate to other apps or lock your phone while continuing to hear the call.
35

Mobile App
2 Click Participants
Adding meeting participants
1 Click on the name of the meeting after you have joined
2 Click Add participants
3 Enter the name or email address of the individual you want to contact
4 Click the name or email address of the individual you want to contact
36